


Sonifex Net-Log
User Handbook

©Sonifex Ltd, 2005
All Rights Reserved
Revision 1.07, February 2005
Sonifex Ltd, 61, Station Road, Irthlingborough,
Northants, NN9 5QE, England.
Tel: +44 (0)1933 650 700
Fax: +44 (0)1933 650 726
Email: sales@sonifex.co.uk
Website: http://www.sonifex.co.uk
Information in this document is subject to change without notice and does not represent a commitment on the part of the
vendor. Sonifex Ltd shall not be liable for any loss or damage whatsoever arising from the use of information or any error
contained in this manual.
No part of this manual may be reproduced or transmitted in any form or by any means, electronic or mechanical, including
photocopying, recording, information storage and retrieval systems, for any purpose other than the purchaser’s personal
use, without the express written permission of Sonifex Ltd. Unless otherwise noted, all names of companies, products and
persons contained herein are part of a completely fictitious adaptation and are designed solely to document the use of
Sonifex product.

Contents
TABLE OF CONTENTS
License Agreement...........................................................................................................................................1
Net-Log License Form.......................................................................................................................................3
Warranty & Safety Information..........................................................................................................................5
Warranty and Liability ......................................................................................................................................5
Returning the Warranty Card.............................................................................................................................6
Reporting Software Bugs ..................................................................................................................................6
Unpacking the Net-Log .....................................................................................................................................6
Safety of Mains Operated Equipment..................................................................................................................6
Fuse Rating.....................................................................................................................................................6
Power Cable and Connection .............................................................................................................................6
1 Introduction ............................................................................................................................................... 7
General Overview ............................................................................................................................................7
The Net-Log....................................................................................................................................................7
Net-Log Control Software..................................................................................................................................7
Recording .......................................................................................................................................................7
Playing ...........................................................................................................................................................8
Archiving ........................................................................................................................................................8
Network .........................................................................................................................................................8
Required Hardware ..........................................................................................................................................9
2 Net-Log Hardware......................................................................................................................................11
Physical Description .......................................................................................................................................11
Power...........................................................................................................................................................11
Level Indicators............................................................................................................................................. 11
Record Control/Indicator................................................................................................................................. 11
Archive Alarm................................................................................................................................................12
Disk Drive Alarm............................................................................................................................................12
Reset Switch .................................................................................................................................................12
Audio Inputs/Input Level Control ..................................................................................................................... 12
Network Status Indicators............................................................................................................................... 12
Network Connections......................................................................................................................................12
RS232 Serial Ports......................................................................................................................................... 12
Alarm Outputs And Remote Inputs................................................................................................................... 12
3 Net-Log Set-up & Installation ....................................................................................................................13
Adjusting Record Input Levels ......................................................................................................................... 13
Network Topology..........................................................................................................................................13
Maximum Network Connections.......................................................................................................................13
Connecting Net-Log To Your Network ............................................................................................................... 14
IP Addresses.................................................................................................................................................14
Installing Net-Log-Win Software ......................................................................................................................15
Entering Network Settings ..............................................................................................................................15
4 Startup & Login ............................................................................................................................................19
Starting Net-Log-Win .....................................................................................................................................19
Maximum Concurrent Users ............................................................................................................................19
Multiple Net-Logs On A Network ......................................................................................................................19
Licensing Your Net-Log................................................................................................................................... 19
Obtaining License Codes.................................................................................................................................20
The Login Procedure.......................................................................................................................................20
The Device List Editor.....................................................................................................................................20
First Time Use of Net-Log................................................................................................................................21
Changing User Details .................................................................................................................................... 21
General Screen Layout ...................................................................................................................................21
5 Recording ..................................................................................................................................................23
The Record Screen.........................................................................................................................................23
Manual Recording .......................................................................................................................................... 23
Program Recording ........................................................................................................................................24
Saving and Loading Record Programs...............................................................................................................25
Remote Recording..........................................................................................................................................25
Auto Recording..............................................................................................................................................25
6 Playing & Downloading..............................................................................................................................15
Track List Display...........................................................................................................................................15
Play Download............................................................................................................................................... 15
Play Stream ..................................................................................................................................................16
Sonifex Net-Log User Handbook

Contents
Play File........................................................................................................................................................17
7 Archiving ...................................................................................................................................................19
The Archiving Process.....................................................................................................................................19
Configuring Archival To A Networked PC ...........................................................................................................19
Format of Archived Files ................................................................................................................................. 20
Beginning to Archive ...................................................................................................................................... 20
8 Auto-Archive..............................................................................................................................................21
Introduction.................................................................................................................................................. 21
Licensing ......................................................................................................................................................21
The Net-Log List............................................................................................................................................21
The Status Bar .............................................................................................................................................. 21
Performance .................................................................................................................................................21
Set-up.......................................................................................................................................................... 22
E-Mail .......................................................................................................................................................... 22
Auto-Delete Archives...................................................................................................................................... 22
Device List.................................................................................................................................................... 22
The Status Screen .........................................................................................................................................23
The Control Screen ........................................................................................................................................ 23
The Archive Screen........................................................................................................................................23
The Event Log Screen.....................................................................................................................................24
Reports ........................................................................................................................................................ 24
Status Report................................................................................................................................................24
Error Report.................................................................................................................................................. 24
Possible Errors ..............................................................................................................................................24
‘Archive Warn’ Report..................................................................................................................................... 24
‘Archive Alarm’ Report.................................................................................................................................... 24
9 Serial Control Interface .............................................................................................................................25
Televic CE2500 Interface................................................................................................................................25
Televic CE2500 Protocol .................................................................................................................................27
AMX/Crestron Interface ..................................................................................................................................28
AMX/Crestron Protocol....................................................................................................................................28
10 Options....................................................................................................................................................31
Record .........................................................................................................................................................31
Archive......................................................................................................................................................... 32
Record Remotes ............................................................................................................................................ 33
Clock Source................................................................................................................................................. 33
Control......................................................................................................................................................... 34
Information...................................................................................................................................................34
Saving and Loading Options............................................................................................................................ 34
11 The Administrator....................................................................................................................................35
Licences ....................................................................................................................................................... 35
Accounts Editor ............................................................................................................................................. 35
Function Access – View................................................................................................................................... 35
Function Access – Control...............................................................................................................................35
User Name & Password................................................................................................................................... 36
The Onboard Clock.........................................................................................................................................36
Updating The Onboard Clock...........................................................................................................................36
Network Settings...........................................................................................................................................37
Updating Firmware.........................................................................................................................................37
Resetting The Net-Log.................................................................................................................................... 37
12 Tools........................................................................................................................................................39
Auto Refresh Cut Display ................................................................................................................................39
Play Cut Auto Load ........................................................................................................................................ 39
Hide Unavailable Cuts.....................................................................................................................................39
Deleting Cuts ................................................................................................................................................ 39
View ............................................................................................................................................................39
Net-Log Connections......................................................................................................................................39
Net-Log Status..............................................................................................................................................39
Network Stats ............................................................................................................................................... 40
Audio Header Info.......................................................................................................................................... 40
About Sonifex Net-Log....................................................................................................................................40
13 Technical Specifications...........................................................................................................................41
Physical Specification ..................................................................................................................................... 41
Audio Specification......................................................................................................................................... 41
Rear Panel Connections, Controls and Indicators................................................................................................ 41
Front Panel Controls and Indicators.................................................................................................................. 41
Additional Information....................................................................................................................................41
Pin Connections............................................................................................................................................. 42
14 Glossary & Abbreviations.........................................................................................................................45
Index...........................................................................................................................................................47
Sonifex Net-Log User Handbook

Contents
LIST OF FIGURES
Figure 1.1 System Block Diagram .........................................................................................................................7
Figure 1.2 Single Net-Log Connection example.......................................................................................................7
Figure 1.3 Multiple Net-Log Connection example.....................................................................................................8
Figure 2.1 The Front Panel.................................................................................................................................11
Figure 2.2 The Rear Panel.................................................................................................................................. 12
Figure 3.1 Network Topology .............................................................................................................................13
Figure 3.2 Maximum Simultaneous Streams......................................................................................................... 14
Figure 3.3 IP Addresses..................................................................................................................................... 14
Figure 3.4 Net-Log-Win Installation..................................................................................................................... 15
Figure 3.5 Net-Log-Win Serial Utility ................................................................................................................... 15
Figure 3.6 Detail of Net-Log-Win Serial Utility....................................................................................................... 15
Figure 3.7 Diagram of a Null Modem Cable...........................................................................................................16
Figure 3.8 Diagram of “straight through” and “crossover” CAT5 Cables.................................................................... 16
Figure 3.9 Details of Net-Util Tool buttons............................................................................................................16
Figure 4.1 The Initialisation Screen.....................................................................................................................19
Figure 4.2 The Licensing Screen .........................................................................................................................19
Figure 4.3 The Login Screen...............................................................................................................................20
Figure 4.4 The Net-Log Device List Editor ............................................................................................................20
Figure 4.5 User Details...................................................................................................................................... 21
Figure 4.6 General Screen Layout.......................................................................................................................21
Figure 5.1 Manual Record Screen........................................................................................................................23
Figure 5.2 Program Record Screen...................................................................................................................... 24
Figure 5.3 Program Record Popup Menu Commands.............................................................................................. 24
Figure 5.4 Auto Record Mode ............................................................................................................................. 25
Figure 6.1 Play Download Screen........................................................................................................................15
Figure 6.2 Play Stream Screen ........................................................................................................................... 16
Figure 6.3 Play File Screen................................................................................................................................. 17
Figure 7.1 Archive Options Screen ...................................................................................................................... 19
Figure 7.2 Archive Screen..................................................................................................................................20
Figure 8.1 The Status Screen .............................................................................................................................21
Figure 8.2 The Net-Log List................................................................................................................................21
Figure 8.3 The Settings Screen........................................................................................................................... 22
Figure 8.4 The Status Screen .............................................................................................................................23
Figure 8.5 The Control Screen............................................................................................................................23
Figure 8.6 The Archive Screen............................................................................................................................23
Figure 8.7 The Event Log Screen ........................................................................................................................24
Figure 9.1 Control Options Screen ......................................................................................................................25
Figure 9.2 Televic CE2500 Interface Options ........................................................................................................25
Figure 9.3 Additional Play Cut List Columns..........................................................................................................26
Figure 10.1 Record Options................................................................................................................................ 31
Figure 10.2 Archive Options...............................................................................................................................32
Figure 10.3 Record Remotes Options................................................................................................................... 33
Figure 10.4 Clock Source Options ....................................................................................................................... 33
Figure 10.5 Control Interface Options.................................................................................................................. 34
Figure 10.6 Televic CE2500 Control Options.........................................................................................................34
Figure 10.7 System Information .........................................................................................................................34
Figure 11.1 Net-Log Administrator Menu..............................................................................................................35
Figure 11.2 Accounts Editor ............................................................................................................................... 35
Figure 11.3 Function View..................................................................................................................................35
Figure 11.4 Function Control..............................................................................................................................35
Figure 11.5 Select or Edit User Name & Password................................................................................................. 36
Figure 11.6 Network Settings.............................................................................................................................37
Figure 11.7 Upgrading Firmware......................................................................................................................... 37
Figure 12.1 Net-Log Tools Menu .........................................................................................................................39
Figure 12.2 Net-Log Connections Screen .............................................................................................................39
Figure 12.3 Net-Log Status Screen .....................................................................................................................39
Figure 12.4 Net-Log Stats Screen .......................................................................................................................40
Figure 12.5 Net-Log Audio Header Info Screen.....................................................................................................40
Figure 12.6 Net-Log About Screen ...................................................................................................................... 40
Sonifex Net-Log User Handbook

Contents
Sonifex Net-Log User Handbook

License Agreement
LICENSE AGREEMENT
This is a legal agreement between you, the end user, and Sonifex Limited.
BY PROCEEDING WITH THE INSTALLATION OR USE OF THE SOFTWARE, YOU AGREE TO BE BOUND BY THE TERMS OF
THIS AGREEMENT. IF YOU DO NOT AGREE TO THE TERMS OF THIS AGREEMENT, DO NOT INSTALL OR USE THIS
SOFTWARE.
Sonifex Limited ("Sonifex") and the individual or entity acquiring the Software ("Licensee"), agree as follows:
1. Definitions
"Software" means the computer program(s) in machine-readable form furnished to Licensee by Sonifex or Sonifex’s
suppliers, in whatever media and by whatever method. Software includes any related update or upgrade programs that
may be added from time-to-time.
"Hardware" means the equipment, furnished to Licensee by Sonifex or Sonifex’s suppliers, to which the Software relates.
Hardware is to be used solely in conjunction with the Software.
2. Software License
a. Sonifex hereby grants to Licensee a non-exclusive, non-transferable license to use the Software for Licensee's internal
purposes only, on any computer possessed by Licensee on which the Software is designed to operate, such use to be in
accordance with and subject to the terms and conditions of this Agreement.
b. Licensee shall not distribute, lend, incorporate, modify, or use the Software for any purpose except as expressly
provided herein. Licensee may transfer rights under this Agreement on a permanent basis, provided all copies of the
Software and all written materials are transferred, and the recipient agrees to the terms of this Agreement.
c. If Licensee fails to comply with the provisions of this Agreement, the License is automatically terminated.
d. Except for the rights expressly granted herein to Licensee, the title and all intellectual property rights in and to the
Software and any copy of the Software which may be made by Licensee hereunder remain the sole and exclusive property
of Sonifex and/or Sonifex’s licensors.
3. Limited Warranty & Remedies
a. Sonifex warrants to Licensee that the media containing the Software will be free from defects in materials and
workmanship under normal use and service for a period of ninety (90) days from the date of delivery.
b. Sonifex further warrants that (a) the Software will perform substantially in accordance with the accompanying Product
Manual(s) for a period of ninety (90) days from the date of delivery; and (b) any Sonifex supplied Hardware
accompanying the Software will be free from defects in materials and workmanship under normal use and service for a
period of one year from the date of receipt. Any implied warranties on the Software and Hardware are limited to ninety
(90) days and one (1) year, respectively, or the shortest period permitted by applicable law, whichever is greater.
c. Any products which are not returned to Sonifex within the warranty period or which have been subject to accident,
abuse, misuse, alteration, neglect, or unauthorised repair or installation are not covered by warranty.
4. Warranty Disclaimer
EXCEPT FOR THE ABOVE EXPRESSED LIMITED WARRANTIES, SONIFEX MAKES NO WARRANTIES ON THE SOFTWARE,
WHETHER EXPRESSED, IMPLIED, STATUTORY, OR IN ANY OTHER PROVISION OF THIS AGREEMENT OR COMMUNICATION
WITH LICENSEE, AND SONIFEX SPECIFICALLY DISCLAIMS ANY IMPLIED WARRANTY OF MERCHANTABILITY OR FITNESS
FOR A PARTICULAR PURPOSE. SONIFEX DOES NOT WARRANT THAT THE OPERATION OF THE SOFTWARE BY LICENSEE
WILL BE UNINTERRUPTED OR ERROR FREE. LICENSEE ASSUMES RESPONSIBILITY FOR SELECTION OF THE SOFTWARE
AND HARDWARE TO ACHIEVE ITS INTENDED RESULTS, AND FOR THE PROPER INSTALLATION, USE, AND RESULTS
OBTAINED FROM THE SOFTWARE. EXCEPT FOR THE ABOVE EXPRESSED LIMITED WARRANTIES, LICENSEE ASSUMES THE
ENTIRE RISK OF THE SOFTWARE PROVING DEFECTIVE OR FAILING TO PERFORM PROPERLY AND IN SUCH EVENT,
LICENSEE SHALL ASSUME THE ENTIRE COST AND RISK OF ANY REPAIR, SERVICE, CORRECTION, OR ANY OTHER
LIABILITIES OR DAMAGES CAUSED BY OR ASSOCIATED WITH THE SOFTWARE.
SONIFEXS’ SOLE LIABILITY, AND LICENSEE'S SOLE REMEDY, IS SET FORTH ABOVE.
5. Object Code
Licensee shall not attempt to reverse translate, de-compile or otherwise attempt to derive the source code of the
Software. In the event any source code is explicitly licensed to Licensee as part of the Software, such limitation will not
apply to such source code. Licensee shall not alter or remove from the Software any copyright, trademark or other
proprietary notices of Sonifex and/or Sonifex’s licensors. Any use or attempted use of the Software in violation of the
foregoing restrictions is a breach of the Agreement which will cause irreparable harm to Sonifex, entitling Sonifex to
injunctive relief in addition to all legal remedies.
Sonifex Net-Log User Handbook
1

License Agreement
6. Limitation of Liability
a. Licensee agrees that Sonifex’s entire liability to Licensee and Licensee's sole remedy hereunder for any cause
whatsoever, regardless of the form of the action, and at Sonifex’s option, shall be limited to either (a) the price paid to
Sonifex for the Software and Hardware or (b) repair or replacement of the Software or Hardware that does not meet
Sonifex’s Limited Warranty and which is returned to Sonifex with a copy of Licensee's receipt or invoice. Any replacement
Software or Hardware will be warranted for the remainder of the original warranty period or 30 days, whichev er is longer.
b. TO THE MAXIMUM EXTENT PERMITTED BY APPLICABLE LAW, SONIFEX AND ITS SUPPLIERS SHALL NOT BE LIABLE FOR
ANY OTHER DAMAGES WHATSOEVER (INCLUDING, WITHOUT LIMITATION, DAMAGES FOR LOSS OF BUSINESS PROFITS,
BUSINESS INTERRUPTION, LOSS OF BUSINESS INFORMATION, OR OTHER PECUNIARY LOSS) ARISING OUT OF THE USE
OF OR INABILITY TO USE THIS SONIFEX PRODUCT, EVEN IF SONIFEX HAS BEEN ADVISED OF THE POSSIBILITY OF SUCH
DAMAGES. IN ANY CASE, SONIFEXS’ ENTIRE LIABILITY UNDER ANY PROVISION OF THIS AGREEMENT SHALL BE LIMITED
TO THE AMOUNT ACTUALLY PAID FOR THE SOFTWARE AND HARDWARE.
7. Copyright
The Software is owned by Sonifex and is protected by United Kingdom copyright laws, international treaty provisions and
all other applicable national laws.
This Agreement is governed by the laws of England.
2
Sonifex Net-Log User Handbook

NET-LOG LICENSE FORM
To provide a license for your Net-Log, Sonifex requires the following information:
License reference code from the Administrator Menu -> Licenses screen.
Ethernet MAC address from the Administrator Menu -> Licenses screen.
Serial number from rear of Net-Log.
Number of consecutive streams to be licensed (2, 5 or upgrade 2-5)
Your Name and Address
Agent or Distributor purchased from
At least one of the following:
Telephone (inc country code)
Fax number (inc country code)
Email address
Please send this form to
Net-Log Licensing
Sonifex Ltd
61 Station Road
Irthlingborough
Northants NN9 5QE
United Kingdom
OR telephone during
UK working hours to
+44 (0)1933 650700
OR Fax to
+44 (0)1933 650726
License Form
OR email all this information to
netlog.support@sonifex.co.uk
OR fill in the form which can be
found on our website
www.sonifex.co.uk/netlog
Sonifex Net-Log User Handbook
3

License Form
4
Sonifex Net-Log User Handbook

Warranty & Safety
WARRANTY & SAFETY
INFORMATION
Warranty and Liability
Important: the purchaser is advised to read this clause
(a) The Company agrees to repair or (at its discretion) replace Goods which are found to be defective (fair wear and tear
excepted) and which are returned to the Company within 12 months of the date of despatch provided that each of the
following are satisfied:
(i) notification of any defect is given to the Company immediately upon its becoming apparent to the Purchaser;
(ii) the Goods have only been operated under normal operating conditions and have only been subject to normal use
(and in particular the Goods must have been correctly connected and must not have been subject to high voltage or to
ionising radiation and must not have been used contrary to the Company's technical recommendations);
(iii) the Goods are returned to the Company's premises at the Purchaser's expense;
(iv) any Goods or parts of Goods replaced shall become the property of the Company;
(v) no work whatsoever (other than normal and proper maintenance) has been carried out to the Goods or any part of
the Goods without the Company's prior written consent;
(vi) the defect has not arisen from a design made, furnished or specified by the Purchaser;
(vii) the Goods have been assembled or incorporated into other goods only in accordance with any instructions issued
by the Company;
(viii) the defect has not arisen from a design modified by the Purchaser;
(ix) the defect has not arisen from an item manufactured by a person other than the Company. In respect of any item
manufactured by a person other than the Company, the Purchaser shall only be entitled to the benefit of any warranty or
guarantee provided by such manufacturer to the Company.
(b) In respect of computer software supplied by the Company the Company does not warrant that the use of the software
will be uninterrupted or error free.
(c) The Company accepts liability:
(i) for death or personal injury to the extent that it results from the negligence of the Company, its employees (whilst
in the course of their employment) or its agents (in the course of the agency);
(ii) for any breach by the Company of any statutory undertaking as to title, quiet possession and freedom from
encumbrance.
(d) Subject to conditions (a) and (c) from the time of despatch of the Goods from the Company's premises the Purchaser
shall be responsible for any defect in the Goods or loss, damage, nuisance or interference whatsoever consequential
economic or otherwise or wastage of material resulting from or caused by or to the Goods. In particular the Company
shall not be liable for any loss of profits or other economic losses. The Company accordingly excludes all liability for the
same.
(e) At the request and expense of the Purchaser the Company will test the Goods to ascertain performance levels and
provide a report of the results of that test. The report will be accurate at the time of the test, to the best of the belief and
knowledge of the Company, and the Company accepts no liability in respect of its accuracy beyond that set out in
Condition (a).
(f) Subject to Condition (e) no representation, condition, warranty or other term, express or implied (by statute or
otherwise) is given by the Company that the Goods are of any particular quality or standard or will enable the Purchaser to
attain any particular performance or result, or will be suitable for any particular purpose or use under specific conditions or
will provide any particular capacity, notwithstanding that the requirement for such performance, result or capacity or that
such particular purpose or conditions may have been known (or ought to have been known) to the Company, its
employees or agents.
(g) (i) To the extent that the Company is held legally liable to the Purchaser for any single breach of contract, tort,
representation or other act or default, the Company's liability for the same shall not exceed the Price of the Goods.
(ii) The restriction of liability in Condition (g)(i) shall not apply to any liability accepted by the Seller in Condition (c).
(h) Where the Goods are sold under a consumer transaction (as defined by the Consumer Transactions (Restrictions on
Statements) Order 1976) the statutory rights of the Purchaser are not affected by these Conditions of Sale.
Sonifex Net-Log User Handbook
5

Warranty & Safety
Returning the Warranty Card
In order to register the date of purchase so that we can keep you informed of any design improvements or modifications,
it is important to complete the warranty registration document that is enclosed with you and return it to Sonifex Ltd in the
UK.
For your own records you should write down the serial number (which can be found on the rear of the Net-Log) and
software versions (which is found in the About menu screen of Net-Log-Win, which is accessed via the help menu).
Serial Number ……………………….
Net-Log-Win Version V…………………………
Net-Log-Win Play Filter Version V…………………………
Net-Log Base Version V…………………………
Net-Log Version V…………………………
Reporting Software Bugs
Whilst every effort has been made to ensure that the Net-Log-Win software is bug-free, it is possible that there are bugs
in the software. If you find any bugs, please report them to Sonifex because it helps us to improve the quality of the
product and we will usually be able to issue another version of software onto the Sonifex website for you to download and
upgrade your Net-Log.
Report any bugs by email to: netlog.support@sonifex.co.uk
When you report a bug, please add the following points:
• The Net-Log serial number, the Software versions, and the License status you are using. All of which can be found in
the About menu screen (Figure 11.6).
• If the bug is associated with Audio timing or data please include the data from the audio header screen (Figure 11.5)
• A contact who we can get in touch with regarding the problem, together with a reply email address.
• What you were doing when the bug occurred.
• What actually happened, in as much detail as possible.
• What you think the problem was caused by.
The more information you include, the easier it is to find the bug and cure it so please add as much information as you
can.
Unpacking the Net-Log
Each Net-Log is shipped in protective packaging and should be inspected for damage before use. Where an item is found
to have transit damage, notify your supplier immediately with all the relevant details of the shipment. Packing materials
should be kept for inspection and also for if the product needs to be returned.
Safety of Mains Operated Equipment
This equipment has been designed to meet the safety regulations currently advised in the country of purchase
and it conforms to the safety regulations specified by use of the CE Mark.
The power supply is rated to 95 - 265VAC at 47 – 63Hz with a fuse of 2A.
Warning: There are no user serviceably parts inside the machine. If you should ever need to look inside the unit, always
disconnect the mains supply before removing the equipment covers.
Fuse Rating
The Net-Log is supplied with a single fuse in the live conducting path of the power-in feed at the power supply. For
reasons of safety it is important that the correct rating and type of fuse is used. Incorrectly rated fuses could present a
possible fire hazard, under equipment fault conditions.
Power Cable and Connection
An IEC power connector is supplied with the Net-Log, which has a moulded plug attached – this is a legal requirement. If
no moulded plug has been supplied with your Net-Log, please contact your supplier, because an IEC connector is always
supplied from the Sonifex factory.
If for any reason, you need to use the Net-Log with a different power cable, you should use the following wiring guidelines
Wire Colour Connection
Green, or green and yellow Earth (E)
Blue, or Black Neutral (N)
Brown, or Red Live (L)
6
Sonifex Net-Log User Handbook

INTRODUCTION
1. Introduction
1
Figure 1.1 System Block Diagram
Figure 1.2 Single Net-Log Connection example
General Overview
The principal behind the Net-Log logger is that generally
speaking, computers should not be used for recording
audio where their general unreliability can cause system
crashes or lockups, with little regard for the security of the
audio being recorded. However, for playback, using
computers is perfectly acceptable and probably preferable,
due to the ability to manipulate and edit the audio,
provided it is in a suitable format.
The Net-Log
The Net-Log is a 1U rack-mount, hardware audio recorder,
designed primarily for audio logging in a broadcast
environment. It is able to record up to 4 mono, or 2 stereo
audio feeds, which are saved onto a large internal IDE
hard disk. The hard disk is continuously over-written,
allowing access to all the audio recorded on it. Apart from
the front panel mounted record override button, all
functions and configurations are controlled via the
Ethernet TCP/IP network connection using the supplied
Windows control software package.
Net-Logs can be used singularly (Figure 1.2), or if more
record channels are required, multiple Net-Logs can easily
be configured to operate on the same Network (Figure
1.3).
Net-Log Control Software
Net-Log works in conjunction with a software control
package that runs under Windows. This package consists
of Net-Log-Win, Net-Util and Net-Log Auto-Archive. NetLog-Win is the main control and configuration program.
Net-Util is a configuration and monitoring utility that
communicates with Net-Log via a serial connection. NetLog Auto-Archive is a program designed to Archive audio
data from multiple Net-Logs simultaneously.
Recording
Audio presented to the inputs is encoded in one of two
user selectable formats, MPEG layer 2 or G.729A (An
additional license is required to enable the G.729A format
– contact Sonifex Ltd for details). The compressed data is
then written to the internal IDE hard disk drive. Recording
can be either continuous or programmed to start and stop
at selected times. Record set-up allows for mono/dual
mono/stereo and sample-frequency/bit-rate selection,
depending on record format selected.
When recording has started, these parameters can only be
altered once the audio on the disk has been deleted. The
hard disk audio cannot be deleted whilst the logger is
recording.
Sonifex Net-Log User Handbook
7

1. Introduction
Playing
Two methods of audio playback are supported by Net-Log in
conjunction with the Net-Log-Win software. Sections of
audio can be transferred to a file on the PC using the Play
Download function. These files can then be played using
Net-Log-Wins media file player. Alternatively, Play Stream
offers the ability to play audio direct from the Net-Log.
Archiving
Archive is an automated method of transferring audio data
from one or more Net-Logs to a designated PC via the
Network interface. When the audio data arrives at the PC, it
can be arranged into files of a predetermined size. These
files can then be copied to a removable media for long-term
storage. If temporary audio storage is required, to satisfy
broadcast authority requirements for example, then
Archiving may not be necessary as the large hard drives
used in Net-Log can, depending on the format or bit rate of
the recordings, hold several weeks of audio. Sections of the
audio could be downloaded as required using the Play
Download function. The Net-Log-Win software provides a
simple method of Archiving audio data for users with a
single Net-Log. For larger installations where multiple NetLogs are used, the Net-Log Auto-Archive package offers the
ability to archive audio data from up to 20 Net-Logs
simultaneously.
Network
The speed of the network connection on Net-Log is 10Mbps,
and the physical connection is made via a BNC connector for
coax cables, or a RJ45 connector for twisted pair cabled
networks. For maximum network performance, the Net-Logs
and client PCs’ should be linked via a network Switch. This
will cater for the Net-Logs’ 10Mb connection whilst allowing
the client PCs’ to run at 100Mb. In most applications, this
arrangement will provide sufficient network performance for
multiple clients to simultaneously access multiple Net-Logs.
However, on existing networks where network traffic is
already high, or where archiving audio from multiple NetLogs running at high data rates, the required bandwidth of
the network hardware needs to be carefully considered. In
such cases a dedicated network may be required. The
specification of the PC used as the Auto-Archive client will
also need to be able to handle the large amounts of audio
data being transferred. If the network hardware is incapable
of handling the required data rates, Play Stream will be
interrupted by periods of silence and audio data on the NetLog may be overwritten before it can be archived to the
target PC.
The following example illustrates a known working
configuration and provides a starting point when considering
larger systems.
5 Net-Logs each configured as follows:
4 mono channels of MPEG compression recording non-stop,
32 kHz sample rate, 192 kbps bit rate, archiving to a single
Auto-Archive client PC via a dedicated 10/100Mb Network
switch. The Auto-Archive client PC is an Intel PIII, 1GHz or
equivalent fitted with a 100Mb network card.
This system provides sufficient bandwidth for continuous
archiving plus the capability for additional Net-Log-Win
clients to Play Stream audio.
Figure 1.3 Multiple Net-Log Connection example
8
Sonifex Net-Log User Handbook

1. Introduction
Required Hardware
Audio can be delivered to a network-connected remote
PC for live playback through an appropriate audio card.
For recordings made using the MPEG format, a software
codec supplied as part of the Windows 98/2000
operating system, provides the decoding and conversion
of the audio to a format supported by any standard
Windows audio card capable of playing .wav files.
Likewise, recordings made using G.729A are converted
to the same Windows supported format by a software
codec embedded in the Net-Log-Win software.
Therefore, Net-Log-Win client PC’s can play audio in
both format s using a single audio card.
It is recommended to use a PC with the following
minimum specification:
Pentium 166MHz
64MB RAM
Audio card & speakers as above
100Mbps network connection
Windows 95/98/NT/2000
DirectX 6 or greater
Sonifex Net-Log User Handbook
9

1. Introduction
10
Sonifex Net-Log User Handbook

A
2. Net-Log Hardware
N
Power LED
ET-LOG HARDWARE
Level
Indicators
rchive
Alarm
Disk Drive
Alarm
Record
Control
Figure 2.1 The Front Panel
Reset
Switch
Physical Description
The logger is housed in a 1U high 19” rack mount box.
The front panel is sprayed with a green to purple “flip”
colour, which also has a fish-scale overlay. There are
chrome plated panel inserts for the fan inlet/outlet with
domed labels for the “Sonifex” and “Net-Log”.
Power
The unit is powered via an IEC filtered input for 95 – 265V
supply at 47–63Hz, peak 60W, 30W average. There is an
external fuse for the mains input that is rated at 2A. We
recommend that the Net-Log is operated from an
uninterruptable power supply. It should be noted that the
record header is written regularly during the record
process so if the power fails the data lost will be limited.
At a bit rate of 192kbps this loss will be a maximum of 1
minute. Lower data rates will give proportionately greater
time loss.
Level Indicators
There are four tri-colour LED’s positioned on the front
panel indicating input levels for each individual channel:
Led State Meaning
Off Input level < -18dBu
Yellow –18dBu < Input level < 0dBu
Green 0dBu < Input level < 12dBu
Red Input level >12dBu
Record Control/Indicator
This backlit button gives an indication of what channels
are currently being recorded and can also be used to give
limited control over the recording. When pressed, the
button will flash indicating that a record start or stop has
been initiated and must be pressed again within three
seconds to confirm the action. The LED states and their
relative modes are shown below:-
Button State Mode
Off No channels recording
Fast flashing Record Start/Stop initiated
Slow flashing Some channels recording
On All available channels record ing
When the button is pressed, the Net-Log checks to see
which channels can be altered using this button (See
Options, Record Format options, Override Enabled). If
recording, a confirmed button press will stop the
recording. If not recording, a confirmed button press will
start the recording on enabled channels.
2
Sonifex Net-Log User Handbook
11

2. Net-Log Hardware
Archive Alarm
This red coloured LED is used to warn of loss of data
during a recording process. If the Net-Log is about to
overwrite data that has not been archived on to a remote
computer then this indicator will start to flash. The amount
of warning time you get before data is lost can be
configured in the main software.
LED State Meaning
Off Normal
Flashing Data is about to be lost
On Data has been lost
Disk Drive Alarm
A red coloured LED giving an indication that there has
been an error reading/writing from/to the internal hard
disk.
Reset Switch
Restarts the machine. NOTE that this does not overwrite
any configurations and simply reboots the machine.
Audio Inputs/Input Level Control
The audio inputs consist of four 3-pin XLR connectors (2channel stereo, 4-channel mono) with independent level
gain controls for each input, accessible through the rearpanel using a flat-blade screwdriver.
Network Status Indicators
There are four network status indicators, which are all
labelled independently.
Rx Receiving data.
Tx Transmitting data.
Link A network link has been established
Col Network collision
Network Connections
There are two network connectors: one a BNC (coax,
10base2), and the other a RJ45 (10baseT). Either of
these can be used for TCP/IP connection.
RS232 Serial Ports
There are two 9 pin D-Type connectors (COM1 and COM2)
situated on the rear panel. COM1 is used for firmware
updates and for updating the network settings, i.e. IP
Address, Subnet Mask, etc. It can also be used as a
messaging output for data analysis. COM2 is used for the
Serial Control Interface.
The settings for COM1 are fixed at:Baud rate 115200
Data Bits 8
Parity NONE
Stop Bits 1
Alarm Outputs And Remote Inputs
The remote connector is a 15 pin male D-type, which has
eight remote inputs to control recording and a doublepole-double-throw alarm output relay which activates on
either the Archive Alarm or the Hard-Disk Alarm.
The inputs can be driven by 5V logic and are active low.
These can be set to momentary or latching action via the
main software screen.
See Chapter 12 for pin connection details.
Figure 2.2 The Rear Panel
12
Sonifex Net-Log User Handbook

NET-LOG SET-UP &
3. Net-Log Set-up & Installation
INSTALLATION
Figure 3.1 Network Topology
Adjusting Record Input Levels
The peak audio input levels are preset at +12dBu. This
means that an audio signal of +12dBu, once encoded, will
be at the maximum digital value. To change the peak
audio input level, follow the procedure below.
1. Switch the unit on and while the alarm LED’s on the
front panel are flashing, press the record control
button. The record button will illuminate.
2. Connect a constant audio signal at the required peak
level to Input 1.
3. Adjust the Input 1 level control on the rear panel until
the input level LED 1 on the front panel is green.
4. Repeat steps 2 & 3 for all 4 inputs. When you have
finished, simply press the record control button and
the Net-Log will complete its initialisation procedure.
3
Network Topology
The network that the Net-Log is connected to must be a
dedicated network, if you are to guarantee the audio being
available for play streaming. The ideal configuration is
shown in Figure 3.1, with the Net-Log(s) connected
directly to a network switch, which is connected directly to
dedicated network interface cards in the PC’s. It is under
these conditions that the test results have been achieved
in Figure 3.2.
Maximum Network Connections
The maximum number of people that can connect to the
Net-Log and use Play Streaming simultaneously is
dependent on the number of software licenses that have
been bought and also the data rate of the recordings that
you are making. The software license is available as either
a 2-stream license, or a 5-stream license. Due to the low
fixed bit rate of the G.729A record format, the type of
license (2 or 5 streams) is the only limiting factor for the
number of simultaneous Play Streams when G.729A is
selected.
Figure 3.2 shows the maximum number of streams, for
the MPEG record format, for the given recording bit rate
configured. These figures assume that there is no other
activity on the network, including Archiving of Net-Log
audio.
The figures show that for 5 people to be able to
simultaneously Play Stream one stereo channel of MPEG
audio, the recording bit-rate must be set to 160kbps or
less.
If you have two pairs of stereo channels on a Net-Log set
at different bit-rates, the total number of people that can
Play stream them is governed by the combined bit rates of
the play streaming. The limit of the maximum total stream
rate is around 900kbps.
Sonifex Net-Log User Handbook
13

3. Net-Log Set-up & Installation
Above this stream rate, play streaming will start to fail,
i.e. there will be non-continuous audio and audio silences
on playback.
E.g. 2 people play streaming 64kbps recording
= 2 x 64kbps = 128kbps, plus
2 people play streaming 384kbps recording
= 2 x 384kbps = 768kbps
Total = 896kbps, which is less than 900kbps and
allowable.
Play streaming can occur with archiving also happening in
the background. Archiving audio to a nominated harddrive on the network happens at a maximum data rate of
1000kbps. This data rate falls if play streaming is
occurring, because play streaming is given a priority over
any other process. There is a downside of this priority,
which is that if many people are play streaming
continuously for a number of hours (or days), the
archiving data rate may fall below the recording data rate,
so that the audio is not being archived as quickly as it is
recorded.
You can calculate whether this will happen by subtracting
the total maximum stream rate (calculated in the above
example) from 1000kbps. If the remainder is less than the
recording bit rate that you are archiving, then your
archiving may happen at less than real time and will,
eventually fail. Note: this does assume that the play
streaming is at, or beyond, the maximum for a
considerable length of time (to fill the Net-Log hard disk).
Invariably, the play streaming is for “dip-in” access of a
short duration (<1 hour) and the archive process has time
to catch-up when there is no, or little, play streaming.
Connecting Net-Log To Your Network
Before connecting the Net-Log you first need to give it an
IP Address, Subnet Mask and a Default Gateway. You may
need to obtain these from your network administrator, but
please note that the Net-Log is not compatible with DHCP
(Dynamic Host Configuration Protocol) and DNS (Domain
Name System).
To help in your selection of an IP Address for the Net-Log,
following is a brief description of how IP Addresses and
Subnet Masks work.
IP Addresses
An IP Address is used to determine where a node (PC,
Printer etc.) is situated on a network. This address must
be unique to the network, otherwise conflicts will occur.
The actual address is made up of 32 bits, split into four
sections (each section is called an octet). Held in the
address is a network ID and host ID.
The network ID, or network address, is basically the
address of the local network, and all nodes within that
network must have the same network ID. The host ID part
of the address identifies the node within that network.
There are three different classes of IP Address: A, B and
C. These determine what parts of the address contain the
network ID and the host ID, (Figure 3.3).
MPEG Record
Bit Rate
160 kbps 5 streams 800 kbps
192 kbps 4 streams 768 kbps
224 kbps 4 streams 896 kbps
256 kbps 3 streams 768 kbps
320 kbps 2 streams 640 kbps
384 kbps 2 streams 768 kbps
Figure 3.2 Maximum Simultaneous Streams
Maximum number
of simultaneous
streams
Figure 3.3 IP Addresses
Total
stream rate
14
Sonifex Net-Log User Handbook

Figure 3.4 Net-Log-Win Installation
Figure 3.5 Net-Log-Win Serial Utility
Figure 3.6 Detail of Net-Log-Win Serial Utility
3. Net-Log Set-up & Installation
Class A address: The first octet contains the network ID
and the second, third and fourth contain the host ID.
Class B address: The first and second octets contain the
network ID and the third and fourth contain the host ID.
Class C address: The first, second and third octets contain
the network ID and the fourth contains the host ID.
So, the network ID of the IP Address that you give the
Net-Log must match the network address of the network
on which you connect it and the host ID of the Net-Log’s
IP Address must be different to that of any other device
on the network.
Subnet Masks
To determine which parts of an address contain the
network ID and host ID we use a Subnet Mask, which has
an identical format to the IP Address being made up of
32-bits, split up into four octets. It is configured as
follows:
For every bit in the IP Address that contains the network
ID the corresponding bit in the Subnet Mask must be set
to binary 1, (i.e. the byte of 8 bits is set to “255”). For
example if the IP Address is a class A address, the
network ID is contained in the first octet. So the first eight
bits of the address contain the Network ID. Therefore the
first eight bits in the Subnet Mask must be set to binary 1,
making it “255.0.0.0”.
Installing Net-Log-Win Software
The procedure below describes how to install the PC
software. As the initial set-up procedure will required the
use of the Net-Log Serial Utility, the software must initially
be installed on a PC with a free serial port.
1. Insert the Sonifex Software Installation CD into your
CD-ROM drive.
2. The installation process should begin auto matically. If
it fails to start, select “Run…” from the Start Menu
and type “x:\Index.htm” where x is the letter of your
CD-ROM drive.
3. The installation starts by displaying a web page that
has links to several software packages from Sonifex.
Locate Net-Log-Win from the list and click on the link
provided. The Net-Log-Win installation will begin as
shown in Figure 3.4. Simply follow the on screen
instructions to proceed. During the installation, Set-up
will attempt to detect what version, if any, of DirectX
is installed. DirectX is required for audio playback and
Net-Log-Win requires that version 6 or later is
installed. If a compatible version is not found, then
the supplied DirectX 8.0 will be automatically
installed.
4. The installation will place three shortcuts in the start
menu – Net-Log-Win, Net-Util and Net-Log AutoArchive.
Entering Network Settings
To do this you need to start the Net-Log-Win Serial Utility
(Figure 3.5 & 3.6), and connect one of your PC’s
available serial ports to the Net-Log’s serial port (COM1).
This is done with the null modem cable supplied with the
Net-Log.
Select the relevant PC COM port number in the serial
utility by using the up/down buttons labelled “1” in Figure
3.6). Now press the Connect button (labelled “2”). To test
the connection between the PC and Net-Log press the
question mark Test button (labelled “3”). This sends a
command to the Net-Log, and waits for a reply. If there is
no reply, an error message box appears declaring that the
connection test has failed.
Sonifex Net-Log User Handbook
15

3. Net-Log Set-up & Installation
If this occurs make sure that you have the Net-Log
switched on, that all cables are correctly wired and
connected, and that you have selected the correct COM
port number.
The wiring for the cable is shown in Figure 3.7. If the
connection is successful a message box is displayed
indicating this.
Now you need to enter the IP Address, Subnet Mask and
Default Gateway (labelled “4”). The Default Gateway is
defined as the target system’s default route and is a
convention used on all networks. If you have a bridge to
another network, then set the IP Address of the Default
Gateway to the IP Address of the bridge. If you are using
the Net-Log on an isolated network or directly to a single
PC, then set the Default Gateway IP Address to that of the
Net-Log.
Check that the values have been entered correctly and
press the Download button (labelled “5”). This writes the
information to the Net-Log, and stores it in the system
ROM.
If at anytime you need to check the IP Address of the NetLog you can simply press the Reload button (labelled “6”).
This loads the current network settings from the Net-Log
and displays them. You can edit these if you need to and
write any changes to the Net-Log by pressing the
Download button again.
Enter the downloaded values here for future reference:
Net-Log Serial Number: …………………………………
IP Address: . . . .
Subnet Mask: . . . .
Default Gateway: . . . .
Note: This utility can also be used to download firmware
upgrades directly to the Net-Log via the serial port
(instead of using the Net-Log-Win software across the
network). To do this, click on the Firmware Update button
(labelled “7”), select the relevant update file and press
OK. The file will be downloaded to the Net-Log.
During all these procedures the messages sent from the
Net-Log can be monitored in the Message window. This
shows the status of the update with regards to the
network settings or firmware updating.
Net-Util also provides various tools for monitoring the
status and operation of the connected Net-Log. These
functions are available from the menu or by pressing the
button showing the right arrow symbol. When this button
is pressed, the icon changes to a left facing arrow to
indicate that a further press will hide the additional
controls. These buttons are shown in Figure 3.9. Whilst
running Net-Util, you can place the mouse cursor above
the button to show a brief description of the buttons’
functionality.
The first button on the left in Figure 3.9 simply clears the
main messaging window.
The next button allows the serial messages that are sent
from Net-Log and displayed on the screen, to also be
copied to a text file. This is particularly useful if a problem
occurs on the Net-Log as the message window can only
display the most recent messages.
Figure 3.7 Diagram of a Null Modem Cable
Figure 3.8 Diagram of “straight through” and
“crossover” CAT5 Cables
Figure 3.9 Details of Net-Util Tool buttons
16
Sonifex Net-Log User Handbook

3. Net-Log Set-up & Installation
The fourth, fifth and sixth buttons select the desired serial
message mode. The button marked with a “1” selects
minimum mode. In this mode, only details of fatal errors
are displayed. The button marked with a “2” selects
medium messaging mode. In this mode both fatal and
non-fatal error details are displayed. In maximum mode,
selected by pressing the button marked with a “3”, system
event details are also displayed.
The next button enables network communication
monitoring. This feature will display all input and output
communications on the connected Net-Log and is intended
for debugging purposes only – enabling it will severely
affect the network performance of the Net-Log.
The next two buttons are used to display and clear the onboard message log on Net-Log. Each time Net-Log sends a
serial message, it adds it to its own internal text log. This
log is limited in size and only contains the most recent
error/event messages.
The next two buttons are also intended as debug tools
although there use will not affect Net-Log’s performance.
The first is used to display the current status of the
network interface on Net-Log. The second is used to
display record cut information.
The last button is a “Reset all” button. This will return the
connected Net-Log to its factory defaults. Please note use of this button will delete all audio on the connected
Net-Log.
Once all the required information has been entered into
the Net-Log you are ready to connect the unit to your
network.
Ideally, the unit should be connected directly to a switch,
but if this is not possible or practical, connecting it to a
hub should be sufficient. If you are using the RJ45
connector on the rear of the Net-Log, you should use
twisted pair network cable (i.e. CAT5), wired “straight
through” as shown in Figure 3.8.
If you are connecting your Net-Log directly to a network
interface card in your PC, then you will require a
“crossover” cable, which is also shown in Figure 3.8.
When you have the Net-Log switched on and connected to
your PC or network, you can now run the Net-Log-Win
software. Read the next section on Start-up and Login,
which gives an explanation of the logging procedure and
how to enter your Net-Log into the device list.
Note: It is important to fully configure each Net-Log prior
to use. Once a successfully connection has been
established, refer to section 10 which details all the
configuration settings.
Sonifex Net-Log User Handbook
17

3. Net-Log Set-up & Installation
18
Sonifex Net-Log User Handbook

S
TARTUP & LOGIN
4. Startup & Login
4
Starting Net-Log-Win
To start the Net-Log-Win software, select the icon from
your desktop or Start menu depending on how you
installed the software. The startup screen will be displayed
(Figure 4.1) normally followed by the Login Screen
(Figure 4.3). However the first time the Net-Log is used
the license manager screen (Figure 4.2) will be
displayed.
Maximum Concurrent Users
The Net-Log-Win software can be purchased as either a 2stream license, or as a 5-stream license. This means that
Figure 4.1 The Initialisation Screen
you can install the Net-Log-Win software on as many PC’s
in your network as you like, but that only 2, or 5
simultaneous accesses to the licensed Net-Log can be
made respectively. If 2, or 5, users are using a Net-Log
and another user tries to access it, a message will be
displayed telling them that the allotted number of licenses
are already in use.
Remember that if Archiving is enabled, this will use a
license.
Multiple Net-Logs On A Network
Only one license is required per network regardless of the
number of Net-Logs attached to that network. The first
Net-Log connected will need to have a valid license and
then all further Net-Logs should be set as slave units and
will validate their license from this master. This means
that the master will need to be attached at all times. If the
master should be removed from the network the slave
units will continue to be available for a period of 3 days.
After this time they will still continue to record but will be
inaccessible from the Net-Log-Win software. Reconnecting
the master unit will re-enable all features.
Licensing Your Net-Log
The License Manager Screen (Figure 4.2) is shown when
first connecting to a Net-Log or can be accessed from the
Administrator menu. This dialog shows the unique boot
code used to validate the master licenses and the 3
licensing options. These allow the user to set the unit as a
master by entering the license code; as a slave by
Figure 4.2 The Licensing Screen
entering the TCP/IP address of a connected Net-Log
master unit; or define the unit as a demo. Similar to
disconnected slave units the demo allows for 3 days of
normal operation and the unit can be upgraded at any
time to function as a master or as a slave by entering the
appropriate data. Re-selecting the unit as a demo will
delete all audio data and settings from the Net-Log.
Sonifex Net-Log User Handbook
19

4. Startup & Login
Obtaining License Codes
The license code must be obtained directly from Sonifex.
You can do this in several ways, either by phone to
Sonifex on +44 (0)1933 650700 during normal UK
working hours; or by sending the form from the front of
the manual by fax to +44 (0)1933 650726 or directly by
post; or by completing the form on the supplied link or
through our website
www.sonifex.co.uk/netlog; or by
supplying the information indicated on the form by email
to
netlog.support@sonifex.co.uk. Sonifex will endeavour
to return the license codes as quickly as possible. In the
mean time the machine can be used as a 2-stream license
demo machine for 3 days.
The Login Procedure
To enter the system, all users must specify a User Name
and a Password.
These will then be compared to details which are stored
onboard the Net-Log before the user can access the
system. If the user enters the correct information, they
will be allowed to use the PC interface to control the
designated logger. If the user enters incorrect information,
they will be asked to re-enter the User Name and
Password.
To configure the system, enter a User Name of “admin”
and a Password of “admin”. The password should be
changed once you are running the program.
There is a Net-Log Device List, which allows you to choose
one of any number of Net-Logs connected to the network.
When the software is loaded for the first time, no Net-Logs
are available in the Device List, and a message box
appears stating this. You will be taken automatically to the
Device List editor, where you can add your Net-Log into
the list.
The Device List Editor
To enter a Net-Log into the list you must give it a text
name and the IP Address that was downloaded into the
Net-Log as described in the “Setup & Installation” chapter.
Once you have entered the Name and IP Address into the
boxes, press the “A
the list.
The two up/down arrows on the right hand side are used
to select the default Net-Log used when you have multiple
units. The default unit is the one that is automatically
selected when you login.
Multiple Net-Logs can be A
See Figure 4.4.
To edit the name or the IP Address of a device, select the
unit in the list and edit its details that appear in the Name
and IP Address text boxes. When you have finished, click
the “Replace” button.
To delete a device contained in the list, select the unit,
and then press “Delete”. Once you have finished entering
the details of your Net-Log(s) into the device list press
“OK”. This will return you to the Login screen.
Note: Prior to logging on to a new Net-Log for the first
time, ensure that the clock on the PC is set correctly as
this time will be used to update Net-Logs’ onboard clock.
The software will attempt to connect to the Net-Log and
when a connection has been established you will see the
main screen.
dd” button, and it will now appear in
dded, Deleted and Replaced.
Figure 4.3 The Login Screen
Figure 4.4 The Net-Log Device List Editor
20
Sonifex Net-Log User Handbook

4. Startup & Login
If the main screen does not appear then there is a
problem connecting to the Net-Log. Check that the IP
Address entered in the device editor list is the same as the
one downloaded using the Net-Log-Win Serial Utility.
Secondly, check that the IP Address and Subnet Mask are
valid for your network. If invalid details are entered, the
Net-Log will not appear on your network (see your system
administrator for more information).
First Time Use of Net-Log
For a brief step by step guide to first time use please refer
to Appendix A. Following this procedure the first time you
use the Net-Log you will need to setup the configuration
for your particular application. The configuration is
accessible from the Options tab. See Chapter 9 for full
details. At the very minimum you will need to set up the
Record Format, Record Media and Clock Source options.
Changing User Details
Once you have logged in for the first time it is advised
that you change your User name and Password from the
default settings to stop unauthorised access to your user
account. To do this, select the Edit menu, and then User
Details (Figure 4.5). Enter your new details and press
“OK”. If the “Cancel” button is pressed, none of the
changes made will take effect.
Note that the password is case sensitive, and you must re-
Figure 4.5 User Details
Figure 4.6 General Screen Layout
enter the password to confirm it is correct.
There is a special case available to demonstrate just the
screen layout and use of the Net-Log-Win software that
can be initiated by selecting a user name of demo and
leaving the passwords blank.
General Screen Layout
After logging in, the main screen appears (Figure 4.6).
Whether all of the 4 main selection screens (Record,
Archive, Play and Options) are displayed will vary
depending on the user account that you have logged in
with. However, the screen layout will remain the same
throughout.
1. Disconnect/Log-Off Button
If you are currently connected to a Net-Log then this
button allows you to disconnect and select a different unit.
If you are not currently connected to a Net-Log, this
allows you to log off and either log on as another user, or
exit the application. Note that logging off, or
disconnecting, from the Net-Log will not affect the
operation of the Net-Log, i.e. it won’t stop it recording,
etc.
2. Net-Log Selector
Use this to select other Net-Logs from the drop-down list
and connect to them as the user that you are currently
logged on as.
3. Alarm Indicators
These replicate the LED alarms situated on the front panel
of the Net-Log. The alarm conditions are also available on
the remote connector.
4. Network Activity Indicators
These are transmit Tx (left, red) and receive Rx (right,
green) indicators showing data transfer between the Netlog and your client PC.
Sonifex Net-Log User Handbook
21

4. Startup & Login
5. Net-Log & PC Time
Date and Time of the Net-Log clock and the local PC clock.
6. Status Bar
General information is displayed here.
7. Screen Selection Buttons
These are used to switch between the different screens
that are used to control the Net-Log.
8. Mentor Status Indicator
Status of the Mentor Time Server, used for synchronising
the PC and Net-Log times on a network.
22
Sonifex Net-Log User Handbook

R
ECORDING
5. Recording
5
Figure 5.1 Manual Record Screen
The Record Screen
This is where all recording actions are controlled. Each
input channel (up to a maximum of four mono, or two
stereo channels) can be controlled independently and is
represented by a separate display panel. Each panel
shows the current configuration and state for that
channel. For convenience, it also monitors the levels of the
inputs, and gives an indication of when there is “silence”
as shown in Figure 5.1. The record channels are
configured using the Options screen.
There are two formats available for recording, MPEG and
G.729A. MPEG allows for mono, dual mono and stereo
channel selection as well as variable sample and bit rates.
G.729A is a high compression, fixed bit rate, mono or dual
mono record format. Its low bandwidth makes it ideal for
recording speech and gives very high storage capability –
approximately 13 minutes per Mbyte. G.729A can be used
only after purchasing an additional license. Contact
Sonifex Ltd for details.
The Net-Log facilitates three modes of recording:
Manual recording
Button presses control recordings on each logger channel.
Program recording
Record control occurs automatically by defining a “timesheet” for each channel.
Auto recording
Record control occurs automatically as the input audio
level rises above and below user-defined start and stop
threshold levels. Auto record mode is not available when
using the G.729A record format.
Note: The Net-Log can record up to a maximum of
250000 tracks on each configured partition on the hard
drive. When the end of a partition is reached, recording
continues at the start of the partition – over-writing
existing data. Each time the record “loops” back to the
beginning of a partition, the track count is reset and a
further 250000 tracks are available. Once the 250000track limit is reached, subsequent recordings will be
appended to the 250000
th
track.
Manual Recording
To start recording manually, select the “Manual” tab,
choose the channel you wish to begin recording on and
press the relevant “Record Start” button. The Net-Log will
start recording and the on-screen LED will illuminate red
to indicate this.
Sonifex Net-Log User Handbook
23

5. Recording
Once recording has started, the Record Control button on
the front panel of the Net-Log will light up accordingly,
and a track list entry will also be created in the play
screen.
To stop the recording, press the “Stop” button. The Record
Control button will change accordingly and the track list
entry in the play screen will now contain an end-date and
time.
Program Recording
To set-up a program recording you must first make sure
that you have a channel enabled to do this. See the
Record Format tab of the Options screen – Section 10.
Once enabled, you can select the “Program” tab in the
Record screen. The Program Record screen will be
displayed (Figure 5.2).
This shows a time sheet for a complete week, with the
seven days of the week along the left-hand side and the
time of day along the top.
Select the record channel that you would like to program
by using the left/right arrow buttons.
The time sheet works by defining a Program number and
editing the start time and duration. The Program number
is then assigned to any of the days by selecting the
associated tick-box. Up to 20 Program numbers can be
defined.
A graphical representation of the program is displayed.
Note that if you alter a start-time or duration once
programmed, the graphic display will alter also to reflect
the changes.
Additional options are available to assist with setting up
the record programs. These options are accessed by
pressing the right mouse button whilst the cursor is
positioned over the record program screen. A popup menu
will be displayed as shown in Figure 5.3. The first two
options allows you to quickly assign the currently selected
program to either run every day or not run on any day.
The next three options can be used to clear programs.
Clearing a program resets the start time and duration to
defaults and removes all the day assignments. The last
two options allow you to make copies of programs.
Click on the “Update” button to send the program to the
Net-Log. The record start and stop times are stored on the
Net-Log and recording will now start and stop
automatically. Storing the information on the Net-Log
allows the recording to be made even if there is a network
problem at the time the recording state is due to change,
and allows everyone to see the record programs being
used.
If you need to change the program times for a particular
Net-Log, or just want to view them, the display will be
refreshed automatically when you select the Net-Log, or
you can press the “Re-load” button which gets the
information from the connected Net-Log.
If you make alterations in this screen and wish to cancel
them, then simply leave this screen, or press the “Reload” button to show the existing settings.
Figure 5.2 Program Record Screen
Figure 5.3 Program Record Popup Menu Commands
24
Sonifex Net-Log User Handbook

5. Recording
Figure 5.4 Auto Record Mode
Note: If the Net-Log is currently using a program
recording, and you update it with a new program, the
current state of the recording will reflect the new program
state. E.g. if the Net-Log is recording at 4.00pm on a
Monday and a new program is loaded at that time which
has a record stop at 3pm and record start at 5pm on a
Monday, the recording will stop. It will then restart
recording at 5pm.
Saving and Loading Record Programs
Once you have finished setting up the record programs,
you can make a copy of them on a PC. This can be
particularly useful if you have more than one Net-Log and
you want each machine to follow the same programs.
To save the complete set of record programs for the
connected Net-Log, select File, Save As from the main
menu. A dialog will be displayed allowing you to specify
the location and name of the file that will be used to store
the current program information. Once you have made
these selections, press Save.
To load a previously saved file, select File, Open and then
select the file that contains the required program
information.
Please note, you can only load and save programs whilst
in the record program screen.
Remote Recording
Recording for each channel can also be started remotely
using the 15 Pin D-Type socket found on the rear of the
unit. There are currently four record input pins that can be
assigned as momentary or latched in the Record Remotes
Option screen.
Auto Recording
To use auto recording, you must first make sure that the
auto record mode has been selected, and the auto start
and auto stop parameters have been set as required. See
the Record Format tab of the Options screen – Section 10.
To start auto recording, press the relevant “Record Start”
button. The channel display will show “Waiting for auto
start level…”, and the Net-Log will start recording
automatically when the input audio level rises above the
auto start threshold. The on-screen LED will illuminate red
to indicate when a channel has started recording.
Recording will continue until the input audio level falls
below the auto stop level threshold, at which point the
recording is provisionally ended. The input audio level
must then remain below the stop level threshold for the
period of time set by the stop duration, otherwise
recording will continue.
Once a recording has ended, the length of the new cut is
compared to the auto start duration. If the new cut length
is less than the auto start duration, it will be automatically
deleted.
The process is then repeated the next time the input audio
level rises above the auto start level threshold.
To stop auto recording at any time, press the “Stop”
button.
Sonifex Net-Log User Handbook
25

5. Recording
26
Sonifex Net-Log User Handbook

PLAYING &
6. Playing & Downloading
DOWNLOADING
Audio recorded on the Net-Log can be accessed in two
ways. Firstly, you can download a selected piece of audio
straight to your hard drive, and then play it either using
the embedded player (Figure 6.3), or for MPEG
recordings, the Windows Media Player. G.729A recordings
can only be played using the embedded player.
Alternatively, you can stream audio directly from the NetLog and listen to it whilst it plays.
6
Track List Display
The Net-Log can record up to 250000 tracks per channel.
To make it easier and quicker to find the required audio
for playback, the recorded track display is split into two
parts. The list on the left shows a summary of tracks that
exist on the selected channel, indicating the start dates
and number of tracks that were started on that date. Click
on the required date to load the list on the right with
details of each track recorded on that date. The “Refresh”
Figure 6.1 Play Download Screen
button is used to refresh both lists to include any newly
recorded tracks. Select the left/right arrow buttons to
change the channel.
The “Cut summary” list is, by default, loaded automatically
when entering the play screen, or when selecting a
different channel. In addition, both lists will be updated if
a new recording is initiated on Net-Log. This auto refresh
feature can be disabled by selecting Tools from the main
menu, and de-selecting the “Auto Refresh Cut Display”
option. It is particularly useful to have this option disabled
if you record a large number of tracks on a daily basis, as
it prevents the lists being updated every time a new
recording is made.
Play Download
Downloading can be used to get a piece of audio from the
Net-Log, which can be saved as a file for playback later or
for emailing/forwarding to a colleague or customer.
Select the “Download” tab to select the Play Download
screen (Figure 6.1). There are two methods of selecting
audio for download, by entering the start date and time
and the duration of the required piece of audio, or by
selecting a track and downloading it in its entirety.
To download a piece of audio by selecting the start date
and time, ensure the “Select audio by cut” check box is
not ticked. Then click on a track and its time and date
details are automatically entered into the Download
section. Alternatively, use the right mouse button to load
the end time and date of the selected track. This is
particularly useful for selecting audio near the end of a
track.
Sonifex Net-Log User Handbook
15

6. Playing & Downloading
The start time, start date and duration can be altered to
get the exact piece of audio required. You can also use the
end date and time controls to set the effective duration of
the required audio. Highlight the hour, minute, second,
day, month, or year and by using the up and down spin
wheels to alter the value. Alternatively, you can enter the
required value directly.
The file size is calculated as you change the duration and
is displayed below the time and date selection boxes.
To download a complete track, ensure the “Select audio
by cut” check box is ticked and select the track to
highlight it ready for downloading. Multiple tracks can be
selected by holding down the Ctrl key on the keyboard
and clicking on additional tracks.
Once you have made your selections for play download,
press the “Start” button, and if a destination file has been
selected the download will start. Otherwise you will be
asked to specify a destination file and then the download
will start automatically.
The file name for the download can be automatically
generated by selecting the “Generate file name from cut
details” check box. In this mode, the file name will be
based in the start date, start time and duration of the
selected piece of audio. When the “Start” button is
pressed, the file is created automatically and the download
will begin. To use this option, you must have a default
directory selected. Press the “Default directory” button to
choose the directory where the file will be placed.
For tracks recorded using the MPEG format, the file is
created with either a .wav or .mp2 suffix depending on the
file type selected. For G.729A tracks, the file extension will
be .g7a (see Play File for file type description). MPEG
recordings can be played either with the embedded player
(Figure 6.3), Windows Media Player or any other capable
software. G.729A recordings however, can only be played
on the embedded player, as Windows Media Player does
not support this format.
Play Stream
Select the “Stream” tab to select the Play Stream screen
(Figure 6.2). Select the left/right arrow to change the
channel. Only one mono or stereo channel can be played
at any one time. Select the track that contains the piece of
audio that you want to stream.
The start time will be entered in the Stream section of the
display. Alter the time and date of the track to the time
and date of the recording that you wish to hear.
Press the “Play” button to hear the audio. It will take a
few seconds to access the audio from the Net-Log and to
steam it across your network. The Recorded Time and
Recorded Date are displayed during playback.
You can use the “Pause” and “Stop” buttons to pause and
stop the audio respectively. The slider on the right can be
used to alter the volume of playback and the “00” button
is used to reset the “Play Duration” counter.
Pressing the “Stop” button will recue the audio back to the
“Play from …” time and date.
Figure 6.2 Play Stream Screen
16
Sonifex Net-Log-Win User Handbook

6. Playing & Downloading
Figure 6.3 Play File Screen
Play File
Select the “File” tab. The Play File screen shown in Figure
6.3 is for playing archived or downloaded files. The screen
layout is similar to the Play live screen.
The Play File screen is split into two parts; play control
and the play list. Audio files are loaded into the play list by
pressing the “Open…” button, and selecting the required
file(s). Audio files of all supported formats can be loaded
into the play list. Single entries in the play list can be
deleted by highlighting the entry and pressing the “Delete”
button. Alternatively, the whole play list can be cleared by
pressing the “Clear” button.
To play the current play list, press the green “Play”
button. Play starts at the entry highlighted in the play list
and continues to the end of the list. There are other
controls including next/previous track select, seek, pause
and stop with an extra control for altering the playback
speed of the file. This is situated alongside the volume
control. The volume control is equivalent to the Wave
Output volume control on the Windows Mixer, usually
situated in the Windows System Tray.
When an MPEG file is archived or downloaded from the
Net-Log, the file can be created as either a raw mpeg data
file (.mp2), or as a broadcast wave format file (.wav).
Creating a broadcast wave format (bwf) file allows
additional information about the recording to be stored
and recalled on playback. Creating an mpeg file doesn’t
allow this information to be recorded. G.729A files are
created with this additional information automatically
included.
The MPEG bwf and G.729A recordings contain information
specific to the file, including the recording format of the
file, the origination time of the file, the MAC Address of
the Net-Log that it was recorded on and the name of the
recording, etc. The origination time and date of the file,
together with the file name and file duration, are displayed
when the corresponding entry in the play list is selected or
played.
Sonifex Net-Log User Handbook
17

6. Playing & Downloading
18
Sonifex Net-Log-Win User Handbook

ARCHIVING
7. Archiving
7
Figure 7.1 Archive Options Screen
The Archiving Process
Archiving is the process of getting Net-Log to automatically
and continuously create audio files (.wav, .mp2 or .g7a files)
on a selected drive or device. Long recordings can be reformatted into smaller files of a fixed duration for ease of
use.
Typically, this is so that a long-term archive of recorded
material can be stored on a separate hard-drive, such as on
a server, where many people can access historic files
without interfering with the operation of the Net-Log.
Additionally, the server could then be used to make
permanent archives on to CD-R, DAT, or DVD-R, using
conventional low-cost IT technology.
Configuring Archival To A Networked PC
Enter the Options screen and select the “Archive” tab
(Figure 7.1). To configure the options correctly you need to
know the IP Address of the networked PC and the
designated share name of the folder to which you want to
archive to. You must also have write access to this folder.
Archiving is configured for individual recording channels, or
pairs of channels, depending on the recording options
settings. For each channel, the following settings should be
configured:
Alarm Enabled
This option allows you to disable the archive warnings and
alarms. It is primarily for users who don’t wish to use
Archiving and therefore don’t want the distraction of having
the archive warnings and alarms activating when data is
overwritten.
Buffer Size
The buffer size (5-1000Mbytes for MPEG, 1–200Mbytes for
G.729A) is the amount of un-archived data stored on the
Net-Log before archiving will start. If you set the buffer to
150MB, the Net-Log waits until it has that much data before
it archives to the selected destination. The size of the buffer
you select is really dependent on network activity. If your
network is quite busy you might want to set the buffer at a
relatively low size (5-50MB).
Warn Time
In normal operation, the Net-Log records continually,
overwriting information initially recorded on the drive when
it reaches the end. The warn time is the amount of time
prior to data loss on the Net-Log (5 mins to 14 days) and
provides a warning that data will soon be overwritten which
has not been archived. Once data is overwritten, the archive
alarm will activate. Please note that if you have a busy
network you should set this time quite high to give enough
time to archive the data. This option has no effect if the
Alarm Enabled option is disabled.
Sonifex Net-Log User Handbook
19

7. Archiving
Arrange Archive Audio into Fixed Duration Files
When this box is ticked, the audio transferred from the NetLog to the archive destination drive will be split into fixed
length files, determined by the Target File Duration option.
Without this option enabled, the audio files will appear on
the archive destination drive as they do on the Net-Log.
Target File Duration
This is the duration (5 – 60mins) of the files that will be
created on the destination drive. For example, if it is set to 5
minutes then the files on the target drive or device will be of
a five-minute duration. This option is only valid when the
“Arrange Archive Audio into Fixed Duration Files” box is
ticked.
File Type
This determines the type of file that is created (.wav, .mp2
or .g7a).
Destination IP Address
This is the IP Address of the PC on the network that you
want to archive to.
Target Folder Share Name
This should be set to the share name of the folder where
you want the archives to be stored at the destination IP
Address. Only the share name should be entered, not the
path of the shared folder. To find the share name, locate the
target folder in Windows Explorer, the right click on this
folder and select “Sharing” from the popup menu. When the
archive begins, sub-folders will be created automatically.
Auto Purge on Record Stop Enabled
When this box is ticked, all available audio is archived each
time a recording is ended.
Once you are happy with the settings, press the “Update”
button, and they will be written to the Net-Log shown in the
Net-Log selector.
Format of Archived Files
The archived files are stored in sub-directories beneath the
directory name that you have defined. The format is
(depending on the selected file type):
\IP Address\Service Name\dd-mm-yyyy\hh-mm-ss.wav
or
\IP Address\Service Name\dd-mm-yyyy\hh-mm-ss.mp2
or
\IP Address\Service Name\dd-mm-yyyy\hh-mm-ss.g7a
Where IP Address is the Net-Log’s IP Address, Service Name
is that defined in the Service Name tab of the Options, ddmm-yyyy represents the date of the recording in daymonth-year format and hh-mm-ss is the start time of the
recording in hours-minutes-seconds format.
Beginning to Archive
To start archiving, select the Archive screen and press the
“Archive Start” button (Figure 7.2) for the particular
channels that you wish to archive. The LED in the button will
illuminate when data is being archived (i.e. transferred from
Net-Log to the PC).
If you want to stop the archive process, simply select the
“Stop” button.
Note: You can only archive audio data from the Net-Log that
you are currently logged on to. If you disconnect, all
archiving will stop. See section 8 – Auto archive, for details
of how to archive data from one or more Net-Logs
simultaneously and without having to logon/logoff.
Figure 7.2 Archive Screen
20
Sonifex Net-Log-Win User Handbook

8. Auto-Archive
AUTO-ARCHIVE
8
Introduction
Net-Log Auto-Archive is a utility designed to improve the
usability of the ‘Archive’ function of Net-Log.
Using Net-Log-Win to archive material from a Net-Log
unit to a PC/Server requires a user to manually log-on to
the Net-Log, initiate archiving and remain logged-on for
the duration of the archive process. Whilst this is
satisfactory for most set-ups with one Net-Log unit, a
more automated solution is required for installations of
two or more Net-Log units.
Net-Log Auto-Archive can be used with up to twenty NetLogs simultaneously, automatically logging-in, archiving
the available material and logging-out.
Licensing
When connecting to a Net-Log unit, an available stream
Figure 8.1 The Status Screen
Figure 8.2 The Net-Log List
licence is required to perform the archiving process.
Using Net-Log-Win, it is suggested that a user (such as
User20) is defined as having ‘Archive Control’ and ‘Record
Control’, but no ‘Play Control’. Auto-Archive will then
only use one stream licence when connected to a Net-Log
unit.
The Net-Log List
The Net-Log Auto-Archive screen displays the defined list
of Net-Log unit down the left side. When a particular unit
has been logged-on, the username is displayed in
brackets. See Figure 8.2. This list can be edited by
selecting ‘Tools->Option..’ from the menu.
The Status Bar
The status bar has transmit (Tx) and receive (Rx)
indicators, which can be viewed to confirm the connection
to the selected Net-Log.
Performance
Please note that the performance of Auto-Archive
depends upon the network and PC architecture, number
of Net-Log units and the bit rate of the archives being
created.
Sonifex Net-Log User Handbook
21

8. Auto-Archive
Set-up
Net-Log units are equipped with 10mb/s network
interfaces that should be connected directly to a 10/100
or 10/100/1000 capable Ethernet switch.
The archiving PC/server should be fitted with at least a
100mb/s network interface. If possible use a 1000mb/s
network interface, especially if multiple Net-Logs are
being archived with high bit rates (e.g. 384kb/s stereo, or
192kb/s mono).
These options are used to configure the sending of the emailed status reports.
o SMTP Address – TCP/IP address of your e-mail
server.
o Port – TCP/IP port for SMTP (usually ‘25’)
o Address To – E-mail address of recipient. Must
contain only one address and in the format:
user@your-company.com
o Address From – E-mail address of sender in the
format: user@your-company.com
and ‘>’)
This can be useful when multiple copies of Net-
Log Auto-Archive are in use.
(including ‘<’ and ‘>’)
(including ‘<’
Figure 8.3 The Settings Screen
o Interval – Interval (in hours) between sending of
Status Reports. Suggest setting this between ‘6’
and ‘24’ hours.
o E-mail Status Report – option to send/not send
Status Reports.
o E-mail Error Report – option to send/not send
Error Reports.
o E-mail ‘Archive Warn’ – option to send/not send
‘Archive Warn’ reports.
o E-mail ‘Archive Alarm’ – option to send/not send
‘Archive Alarm’ reports.
Auto-Delete Archives
If Auto-Delete is enabled, previously archived material
will be deleted after the specified number of days.
Device List
Define you list of Net-Log units using the ‘Add’, ‘Replace’,
and ‘Delete’ buttons. To enable successful archiving on
each Net-Log, be sure to use the username and password
that has ‘Archive Control’ rights. See the Net-Log-Win
user manual for more information on users and rights.
When connecting to a Net-Log unit, an available stream
licence is required to perform the archiving process.
Using Net-Log-Win, it is suggested that a user (such as
User20) is defined as just having ‘Archive Control’ and no
‘Play Control’, and this user used by Net-Log AutoArchive.
Please refer to your Net-Log user manual for information
regarding licensing and users.
22
Sonifex Net-Log-Win User Handbook

8. Auto-Archive
The Status Screen
The Status screen displays the current known status of
each defined Net-Log unit. See Figure 8.4.
If auto-login and/or
also shows
each Net-Log unit.
To view the Status Screen, press the
‘Status’ button on the toolbar.
auto-logout are enabled, this screen
the log-in and log-out countdown timers for
Figure 8.4 The Status Screen
The Control Screen
The Control Screen can be used to start and stop
recordings, and also start and stop the archive process
on each of the designated Net-Log units. See Figure 8.5.
Archive LED states:
• Flashing Yellow : Archive Pending
• Steady Yellow : Archive Active
• Flashing Red : Archive Warn
• Steady Red : Archive Alarm
• Off : No Archive Pending
Figure 8.5 The Control Screen
To view the Control Screen, press the
‘Control’ button on the toolbar.
The Archive Screen
The Archive Screen can also be used to control the
archive process of the currently selected Net-Log. See
Figure 8.6.
This screen also shows record parameters, and displays
the filenames of archives currently being written to disk.
To view the Archive Screen, press the
‘Archive’ button on the toolbar.
Sonifex Net-Log User Handbook
Figure 8.6 The Archive Screen
23

8. Auto-Archive
Figure 8.7 The Event Log Screen
The Event Log Screen
The Event Log Screen lists noteworthy events in
chronological order. See Figure 8.7.
Such events include:
connections/disconnections with Net-Log units
•
portant information regarding failure to
• im
• confirmation of sent email reports
perly archive material
pro
To view the Even tLog Screen, press the
‘EventLog’ button on the toolbar.
Reports
There are four types of e-mailed reports available from
Net-Log Auto-Archive.
Status Report
The general Status Report includes information regarding
the known current state of all defined Net-Log units,
including Login/logout timings and audio input status.
This report can be generated manually by pressing the
‘E-Mail’ report button on the toolbar.
Error Report
Error reports are generated when a communication error
has occurred with a single Net-Log unit. The error type
will be included within the report. Whilst some of these
errors will be critical (such as ‘Connection Error’), some
are not (such as ‘User Unavailable’)
Possible Errors
o ‘Invalid Username’ – username is not recognised
by Net-Log unit. Check Options.
o ‘Invalid Password’ – password is not recognised
by Net-Log unit. Check Options.
o ‘User Unavailable’ – user is already logged-in.
Check connected users with Net-Log-Win.
o ‘No/Bad Response’ – connection broken. Check
network cabling.
o ‘No Valid Licenses’ – Net-Log has not been
licensed. Use Net-Log-Win to issue licence.
o ‘Valid licenses in use’ – all licences are in use.
o ‘Connection Error’ – unable to connect to Net-
Log. Check network cabling.
o ‘No Disk Space!’ – archive target has no useable
space remaining. Change archive destination or
make some space available.
‘Archive Warn’ Report
‘Archive Warn’ reports are generated when a Net-Log
input channel is about to overwrite material that has not
yet been archived. This usually happens when the input
channel has not been ‘Archive Enabled’.
‘Archive Alarm’ Report
‘Archive Alarm’ reports are generated when a Net-Log
input channel is overwriting material that has not been
archived. This usually happens when the input channel
has not been ‘Archive Enabled’.
24
Sonifex Net-Log-Win User Handbook

SERIAL CONTROL
INTERFACE
9. Serial Control Interface
9
Figure 9.1 Control Options Screen
Figure 9.2 Televic CE2500 Interface Options
The Serial Control Interface allows external equipment to
remotely control several functions of the Net-Log. Each of
the available interface protocols have been designed
according to customers’ specific requirements. Additional
interface options may be added in the future; please
contact Sonifex Ltd for further details.
To enable the Serial Control Interface, enter the Options
screen and select the “Control” tab (Figure 9.1). From
the drop down list, select the required Control Interface
type. If the drop down list is disabled, this means the
firmware in the connected Net-Log has not got the Serial
Control Interface enabled, or a later version of firmware is
required.
The Interface types currently available are:
Televic CE2500
AMX/Crestron
When a Control Interface type is selected from the list, the
available settings for that type will then be displayed.
Televic CE2500 Interface
The Televic CE2500 is the central control unit of Televic’s
Digital Conference and Interpretation System. This
interface provides automatic record start when the
Conference Systems’ microphones are activated. The
recording is then stopped when the microphone is
deactivated. The Net-Log also extracts the microphone
number and the name of the speaker from the microphone
activation command and stores this information on the
internal hard disk along with the normal cut information.
This additional data is then displayed in the Play screens
cut list. The Net-Log can currently support up to 128
microphones.
The settings relating to this interface allow the available
record channels to be associated with specific microphone
numbers. Each channel is displayed according to the
Record option settings. In Figure 9.2, Audio Input 1 is
configured as stereo and Audio Input 2 is configured as
dual mono. Each available channel is identified by the
service name also given in the Record options.
Each channel can be configured in one of three modes:
Note: Only one microphone number and name can be
stored per recording, so the last one used is stored.
Disabled
When this option is selected, the channel will not be
controlled by any of the microphones on the Conference
System.
Sonifex Net-Log User Handbook
25

9. Serial Control Interface
Single mic
This selection configures the associated channel to be
controlled by a single microphone. The microphone’s
identification number can be entered in the edit box.
Alternatively use the up/down arrows to select the
required identification number. The lowest microphone
number is 1 and the highest is 128.
Mic range
This selection configures the associated channel to be
controlled by a range of microphones. Activating any one
of the microphones in the specified range will start the
channel recording. The channel will only then stop
recording when all microphones in the range have been
deactivated. Again the lowest microphone number is 1 and
the highest is 128.
The settings for Single mic and Mic range can overlap such
that a microphone can control multiple record channels.
Once the required settings have been entered, press the
“Update” button, and they will be written to the Net-Log
shown in the Net-Log selector.
The cut list display in the Play screen in Net-Log-Win will
now show two additional columns: Mic and Name (see
Figure 9.3). These new columns display the Mic number
and the Name of the speaker who initiated the recording.
When the Net-Log is powered up with the Televic CE2500
Interface selected, it waits to receive a synchronisation
command from the CE2500 before it will execute any
further commands. This is to ensure that if any of the
microphones are currently activated, and have been
previously associated with a record channel, recording is
started on the relevant channel. The synchronisation
commands are issued by the CE2500 every 5 seconds.
If an attempt is made to stop recording manually in NetLog-Win on a channel that is associated with an active
microphone, a warning message will be displayed in NetLog-Win.
An alternative method of controlling the recording can be
used when using the Televic CE2500 Interface. This is
done by utilising the closing contact controlled by the
AOP2500 Analog Output device. This contact is closed
when any of the microphones is activated and remains
closed until all microphones are deactivated.
By setting all available microphone options to “Disabled” in
the Control Options screen, serial control of record start
and stop is disabled. Note that the microphone number
and name are still recorded in this mode, but because only
one closing contact can be used by the AOP2500, only one
channel can be recorded, so the microphone number and
name are appended to the last recording.
The closing contact on the AOP2500 can then be used to
control the remote inputs on Net-Log. See “Record
Remotes” in Section 10 for more details on setting up the
remote inputs and Section 13 for the pin descriptions of
the remote connector.
Figure 9.3 Additional Play Cut List Columns
26
Sonifex Net-Log-Win User Handbook

9. Serial Control Interface
Televic CE2500 Protocol
The serial settings on Net-Log for the Televic CE2500
interface are as follows:
Serial port: COM2
Baud rate: 19200
Data bits: 8
Stop bits: 1
Parity: none
Flow control: none
The Net-Log responds to 7 of the serial commands issued
by the CE2500 unit. These commands share a common
structure:
STX ID DATA CRC ETX
where:
STX is the start transmit character ‘%’ (0x25)
ID is a single character which identifies the command
DATA is text associated with the command
CRC is the 16 bit sum of the ASCII chars STX, ID & Data
ETX is the end transmit character (0x0D)
Examples of the 7 commands are as follows:
System synchronisation
“%S0001000201D6\r”
“%” is the start of transmit character (0x25)
“S” indicates command type
“00010002” indicates that mics 1 and 2 are active (0000
for no mics active)
“01D6” is the 16 bit CRC
“\r” is the end of transmit character (0x0D)
President microphone activation
“%P0001Mr John Smith05A4\r”
“%” is the start of transmit character (0x25)
“P” indicates command type
“0001” indicates the microphone number
“Mr John Smith” is the speakers name
“05A4” is the 16 bit CRC
“\r” is the end of transmit character (0x0D)
President microphone deactivation
“%p00010131\r”
“%” is the start of transmit character (0x25)
“p” indicates command type
“0001” indicates the microphone number
“0131” is the 16 bit CRC
“\r” is the end of transmit character (0x0D)
Delegate microphone activation
“%M0002Mr Joe Bloggs058D\r”
“%” is the start of transmit character (0x25)
“M” indicates command type
“0002” indicates the microphone number
“Mr Joe Bloggs” is the speakers name
“058D” is the 16 bit CRC
“\r” is the end of transmit character (0x0D)
Delegate microphone deactivation
“%m0002012F\r”
“%” is the start of transmit character (0x25)
“m” indicates command type
“0002” indicates the microphone number
“012F” is the 16 bit CRC
“\r” is the end of transmit character (0x0D)
Sonifex Net-Log User Handbook
27

9. Serial Control Interface
Deactivate all microphones
“%V00000116F\r”
“%” is the start of transmit character (0x25)
“V” indicates command type
“0000” indicates no mics active
“0116” is the 16 bit CRC
“\r” is the end of transmit character (0x0D)
System reset (deactivate all microphones)
“%R0052\r”
“%” is the start of transmit character (0x25)
“R” indicates command type
“0052” is the 16 bit CRC
“\r” is the end of transmit character (0x0D)
AMX/Crestron Interface
The AMX/Crestron interface provides simple record control
and monitoring for the AMX/Crestron range of Control
Panels. These control panels provide a flexible user
interface that can be used in addition to the client PCs
running Net-Log-Win.
There are no additional configuration options for this
interface type. The COM port settings and the protocol
commands are fixed.
AMX/Crestron Protocol
The serial settings on Net-Log for the AMX/Crestron
interface are as follows:
Serial port: COM2
Baud rate: 19200
Data bits: 8
Stop bits: 1
Parity: none
Flow control: none
The Net-Log recognises 5 serial commands issued by the
AMX/Crestron Control Panel. These commands share a
common structure as shown:
CMD DATA NL CR
where:
CMD is the command identifier
DATA is the data associated with the command
NL is the new line character (0x0A)
CR is the carriage return character (0x0D)
The Net-Log issues a reply to all valid commands received.
The type of reply depends on the type of command
received. For non-data request commands, the reply will
either be an acknowledgement or an error code. For data
request commands, the reply will consist of the data
requested.
Record Start Command
Command: “START:ch\n\r”
Reply: “ACK\n\r” or “ERR:ee\n\r”
where: START: = command identifier
ch = channel 1,3 for stereo or 1,2,3,4 for mono
\n\r = new line(0x0A) and carriage return(0x0D)
ACK = command accepted
ERR: = command rejected
ee = error code (see below for error codes)
28
Sonifex Net-Log-Win User Handbook

9. Serial Control Interface
Record Stop Command
Command: “STOP:ch\n\r”
Reply: “ACK\n\r” or “ERR:ee\n\r”
where: STOP: = command identifier
ch = channel 1,3 for stereo or 1,2,3,4 for mono
\n\r = new line(0x0A) and carriage return(0x0D)
ACK = command accepted
ERR: = command rejected
ee = error code (see below for error codes)
Status Command
Command: “STATUS\n\r”
Reply: “STATE:s1,s2,s3,s4,a1,a2,a3,a4,da\n\r”
where: STATUS = command identifier
\n\r = new line(0x0A) and carriage return(0x0D)
STATE: = reply identifier
s1 – s4 = record channel status 0=not recording,
1=recording,2=unavailable
a1 – a4 = archive channel alarm status 0=no
alarm,1=alarm activated,3=unavailable
Time Command
Command: “TIME:ch\n\r”
Reply: “TIME:ch,t1,t2\n\r”
where: TIME: = command and reply identifier
ch = channel 1,3 for stereo or 1,2,3,4 for mono
\n\r = new line(0x0A) and carriage return(0x0D)
t1 = length of current recording in dd.hh.mm.ss
t2 = time to data overwrite in dd.hh.mm.ss
Date Command
Command: “DATE\n\r”
Reply: “DATE:dd/mm/yyyy hh.mm.ss\n\r”
where: DATE = command identifier
\n\r = new line(0x0A) and carriage return(0x0D)
DATE: = reply identifier
dd/mm/yyyy = current date of Net-Log in GMT
hh.mm.ss = current time of Net-Log in GMT
Reply Error Codes
The following error codes are used for non-data request
commands (START and STOP):
1 = invalid channel
2 = disabled channel
3 = illegal channel
4 = channel already in requested state
Sonifex Net-Log User Handbook
29

9. Serial Control Interface
30
Sonifex Net-Log-Win User Handbook

OPTIONS
10. Options
10
Figure 10.1 Record Options
The Options screens are used for initially configuring the
Net-Log before recording. All of the options should be set
before Net-Log starts recording, as some of them can not
be altered once recording has started.
Record
This screen (Figure 10.1) displays the current settings of
the two input channels, and also allows them to be changed.
Each input is independent of the other, although when they
are set-up for dual mono recording, the two mono channel
record settings cannot be configured individually.
Disable
Disables the channel.
Override Enabled
Enables this channel to be controlled by the Record Control
button on the front of the Net-Log.
Format
Selects the record format, either MPEG or G.729A. Any
existing tracks must be deleted from all channels before the
record format can be changed. To use the G.729A record
format, an additional license must be purchased from
Sonifex Ltd.
Mode
In Manual mode, recording is started and stopped via the
Record Start button in the record screen.
In Program mode recording is automatically started and
stopped according to the program for that particular
channel. Note: If the mode is set to Manual mode, the
Program record screen will not be available.
In Auto Start Mode, recording is started and stopped
automatically as the input audio level passes through
threshold level settings. Auto Start mode is not available for
channels configured to use the G.729A record format.
Channels
Channel format i.e. stereo, mono or dual mono. For G.729A
channels, only mono or dual mono configurations are
available.
Sample Rate & Bit Rate
Selects the recording parameters for that Input. These
settings are only relevant to MPEG configured channels.
When selecting the recording bit-rates for the two pairs of
channels, it is important to refer to the maximum number of
network connections in Chapter 3.
Start Level
Defines the auto recording start threshold level in dB. When
the input audio level rises above this value, recording
automatically starts.
Sonifex Net-Log User Handbook
31

10. Options
Start Duration
Sets the minimum track length in seconds for auto
recording. Tracks that are shorter than this value are
automatically deleted.
Stop Level
Defines the auto recording stop threshold level in dB. When
the input audio level falls below this value, recording
provisionally stops.
Stop Duration
Sets the period of time that the input audio level must stay
below the stop threshold level to complete the end of an
auto recording. This value is in seconds.
Service Names
You can give names to the particular recording channels for
easier identification These names are displayed on the
record, archive and play screens and will also be stored in
the MPEG BWF or G.729A header of an archive or download
file.
Note that once recording has started on a channel, the
record format cannot be changed until recording has
stopped and all track/s have been deleted.
Record Capacity
The slide bar at the bottom of the record options screen
allows you to select the hard drive partition size for each
input. The partition size is the amount of space allocated to
each input for storing audio. The bigger the partition the
more space is available, allowing for longer recordings. If an
Audio Input is set to Mono (Dual), each mono channel will
share equally the space allocated for that input.
The duration of the audio recorded to each partition is
calculated and displayed. To change the duration for a fixed
partition size using MPEG as the record format, the Bit Rate
should be set to a new value. A lower Bit Rate means a
longer duration and, conversely, a higher Bit Rate means a
shorter duration.
Archive
This screen (Figure 10.2) displays the current settings for
archiving from the Net-Log. See Chapter 7 for more detailed
information.
Alarm Enabled
Allows data loss warnings and alarms to be disabled.
Buffer Size (Mbytes)
Amount of data that has to be available before archiving can
start.
Warn time prior to data loss
Amount of time prior to data loss occurring that a warning is
activated.
Arrange Archive Audio into Fixed Duration Files
Formats the archived audio into fixed duration files.
Target File Duration (mins)
The length of the target files. (5 - 60 minutes)
Target File Type
The type of files that are created. The options available for
this setting will change depending on the record format
selected for this channel.
Figure 10.2 Archive Options
32
Sonifex Net-Log-Win User Handbook

10. Options
Figure 10.3 Record Remotes Options
Destination IP Address
The IP Address of the destination computer.
Target Folder Share Name
The share name of the destination folder on the target
computer.
Auto Purge on Record Stop Enabled
Automatically downloads all outstanding audio on a channel
when the recording is stopped.
Note that some of the settings cannot be changed while
archiving is active for a channel.
Record Remotes
This screen (Figure 10.3) displays the current settings of
the record remote inputs for the Net-Log. The two pairs of
audio input channels can be set-up independently. There are
three settings for the remotes, and these are:
Disabled
The remote inputs are disabled for this channel.
Momentary
While the specific pin is connected to ground this channel
will be recording.
Latching
Connecting the specific pin to ground for half a second will
cause the Net-Log to start recording on that channel. Doing
this again will cause it to stop recording.
For information on the remote connector pin connections,
please refer to the Technical Specifications - Section 13.
This screen also displays the current settings for the Alarm
Relay. The remote connector has a pair of contacts that
become connected/disconnected when an alarm condition
occurs.
Normally Off, Switched On For Alarm Condition
The contacts on the remote connector are connected when
an alarm condition occurs.
Normally On, Switched Off For Alarm Condition
The contacts on the remote connector are disconnected
when an alarm condition occurs.
Clock Source
When updating the RTC clock, the Net-Log gets it’s source
from either the clock of the connected PC, or the Sonifex
Mentor Server (Figure 10.4). For more information about
how Net-Log uses the time settings see Chapter 11.
Figure 10.4 Clock Source Options
Sonifex Net-Log User Handbook
33

10. Options
Control
This screen (Figure 10.5) displays the currently selected
serial Control Interface. If any additional options exist for
an interface, these will be displayed when the relevant type
is selected. The current options are:
No Control/Interface Selected
The serial Control Interface is disabled.
Televic CE2500
The Serial Control Interface is configured for connection to
the Televic CE2500 Digital Conference and Interpretation
System. Additional options are displayed for configuring the
available record channels to be controlled by specific
microphones (see Figure 10.6).
AMX/Crestron
The Serial Control Interface is configured for connection to
an AMX/Crestron Control Panel. There are no additional
options for this interface type.
Information
This screen (Figure 10.7) displays general information
about the Net-Log. The Network settings are the MAC
Address, IP Address, Subnet Mask and Default Gateway for
the connected Net-Log. The administrator can change all
these settings (except the MAC address) by selecting the
Network Settings menu in the administrator menu or by
using the Net-Log-Win serial utility, whereby the settings
are downloaded to the Net-Log via the serial port. The MAC
Address is also stored in the BWF header of an archive or
download file.
The Disk Drive Info shows the Model, Serial Number,
Firmware Revision and Capacity of the disk drive.
Saving and Loading Options
Once you have finished setting up the options, you can
make a copy of them on a PC. This can be particularly useful
if you have more than one Net-Log and you want each
machine to share a similar configuration.
To save the options for the connected Net-Log, select File,
Save As from the main menu. A dialog will be displayed
allowing you to specify the location and name of the file that
will be used to store the current configuration information.
Once you have made these selections, press Save.
To load a previously saved file, select File, Open and then
select the file that contains the required configuration
information.
Please note, you can only load and save options whilst in the
options screens.
Figure 10.5 Control Interface Options
Figure 10.6 Televic CE2500 Control Options
34
Sonifex Net-Log-Win User Handbook
Figure 10.7 System Information

THE
11. The Administrator
ADMINISTRATOR
Figure 11.1 Net-Log Administrator Menu
Figure 11.2 Accounts Editor
Figure 11.3 Function View
Figure 11.4 Function Control
There are several operations that can only be accessed by
the administrator. These include the License entry and
Accounts editor screens and they are all accessed through
the Administrator menu. (Figure 11.1).
Licences
This screen displays how many users the Net-Log is
licensed for and also allows the administrator to enter
more licences. (See Figure 4.2)
Accounts Editor
The Accounts Editor (Figure 11.2) can be accessed via
the Administrator menu option and is used to set-up or
change accounts for users who connect to the Net-Log.
Below are all the default usernames. Initially the user
name and passwords are the same – these can (and
should) be altered once the software is running.
“admin”
This is the Administrators login. The administrator is in
charge of defining user profiles and configuring the
settings of the Net-Log.
“user1” to “user25”
Up to 25 users can be defined in the software. Each user
can be given different access rights for each function –
these are described in more detail below.
“guest”
Guest entry allows playback only.
These password settings are stored on the Net-Log
machine currently being connected to, so if you have a
number of machines, you can change user access to each
machine individually.
Function Access – View
There are four check boxes associated with this restriction
control (Figure 11.3) If checked, the currently selected
user will be able to view that specific function but will not
be able to change the operation of that specific function in
any way.
Note that the administrator will always have view access
to configuration and that this cannot be changed.
Function Access – Control
There are three check boxes associated with this
restriction control (Figure 11.4). If checked, the currently
selected user will be able to view and control that specific
function.
Note that only one person can have access to archive
control and by default this is the administrator.
11
Sonifex Net-Log User Handbook
35

11. The Administrator
User Name & Password
To change a user name or password, select the user
whose details you wish to change and type in a new name
or password (Figure 11.5).
Note that all the changes made will only take effect when
the “Update” button is pressed. If “Abort” is pressed then
the changes are lost.
The Onboard Clock
The Net-Log uses an accurate onboard real time clock
(RTC) to record the start & stop times of cuts and to start
& stop record programs. This time is stored on the NetLog in UTC format which is identical to Greenwich Mean
Time and is unaffected by any summer or daylight saving
time schemes.
The accuracy of the RTC is +/– 1.53 minutes per month.
This equates to about 3 seconds per day. During long or
continuous recordings, an error can develop between the
actual time a piece of audio is recorded, and the time used
from the RTC to reference the cut. In a worst case
scenario, when the RTC is running slightly slow with
respect to real time, the audio at the end of a long
recording could be unavailable. This is because the time
stamp taken from the RTC for the end of the cut would be
earlier than the actual time the cut ended. To overcome
this, the Net-Log firmware determines whether the RTC
derived time for the end of a recording differs from the
time the Net-Log calculates the cut should end at. This
calculation is made using the start time and length of the
recording. Future play or archive accesses to this cut will
then use this error figure to bias the search calculation so
that the whole cut is accessible.
If the RTC has drifted, then the start time of any new cuts
will not be a true reflection of the actual time the
recording was started. If the start time for a recording is
inaccurate, the time displayed when playing the recording
and when searching within it will also be inaccurate. Also,
if program record mode is used, the automated record
starts/stops will not happen at exactly the right time. It is
important therefore, to regularly update the RTC if
accurate audio to time synchronisation is required.
Updating The Onboard Clock
The onboard clock can be updated at any time. If an
update occurs whilst a channel is recording, and the
difference between the current RTC and the time update is
greater than two seconds, the recording will stop prior to
the clock update. Once the clock has been updated, a new
recording will automatically begin. This is done to reduce
the error correction required when searching for audio. It
also happens so quickly that you will not lose any audio.
However there will be a time difference between the two
recordings.
There are two options for RTC clock updates. The first is to
update Net-Log with the time currently set on the
connected PC. This is an administrator only function and it
is not automatic. The second option is to automatically
synchronise the onboard clock to a specific PC using the
Mentor software. It is advisable to have the clock on the
PC running the Mentor server accurately maintained from
an external source. The Mentor software will then
distribute the time information to multiple Net-Logs every
30 minutes.
Figure 11.5 Select or Edit User Name & Password
36
Sonifex Net-Log-Win User Handbook

11. The Administrator
Whichever update method is used it is very important that
any PC used to connect to Net-Log is set for the right Time
Zone. Otherwise, the conversion between UTC and local
time that Net-Log-Win performs for all time related data,
will be incorrect. This is set in the PC Control Panel setting
for Date/Time.
It is possible to force a clock update for either of the two
clock options by selecting the Administrator menu (Figure
11.1), and then Update Onboard Clock. If you are using
the PC clock option and you want to keep the Net-Log
clock accurate to within 10 seconds, you will need to do
this every 2-3 days.
Network Settings
To change the Network Settings of the Net-Log simply
enter the administrator menu and select the Network
Settings menu. The screen (Figure 11.6) shows the
current settings and next to these are a series of edit
boxes where the new settings should be typed. When they
have been entered simply press the “Update” button, the
settings will then be downloaded to the Net-Log and the
application will shut down. Once the Net-Log has re-
initialised with new settings you can restart Net-Log-Win.
You may need to change the IP Address of the unit in the
device editor before you can attempt to log onto the Net-
Log.
Updating Firmware
From time to time updates will be made available to keep
the Net-Log running smoothly and reliably. To update the
firmware contained in the Net-Log simply select the
“Firmware Update” option in the Administrator menu, you
will then be given a warning and asked to confirm your
action. If “Ok” is pressed, you will then have to select the
update file (.dwn suffix). Once this has been done you will
be taken to the Net-Log Update Firmware screen. Press
the “Transfer” button and the file will then be transferred
onto the hard drive contained on the Net-Log (Figure
11.7).
Please note that you can still abort the update even after
the transfer has been completed. To commence the actual
update, press the “Transfer” button again. The System
ROM is then erased and programmed with the updated
software (shown by the Record Control button on the front
of the Net-Log being lit), after which the Net-Log will
restart and is ready for use again. Note that updating the
firmware can also be done using the Net-Log serial utility.
Resetting The Net-Log
This option is a sub menu of system in the administrator
menu. This is used to restore all the configuration settings
to factory defaults. It also deletes all the tracks contained
on the Net-Log.
Figure 11.6 Network Settings
Figure 11.7 Upgrading Firmware
Sonifex Net-Log User Handbook
37

11. The Administrator
38
Sonifex Net-Log-Win User Handbook
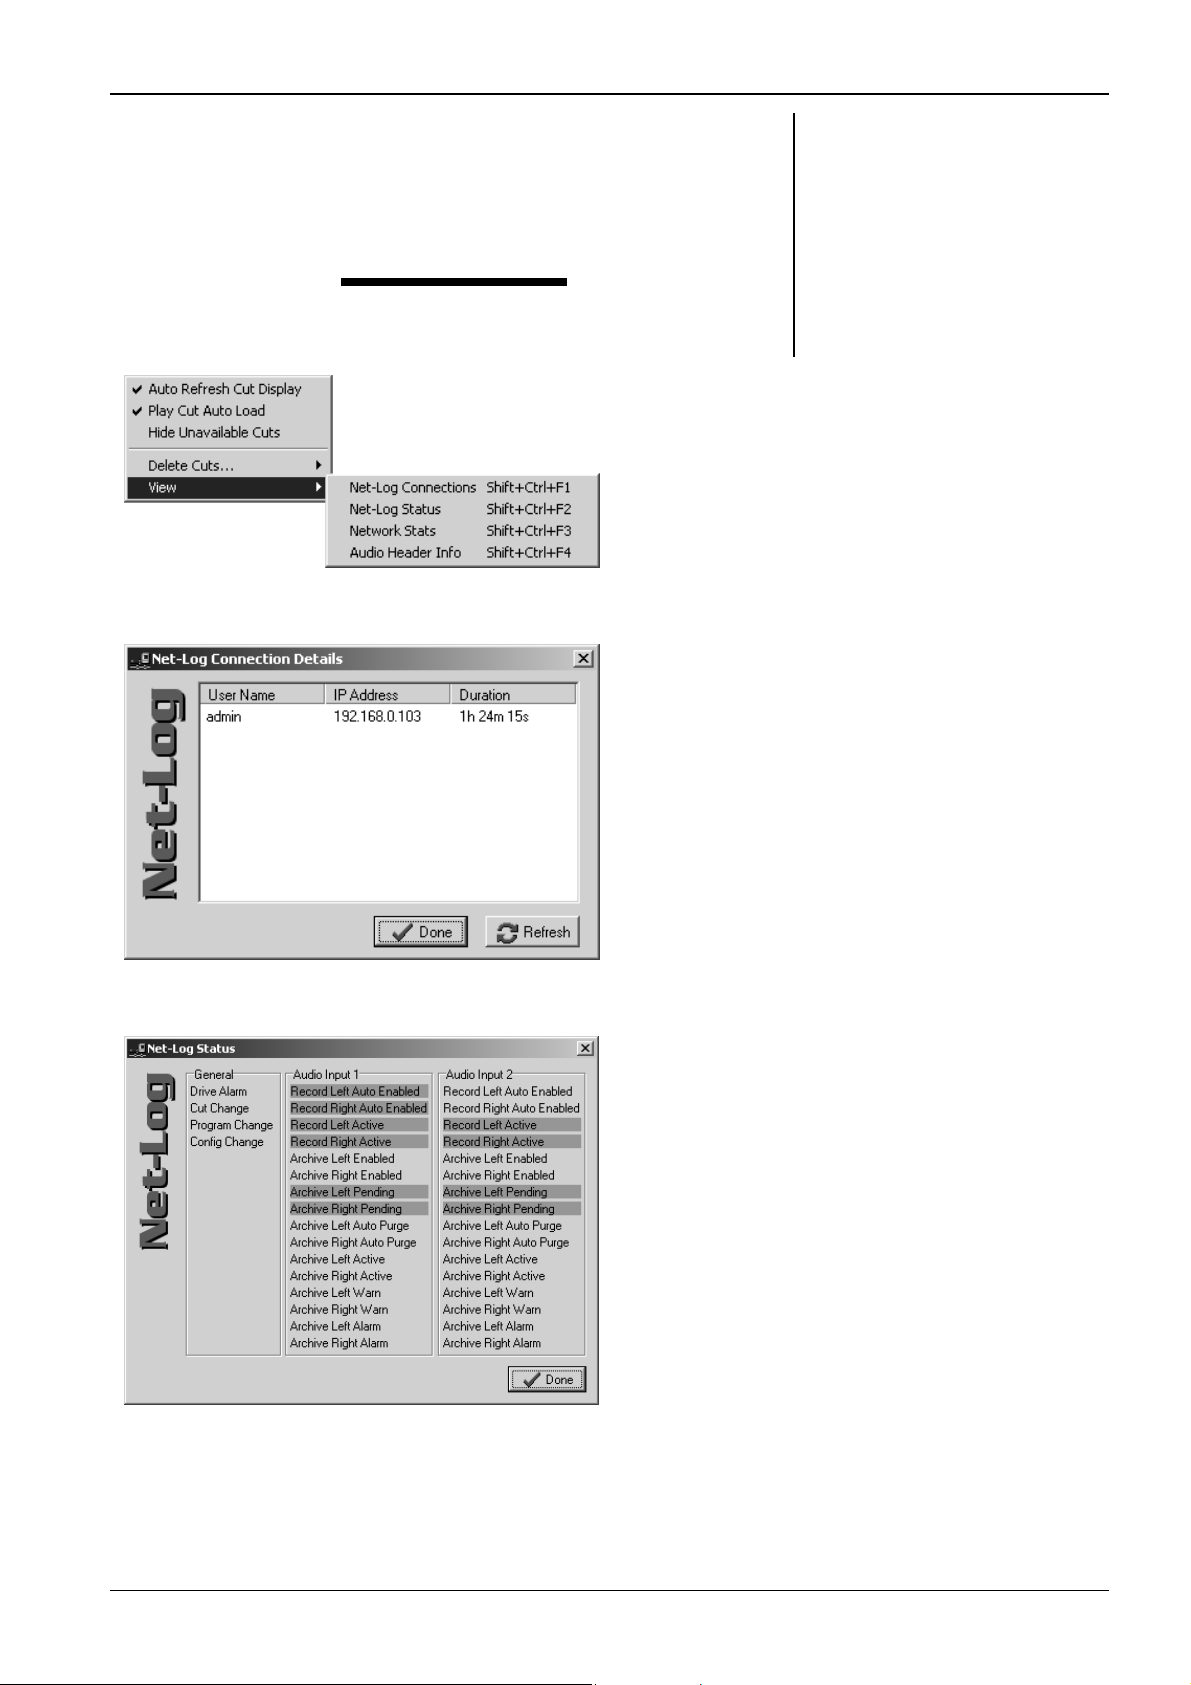
T
OOLS
12. Tools
12
Figure 12.1 Net-Log Tools Menu
Figure 12.2 Net-Log Connections Screen
Figure 12.3 Net-Log Status Screen
The Tools menu (Figure 12.1) contains a number of
useful tools to check on the performance and status of the
Net-Log unit. There is also a Delete Cuts sub-menu,
although this is only available to users who have record
access.
Auto Refresh Cut Display
With this option ticked, the cut displays in the Play screen
will automatically refresh when a recording is started or
stopped, or when you change to a different channel.
Play Cut Auto Load
When this option is ticked, the details of the first recording
for the selected Start Date will automatically be loaded
into the current Play screen (Play Download or Play
Stream).
Hide Unavailable Cuts
When this option is ticked, all recordings that are no
longer available due to being over-recorded are hidden
from the Play screen cut list.
Deleting Cuts
This menu option does exactly what it says. When you
select this option a sub-menu appears showing all the
channels that you are able to delete cuts from. Note that
you can only delete cuts from a channel if this channel is
not currently recording. The Delete All option
automatically deletes all cuts from all non-recording
channels.
View
Contained in this menu are four sub-menus. Net-Log
Connections, Net-Log Status, Network Stats and Audio
Header Info. Each of these display information about the
Net-Log’s performance and status, and are described in
more detail below.
Net-Log Connections
This useful screen (Figure 12.2) displays all users
currently connected to Net-Log, and displays their IP
Address and connection duration.
Net-Log Status
This screen (Figure 12.3) displays the status of the NetLog and All the Input Channels. Described below are all
the status indicators.
Drive Alarm
Problem writing to the Disk. (Equivalent to the LED on the
front panel). This Alarm is cleared only once the fault has
been rectified
Sonifex Net-Log User Handbook
39

12. Tools
The next 3 indicators give momentary indication of a
change in state of the appropriate feature
Cut Change
Indicates a recording start/stop or cuts being deleted.
Program Change
Programs have been changed.
Config Change
Configuration settings have been changed.
Record Auto Enabled
Auto record mode is enabled on the specified channel.
Record Active
Net-Log is currently recording on the specified channel.
Archive Enabled
Archive is enabled on the specified channel.
Archive Pending
Net-Log has data ready to archive for the specified
channel but Archiving is not enabled.
Archive Auto Purge
Archive will transfer all available audio data for the
specified channel.
Archive Active
Data is currently being archived from the specified
channel.
Archive Warn
Loss of data is about to occur on the specified channel.
Archive Alarm
Loss of data is has occurred on the specified channel.
Network Stats
This screen (Figure 12.4) displays the rate of
transmission between the Net-Log and connected Client,
and also displays the status messages transmitted to and
from the Net-Log. This is useful for network traffic
monitoring.
Audio Header Info
This screen (Figure 12.5) shows detailed information
about the audio cuts on the selected Net-Log. It is mainly
for debugging purposes.
About Sonifex Net-Log
This screen (Figure 12.6) accessible from the help menu
shows the software versions of the Net-Log-Win and the
currently connected Net-Log. The current status of the
License on the currently connected Net-Log is also shown
here. The information on this screen is mainly used for
debugging and version checking.
Figure 12.4 Net-Log Stats Screen
Figure 12.5 Net-Log Audio Header Info Screen
Figure 12.6 Net-Log About Screen
40
Sonifex Net-Log-Win User Handbook

13. Technical Specifications
TECHNICAL
SPECIFICATIONS
13
Physical Specification
External Dimensions: 1U 19” rack X 220mm deep
Net Weight: 2.5kg
Gross Weight: 3.5kg
Audio Specification
Input Impedance: >10kΩ balanced
Input Gain Range: -6dBu to +20dBu ref. full scale digits
Maximum Input Level: +20dBu
Distortion: <0.1% @ 1kHz +16dBu
Signal To Noise Ratio: 90 dB RMS a wtd. 22kHz bandwidth
Wow and Flutter: Un-measurable
Phase Error at 10kHz: Un-measurable
Please note that the audio specification of the play output depends on the soundcard that you have installed in your PC.
Net-Log is a recording device and has no audio output of its own.
Rear Panel Connections, Controls and Indicators
Analogue Inputs (4): XLR 3 Pin socket
Input Level Controls (4): Rotary pre-set potentiometers
Network: RJ45 (10BaseT) and BNC (10Base2) 10Mbps Ethernet
Network Status LED’s: Rx, Tx, link and collision
RS232 (2): 9 way D-type plug
Alarm Outputs and Remote Inputs: 15 way D-type plug
Power: IEC Power Plug, 95-265 VAC, 47-63Hz, peak 60W, 30W average
Front Panel Controls and Indicators
Controls: Record control to instantly start recording
Alarm Indicators (2): Disk drive alarm, archive alarm
Level Indicators (4): Analogue input level for each indicator
Additional Information
Audio Formats: MPEG layer 2, G.729A
Sample Rates: MPEG: 16kHz, 22.05kHz, 24kHz, 32kHz, 44.1kHz and 48kHz
G.729A: fixed at 8kHz
Recording Types: MPEG: Stereo, Dual Mono, Mono
G.729A: Dual Mono, Mono
Minimum PC Specification Pentium 166MHz, 64MB RAM, Windows compatible Sound card (capable of
Real Time Clock Accuracy: 1.53 minutes per month.
playing PCM files) & speakers, 10Mbps network connection, Windows
98/98/NT/2000, DirectX 6 or greater.
Sonifex Net-Log User Handbook
41

13. Technical Specification
Hard Disk Capacity: A minimum hard-disk size of 200GB is fitted. Due to the rapidly increase of
MPEG Data Rate in
kilobits per second
(kbps)
8 11d 13h 46m
16 5d 18h 53m
24 3d 20h 35m
32 2d 21h 26m
40 2d 7h 33m
48 1d 22h 17m
56 1d 15h 40m
64 1d 10h 43m
80 1d 3h 46m
96 23h 8m
112 19h 50m
128 17h 22m
Record Duration per Gigabyte of
Hard Disk Space in
Days.Hours.Minutes
disk capacities, the actual hard disk installed may be larger than this. The
following tables show the capacity in duration for the different record formats.
If more than one channel is used then the duration will need to be shared.
MPEG Data Rate in
kilobits per second
(kbps)
144 15h 25m
160 13h 53m
192 11h 34m
224 9h 55m
256 8h 41m
320 6h 56m
384 5h 47m
G.729A Data Rate in
kilobits per second
(kbps)
9.6 (fixed) 9d 15h 28m
Record Duration per Gigabyte of
Hard Disk Space in
Days.Hours.Minutes
Record Duration per Gigabyte of
Hard Disk Space in
Days.Hours.Minutes
Pin Connections
COM 1/2 (9 Pin D-Type Plug):
Pin No. Signal Direction Description
1 CD I Carrier Detect
2 Rx I Receive Data
3 Tx O Transmit Data
4 DTR O Data Terminal Ready
5 SG - Signal Ground
6 DSR I Data Set Ready
7 RTS O Request To Send
8 CTS I Clear To Send
9 N/C - No Connection
Alarm Outputs/Remote Inputs (15 Pin D-Type Plug):
Pin No. Signal Direction Description
1 Relay
Common
2 Relay N/C O Alarm Output Relay N/C to Pin 1 activates for both Archive and Hard Disk
3 Relay N/O O Alarm Output Relay N/O to Pin 1 activates for both Archive and Hard Disk
4 Relay
Common
5 Relay N/C O Alarm Output Relay N/C to Pin 4 activates for both Archive and Hard Disk
6 Relay N/O O Alarm Output Relay N/O to Pin 4 activates for both Archive and Hard Disk
7 GND - Ground
8 REMOTE_I1 I Remote Input 1 short to Ground (Remote record Channel 1, Left input 1). Set
9 REMOTE_I2 I Remote Input 2 short to Gro und (Remote record Channel 2, Right input 1) Set
10 REMOTE_I3 I Remote Input 3 short to Ground (Remote record Channel 3, Left input 2) Set to
11 REMOTE_I4 I Remote Input 4 sho rt to Ground (Remote record Channel 4, Right input 2) Set
12 REMOTE_I5 I Remote Input 5 short to Ground (Not used in V1.00 software)
13 REMOTE_I6 I Remote Input 6 short to Ground (Not used in V1.00 software)
14 REMOTE_I7 I Remote Input 7 short to Ground (Not used in V1.00 software)
15 REMOTE_I8 I Remote Input 8 short to Ground (Not used in V1.00 software)
O Alarm Output Relay Common
Alarms
Alarms
O Alarm Output Relay Common
Alarms
Alarms
to momentary or latching action via the Options, Record Remotes screen.
to momentary or latching action via the Options, Record Remotes screen.
momentary or latching action via the Options, Record Remotes screen.
to momentary or latching action via the Options, Record Remotes screen.
42
Sonifex Net-Log-Win User Handbook

Network Connector (RJ45):
Pin No. Signal Direction Description
1 Tx+ O Transmit Data (Positive)
2 Tx- O Transmit Data (Negative)
3 Rx+ I Receive Data (Positive)
4 N/C - No Connection
5 N/C - No Connection
6 Rx- I Receive Data (Negative)
7 N/C - No Connection
8 N/C - No Connection
Network Connector (BNC Socket):
Pin No. Signal Direction Description
1 Rx I Receive Data
2 Tx O Transmit Data
Audio Inputs (XLR Socket):
Pin No. Signal Direction Description
1 S - Screen
2 P I Phase
3 NP I Non-Phase
13. Technical Specifications
Sonifex Net-Log User Handbook
43

13. Technical Specification
44
Sonifex Net-Log-Win User Handbook

14. Glossary
GLOSSARY &
ABBREVIATIONS
14
10Base2 Coaxial, Thin Ethernet. The 10 indicates a transfer rate of 10 Mbps. Base indicates a baseband
10BaseT RJ45, Twisted Pair Ethernet. The 10 indicates a transfer rate of 10 Mbps. Base indicates a
Bit Rate The raw speed of data over a serial link. Depending on the type of link this may indicate the
Channel Audio signal that generates a single audio stream. The signal can be either mono or stereo but will
Client A node on the network that receives services from a server.
Collision (Cl) This occurs when two different nodes attempt to use the network at the same time.
Cut A single continuous piece of audio, either stereo or mono, recorded on the hard drive
dB (decibel) A ratio of two voltages or signal levels, expressed by the equation
DHCP Dynamic Host Configuration Protocol; Hosts are given configuration information across a network,
DNS Domain Name System; TCP/IP applications resolve a name into an IP Address
G.729A High compression record format primarily designed for speech.
Gain The degree of amplification, or attenuation, applied to a signal.
Gateway A router that links one network to another.
Gigabyte or GB 1000 million bytes of data storage for a disk drive or 1073 million bytes of data storage for memory
Host ID The part of the IP Address identifying the node within the network.
Hub A device used to connect nodes together to form a network.
IP Address Internet Protocol Address; A 32-bit address used to locate a node on a network.
kbps Acronym for kilo (thousand) bits per second
LED Light Emitting Diode.
Link A connection to a network.
Mbps Acronym for Mega (million) bits per second
MPEG Acronym for Motion Picture Experts Group who were responsible for the initial audio compression
NetworkID The part of the IP Address identifying the address of the local network.
NIC Network Interface Card; A card placed in a PC or Device used to connect to a network.
Node A device connected to a network, usually a PC or Printer.
Octet Eight bits. There are four octets in an IP Address.
Rx Shorthand for Receiver
Sample Rate The frequency at which the incoming audio is sampled. The higher the sample rate the higher the
Subnet Mask A mask address to determine the NetworkID and HostID contained in an IP Address.
Switch An intelligent hub.
TCP/IP Transmission Control Protocol/Internet Protocol;
THD The Total Harmonic Distortion is the percentage presence of signals outside the measured frequency
Tx Shorthand for Transmitter
UTC Acronym for Universal Time Code which is an internet reference time based on Greenwich Mean
UTP Acronym for Unshielded Twisted Pair which is the descriptio n of the type of cable normally used
medium and the 2 indicates that the sections must be a maximum of 200 meters.
baseband medium and the T indicates twisted pair wiring.
theoretical maximum rates e.g. 10BaseT sends packets of data at 10Mbps but due to overheads and
the availability the actual data throughput is significantly less.
For audio data rates the bitrate is the actual amount of data generated per second
still be treated a single channel. If the Net-Log is formatted to use dual mono then this is considered
as providing 2 channels. If both audio inputs are formatted as dual mono then a total of 4 channels
will be available.
dB = 20LOG(V1/V2)
Adding the suffix “u” denotes that the signal is relative to 0.775V RMS
Adding the suffix “v” denotes that the signal is relative to 1V RMS
usually from a server.
( i.e. 1024 x 1024 x 1024 bytes)
specification
frequency of the audio that will be captured.
range.
Time
networking or phone connections
Sonifex Net-Log User Handbook
45

14. Glossary
46
Sonifex Net-Log-Win User Handbook

INDEX
Index
Accounts editor .............................. See Administrator
Administrator
accounts...........................................................47
clock updates....................................................4 8
firmware upgrades.............................................48
network settings................................................48
Alarms
archive.............................................................12
drive ................................................................12
outputs.............................................................12
pin connections .................................................54
Archive
alarm...............................................................12
file format.........................................................32
options................................................See Options
Audio file types ....................................................29
Audio inputs
level adjustment................................................13
pin connections .................................................55
Auto archive
archive screen...................................................35
auto delete .......................................................34
control screen ...................................................35
email options ....................................................34
event log screen................................................36
reports.............................................................36
status screen.....................................................35
BWF.................................................See File formats
CE mark................................................................6
Clock source options ................................See Options
Clock updates ................................ See Administrator
Control opions.........................................See Options
Deleting tracks...........................................See Tools
Device list editor...................................................20
DirectX............................................................ 9, 53
Disk drive alarm...................................................12
Downloading audio
archive.............................................................31
auto archive......................................................33
play .................................................................27
File formats
broadcast wave format.......................................29
G729A..............................................................29
mpeg ...............................................................29
Firmware
upgrades .................................... See Administrator
First Time Use of Net-Log ......................................21
Front panel
description........................................................11
input level LEDs.................................................11
record control....................................................11
reset switch ......................................................12
Fuse Rating............................................................6
G.729A ............................................See File formats
Introduction
Archive...............................................................8
Network .............................................................8
Overview ............................................................7
Playing ...............................................................8
Recording ...........................................................7
Software.............................................................7
License agreement..................................................1
Licensing Your Net-Log..........................................19
G.729A.............................................................23
Login
user name & password .......................................20
Main screen
alarm indicators.................................................21
disconnect/log-off button.................................... 21
Mentor status.................................................... 22
Net-Log selector................................................ 21
network activity indicators.................................. 21
status display.................................................... 22
time display...................................................... 22
Maximum Concurrent Users................................... 19
MPEG...............................................See File formats
Multiple Net-Logs On A Network............................. 19
Network
capability ......................................................... 13
connection............................................. 12, 14 , 17
pin connections.................................................55
settings
Default Gateway............................................. 16
IP Address.....................................................14
Subnet Mask.................................................. 15
updating...................................................15, 48
topology........................................................... 13
Onboard Clock.....................................................48
Options
archive........................................................31, 44
auto archive ..................................................... 34
clock source...................................................... 45
control............................................................. 46
information....................................................... 46
record.............................................................. 43
duration ........................................................ 44
service names................................................ 44
record remotes ................................................. 45
saving and loading............................................. 46
Play
auto refresh...................................................... 27
download ......................................................... 27
by date and time ............................................ 27
by selecting tracks.......................................... 27
file................................................................... 29
priority............................................................. 14
stream............................................................. 28
track lists ......................................................... 27
Power Connection...................................................6
Power requirments ............................................... 11
Rear panel
alarm outputs ................................................... 12
description ....................................................... 12
input level controls ............................................ 12
network connection ........................................... 12
network status LEDs .......................................... 12
remote intputs .................................................. 12
serial ports ....................................................... 12
Record
auto ................................................................ 25
formats............................................................ 23
manual ............................................................ 23
maximum cuts .................................................. 23
program........................................................... 24
saving and loading.......................................... 25
remotes ........................................................... 25
Record duration options ...........................See Options
Record options........................................See Options
Record remote options.............................See Options
Record remotes
inputs .............................................................. 12
pin connections.................................................54
Reset
hardware.......................................................... 12
software........................................................... 48
Serial control interface
Sonifex Net-Log User Handbook
47

Index
AMX/Crestron....................................................40
introduction ......................................................37
Televic CE2500..................................................37
Serial ports
description........................................................12
pin connections .................................................54
Serial protocol
AMX/Crestron....................................................40
Televic CE2500..................................................38
Serial utility
updating firmware .............................................16
updating network settings...................................1 5
Service names options .............................See Options
Software
installing...........................................................15
licenses ...................................................... 13, 47
Software bugs
reporting............................................................6
Starting Net-Log-Win............................................ 19
Time & Date................................. See Onboard Clock
Tools
audio header info .............................................. 52
connections ...................................................... 51
deleting tracks.................................................. 51
network stats.................................................... 52
status .............................................................. 51
User details
changing.......................................................... 21
UTC............................................. See Onboard Clock
Warranty ..............................................................5
Warranty card .......................................................6
48
Sonifex Net-Log-Win User Handbook
 Loading...