

Page 1
SonicWALL Network Security Appliances
NETWORK SECURITY
TZ 100 / TZ 200 Series
Getting Started Guide
Page 2

SonicWALL TZ 100/200 series
Getting Started Guide
This Getting Started Guide provides instructions for basic
installation and configuration of the SonicWALLTZ 100/200
series appliance running SonicOS Enhanced.
Document Contents
This document contains the following sections:
1
Setting Up Your Network - page 1
2
Registering Your Appliance - page 9
3
Enabling Security Services - page 13
Advanced Network Configuration - page 21
4
Advanced Deployments - page 33
5
Support and Training Options - page 59
66
SonicWALL TZ 100/200 Series Getting Started Guide Page i
Page 3

Page ii
Page 4

Setting Up Your Network
1
In this Section:
This section provides pre-configuration information. Review this section before setting up your SonicWALL TZ 100/200 series appliance.
•
System Requirements - page 2
•
Recording Configuration Information - page 2
•
Completing the Setup Wizard - page 4
•
Accessing the Management Interface - page 5
•
Verifying WAN (Internet) Connectivity - page 6
•
Connecting Your Network Devices - page 6
•
Troubleshooting Initial Setup - page7
SonicWALL TZ 100/200 Series Getting Started Guide Page 1
Page 5
System Requirements
Recording Configuration Information
Before you begin the setup process, verify that you have:
• An Internet connection
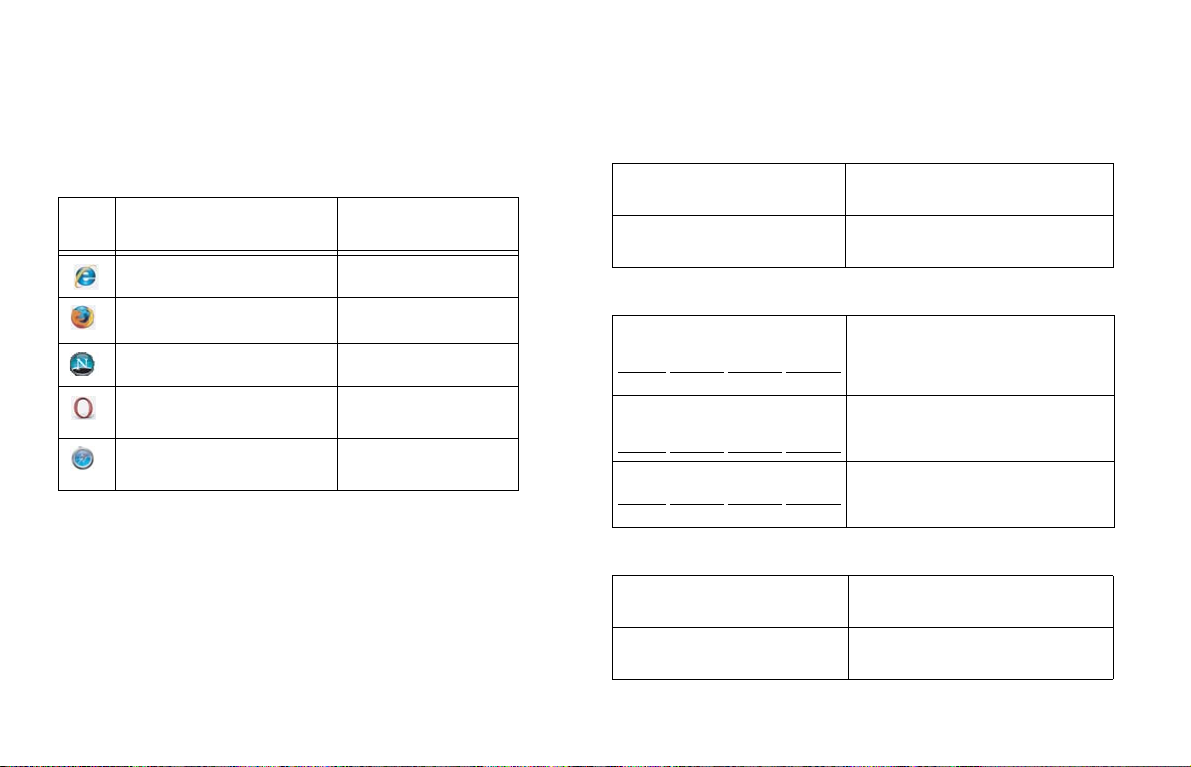
• A Web browser supporting Java Script and HTTP uploads.
Supported browsers include the following:
Supported Browsers Browser Version
Number
Internet Explorer 6.0 or higher
Firefox 2.0 or higher
Netscape 9.0 or higher
Opera 9.10 or higher
for Windows
Safari 2.0 or higher
for MacOS
Record the following setup information to use during the setup
process and for future reference:
Registration Information
Serial Number:
Authentication Code:
Record the serial number found on the
bottom panel of your SonicWALL
appliance.
Record the authentication code found on
the bottom panel of your SonicWALL
appliance.
Networking Information
LAN IP Address:
. . .
Subnet Mask:
. . .
Ethernet WAN IP Address:
. . .
Select a static IP address for your
SonicWALL appliance that is within the
range of your local subnet. If you are
unsure, you can use the default IP
address (192.168.168.168).
Record the subnet mask for the local
subnet where you are installing your
SonicWALL appliance.
Select a static IP address for your
Ethernet WAN. This setting only applies if
you are already using an ISP that assigns
a static IP address.
Administrator Information
Admin Name:
Admin Password:
Select an administrator account name.
(default is admin)
Select an administrator password.
(default is password)
Page 2 System Requirements
Page 6
Primary Internet Service Provider (ISP) Information
Secondary ISP Information
Record the following information about your current ISP:
If you connect
via
Cable modem,
DSL with a
router
Home DSL PPPoE
T1/E1,
Static
broadband,
Cable or DSL
with a static IP
Dial-in to a
server
You likely
use
DHCP No Internet connection information is
Static IP IP Address:
PPTP
Please record
usually required, although some service
providers require a host name.
Host Name:
User Name:
Password:
Note: Your ISP may require your user name
in the format: name@ISP.com
. . .
Subnet Mask: . . .
Default Gateway
(IP Address):
Primary DNS: . . .
Secondary DNS
(optional):
Server Address:
User Name:
Password:
. . .
. . .
If applicable, record the following information about your
secondary ISP or WWAN service provider:
If you connect
via
Cable modem,
DSL with a
router
Home DSL PPPoE
T1/E1,
Static
broadband,
Cable or DSL
with a static IP
Dial-in to a
server
You likely
use
DHCP
Static IP
PPTP
Please record
Host Name:
User Name:
Password:
IP Address:
Subnet Mask: . . .
Default Gateway
(IP Address):
Primary DNS: . . .
Secondary DNS
(optional):
Server Address:
User Name:
Password:
. . .
. . .
. . .
SonicWALL TZ 100/200 Series Getting Started Guide Page 3
Page 7

Completing the Setup Wizard
The Setup Wizard takes you through several basic steps to get
your SonicWALL TZ 100/200 series appliance configured for
your network. Use the Recording Configuration Information
section, on page 2 to record your configuration information
as you complete the wizard.
Note: If you are having trouble accessing the Setup Wizard,
see the Troubleshooting the Setup Wizard section, on
page 7 of this document.
The Setup Wizard guides you through the following steps:
Change Password—Create a new password so that only you
have access to the management interface. The default
password is “password.”
Change Time Zone—Select the correct time zone for proper
updates and time-based functionality.
WAN Network Mode—Choose your method of connecting to
the Internet. This information is provided by your Internet
Service Provider (ISP).
WAN Settings—Required for some WAN modes. This
information is also provided by your ISP.
LAN Settings—Enter custom local network address settings,
or use the default values, which work well for most networks.
LAN DHCP Settings—Allow your SonicWALL TZ 100/200
series appliance to automatically connect other local computers
by specifying a DHCP range, or use the default.
Ports Assignment—Configure the extra interfaces (X2-X5) for
different network requirements.
At the end of the wizard, a configuration summary displays. It is
recommended that you record this information in the Recording
Configuration Information section, on page 2 of this guide.
After the Setup Wizard completes, the appliance may reboot.
Please wait a few minutes while the SonicWALL appliance
reboots to save the updated firmware settings, and then
continue with the next section of this guide.
Page 4 Completing the Setup Wizard
Page 8
Accessing the Management Interface
The computer you use to manage the SonicWALL TZ 100/200
series appliance must be set up to connect using DHCP, or with
a static IP address in your chosen subnet. The default subnet
for LAN zone ports is 192.168.168.x.
If your SonicWALL TZ 100/200 series appliance required a
reboot after completing the Setup Wizard, wait until the LED
is no longer lit before continuing.
To access the SonicOS Web-based management interface:
1. Enter the default IP address of http://192.168.168.168, or
the LAN IP address you chose during the Setup Wizard, in
the Location or Address field of your Web browser.
Tip: If you changed the LAN IP of your SonicWALL during
the Setup Wizard, you may need to restart your
computer for changes to take effect.
2. When the SonicWALL Management Login page displays,
enter your username and password (default values are
“admin” for user name and “password” for password).
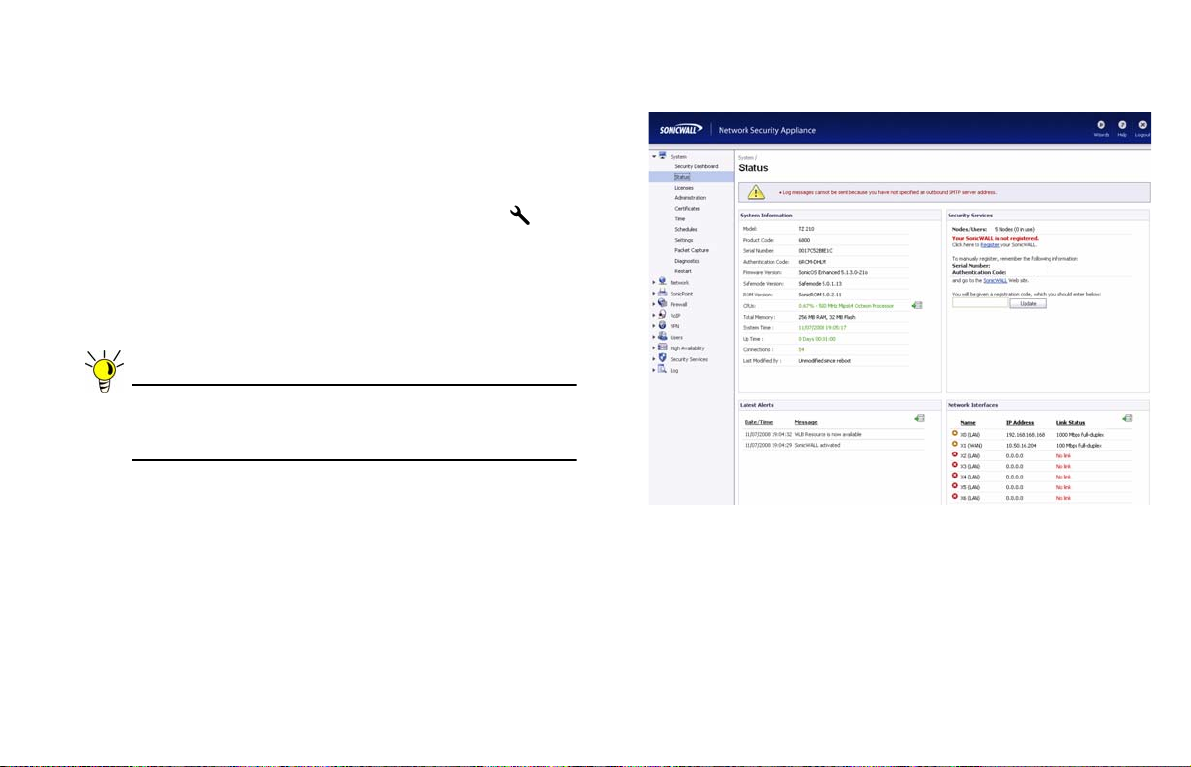
If the System > Status page (shown below) displays, then you
have correctly configured the SonicWALL TZ 100/200 series
appliance to work with the computer on your LAN.
SonicWALL TZ 100/200 Series Getting Started Guide Page 5
Page 9
Verifying WAN (Internet) Connectivity
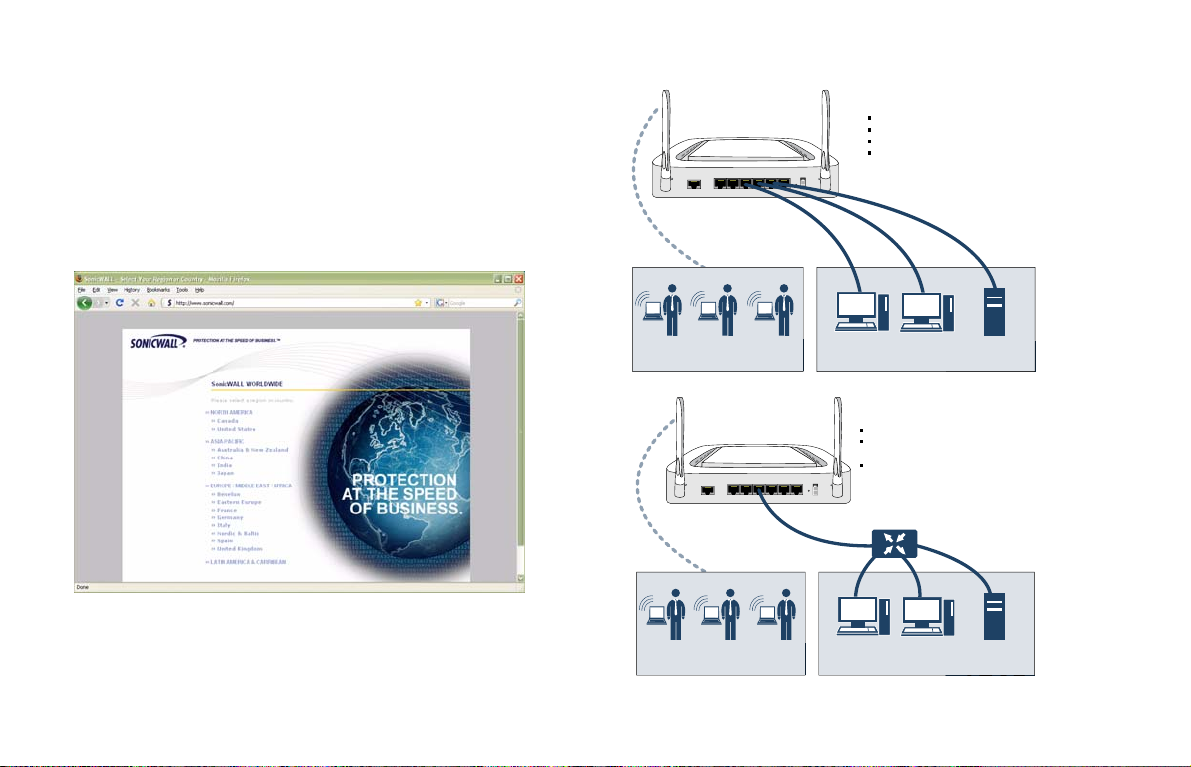
Connecting Your Network Devices
Complete the following steps to confirm your Internet
connectivity:
1. In the Windows interface, launch your Web browser.
2. Enter “http://www.sonicwall.com” in the address bar and
press Enter on the keyboard. The SonicWALL website
displays. If you are unable to browse to a Website, see
“Troubleshooting Internet Connection” on page 7.
W0 WLAN
W0 WLAN
LAN
WAN
X0 X1
Console
Wireless Clients
LAN
X0 X1
Console
Wireless Clients
X2 X3 X4 X5
WAN
X2 X3 X4 X5
X2 LAN
Connecting Directly
Good for small networks (less than 5 clients)
Easy to setup
Requires less equipment
Each interface may be congured for a
dierent zone (LAN, WAN, DMZ)
Power
X2 LAN X3 LAN X4 LAN
Desktop Clients
Connecting With a Hub/Switch
Requires extra equipment (hub/switch)
Ability to connect to multiple clients
through one port
Zone security assignment (LAN, WAN, DMZ)
can be applied to many clients on a
single interface
Power
Hub/Switch
Desktop Clients
Local Server
Local Server
Page 6 Verifying WAN (Internet) Connectivity
Page 10

Troubleshooting Initial Setup
This section provides troubleshooting tips for the following initial
setup topics:
Troubleshooting the Setup Wizard - p a ge7
•
•
Troubleshooting Internet Connection - page 7
•
Configuring DHCP IP Addressing - page 8
Troubleshooting the Setup Wizard
• If you see the login screen, but not the Setup Wizard:
• Configure your Web browser to allow pop-ups.
• Log into the security appliance using “admin” as the
user name and “password” as the password. After
you log in, click the Wizards button at the top right.
• If you do not
verify the following:
• Did you correctly enter the SonicWALL TZ 210 series
appliance management IP address, 192.168.168.168,
in your Web browser?
• Is your computer set to accept DHCP addressing or
set to a static IP address within the 192.168.168.x
subnet range? If not, see the Configuring DHCP IP
Addressing section, on page 8 for instructions.
• Is the Ethernet cable connected between your
computer and the LAN (X0) port on your SonicWALL?
see the login screen or the Setup Wizard,
• Do you need to add the SonicWALL appliance to your
list of trusted sites in your Web brow se r? Use the
default IP address (192.168.168.168) for this.
• Is the Test LED on the front panel of your SonicWALL
appliance lit? If the Test LED stays lit for more than a
few minutes after the initial power on sequence, power
cycle the SonicWALL appliance.
Troubleshooting Internet Connection
If you can view the SonicWALL home page, you have
configured your SonicWALL TZ 100/200 series appliance
correctly. If you cannot view the SonicW ALL home page, try the
following:
• Renew your management station DHCP address if
you changed the IP address/subnet of your network
during setup.
• Restart your management station to accept new
network settings from the DHCP server in the
SonicWALL appliance.
• Restart your Internet router or modem to
communicate with the DHCP client in the SonicWALL
appliance.
• Log into the SonicOS management interface and
launch the Setup Wizard again by clicking the Wizards
button in the top right corner of the interface. Ensure
that all of your settings are correct.
SonicWALL TZ 100/200 Series Getting Started Guide Page 7
Page 11

Configuring DHCP IP Addressing
If you are having trouble connecting to the SonicWALL TZ 100/
200 series appliance, complete the following section based on
your Windows operating system flavor. Configure your
management computer to obtain an IP address using DHCP.
Windows Vista
1. From the Start menu, right-click Network and select
Properties.
2. In the Tasks menu, click Manage network connections.
The Network Connections windows displays.
3. Right-click on your Local Area Connection and select
Properties.
4. In the list, double-click Internet Protocol Version 4 (TCP/
IP).
5. Select Obtain an IP address automatically and Obtain a
DNS address automatically.
6. Click OK, and then click OK again for the settings to take
effect.
Windows XP
1. From the Start menu, highlight Connect To and then
select Show All Connections.
2. Right-click on your Local Area Connection and select
Properties.
3. In the list, double-click Internet Protocol (TCP/IP).
4. Select Obtain an IP address automatically and Obtain a
DNS address automatically.
5. Click OK, and then click OK again for the settings to take
effect.
Windows 2000
1. From the Windows Start menu, select Settings.
2. Open Network and Dial-up Connections.
3. Click Properties.
4. Highlight Internet Protocol (TCP/IP) and click Properties.
5. Select Obtain an IP address automatically and Obtain a
DNS address automatically.
6. Click OK for the settings to take effect.
Page 8 Troubleshooting Initial Setup
Page 12

Registering Your Appliance
2
In this Section:
This section provides instructions for registering your SonicWALL TZ 100/200 series appliance.
•
Creating a MySonicWALL Account - page10
•
Registering and Licensing Your Appliance on MySonicWALL - page 10
Note: Registration is an important part of the setup process and is necessary to receive the benefits of SonicWALL security services,
firmware updates, and technical support.
SonicWALL TZ 100/200 Series Getting Started Guide Page 9
Page 13
Creating a MySonicWALL Account
A MySonicWALL account is required for product registration. If
you already have an account, continue to the Registering and
Licensing Your Appliance on MySonicWALL section.
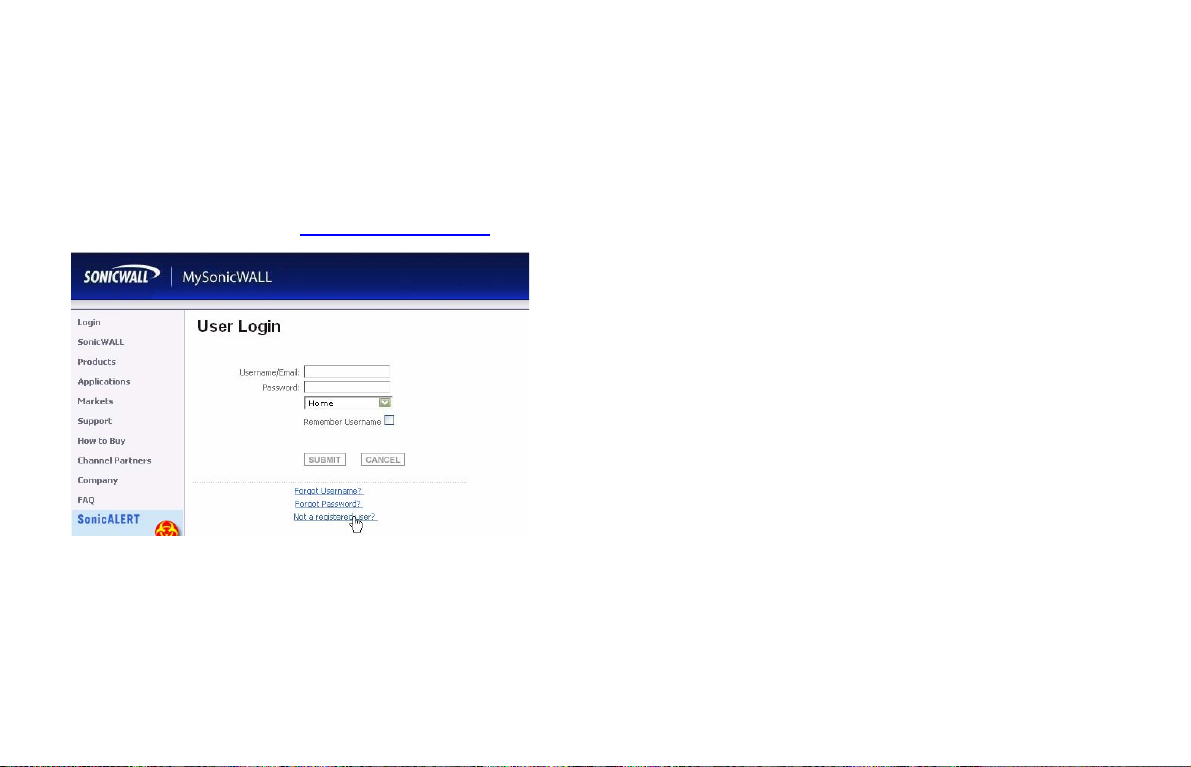
Perform the following steps to create a MySonicWALL account:
1. In your browser, navigate to www.mysonicwall.com.
2. In the login screen, click the Not a registered user?
3. Complete the Registration form and click Register.
4. Verify that the information is correct and click Submit.
5. In the screen confirming that your account was created,
click Continue.
link.
Registering and Licensing Your Appliance on MySonicWALL
This section contains the following subsections:
Product Registration - page 10
•
•
Security Services and Software - page 11
•
Activating Security Services and Software - page 12
•
Trying or Purchasing Security Services - page 12
Product Registration
You must register your SonicWALL security appliance on
MySonicWALL to enable full functionality.
1. Login to your MySonicWALL account. If you do not have an
account, you can create one at www.mysonicwall.com.
2. On the main page, type the appliance serial number in
the Register A Product field. Then click Ne xt.
3. On the My Products page, under Add New Product,
type the friendly name for the appliance, select the
Product Group if any, type th e authentication code into
the appropriate text boxes, and then click Register.
4. On the Product Survey page, fill in the requested
information and then click Continue.
Page 10 Creating a MySonicWALL Account
Page 14
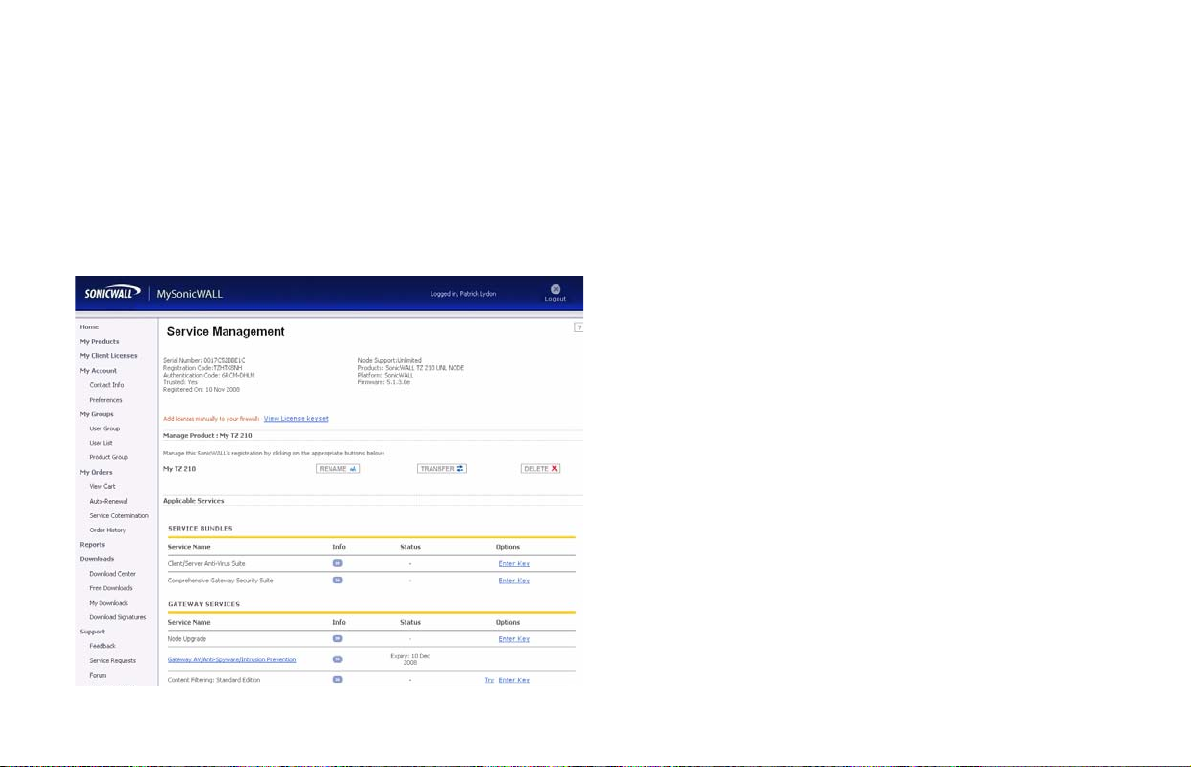
Security Services and Software
The Service Management - Associated Products page in
MySonicWALL lists security services, support options, and
software, such as ViewPoint, that you can purchase or try with a
free trial. For details, click the Info button.
If you purchased an appliance that is pre-licensed, you may be
required to enter your activation key here unless current
licenses are already indicated in the Status column with either a
license key or an expiration date.
The following products and services are available for the
SonicWALL TZ 100/200 series appliances:
• Gateway Service Bundles:
• Client/Server Anti-Virus Suite
• Comprehensive Gateway Security Suite
• Individual Gateway Services:
• Gateway Anti-Virus, Anti-Spyware,
Intrusion Prevention
• Global Management System
• Content Filtering: Premium Edition
• High Availability Upgrade
• Desktop and Server Software:
• Enforced Client Anti-Virus and Anti-Spyware
• Global VPN Client
• Global VPN Client Enterprise
•ViewPoint
• Support Services:
• Dynamic Support 8x5
• Dynamic Support 24x7
• Software and Firmware Updates
SonicWALL TZ 100/200 Series Getting Started Guide Page 11
Page 15

Activating Security Services and Software
Trying or Purchasing Security Services
If you purchase a service subscription or upgrade from a sales
representative, you will receive an activation key. This key is
emailed to you after online purchases, or is on the front of the
certificate that was included with your purchase.
To activate existing licenses, perform the following tasks:
1. Navigate to the My Products page and select the
registered product you want to manage.
2. Locate the product on the Service Management page and
click Enter Key in that row.
3. In the Activate Service page, type or paste your key into
the Activation Key field and then click Submit.
Once the service is activated, you will see an expiration
date or a license key string in the Status column on the
Service Management page.
To try a Free Trial of a service, click Try in the Service
Management page. To purchase a product or service, click
Buy Now in the Service Management page.
When activation is complete, MySonicWALL displays an
activation screen with service status and expiration information.
The service management screen also displays the product you
licensed.
You have successfully registered your SonicWALL appliance.
And now you need to enable Unified Threat Management
(UTM) security services. SonicWALL UTM security services are
not enabled by default.
Page 12 Registering and Licensing Your Appliance on MySonicWALL
Page 16

Enabling Security Services
In this Section:
Security services are an essential component of a secure network deployment. This section provides instructions for registering and
enabling security services on your SonicWALL TZ 100/200 series appliance.
Enabling Security Services in SonicOS - page 14
•
•
Verifying Security Services on Zones - page 19
3
SonicWALL TZ 100/200 Series Getting Started Guide Page 13
Page 17

Enabling Security Services in SonicOS
After completing the registration process in SonicOS, perform
the tasks listed below to activate your licenses and enable your
licensed services from within the SonicOS user interface.
SonicWALL security services are key components of threat
management in SonicOS. The core security services are
Gateway Anti-Virus, Intrusion Prevention Services, and AntiSpyware.
You must enable each security service individually in the
SonicOS user interface. See the following procedures to enable
and configure your security services:
Verifying Licenses - page 14
•
•
Enabling Gateway Anti-Virus - pa ge15
•
Enabling Intrusion Prevention Services - page 16
•
Enabling Anti-Spyware - page17
• Enabling Content Filtering Service - page 18
Verifying Licenses
Verify that your security services are licensed on the System >
Status page.
If services that are already activated on MySonicWALL do not
display as licensed, you need to synchronize your SonicWALL
with the licensing server.
If initial setup is already complete, click the Synchronize button
to synchronize licenses from the System > Licenses page.
Page 14 Enabling Security Services in SonicOS
Page 18

Enabling Gateway Anti-Virus
To enable Ga teway Anti-Virus (GAV) in SonicOS:
1. Navigate to the Security Services > Gateway Anti-Virus
page.
2. Select the Enable Gateway Anti-Virus checkbox and click
Accept to apply changes.
3. Verify that the Enable Inbound Inspection checkboxes
are selected for the protocols you wish to inspect. See the
following table for an explanation of these protocols.
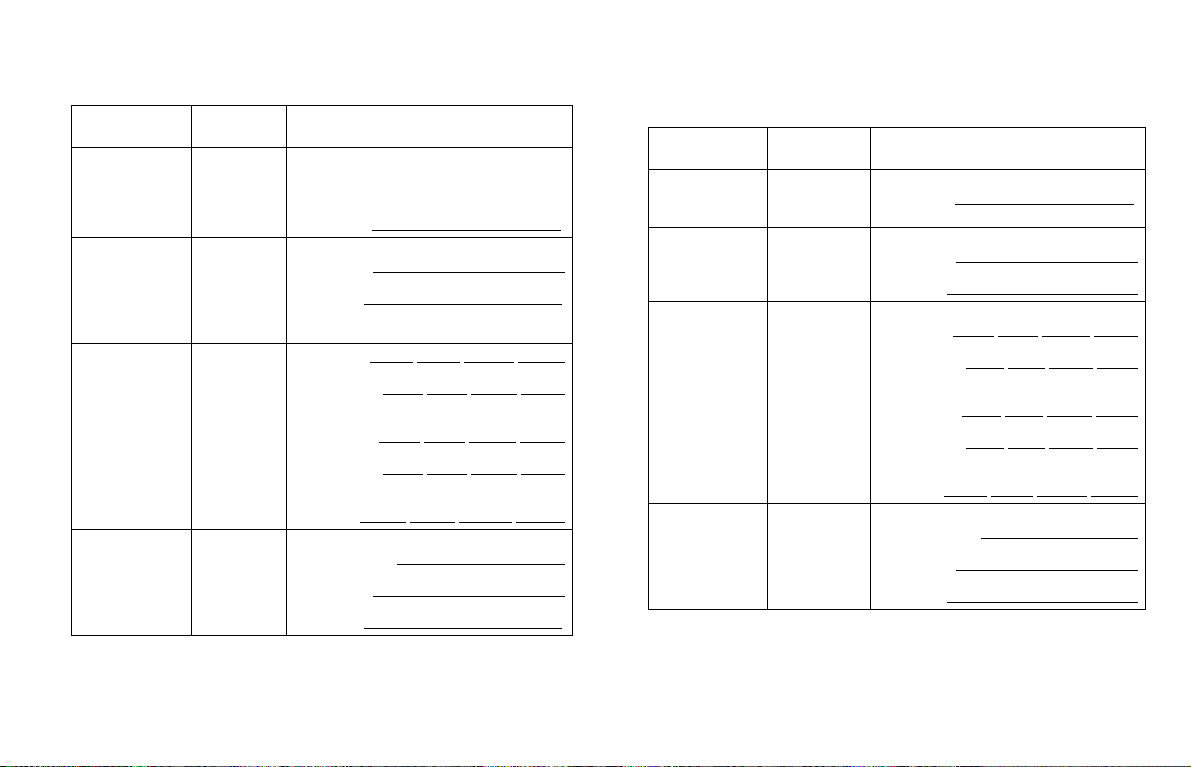
The following table gives descriptions and default values for
GAV-enforced protocols:
Protocol Default Description
H TT P Enabled Hyper-T ext T ransf er Protocol, common Web -browsing
F TP Enabled File Transfer Protocol, dedicated fi le download ser vers
I MA P Enabled Internet Message Access P rotocol, st andard method
SMTP Enabled Simple Mail T ransfer Protocol, st andard method for
POP3 Enabled Post Office P rotocol 3, st andard meth od for accessing
CIFS/
N et b i o s
TCP Stream Disabled Any other non-standard type of network dat a transfer
Disabled Intra-network traffic on Windows operating system
traffic
for accessing email
accessing email
email
(network file-sharing)
4. Click the Accept button to apply changes.
GAV contains many other useful features, including:
• Outbound SMTP Inspection scans outbound email
• User Notification notifies users when content is blocked
• File-Type Restrictions blocks various non-scannable files
• Exclusion Lists for network nodes where Gateway AntiVirus enforcement is not necessary.
Tip: For a complete overview of GAV features, refer to the
SonicOS Enhanced Administrator’s Guide.
SonicWALL TZ 100/200 Series Getting Started Guide Page 15
Page 19

Enabling Intrusion Prevention Services
To enable Intrusion Prevention (IPS) in SonicOS:
1. Navigate to the Security Services > Intrusion Prevention
page.
2. Select the Enable Intrusion Prevention checkbox.
3. In the Signature Groups table, select the Prevent All and
Detect All checkboxes based on attack priority.
Note: Prevent All blocks attacks of the chosen priority, and
Detect All saves a log of these attacks that can be
viewed on the Log > View page. A common setting is
to enable Prevent for High and Medium Priority
threats, and Detect for all threats.
4. Click the Accept button to apply changes.
Intrusion Prevention contains other useful features, including:
• Exclusion Lists for network nodes where IPS
enforcement is not necessary.
• Log Redundancy to control log size during high-volume
intrusion attack attempts by enforcing a delay between log
entries.
Tip: For a complete overview of IPS features, refer to the
SonicOS Enhanced Administrator’s Guide.
Page 16 Enabling Security Services in SonicOS
Page 20

Enabling Anti-Spyware
Anti-Spyware contains other useful features, including:
To enable Anti-Spyware in SonicOS:
1. Navigate to the Security Services > Anti-Spyware page.
2. Select the Enable Anti-Spyware checkbox.
3. In the Signature Groups table, select the Prevent All and
Detect All checkboxes for each spyware danger level that
you want to prevent.
Note: Prevent all blocks attacks of the chosen priority, Detect
All saves a log of these attacks which can be viewed in
the Log > View screen.
4. Click the Accept button to apply changes.
• Exclusion Lists excludes network nodes when
Anti-Spyware enforcement is not necessary.
• Log Redundancy controls log size during high-volume
intrusion attack attempts by enforcing a delay between log
entries.
• Clientless Notification displays messages to users when
content is blocked by SonicWALL Anti-Spyware.
• Outbound Inspection enables scanning and logging of
outbound spyware communication attempts.
• Disable SMTP Responses suppresses the sending of
email messages to clients when spyware is detected.
Tip: For a complete overview of Anti-Spyware features,
refer to the SonicOS Enhanced Administrator’s Guide.
SonicWALL TZ 100/200 Series Getting Started Guide Page 17
Page 21

Enabling Content Filtering Service
To enable Content Filtering Service (CFS) in SonicOS:
1. Navigate to the Security Services > Content Filter page.
2. Select SonicW AL L CF S in the Content Filter Type dropdown list and then click the Configure button.
3. In the Policy tab, click the Configure button for the default
policy. The Edit CFS Policy windows displays.
4. In the URL List tab, review and select additional exclusion
categories as needed.
5. Click OK to both pop-up windows.
6. Click the Accept button to apply changes.
Content FIltering Service contains other useful features,
including:
• URL Rating Review allows the administrator and users to
review blocked URL ratings if they think a URL is rated
incorrectly.
• Restrict Web Features restricts features such as cookies,
Java, ActiveX, and HTTP Proxy access.
• Trusted Domains allows access to restricted features on
trusted domains.
• CFS Exclusion List excludes administrators and/or IP
ranges from content filtering enforcement.
• Blocked Content Web Page displays a custom HTML
page to users when content is blocked.
Tip: For a complete overview of CFS fea tures, refer to the
SonicOS Enhanced Administrator’s Guide.
Page 18 Enabling Security Services in SonicOS
Page 22

Verifying Security Services on Zones
Security services such as Gateway Anti-Virus are automatically
applied to the LAN and WAN network zones. To protect other
zones such as the DMZ or Wireless LAN (WLAN), you must
apply the security services to the network zones. For example,
you can configure SonicWALL Intrusion Prevention Service for
incoming and outgoing traffic on the WLAN zone to add more
security for internal network traffic.
To apply services to network zones:
1. Navigate to the Network > Zones page.
2. In the Zone Settings table, click the Configure icon for the
zone where you want to apply security services.
3. In the Edit Zone dialog box on the General tab, select the
checkboxes for the security services to enable on this
zone.
4. Click OK.
Congratulations! Your SonicWALL TZ 100/200 series
appliance is registered and fully functional with active UTM
security services enabled.
For advanced network setup information, continue to:
•
Advanced Network Configuration - page 21
•
Advanced Deployments - page 33
SonicWALL TZ 100/200 Series Getting Started Guide Page 19
Page 23

Page 20 Verifying Security Services on Zones
Page 24

Advanced Network Configuration
In this Section:
This section provides detailed overviews of advanced deployment scenarios, as well as configuration instructions for connecting your
SonicWALL TZ 100/200 series appliance to various network devices.
An Introduction to Zones and Interfaces - page 22
•
•
SonicWALL Wireless Firewalling - page 23
•
Configuring Interfaces - page 24
•
Creating Network Access Rules - page 27
• Address Objects - page 29
•
Network Address Translation - page 31
Tip: Before completing this section, fill out the information in Recording Configuration Information - page 2.
4
SonicWALL TZ 100/200 Series Getting Started Guide Page 21
Page 25

An Introduction to Zones and Interfaces
Zones split a network infrastru cture into logi cal areas, each w ith
its own set of usage rules, security services, and policies. Most
networks include multiple definitions for zones, including those
for trusted, untrusted, public, encrypted, and wireless tra ffic.
Some basic (default) zone types include:
WAN—Untrusted resources outside your local network.
LAN—Trusted local network resources.f
WLAN—Local wireless network resources originating from
SonicWALL wireless enabled appliances.
DMZ—Local network assets that must be accessible from the
WAN zone (such as Web and FTP servers).
VPN—Trusted endpoints in an otherwise untr usted zone, such
as the WAN.
The security features and settings that zones carry are
enforced by binding a zone to one or more physical interfaces
(such as, X0, X1, or X2) on the SonicWALL TZ 100/200 series
appliance.
The X1 and X0 interfaces are preconfigured as WAN and LAN
respectively. The remaining ports are also LAN ports by default,
however, these ports can be configured to meet the needs of
your network, either by using basic zone types (WAN, LAN,
WLAN, DMZ, VPN) or configuring a custom zone type to fit your
network requirements (Gaming Console Zone, Wireless Printer
Zone, Wireless Ticket Scanner Zone, and more).
W0 WLAN
X1 WAN
Console
X0
Wireless (WLAN)
Wireless Clients
Wireless Devices
X0 LAN
Hotel / Home Oce
Page 22 An Introduction to Zones and Interfaces
Front Lobby
Sales Marketing
Page 26

SonicWALL Wireless Firewalling
When a wireless device uses an access point to communicate
with a device on another subnet or on a completely different
network, traffic between the devices is forced to traverse the
network gateway. This traversal enables Unified Threat
Management (UTM) services to be enforced at the gateway.
Standard practice for wireless firewalling (where one wireless
client is communicating with another) bypasses many of the
critical UTM security services. The illustration below shows the
standard practice for wireless firewalling.
?
Other Security Appliance
Content Filtering Service
Client Anti-Virus Enforcement
Gateway Anti-Virus
Gateway Anti-Spyware
Intrusion Prevention Service
Security Services
WLAN Zone
Many security products on the market share this potential
vulnerability when two users connected by a common hub or
wireless access point wish to exchange data.
SonicWALL addresses this security shortcoming by managing
the SonicPoint access points from the UTM appliance. This
allows complete control of the wireless space, including zone
enforcement of security services and complete firewalling
capabilities, as shown in the illustration below.
SonicWALL
SonicPoint*
SONICPOINT
SonicWALL TZ 100/200
Content Filtering Service
Client Anti-Virus Enforcement
Gateway Anti-Virus
Gateway Anti-Spyware
Intrusion Prevention Service
WLAN Zone
*SonicPoint needed for wireless access on wired-only models
series appliance
Security Services
SonicWALL TZ 100/200 Series Getting Started Guide Page 23
Page 27

Configuring Interfaces
Interfaces, also known as ports, are physical network
connections that can be configured to provide different
networking and security features based on your network needs.
Note: For more information on Zone types, see “An
Introduction to Zones and Interfaces” on page 22.
This section contains the following sub-sections:
•
Configuring an Interface - page 24
•
PortShield Wizard - page 25
• Manual PortShield Configuration - page 26
Configuring an Interface
The SonicOS Enhanced Web-based management interface
allows you to configure each individual Ethernet port (from X2X5) with its own security settings through the use of zones.
To configure a network interface:
1. In the Network > Interfaces panel, click the Configure
button for the interface you wish to configure. The Edit
Interface window displays.
Note: If only X0 and X1 interfaces are displayed in the
Interfaces list, click the Show PortShield Interfaces
button to show all interfaces.
2. Select a Zone T y pe for this interface.
3. Select an IP assignment for this interface. If you intend to
create a new network segment on this interface such as a
DMZ or secondary LAN, this value should be set to Static.
4. Enter a static IP Address for the interface. For private and
semi-private network segments, any private static IP
address such as 10.10.20.1 is appropriate. Ensure that the
static IP address you choose does not conflict with any
currently existing interfaces. The newly created interface
appears in the Interfaces list. You may now connect the
appropriate network resources to this interface.
Page 24 Configuring Interfaces
Page 28

PortShield Wizard
3. Select from the following:
With PortShield, multiple ports can share the network settings of
a single interface. The SonicWALL PortShield feature enables
you to easily configure the ports on the SonicWALL TZ 100/200
series appliance into common deployments.
Tip: Zones can always be applied to multiple interfaces in
the Network > Interfaces page, even without the use
of PortShield groupings. However, these interfaces will
not share the same network subnet unless they are
grouped using PortShield.
To configure ports using the SonicWALL PortShield Wizard:
1. Click the Wizards button on the top-right of the SonicOS
management interface.
2. Choose PortShield Interface Wizard and click Next.
Selection Port Assignment Usage
WAN/LAN X1: WAN
WAN/LAN/
D MZ
All Other Ports: LAN
X1: WAN
X2: DMZ
All Other Ports: LAN
Connect Internet connection to X1
Connect network devices to any remaining
portfor local and Internet connectivity.
Connect Internet connection to X1.
Connect public-facing servers or other
semi-public resources to X2.
Connect network devices to any remaining
port for local and Internet connectivity .
4. WAN/LAN or WAN/LAN/DMZ and click Next to
continue.This will prompt a configuration summary to
appear. Verify that the ports assigned are correct.
5. Click Apply to change port assignments.
Note: For more information about PortShield interfaces, see
the SonicOS Enhanced Administrator’s Guide.
SonicWALL TZ 100/200 Series Getting Started Guide Page 25
Page 29

Creating Network Access Rules
A Zone is a logical grouping of one or more interfaces designed
to make management a simpler and more intuitive process than
following a strict physical interface scheme.
By default, the SonicWALL security appliance’s stateful packet
inspection allows all communication from the LAN to the
Internet, and blocks all traffic from the Internet to the LAN. The
following behaviors are defined by the “Default” stateful
inspection packet access rule enabled in the SonicWALL
security appliance:
Originating Zone Destination Zone Action
LAN, WLAN WAN, DMZ
DMZ WAN
WAN DMZ
WAN and DMZ LAN or WLAN
Allow
Allow
Deny
Deny
To create an access rule:
1. On the Firewall > Access Rules page in the matrix view,
select two zones that will be bridged by this new rule.
2. On the Access Rules page, click Add.
The access rules are sorted from the most specific to the
least specific at the bottom of the table. At the bottom of the
table is the Any rule.
Note: SonicWALL’s default firewall rules are set in this way
for ease of initial configuration, but do not reflect best
practice installations. Firewall rules should only allow
the required traffic and deny all other traffic.
Page 26 Creating Network Access Rules
Page 30

3. In the Add Rule page on the General tab, select Allow or
Deny or Discard from the Action list to permit or block IP
traffic.
4. Configure the other settings on the General tab as
explained below:
• Select the service or group of services affected by the
access rule from the Service drop-down list. If the
service is not listed, you must define the service in the
Add Service window. Select Create New Service or
Create New Group to display the Add Service
window or Add Service Group window.
• Select the source of the traffic affected by the access
rule from the Source drop-down list. Selecting Create
New Network displays the Add Address Object
window.
• Select the destination of the traffic affected by the
access rule from the Destination drop-down list.
Selecting Create New Network displays the Add
Address Object window.
• Select a user or user group from the Users Allowed
drop-down list.
• Select a schedule from the Schedule drop-down list.
The default schedule is Always on.
• Enter any comments to help identify the access rule in
the Comments field.
SonicWALL TZ 100/200 Series Getting Started Guide Page 27
Page 31

5. Click on the Advanced tab.
Address Objects
Address Objects are one of four object classes (Address, User,
Service, and Schedule) in SonicOS Enhanced. Once you
define an Address Object, it becomes available for use
wherever applicable throughout the SonicOS management
interface. For example, consider an internal Web server with an
IP address of 67.115.118.80.
6. Configure the other settings on the Advanced tab as
explained below:
• In the TCP Connection Inactivity T imeout (minutes)
field, set the length of TCP inactivity after which the
access rule will time out. The default value is 15
minutes.
• In the UDP Connection Inactivity Timeout
(minutes) field, set the length of UDP inactivity after
which the access rule will time out. The default value
is 30 minutes.
• In the Number of connections allowed (% of
maximum connections) field, specify the percentage
of maximum connections that is allowed by this access
rule. The default is 100%.
• Select Create a reflexive rule to create a matching
access rule for the opposite direction, that is, from
your destination back to your source.
7. Click on the QoS tab to apply DSCP marking to traffic
governed by this rule.
8. Click OK to add the rule.
Page 28 Address Objects
Rather than repeatedly typing in the IP address when
constructing Access Rules or NA T policies, you can create an
Address Object to store the Web server’s IP address. This
Address Object, “My Web Server,” can then be used in any
configuration screen that employs Address Objects as a
defining criterion.
Available Address Object types include the following:
• Host – Define a single host by its IP address.
• Range – Define a range of contiguous IP addresses.
• Network – Network Address Objects are like Range
objects in that they comprise multiple hosts, but rather than
being bound by specified upper and lower range delimiters,
the boundaries are defined by a valid netmask.
• MAC Address – Allows for the identification of a host by its
hardware address.
• FQDN Address – Fully Qualified Domain Names (FQDN)
Address Objects allow for the identification of a host by its
domain name, such as www.sonicwall.com.
Page 32

Network Address Translation
Tip: SonicOS Enhanced provides a number of default
Address Objects that cannot be modified or deleted.
You can use the default Address Objects when creating
a NAT policy, or you can create custom Address
Objects to use. All Address Objects are available in the
drop-down lists when creating a NAT policy.
Creating and Managing Address Objects
The Network > Address Objects page allows you to create
and manage your Address Objects. You can view Address
Objects in the following ways using the Vi ew Style menu:
• All Address Objects – displays all configured Address
Objects.
• Custom Address Objects – displays Address Objects
with custom properties.
• Default Address Objects – displays Address Objects
configured by default on the SonicWALL security
appliance.
The Network Address Translation (NAT) engine in SonicOS
Enhanced allows users to define granular NAT policies for their
incoming and outgoing traffic. By default, the SonicWALL
security appliance has a preconfigured NAT policy to perform
Many-to-One NAT between the systems on the LAN and the IP
address of the WAN interface. The appliance does not perform
NAT by default when traffic crosses between the other
interfaces.
You can create multiple NAT policies on a SonicWALL running
SonicOS Enhanced for the same object – for instance, you can
specify that an internal server uses one IP address when
accessing Telnet servers, and uses a different IP address for all
other protocols. Because the NAT engine in SonicOS Enhanced
supports inbound port forwarding, it is possible to access
multiple internal servers from the WAN IP address of the
SonicWALL security appliance. The more granular the NAT
Policy, the more precedence it takes.
Before configuring NAT Policies, you must create all Address
Objects that will be referenced by the policy. For instance, if you
are creating a One-to-One NAT policy, first create Address
Objects for your public and private IP addresses.
SonicWALL TZ 100/200 Series Getting Started Guide Page 29
Page 33

Configuring NAT Policies
NAT policies allow you to control Network Address Translation
based on matching combinations of Source IP address,
Destination IP address, and Destination Services. Policy-based
NAT allows you to deploy different types of NA T simultaneously.
The following NAT configurations are available in SonicOS
Enhanced:
• Many-to-One NAT Policy
• Many-to-Many NAT Policy
• One-to-One NAT Policy for Outbound Traffic
• One-to-One NAT Policy for Inbound Traffic (Reflexive)
• One-to-Many NAT Load Balancing
• Inbound Port Address Translation via One-to-One NAT
Policy
• Inbound Port Address Translation via WAN IP Address
This section describes how to configure a One-to-One NAT
policy. One-to-One is the most common NAT policy used to
route traffic to an internal server, such as a W eb server. Most of
the time, this means that incoming requests from external IP
addresses are translated from the IP address of the SonicWALL
security appliance WAN port to the IP address of the internal
Web server. The following example configuration illustrates the
use of the fields in the Add NAT Policy procedure. To add a
One-to-One NAT policy that allows all Internet traffic to be
routed through a public IP address, two policies are needed:
one policy for the outbound traffic, and one policy for the
inbound traffic.
Page 30 Network Address Translation
Page 34

To add the components of a One-to-One NAT policy, perform
the following steps:
1. Navigate to the Network > Address Objects Page and
choose the Custom radio button.
2. Click the Add button; define a network address object
(example named 'webserver 10.33.4.101' ; a LAN host
object w/ IP address 10.33.4.101)
3. Navigate to the Network > NAT Policies page. Click Add.
The Add NAT Policy dialog box displays.
4. For Original Source, select Any.
5. For Translated Source, select Original.
6. For Original Destination, select WAN Primary IP.
7. For Translated Destination, select 'webserver
10.33.4.101'
8. For Original Service, select HTTP.
9. For Translated Service, select Original.
10. For Inbound Interface, select X1.
11. For Outbound Interface, select Any.
12. For Comment, enter a short description.
13. Select the Enable NA T Policy checkbox.
14. Select the Create a reflexive policy checkbox if you want
a matching NAT policy to be automatically created in the
opposite direction. This will create the outbound as well as
the inbound NAT Policy.
For more information on creating NAT policies, refer to the
SonicOS Enhanced Administrator’s Guide.
SonicWALL TZ 100/200 Series Getting Started Guide Page 31
Page 35

Page 32 Network Address Translation
Page 36

Support and Training Options
In this Section:
This section provides overviews of customer support and training options for the SonicWALL TZ 100/200 series appliances.
•
Customer Support - page 60
•
Knowledge Portal - page 60
•
Onboard Help - page 61
•
SonicWALL Live Product Demos - page 61
•
User Forums - page 62
•
Training - page 63
•
Related Documentation - page 64
•
SonicWALL Secure Wireless Network Integrated Solutions Guide - page 65
5
SonicWALL TZ 100/200 Series Getting Started Guide Page 59
Page 37

Customer Support
Knowledge Portal
SonicWALL offers Web-based and telephone support to
customers who have a valid Warranty or who purchased a
Support Contract. Please review our Warranty Support Policy
for product coverage. SonicWALL also offers a full range of
consulting services to meet your needs, from our innovative
implementation services to traditional statement of work-based
services.
For further information, visit:
<http://www.sonicwall.com/us/support/contact.html>
The Knowledge Portal allows users to search for SonicWALL
documents based on the following types of search tools:
•Browse
• Search for keywords
• Full-text search
For further information, navigate to the Support > Knowledge
Portal page at:
<http://www.mysonicwall.com/>
Page 60 Customer Support
Page 38

Onboard Help
SonicWALL Live Product Demos
SonicOS features a dynamic Onboard Help in the form of
helpful tooltips that appear over various elements of the GUI
when the mouse hovers over them. Elements that display these
tooltips include text fields, radio buttons, and checkboxes.
The SonicWALL Live Demo Site provides free test drives of
SonicWALL security products and services through interactive
live product installations:
• Unified Threat Management Platform
• Secure Cellular Wireless
• Continuous Data Protection
• SSL VPN Secure Remote Access
• Content Filtering
• Secure Wireless Solutions
• Email Security
• SonicWALL GMS and ViewPoint
For further information, visit:
<http://livedemo.sonicwall.com/>
SonicWALL TZ 100/200 Series Getting Started Guide Page 61
Page 39

User Forums
The SonicWALL User Forums is a resource that provides users
the ability to communicate and discuss a variety of security and
appliance subject matters. In this forum, the following
categories are available for users:
• Content Security Manager topics
• Continuous Data Protection topics
• Email Security topics
• Firewall topics
• Network Anti-Virus topics
• Security Services and Content Filtering topics
• SonicWALL GMS and Viewpoint topics
• SonicPoint and Wireless topics
• SSL VPN topics
• TZ 200 / Wireless WAN - 3G Capability topics
• VPN Client topics
• VPN site-to-site and interoperability topics
For further information, visit:
<https://forum.sonicwall.com/>
Page 62 User Forums
Page 40

Training
SonicWALL offers an extensive sales and technical training
curriculum for Network Administrators, Security Experts and
SonicWALL Medallion Partners who need to enhance their
knowledge and maximize their investment in SonicWALL
Products and Security Applications. SonicWALL Training
provides the following resources for its customers:
• E-Training
• Instructor-Led Training
• Custom Training
• Technica l Certification
• Authorized Training Partners
For further information, visit:
<http://www.sonicwall.com/us/training.html>
SonicWALL TZ 100/200 Series Getting Started Guide Page 63
Page 41

Related Documentation
See the following related documents for more information:
• SonicOS Enhanced Administrator’s Guide
• SonicOS Enhanced Release Notes
• SonicOS Enhanced Feature Modules
• Dashboard
• High Availability
• Multiple Admin
• NAT Load Balancing
• Packet Capture
• Radio Frequency Monitoring
• Single Sign-On
• SSL Control
• Virtual Access Points
• SonicWALL GMS 5.0 Administrator’s Guide
• SonicWALL GVC 4.0 Administrator’s Guide
• SonicWALL ViewPoint 5.0 Administrator’s Guide
• SonicWALL GAV 4.0 Administrator’s Guide
• SonicWALL IPS 2.0 Administrator’s Guide
• SonicWALL Anti-Spyware Administrator’s Guide
• SonicWALL CFS Administrator’s Guide
For further information, visit:
<http://www.sonicwall.com/us/support.html>
Page 64 Related Documentation
Page 42

SonicWALL Secure Wireless Network Integrated Solutions Guide
The Official Guide to SonicWALL’s market-leading wireless
networking and security devices.
This 512 page book is available in hardcopy. Order the book
directly from Elsevier Publishing at:
<http://www.elsevier.com>
SonicWALL TZ 100/200 Series Getting Started Guide Page 65
Page 43

Page 66 SonicWALL Secure Wireless Network Integrated Solutions Guide
Page 44

SonicWALL, Inc.
1143 Borregas Avenue T +14 08.745.9600
SunnyvaleCA94089-1306 F+1408.745.9300
P/N 232-001720-00
Rev A 05/09
©2009SonicWALL,Inc.is aregisteredtrademarkofSonicWALL,Inc.Otherproductnamesmentionedhereinmaybetrademarksand/orregisteredtrademarks of their respective companies. Specications and descriptionssubjec t tochange without notice.
www.sonicwall.com
 Loading...