

Page 1

Network Security Manager
On-Premises System
Administration Guide
Page 2

Contents
About Network Security Manager 4
About NSM 4
About the System Option 5
Conventions 5
Guide Conventions 5
UI Conventions 6
Related Documents 7
Dashboard 8
System Information 8
CPU Usage 9
Memory Usage 9
Network Interfaces 10
Disk Usage 10
Active Users 11
Settings 12
Licenses 12
Administration 12
Time 14
Setting Time 15
Adding an NTP Server 15
Deleting an NTP Server 16
Certificates 16
Diagnostics 17
Diagnostics Tests 17
Tech Support Report 18
Firmware and Settings 18
Zero Touch 19
Shutdown/Reboot 19
Closed Network 19
Network 21
Settings 21
Interface 22
Routes 22
System Monitor 24
Settings 24
Network Security Manager On-Premises System Administration Guide
Contents
2
Page 3

Live Monitor 25
Process Monitor 25
Service Monitor 26
System Report 27
High Availability 28
Status 28
Settings 29
Advanced Settings 29
Virtual IP 30
HA Modes and Terminologies 31
NSMManagement Console 32
Upgrade Instructions 32
SonicWall Support 35
About This Document 36
Network Security Manager On-Premises System Administration Guide
Contents
3
Page 4

About Network Security Manager
SonicWall® Network Security Manager is a web-based application that centralizes management for the
SonicWall family of network security appliance and web services. This on-premises solution automates the
steps to set up an appliance and offers robust reporting and management tools.
Topics:
l About NSM
l About the System Option
l Conventions
l Related Documents
1
About NSM
SonicWall Network Security Manager (NSM) is the next generation firewall management application that
provides a holistic approach to security management. The approach is grounded in the principles of
simplifying and automating various tasks to achieve better security operation and decision-making, while
reducing the complexity and time required. NSM gives you everything you need for firewall management to
govern the entire SonicWall network security operations with greater clarity, precision, and speed. This is all
managed from a single, function-packed interface that can be accessed from any location using a browserenabled device. Firewalls can be centrally managed to provision all of the network security services with a
single-pane-of-glass experience.
The on-premises solution enables organizations to centrally and reliably manage a single small network to
one or more enterprise-class deployments with the flexibility to scale without increasing management and
administrative overhead. NSM offers many salient features:
l Closed Network support feature is ideal for customers that run one or more private networks that are
completely shut-off from the outside environment. Customers can license the NSM managed firewall
without contacting License Manager (LM) or MySonicWall (MSW), when onboarding and patching
SonicWall firewall to preserve the privacy and security of the closed networks.
l High Availability that allows two identical NSMs to be configured to provide a reliable continuous
connection to the public internet.
l Azure and KVM hypervisor deployments.
l Account Lockout feature, designed to prevent unauthorized access to the Network Security Manager
environment and other brute-force attacks, social engineering, and phishing. This disables the user
account if incorrect passwords are entered after a specified number of failed attempts during a given
Network Security Manager On-Premises System Administration Guide
About Network Security Manager
4
Page 5

period. Admin can set the lockout duration until the lockedaccountis released either after a specified
time or manually done by an administrator when three unsuccessful log in attempts in 15 minutes are
exceeded.
l Certificate management feature that enables a user interface to facilitate the management of digital
certificates for all Network Security Manager managed firewalls. This enhances trust established
between parties in a secure communication session.
l NSM adds support for the firewall series Gen 7 NSa 2700 and TZ Series (270, 370, and 470) running
SonicOS as well as NSsp and Gen 7 NSv, with multi-tenancy and unified policy management
features.
l Login To Unit that provides admins a fast and easy access to the managed firewall device-level UI
directly from the device inventory page of Network Security Manager.
l Multi-Device Upgrade Feature to upgrade multiple firewalls from a group of devices in NSM instead
of manually upgrading each firewall. Admins can execute them using NSMAPIs as well.
l Security feature to grant admin rights based on specific IP address ranges. The IP restrictions can be
added in 3 formats - single IP, an IP range, or a specific network with a subnet mask.
l Configure or edit virtual or network interfaces using templates.
NSM can manage both Gen6 and Gen7 SonicWall firewalls. SonicOS 6.5.4.6 is the recommended version,
but NSM can on-board the older Gen6 Firewall versions as well.
About the System Option
The System command set provides a centralized user interface, where the administrator can manage and
monitor the on-premises NSM solution. You use the commands associated with the System option to
configure NSM, manage NSM performance, monitor activities, and manage upgrades and licensing. The
tools supporting this task include:
l Dashboard
l Settings for the NSM application
l Network settings, interfaces, and routes
l Monitoring for the system parameters that comprise the on-premises solution
l High Availability option to provide a reliable continuous connection to the public internet.
Conventions
The Network Security Manager On-Premises SystemAdministration Guide makes use of the following
conventions:
l Guide Conventions
l UI Conventions
Guide Conventions
The following text conventions are used in this guide:
Network Security Manager On-Premises System Administration Guide
5
About Network Security Manager
Page 6

Convention Use
Bold text Used in procedures to identify
elements in the user interface like
dialog boxes, windows, screen
names, messages, and buttons. Also
used for file names and text or values
you are being instructed to select or
type into the interface.
Menu view or mode | Menu item > Menu item Indicates a multiple step menu
choice on the user interface. For
example, Manager View | HOME >
Firewall > Groups means that you
are in the Manager View with the
HOME option selected. Then click on
Firewall in the left-hand menu, and
select Groups.
Computer code
<Computer code italic>
Indicates sample code or text to be
typed at a command line.
Represents a variable name when
used in command line instructions
within the angle brackets. The
variable name and angle brackets
need to be replaced with an actual
value. For example, in the segment
serialnumber=<your serial number>
replace the variable and brackets
with the serial number from your
device:
serialnumber=C0ABC00000321.
Italic
Indicates the name of a technical
manual. Also indicates emphasis on
certain words in a sentence, such as
the first instance of a significant term
or concept.
,
UI Conventions
When acquiring devices for management and reporting, the Status option uses colored icons to indicate the
various states of the devices being monitored and managed.
Status
Icon
Definition
Indicates that a process is in progress. In some instances, specific details are provided. For
example, Requesting Licenses.
Network Security Manager On-Premises System Administration Guide
About Network Security Manager
6
Page 7

Status
Icon
Definition
Indicates that a process has completed successfully. May provide the message Success or
something with more detail like Device parameters set up in Cloud Capture Security Center
complete.
Also indicates that a configuration is in sync and acquired.
Indicates that a task is in process or pending the completion of another task. The message
Pending is usually displayed, as well.
Indicates a potential issue or a warning. Messages provide additional detail to help you
resolve the issue.
Indicates an error. Additional information may be provided via an information icon. Click the
icon or mouse over it to see the message:
Indicates an alert.
Indicates the device is online.
Indicates the device is offline.
Indicates unmanaged devices.
Indicates managed devices.
Indicates that Zero Touch Connection is disabled for a device.
Related Documents
The NSM documentation includes the following:
l About Network Security Manager provides an overview of the product and describes the base modes
of operation, the navigation and icons, and the Notification Center.
l The Network Security Manager Getting Started Guide describes how to license and configure a basic
NSM setup.
l The NSM Administration Guide reviews the management tasks for administering your security
infrastructure.
l The Network Security Manager Reporting and Analytics Administration Guide discusses how to use
the reporting and analytics features.
l Network Security Manager On-Premises System Administration describes the system administration
tasks for an on-premises deployment of NSM.
l The NSM Release Notes summarizes the new features for the product.
Network Security Manager On-Premises System Administration Guide
About Network Security Manager
7
Page 8

Dashboard
The System Dashboard provides information and status for the On-Premises NSM implementation.
2
You can customize the interval for the Dashboard by sliding the orange bar above the graphs to the left or
the right. You can select one of several predefined intervals. The ranges differ from the Past 24 hours to
the Past 5 days. Refresh the data by clicking the Refresh icon on the right.
The data in the Dashboard includes:
l System Information
l CPU Usage
l Memory Usage
l Network Interfaces
l Disk Usage
l Active Users
System Information
The information about the system hosting the On-Premises NSM is displayed in the upper left tile on the
Dashboard. This is a read only data; the tile has no active links.
Network Security Manager On-Premises System Administration Guide
Dashboard
8
Page 9
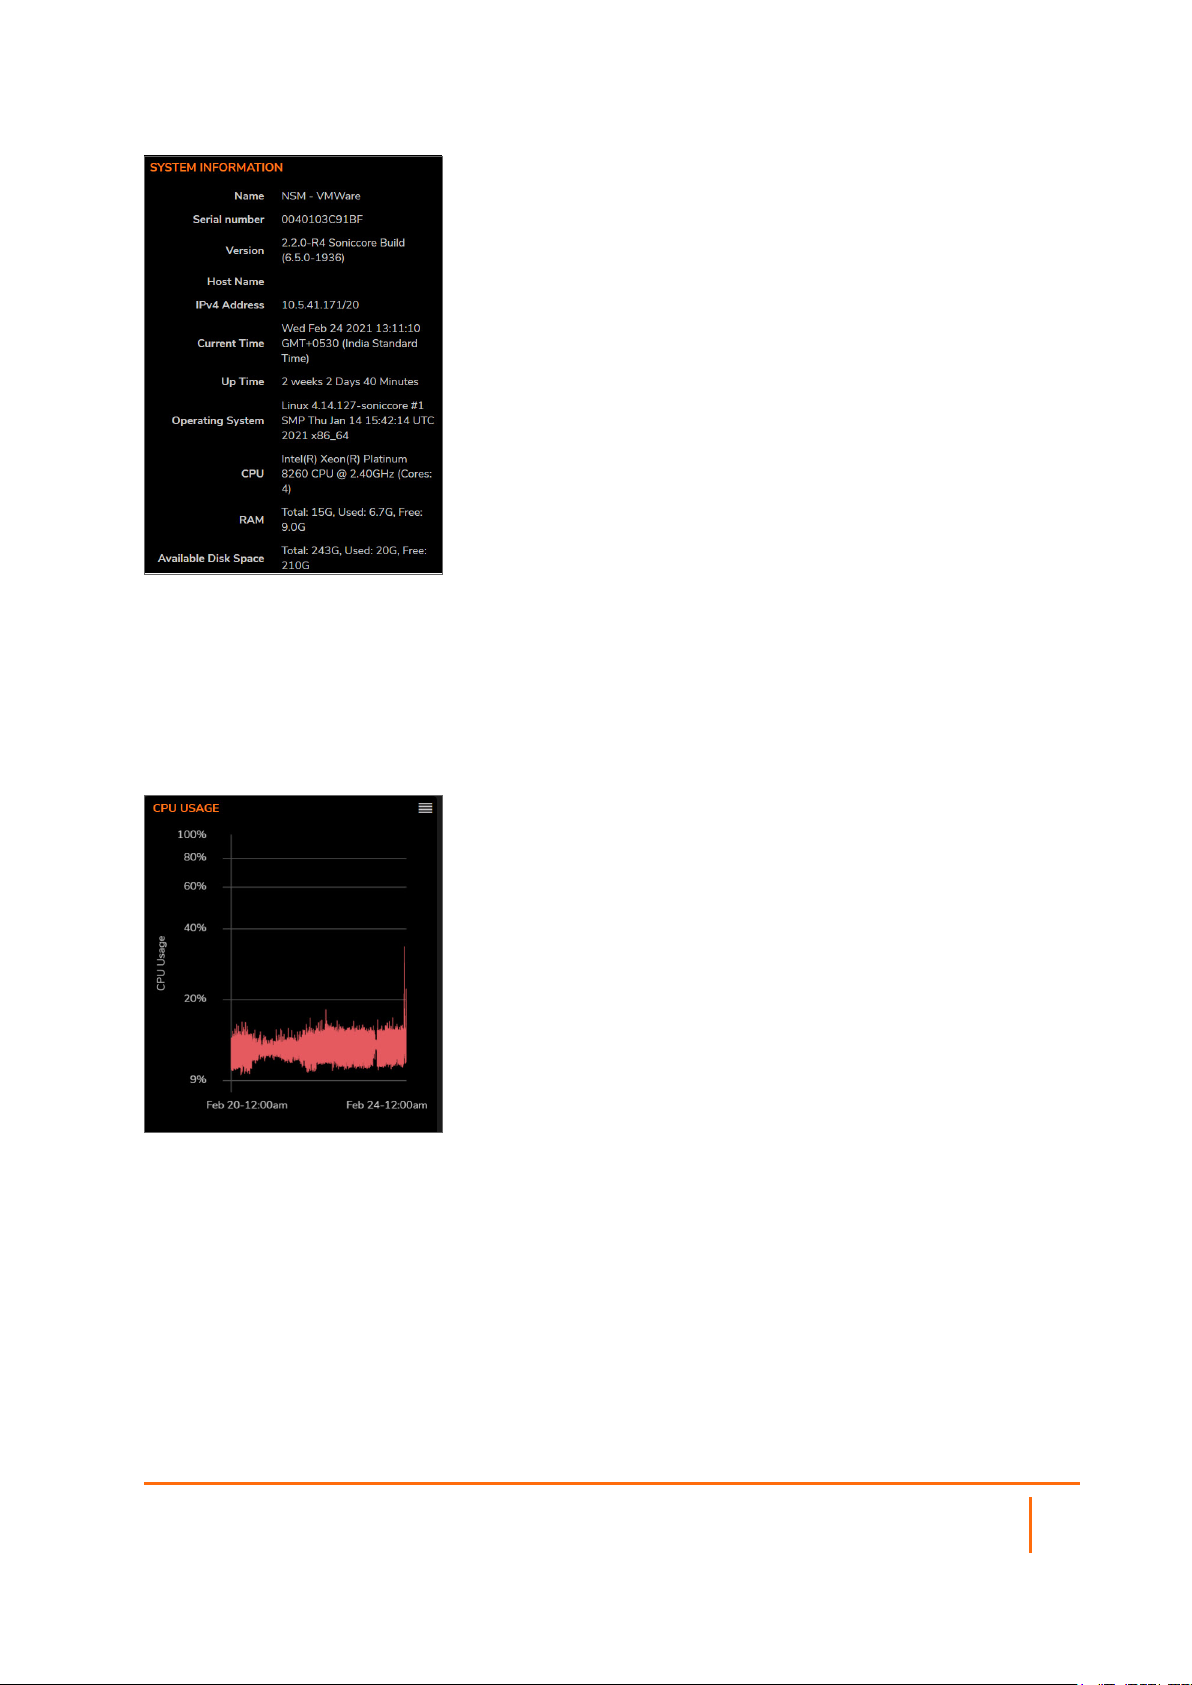
CPU Usage
The CPUUsage tile summarizes the CPU usage in graph form. You can easily see when the high and low
usage times occur, and by adjusting the time interval to shorter period, you can see better granularity on the
graph.
Click on the icon in the upper right corner to Show System Report. This redirects you to System Monitor >
System Report to view a more detailed graph on CPU Utilization.
Memory Usage
The Memory Usage tile summarizes the memory usage in graph form. You can easily see when the high and
low usage times occur, and by adjusting the time interval to shorter period, you can see better granularity on
the graph.
Network Security Manager On-Premises System Administration Guide
Dashboard
9
Page 10

Click on the icon in the upper right corner to Show System Report. This redirects you to System Monitor >
System Report to view a more detailed graph on Memory Utilization.
Network Interfaces
The Network Interfaces tile lists the network interfaces for your system. The icon shows the status of the
interfaces.
Click on the icon in the upper right corner to Show Network Interfaces. This redirects you to Network >
Interfaces to view the details on each interface.
Disk Usage
The Disk Usage tile summarizes the memory usage using a pie chart. Click on either the Free or Used
segment to see the percentage allocated to each.
Network Security Manager On-Premises System Administration Guide
Dashboard
10
Page 11
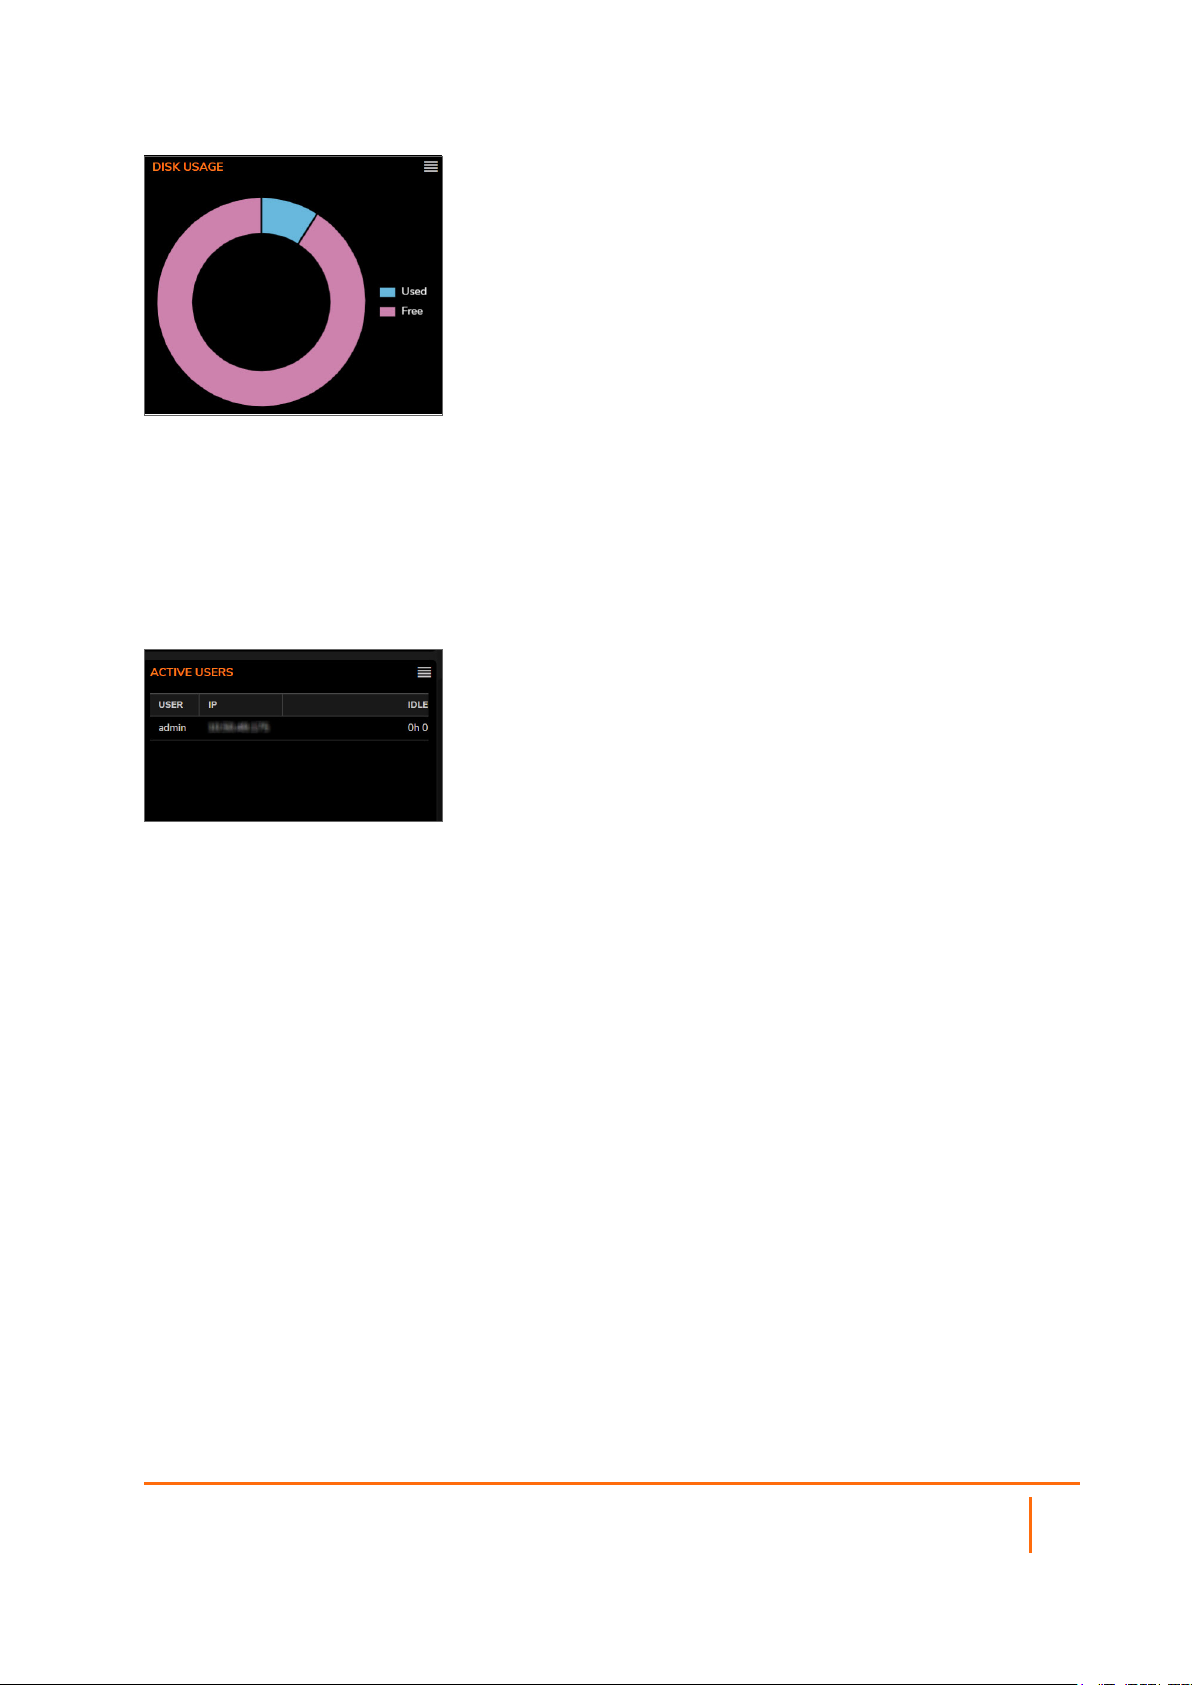
Click on the icon in the upper right corner to Show System Report. This redirects you to System Monitor >
System Report; you may need to scroll down to view the Disk Utilization graph.
Active Users
The Active Users tile lists the users who are currently logged in.
Click on the icon in the upper right corner to Show Active Users. This redirects you to Home | User
Management > Status to view more information about the user and their session. You can also log out a
user from this page.
Network Security Manager On-Premises System Administration Guide
Dashboard
11
Page 12

Settings
Most of the tasks for setting up NSM for an on-premises implementation are grouped under settings.
Topics:
l Licenses
l Administration
l Time
l Certificates
l Diagnostics
l Firmware and Settings
l Zero Touch
l Shutdown/Reboot
l Closed Network
3
Licenses
Manage your NSM licenses by navigating to System | Settings > Licenses.
The Licenses page lists both your Security Services and the Support Service information. You can quickly
confirm the status of licensing, count, the expiration date and action status of each.
From this page you can also upgrade your NSM, start a trial, renew, or activate service.
Administration
Set your NSM administrative settings by navigating to System | Settings > Administration.
Network Security Manager On-Premises System Administration Guide
Settings
12
Page 13

To name your system:
1.
Navigate to System | Settings > Administration.
2.
On the General tab, enter the NSM Friendly Name in the field provided.
3.
Click Accept.
To set up your administrator settings:
1.
Navigate to System | Settings > Administration.
2.
Select the NSM Administrator tab.
3.
Enter the User Timeout in minutes. If set to -1, NSM never logs out.
4.
Type the Current Password.
5.
Enter the New Password and confirm it.
6.
Click Accept.
To define the web management settings:
1.
Navigate to System | Settings > Administration.
2.
Select the Web Management tab.
Network Security Manager On-Premises System Administration Guide
Settings
13
Page 14

3.
Enter the HTTPS Port in the field provided.
4.
Select Certificate from the drop-down list.
5.
Click Accept.
To define the mail server settings
1.
Navigate to System | Settings > Administration.
2.
Select the SMTP tab.
3.
Enter the name or IPaddress for the Mail Server in the field provided.
4.
Define the From E-mail address. This is the mail address for messages sent from the system.
5.
Select Advanced Settings to view more options.
6.
(Optional) Select Skip TLS Cert Verification if you want to skip the TLS certificate verifications.
7.
Specify the SMTPPort.
8.
Select the Connection Security Method.
9.
(Optional) Select SMTPEnable Authentication.
10.
Specify User Name and Password
11.
Click Accept.
Time
The Time page helps you set the system time and setup the Network Timer Protocol (NTP) servers.
Network Security Manager On-Premises System Administration Guide
14
Settings
Page 15

Topics:
l Setting Time
l Adding an NTP Server
l Deleting an NTP Server
Setting Time
You can set the time to be managed using an NTP (Network Timer Protocol) server.
On the Settings tab, enable the switch for the option Set Time automatically using NTP.
To set the system time manually:
1.
Navigate to System | Time > Settings.
2.
Set the Date/Time using the icon in the field provided.
3.
Select the Time Zone.
4.
Click Accept.
Adding an NTP Server
To add an NTPserver:
1.
Navigate to System | Settings > Time.
2.
Select the NTP Servers tab.
3.
Click on +Add.
4.
Enter the NTP Server in the field provided.
5.
Click Add.
The server you have newly added appears in the list.
Network Security Manager On-Premises System Administration Guide
Settings
15
Page 16

Deleting an NTP Server
To delete an NTP server:
1.
Navigate to System | Settings > Time.
2.
Select the NTP Servers tab.
3.
Select the NTP Server you need to delete from the list.
4.
Click Delete.
5.
Click OKto confirm the deletion.
The server you have deleted is removed from the list.
Certificates
Manage your certificates on the Certificates page. Navigate to System | Settings > Certificates to see
the list of certificates.
The following functions can be used to manage your certificates:
Search Use the Search function to find a specific certificate or filter to a set with similar
parameters.
Generate Self
Signed
Certificate
Import
Delete
Refresh
Click this icon to generate a single certificate.
To import a list of certificates:
1.
Click the Import icon to a list of active certificates.
2.
Browse your computer for the folder name and select it.
3.
Enter the password if applicable.
4.
Click Upload.
Select the certificate you want to delete and click the Delete icon. You can select multiple
certificates to delete as the same time.
Clicking Refresh updates the certificate list.
Network Security Manager On-Premises System Administration Guide
Settings
16
Page 17

Diagnostics
On-Premises NSM provides tools for helping you diagnose issues with your system. Navigate to System |
Settings > Diagnostics.
Topics:
l Diagnostics Tests
l Tech Support Report
Diagnostics Tests
The diagnostics tests tab provides the tools to validate connectivity, trace routes and ping an IP address.
Use the Connectivity tests to validate connectivity to the systems listed in the table. Check the test you want
to run and click on the link Test All or Test Selected. The results are reported in the table as shown below:
Click on the information icon next to License Manager Connectivity to see the name of the License
Manager Host.
To trace a route:
1.
Click on the tab Trace Route.
2.
Enter the IP address for the host you are tracing.
3.
Click Go.
Network Security Manager On-Premises System Administration Guide
Settings
17
Page 18

To ping an address:
1.
Click on the tab Ping.
2.
Enter the IP address for the device you are pinging.
3.
Click Go.
Tech Support Report
When you have issues, you can create a Tech Support Report (TSR) directly from NSM. It includes all the
data needed for SonicWall Support to help you. Navigate to System | Settings > Diagnostics and select
the Tech Support Report tab.
Set the Log Rotation Size for the data to be included in the TSR information. The maximum size allowed is
100 MB. If you want to include the logs in your TSR enable the switch. Click Download TSR. Submit the
information in the TSR provided to SonicWall Support.
Firmware and Settings
Manage your NSM firmware on the Firmware and Settings page. Navigate to System | Settings >
Firmware and Settings.
The table lists key statistics about the firmware like Build Date, Load Date, File Size, Version, and
incompatibilities.
The columns on the table can be customized by clicking Column Selection and checking which columns you
want to appear.
Other actions include:
Import/Export
Settings
Use this command to import or export the firmware settings.
Network Security Manager On-Premises System Administration Guide
18
Settings
Page 19

Upload Firmware Use this command to upload a new firmware version.
Zero Touch
NSM has automated the process of acquiring and configuring your firewalls with the Zero Touch feature as
well as providing the mechanism to manage your firewalls with “zero” touch when you are setting it up for
management. The firewall need only be registered in MySonicWall and enabled for Zero Touch.
NOTE: Firewall registration can be completed even before you receive the unit.
When you get the firewall, plugged it in for power and connected to the internet for this feature to operate.
Beyond that, the firewall, NSM, and other entities within the network infrastructure function together to bring
the unit under management.
For the Zero Touch feature to function correctly, you must have SonicOS 6.5.1.1-42n or later running on
your firewall. New firewall shipments already have that version and Zero Touch enabled in the firmware.
Shutdown/Reboot
Use this command to shut down or reboot your NSM system. Navigate to System | Settings >
Shutdown/Reboot.
Use Shutdown to power down the system and use Restart to power down and reset the system.
IMPORTANT: Either of these actions disconnects all users. The restarting process takes several
minutes and any unsaved changes are lost.
Closed Network
Closed Network support feature helps you to run one or more private networks that are completely shut-off
from the outside environment. You can license the NSM managed firewall without contacting License
Manager (LM) or (MSW), when onboarding and patching SonicWall firewall to preserve the privacy and
security of the closed networks.
Navigate to System | Settings > Closed Network.
Network Security Manager On-Premises System Administration Guide
19
Settings
Page 20

To import Network Files:
1.
Click Import.
2.
Click Browse and select the license file you need to import from your computer.
3.
Click Upload.
NOTE: You can import only a ZIP file with .LIC extension.
The imported network is listed with the details including Serial Number, Friendly Name, Status, and Keyset
data.
An imported closed network file contains the NSM License along with the firewall license and signature files.
After the Closed network file is imported in NSM, you can add the devices as usual in the Firewalls >
Inventory page. After adding or acquiring the device successfully, the device gets registered automatically.
The device license will be updated in the Device >Licenses page and the NSM Firewalls >Inventory
page.
You can also update a firewall from the Closed Network page.
To Update a Firewall:
1.
Select the firewall from the list.
2.
Click Update Firewall.
Network Security Manager On-Premises System Administration Guide
20
Settings
Page 21

Network
Use the Network command to define the network infrastructure for your On-Premises NSM system.
Topics:
l Settings
l Interface
l Routes
Settings
4
You can set up your host and DNS servers by navigating to System | Network > Settings.
To setup the host:
1.
In the Host section, input the server Name in the field provided.
2.
Add the Domain name.
3.
Click Accept.
To set up a DNS server:
1.
In the DNS section, input the IPaddress in the field provided. You can add IPaddresses for up to
three DNS server.
2.
Click Accept.
Network Security Manager On-Premises System Administration Guide
Network
21
Page 22

Interface
To see the network interfaces for your NSM system, navigate to System | Network >Interfaces.
Use the Search field to find a specific interface or filter on a parameter. Use Column Selection to
customize which column display.
Routes
Use the Routes page to manage the network routes for your NSM implementation. Navigate to System |
Network > Routes. You can add, edit or delete the routes.
To add a route:
1.
Click the +Add icon.
2.
Add a name for the Destination Network.
3.
Input the Netmask.
4.
Enter the Gateway Address.
5.
Select the Egress Interface from the drop-down list.
6.
Click Add.
Network Security Manager On-Premises System Administration Guide
Network
22
Page 23

To edit a network route:
1.
Select the route that you want to edit.
2.
In the Action column, click the Action icon and select Edit.
NOTE: You cannot edit the default routes.
3.
Make changes to fields as needed.
4.
Click Save.
To delete a network route:
1.
Select the route that you want to delete.
2.
In the Action column, click the Action icon and select Delete. Or you can click on the Delete icon
above the table.
NOTE: You cannot delete the default routes.
NOTE: You can delete multiple routes at once by checking the boxes to the right of the names
and clicking the Delete icon.
3.
Confirm the delete as needed.
Network Security Manager On-Premises System Administration Guide
Network
23
Page 24

System Monitor
Use the System Monitor commands to monitor and assess the performance of your NSM implementation.
Topics:
l Settings
l Live Monitor
l Process Monitor
l Service Monitor
l System Report
5
Settings
Use the Settings page to set the thresholds for CPU, memory and disk utilization. Navigate to System |
System Monitor > Settings.
Use the sliding bars in the first column to set the threshold for warning notifications. The Warning range is
predefined to span from 60% to 80%. for CPUand memory utilization. It spans from 50% to 75% for the disk
utilization. Slide the orange button to the setting you want, and you will be sent a notice that the utilization
has risen to the Warning level.
Use the sliding bars in the second column to set the threshold for critical notification levels. The Critical
range is predefined to span from 85% to 95% for CPUand memory utilization. It spans from 80% to 95% for
the disk utilization. Slide the orange button to the setting required, and you will be sent a notice that the
utilization has risen to Critical level.
Be sure to click Accept when you finish defining your thresholds.
Network Security Manager On-Premises System Administration Guide
24
System Monitor
Page 25

Live Monitor
Use the Live Monitor to see how the NSM is behaving in real time. Navigate to System | System Monitor >
Live Monitor.
When first reaching the Live Monitor page, you may want to define the settings for the report.
l Using the orange slider bar to set the interval for the report. The predefined intervals range from 1
min to 60 min.
l Set the Refresh period in seconds.
l Enable or disable the Exponential View.
l Using the icons to the right you can change between a line graph and a bar chart.
Process Monitor
Use the Process Monitor to see the processes that are running on the NSM system and the utilization
associated with them. Navigate to System | System Monitor > Process Monitor.
Network Security Manager On-Premises System Administration Guide
System Monitor
25
Page 26

You can use the Search field to search for a specific process or filter to a set of similar processes. The table
responds as you type.
Click the Refresh icon to refresh the data in the table.
Service Monitor
Use the Service Monitor to see the services that are running on the NSM system and the utilization
associated with them. Navigate to System | System Monitor > Service Monitor.
You can use the Search field to search for a specific process or filter to a set of similar processes. The table
responds as you type. You have the option for column selection.
You can also view the status of the services, start, restart, or stop them.
Click the Refresh icon to refresh the data in the table.
Network Security Manager On-Premises System Administration Guide
System Monitor
26
Page 27

System Report
The System Report page displays the historical reports for CPU, memory, and disk utilization. Navigate to
System | System Monitor > System Report.
When first reaching the System Report page, you may want to define the settings for the report.
l Using the orange slider bar to set the period for the report. The predefined periods range from Past
24 hours to Past 5 days.
l Enable or disable the Exponential View.
l Using the icons to the right, change between a line graph and a bar chart.
l Click Refresh to update the data in the table.
Network Security Manager On-Premises System Administration Guide
System Monitor
27
Page 28

High Availability
High Availability feature allows two identical NSMs to be configured to provide a reliable continuous
connection. One NSM is configured as the primary, and an identical NSM is configured as the secondary. If
the primary NSM fails, the secondary NSM takes over to secure a reliable connection for the protected
network. Two NSMs configured in this way are also known as a High Availability pair (HA pair).
Use the System Monitor commands to monitor and assess the performance of your NSM implementation.
Topics:
l Status
l Settings
l Advanced Settings
l Virtual IP
l HA Modes and Terminologies
6
Status
Use the Status command to monitor and assess the status information of your NSM High Availability. You
can also view the configuration and license details, and refresh the page to view the latest information.
Network Security Manager On-Premises System Administration Guide
High Availability
28
Page 29

Settings
Use the Settings command to view the general settings of the NSM High Availability. You can view the
Primary and Secondary device details in this page.
You can change the modes of High Availability to None or Active/Standby.
NOTE: For more details on High Availability modes, refer to HA Modes and Terminologies
You can also enable the preempt mode and the encryption for control communication between the active
and the standby NSMs.
You can edit the secondary device details and click Accept to save the changes.
Advanced Settings
Use the Advanced command to monitor the advanced settings of your NSM High Availability
implementation. You can edit and save the settings including Heartbeat Interval, Failover Trigger Level,
Probe Interval, and the missed Probe Counts.
Hover the mouse over the info icon to view more details of each settings. Click Accept to save the changes.
You can also synchronize the settings and force the active or standby failover, clicking the respective buttons
in the Diagnostics section.
Network Security Manager On-Premises System Administration Guide
High Availability
29
Page 30

Virtual IP
Use the Virtual IPpage to set the virtual IPdetails of NSM High Availability. You can view the details
including Virtual IPaddress, Probe IPAddress, and the Probe Monitoring status.
Click to edit the Virtual IPsettings. You can edit, enable, or disable the Probe IPAddress using this
option.
Network Security Manager On-Premises System Administration Guide
High Availability
30
Page 31

HA Modes and Terminologies
Modes Definitions
None Selecting None activates a standard high availability configuration and NSM
failover functionality, with the option of enabling stateful High Availability.
Active/Standby Active/Standby mode provides basic high availability with the configuration of two
identical NSMs as a High Availability pair. The Active NSM handles all traffic, while
the Standby NSM shares its configuration settings and can take over at any time to
provide continuous network connectivity if the Active NSM stops working.
By default, Active/Standby mode is stateless, meaning that network connections
must be re-established after a failover. To avoid this, stateful synchronization can
be licensed and enabled with Active/Standby mode. In this stateful High Availability
mode, the dynamic state is continuously synchronized between the Active and
Standby NSMs. When the Active NSM encounters a fault condition, stateful
failover occurs as the Standby NSM takes over the Active role with no interruptions
to the existing network connections.
Terms Definitions
Active The operative condition of an NSM. The Active identifier is a logical role that can be
assumed by either a primary or secondary NSM.
Primary The principal NSM. The primary identifier is a manual designation and is not
subject to conditional changes. Under normal operating conditions, the primary
NSMoperates in an Active role.
Secondary The subordinate NSM. The secondary identifier is a relational designation and is
assumed by an NSM when paired with a primary NSM. Under normal operating
conditions, the secondary NSM operates in a standby mode. Upon failure of the
primary NSM, the secondary NSMassumes the Active role.
HA High Availability: non-state, NSM failover capability.
Failover The actual process in which the Standby NSM assumes the Active role following a
qualified failure of the Active NSM. Qualification of failure is achieved by various
configurable physical and logical monitoring facilities.
Preempt Applies to a post-failover condition in which the primary NSM has failed, and the
secondary NSM has assumed the Active role. Enabling Preempt causes the
primary NSM to seize the Active role from the secondary after the primary NSM has
been restored to a verified operational state.
Standby (Idle) The passive condition of an NSM. The standby identifier is a logical role that can be
assumed by either a primary or secondary NSM. The Standby NSM assumes the
Active role upon a determinable failure of the Active NSM.
Network Security Manager On-Premises System Administration Guide
High Availability
31
Page 32

NSMManagement Console
This chapter describes how to use the NSM Management Console to upgrade your NSM from 2.1.1 to 2.2.
Upgrade Instructions
When upgrading from NSM 2.1.1 to NSM 2.2, the Firmware Settings page provides you a tool tip that
directs you to upgrade using the NSM Management Console. The settings and configuration data is
preserved across upgrades.
NOTE: The concepts and processes to upgrade NSM 2.1.1 for ESXi, KVM, and Hyper-V to NSM 2.2 are
almost similar.
7
The directions are listed below:
1.
Open the NSM Management Console in a 2.1.1 NSM On-Premises Virtual Machine.
NOTE: For VMWare ESXi, right click on the VM and click Open Console.
2.
Ensure that NSM on-premises virtual machine has access to internet.
3.
Open Network Interfaces menu and make any changes to network configuration, if required.
4.
Navigate to System Update.
5.
Click Start Update and then click Yes to check for new available updates.
Network Security Manager On-Premises System Administration Guide
NSMManagement Console
32
Page 33

6.
Press Ctrl+P to view or edit the update channel.
IMPORTANT: Updates are provided over update channels. The default channel is Stable.
7.
When the upgrade version is displayed, click Enter to begin the update.
This downloads and installs the update. During this process, you can close the downloading window
by clicking Esc.
Network Security Manager On-Premises System Administration Guide
NSMManagement Console
33
Page 34

NOTE: The NSM On-Premises VM is operational during update process.
8.
Restart your system when the update is complete. Rebooting your system re-initializes the NSM OnPremises services.
9.
Log in and navigate to SYSTEM > Settings > Firmware and Settings to confirm that the firmware is
updated.
Network Security Manager On-Premises System Administration Guide
NSMManagement Console
34
Page 35

SonicWall Support
Technical support is available to customers who have purchased SonicWall products with a valid
maintenance contract.
The Support Portal provides self-help tools you can use to solve problems quickly and independently, 24
hours a day, 365 days a year. To access the Support Portal, go to https://www.sonicwall.com/support.
The Support Portal enables you to:
l View knowledge base articles and technical documentation
l View and participate in the Community forum discussions at
https://community.sonicwall.com/technology-and-support.
l View video tutorials
l Access https://mysonicwall.com
l Learn about SonicWall professional services
l Review SonicWall Support services and warranty information
l Register for training and certification
l Request technical support or customer service
8
To contact SonicWall Support, visit https://www.sonicwall.com/support/contact-support.
Network Security Manager On-Premises System Administration Guide
35
SonicWall Support
Page 36

About This Document
NOTE: A NOTE icon indicates supporting information.
IMPORTANT: An IMPORTANT icon indicates supporting information.
TIP: A TIP icon indicates helpful information.
CAUTION: A CAUTION icon indicates potential damage to hardware or loss of data if
instructions are not followed.
WARNING: A WARNING icon indicates a potential for property damage, personal injury, or
death.
Network Security Manager On-Premises System Administration Guide
Updated - March 2021
232-005511-00 Rev B
Copyright © 2021 SonicWallInc. All rights reserved.
The information in thisdocument is pr ovided in connection with SonicWalland/or its affiliates’products. No license, express or
implied, byestoppel or otherwise, to any intellectual property right is granted bythisdocument or in connection with the sale of
products. EXCEPT AS SET FORTH IN THE T ERMS AND CONDITIONS AS SPECIFIED IN THE LICENSE AGREEMENT FOR
THIS PRODUCT, SONICWALL AND/OR ITS AFFILIATES ASSUME NO LIABILITY WHATSOEVER AND DISCLAIMS ANY
EXPRESS, IMPLIED OR STATUTORY WARRANTY RELATING T O ITS PRODUCTS INCLUDING, BUT NOT LIMITED TO,
THE IMPLIED WARRANTY OF MERCHANTABILITY, FITNESS FOR A PARTICULAR PURPOSE, OR NON-INF RINGEMENT.
IN NO EVENT SHALL SONICWALL AND/OR ITS AFFILIATES BE LIABLE FOR ANY DIRECT, INDIRECT, CONSEQUENTIAL,
PUNITIVE, SPECIAL OR INCIDENTAL DAMAGES (INCLUDING, WITHOUT LIMITATION, DAMAGES FOR LOSS OF
PROFITS, BUSINESS INTERRUPTION OR LOSS OF INFORMATION) ARISING OUT OF THE USE OR INABILITY TO USE
THIS DOCUMENT, EVEN IF SONICWALL AND/OR ITS AFFILIATES HAVE BEEN ADVISED OF THE POSSIBILITY OF SUCH
DAMAGES. SonicWalland/or itsaffiliates make no representations or warr anties with respect to the accuracy or completeness of
the contents of this document and reservesthe right to make changes to specifications and product descriptions at any time without
notice. and/or its affiliatesdo not make anycommitment to update the information contained in this document.
For more information, visit https://www.sonicwall.com/legal.
End User Product Agreement
To view the SonicWallEnd User Product Agreement, go to:https://www.sonicwall.com/legal/end-user-product-agreements/.
Open Source Code
SonicWall Inc. is able to provide a machine-readable copy of open source code with restrictive licenses such as GPL, LGPL, AGPL
when applicable per license requirements. T o obtain a complete machine-readable copy, send your written requests, along with
certified check or money order in the amount of USD 25.00 payable to “SonicWallInc.”, to:
General Public License Source Code Request
Attn: Jennifer Anderson
1033 McCarthy Blvd
Milpitas, CA 95035
Network Security Manager On-Premises System Administration Guide
SonicWall Support
36
 Loading...