

Page 1
Getting Started Guide
SonicWALL Email Security Appliances
EMAIL SECURITY
ES 4300
Page 2
SonicWALL ESA 4300 Getting Started Guide Page i
SonicWALL ESA 4300
Getting Started Guide
This Getting Started Guide provides instructions for basic
installation and configuration of the SonicWALL Email Security
4300 appliance into an existing or new network.
SonicWALL ESA 4300 provides effective, high-performance,
and easy-to-use inbound and outbound email threat protection.
Ideal for any size business, this self-running, self-updating
appliance delivers powerful protection. Combining anti-spam,
anti-phishing, content filtering, policy management and content
compliance capabilities in a single seamlessly integrated
solution, SonicWALL Email Security provides powerful
protection without complexity.
Please read this entire Getting Started Guide before setting up
your SonicWALL ESA 4300. For more detailed technical
documentation, refer to the SonicWALL Email Security
Appliance Administrator Guide at:
<http://www.sonicwall.com/us/support>
Steps
Step Procedure
Pre-Configuration Tasks - page 1
Setting Up the SonicWALL - page 5
Preparing for First Use - page 11
Support and Training Options - page 19
Safety and Regulatory Information - page 25
12345
Page 3
Page ii Overview of the SonicWALL ESA 4300
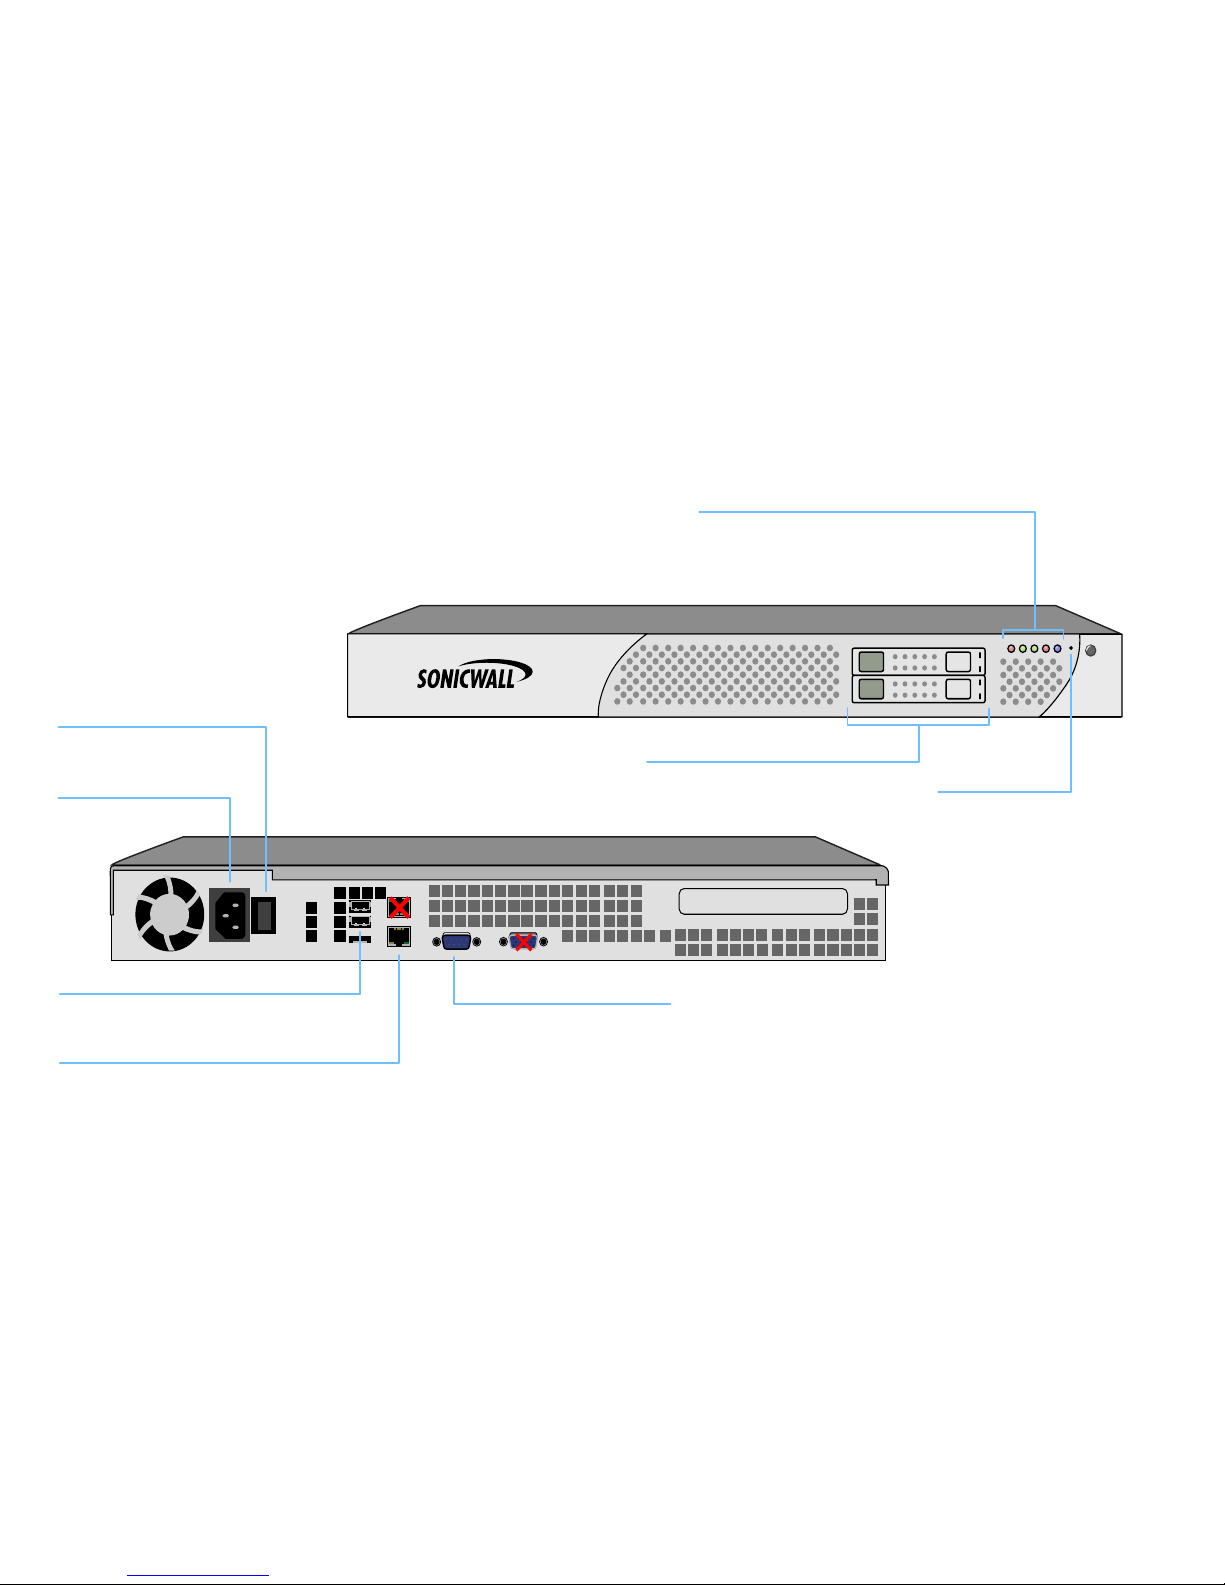
Overview of the SonicWALL ESA 4300
The graphic below is an overview of the Front and Rear panels of the SonicWALL ESA 4300 appliance.
ES 4300
Email Security Appliance
I
o
Console Port
USB Ports (2)
Reset Button
LED Indicators (left to right)
Hard Disk Drives (ES 4300 Only)
AC Power Supply
Access the Command Line Interface (CLI)
using the DB9 -> RJ45 cable
For future feature extensions with SonicWALL
approved modules
Ethernet Port
Provides 10/100/1000 Ethernet connectivity
Press and hold for several
seconds to manually reset
the appliance
AC power connection for use
with the supplied power cable
Power Switch
Switch to power the SonicWALL
appliance On (I) and Off (o)
ALM Minor/major alarm
ETH1 Ethernet 1 port is in use
ETH0 Ethernet 0 port is in use
HD Indicates data transfer to and from the hard disk drive
PWR Indicates the appliance is powered on
Two (2) hot-pluggable hard disk
drive modules
Page 4

SonicWALL ESA 4300 Getting Started Guide Page 1
Pre-Configuration Tasks
In this Section:
This chapter provides pre-configuration information. Review this section before setting up your SonicWALL ESA 4300.
• Checking ESA 4300 Package Contents - page 2
• What You Need to Begin - page 3
• Obtaining Configuration Information - page 3
1
Page 5
Page 2 Checking ESA 4300 Package Contents
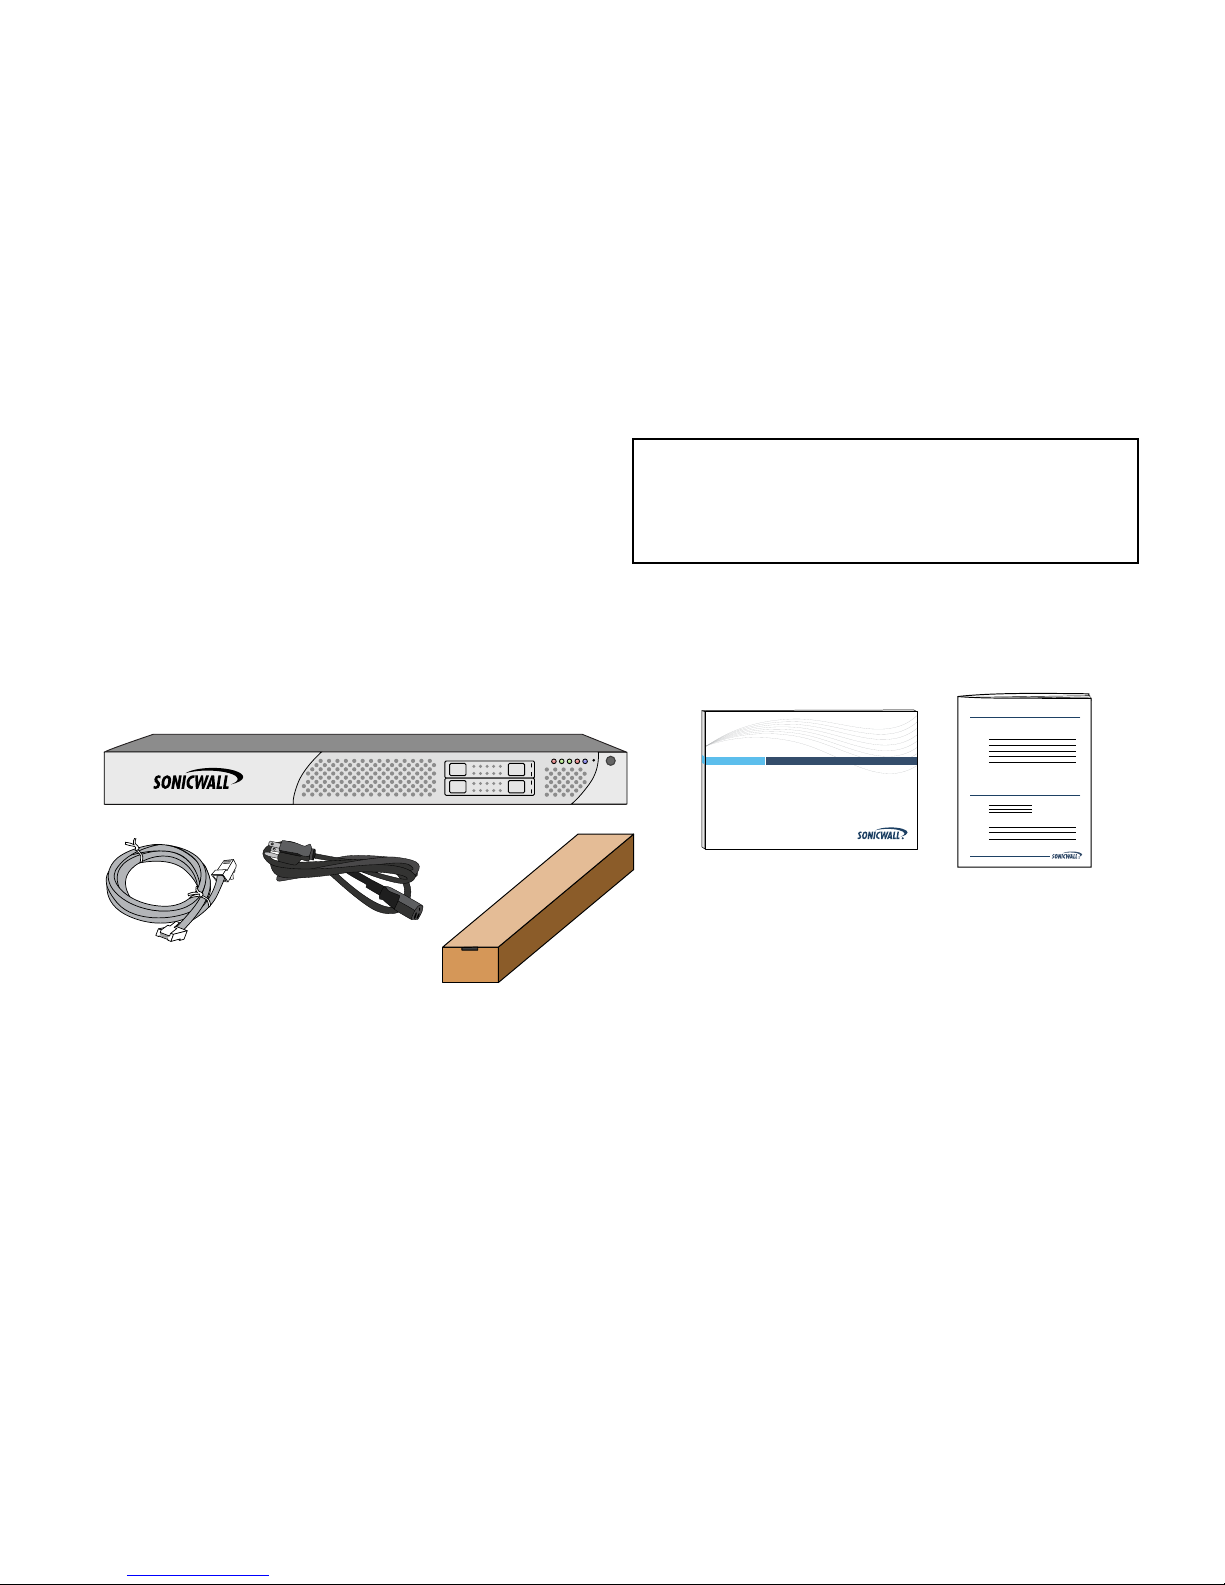
Checking ESA 4300 Package Contents
Before setting up your SonicWALL ESA, verify that your
package contains the following parts:
• SonicWALL Email Security 4300 Appliance
• Getting Started Guide
• Release Notes
• Ethernet Cable
• Standard Power Cord
• Rack Mounting Kit
Any Items Missing?
If any items are missing from your package,
please contact SonicWALL support.
A listing of the most current support documents are available online
at: <http://www.sonicwall.com/us/support.html>
*The pictured power cord is intended for use in North America only.
Release Notes
Contents
ESA 4300
Getting Started Guide
SonicWALL Email Security Appliances
EMAIL SECURITY
ES 4300
*
Page 6

SonicWALL ESA 4300 Getting Started Guide Page 3
What You Need to Begin
To configure a SonicWALL ESA 4300, you must have a
computer that meets or exceeds the following requirements:
• An Internet connection
• A computer to use as a management station for initial
configuration of SonicWALL Email Security software
• A Web browser supporting Java Script and HTTP uploads.
Supported browsers include the following:
For the latest list of supported Windows operating systems and
service packs, refer to the SonicWALL Email Security Release
Notes and the following web page:
<http://www.sonicwall.com/us/products/email_security_anti-
spam_67.html>
Obtaining Configuration Information
Record the following configuration information to configure your
SonicWALL ESA 4300:
Networking Information
Accepted Browser Browser Number Version
Internet Explorer 7.0 or higher
Firefox 3.0 or higher
Opera 9.10 or higher for Windows
Chrome 4.0 or higher
Safari 3.0 or higher for MacOS
Email Security IP
Address:
__________________
Select a free static IP address in
the range of your local subnet.
Email Security Subnet
Mask
__________________
Enter the subnet mask for the local
subnet.
Gateway IP Address
_________________
Record the IP address of your
network’s gateway device (such as
your perimeter firewall/router).
DNS Server 1
__________________
DNS Server 2 (optional)
__________________
Record your DNS server
information.
Host Name
__________________
Record the fully qualified domain
name within your network for your
SonicWALL ESA 4300 (maximum
32 characters).
Page 7

Page 4 Obtaining Configuration Information
General Information
LDAP Server IP
__________________
Record the IP address or hostname
of your directory services server,
such as LDAP or Microsoft Active
Directory.
Server Name:
__________________
Select a friendly name for your
SonicWALL ESA 4300 (maximum
32 characters).
Password:
__________________
Select a password for your
SonicWALL ESA 4300 (default is
password).
Serial Number:
__________________
Record the serial number found
on the label of your SonicWALL
appliance.
Registration Code:
__________________
Record the registration code that
is generated in mysonicwall.com.
See Registering Your SonicWALL
ESA 4300 Appliance
section, on
page 6
.
Page 8

SonicWALL ESA 4300 Getting Started Guide Page 5
Setting Up the SonicWALL
In this Section:
This chapter contains instructions for connecting and registering your SonicWALL ESA 4300 appliance.
• Registering Your SonicWALL ESA 4300 Appliance - page 6
• Connecting the SonicWALL ESA 4300 Appliance to Your Network - page 9
• Activating Your SonicWALL ESA 4300 Appliance - page 10
Note: Registration is an important part of the setup process and is necessary to receive the benefits of SonicWALL security services,
firmware updates, and technical support.
2
Page 9

Page 6 Registering Your SonicWALL ESA 4300 Appliance
Registering Your SonicWALL ESA 4300
Appliance
The SonicWALL SonicWALL ESA 4300 appliance must be
registered with the firmware license key before first use.
Perform the following steps to register your SonicWALL
appliance:
1. Supply power to your appliance by connecting the power
cord into the back of the SonicWALL ESA 4300 and the
other end into an appropriate power outlet.
2. Turn on the power switch of the appliance.
The Power LED on the front panel is green when you
power on the appliance. The HDD LED may blink while the
appliance performs a series of diagnostic tests. When the
HDD LED is no longer lit, the SonicWALL Email Security
appliance is ready for configuration.
If the alert light stays lit, ensure that the power supply is
properly plugged in.
3. Open a Web browser on the computer you are using to
manage the SonicWALL ESA 4300. Navigate to:
<http://www.mysonicwall.com>.
4. Enter your MySonicWALL account username and
password in the appropriate fields and click Submit.
Note: You must have a MySonicWALL account to
register the SonicWALL ESA 4300.
5. Under the Quick Register section of your MySonicWALL
account, enter the Activation Key or Serial Number of the
appliance.
6. Confirm your Serial Number, enter a Friendly Name for
your appliance, and enter your Authentication Code in the
Quick Register > Add New Product section.
7. Click Register. Follow the online prompts to fill out the
survey and complete the registration process. A
confirmation window displays when you havce successfully
completed the registration process.
Configuring Appliance Settings
Specific appliance settings must be configured for your
appliance to communicate with your network. The following
procedures configure local time zone settings and network
settings on your appliance.
This section contains the following subsections:
• Logging Into the Web Management Interface - page 7
• Configuring Local Time Zone Settings - page 7
• Configuring Static IP Address - page 8
• Configuring Default Gateway Address - page 9
• Configuring Domain Name Server Address - page 9
Page 10
SonicWALL ESA 4300 Getting Started Guide Page 7
Logging Into the Web Management Interface
The SonicWALL Email Security appliance comes preconfigured with an IP address of 192.168.168.169. Set the
administration computer to have a static IP address on the
192.168.168.168.0/24 subnet.
To configure a static IP address on your computer, refer to
Configuring a Static IP Address section, on page 18.
1. Connect the Ethernet cable from the LAN (eth 1) port on
the SonicWALL to the Ethernet port of the computer.
Note: One or more security warnings may display while
connecting to the Email Security Web management
interface. Accept the certificates in order to log in to the
SonicWALL Email Security appliance.
2. Open a Web browser and enter http://192.168.168.169
(the default IP address of the appliance) in the Location or
Address bar.
3. On the SonicWALL ESA 4300 Web management login
screen, enter “admin” in the Name field and “password” in
the Password field, select your language from the
Language drop-down menu, and click Login.
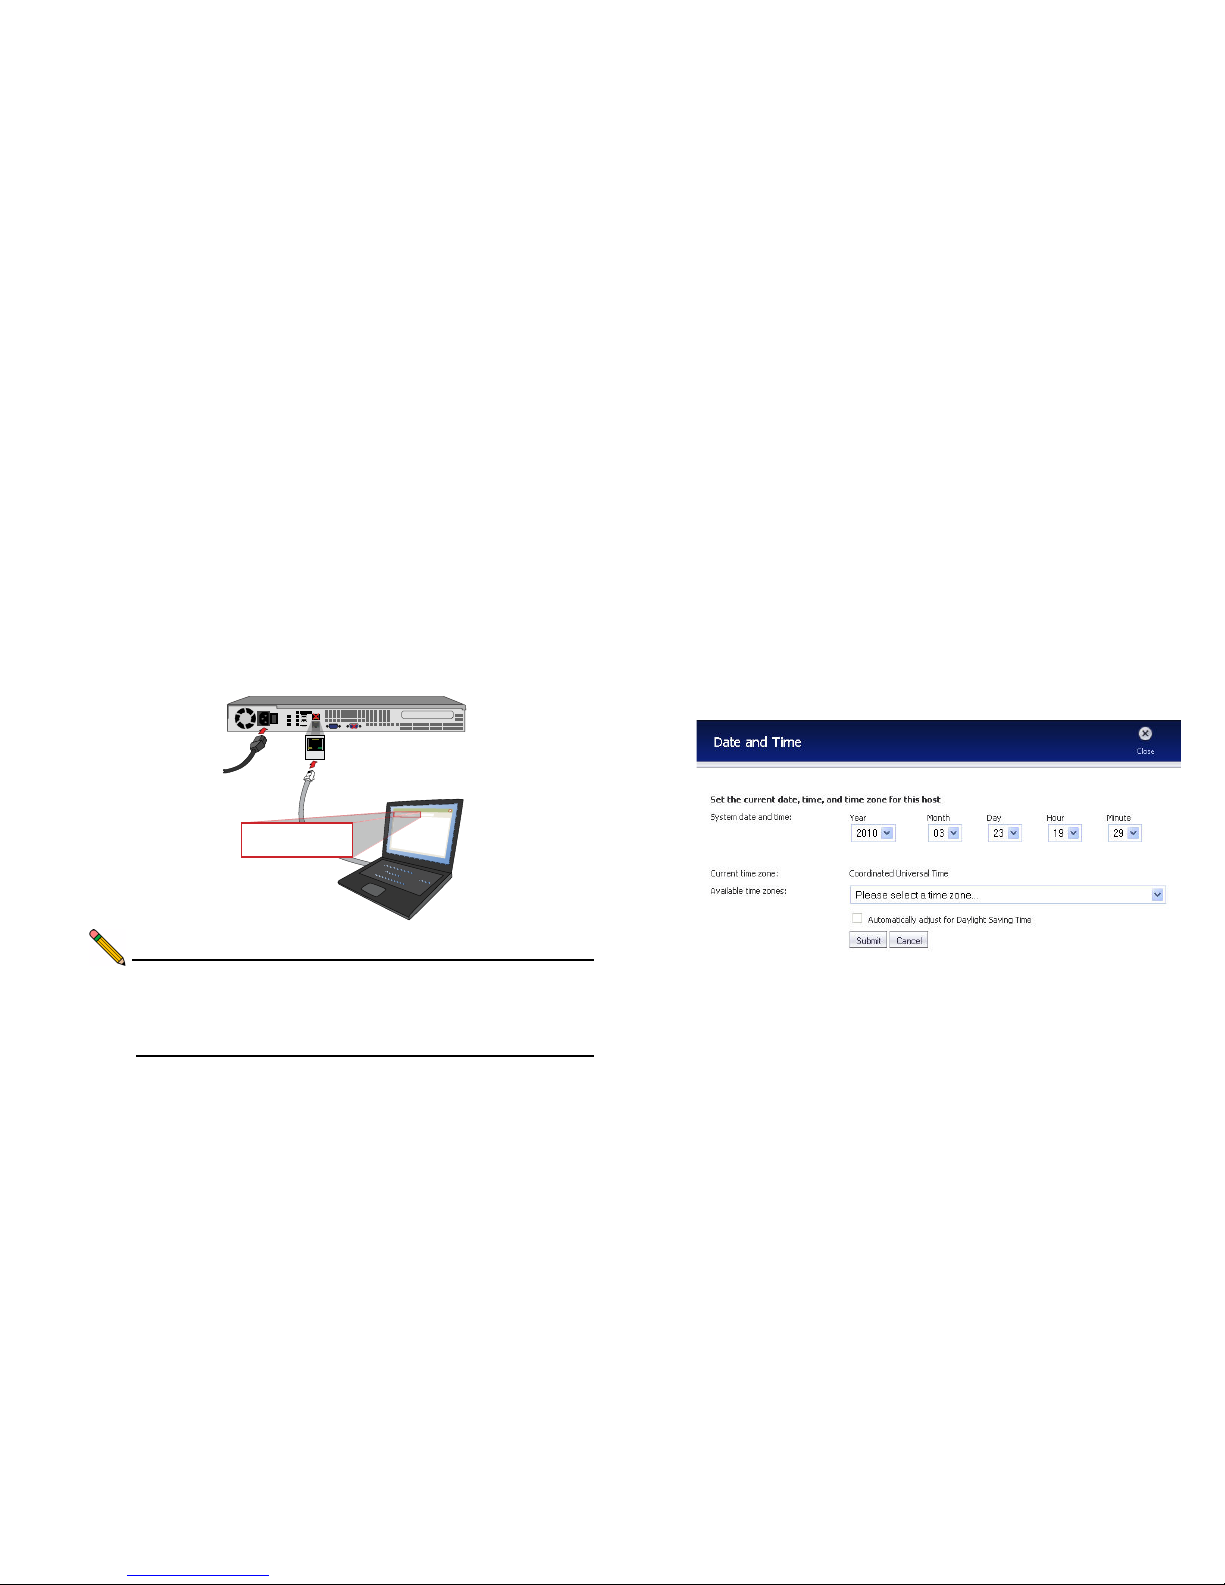
Configuring Local Time Zone Settings
1. Navigate to System > Host Configuration in the left
navigation menu.
2. Scroll down to the More Settings section, and click Set
Date and Time.
I
o
eth 1
http://192.168.168.169/
http://192.168.168.168/
SonicWALL LAN IP
Page 11
Page 8 Configuring Appliance Settings
Configure the following fields:
3. Click Submit to save changes.
Your SonicWALL ESA 4300 appliance is now set to your local
time. The Web management interface may log you out after the
time is set. This is normal—Just log in again.
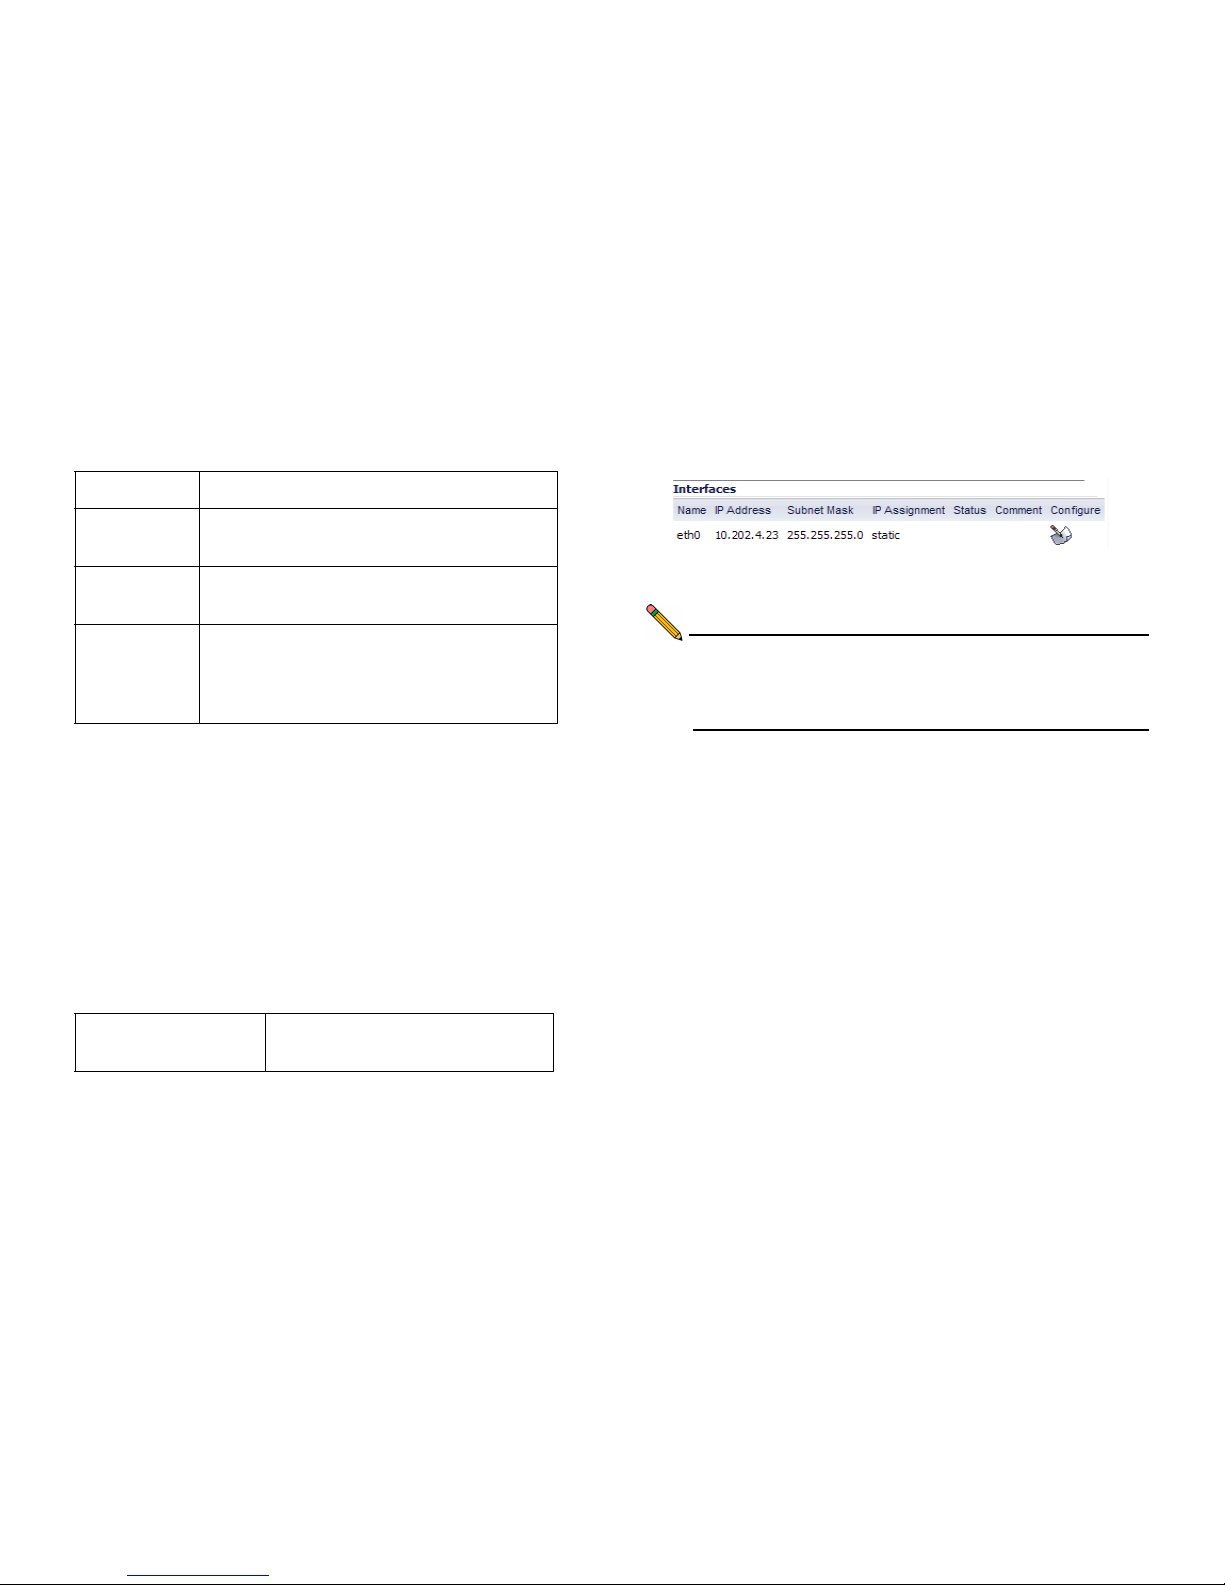
Configuring Static IP Address
Once the IP address of your SonicWALL ESA 4300 appliance is
changed, you cannot access the appliance without this
address. Before continuing, enter the chosen IP address for
your SonicWALL ESA 4300 appliance.
1. On the Network > Settings page of the Web Management
interface, click the Configure icon in the Interfaces table.
2. In the IP Address field, enter an unused static IP address
that is within the range of your local subnet.
Note: Using an IP address within the range of a local subnet
is usually accomplished by keeping the first three
groups of numbers (xxx.xxx.xxx.xxx) of the LAN IP
address the same.
3. Enter your subnet mask, for example, 255.255.255.0.
4. In the Comment field, optionally enter a descriptive
comment such as “WAN” or “DMZ” to identify your
appliance if you have more than one.
5. Click OK.
6. Click Accept at the top of the screen to save your settings.
Your SonicWALL ESA 4300 appliance is now set to
communicate with your network using a static IP address.
Disconnect your management computer from the appliance and
continue to the next section to connect the appliance to your
local area network. Note that you may lose connectivity with the
SonicWALL ESA 4300 appliance during an IP address change.
This occurs because the appliance is now on a different subnet
than the management computer.
Field Description
System date
and time
Select the date (year, month, day) and time
(hours:minutes) in 24-hour format.
Available
Time Zones
Select your local time zone.
Automatically
adjust for
Daylight
Savings Time
Select the checkbox if you would like to
enable this feature.
Email Security IP
address: ______.______.______.______
Page 12

SonicWALL ESA 4300 Getting Started Guide Page 9
Configuring Default Gateway Address
Configure the static IP address before configuring the default
gateway address settings to register and use your SonicWALL
ESA 4300 appliance
.
1. Navigate to Network > Settings in the left navigation
menu.
2. Click the Configure icon in the Network Routes table.
3. Enter the IP address of your gateway device and click OK.
4. Click Accept at the top of the screen to save your settings.
Configuring Domain Name Server Address
Configure the DNS address settings to register and use your
SonicWALL ESA 4300 appliance. The DNS server must be able
to resolve external Internet names.
1. Navigate to Network > Settings in the left navigation
menu.
2. Scroll down to Name Servers and click Add...
3. In the Add/Entry field, enter a single Domain Name Server
and click OK. Repeat steps 2 and 3 to add additional DNS
entries.
4. Click Accept at the top of the screen to save your settings.
Connecting the SonicWALL ESA 4300
Appliance to Your Network
Your SonicWALL Email Security appliance is designed to
operate in most network setups with minimal configuration. The
diagrams below provide before and after views of a network
using SonicWALL Email Security.
To physically connect your SonicWALL ESA 4300 appliance to
your network:
1. Plug one end of the provided Ethernet cable into the LAN
port on the back of your appliance.
2. Plug the other end of the Ethernet cable into an open port
on your network hub or switch.
3. Plug the supplied power cable into the back of the
appliance.
4. Plug the other end of the supplied power cable into an AC
socket. The appliance automatically powers on and begins
the initial boot process.
Default Gateway:
______.______.______.______
My SonicWALL
DNS address: ______.______.______.______
Page 13

Page 10 Activating Your SonicWALL ESA 4300 Appliance
Your SonicWALL Email Security Appliance will perform better if
you follow proper shutdown procedures. To shut down your
appliance, use the web interface, or press the power button on
the front of the appliance once. Holding down the power button
or unplugging your appliance does not give it time to write all
the data from volatile memory in to stable memory, and you
may lose settings or data.
Activating Your SonicWALL ESA 4300
Appliance
SonicWALL Email Security provides dynamic licensing, which
allows you to activate your licenses by logging into your
mysonicwall.com account. Mysonicwall.com server uses the
serial number and authentication code that came with your
Email Security appliance.
1. Log in to mysonicwall.com.
2. Choose My Products from the left navigation bar.
3. Enter your serial number, the friendly name if you wish, and
choose the product group. The serial number is found on
the tri-fold postcard or email that confirmed your
SonicWALL Email Security order.
4. Click Register. The product is added to the list of your
registered products, and you can click on it to add or
activate services.
5. You can check that the registration is correct by logging in
to your SonicWALL Email Security administration site and
clicking System/License Management. All your license
information should be available. If it is not, click Test
Connectivity to SonicWALL to check that you are
connected.
Note: If you purchased Total Secure Email, licensing is
automatic and you do not need to take any action
activate your licenses.
Page 14

SonicWALL ESA 4300 Getting Started Guide Page 11
Preparing for First Use
In this Section:
This section provides instructions to configure your SonicWALL ESA 4300 appliance for first time use.
• Initial Configuration Settings - page 12
• The SonicWALL Email Security Interface - page 14
• Verification - page 17
• Configuring a Static IP Address - page 18
3
Page 15

Page 12 Initial Configuration Settings
Initial Configuration Settings
The first time you log in to the SonicWALL Email Security
appliance, you are directed to the system configuration page.
Configure your settings as follows:
Monitoring
Hostname and Networking
Email address of
the administrator
who receives
emergency alerts
The email address of the mail server
administrator. Enter the complete email
address.
For example, user@example.com
Postmaster for
the MTA
The email address of the Mail Transfer Agent
administrator who will receive non-deliverable
receipts.
For example, mail@example.com
Name or IP
address of
backup SMTP
servers
Enter fully qualified domain names or IP
addresses.
For example, mail2.example.com or 10.100.0.1
Hostname Enter a hostname you can use within your
network to address the SonicWALL Email
Security appliance. Enter a fully qualified
domain name.
For example, emailsecurity.example.com
Get all network
settings from
DHCP
Select this if you want your SonicWALL Email
Security appliance to get dynamic IP settings
from the DHCP server on your network.
Use the static
settings below
Select this to assign your SonicWALL Email
Security appliance a static IP address.
Enter:
• This machine's IP address
• Primary DNS server IP address (the local
DNS server that has the MX record for
your mail server)
• Fallback DNS server IP address
• Default gateway IP address
• Subnet mask
Page 16

SonicWALL ESA 4300 Getting Started Guide Page 13
Date and Time
Select the proper time zone to ensure optimal network
performance of your SonicWALL Email Security appliance.
1. Click Apply Changes to save this configuration.
2. A popup will display. Click Continue to reboot the
SonicWALL Email Security appliance with your new
settings.
3. Disconnect the crossover cable from the SonicWALL Email
Security appliance.
4. Reset your administration computer’s IP settings to work
with your network. For example, if your network uses
DHCP, reset your Local Area Connection to obtain an IP
address and DNS settings dynamically from the server.
5. Reconnect your administration computer to your network.
You will use the network to access the SonicWALL Email
Security appliance in the next steps.
Alert: Your ESA 4300 is equipped with a battery backup unit
on the RAID Controller Card, which allows the
appliance to write volatile memory to disk in the event
of a loss of power. This battery backup unit must be
charged for 24 hours. When deploying your ESA 4300
appliance, follow the startup and registration
instructions detailed in this document, and then allow
the battery backup in the unit to charge for 24 hours. If
the battery is not fully charged, some RAID features
are turned off, and the appliance performance is
temporarily impaired until the battery is fully charged.
System Date and
Time
Select the current year, month, day, hour, and
minute.
Current Time
Zone
Displays the currently configured time zone.
Available Time
Zones
Select the time zone for your area.
Automatically
Adjust for Daylight
Savings Time
Select this if your area observes Daylight Saving
Time.
Page 17

Page 14 The SonicWALL Email Security Interface
The SonicWALL Email Security Interface
This section describes the SonicWALL ESA 4300 administrator’s interface.For a detailed SonicWALL Email Security user interface
overview, refer to the SonicWALL Email Security Administrator’s Guide.
Page 18

SonicWALL ESA 4300 Getting Started Guide Page 15
Changing the Default Administrator Password
To protect your appliance, change the password from its default.
1. Log in to the SonicWALL Email Security appliance using
the IP address you entered in Hostname and Networking page 12.
2. Enter a new management password.
3. Navigate to the System > Administration page.
4. Enter it again in the Confirm Password field.
5. Click Apply Changes.
Using Quick Configuration to Set Up Email
Management
The Quick Configuration page walks you step-by-step through
the configuration of your SonicWALL Email Security appliance.
Use this window the first time you configure SonicWALL Email
Security if you are installing SonicWALL Email Security as an
All-In-One server and have only one downstream server.
The information you enter for LDAP configuration is used to
authenticate users as they log in to their personal Junk Boxes.
For detailed configuration instructions, refer to the SonicWALL
Email Security Administrator’s Guide.
1. Navigate to the System > Administration page.
2. Click Click Here for Quick Configuration.
3. In the Quick Configuration dialog box under Network
Architecture, enter the host name or IP address and the
port into the Inbound destination server fields.
The inbound destination server is the email server that will
accept good email after SonicWALL Email Security
removes and quarantines junk email. For example, this
could be the IP address of a Microsoft Exchange server.
The default port is 25.
Page 19

Page 16 The SonicWALL Email Security Interface
4. For Inbound SMTP setup, select one of the following:
• Allow SMTP recipient addresses to all domains on
inbound path or...
This option does not restrict incoming email to any
domain.
• Only allow SMTP recipient addresses to these
domains on inbound path
This option allows you to specify the domains to which
incoming email will be delivered. In the text box, type
the allowed domains one per line.
5. Click Test Mail Servers to verify connectivity to the
downstream Email Security server specified in preceding
steps.
6. Select the Outbound path setup check box to route
outbound email across the Internet using MX records.
7. Under LDAP Configuration, enter a hostname or IP
address into the LDAP server name field. This is often
your Exchange server or email server.
8. Select your LDAP server type.
9. Enter a valid LDAP login name and password.
10. Click Test LDAP Login and Test LDAP Query to verify
your settings.
11. Enter one or more NetBIOS domain name in the NetBIOS
domain names field. Click What is this? for more
information.
12. Under Message Management, specify how junk mail will be
handled by selecting one of the following:
• Quarantine junk - sends junk mail to the user’s junk
box
• Deliver all messages to users - does not separate
junk mail from good email
Page 20

SonicWALL ESA 4300 Getting Started Guide Page 17
13. Under Junk Box Summary, select Send daily summaries
to receive daily summary messages about junk mail caught
by SonicWALL Email Security,.
14. To allow users to preview their junk mail messages without
unjunking them, select Users can preview their own
quarantined junk mail.
Summaries will contain a preview link for each junk email.
15. Type the URL where users can view their email junk boxes
in the URL for user view field. Click Test this Link to
verify connectivity.
16. Under Updates, click Test Connectivity to SonicWALL to
test your connection to mysonicwall.com for automated
software updates.
17. Click Apply Changes.
Verification
Routing Mail to Your SonicWALL ESA 4300
For your SonicWALL Email Security appliance to start filtering
and monitoring mail, you must re-route mail traffic through your
SonicWALL Email Security appliance. Mail traffic must pass
from the Internet to the appliance, and then the appliance sends
the good mail on to your mail server.
You have two choices for routing mail traffic to your SonicWALL
Email Security appliance instead of to your mail server:
• Change the MX record in your DNS server to resolve to the
IP address of your SonicWALL Email Security appliance.
You may have to work with your ISP to change this record.
• Create a rule in your firewall or router to route all port 25
(SMTP mail) traffic to your SonicWALL Email Security
appliance. Refer to your firewall or router documentation
for instructions on creating rules to route traffic.
Verifying Mail from the Internet Through Your
SonicWALL ESA 4300
1. Go to an external mail account, for example Yahoo mail or
GMail.
2. Create a new email message:
3. Send the message.
4. In the SonicWALL Email Security appliance administrative
interface, click Auditing.
5. Check the Inbound auditing reports to make sure the email
appears as Delivered.
6. Check the mail account you sent the message to. If you
received the message, you have correctly configured your
SonicWALL Email Security appliance.
To An email address where you receive email that is on the
mail server for which you have configured the
SonicWALL Email Security appliance.
Subject SonicWALL Email Security Verification Message
Body SonicWALL Email Security Verification Message
Page 21

Page 18 Configuring a Static IP Address
Configuring a Static IP Address
Complete the following section based on your operating system
in order to configure your management computer with a static
IP address:
Windows XP
1. From the Start menu, highlight Connect To and then
select Show All Connections.
2. Open the Local Area Connection Properties window.
3. Double-click Internet Protocol (TCP/IP) to open the
Internet Protocol (TCP/IP) Properties window.
4. Select Use the following IP address and type
192.168.168.50 in the IP address field.
5. Type 255.255.255.0 in the Subnet Mask field.
6. Click OK for the settings to take effect.
Windows Vista
1. On the Windows Start menu, right-click Network and
select Properties.
2. In the Tasks menu, click Manage network connections.
The Network Connections window displays.
3. Right-click on your Local Area Connection and select
Properties.
4. In the list, double-click Internet Protocol Version 4 (TCP/
IP)
5. Select Use the following IP address and type
192.168.168.50 in the IP address field.
6. Type 255.255.255.0 in the Subnet Mask field.
7. Click OK, and then click OK again for the settings to take
effect.
If you are not using Windows XP or Windows Vista, please
consult your operating system instructions to configure a static
IP address for your system.
Page 22

SonicWALL ESA 4300 Getting Started Guide Page 19
Support and Training Options
In this Section:
This chapter provides an overview of customer support and training options for the SonicWALL ESA 4300.
• Customer Support - page 20
• Knowledge Base - page 20
• SonicWALL Live Product Demos - page 21
• Related Documentation - page 21
• User Forums - page 22
• Training - page 23
• SonicWALL Secure Wireless Network Integrated Solutions Guide - page 24
4
Page 23

Page 20 Customer Support
Customer Support
SonicWALL offers Web-based and telephone support to
customers who have a valid Warranty or who purchased a
Support Contract. Please review our Warranty Support Policy
for product coverage. SonicWALL also offers a full range of
consulting services to meet your needs, from our innovative
implementation services to traditional statement of work-based
services.
For further information, visit:
<
http://www.sonicwall.com/us/support/contact.html>
Knowledge Base
The Knowledge Base allows users to search for SonicWALL
documents based on the following types of search tools:
•Browse
• Search for keywords
• Full-text search
For further information, navigate to the Support > Knowledge
Base page at:
<
http://www.mysonicwall.com/>
Page 24

SonicWALL ESA 4300 Getting Started Guide Page 21
SonicWALL Live Product Demos
Get the most out of your Global Management System with the
complete line of SonicWALL products. The SonicWALL Live
Demo Site provides free test drives of SonicWALL security
products and services through interactive live product
installations:
• Unified Threat Management Platform
• Secure Cellular Wireless
• Continuous Data Protection
• SSL VPN Secure Remote Access
• Content Filtering
• Secure Wireless Solutions
• Email Security
• SonicWALL GMS and ViewPoint
For further information, visit:
<
http://livedemo.sonicwall.com/>
Related Documentation
See the following related documents for more information:
• SonicWALL Email Security Administrator’s Guide
• SonicWALL Email Security User’s Guide
For further information, visit:
<http://www.sonicwall.com/us/support/289.html>
Page 25

Page 22 User Forums
User Forums
The SonicWALL User Forums is a resource that provides users
the ability to communicate and discuss a variety of security and
appliance subject matters. In this forum, the following
categories are available for users:
• Content Security Manager topics
• Continuous Data Protection topics
• Email Security topics
• Firewall topics
• Network Anti-Virus topics
• Security Services and Content Filtering topics
• SonicWALL GMS and Viewpoint topics
• SonicPoint and Wireless topics
• SSL VPN topics
• NSA 2400MX / Wireless WAN - 3G Capability topics
• VPN Client topics
• VPN site-to-site and interoperability topics
For further information, visit:
<
https://forum.sonicwall.com/>
Page 26

SonicWALL ESA 4300 Getting Started Guide Page 23
Training
SonicWALL offers an extensive sales and technical training
curriculum for Network Administrators, Security Experts and
SonicWALL Medallion Partners who need to enhance their
knowledge and maximize their investment in SonicWALL
Products and Security Applications. SonicWALL Training
provides the following resources for its customers:
• E-Training
• Instructor-Led Training
• Custom Training
• Technical Certification
• Authorized Training Partners
For further information, visit:
<http://www.sonicwall.com/us/support/training.html>
Page 27

Page 24 SonicWALL Secure Wireless Network Integrated Solutions Guide
SonicWALL Secure Wireless Network
Integrated Solutions Guide
The Official Guide to SonicWALL’s market-leading wireless
networking and security devices. This book is available in
hardcopy by ordering directly from Elsevier Publishing at:
<http://www.elsevier.com>
Page 28

SonicWALL ESA 4300 Getting Started Guide Page 25
Safety and Regulatory Information
In this Section:
This chapter provides regulatory, trademark, and copyright information.
• Mounting the SonicWALL ESA 4300 - page 26
• Weitere Hinweise zur Montage - page 26
• Safety and Regulatory Information - page 27
• Cable Connections - page 30
• Copyright Notice - page 30
• Trademarks - page 30
5
Page 29

Page 26 Mounting the SonicWALL ESA 4300
Mounting the SonicWALL ESA 4300
When mounting your SonicWALL ESA 4300:
• Use the mounting hardware recommended by the rack manufacturer and
ensure that the rack is adequate for the application.
• Four mounting screws, compatible with the rack design, must be used and
hand tightened to ensure secure installation. Choose a mounting location
where all four mounting holes line up with those of the mounting bars of the
19-inch, rack mount cabinet.
• Mount in a location away from direct sunlight and sources of heat. A
maximum ambient temperature of 104º F (40º C) is recommended.
• Route cables away from power lines, fluorescent lighting fixtures, and
sources of noise such as radios, transmitters, and broadband amplifiers.
• The included power cord is intended for use in North America only. For
European Union (EU) customers, a power cord is not included.
• Ensure that no water or excessive moisture can enter the unit.
• Allow unrestricted airflow around the unit and through the vents on the side
of the unit. A minimum of 1 inch (25.44mm) clearance is recommended.
• If installed in a closed or multi-unit rack assembly, the operating ambient
temperature of the rack environment may be greater than room ambient.
Therefore, consideration should be given to installing the equipment in an
environment compatible with the maximum recommended ambient
temperature shown above.
• Mount the SonicWALL appliances evenly in the rack in order to prevent a
hazardous condition caused by uneven mechanical loading.
• Consideration must be given to the connection of the equipment to the supply
circuit and the effect that overloading of circuits might have on overcorrect
protection and supply wiring. Appropriate consideration of equipment
nameplate ratings must be used when addressing this concern.
• Reliable grounding of rack-mounted equipment must be maintained.
Particular attention must be given to power supply connections other than
direct connections to the branch circuits, such as power strips.
Weitere Hinweise zur Montage
• Vergewissern Sie sich, dass das Rack für dieses Gerät geeignet ist und
verwenden Sie das vom Rack-Hersteller empfohlene Montagezubehör.
• Verwenden Sie für eine sichere Montage vier passende
Befestigungsschrauben, und ziehen Sie diese mit der Hand an. Wählen Sie
einen Ort im 19-Zoll-Rack, wo alle vier Befestigungen der Montageschien
verwendet werden.
• Wählen Sie für die Montage einen Ort, der keinem direkten Sonnenlicht
ausgesetzt ist und sich nicht in der Nähe von Wärmequellen befindet. Die
Umgebungstemperatur darf nicht mehr als 40 °C betragen.
• Achten Sie darauf, das sich die Netzwerkkabel nicht in der unmittelbaren
Nähe von Stromleitungen, Leuchtstoffröhren und Störquellen wie
Funksendern oder Breitbandverstärkern befinden.
• Das beigefügte Netzkabel ist nur für den Gebrauch in Nordamerikas
Vorgesehen. Für Kunden in der Europaïschen Union (EU) ist ein Netzkabel
nicht im Lieferumfang enthalten.
• Stellen Sie sicher, dass das Gerät vor Wasser und hoher Luftfeuchtigkeit
geschützt ist.
• Stellen Sie sicher, dass die Luft um das Gerät herum zirkulieren kann und die
Lüftungsschlitze an der Seite des Gehäuses frei sind. Hier ist ein
Belüftungsabstand von mindestens 26 mm einzuhalten.
• Wenn das Gerät in einem geschlossenen 19"-Gehäuse oder mit mehreren
anderen Geräten eingesetzt ist, wird die Temperatur in der Gehäuse höher
sein als die Umgebungstemperatur. Achten Sie daraf, daß die
Umgebungstemperatur nicht mehr als 40° C beträgt.
• Bringen Sie die SonicWALL waagerecht im Rack an, um mögliche Gefahren
durch ungleiche mechanische Belastung zu vermeiden.
• Prüfen Sie den Anschluss des Geräts an die Stromversorgung, damit der
Überstromschutz sowie die elektrische Leitung nicht von einer eventuellen
Überlastung der Stromversorgung beeinflusst werden. Prüfen Sie dabei
sorgfältig die Angaben auf dem Aufkleber des Geräts.
• Eine sichere Erdung der Geräte im Rack muss gewährleistet sein.
Insbesondere muss auf nicht direkte Anschlüsse an Stromquellen geachtet
werden wie z. B. bei Verwendung von Mehrfachsteckdosen.
Page 30

SonicWALL ESA 4300 Getting Started Guide Page 27
Safety and Regulatory Information
Unauthorized Ports
Do not plug devices into any ports (other than those indicated) unless explicitly instructed to do so by a SonicWALL technical support
representative; doing so may void your warranty.
Regulatory Model/Type Product Name
1RK24-07D SonicWALL ESA 4300
I
o
Page 31

Page 28 FCC Part 15 Class A Notice
FCC Part 15 Class A Notice
This equipment was tested and found to comply with the limits
for a Class A digital device, pursuant to Part 15 of the FCC
Rules. These limits are designed to provide reasonable
protection against harmful interference when the equipment is
operated in a commercial environment. This equipment
generates, uses, and can radiate radio frequency energy. And if
not installed and used in accordance with the instruction
manual, the device may cause harmful interference to radio
communications. Operation of this equipment in a residential
area is likely to cause harmful interference in which case the
user is required to correct the interference at his own expense.
Note: Modifying this equipment or using this equipment for
purposes not shown in this manual without the written
consent of SonicWALL, Inc. could void the user’s
authority to operate this equipment.
BMSI Statement
VCCI Statement
Canadian Radio Frequency Emissions Statement
This Class A digital apparatus complies with Canadian
ICES-003.
Cet appareil numérique de la classe A conforme à la norme
NMB-003 du Canada.
Page 32

SonicWALL ESA 4300 Getting Started Guide Page 29
CISPR 22 (EN 55022) Class A
Complies with EN 55022 Class A and CISPR22 Class A. This is a class
A product. In a domestic environment, this product may cause radio
interference in which case the user may be required to take adequate
measures.
Regulatory Information for Korea
All products with country code “” (blank) and “A” are made in the USA. All
products with country code “B” are made in China.
All products with country code “C” or “D” are made in Taiwan R.O.C.
Lithium Battery Warning
The lithium battery used in the SonicWALL appliance may not
be replaced by the user. The appliance must be returned to a
SonicWALL authorized service center for battery replacement
with the same or equivalent type recommended by the
manufacturer. If, for any reason, the battery or SonicWALL
appliance must be disposed of, do so following the battery
manufacturer's instructions.
Declaration of Conformity
Application of council
Directive
2004/108/EC (EMC) and 2006/95/EC
(LVD)
Standards to which
conformity is declared
EN 55022 (2006) Class A
EN 55024 (1998) +A1 (2001), +A2 (2003)
EN 61000-3-2 (2006)
EN 61000-3-3 (1995) + A1 (2001), +A2
(2005)
EN 60950-1 2006+
National Deviations: AR, AT, AU, BE, CA,
CH, CN, CZ, DE, DK, FI, FR, GB, GR,
HU, IL, IN, IT, JP, KE, KR, MY, NL, NO,
PL, SE, SG, SI, SK, US
Ministry of Information and Telecommunication
Certification Number SWL-1RK24-07E (A)
Page 33

Page 30 Cable Connections
Cable Connections
All Ethernet and RS232 (Console) cables are designed for
intra-building connection to other equipment. Do not connect
these ports directly to communication wiring or other wiring that
exits the building where the SonicWALL is located.
Regulatory and Safety Instructions
in German
Hinweis zur Lithiumbatterie
Die in der Internet Security Appliance von SonicWALL
verwendete Lithiumbatterie darf nicht vom Benutzer
ausgetauscht werden. Zum Austauschen der Batterie muss die
SonicWALL in ein von SonicWALL autorisiertes Service-Center
gebracht werden. Dort wird die Batterie durch denselben oder
entsprechenden, vom Hersteller empfohlenen Batterietyp
ersetzt. Beachten Sie bei einer Entsorgung der Batterie oder
der SonicWALL Internet Security Appliance die
diesbezüglichen Anweisungen des Herstellers.
Kabelverbindungen
Alle Ethernet- und RS232-C-Kabel eignen sich für die
Verbindung von Geräten in Innenräumen. Schließen Sie an die
Anschlüsse der SonicWALL keine Kabel an, die aus dem
Gebäude in dem sich das Gerät befindet, herausgeführt
werden.
Copyright Notice
© 2010 SonicWALL, Inc.
All rights reserved.
Under the copyright laws, this manual or the software described within,
cannot be copied, in whole or part, without the written consent of the
manufacturer, except in the normal use of the software to make a
backup copy. The same proprietary and copyright notices must be
affixed to any permitted copies as were affixed to the original. This
exception does not allow copies to be made for others, whether or not
sold, but all of the material purchased (with all backup copies) can be
sold, given, or loaned to another person. Under the law, copying
includes translating into another language or format.
Specifications and descriptions subject to change without notice.
Trademarks
SonicWALL is a registered trademark of SonicWALL, Inc.
Microsoft Windows NT, Windows 2000, Windows XP, Windows Vista,
Windows Server 2000, Windows Server 2003, Windows Server 2008,
Internet Explorer, and Active Directory are trademarks or registered
trademarks of Microsoft Corporation.
Other product and company names mentioned herein may be
trademarks and/or registered trademarks of their respective companies
and are the sole property of their respective manufacturers.
Page 34

© 2 0 10 S o n ic W A L L , I n c . i s a r e g i s t e r e d t r a d e m a r k o f S o n ic W A L L , I n c . O t h e r p r o d u c t n a m e s m e n t i o n e d h e r ei n m a y b e t r a d e m a r k s a n d / o r r e g i s t e r e d t r a d e m a r k s o f t h e i r r e s p e c t i v e c o m p a n i e s . S p e c i c a t i o n s a n d d e s c r i p t i o n s s u b j e c t to c h a ng e w i t h o u t n o t i c e .
S on i c W A L L , I n c .
2001 Logic Drive T + 1 4 0 8 . 7 4 5 . 9 6 0 0 w w w . s o n i c w a l l . c o m
San Jose CA 95124-3452 F + 1 4 0 8 . 7 4 5 . 9 3 0 0
P/N 232-001700-50
Rev A 06/10
 Loading...