

Page 1

SonicWALL® Email Security
Appliance Administrator Guide
Version 7.3
SonicWALL, Inc.
2001 Logic Drive
San Jose, CA 95124-3452
Phone: +1.408.745.9600
Fax: +1.408.745.9300
E-mail: info@sonicwall.com
Part Number: 232-001974-00
Rev A
Page 2

SonicWALL® Email Security
Appliance Administrator’s Guide
Version 7.3
SonicWALL, Inc.
2001 Logic Drive
San Jose, CA 95124-3452
Phone: +1.408.745.9600
Fax: +1.408.745.9300
E-mail: info@sonicwall.com
Page 3

Copyright Notice
© 2010 SonicWALL, Inc.
All rights reserved.
Under the copyright laws, this manual or the software described within, can not be copied, in whole or part, without the written consent of the
manufacturer, except in the normal use of the software to make a backup copy. The same proprietary and copyright notices must be affixed to
any permitted copies as were affixed to the original. This exception does not allow copies to be made for others, whether or not sold, but all of
the material purchased (with all backup copies) can be sold, given, or loaned to another person. Under the law, copying includes translating
into another language or format.
Specifications and descriptions subject to change without notice.
Trademarks
© 2010 SonicWALL, Inc. All rights reserved. SonicWALL is a registered trademark of SonicWALL, Inc. Other product names
mentioned herein may be trademarks and/or registered trademarks of their respective companies.
Limited Warranty
SonicWALL, Inc. warrants that commencing from the delivery date to Customer (but in any case commencing not more than ninety (90) days
after the original shipment by SonicWALL), and continuing for a period of twelve (12) months, that the product will be free from defects in
materials and workmanship under normal use. This Limited Warranty is not transferable and applies only to the original end user of the product.
SonicWALL and its suppliers' entire liability and Customer's sole and exclusive remedy under this limited warranty will be shipment of a
replacement product. At SonicWALL's discretion the replacement product may be of equal or greater functionality and may be of either new or
like-new quality. SonicWALL's obligations under this warranty are contingent upon the return of the defective product according to the terms of
SonicWALL's then-current Support Services policies.
This warranty does not apply if the product has been subjected to abnormal electrical stress, damaged by accident, abuse, misuse or
misapplication, or has been modified without the written permission of SonicWALL.
DISCLAIMER OF WARRANTY. EXCEPT AS SPECIFIED IN THIS WARRANTY, ALL EXPRESS OR IMPLIED CONDITIONS,
REPRESENTATIONS, AND WARRANTIES INCLUDING, WITHOUT LIMITATION, ANY IMPLIED WARRANTY OR CONDITION OF
MERCHANTABILITY, FITNESS FOR A PARTICULAR PURPOSE, NONINFRINGEMENT, SATISFACTORY QUALITY OR ARISING FROM A
COURSE OF DEALING, LAW, USAGE, OR TRADE PRACTICE, ARE HEREBY EXCLUDED TO THE MAXIMUM EXTENT ALLOWED BY
APPLICABLE LAW. TO THE EXTENT AN IMPLIED WARRANTY CANNOT BE EXCLUDED, SUCH WARRANTY IS LIMITED IN DURATION
TO THE WARRANTY PERIOD. BECAUSE SOME STATES OR JURISDICTIONS DO NOT ALLOW LIMITATIONS ON HOW LONG AN
IMPLIED WARRANTY LASTS, THE ABOVE LIMITATION MAY NOT APPLY TO YOU. THIS WARRANTY GIVES YOU SPECIFIC LEGAL
RIGHTS, AND YOU MAY ALSO HAVE OTHER RIGHTS WHICH VARY FROM JURISDICTION TO JURISDICTION. This disclaimer and
exclusion shall apply even if the express warranty set forth above fails of its essential purpose.
DISCLAIMER OF LIABILITY. SONICWALL'S SOLE LIABILITY IS THE SHIPMENT OF A REPLACEMENT PRODUCT AS DESCRIBED IN
THE ABOVE LIMITED WARRANTY. IN NO EVENT SHALL SONICWALL OR ITS SUPPLIERS BE LIABLE FOR ANY DAMAGES
WHATSOEVER, INCLUDING, WITHOUT LIMITATION, DAMAGES FOR LOSS OF PROFITS, BUSINESS INTERRUPTION, LOSS OF
INFORMATION, OR OTHER PECUNIARY LOSS ARISING OUT OF THE USE OR INABILITY TO USE THE PRODUCT, OR FOR SPECIAL,
INDIRECT, CONSEQUENTIAL, INCIDENTAL, OR PUNITIVE DAMAGES HOWEVER CAUSED AND REGARDLESS OF THE THEORY OF
LIABILITY ARISING OUT OF THE USE OF OR INABILITY TO USE HARDWARE OR SOFTWARE EVEN IF SONICWALL OR ITS
SUPPLIERS HAVE BEEN ADVISED OF THE POSSIBILITY OF SUCH DAMAGES. In no event shall SonicWALL or its suppliers' liability to
Customer, whether in contract, tort (including negligence), or otherwise, exceed the price paid by Customer. The foregoing limitations shall
apply even if the above-stated warranty fails of its essential purpose. BECAUSE SOME STATES OR JURISDICTIONS DO NOT ALLOW
LIMITATION OR EXCLUSION OF CONSEQUENTIAL OR INCIDENTAL DAMAGES, THE ABOVE LIMITATION MAY NOT APPLY TO YOU.
NOTE: The SonicWALL Email Security software service is an annual subscription that is subject to the terms and conditions of SonicWALL,
Inc.’s applicable subscription agreement and includes:
Product updates, SonicWALL threat signature updates, and standard technical support for one (1) year from the date of purchase.
SonicWALL Email Security appliances are integrated hardware and software solutions, which include SonicWALL Email Security software.
SonicWALL Email Security appliances are subject to the terms and conditions of SonicWALL, Inc.’s applicable license agreement. Updates to
the SonicWALL Email Security software, SonicWALL Spam Signature Updates, and technical support may be purchased on an annual basis.
AntiVirus support is optionally available.
Page 4

Table of Contents
Preface ...................................................................................................................................1
About this Guide............................................................................................................ 1
Documentation Conventions.................................................................................. 1
Documentation Overview ...................................................................................... 1
Finding Online Help.............................................................................................. 1
Chapter 1 Planning SonicWALL Email Security Deployment ..................................2
SonicWALL Email Security and Mail Threats....................................................................... 2
Defining SonicWALL Email Security Deployment Architecture............................................... 3
Inbound and Outbound Email Flow ......................................................................... 4
Proxy versus MTA ................................................................................................ 5
Should You Choose an All in One or a Split Architecture?........................................... 5
Typical SonicWALL Email Security Deployments ................................................................. 6
SonicWALL Email Security as the First-Touch / Last-Touch Server .............................. 6
SonicWALL Email Security Not as a First-Touch / Last Touch Server............................ 7
Chapter 2 System ...............................................................................................................8
Introduction.................................................................................................................. 8
Setting Your Network Architecture ................................................................................... 8
Adding an Inbound Mail Server for All in One Architecture ......................................... 8
Source IP Contacting Path............................................................................................... 9
Adding an Outbound Mail Server for All in One Architecture ..................................... 10
Adding a Server for Split Architecture................................................................... 11
Adding a Control Center...................................................................................... 11
Adding a Remote Analyzer .................................................................................. 11
Configuring Inbound Email Flow for a Remote Analyzer........................................... 11
Configuring Outbound Email Flow for a Remote Analyzer......................................... 11
Configuring Remote Analyzers to Communicate with Control Centers ........................ 12
Deleting a Remote Analyzer from a Split Configuration............................................ 12
Testing the Mail Servers ..................................................................................... 12
Changing from an All in One Configuration to a Split Configuration ........................... 12
Configure MTA......................................................................................... 13
Certain fields in the subject line, body, and sender of the DSN can be specified by the ad-
ministrator: ................................................................................................................ 13
Email Address Rewriting ........................................................................... 14
Trusted Networks..................................................................................... 14
LDAP Configuration ...................................................................................................... 14
Configuring LDAP............................................................................................... 14
LDAP Query Panel.............................................................................................. 15
Advanced LDAP Settings ..................................................................................... 16
Multiple LDAP Server Support.............................................................................. 17
Configuring SonicWALL ES for Multiple LDAP Servers .................................... 17
Administering Multi-LDAP Environments...................................................... 18
Editing LDAP Connection Information.......................................................... 18
SonicWALL Email Security Administrator Guide
i
Page 5

Email Address Rewriting ........................................................................... 18
Default Message Management Settings........................................................................... 19
Junk Box Summary...................................................................................................... 19
User View Setup.......................................................................................................... 20
Updates ..................................................................................................................... 21
Web Proxy Configuration .................................................................................... 21
Test Connectivity to SonicWALL Email Security ............................................ 21
Monitoring .................................................................................................................. 22
About Alerts...................................................................................................... 22
Viewing Alert History.......................................................................................... 23
Alert Suppression Schedule................................................................................. 23
Using Syslog ..................................................................................................... 24
Connection Management .............................................................................................. 25
Intrusion Prevention........................................................................................... 25
Directory Harvest Attack (DHA) Protection .................................................. 25
Denial of Service (DoS) Attack Protection.................................................... 26
Quality of Service .............................................................................................. 27
BATV ..................................................................................................... 27
Sender IP Reputation ............................................................................... 28
GRID Connection Management with Sender IP Reputation and Connection Management
Precedence Order ........................................................................................................ 29
Using GRID IP Reputation ......................................................................... 29
Greylisting .............................................................................................. 30
Benefits of Greylisting .............................................................................. 30
Greylisting and Connection Management Precedence Order ........................... 30
Enabling and Disabling Greylisting.............................................................. 31
Throttling (Flow control) ........................................................................... 31
Connections ............................................................................................ 32
Messages................................................................................................ 32
Manually Edit IP Address List............................................................................... 32
Backup/Restore Settings .............................................................................................. 33
Manage Backup ................................................................................................. 33
Snapshots .............................................................................................. 33
Scheduled Backup ............................................................................................. 33
Manage Restores ............................................................................................... 33
Host Configuration....................................................................................................... 34
Changing the Hostname ..................................................................................... 34
Date & Time Settings ......................................................................................... 34
Network Settings ............................................................................................... 34
CIFS Mount Settings .......................................................................................... 35
Configuring Advanced Settings ...................................................................................... 35
Upload Patch........................................................................................... 36
Download System/Log Files....................................................................... 36
Reinitialize to Factory Settings................................................................... 37
Branding .................................................................................................................... 37
Quick Settings................................................................................................... 37
Text Preferences...................................................................................... 37
Image Preferences ................................................................................... 38
Junk Summary Preferences ....................................................................... 38
Packages .......................................................................................................... 38
Chapter 3 Anti-Spam Anti-Phishing Techniques ...................................................... 39
Managing Spam .......................................................................................................... 39
Spam Identification............................................................................................ 39
SonicWALL Email Security Administrator Guide
ii
Page 6

Managing Spam through Default Settings.............................................................. 39
Adding People to Allowed and Blocked Lists for the Organization .............................. 40
Companies or Domains....................................................................................... 41
Mailing Lists ...................................................................................................... 42
Anti-Spam Aggressiveness .................................................................................. 42
Configuring SMART Network Aggressiveness Settings ................................... 42
Configuring Adversarial Bayesian Aggressiveness Settings............................. 42
Determining Amounts and Flavors of Spam ................................................. 43
Authenticating the Sender’s Domain via Sender ID ...................................... 43
About Sender ID and SPF.......................................................................... 43
Sender ID or SPF Implementation Notes ..................................................... 43
Effects of SPF on Email Security Behavior.................................................... 44
Publishing Your SPF Record ....................................................................... 44
Languages ........................................................................................................ 44
Black List Services (BLS) .................................................................................... 44
Add........................................................................................................ 44
Email that Arrives from Sources on the Black Lists Services........................... 45
Managing Spam Submissions and Probe Accounts .................................................. 45
Managing Miscategorized Messages ...................................................................... 45
What Happens to Miscategorized Email Messages ......................................... 46
Forwarding Miscategorized Email to SonicWALL Email Security....................... 46
Configuring Submit-Junk and Submit-Good Email Accounts ........................... 46
Problem with Forwarding Miscategorized Email............................................. 47
Probe Accounts.................................................................................................. 47
Managing Spam Submissions .............................................................................. 47
Anti-Phishing .............................................................................................................. 48
What is Enterprise Phishing? ............................................................................... 48
Preventing Phishing ..................................................................................................... 48
Configuring Phishing Protection ..................................................................................... 49
Use SonicWALL Email Security’s Community to Alert Others .................................... 49
Report Phishing and Other Enterprise Fraud to SonicWALL Email Security.................. 49
Chapter 4 Anti-Virus Techniques ..................................................................................50
How Virus Checking Works............................................................................................ 50
Preventing Viruses and Likely Viruses in Email ....................................................... 50
Checking for Updates ......................................................................................... 51
Zombie and Spyware Protection..................................................................................... 52
Chapter 5 Auditing ...........................................................................................................54
Email Auditing............................................................................................................. 54
Searching Inbound and Outbound Emails ........................................................................ 54
Audit Simple View.............................................................................................. 54
Audit Advanced View.......................................................................................... 55
Configure Auditing ....................................................................................................... 56
Message Audit............................................................................................................. 56
Judgment Details............................................................................................... 57
Using Judgment Details ............................................................................ 57
SonicWALL Email Security Administrator Guide
iii
Page 7

Chapter 6 Policy & Compliance .....................................................................................59
Standard Module vs. Compliance Module......................................................................... 59
Basic Concepts for Policy Management ........................................................................... 59
Defining Word Usage.......................................................................................... 60
Defining Email Address Matching ......................................................................... 60
Defining Intelligent Email Attachment Matching ..................................................... 60
Defining Disguised Text Identification ................................................................... 62
Inbound vs. Outbound Policy Filters ............................................................................... 62
Preconfigured Inbound Filters .............................................................................. 63
Strip Potentially Dangerous File Attachments............................................... 63
Junk Emails with Attachments over 4MB ..................................................... 63
Strip Picture and Movie Attachments .......................................................... 63
Detect Personal Financial Information (PFI) Records in Inbound Mails ............. 63
Detect Personal Health Information (PHI) Records in Inbound Mails ................ 63
Detect Corporate Financial Information in Inbound Mails ............................... 63
Preconfigured Outbound Filters............................................................................ 64
Detect Personal Financial Information (PFI) Records in Outbound Mails ........... 64
Detect Personal Health Information (PHI) Records in Outbound Mails .............. 64
Detect Corporate Financial Information in Outbound Mails ............................. 64
Language Support ............................................................................................. 68
Managing Filters .......................................................................................................... 68
Editing a Filter................................................................................................... 68
Deleting a Filter................................................................................................. 68
Changing Filter Order ......................................................................................... 68
Advanced Filtering ............................................................................................. 68
Creating a Multi-Layered Filter................................................................... 68
Configuring a Policy Filter for Outbound Email to Include
a Company Disclaimer Message ..................................................................................... 69
Configuring a Policy Filter for Inbound Email................................................ 70
Exclusive Actions ..................................................................................... 70
Parameterized Notifications ....................................................................... 70
Policy Groups .............................................................................................................. 71
Multiple LDAP Groups ............................................................................... 71
Email Address Rewriting ........................................................................... 72
Compliance Module ...................................................................................................... 72
Dictionaries....................................................................................................... 72
Approval Boxes ................................................................................................. 73
Encryption ........................................................................................................ 74
Record ID Definitions ......................................................................................... 74
Archiving .......................................................................................................... 75
Chapter 7 User and Group Management ...................................................................76
Working with Users...................................................................................................... 76
Searching for Users............................................................................................ 76
Sort ................................................................................................................. 76
Signing In as a User........................................................................................... 76
Resetting User Message Management Setting to Default ......................................... 77
Edit User Rights................................................................................................. 77
Import ............................................................................................................. 77
Export.............................................................................................................. 77
Add ................................................................................................................. 77
Remove............................................................................................................ 77
SonicWALL Email Security Administrator Guide
iv
Page 8

Working with Groups.................................................................................................... 77
About LDAP Groups............................................................................................ 77
Add a New Group..................................................................................... 78
Removing a Group ................................................................................... 78
Listing Group Members ............................................................................. 78
SonicWALL Email Security Roles .................................................................................... 78
Setting a LDAP Group’s Role.......................................................................................... 79
Setting Spam Blocking Options for LDAP Groups .............................................................. 79
User View Setup ................................................................................................ 79
Rules and Collaborative Settings .......................................................................... 79
Configuring Foreign Language for Groups.............................................................. 80
Managing the Junk Box Summary ........................................................................ 80
Spam Management ............................................................................................ 80
Phishing Management ........................................................................................ 80
Virus Management ............................................................................................. 80
Assigning Delegates ........................................................................................... 81
Users and Groups in Multiple LDAP................................................................................. 81
Users ............................................................................................................... 81
Groups ............................................................................................................. 82
Administering groups ............................................................................... 82
Setting Junk Blocking by Group ................................................................. 83
Chapter 8 Junk Box .......................................................................................................... 84
Junk Box - Simple View ................................................................................................ 85
Junk Box - Advanced View ............................................................................................ 85
Outbound Messages Stored in Junk Box.......................................................................... 86
Working with Junk Box Messages................................................................................... 87
Unjunk ............................................................................................................. 87
Send Copy To.................................................................................................... 87
Release ............................................................................................................ 87
Delete .............................................................................................................. 87
Message Details................................................................................................. 87
Managing Junk Summaries ........................................................................................... 87
Supported Search in Audit and Junkbox .......................................................................... 87
Boolean Search ....................................................................................... 87
Wildcard Search ...................................................................................... 88
Phrase Search ......................................................................................... 88
Fuzzy Search........................................................................................... 88
Proximity Search ..................................................................................... 88
Chapter 9 Reports and Monitoring ...............................................................................89
Status Reports ............................................................................................................ 89
System Status................................................................................................... 89
MTA Status ....................................................................................................... 89
Real-Time System Monitor .................................................................................. 90
Performance Monitoring...................................................................................... 90
Reading Performance Monitoring................................................................ 90
Creating a Performance Monitoring Graph ................................................... 91
Monitored Metrics .................................................................................... 91
Metrics List ............................................................................................. 92
Reporting in SonicWALL Email Security........................................................................... 93
SonicWALL Email Security Administrator Guide
v
Page 9

Generating Per-Domain Reports........................................................................... 94
Overview Reports .............................................................................................. 94
Reports Dashboard .................................................................................. 95
Good Email vs Junk Email ......................................................................... 95
Spam Caught .......................................................................................... 95
Junk Email Breakdown.............................................................................. 95
System Load Average (15 min).................................................................. 95
System % Processor Time (15 min)............................................................ 95
Top Spam Recipients................................................................................ 95
Top Outbound Email Senders.................................................................... 95
Return on Investment .............................................................................. 95
Determining the ROI for Your Organization.................................................. 96
Bandwidth Savings................................................................................... 96
Inbound Good vs Junk .............................................................................. 96
Outbound Good vs Junk............................................................................ 96
Inbound vs Outbound Email ...................................................................... 96
Top Outbound Email Senders..................................................................... 96
Junk Email Breakdown.............................................................................. 96
Anti-Spam Reports............................................................................................. 97
Anti-Phishing Reports ......................................................................................... 97
Anti-Virus Reports ............................................................................................. 97
Policy Management Reports ................................................................................ 98
Compliance Reports ........................................................................................... 98
Directory Protection Reports................................................................................ 98
Connection Management Reports ......................................................................... 99
Advanced ................................................................................................................... 99
Scheduled Reports ............................................................................................. 99
Custom Reports................................................................................................100
Configuring a Custom Report for Inbound Good versus Junk Email.................100
SNMP Monitoring ........................................................................................................101
Overview...................................................................................................................102
Multiple LDAP Server Support.......................................................................................102
Feature Overview .............................................................................................103
Using Multiple LDAP Servers...............................................................................103
Configuring SonicWALL ES for Multiple LDAP Servers ...................................103
Administering Multi-LDAP Environments.....................................................103
Editing LDAP Connection Information.........................................................104
Users and Groups ...................................................................................104
Users ....................................................................................................104
Groups ..................................................................................................106
Policy Groups .........................................................................................107
Email Address Rewriting ..........................................................................107
Per-domain DHA Settings ............................................................................................108
Introduction...............................................................................................................109
Logging into the CLI..........................................................................................109
Scripting..........................................................................................................110
Using the Command Line Interface................................................................................110
cleanupdcdatabase ...........................................................................................110
configurehttps ..................................................................................................110
createreportdb .................................................................................................110
date................................................................................................................111
deletebookmarks ..............................................................................................111
deletelastnotifiedfiles.........................................................................................111
deletereportdb .................................................................................................111
dig..................................................................................................................111
SonicWALL Email Security Administrator Guide
vi
Page 10

dns .................................................................................................................112
esdu ...............................................................................................................112
eshostname .....................................................................................................112
esps................................................................................................................112
exit.................................................................................................................113
fdatadisk .........................................................................................................113
fetchurl ...........................................................................................................113
get .................................................................................................................113
gms ................................................................................................................113
help ................................................................................................................114
interface..........................................................................................................114
iostat ..............................................................................................................114
mlfdnstest .......................................................................................................115
mlfmta ............................................................................................................115
ns...................................................................................................................115
ntp .................................................................................................................115
ping................................................................................................................116
quit ................................................................................................................116
raidadd ...........................................................................................................116
raiddrives ........................................................................................................116
raidinfo ...........................................................................................................116
raidports .........................................................................................................117
raidrebuild .......................................................................................................117
raidremove ......................................................................................................117
raidstatus ........................................................................................................117
raidverify.........................................................................................................118
reboot.............................................................................................................118
rebuildreplicatorindex........................................................................................118
rebuildsearchdb................................................................................................118
rebuildwebroot .................................................................................................118
recreatereportdb ..............................................................................................119
redirecthttp......................................................................................................119
reinitializetofactorysettings ................................................................................119
repairdb ..........................................................................................................119
reportdbalert....................................................................................................120
reportdbupdate ................................................................................................120
reportdbupdatetocurver.....................................................................................120
restart.............................................................................................................120
route ..............................................................................................................120
sethostinheader................................................................................................121
setlog .............................................................................................................121
setsearchengineconfig [-memory <MemoryinMB / -1>] [-sort <true/false>] [-stats <number of
terms / -1>] ..............................................................................................................121
snmp ..............................................................................................................122
sshd ...............................................................................................................122
start ...............................................................................................................122
stop ................................................................................................................122
testdbspeed .....................................................................................................123
telnet..............................................................................................................123
time................................................................................................................123
traceroute .......................................................................................................123
tsr ..................................................................................................................124
validatedb .......................................................................................................124
Inbound TCP Traffic ....................................................................................................125
Outbound TCP Traffic ..................................................................................................125
SonicWALL Email Security Administrator Guide
vii
Page 11

Split Configuration TCP Port Utilization...........................................................................126
Index ..................................................................................................................................130
SonicWALL Email Security Administrator Guide
viii
Page 12
Preface
SonicWALL’s email threat protection solution is a dynamic, self-learning, and self-running system,
providing IT departments with the protection they need for inbound and outbound email.
SonicWALL Email Security offers redundancy, comprehensive reporting and central administration
across multiple data centers. The solution scales for organizations with 10 employees to enterprises
with 100,000 or more employees.
About this Guide
This guide describes how to configure SonicWALL Email Security and the SonicWALL Email Security
appliances. Information that is specifically about SonicWALL Email Security appliances is indicated
by a footnote at the bottom of the page.
Documentation Conventions
Font Meaning
Bold
Italic
Courier
Bold Courier
Terms you see in a SonicWALL Email Security window
Variable names
Text on a command line
Text that you type in a command line
Documentation Overview
SonicWALL Email Security provides the following documents to help in the installation,
administration, and use of its products to protect email users from phishing, spam, viruses, and to
manage the security policies you define for your organization.
Who Should Read this? Document Name
Network Administrators SonicWALL Email Security’s Getting Started Guide
SonicWALL Email Security’s Administrator Guide
Email Users SonicWALL Email Security’s User Guide
Finding Online Help
Click the What is this? button for in-depth online help on a specific area of the
SonicWALL Email Security interface.
Click the Help button on any UI web page for information on how to use the UI features on that
page.
Page 13

Planning SonicWALL Email Security Deployment
Determine the appropriate architecture for SonicWALL Email Security before you deploy it in your
network. This section discusses the different modules available in SonicWALL Email Security and
network topology planning.
Note
z
For installation and set up instructions for your SonicWALL Email Security appliance, refer to
the SonicWALL Email Security Series Getting Started Guide document.
SonicWALL Email Security and Mail Threats
SonicWALL Email Security determines that an email fits only one of the following threats: Spam,
Likely Spam, Phishing, Likely Phishing, Virus, Likely Virus, Policy Violation, or Directory Harvest
Attack (DHA). It uses the following precedence order when evaluating threats in email messages:
z
Phishing
z
Likely Phishing
z
Virus
z
Spam
z
Likely Spam
z
Likely Virus
For example, if a message is both a virus and a spam, the message will be categorized as a virus
since virus is higher in precedence than spam.
If SonicWALL Email Security determines that the message is not any of the above threats, it is
deemed to be good email and is delivered to the destination server.
CHAPTER 1
Page 14
SonicWALL Email Security Administrator’s Guide|3
Defining SonicWALL Email Security Deployment Architecture
SonicWALL Email Security can be configured in two ways:
z
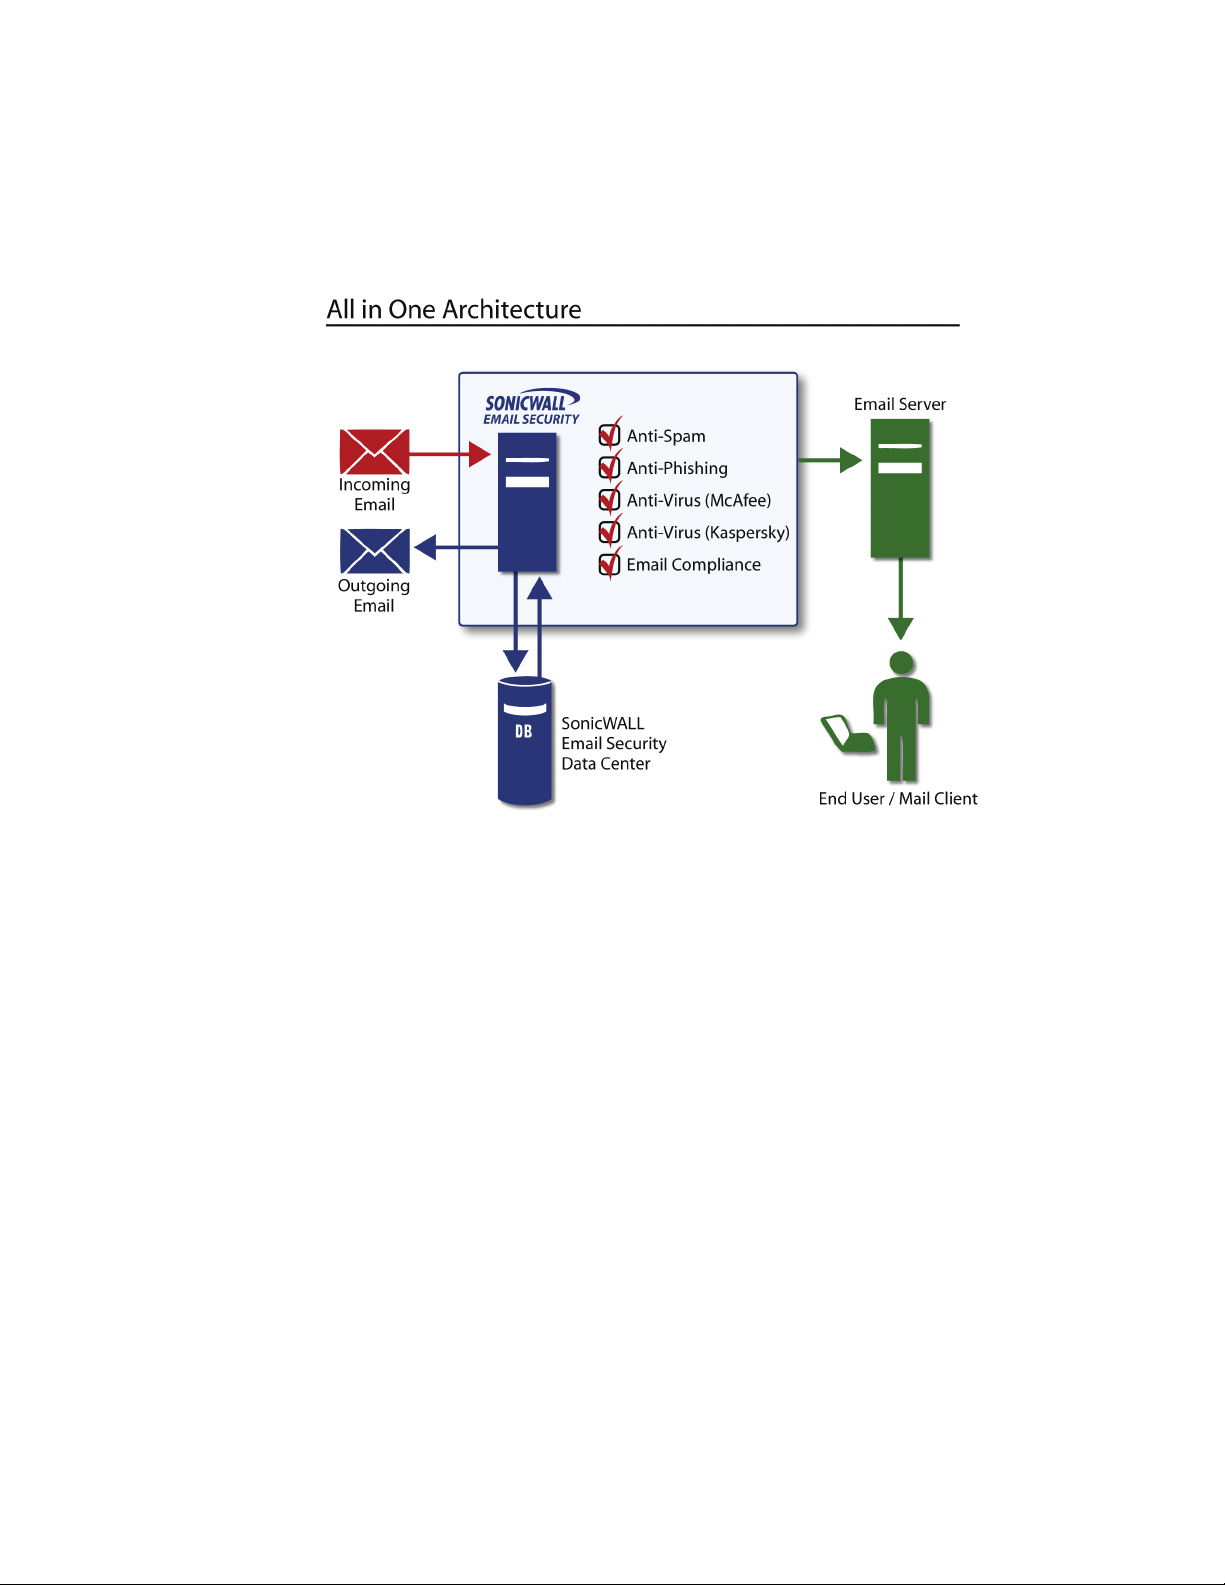
All in One: In this configuration, all machines running SonicWALL Email Security analyze email,
quarantine junk mail, and allow for management of administrator and user settings.
A typical Al
l in One configuration:
In an All in One configuration, you can also deploy multiple SonicWALL Email Security servers
in a cluster setup wherein all of the gateways share the same configuration and data files. To
set up such a cluster, begin by creating a shared directory, on either one of the
SonicWALL Email Security servers or on another dedicated server
same operating system. This shared directory will be used to store data including user
settings, quarantine email, etc., from all the SonicWALL Email Security servers in the
z
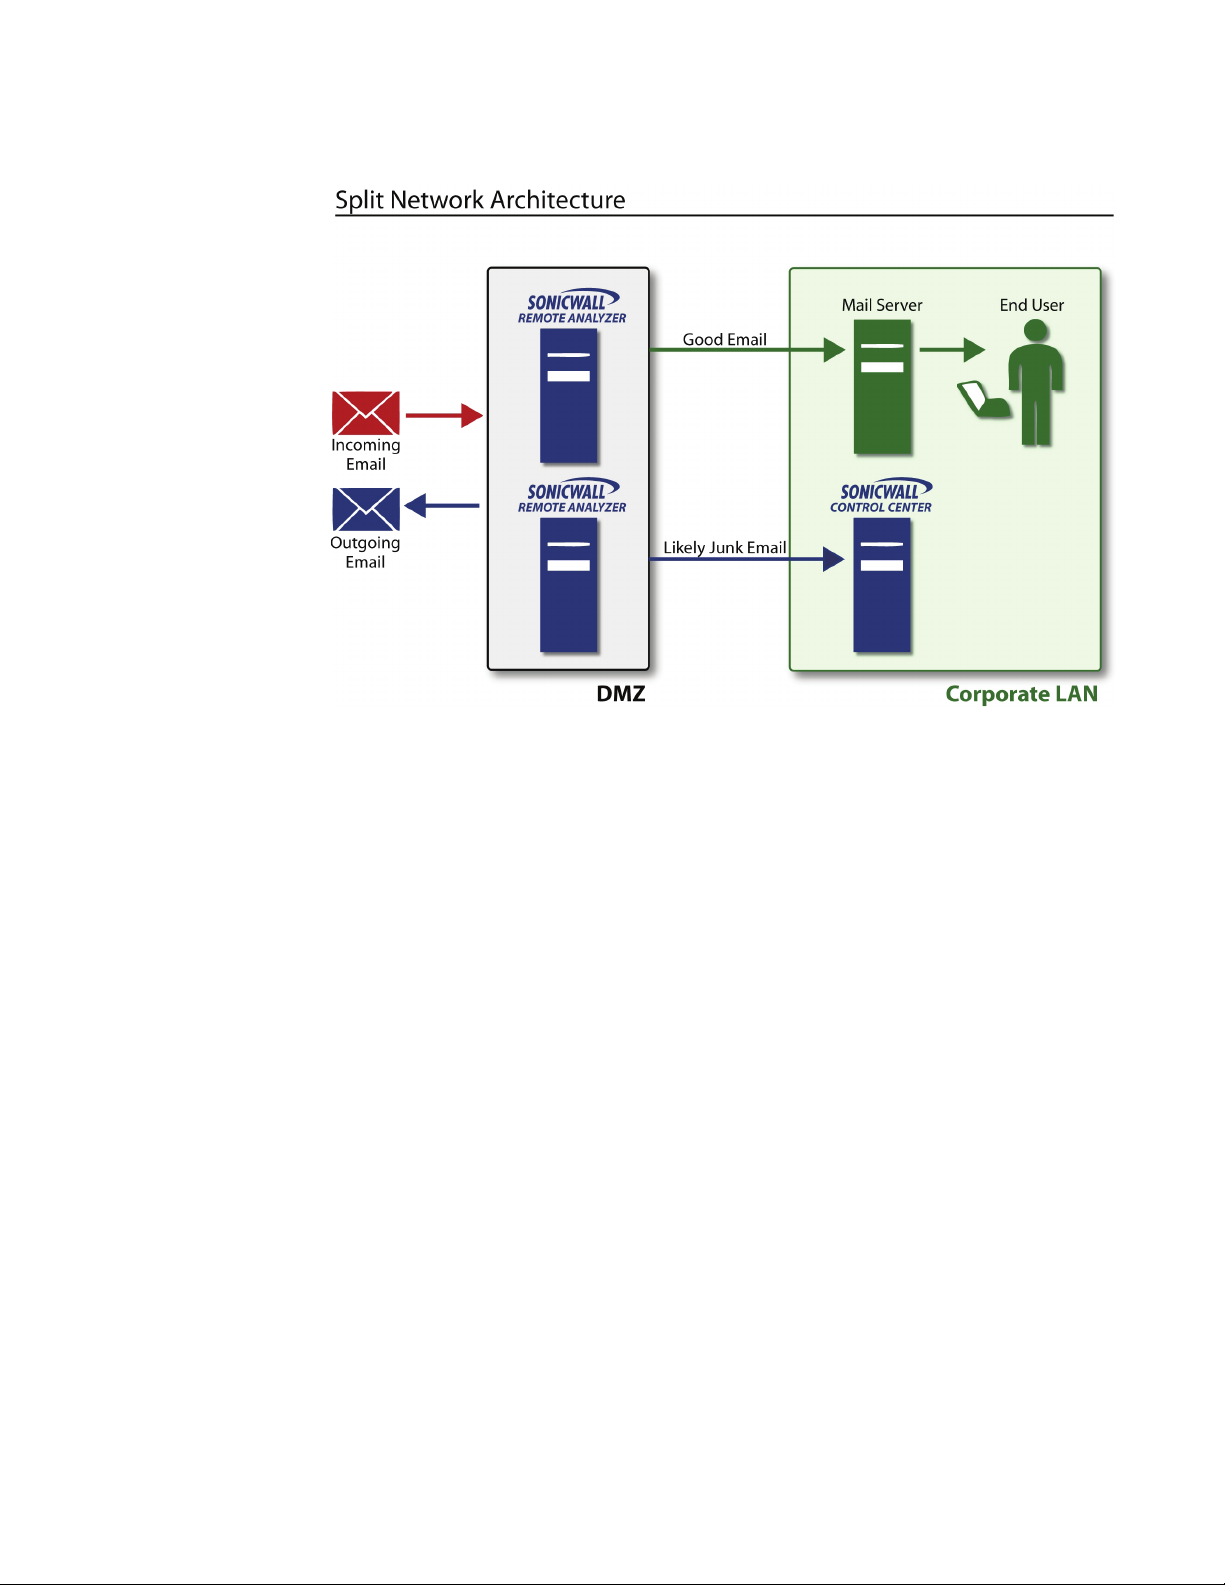
Split: In a Split network configuration, there are two kinds of servers: Control Centers and
Remote Analyzers. In this configuration there is typically one Control Center and multiple
Remote Analyzers, but the Control Center can be set up in a cluster as well. The Split
configuration is designed for organizations with remote physical data centers.
The Split configuration allows you to manage SonicWALL Email Security so that email
ssages are filtered in multiple remote locations through multiple Remote Analyzers. The
me
entire setup is centrally managed from a single location through the Control Center.
(preferred) running the
cluster.
Page 15
SonicWALL Email Security Administrator’s Guide|4
Control Center clusters are not supported by SonicWALL Email Security appliance.
z
The Control Center, in addition to managing all data files, controls, monitors and communicates
with all Remote Analyzers. The data files consist of statistical data such as how much email has
been received, network usage, remote hardware space used, and hourly spam statistics. The
Control Center stores or quarantines junk email it receives from the Remote Analyzers. It also
queries LDAP servers to ensure valid users are logging in to SonicWALL Email Security. End
users can log
z
Remote Analyzers analyze incoming email to determine whether it is good or junk. It sends junk
in to a Control Center to manage their junk mail.
email to the Control Center where it is quarantined. It routes good mail to its destination server.
Only administrators can log in to a Remote Analyzer.
Note:
z
The Replicator is the SonicWALL Email Security component that automatically sends data
updates from the Control Center to the Remote Analyzer, ensuring that these components are
always synchronized. Replicator logs are stored in the Control Center’s logs directory. You can
review replication activity from these logs for troubleshooting purposes.
Inbound and Outbound Email Flow
SonicWALL Email Security can process both inbound and outbound email on the same machine. In
an All in One configuration, each SonicWALL Email Security instance can support both inbound and
outbound email. In a Split configuration, each Remote Analyzer can support both inbound and
outbound email.
For inbound email flow, DNS configuration and firewall rules need to be set to direct email traffic to
SonicWALL Email Security. Whereas, for outbound email flow, the downstream email server must
be configured to send all email to Email Security (Smart Host Configuration).
Page 16

SonicWALL Email Security Administrator’s Guide|5
Proxy versus MTA
SonicWALL Email Security can run either as an SMTP proxy or an MTA (Mail Transfer Agent).
The SMTP proxy operates by connecting to a destination SMTP server before accepting messages
from a sending SMTP server. Note that SMTP proxies can only send email to one server. Some
benefits of the SMTP proxy are:
z
All processing occurs in memory, significantly reducing the latency and providing higher
throughput
z
There is no queue and SonicWALL Email Security does not lose any email messages.
SonicWALL
infrastructure experiences a failure.
The MTA service operates by writing messages to disk and allows for routing of a message. Some
benefits of the MTA are:
z
Can route messages to different domains based on MX records or LDAP mapping.
z
Can queue messages by temporarily storing messages on disk and retrying delivery later in
case the receiving server is not ready.
z
Allows SonicWALL Email Security to be the last touch mail gateway for outbound traffic
Email Security automatically respects your existing fail over strategies if your mail
Should You Choose an All in One or a Split Architecture?
SonicWALL recommends the All in One configuration whenever possible because of its simplicity.
Choose a Split configuration to support multiple physical data centers and if you want to centrally
manage this deployment from a single location.
SonicWALL strongly recommends that after you deploy the chosen architecture, you do not change
the setup from a Control Center to a Remote Analyzer or vice versa, as there are no obvious
advantages, and some data might be lost. Thus, it is important to make the deployment
architecture decision before installing SonicWALL Email Security.
Page 17
SonicWALL Email Security Administrator’s Guide|6
Typical SonicWALL Email Security Deployments
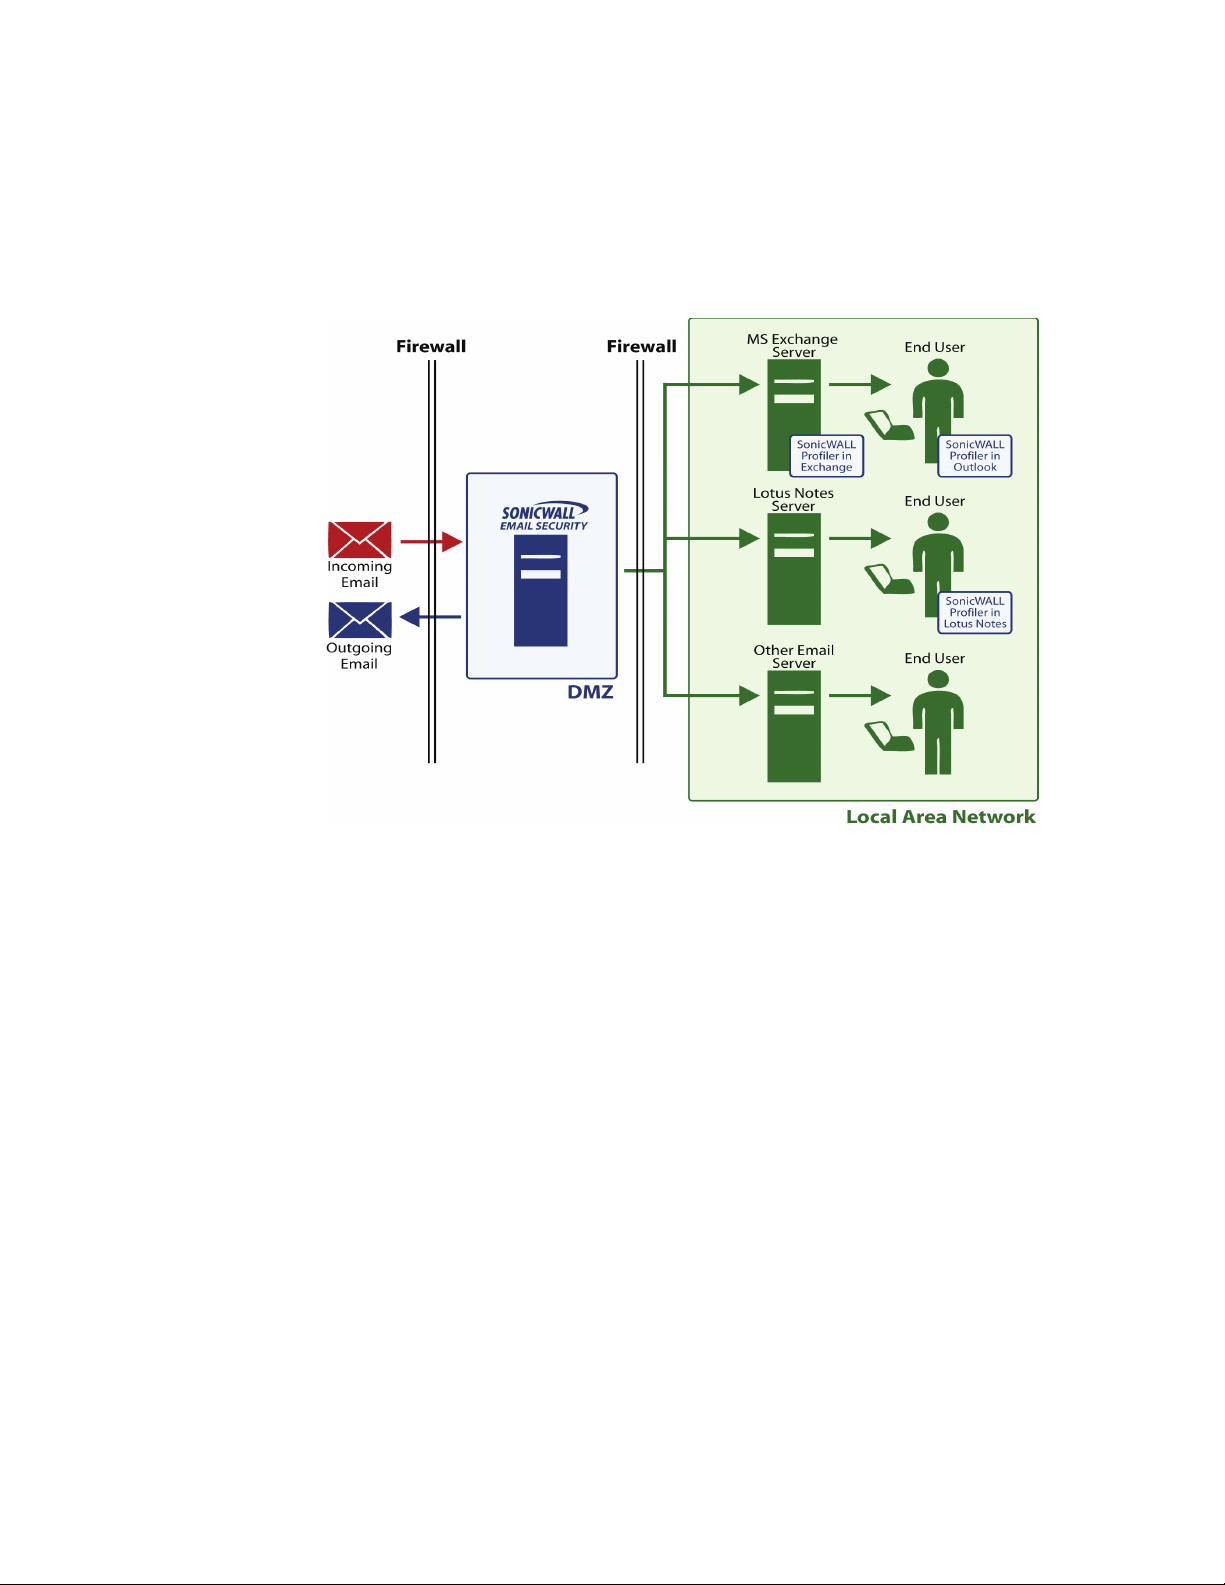
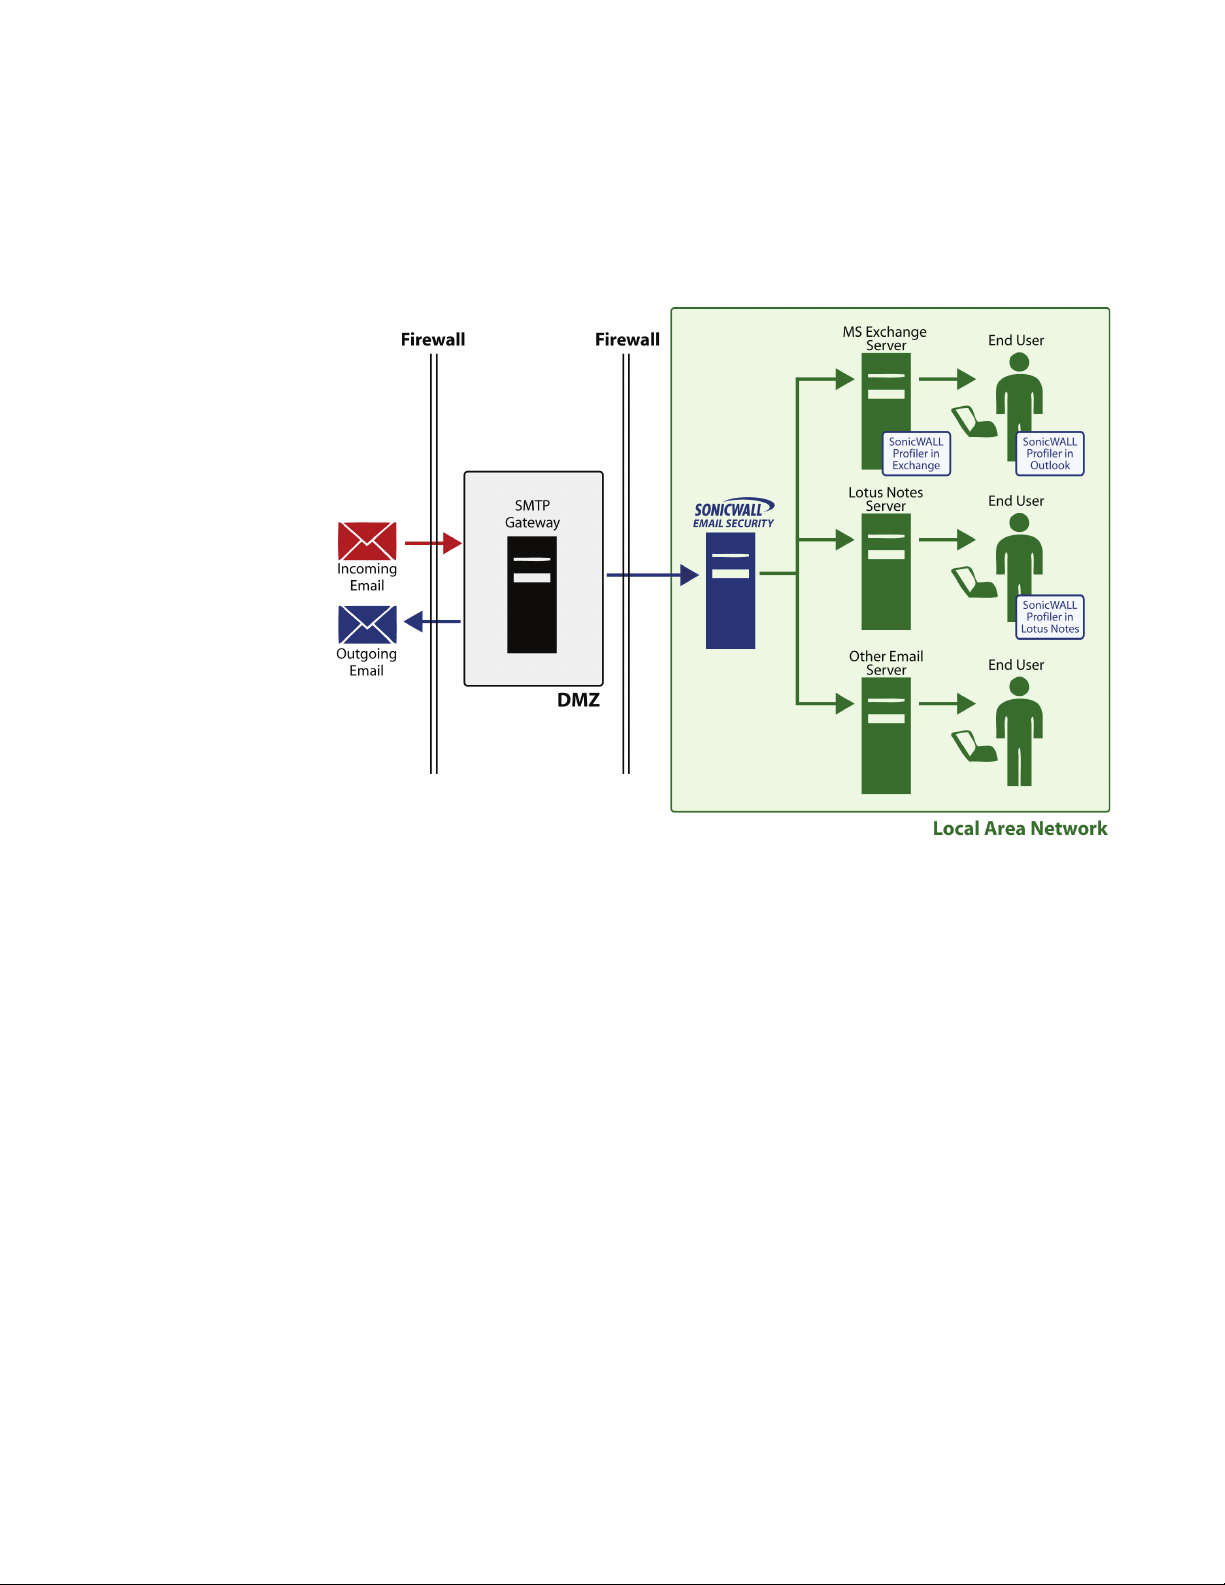
SonicWALL Email Security as the First-Touch / Last-Touch Server
In a deployment with first-touch and last-touch in the DMZ, change your MX records to point to the
SonicWALL Email Security setup. Also, all the inbound and outbound connections (typically port 25)
for SonicWALL Email Security must be properly configured in your firewalls.
In this configuration, SonicWALL Emai
a SMTP Proxy or a MTA. On the outbound path, it must be configured to be a MTA. This setup also
can be extended to a cluster with multiple SonicWALL Email Security servers all using a shared drive
for data location. For more information on routing using Smart Host, refer to “Adding an Inbound
Mail Server for All in One Architecture” on page 8.
X To configure SonicWALL Email Security in this configuration, you also need to:
1. Configure SonicWALL Email Security server with a static IP address on your DMZ.
2. In your firewall, add an inbound NAT Rules’s privat
address for TCP port 25 (SMTP).
3. In the public DNS server on th
smtp.my_domain.com, to the Internet addressable IP address you assigned in step 2.
4. Update your email domain’s MX reco
SonicWALL Email Security for each MX record.
l Security can be configured on the inbound path to be either
e IP address to an Internet addressable IP
e Internet, create an A record, mapping a name such as
rd to point to the new a record. You need to deploy the
Page 18
SonicWALL Email Security Administrator’s Guide|7
SonicWALL Email Security Not as a First-Touch / Last Touch Server
A network topology where Email Security is not the first-touch and last-touch SMTP server. is not
recommended because security mechanisms such as SPF and Connection Management cannot be
used.
In this configuration SonicWALL Email Security can be configured to be either an MTA or a proxy.
Page 19

Introduction
CHAPTER 2
System
In this chapter, you will learn how to configure the system more extensively and learn more about
additional system administration capabilities.
This chapter contains the following sections:
z
“Setting Your Network Architecture” on page 8
z
“LDAP Configuration” on page 14
z
“Default Message Management Settings” on page 19
z
“Junk Box Summary” on page 19
z
“User View Setup” on page 20
z
“Updates” on page 21
z
“Monitoring” on page 22
z
“Connection Management” on page 25
z
“Backup/Restore Settings” on page 33
z
“Host Configuration” on page 34
z
“Configuring Advanced Settings” on page 35
z
“Branding” on page 37
Setting Your Network Architecture
There are different ways to configure and deploy SonicWALL Email Security, and the first decision
to make is the choice of network architecture. See “Planning SonicWALL Email Security
Deployment” on page 2 for more information on what network architecture is appropriate for your
need. You must decide whether you are setting up a Split or All in One architecture, as that choice
impacts other configuration options. You can change the architecture later, but if you do so, you will
need to add your mail servers and reset configuration options again.
To configure SonicWALL Email Security as your desired network architecture, click System >
Network Architecture.
Adding an Inbound Mail Server for All in One Architecture
Set this server to All in One configuration by choosing the radio button next to All in One.
Click the Add Path button in the Inbound Email Flow section. The Add Inbound Path window
appears.
Page 20

Source IP Contacting Path
1. In this section you can configure from where you accept email. You can choose to
{
Accept connections for all senders. Use of this setting can make the product an open relay.
SonicWALL Email Security strongly recommends against an open relay. Open relays can
!
reduce the security of your email network and allow malicious users to spoof your email
domain.
{
Accept connections for all senders sending to the specified domains.
{
Accept connections from the specified senders
2. Path Listens On. In this section, you can specific which IP addresses and port number the
service is listening on for incoming email.
{
Listen for all IP address on this port - This is the typical setting for most environment
as the service listens on the specified port using the machine’s default IP address. The
usual port number for incoming email traffic is 25.
{
Listen only on this IP address and port - If you have multiple IP addresses configured
in this machine, you can specify which IP address and port number to listen on.
3. Destination of Path. In this section, you can specify the destination server for incoming
email traffic in this path.
{
This is a proxy. Pass all email to destination server - This setting configures this path
to act as a proxy and relay messages to a downstream email server. If the downstream
server is unavailable, incoming messages will not be accepted.
{
This is an MTA. Route email using SmartHost to - This setting is the same as the
above Proxy option, except that incoming messages will be accepted and queued if the
downstream server is unavailable. In this instance, this path acts as a SMTP smarthost.
{
This is an MTA. Route email using SmartHost with load balancing to the following
multiple destination servers - When a path is configured with this choice, messages
received will be routed to multiple downstream servers as follows.
{
If Round robin is specified, email will be load-balanced by sending a portion of the email
flow through each of the servers specified in the text box in round-robin order. All of the
servers will process email all the time.
{
If Fail over is specified, the first server listed will handle all email processing under
normal operation. If the first server cannot be reached, email will be routed through the
second server. If the second server cannot be reached, email will be routed through the
third server, and so on.
{
MTA with MX record routing - This setting configures this path to route messages by
standard MX (Mail Exchange) records. To use this option, your DNS server must be
configured to specify the MX records of your internal mail servers that need to receive the
email.
{
MTA with MX record routing (with exceptions) - This setting configures this path to
route messages by standard MX (Mail Exchange) records, except for the specified
domains. For the specified domains, route messages directly to the listed IP address.
Note:
z
You can specify email addresses in addition to domains in this routing table. Also, hostnames
can be specified instead of IP addresses. For example, if you want to route customer service
emails to one downstream server and the rest of the traffic to a different downstream server,
you can specify something like:
service@mycompany.com 10.1.1.1
mycompany.com internal_mailserver.mycompany.com
4. Advanced Settings
5. Use this text instead of a host name in the SMTP banner - Use this text to customize the
HELO banner. By default, the fully qualified domain name will be used
SonicWALL Email Security Administrator’s Guide|9
Page 21

SonicWALL Email Security Administrator’s Guide|10
6. Set the action you want to take for messages for email recipients who are not listed in your
LDAP server. Typically, it is a good practice to set this path to adhere to corporate settings.
7. Enable StartTLS on this path - Check this check box if you want a secure internet
connection for email. If the check box is checked, SonicWALL
Email Security uses Transport
Layer Security (TLS) to provide the secure internet connection. When StartTLS is enabled,
email can be sent and received over a secure socket. The source and destination email
addresses and the entire message contents are all encrypted during transfer.
8. Click Add to add an inbound path for this All in One server.
Adding an Outbound Mail Server for All in One Architecture
1. Click the Add Path button in the Outbound Email Flow section. The Add Outbound Path
window appears.
2. Source IP Contacting Path. In this section, you can specify which servers within your
organization can connect to this path to relay outgoing email.
{
Any source IP address is allowed to connect to this path - This setting configures
this path to receive outgoing email from any server. Using this option could make your
server an open relay.
{
Only these IP addresses can connect and relay - This setting configures this path to
accept email only from the specified IP addresses.
Note:
z
You need to use this setting if you configure your SonicWALL Email Security installation to listen
for both inbound and outbound email traffic on the same IP address on port 25.
3. Path Listens On. In this section, you can specify the IP addresses and port number on which
this path listens for connections.
{
Listen for all IP address on this port - This is the typical setting for most environment
as the service listens on the specified port using the machine’s default IP address.
{
Listen only on this IP address and port - If you have multiple IP addresses configured
in this machine, you can specify which IP address and port number to listen to.
4. Destination of Path. In this section, you can specify the destination server for outgoing
email traffic in this path.
{
This is a Proxy. Pass all email to destination server - Use this setting if you want this
path to act as a proxy and relay messages to an upstream MTA. Enter the host name or IP
address of the upstream MTA and the port on which it should be contacted. If the
upstream MTA is unavailable, outgoing messages will not be accepted.
{
This is an MTA. Route email using SmartHost to - This setting is same as the Proxy
option above except that outgoing messages will be accepted and queued if the upstream
MTA is unavailable.
{
This is an MTA. Route email using SmartHost with load balancing to the following
multiple destination servers - When a path is configured with this choice, outbound
messages will be routed to multiple upstream MTAs as follows.
{
If Round robin is specified, email will be load-balanced by sending a portion of the email
flow through each of the MTAs specified in the text box in round-robin order. All of the
MTAs will process email all the time.
{
If Fail over is specified, the first MTA listed will handle all email processing under normal
operation. If the first MTA cannot be reached, email will be routed through the second
MTA. If the second MTA cannot be reached, email will be routed through the third MTA,
and so on.
{
This is an MTA. Route email using MX record routing - Use this setting to configure
this path to route outbound email messages by standard MX (Mail Exchange) records.
{
This is an MTA. Route email using MX record routing with these exceptions - Use
this setting to configure this path to route outbound email messages by standard MX (Mail
Exchange) records except for the specified domains. For the specified domains, route
messages directly to the listed IP address.
Page 22

5. Advanced Settings
{
Use this string instead of a host name in the SMTP banner - Use this string to
customize the HELO banner. By default, the fully qualified domain name will be used.
Adding a Server for Split Architecture
If you chose Split Architecture, you must define whether the server is the Control Center or Remote
Analyzer, and then let each know about the other.
1. Go to System > Network Architecture.
2. Choose Split.
3. Click Control Center to configure the server as a Control Center or click Remote Analyzer to
configure the server as a Remote Analyzer.
4. Click Apply.
Adding a Control Center
X To add a Control Center:
1. Click Add Server in the Control Center section of the Network Architecture window.
2. Enter the Control Center hostname.
3. If feasible, use the default port number. If not, enter a new Control Center Server Address
Port Number.
4. Click Add.
SonicWALL Email Security Administrator’s Guide|11
Adding a Remote Analyzer
You must add one or more Remote Analyzers to a Split Configuration. Remote Analyzers can process
inbound messages or outbound messages or both.
1. Click the Add Server button in the Inbound Remote Analyzer or Outbound Remote Analyzer
section based on your need.
2. Enter the Remote Analyzer’s hostname or IP address.
3. Enter the Remote Analyzer Server Address Port number.
4. If your network requires SSL, check the Requires SSL check box.
5. Click the Add button.
Note:
z
If there is a high volume of network traffic, it might take some time before the new Remote
Analyzer is displayed in the System>Network Architecture window.
Any changes you make at the Control Center are propagated to the Remote Analyzers you just
added. You can monitor their status on the Reports page as well.
Configuring Inbound Email Flow for a Remote Analyzer
While logged into the Control Center, Click the Add Path button next to the Inbound Remote
Analyzer. An Add Inbound Path window appears. Follow the instructions in “Adding an Inbound
Mail Server for All in One Architecture” on page 8.
Configuring Outbound Email Flow for a Remote Analyzer
While logged into the Control Center, Click the Add Path button next to the Outbound Remote
Analyzer. An Add Outbound Path window appears. Follow the instructions in “Adding an Outbound
Mail Server for All in One Architecture” on page 10. Make sure that the Control Center can connect
and relay email messages through this path - step 1 in the Add Outbound Path dialog.
Page 23
SonicWALL Email Security Administrator’s Guide|12
Configuring Remote Analyzers to Communicate with Control Centers
After you have set up the Control Center, configure each Remote Analyzer so that it can
communicate with its Control Center.
1. Log in to each server set up as a Remote Analyzer and go to Network Architecture.
2. Click the Add button to identify from which Control Center this Remote Analyzer will accept
instructions.
3. An Add Control Center screen appears. Enter the hostname of your Control Center.
If your Control Center is a cluster, you must add each individual hostname as a valid Control
Center.
Note:
z
If your Control Center is a cluster, add each individual hostname as a valid Control Center by
repeating steps 2-3.
All other configuration options for the Remote Analyzer are managed by the Control Center.
Deleting a Remote Analyzer from a Split Configuration
X Before deleting a Remote Analyzer, ensure there are no messages in the queue for
quarantine
1. Stop SMTP traffic to the Remote Analyzer by turning off the SonicWALL Email Security Service.
Click Control Panel>Administrative Tools>Services>MlfASG Software> Stop.
2. After a few minutes, view the last entry in the mfe log on the Remote Analyzer log.
3. View the mfe log in the Control Center logs directory to ensure the last entry in the mfe log for
the Remote Analyzer is there: this can take a few moments.
Turn off the ability of the associated email server to send ma i l to th i s Rem o te Ana l y zer, and / or poi n t
the associated email server to another installed and configured Remote Analyzer.
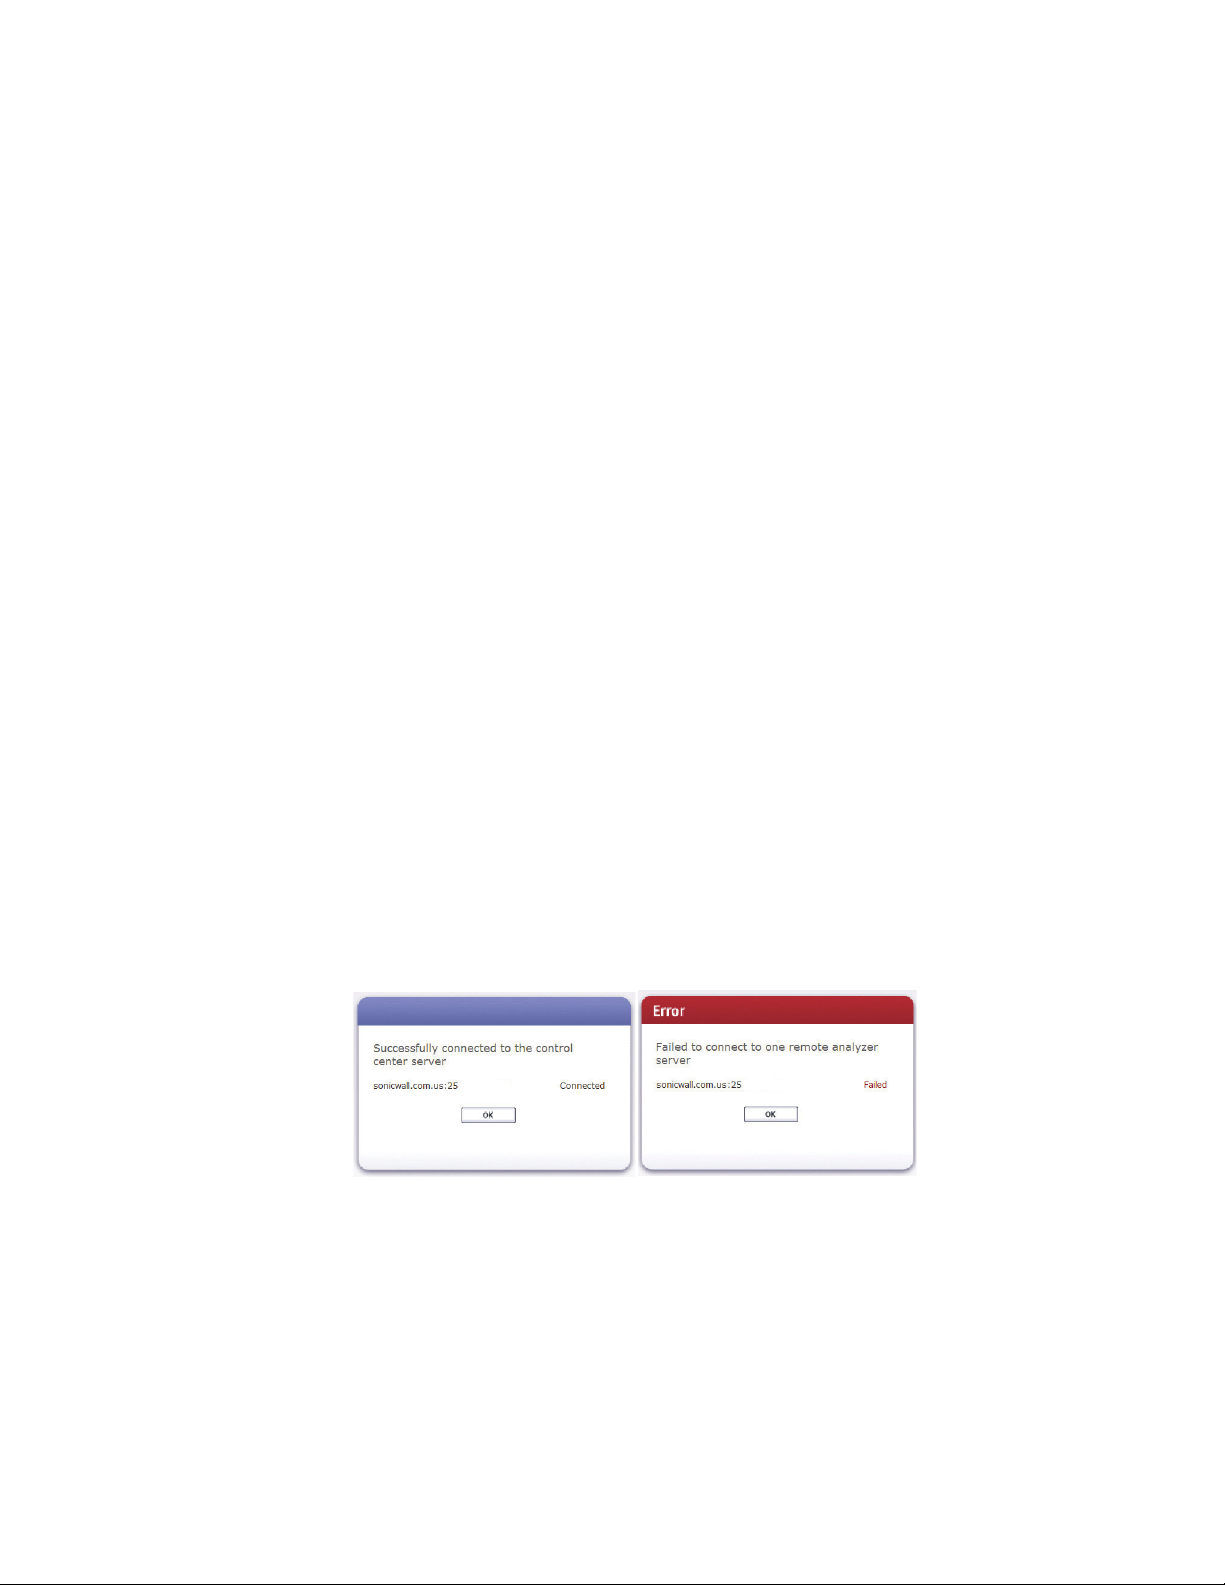
Testing the Mail Servers
Click the Test Mail Servers button. SonicWALL Email Security displays a window that indicates
either a successful test or an unsuccessful test.
Note:
z
It takes 15 seconds for SonicWALL Email Security to refresh its settings. If the first test fails,
try the test again.
Changing from an All in One Configuration to a Split Configuration
There are only two situations that warrant changing your configuration:
z
You are a current SonicWALL Email Security customer running All in One architecture and want
to upgrade to a Split Network configuration.
z
You are a new customer and have incorrectly configured for All in One architecture and you want
to configure for Split Network, or vice versa.
Page 24

SonicWALL Email Security Administrator’s Guide|13
Configure MTA
You can configure the Mail Transfer Agent (MTA) Settings by navigating to the System>Network
Architecture> MTA Configuration screen. You can specify how the MTA will handle a case in
which Email Security is unable to deliver a message right away. Note that most installations will not
require any change to the MTA settings.
Delivery
Messages are bounced if the recipient domain returns a permanent failure (5xxx error code). In the
case of transient failures (4xx error codes, indicating a delay), the MTA will retry delivery of the
message periodically based on the schedule specified in the Retry interval field. Delayed
messages that cannot be delivered within the time period specified in the Bounce after field will
be bounced; no further attempts will be made to deliver them.
Non-Delivery Reports (NDR)
When an email cannot be sent due to either a transient delay or a permanent failure, the sender
may receive a notification email, or a Non-Delivery Report (NDR), describing the failure.
Administrators can use this pane to customize the schedule and contents of those notification
emails.
Transient Failure Settings
To enable Transient NDR, select the “Send NDR for transient failures” check box. Specify the interval
(days, hours, minutes) at which notifications are sent, the sender name and email address (for
example, “Eric Smith” and “ericsmith@example.com”), a customized subject line for the NDR (for
example, “Delay in sending your email”), and a customized body for the NDR.
Permanent Failure Settings
Choose a name and email address from which NDRs will be sent (for example, “Eric Smith” and
“ericsmith@example.com”), a customized subject line for the NDR (for example, “Your email could
not be sent”), and a customized body for the NDR. Note that Permanent Failure Settings cannot be
disabled.
General Settings
All NDRs include a diagnostic report about the problem that prevented delivery, including the
headers of the original message. Permanent NDRs may optionally have the contents of the original
message attached.
Customized Fields
Certain fields in the subject line, body, and sender of the DSN can be specified by the administrator:
z
$subject - the subject of the original email
z
$hostname - the hostname from which the NDR is sent
z
$originator - the sender of the original email
z
$recipient - the intended recipient of the original email
z
$timeQueued - the time at which the original email was queued
z
$date - the current date
z
$retryAfter - the interval at which delivery of delayed emails is retried
z
$bounceAfter - the time after which delivery attempts will cease for delayed emails
Example Sender - postmaster@$hostname
Example Subject - Delivery Status Notification (re: $subject)
Example Body - Your email from $originator regarding $subject has bounced. It was sent on
$timeQueued to $recipient. No further attempts at delivery will be made. Have a nice day!
Page 25

Note:
z
Email Address Rewriting
Use this dialog to rewrite email addresses for inbound or outbound emails. These operations affect
only the email envelope (the RFC 2821 fields): the email headers are not affected in any way. For
inbound email, the “To” field (the RCPT TO field) is rewritten. For outbound email, the” From” field
(the MAIL FROM field) is rewritten.
Trusted Networks
When the SonicWALL Email Security receives email messages from an upstream server that us es a
non-reserved or public IP address, the GRID Network effectiveness may degrade. To avoid this
degradation on the GRID Network, users can put public IP addresses on a “privatized” list. To add
IP addresses to a Trusted Network, click the Add Server button. In the box that displays, type in
the IP addresses you want to add, then click Save. The IP addresses will now appear on the Server
List.
LDAP Configuration
SonicWALL Email Security uses Lightweight Directory Access Protocol (LDAP) to integrate with your
organization’s email environment. LDAP is an Internet protocol that email programs use to look up
users’ contact information from a server. As users and email distribution lists are defined in your
mail server, this information is automatically reflected in SonicWALL Email Security in real time.
SonicWALL Email Security Administrator’s Guide|14
Some mail servers, such as Microsoft Exchange, may send their own NDRs or rewrite the
contents of NDRs sent from other products. Please see the Administrator's Guide for information
on integrating this product's NDR functionality with Microsoft Exchange.
Many enterprise network use directory servers like Active Directory or Lotus Domino to manage
user information. These directory servers support LDAP and SonicWALL Email Security can
automatically get user information from these directories using the LDAP. You can run
SonicWALL Email Security without access to an LDAP server as well. If your organization does not
use a directory server, users cannot access their Junk Boxes, and all inbound email is managed by
the message-management settings defined by the administrator.
SonicWALL Email Security uses the following data from your mail environment.
z
Login Name and Password: When a user attempts to log into the SonicWALL Email Security
server, their login name and password are verified against the mail server using LDAP
authentication. Therefore, changes made to the user names and passwords are automatically
uploaded to SonicWALL
z
If your organization allows users to have multiple email aliases, SonicWALL Email Security
ensures any individual settings defined for the user extends to all the user’s email aliases. This
means that junk sent to those aliases aggregates into the same folder.
z
Email groups or distribution lists in your organization are imported into
SonicWALL
as a user’s settings.
LDAP groups allow you to assign roles to user groups and set spam-blocking options for user
groups.
Configuring LDAP
Use the LDAP Configuration screen to configure SonicWALL Email Security for username and
password authentication for all employees in the enterprise.
Note
z
Complete the LDAP configuration screen to get the complete list of users who are allowed to
login to their Junk Box. If a user does not appear in the User list in the User & Group screen,
their email will be filtered, but they cannot view their personal Junk Box or change default
message management settings.
Email Security in real time.
Email Security. You can manage the settings for the distribution list in the same way
Page 26

SonicWALL Email Security Administrator’s Guide|15
Enter the server information and login information to test the connection to the LDAP server.
1. Click the Add Server button to add a new LDAP Server. Configuring the LDAP server is
essential to enabling per-user access and management. These settings are limited according
to the preferences set in the User Management pane. See the SonicWALL
Email Security
Administration Guide “User View Setup” in Chapter 6 for details.
2. The following checkboxes appear under the Settings section:
{
Show Enhanced LDAP Mappings fields: Select this option for Enhanced LDAP, or LDAP
Redundancy. You will have to specify the Secondary Server IP address and Port number.
{
Auto-fill LDAP Query fields when saving configurations: Select this option to
automatically fill the LDAP Query fields upon saving.
3. Enter the following information about your LDAP server:
{
Friendly Name: The friendly name for your LDAP server.
{
Primary Server Name or IP address: The DNS name or IP address of your LDAP
server. (Configuration checklist parameter M)
{
Port number: The TCP port running the LDAP service. The default LDAP port is 389.
(Configuration checklist parameter N)
{
LDAP server type: Choose the appropriate type of LDAP server from the dropdown list.
{
LDAP page size: Specify the maximum page size to be queried. The default size is 100.
{
SSL Connection: Select this box if your server requires a secured connection.
{
Type of LDAP Server: Choose the appropriate type of LDAP server from the list.
{
Allow LDAP referrals: Leaving this option unchecked will disable LDAP referrals and
speed up logins. You may select this option if your organization has multiple LDAP servers
in which the LDAP server can delegate parts of a request for information to other LDAP
servers that may have more information.
4. Specify if the LDAP login method for your server is by Anonymous Bind or Login. Specify the
Login name and Password. This may be a regular user on the network, and typically does
not have to be a network administrator.
Note:
z
Some LDAP servers allow any user to acquire a list of valid email addresses. This state of
allowing full access to anybody who asks is called Anonymous Bind. In contrast to Anonymous
Bind, most LDAP servers, such as Microsoft's Active Directory, require a valid
username/password in order to get the list of valid email addresses. (Configuration checklist
parameter O and P)
5. Click the Test LDAP Login button.
A successful test indicates a simple connection was made to the LDAP server. If you are using
anonymous bind access, be aware that even if the connection is successful, anonymous bind
privileges might not be high enough to retrieve the data required by
SonicWALL
Email Security.
6. Click Save Changes.
LDAP Query Panel
To access the LDAP Query Panel settings window, click the Friendly Name link or the Edit button
of the server you wish to configure.
Note:
z
SonicWALL Email Security does not require you to configure LDAP query information settings
for most installations.
X To configure advanced LDAP settings for users
1. Enter values for the following fields:
{
Directory node to begin search: The node of the LDAP directory to start a search for
users. (Configuration checklist parameter Q).
Page 27

SonicWALL Email Security Administrator’s Guide|16
{
Filter: The LDAP filter used to retrieve users from the directory.
{
User login name attribute: the LDAP attribute that corresponds to the user ID.
{
Email alias attribute: The LDAP attribute that corresponds to email aliases.
2. Click the Test User Query button to verify that the configuration is correct.
3. Click Save Changes to save and apply all changes made.
Note:
z
You may click the Auto-fill User Fields button to have SonicWALL Email Security automatically
complete the remainder of this form.
X To configure LDAP Settings for Groups:
1. Enter values for the following fields:
{
Directory node to begin search: The node of the LDAP directory to start a search for
users. (Configuration checklist parameter Q).
{
Filter: the LDAP filter used to retrieve groups from the directory.
{
Group name attribute: the LDAP attribute that corresponds to group names.
{
Group members attribute: the LDAP attribute that corresponds to group members.
{
User member attribute: the LDAP attribute that specifies attribute inside each user's
entry in LDAP that lists the groups or mailing lists that this user is a member of.
2. Click the Test User Query button to verify that the configuration is correct.
3. Click Save Changes to save and apply all changes made.
Note:
z
Click the Auto-fill Group Fields button to have SonicWALL Email Security automatically
complete the remainder of this form. ‘
z
If you have a large number of user mailboxes, applying these changes could take several
minutes.
Advanced LDAP Settings
In a Microsoft Windows environment, you will need to specify the NetBIOS domain name,
sometimes called the pre-Windows 2000 domain name.
X To locate the pre-Windows 2000 domain name
1. Login to your domain controller.
2. Navigate to Start > All Programs > Administrative Tools > Active Directory Domains and
Trusts.
3. In the left pane of the Active Directory Domains and Trusts dialog box, highlight your domain
and click Action.
4. Next, click Properties. The domain name or pre-Windows 2000 name will display in the
General tab.
On some LDAP servers, such as Lotus Domino, some valid email addresses do not appear in LDAP.
This panel provides two methods of managing such email addresses.
This panel provides a way to add additional mappings from one domain to another. For example, a
mapping could be added that would ensure emails addressed to anybody@engr.corp.com are sent
to anybody@corp.com.
It also provides a way of substituting single characters in email addresses. For example, a
substitution could be created that would replace all the spaces to the left of the "@" sign in an email
address with a "-". In this example, email addressed to Casey Colin@corp.com would be sent to
Casey-Colin@corp.com.
Page 28

SonicWALL Email Security Administrator’s Guide|17
Note:
z
This feature does not make changes to your LDAP system or rewrite any email addresses; it
makes changes to the way SonicWALL Email Security interprets certain email addresses.
To access the Advanced LDAP Settings, click the Friendly Name link or the Edit button of the
server you wish to configure.
X To configure the advanced LDAP settings panel
1. Click the Add LDAP Mappings button.
2. From the first drop-down list, choose one of the following:
z
domain is - choose this to add additional mappings from one domain to another.
{
If replace with is chosen from the second drop-down menu, then the domain is replaced.
{
If also add is chosen from the second drop-down menu, then when first domain is found,
the second domain is added to the list of valid domains.
z
left hand side character is to add character substitution mappings.
{
If replace with is chosen from the second drop-down menu, then the character is replaced
in all characters to the left of the "@" sign in the email address.
{
If also add is chosen from the second drop-down menu, then a second email address is
added to the list of valid email addresses.
3. Click the Add Mapping button.
Multiple LDAP Server Support
The following table describes the actions that can be taken on a group, domain, or global level.
Function Domain LDAP Group Global
Directory Harvest Attack prevention Y - Y
Policy Y Y Y
Reporting Y - Y
Roles - Y Y
Settings Y* Y Y
* Requires creating a master group on the LDAP server.
Configuring SonicWALL ES for Multiple LDAP Servers
The LDAP configuration page allows administrators to configure more than one LDAP server. All
LDAP servers are listed. For each LDAP server, you can edit or delete it without affecting the
connection of other LDAP servers.
X To add an LDAP server:
1. Log in as the Email Security administrator.
2. Click System and then LDAP Configuration.
3. Click the Add Server button.
4. Fill in the connection information for the LDAP server you wish to add. Be sure to give it a
unique friendly name so that you can easily identify it in the list of servers.
5. When you are finished, click Apply Changes and use the test button to confirm that the LDAP
server is properly connected and configured.
Page 29
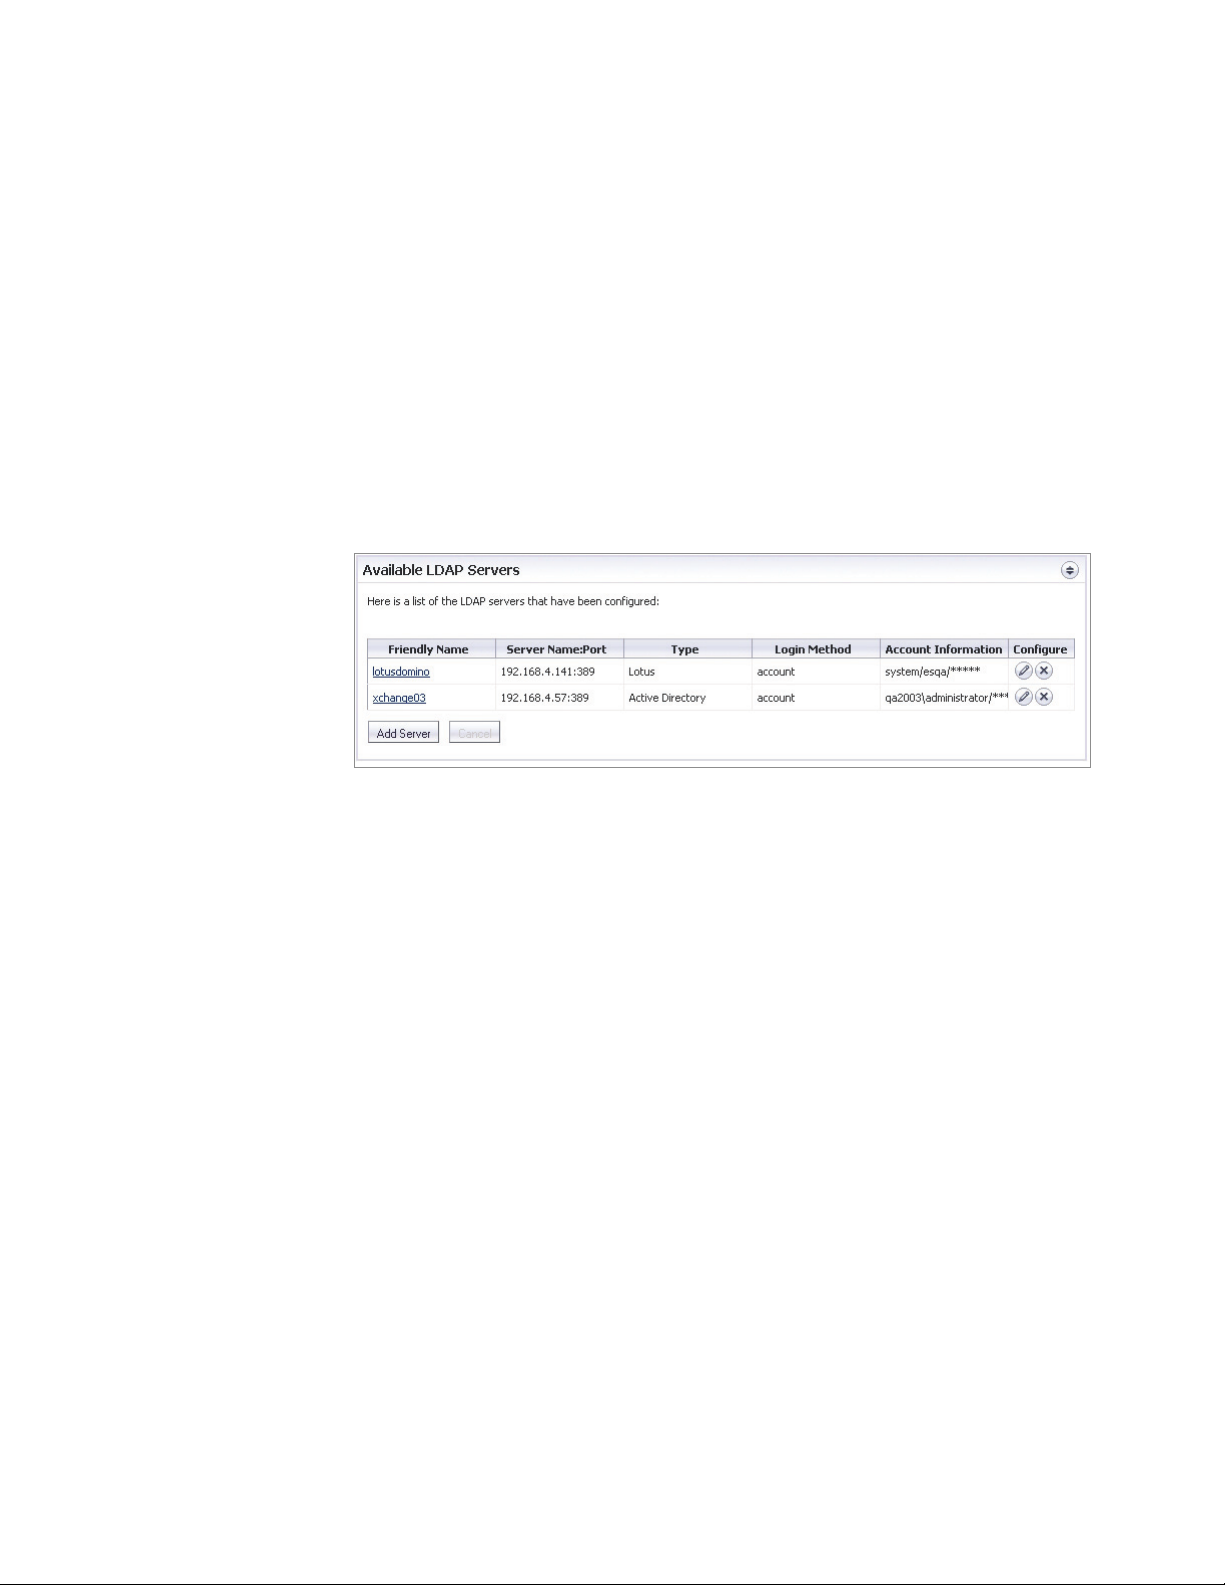
SonicWALL Email Security Administrator’s Guide|18
Administering Multi-LDAP Environments
Administrators must log into a specific domain unless they are the SonicWALL Email Security
administrator. Once a domain administrator is logged in, she can modify the Email Security settings
for her domain, including the anti-spam settings. The Email Security administrator can see all the
LDAP servers attached to SonicWALL Email Security. The administrator logs in with no domain
specified.
Editing LDAP Connection Information
The Email Security administrator configures the multiple domains.
X To change the settings of an existing LDAP server
1. Log in as the Email Security administrator.
2. Click Syst
3. Click the server name link or the Edit (pencil) button associated with
LDAP server you want to change.
em and then LDAP Configuration.
the friendly name of the
4. Edit the details of the LDAP server using the information you have collected.
5. In the Global Con
example, the administrator can configure aliases (on the right side) to correspond with the
pseudo-domain. Aliases must be unique and can consist of lowercase alpha-numeric
characters and underscores. Aliases are separated by commas. If you set an alias to the
domain name, users can log in using their email address.
6. In the Set
dropdown box. If this box is checked, all users will be able to see all domains. If it remains
unchecked, users must log in with their fully-qualified login, such as user@sonicwall.com. You
can also choose how often SonicWALL ES refreshes the LDAP usermap.
7. When you are done, click App
server is properly connected and configured.
tings subsection, choose whether you want the domains to appear in the login
figurations section, you can enter aliases for your pseudo-domains. In this
ly Changes and use the test button to confirm that the LDAP
Email Address Rewriting
In a multiple LDAP server environment, administrators can map incoming or outbound email
addresses to new apparent domains. This feature also allows you to expand an email list into its
constituent members.
X To configure Email Address Rewriting on a per-LDAP basis:
1. Log in as the Email Security administrator.
2. Click Syst
3. Scroll down and click the Emai
4. Click the A
5. In Type
you could also choose LDAP Email List Expansion.
6. Enter the information for the
em and then Network Architecture.
l Address Rewriting button.
dd New Rewrite Operation button.
of Operation, choose LDAP Rewrite to Primary. If you are on the Inbound tab,
operation you have chosen.
Page 30

7. Enter a name for the rewrite operation.
8. Click Save This Rewrite Operation.
Default Message Management Settings
The Default Message Settings window enables the administrator to set default settings for users’
messages.
The Default Message Settings window allows you to choose default settings for messages that
contain spam, phishing, virus, and policy management issues.
1. Choose the Number of Junk Box days from the drop-down list.
Set the enterprise-wide policy for the number of days email messages will remain in the Junk
Box before being automatically deleted. The maximum number of days is 180. This can be
adjusted for an individual user by an administrator or the user, if you allow it (See Configuring
the User View Setup on page 68.)
2. Choose the number of items to display in the Message Center from the drop-down list.
3. Review the four check box options that allow the user to define conditions for tagging
messages incoming to their inbox. Each of the tags below will be prefixed to the subject line of
the message.
{
To tag unjunked messages, check the Tag unjunked messages with this text added
to the subject line checkbox, and input word(s) to be used for tagging.
{
To tag messages which were considered as junk but will be delivered because the sender’s
domain is on the user’s Allow list, check the Tag messages considered junk, but
delivered because sender/domain/list is in Allowed list with the text added to
the subject line checkbox, and input word(s) to be used for tagging.
{
To tag messages which were considered as junk but will be delivered because of a Policy
action in effect, check the Tag messages considered junk, but delivered because of
a Policy action with the text added to the subject line checkbox, and input word(s)
to be used for tagging.
{
To tag all those messages that are processed by Email Security 6.0 Server for testing,
check Tag all messages processed by Email Security for initial deployment testing
with this text added to the subject line checkbox, and input word(s) to be used for
tagging.
4. Click the click here links to manage spam, virus, phishing, and policy.
5. Click the Apply Changes button.
SonicWALL Email Security Administrator’s Guide|19
Junk Box Summary
SonicWALL Email Security sends an email message to users listing all the messages that have been
placed in their Junk Box. The Junk Box Summary includes:
z
z
Users can unjunk items listed in the Junk Box Summary email by clicking links in the email. When
unjunking there is an option not to add a sender to the Allowed list.
X To manage the Junk Box summary
1. Choose Frequency of Summaries from the drop-down box.
2. Choose the dates and times to receive email notification.
3. Choose whether to include in message summary All Junk Messages or Likely Junk Only
4. Choose Language of summary emails from the drop-down list.
5. Choose a plain or graphics rich summary.
Good vs Junk count (organization)
Number of blocked messages (per user)
Individual users can override these settings.
(hide definite junk).
Page 31

User View Setup
SonicWALL Email Security Administrator’s Guide|20
6. If a delegate has been assigned to manage an user’s Junk Box, select the summary for that
user to be sent to the assigned delegate.
7. Select to send summary only to users in LDAP.Email Sent From.
The message summary can come from the individual user or another email address which you
enter here. Be aware that if summaries are sent because the address doesn’t exist, the
message summary message will bounce as well.
8. Select the name to be displayed in end user’s email client for the summary emails.
{
Subject
Enter the subject line for the Junk Box Summary email.
{
URL for User View
This text box is filled in automatically based on your server configuration and is included in
the Junk Box Summary email. Clicking on the email link will allow users to unjunk
messages. Test the link if you make any changes to ensure connectivity. If you have
multiple SonicWALL Email Security deployments, enter the virtual hostname here.
{
Test this Link
Users unjunk items in the Junk Box summary email by clicking links in the email. To test
the URL, click Test this Link. If the test fails, check that the URL is correct. (Installation
checklist parameters B, C, D)
9. Click the Apply Changes button.
Configure whether and how the end users of the SonicWALL Email Security server access the
system and what capabilities of the system are exposed to the end users.
X To set up the user view
1. Select one or more HTTP settings:
{
To enable HTTP, select Enable HTTP access on port checkbox and enter the port
number in the field. The default port for http is 80.
{
To enable HTTPS (SSL) access, select Enable HTTPS (SSL) access on port: checkbox
and enter the port number in the field. The default port for HTTPS is 443.
{
Click the Redirect access from HTTP to HTTPS checkbox if you always want the users
to connect through HTTPS.
2. Select one or more items to appear in the user navigation toolbar:
{
Select the Login enabled checkbox to allow users to access their junk boxes.
Allow users to log into SonicWALL Email Security and have access to their per-user Junk
Box. If you disable this, mail will still be analyzed and quarantined, but users will not have
access to their Junk Box. It makes SonicWALL
Email Security operate in a manner that is
not visible to the user.
{
Select the Anti-Spam Techniques checkbox to include the user-configurable options
available for blocking spam emails. Users can customize the categories People,
Companies, and Lists into their personal Allowed and Blocked lists. You can choose to
grant users full control over these settings by selecting the Full user control over anti-
spam aggressiveness settings checkbox, or force them to accept the corporate
aggressiveness defaults by leaving the checkbox empty.
{
Select the Reports checkbox to provide junk email blocking information about your
organization as a whole. Even if this option is checked, users may view only a small subset
of the reports available to administrators.
{
Select the Settings checkbox to provide options for management of the user's Junk Box,
including individual junk summary reports and specifying delegates.
3. Determine the user download settings:
{
Check the Allow users to download SonicWALL Anti-Spam Desktop for OutLook
and Outlook Express checkbox to allow users to download the Anti-Spam Desktop. Anti-
Page 32

Updates
SonicWALL Email Security Administrator’s Guide|21
Spam desktop is a plugin for Microsoft Outlook and Outlook Express that filters spam and
allows users to mark emails they receive as junk or good email. It is a complete anti-spam
application.
{
Check the Allow users to download SonicWALL Junk Button for Outlook check box
to allow users to download SonicWALL
Button is a lightweight plugin for Microsoft Outlook. It allows users to mark emails they
receive as junk, but does not filter email.
4. Determine the settings for quarantined junk mail:
{
Check the Users can preview their own quarantined junk mail checkbox to enable
users to view their individual mail that is junked.
{
Choose which other types of users can preview quarantined junk mail. These roles are
configured within SonicWALL Email Security.
5. Users are not usually shown reports which include information about users, such as email
addresses. Select the Reports view settings checkbox to give user access to those reports.
6. Enter an Optional login help URL.
An administrator can specify a URL for any customized help web page for users to view on the
Login screen. If no URL is entered, SonicWALL
screen. If a URL is entered, that page is launched when the user clicks the Login Help link.
7. Click Apply Changes.
Email Security Junk Button for Outlook. Junk
Email Security provides a default login help
SonicWALL Email Security uses collaborative techniques as one of many tools in blocking junk
messages. The collaborative database incorporates thumbprints of junked email from MailFrontier
Desktop and SonicWALL Email Security users. Your SonicWALL Email Security communicates with
a data center hosted by SonicWALL (using the HTTP protocol) to download data used to block spam,
phishing, virus and other evolving threats.
SonicWALL Email Security recommends that you check for spam, phishing, and virus blocking
updates at least every twenty minutes.
Check the Submit unjunk thumbprints check box to submit thumbprints to the
SonicWALL Email Security data center when users unjunk a message. Thumbprints sent from
SonicWALL Email Security contribute to the collaborative community by improving junk-blocking
accuracy. They contain absolutely no readable information.
Check the Submit generic spam blocking data check box to send generic spam-blocking data to
the SonicWALL Email Security data center to assist in customer support and to help improve spam
blocking. No emails, email content, header information or any other uniquely identifiable
information is ever sent.
Web Proxy Configuration
When your SonicWALL Email Security contacts the SonicWALL hosted data center to download data,
it uses the HTTP protocol. If your organization routes HTTP traffic through a proxy, you can specify
the proxy server here. You can also allow HTTP traffic from certain servers to bypass the proxy
server. You may want to do this for data transferred between SonicWALL Email Security servers
within your organization.
If your organization routes HTTP traffic through a proxy which requires basic authentication, you
can enter the username and password to configure SonicWALL Email Security to authenticate with
the HTTP proxy server.
Test Connectivity to SonicWALL Email Security
Test that communication through the web proxy is working. Click the Test Connectivity to
SonicWALL button to ensure that SonicWALL Email Security has access to the SonicWALL hosted
data center.
Page 33

Monitoring
About Alerts
SonicWALL Email Security Administrator’s Guide|22
Use the Monitoring page to enter the email addresses of administrators who receive emergency
alerts and outbound quarantine notifications. If this field is left blank, notifications will not be sent.
Th e Mon itor ing p age i s al s o us e d to s et u p the post m aster fo r the MTA. If Soni cWA LL Em ail S ecur ity
has been configured to be an MTA, enter the email address to which postmaster notifications
generated by the MTA should be sent. Notifications are not sent more than once every ten minutes.
You can also enter the names or IP addresses of backup SMTP servers. If you are running
SonicWALL Email Security in split mode, and you route outbound email through
SonicWALL Email Security, you must enter the IP addresses or fully-qualified domain names of any
Remote Analyzers through which outbound email is routed in this text box on the Control Center.
Use the monitoring page to configure the Syslog settings. Options include setting external servers
for logging and alerts.
To create a customized signature, enter text in the text box. This text appears at the bottom of all
email alerts.
Alerts in SonicWALL Email Security provide the following details:
z
A summary of the alert
z
Details that include the following:
{
Host Name
{
Two to three lines of description of an alert or trigger
{
A trigger message if available
z
A time stamp
{
In local time
{
In GMT
If available, the alert will also include the following:
z
Recommended action with possible suggestions on a next step
z
An alerts configuration page
z
General alert settings
Page 34

The following is an example of an alert:
Viewing Alert History
SonicWALL Email Security Administrator’s Guide|23
To view a history of alerts that have been sent, click the View Alert History button located in the
top-right corner of the page.
Alert Suppression Schedule
If you want to turn off alerts during a product maintenance window, you can suppress them for a
period of time by clicking the Schedule Alert Suppression button.
X To turn off alerts
1. Click the Schedule Alert Suppression button. Select a host from the drop-down menu.
2. Select the severity of the alerts that you wish to suppress.
3. Choose the date and the time (24-hour clock) you would like to suppress the alerts.
4. Enter a reason for suppressing the alert.
5. Select the Submit button.
Page 35

Using Syslog
SonicWALL Email Security Administrator’s Guide|24
The log files for SonicWALL Email Security are now configurable. Syslog supports ES Alerts and
Subset of MFE lines. You can choose specific notifications and have them sent to external servers
automatically. You can also use the syslog to report email events directly to the Windows Event
Viewer.
X To change Syslog settings
1. Log in as the Email Security administrator.
2. Click System. Navigate to Monitoring>Set System Logging.
The Set System Logging page appears.
3. Set your Log Level. Changing your log level will only affect the syslog.
4. If you are running SonicWALL Email Security as a software installation on a Windows system,
you can check Local to send the log information to the Windows Event Viewer. This option is
also available for Appliances. The log information will be sent to
/opt/emailsecurity/logs/essyslog.log.
5. If you want to send your log information to a remote logging server, check the Remote box. If
you choose this option, you must configure at least one remote server.
6. Click Send Message Details. This will enable or disable the subset of MFE lines on the syslog.
7. Enter the server and port which will receive logged events. The secondary server is not a
failover. If two servers are configured, both will receive event notifications.
8. Click Save. In the save process, your external logging server, if any, is validated, and you are
alerted if there is a problem.
Page 36

X To view log files
1. Log in as the Email Security administrator.
2. Click System and then Advanced. The Advanced page displays.
3. Scroll down to Download System/Log Files. The contents of the Choose Specific Files field
change, depending on the type of file you have selected. For example, choosing the Data
Directory regenerates the page and offers you several choices, including SW-ES-MIB.txt, a file
that describes the MIB identifiers for Email Security-specific events.
4. Click Download or Email To to send the log file you have selected.
Connection Management
The Connection Management section uses technology to slow or drop unwanted email traffic. As
part of Connection Management, SonicWALL Email Security rejects messages with an invalid MAIL
FROM setting.
Connection Management includes the following subsections:
z
Intrusion Prevention—Protection against Denial of Service (DoS) attacks, Directory Harvest
Attacks (DHA), and invalid email addresses.
z
Quality of Service—Enables a greater control over the server connection from suspicious clients.
Intrusion Prevention
SonicWALL Email Security Administrator’s Guide|25
To access the Intrusion Prevention portion of the Connection Management module, go to System
> Connection Management.
Directory Harvest Attack (DHA) Protection
Spammers not only threaten your network with junk mail, they stage Directory Harvest Attacks
(DHA) to get a list of all users in an organization’s directory. DHA makes unprotected organizations
vulnerable to increased attacks on their email and other data systems.
DHA can threaten your network in the following ways:
Expose the users in your directory to spammers—The people at your organization need their privacy
in order to be effective. To expose them to malicious hackers puts them and the organization at
significant risk from a variety of sources.
Users whose email addresses have been harvested are at risk. Once a malicious hacker knows their
email, users are at risk for being spoofed: someone can try to impersonate their email identity. In
addition, exposed users can be vulnerable to spoofing by others. IT departments routinely receive
email from people pretending to be providing upstream services, such as DNS services.
Expose users to phishing—Exposed users can be targeted to receive fraudulent email. Some receive
legitimate-appearing email from banks or credit cards asking for personal or financial information.
Some exposed users have been blackmailed; Reuters reported cases where users were told if they
did not pay up, their computers would be infected with viruses or pornographic material.
Expose your organization to Denial of Service Attacks—DHA can lead to denial of service attacks
because malicious hackers can send lots of information to valid email addresses in an effort to
overwhelm the capacity of your mail server.
Expose your organization to viruses—DHA provides a highly effective means of delivering virusinfected email to users.
Exposes users to fraudulent email masquerading as good email—Directory Harvest Attacks can
perpetuate fraudulent email messages by giving malicious hackers the ability to target your users
individually and by name.
Page 37

SonicWALL Email Security Administrator’s Guide|26
The following table outlines the available options for messages that are sent to email addresses that
are not configured in your LDAP server.r
Options Consequences
Directory Harvest Attack (DHA)
protection off.
Process all messages the same (whether or
not email address is in LDAP)
No action is taken on messages to invalid
recipients.
Permanently Delete
All email addressed to users not in the
organization’s directory is permanently
deleted.
Reject invalid email addresses
(Tarpitting)
SMTP clients that specify invalid recipients
will be tarpitted.
Always store in Junk Box (regardless
of spam rating).
Email that is sent to an invalid address is
stored in the Junk Box.
SonicWALL Email Security does not process
the email to determine if it is spam or
another form of unwanted email.
No directory protection.
The sender does not receive notification about
the email they have sent. This option can lead
to permanently deleting legitimate mail with a
typographical error in the address.
Responses to those invalid recipient commands
are delayed for some time period to slow down
the rate that they can attack an organization’s
mail system. Warning: Enabling tarpitting
protection uses your system resources (CPU,
memory) that may slow down your server.
SonicWALL Email Security recommends this
option to protect the confidentiality of your
directory population.
Apply DHA protection to these recipient domains
Options Consequences
Apply to all recipient domains.
SonicWALL recommends that most
organizations choose Apply to all recipient
domains.
Apply only to the recipient domains
listed below.
Apply to all recipient domains except
those listed below.
Applies DHA protection to all recipient domains.
Applies DHA protection to the recipient
domain(s) listed.
Applies DHA protection to all recipient domains
except for those listed.
Denial of Service (DoS) Attack Protection
A Denial of Service attack aims at preventing authorized access to a system resource or the
delaying of system operations and functions for legitimate users.
Denial of Service attacks can threaten your network in the following ways:
z
Bandwidth consumption—The available bandwidth of a network is flooded with junkmail
addressed to invalid recipients.
z
Resource starvation—The mail servers of an organization are overwhelmed trying to process the
increased volume of messages coming from infected computers, which leads to the mail servers
to run out of resources (CPU, memory, storage space).
The Denial of Service Attack Protection adds an extra level of security to thwart an attack.
Page 38

X To set Denial of Service Attack Protection
1. Navigate to go to System > Connection Management.
2. Check the Enable DoS attack protection box. Read and acknowledge the warning.
To use the Denial of Service Attack protection feature, your SonicWALL Email Security
appliance must be the first destination for incoming messages. If you are routing mail to your
Email Security appliance from an internal mail server or using a mail transfer agent, do not
use Denial of Service Attack protection.
3. Specify the trigger:
{
4. Specify an action to take:
{
{
5. Click the Apply Changes button.
Quality of Service
To access the Quality of Service portion of the Connection Management module, go to System >
Connection Management and scroll down to the Quality of Service section.
The following sections describe how to configure the Quality of Service components:
z
“BATV” on page 27
z
“Sender IP Reputation” on page 28
z
“Throttling (Flow control)” on page 31
z
“Connections” on page 32
z
“Messages” on page 32
SonicWALL Email Security Administrator’s Guide|27
specify the number of connections to allow from a given IP address
deferral for a set period of time
completely block all further connections
BATV
BATV adds a stamp to the envelope of all outbound mail. If the mail is bounced and does not reach
a recipient, the stamp alerts the inbound mail processor that this email originated within your
organization. False bounce messages, which will not have the stamp, will not be passed through the
inbound mail processor.
To use BATV, SonicWALL Email Security must touch all outbound mail. For maximum efficiency of
processing inbound bounces, SonicWALL Email Security should be your first-touch inbound mail
processor. SonicWALL Email Security will read the bounce message envelope, determine whether
or not it is legitimate, and only download and pass through legitimate messages. The added BATV
tag is removed before the email is passed to the users.
BATV is not enabled by default. Although BATV is a powerful tool to eliminate false bounce
messages, some configurations on other mail servers may cause the BATV system to reject
legitimate bounce messages. The user who sent out the message would not know it did not reach
the intended recipient. Reasons for "false positives" might include:
z
LDAP upstream of SonicWALL Email Security
z
Null reverse paths instead of "From" fields
z
Divergent SonicWALL Email Security configuration
z
Incorrect or altered reverse mail paths
Users might also receive "false negatives", which are false bounce messages even though they did
not send the originals. False negatives might come from a spambot or zombie infection of the
organization. In that case, the spam would be properly stamped as it left the organization.
Page 39

SonicWALL Email Security Administrator’s Guide|28
To enable BATV, you must turn it on for both your outbound and inbound SonicWALL Email Security
servers, if they are different. If you are running an all-in-one system, you only have to turn it on
once. BATV will w ork be st if you r SonicWAL L portal is the last-touch for outbound mail and the firsttouch for inbound mail.
Note:
z
For the first 4-5 days after you enable BATV, your users may not receive legitimate bounce
messages. This is because there are email messages which are still trying to reach an invalid
destination, and when they come back, they will not have the appropriate stamp.
X To enable BATV
1. Log into your Email Security as an administrator.
2. Choose System from the left navigation bar.
3. Choose Connection Management.
4. Scroll down to the Quality of Service section.
5. Click in the Bounced Address Tag Validation to enable BATV.
6. Click Apply Changes.
BATV is now enabled. If you have different servers for inbound and outbound mail, make sure that
it is enabled on both servers.
BATV is a solution to email backscatter caused by spoofed email addresses. Only messages sent
from within your organization will be returned as bounces. This drastically reduces the bounce
traffic. BATV must be enabled on both inbound and outbound servers to work.
Sender IP Reputation
This section describes the SonicWALL GRID Connection Management with Sender IP Reputation
feature. GRID Network Sender IP Reputation is the reputation a particular IP address has with
members of the SonicWALL GRID Network. When this feature is enabled, email is not accepted from
IP addresses with a bad reputation. When SonicWALL Email Security will not accept a connection
from a known bad IP address, mail from that IP address never reaches the Email Security server.
This feature is useful only for Email Security servers that are running as the “first touch” server
(receiving email directly from the internet). SonicWALL recommends disabling GRID Connection
Management Network IP Reputation if Email Security is not first touch.
GRID Network Sender IP Reputation checks the IP address of incoming connecting requests against
a series of lists and statistics to ensure that the connection has a probability of delivering valuable
email. The lists are compiled using the collaborative intelligence of the SonicWALL GRID Network.
Known spammers are prevented from connecting to the SonicWALL Email Security server, and their
junk email payloads never consume system resources on the targeted systems.
Benefits:
z
Because as much as 80 percent of junk email is blocked before it ever reaches your servers,
you need fewer resources to maintain your level of spam protection.
z
Your bandwidth is not wasted on receiving junk email on your servers, only to analyze and
delete it.
z
A global network watches for spammers and helps legitimate users restore their IP reputations
if needed.
Page 40

SonicWALL Email Security Administrator’s Guide|29
GRID Connection Management with Sender IP Reputation and Connection Management Precedence Order
When a request is sent to your first-touch SonicWALL Email Security server, the server evaluates
the ‘reputation’ of the requestor. The reputation is compiled from white lists of known-good senders,
block lists of known spammers, and denial-of-service thresholds.
If IP Reputation is enabled, the source IP address is checked in this order:
Evaluation Description
Allow-list If an IP address is on this list, it is allowed to pass messages through
Block-list This IP address is banned from connecting to the SonicWALL Email
Reputation-list If the IP address is not in the previous lists, the SonicWALL Email
Defer-list Connections from this IP address are deferred. A set interval must pass
DoS If the IP address is not on the previous lists, the SonicWALL Email
Throttling If the IP address has crossed the throttling threshold, the server uses
Not-grey-list* This IP address has already been through (and passed) the grey-list
Grey-list* If this is the first time this IP address has attempted to connect with the
Connection Management. The messages will be analyzed by your
SonicWALL Email Security server as usual.
Security server.
Security server checks with the GRID Network to see if this IP address
has a bad reputation.
before the connection is allowed.
Security server checks to see if the IP address has crossed the Denial of
Service threshold. If it has, the server uses the existing DoS settings to
take action.
the existing throttling settings to take action.
filter.
server, add it to the grey list.
* Only if this feature is enabled
Only if the IP address passes all of these tests does the SonicWALL Email Security server allow that
server to make a connection and transfer mail. If the IP address does not pass the tests, there is a
message from the SonicWALL server to the requesting server indicating that there is no SMTP
server. The connection request is not accepted.
Using GRID IP Reputation
Most of the work of the IP Reputation feature happens before a connection is ever accepted. This
means that you won’t see reports on junk mail messages that are blocked before they ever appear
on your servers.
You may also see changes in the reporting statistics. Blocked connections are added to the Junk
Email Breakdown report. Each connection might have delivered many junk messages, but we
cannot tell how many emails were blocked by rejecting a connection from an IP address. Instead,
we keep a tally of rejected IP connections and a log of why they were rejected.
X To turn on GRID IP Reputation
1. Log in as the Email Security administrator.
2. Click System and then Connection Management.
3. Scroll down to the Quality of Service section and select the box for GRID Network IP
Reputation.
4. Click the Apply Changes button.
Page 41

SonicWALL Email Security Administrator’s Guide|30
All inbound connection requests will be evaluated for reputation. If the connection fails to meet the
standards set by SonicWALL Email Security, the connection request is dropped. The error message
sent back to the requesting server is “544 No SMTPd Here”.
Greylisting
In this section you can enable or disable Greylisting. Greylisting is disabled by d efa u lt i n Son icWALL
Email Security. The Greylisting feature in SonicWALL Email Security discourages spam without
permanently blocking a suspicious IP address. When Greylisting is enabled, Email Security assumes
that all new IP addresses that contact it are suspicious, and requires those addresses to retry before
it will accept the email. The assumption is that most spammers do not waste time retrying failed
connections. Therefore, forcing enterprise level Mail Transfer Agents (MTAs) to retry the connection
a second time should reduce the amount of spam received by your organization.
The Greylist is the list of IP addresses which have contacted SonicWALL Email Security once, and
have been sent a request to retry the connection. The Greylist is cleared and restarted every night.
Thus, if the connection is not retried before the Greylist is restarted, that server will be asked to
retry the connection again when it sends a retry of the initial connection request.
SonicWALL Email Security also keeps track of the MTAs that have successfully retried the connection
and are now deemed to be responsible MTAs. These IP addresses are added to a separate list.
Connections from MTAs on this “Responsible MTA List” are accepted without further retry requests,
but the data from the connection is subjected to the rigorous checking performed by SonicWALL
Email Security on all incoming email.
Notes:
z
The Greylisting feature is useful only for Email Security servers that are running as the "first
touch" server (receiving email directly from the Internet). SonicWALL recommends disabling
Greylisting if Email Security is not first touch.
z
Enabling Greylisting may cause good email to be delayed. The mail should be delivered within
15 minutes, depending on the configuration of the sending MTA.
Benefits of Greylisting
The benefits of enabling Greylisting are:
z
Increased effectiveness – Less spam received into the gateway translates to less spam
delivered to the Inbox.
z
Better performance – Greylisting can reduce the volume of traffic at the gateway, as well as
traffic to the downstream (e.g., the Exchange server). As a result of the reduced volume,
valuable system resources are freed up (e.g., sockets, memory, network utilization, etc.,)
allowing SonicWALL Email Security to process more good mail in the same amount of time.
z
Storage requirements – With the increasing focus on archiving, Greylisting will reduce the
amount of junk that gets stored in an archive, again saving valuable resources.
Greylisting and Connection Management Precedence Order
Greylisting functionality is intended for “First Touch” installations of SonicWALL Email Security on
inbound paths only. If SonicWALL Email Security has not been contacted by a reasonable number
of unique IP addresses in a certain amount of time, the SonicWALL gateway will detect this and
automatically disable Greylisting. However, there would be no harm if this feature were
inadvertently enabled even when not running on a First Touch server, as the first connection would
be deferred, but subsequent connections would immediately be allowed.
If Greylisting is enabled, the Source IP address will be cross-checked against the SonicWALL Email
Security Connection Management components, in the following order:
z
Allow-list—If an IP address is on this list, it gets a free pass through Connection Management
(the message is still subject to plug-in chain processing)
z
Block-list—This IP address is already blocked from connecting to SonicWALL Email Security
z
Defer-list—Connections from this IP address are already configured to be deferred
Page 42

SonicWALL Email Security Administrator’s Guide|31
z
DoS—Check to see if the IP address has crossed the DoS threshold, and if so, take the
appropriate action
z
Throttling—Check to see if the IP address has crossed the throttling threshold, and if so, take
the appropriate action
z
Responsible MTA List—This IP address has already been through and passed the Greylisting
filter
z
Greylist—If this is the first time this IP address has contacted us, add it to the Greylist
Enabling and Disabling Greylisting
Greylisting is disabled by default in SonicWALL Email Security. You can enable it or disable it on the
System > Connection Management page.
Note:
z
When the Greylisting feature is first enabled, it automatically runs in evaluation mode for the
first 24 hours. During that time, IP addresses will be collected, but no connections will be
deferred. After 24 hours the Greylisting feature will operate fully.
X To enable or disable Greylisting
1. Navigate to System > Connection Management.
2. Scroll down to the Quality of Service section of the page.
3. To enable Greylisting, select the Enable greylisting check box.
4. To disable Greylisting if it is enabled, clear the Enable greylisting check box.
5. Click the Apply Changes button.
Throttling (Flow control)
In this section you can set specific thresholds to limit the sending ability of suspicious clients by
limiting offensive IP addresses. Some example thresholds include:
z
one connection per hour
z
one message per minute for the next 24 hours
z
ten recipients per message
X To set the Throttling feature
1. Navigate to System > Connection Management.
2. Check the Enable throttling box.
3. Specify the trigger:
{
specify the number of connections, messages, or the number of recipients from a given IP
address
{
specify the percentage of invalid emails to recipients. This setting only applies to recipient
commands
4. Specify an action to take:
{
deferral for a set period of time
{
completely block all further connections
{
limit a number of connections, messages, or recipients, for a number of minutes over a
range of time
5. Click the Apply Changes button.
Note:
z
Some scenarios can be implemented with either Denial of Services Attack Protection or
Throttling settings. You can choose to throttle mail from clients above one threshold and
choose to block clients above a second threshold.
Page 43

Connections
In this section you can impose a limit on the number of simultaneous inbound and outbound
connections that your SonicWALL Email Security server can accept.
On the inbound path, this value limits the number of simultaneous connections external hosts can
make to SonicWALL Email Security. On the outbound path, this value limits the number of
simultaneous connections internal hosts can make to SonicWALL Email Security to deliver
messages. When the connections limit is exceeded SonicWALL Email Security will send a transient
failure (421 error code).
Messages
In this section, you can limit messages based on message characteristics such as message size and
number of recipients.
SonicWALL Email Security will return a transient failure (4xx error code) if too many recipients are
specified in a message and a permanent failure (5xx error code) if the message size limit is
exceeded.
Note:
z
For limiting message size, SonicWALL Email Security depends on the SMTP client to specify the
message size in the ESMTP transaction.
Manually Edit IP Address List
SonicWALL Email Security Administrator’s Guide|32
To access this portion of the Connection Management module, go to System > Connection
Management. The Manually Edit IP Address Lists appears. Use this window to manage the list
of IP addresses you want to allow, defer, block, and throttle.
When an IP address is added to the Allowed list, Email Security will continue to check for spam and
phishing attacks in messages from that IP address. However, messages from IP addresses in the
Allowed list will not be blocked, deferred, or throttled even when the IP address is affected by
connection management rules that would do so. To stop checking for spam and phishing attacks in
messages from a certain IP address, you can configure a policy. See “Configuring a Policy Filter for
Inbound Email” on page 70.
When the SMTP server
with a "554 No SMTP service here" error and reject the TCP/IP connection. In the case of a
connection from a deferred IP address, the transient message is “421 4.4.5 Service not available,
connection deferred.” and a connection from a list of throttled addresses, “421 4.4.5 Service not
available, too many connections due to throttling.”
receives a connection from an IP address on a blocked list, it will respond
Page 44

Backup/Restore Settings
On the System > Backup/Restore page, the administrator can decide what and how the
SonicWALL Email Security will backup and restore collected data.
Note:
z
It is not necessary to perform either of these functions. Executing these functions depends on
the needs of your organization.
Manage Backup
In the Manage Backups section, the administrator can select from the following backup
configurations:
z
Settings—Select this setting to back up your ALL user settings, including network architecture,
LDAP, per-user settings and policies. SonicWALL recommends that you back up your settings
regularly since this data loss would require a complete re-configuration of your settings.
z
Junk Box—Select this backup setting to enable a snapshot of your Junk box for future recovery.
Enabling this backup setting requires sufficient disk space and requires 30 to 60 minutes to
complete the backup snapshot.
z
Archive—Select this backup setting to enable a back up of the archive. This setting backs up
all messages that have been archived on this server's file system. Note that this setting does
not back up messages that have been archived to an external SMTP server.
z
Reports Data—Select this backup setting to enable a snapshot of your reports data. This
backup setting is the least critical of the three backup settings. Reports data does not include
critical information for system recovery.
SonicWALL Email Security Administrator’s Guide|33
Snapshots
Click the Take Snapshot Now button to combine the files selected for backup into a single zip file,
or the “snapshot.” There is only one snapshot file on a system at any time. When a new snapshot
is taken, the existing snapshot file (if any) is overwritten.
Click the Download Snapshot button the download the last snapshot from the system running.
The administrator can choose to save the downloaded snapshot file to a separate system.
Scheduled Backup
Scheduled Backups allow administrators to schedule daily, weekly, or monthly backups. By checking
the Enable scheduled backup checkbox and specifying the backup frequency and schedule, you
will be able to schedule when snapshots are taken periodically and copied onto the configured
remote FTP server. Note that you will need to specify the FTP server, port number, username,
password, and destination path to properly authenticate your FTP server.
Manage Restores
In the Manage Restores section, the administrator can restore data from a snapshot file, from the
following restore configurations:
z
The administrator can select either to restore the data from a snapshot file from the SonicWALL
Email Security server or to upload a snapshot from the local hard drive.
A snapshot is saved on the computer work station and not on the SonicWALL Email Security
appliance.
z
The administrator can select the snapshot files by checking the boxes of what is to be restored.
From the three selections of Settings, Junk box, and Reports data, the administrator has
the flexibility to choose options suitable for system recovery or system management.
Page 45

Host Configuration
You can use this page to make changes to the server on which SonicWALL Email Security is
installed. After applying these settings, you can use the Restart Services or Reboot this Server
buttons at the top of the Host Configuration screen.
Changing the Hostname
If you want to change the hostname of this server, enter the new fully-qualified hostname in the
Hostname field and click the Apply Changes button.
Note:
z
Changing the hostname will cause a number of changes to be made to SonicWALL Email Security
settings, configuration files, and will rename some of the directories in the
SonicWALL Email Security installation and data directories.
If you are running the SonicWALL Email Security appliance in split mode, you must also make
changes to the hostname on the other servers. If you rename a Remote Analyzer, you must log in
to the Control Center and click the System > Network Architecture page. Then remove the old
Remote Analyzer hostname from any of the Control Centers with which it is associated, and add the
new Remote Analyzer hostname. If you rename a Control Center, you must login to the Remote
Analyzers and click the System > Network Architecture page. Then remove the old Control
Center hostname and add the new one.
SonicWALL Email Security Administrator’s Guide|34
The system will perform a reboot upon a host name change and clicking the Apply Change
button.
Date & Time Settings
Use this section to set the time zone, date, and time of the host machine. To finish applying these
settings, you must either restart all the services, or reboot the host machine.
Note:
z
If your server is running Microsoft Windows, please use the Windows Control Panel to
configure date and time settings, instead of on the SonicWALL Email Security appliance.
For NTP Settings, enable the Network Time Protocol option, then provide the list of NTP servers to
use in synchronizing the time.
Network Settings
To configure network settings, such as the IP address, use the Networking panel. If Dynamic Host
Configuration Protocol (DHCP) is chosen, all the necessary settings will be automatically found from
the network DHCP server. If static IP settings are chosen, additional information must be entered
in the remaining fields. To view an assigned DHCP IP address, log in to the SonicWALL Email
Security command line interface (CLI) and then type the command tsr at the CLI prompt. In
the output, the assigned IP address is available in two places:
• As the value for ifconfig
In the inet_addr field for eth0
To enable, disable, and configure a Secondary Network Interface Controller, or Dual NIC, select the
Enable use of Ethernet1 port option, and specify the IP address and Subnet mask of the second
NIC.
Note:
z
By default, the primary NIC does not have the option to be disabled.
Click the Add Virtual IP button to bind multiple IP addresses to a single network interface. You will
have to specify the IP address and Subnet mask, and then click Save. The new Virtual IP will display
just below the interface you added it to.
Page 46

Note:
z
You are able to add or delete Virtual IPs to one or both NICs. However, updating an existing
Virtual IP is not supported in this release.
CIFS Mount Settings
CIFS Mounting allows the mounting of an external drive to store the appliance’s data. The available
data on the current drive will be migrated to the external storage drive, which increases storage
limit for the appliance. For Dual NIC, the same external drive can be mounted on both control
centers to share the data. The two control centers can be configured to either share the load or as
a failover.
Provide the Hostname (FQDN), Shared Drive name, Remote Login User ID, and Remote Login
Password. Then, click on one of the following:
z
Mount—This option will mount the external drive. If the external drive is empty, a warning
message will display. Click Continue to migrate the local data to the external drive. If the
external drive already contains Email Security-related data, the external drive will be directly
mounted.
z
Migrate—This option will migrate local data to the external drive.
z
Unmount—This option will unmount the external drive, and revert back to the local drive. Note
that the data stored on the external drive will not be migrated back to the local drive.
z
Test Mount—This option will test whether or not the external drive has successfully mounted.
SonicWALL Email Security Administrator’s Guide|35
Configuring Advanced Settings
The Advanced Settings window enables you to configure logging levels, customize the SMTP banner,
specify LDAP page size, and other advanced features including reinitialize to factory settings and
download system/log files.
The Advanced page contains tested values that work well in most configurations. Changing
!
these values can adversely affect performance.
Configure the following settings:
z
Customize the SMTP banner. Use this setting to customize the SMTP banner.
When remote SMTP servers contact SonicWALL Email Security to send email through it, they
see an SMTP header that identifies the server with whom they are communicating as a
SonicWALL
present their own custom SMTP banner header information. Be sure to use valid characters
and syntax for an SMTP header.
z
Replace SonicWALL in “Received:” headers: Use this setting to replace the name in the
Received: header. If you do not want to have the SonicWALL
“Received” headers when sending good email downstream to your servers, use this field to
specify another value.
z
DNS timeout for Sender ID: Enter the number of seconds to search for the DNS record of the
sender. If SonicWALL
specify, it times out and does not return the DNS record of the sender. The default value is two
seconds. You can set this value from 1 to 30 seconds. For more information about SPF, see
“About Sender ID and SPF” on page 43.
z
Reports data will be deleted when older than: Enter the number of days of data that you
want to preserve for reporting information. Lowering this number means less disk space will be
used, but you will not have report data older than the number of days specified. The default
value is 366 days. If your organization's email volume is very high, you may want to consider
reducing this number.
z
Permit users to add members of their own domain to their Allowed Lists: Use this check
box to enables users to add people within your domain to their Allowed List. For example, if you
work at example.com and check this check box, all users at example.com can be added to your
Email Security server. Some companies might want to hide this information and
Email Security name in the
Email Security cannot find the DNS record in the number of seconds you
Page 47

SonicWALL Email Security Administrator’s Guide|36
Allowed list. As a result, their email messages to internal users are not filtered by
SonicWALL
automatically adds each person to whom users send email.
The default setting is On.
z
Save a copy of every email that enters your organization: When email archiving is
enabled, folders containing the entire contents of every email are created in the logs directory
of each SonicWALL
z
Save a copy of every email that leaves your organization: When email archiving is
enabled, folders containing the entire contents of every email are created in the logs directory
of each SonicWALL
z
Log Level: Use this setting to change the log level for SonicWALL Email Security.
By default, logging is enabled at level 3. You can set event logging from level 1, for maximum
logging, to level 6, for minimum logging. Log files roll over at different sizes, or don't roll over
at all.
Note:
Email Security. You can either add people manually or SonicWALL Email Security
Email Security server that analyzes email traffic.
Email Security server that analyzes email traffic.
• Do not adjust the log level unless you are troubleshooting a specific problem.
z
Reports data will be deleted when older than: Enter the number of days of data that you
want to preserve for reporting information. Lowering this number means less disk space will be
used, but you will not have report data older than the number of days specified. The default
value is 366 days. If your organization's email volume is very high, you may want to consider
reducing this number.
z
Click the Test Connectivity to reports database button to verify that you can access the
Reports database. See the Reports and Monitoring chapter in this guide for more information
on accessing and customizing reports.
Upload Patch
When a new SonicWALL Email Security firmware update becomes available, the SonicWALL Email
Security appliance automatically downloads the update and alerts the administrator via email that
it is available. Upon logging in to the SonicWALL Email Security administrative interface, a pop-up
screen displays, prompting the administrator to either click to update now or wait to update later.
In some instances an administrator may want or need to apply a patch manually. For example, if
an administrator has multiple servers running in split configuration mode (Remote Analyzer/Control
Center configuration), updates must be applied manually.
Note:
z
Updating servers in split mode configuration requires that the Remote Analyzer be updated first
and the Control Center updated last.
X To apply a patch manually, perform the following steps
1. Log into www.mysonicwall.com with your user name and password.
2. In the left-hand side navigation menu, click Download Center to access the list of available
firmware.
3. Download the build onto your Email Security management machine (not to the Email Security
appliance).
4. In SonicWALL Email Security, navigate to the System > Advanced page. In the Upload Patch
section, click the Browse button to locate the executable file located in your client machine.
5. Click the Apply Patch button to upload and install the signed installer executable.
As part of the upgrade process, the Email Security appliance will reboot. All the settings and
data will be preserved.
Download System/Log Files
The administrator can download log files from SonicWALL Email Security to another computer.
Page 48

Branding
Quick Settings
SonicWALL Email Security Administrator’s Guide|37
Reinitialize to Factory Settings
An administrator may consider this advanced feature to set the server back to factory default
values. Selecting Reinitialize to Factory Settings will wipe out all the user’s configured data and
reconfigure the SonicWALL Email Security server with another IP. On selecting the button, a warning
dialogue box appears on the screen, prompting the user to confirm or cancel the reinitialize process.
Branding provides the ability to customize aspects of the user interface. Administrators can upload
replacement assets for the key branding elements, including company name, logo, and other
branding assets.
The Quick Settings tab allows administrators to specify global settings for the most commonly
modified asset files on the GUI. Note that any settings configured in this tab will override those
specified by deployed packages.
Text Preferences
Contact Us URL—The Email Address or URL provided in this field appears as the “Contact Us” link
that appears at the footer of each page. This field supports “http://”, “https://”, and “mailto:”.
Page 49

SonicWALL Email Security Administrator’s Guide|38
Image Preferences
The image preference files can all be modified by clicking the “Browse...” button or clicking the
Download icon to download the default SonicWALL image file. Note that an error message will
display if you have uploaded an incorrect file type. The following are image preference files that can
be modified:
z
Web Icon file—This field replaces the 4-bit SonicWALL ‘S’ logo that appears in the address bar
of every Webpage across all browser platforms.
z
Logon logotype file—This field replaces the logon, logout, and mini-logon generic bitmap that
displays the SonicWALL challenge screen layout and design.
z
Logon backdrop art file—This field replaces the logotype bitmap that appears upon every
challenge screen.
z
Page header art file—This field replaces the SonicWALL banner art bitmap at the top of each
Webpage.
z
Page logotype file—This field replaces the short version of the SonicWALL logotype that
appears at the top of each Webpage's banner art.
z
Pop-up Dialog art file—This field replaces the smaller version of the SonicWALL banner art
that appears at the top of each pop-up dialog page.
z
Pop-up Dialog logotype file—This field replaces the smaller version of the SonicWALL
logotype that appears at the top of each pop-up diaglog's page banner art.
Junk Summary Preferences
Packages
The Junk Summary Preferences can all be modified by clicking the "Browse..." button or clicking
the Download icon to download the default SonicWALL image file. Note that an error message will
display if you have downloaded an incorrect file type. The following are Junk Summary preference
files that can be modified:
z
Junkbox Summary logotype file—This field replaces the black-on-white logotype that always
appears at the top of each Junkbox summary email.
z
Junkbox Summary header art file—This field replaces the Junkbox summary banner art
bitmap at the top of each page.
The Packages tab allows administrators to manage, upload, and apply branding packages to their
GUI. The Manage Packages table displays the available packages the administrator can apply to the
GUI, including the SonicWALL brand package which may never be deleted. Administrators are able
to edit or delete all other brand packages that have been uploaded.
Page 50

Managing Spam
Spam Identification
CHAPTER 3
Anti-Spam Anti-Phishing Techniques
SonicWALL Email Security uses multiple methods of detecting spam and other unwanted email.
These include using specific Allowed and Blocked lists of people, domains, and mailing lists;
patterns created by studying what other users mark as junk mail, and the ability to enable thirdparty blocked lists.
You can define multiple methods of identifying spam for your organization; users can specify their
individual preferences to a lesser extent. In addition, SonicWALL Email Security provides updated
lists and collaborative thumbprints to aid in identifying spam and junk messages.
SonicWALL Email Security uses a multi-prong approach to identifying spam and other unwanted
email. It is useful to understand the general operation so you can build your lists appropriately.
When an email comes in, the sender of the email is checked against the various allowed and blocked
lists first, starting with the corporate list, then the recipient’s list, and finally
theSonicWALL Email Security-provided lists. If a specific sender is on the corporate blocked list but
that same sender is on a user’s allowed list, the message is blocked, as the corporate settings are
a higher priority than a user’s.
More detailed lists take precedence over the more general lists. For example, if a message is
received from aname@domain.com and your organization’s Blocked list includes domain.com but a
user’s Allowed list contains the specific email address aname@domain.com, the message is not
blocked because the sender’s full address is in an Allowed list.
After all the lists are checked, if the message has not been identified as junk based on the Allowed
and Blocked lists, SonicWALL Email Security analyzes messages’ headers and contents, and use
collaborative thumbprinting to block email that contains junk.
Managing Spam through Default Settings
Use the Default Spam Management window to select options for dealing with spam and likely spam.
The default setting for spam and likely spam will quarantine the message in the user’s junk box.
X To manage messages marked as spam or likely spam
1. Choose one of the following responses for messages marked as definite spam and likely spam
Response Effect
Definite Spam
filtering off
SonicWALL Email Security does not filter
messages for spam. All messages are passed
through to the recipient.
Page 51

SonicWALL Email Security Administrator’s Guide|40
Response Effect
Permanently Delete The email message is permanently deleted.
Bounce Back to Sender The message is returned to sender with a
CAUTION: If you select this option, your
organization risks losing wanted email.
message indicating that it was not deliverable.
Store in Junk Box
(default setting)
Send to Enter the email address of the person to receive
Tag With The email is tagged with a term in the subject
2. Check the Accept Automated Allowed List check box to accept automated lists that are
created by User Profilers. User Profilers analyze your outbound traffic and automatically
populate per user white lists. This helps reduce the false positives.
Note
z
If this check box is unchecked in the Corporate, Group, or User windows, User Profilers have no
effect.
3. Check the Skip spam analysis for internal email to exclude internal emails from spam
analysis.
4. Check the Allow users to delete junk to allow users to control the delete button on
individual junk boxes.
Note:
z
When you go on vacation, deselect this box so that your vacation-response reply does not
automatically place all recipients on your Allowed list.
5. Click Apply Changes.
The email message is stored in the Junk Box. It
can be unjunked by users and administrators
with appropriate permissions.
This option is the recommended setting.
this email.
line, for example, [JUNK] or [Possible Junk?].
Selecting this option allows the user to have
control of the email and can junk it if it is
unwanted.
Adding People to Allowed and Blocked Lists for the Organization
You can add specific people’s email addresses to organization-wide Allowed or Blocked lists. Use
People page.
If the sender-ID check fails, the Allowed list entry will be ignored.
This page displays the email address of senders on the organization’s Allowed or Blocked lists. The
source of the address is shown in the right-hand column.
If you attempt to add your own email address or your organization’s domain, SonicWALL Email
Security will display a warning. A user’s email address is not automatically added to the allowed list,
because spammers sometimes use a recipient’s own email address. Leaving the address off the
allowed list does not prevent users from emailing themselves, but their emails are evaluated to
determine if they are junk.
Page 52

SonicWALL Email Security Administrator’s Guide|41
Note
z
These settings apply to the entire organization. Individual users can add or block people for
their personal lists by clicking Anti-Spam Techniques > People in their
SonicWALL
that user. For more information, see
Email Security user accounts. To see an individual user’s lists, you must log in as
“Signing In as a User” on page 76.
To search for an address, enter all or part of the email address. For example, entering sale displays
sales@domain.com as well as forsale@domain.com.
X To add people to the Allowed or Blocked lists
1. Choose the Allowed or Blocked tab.
2. Click the Add button
3. Enter one or more email addresses, separated by carriage returns, to add to the chosen list.
Notes:
z
You cannot put an address in both the Allowed and Blocked list simultaneously. If you add an
address in one list that already exists on the other, it is removed from the first one.
z
SonicWALL Email Security will warn you if you attempt to add your own email address or your
own organization.
z
Email addresses are case-insensitive; SonicWALL Email Security converts the address to
lowercase.
z
SonicWALL Email Security will ignore any entries to the Allowed list if the sender-ID (SPF) check
fails. For more information on SPF, see
“Effects of SPF on Email Security Behavior” on page 44.
Companies or Domains
You can allow and block email messages from entire domains. If you do business with certain
domains regularly, you can add the domain to the Allowed list; SonicWALL Email Security allows all
users from that domain to send email. Similarly, if you have a domain you want to block, enter it
here and all users from that domain are blocked.
Note:
z
SonicWALL Email Security does not support adding top-level domain names such as .gov or
.abc to the Allowed and Blocked lists.
X To add domains to the Allowed or Blocked lists
1. Choose the Allowed or Blocked tab.
2. Click the Add button.
3. Enter one or more domains, separated by carriage returns.
Notes:
z
A domain cannot be on both the Allowed and Blocked list at the same time. If you add a domain
to one list and it already exists on the other, it is removed from the first list.
z
Domain names are case-insensitive and are converted to lowercase.
Page 53

Mailing Lists
SonicWALL Email Security enables you to add mailing lists, such as listserv lists, to your Allowed
list.
Mailing list email messages are handled differently than individuals and domains because
SonicWALL Email Security looks at the recipient’s address rather than the sender’s. Because many
mailing list messages appear spam-like, entering mailing list addresses prevents misclassified
messages.
X To add mailing lists
1. Click Add.
2. Enter one or more email addresses, separated by carriage returns.
Email addresses are case-insensitive; the message is converted to lowercase.
Anti-Spam Aggressiveness
The Anti-Spam Aggressiveness window allows you to tailor SonicWALL Email Security to your
organization’s preferences. Configuring this window is optional. SonicWALL Email Security
recommends using the default setting of Medium (or 3) unless you require different settings for
specific types of spam blocking.
Configuring SMART Network Aggressiveness Settings
SonicWALL Email Security Administrator’s Guide|42
SMART Network refers to SonicWALL Email Security user community. Every email that is junked by
an user in SMART Network is summarized in the form of thumbprints. A thumbprint is an
anonymous record of the junked email that contains no information about the user who received
the mail or the contents of the mail.
You can adjust SMART Network settings to customize the level of influence community input has on
spam blocking for your organization. Updates are provided to your gateway server at defined
intervals.
To adjust your settings, click one of the radio buttons from Mild (1) to Strong (5). A setting of 5
indicates that you are comfortable with the collective experience of the SonicWALL Email Security
us e r comm u nity, a nd do n o t wan t to see m o re em a i l. A s e tting o f 1 or 2 i n dica t e s tha t want t o judge
more email for yourself and rely less on the collective experience of SonicWALL Email Security's
user community.
Configuring Adversarial Bayesian Aggressiveness Settings
The Adversarial Bayesian technique refers to SonicWALL Email Security’s statistical engine that
analyzes messages for many of the spam characteristics. This is the high-level setting for the Rules
portion of spam blocking and lets you choose where you want to be in the continuum of choice and
volume of email. This setting determines the threshold for how likely an email message is to be
identified as junk email.
Use these settings to specify how stringently SonicWALL Email Security evaluates messages.
z
If you choose Mild (check box 1 or 2), you are likely to receive more questionable email in your
mailbox and receive less email in the Junk Box. This can cause you to spend more time weeding
unwanted email from your personal mailbox.
z
If you choose Medium (check box 3), you accept SonicWALL Email Security’s spam-blocking
evaluation.
z
If you choose Strong (check box 4 or 5), SonicWALL Email Security rules out greater amounts
of spam for you. This can create a slightly higher probability of good email messages in your
Junk Box.
Page 54

SonicWALL Email Security Administrator’s Guide|43
Determining Amounts and Flavors of Spam
You can determine how aggressively to block particular types of spam, including sexual content,
offensive language, get rich quick, gambling, and advertisements.
For each of the spam flavors:
z
Choose Mild (check box 1) to be able to view email that contains terms that relate to these
topics.
z
Choose Medium (check box 2 through 4) to cause SonicWALL Email Security to tag this email
as likely junk.
z
Choose Strong (check box 5) to make it more likely that email with this content is junked.
For example, the administrator has determined that they want to receive no email with sexual
content by selecting Strong (5). They are less concerned about receiving advertisements, and
selected Mild (1). You can also choose whether to allow users to unjunk specific flavors of spam.
Authenticating the Sender’s Domain via Sender ID
Select the Consider Sender ID in statistical evaluation check box.
About Sender ID and SPF
Many senders of junk email messages spoof addresses to make their email appear more legitimate
and compelling. When you send an email message, the email contains information about the
domain from which the message was sent. Sender ID, sometimes called Sender Policy Framework
(SPF) is a system that checks the sender’s DNS records. SonicWALL Email Security determines
whether the IP address from which the message was sent matches the purported domain. Many
organizations publish their list of IP addresses that are authorized to send email so that recipient’s
MTAs can authenticate the domain of messages that claim to be from that address.
SonicWALL Email Security uses the following system to determine if the sender is authorized to
send email from the purported address:
1. Stores the IP address of the SMTP client that delivered the message, which is the Source IP
address.
2. Finds the sender of the message, and stores the domain that the message claims to be from.
3. Using the Domain Name System (DNS), queries the domain for its Sender ID record, if it is
published. Those records are published by many domain owners, and create a list of IP
addresses that are authorized to send mail for that domain.
4. Validates that the domain authorizes the Source IP address in its SPF record.
Below is a simple example:
z
SonicWALL Email Security receives a message from 192.0.2.128
z
In the message, SonicWALL Email Security finds From: John.Smith@example.com so it uses
example.com as the domain.
z
SonicWALL Email Security queries example.com for its SPF record
z
The SPF record published at example.com lists 192.0.2.128 as a system that is authorized to
send mail for example.com, so SonicWALL
SPF = pass result. This information is taken into account by SonicWALL Email Security in the
determination of spam.
Email Security gives this message an
Sender ID or SPF Implementation Notes
To use Sender ID or SPF effectively, SonicWALL Email Security must be the first-touch server.
SonicWALL Email Security factors each message’s SPF score as a portion of information used by its
spam- detection engine. SonicWALL Email Security needs the Source IP address of the SMTP client
sending messages. Thus, if your SonicWALL Email Security is downstream from another MTA, for
example, Postfix or SendMail, this check will not provide useful information, since all of the
messages will come from the IP Address of your Postfix or SendMail server.
Page 55

SonicWALL Email Security Administrator’s Guide|44
Note:
z
SonicWALL Email Security performance might vary if you enable Sender ID because each email
is placed on hold while the DNS server is being queried.
Effects of SPF on Email Security Behavior
SonicWALL Email Security relies on SPF to help define a message as spam or likely spam. As
implemented, SPF can return a soft failure or a hard failure when validating the sender’s MAIL FROM
field. A hard failure causes the message to be marked as likely spam even when no other test
confirms it. With confirmation from another Email Security plug-in, the message can be marked as
definite spam. A soft failure by SPF lends weight to the classification of a message as spam or likely
spam, but is not enough to mark the message by itself. If the sending domain does not publish SPF
records, Email Security does not use SPF to take any action.
In cases where a certain domain is on a user’s Allowed list, an SPF soft or hard failure will still
prevent spam based on spoofed use of the allowed domain. Once Email Security determines that a
domain has been spoofed in an incoming message, it disables checking of the Allowed list.
Publishing Your SPF Record
SonicWALL strongly recommends that you publish your SPF records to prevent spammers from
spoofing your domain. When spammers spoof your domain, your domain can receive a high volume
of bounced messages due to fraudulent or junk email that appears to come from your domain.
Implementing SPF prevents your company’s branding from being diluted. For assistance in setting
up your SPF records, go to http://spf.pobox.com/wizard.html.
To see an example of an SPF record, you can use a tool such as nslookup from your favorite shell.
As an example, to query SPF records for AOL, type:
nslookup -query=TXT aol.com
Languages
You can allow, block, or enter no opinion on email in various languages. If you enter No opinion,
SonicWALL Email Security judges the content of the email message based on the
SonicWALL Email Security modules that are installed.
Note:
z
Some spam email messages are seen in English with a background encoded in different
character sets such as Cyrillic, Baltic, or Turkish. This is done by spammers to bypass the antispam mechanism that only scans for words in English. In general, unless used, it is
recommended to exclude these character sets. Common languages such as Spanish and
German are normally not blocked.
Black List Services (BLS)
Public and subscription-based black list services, such as the Mail Abuse Prevention System (MAPS),
Real-time Blackhole List (RBL), Relay Spam Stopper (RSS), Open Relay Behavior-modification
Systems (ORBS) and others, are regularly updated with domain names and IP addresses of known
spammers. SonicWALL Email Security can be configured to query these lists and identify spam
originating from any of their known spam addresses.
Note:
z
SonicWALL Email Security performance may vary if you add Black List Services because each
email is placed on hold while the BLS service is queried.
Add
Click Add and enter the server name of the black list service, for example list.dsbl.org. Each
black list service is automatically enabled when you add it.
Page 56

SonicWALL Email Security Administrator’s Guide|45
Email that Arrives from Sources on the Black Lists Services
Check the Treat all email that arrives from sources on Black List Services as Likely Spam
check box to prevent users from receiving messages from known spammers. If you check this box,
you will be warned that enabling this feature increases the risk of false positives, and you may not
receive some legitimate email.
Managing Spam Submissions and Probe Accounts
Use the Spam Submissions page to manage email that is miscategorized and to create probe
accounts to collect spam and catch malicious hackers. Managing miscategorized email and creating
probe accounts increases the efficiency of SonicWALL Email Security’s spam management. This
page enables administrators and users to forward the following miscategorized email messages to
their IT groups, create probe accounts, and accept automated allowed lists to prevent spam.
Managing Miscategorized Messages
The following diagrams illustrate the process of junk submissions. They show how junk email that
was missed by SonicWALL Email Security (also known as false negatives) is sent to
SonicWALL Email Security’s Research Laboratory for analysis. They also show how good email that
was junked by the SonicWALL Email Security (also known as false positives) is sent to
SonicWALL Email Security’s Collaborative laboratory for analysis. This image demonstrates
Submitting missed and miscategorized messages
Page 57

SonicWALL Email Security Administrator’s Guide|46
What Happens to Miscategorized Email Messages
The following happens when an email message is miscategorized
z
For false negatives, SonicWALL Email Security adds the sender address of the junked email to
the user’s Blocked List so that future email messages from this sender are blocked. (The original
sender is blacklisted for the original recipient.)
z
For false positives, SonicWALL Email Security adds the addresses of good email senders that
were unjunked to the user’s Allowed List. (The original sender is whitelisted for the original
recipient.) If the sender email is the user’s own email address, the address is not added to the
allowed list, because spammers send email pretending to be from the user. Email sent to and
from the same address will always be evaluated to determine if it is junk.
z
These messages are sent to the global collaborative database. Good mail that was unjunked is
analyzed to determine why it was categorized as junk.
Forwarding Miscategorized Email to SonicWALL Email Security
You must set up your email system so that email sent to the this_is_spam@es.your_domain.com
and not_spam@es.your_domain.com passes through SonicWALL Email Security.
Note:
z
The email addressed to not_spam@es.your_domain.com and
this_is_spam@es.your_domain.com must pass through SonicWALL Email Security so that it
can be operated on. The same domain as the domain that is used to forward emails to. Using
a domain that does not route, such as “fixit.please.com”, is recommended.
Configuring Submit-Junk and Submit-Good Email Accounts
Mail is considered miscategorized if SonicWALL Email Security puts wanted (good) email in the Junk
Box or if SonicWALL Email Security delivers unwanted email in the user’s inbox. If a user receives
a miscategorized email, they can to update their personal Allowed list and Blocked list to customize
their email filtering effectiveness. This system is similar to the benefits of running MailFrontier
Desktop in conjunction with SonicWALL Email Security, and clicking Junk or Unjunk messages, but
does not require SonicWALL Email Security Desktop to be installed.
The email administrator can define two email addresses within the appropriate configuration page
in SonicWALL Email Security, such as this_is_spam@es.your_domain.comand
not_spam@es.your_domain.com. As SonicWALL Email Security receives email sent to these
addresses, it finds the original email, and appropriately updates the user’s personal Allowed and
Blocked list.
Note:
z
Users must forward their miscategorized email directly to these addresses after you define them
so that SonicWALL
Email Security can learn about miscategorized messages.
Page 58

Problem with Forwarding Miscategorized Email
A problem can arise if the user sends an email to this_is_spam@es.your_domain.com, and the
local mail server (Exchange, Notes, or other mail server) is authoritative for this email domain, and
does not forward it to SonicWALL Email Security. There are a few ways around this problem; the
most common solution is included below as an example.
X To forward the missed email to SonicWALL Email Security for analysis
1. Add the this_is_spam and not_spam email addresses as
Note:
z
2. Tell users to forward mail to this_is_spam@ES.your_domain.com or
Probe Accounts
Probe accounts are accounts that are established on the Internet for the sole purpose of collecting
spam and tracking hackers. SonicWALL Email Security suggests that you use the name of a past
employee as the name in a probe account, for example, fredjones@example.com.
Configure the Probe Email Account fields to cause any email sent to your organization to create
fictitious email accounts from which mail is sent directly to SonicWALL, Inc. for analysis. Adding this
junk email to the set of junk email messages that SonicWALL Email Security blocks enhances spam
protection for your organization and other users. If you configure probe accounts, the contents of
the email will be sent to SonicWALL, Inc. for analysis.
SonicWALL Email Security Administrator’s Guide|47
this_is_spam@es.your_domain.com and not_spam@es.your_domain.com into the
SonicWALL Email Security Junk Submission text boxes.
Create an A and an MX record in your internal DNS that resolves es.your_domain.com to your
SonicWALL
not_spam@ES.your_domain.com.
The mail goes directly to the SonicWALL Email Security servers.
Email Security server's IP address.
Managing Spam Submissions
X To manage spam submissions
1. Click Anti-Spam Techniques > Spam Submissions.
The Spam Submission window appears.
2. Enter an email address in Submitting Missed Spam.
For example, you might address all missed spam email to
mailto:submitmissedspam@your_domain.com.
3. Enter an email address in Submitting Junked Good Mail.
For example, you might address all misplaced good email to
mailto:submitgood@your_domain.com.
4. Establish one or more Probe Email Accounts.
Enter the email address of an account you want to use to collect junk email. The email address
does not have to be in LDAP, but it does have to be an email address that is routed to your
organization and passes through SonicWALL
probe email account with the address
mailto:probeaccount1@your_domain.com.
A probe account should NOT contain an email address that is used for any purpose other than
!
collecting junk email. If you enter an email address that is in use, the owner of that email
address will never receive another email - good or junk - again, because all email sent to that
address will be redirected to the SonicWALL corporation’s data center.
5. Click the Apply Changes button.
Email Security. For example, you might create a
Page 59

Anti-Phishing
What is Enterprise Phishing?
SonicWALL Email Security Administrator’s Guide|48
SonicWALL Email Security’s Anti-Spam Anti-Phishing module protects organizations against email
containing fraudulent content. There are two audiences for fraud: the consumer and enterprise
users. SonicWALL Email Security focuses on preventing fraud that enters the enterprise via email.
Email is an entry point for malicious hackers.
There are numerous types of enterprise phishing.
z
Consumer phishers try to con users into revealing personal information such as social security
numbers, bank account information, credit card numbers, and driver’s license identification.
This is known as identity theft. Recouping from having a phisher steal your identity can take
many hours and can cost consumers many dollars. Being phished can bring your life to a virtual
standstill as you contact credit card companies, banks, state agencies, and others to regain
your identity.
z
Enterprise phishers attempt to trick users into revealing the organization’s confidential
information. This can cost thousands of executive and legal team hours and dollars. An
organization’s electronic-information life can stop abruptly if hackers deny services, disrupt
email, or infiltrate sensitive databases.
Phishing aimed at the IT group in the organization can take the following forms:
z
Email that appears to be from an enterprise service provider, such as a DNS server, can cause
your organization’s network to virtually disappear from the Web.
z
Hacking into your web site can cause it to be shut down, altered, or defaced.
z
Email might request passwords to highly sensitive databases, such as Human Resources or
strategic marketing information. The email might take the form of bogus preventive
maintenance.
z
Other information inside the organization’s firewall, such as Directory Harvest Attacks (DHA) to
monitor your users.
Phishing can also take the form of malicious hackers spoofing your organization. Email is sent that
appears to come from your organization can damage your community image and hurt your
customers in the following ways:
z
Spoofed email can ask customers to confirm their personal information.
z
Spoofed email can ask customers to download new software releases, which are bogus and
infected with viruses.
Preventing Phishing
Phishing harms organizations and consumers by raising the price of doing business, which raises
the cost of goods and services. SonicWALL Email Security prevents phishing through:
Adapting SonicWALL Email Security’s spam-fighting heuristics to phishing
z
z
Divergence DetectionTM—ensures that all contact points are legitimate. Contact points include
email addresses, URLs, phone numbers, and physical addresses.
Sender ID or Sender Policy Framework (SPF)—a system that attempts to validate that a
message is from the domain from which it purports to be. Sender ID authenticates that the
domain from which the sender’s message reports matches one of the IP addresses published
by that domain. SonicWALL
For more information about Sender ID, see
on page 43.
Email Security factors Sender ID pass or fail into its junk algorithm.
“Authenticating the Sender’s Domain via Sender ID”
Page 60

Configuring Phishing Protection
X To configure SonicWALL Email Security to screen for phishing:
1. Navigate to the Anti-Phishing page.Click the radio button to choose which action to take for
messages that contain Phishing.
2. Click the radio button to choose which action to take for messages that contain Likely
Phishing.
3. Check the Allow users to unjunk phishing messages checkbox if you want to allow users
to unjunk fraudulent messages.
4. Enter one or more email addresses of people designated to receive proactive phishing
alerts.
5. To send copies of fraudulent email messages to a person or people designated to deal with
them, enter the recipients’ email addresses in the Send copies of emails containing
phishing attacks to the following email addresses text box. \
6. Click Apply Changes.
Use SonicWALL Email Security’s Community to Alert Others
Phishing is continuously evolving and adapting to weaknesses in the organization’s network.
Malicious hackers use any known weakness to infiltrate the corporate firewall.
SonicWALL Email Security has tuned and enhanced their spam-management techniques to prevent
phishing. SonicWALL Email Security also collects incidences of phishing and summarizes the email
addresses, text, phone numbers, and domains of phishing perpetrators in a database, which stores
the thumbprints of the phishing message.
SonicWALL Email Security Administrator’s Guide|49
Report Phishing and Other Enterprise Fraud to SonicWALL Email Security
SonicWALL Email Security alerts organizations to phishing attacks. SonicWALL Email Security
needs you to report fraudulent email messages to
phishing enables SonicWALL Email Security to alert other users to the phishing attacks you
experienced.
mailto:fraud@sonicwall.com. Reporting
Page 61

Anti-Virus Techniques
SonicWALL Email Security’s Anti-Virus modules protect your organization from inbound emailborne viruses and prevent your employees from sending viruses with outbound email. Once
SonicWALL Email Security has identified the email message or attachment that contains a virus or
is likely to contain a virus, you choose how to manage the virus-infected email.
Optional virus-protection modules for the entire organization are available.
How Virus Checking Works
The Anti-Virus modules use virus-detection engines to scan email messages and attachments for
viruses, Trojan horses, worms, and other types of malicious content. The virus-detection engines
receive periodic updates to keep them current with the latest definitions of viruses.
SonicWALL Email Security supports McAfee ® and Kaspersky virus-detection engines. You can
choose to buy and deploy one or both virus-detection engines supported by
SonicWALL Email Security. Messages determined to be dangerous by McAfee or Kaspersky engine
are categorized as Viruses. SonicWALL Email Security also supports the SonicWALL GRID antivirus
automatically. GRID virus-detection works in with the McAfee and Kaspersky virus-detection
engines to improve your protection from virus payloads.
When any one of the virus-detection engines is activated, you also get the benefit of
SonicWALL Email Security’s Time Zero Virus Technology. This technology uses heuristic
statistical methodology and virus outbreak responsive techniques to determine the probability that
a message contains a virus. If the probability meets certain levels, the message is categorized as
Likely Virus. This technology complements virus-detection engines and enabling this technology
provides the greatest protection for time zero viruses, the first hours that a virus is released, when
major anti-virus companies have not yet modified their virus definitions to catch it.
CHAPTER 4
Preventing Viruses and Likely Viruses in Email
X To configure anti-virus protection
1. Log in as the Email Security Administrator.
2. Navigate to the Anti-Virus Techniques page.
The Anti-Virus window appears.
Page 62

SonicWALL Email Security Administrator’s Guide|51
If you have licensed more than one virus-detection engines, they will all work in tandem.
Licensed virus-detection engines can be used on both inbound and outbound paths.
Action Consequence Additional Information
Virus Filtering
Off
SonicWALL Email Security
passes this email through to
users without stripping the
viruses or likely viruses.
Permanently
Delete
SonicWALL Email Security
permanently deletes this
message.
Bounce Back to
Sender
SonicWALL Email Security
bounces email back to the sender
with the virus removed.
Store in Junk
Box
(default setting)
SonicWALL Email Security stores
email in the Junk Box. If you click
the Allow Users to Unjunk
button, users can unjunk the
message.
Send To SonicWALL Email Security sends
email to a specified address
Ta g w i t h
[VIRUS] or
[LIKELY VIRUS]
SonicWALL Email Security
delivers email to the addressee
and strips the virus. The subject
is tagged with [VIRUS], or
[LIKELY VIRUS] or another
administrator-specified term.
3. Determine how to treat email messages that contain Viruses or Likely Viruses and select the
action to take.
4. Click the Allow Unjunk checkbox to allow users to view messages with viruses from Junk
Box.
SonicWALL Email Security removes the virus from the message before the user retrieves it.
5. Click Apply Changes.
This choice provides no screening for
viruses or likely viruses.
This is a secure option for the
enterprise because the virus or likely
virus is permanently deleted. However,
neither the receiver nor the sender
knows that the email message
contained a virus or likely virus, and
once the message is deleted, you
cannot retrieve it.
The sender is notified of the virus or
likely virus in the email.
Mail is stored in Junk Box. If you click
the Allow Users To Unjunk button
users can receive the message, with
the virus or likely virus removed.
NOTE: SonicWALL Email Security
recommends this option because you
can retrieve the message after
SonicWALL Email Security strips the
virus.
Option allows messages to be copied
to a specific email address
You can enter another tag in the text
box or use the default [VIRUS] or
[LIKELY VIRUS].
Checking for Updates
X To determine how frequently you want to check for virus definition updates
1. Click System > Updates.
The Updates window appears.
2. Choose a time interval from the dropdown list adjacent to Check for Spam, Phishing, and
Virus Blocking Updates.
You can choose every 5 minutes to every 2 hours.
3. Click the Apply Changes button
Page 63

Zombie and Spyware Protection
Unauthorized software may be running on a computer within your organization sending out junk
email messages such as: spam, phishing, virus, or other unauthorized content. This scenario could
happen if your organization was subjected to a virus attack called Trojans or a user downloaded
something from the web and unauthorized software got installed without user’s knowledge. These
unauthorized software programs that send out malicious content are called Zombies or Spyware.
SonicWALL Email Security's Zombie and Spyware Protection technology brings the same high
standard of threat protection available on the inbound email path to email messages leaving your
organization through the outbound path.
To e n a b le Zombie and Spyware Protection, navigate to the Anti-Virus Techniques page, click
on the Outbound tab and check the box Enable Zombie and Spyware Protection.
Table 0-1
Action Description
Action for messages identified
as Definite Viruses leaving
your organization:
Action for messages
identified by SonicWALL’s
Time Zero Virus
Technology as Likely
Viruses leaving your
organization:
SonicWALL Email Security Administrator’s Guide|52
Select one of the following settings:
z
Definite Virus filtering off (deliver message to
users)—Virus filtering is disabled and messages are
delivered to users without stripping the viruses or likely
viruses.
z
Permanently delete—The email message is
permanently deleted.
z
Bounce back to sender—The email message is sent
back to the sender with the virus removed.
z
Store in Junk box (recommended for most
configurations)—Identified email messages that
contain viruses are stripped of the virus attachment and
stored in the Junk Box. If you click the Allow Users to
Unjunk button, users can receive the message with the
virus or likely virus removed.
z
Send to—Enter a designated email address.
SonicWALL's Time Zero Virus Technology uses a
combination of Predictive and Responsive techniques to
identify messages with a possible virus. This technology is
most useful when a virus first appears and before a virus
signature is available to identify, stop and clean the virus.
Select one of the following settings:
z
Likely Virus filtering off (deliver message to users)
— Virus filtering is disabled and messages are delivered
to users without stripping the viruses or likely viruses.
z
Permanently delete—The email message is
permanently deleted.
z
Bounce back to sender—The email message is sent
back to the sender with the virus removed.
z
Store in Junk box (recommended for most
configurations)—Identified email messages that
contain viruses are stored in the Junk Box. If you click
the Allow Users to Unjunk button, users can receive
the message with the virus or likely virus removed.
z
Send to—Enter a designated email address.
Page 64

SonicWALL Email Security Administrator’s Guide|53
Table 0-1
Action Description
Enable Zombie and Spyware
Protection to block spam,
phishing attacks, and virus
zombies and to alert
administrators immediately
when a zombie has infected
your organization:
Monitoring for Zombie and
Spyware Activity:
Actions to take when emails
are sent by Zombies:
Specify senders that will not
trigger alerts or actions:
This feature is not enabled by default. Select this checkbox
to enable Zombie and Spyware Protection. Once the
Zombie and Spyware Protection is selected, the fields in
the three sections below become active.
These settings do not take any action other than alerting the
administrator of a potential zombie infection.
Select any of the check boxes to send and alert to the
administrator if:
z
Email is sent from an address not in the LDAP
within the last hour.
z
More than (select a number) messages are identified
as possible threats within the last hour.
z
More than (select a number) messages are sent by
one user within an hour.
These settings can affect email flow leaving your
organization. Choose actions for messages leaving your
organization that are identified as a threat and also to
choose to activate/deactivate Outbound Safe Mode.
Outbound Safe Mode, when enabled, blocks all emails with
potentially dangerous attachments from leaving your
organization. Outbound Safe Mode, when enabled,
minimizes the possibility of new virus outbreaks spreading
through your outbound email traffic. This setting is most
useful when a virus first appears and before a virus signature
is available to identify, stop and clean the virus.
Enter email addresses in this box you want exempt from
Zombie Protection. (This list might include any email
addresses that are not in LDAP and email addresses that are
expected to send a lot of messages.)
Page 65

Auditing
SonicWALL Email Security’s Auditing module enables the user to monitor all emails, both inbound
and outbound, that pass through SonicWALL Email Security. This allows the user to monitor where
emails have filtered into or locate the destination of a particular email.
Email Auditing
The Email Auditing window can track the path of any message that passes through SonicWALL Email
Security. The Email Auditing window contains a search display that the administrator uses to search
inbound or outbound emails. SonicWALL now uses a search engine to search on audit and junk
messages. Refer to “Supported Search in Audit and Junkbox” section on page 87 for more
information about the search types.
Searching Inbound and Outbound Emails
Inbound emails processed by SonicWALL Email Security are those that originate from outside of
your organization including the total number of junk messages and good messages. Below the
search section a list of emails is displayed with the following information:
z
the recipient of the email
z
where the email is located
z
the subject heading of the email
z
the sender of the email
z
the date of the email from the email header
Outbound emails processed by SonicWALL Email Security are those that come from the recipients
of your organization. This includes both junk emails and good emails.
CHAPTER 5
Audit Simple View
X To use the Audit Simple View
1. Search for messages containing specific strings in the following fields: To, Subject, or From.
Note that the search is not case-sensitive.
2. Select the specific date to search on any particular date.
3. Click Search.
Page 66

Audit Advanced View
This view provides support to search on multiple fields to get the results in more granularity.
X To use Advanced Search
1. On the Auditing page, click the Advanced View button.
SonicWALL Email Security Administrator’s Guide|55
2. To search for specific email threat types, or in specific mail locations, select the desired
checkboxes.
3. Click Search.
Messages matching your search criteria are displayed. To move quickly through results pages, click
in the field that says “Page 1 of 14” and type the result page you want to view. You can also change
the number of messages displayed on each page. As an example, suppose you wanted to see only
messages that were Spam or Likely Spam. Clear all the checkboxes except the Show *Spam and
Show Likely Spam check boxes. Leave all the locations selected and click Search.
Page 67

Configure Auditing
The Configure Auditing window allows you to tailor SonicWALL Email Security to your organization’s
preferences for auditing emails. Configuration in this window is optional. SonicWALL Email Security
sets the default in the on positions with a default of 30 days for keeping auditing files.
X To turn on Configure Auditing
Message Audit
SonicWALL Email Security enables you to diagnose why an email failed through the Message Audit
window. To activate the window, click on the desired email address which is displayed in the inbound
or outbound tab. SonicWALL Email Security displays the message audit.
SonicWALL Email Security Administrator’s Guide|56
1. Navigate to the Auditing module.
2. Click the Configure Auditing button located in the upper-left corner of the Email Auditing
page.
3. Select the radio button(s) in the On position for the following:
{
Auditing for inbound email
{
Auditing for outbound email
4. Select the length of time from the drop-down list to audit messages. Time ranges from one
day to seven years.
5. Click the Apply button.
When the message audit window is open, data is displayed about the actions of the email, such as
the IP address of the computer that sent the email, and also the details about the email itself, such
as the subject heading and message size.
Message actions and message details with their descriptions.
Message Action Description
Arrived into gateway
from:
Direction: The email is either inbound or outbound.
Arrival notes: Additional information about the arrival of the email, e.g. if the
Audit trails: Provides information on what happens to the email on a
Tabl e 1 :
Message Field Description
Subject Subject title of the email
From Sender’s email address
To Recipient’s email address
Date Received Date and time, taken from the email header
Message Size Message size
Threat Identifies the threat status of the email
Category Identifies the subtype of spam the email is categorized with
Attachment Attachment
Shows the IP address from the computer that sent the email.
The date and time are taken from the email header.
email arrived encrypted.
per recipient basis
Page 68

Judgment Details
The SonicWALL Judgment Details feature allows administrators to view blocked email and
determine why it was blocked. This additional information allows them to tune their filters better
and reduce false positives.
Judgment Details are a description of why a particular email message was flagged as junk or
possible junk by SonicWALL Email Security. This might include keywords, suspicious headers, or
other data that indicates a message is not legitimate. This information is only available to
administrators.
SonicWALL Email Security has always collected data on why a particular email was rejected. A
simplified version of the judgment details appears to users in their junk boxes, explaining that their
messages were flagged as having attributes of a particular category of junk mail, including phishing
or gambling. Judgment Details for administrators is a much more fine-grained tool that identifies
exactly which words, phrases, headers, or contents caused SonicWALL Email Security to put the
message in the Junk Box.
Using Judgment Details
Full judgment details are only available if judgment detail auditing has been configured on the
auditing page. Auditing must also be turned on, or judgment detail auditing information is not
stored. Only administrators can view judgment details.
X Turn on auditing for judgment details
1. Log in as the Email Security administrator.
2. Click Auditing.
3. Click the Configure Auditing button at the top of the page.
4. Select the On button next to Auditing for inbound email.
5. Select the On button next to Auditing for outbound email (if relevant).
6. Select the On button next to Enable Effectiveness Details logging. While this option is
selected, each piece of email that is sent to the junk box has a record of the judgment details
appended to it.
Only em ails that are s orted af ter the auditi ng for ju dgmen t d etail s is turn ed on will have full detai ls.
SonicWALL Email Security Administrator’s Guide|57
When judgment detail is being audited, an administrator can view a message. In addition to the
existing message details, there will be a list of judgment details.
X To view judgment details
1. Log in as the Email Security administrator.
2. Click Auditing.
3. Configure the search to find the message(s) you are interested in viewing and click Search.
4. Click on the link in the Subject column for the message you want details on.
5. You will see the Message Audit window.
Your judgment details appear as a part of this window. The specific fields recorded depend on
whether the message was inbound or outbound. Not all fields will appear all the time - fewer
judgment details are collected on outbound messages.
Page 69

SonicWALL Email Security Administrator’s Guide|58
Effectiveness Field Description
Anti-Virus Which of your virus scanners was first to find a virus in the
message
Policy The name of the policy that blocked emails with this characteristic
People, Companies, Lists If this message was blocked because of a list you configured, which
Anti-Spam Aggressiveness Depending on the aggressiveness settings you have configured,
Significant Keywords and
Phrases Found
Spammer’s Tricks Known spammer tricks that have been coded against. Only the
Language Detected Which language the email is in. Some organizations block
GRID Network Reports from other users about this email
Reputation Sender ID
Misc The reason a message was allowed through without checking. This
list item occurred in the message
where this message falls on the sensitivity ratings.
Which words in the email increased the email’s score.
first-found spammer trick is reported in this window.
languages they do not expect.
is usually because the message is from a sender in the same
domain as the recipient.
Page 70

Policy & Compliance
SonicWALL Email Security’s Policy Management module enables you to write policies to filter
messages and their contents as they enter or exit your organization. Policies can be defined only
by an administrator. Typical use of policies include capturing messages that contain certain business
terms, such as trademarked product names, company intellectual property and dangerous file
attachments.
Standard Module vs. Compliance Module
The SonicWALL Email Security Policy & Compliance Module is divided into two subsections:
1. Standard Module—This module comes activated through the Email Security Base License
Key that deploys with SonicWALL Email Security and includes access to the following features
in the left-hand navigation menu:
{
“Filters” on page 64
{
“Policy Groups” on page 71
2. Compliance Module—This module is accessible through the optional purchase of a
Compliance Subscription License Key. The module contains the following features in the lefthand navigation menu:
{
“Dictionaries” on page 72
{
“Approval Boxes” on page 73
{
“Encryption” on page 74
{
“Record ID Definitions” on page 74
{
“Archiving” on page 75
CHAPTER 6
Basic Concepts for Policy Management
Policy Management enables you to filter email based on message contents and attachments. You
can filter for specific terms that you want, such as terms in your product or terms you do not want
in your organization’s email.
You manage policy by creating filters in which you specify the words to search for in content,
senders, or other parts of the email. After filtering for specified characteristics, you can choose from
a list of actions to apply to the message and its attachments.
Page 71

Defining Word Usage
In the context of Policy Management, a word is a series of alphabetic characters and numbers with
no spaces.
Punctuation Character Example
Slash /
Punctuation allowed as
first or last character
but not in the middle.
Dollar sign $
Percent sign %
Punctuation allowed in
the middle but not as
first or last character
Period
“at” sign @
Ampersand &
Colon :
Hyphen -
SonicWALL Email Security Administrator’s Guide|60
Character value
Character value
.
http://example.com
Example
$100
100%
Example
http://example.com is allowed.
.mail or mail. are not allowed.
ktran@sonicwall.com
AT&T
http://example.com
xxx-yyy
All other punctuation is used as word separators to split words. Punctuation included in this category
includes the following characters:
~ ! # ^ * + = { } [ ] ; " < > , ? \ | `()"
For example, X~Y is treated as two words, X and Y.
Defining Email Address Matching
Policy Management can do intelligent matching for email addresses in the From and To/CC/BCC
fields.
Address field Matching strings
jdoe company.com jdoe@company.com
jdoe@company.com Match Match Match
asmith@company.com No Match Match No Match
jdoe@yahoo.com Match No Match No Match
Defining Intelligent Email Attachment Matching
When you create a policy to detect attachments based on file extension, by default,
SonicWALL Email Security will do simple matching based on the specified file extension. If the
attachment has been renamed to have a different file extension, this simple matching will not detect
that. To accurately detect attachments without relying on the file extension, select Intelligent
Page 72

SonicWALL Email Security Administrator’s Guide|61
Attachment Matching checkbox. For example, an executable attachment renamed to .txt
extension can be matched as an executable. SonicWALL Email Security supports Intelligent
Attachment Matching for the following file extensions.
File Format Extension
Bitmap format .bmp
FITS format .fits
GIF format .gif
Graphics Kernel System .gks
IRIS rgb format .rgb
ITC (CMU WM) format .itc
JPEG File Interchange Format .jpg
NIFF (Navy TIFF) .nif
PM format .pm
PNG format .png
Postscript format .[e]ps
Sun Rasterfile .ras
Targa format .tga
TIFF format (Motorola - big
endian)
TIFF format (Intel - little endian) .tif
X11 Bitmap format .xbm
XCF Gimp file structure .xcf
Xfig format .fig
XPM format .xpm
Bzip .bz
Compress .Z
gzip format .gz
pkzip format .zip
TAR (pre-POSIX) .tar
TAR (PO SIX ) .tar
MS-DOS, OS/2 or MS Windows .exe
Unix elf
pgp public ring
pgp security ring
pgp security ring
pgp encrypted data
.tif
Page 73

Defining Disguised Text Identification
SonicWALL Email Security provides disguised text identification to prevent users in your
organization from sending or receiving messages with unwanted words with substituted, inserted,
constructed, or deleted characters. Using traditional word matching or spell checking finds exact
matches or known frequent misspellings, such as hte for the.
Disguised text identification is as simple and intuitive as traditional word matching; and is more
powerful than using regular expressions to find specific words or terms. In addition, it is far easier
to use and less potentially dangerous than regular expressions.
Disguised text identification provides the following types of matches:
Variations Resulting Words or Phrases
Constructed characters \ / for V, or \./\/ for W, for example, \/\/ork at home
Inserted characters - or _, for example, c-o-m-m-e-n-t or f_e_e_s
Substituted characters @ for a or 1 for i, for example, p@ntyhose or Sat1sfact10n
Deleted characters wnderful opprtunty
Imaginative spelling Purrfection or garunteeed suxess
Note:
z
Disguised text identification might result in false positives due to unexpected conditions, and
can be computationally intensive.
SonicWALL Email Security Administrator’s Guide|62
Disguised text identification is not meant to be a spam catcher. SonicWALL Email Security has
developed extensive heuristic statistical techniques for catching spam. Instead, this feature allows
you to detect terms that are important to your organization and build policies based on them. You
can use this feature to capture specific terms, for example, route incoming messages with your
product’s name with appropriate trademarks for your sales departments. It can also be used to filter
outgoing mail. As an example, if your organization prohibits sending source code outside of the
company, you could use various programming keywords as search terms and route messages with
those terms to the appropriate manager.
Inbound vs. Outbound Policy Filters
Organizations can create policies to deal with both inbound and outbound messages. To create
inbound policies select Inbound tab and click on Add New Filters. Policies created on the inbound
path can not be shared with the outbound path and vice versa. To create outbound policies, select
Outbound tab and click on Add New Filter.
See the Managing Filters section on page 68 for examples of adding inbound and outbound
policies.
Page 74

Preconfigured Inbound Filters
New installations of SonicWALL Email Security ship with preconfigured filters. These preconfigured
filters are not enabled by default.
Strip Potentially Dangerous File Attachments
This filter, Strip Potentially Dangerous File Attachments, strips all attachments from the incoming
email messages that triggered the filter conditions. Enable and edit this rule if you want to allow
some of these attachments and not others.
Junk Emails with Attachments over 4MB
SonicWALL Email Security Administrator’s Guide|63
This filter, Junk Emails with Attachments Over 4MB, stores all incoming email messages over 4MB
in size in the Junk Box.
Strip Picture and Movie Attachments
This filter, Strip Picture and Movie Attachments, strips all attachments from the incoming email
messages that triggered the filter conditions. Enable and edit this rule if you want to allow some of
these attachments and not others.
Detect Personal Financial Information (PFI) Records in Inbound Mails
This filter, Detect Personal Financial Information (PFI) Records in Inbound Mails, detects personal
financial information by using the Record ID definitions feature as an identifying tool looking for
mails that match Social Security Number and Credit Card Number formats.
Detect Personal Health Information (PHI) Records in Inbound Mails
This filter, Detect Personal Health Information (PFI) Records in Inbound Mails, detects personal
health information by utilizing the Medical Drug Names pre-defined dictionary as an identifying tool.
Detect Corporate Financial Information in Inbound Mails
This filter, Detect Corporate Financial Information in Inbound Mails, detects corporate financial
information in the subject line or body of an email by utilizing the Financial Terms predefined
dictionary as an identifying tool.
Page 75

Preconfigured Outbound Filters
New installations of SonicWALL Email Security ship with preconfigured filters. These preconfigured
filters are not enabled by default
.
Detect Personal Financial Information (PFI) Records in Outbound Mails
This filter, Detect Personal Financial Information (PFI) Records in Outbound Mails, detects personal
financial information by using Record ID definitions feature as an identifying tool looking for mails
that match Social Security Number and Credit Card Number formats.
Detect Personal Health Information (PHI) Records in Outbound Mails
SonicWALL Email Security Administrator’s Guide|64
This filter, Detect Personal Health Information (PFI) Records in Outbound Mails, detects personal
health information by utilizing the Medical Drug Names pre-defined dictionary as an identifying tool.
Detect Corporate Financial Information in Outbound Mails
This filter, Detect Corporate Financial Information in Outbound Mails,detects corporate financial
information in the subject line or body of an email by utilizing the Financial Terms predefined
dictionary as an identifying tool.
Filters
A Policy Filter is an action or actions you want SonicWALL Email Security to take on messages that
meet the conditions you define. SonicWALL's Policy Management module enables you to filter email
as it enters or exits your organization. Policy Management is a tool only for administrators: policies
cannot be managed individually and are not user-configurable.
X To create and manage policy filters
1. Select Filters link under Policy Management module.
2. Select the Inbound or
messages respectively.
3. Click the A
The Add Filte
Note:
z
The fields in the window will change based on the action you choose.
4. The En
that do not go into effect immediately.
5. Choose whether the filter matches Al
{
{
6. Choose the part of the message to filter.
dd New Filter button.
r window appears.
able this Filter checkbox is checked by default. Uncheck the checkbox to create rules
All - Causes email to be filtered when any of the filter conditions apply (logical AND)
Any - Causes email to be filtered when any of the conditions apply (logical OR)
Outbound tab to create filters for inbound or outbound email
l of the conditions or Any of the conditions
Page 76

SonicWALL Email Security Administrator’s Guide|65
Select Definition
Judgement The server’s assessment of a categorized message threat
From Filter by the sender’s name
To/Cc/Bcc Filter by the names in the To: cc: or bcc: fields
Subject Filter by words in the subject
Body Filter based on information in the body of the email
Subject or Body Filter based on information in the subject and body of the email
Subject, Body, or
Attachments
Message header Filter by the RFC822 information in the message header fields, which
Attachment name Filter attachments by name
Attachment contents Filter based on information in the email attachments
Size of message Filter messages based on the size of the message
Number of recipients Filter messages based on the number of recipients
RFC 822 Byte Scan Scan the entire email message
Filter based on information in the subject, body, and attachments of
the email
includes information including the return path, date, message ID,
received from, and other information
7. Choose the matching operation. The choices for matching operation vary with the message
part being matched against. The following table describe the matching operations available.
Type Explanation Example
With Specific
Word
Without
Specific Word
With Specific
Phrase
Without
Specific Phrase
Starts With The message part being
Ends With The message part being
Equivalent to “Find the whole
word only”
Not equivalent to “Find the
whole word only”
Equivalent to “Find complete
phrase”
Not equivalent to “Find complete
phrase”
searched for should start with
the search value
searched for should end with the
search value
z
Search for the word “Mail” from the
subject line “This is Mail” will match.
z
Search for the word “Mail” from the
subject line “This is MailFrontier” will not
match.
z
Search for the words “is Mail” from the
subject line “This is Mail” will match.
z
Search for the word “is Mail” from the
subject line “This is MailFrontier” will not
match.
Search for “This” from the subject line “This is
Mail” will match.
Search for “is Mail” from the subject line “This
is Mail” will match.
Page 77

SonicWALL Email Security Administrator’s Guide|66
Is Only the search criteria should
exist (exact match).
z
Search for the word “Mail” from the
subject line “This is Mail” will not match.
z
Search for “is Mail” from the subject line
“is Mail” will match.
Is Not Only the search criteria should
not exist
Search for the phrase “is Mail” from the
subject line “This is MailFrontier”, will match.
Contains Substring search Search for “is Mail” from the subject line “This
is Mail” will match.
Does not
Contain
Substring search does not
match
8. Enter the words or phrase that you want to filter in the Search Value text box. Select the
appropriate check boxes.
{
Match Case - Filters a word or words sensitive to upper and lower case.
{
Intelligent Attachment Matching - Filters attachment names, such as .exe or .zip.
{
Disguised Text Identification - Filters disguised words through the sequence of its letters,
for example Vi@gr@.
Note:
z
Disguised Text Identification cannot be used together with Match Case and can be selected only
for Body and Subject message parts.
If the Compliance Module is active, the administrator has additional filtering conditions that can be
set. The Use Dictionary option of using terms from a dictionary can be selected, as well as the
Use Record Match option which looks for numbers such as telephone numbers or social security
numbers.
1. Click the plus sign (+) to add another layer of filtering. See “Junk Emails with Attachments
over 4MB” on page 63.
You can add up to 20 filters.
Filters are similar to rock sifters. Each additional filter adds further screens that test email for
additional conditions.
2. Choose the response action from the Action drop-down list.
Action Effect
Log as event The email message is logged. No further processing in Policy
Permanently delete The email message is permanently deleted and no further processing
Store in Junk Box The email message is stored in the Junk Box. It can be unjunked by
Store in Approval Box The email message is stored in the Approval Box. It will not be delivered
Bounce back to sender The message is returned to sender with an optional message indicating
management occurs (default). This option stores a log of all messages
so that the administrator has a record and can analyze traffic patterns.
The log is in the mfe log.
NOTE: Policy management logs all messages as events regardless of
the action specified.
occurs in any SonicWALL Email Security module occurs. This option
does not allow the user to review the email and can cause good email
to be lost.
users and administrators with appropriate permissions. The user has
the option of unjunking the email.
until an administrator approves it for delivery.
that it was not deliverable.
Page 78

SonicWALL Email Security Administrator’s Guide|67
Action Effect
Deliver and bounce The message is delivered to the recipient and is bounced back to the
sender with an optional message.
Deliver and skip Spam
and Phishing Analysis
Route to The message is routed to the specified email address. The message can
Deliver and route to Deliver to the recipients and also route to the specified email address.
Tag subject with The subject of the email is tagged with a the specified term.
Strip all attachments Remove all the attachments from the email.
Append text to message The specified text is appended to the message body.
Issue email notification Sends an email notification to the recipients of the email that triggered
Add X-header to
message
Remove X-header from
message
Route to IP The message is routed to the specified IP address. The message can be
Deliver and Route to IP Deliver to the recipients and also route to the specified IP address. The
Route Copy to Archive A copy of the message is routed to the archive.
Encrypt Message is sent to the encryption center for encryption. This action is
Decrypt Message is sent to the decryption center for decryption. This action is
The message is delivered without spam or phishing analysis.
be routed to only one email address.
The message can be routed to only one email address
the rule.
Adds an X-header to the email.
Removes an X-header from an email.
routed to only one IP address.
message can be routed to only one IP address
used for outbound messages. The administrator must provide a name
or IP address of SMTP server for encryption at the Policy &
Compliance > Encryption page.
used for inbound messages. The administrator must provide a name or
IP address of SMTP server for encryption at the Policy & Compliance
> Encryption page.
When no additional filtering is required on a message, select the and stop processing policy
filters checkbox. This checkbox is automatically selected and grayed out when you have selected
a terminal action.If additional actions need to be performed on the same message, select the plus
sign (+) to the right. You cannot add the same action more than once to a specific filter rule. As a
result, once an action has been selected, it will not be available in the drop-down list for further
selection within the current filter rule.
3. Type a descriptive name in the Filter Name text box.
4. Select a policy group you want to apply this filter to. By default, All Groups will be selected
and this filter will apply to all email messages.
5. Click Save This Filter.
Page 79

Language Support
Managing Filters
Editing a Filter
SonicWALL Email Security Administrator’s Guide|68
Policy management supports filtering messages based on non-English terms in the Search Value.
For example, you can search for a Japanese word or phrase in the body of a message. However,
SonicWALL Email Security does not support adding text strings to email messages in languages
other than English and does not support foreign language filter names.
Note:
z
To view messages in Asian languages, you might need to install East Asian Language Packs on
the server where you run SonicWALL Email Security (for Windows only). This applies to
yments using the SonicWALL Email Security Software Edition.
deplo
The main Policy Management page lists all the filters created in the system for the Inbound and
Outbound path. From this view, you can Add New Filter, Change the order of filters, Edit or
Delete filters. Filters that have been enabled are indicated with a green tick mark.
X To change a filter that has been saved:
1. Click the Edit button adjacent to the fil
2. Change any of the filter conditions.
3. Click S
ave This Filter.
ter to be changed.
Deleting a Filter
To delete a filter, click the Delete button adjacent to the filter.
Changing Filter Order
Filters are processed in the order they appear.
To change the order of the filters, use the up and down arrow icons to the left of the filters.
Advanced Filtering
Creating a Multi-Layered Filter
You can create filters with multiple conditions chained together and multiple actions to be performed
on the message, if the specified conditions are met.
For an example, if the email message is
z
sent from NASA and
z
the body contains the word Mars
then take the following actions:
z
Tag the subject with the term [Mars Update from NASA] and
z
Route the message to engineering.
Page 80

SonicWALL Email Security Administrator’s Guide|69
X To create a multi-layered filter:
1. Click the Add New Filter button from the Policy & Compliance > Filters > Inbound module.
2. Select All conditions to be met
3. With Specific Words operation, search for nasa.org in the message part From.
4. Select the + button to the right to add another condition
5. With Specific Words operation, search for Mars in the message part Body. Enable Match
Case to get an exact case match.
6. Select the action Tag Subject With. Set the Tag field to [Mars Update from NASA]. Make
sure and stop processing policy filters checkbox is not enabled.
7. Select the + button to the right to add another action
8. Select the action Route To and set the To field to engineering@company.com. Select and
Stop Processing Policy Filters checkbox to stop further policy filtering on this message.
9. Select the Save This Filter button.
Configuring a Policy Filter for Outbound Email to Include a Company Disclaimer Message
To add a company disclaimer to the end of each outgoing message from your organization, you
would set the policy filter in this way.
If an email is sent from anyone at sonicwall.com
then take the following actions: Append text to the end of the message,
This is my company disclaimer
X To create the outbound policy filter perform the following steps:
1. In the Email Security management interface, browse to the Policy & Compliance > Filters
screen and click the Outbound tab.
2. Click the Add New Filter button.
3. Select All conditions to be met.
4. Select From in the Select drop-down list, and select contains in the Matching drop-down
list.
5. In the Search Value field, type sonicwall.com.
6. To protect against internal spammers or zombies, click the plus sign icon to add another
condition.
7. Select Judgement in the Select drop-down list, and select is good in the Matching drop-
down list.
8. Select the action Append text to message.
9. In the Message text write: This is my company disclaimer
10. Name the filter Outbound Disclaimer
11. Select Apply to Everyone from the dropdown menu in the Apply this filter to: section.
12. Click the Save This Filter button.
Page 81

SonicWALL Email Security Administrator’s Guide|70
Configuring a Policy Filter for Inbound Email
To filter email messages sent to your organization that are not judged as spam but contain the
words “job application” in the subject or body of the email message you would set the policy filter
this way:
If an email is
z
Not judged as spam
z
The subject or body of the email contains the words job application
then take the following actions:
z
route the email to hr@sonicwall.com
X To create the inbound policy filter:
1. Select Add New Inbound Filter button.
2. Select All conditions to be met.
3. Judgement operation, matching is not spam.
4. Select the + button to the right to add another condition.
5. With specific phrase operation, search for job application in the message part Subject
or Body.
6. Select the action Route to and enter the email address hr@sonicwall.com in the To: field.
7. Name the filter Resume Routing.
8. Select Apply to Everyone from the dropdown menu in the Apply this filter to: section.
9. Select the Save This Filter button.
Exclusive Actions
The action named Permanently delete is an exclusive action and is terminal in nature and no further
policy filtering will be possible after this action has been performed. The Stop Processing Policy
Filters checkbox will be automatically enabled and grayed out if an exclusive action is selected.
Parameterized Notifications
SonicWALL Email Security supports parameterized notifications wherein you can use pre-defined
parameters in the text fields for the Issue Email Notification action. These parameters will get
substituted with corresponding values when the message is processed. You can use these
parameters in either the Subject or Message Text fields of the Issue Email Notification action. The
parameters can be used multiple times and are substituted each time they are used. Each
parameter entered should start and end with % symbol.
Parameter Val ue
%SUBJECT% the Subject: content from the triggering email
%FROM% the From: content from the triggering email
%ATTACHMENT_NAMES% a comma-separated list of attachment names from the triggering
email
%FILTER_NAME% the name of the policy filter which took the action on the triggering
email
%MATCHED_RECORDID% the Record ID file name which has a matching pattern in the
%MATCHED_TERM% the Dictionary term which matched in the triggering email
triggering email
Page 82

Policy Groups
SonicWALL Email Security Administrator’s Guide|71
In some cases, it may be appropriate to associate a policy filter to a group of users rather than the
entire organization. For example, you may want a policy filter to be applied to all incoming email
messages sent to your sales team and no one else in your organization.
If you want policy filters you create to be applied to particular group of users, you first have to
create policy groups from LDAP. Policy groups, once created, can be associated with either inbound
or outbound policies.
To manage policy groups, select Policy Groups link under Policy & Compliance module. From
this screen, you can manage all policy groups for your SonicWALL Email Security setup.
To add a new policy group, select the Add New Group button.
From the pull down menu, select one of three methods to locate a desired group
equal to (fast) search using the actual name
st
arting with
(medium)
containing (slow) search using a substring of characters
Once the list of group names is displayed, select the checkbox of the group you wish to add. Click
on the Add Group button.
search using the first few characters
To remove a group, check the group(s) to be removed and select the Remove Group button. You
can view the members of a group by selecting that group and clicking on the List Group Members
button.
If a user is present in more than one group, that user is treated to be a member of the group that
is listed highest in the list. You can change group ordering, by clicking on the arrows to the left of
listed groups. To change the order in which groups are listed, use the up and down arrow icons to
the left of the groups.
For example in the above illustration, if jdoe@com
and Sales, the policy filter that is associated with SalesEngineering will be applied to email
messages for jdoe@company.com.
pany.com is listed under both SalesEngineering
Multiple LDAP Groups
X To manage policy groups from multiple LDAP servers
1. Log in as the Email Security administrator.
2. Click Po
3. Select the LDAP source and click the Go bu
4. Click the A
5. Choose the groups you want to add policies to.
6. When you have selected the groups, click
7. You can now apply policies to th
actions will only be taken on the first group the system reads.
licy and Compliance and then Policy Groups.
tton. You are connected to that LDAP server.
dd Group button. The groups on that LDAP server are retrieved and presented.
the Add Group button. Your groups are added.
ese groups. If a user is a member of more than one group,
Page 83

Email Address Rewriting
In a multiple LDAP server environment, administrators can map incoming or outbound email
addresses to new apparent domains. This feature also allows you to expand an email list into its
constituent members.
X To configure Email Address Rewriting on a per-LDAP basis:
1. Log in as the Email Security administrator.
2. Click System and then Network Architecture.
3. Scroll down and click the Email Address Rewriting button.
4. Click the Add New Rewrite Operation button.
5. In Type of Operation, choose LDAP Rewrite to Primary. If you are on the Inbound tab,
6. Enter the information for the operation you have chosen.
7. Enter a name for the rewrite operation.
8. Click Save This Rewrite Operation.
Compliance Module
This module is accessible through the optional purchase of a Compliance Subscription License Key
and enables organizations to make efforts in ensuring that email complies with relevant regulations
and/or corporate policies.
SonicWALL Email Security Administrator’s Guide|72
you could also choose LDAP Email List Expansion.
Dictionaries
Once the Compliance Module is activated, the network administrator has access to the new
Encryption and Archiving features in addition to features such as additional filtering tools that
enhance the Standard Module.
Note:
z
When the Compliance Module license expires, filters that were created during the valid license
period will continue to work, taking advantage of the advanced features. However, the
administrator will not be able to add any new filters to use licensed features until a license to
the module is obtained.
A dictionary is a convenient collection of set of words or phrases that you can group together for
use in policy filters. A dictionary can be specified as a search value in a policy filter. Dictionaries can
be created or modified either manually or by importing from a file in the file system.
A predefined dictionary is a group of words or phrases all belonging to a specific theme such as
medical or financial terms, which can be used as a database of words that filters can look for. By
default, SonicWALL Email Security provides two pre installed dictionaries:
z
Financial Terms
z
Medical Drug Names
These dictionaries may be modified by clicking the edit button.
X To import a dictionary from a file on the file system:
1. Click on the Import Dictionary button.
2. Choose to name a new dictionary or to replace an existing dictionary by selecting the
appropriate radio button next to your selection.
3. Find the import file by browsing to the correct location.
The imported file should contain one word or phrase per line and each line should be
separate by <CR>.
4. Click the Import button.
Page 84

X To manually add a dictionary:
1. Click on the Add New Dictionary button.
2. Enter a word or phrase under Dictionary Terms and click Add Term. Repeat for all the terms
3. Give your dictionary a name.
4. Click Save Dictionary. You will automatically be returned to the Policy & Compliance >
Approval Boxes
An Approval Box is a list of stored email messages that are waiting for an administrator to take
action. They will not be delivered until an administrator approves them for delivery. The View
Approval Box for drop-down list allows you to have two different views of Approval Boxes: the
Manager view and the individual approval box view.
To see a list of the Approval Boxes that have been created, select Approval Box Manager from
the pull-down menu in the View box from this list. The Approval Box Manager view allows you to
edit or delete existing Approval Boxes, and to create new Approval Boxes.
To see the contents of a particular Approval Box, choose the desired Approval Box name from the
View Approval Box for drop-down list. This page allows you to search the messages stored in that
Approval Box and to take action on any of those messages.
Note:
z
SonicWALL Email Security Administrator’s Guide|73
you want to add to the dictionary.
Dictionaries module.
Only users who have administrative rights can see the contents of an approval box. See Chapter
7, “User and Group Management” for managing user rights and privileges.
X To store messages in an Approval Box
1. Create the Approval Box by clicking the Add New Approval Box button in the Summary view
page. Then, go to the Policy Management > Filters page and create a policy filter that has
Store in Approval Box as its Action, and choose the desired Approval Box for email messages
caught by that filter.
2. Enter a name for this Approval Box. This name will appear in the page that shows the list of
approval boxes and in the drop-down list that allows you to select the detailed view of
individual approval boxes.
3. From the Default action pull-down menu, select an action to be taken. This action will
automatically be taken on the message waiting for approval if the administrator does not
respond to the notification within the period of time specified.
None No action is taken. The email remains in the Approval
Approve & Deliver The email is passed to the recipient.
Delete The email is deleted.
Bounce Back to
Sender
4. Enter a list of email recipients in the text box. Separate multiple email addresses with a
carriage return.
Note:
z
Make sure that the email recipients you enter are users that have administrative rights to the
SonicWALL Email Security appliance. If they do not have administrative access, they will not be
able to view the approval boxes when they receive email notification.
Box.
The email will automatically be bounced back to the
sender and removed from the approval box after the
specified length of time elapses. It will not be delivered
to the intended recipients.
Page 85

5. Select a notification frequency for this approval box. Approval box notification emails for this
approval box will be sent according to the schedule you choose here.
6. Write the emai
7. Click the A
Encryption
This section is used to configure the servers used to encrypt and decrypt messages. Once
configured, you may create a policy filter for which the action is to encrypt or decrypt messages.
A policy action of encrypt can be used to direct confidential outbound messages to the encryption
server. A policy action of decrypt can be used to direct confidential inbound messages to the
decryption server.
Record ID Definitions
A Record ID Definition can be used to detect specific IDs described by a series of generic patterns.
This section allows the administrator to predefine a cluster or clusters of letters and numbers into
logical sets of groups such as social security numbers, patient medical record numbers, or credit
card numbers. When these patterns are discovered, compliance actions can be taken to ensure that
the organization's privacy and security regulations are met. The filter will stop processing a
message after it finds the first matching Record ID Definition.
By default, SonicWALL Email Security provides the following Record ID Definitions pre installed:
z
ABA Bank Routing Number
z
Canadian Social Security Number
z
Credit Card Number
z
Date
z
Phone Number
z
Social Security Number
z
Zip Code
SonicWALL Email Security Administrator’s Guide|74
l subject line for this notification.
pply Changes button to save your changes to this approval box notification.
X To add a new record ID definition
1. Click the A
dd New Record ID Definition button. The Add Record ID Definition window
displays.
2. Name the Record ID you are creating.
3. Enter a ‘term’ including correct spacing, dashes or other symbols. Use the key to set values to
th
e sets of characters
4. Select Add Term to add the term to the Record ID.
5. Repeat adding terms for each
Record ID as necessary.
Page 86

Archiving
SonicWALL Email Security Administrator’s Guide|75
This section is used to configure how messages are archived. Once configured, you may create a
policy filter for which the action is “Route copy to archive”. Messages can be archived either to a
remote archive server or to a file system.
To have messages archived to a remote server, click the External SMTP Server radio button, and
enter the IP address of the server to which email messages should be routed for archiving in the
Route to Archive Email Address field.
X To have messages archived to a file system
1. Click the File System radio button.
2. Choose from the archive settings for both inbound and outbound emails.
3. Select a length of time for emails to be archived.
4. Click the Apply Changes button.
Page 87

User and Group Management
The User and Group Management function allows you to:
z
z
z
This chapter also describes how to assign a delegate to manage your Junk Box. For more
information, see “Assigning Delegates” on page 81.
Notes:
z
z
Working with Users
X To manage users in SonicWALL Email Security
1. Click the User & Group Management icon.
2. Select the Users link.
From this screen, you can sign in as an user, set their message management settings to corporate
default and edit their privileges in the system.
CHAPTER 7
Manage the list of users who can log in to the SonicWALL Email Security
Assign roles to individual users or groups of users
Set spam blocking options for groups of users
To manage users and groups from within this module, you need to have configured your
SonicWALL
configure LDAP settings and queries on the System > LDAP Configuration page.
SonicWALL Email Security queries your corporate LDAP server every hour to update users and
groups. Changes made to some settings in this section may not be reflected immediately on
SonicWALL
SonicWALL Email Security displays the Users and Groups window.
Email Security setup to synchronize with your organization’s LDAP server. You can
Email Security, but are updated within an hour.
Searching for Users
If there are too many users to display in a window, select the search option from the drop down
menu (equal, starts with, or contains), enter the search parameter in the blank field, and click Go.
The search speed varies according to the search parameter.
Sort
Click User Name or Primary Email to sort the list of users by that column.
Signing In as a User
Administrators can sign in as any user, see their Junk Box, and change the settings for that user. In
addition, you can sign in as a particular user to manage their delegates for them.
Page 88

SonicWALL Email Security Administrator’s Guide|77
Resetting User Message Management Setting to Default
Select one or more users and click Set Message Management to Default to restore all settings
to the defaults. Be aware that this overrides all individual user preferences the user might have set.
Edit User Rights
Administrators can assign different privileges to different users in the system by assigning them
pre-defined roles. To assign a role to an user, select the user and click on Edit User Rights button.
See “SonicWALL Email Security Roles” on page 78 for more information.
Import
The administrator can add multiple non-LDAP users by importing a list of names. The list is made
up of the primary addresses followed by the corresponding aliases of the users. The imported file
can be appended to the existing names, or overwrite them. The format of the file is tab-delimited.
One may use an Excel spreadsheet to generate a user list and save it as a tab-delimited file. To
import the list, click the browse button to locate the file and click Import.
Export
The administrator can download a tab-delimited list by clicking this button. The file generated lists
multiple non-LDAP users and can later be imported using the Import feature.
Add
The administrator can add individual non-LDAP users. Fill out the Primary Address and Alias fields
and click Add. Add an existing user with an alias and the user will have that alias added to them.
This is not dependent on LDAP status.
Note:
z
Users added in this way remain non-LDAP users. Their User Rights cannot be changed. Their
source will be listed as Admin. Users can edit their Junk Box setting only if the administrator
sets the Junk Box setting, Enable "Single Click" viewing of messages to "Full Access" in the
System > Junk Box Summary page.
Remove
The administrator can remove individual non-LDAP users. First select a non-LDAP user by using the
checkbox in front of the name, then click the Remove button to delete the name from the list.
Working with Groups
About LDAP Groups
This section describes how SonicWALL Email Security lets you query and configure groups of users
managed by an LDAP server. Most organization create LDAP groups on their Exchange server
according to the group functions, for example: a group configured on their Exchange server called
support represents the technical support groups in Exchange.
Configure LDAP groups on your corporate LDAP server before configuring the rights of users and
groups on SonicWALL Email Security in the User and Group Management screen.
SonicWALL Email Security allows you to assign roles and set spam-blocking options for user groups.
Though a user can be a member of multiple groups, SonicWALL Email Security assigns each user
to the first group it finds when processing the groups. Each group can have unique settings for the
aggressiveness for various spam prevention. You can configure each group to use the default
settings or specify settings on a per-group basis.
Page 89

SonicWALL Email Security Administrator’s Guide|78
Updates to groups settings in this section do not get reflected immediately. The changes will be
reflected the next time SonicWALL Email Security synchronizes itself with your corporate LDAP
server. If you want to force an update, click on the Refresh From LDAP button.
Add a New Group
To add a new group, Click Add New Group button. The Add Group window appears with a list of
all the groups to which you can assign roles. You can also add new groups in this window.
X To find a group
1. Search for the group you want by entering the name in the text box. Choose the search
mechanism and search speed: equals (fast), starts with (medium), or contains (slow). Click
Go to begin the search.
or
Scroll through the list of groups to locate the group you want to add.
2. Click the checkbox to include the group.
3. Click Add Group.
A message appears stating that the group was added successfully.
Removing a Group
1. Click the checkbox adjacent to the group(s) to remove.
2. Click the Remove Group button.
A success message appears.
Listing Group Members
1. Click the checkbox adjacent to the group to list.
2. Click the List Group Members button.
Users belonging to that group will be listed in a pop-up window.
SonicWALL Email Security Roles
Roles are a set of privileges that you can grant any individual user or group of users in the
SonicWALL Email Security. There are five defined roles that can be assigned to any user or group.
z
Admin: An administrator role has full rights over the system. Administrators are taken to the
system status page after logging in. They can log in as any user to change individual settings
and view Junk Boxes, manage the corporate Junk Box, and configure everything.
z
Help Desk: A Help Desk role can sign in as any user in the system, change their settings and
address books, or operate on the Junk Box. This role is not allowed to change any corporatewide settings and other server configurations.
z
Group Admin: A group administrator role is similar to the Help Desk role except that this role’s
privileges are limited to users for the group they are specified to administer. Group Admin role
is always associated with one or more groups added to the Spam Blocking Options for Groups
section.
z
Manager: A manager role has access to only system reports.
z
User: Using the user role, you can allow users in your organization to log in to
SonicWALL
window. In addition, you can also allow them access to other areas such as reports, message
management, and lists.
Email Security. SonicWALL Email Security displays their Junk Box as the opening
Page 90

SonicWALL Email Security Administrator’s Guide|79
Setting a LDAP Group’s Role
All members of a group get the role assigned to the group.
X To set the role of a group
1. Click the checkbox adjacent to the group to edit.
2. Click Edit Role
A window appears with the group’s name and current role.
3. Click the radio button for the appropriate role that you want to assign to the group.
4. Click Apply Changes.
A message appears stating that the group was changed successfully.
Setting Spam Blocking Options for LDAP Groups
All members of a group get the spam blocking options assigned to the group.
X To set spam blocking options for an LDAP group:
1. Click the checkbox adjacent to the group that you want to edit.
2. Click the Edit Junk Blocking Options button.
The Edit Spam Blocking Options for Group window appears.
Note:
z
The Adhere to Corporate/Group Defaults box is checked by default. By opening this screen, you
are now editing the spam blocking options for this one group. There is an Adhere to Corporate
Defaults check box at the very top of each sub-page in this dialog, this check box only applies
to the values on one page and for the current group only. For example, you can adhere to the
corporate defaults for the two pages User View Setup and Rules and Collaboration, and uncheck
the box and set custom settings for this one group for Foreign Language and then uncheck the
box for and set custom settings for this group for Spam Management.
To enable the specified group to have special privileges, deselect the Adhere to
Corporate/Group Defaults box.
User View Setup
This controls what options are available to the users in this group when they login to server using
their user name and password. You can change the settings on the following items:
z
Login Enabled—enables users in this group to log into their Junk Box
z
Allow/Block People, Companies, Lists, Foreign Languages, Rules—Allows or blocks
specified people, companies, foreign languages, and rules as these were configured in the user
setup.
z
Reports—let users in this group look at their Spam reports
z
Settings—enables users in this group to view their settings
z
Click the Allow the following types of user downloads from the SonicWALL Email Security
check box to enable users in this group to preview quarantined junk mail.
z
Click Apply.
Rules and Collaborative Settings
You can configure rules and collaborative settings for groups.
z
Choose the appropriate Collaborative level for this group.
You can adjust collaborative settings to customize the level of influence community input has
on enterprise spam blocking.
z
Choose the appropriate Aggressiveness level this group.
Page 91

SonicWALL Email Security Administrator’s Guide|80
z
For each category of spam, determine level and whether members of the group are allowed to
unjunk their Junk Boxes.
z
Click Apply Changes.
Configuring Foreign Language for Groups
You can determine the foreign language email that groups can receive.
z
Select Allow All to allow all users in a group to receive email in the specified language.
z
Select Block All to block all users in a group from receiving email in the specified language.
z
Click No opinion to permit email to be subject to the spam and content filtering of
SonicWALL
z
Click Apply Changes.
Email Security.
Managing the Junk Box Summary
You can manage the way in which you receive the Junk Box summary of emails.
X To manage the Junk Box for groups
1. Choose the default email frequency users to receive notification of junk email.
{
Choose the time of day to receive junk email.
{
Choose the day of the week to receive junk email.
{
Choose a plain or graphics rich summary.
{
Choose if sending the junk box summary to a delegate or delegates.
2. Click Apply Changes.
Spam Management
You can manage how groups deal with spam through the Spam Management window.
To manage messages marked as Spam or Likely Spam for this group:
Choose what you want done with messages:
z
Spam Filtering Off—passes all messages to users without filtering.
z
Permanently Delete
z
Bounce back to sender—send the message back to the sender.
Caution: in cases of self-replicating viruses that engage the sender’s address book, this can
inadvertently cause a denial of service to a non-malicious user.
z
Send to—you must specify an email address for the recipient.
z
Tag with—label the email to warn the user. The default is [JUNK].
Click Apply Changes.
Phishing Management
The phishing management window gives you the option of managing phishing and likely phishing
settings at a group level. Just like spam management options, it allows to you deal with phishing
differently for different groups. However, unlike spam management options, these settings cannot
be altered for individual users.
Virus Management
The virus management window gives you the option to manage virus and likely virus settings at a
group leve l . J u s t l i k e s p a m m a n a g e m e n t o p t i o n s , i t a l l o w s t o y o u d e a l w i t h v i r u s e s a n d l i k e l y v i r u s e s
differently for different groups. However, unlike spam management options, these settings can not
be altered for individual users.
Page 92

Assigning Delegates
Delegates are people who have full access to your individual Junk Box. This includes the ability to
change your Junk Box settings and manage the messages in your Junk Box. The most common use
of delegates is for an administrative assistant to act as a delegate of the CEO of a company. The
assistant frequently has access to all of the CEO's email, so the assistant now would have access
to the CEO's Junk Box and Junk Box settings as well.
X To assign a delegate to manage your Junk Box
1. Sign in to your individual user account; click the Sign in as any user link at the bottom of most
SonicWALL
2. Go to Settings > Delegate.
3. To add a delegate, click the Add button.
The Add New Delegate screen appears.
4. Enter the email address of the delegate in the text box.
5. Click Go.
A group of people who match the email address appear.
6. Click the checkbox adjacent to the preferred delegate.
7. Click Add Delegate.
To remove a delegate, click the Remove button on the Delegate window.
SonicWALL Email Security Administrator’s Guide|81
Email Security windows and sign in with your username and password.
Users and Groups in Multiple LDAP
The administrators of each organization can create a master LDAP group that encompasses all their
users and groups. That master group can then be used to administer Email Security settings across
the organization, even if there are multiple domains. With a group that contains all the members
of the LDAP, the administrator effectively administers the LDAP.
Users
When an administrator logs in and views the Users page, she sees all the email addresses that exist
on that instance of SonicWALL Email Security. The administrator can then narrow the view to only
the entries from that LDAP.
Note:
z
The Using Source selection allows administrators to access users who were added directly to
SonicWALL Email Security, and did not come in through an LDAP entry. These entries will not
be deleted with an LDAP deletion.
X To filter the user view setup by source
1. Log in as the Email Security administrator.
2. Click Users & Groups and then Users.
3. Scroll down to User View Setup.
4. From the Using Source drop-down menu, choose the LDAP source associated with the users
you want to view. Click Go.
You will see only the users associated with that LDAP source. The list of users can be sorted by user
name, primary email address, user rights, or source. If you have already filtered by source, sorting
by source will not retrieve anything outside the filter.
To sort a list of users, click on the column heading that describes the sort type. Click again to sort
in reverse order.
Page 93

SonicWALL Email Security Administrator’s Guide|82
Each LDAP user record has a checkbox next to it. To edit a user or users, check the box. If you select
one user, you can log in as that user or edit that user’s rights, for example, to elevate them to group
admin or help desk-level rights. If you select more than one user, you can only change their
message management style to the default style.
Because there are usually many records in an LDAP source, SonicWALL Email Security has provided
several ways of looking for a specific user.
X To find a specific user
1. Log in as the Email Security administrator.
2. Click Users & Groups and then Users.
3. Scroll down to User View Setup.
4. From the Find all users in column drop-down menu, choose either the username or the
primary email address to search on.
5. Choose which type of search you want. Exact matches are the fastest, but matches contain
your search term may help you more if you cannot remember the exact username or address
you are looking for.
6. Enter your search term.
7. Click Go. You will see the users who mach your search criteria.
If you want to add a user who does not appear in the automatically-generated list from your LDAP,
you can choose to manually add an account. If an LDAP is not provided, the user will be added to
the default LDAP source. You cannot add users to your LDAP from the SonicWALL Email Security
interface.
Groups
X To add a user
1. Log in as the Email Security administrator.
2. Click Users & Groups and then Users.
3. Scroll down to User View Setup.
4. Click Add.
5. Enter the user’s fully-qualified email address, choose a source (if any), and any aliases you
wish to associate with the user.
X To delete a user
1. Log in as the Email Security administrator.
2. Click Users & Groups and then Users.
3. Scroll down to User View Setup.
4. Select the user you wish to delete. Deleting a user will not remove the user’s LDAP entry, only
the entry in the Email Security.
5. Click Add.
Administering groups
Use groups within SonicWALL Email Security to incorporate or extend existing LDAP groups. You
can also change a group’s security role in SonicWALL Email Security and view the membership of a
group.
X To filter the group view by source
1. Log in as the Email Security administrator.
2. Click Users & Groups and then Groups.
3. Scroll down to Assign Roles to Groups Found in LDAP.
Page 94

SonicWALL Email Security Administrator’s Guide|83
4. From the Using Source drop-down menu, choose the LDAP source associated with the groups
you want to view. Click Go.
5. If you do not see the group you want, click the Add Group button. You can choose an existing
group from one of your sources. You cannot create a group that does not exist.
You can change each group’s role in SonicWALL Email Security. Email Security roles determine a
user’s permissions to change Email Security settings, including user settings.
X To change a group’s role
1. Log in as the Email Security administrator.
2. Click Users & Groups and then Groups.
3. Scroll down to Assign Roles to Groups Found in LDAP.
4. Select the box next to the group you want to change.
5. Click Edit Role.
6. In the pop-up window, choose the role you want that group to have. You can choose only one
role per group. If a user is in multiple groups, permissions are granted in the order in which
the groups are listed in the user’s profile.
7. Click Apply Changes. You will see a status update at the top of the page.
You can view the members of a group in SonicWALL Email Security.
X To view the members of a particular group
1. Log in as the Email Security administrator.
2. Click Users & Groups and then Groups.
3. Scroll down to Assign Roles to Groups Found in LDAP.
4. Select the box next to the group you want to see the membership of.
5. Click List Members.
You will see a pop-up window that lists the group’s membership by primary email address.
Setting Junk Blocking by Group
You can use the existing LDAP groups to configure the filtering sensitivity for different user groups.
For example, your sales group might need to receive email written in foreign languages.
X To set junk blocking by group
1. Log in as the Email Security administrator.
2. Click Users & Groups and then Groups.
3. Scroll down to Set Junk Blocking Options for Groups Found in LDAP.
4. Under Using LDAP, select your LDAP.
5. Select a group to edit.
6. Click Edit Junk Blocking Options. You will see the Group Junk Blocking Options window.
Follow the recommendations described in
Chapter 3, “Anti-Spam Anti-Phishing Techniques” .
Page 95

CHAPTER 8
Junk Box
The Junk Box allows you to review and process email messages that have been flagged as spam,
virus-infected, organization policy violations, or phishing. You can unjunk or release a falsely
identified message. When you or the recipient unjunks an incoming message,
SonicWALL Email Security adds the sender of the message to the recipient’s Allowed list and
delivers the email to the recipient.
The size of the junk box can grow rapidly. By default, the messages are stored in junk box for 30
days and deleted after that. You may need to customize this setting depending on your
organization’s policies and storage capacity on the shared data directory for messages are stored.
To change this setting, go to System > Default Message Management > Store in Junk Box
and delete after and choose a value between 1 and 180 days.
Messages in junk box can be quickly sorted and viewed by threat types. Messages that contain
definite spam, phishing, and viruses have red asterisks (*) adjacent to them. Messages that contain
likely spam, phishing, and viruses do not have any marks.
Type of Message Display
Spam (definite) *Spam
Likely Spam Spam
Phishing (definite) *Phishing
Likely Phishing Phishing
Virus (definite) *Virus
Likely Virus Virus
Page 96

Junk Box - Simple View
At the top of the junk box page, the number of days messages will be stored in junk box will be
displayed. The window also displays all the messages that have been categorized as the selected
threats. You can also:
z
Search for messages containing specific strings in the following fields: To, Subject, or From.
Search is not case sensitive.
z
Select specific date to search on any particular date.
Junk Box - Advanced View
Additional search capabilities give administrators the ability to support users more effectively, audit
more selectively, and dispose of unwanted messages with more granularity.
SonicWALL Email Security Administrator’s Guide|85
X To use Advanced Search
1. On the Junkb
2. To search for specific email threat types, clear the check boxes under the Search text box to
remove the information you want excluded.
3. Click Se
ox page, click the Advanced View button.
arch.
Page 97

SonicWALL Email Security Administrator’s Guide|86
Messages matching your search criteria are displayed. To move quickly through results pages, click
in the field that says “Page 1 of 14” and type the result page you want to view. You can also change
the number of messages displayed on each page. As an example, suppose you wanted to see only
messages that were Spam or Likely Spam. Clear all the checkboxes except the Show *Spam and
Show Likely Spam check boxes. Leave all the locations selected and click Search.
Outbound Messages Stored in Junk Box
To display the outbound messages in junk box, click on the Outbound tab. Outbound message
management detects messages sent by users in your organization that contain viruses, likely
viruses, and message that trigger policy alerts. Outbound message management also quarantines
outbound spam, phishing, and UAS.
Page 98

Working with Junk Box Messages
Unjunk
This button is available only on the inbound junk box. Select Unjunk to forward the selected
messages to the recipient and add the sender of each message to the recipient’s Allowed list.
Unjunking a message removes it from the Junk Box.
Send Copy To
Select Send Copy To to forward a copy of the messages (including attachments, if any) to the
specified email address. The message will still remain in the Junk Box. This button will only be
available to members of administrative group and only if they are allowed to view the messages in
the Junk Box.
Release
This button is available only on the outbound junk box. Select Release to release the selected
messages from the queue and forward them to the recipients. The message will be removed from
the Junk Box.
Delete
Deletes the selected messages. Messages are automatically deleted after a set number of days, so
there is no need to do this on a regular basis. Set the number of days messages are kept in the
junk box through the System > Default Message Management > Number of days to store
messages in the Junk Box field.
SonicWALL Email Security Administrator’s Guide|87
Message Details
You can scroll through the messages and click the Subject field to view more information about the
message in plain text. Depending on your user access set up, you might see the content of the
messages. To control who is allowed to preview the content of messages, go to System > User
View Setup.
Managing Junk Summaries
Both administrators and users receive Junk Box summaries listing the incoming email that
SonicWALL Email Security has classified as junk. From these email messages, users can choose to
view or unjunk an email if the administrator has configured these permissions.
From the Junk Box Summary window, users can determine the language, frequency, content, and
format of Junk Box summaries.
X To configure Junk Box Summaries:
1. Select the timing and frequency for email summaries.
2. Select the language for Junk Box summaries from the Language of summary email: list.
3.
Supported Search in Audit and Junkbox
The following types of search can be performed in the To, From, or Subject field.
Boolean Search
z
OR Operator: This is the default search. Add OR in between search words. The results will
contain any of these search words.
Page 99

SonicWALL Email Security Administrator’s Guide|88
z
AND Operator: Add ‘+’ before the search word (or) AND in between search words. Each result
must contain these words.
z
NOT Operator: Add ‘-’ before the search words (or) NOT in between search words. The results
must not contain these search words.
Wildcard Search
z
* operator: Add * to the middle or end of the word. This substitutes more than one character
to the search word, and attempts to perform a search on all possible words.
z
? operator: Add ? to the middle or end of the word. This substitutes one character and will find
the match for the word.
Note: Wildcard operators should be added to the middle or end of the text, rather than at that
beginning.
Phrase Search
A phrase is a group of words surrounded by “quotes.” The exact phrase will be searched.
Fuzzy Search
Add ‘~’ to the end of the word to search for the closest possible match. This search is useful when
search words have an error, or the exact spelling for the text is unknown.
Proximity Search
This searches for words closer to each other.
The syntax is “word 1 word2”~distance
Page 100

Status Reports
System Status
CHAPTER 9
Reports and Monitoring
SonicWALL Email Security allows you to view system status and data through the Reports and
Monitoring module. View statistics for different time periods on the local system or the mail transfer
agent (MTA). Monitor the flow of email traffic passing through Email Security in real time. Use SNMP
to send information to a monitoring agent.
This chapter contains the following sections:
z
“Status Reports” on page 89
z
“Reporting in SonicWALL Email Security” on page 93
z
“Advanced” on page 99
z
“SNMP Monitoring” on page 101
For a description of the different monitoring methods available in SonicWALL Email Security, see the
following sections:
z
“System Status” on page 89
z
“MTA Status” on page 89
z
“Real-Time System Monitor” on page 90
z
“Performance Monitoring” on page 90
MTA Status
The System Status window shows the status of SonicWALL Email Security and the status of
connections with other systems that it needs to communicate with. A green check indicates the
system is functioning as expected and a red X indicates it is not.
The lower half of the System Status window in the Control Center Status section shows system
statistics, including the disk space used b the Junk Box, free disk space on the data drive, and free
disk space on the install drive.
The MTA status page gives details on the status of the mail transfer agent (MTA) if one or more
paths have been configured to act as MTAs
The following options are available on this screen:
z
MTA Status
{
One or more paths are configured to be MTAs - Will be set to Yes if one or more
paths have been configured to act as MTAs; will be set to No otherwise.
{
MlfMTA service is running - If the MTA is running as expected, this field will show a
checkmark in a green circle. If the MTA is not running as expected, the field will show an X
in a red circle.
 Loading...