

Page 1

10.5.1 Getting Started GuideSonicWALL / Aventail Secure Remote Access
Page 2

Thank You
®
For Selecting SonicWALL
SonicWALL offers a wide range of high performance network securit y , content security
for Web and e-mail security, secure remote access, continuous data protection, and
management and reporting solutions. To take a deeper look at all the SonicWALL
solutions please visit http://www.sonicwall.com/products/. To ensure the optimal
performance and operation, visit https://www.mysonicwall.com to register your
appliance and download the latest firmware, product documentation, and release
notes.
Protection.
E-Class Support 24x7
In case you need assistance, contact our Global Support Center at the numbers listed
here: http://www.sonicwall.com/us/support/contact.html. Have the serial number of
your appliance available so that we can validate your contr act and begin resolving any
issues you may have.
If you are located in the Americas or Asia Pacific:
Call our toll-free Enterprise Support phone number at 1-866-360-1949 (your call will
be transferred to SonicWALL's E-Class Technical Support team), or contact us at
E-ClassSupport@SonicWALL.com.
If you are located in Europe, the Middle East, or Africa:
Call the phone number listed for your country, and then select the “Enterprise
Support” option when prompted so that your call is transferred to our Enterprise
Technical Support team.
Page 3

SonicWALL Aventail E-Class SRA Getting Started Guide | i
Table of Contents
Registering and Licensing Your Appliance. . . . . . . . . . . . . . . . . . . . . . . . . . . . . . . . . . . . v
Chapter 1
Introduction . . . . . . . . . . . . . . . . . . . . . . . . . . . . . . . . . . . . . . . . . . . . . . . . . . . . . . . . . . . 1
Introduction to SonicWALL Aventail Secure Remote Access . . . . . . . . . . . . . . . . . . . . . . . . . . .1
Key SSL VPN Concepts and SonicWALL Aventail Features . . . . . . . . . . . . . . . . . . . . . . . . . . . .2
Resources. . . . . . . . . . . . . . . . . . . . . . . . . . . . . . . . . . . . . . . . . . . . . . . . . . . . . . . . . .3
Users and Groups . . . . . . . . . . . . . . . . . . . . . . . . . . . . . . . . . . . . . . . . . . . . . . . . . . . .3
Authentication. . . . . . . . . . . . . . . . . . . . . . . . . . . . . . . . . . . . . . . . . . . . . . . . . . . . . . .3
Communities. . . . . . . . . . . . . . . . . . . . . . . . . . . . . . . . . . . . . . . . . . . . . . . . . . . . . . . .4
Access Policy. . . . . . . . . . . . . . . . . . . . . . . . . . . . . . . . . . . . . . . . . . . . . . . . . . . . . . . .5
End Point Control (EPC) . . . . . . . . . . . . . . . . . . . . . . . . . . . . . . . . . . . . . . . . . . . . . . . .5
SSL and Encryption . . . . . . . . . . . . . . . . . . . . . . . . . . . . . . . . . . . . . . . . . . . . . . . . . . .6
Single Sign-On . . . . . . . . . . . . . . . . . . . . . . . . . . . . . . . . . . . . . . . . . . . . . . . . . . . . . .7
Higher Availability and Capacity. . . . . . . . . . . . . . . . . . . . . . . . . . . . . . . . . . . . . . . . . . .8
Sharing Configuration Data. . . . . . . . . . . . . . . . . . . . . . . . . . . . . . . . . . . . . . . . . . . . . .8
Role-Based Administration . . . . . . . . . . . . . . . . . . . . . . . . . . . . . . . . . . . . . . . . . . . . . .9
System Monitoring and Logging. . . . . . . . . . . . . . . . . . . . . . . . . . . . . . . . . . . . . . . . . . .9
SonicWALL Aventail Secure Remote Access Components. . . . . . . . . . . . . . . . . . . . . . . . . . . . .9
Client Components and Access Methods . . . . . . . . . . . . . . . . . . . . . . . . . . . . . . . . . . . .10
End Point Control. . . . . . . . . . . . . . . . . . . . . . . . . . . . . . . . . . . . . . . . . . . . . . . . . . . .14
Virtual Assist. . . . . . . . . . . . . . . . . . . . . . . . . . . . . . . . . . . . . . . . . . . . . . . . . . . . . . .14
Administrator Components . . . . . . . . . . . . . . . . . . . . . . . . . . . . . . . . . . . . . . . . . . . . .15
Chapter 2
Planning Your VPN . . . . . . . . . . . . . . . . . . . . . . . . . . . . . . . . . . . . . . . . . . . . . . . . . . . . . 19
Who Will Access Your VPN? . . . . . . . . . . . . . . . . . . . . . . . . . . . . . . . . . . . . . . . . . . . . . . . . 19
What Types of Resources Should Users Have Access To? . . . . . . . . . . . . . . . . . . . . . . . . . . .20
How Will Users Access Your Resources? . . . . . . . . . . . . . . . . . . . . . . . . . . . . . . . . . . . . . . . 20
Security Administration. . . . . . . . . . . . . . . . . . . . . . . . . . . . . . . . . . . . . . . . . . . . . . . . . . . 22
Defining Resources . . . . . . . . . . . . . . . . . . . . . . . . . . . . . . . . . . . . . . . . . . . . . . . . . . 22
Managing Access Control with an Access Policy . . . . . . . . . . . . . . . . . . . . . . . . . . . . . . .25
End Point Control . . . . . . . . . . . . . . . . . . . . . . . . . . . . . . . . . . . . . . . . . . . . . . . . . . . . . . .28
Advanced EPC . . . . . . . . . . . . . . . . . . . . . . . . . . . . . . . . . . . . . . . . . . . . . . . . . . . . . .29
Putting It All Together: Using Realms and Communities . . . . . . . . . . . . . . . . . . . . . . . . . . . .29
Chapter 3
Preparing for Installation and Deployment . . . . . . . . . . . . . . . . . . . . . . . . . . . . . . . . . . 33
Installation Overview . . . . . . . . . . . . . . . . . . . . . . . . . . . . . . . . . . . . . . . . . . . . . . . . . . . .33
Step 1: Make a note of your serial number and authentication code. . . . . . . . . . . . . . . . . 33
Step 2: Rack-mount the appliance. . . . . . . . . . . . . . . . . . . . . . . . . . . . . . . . . . . . . . . .34
Page 4

ii | Table of Contents
Step 3: Connect the appliance and turn it on . . . . . . . . . . . . . . . . . . . . . . . . . . . . . . . .34
Step 4: Enter basic network settings . . . . . . . . . . . . . . . . . . . . . . . . . . . . . . . . . . . . . .34
Step 5: Run Setup Wizard. . . . . . . . . . . . . . . . . . . . . . . . . . . . . . . . . . . . . . . . . . . . . .35
Step 6: Connect to the Aventail Management Console (AMC) . . . . . . . . . . . . . . . . . . . . .36
Step 7: Create a MySonicWALL Account . . . . . . . . . . . . . . . . . . . . . . . . . . . . . . . . . . . . 37
Verifying Your Firewall Policies. . . . . . . . . . . . . . . . . . . . . . . . . . . . . . . . . . . . . . . . . . . . . .37
Deployment Overview. . . . . . . . . . . . . . . . . . . . . . . . . . . . . . . . . . . . . . . . . . . . . . . . . . . .38
Deploying Aventail WorkPlace . . . . . . . . . . . . . . . . . . . . . . . . . . . . . . . . . . . . . . . . . . .39
Deploying the SonicWALL Aventail Access Methods . . . . . . . . . . . . . . . . . . . . . . . . . . . . 40
Deploying an End Point Control Agent . . . . . . . . . . . . . . . . . . . . . . . . . . . . . . . . . . . . .41
Chapter 4
Common VPN Configurations . . . . . . . . . . . . . . . . . . . . . . . . . . . . . . . . . . . . . . . . . . . . . 43
Deployment Scenario: Remote Access for Employees and Partners . . . . . . . . . . . . . . . . . . . .43
Establishing an Authentication Realm. . . . . . . . . . . . . . . . . . . . . . . . . . . . . . . . . . . . . .45
Identifying Users . . . . . . . . . . . . . . . . . . . . . . . . . . . . . . . . . . . . . . . . . . . . . . . . . . . . 47
Adding Resources . . . . . . . . . . . . . . . . . . . . . . . . . . . . . . . . . . . . . . . . . . . . . . . . . . .47
Creating Zones of Trust . . . . . . . . . . . . . . . . . . . . . . . . . . . . . . . . . . . . . . . . . . . . . . .48
Customizing WorkPlace. . . . . . . . . . . . . . . . . . . . . . . . . . . . . . . . . . . . . . . . . . . . . . . .51
Creating an Employee Community . . . . . . . . . . . . . . . . . . . . . . . . . . . . . . . . . . . . . . . .54
Creating a Partner Community . . . . . . . . . . . . . . . . . . . . . . . . . . . . . . . . . . . . . . . . . .57
Access Control Lists . . . . . . . . . . . . . . . . . . . . . . . . . . . . . . . . . . . . . . . . . . . . . . . . . .58
Testing the Deployment Scenario. . . . . . . . . . . . . . . . . . . . . . . . . . . . . . . . . . . . . . . . . . . . 59
Other Remote Access VPN Scenarios . . . . . . . . . . . . . . . . . . . . . . . . . . . . . . . . . . . . . . . . .61
Providing Access to Web Resources . . . . . . . . . . . . . . . . . . . . . . . . . . . . . . . . . . . . . . .61
Web-Based File Access to Entire Networks . . . . . . . . . . . . . . . . . . . . . . . . . . . . . . . . . .62
Remote Access for Mobile Users. . . . . . . . . . . . . . . . . . . . . . . . . . . . . . . . . . . . . . . . . .63
Additional Partner VPN Scenarios. . . . . . . . . . . . . . . . . . . . . . . . . . . . . . . . . . . . . . . . . . . .64
Access to a Specific Web Resource Using an Alias . . . . . . . . . . . . . . . . . . . . . . . . . . . . . 64
Web-based Access to a Client/Server Application. . . . . . . . . . . . . . . . . . . . . . . . . . . . . .64
End Point Control Scenarios. . . . . . . . . . . . . . . . . . . . . . . . . . . . . . . . . . . . . . . . . . . . . . . . 64
Quarantining Employees on Untrusted Systems. . . . . . . . . . . . . . . . . . . . . . . . . . . . . . .65
Secure Desktop Emulator for Partners . . . . . . . . . . . . . . . . . . . . . . . . . . . . . . . . . . . . .65
Denying Access . . . . . . . . . . . . . . . . . . . . . . . . . . . . . . . . . . . . . . . . . . . . . . . . . . . . . 65
Access Policy Scenarios. . . . . . . . . . . . . . . . . . . . . . . . . . . . . . . . . . . . . . . . . . . . . . . . . . .66
Application-Specific Scenarios . . . . . . . . . . . . . . . . . . . . . . . . . . . . . . . . . . . . . . . . . . . . . . 66
Providing Access to Outlook Web Access (OWA) . . . . . . . . . . . . . . . . . . . . . . . . . . . . . .67
Providing Access to Voice Over IP (VoIP) . . . . . . . . . . . . . . . . . . . . . . . . . . . . . . . . . . .67
Providing Access to Windows Terminal Services or Citrix Resources . . . . . . . . . . . . . . . . .68
Authentication Scenarios. . . . . . . . . . . . . . . . . . . . . . . . . . . . . . . . . . . . . . . . . . . . . . . . . . 68
Using Multiple Realms vs. a Single Real m . . . . . . . . . . . . . . . . . . . . . . . . . . . . . . . . . . . 68
Access Component Provisioning. . . . . . . . . . . . . . . . . . . . . . . . . . . . . . . . . . . . . . . . . . . . . 69
Deploying the Same Agents to All Users . . . . . . . . . . . . . . . . . . . . . . . . . . . . . . . . . . . .69
Deploying Different Agents to Different Users . . . . . . . . . . . . . . . . . . . . . . . . . . . . . . . .70
Page 5

SonicWALL Aventail E-Class SRA Getting Started Guide | iii
Chapter 5
Safety and Regulatory Information . . . . . . . . . . . . . . . . . . . . . . . . . . . . . . . . . . . . . . . . 71
Safety Information for E-Class SRA EX6000 . . . . . . . . . . . . . . . . . . . . . . . . . . . . . . . . . . . .71
Lithium Battery Warning. . . . . . . . . . . . . . . . . . . . . . . . . . . . . . . . . . . . . . . . . . . . . . . 72
Cable Connections . . . . . . . . . . . . . . . . . . . . . . . . . . . . . . . . . . . . . . . . . . . . . . . . . . . 73
Sicherheit Information für das E-Class SRA EX6000 Gerät. . . . . . . . . . . . . . . . . . . . . . . . . . .73
Hinweis zur Lithiumbatterie. . . . . . . . . . . . . . . . . . . . . . . . . . . . . . . . . . . . . . . . . . . . .74
Kabelverbindungen . . . . . . . . . . . . . . . . . . . . . . . . . . . . . . . . . . . . . . . . . . . . . . . . . .74
Safety Information for E-Class SRA EX7000 . . . . . . . . . . . . . . . . . . . . . . . . . . . . . . . . . . . .75
Lithium Battery Warning. . . . . . . . . . . . . . . . . . . . . . . . . . . . . . . . . . . . . . . . . . . . . . . 76
Cable Connections . . . . . . . . . . . . . . . . . . . . . . . . . . . . . . . . . . . . . . . . . . . . . . . . . . . 76
Sicherheit Information für das E-Class SRA EX7000 Gerät. . . . . . . . . . . . . . . . . . . . . . . . . . .77
Hinweis zur Lithiumbatterie. . . . . . . . . . . . . . . . . . . . . . . . . . . . . . . . . . . . . . . . . . . . .78
Kabelverbindungen . . . . . . . . . . . . . . . . . . . . . . . . . . . . . . . . . . . . . . . . . . . . . . . . . .78
FCC Part 15 Class A Notice . . . . . . . . . . . . . . . . . . . . . . . . . . . . . . . . . . . . . . . . . . . . . . . .79
Page 6

iv | Table of Contents SonicWALL Aventail E-Class SRA Getting Started Guide | v
Page 7

Registering and Licensing Your Appliance
Before getting started with the installation of your SonicWALL Aventail
appliance, you must follow these steps, which are described in more detail
below:
z Create a MySonicWALL account, if you don't already have one. Y ou nee d
an account in order to register your SonicWALL Aventail E-Class SRA.
Note: MySonicWALL registration information is not sold or shared with
any other company.
z Register your device on MySonicWALL. Registration provides access to
essential resources, such as your license file, firmware updates,
documentation, and technical support information.
z Use your MySonicWALL account to retrieve the license file for your
SonicWALL Aventail E-Class SRA.
z Import your license file using the Aventail Management Console (AMC).
Creating a MySonicWALL Account
To create a MySonicWALL account, just complete the online registration:
1. In your Web browser, go to https://www.mysonicwall.com.
2. On the user login page, follow the link for users who are not yet
registered.
3. Enter your account information, personal information, and preferences,
and then click Submit. Be sure to use a valid email address.
4. Follow the prompts to finish creating your account. SonicWALL will send
a subscription code to the email address you entered in step 3.
5. When you return to the login screen, log in with your new username and
password.
6. Confirm your account by entering the subscription code you received by
email.
Page 8

vi | Registering and Licensing Your Appliance
You have now created and logged into your MySonicWALL account. Your next
steps are to register your appliance and retrieve its lice nse file.
Appliance Registration for New Users
To register your appliance, log in to your MySonicWALL account:
1. In your Web browser, go to https://www.mysonicwall.com and log in
with your username and password.
2. Locate your software serial number and authentication code, which
you’ll find in one or both of these places, depending on your appliance
model:
{
Printed on your appliance label
{
Displayed on the General Settings page once you complete setup
and start the Aventail Management Console
3. Enter a friendly name for this appliance.
4. Click Register to continue and follow the online prompts to fill out the
survey and complete the registration process.
The serial number and authentication code are also displayed in the Aventail
Management Console (AMC) once you connect to your appliance. Click
General Settings in AMC, and then go to the Licensing area. Printed
instructions for getting connected and initial system configuration are
included in your product box.
Retrieving Your SonicWALL Aventail License
To retrieve the license file for your appliance, log in to your MySonicWALL
account:
1. In your Web browser, go to https://www.mysonicwall.com/, log in with
your username and password, and then click the link for the appliance
that requires a license.
2. On the Service Management page, follow the link for the license file.
3. Save the license file (.xml) to your computer. After you get your
appliance up and running you must import this license file using the
Aventail Management Console.
Page 9

SonicWALL Aventail E-Class SRA Getting Started Guide | vii
Importing Your SonicWALL Aventail License
You can retrieve an initial user license from MySonicWALL that is valid for one
user (the administrator plus one end user) for an unlimited number of days.
To become familiar with the Aventail Management Console (AMC) and test it
in your environment with additional users, request a lab license.
After initial setup and testing, download your appliance license file from
https://www.mysonicwall.com and then import it to the appliance. The
number of concurrent users supported with your appliance license varies,
depending on the appliance model you have:
z SRA EX7000 and EX-2500—For up to 2,000 concurrent users; can be
used in an HA pair
z SRA EX6000 and EX-1600—For up to 250 users; can be used in an HA
pair
z SRA EX-750—For up to 50 users
The process for importing an appliance license file is described in detail in the
online help for the Aventail Management Console (AMC). Briefly, the steps
are as follows:
1. From the main navigation menu in AMC, click General Settings, and
then click the Edit link in the Licensing area. The Manage Licenses
page appears.
2. Click Import License.
3. In the License file box, type the path for the license file you retrieved
from your MySonicWALL account, or click Browse to locate it.
4. Click Upload, and then apply the change by clicking the Pending
changes link in the upper-right corner.
Note: When you upload a Spike License, the countdown of the number
of days it is valid begins once you activate it and apply the pending
change in AMC. Don't click the Activate link until you are ready to start
using it.
Page 10

viii | Registering and Licensing Your Appliance
Page 11

SonicWALL Aventail E-Class SRA Getting Started Guide | 1
Chapter 1
Introduction
This chapter provides a brief overview of the features of the SonicWALL
Aventail SSL VPN appliance and some of the key concepts associated with a
virtual private network. For detailed information and step-by-step
procedures describing how to install and configure the appliance, see the
separate Installation and Administration Guide or online help for the A ventail
Management Console (AMC).
Introduction to SonicWALL Aventail Secure Remote Access
The SonicWALL Aventail appliance provides secure remote access—to Web
applications, client/server applications, and file shares—to employees,
business partners, and customers. All traffic is encrypted using Secure
Sockets Layer (SSL) to protect it from unauthorized users.
The appliance makes applications available using different access methods
and devices on a wide range of platforms, including Windows, Macintosh, and
Linux. You might use the appliance to:
z Create a remote access VPN that gives remo te employees secu re access
to private company applications such as email.
z Create a business partner VPN that provides designated suppliers with
access to an internal supply chain application.
Page 12
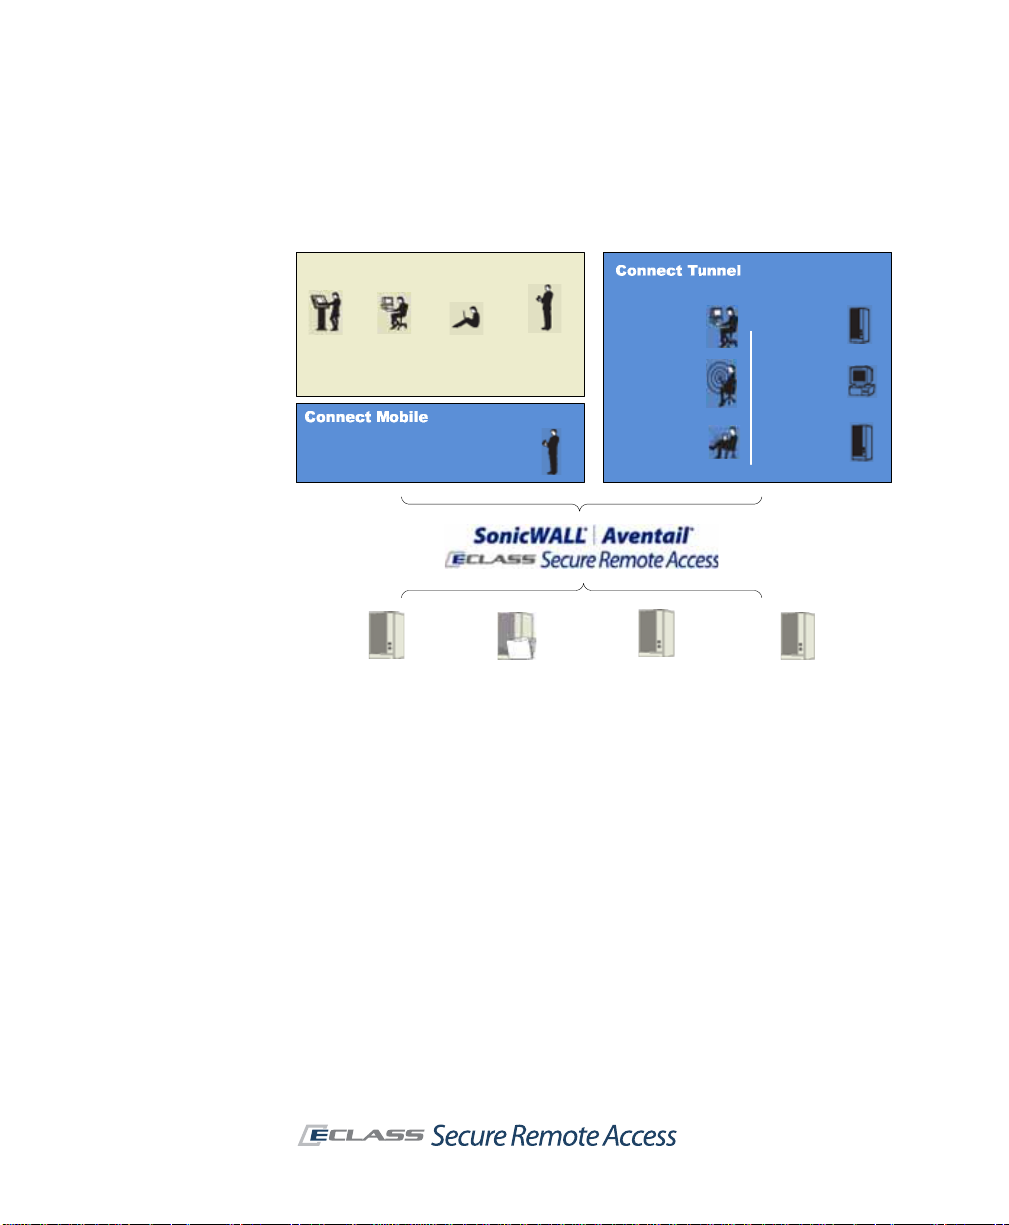
2 | Chapter 1 - Introduction
Aventail WorkPlace
Kiosk
users
Business
partners
Teleworkers
PDA
smartphone
users
Windows
servers
Windows
desktops
Branch office
applications
Wireless
LANs
Internal
users
IT-managed
devices
Windows Mobile-powered devices
Web-based
applications
File shares
Thin client/server
applications
Traditional client/
server applications
As the administrator , you determine the resources that users have access to,
and the SSL VPN transparently and dynamically uses the access methods
appropriate for those resources.
Key SSL VPN Concepts and SonicWALL Aventail Features
The appliance’s access control enables you to define policy and control access
in broad or very specific terms. To increase efficiency, the appliance is
managed from a Web-based management console. With the Aventail
Management Console (AMC), you can configure the appliance from a
standard Web browser, and centrally manage and distribute policy.
This section describes the essential concepts that you should become familiar
with before installing, configuring, and managing the SonicWALL Aventail
SRA appliance.
Page 13

SonicWALL Aventail E-Class SRA Getting Started Guide | 3
Resources
The appliance manages a wide variety of corporate resources in three main
categories:
z Web resources—Applications or services that run over the HTTP or
HTTPS protocol, such as Microsoft Outlook Web Access
z Client/server resources—Ent erprise applications that run o ver TCP/IP,
such as Citrix, and Voice over Internet Protocol (VoIP) telephony
applications
z File shares—Network servers or computers containing shared folders
and files
When specifying a resource type, keep the intended audience in mind. For
example, you can give business partners narrow access to a Web application
by defining a URL as a resource (and even “alias” the host name for an extra
measure of security). To give remote employees broader access, you could
define the network segment in which the Web application is located as a
domain, IP range, or subnet resource. Employees would then have access to
all of the Web resources in that domain.
Users and Groups
A user is an individual who needs access to resources on your network, and
a group is a collection of users. After you’ve created users or user groups on
the appliance that are mapped to an external authentication server , you can
reference them in access control rules to permit or deny them access to
resources. You can even form dynamic groups if you want to reference a user
population that isn’t already defined in the external directory.
Authentication
Authentication is the process of verifying a user’s identity. To manage user
authentication with the appliance, use AMC to define one or more external
authentication servers (also known as dire ctory serv ers or use r stores) th at
contain the credentials for your user population. The actual management of
the user information is still done on your authentication servers; the
appliance simply makes use of that information to authenticate us ers.
Creating an authentication realm in AMC also involves specifying an
authentication method (username/password or one-time password, token or
smart card, or digital certificate).
Page 14

4 | Chapter 1 - Introduction
The appliance supports the following directories and authentication me thods:
z LDAP with username/password
z Microsoft Active Directory with username/password, configured with
either a single root domain, or one or more subordinate (child) domains
z RADIUS with username/password or token-based authentication (such
as SecurID or SoftID)
z Public Key Infrastructure (PKI) with digital certificate
z RSA Authentication Manager server authentication using token-based
user credentials
z RSA ClearTrust with credentials
z Local users with username/password (used primarily for testing
purposes and not recommended in a production environment)
An authentication realm is what users log in to on the appliance to gain
access to your resources. If your organization has only one authentication
server, you would create one realm on the appliance. If you have several
authentication servers, you can create a realm for each of them, o r set up
pairs of servers for chained authentication. T o take a more granular approach
to deployment and security , you can further subdivide the user population of
a realm into communities.
Communities
Communities are a cornerstone of the appliance’s approach to deployment
and security. They are used to aggregate users and groups for the purpose
of deploying access agents and controlling the end point, and can also be
referenced in access control rules.
You can create communities for specific types of users, such as remote
employees or business partners, or take a more granular approach and
create communities of users in a particular department or location.
For example, employees who require broad access to resources and
applications on your network could be assigned to a community that offers
the network tunnel client as an access method. To make sure that they are
using laptops managed by your IT department, specify which End Point
Control zones are available to users in this community.
You may have another group of users who require only limited access to
resources because they’re logging in from public kiosks or other non-secure
locations. To give these two different groups access to your network
resources, you could create separ ate communities, each configured to deploy
Page 15

the appropriate access agents, and (in the case of users with non-secure
devices) use End Point Control to prevent sensitive data from being left on
the device.
Access Policy
An access policy is a set of rules that defines the applications or network
resources that users or groups are given access to throug h the appliance.
Access to a resource can be based on several criteria. Most rules control
access based on who the user is—that is, the user’s name or group
membership—and the destination resource. You can use other criteria in
access control rules, such as the access method for a resource, the user’s
network address, the zone of trust, or the date and time of the connection
request.
The appliance gives you wide latitude in creating access control rules,
depending on whether your organization’s security policy is relatively
permissive or demands stringent control. For example, if your VPN is
accessed only by highly trusted employees who are using computers
managed by your IT department, you could create an open access policy that
defines your entire network domain as a resource and grants broad access
to your employees.
Conversely, if you are providing access to a diverse group of users with
varying degrees of access privileges, or who connect from less-secure
devices such as public kiosks, you might use an access policy that defines
individual resources and establishes more granular access requirements.
As the network changes over time, so should your access control rules.
SonicWALL Aventail E-Class SRA Getting Started Guide | 5
End Point Control (EPC)
Traditional VPN solutions typically provide access only from the relative
safety of an IT-managed device. In that environment, the major security
concern is unauthorized net work access. Because an SSL VPN enables access
from any Web-enabled system, it may bring the additional risk of computers
in untrusted environments, such as a kiosk at an airport or hotel, or an
employee-owned computer.
Page 16

6 | Chapter 1 - Introduction
The appliance’s EPC configuration options give you granular control over VPN
access using device profiles and zones to protect sensitive data and ensure
that your network is not compromised:
z A device profile is a set of attributes that characterize the device
requesting the connection, such as a Windows domain name, the
presence of a certain software program, a registry entry , or other unique
characteristics.
z An End Point Control zone classifies a connection request based on the
presence or absence of a device profile. The zone in which a device is
then placed controls the provis ioning of data protection components and
can be used to determine which resources are available. A device can be
placed in a Standard zone, a Quarantine zone (with instructions on
installing the required security programs), or in a Deny zone, where the
user is denied access to the network.
SSL and Encryption
The SonicWALL Aventail appliance encrypts information using the Secure
Sockets Layer (SSL) protocol. SSL is an authentication and encryption
protocol that uses a key exchange method to establish a secure environment
in which all data exchanged is encrypted to protect it from eavesdropping
and alteration.
The appliance uses SSL certificates to validate the appliance’s identity to
connecting users, and to provide a public key to secure information that the
client computer sends to the server. The appliance requires a minimum of
two SSL certificates:
z The appliance services use a certificate to secure user traffic.
z The Aventail Management Console (AMC) uses a certificate to secure
management traffic.
There are two types of certificates: self-signed and commercial. With a selfsigned SSL certificate, the appliance identifies itself with a certificate that has
not been signed by a commercial CA, and the associated private key data is
encrypted using a password. AMC uses a self-signed certificate.
A self-signed certificate can also be a wildcard certificate, allowing it to be
used by multiple servers which share the same IP address and certificate, but
have different FQDNs. For example, a wildcard certificate such as
*.company.com could be used for iPhone acce ss at iphonemail.company.com
and for VPN access at vpn.company.com.
Page 17

SonicWALL Aventail E-Class SRA Getting Started Guide | 7
You can al so configure an aut hentication s erver to tru st an intermediate CA.
For example, you could create a root certificate signing auth ority on a system
that is not connected to the corporate network. You can then issue a set of
trusted intermediate signing author it y certificates to be deployed in various
sectors of the network (often by department or organizational unit).
Although a self-signed SSL certificate is secure, you may want to secure user
traffic with a certificate from a commercial certificate authority (CA), such as
VeriSign.
When deciding which type of certificate to use for the servers, consider who
will be connecting to the appliance and how they will use resources on your
network:
z If business partners are connecting to Web resources through the
appliance, they will likely want some assurance of your identity before
performing a transaction or providing confidential information. In this
case, you would probably want to obtain a certi ficate from a commerci al
CA for the appliance.
z On the other hand, employees connecting to W eb resour ces may tr ust a
self-signed certificate. Even then, you may want to obtain a third-party
certificate so that users are not prompted to accept a self-signed
certificate each time they connect. Or, add the self-signed certificate to
the user’s list of Trusted Root Certificate Authorities in the Web browser.
Single Sign-On
Single sign-on (SSO) is an option that controls whether user credentials are
forwarded to back-end W eb resources. Configuring the appliance to use SSO
prevents the user from having to log in multiple times (once to get to the
appliance, and again to access an application resource).
The appliance supports several types of Web-based SSO:
z Basic authentication forwarding is a widely supported form of
authentication forwarding, but is not very secure because it sends
passwords in the clear across the network. The appliance can be
configured to send each user’s unique authentication credentials, or
“static” credentials (that is, the same credentials for all users). Basic
authentication forwarding is configured within a Web application profile,
which is assigned to one or more application resources in AMC.
z NTLM authentication forwarding provides a secure method for
sending Windows network credentials to a Microsoft IIS (Internet
Information Services) Web server. NTLM (Windows NT LAN Manager , also
known as Windows NT challenge/response authentication) uses a
Page 18

8 | Chapter 1 - Introduction
challenge/response mechanism to securely authenticate users without
sending passwords in the clear across the network. NTLM authentication
forwarding passes a Windows domain name along with the user’s
authentication credentials.
z RSA ClearTrust is a third-party product that provides a centralized
mechanism for administering authentication and single sign-on. You can
configure the appliance to receive user authentication credentials and
forward them to any back-end Web resources it is protecting.
Higher Availability and Capacity
A high-availability cluster of SonicWALL Aventail appliances is designed to
prevent a single point of failure by providing integrated load balancing,
stateful user authentication failover, and centralized administration. The
cluster is administered from a single point and appears as a single appliance
to users, applications, and the network.
A two-node cluster supports an Active/Active configuration, meaning that
both nodes in the cluster are actively sharing the user load at any given time:
z The SonicWALL Aventail EX6000 or EX-1600 appliance supports a
two-node cluster for up to 250 users.
z In a similar two-node configuration with internal load-balancing, the
EX7000 or EX-2500 can handle up to 2,000 users.
To increase capacity and support more users, the SonicWALL Aventail
EX7000 and EX-2500 appliances support the clustering of up to eight
appliances using an external load balancer.
Sharing Configuration Data
To keep settings matched up, you can replicate and distribute configuration
data to a group of Aventail appliances. For example, you might have
appliances behind an external load-balancer supporting thousands of users,
or appliances in different locations that must share configurations. This is not
a merging of data: some of the settings on the receiving appliances are
overwritten (security policy and CA certificates, for example), and others are
not (network settings).
When you define a collection of appliances that will share settings, the nodes
in the collection communicate over the internal interface using SSL. They
operate in peer-to-peer mode: replication can be initiated from any system
that knows the shared secret for a collection. This is in contrast to the
synchronization that occurs in a high-availability cluster of Aventail
appliances, in which one node is designated the master.
Page 19

SonicWALL Aventail E-Class SRA Getting Started Guide | 9
Role-Based Administration
Permission to manage the appliance and perform specific administration
functions using AMC is assigned in AMC. The primary administrator defines
the roles and identities of all secondary administrators, setting the
permission levels for each administrative role, and creating a passwordprotected account for each administrator.
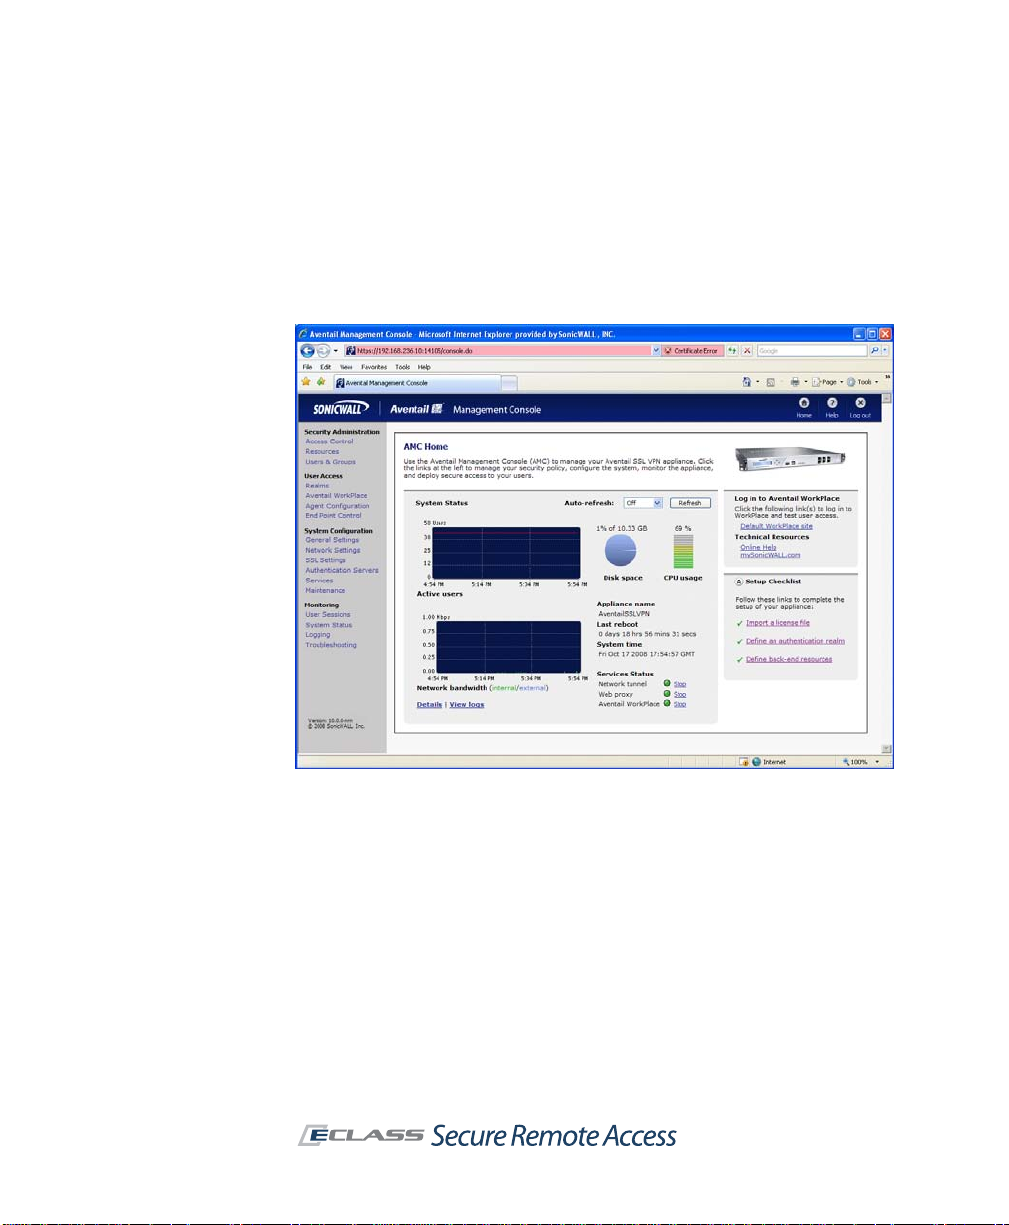
System Monitoring and Logging
System monitoring and logging features allow administrators to view both
real-time and historical data about the performance of the appliance and its
access services, as well as user activity.
The AMC home page displays a graphical summary of the current number of
active users, network bandwidth, disk space usage, and CPU usage. More
detailed views of this graphical data are available in hourly , daily , weekly , and
monthly increments.
If a user is experiencing trouble—for example, he is logged in but cannot
establish a connection or is denied access to resources—you can view his
session details to diagnose the problem. You can quickly see why a user’s
device is classified into a particular zone, and what policy rules are applied,
editing them as needed.
If you have an SMTP (Simple Network Management Protocol) tool, you can
use it to monitor the appliance as an SNMP agent. The appliance provides a
variety of management data in MIB (Management Information Base) format.
The AMC log viewer provides a detailed view of appliance, user access, and
other activities contained in a series of log files. The viewer allows you to
customize the display of log message data using sorting, searching, and
filtering options. If you need to perform additional analysis of the log
message data, or display the data differently than how it appears in the log
viewer, you can export data to comma-separated values (.csv) files for use
by another application, such as Microsoft Excel.
SonicWALL Aventail Secure Remote Access Components
Your SonicWALL A ventail SRA appliance consists of several administrator and
client components. For Web-based access, when a user logs in to Aventail
WorkPlace for the firs t time, the appliance automatically provisions t he agent
that will provide the broadest range of access based on the user’s privileges,
Page 20

10 | Chapter 1 - Introduction
operating system, browser configuration, and any other constraints on the
user’s system. Stand-alone clients, such as Connect Tunnel, can be
provisioned from the appliance or distributed manually.
Client Components and Access Methods
The appliance includes several components that provide users with access to
resources on your network.
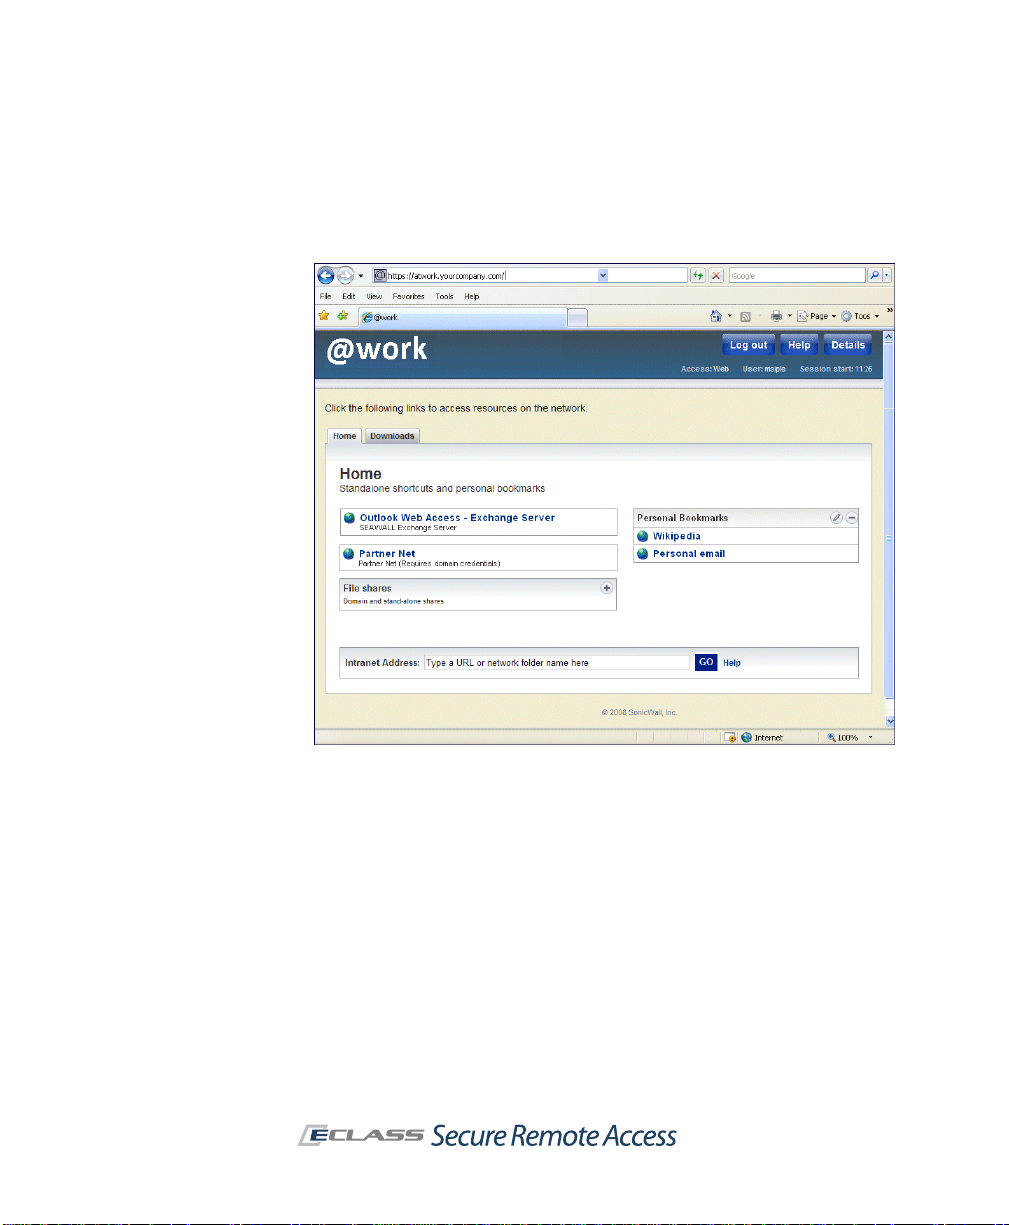
Aventail WorkPlace
The Aventail W orkPlace portal provides your users with access to We b-based
resources. You can create customized WorkPlace sites, each with a unique
URL and appearance (colors, logo, and greeting text). This enables you to
configure and deploy unique portals for different audiences, such as partners
and employees.
For Windows users, Av e n tai l Acce ss M anage r takes care of installing agents
and clients through the browser, and client installation log files make the
process easy to troubleshoot. Once Access Manager is installed on a user
device, most users will be able to receive client updates without requiring
administrator privileges.
After a user logs in to WorkPlace, a Web page presents an administratordefined list of shortcuts. These shortcuts reference the Web-based
resources, Windows file system resources, and terminal servers to which the
user has access privileges. Users can also add their own WorkPlace
bookmarks to Web sites or network shares. The means of access to these
resources depends on the user’s browser:
z Web resources and file system resources can be accessed from any Web
browser that supports JavaScript and SSL. By default, the appliance is
configured to deploy a Microsoft ActiveX control (the Web proxy agent)
on Microsoft Windows systems running Internet Explorer. The Web proxy
agent proxies Web content directly through the appliance.
Page 21
SonicWALL Aventail E-Class SRA Getting Started Guide | 11
z For users running other browsers, the appliance automatically provides
T ranslated W eb access. If you’d rather not install an agent or your users’
systems don’t support ActiveX, you can configure the appliance to
provide Translated Web access.
z As an alternative to Translated Web access, which may have limitations
with some Web applications such as AJAX, custom port mapping or
custom FQDN mapping can be used. These methods involve mappin g the
backend resource either to a port on the EX-Series appliance, or to an
external fully qualified domain name.
The appliance also supports Web-based access to Windows T erminal Services
(WTS) and Citrix hosts. These hosts are accessed by Web-based terminal
agents that use proprietary protocols to communicate with the terminal
server.
Page 22
12 | Chapter 1 - Introduction
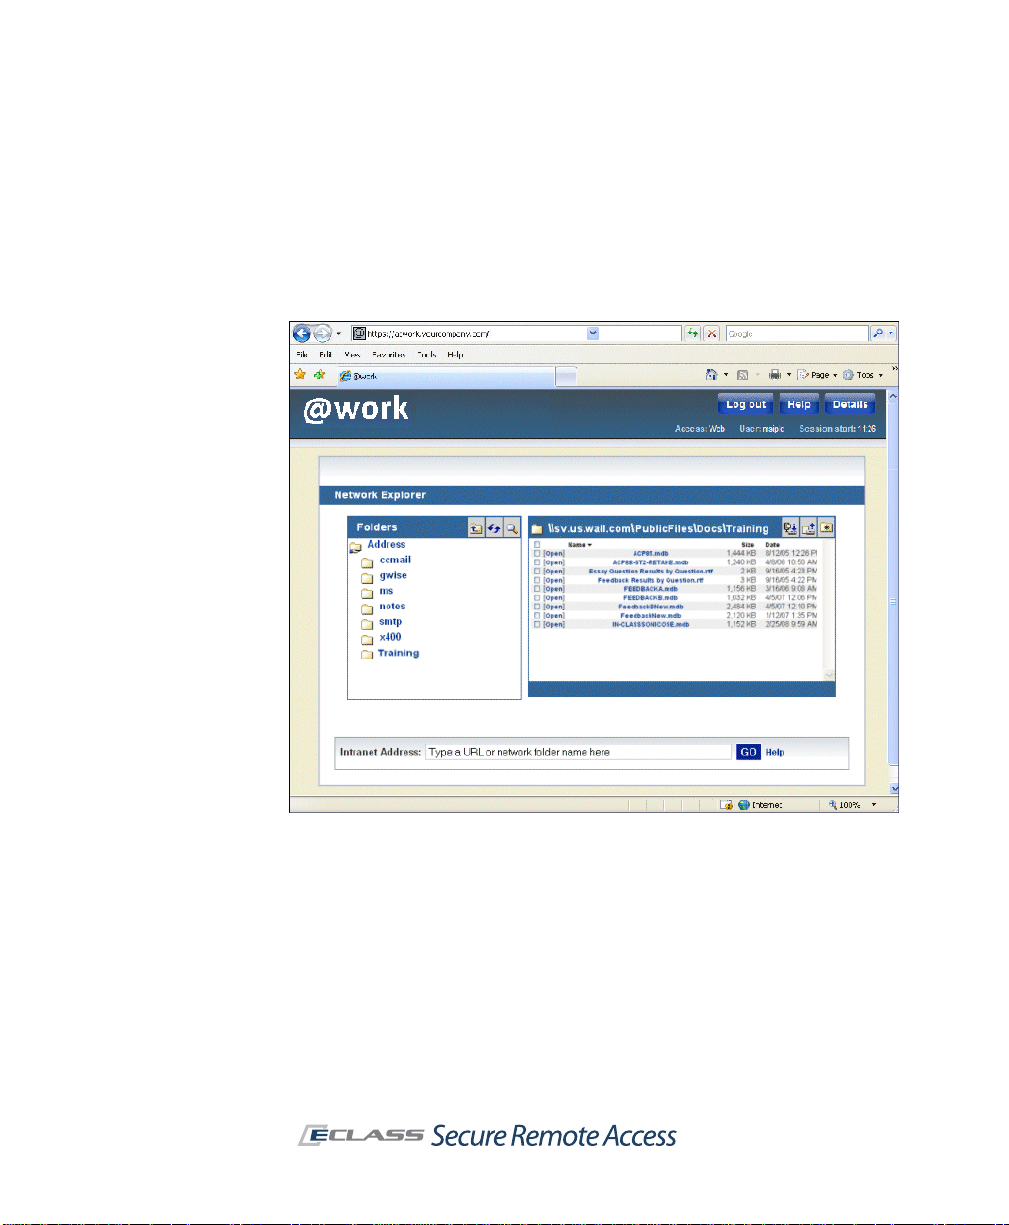
Network Explorer
Network Explorer is a Web-based extension, accessible from Aventail
WorkPlace, that provides access to any Windows file system resources that
the user has permission to use (even from desktop browsers on nonWindows platforms). These resources can include servers, computers,
workgroups, folders, and files.
Connect Tunnel Client
Connect Tunnel is an application that provides broad access to network
resources from devices running a Windows, Macintosh, or Linux operating
system. It provides access to any IP-based type of application protocol and
ICMP, and it will route VoIP (Voice Over Internet Protocol) over TCP/IP.
Connect Tunnel is initially installed from the WorkPlace portal or from a
separate installer package.
Page 23

SonicWALL Aventail E-Class SRA Getting Started Guide | 13
OnDemand Tunnel Agent
The OnDemand Tunnel agent is lightweight, Web-based, and provides the
same broad access to applications and protocols as Connect Tunnel. It is
similar in all respects to Connect T unnel except that it is activated each time
a user logs in to the Aventail WorkPlace portal from an ActiveX or Javaenabled device.
Connect Mobile Client
The Connect Mobile client is a lightweight application for Windows Mobilepowered devices. It provides access to a broad range of resources, including
client/server applications, thin-client applications, file servers, and Web
resources. The Connect Mobile client is installed using a Windows setup
program that extracts the application files and then copies the files to the
user’s mobile device using ActiveSync.
Web Proxy Agent
The Web proxy agen t provides access through Avent ail WorkPlace to any W eb
resource, including Web-based applications, Web portals, and Web servers,
as well as Windows network shares. Web proxy access eliminates the need
for Web content translation and provides broad access to enterprise Web
applications for Microsoft Windows users who are running Internet Explorer
with ActiveX enabled.
Translated Web Access
Translated Web access provides access to Web resources and Windows
network shares. It is available from any Web browser that supports SSL and
has JavaScript enabled.
Custom Port Mapping
Custom port mapping provides Web-based access by mapping the backend
resource or server to a port number at the EX-Series appliance. Custom port
mapping does not require installation of a client agent, and works with any
Web browser.
Page 24

14 | Chapter 1 - Introduction
Custom FQDN Mapping
Custom FQDN mapping provides Web-based access by mapping the backend
resource or server to an external fully qualified domain name (host and
domain). The FQDN name should be resolvable to an IP address in the public
domain. Custom FQDN mapping does not require installation of a client
agent, and works with any Web browser.
End Point Control
End Point Control (EPC) components ensure that your network is not
compromised when accessed from PCs in untrusted environments. As
devices attempt to connect to the appliance, EPC “interrogates” them to
determine whether they are running the programs that you require. You can
also use EPC to specify that a data protection agent—Aventail Cache
Control—automatically removes session data from the PC.
Advanced EPC provides an extended and detailed list of personal firewall,
antivirus, and spyware programs to check for in device profiles for clients
running on Microsoft Windows and Mac OS X. For clients running on Microsoft
Windows, it provides additional session-related security with OPSWAT Secure
Desktop Emulator. Advanced EPC is included with the EX7000 and EX-2500
appliances and licensed separately for all other appliance models.
Virtual Assist
SonicWALL Virtual Assist is a remote support tool that enables an
administrator or help desk technician to assume control of a user’s PC or
laptop in order to provide remote technical assistance. With the user’s
permission, the technician gains instant access to the computer using a Web
browser and can then diagnose and fix a problem remotely. It also gives
technicians the ability to transfer files from a user’s computer (such as log
files), and to chat online with the user.
Virtual Assist does not require the installation of any external software. For
computers that do not support Java, Virtual Assist can be manually installed
by downloading an executable file that is available in the SonicWALL Aventail
Management Console.
There are two sides to a Virtual Assist session: the client view and the
technician view. The client is the person requesting assistance on their
computer. The technician is the person providing assistance. Technicians
install the stand-alone Virtual Assist application from AMC.
Page 25

SonicWALL Aventail E-Class SRA Getting Started Guide | 15
To initiate a Virtual Assist session, an end user can request assistance
directly by clicking the Assistance butt on at the top of the WorkPlace portal
and downloading and running a small client program. Or, a technician can
send email invitations to users that contain a direct URL link to initiate a
Virtual Assist session.
Administrator Components
This section highlights the key components that you’ll use to set up and
manage the SonicWALL Aventail appliance and services.
Setup Wizard
Setup Wizard streamlines the initial config uration of the appliance. It guides
you through the process of selecting basic network settings, configuring
appliance options, defining resources, creating a basic access policy, and
creating local users for testing purposes.
Page 26
16 | Chapter 1 - Introduction
Aventail Management Console
AMC is a Web-based administrative tool for managing the appliance. It
provides centralized access for managing security policies, configuring the
system (including networking and certificate configuration), distributing
configuration data, monitoring, troubleshooting, and setting up
administrator accounts.
Aventail Access Services
The appliance uses various access services to manage the access clients and
agents that users employ to connect to your network resources:
z The network tunnel service is a network routing technology that
provides secure network tunnel access to a wide range of applications
and protocols, including non- TCP protocols such as VoIP (Voice o ver IP)
and ICMP, reverse-connection protocols like SMS, and bi-directional
protocols such as FTP. It works in conjunction with the Connect Tunnel
client and the OnDemand Tunnel agent to provide authenticated and
encrypted access.
Page 27

SonicWALL Aventail E-Class SRA Getting Started Guide | 17
z The Web proxy service provides users with secure access to Web-
based applications and servers from a Web browser, or Web-based
applications and servers from a Windows Mobile-powered device using
the Connect Mobile client. The Web proxy service contains a secure HTTP
reverse proxy that brokers and encrypts access to W eb-based resources.
z The Aventail WorkPlace service controls access to WorkPlace
resources accessed from a Web browser . The Aventail W orkPlace service
communicates with Windows file servers and n etw ork sh are s (inc luding
Microsoft Distributed file system, or DFS, resources) using the Server
Message Block (SMB) file-sharing protocol.
Page 28

18 | Chapter 1 - Introduction
Page 29

SonicWALL Aventail E-Class SRA Getting Started Guide | 19
Chapter 2
Planning Your VPN
T o effec tively design y our VPN, you must ident ify who will use it, what types
of resources to make available, and which access methods to provide to
users so they can reach your network.
Who Will Access Your VPN?
A key consideration in planning your VPN is identifying the users who need
to access your network resources. Your user community will have a major
impact on how you design and administer your VPN.
Most VPN users generally fall into one of two major categories: remote
employees or business partners.
z Remote employees. When serving remote and mobile employees,
you’ll probably give them relatively open access to enterprise resources.
Of course, you can also define a more granular access policy for specific
resources that contain sensitive information (such as a payroll
application).
Employee computer systems under IT control provide the flexibility to
install client software—such as the Connect Tunnel client—on the
desktop.
z Business partners. Suppliers, vendors, contractors, and other partners
generally have restricted access to resources on your network. This
requires you to administer more granular resource definitions and access
control rules than those typically used for a remote access VPN.
For example, instead of simply defining a domain resource and granting
open access privileges, you’ll often need to define specific host
resources and manage a more complex access policy. When defining a
Web resource you may also want to obscure its internal host name to
maintain the privacy of your network.
Page 30

20 | Chapter 2 - Planning Your VPN
Because of the administrative and support issues associated with
installing client software on computers outside the control of your IT
organization, a Web-based access method is often best for business
partners.
What Types of Resources Should Users Have Access To?
The SonicWALL Aventail appliance manages a wide variety of corporate
resources, which fall into three categories:
Resource type Examples Planning considerations
Web
Client/server
File shares
z Microsoft Outlook We b
Access
z Web-based
applications
z Web portals
z Web servers
z Terminal servers
(such as Citrix or WTS)
z Microsoft Outlook
z Lotus Notes
z Network folders
z Shared folders
z Network browsing
z Windows domains
z When specifying URLs to Web
resources, include the http://
or https:// prefix.
z Use aliases to obscure host
names on private networks.
z Identify resources by host name,
IP address or IP range, subnet IP
address, or domain name.
z A specific file system resource
can be an entire server (for
example, \\ginkgo), a shared
folder (\\john\public), or a
network folder (\\ginkgo\news).
z Defining a Windows domain
gives authorized users access to
all network file resources.
How Will Users Access Your Resources?
Users can access VPN resources secured by t he appl iance usi ng a variety of
agents and clients. Your deployment options can range anywhere from
“managed” desktops controlled by your IT department, to systems outside
of your control, including employees’ home computers, partner desktops,
and other systems such as kiosks or handheld devices.
How users gain access to your network resources depends on what those
resources are. The Connect Tunnel client, for example, is installed on the
user’s device and provides the broadest network access and support, and
greatest ease of administration. The OnDemand agent also provides broad
cross-platform support, but does not handle bi-directional applications like
VoIP .
Page 31

SonicWALL Aventail E-Class SRA Getting Started Guide | 21
Tunnel, Proxy, or Web: Which Access Method is Best?
The SonicWALL Aventail access services and clients offer a wide array of
methods with different degrees of capability for reaching your organization’s
resources. Use the table below to determine which ones are best for you and
your users.
Other factors to consider, aside from technical requirements, are:
z Security requirements, such as the safeguards you want to put in
place on the desktop.
z User profiles, including th e levels of technical sophistication amo n g
your users.
z Administrative resources available to manage and support a VPN.
The following table summarizes the access me thods and their advantages.
Access method Provides access to Advantages
Connect Tunnel Full network access to
OnDemand Tunnel Full network access to
client/server applications,
Web resources, network
shares, and bi-directional
applications such as VoIP,
SMS, and FTP.
client/server applications,
Web resources, network
shares, and bi-directional
applications such as VoIP,
SMS, and FTP.
z Stand-alone client installed
from Aventail WorkPlace portal
or from custom installer
package, with no rebooting
required.
z Enhanced security option s
including split tunneling, and
redirection of all traffic or only
local traffic.
z Local printing support.
z T ypically used for remote access
on systems that can be readily
managed by IT, such as a
corporate laptop used by a
traveling or remote employee.
Note: Administrator rights are
required for installation.
z Activated from the WorkPlace
portal.
z Enhanced security option s
including split tunneling, and
redirection of all or only local
traffic.
z Local printing support.
z Auto-updating (Windows client
only).
Note: Administrator rights are
required for installation.
Page 32

22 | Chapter 2 - Planning Your VPN
Access method Provides access to Advantages
Connect Mobile Client/server applications,
Web proxy agent
(Internet Explorer)
Translated Web
access
thin-client applications,
and Web resources.
Any Web resource
(including Web-based
applications, Web portals,
and Web servers) and
Windows network shares.
Any Web resource
(including Web-based
applications, Web portals,
and Web servers).
Translated Web on
Windows operating
systems also offers access
to network shares.
z Stand-alone, lightweight
application that runs on
Windows Mobile-powered
devices.
z Convenient access from
Internet Explorer with ActiveX
enabled.
z Used as a fallback if OnDemand
Tunnel cannot run.
z Minimal client configuration and
administration tasks.
z Users can access any network
URL by typing the actual URL in
the browser’s address box.
z Broad Web-based access to
enterprise applications.
z Single sign-on.
z Convenient access to Web and
file system resources from any
Web browser that supports SSL
and has JavaScript enabled.
z No client configuration or
administration tasks.
z Supports the use of aliases to
hide internal host names in the
browser address bar.
z Single sign-on to back -end W eb
servers.
z A good option for providing
business partner access,
because it does not require any
client configuration or
administration.
Security Administration
Administering your security policy involves defining resources and then
creating access control rules that determine the availability of those
resources.
Defining Resources
You have some flexibility when you specify a resource type for a given object
on your network. For example, you might define a Web application narrowly
as a URL resource for business partners; employees, on the other hand,
might be given access to an entire domain, including the Web application.
Page 33

SonicWALL Aventail E-Class SRA Getting Started Guide | 23
Web Resources
Any Web resource—such as a Web application, a Web portal, or a Web
server—can be defined as a URL resource (they are specified in AMC using
the standard http:// or https:// URL syntax). Examples include Microsoft
Outlook Web Access and other Web-based e-mail programs, Web portals,
corporate intranets, and standard Web servers.
Defining a Web resource as a URL provides several advantages:
z You can cre ate a W eb shortcut on A ventail Wor kPlace to give us ers quick
access.
z You can define very specific access rules to control which users can
access the URL.
z You have the option of obscuring (or “aliasing”) the internal host name
so it is not publicly exposed.
z You can block attachments from being downloaded to untrusted devices,
or prevent a Web-based application from displaying restricted data to
untrusted devices.
Web traffic is proxied through the Web proxy service, a secure gateway
through which users can access private Web resources from the Internet.
Client/Server Resources
Client/server resources encompass applications, file servers, and multiple
Web resources and are specified in AMC using either a domain, subnet, IP
range, host name, or IP address:
z Client/server applications include “traditional” applications developed
for a particular operating system, or thin-client applications that are
Web-based.
z Network shares include Windows file servers or file shares. Network
shares are accessible using either OnDemand or Connect Tunnel. (To
access a network share using a Web browser, you must instead define it
as a file system resource.)
z Source networks are referenced in an access rule to permit or deny a
connection to a destination resource based on the location from which
the request originates. For example, you might permit connections only
from a particular domain, or permit them only from a specific IP address.
z Graphical terminal agents can be added to Aventail WorkPlace as
shortcuts that provide acce ss to a terminal serv er (or Citrix server farm)
using a Windows Terminal Services or Citrix client.
Page 34

24 | Chapter 2 - Planning Your VPN
z Multiple Web resources on your network—whether in a domain,
subnet, or IP range—can be defined. This is a convenient way for you to
administer multiple Web servers from a single resource in AMC. For
example, if you specify a domain (and create the appropriate access
rule), users are able to use their Web browsers to access any Web
resources contained within that domain. They can also use OnDemand or
Connect Tunnel to get to those resources.
On the downside, however, your users cannot access those resources
from a shortcut on Aventail WorkPlace; instead, they must know the
internal host name of the resource. If the Web proxy agent is running,
they can enter any URL directly in the browser. However, in translated
mode, users must manually type URLs in the Intranet Address box in
WorkPlace.
With such a wide scope of resource definitions—from broad resources such
as a domain or subnet, down to a single host or IP address—you may wonder
how best to define your network resources. Broad resource definitions
simplify your job as system administrator, and are typically used when
managing a remote access VPN with an open access policy. For example, you
could define your internal DNS namespace as a domain and create a single
policy rule granting employees access privileges.
On the other hand, a more restrictive security policy requires you to define
network resources more narrowly. This approach is typically used when
administering a partner VPN. For example, to provide an external supplier
with access to an inventory application, you might specify its host name as
a resource and create a policy rule specifically granting the s upplier access
privileges.
File Shares
File shares include Windows network servers or computers containing shared
folders and files that users can access through Aventail WorkPlace.
You can define a specific file system resource by typing a UNC path, or you
can define an entire Windows domain:
z A specific file system resource can be an entire server, a shared folder,
or a network folder.
z A file system resource can also reference a user’s personal folder on the
network. This feature allows you to create a single shortcut on Aventail
WorkPlace that dynamically references a personal folder for the current
user.
z Defining an entire Windows domain gives authorized users access to all
the network file resources within the domain.
Page 35

SonicWALL Aventail E-Class SRA Getting Started Guide | 25
The various options for defining a file system resource provide you with the
flexibility to create a granu lar policy that controls access at the server, share,
or folder level, or to create a more open policy that provides access to an
entire domain.
Managing Access Control with an Access Policy
Once you’ve defined your VPN resources, you control which ones are
available to users by creating an access policy.
After a user successfully authenticates (that is, his or her identity is verified),
the appliance evaluates the rules that control access to specific resources.
Rules appear on the Access Control page:
Access control rules are displayed as an ordered list in AMC. When the
appliance evaluates a connection request, it begins at the top of the list and
works its way down until it finds a match. When it finds a match, the action
required by the rule—either Permit or Deny—is applied and no further rules
are evaluated.
Page 36

26 | Chapter 2 - Planning Your VPN
Access to a resource can be based on several criteria. Most rules control
access based on who the user is—that is, the user’s name or group
membership—and the destination resou rce. (If you don’t restrict ac cess to a
particular user or destination resource, the word Any appears in the access
control list.)
Additionally, you can control access based on several other criteria:
z The EPC zone from which the connection request originates.
Suppose you want to require users accessing a sensitive financial
application to run a browser cache cleaner after each session. If so, you
could configure a rule that allows access only to systems in a “trusted”
zone that are running a particular program.
In the previous illustration, access to Remote office desktops is
restricted to users in the Remote group who have device profiles that
place them in the Trusted laptop zone.
z The address from which the connection request originates. You
might want to control access to a resource based on the names of any
source networks you want evaluated in the rule.
z The access method used to reach the resource. You might want to
enable broad access to resources within an internal domain from the
network tunnel or proxy agents, but prevent browser-based access to
Web servers within the domain.
z The day or time of the request. For example, you might give business
partners access to a particular application on weekdays from only 9:00
A.M. to 5:00 P.M.
A connection request can be summarized as follows:
1. A user is authenticated and initiates a co nnection.
2. The appliance analyzes the connection request to id entify its attributes
(including user and group information, the destination being requested,
the source network from which the request originates, and the day or
time of the request).
3. The appliance reads the first rule in the access control list and compares
it to the request criteria:
{
If a match is found, the action (Permit or Deny) specified in the rule
is applied and no further rules are evaluated.
{
If no match is found, the appliance evaluates the next rule in the list
to see if it matches the request.
4. If the appliance processes all of the rules without finding a match, an
implicit Deny rule is applied.
Page 37

SonicWALL Aventail E-Class SRA Getting Started Guide | 27
Access Control for Bi-Directional Connections
VPN connections typically involve what are called forward connections, which
are initiated by a user to a network resource. However, if you deploy network
tunnel clients (Connect Tunnel or OnDemand Tunnel) to your users, bidirectional connections are en abled. Examples of bi-directional connections
include an FTP server that downloads files to or uploads files from a VPN user ,
and remote Help Desk applications.
Within the SonicWALL Aventail VPN, bi-directional connections encompass
the following:
z Forward connections from a VPN user to a network resource.
z Reverse connections from a network resource to a VPN user . An example
of a reverse connection is an SMS server that “pushes” a software update
to a user’s machine.
z Cross-connections refer specifically to VoIP (Voice over IP) applications
that enable one VPN user to telephone another. This kind of connection
requires a pair of access control rules: one for the forward connection
and one for the reverse connection.
Design Guidelines for Access Rules
Because the appliance processes your access control rules sequentially, the
order in which you organize them is significant in terms of whethe r access is
permitted or denied. Carefully review your security policy settings to avoid
inadvertently placing rules in the wrong order.
z Put your most specific rules at the top of the list. As a general rule,
it is best to put your most specific rules at the top of the list. Putting
broader rules that grant more permissions at the top of the list may
cause the appliance to find a match before it has a chance to process
your more restrictive rules.
z Be careful with Any rules. If you create a rule that does not restrict
access to a particular user or destination resource, carefully consider its
impact on policy rules.
z Optimizing performance. Because the appliance evaluates rules in
sequential order, you can optimize performance by placing the network
resources that are accessed most frequently at the top of the list .
z Avoid resource and access method incompatibilities. In some very
specific cases, certain combinations of resource types and access
methods can create problems with y our access policy . AMC validates y our
Page 38

28 | Chapter 2 - Planning Your VPN
Interrogate
client
Classify into
a zone
Client connects
to appliance
Check for device
profile attributes
Zone =
IT-managed
Place client into an
End Point C ontrol
zone
Registry key
Antivirus software
Application
rule and notifies you of potential problems when you save it. See
“Security Administration” in the Installation and Administration Guide for
details on resolving incompatibility issues.
End Point Control
You can use En d Point Control to cl assify devices as the y attempt to connect
to the appliance. When a device matches a profile that you have created, it
is assigned to an EPC “zone of trust,” where the device is granted a certain
amount of access, quarantined, or denied access altogether. In addition,
once a device is classified into a given zone, you can keep checking it at a
set interval to see if it meets your EPC requirements.
An EPC zone can reference one or more device profiles. Multiple device
profiles are useful if users with similar VPN access needs use different
computer platforms. For example, you could configure an EPC zone that
references a device profile for Windows computers, and another zone for
Macintosh computers.
Zones are in turn referenced in a community, which determines what data
protection agents are deployed. Optionally, you can reference a zone in an
access control rule to determine which resources are available to users in
that zone.
The following diagram illustrates the EPC evaluation process performed by
the appliance when a user connects to the appliance:
Page 39

Advanced EPC
Advanced EPC provides an extended and detailed list of personal firewall,
antivirus, and spyware programs to check for on a client. It also provides
additional session-related security (beyond cache cleaning) with OPSWAT
Secure Desktop Emulator.
There are a few device profiles to help y ou get starte d: you ca n use them as
is or modify them to suit your access poli cy and resource requ irements. The
“home user” profiles, for example, check for a wide variety of antivirus and
personal firewall programs, while a series of corporate profiles check for
programs from particular vendors.
If the preconfigured device profiles don’t address your specific security needs
or computing environment, you can create additional profiles that the
appliance will use to detect the presence of specified attributes on users’
devices. The types of device profile attributes available are:
z Antivirus software
z Antispyware software
z Application
z Client certificate
z Directory name
z File name, size, or timestamp
z Personal firewall program
z Windows domain
z Windows registry entry
z Windows version
SonicWALL Aventail E-Class SRA Getting Started Guide | 29
Putting It All Together: Using Realms and Communities
Realms are the top-level objects that tie together authentication, user
management, access agent provisioning, and End Point Control restrictions.
A realm references one authentication server or a pair of them (for chained
authentication). Authentication servers must first be defined in AMC, and
they are then referenced by a realm that users log in to.
After users log in to the appliance, they are assigned to a community based
on the identity supplied during login. By default, all users are assigned to a
default community, but you can sort users into different groups based on
individual identity or group memberships. In turn, the community defines a
default set of access methods and the set of end point restrictions placed on
Page 40
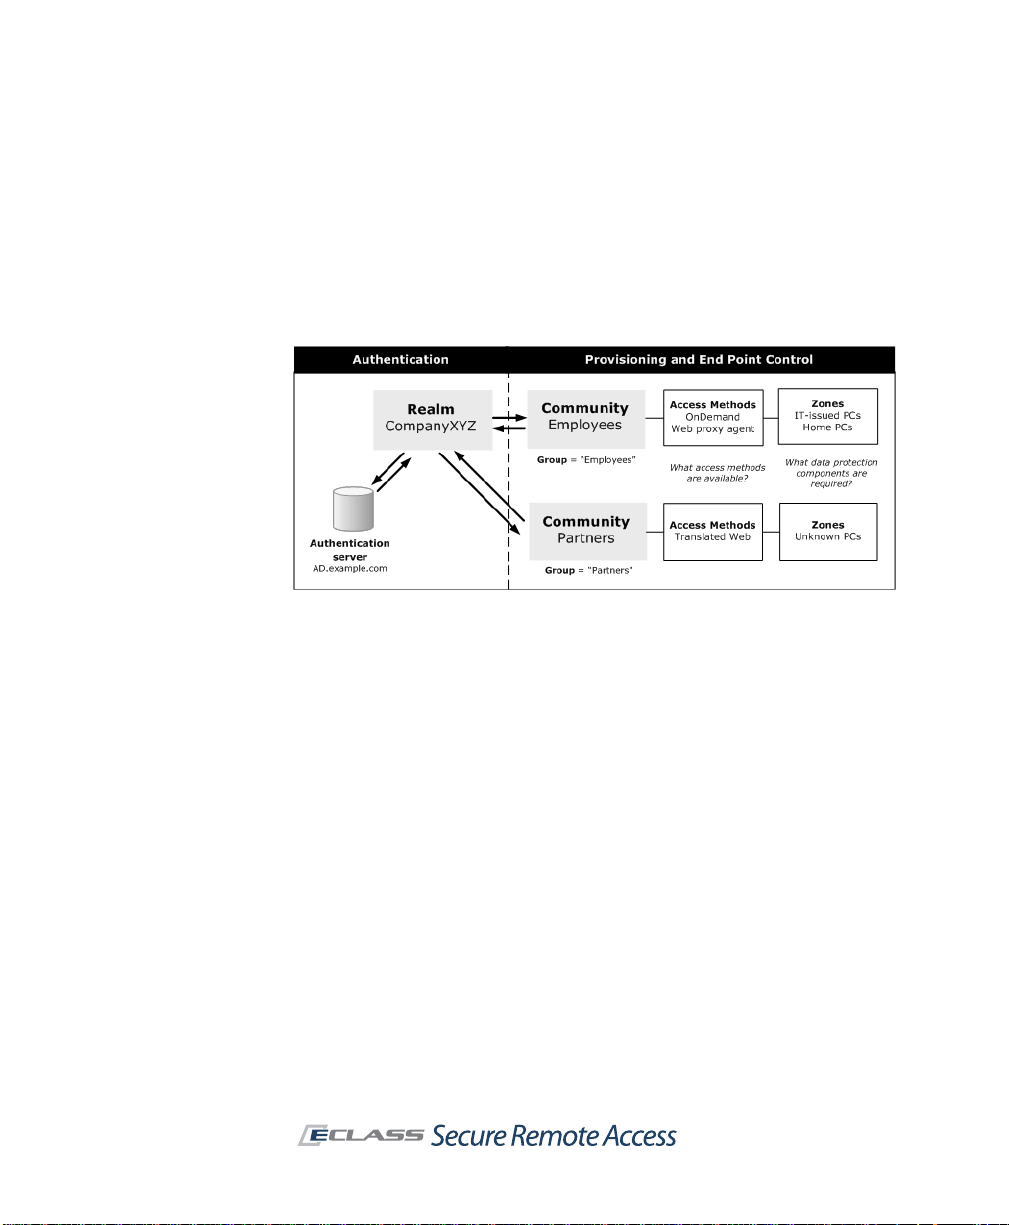
30 | Chapter 2 - Planning Your VPN
client devices. The community can also determine the appearance of
WorkPlace: the layout and style of WorkPlace pages can be tailored to a
particular community.
The following illustration shows how a realm authenticates users, assigns
them to communities to provision access agents and, with End Point Control
enabled, assigns community members to different zones based on the
trustworthiness of their computers.
If your network uses a single authentication server to store user information,
you’ll probably need to create only one realm in AMC. That realm could then
reference the global community that is configured by default in AMC. This
would be useful if you have a homogenous user population with identical
access requirements.
Using only one realm doesn’t l imit your ability to configure more granular
levels of user access and End Point Control. AMC allows you to create
communities of users within a realm based on their access needs or other
security considerations. A community can consist of all the users in a realm,
or only selected users or groups.
For example, you might have two distinct groups of users—employees and
business partners—requiring different forms of VPN access. The following
tables contrast the access agents that are made available to these two
groups, and how EPC is used to secure their connections. By creating
different WorkPlace styles and layouts you also can determine how
WorkPlace looks to members of these two communities.
Page 41

SonicWALL Aventail E-Class SRA Getting Started Guide | 31
Employee community
Users connect from trusted computing environments (such as laptops
provided by your IT department) and require broad access to your network
resources.
Access agent EPC
A tunnel client, enabling them to
access Web, network, and file
share resources.
EPC is used to detect whether
employees’ computers are running an
antivirus program and firewall before
placing them in a trusted zone.
Business partner
Partners connect through unsecured computing environments and require
access only to specific, limited resources.
Access agent EPC
Limited, Web-only access Business partners are assigned to a
community
less-trusted zone where they are
provisioned with Aventail Cache
Control.
Page 42

32 | Chapter 2 - Planning Your VPN
Page 43

SonicWALL Aventail E-Class SRA Getting Started Guide | 33
Chapter 3
Preparing for Installation and Deployment
The Installation and Administration Guide has complete instructions for
installing and configuring your SonicWALL Aventail appliance and deploying
resources to users. This chapter provides a broad overview of those steps,
what information you’ll need, and when you’ll need it.
Installation Overview
There are three phases to the installation process:
Phase Steps Description
Hardware 1 through 4
(pages 33-35)
Setup Wizard 5
(pages 35-36)
AMC 6 through 7
(pages 36-37)
Rack-mount the appliance, connect it,
and use the LCD keypad to specify
enough network settings to run Setup
Wizard.
Use a browser to continue configuring
the appliance, specifying enough settings
so that you can log in to the Aventail
Management Console (AMC).
AMC is a Web-based application used to
configure and administer the appliance.
Step 1: Make a note of your serial number and authentication code
You'll need your serial number and authentication code when you register
your product on MySonicWALL.co m. Product registration gives you access to
essential resources, such as your license file, firmware updates,
documentation, and technical support information.
Page 44

34 | Chapter 3 - Preparing for Installation and Deployment
You can find the information in one or both of these places, depending on
your appliance model:
z Printed on your appliance label.
z Displayed on the General Settin gs page once you complete setup and
start the Aventail Management Console
Step 2: Rack-mount the appliance
To mount the appliance in an equipment rack, you'll first need to install the
rack hardware. The product packaging contains a slide rail kit for mounting
the appliance in a four-post cabinet.
Step 3: Connect the appliance and turn it on
Insert a network cable from your internal network to the internal interface
on your appliance, and then turn the appliance on. See the illustrations in the
Installation and Administration Guide to find the internal interface for your
appliance model.
Step 4: Enter basic network settings
Before you can run Setup Wizard, you must first enter basic network settings
so that you can use a Web browser to connect to the appliance. There are
two sets of instructions, one for the EX -750 appliance, and one for th e other
models.
EX7000, EX6000, EX-2500, and EX-1600
T o the right of the LCD screen on the front of your appliance are four buttons
you'll use to enter your settings. Press Up and Down to read the welcome
screen, and press Right to continue past it.
1. Enter the IP address for your internal interface
To change the IP address that appears, use the Left and Right buttons
to position your cursor over the number you want to change, and then
use Up and Down to change the number. Press Right to continue to the
next screen.
2. Enter your subnet mask
Again, use the four buttons to change the IP address displayed on the
LCD screen. Press Right to continue to the next screen.
3. Cluster configuration
Page 45

SonicWALL Aventail E-Class SRA Getting Started Guide | 35
Specify whether the appliance you are configuring will be part of a
cluster (a high-availability pair of appliances), and which node it is
(enter “1” for the master node, and “2” for the slave node). Press Right
to continue to the next screen.
4. Confirm your settings
Review your settings and confirm them. After the appliance is updated
you are ready to continue configuring the appliance using the Webbased Setup Wizard.
EX-750
You must use Setup Tool to enter the basic network settings necessary for
making a connection to the appliance using a Web browser.
1. Establish a serial connection
Use a terminal emulation program to establish a serial connection with
the appliance from a laptop computer or terminal.
2. Log in
The first time you start the system from a serial connection, Setup Tool
automatically runs. When prompted to log in, type root for the
username.
3. Configure the appliance
Next, you are prompted to provide the following information:
{
IP address and subnet mask for the internal interface
{
Default gateway used to access the internal interface
{
Indicate whether the appliance you are configuring will be part of a
cluster (a high-availability pair of appliances), and which node it is
(enter “1” for the master node, and “2” for the slave node)
Step 5: Run Setup Wizard
Setup Wizard guides you through the process of initial setup for your
SonicWALL E-Class SRA appliance.
1. Access the wizard
Start a Web browser and type https://<ipaddress>:8443, where
<ipaddress> matches the address you defined for the internal network
interface.
Page 46
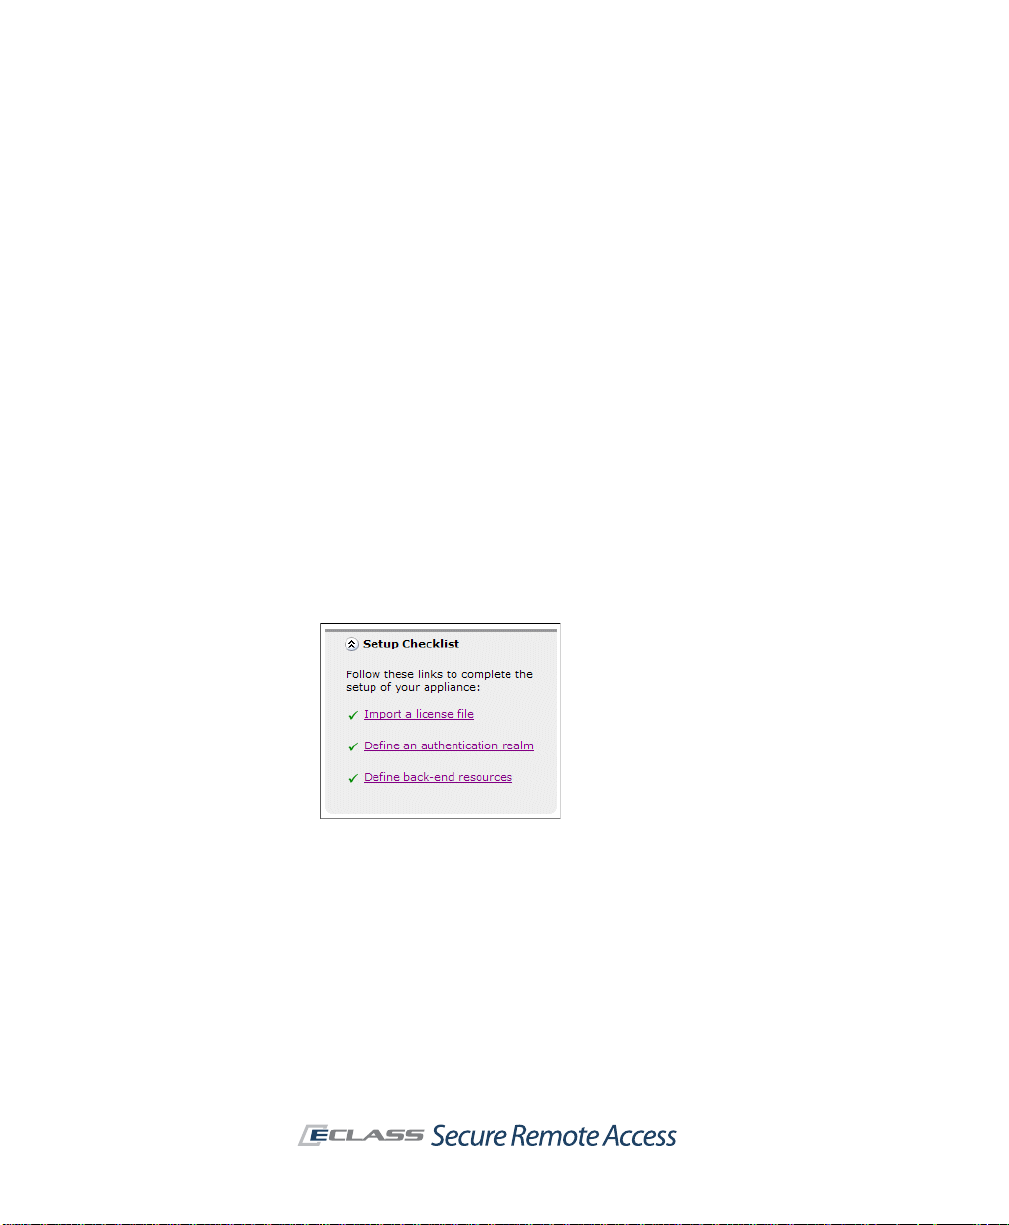
36 | Chapter 3 - Preparing for Installation and Deployment
2. Enter your configuration settings
Follow the instructions in the wizard to accept the license agreement,
create an administrator password, configure the network interfaces and
routing, and then enter optional clustering information. You can also
make some decisions regarding user access and an ini ti a l access policy
for users, which you can refine later in AMC.
3. Apply your changes
When you're done with the wizard, click Finish to apply your settings.
The appliance restarts, which causes you to lose your current
connection. Wait a few minutes and then go to the next step.
Step 6: Connect to the Aventail Management Console (AMC)
You're ready to access AMC, the Web-based application used to administer
the appliance. Once Setup Wizard finished you’ll see the login page: type
admin in the Username box, and then enter the password you created with
Setup Wizard. Both are case-sensitive.
You can use the Setup Checklist on the AMC home page to jump to the right
configuration page in AMC, and to track your progress (as each configuration
item is completed, a check mark is added):
There are many more items you can configure—at this point you have
established only the most basic security policy—but you have enough to get
you started and to be able to walk through some standard VPN scenarios,
described in “Deployment Scenario: Remote Access for Employees and
Partners” on page 43.
Page 47

SonicWALL Aventail E-Class SRA Getting Started Guide | 37
Step 7: Create a MySonicWALL Account
Go to www.mysonicwall.c om and create an account, if you don't already have
one. You need an account in order to register your appliance. Product
registration gives you access to essential resources, such as your license file
and updates.
In order to register, you need both the serial number for your appliance and
its authentication code. Note: this registration information is not sold or
shared with any other company.
The initial user license available on MySonicWALL is valid for on e user (the
administrator plus one e nd user) for an unlimited number of days. T o become
familiar with the Aventail Management Console (AMC) and test it in your
environment with additional users, you can request a lab license. When
you’re ready to move the appliance into production, download your appliance
license file from www.mysonicwall.com and then import it in AMC.
Verifying Your Firewall Policies
For the appliance to function correc tly , you must open ports on you r external
(Internet-facing) and internal firewalls.
External firewall
For secure access to the appliance from a Web browser, Connect Tunnel, or
OnDemand Tunnel, you must make sure that ports 80 and 443 are open on
firewalls at your site. Opening your fire wall to permit SSH access is optional,
but can be useful for performing administrative tasks from a remote system.
Traffic type Port/protocol Usage Required?
HTTP 80/tcp Unencrypted network access x
HTTPS 443/tcp Encrypted network access x
SSH 22/tcp Administrative access to the appliance
Page 48

38 | Chapter 3 - Preparing for Installation and Deployment
Internal firewall
If you have a firewall on the internal network, you may need to adjust its
policy to open ports for back-end applications with which the appliance must
communicate. In addition to opening ports for standard network services
such as DNS and e-mail, you may need to modify your firewall policy to
enable the appliance to access the following services:
Traffic type Port/protocol Usage
Microsoft
networking
LDAP
(unencrypted)
LDAP over SSL
(encrypted)
RADIUS 1645/udp or 1812/udp Communicate with a RADIUS
NTP 123/udp Synchronize the appliance clock
Syslog 514/tcp Send system log information to a
SNMP 161/udp Monitor the appliance from an
z 138/tcp and 138/udp
z 137/tcp and 137/udp
z 139/udp
z 162/snmp
z 445/smb
389/tcp Communicate with an LDAP
636/tcp Communicate with an LDAP
Used by Aventail WorkPlace to
perform WINS name resolution,
browse requests, and access file
shares
directory or Microsoft Active
Directory
directory or Microsoft Active
Directory over SSL
authentication server
with an NTP server
syslog server
SNMP management tool
Deployment Overview
After you've defined your resource s and access policy , it's time to make those
resources available to users. Using AMC, you can make Web resources, file
shares, and terminal server resources available to users in Aventail
WorkPlace using the clients and agents you specify for them.
z See “How Will Users Access Your Resources?” on page 20 for a complete
list of access methods and the advantages of each.
z See “Deploying the SonicW ALL A ventail Access Methods” on page 40 for
a summary of how access methods are deployed to users.
Page 49

SonicWALL Aventail E-Class SRA Getting Started Guide | 39
One- or two-
column layout
Personal
Bookmarks
Shortcut group
(collapsible)
Navigation: tabs
or side menu
Greeting
Company
logo
WorkPlace title Link to custom help file
Custom URL
Intranet box: an additional way to access resources
Deploying Aventail WorkPlace
Aventail WorkPlace is a Web portal that provides users with dynamically
personalized access to your network. It’s an easy way for you to deploy
resources directly from the appliance and give users access to the major
components of your VPN. On a per-community basis, you determine how the
portal is laid out and what elements users will see:
z Web shortcuts and Shortcut groups provide users with quick access
to Web resources. Network shortcuts give them access to file system
resources, and Graphical terminal shortcuts give them Web-based
access to resources that are available through Windows Terminal
Services or Citrix hosts.
z The Network Explorer page provides Web-based access to file shares.
Its Windows Explorer-like interface supports most common file
management tasks, such as opening, uploading, downloading, and
copying files. The appliance’ s file system acce ss policy is used to con trol
each user’s access privileges. You can also disable file uploads from
Aventail WorkPlace, or disable access to file shares entirely.
Page 50

40 | Chapter 3 - Preparing for Installation and Deployment
z Users can create and manage personal Bookmarks that point to URLs
and other resources that are protected by the appliance. These personal
links are stored on the appliance, so users have access to them whenever
(and however) they are logged in to WorkPlace.
z The Intranet Address box enables users to type a URL or UNC path
name for access to resources for which you have not yet created specific
shortcuts. For exa mple, a user could type the host name of a W eb server,
or a specific folder on a Windows share.
WorkPlace also provides support for a v ariety of smaller devices: when a user
logs in to WorkPlace from a small form factor device, WorkPlace detects the
device type and automatically transforms to best match the capabilities of
the client device.
For complete information on configuring Aventail WorkPlace, see the
Installation and Administration Guide. For an example illu strating how to set
up two different communities, each with its own WorkPlace “look”, see
“Deployment Scenario: Remote Access for Employees and Partners” on
page 43.
Deploying the SonicWALL Aventail Access Methods
This section offers a brief description of how the access clients and agents
are deployed to users. For detailed information, see the Installation and
Administration Guide.
Access method Deployment options
Connect Tunnel client
OnDemand Tunnel agent
Connect Mobile client
Translated Web access
z Users can download and install the client for
Windows, Macintosh, or Linux in Aventail W orkPlace.
z Administrators can create a custom installer
package of Connect T unnel componen ts and make it
available for users to install from another network
location (without requiring them to log in to Aventail
WorkPlace), or distribute the client as a disk image.
z The agent is automatically activated each time a
user logs in to Aventail W orkPlace and authenticates
using a Web browser.
z The client is installed using a Windows setup
program that extracts the application files and then
copies the files to the user’s Windows Mobilepowered device.
z T ranslated Web provides access through the Aventail
WorkPlace portal as a fallback for systems that do
not support other access methods.
Page 51

SonicWALL Aventail E-Class SRA Getting Started Guide | 41
Deploying an End Point Control Agent
For advanced cache control and data protection, you can configure the EClass SRA appliance to use Aventail Cache Control or a third-party EPC tool
provided by OPSWAT called Secure Desktop Emulator. For detailed
information, see the Installation and Administration Guide.
This section offers a brief description of how End Point Control components
are deployed to users. Both the Aventail Cache Control and Secure Desktop
Emulator are configured on the Agent Configuration page in AMC. For
detailed information, see the Installation and Administration Guide.
EPC component Deployment steps
Aventail Cache Control
Secure Desktop Emulator
SDE is included with the
EX7000 and EX-2500, and
requires separate purchase
with the other appliances.
z Enabled and configured on the Configure Data
Protection page.
z EPC must also be enabled on the End Point
Control Zones page.
z Deployed on a per-realm basis.
z Upload Secure Desktop Emulator license to the
appliance from the Manage Licenses page.
z Enabled and configured on the Configure Data
Protection page.
z EPC must also be enabled on the End Point
Control Zones page.
z Deployed on a per-realm basis.
Page 52

42 | Chapter 3 - Preparing for Installation and Deployment
Page 53

SonicWALL Aventail E-Class SRA Getting Started Guide | 43
Chapter 4
Common VPN Configurations
This chapter walks you through the configuration steps of a typical
deployment: relatively open, remote access for employees, and more
restricted access for partners. As part of this exercise we’ll also make
Aventail WorkPlace look different, depending on which of the two
communities the user belongs to. Following these steps will introduce you to
the Aventail Management Console (AMC) and how its configuration elements
interact.
The sample deployment is followed on page 61 by brief descriptions of other
scenarios for configuring and deploying VPN access for your users.
Deployment Scenario: Remote Access for Employees and Partners
To better understand how to deploy a remote access VPN, go through the
steps in this section to set up rel atively open access for employ ees, and more
restricted remote access for a less trusted group, partners. The assumption
in this scenario is that you have Advanced EPC, which is included in an
evaluation license and with the EX7000 and EX-2500 appliances, and is
otherwise licensed separately.
First we’ll lay the foundation for this sample VPN, con figuring the ite ms that
you’ll make use of later when you set up access for the two communities:
VPN building block Description
Create an
authentication realm
Set up a Microsoft Active Directory (AD)
authentication server.
See “Establishing an Authentication Realm” on
page 45.
Page 54

44 | Chapter 4 - Common VPN Configurations
VPN building block Description
Identify users Add a few test users with names that match ones
on your AD server. For this test scenario we’ll
identify two of them as employees, and two of
them as partners.
See “Identifying Users” on page 47.
Add resources Define just a few resources.
See “Adding Resources” on page 47.
End Point Control Create two Standard zones of trust: a trusted
one for members of the Employees community,
and a less trusted one for Partners. Also create a
quarantine zone, for devices that don’t fit into
either community.
Create WorkPlace styles
and layouts
Change how WorkPlace looks on a percommunity basis. Though optional, this produces
a more polished and customized look. We ’ll
modify the default style and layout and use it for
the employees community, and then create a
different look for the partner community.
See “Customizing WorkPlace” on page 51.
The next step is to put it all together, using the VPN “building blocks” you
created, and configure two communities:
z See “Creating an Employee Community” on page 54
z See “Creating a Partner Community” on page 57
The steps for configuring a community are similar for both:
Setting up communities Description
Members Identify the members for each community.
Access methods Define what access methods are available.
End Point Control Create zones of trust: a trusted one for
members of the Employees community , and a
less trusted one for Partners.
WorkPlace appearance Use di fferent WorkPlace styles and layouts for
the two communities.
Page 55

SonicWALL Aventail E-Class SRA Getting Started Guide | 45
Setting up communities Description
Access control rule Create rules for what resources can be
Throughout these procedures, remember to click Pending Changes in the
upper-right corner in AMC, and then click Apply Changes to save your
configuration changes.
accessed by which users.
See “Access Control Lists” on page 58.
Establishing an Authentication Realm
In order to authenticate your users, you must first define an authentication
realm, which is the combination of an existing company directory and an
authentication method.
1. From the main navigation menu, click Realms, and then click New
realm.
2. Enter a realm name in the Name box. For example, Company XYZ.
3. Click New next to the Authentication server drop-down list.
4. Select Microsoft Active Directory, and then click Continue.
5. Enter a name for the authentication server in the Name box. For
example, Company Directory.
Page 56

46 | Chapter 4 - Common VPN Configurations
6. In the Primary domain controller box, type the host name (assuming
you’ve already configured DNS) or IP address for the authentication
server.
7. To perform Active Directory searches, the appliance must be able to log
on to the authentication server . In the Login name box, type the Active
Directory login name. In the Password box, type the password that
corresponds with the login name.
8. Click the Test button to validate that the connection is properly
configured and that the authentication server is accessible from the
appliance.
9. Resources sometimes require NTLM credentials to be forwar ded to backend Web servers; Outlook is often set up this way. Expand the
Advanced settings, and then scroll down to the NTLM authentication
forwarding area to specify how the domain name portion of the
credentials will be forwarded.
10. forwarding options, and set up one-time passwords
11. Click Save. You will be returned to the Configure Realm page.
Page 57

SonicWALL Aventail E-Class SRA Getting Started Guide | 47
12. From the Authentication server drop-down list, select the
authentication server you just configured (Company Directory).
13. Click Finish (we’ll create communities within the Company XYZ realm
later in this process).
Identifying Users
Using the AD store associated with the Company XYZ realm, add two
“employees” and two “partners”.
X Add users
1. Click Users & Groups in the main navigation menu, and then click the
Users tab.
2. In our sample deployment, we’re going to add just four users (later
you’ll see how to control access to resources based on the user on the
Access Control page). Click New, and then select Manual entry.
3. Create four user mappings:
a. From the Realm name list, select Company XYZ.
b. In the Username box, enter a username as it appears in your AD
server, and then click Save and add another.
c. Continue to add three more users, and then click Save.
Adding Resources
The SonicWALL Aventail appliance can manage a wide variety of corporate
resources, which are described in “Defining Resources” on page 22. For our
sample scenario we will just define a few:
z A network share with marketing materials (intended for business
partners and visible to employees)
z Access to Microsoft Outlook on the Web (intended solely for employees)
X Define two corporate resources
1. Click Resources in the main navigation menu in AMC, and then click
New and select Network share.
2. Enter a name for the resource in the Name box. This is the only
resource in our sample deployment to which partners will have access.
Name it VAR marketing collateral.
3. Using UNC syntax, enter the path for the resource in the Network
share box. For example, \\company_xyz\var\marketing.
Page 58

48 | Chapter 4 - Common VPN Configurations
4. Select Create shortcut on Aventail WorkPlace so that a link to the
resource will be visible to users.
5. Click Save. VAR marketin g collateral is now added to your default
resources.
6. Add a second resource: click New and select URL.
7. In the Name box, enter Outlook Web Access. This resource is intended
for employees only.
8. In the URL box, enter https://mail.company_xyz.com.
9. Select Create shortcut on Aventail WorkPlace.
10. Click Save. You should now see two new items in your resource list:
There are some built-in resources, to make setting up a WorkPlace
portal easier; they cannot be deleted. The Used column indicates
whether a resource is in use (as part of a WorkPlace shortcut or layout,
for example). To see where it is used, expand it. A resource cannot be
deleted until it is no longer used by other configuration elements.
Creating Zones of Trust
End Point Control (EPC) provides extensive protection to ensure that your
users’ access devices are secure. To keep things simple in this example, we
will assume that your appliance has a license for Advanced EPC, and we will
create two Standard zones: a trusted one for members of the Employees
community, and a less trusted one for Partners. We’ll also set up a
Quarantine zone for users (employees or partners) whose devices fail to
match the profiles that we specify.
Creating a zone is simply a way of setting one or more conditions that users
must meet before they are granted secure, remote access to resources. In
our example, the user will be classified into the Trusted zone if a certain
Page 59

SonicWALL Aventail E-Class SRA Getting Started Guide | 49
antivirus program is running (Norton AntiVirus is used in this example, but
you can substitute another program). If the program is not running, the user
is classified into the Untrusted zone.
The conditions you set in a real deployment will of course be different—this
is just a demonstration of how EPC works.
X Create a Standard zone named Trusted for employees
1. From the main navigation menu in AMC, click End Point Control.
2. If the link next to End Point Control is Disabled, click the link and
select the Enable End Point Control check box on the Configure
General Appliance Options page.
3. Click New and then select Standard zone from the menu. The Zone
Definition - Standard Zone page appears.
4. In the Name box, type Trusted.
5. In the All Profiles list, select the check box next to Windows antivirus,
and then click the right arrows (>>) to add it to the In Use list. To see
the attributes in this built-in profile, click its name:
6. At the bottom of the Zone Definition page you can specify whether a
Data protection agent is required. Skip this step for now.
7. The client device will be checked at login to see if it is running either
Norton Antivirus or MacAfee VirusScan. If you want to this check to
reoccur during a given session, set the interval in minutes in the
Recurring EPC area.
8. When you are finished configuring the zone, click Save. The Standard
zone named Trusted is now displayed in the list of End Point Control
zones. In order to match this profile, a user’s device must be running
the security programs you specified in step 5.
In this example, we will classify devices that do not match the Standard zone
we created into a Quarantine zone named Untrusted; see “Create a
Quarantine zone named Untrusted” on page 51.
Page 60

50 | Chapter 4 - Common VPN Configurations
X Create a Standard zone named Partner zone for partners
1. From the main navigation menu in AMC, click End Point Control.
2. Click New and then select Standard zone from the menu.
3. In the Name box, type Partner zone.
4. To create a device profile, click New and then select a platform from
the shortcut menu (for example, Microsoft Windows).
5. Enter a name for the device profile in the Name box. For example,
Symantec AV.
6. Select Antivirus program from the list of attribut e types, and then se lect
a series of antivirus programs. For a match, the client device you plan
to use for testing should have one of these products. For example,
select Symantec Corp. as the vendor, and then select the first three
products in the Product name list, clicking Add to Current Attributes
after each one.
The Current attributes list at the bottom of the AMC page now looks
like this:
7. Click Save.
8. In the All Profiles list, select the check box for Symantec AV, and then
click the right arrow (>>) button.
9. At the bottom of the Zone Definition page select Symantec On-
Demand Protection from the Required data protection tool list. This
third-party program removes data left on the client after a user’s
session, such as the browser cache.
10. The client device will be checked at login to see if it is running one of the
antivirus programs identified in the Symantec AV device profile. If you
want to this check to reoccur during a given session, set the interval in
minutes in the Recurring EPC area.
Page 61

SonicWALL Aventail E-Class SRA Getting Started Guide | 51
11. When you are finished configuring the zone, click Save. The Standard
zone named Partner zone is now displayed in the list of End Point
Control zones.
X Create a
1. From the main AMC navigation menu, click End Point Control.
2. Click New and then select Quarantine zone.
3. Enter a name for the Quarantine zone. For example, Untrusted.
4. In the Customization area, enter the text a user will see if his or her
device does not meet the criteria for any of the Standard zones. For
example, You are not running an antivirus product from the
approved list.
5. Click Save.
Quarantine
Customizing WorkPlace
You can alter the appearance of WorkPlace on a per-community basis by
creating different styles and layouts:
z Styles are used to customize the look and feel of the WorkPlace login and
portal pages. They contain information about fonts, colors, and images
that will be displayed on the WorkPlace site.
z WorkPlace layouts are used to customize page content in terms of links,
groups, navigation, columns, and personal bookmarks. Creating
additional layouts is useful if you find that your access policies don’t
completely define what you want each user to see.
Both styles and layouts are created independent of communities and can be
reused.
In our example we’ll modify the default style and layout slightly for the
Employees community, and then create a different look for the Partners
community .
zone named Untrusted
Modifying the Default Style and Layout
In our example we’ll modify the default style and layout slightly for the
Employees community, and then create a different look for the Partners
community .
Page 62

52 | Chapter 4 - Common VPN Configurations
X Modify the default WorkPlace layout and style
1. Click Aventail WorkPlace in the main navigation menu, and then click
the Appearance tab.
2. Click Default Style in the Styles area.
3. The default “look” for WorkPlace is intended for employees in our
scenario. For now, just change the banner that employees will see. Type
WorkPlace in the Title box.
4. Click Save, and then click Default Layout in the Layouts area.
5. Again, we’ll keep changes to a minimum: on the General page, select
Display the Personal Bookmarks group. This automatically displays
the content in two columns. Click Save.
Creating a New WorkPlace Style and Layout
The appearance of WorkPlace for the Employees community in this sample
deployment has a few changes (the title is different, and personal bookmarks
are included in a two-column page layout). Now we’ll create a different look
for the partner community.
X Create a WorkPlace style for partners
1. On the main navigation menu, click Aventail WorkPlace, and then
click the Appearance tab.
2. In the Styles area, click New.
3. In the Name box, type a unique name for the WorkPlace style. For
example, Partners style.
4. In the Font family list, select the type of font you want to use. (In
general, a sans-serif font is easier to read online.)
5. In the Color scheme list, click the name of the color scheme you want
to use.
6. To replace the SonicWALL Aventail logo that is displayed in WorkPlace
with a different image, use the Replace with box to enter or browse for
the .gif or .jpg file you want to use.
7. When Display gradient background behind logo is selected, the
accent color of your Color scheme is displayed at the top of each
WorkPlace page, gradually going from dark (at the top of the page) to
light. Any heading (Title) that you have appears in white.
Page 63

SonicWALL Aventail E-Class SRA Getting Started Guide | 53
8. On small form factor devices, the logo specified in the Images area is
resized by default. The logo is automatically omitted from WAP and
i-mode devices, so this setting does not affect the display on those
devices.
9. In the Title box, type WorkPlace for Partners.
10. In the Greeting box, type the introductory text that should appear
below the title. If you have multiple pages in WorkPlace, the same text
appears on all of them.
11. To further assist the user, you could specify a custom Help file that
provides more detailed information about the resources available on
your VPN, or describe how to get technical support.
12. Click Save to save Partners style.
X Create a WorkPlace layout for partners
1. On the main navigation menu, click Aventail WorkPlace, and then
click the Appearance tab.
2. In the Layouts area, click New.
3. In the Name box, type a unique name for the WorkPlace layout. For
example, Partners layout.
4. In the Initial content area, select a layout for any shortcuts and
shortcut groups that you’ve defined, or choose to set up an initial
structure for your content and add WorkPlace resources later. No
matter how you decide to l ay ou t y our in itia l c onten t, yo u can c han ge it
later by adding, removing, or rearranging pages and page content.
5. In the Page navigation area, specify the kind of navigation controls
that will be displayed if your content requires more than one page.
6. Specify whether the Intranet Address box will be displayed when this
layout is used. It gives users access to resources by typing a resource
name (a UNC path, URL, or both). Click Next.
7. Click the Edit page properties link to change the basic properties of
this WorkPlace page. Change its name to Partner resources, and then
click Save.
8. Use the page, column, and shortcut controls to add pages, content, and
rearrange the elements on each page (click Help in AMC for details on
using these controls). Rearranging items in a layout or deleting them
from a layout does not affect the resource itself, just its appearance in
WorkPlace.
9. Click Next
will look on devices with different display capabilities. On a mobile
to move to the Device Preview page to see how the layout
Page 64

54 | Chapter 4 - Common VPN Configurations
device, for example, the Intranet Address box cannot be displayed,
even if it is configured to be part of a layout. Click Finish.
Creating an Employee Community
You must now create a new community for your employees. Normally you
would configure this broadly (to include all employees or a group of them).
For now, just add two users.
X Create a community for your employees
1. Click Realms in the main navigation menu, click Company XYZ, and
then click the Communities page.
2. Click New: the Configure Community page appears.
3. Enter a name for the community in the Name box. For example,
Employees.
4. To add users as members of the community, click Edit. The Users and
Groups window is displayed.
Page 65

SonicWALL Aventail E-Class SRA Getting Started Guide | 55
5. Select the check box next to two of the users you added.
6. Click Save. The Users and Groups window closes and the users are
now displayed in the Members list.
7. Click Next to configure the access methods allowed for the Employees
community.
Specifying Access Methods for Employees
For each community of users, you can configure which access methods are
available: Smart Tunnel Access (IP Protocol), Web-based proxy access (TCP
Protocol), or Web access (HTTP).
For the Employees community, it’s likely that you will want to grant open
access so that a user can establish remote access using whatever method is
appropriate for his or her device. By contrast, th e Partners community, in this
example, will have only Web access.
The tunnel clients give users an “in-office” experience, with full VPN access
to their applications. In the following steps you’ll grant Employees the ability
to use OnDemand Tunnel, and set up an IP address pool for the client.
X Specify open, tunnel access for employees
1. In the Smart tunnel access (IP Protocol) section, select the
Network tunnel client check box. If you don’t have an IP address pool
configured yet, a warning is displayed:
2. Click Configure. The Network Tunnel Client Settings page is
displayed.
3. Click Edit next to Address pools.
Page 66

56 | Chapter 4 - Common VPN Configurations
4. On the Address Pools page, click New.
5. In the Name box, enter a label for the IP address pool that will be used
to allocate addresses to the network tunn el clients.
6. There are several ways to specify an address pool. If you’re not sure
which one to choose, select Translated address pool (Source NAT)
so that the appliance will assign non-routable IP addresses to clients
and use Source NAT to translate them to a single address. The
drawback is that applications that require reverse connections, such as
VoIP or active-mode FTP, may not function properly.
7. Click Save. The address pool appears in the Address Pools list.
8. Select the check box next to the address pool you just configured and
click Save.
9. Click OK. You should now be back on the Configure Community -
Access Methods page.
10. Click Next to define the zone of trust for employees.
End Point Control for Employees
Configure the Employees community to use the zone of trust you configured
earlier (“Create a Standard zone named T rusted for employees” on page 49).
X Specify the Trusted zone for ‘Employees’
1. In the Standard zones list, select the check box next to Trusted and
then click the right arrow (>>) button. It is now in the In use list.
2. Under Zone fallback options, click Place into quarantine zone and
then select Untrusted from the drop-down list.
3. Click Next to select WorkPlace appearance settings for employees.
WorkPlace Appearance for Employees
Configure the Employees community to use the W orkPlace “look” you defined
earlier (“Modify the default WorkPlace layout and style” on page 52).
X Specify the Default style and layout for ‘Employees’
1. In the Style list, select Partners style, and in the Layout list, select
Partners layout.
2. On smaller devices, the layout for this community is automatically
changed to accommodate them; for example, the Intranet Address box
Page 67

SonicWALL Aventail E-Class SRA Getting Started Guide | 57
(if it is part of the layout) will be displayed on an advanced mobile
device, but not a basic one.
3. Click Finish.
Creating a Partner Community
To give remote access to partners—a less trusted group of users—create a
separate community.
X Create a community for partners
1. From the main navigation menu in AMC, click Realms, and then click
Company XYZ.
2. On the Configure Realm page, click the Communities link at the top;
you’ll see the Employees and Default communities. Click New.
3. Enter a name for the new community in the Name box. For example,
Partners.
4. To add users to the Partners community, click Edit. The Users and
Groups window is displayed.
5. You’ll see the users you added in “Identifying Users” on page 47. Click
the check box next to a one or two of them.
6. Click Next to configure the access methods allowed for partners.
Specifying An Access Method for Partners
The Partners community should be configured for Web access only.
X Specify Web access for partners
1. Clear the Network tunnel client (OnDemand) check box; only Web
proxy agent should be selected.
2. Click Next to define the zone of trust for partners.
End Point Control for Partners
Configure the Partners community to use the zone of trust you configured
earlier (“Create a Standard zone named Partner zone for partners” on
page 50).
Page 68

58 | Chapter 4 - Common VPN Configurations
X Specify the Partner zone for partners
1. In the Standard zones list, select the check box next to Partner zone,
and then click the right arrow (>>) button to put it in the In use list.
2. Under Zone fallback options, click Place into quarantine zone and
then select Untrusted from the drop-down list.
3. Click Next to select WorkPlace appearance settings for partners.
WorkPlace Appearance for Partners
Configure the Partners community to use the WorkPlace “look” you defined
earlier (“Creating a New WorkPlace Style and Layout” on page 52).
X Specify the new style and layout for the partners community
1. In the Style list, select Partners style, and in the Layout list, select
Partners layout.
2. On smaller devices, the layout for this community is automatically
changed to accommodate them; for example, the Intranet Address box
(if it is part of the layout) will be displayed on an advanced mobile
device, but not a basic one.
3. Click Finish.
Access Control Lists
Broadly speaking, access rules define which resources can be accessed by
which users. They can be defined very broadly (all the users in Group X have
access to any corporate resource), or very narrowly (the users in Group Y
have Web-only access to a single resource).
In our example we’ll keep it simple and give the Partners community access
to the resource named VAR marketing collateral, and give Employees access
to all of the resources. The appliance evaluates the rules in numbered order.
If a match is found, the permit or deny action is applied and no further rules
are evaluated.
X Add a rule that gives partners access to VAR marketing collateral
1. Click Access Control from the AMC navigation menu, and th en click
New.
2. Type a name for the rule (for example, Partner materials) and leave
the Action as Permit.
Page 69

SonicWALL Aventail E-Class SRA Getting Started Guide | 59
3. Next to the From box, click the Edit button, and then select the check
box next to the Partners community.
4. Click the Edit button next to the To box, and then select the check box
next to VAR marketing collateral in the Resources list.
5. Click Finish and Add Another.
X Add a rule that gives employees access to all resources
1. Type a name for the second rule (FT employees only) and leave the
Action as Permit.
2. Next to the From box, click the Edit button, and then select the check
box next to the Employees community.
3. Click Finish. Your access control list now looks like this (Default
Workplace permit all rule is present by default in an “open policy”):
Testing the Deployment Scenario
To test out the scenario you have configured, log in to WorkPlace as an
employee, and then (in a separate session) as a partner.
T o get to W orkPlac e, click Home in the upper-right corner of any AMC page,
and then click the link for WorkPlace, just under the appliance image.
X Log in as an employee
In “Creating an Employee Community” on page 54, you set up two
users who belong to the Employees community. Log in using the
credentials of one of those users. If you are in the Trusted zone (that is,
your device has the attributes specified in the Windows antivirus device
Page 70

60 | Chapter 4 - Common VPN Configurations
profile), among the resources you should see will be the two you set up
in “Adding Resources” on page 47:
X Log in as a partner
In “Creating a Partner Community” on page 57, you set up at least one
user who belongs to the Partners community. Log in using the
credentials of that user. If you are in the Partners zone—meaning that
your device has the attributes specified in the Symantec AV device
profile—among the resources you should see will be VAR marketing
collateral. This is because the appliance found a match for you in the
Page 71

SonicWALL Aventail E-Class SRA Getting Started Guide | 61
first access control rule; once a match is found, no further rules are
evaluated.
Other Remote Access VPN Scenarios
T o better understand how to deploy a remote access VPN, here is an overview
of some common scenarios.
Providing Access to Web Resources
Web resources are applications or services that run over the HTTP or HTTPS
protocols, such as Microsoft Outlook Web Access or a corporate intranet.
There are several ways to give users access to these resources—choose the
method that is appropriate for your various audiences. For example, you can
give business partners narrow access to a Web application by specifying a
particular URL in your resource definition. Employees are granted broader
access if you define the domain in which that Web application is located as a
resource.
Page 72

62 | Chapter 4 - Common VPN Configurations
Defining Specific Web Resources
To provide user access to a specific Web application or other Web resource:
1. Define a URL resource on the Add/Edit Resource page.
2. Create an access control rule referencing the URL on the Add/Edit
Access Rule page.
3. Add a Web shortcut to WorkPlace on the WorkPlace Shortcuts page.
Web Resources on a Portion of Your Network
To provide user access to any Web resource on a given portion of your
network:
1. Define a resource (such as a subnet or IP address range) for the portion
of the network containing the Web resources on t he Add/Edit
Resource page.
2. Create a rule referencing the network object on the Add/Edit Access
Rule page.
3. Instruct your users to type the host name or URL for any Web resources
in the Intranet Address box on WorkPlace.
All Web Resources on Your Network
To provide user access to all the Web resources on your network:
1. Define a resource (such as a domain) for all internal DNS domains on
the Add/Edit Resource page.
2. Create a rule referencing the network object on the Add/Edit Access
Rule page.
3. Instruct users to type the host name or URL for any Web resources in
the Intranet Address box on WorkPlace.
Web-Based File Access to Entire Networks
To provi d e Web-based access to all the file system resources within a
domain:
1. Define a resource referencing your Windows domain on the Add/Edit
Resource page.
2. Create a rule referencing the domain on the Add/Edit Access Rule
page.
Page 73

SonicWALL Aventail E-Class SRA Getting Started Guide | 63
3. Add a network shortcut referencing the domain on the WorkPlace
Shortcuts page.
4. Make sure WorkPlace’s Network Explorer tab is enabled (this is the
default state).
5. Instruct your users to click the appropriate link to the file system
resource in Network Explorer.
Broad Access to Network Resources
T o giv e users comprehensiv e access to y our network resource s from devices
that are owned and managed by your organization, distribute these clients,
which run on a wide variety of devices:
z Connect Tunnel clients run on Windows, Macintosh, and Linux devices
z The Connect Mobile client gives users with Windows Mobile-powered
devices access to both Web and client/server applications
To allow broad, “in-office” access to your network:
1. Define a resource referencing your DNS domain on the Add/Edit
Resource page.
2. Create a rule referencing the domain on the Add/Edit Access Rule
page.
3. Configure and distribute the network tunnel clients to your users.
Remote Access for Mobile Users
There are two remote access solutions for mobile device users:
WorkPlace Mobile is a Web portal that provides access to Web-based
applications from virtually any mobile device with a functional Web browser .
You also have the option of customizing the appearance of the portal for
mobile devices. For detailed information on this solution, see the “WorkPlace
and Small Form Factor Devices” section of the Installation and Administration
Guide or the AMC online help.
Connect Mobile is a proxy client for Windows Mobile-powered devices that
gives users access to a broad range of Web and client/server applications.
Connect Mobile users can reach secure, intranet resources that are not
available using traditio nal W eb-only acc ess. A link in an e-mail message, for
example, to a confidential Word document located on an internal server can
be opened just as if the recipient were in the office.
Page 74

64 | Chapter 4 - Common VPN Configurations
Connect Mobile can also be used with any client/server application that is
supported by the mobile device. A salesperson, for example, can use
inventory management and CRM applications to send and receive account
and supply information securely from any location where there is Internet
access. Instead of synchronizing data at the end of the day , opportunities and
sales-related activities can be tracked in real-time.
Additional Partner VPN Scenarios
Here are examples of common steps for deploying a VPN to business
partners. These scenarios could also be useful in providing VPN access to
contractors or other third-party users who require access to your network
resources.
Access to a Specific Web Resource Using an Alias
T o provide access to a specific Web resource, using an alias to prevent users
from seeing its internal host name:
1. Define a URL resource on the Add/Edit Resource page, and then
specify an alias for the resource in the page’s Advanced section.
2. Create a rule referencing the URL on the Add/Edit Access Rule page.
3. Add a Web shortcut to WorkPlace on the WorkPlace Shortcuts page.
Web-based Access to a Client/Server Application
T o provide Web access to a client/server application, such as a CRM system:
1. Define a network resource on the Add/Edit Resource page,
referencing the application’s host name or IP address.
2. Create a rule on the Add/Edit Access Rule page referencing the
network resource.
3. Configure the OnDemand Tunnel client.
4. Add a Web shortcut on the WorkPlace Shortcuts page.
End Point Control Scenarios
Here are some basic examples of how to deploy End Point Control to protect
sensitive data and ensure that your network is not compromised when
accessed from devices in untrusted environments.
Page 75

SonicWALL Aventail E-Class SRA Getting Started Guide | 65
Quarantining Employees on Untrusted Systems
Follow these configuration steps to quar antine an employee who logs in using
a device that doesn’t match any of your device profiles. The only resources
available will be those that you set up. You could, for example, display a
customized page with links to Web resources for bringing the user’s system
into compliance with your security policies:
1. Define a device profile on the Device Profile Definition page with an
attribute referencing an application or other attribute that is unique to
your organization.
2. Configure a Standard zone that references the device profile in step 1.
3. Configure a Quarantine zone that displays a custom Web page with links
to resources for bringing a user’s system into compliance.
4. Create a community that references the Standard zone you created,
and identify the Quarantine zone as your fallback option. Connection
requests from devices that don’t match the trusted profile are
automatically assigned to the Quarantine zone.
Secure Desktop Emulator for Partners
T o deploy OPSWA T Secure Desktop Emulator (which is part of Advanced EPC)
to business partners who are connecting from their company domain:
1. Enable Secure Desktop Emulator on the Agent Configuration page in
AMC.
2. Define a device profile with an attribute referencing the partner’s
Windows domain name.
3. Reference the device profile in a zone, and configure the zone to require
Secure Desktop Emulator.
4. Reference the zone in the community used by your partners.
5. Configure the Default zone to block VPN access (this will prevent
unknown systems from accessing the network).
Denying Access
There may be situations in which you want to deny access to an employee
using a device that has an unacceptable profile. Follow these configuration
steps to deny access to an employee who logs in using a device that is
running Google Desktop:
1. Define a device profile with an attribute referencing the Google Desktop
application.
Page 76

66 | Chapter 4 - Common VPN Configurations
2. Reference the device profile in a Deny zone.
3. Reference the Deny zone in the community used by your employees.
4. The appliance determines that the device is running Google Desktop,
making it a match for a Deny zone. Deny zones are always evaluated
first: if Google Desktop is running, no other zones are evaluated, the
access request is denied, and the user is logged out.
Access Policy Scenarios
Access control rules determine what resources are available to users or
groups. Rules can be defined broadly to provide access from any access
method, or defined narrowly so that only a specific access method is
permitted.
VPN connections typically involve what are called forward connections—these
are initiated by a user to a network resource. All access methods support
forward connections. However , if y ou are running the network tunnel service
and you deploy the network tunnel clients to your users, you can also create
access control rules for bi-directional connections.
For the SonicWALL Aventail VPN, bi-directional connections encompass:
z Reverse connections from a network resource to a VPN user, such as an
SMS server that “pushes” a software update to users’ computers.
z Cross-connections using Voice over Internet Protocol (V oIP) applications
that enable one VPN user to telephone another VPN user. These
connections require a pair of access control rules: one for the forward
connection and one for the reverse connection. For information on VoIP
scenarios, see “Providing Access to Voice Over IP (VoIP)” on page 67.
z Other types of bi-directional connections include FT P servers that
download files to or upload files from a VPN user, and remote Help Desk
applications.
Application-Specific Scenarios
Here are some examples of how to configure the appliance to permit remote
users to access some commonly used applications, such as Microsoft Outlook
Web Access and Citrix.
Page 77

SonicWALL Aventail E-Class SRA Getting Started Guide | 67
Providing Access to Outlook Web Access (OWA)
For convenience, AMC includes a pre-configured Web application profile for
Microsoft Outlook Web Access (OWA). To provide user access to OWA:
1. Define a URL resource for the Outlook Web Access server on the
Add/Edit Resource page.
2. Select OWA/Single Sign-On as the Web application profile on the
Add/Edit Resource page. This automatically configures single sign-on
and content translation for OWA.
3. Create an access control rule referencing the OWA server resource on
the Add/Edit Access Rule page.
4. Add a Web shortcut to OWA for Aventail WorkPlace users on the
Add/Edit Web Shortcut page.
5. Use the Start page box on the Add/Edit Web Shortcut page to
append more specific information to the URL for OWA. For example, if
you want the shortcut to point to a directory or file other than the root,
type a relative path in the Start page box. If the selected URL for
Outlook Web Access is owa.company_xyz.com, for example, you could
set the start page to /mail/root.asp. The resulting URL would be
https://owa.company_xyz.com/mail/root.asp.
You can also create a resource that will block e-mail attachments; see the
description of the Matching URL resource type in the AMC help.
Providing Access to Voice Over IP (VoIP)
To permit users running one of the network tunnel clients to call e a ch o th er
using a Voice over IP (VoIP) telephony application, follow the steps outlined
next.
1. Ensure that the network tunnel service is running on the appliance; you
can do this on the AMC home page or Services page.
2. Create an IP address pool for the network tunnel clients (Connect
Tunnel or OnDemand Tunnel) on the Configure Network Tunnel
Service page.
3. Ensure that the users who will access the VoIP application belong to a
community that is configured to deploy one of the network tunnel
clients to their computers. This is done on the Access Methods tab of
the Configure Community page.
4. Create an access control rule from the VoIP users to the address pool
that will be used for the VoIP application on the Add/Edit Access Rule
page.
Page 78

68 | Chapter 4 - Common VPN Configurations
5. Create a second access control rule from the address pool for the VoIP
application to the VoIP users the Add/Edit Access Rule page.
Providing Access to Windows Terminal Services or Citrix Resources
To give us ers access to an individual Windows Terminal Services or Citrix
host, or a Citrix server farm, follow the steps outlined here:
1. Install or update the Windows Terminal Services agent or the Citrix
agent on the Configure Graphical Terminal Agents page.
2. Define a resource on the Add/Edit Resource page for the Windows
Terminal Services or Citrix host, or the Citrix server farm.
3. Create a rule on the Add/Edit Access Rule page referencing the
terminal-server resource.
4. Create a WorkPlace shortcut for accessing the Windows Terminal
Services host or Citrix resource on the Add/Edit Terminal Shortcut
page.
Authentication Scenarios
Realms are used by the appliance for the following key purposes:
z Referencing external authentication servers
z Provisioning access agents to VPN users, based on community
membership
z Determining which End Point Control restrictions are imposed on users’
devices
z Controlling the user’s login experience at a WorkPlace portal
Using Multiple Realms vs. a Single Realm
If your organization uses only one authentication server , you’ll probably need
to configure only one realm in AMC. There are other situations in which
multiple authentication servers are required:
z Multiple user repositories—If your users are stored in multiple
directories, you must create a separate realm for each one. For example,
if your employees are stored on an LDAP server, while your business
partners are stored on an Active Directory server, you would create a
separate realm for each directory server.
z Chained authentication—For increased security, you can require users to
authenticate to a single realm using two different authentication
methods. For example, you could set up RADIUS or a digital certificate
Page 79

SonicWALL Aventail E-Class SRA Getting Started Guide | 69
as the first authentication method, and LDAP or Active Directory as the
second one. To make the login experience for your users a one-step
process you can configure AMC such that users see only one set of
prompts.
Access Component Provisioning
All of the user access components are provisioned or activated throug h the
WorkPlace portal.
Optionally , you ca n make the Connect Tunnel client components a vailable for
users to download and install from another network location (such as a Web
server, FTP server , or file server), without requiring them to log in to Aventail
WorkPlace.
User access agents are deployed on a per-community basis. When
configuring a user community, you can specify which access methods will be
available to community members to connect to resources on your network.
When a user logs in to Aventail WorkPlace for the first time, WorkPlace
automatically provisions and installs the appropriate user access agent based
on the user’s community settings. The agent that is deployed will be installed
on the user’s computer; on subs equent connections from the same comput er
with the same Web browser, that same agent is automatically deployed.
Deploying the Same Agents to All Users
When you create an authentication realm in AMC, a default community
associated with the realm is also automatically created. This single
community may be sufficient if you have a homogenous group of users
whose resource needs and access methods are identical.
The configuration steps involved in creating a single community are as
follows:
1. Create a realm on the General section of the Configure Realm page
that references an external authentication server. AMC automatically
creates a default community that is referenced by the realm. The
default community settings are global and apply to any realms that
reference it.
2. Configure the community by selecting the users or groups who belong
to it, the access methods they’ll use to connect to the VPN, and
optionally any End Point Control options.
Page 80

70 | Chapter 4 - Common VPN Configurations
If you have a diverse group of remote users, you’ll probably want to create
multiple communities, as descri bed next.
Deploying Different Agents to Different Users
Multiple communities give you the flexibility to provision different access
agents to different populations of users, and to deploy different End Point
Control configurations. Even if your users are stored on a single external
authentication server, you may want to segment them by function in your
organization, by the types of resources to which they need access, or for
security reasons.
For example, you ma y want to create a community for those employees who
use IT-managed laptops for remote access, and provision them with the
Connect Tunnel client to allow them extensive access to your network
resources. For your business partners, you may want to create a community
that restricts them to Web access and assigns them to an End Point Control
zone that provisions a data protection tool to remove all session data after
they log off.
The configuration steps involved in creating multiple communities are
described in “Deployment Scenario: Remote Access for Employees and
Partners”, beginning on page 43.
Page 81

SonicWALL Aventail E-Class SRA Getting Started Guide | 71
Chapter 5
Safety and Regulatory Information
The SonicWALL appliance is designed to be mounted in a standard 19-inch
rack mount cabinet. The conditions required for proper installation depend
on which model you have:
SRA EX6000 (model 1RK20-05A)
z “Safety Information for E-Class SRA EX6000” (below)
z “Sicherheit Information für das E-Class SRA EX6000 Gerät”
(safety information in German), page 73
SRA EX7000 (model 1RK15-059)
z “Safety Information for E-Class SRA EX7000” on page 75
z “Sicherheit Information für das E-Class SRA EX7000 Gerät”
(safety information in German), page 77
Regulatory information for all models is detailed in “FCC Part 15 Class A
Notice” on page 79.
Safety Information for E-Class SRA EX6000
Model Product
1RK20-05A SRA EX6000
z Use the mounting hardware recommended by the rack manufacturer and
ensure that the rack is adequate for the application.
z Four mounting screws, compatible with the rack design, must be used
and hand tightened to ensure secure installation. Choose a mounting
location where all four mounting holes line up with those of the mounting
bars of the 19-inch, rack mount cabinet.
Page 82

72 | Chapter 5 - Safety and Regulatory Information
z Mount in a location away from direct sunlight and sources of heat. A
maximum ambient temperature of 104º F (40º C) is recommended.
z Route cables away from power lines, fluorescent lighting fixtures, and
sources of noise such as radios, transmitters, and broadband amplifiers.
z The included power cord is intended for use in North America only. For
European Union (EU) customers, a power cord is not included.
z Ensure that no water or excessive moisture can enter the unit.
z Allow unrestricted airflow around the unit and through the vents on the
side of the unit. A minimum of 1 inch (25.44mm) clearance is
recommended.
z If installed in a closed or multi-unit rack assembly , the operating ambient
temperature of the rack environment may be greater than room
ambient. Therefore, consideration should be given to installing the
equipment in an environment compatible with the maximum
recommended ambient temperature shown above.
z Mount the SonicWALL appliances evenly in the rack in order to prevent a
hazardous condition caused by uneven mechanical loading.
z Consideration must be given to the connection of the equipment to the
supply circuit. The effect of overloading the circuits has minimal impact
on overcurrent protection and supply wiring. Appropriate consideration
of equipment nameplate ratings must be used when addressing this
concern.
z This product is not intended to be installed and used in a home or public
area accessible to the general population. When installed in schools this
equipment must be installed in a secure location accessible only by
trained personnel.
z Thumbscrews should be tightened with a tool after both installation and
subsequent access to the rear of the product.
z Reliable grounding of rack-mounted equipment must be maintained.
Particular attention must be given to power supply connections other
than direct connections to the branch circuits, such as power strips.
Lithium Battery Warning
The lithium battery used in the SonicWALL appliance may not be replaced by
the user. The appliance must be returned to a SonicWALL authorized service
center for battery replacement with the same or equivalent type
recommended by the manufacturer. If, for any reason, the battery or
SonicWALL appliance must be disposed of, do so following the battery
manufacturer's instructions.
Page 83

SonicWALL Aventail E-Class SRA Getting Started Guide | 73
Cable Connections
All Ethernet and RS232 (console) cables are designed for intra-building
connection to other equipment. Do not connect these ports directly to
communication wiring or other wiring that exits the building in which the
SonicWALL appliance is located.
Sicherheit Information für das E-Class SRA EX6000 Gerät
Modell Produkt
1RK20-05A SRA EX6000
Das SonicWALL Modell ist für eine Montage in einem standardmäßigen
19-Zoll-Rack konzipiert. Für eine ordnungsgemäße Montage sollten die
folgenden Hinweise beachtet werden:
z Vergewissern Sie sich, daß das Rack für dieses Gerät geeignet ist und
verwenden Sie das vom Rack-Hersteller empfohlene Montagezubehör.
z Verwenden Sie für eine sichere Montage vier passende Befestigungs-
schrauben, und ziehen Sie diese mit der Hand an.
z Wählen Sie für die Montage einen Ort, der keinem direkten Sonnenlicht
ausgesetzt ist und sich nicht in der Nähe von Wärme quellen befindet. Die
Umgebungstemperatur darf nicht mehr als 40° C betragen.
z Achten Sie darauf, daß sich die Netzwerkkabel nicht in der unmittelbaren
Nähe von Stromleitungen, Leuchtstoffröhren und Störquellen wie
Funksendern oder Breitbandverstärkern befinden.
z Das beigefügte Netzkabel ist nur für den Gebrauch in Nordamerika
vorgesehen. Für Kunden in der Europäischen Union ist kein Kabel
beigefügt.
z Stellen Sie sicher, daß das Gerät vor Wasser und hoher Luftfeuchtigkeit
geschützt ist.
z Stellen Sie sicher , daß die Luft um das Gerät herum zirkulieren kann und
die Lüftungsschlitze an der Seite des Gehäuses frei sind. Hier ist ein
Belüftungsabstand von mindestens 26 mm einzuhalten.
z Wenn das Gerät in einem geschlossenen 19"-Gehäuse oder mit mehreren
anderen Geräten eingesetzt ist, wird die Temperatur in der Gehäuse
höher sein als die Umgebungstemperatur. Achten Sie darauf, daß die
Umgebungstemperatur nicht mehr als 40° C beträgt.
z Bringen Sie die SonicWALL waagerecht im Rack an, um mögliche
Gefahren durch ungleiche mechanische Belastung zu vermeide n.
Page 84

74 | Chapter 5 - Safety and Regulatory Information
z Prüfen Sie den Anschluss des Geräts an die Stromversorgung, damit der
Überstromschutz sowie die elektrische Leitung nicht von einer
eventuellen Überlastung der Stromversorgung beeinflusst werden.
Prüfen Sie dabei sorgfältig die Angaben auf dem Aufkleber des Geräts.
z Dieses Produkt ist nicht dafür entwickelt, um in Bereichen mit öffent-
lichem Zugriff betrieben zu werden. Wenn es in Schulen betrieben wird
stellen Sie sicher, daß sich das Gerät in einem abgeschlossenen Raum
installier wird, der nur von speziell ausgebildetem Personal betrieben
werden kann.
z Die an der Geräterückseite befindlichen Schrauben sollten mit einem
entsprechenden Werkzeug festgezogen werden.
z Vergewissern Sie sich, daß das Gerät sicher im Rack befestigt ist.
Insbesondere muss auf nicht direkte Anschlüsse an Stromquellen
geachtet werden wie z. B. bei Verwendung von Mehrfachsteckdosen.
Hinweis zur Lithiumbatterie
Die in der Internet Security Appliance von SonicWALL verwendete
Lithiumbatterie darf nicht vom Benutzer ausgetaus cht werden. Zum
Austauschen der Batterie muss die SonicWALL in ein von SonicWALL
autorisiertes Service-Center gebracht werden. Dort wird die Batterie durch
denselben oder entsprechenden, vom Hersteller empfohlenen Batterietyp
ersetzt. Beachten Sie bei einer Entsorgung der Batterie oder der SonicWALL
Internet Security Appliance die diesbezüglichen Anweisungen des
Herstellers.
Kabelverbindungen
Alle Ethernet- und RS232-C-Kabel eignen sich für die Verbindung von
Geräten in Innenräumen. Schließen Sie an die Anschlüsse der SonicWALL
keine Kabel an, die aus dem Gebäude in dem sich das Gerät befindet,
herausgeführt werden.
Page 85

SonicWALL Aventail E-Class SRA Getting Started Guide | 75
Safety Information for E-Class SRA EX7000
Model Product
1RK15-059 SRA EX7000
z Use the mounting hardware recommended by the rack manufacturer and
ensure that the rack is adequate for the application.
z Four mounting screws, compatible with the rack design, must be used
and hand tightened to ensure secure installation. Choose a mounting
location where all four mounting holes line up with those of the mounting
bars of the 19-inch, rack mount cabinet.
z Mount in a location away from direct sunlight and sources of heat. A
maximum ambient temperature of 104º F (40º C) is recommended.
z Route cables away from power lines, fluorescent lighting fixtures, and
sources of noise such as radios, transmitters, and broadband amplifiers.
z The included power cord is intended for use in North America only. For
European Union (EU) customers, a power cord is not included.
z Ensure that no water or excessive moisture can enter the unit.
z Allow unrestricted airflow around the unit and through the vents on the
side of the unit. A minimum of 1 inch (25.44mm) clearance is
recommended.
z If installed in a closed or multi-unit rack assembly , the operating ambient
temperature of the rack environment may be greater than room
ambient. Therefore, consideration should be given to installing the
equipment in an environment compatible with the maximum
recommended ambient temperature shown above.
z Mount the SonicWALL appliances evenly in the rack in order to prevent a
hazardous condition caused by uneven mechanical loading.
z Consideration must be given to the connection of the equipment to the
supply circuit. The effect of overloading the circuits has minimal impact
on overcurrent protection and supply wiring. Appropriate consideration
of equipment nameplate ratings must be used when addressing this
concern.
z DC configuration includes input cable with protective earthing conductor
(green and yellow wire). This conductor must be connected to safety
earth ground of circuit.
z Never remove or install a power supply with the AC power cord attached
to the power supply being removed or installed.
z A suitably rated, listed branch circuit breaker shall be provided as part of
the building installation.
Page 86

76 | Chapter 5 - Safety and Regulatory Information
z DC rating includes tolerances. Do not operate product outside of range
shown on product label.
z This model is shipped as AC mains configuration with standard 3
conductor inlet appliance couplers (IEC 60320 C14). A separate DC
conversation kit is available to change the configuration to DC mains. The
DC mains connector is a keyed square 6 conductor with two blank
locations. Do not connect AC mains configurations to DC mains and do
not connect DC configurations to AC mains. Detailed instructions are
provided with the DC conversion kit. Product must be configured as all
DC voltage or AC voltage.
z This product is not intended to be installed and used in a home or public
area accessible to the general population. When installed in schools this
equipment must be installed in a secure location accessible only by
trained personnel.
z Thumbscrews should be tightened with a tool after both installation and
subsequent access to the rear of the product.
z Reliable grounding of rack-mounted equipment must be maintained.
Particular attention must be given to power supply connections other
than direct connections to the branch circuits, such as power strips.
Lithium Battery Warning
The lithium battery used in the SonicWALL appliance may not be replaced by
the user. The appliance must be returned to a SonicWALL authorized service
center for battery replacement with the same or equivalent type
recommended by the manufacturer. If, for any reason, the battery or
SonicWALL appliance must be disposed of, do so following the battery
manufacturer's instructions.
Cable Connections
All Ethernet and RS232 (console) cables are designed for intra-building
connection to other equipment. Do not connect these ports directly to
communication wiring or other wiring that exits the building in which the
SonicWALL appliance is located.
Page 87

SonicWALL Aventail E-Class SRA Getting Started Guide | 77
Sicherheit Information für das E-Class SRA EX7000 Gerät
Modell Produkt
1RK15-059 SRA EX7000
Das SonicWALL Modell ist für eine Montage in einem standardmäßigen
19-Zoll-Rack konzipiert. Für eine ordnungsgemäße Montage sollten die
folgenden Hinweise beachtet werden:
z Vergewissern Sie sich, daß das Rack für dieses Gerät geeignet ist und
verwenden Sie das vom Rack-Hersteller empfohlene Montagezubehör.
z Verwenden Sie für eine sichere Montage vier passende Befestigungs-
schrauben, und ziehen Sie diese mit der Hand an.
z Wählen Sie für die Montage einen Ort, der keinem direkten Sonnenlicht
ausgesetzt ist und sich nicht in der Nähe von Wärme quellen befindet. Die
Umgebungstemperatur darf nicht mehr als 40° C betragen.
z Achten Sie darauf, daß sich die Netzwerkkabel nicht in der unmittelbaren
Nähe von Stromleitungen, Leuchtstoffröhren und Störquellen wie
Funksendern oder Breitbandverstärkern befinden.
z Das beigefügte Netzkabel ist nur für den Gebrauch in Nordamerika
vorgesehen. Für Kunden i n der Europaïschen Union (EU) ist ein Netzkabel
nicht im Lieferumfang enthalten.
z Stellen Sie sicher, daß das Gerät vor Wasser und hoher Luftfeuchtigkeit
geschützt ist.
z Stellen Sie sicher , daß die Luft um das Gerät herum zirkulieren kann und
die Lüftungsschlitze an der Seite des Gehäuses frei sind. Hier ist ein
Belüftungsabstand von mindestens 26 mm einzuhalten.
z Wenn das Gerät in einem geschlossenen 19"-Gehäuse oder mit mehreren
anderen Geräten eingesetzt ist, wird die Temperatur in der Gehäuse
höher sein als die Umgebungstemperatur. Achten Sie darauf, daß die
Umgebungstemperatur nicht mehr als 40° C beträgt.
z Bringen Sie die SonicWALL waagerecht im Rack an, um mögliche
Gefahren durch ungleiche mechanische Belastung zu vermeide n.
z Prüfen Sie den Anschluss des Geräts an die Stromversorgung, damit der
Überstromschutz sowie die elektrische Leitung nicht von einer
eventuellen Überlastung der Stromversorgung beeinflusst werden.
Prüfen Sie dabei sorgfältig die Angaben auf dem Aufkleber des Geräts.
z Entfernen Sie nie das Netzteil und betreiben sie das Gerät nur mit
passenden Stromkabeln.
z Achten Sie darauf, daß der Stromkreis durch eine angemessene
Sicherung abgesichert ist.
Page 88

78 | Chapter 5 - Safety and Regulatory Information
z Betreiben Sie das Gerät nicht ausserhalb der auf dem Geräteetikett
angegebenen Spezifikationen.
z Dieses Model wird in einer Wechselspannungskonfiguration mit
3-poligem Geräteanschluss (IEC 60320 C14) ausgeliefert. Ein Umrüstsatz auf Gleichspannung ist als Zubehör erhältli ch. Der Gleichspannungsanschluss enthält 6 Pole und 2 unbesetzte Felder. Schliessen
sie keine Gleichspannung an den Wechselspannungsanschluss und
schliessen sie keine Wechselspannung an den Gleichspannungsanschluss
an. Detaillierte Informationen befinden sich im GleichspannungsUmrüstsatz. Das Produkt muss entweder komplett mit W echselspannung
oder komplett mit Gleichspannung ausgerüstet sein.
z Dieses Produkt ist nicht dafür entwickelt, um in Bereichen mit öffent-
lichem Zugriff betrieben zu werden. Wenn es in Schulen betrieben wird
stellen Sie sicher, daß sich das Gerät in einem abgeschlossenen Raum
installier wird, der nur von speziell ausgebildetem Personal betrieben
werden kann.
z Die an der Geräterückseite befindlichen Schrauben sollten mit einem
entsprechenden Werkzeug festgezogen werden.
z Vergewissern Sie sich, daß das Gerät sicher im Rack befestigt ist.
Insbesondere muss auf nicht direkte Anschlüsse an Stromquellen
geachtet werden wie z. B. bei Verwendung von Mehrfachsteckdosen.
Hinweis zur Lithiumbatterie
Die in der Internet Security Appliance von SonicWALL verwendete
Lithiumbatterie darf nicht vom Benutzer ausgetaus cht werden. Zum
Austauschen der Batterie muss die SonicWALL in ein von SonicWALL
autorisiertes Service-Center gebracht werden. Dort wird die Batterie durch
denselben oder entsprechenden, vom Hersteller empfohlenen Batterietyp
ersetzt. Beachten Sie bei einer Entsorgung der Batterie oder der SonicWALL
Internet Security Appliance die diesbezüglichen Anweisungen des
Herstellers.
Kabelverbindungen
Alle Ethernet- und RS232-C-Kabel eignen sich für die Verbindung von
Geräten in Innenräumen. Schließen Sie an die Anschlüsse der SonicWALL
keine Kabel an, die aus dem Gebäude in dem sich das Gerät befindet,
herausgeführt werden.
Page 89

SonicWALL Aventail E-Class SRA Getting Started Guide | 79
FCC Part 15 Class A Notice
The following regulatory information applies to both the SRA EX6000 (model
1RK20-05A) and the SRA EX7000 (model 1RK15-059).
NOTE: This equipment was tested and found to comply with the limits for a
Class A digital device, pursuant to Part 15 of the FCC R ules. These limits are
designed to provide reasonable protection against harmful interference when
the equipment is operated in a commercial environment. This equipment
generates, uses, and can radiate radio frequency energy. And if not installed
and used in accordance with the instruction manual, the device may cause
harmful interference to radio communications. Operation of this equipment
in a residential area is likely to cause harmful interference in which case the
user is required to correct the interference at his own expense.
Complies with EN 55022 Class A and CISPR22 Class A.
Caution: Modifying this equipment or using this equipment for purposes not
shown in this manual without the written consent of SonicWALL, Inc. could
void the user's authority to operate this equipment.
Canadian Radio Frequency Emissions Statement
This Class A digital apparatus complies with Canadian ICES-003.
Cet appareil numérique de la classe A est conforme à la norme NMB- 003 du
Canada.
CISPR 22 (EN 55022) Class A
Warning: This is a class A product. In a domestic environment, this product
may cause radio interference in which case the user may be required to take
adequate measures.
Declaration of Conformity
Application of council Directive 2004/108/EC (EMC) AND 2006/95/EC (LVD)
Standards to which conformity is declared:
EN 55022 (2006) Class A
EN 55024 (1998) +A2
EN 61000-3-2 (2006)
EN 61000-3-3 (1995) +A2
EN 60950-1 (2001) +A11
National Deviations: AR, A T, AU, BE, BR, CA, CH, CN, CZ, DE, DK, FI, FR, GB,
GR, HU, IL, IN, IT, JP, KE, KR, MY, NL, NO, PL, SE, SG, SI, SK, US
Page 90

80 | Chapter 5 - Safety and Regulatory Information
BMSI Statement
VCCI Statement
Regulatory Information for Korea
Ministry of Information and Telecommunication Certification Number
Model 1RK15-079 is KCC SWL-1RK15-059(A)
Model 1RK20-05A is KCC SWL-1RK20-05A(A)
All products with country code “” (blank), “A”, or “J” are made in the USA.
All products with country code “B” are made in China.
All products with country code “C” or “D” are made in Taiwan R.O.C.
Page 91

SonicWALL Aventail E-Class SRA Getting Started Guide | 81
All certificates held by Secuwide, Corp.
Page 92

SonicWALL , Inc.
2001 Logic Drive, San Jose, CA 95124
T+1 408.745.960 0 F+1 408.745.9300
ww w.sonicwall.com
©2010 Son icWALL an d the So nicWALL l ogo is re gistere d trade marks o f SonicWA LL, Inc . Dynami c Secur ity For T he Glob al Netw ork is a t radema rk of Son icWALL, I nc. Oth er prod uct nam es
232-001900-00 Rev A
07/2010
 Loading...