

Page 1

02/4%#4)/.!44(%30%%$/&"53).%33
3ONIC7!,,%NFORCED#LIENT
!NTI6IRUSAND!NTI3PYWARE
0RODUCT'UIDE
6ERSION
Page 2

Enforced Client Anti-Virus and Anti-Spyware 4.5COPYRIGHT
Copyright © 2007 McAfee, Inc. All Rights Reserved.
No part of this publication may be reproduced, transmitted, transcribed, stored in a retrieval system, or translated into any language in any form or by any means without
the written permission of NcAfee, Inc., or its suppliers or affiliate companies.
TRADEMARK ATTRIBUTIONS
ACTIVE FIREWALL, ACTIVE SECURITY, ACTIVESECURITY (AND IN KATAKANA), ACTIVESHIELD, CLEAN-UP, DESIGN (STYLIZED E), DESIGN
(STYLIZED N), ENTERCEPT, EPOLICY ORCHESTRATOR, FIRST AID, FOUNDSTONE, GROUPSHIELD, GROUPSHIELD (AND IN KATAKANA),
INTRUSHIELD, INTRUSION PREVENTION THROUGH INNOVATION, MCAFEE, MCAFEE (AND IN KATAKANA), MCAFEE AND DESIGN,
MCAFEE.COM, MCAFEE VIRUSSCAN, NET TOOLS, NET TOOLS (AND IN KATAKANA), NETSCAN, NETSHIELD, NUTS & BOLTS, OIL CHANGE,
PRIMESUPPORT, SPAMKILLER, THREATSCAN, TOTAL VIRUS DEFENSE, VIREX, VIRUS FORUM, VIRUSCAN, VIRUSSCAN, VIRUSSCAN (AND IN
KATAKANA), WEBSCAN, WEBSHIELD, WEBSHIELD (AND IN KATAKANA) are registered trademarks or trademarks of McAfee, Inc. and/or its affiliates in the
US and/or other countries. The color red in connection with security is distinctive of McAfee brand products. All other registered and unregistered trademarks herein are
the sole property of their respective owners.
LICENSE INFORMATION
License Agreement
NOTICE TO ALL USERS: CAREFULLY READ THE APPROPRIATE LEGAL AGREEMENT CORRESPONDING TO THE LICENSE YOU PURCHASED, WHICH SETS FORTH THE
GENERAL TERMS AND CONDITIONS FOR THE USE OF THE LICENSED SOFTWARE. IF YOU DO NOT KNOW WHICH TYPE OF LICENSE YOU HAVE ACQUIRED, PLEASE
CONSULT THE SALES AND OTHER RELATED LICENSE GRANT OR PURCHASE ORDER DOCUMENTS THAT ACCOMPANIES YOUR SOFTWARE PACKAGING OR THAT YOU
HAVE RECEIVED SEPARATELY AS PART OF THE PURCHASE (AS A BOOKLET, A FILE ON THE PRODUCT CD, OR A FILE AVAILABLE ON THE WEBSITE FROM WHICH YOU
DOWNLOADED THE SOFTWARE PACKAGE). IF YOU DO NOT AGREE TO ALL OF THE TERMS SET FORTH IN THE AGREEMENT, DO NOT INSTALL THE SOFTWARE. IF
APPLICABLE, YOU MAY RETURN THE PRODUCT TO MCAFEE OR THE PLACE OF PURCHASE F OR A FULL REFUND.
Attributions
This product includes or may include:
• Software developed by the OpenSSL Project for use in the OpenSSL Toolkit (http://www.openssl.org/). • Cryptographic software written by Eric A. Young and software
written by Tim J. Hudson. •
Software licenses which, among other rights, permit the user to copy, modify and redistribute certain programs, or portions thereof, and have access to the source code.
The GPL requires that for any software covered under the GPL which is distributed to someone in an executable binary format, that the source code also be made available
to those users. For any such software covered under the GPL, the source code is made available on this CD. If any Free Software licenses require that McAfee pro-+34vide
rights to use, copy or modify a software program that are broader than the rights granted in this agreement, then such rights shall take precedence over the rights and
restrictions herein. •
Copyright ©
copy of the license agreement for this software can be found at www.apache.org/licenses/LICENSE-2.0.txt. •
©1995-2002 International Business Machines Corporation and others. •
Inc. •
Outside In
Software copyrighted by Expat maintainers. • Software copyrighted by The Regents of the University of California, © 1996, 1989, 1998-2000. • Software copyrighted
•
by Gunnar Ritter. •
Gisle Aas. ©
RSA Data Security, Inc., ©
copyrighted by Brad Appleton, ©
copyrighted by Larry Wall and Clark Cooper, ©
Foundation, Copyright ©
©
Simone Bordet & Marco Cravero, ©
(http://www.extreme.indiana.edu/). •
University of California, Berkeley and its contributors. •
www.modssl.org/). •
copyrighted by David Abrahams, ©
Dawes, Howard Hinnant & John Maddock, ©
•
Software copyrighted by Jeremy Siek, © 1999-2001. • Software copyrighted by Daryle Walker, © 2001. • Software copyrighted by Chuck Allison and Jeremy Siek,
©
by Doug Gregor (gregod@cs.rpi.edu), ©
2001. •
David Abrahams, Jeremy Siek, and Daryle Walker, ©1999-2001. •
by Housemarque Oy <http://www.housemarque.com>, ©
©
by Jeremy Siek and John R. Bandela, ©
University ©
copyrighted by Cisco, Inc. and Information Network Center of Beijing University of Posts and Telecommunications, ©
Josefsson, ©
copyrighted by Todd C. Miller, ©
contributed to Berkeley by Chris Torek.
1996-7 Robert Nordier. • Software written by Douglas W. Sauder. • Software developed by the Apache Software Foundation (http://www.apache.org/). A
FEAD® Optimizer® technology, Copyright Netopsystems AG, Berlin, Germany. • Outside In® Viewer Technology ©1992-2001 Stellent Chicago, Inc. and/or
®
HTML Export, © 2001 Stellent Chicago, Inc. • Software copyrighted by Thai Open Source Software Center Ltd. and Clark Cooper, © 1998, 1999, 2000.
1995-2003. • Software copyrighted by Michael A. Chase, © 1999-2000. • Software copyrighted by Neil Winton, ©1995-1996. • Software copyrighted by
1994-1999, 2002. • Software written by Andrew Lumsdaine, Lie-Quan Lee, Jeremy G. Siek © 1997-2000 University of Notre Dame. • Software copyrighted by
2001, 2002. • Software copyrighted by Samuel Krempp, © 2001. See http://www.boost.org for updates, documentation, and revision history. • Software copyrighted
Software copyrighted by Jaakko Järvi (jaakko.jarvi@cs.utu.fi), ©1999, 2000. • Software copyrighted by Ronald Garcia, © 2002. • Software copyrighted by
1998-2002. • Software copyrighted by Greg Colvin and Beman Dawes, © 1998, 1999. • Software copyrighted by Peter Dimov, © 2001, 2002. • Software copyrighted
1989, 1991, 1992. • Software copyrighted by Cambridge Broadband Ltd., © 2001-2003. • Software copyrighted by Sparta, Inc., © 20 03-2004. • Software
2003. • Software copyrighted by Thomas Jacob, © 2003-2004. • Software copyrighted by Advanced Software Engineering Limited, © 2004. • Software
Some software programs that are licensed (or sublicensed) to the user under the GNU General Public License (GPL) or other similar Free
Software originally written by Henry Spencer, Copyright 1992, 1993, 1994, 1997 Henry Spencer. • Software originally written by Robert Nordier,
Software developed by CrystalClear Software, Inc., Copyright ©2000 CrystalClear Software,
International Components for Unicode ("ICU") Copyright
Software copyrighted by Sun Microsystems, Inc., 4150 Network Circle, Santa Clara, California 95054, U.S.A., © 2003. • Software copyrighted by
1990-1992. • Software copyrighted by Sean M. Burke, © 1999, 2000. • Software copyrighted by Martijn Koster, © 1995. • Software
1996-1999. • Software copyrighted by Michael G. Schwern, ©2001. • Software copyrighted by Graham Barr, © 1998. • Software
1998-2000. • Software copyrighted by Frodo Looijaard, © 1997. • Software copyrighted by the Python Software
2001, 2002, 2003. A copy of the license agreement for thi s software can be found at www.python.org. • Software copyrighted by Beman Dawes,
2002. • Software copyrighted by Stephen Purcell, © 2001. • Software developed by the Indiana University Extreme! Lab
Software copyrighted by International Business Machines Corporation and others, © 1995-2003. • Software developed by the
Software copyrighted by Kevlin Henney, © 2000-2002. • Software copyrighted by Peter Dimov and Multi Media Ltd. © 2001, 2002. • Software
2001, 2002. See http://www.boost.org/libs/bind/bind.html for documentation. • Software copyrighted by Steve Cleary, Beman
2000. • Software copyrighted by Boost.org, © 1999-2002. • Software copyrighted by Nicolai M. Josuttis, © 1999.
Software developed by Ralf S. Engelschall <rse@engelschall.com> for use in the mod_ssl project (http://
2001, 2002. • Software copyrighted by Cadenza New Zealand Ltd., © 2000. • Software copyrighted by Jens Maurer, ©2000,
Software copyrighted by Stephen Cleary (shammah@voyager.net), ©2000. • Software copyrighted
2001. • Software copyrighted by Paul Moore, © 1999. • Software copyrighted by Dr. John Maddock,
2001. • Software copyrighted by Joerg Walter and Mathias Koch, © 2000-2002. • Software copyrighted by Carnegie Mellon
2004. • Software copyrighted by Simon
1998. • Software copyrighted by The Regents of the University of California, © 1990, 1993, with code derived from software
PATENT INFORMATION
Protected by US Patents 6,006,035; 6,029,256; 6,035,423; 6,151,643; 6,266,774; 6,266,811; 6,269,456; 6,301,699; 6,457,076; 6,496,875; 6,510,448; 6,542,943;
6,550,012; 6,594,686; 6,611,925; 6,622,150; 6,668,289; 6,684,329; 6 ,697,950; 6,725,377; 6,728,885; 6,757,830; 6,763,403; 6,775,780; 6,782,527; 6,799,197; 6,8 23,460;
6,839,852; 6,907,396; 6,931,540; 6,931,546; 6,947,986; 6,966,059; 6,973,578; 6,976,068; 6,978,454; 6,988,209; 7,016,939; 7,058,975; 7,069,330.
Issued February 2007 / Enforced Client Anti-Virus and Anti-Spyware
DBN-001-EN
Page 3

Contents
1 Introduction 7
What is Enforced Client? . . . . . . . . . . . . . . . . . . . . . . . . . . . . . . . . . . . . . . . . . . . . . . . . . . . .8
Select the right version of Enforced Client . . . . . . . . . . . . . . . . . . . . . . . . . . . . . . . . . . . 9
Protect against many kinds of threats . . . . . . . . . . . . . . . . . . . . . . . . . . . . . . . . . . . . . . . 9
Ensure continuous, automatic protection . . . . . . . . . . . . . . . . . . . . . . . . . . . . . . . . . . . 10
What is new in this release? . . . . . . . . . . . . . . . . . . . . . . . . . . . . . . . . . . . . . . . . . . . . . . . . . 11
How does the software work?. . . . . . . . . . . . . . . . . . . . . . . . . . . . . . . . . . . . . . . . . . . . . . . . 12
The updating process . . . . . . . . . . . . . . . . . . . . . . . . . . . . . . . . . . . . . . . . . . . . . . . . . . 12
Retrieving updates . . . . . . . . . . . . . . . . . . . . . . . . . . . . . . . . . . . . . . . . . . . . . . . . . 13
Uploading security information . . . . . . . . . . . . . . . . . . . . . . . . . . . . . . . . . . . . . . . 14
Outbreak response . . . . . . . . . . . . . . . . . . . . . . . . . . . . . . . . . . . . . . . . . . . . . . . . . . . . 14
Rumor technology . . . . . . . . . . . . . . . . . . . . . . . . . . . . . . . . . . . . . . . . . . . . . . . . . . . . 14
Internet Independent Updating (IIU) . . . . . . . . . . . . . . . . . . . . . . . . . . . . . . . . . . . . . . 15
Managing with the online SecurityCenter . . . . . . . . . . . . . . . . . . . . . . . . . . . . . . . . . . . . . . 16
User groups . . . . . . . . . . . . . . . . . . . . . . . . . . . . . . . . . . . . . . . . . . . . . . . . . . . . . . . . . . 18
Customized policies . . . . . . . . . . . . . . . . . . . . . . . . . . . . . . . . . . . . . . . . . . . . . . . . . . . 19
Using this guide . . . . . . . . . . . . . . . . . . . . . . . . . . . . . . . . . . . . . . . . . . . . . . . . . . . . . . . . . . 20
Who should read this guide? . . . . . . . . . . . . . . . . . . . . . . . . . . . . . . . . . . . . . . . . . . . . 20
Conventions . . . . . . . . . . . . . . . . . . . . . . . . . . . . . . . . . . . . . . . . . . . . . . . . . . . . . . . . . . 21
Getting product information . . . . . . . . . . . . . . . . . . . . . . . . . . . . . . . . . . . . . . . . . . . . . . . . 22
Contact information . . . . . . . . . . . . . . . . . . . . . . . . . . . . . . . . . . . . . . . . . . . . . . . . . . . 23
2 Installing Enforced Client 25
After you place your order . . . . . . . . . . . . . . . . . . . . . . . . . . . . . . . . . . . . . . . . . . . . . . . . . . 26
System requirements . . . . . . . . . . . . . . . . . . . . . . . . . . . . . . . . . . . . . . . . . . . . . . . . . . . . . .27
Operating systems . . . . . . . . . . . . . . . . . . . . . . . . . . . . . . . . . . . . . . . . . . . . . . . . . . . . 27
Operating system support ending . . . . . . . . . . . . . . . . . . . . . . . . . . . . . . . . . . . . . 28
RAM . . . . . . . . . . . . . . . . . . . . . . . . . . . . . . . . . . . . . . . . . . . . . . . . . . . . . . . . . . . . . . .29
Email security service . . . . . . . . . . . . . . . . . . . . . . . . . . . . . . . . . . . . . . . . . . . . . . . . . . 29
Email server security application . . . . . . . . . . . . . . . . . . . . . . . . . . . . . . . . . . . . . . . . . 29
Terminal servers . . . . . . . . . . . . . . . . . . . . . . . . . . . . . . . . . . . . . . . . . . . . . . . . . . . . . . 30
Before you install . . . . . . . . . . . . . . . . . . . . . . . . . . . . . . . . . . . . . . . . . . . . . . . . . . . . . . . . . 31
Uninstall existing virus protection software . . . . . . . . . . . . . . . . . . . . . . . . . . . . . . . . . 31
Uninstall existing firewall software . . . . . . . . . . . . . . . . . . . . . . . . . . . . . . . . . . . . . . . 33
Configure your browser . . . . . . . . . . . . . . . . . . . . . . . . . . . . . . . . . . . . . . . . . . . . . . . . 33
Internet Explorer . . . . . . . . . . . . . . . . . . . . . . . . . . . . . . . . . . . . . . . . . . . . . . . . . . 33
Non-Microsoft browsers . . . . . . . . . . . . . . . . . . . . . . . . . . . . . . . . . . . . . . . . . . . . 33
Install the standalone installation agent . . . . . . . . . . . . . . . . . . . . . . . . . . . . . . . . . . . . 34
Installing Enforced Client . . . . . . . . . . . . . . . . . . . . . . . . . . . . . . . . . . . . . . . . . . . . . . . . . . 35
Standard URL installation . . . . . . . . . . . . . . . . . . . . . . . . . . . . . . . . . . . . . . . . . . . . . . 35
Requirements . . . . . . . . . . . . . . . . . . . . . . . . . . . . . . . . . . . . . . . . . . . . . . . . . . . . . 35
Sending an installation URL to users . . . . . . . . . . . . . . . . . . . . . . . . . . . . . . . . . . 36
Installing on client computers . . . . . . . . . . . . . . . . . . . . . . . . . . . . . . . . . . . . . . . . 36
Advanced installation methods . . . . . . . . . . . . . . . . . . . . . . . . . . . . . . . . . . . . . . . . . . . 38
Silent installation . . . . . . . . . . . . . . . . . . . . . . . . . . . . . . . . . . . . . . . . . . . . . . . . . . 39
Push installation . . . . . . . . . . . . . . . . . . . . . . . . . . . . . . . . . . . . . . . . . . . . . . . . . . 42
If you use a corporate firewall or proxy server . . . . . . . . . . . . . . . . . . . . . . . . . . . . . . 45
Enabling relay servers . . . . . . . . . . . . . . . . . . . . . . . . . . . . . . . . . . . . . . . . . . . . . . . . . 46
Using the Push Install utility . . . . . . . . . . . . . . . . . . . . . . . . . . . . . . . . . . . . . . . . . 46
3
Page 4

Enforced Client Product Guide Contents
Using VSSETUP . . . . . . . . . . . . . . . . . . . . . . . . . . . . . . . . . . . . . . . . . . . . . . . . . . 46
Completing the installation . . . . . . . . . . . . . . . . . . . . . . . . . . . . . . . . . . . . . . . . . . . . . . . . . 47
Test virus protection . . . . . . . . . . . . . . . . . . . . . . . . . . . . . . . . . . . . . . . . . . . . . . . . . . . 47
Scan the client computer . . . . . . . . . . . . . . . . . . . . . . . . . . . . . . . . . . . . . . . . . . . . . . . . 47
Scan the email Inbox . . . . . . . . . . . . . . . . . . . . . . . . . . . . . . . . . . . . . . . . . . . . . . . . . . . 48
Set up the default firewall . . . . . . . . . . . . . . . . . . . . . . . . . . . . . . . . . . . . . . . . . . . . . . . 48
What should I do after installing?. . . . . . . . . . . . . . . . . . . . . . . . . . . . . . . . . . . . . . . . . . . . . 49
3 Using Enforced Client 51
Using the client software . . . . . . . . . . . . . . . . . . . . . . . . . . . . . . . . . . . . . . . . . . . . . . . . . . . 52
Enforced Client system tray icon . . . . . . . . . . . . . . . . . . . . . . . . . . . . . . . . . . . . . . . . . 52
Removing and displaying the icon . . . . . . . . . . . . . . . . . . . . . . . . . . . . . . . . . . . . 52
Client menu . . . . . . . . . . . . . . . . . . . . . . . . . . . . . . . . . . . . . . . . . . . . . . . . . . . . . . . . . 53
Administrative menu and tasks . . . . . . . . . . . . . . . . . . . . . . . . . . . . . . . . . . . . . . . . . . 53
Updating client computers . . . . . . . . . . . . . . . . . . . . . . . . . . . . . . . . . . . . . . . . . . . . . . . . . . 54
Update automatically . . . . . . . . . . . . . . . . . . . . . . . . . . . . . . . . . . . . . . . . . . . . . . . . . . 54
Update manually . . . . . . . . . . . . . . . . . . . . . . . . . . . . . . . . . . . . . . . . . . . . . . . . . . . . . . 54
Update during an outbreak . . . . . . . . . . . . . . . . . . . . . . . . . . . . . . . . . . . . . . . . . . . . . . 55
Update computers where no user is logged on . . . . . . . . . . . . . . . . . . . . . . . . . . . . . . . 55
Using the SecurityCenter . . . . . . . . . . . . . . . . . . . . . . . . . . . . . . . . . . . . . . . . . . . . . . . . . . . 55
Getting started . . . . . . . . . . . . . . . . . . . . . . . . . . . . . . . . . . . . . . . . . . . . . . . . . . . . . . . . . . . 57
Log on to the SecurityCenter . . . . . . . . . . . . . . . . . . . . . . . . . . . . . . . . . . . . . . . . . . . . 57
Access online features and functions . . . . . . . . . . . . . . . . . . . . . . . . . . . . . . . . . . . . . . 57
Make the most of your online data . . . . . . . . . . . . . . . . . . . . . . . . . . . . . . . . . . . . . . . . 59
Customize listings and reports . . . . . . . . . . . . . . . . . . . . . . . . . . . . . . . . . . . . . . . . . . . 60
Using the online help . . . . . . . . . . . . . . . . . . . . . . . . . . . . . . . . . . . . . . . . . . . . . . . . . . 61
Setting up your account . . . . . . . . . . . . . . . . . . . . . . . . . . . . . . . . . . . . . . . . . . . . . . . . . . . . 62
Set up your profile . . . . . . . . . . . . . . . . . . . . . . . . . . . . . . . . . . . . . . . . . . . . . . . . . . . . 62
Change your SecurityCenter password . . . . . . . . . . . . . . . . . . . . . . . . . . . . . . . . . . . . 62
Sign up for email notifications . . . . . . . . . . . . . . . . . . . . . . . . . . . . . . . . . . . . . . . . . . . 62
Viewing your security services at-a-glance . . . . . . . . . . . . . . . . . . . . . . . . . . . . . . . . . . . . . 63
Install protection services . . . . . . . . . . . . . . . . . . . . . . . . . . . . . . . . . . . . . . . . . . . . . . . 64
View and resolve action items . . . . . . . . . . . . . . . . . . . . . . . . . . . . . . . . . . . . . . . . . . . 64
View security coverage for your account . . . . . . . . . . . . . . . . . . . . . . . . . . . . . . . . . . . 65
Managing your computers . . . . . . . . . . . . . . . . . . . . . . . . . . . . . . . . . . . . . . . . . . . . . . . . . . 65
Search for computers . . . . . . . . . . . . . . . . . . . . . . . . . . . . . . . . . . . . . . . . . . . . . . . . . . 67
Install protection services . . . . . . . . . . . . . . . . . . . . . . . . . . . . . . . . . . . . . . . . . . . . . . . 67
Display details for a computer . . . . . . . . . . . . . . . . . . . . . . . . . . . . . . . . . . . . . . . . . . . 67
View detections for a computer . . . . . . . . . . . . . . . . . . . . . . . . . . . . . . . . . . . . . . . . . . 69
View user-approved applications for a computer . . . . . . . . . . . . . . . . . . . . . . . . . . . . . 69
Send email to computers . . . . . . . . . . . . . . . . . . . . . . . . . . . . . . . . . . . . . . . . . . . . . . . 69
Block computers from receiving updates . . . . . . . . . . . . . . . . . . . . . . . . . . . . . . . . . . . 70
Delete computers from your reports . . . . . . . . . . . . . . . . . . . . . . . . . . . . . . . . . . . . . . . 70
Move computers into a group . . . . . . . . . . . . . . . . . . . . . . . . . . . . . . . . . . . . . . . . . . . . 70
Creating groups to manage your site . . . . . . . . . . . . . . . . . . . . . . . . . . . . . . . . . . . . . . . . . . 71
The Default group . . . . . . . . . . . . . . . . . . . . . . . . . . . . . . . . . . . . . . . . . . . . . . . . . . . . . 72
Create or edit a group . . . . . . . . . . . . . . . . . . . . . . . . . . . . . . . . . . . . . . . . . . . . . . . . . . 72
Delete a group . . . . . . . . . . . . . . . . . . . . . . . . . . . . . . . . . . . . . . . . . . . . . . . . . . . . . . . . 72
Designating group administrators . . . . . . . . . . . . . . . . . . . . . . . . . . . . . . . . . . . . . . . . . . . . 72
Create or edit a group administrator . . . . . . . . . . . . . . . . . . . . . . . . . . . . . . . . . . . . . . . 74
Delete a group administrator . . . . . . . . . . . . . . . . . . . . . . . . . . . . . . . . . . . . . . . . . . . . 75
Setting up policies . . . . . . . . . . . . . . . . . . . . . . . . . . . . . . . . . . . . . . . . . . . . . . . . . . . . . . . . 75
The SonicWALL Default policy . . . . . . . . . . . . . . . . . . . . . . . . . . . . . . . . . . . . . . . . . . 76
Create or edit a policy . . . . . . . . . . . . . . . . . . . . . . . . . . . . . . . . . . . . . . . . . . . . . . . . . . 77
Assign a policy to a group . . . . . . . . . . . . . . . . . . . . . . . . . . . . . . . . . . . . . . . . . . . . . . . 77
Restore default policy settings . . . . . . . . . . . . . . . . . . . . . . . . . . . . . . . . . . . . . . . . . . . 77
Delete a policy . . . . . . . . . . . . . . . . . . . . . . . . . . . . . . . . . . . . . . . . . . . . . . . . . . . . . . . 78
Viewing reports . . . . . . . . . . . . . . . . . . . . . . . . . . . . . . . . . . . . . . . . . . . . . . . . . . . . . . . . . . 78
View duplicate computers . . . . . . . . . . . . . . . . . . . . . . . . . . . . . . . . . . . . . . . . . . . . . . 80
View computer profiles . . . . . . . . . . . . . . . . . . . . . . . . . . . . . . . . . . . . . . . . . . . . . . . . 81
Managing your correspondence . . . . . . . . . . . . . . . . . . . . . . . . . . . . . . . . . . . . . . . . . . . . . . 81
4
Page 5

Enforced Client Product Guide Contents
Send email to users . . . . . . . . . . . . . . . . . . . . . . . . . . . . . . . . . . . . . . . . . . . . . . . . . . . . 82
Update user email addresses . . . . . . . . . . . . . . . . . . . . . . . . . . . . . . . . . . . . . . . . . . . . . 82
Update your account’s email address . . . . . . . . . . . . . . . . . . . . . . . . . . . . . . . . . . . . . . 82
Add your logo to reports . . . . . . . . . . . . . . . . . . . . . . . . . . . . . . . . . . . . . . . . . . . . . . . . 82
Managing your subscriptions . . . . . . . . . . . . . . . . . . . . . . . . . . . . . . . . . . . . . . . . . . . . . . . . 83
View your service subscriptions . . . . . . . . . . . . . . . . . . . . . . . . . . . . . . . . . . . . . . . . . . 83
Update subscription information . . . . . . . . . . . . . . . . . . . . . . . . . . . . . . . . . . . . . . . . . 84
Purchase, add, and renew services . . . . . . . . . . . . . . . . . . . . . . . . . . . . . . . . . . . . . . . . 84
Request a trial subscription . . . . . . . . . . . . . . . . . . . . . . . . . . . . . . . . . . . . . . . . . . . . . 85
Receive subscription notifications . . . . . . . . . . . . . . . . . . . . . . . . . . . . . . . . . . . . . . . . 85
Getting assistance . . . . . . . . . . . . . . . . . . . . . . . . . . . . . . . . . . . . . . . . . . . . . . . . . . . . . . . . 85
View printed and online documents . . . . . . . . . . . . . . . . . . . . . . . . . . . . . . . . . . . . . . . 85
Download utilities . . . . . . . . . . . . . . . . . . . . . . . . . . . . . . . . . . . . . . . . . . . . . . . . . . . . 86
Contact product support . . . . . . . . . . . . . . . . . . . . . . . . . . . . . . . . . . . . . . . . . . . . . . . . 86
4 Using the Virus and Spyware Protection Service 87
Accessing client features (Scan Tasks menu) . . . . . . . . . . . . . . . . . . . . . . . . . . . . . . . . . . . 87
Scanning client computers . . . . . . . . . . . . . . . . . . . . . . . . . . . . . . . . . . . . . . . . . . . . . . . . . . 89
Scan automatically (on-access scans) . . . . . . . . . . . . . . . . . . . . . . . . . . . . . . . . . . . . . . 89
Scan manually (on-demand scans) . . . . . . . . . . . . . . . . . . . . . . . . . . . . . . . . . . . . . . . . 90
View scan results . . . . . . . . . . . . . . . . . . . . . . . . . . . . . . . . . . . . . . . . . . . . . . . . . . 90
How detections are handled . . . . . . . . . . . . . . . . . . . . . . . . . . . . . . . . . . . . . . . . . 92
Schedule on-demand scans . . . . . . . . . . . . . . . . . . . . . . . . . . . . . . . . . . . . . . . . . . . . . . 92
Scan email . . . . . . . . . . . . . . . . . . . . . . . . . . . . . . . . . . . . . . . . . . . . . . . . . . . . . . . . . . 92
Scan for spyware . . . . . . . . . . . . . . . . . . . . . . . . . . . . . . . . . . . . . . . . . . . . . . . . . . . . . 93
Configuring policies for virus and spyware protection . . . . . . . . . . . . . . . . . . . . . . . . . . . . 95
Set basic virus protection options . . . . . . . . . . . . . . . . . . . . . . . . . . . . . . . . . . . . . . . . . 95
Schedule on-demand scans . . . . . . . . . . . . . . . . . . . . . . . . . . . . . . . . . . . . . . . . . . 95
Exclude files and folders from virus scans . . . . . . . . . . . . . . . . . . . . . . . . . . . . . . 96
Set advanced virus protection options . . . . . . . . . . . . . . . . . . . . . . . . . . . . . . . . . . . . . 97
Select your update frequency . . . . . . . . . . . . . . . . . . . . . . . . . . . . . . . . . . . . . . . . 97
Enable optional protection . . . . . . . . . . . . . . . . . . . . . . . . . . . . . . . . . . . . . . . . . . 97
Set basic spyware protection options . . . . . . . . . . . . . . . . . . . . . . . . . . . . . . . . . . . . . . 99
Enable spyware protection . . . . . . . . . . . . . . . . . . . . . . . . . . . . . . . . . . . . . . . . . . 99
Select a spyware protection mode . . . . . . . . . . . . . . . . . . . . . . . . . . . . . . . . . . . . 100
Specify approved programs . . . . . . . . . . . . . . . . . . . . . . . . . . . . . . . . . . . . . . . . . 101
Set advanced spyware protection options . . . . . . . . . . . . . . . . . . . . . . . . . . . . . . . . . . 102
Viewing reports for virus and spyware detections . . . . . . . . . . . . . . . . . . . . . . . . . . . . . . . 103
View detections . . . . . . . . . . . . . . . . . . . . . . . . . . . . . . . . . . . . . . . . . . . . . . . . . . . . . 103
View unrecognized programs . . . . . . . . . . . . . . . . . . . . . . . . . . . . . . . . . . . . . . . . . . . 105
View your detection history . . . . . . . . . . . . . . . . . . . . . . . . . . . . . . . . . . . . . . . . . . . . 107
Managing detections . . . . . . . . . . . . . . . . . . . . . . . . . . . . . . . . . . . . . . . . . . . . . . . . . . . . . 108
Manage your protection strategy with best practices . . . . . . . . . . . . . . . . . . . . . . . . . 108
Manage quarantined files . . . . . . . . . . . . . . . . . . . . . . . . . . . . . . . . . . . . . . . . . . . . . . 109
Disabling on-access scanning . . . . . . . . . . . . . . . . . . . . . . . . . . . . . . . . . . . . . . . . . . . . . . 110
5 Using the Firewall Protection Service 111
Accessing client features (Firewall Settings command) . . . . . . . . . . . . . . . . . . . . . . . . . . 111
Configuring policies for firewall protection . . . . . . . . . . . . . . . . . . . . . . . . . . . . . . . . . . . 112
Specify who configures firewall protection settings . . . . . . . . . . . . . . . . . . . . . . . . . 113
Install the firewall protection service via policy . . . . . . . . . . . . . . . . . . . . . . . . . . . . 114
Enable firewall protection . . . . . . . . . . . . . . . . . . . . . . . . . . . . . . . . . . . . . . . . . . . . . 114
Select a firewall protection mode . . . . . . . . . . . . . . . . . . . . . . . . . . . . . . . . . . . . . . . . 115
Learn mode . . . . . . . . . . . . . . . . . . . . . . . . . . . . . . . . . . . . . . . . . . . . . . . . . . . . . 116
Specify a connection type . . . . . . . . . . . . . . . . . . . . . . . . . . . . . . . . . . . . . . . . . . . . . . 116
Configure a custom connection . . . . . . . . . . . . . . . . . . . . . . . . . . . . . . . . . . . . . . . . . 117
Configure system services for a custom connection . . . . . . . . . . . . . . . . . . . . . . 117
Configure IP addresses for a custom connection . . . . . . . . . . . . . . . . . . . . . . . . 120
Set up allowed Internet applications . . . . . . . . . . . . . . . . . . . . . . . . . . . . . . . . . . . . . . 121
Specify Internet applications in a policy . . . . . . . . . . . . . . . . . . . . . . . . . . . . . . . 121
Specify whether to use SonicWALL recommendations. . . . . . . . . . . . . . . . . . . . 122
5
Page 6

Enforced Client Product Guide Contents
Viewing reports for firewall protection . . . . . . . . . . . . . . . . . . . . . . . . . . . . . . . . . . . . . . . 122
View unrecognized Internet applications . . . . . . . . . . . . . . . . . . . . . . . . . . . . . . . . . . 123
View inbound events blocked by the firewall . . . . . . . . . . . . . . . . . . . . . . . . . . . . . . 124
Managing suspicious activity with best practices . . . . . . . . . . . . . . . . . . . . . . . . . . . . . . . 125
6 Using the Browser Protection Service 127
Accessing site safety information . . . . . . . . . . . . . . . . . . . . . . . . . . . . . . . . . . . . . . . . . . . . 127
How safety ratings are compiled . . . . . . . . . . . . . . . . . . . . . . . . . . . . . . . . . . . . . . . . 128
Staying safe during searches . . . . . . . . . . . . . . . . . . . . . . . . . . . . . . . . . . . . . . . . . . . 128
Staying safe while browsing . . . . . . . . . . . . . . . . . . . . . . . . . . . . . . . . . . . . . . . . . . . . 129
Viewing safety reports . . . . . . . . . . . . . . . . . . . . . . . . . . . . . . . . . . . . . . . . . . . . . . . . 130
Configuring browser protection settings . . . . . . . . . . . . . . . . . . . . . . . . . . . . . . . . . . . . . . 130
Configuring browser protection from the SecurityCenter. . . . . . . . . . . . . . . . . . . . . . 130
Installing via policy . . . . . . . . . . . . . . . . . . . . . . . . . . . . . . . . . . . . . . . . . . . . . . . 130
Configuring browser protection on the client computer . . . . . . . . . . . . . . . . . . . . . . . 131
Submitting feedback . . . . . . . . . . . . . . . . . . . . . . . . . . . . . . . . . . . . . . . . . . . . . . . . . . . . . 132
7 Using the Email Security Service 133
Activating the email security service . . . . . . . . . . . . . . . . . . . . . . . . . . . . . . . . . . . . . . . . . 134
Using the portal . . . . . . . . . . . . . . . . . . . . . . . . . . . . . . . . . . . . . . . . . . . . . . . . . . . . . . . . . 134
Setting up your account . . . . . . . . . . . . . . . . . . . . . . . . . . . . . . . . . . . . . . . . . . . . . . . . . . . 135
Update your MX records . . . . . . . . . . . . . . . . . . . . . . . . . . . . . . . . . . . . . . . . . . . . . . 135
Customize your account settings . . . . . . . . . . . . . . . . . . . . . . . . . . . . . . . . . . . . . . . . . 135
Default settings . . . . . . . . . . . . . . . . . . . . . . . . . . . . . . . . . . . . . . . . . . . . . . . . . . 136
Recommended first steps . . . . . . . . . . . . . . . . . . . . . . . . . . . . . . . . . . . . . . . . . . 136
Optional customization . . . . . . . . . . . . . . . . . . . . . . . . . . . . . . . . . . . . . . . . . . . . 137
Configure general administration settings. . . . . . . . . . . . . . . . . . . . . . . . . . . . . . . . . . 138
Viewing your email protection status . . . . . . . . . . . . . . . . . . . . . . . . . . . . . . . . . . . . . . . . 140
Configuring a policy for email security . . . . . . . . . . . . . . . . . . . . . . . . . . . . . . . . . . . . . . . 141
Viewing reports for the email security service . . . . . . . . . . . . . . . . . . . . . . . . . . . . . . . . . 141
Managing quarantined email . . . . . . . . . . . . . . . . . . . . . . . . . . . . . . . . . . . . . . . . . . . . . . . 142
View and manage quarantined user messages . . . . . . . . . . . . . . . . . . . . . . . . . . . . . . 142
Check the Quarantine Summary . . . . . . . . . . . . . . . . . . . . . . . . . . . . . . . . . . . . . . . . . 142
View quarantined mail deliveries . . . . . . . . . . . . . . . . . . . . . . . . . . . . . . . . . . . . . . . . 143
Getting more information . . . . . . . . . . . . . . . . . . . . . . . . . . . . . . . . . . . . . . . . . . . . . . . . . 143
8 Troubleshooting 145
Uninstalling protection services . . . . . . . . . . . . . . . . . . . . . . . . . . . . . . . . . . . . . . . . . . . . . 145
Frequently asked questions (FAQ) . . . . . . . . . . . . . . . . . . . . . . . . . . . . . . . . . . . . . . . . . . 146
Installing . . . . . . . . . . . . . . . . . . . . . . . . . . . . . . . . . . . . . . . . . . . . . . . . . . . . . . . . . . .146
Adding, renewing, and moving licenses . . . . . . . . . . . . . . . . . . . . . . . . . . . . . . . . . . . 147
Configuring and managing policies. . . . . . . . . . . . . . . . . . . . . . . . . . . . . . . . . . . . . . . 148
Scanning . . . . . . . . . . . . . . . . . . . . . . . . . . . . . . . . . . . . . . . . . . . . . . . . . . . . . . . . . . . 148
Reporting . . . . . . . . . . . . . . . . . . . . . . . . . . . . . . . . . . . . . . . . . . . . . . . . . . . . . . . . . . 149
Updating . . . . . . . . . . . . . . . . . . . . . . . . . . . . . . . . . . . . . . . . . . . . . . . . . . . . . . . . . . . 150
Firewall protection. . . . . . . . . . . . . . . . . . . . . . . . . . . . . . . . . . . . . . . . . . . . . . . . . . . . 150
Browser protection . . . . . . . . . . . . . . . . . . . . . . . . . . . . . . . . . . . . . . . . . . . . . . . . . . . 151
Email . . . . . . . . . . . . . . . . . . . . . . . . . . . . . . . . . . . . . . . . . . . . . . . . . . . . . . . . . . . . . .151
General . . . . . . . . . . . . . . . . . . . . . . . . . . . . . . . . . . . . . . . . . . . . . . . . . . . . . . . . . . . . 152
Error messages . . . . . . . . . . . . . . . . . . . . . . . . . . . . . . . . . . . . . . . . . . . . . . . . . . . . . . . . . . 153
Contacting product support . . . . . . . . . . . . . . . . . . . . . . . . . . . . . . . . . . . . . . . . . . . . . . . . 159
Glossary 161
Index 167
6
Page 7

1
Introduction
SonicWALL Enforced Client Anti-Virus and Anti-Spyware, referred to in this guide as Enforced
Client, safeguards your computers automatically, and its advanced features let you customize
your business’s security strategy.
This section provides an overview of the product, its features, and how to use product resources
for additional assistance.
What is Enforced Client?
What is new in this release?
How does the software work?
Managing with the online SecurityCenter
Using this guide
Getting product information
7
Page 8
Enforced Client Product Guide Introduction
What is Enforced Client?
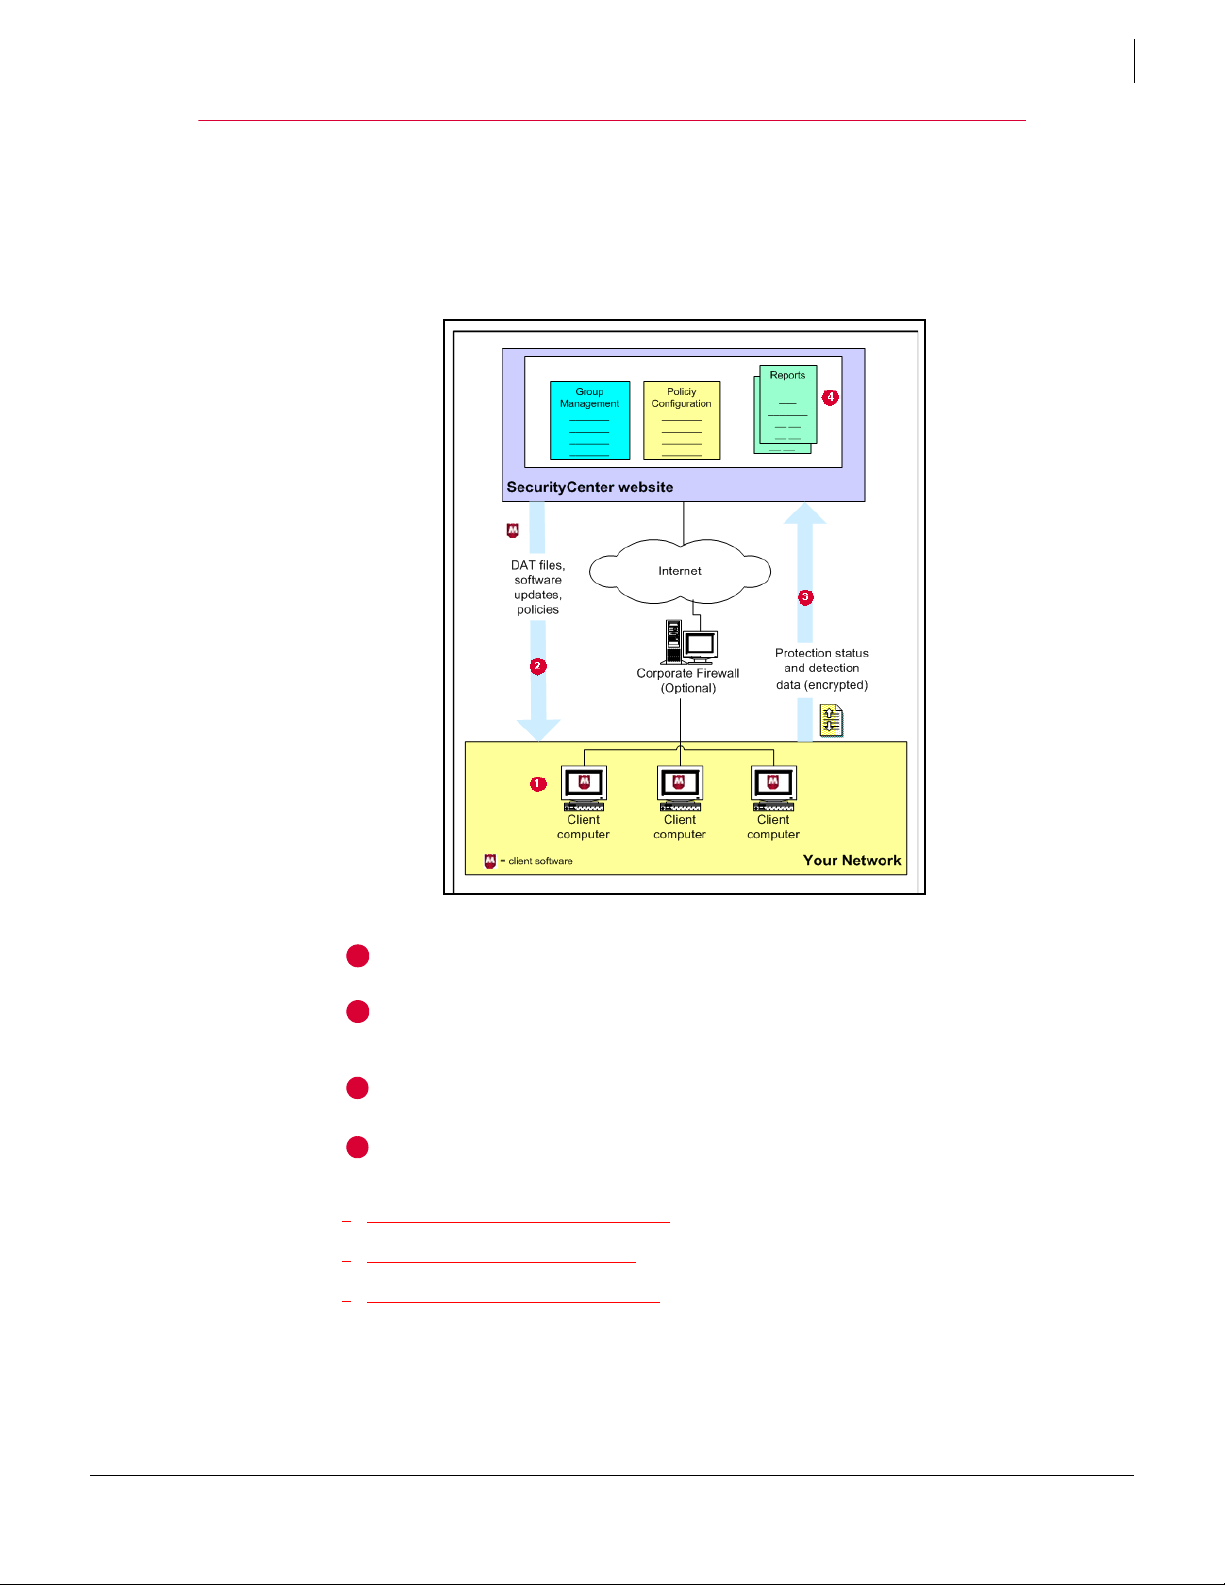
What is Enforced Client?
Enforced Client delivers comprehensive security as a service for all the computers on your
account. These services automatically check for threats, intercept them, take the appropriate
action to keep your data and your network safe, and track detections and security status for
reports.
Figure 1-1 Enforced Client overview
1
1
2
The Enforced Client client software runs on each computer where it is installed.
The client software updates itself — automatically and silently — by downloading the latest
detection definition (
DAT) files from your account’s administrative website, the SonicWALL
SecurityCenter.
3
4
The client software uploads security information about each computer to the SecurityCenter
for use in administrative reports.
As your account’s administrator, you can use a web browser to visit the SecurityCenter,
where you can access reports that detail the status of client computers and use tools for
customizing and managing security.
Select the right version of Enforced Client
Protect against many kinds of threats
Ensure continuous, automatic protection
8
Page 9
Enforced Client Product Guide Introduction
What is Enforced Client?
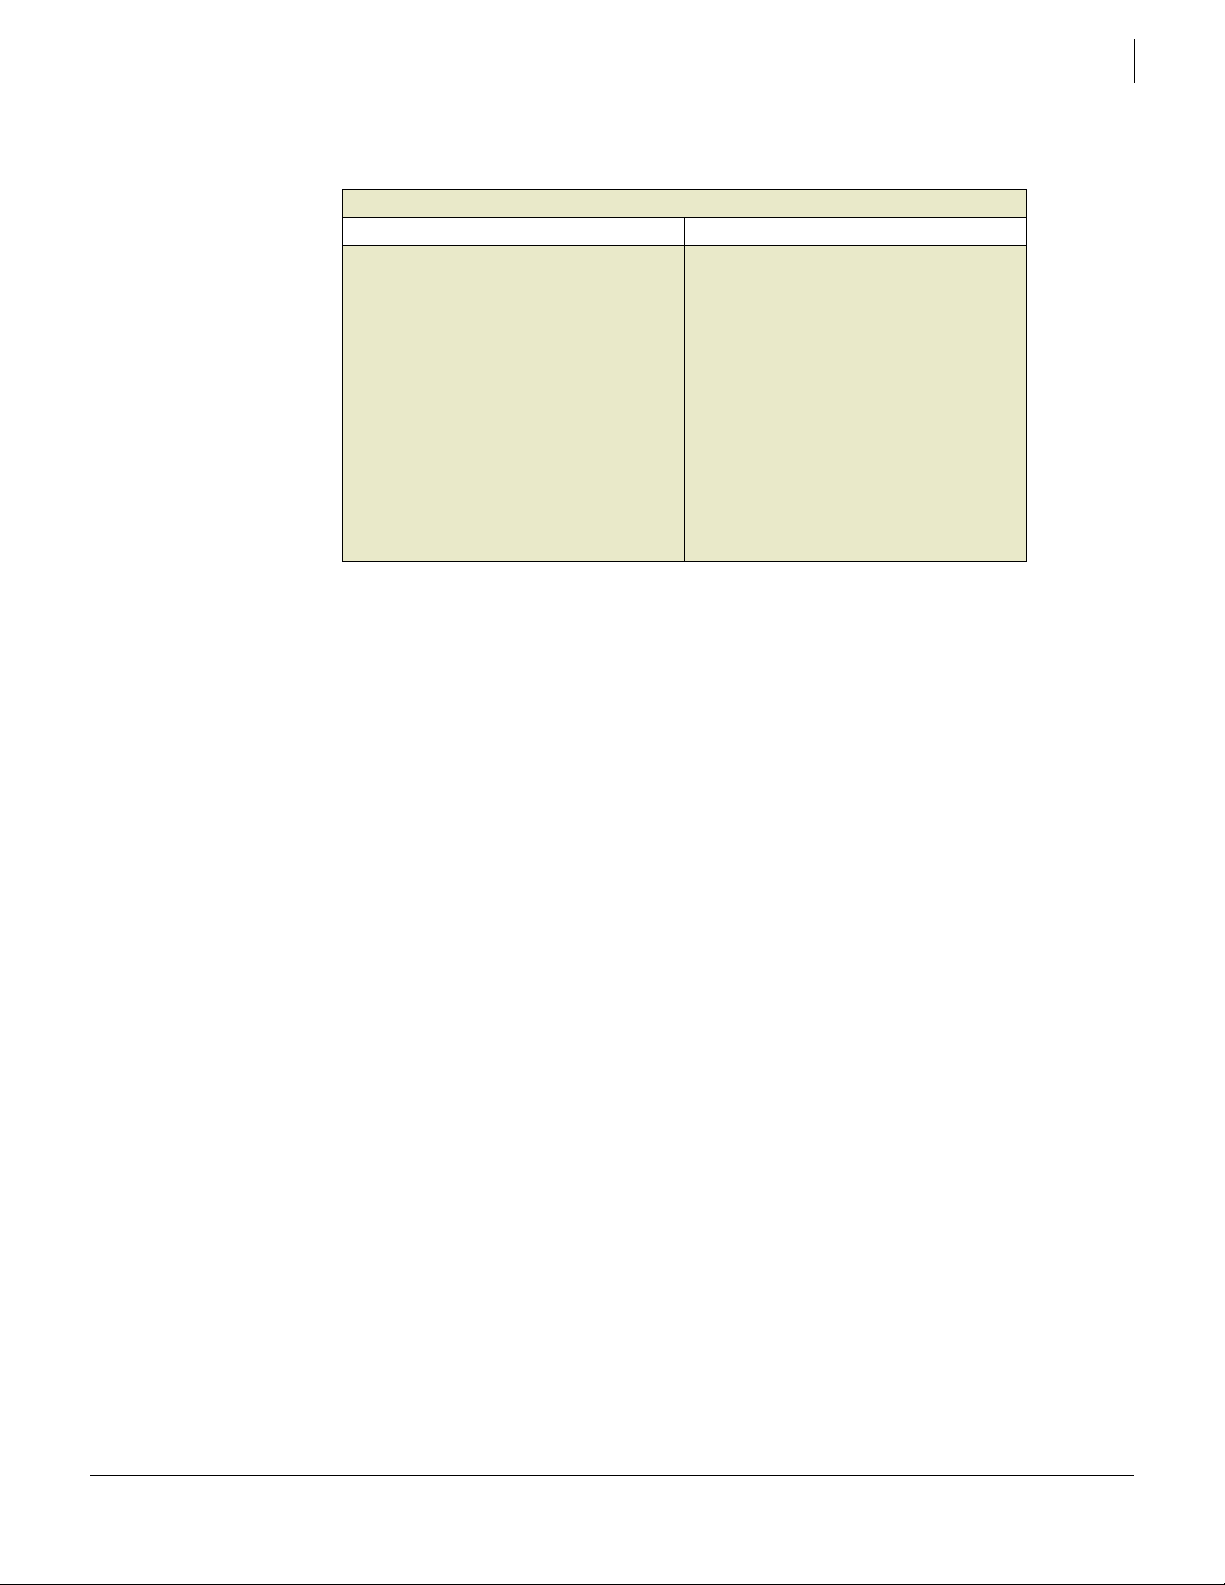
Select the right version of Enforced Client
Select the version that best supports your needs.
Enforced Client Anti-Virus and Anti-Spyware
Basic Advanced
Virus and spyware protection for desktop
computers and servers.
Firewall protection for desktop computers and
servers.
Browser protection for desktop computers.
Access to the SonicWALL SecurityCenter for
centralized management of your accounts.
This guide focuses on the Enforced Client services for desktop computers and servers, and also
contains instructions for setting up the email security service available in Enforced Client
Advanced. Refer to your product CD or the SonicWALL download center for information about
using the email server security application.
Virus and spyware protection for desktop
computers and servers.
Firewall protection for desktop computers and
servers.
Browser protection for desktop computers.
Access to the SonicWALL SecurityCenter for
centralized management of your accounts.
Email security:
Email security service to protect all inbound
email against virus, spam, and phishing attacks,
or
Email server security application for additional
virus protection at the server level.
1
Protect against many kinds of threats
Enforced Client protects against a broad range of threats:
The virus and spyware protection service checks for viruses, spyware, unwanted
programs, and other potential threats borne on removable media or brought in from your
network, including via email. Every time a file on your computer is accessed, your service
scans the file to make sure it is free of viruses and spyware.
The firewall protection service establishes a barrier between each computer and the Internet
or other computers on your local network. It silently monitors communications traffic for
suspicious activity and takes appropriate action, such as blocking.
The browser protection service displays information to safeguard client computer users
against web-based threats. Users can view website safety ratings and safety reports as they
browse or search with Microsoft Internet Explorer or Mozilla Firefox.
The email security service protects against email threats by scanning messages before they
are received. It blocks or quarantines detections of directory harvest attacks, spam, phishing
scams, viruses, and other email-borne threats in messages and attachments, to prevent them
from reaching client computers. The email security service is available with Enforced Client
Advanced.
The email server security application, SonicWALL GroupShield
and Lotus Domino, provides comprehensive virus protection for the email and other content
entering and leaving your Microsoft Exchange Server 2000/2003 environment. Proactive
anti-virus scanning and an automatic outbreak manager prevent malicious code from
disrupting the system, while advanced content filtering allows administrators to set up rules
for inappropriate content, sensitive information, and adding disclaimers to messages.
®
for Microsoft Exchange
9
Page 10

Enforced Client Product Guide Introduction
What is Enforced Client?
The email server security application is available with Enforced Client Advanced. Detailed
documentation on this application is available on the CD or in the downloadable installer
accessible from the SonicWALL download center.
Ensure continuous, automatic protection
Enforced Client safeguards your computers with:
Continuous protection — From the time a client computer is turned on until it is turned off,
Enforced Client silently monitors all file input and output, downloads, program executions,
inbound and outbound communications, and other system-related activities.
Instant discovery — When Enforced Client detects a virus threat, it attempts to clean the
item containing the threat before further damage can occur. If an item cannot be cleaned, a
copy of it is placed in a quarantine folder and the original item is deleted.
Customized threat response — By default, Enforced Client provides a high degree of
protection against threats. You can also configure the response to detections of potentially
unwanted programs and suspicious activity to suit the needs of your business: take immediate
action to clean, quarantine, or block the detection; prompt users for a response; or only log
the detection for administrative reports.
Automatic updates — Enforced Client checks for product updates at regular intervals
throughout the day, comparing security components against the latest releases. When a
computer needs a newer version, the client software automatically retrieves it.
1
Avert Early Warning system and outbreak response — Enforced Client uses the latest
information about threats and outbreaks as soon as they are discovered by SonicWALL Avert
Labs, a research division of SonicWALL. Whenever Avert Labs releases an outbreak
detection definition (
DAT) file, your network receives it promptly.
10
Page 11
Enforced Client Product Guide Introduction
What is new in this release?
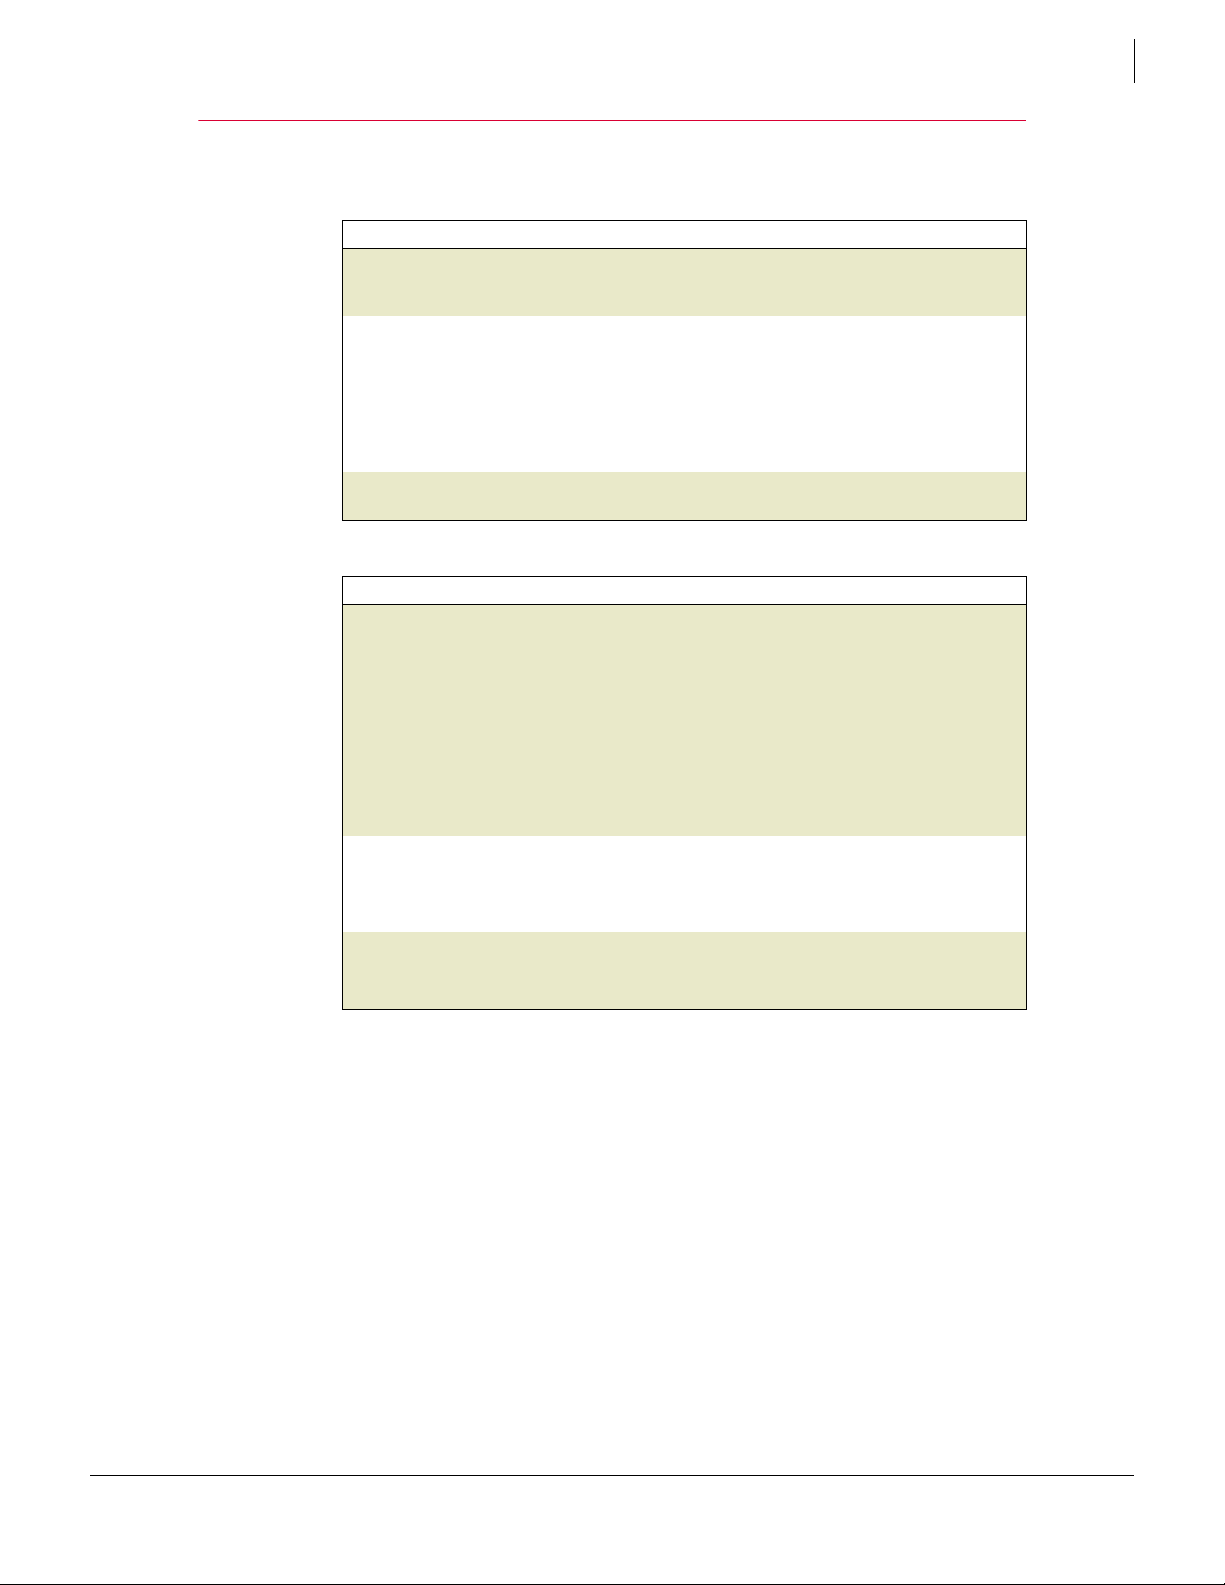
What is new in this release?
New features
New feature Description
Browser protection
service
New policy options for
greater control
Auto-renewal option If your service provider has enabled this option, automatically renews your
Changes in support
Support for... Description
Operating systems Provides protection services for computers running Windows Vista.
Browsers
Languages
Protects client computers against web-based threats while searching and
browsing. Users can display a color-coded safety rating and detailed report
for each website. See Chapter 6, Using the Browser Protection Service.
Virus and spyware protection service: On-demand scans now scan all file
types by default, or administrators can select a policy option to scan only
certain types of files. See Enable optional protection on page 97.
Firewall protection service: Select whether to use SonicWALL
recommendations for safe Internet applications or allow only those you
specify. See Specify whether to use SonicWALL recommendations on
page 121.
subscriptions before they expire.
Extends support to 64-bit versions of Windows XP and Windows Vista.
See Operating systems on page 27.
Computers running older versions of Windows will continue to be
supported against existing threats, but protection against new threats will
be phased out as
support ending on page 28.
Administrators can configure a policy option for displaying notifications
on client computers to remind users that support is ending. See Notifying
users when support ends on page 28.
Installs on computers using Windows Internet Explorer version 7. See
Chapter 2, Installing Enforced Client.
Adds browser protection for Mozilla Firefox. See Chapter 6, Using the
Browser Protection Service.
With Enforced Client Advanced, Quarantine Summary emails generated by
the email security service are now available in multiple languages.
Note: No localized version is available for Brazilian Portuguese.
DAT files are no longer updated. See Operating system
1
11
Page 12

Enforced Client Product Guide Introduction
How does the software work?
How does the software work?
Enforced Client implements a three-prong approach to security by:
1 Silently monitoring all file input and output, downloads, program executions, inbound and
outbound communications, and other system-related activities on client computers.
Detected viruses are deleted or quarantined automatically.
Potentially unwanted programs, such as spyware or adware, are removed automatically
unless you select a different response.
Suspicious activity is blocked unless you specify a different response.
2 Regularly updating detection definition (DAT) files and software components to ensure that
you are always protected against the latest threats.
3 Uploading security information for each client computer to the SecurityCenter, then using
this information to send emails and create reports that keep you informed about your
account’s status.
In addition, it provides tools for managing client computers and customizing your security
strategy.
1
The updating process
Outbreak response
Rumor technology
Internet Independent Updating (IIU)
The updating process
Regular updates are the cornerstone of Enforced Client.
Updates of its security components running on client computers. See Retrieving updates.
Updates to the security data maintained on the SecurityCenter website and used in
administrative reports. See Uploading security information.
12
Page 13
Enforced Client Product Guide Introduction
How does the software work?
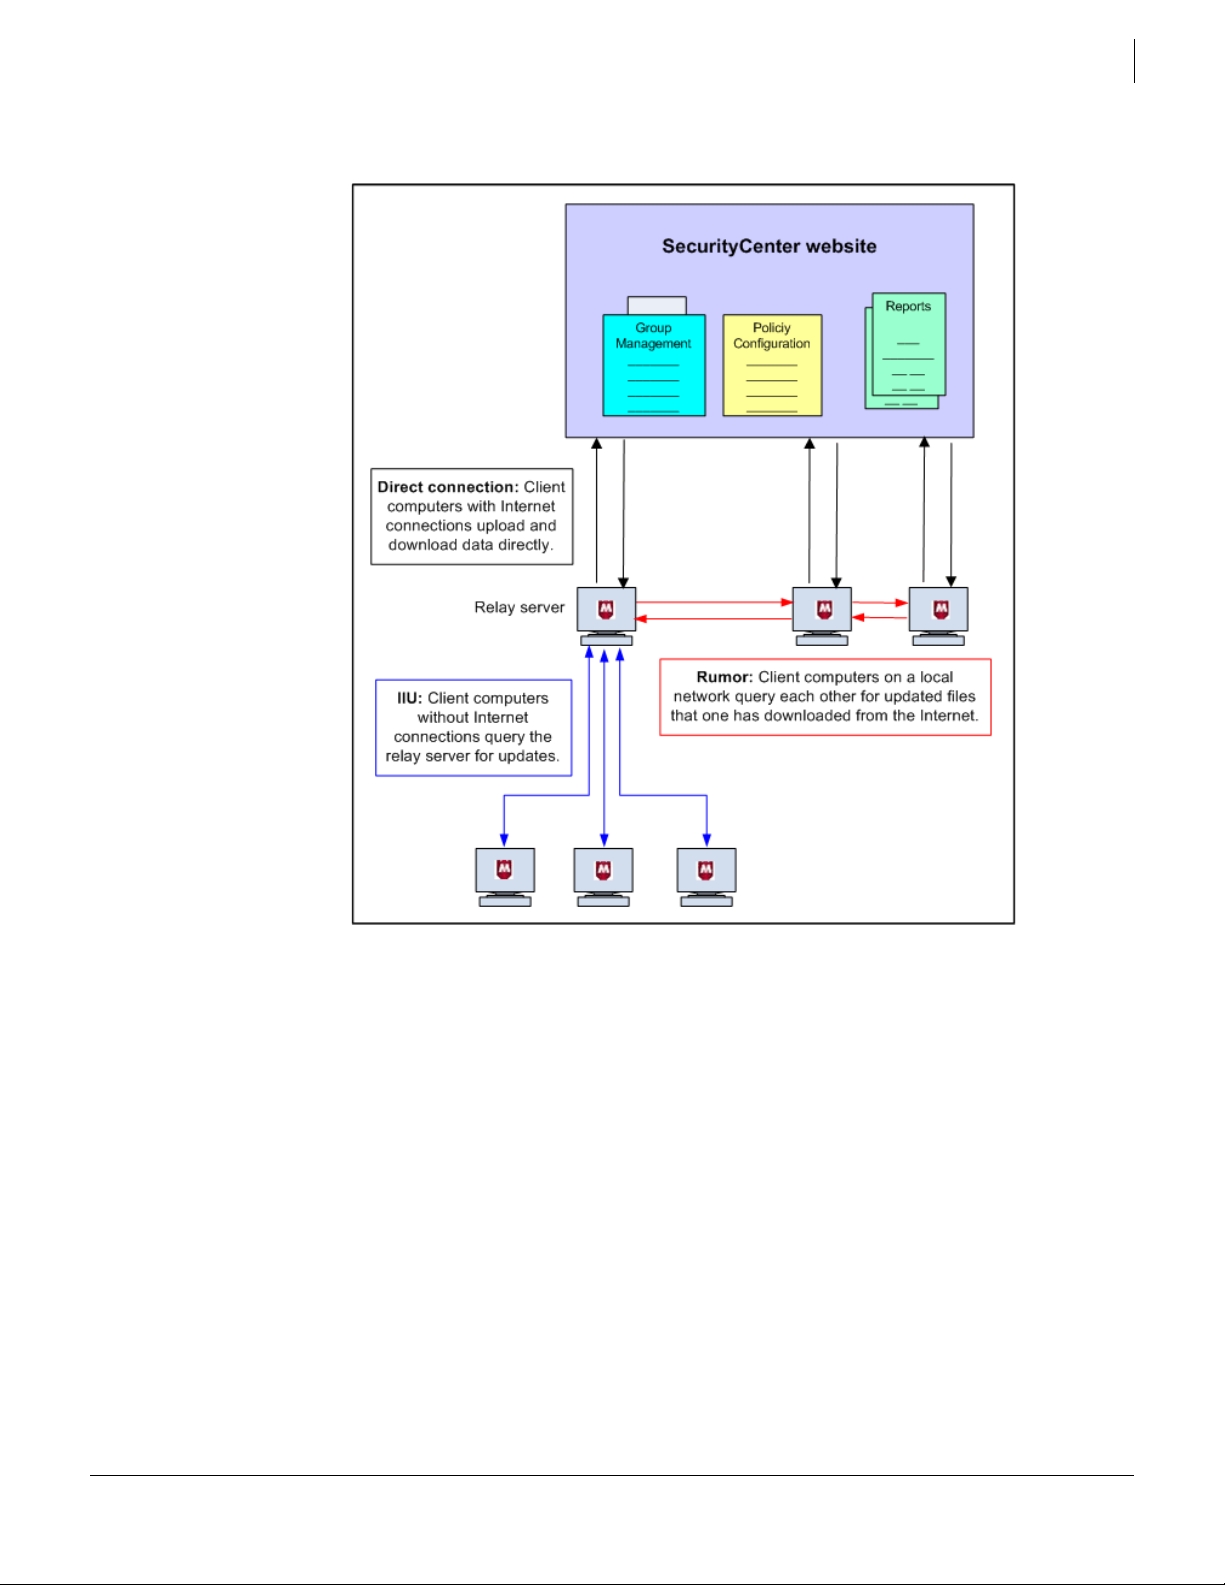
Updates can occur in three ways, enabling you to use network resources efficiently.
Figure 1-2 Methods for updating client computers
1
In a simple scenario, each client computer on your account has a direct connection to the
Internet and checks for new updates.
Rumor technology enables all computers in a workgroup to share downloaded files, which
controls Internet traffic and minimizes expensive downloads.
Internet Independent Updating (IIU) enables any computer on the network to get information
from the update site, even if that computer does not have an Internet connection, as long as
at least one computer on the network is configured as a relay server.
Retrieving updates
Five minutes after a client computer starts, and at regular intervals throughout the day, the
Enforced Client client software checks if updates are available. If they are, the client computer
pulls them from another computer on the network (via
directly from the Internet site.
13
Rumor technology) or downloads them
Page 14
Enforced Client Product Guide Introduction
How does the software work?
The detection definition (DAT) files on the Internet site are regularly updated to add protection
against new threats. When the client software connects to the update site on the Internet, it
retrieves:
Regular DAT files, which contain the latest definitions for viruses, potentially unwanted
programs, and cookies and registry keys that might indicate spyware.
Outbreak DAT files, which are high-priority detection definition files released in an
emergency situation (see Outbreak response).
Upgrades to the software if a newer version exists.
Policy updates.
At any time, users can update manually by double-clicking in the system tray.
Update support for some operating systems is ending. After support ends, client computers
running those operating systems will no longer be protected against new threats. See Operating
Note
system support ending on page 28 for more information.
Uploading security information
Client computers upload detection and status data hourly to the SecurityCenter website. This
information is available to administrators in reports they can view on the SecurityCenter (see
Viewing reports on page 78).
1
Outbreak response
When an outbreak of a new threat is identified by Avert Labs, they issue an outbreak DAT, which
is a special detection definition (
encoded to inform the first computer receiving it to share the update immediately with other
client computers on the network. By default, client computers check for an outbreak
hour.
Rumor technology
When one computer shares updates with other computers on the local area network (LAN),
rather than requiring each computer to retrieve updates from the update website individually, the
Internet traffic load on the network is reduced. This process of sharing updates is called Rumor.
1 Each client computer checks the version of the most recent catalog file on the Internet site.
This catalog file contains information for every component in Enforced Client, and is stored
in a digitally signed, compressed .
If the version is the same as the catalog file on the client computer, the process stops here.
If the version is different from the catalog file on the client computer, the client computer
attempts to retrieve the latest catalog file from its peers. It queries if other computers on
the LAN have already downloaded the new catalog file.
2 The client computer retrieves the required catalog file (directly from the Internet site or from
one of its peers) and uses it to determine if new components are available for Enforced Client.
DAT) file marked as Medium or High importance. It is specially
DAT every
CAB file format.
3 If new components are available, the client computer attempts to retrieve them from its peers.
It queries if computers on the LAN have already downloaded the new components.
14
Page 15

Enforced Client Product Guide Introduction
How does the software work?
If so, the client computer retrieves the update from a peer. (Digital signatures are checked
to verify that the computer is valid.)
If not, the client computer retrieves the update directly from the update site.
4 On the client computer, the catalog file is extracted and new components are installed.
Internet Independent Updating (IIU)
Internet Independent Updating enables computers to use Enforced Client when they are not
connected to the Internet. At least one computer on the subnet must have an Internet connection
to be able to communicate with the udpate site. That computer is configured as a relay server,
and computers without an Internet connection retrieve updates locally from the relay server.
1 When a computer without Internet access fails to connect directly to the update site, it
requests information from the relay server.
2 The relay server downloads a catalog of updates from the update site.
3 The computer with no Internet connection downloads the necessary updates from the relay
server.
For more information, see Enabling relay servers on page 46.
1
15
Page 16
Enforced Client Product Guide Introduction
Managing with the online SecurityCenter
Managing with the online SecurityCenter
To manage your account via the SecurityCenter, use the URL you received in an email message
from your service provider. From the SecurityCenter, you can view the status of your protection
services, access reports on client activity such as detections and suspicious activity, update your
account data, and configure security settings. You can manage client computers by customizing
how often they check for updates, changing the way they handle detections, and scheduling
regular scans.
Figure 1-3 The online SecurityCenter
1
16
Page 17

Enforced Client Product Guide Introduction
Managing with the online SecurityCenter
The SecurityCenter’s main page shows a status summary for all the protection services you have
purchased (except email server protection):
Security Status — Indicates whether any action is required to address security issues, and
links you to instructions for resolving them.
Your virus and spyware protection — Illustrates the number of computers that are up-to-date
and out-of-date, and where the virus and spyware protection service is not installed. Click a
color in the pie chart to display a list of computers in that category.
Your desktop firewall protection — Illustrates the number of computers where the firewall
protection service is and is not installed. Click a color in the pie chart to display a list of
computers in that category.
Your email protection — Illustrates the number of messages delivered by category (clean,
spam, virus detected). Click a color in the pie chart or select the
Click here to configure link to
open the email security service’s web portal and view reports about your email.
Your browser protection — Illustrates the number of computers where the browser protection
service is and is not installed. Click a color in the pie chart to display a list of computers in
that category.
See Using the SecurityCenter on page 55 for more information.
1
The SecurityCenter offers two powerful tools for displaying your computers in groups and
fine-tuning their security settings.
User groups enable you to effectively categorize and manage client computers that require
different security settings or special monitoring.
Customized policies allow you to specify security settings to meet the needs of your users and
effectively use your network resources.
17
Page 18

Enforced Client Product Guide Introduction
Managing with the online SecurityCenter
User groups
Each computer running the client software belongs to a group. A group consists of one or more
computers using the same security settings (called policies). By default, computers are placed in
the
Default group.
Groups help you manage different types of computers effectively. You can base groups on
geographic location, department, computer type, user tasks, or anything meaningful to your
organization.
For example, you might place all laptops used by traveling sales representatives into a single
group called Sales Team. You can then view details about this group of computers separately
from other computers in your account. You can easily check detections for these computers or
customize their security settings in a policy (see
for specific circumstances and risks of a remote user.
To create groups, use the Groups + Policies tab on the SecurityCenter website. See Creating
groups to manage your site on page 71 for more information.
The following example shows how an administrator might configure policies for three different
groups of client computer users in an organization. You should configure policies for your users
to meet your own company’s needs.
Customized policies on page 19) that accounts
1
Policy Setting
On-Demand Scan Weekly Daily Daily
Enable outbreak response Enabled Enabled Enabled
Scan within archives during
on-access scans
Check for updates every 12 hours 4 hours 4 hours
Spyware Protection Mode Prompt Protect Prompt
Approved Programs None None Nmap remote admin tool
Firewall Protection Mode Protect Protect Prompt
Use Smart Recommendations to automatically
approve common Internet
applications
Connection Type Trusted network Untrusted network Trusted network
Allowed Internet
Applications
AOL Instant Messenger None AOL Instant Messenger
No Enabled Enabled
Enabled No Enabled
GoogleTalk
18
Page 19
Enforced Client Product Guide Introduction
Managing with the online SecurityCenter
Customized policies
After installation, Enforced Client protects client computers from threats immediately using
default security settings. However, you might want to change the way some features are
implemented for some or all of your computers. For example, you might want the service to
check for updates every four hours or set up a list of programs you consider safe.
Policies are made up of security settings that define how protection services operate on client
computers. Policy management allows you to assign different levels and types of protection to
different users. If you have created groups, you can assign a unique policy to each group or one
policy to all groups.
For example, you can assign a Sales policy to your mobile Sales Team group, with security
settings that protect against threats in unsecure networks such as airports and hotels.
Figure 1-4 Example: Sales Team group and Sales policy
1
19
Page 20

Enforced Client Product Guide Introduction
Using this guide
1
1
2
3
4
5
6
Create a Sales Team group and a Sales policy.
Assign the Sales policy to the Sales Team group.
Client software running on computers in the Sales Team group performs the tasks defined in
the Sales policy:
Check for updates to software components and DAT files every 4 hours.
Check for outbreak DAT file every hour.
Scan for viruses and potentially unwanted programs daily.
Block communication from computers on local network (untrusted network).
Client software sends security data for each client computer to the SecurityCenter.
Administrator checks the security status for the Sales Team group in reports on the
SecurityCenter.
The administrator adjusts the Sales policy. The modified policy is downloaded automatically
to client computers in the Sales Team group the next time they check for updates.
To create your own policies and assign them to computers or groups, use the Groups + Policies
tab on the SecurityCenter website. See Setting up policies on page 75 for more information.
Using this guide
This guide provides information on installing, configuring, using, and troubleshooting Enforced
Client.
Who should read this guide?
Conventions
Who should read this guide?
This information is designed for:
System and network administrators who want to implement a proactive, hands-on approach
to their security strategy.
Partner Security Services (PSS) partners who remotely manage and monitor the
SecurityCenter on behalf of their customer base.
Hands-off administrators who do not need to customize security settings can read an overview
of basic features in the Quick Start Guide, which is available from the
SecurityCenter website.
Help page on the
20
Page 21
Enforced Client Product Guide Introduction
Using this guide
Conventions
This guide uses the following conventions:
1
Bold
Condensed
All words from the user interface, including options, menus, buttons, and dialog box
names.
Example:
Type the User name and Password of the desired account.
Courier The path of a folder or program; text that represents something the user types exactly
(for example, a command at the system prompt).
Example:
The default location for the program is:
C:\Program Files\McAfee\EPO\3.5.0
Run this command on the client computer:
C:\SETUP.EXE
Italic For emphasis or when introducing a new term; for names of product documentation
and topics (headings) within the material.
Example:
Refer to the VirusScan Enterprise Product Guide for more information.
Blue A web address (URL) and/or a live link.
Visit the SonicWALL website at:
http://www.mcafee.com
<TERM> Angle brackets enclose a generic term.
Example:
In the console tree, right-click <SERVER>.
Note: Supplemental information; for example, an alternate method of executing the
Note
same command.
Tip: Suggestions for best practices and recommendations from SonicWALL for
Tip
threat prevention, performance, and efficiency.
Caution: Important advice to protect your computer system, enterprise, software
Caution
installation, or data.
Warning: Important advice to protect a user from bodily harm when interacting
with a hardware product.
Warning
21
Page 22
Enforced Client Product Guide Introduction
Getting product information
Getting product information
Several types of information are available to meet the specific needs of client computer users
and administrators.
Users — Client computer users can access online help from links in the client software.
Online User Help Access online instructions for performing security tasks in two ways:
Click help on any window displayed by the client software.
Click in the system tray and select Help.
Note: If the product’s built-in help system displays incorrectly on a client
computer, its version of Microsoft Internet Explorer might not be using
ActiveX controls properly. These controls are required to display the help
file. Make sure the latest version of Internet Explorer is installed with its
Internet security settings set to
Online Installation
Instructions
Administrators — Unless otherwise noted, these product documents are Adobe Acrobat .PDF files
available on the product CD or the
Product Guide Product introduction and features, detailed instructions for configuring the
Quick Start Guide A short “getting started” with information on basic product features, routine
Release Notes ReadMe. Product information, resolved issues, known issues, and
Online SecurityCenter
help
Online Push Install help
Avert Labs Threat
Library
Click the help link on any installation dialog box to display instructions for
installing Enforced Client using the URL method. Also contains instructions
for preparing for installation, testing, uninstalling, and troubleshooting
installation issues.
Help page of the SecurityCenter.
software, information on deployment, recurring tasks, and operating
procedures. Recommended for administrators who manage large
organizations or multiple accounts, and for hands-on administrators who
want to customize security settings and actively monitor client computers.
tasks that you perform often, and critical tasks that you perform
occasionally. Recommended for first-time customers who need an overview
of the product, and for hands-off administrators who plan to use the default
security settings and monitor security status through their weekly status
email.
last-minute additions or changes to the product or its documentation.
Available as a text document.
For information about any page of your SecurityCenter website, click the
help (
? ) link in the upper-right corner. You can access additional
information with the table of contents, index, or search feature.
While running the Push Install utility, click the help link on any dialog box
for information about deploying client software remotely to one or more
computers without user intervention.
After an update, click Avert Labs Threat Library on the Enforced Client
window to access the online SonicWALL Threat Library. This website has
detailed information on where threats come from, how they infect your
system, and how to remove them.
The Avert Labs Threat Library contains useful information on hoaxes, such
as virus warnings that you receive via email. A Virtual Card For You and
SULFNBK are two of the best-known hoaxes, but there are many others.
Next time you receive a well-meaning warning, view our hoax page before
you pass the message on to your friends.
Medium or Medium-high.
1
22
Page 23
Enforced Client Product Guide Introduction
Enforced Client Advanced — With Enforced Client Advanced, additional documents are available.
Email security service See Chapter 7, Using the Email Security Service for instructions on setting
up and using basic features of the email security service. Links are available
from the SecurityCenter website to the email security service’s web portal,
where you can configure the service, access its administration guide, and
view reports.
Email server security
application
Detailed documentation for the email server security application is available
on the product CD or in the downloadable installer accessible from the
SonicWALL download center.
Getting product information
Contact information
Threat Center: SonicWALL Avert® Labs http://www.mcafee.com/us/threat_center/default.asp
Avert Labs Threat Library
http://vil.nai.com
Avert Labs WebImmune & Submit a Sample (Logon credentials required)
https://www.webimmune.net/default.asp
Avert Labs DAT Notification Service
http://vil.nai.com/vil/signup_DAT_notification.aspx
1
Download Site http://www.mcafee.com/us/downloads/
Product Upgrades (Valid grant number required)
Security Updates (DATs, engine)
HotFix and Patch Releases
For Security Vulnerabilities (Available to the public)
For Products (ServicePortal account and valid grant number required)
Product Evaluation
SonicWALL Beta Program
Technical Support http://www.mcafee.com/us/support/
KnowledgeBase Search
http://knowledge.mcafee.com/
SonicWALL Technical Support ServicePortal (Logon credentials required)
https://mysupport.mcafee.com/eservice_enu/start.swe
Customer Service
Web
http://www.mcafee.com/us/support/index.html
http://www.mcafee.com/us/about/contact/index.html
Phone — US, Canada, and Latin America toll-free:
+1-888-VIRUS NO or +1-888-847-8766 Monday – Friday, 8 a.m. – 8 p.m., Central Time
Professional Services
Small and Medium Business: http://www.mcafee.com/us/smb/services/index.html
Enforced Client
Beta Site
http://betavscan.mcafeeasap.com
Beta Feedback
DL_ToPS_SMB_Beta@mcafee.com
23
Page 24

Enforced Client Product Guide Introduction
Getting product information
1
24
Page 25

2
Installing Enforced Client
This section describes what happens after you purchase the hosted services in Enforced Client
and Enforced Client Advanced, provides system requirements, and explains how to install the
virus and spyware protection service, firewall protection service, and browser protection service.
If you purchased Enforced Client Advanced, refer to emails and materials from SonicWALL for
instructions on installing the email security service or email server security application. See
Note
Chapter 7, Using the Email Security Service for information about activating and setting up the
email security service.
After you place your order
System requirements
Before you install
Installing Enforced Client
Completing the installation
What should I do after installing?
25
Page 26

Enforced Client Product Guide Installing Enforced Client
After you place your order
After you place your order
When you place an order for Enforced Client, you supply an email address, and your account is
associated with that email address. After you submit your order:
1 SonicWALL processes your order.
2 You receive three emails:
This email... Contains...
Welcome The download URL and instructions for installing the protection
services, accessing documentation, and contacting customer support.
Login credentials Instructions for logging on to the SonicWALL SecurityCenter
administrative website and changing your password.
2
Grant letter The grant number for the order, which is required for customer
support.
3 If you purchased Enforced Client Advanced, you also receive an email with instructions for
changing your MX (Mail eXchange) records. See
If you purchased Enforced Client from a SonicWALL partner who manages security for you, the
partner usually receives these emails. If you have questions about which emails you should
Note
receive, contact the partner.
Update your MX records on page 135.
Placing multiple orders
If you placed more than one order using different email addresses, you have more than one
Enforced Client account. To merge them so that all your security information and emails are sent
to a single email address, contact the SonicWALL partner from whom you ordered, or
SonicWALL customer support if you ordered directly from SonicWALL.
26
Page 27
Enforced Client Product Guide Installing Enforced Client
System requirements
System requirements
Enforced Client is designed for Microsoft Windows operating systems running on a PC
platform. It installs and runs on computers equipped with:
An Intel Pentium processor or compatible architecture.
Microsoft Internet Explorer 5.5 SP2 or later.
Operating systems
RAM
Email security service
Email server security application
Terminal servers
Operating systems
Protection services
Operating system Virus and spyware Firewall Browser
Client computers
Windows 2000 Professional
with Service Pack 3 or later
Windows XP Home
Windows XP Professional
(32-bit)
Windows Vista
(32-bit)
Windows XP
Windows Vista
(64-bit)
Servers
Windows 2000 Server
Advanced Server
Small Business Server
with Service Pack 3 or later
Windows 2003 Standard Server
Enterprise Server
Web Edition
Small Business Server
2
If you upgrade the operating system on a client computer (for example, from Windows 2000 to
Windows XP) and you want to leave your existing files and programs intact during the upgrade,
Caution
you must first uninstall Enforced Client, then reinstall it after the upgrade is complete.
Support for some operating systems is ending. After support ends, client computers running those
operating systems will no longer be protected against new threats. See Operating system support
Caution
ending for more information.
27
Page 28

Enforced Client Product Guide Installing Enforced Client
System requirements
Operating system support ending
Support for these Windows operating systems is ending with Enforced Client version 4.5.
Windows 95
Windows 98
Windows ME
Windows NT 4.x
For more information about support for these operating systems, visit
http://www.mcafee.com/us/enterprise/support/customer_service/end_life.html, then look for
Enforced Client under Managed Services Matrix.
See Notifying users when support ends for information about notifying users when support for
their operating system is ending.
Notifying users when support ends
By default, Enforced Client displays notifications on client computers to remind users that
support is ending for their operating system.
When upgrades to product components, such as the scanning engine, are scheduled to end or
will end within 30 days.
2
When updates to detection definition (DAT) files have ended or will end within 30 days.
A policy option determines whether support notifications are displayed.
Notifications are not displayed for computers running Windows 95 because support for that
operating system has already ended.
Note
To enable or disable notifications:
1 On the Groups + Policies page, click Add Policy (or click Edit to modify an existing policy).
2 Click the Advanced Settings tab.
3 Select or deselect Display support notifications on client computers, then click Save.
28
Page 29
Enforced Client Product Guide Installing Enforced Client
System requirements
RAM
Minimum
virus and spyware
protection
Windows 2000 64 MB 256 MB 256 MB
Windows XP 128 MB 256 MB 256 MB
Windows 2003 256 MB 512 MB 512 MB
Windows Vista 512 MB 512 MB 1 GB
Servers 256 MB 512 MB 512 MB
* Use the value listed for the firewall protection service whether installing that service alone or with
other protection services.
Minimum firewall
protection*
Recommended
Email security service
Enforced Client Advanced includes the additional email security service. To set up and run this
service, you need:
A dedicated email server, either in-house or hosted by an ISP.
A company email domain, such as yourdomain.com, with a static IP address.
2
Email server security application
Enforced Client Advanced gives you the option to install the SonicWALL GroupShield email
server security application.
Minimum requirements for Microsoft Exchange Server 2003:
Intel Pentium or compatible 133MHz processor.
128 MB of RAM (512 MB recommended).
740 MB free disk space.
One of these operating systems:
Microsoft Windows 2000 Server with Service Pack 4.
Microsoft Windows 2000 Advanced Server with Service Pack 4.
Microsoft Windows Server 2003 Standard Edition (32-bit).
Microsoft Windows Server 2003 Enterprise Edition (32-bit).
Minimum requirements for Microsoft Exchange Server 2000 with Service Pack 3:
Intel Pentium or compatible 133MHz processor.
128 MB of RAM (256 MB recommended).
740 MB of free disk space.
Microsoft Windows 2000 Server with Service Pack 4.
29
Page 30

Enforced Client Product Guide Installing Enforced Client
System requirements
Terminal servers
Enforced Client supports terminal servers and the Windows fast user switching feature in most
scenarios, with these limitations:
Enforced Client must be installed on the server by someone with local administrator
privileges.
When an installation or update occurs on a terminal server, one session is designated as the
primary update session (see Update computers where no user is logged on on page 55 for
restrictions that apply to automatic updates).
For all user sessions, the Enforced Client icon is removed from the system tray during the
installation or update. The icon is restarted only for the user logged on to the primary update
session. All user sessions are protected, and other users can manually redisplay their icons
(see Removing and displaying the icon on page 52 for more information).
Detection notifications are not displayed on the desktop of all computer users if the fast user
switching feature is enabled.
If you use an authenticating proxy server, disable the policy option Update client computers
where users are not logged in
virus protection options on page 97).
on the SecurityCenter’s Advanced Settings tab (see Set advanced
2
30
Page 31

Enforced Client Product Guide Installing Enforced Client
Before you install
Before you install
Complete these procedures on each computer to prepare for installing the client software:
Uninstall existing virus protection software
Uninstall existing firewall software
Configure your browser
Install the standalone installation agent — Required if users will install protection services
on client computers where they do not have administrator rights.
Uninstall existing virus protection software
Other virus protection software might conflict with the advanced features of Enforced Client
virus protection. When multiple virus scanning engines try to access the same files on your
computer, they interfere with each other.
Uninstall all virus protection software before installing the Enforced Client virus and spyware
protection service. If you are notified of existing virus protection software on a computer during
installation, follow these instructions to remove it.
2
To uninstall existing virus protection software:
1 In the Windows Control Panel, open Add/Remove Programs.
2 In the list of programs, locate any virus protection software (including Enforced Client), then
click
Remove.
The following lists include products that Enforced Client detects. In some cases, Enforced Client
uninstalls the software automatically; in other cases, it prompts you to uninstall it.
If you have virus protection software that does not appear on these lists, you must manually
uninstall it before installing Enforced Client.
Caution
31
Page 32

Enforced Client Product Guide Installing Enforced Client
Before you install
SonicWALL products automatically detected
2
SonicWALL Enterprise
Anti-Spyware Enterprise (all editions)
ePO agent
Managed VirusScan (previous editions)
Enforced Client Enterprise
VirusScan Enterprise 8.5i / 8.0i / 7.1 / 7.0
VirusScan 4.5.1
VirusScan 4.0.3
SonicWALL Retail
Internet Security Suite
SonicWALL SecurityCenter
Enforced Client for Home Users
VirusScan Retail 8.0
VirusScan Professional Edition 7.0 / 6.0
VirusScan Home Edition 7.0 / 6.0
VirusScan Retail 5.1.X
VirusScan Retail 5.0 for 9x
VirusScan Retail-OEM 4.0.3 for 9x
Non-SonicWALL products automatically detected
Computer Associates
eTrust AntiVirus 7.1
eTrust AntiVirus 7.0
Inoculate IT 3.5.1
Inoculate IT 4.5.3
Pest Patrol for spyware (compatibility)
Finjan
SurfinGuard
F-Secure
AntiVirus 5.52
Antivirus 2004 (home)
Antivirus Client Security
(uninstalls AV only)
F-Secure Internet Security 2006
Kaspersky
AntiVirus Personal
AntiVirus Personal Pro
Antivirus Business Optimal
Microsoft
Live OneCare
Panda
BusinesSecure 2006 (with TruPrevent)
(ClientShield is the AV portion)
ClientShield (with TruPrevent)
EnterpriSecure 2006 (with TruPrevent)
FileSecure
Platinum Internet Security
Titanium Antivirus 2006/2004/2003
WebAdmin Antivirus
Sophos
Sophos Antivirus
Symantec
NAV 2006/2004 Internet Security Edition
NAV 2006/2004 Professional
NAV 2002
NAV 8.0
NAV 7.6 for Windows for 9x
NAV 7.6 for Windows for NT
NAV 7.5.1/7.5
NAV Central Quarantine
Norton Internet Security 2006/2004 home &
Norton Internet Security 2006/2004 Professional
Norton Mobile Update Agent
Norton Mobile Update Distribution Console
Norton Rescue Disk
Norton Systemworks 2006/2004
Symantec Antivirus 10.3, 10.1, 9.x, 8.1
Trend
Micro HouseCall (On-Line)
OfficeScan
PC-Cillin Internet Security 2006
PC-Cillin 2004
Virusbuster Corporate Edition
(uninstalls AV only)
(uninstalls AV only)
small office editions (uninstalls AV only)
home & small office editions (uninstalls AV
only)
(uninstalls AV only)
(all editions)
32
Page 33

Enforced Client Product Guide Installing Enforced Client
Before you install
Uninstall existing firewall software
Before installing the firewall protection service, we recommend that you uninstall any other
firewall programs on your computer. Follow your firewall program’s instructions for
uninstalling or use the Windows Control Panel.
To uninstall existing firewall software:
1 In the Windows Control Panel, open Add/Remove Programs.
2 In the list of programs, locate any firewall software (including Enforced Client), then click
Remove.
On computers running Windows XP and Windows Vista, the Windows firewall is disabled
automatically during installation of Enforced Client.
Note
Configure your browser
Enforced Client requires Microsoft Internet Explorer 5.5 SP2 or later during installation.
Internet Explorer
Non-Microsoft browsers
2
Internet Explorer
Enforced Client works with the default security settings in Internet Explorer. If you are unsure
of your settings, use the following steps to verify and configure them.
version 5.5
1 From the Windows Control Panel, open Internet Options.
2 On the Security tab, select Internet Zone.
3 Click Default Level.
4 Drag the scrollbar to Medium, then click OK.
version 6.x
1 From the Windows Control Panel, open Internet Options.
2 On the Security tab, select Custom Level.
3 From the Reset to menu, select Medium, then click Reset.
version 7.x
1 From the Windows Control Panel, open Internet Options.
2 On the Security tab, select Medium-high.
Non-Microsoft browsers
If on your administrative or client computers you typically use a non-Microsoft browser, such
as Mozilla Firefox or Opera, you must install Internet Explorer before installing Enforced Client.
After the software is installed, you can continue to use your default Internet browser. You can
access the SecurityCenter with Internet Explorer (version 5.5 or later) or Firefox (version 1.5 or
later).
33
Page 34

Enforced Client Product Guide Installing Enforced Client
Before you install
Install the standalone installation agent
To allow users without administrator rights to install Enforced Client on client computers using
the URL method, you must first load a standalone installation agent on their client computers.
You can use a deployment tool to install it from your administrative computer, or you can
download it directly onto the client computers. You must have administrator rights on the client
computer to install this file.
To deploy the installation agent from your administrative computer:
1 From the SecurityCenter website, click the Help tab, select Utilities, then click installation
agent
to download the installation agent.
2 Deploy and execute the file on client computers using your customary deployment tools,
such as Microsoft Systems Management Server (SMS) installer, Windows NT login scripts,
or Tivoli IT Director.
To deploy the installation agent from the client computer:
1 From the SecurityCenter website, click the Help tab, select Utilities, then click installation
agent
to download the installation agent.
2 When the download is complete, double-click the file.
After the standalone installation agent is installed on a client computer, any user can install
Enforced Client client software on that computer.
2
34
Page 35

Enforced Client Product Guide Installing Enforced Client
Installing Enforced Client
Installing Enforced Client
Install the client software in any of the following ways:
Standard URL installation
Use the URL you received in your welcome email message to install the software on your
computer and access the SecurityCenter website. Then install the software on other computers
using a standard or customized URL, or send the URL to users with instructions on how to
install.
Advanced Installation options
From an administrative computer, visit the SecurityCenter website and use these methods to
remotely install the software on one or more computers simultaneously without user interaction.
Silent installation
Download a program called VSSETUP.EXE, then run it at the command line. This method requires
a third-party deployment tool, a login script, or a link to an executable file in an email message.
Push installation
Download the Push Install utility, then deploy the software directly from your service provider’s
website.
2
Standard URL installation
URL installation is the most common installation method. Users install the client software
individually, by downloading it from a company-specific URL.
Requirements
Sending an installation URL to users
Installing on client computers
Requirements
To use the Internet URL installation method, the client computer’s user must have:
Local administrator rights.
Administrator rights are not the default. You need to change the Windows configuration or
deploy a standalone installation agent (see Install the standalone installation agent on page 34
Note
for more information).
Sufficient rights to install an ActiveX control and a product to the system. (This is not
required for computers running Windows Vista.)
An Internet connection.
35
Page 36

Enforced Client Product Guide Installing Enforced Client
Installing Enforced Client
Sending an installation URL to users
As the administrator, you can obtain the company-specific installation URL in two ways:
After signing up for Enforced Client, you receive an email message containing the URL that
has been set up for your company. This installation URL installs all the services you have
subscribed to into your account’s default group in your account’s default language. You can
copy this URL into an email message to send to the client computer users at your company.
At any time, you can log on to your SecurityCenter and create a customized URL to send to
users. This enables them to install specific services in a designated group and language.
To create a customized installation URL:
1 In your web browser, log on to your SecurityCenter website.
2 From the Computers page, click Add Computer.
3 Select the group to place the client computers in, the services to install, and a language for
the software, then click
A customized URL is displayed, along with simple instructions for users.
4 Click Select Text and Copy to Clipboard.
Next.
2
5 In your local email application, open a new message and paste the text you have copied.
6 Revise the instructions if needed, then send the email to the users who need to install the
software.
Installing on client computers
Administrators and users follow the same procedure for installing the client software.
To install using the URL method:
1 On the client computer, open the email message and click the installation URL.
The URL installation method can be used only by client computers with a connection to the
Internet, and users must have local administrator rights (see Requirements.)
Note
Enforced Client installs automatically.
36
Page 37

Enforced Client Product Guide Installing Enforced Client
Figure 2-1 Internet URL installation
Installing Enforced Client
2 Select the services to install if you are prompted to do so, type your email address in the Email
or identifier
field, and click Continue.
2
What is the email address used for?
The information entered here identifies the computer where the installation is taking place.
The SecurityCenter uses it to identify that computer in reports. If reports indicate a problem
with a computer, you can use the email address to notify the user. If the user does not enter
an email address, it is important to know how to contact the user when security issues arise.
3 When you are prompted to do so, click Install.
4 In the File Download dialog box, click Run.
For installation, Enforced Client uses a cookie created at this time. The cookie expires after
24 hours. If you save the installation file and then try to install it after 24 hours have passed,
or delete the cookie, you are prompted to begin the installation process again.
5 On computers running Windows Vista, if the User Account Control dialog box appears, click
Continue.
6 Select Restart when prompted to reboot after installing the firewall protection service.
37
Page 38

Enforced Client Product Guide Installing Enforced Client
Installing Enforced Client
Advanced installation methods
Administrators can use the advanced installation methods to install the Enforced Client client
software without user interaction.
Figure 2-2 Advanced installation methods
2
Two advanced installation methods are available: Silent installation and Push installation.
Select the one that works best for your network.
Advanced installation method
The administrator... Silent Push
Performs the installation from Client computer Administrative computer
Downloads this file VSSETUP.EXE Push Install utility
Installs the client software on One computer One or more computers
Installs remotely No Yes
Can designate relay servers (optional) Yes Yes (separately from client
computers)
Some network configurations require additional information to ensure that client software
operates correctly (see
If you use a corporate firewall or proxy server on page 45).
38
Page 39

Enforced Client Product Guide Installing Enforced Client
Installing Enforced Client
Silent installation
VSSETUP is an executable file for installing Enforced Client on a client computer with no user
interaction. This installation method is not network-specific and installs the software on any
Windows operating system.
Figure 2-3 How silent installation works
2
To use silent installation:
1
2
3
Requirements
Installation
Download VSSETUP from the SecurityCenter.
Deploy to each computer where you want to install the client
software.
On the computer, open a DOS window and run the VSSETUP
command using the appropriate parameters.
Requirements
To use the silent installation method:
You must have a method for installing executable files on your network computers. For
example:
A third-party deployment tool, such as Novell NAL, ZenWorks, Microsoft Systems
Management Server (SMS) installer, or Tivoli IT Director.
A login script.
A link to an executable file in an email message.
A portable medium such as a CD.
You should run this program using an account with sufficient rights to install the product.
Typically local administrator rights are required, and some methods require remote
execution rights.
39
Page 40

Enforced Client Product Guide Installing Enforced Client
You must know your company key (the series of characters in the installation URL after the
characters
CK=).
Installing Enforced Client
Installation
To install Enforced Client silently:
1 From your web browser, log on to your SecurityCenter.
2 On the Computers page, click Add Computer.
3 Select the group to place the user’s computer in, the services to install, and a language for the
software, then click
4 Under Additional Installation Options, click Display advanced installation methods.
5 Under method 1, click VSSETUP to save the VSSETUP.EXE file to your hard drive.
6 Deploy the program to each client computer using your customary deployment tool, such as
those listed under
7 On a client computer, open a DOS window and run the following command:
VSSETUP.EXE /CK=<your company key> /<parameters>
Next.
Requirements.
2
As shown in this example, you must include your company key (CK) as a parameter. See
VSSETUP parameters for a list of optional parameters you can add to your command line.
What is my company key?
Your company key is included in the URL that you received when you subscribed to
Enforced Client. It is the hexadecimal value that follows the characters
CK= at the end of the
URL.
8 Reboot the client computer after installing the firewall protection service.
40
Page 41

Enforced Client Product Guide Installing Enforced Client
Installing Enforced Client
VSSETUP parameters
For a silent installation, use this command line and any of the following parameters (which are
not case-sensitive):
VSSETUP.EXE /CK=<your company key> /<parameters>
/CK=XYZ Required. Launches Setup using the company key.
/Email=x@y.com Identifies the user’s email address in administrative reports.
Note: Despite its name, the email variable does not need to be an
email address. Do not use a string containing non-standard
characters, because they might display incorrectly in reports.
/Uninstall Uninstalls Enforced Client.
/SetRelayServerEnable=1 Sets a computer with a connection to the Internet as a relay
server. If the computer is not used as a relay server, set to 0.
/Reinstall Reinstalls Enforced Client, leaving the previous values for
company key, email address, and machine ID intact.
2
/Groupid=[group number] Places the computer into any group you have created. You can
/P=b
/P=f
/P=v
/P=bf
/P=bv
/P=fv
/P=vfb
find the number associated with a group by generating a
customized URL (see
on page 36).
Note: If you designate a group that does not exist, users are
placed in the
Selects the protection service(s) to install:
b — browser protection service.
f — firewall protection service.
v — virus and spyware protection service.
Note: If you omit the /P parameter, only the virus and spyware
protection service is installed.
To create a customized installation URL:
Default group.
Examples
VSSETUP.EXE /vfb /CK=abcd /Email=joe@example.com /Groupid=3
The virus and spyware, firewall, and browser protection services are installed. The company
key is
abcd, the user’s email address is joe@example.com for reporting purposes, and this
user is placed in an existing group represented by the number
as described in
Sending an installation URL to users on page 36, to find the correct numeric
3. Generate a customized URL,
groupid.
VSSETUP.EXE /CK=abcd /Email=joe@example.com
Only the virus and spyware protection service is installed. The company key is abcd and the
user’s email address is
joe@example.com for reporting purposes.
41
Page 42

Enforced Client Product Guide Installing Enforced Client
Installing Enforced Client
Push installation
Push means deploying remotely to one or more computers in a network. This method uses the
Push Install utility to deploy the client software directly from your service provider’s website to
client computers on your network. Push installation does not require third-party deployment
software or interaction with users.
To perform a push installation:
Designate an administrative computer, where you will download the Push Install utility and
initiate the push.
Select the target computers, which are client computers on your network that will receive the
software.
The Push Install utility is essentially an ActiveX control that runs on an administrative computer.
It installs client software on all target computers that are online when the push takes place. Use
push installation to install client software on new network computers or to install additional
protection services on computers with existing client software.
The Push Install utility allows you to specify one or more network computers with an Internet
connection as relay servers. You must do so in a separate push operation, because you cannot
push to relay servers and non-relay servers at the same time. See
page 46 for more information.
Enabling relay servers on
2
Figure 2-4 How push installation works
42
Page 43

Enforced Client Product Guide Installing Enforced Client
Installing Enforced Client
To perform a push installation:
2
1
2
3
Requirements
Installation
Download the Push Install utility from the SecurityCenter.
Initiate a push to one or more client computers.
Optional. Initiate a push to one or more relay servers.
Online help for the Push Install utility is available by clicking the help link in any dialog box
during installation.
Note
Requirements
To use the push installation method:
The administrative computer must be running the Windows 2000, Windows XP
Professional, or Windows Vista operating system.
Push installation is not supported on Microsoft Windows XP Home Edition because Windows
XP Home Edition cannot log on to an Active Directory domain.
Note
The administrative computer must be running Internet Explorer 5.5 SP2 or later, with
ActiveX enabled.
At the administrative computer, you must be logged on with domain administrator privileges
for the domain being installed.
Administrative computers running the Windows firewall and Windows XP Professional or
Windows Vista must add File and Print Sharing to the firewall’s Exceptions list. For
instructions, see the Push Install Help, available by clicking the
help link in any dialog box
when you run the Push Install utility.
All target computers must be logged on to the same Windows domain as the administrator.
Considerations for scheduling push installations
When scheduling push installations:
Consider other network tasks. Pushing to a large number of computers simultaneously can
produce a high volume of network traffic, so schedule push installations for times when they
will not affect other network tasks.
Make sure the target computers are turned on. The Push Install utility installs client
software on target computers that are online when the push takes place.
Make sure users are not using the target computers. Restarting a client computer while a
push installation is in progress can cause the computer to become unstable, so schedule push
installations for times when users will not be turning off or restarting their computers.
43
Page 44

Enforced Client Product Guide Installing Enforced Client
Installing Enforced Client
Installation
Back up any vital data on your critical servers before pushing software to them.
Caution
To install Enforced Client using the Push Install utility:
1 On the administrative computer, open the web browser, log on to the SecurityCenter, then
click
Install Protection.
2 Select the type of computers to install software on, then click Next.
3 If you are installing to new computers (where no Enforced Client services are currently
installed), select the group where you want to assign the computers.
4 Select the services to install and their language, then click Next.
5 Under Additional Installation Options, click Display advanced installation methods.
6 Under method 2, click Run Push Install utility.
A window displays a list of visible computers in your domain.
Figure 2-5 Select target computers and protection services
2
7 From the left pane, select the target computer(s), then click Add.
8 Optionally, select Set as Relay Server(s) to configure the selected computers as relay servers,
which can distribute updates to other computers on the network. See
Enabling relay servers
on page 46 for details.
9 Select the Enforced Client service(s) to install, then click Install Components.
44
Page 45

Enforced Client Product Guide Installing Enforced Client
Installing Enforced Client
After installation is complete, a status for each target computer is displayed.
Figure 2-6 Status for target computers
10 Click View Log to open a log file in Microsoft Notepad that shows the status of the current
session, then save the file.
The dialog box indicates only whether the files were pushed to the target computers. It is
important to review the log file to verify that the files were installed and updated
successfully. You can also use the log file for troubleshooting. (The contents of the log file
are deleted when you close the Push Install utility or perform another push.)
2
11 Optionally, click Back to return to the previous screen and push to more computers.
12 If you have installed the firewall protection service, restart the client computers.
If you use a corporate firewall or proxy server
Enforced Client downloads components directly from SonicWALL servers to client computers.
If you are behind a corporate firewall, or are connected to the Internet by a proxy server, you
might need to provide additional information for your service to work properly.
Authentication support is limited to anonymous authentication or Windows domain
challenge/response authentication. Basic authentication is not supported.
Advanced installation methods and automatic updating do not support a CHAP or NTLM
proxy.
If you use an authenticating proxy server, disable the policy option Update client computers
where users are not logged in
on the SecurityCenter’s Advanced Settings tab (see Set advanced
virus protection options on page 97).
Contact product support if you have proxy questions while installing or updating Enforced
Client.
Enabling relay servers
If any computers on your network do not have a direct connection to the Internet, the Internet
Independent Updating (IIU) feature allows them to receive software updates from another local
computer. In that case, you must specify at least one computer in your LAN as a relay server.
If all the computers on your network connect to the Internet, you do not need to set up any relay
servers. However, you might want to specify relay servers to reduce Internet traffic on your LAN.
Tip
See Internet Independent Updating (IIU) on page 15 for information on using relay servers.
45
Page 46

Enforced Client Product Guide Installing Enforced Client
Completing the installation
You can specify one or more computers as a relay server in two ways:
Using the Push Install utility
Using VSSETUP
Using the Push Install utility
During the push installation procedure, select Set as Relay Server(s) before clicking Install
Enforced Client
(see step 10 under Installation on page 44).
You must perform a separate push operation to push files to relay servers and non-relay servers,
because you cannot push to both at the same time.
Using VSSETUP
During a silent installation, or at any time after Enforced Client has been installed on a computer,
you can run the
The
vssetup syntax differs, depending on whether this is an initial installation or an existing
installation. (See
Initial installation
During an installation, vssetup uses the following syntax to specify a computer as a relay
server:
vssetup command with the variable that specifies a computer as a relay server.
Silent installation on page 39 for more information.)
2
VSSETUP.EXE /RelayServer=1
If you do not specify the computer as a relay server during the installation process, the default is
0 (off), and the computer is not a relay server.
Note
Changing an existing configuration
You can edit an existing installation using vssetup with the SetRelayServerEnable parameter.
Specify a computer as a relay server:
VSSETUP.EXE /SetRelayServerEnable=1
Change a current relay server computer so that it is no longer a relay server:
VSSETUP.EXE /SetRelayServerEnable=0
Completing the installation
After installing Enforced Client, perform these procedures on each client computer to ensure that
the software is working correctly and the computer is protected. (Users can read instructions for
performing these procedures in the online Installation Instructions or User Help.)
Test virus protection
Scan the client computer
Scan the email Inbox
Set up the default firewall
46
Page 47

Enforced Client Product Guide Installing Enforced Client
Completing the installation
Test virus protection
Test the virus-detection feature of the virus and spyware protection service at any time by
downloading the EICAR Standard AntiVirus Test File at the client computer. Although it is
designed to be detected as a virus, the EICAR test file is not a virus.
To run a test:
1 Download the EICAR file from the following location:
http://www.eicar.org/download/eicar.com
If installed properly, the virus and spyware protection service interrupts the download and
displays a threat detection dialog box.
2 Click OK, then select Cancel.
If installed incorrectly, the virus and spyware protection service does not detect the virus or
interrupt the download process. In this case, use Windows Explorer to delete the EICAR test file
Note
from the client computer. Then reinstall Enforced Client and test the new installation.
Scan the client computer
After installing the virus and spyware protection service for the first time, we recommend
running an on-demand scan of all client computer drives before proceeding. This checks for and
cleans or deletes existing threats in files. In the future, files are scanned when they are accessed,
downloaded, or saved.
2
To scan your computer:
1 Click in the system tray.
2 Select Scan Tasks, then select Scan My Computer.
47
Page 48

Enforced Client Product Guide Installing Enforced Client
Completing the installation
Scan the email Inbox
After installing the virus and spyware protection service for the first time, we recommend
running an on-demand email scan before proceeding. This checks for threats in email already in
the client’s Microsoft Outlook Inbox. Future emails are scanned before they are placed in the
Inbox.
To run an on-demand email scan:
From the Tools menu in Outlook, select Scan for Threats.
The On-Demand Email Scan dialog box appears when the scan starts. You can stop, pause, and
restart the scan. You can also check the results of the scan.
Set up the default firewall
To ensure complete protection on computers running Windows XP or Windows Vista, the
firewall protection service automatically disables the Windows firewall and configures itself as
the default firewall. This enables it to monitor communications for Internet applications and
track events for reporting purposes, even if the Windows firewall is also running.
We recommend that you do not re-enable the Windows firewall while the Enforced Client
firewall is enabled.
2
If both firewalls are enabled, the Enforced Client firewall lists only a subset of the blocked IP
addresses in its
Caution
some of these addresses; however, it does not report them because event logging is disabled in
the Windows firewall by default. If both firewalls are enabled, you must enable Windows
firewall logging to view a list of all blocked IP addresses. The default Windows firewall log is
C:\Windows\pfirewall.log. Enabling both firewalls also results in duplicate status and alert
messaging.
Inbound Events Blocked by the Firewall report. The Windows firewall blocks
48
Page 49

Enforced Client Product Guide Installing Enforced Client
What should I do after installing?
What should I do after installing?
After installing Enforced Client, client computers are protected immediately and no further setup
is required for the virus and spyware protection service, the firewall protection service, or the
browser protection service. You will receive regular status emails with details about your
account. (If you purchased Enforced Client from a SonicWALL partner who manages security
for you, the partner usually receives these emails.)
If you purchased Enforced Client Advanced, refer to emails and other materials from your service
provider for instructions on installing and configuring the additional services. See Chapter 7,
Note
Using the Email Security Service for information about activating and setting up the email
security service.
You might want to take advantage of additional features to more easily manage your account
and customize a security strategy for your specific needs:
Setting up your account on page 62.
Viewing your security services at-a-glance on page 63.
Managing your computers on page 65.
Creating groups to manage your site on page 71.
2
Setting up policies on page 75.
Viewing reports on page 78.
For guidelines on administering an effective security strategy:
For virus and spyware protection, see Manage your protection strategy with best practices
on page 108.
For firewall protection, see Managing suspicious activity with best practices on page 125.
Users configure most browser protection settings on their computers. For descriptions of these
features and recommended settings, see
Configuring browser protection on the client computer
on page 131.
49
Page 50

Enforced Client Product Guide Installing Enforced Client
What should I do after installing?
2
50
Page 51

3
Using Enforced Client
Enforced Client consists of two main components for managing security:
The client software: Software installed on each client computer. The client software runs in
the background to download updates and protect the computer from threats. It also provides
users access to the basic functions of their SonicWALL protection services, such as scanning
files, folders, and email messages.
The SonicWALL SecurityCenter: A website for administrative functions, where you can
centrally manage the protection services for your account. Most administrative tasks are
performed from the SecurityCenter.
Enforced Client is designed for hands-off management. After installing the software on client
computers, you receive regular emails that summarize the security status of all client computers
on your account, and notify you of actions required to address vulnerabilities. Status emails
contain a link to your SecurityCenter website, where you can view detailed reports and
instructions for resolving problems.
In small organizations, status emails might be all that is needed to assure you that your
computers are safe. If you manage a large account or want more proactive, hands-on
involvement, you can take advantage of the tools available on the SecurityCenter.
Using the client software
Updating client computers
Using the SecurityCenter
Getting started
Setting up your account
Viewing your security services at-a-glance
Managing your computers
Creating groups to manage your site
Setting up policies
Viewing reports
Managing your subscriptions
Getting assistance
51
Page 52

Enforced Client Product Guide Using Enforced Client
Using the client software
Using the client software
After installing Enforced Client, the software runs on each client computer to immediately
protect it from threats such as viruses and intrusions.
Typically, users have little interaction with the client software unless they want to manually scan
for threats. User tasks are documented in the online User Help on client computers.
As an administrator, you can most easily use the SecurityCenter website to configure settings
and monitor detections for client computers. Occasionally, you might work directly on a client
computer.
Users and administrators access the client software’s features through these components on a
client computer:
Enforced Client system tray icon
Client menu
Administrative menu and tasks
Enforced Client system tray icon
When Enforced Client is running on a client computer, the Enforced Client icon appears in
the system tray and indicates the status of the services.
3
This icon... ....indicates:
An update is in progress. Do not interrupt the Internet or LAN connection, or
log off the computer.
Move the mouse over the icon to display which condition the icon indicates:
The last update failed to complete. Check the Internet or LAN connection,
then double-click the icon to perform a manual update.
On-access scanning is disabled (see Disabling on-access scanning on
page 110).
The firewall protection service is disabled (see Enable firewall protection
on page 114).
The service subscription is expired (see Managing your subscriptions on
page 83).
See Removing and displaying the icon.
Removing and displaying the icon
When you remove the Enforced Client icon, the protection services continue to protect the client
computer by blocking detections, but do not display any user prompts.
To remove the icon from the system tray:
1 On the client computer, hold down the Ctrl and Shift keys and click in the system tray.
2 Select Exit.
To display the icon in the system tray:
On the client computer, select Start | Programs | SonicWALL | Enforced Client Anti-Virus and
Anti-Spyware | SonicWALL Enforced Client
.
52
Page 53

Enforced Client Product Guide Using Enforced Client
Updating client computers
Client menu
Click in the system tray to access these options:
Scan Tasks: Displays a submenu for accessing features
of the virus and spyware protection service.
Firewall Settings: Displays the current status, mode,
and connection type for the firewall protection service.
If the policy allows users to configure firewall
protection, a dialog box for changing settings appears
instead.
About: Displays information about the software, including the current version of the
detection definition (
Help: Displays the built-in User Help file, which contains basic information about using
DAT) file.
product features.
Update Now: Checks whether a new update is available; if so, the update downloads
automatically.
Administrative menu and tasks
Access administrative features
by holding down both the Ctrl
and
Shift keys when clicking
in the system tray:
3
Exit: Removes the Enforced
Client icon from the system
tray. See Removing and
displaying the icon on
page 52 for more
information.
Scan Tasks | Disable
On-Access Scanner: Turns
off the automatic on-access
scanner. To re-enable the
scanner, reopen the administrative menu and select
on-access scanning on page 110 for more information.
Scan Tasks | Quarantine Viewer: Opens the quarantine folder, which contains possible
threats detected on the computer. See Manage quarantined files on page 109 for more
information.
Administrative tasks for client computers are also described in the online User Help on the client
computer. However, instructions for accessing the administrative menu are provided only in this
Product Guide.
Updating client computers
Enable On-Access Scanner. See Disabling
Enforced Client automatically updates client computers with new detection definition (DAT)
files and other software components.
53
Page 54

Enforced Client Product Guide Using Enforced Client
Updating client computers
Users can check for updates manually at any time. In addition, you can configure optional policy
settings for updating tasks.
Update support for some operating systems is ending. Once support ends, client computers
running those operating systems will no longer be protected against new threats. See Operating
Note
system support ending on page 28 for more information.
Update automatically
Update manually
Update during an outbreak
Update computers where no user is logged on
Update automatically
The software on each client computer automatically connects to the Internet directly or to a relay
server and checks for updated components. Enforced Client checks for updates five minutes
after a user logs on and at regular intervals thereafter. For example:
If a computer is normally connected to the network all the time, it checks for updates at
regular intervals throughout the day.
3
If a computer normally connects to the network each morning, it checks for new updates five
minutes after the user logs on each day, then at regular intervals throughout the day.
If a computer uses a dial-up connection, the computer checks for new updates five minutes
after dialing in, then at regular intervals throughout the day.
By default, computers check for new updates every 12 hours. You can change this interval by
configuring a policy setting (see
On computers where a CHAP or NTML proxy is set up in Internet Explorer, automatic updates
do not work.
Note
Update manually
At times, users might want to check for udpates manually. For example, when a computer
appears to be out-of-date in your administrative reports, users might need to update manually as
part of the troubleshooting process.
To update manually:
Double-click in the system tray, or click the icon and select Update Now.
Update during an outbreak
When an outbreak is identified by SonicWALL Avert Labs, they issue an outbreak DAT, which
is a special detection definition (
encoded to inform the first computer receiving it to share the update immediately with other
client computers on the network.
Select your update frequency on page 97).
DAT) file marked as Medium or High importance. It is specially
In rare cases, SonicWALL might send an EXTRA.DAT file with instructions for manually
Note
installing it.
54
Page 55

Enforced Client Product Guide Using Enforced Client
For maximum protection, configure your policies to check for an outbreak DAT file every hour
(see
Enable optional protection on page 97). This feature is enabled by default.
Using the SecurityCenter
Update computers where no user is logged on
In most scenarios, Enforced Client supports terminal servers and the Windows fast user
switching feature. When an update occurs, one session is designated as the primary update
session. A pseudo user is defined, which enables automatic updates to occur on computers where
no user is logged on.
For certain configurations, automatic updates cannot occur. Enforced Client cannot create the
pseudo user when:
The computer is a domain controller.
Local security policies, including password restrictions, prevent the user’s creation.
When the pseudo user cannot be created, automatic updates do not occur. The pseudo user also
cannot update if the computer is behind an authenticating proxy server.
For these situations, you can disable the Update client computers where users are not logged in
policy setting on the SecurityCenter’s
options on page 97). This prevents automatic update attempts from being reported as errors.
Advanced Settings tab (see Set advanced virus protection
3
To disable updates for non-logged-on users:
1 On the Groups + Policies page, click Add Policy (or click Edit to modify an existing policy).
2 Click the Advanced Settings tab.
3 Deselect Update client computers where users are not logged in, then click Save.
Using the SecurityCenter
Access the administrative features of Enforced Client from the online SecurityCenter.
The SecurityCenter offers tools for administrators who manage many computers or want to
assume a proactive role in overseeing their corporate security strategy.
Use the SecurityCenter to centrally manage the client computers and information for your
account. For every category of account management, you can access all the tasks you need to
perform from the SecurityCenter:
55
Page 56

Enforced Client Product Guide Using Enforced Client
Using the SecurityCenter
When you are... Perform these tasks from the SecurityCenter
Setting up your account
Viewing your security
services at-a-glance
Managing your
computers
Creating groups to
manage your site
Designating group
administrators
Setting up policies
Viewing reports
Managing your
correspondence
Managing your
subscriptions
Getting assistance
Set up your profile
Change your SecurityCenter password
Sign up for email notifications
Install protection services
View and resolve action items
View security coverage for your account
Search for computers
Display details for a computer
View detections for a computer
View user-approved applications for a computer
Send email to computers
Block computers from receiving updates
Delete computers from your reports
Move computers into a group
Create or edit a group
Delete a group
Create or edit a group administrator
Delete a group administrator
Create or edit a policy
Assign a policy to a group
Restore default policy settings
Delete a policy
View detections
View unrecognized programs
View unrecognized Internet applications
View inbound events blocked by the firewall
View duplicate computers
View computer profiles
View your detection history
Send email to users
Update user email addresses
Update your account’s email address
Add your logo to reports
View your service subscriptions
Update subscription information
Purchase, add, and renew services
Request a trial subscription
Receive subscription notifications
View printed and online documents
Download utilities
Contact product support
3
56
Page 57

Enforced Client Product Guide Using Enforced Client
Getting started
Getting started
The SecurityCenter website helps you locate information easily.
Log on to the SecurityCenter
Access online features and functions
Make the most of your online data
Customize listings and reports
Using the online help
Log on to the SecurityCenter
You must use your unique user name and password to log on to the SecurityCenter.
1 Obtain the URL for your SecurityCenter in the login credentials email you received from
your service provider (see
2 Paste or type the URL into your browser.
After you place your order on page 26).
3
3 Type your login credentials:
Email Address
Password
The email address that you used to sign up for Enforced Client.
In most cases, the password that you created when signing up.
4 Click Log In.
At any time after logging on, you can change your password by updating your user profile (see
Change your SecurityCenter password on page 62). Your password is case-sensitive and must
be a minimum of six characters.
Access online features and functions
Administrative features are divided among six pages:
SecurityCenter
Computers
Reports
Groups + Policies
My Account
Help
57
Page 58

Enforced Client Product Guide Using Enforced Client
Getting started
Figure 3-1 SecurityCenter tabs
3
58
Page 59

Enforced Client Product Guide Using Enforced Client
Getting started
Make the most of your online data
Each SecurityCenter page includes features for displaying the exact data you need and using it
efficiently.
Figure 3-2 Page controls for listings and reports
1 2 3
4
5
6
3
7
8
When you want to... Do this...
1
2
Print the current page.
Send the current page as an email
attachment.
Click Print to open the page in a separate browser
window, then select
Windows
Print dialog box.
Send to printer to open the
Click Email to open a blank email message to fill
out, then click
Send. (You must have a local email
application installed to use this feature.)
3
4
5
Save the current page.
Navigate in multiple-page listings.
Select computers to manage. Select the checkbox for individual computers, or
Click Save As, then select the file format you want.
Click the number of entries to display, or click Go
to page
to display a specific page.
select the checkbox in the heading to select all
computers.
6
Check your action items. Problems that require your attention appear in red.
Display instructions for resolving them by clicking
the corresponding action item. See
View and resolve
action items on page 64.
Display details about a computer. Click a computer name in a listing.
7
8
Send email to a computer. Click an email address in the listing to open a blank,
preaddressed message. (You must have a local email
application installed to use this feature.)
59
Page 60

Enforced Client Product Guide Using Enforced Client
Getting started
Customize listings and reports
Select the information to display or the order in which it appears.
To filter information:
At the top of a page, select the information to display (group name, period of time, or type of
information).
To sort information in listings:
Click a column heading to sort by that column. Click it again to switch the order in which it is
displayed (ascending order
or descending ).
3
60
Page 61

Enforced Client Product Guide Using Enforced Client
Getting started
Using the online help
Online help is available from any page on the SecurityCenter website by clicking the help ( ? )
link in the top-right corner of the page. The help window provides information about the page
from which it was called. You can access additional information with the table of contents, the
index, or the search feature.
Help navigation procedures
To.. . Do t h i s . . .
Navigate back to page that initially
appeared or from which you clicked a link
View the table of contents, index, and
search from a single help pane
Click Back on the shortcut menu.
Note: Do not use the Previous or Next buttons. They are
used to navigate through the linear order of pages in the
table of contents.
Click (Show Navigation).
3
Page through the help as ordered in the
table of contents
View related how-to topics
Locate an item alphabetically within the
index
Print a page
Create a bookmark of a page for an HTML
browser
Conduct a search
Remove highlighted text on a page after a
search
Click (Previous and Next).
Click (Related Links).
Click Index in the left pane.
Click (Print), or click Print on the shortcut menu.
Click (Bookmark).
Click Search in the navigation pane, enter the word or
words to search on, and click
Click Refresh on the shortcut menu.
Go.
61
Page 62

Enforced Client Product Guide Using Enforced Client
Setting up your account
Setting up your account
Configure your contact information so that you receive important notices from your service
provider.
Set up your profile
Change your SecurityCenter password
Sign up for email notifications
Set up your profile
Your profile contains the information your service provider needs to contact you about your
account. Initially, information supplied during your product purchase is placed into your profile.
It is important to keep this information up-to-date to prevent a disruption in your services.
We recommend changing the administrator’s email address that you use to access the
SecurityCenter (for example, admin@example.com), so that if the current administrator for
Tip
Enforced Client leaves the company, the administrative email address is easily transferred to the
new administrator.
3
To configure your profile:
On the My Account page under My Profile, click Edit.
Change your SecurityCenter password
We recommend that you change your password when you first visit the SecurityCenter and at
regular intervals thereafter.
To change your password:
1 On the My Account page under My Profile, click Edit.
2 Under Your Contact Information, type and confirm a new password.
Sign up for email notifications
Sign up for email notifications about your account status, service expiration, and service
utilization.
Status emails keep you informed about detections and coverage for your account. It is important
to receive status emails at regular intervals that are appropriate for your account, based on the
Note
frequency with which you need to review detection information. By default, you receive status
emails
Weekly.
To configure your notification preferences:
On the My Account page under My Preferences, click Edit.
62
Page 63

Enforced Client Product Guide Using Enforced Client
Viewing your security services at-a-glance
Viewing your security services at-a-glance
The SecurityCenter page is your “home” page on the SecurityCenter website — a graphical
overview of your coverage with instant access to summary information about the computers and
service subscriptions in your account.
Your status emails contain an overview of the information shown on the SecurityCenter page and
notify you when you need to check your SecurityCenter website.
What can I do from the SecurityCenter page?
The SecurityCenter page shows the current status for your account. It’s your “one-stop service
center,” where you can install services, check for problems, check your security coverage, or
check and update your subscriptions. Access the
SecurityCenter tab.
Figure 3-3 SecurityCenter page
SecurityCenter page at any time by clicking the
3
Select the information that appears on this page:
Groups — Display only the computers in a group or display all computers.
63
Page 64

Enforced Client Product Guide Using Enforced Client
Viewing your security services at-a-glance
From the SecurityCenter page, you can:
Install protection services
View and resolve action items
View security coverage for your account
Purchase, add, and renew services
Request a trial subscription
Install protection services
From the SecurityCenter, you can begin the installation process in two ways:
On the SecurityCenter page, click Install Protection.
OR
On the Computers page, click Add Computer.
See Chapter 2, Installing Enforced Client for more information.
3
View and resolve action items
Action items are security issues that need your immediate attention and are listed in red on the
SecurityCenter page or Computer Details page. Whenever you see information highlighted in red,
check for a corresponding action item on one of those pages. Possible action items are:
Computers are not protected
against the latest threat.
You have no virus and
spyware protection installed.
Click here to install
protection.
You have no desktop firewall
protection installed. Click
here to install protection.
Too many subscriptions in
use.
Your subscription is about to
expire.
Your subscription has
expired.
One or more computers are not updated with the latest detection
definition (
Either you have not installed the virus and spyware protection
service on client computers or the installation failed. Click the
action item to begin installation.
Either you have not installed the firewall protection service on
client computers or the installation failed. Click the action item to
begin installation.
You have installed Enforced Client on more computers than you
are licensed for. You need to uninstall from some computers or
purchase additional licenses.
Your subscription to one or more protection services will expire
soon and needs to be renewed.
Your subscription to one or more protection services is no longer
valid and needs to be renewed.
DAT) files or software components.
Your email is being spooled.
Please check your email
server.
Your email security service
needs to be activated.
Your organization’s email is being stored temporarily on your
service provider’s server because your email server is not
accepting email.
Your subscription to the email security service has not been
activated; you need to proceed with the activation process.
64
Page 65

Enforced Client Product Guide Using Enforced Client
Managing your computers
To view instructions for resolving an action item:
On the SecurityCenter page or the Computer Details page, click an action item.
View security coverage for your account
For each protection service, a pie chart shows the status of client computers in your account.
This color... Indicates...
Red Out-of-date or unprotected computers.
Green Up-to-date or protected computers.
Gray Computers where the protection service is not installed.
To view details about protection coverage for your account:
Click a color to show details about computers in a category.
The Product Coverage page lists details about the computers with the corresponding level of
coverage.
3
Managing your computers
The SecurityCenter provides a centralized location for working with all the computers in your
account. You can instantly view each computer’s group and email address, when it last
connected to the network, whether its detection definition (
detections, and the number of Internet applications approved by its user. You can easily see
which computers need your attention, display additional information, and perform necessary
management tasks.
Click the Computers tab to display the Computers page, which lists all the computers in your
account or only the computers in a selected group.
DAT) file is current, the number of
65
Page 66

Enforced Client Product Guide Using Enforced Client
Managing your computers
Figure 3-4 Computers page
3
Select the information that appears on this page:
Groups — Display only the computers in a group or display all computers.
Report period — Specify the length of time for which to display information.
Computer status — Show all computers, or only out-of-date computers, computers with
detections, or computers you have blocked from receiving updates.
For example, you can check whether there are security issues within specific groups. For groups
that regularly download files from Internet sites, you might want to monitor the number and type
of detections, then modify the security settings to approve safe programs and block
communications from sites you distrust.
From the Computers page, you can:
Search for computers
Install protection services
Display details for a computer
View detections for a computer
View user-approved applications for a computer
Send email to computers
Block computers from receiving updates
Delete computers from your reports
Move computers into a group
What computer management reports are available?
Use the Reports page to access two reports that can assist you with computer management:
66
Page 67

Enforced Client Product Guide Using Enforced Client
View duplicate computers
View computer profiles
Managing your computers
Search for computers
Use this feature to find a particular computer in your listings. Site administrators can search the
entire account; group administrators can search only the groups their site administrator has
assigned to them. (See
Designating group administrators on page 72 for information on group
administrators.)
To search for a computer:
At the top of the Computers page, type a full or partial computer name, email address, IP address,
or relay server name in the
The computer search feature does not recognize wildcard characters. You must use only letters
Note
or numbers.
Find computers box, then click Search.
Install protection services
From the SecurityCenter, you can begin the installation process in two ways:
3
On the SecurityCenter page, click Install Protection.
OR
On the Computers page, click Add Computer.
See Chapter 2, Installing Enforced Client for more information.
Display details for a computer
Use the Computer Details page to check information about a computer and manage its security.
To display details about a computer:
On the Computers page, click a computer name.
The Computer Details page displays information about the computer, its service components, and
its detections.
67
Page 68

Enforced Client Product Guide Using Enforced Client
Managing your computers
Figure 3-5 Computer Details page
1
2
3
3
4
When you want to... Do this...
1
2
Update the email address.
Move the computer into a new group.
For System email address, type a new email
address, then click
Save.
For Group, select a group from the list, then click
Save.
3
Display instructions for resolving an
Click the red action item.
action item.
4
Display details about detections.
Under Detections, click a quantity in the
Detections or User-Approved Applications
column, then click
Save. (To approve any
detections for use by adding them to a policy, see
Specify approved programs on page 101 and Set up
allowed Internet applications on page 121.)
68
Page 69

Enforced Client Product Guide Using Enforced Client
Managing your computers
View detections for a computer
Use this feature to view all the detections for a single client computer.
To view detections:
1 On the Computers page, click a quantity under Detections to display a list of detected items
and their status.
2 From the Detection List, click the name of a detection to display detailed information from the
SonicWALL Avert Labs Threat Library.
View user-approved applications for a computer
Use this feature to see which programs users have approved. Users can add approved programs
and allowed Internet applications only if their policy permits.
To view user-approved applications:
On the Computers page, click a quantity under User-Approved Applications to display a list of
potentially unwanted programs detected by the virus and spyware protection service and Internet
applications detected by the firewall protection service.
These programs were detected as potential threats, but users have approved them to run on their
computers.
3
To approve or allow a program:
To allow a user-approved program to run on other client computers, add it to a policy. (See
Specify approved programs on page 101 or Set up allowed Internet applications on page 121 for
more information.) Approved programs are no longer detected or blocked on any computers
using the updated policy.
Send email to computers
Use this feature to notify users about problems with their computers or tasks they need to
perform. You must have a local email application installed on your administrative computer.
To send email to computers:
On the Computers page, click an email address for a computer in the listing.
OR
Select the checkbox next to each computer you want to send email to, then click Email.
Your local email application opens a blank message, preaddressed (in the BCC field) to the
selected computers.
69
Page 70

Enforced Client Product Guide Using Enforced Client
Creating groups to manage your site
Block computers from receiving updates
Use this feature to prevent unauthorized computers that are connecting to your network
(sometimes called rogue systems) from receiving service updates.
To block computers:
On the Computers page, select the computers you want to block, then click Block.
To unblock computers:
On the Computers page, select Blocked to list all blocked computers, then select the computers
you want to unblock and click
Unblock.
Delete computers from your reports
Use this feature to remove obsolete computers and duplicate computers from your listings.
Duplicates typically appear when the Enforced Client client software has been installed more
than once on a single computer or when users install it on their new computers without
uninstalling it from their previous computers.
Deleting a computer does not uninstall the Enforced Client client software. If you mistakenly
delete a computer with working client software from the report, it automatically reappears in your
Note
listing the next time its report data is uploaded. However, you will no longer be able to view the
historical detection data for that computer.
3
To delete computers:
On the Computers page, select the computers you want to delete, then click Delete.
See View duplicate computers on page 80 for information on displaying a complete listing of
duplicate computers in a report.
Move computers into a group
Every client computer is part of a group (see Creating groups to manage your site on page 71
for more information). Initially, you assign computers to a group when installing Enforced
Client. If no group is specified, computers are placed in the
You can move computers into a different group at any time.
To move computers:
1 On the Computers page, select the computers you want to move.
2 From the Move to list, select the group you want to move the computers to.
You must create the group before you can move computers into it. See Create or edit a group
on page 72.
3 Click Move.
Default group.
Creating groups to manage your site
A group consists of one or more computers that use the same policy of security settings. You can
base groups on geographic location, department, computer type, the tasks performed by the
users, or anything meaningful to your organization.
70
Page 71

Enforced Client Product Guide Using Enforced Client
Creating groups to manage your site
By default, every computer in your account is placed into a group called Default. You can create
other groups to place them in instead.
Why use groups?
Groups help you manage large numbers of computers or computers that use different security
settings (defined in policies). Groups are particularly helpful in larger organizations or
companies that are widely distributed geographically. Placing similar computers into a single
group enables you to view and manage security issues for the group separately from the other
computers in your account.
For example, you might place all laptops used by traveling sales representatives into a single
group called Sales Team. Then you can configure special security settings for those computers
to provide greater protection against threats in unsecure networks such as airports and hotels.
You can also track the number of detections on those computers through more frequent reports
and adjust the security settings as needed. See
User groups on page 18 for an illustration.
How can I manage groups?
Click the Groups + Policies tab to display the groups in your organization and the policies
assigned to them. If you have not created any groups or policies, only the
SonicWALL Default policy are displayed.
Figure 3-6 Groups + Policies tab
Default group and the
3
From the Groups + Policies page, you can:
Create or edit a group
Delete a group
Note
The Default group
Until you create additional groups, all computers where you install your security services are
assigned to the
Computers are assigned to a group when protection services are installed. You can also move
computers to different groups using the
Default group. You cannot change the name of the Default group.
Computers page.
71
Page 72

Enforced Client Product Guide Using Enforced Client
The Default group uses the SonicWALL Default policy, which is configured with settings
recommended by SonicWALL to protect most organizations. You can assign a different policy
to the
Default group.
Designating group administrators
Create or edit a group
Use this procedure to assign a name and a policy to a group. See Move computers into a group
on page 70 for instructions on assigning computers to the group.
To create or edit a group:
On the Groups + Policies page, click Add Group or Edit/Assign Policy, specify a name and a policy
for the group, then click
Only one policy can be assigned to a group. Any existing policy is removed from that group when
you click
Note
Save.
Save.
Delete a group
You must move all computers out of a group before you can delete it. See Move computers into
a group on page 70 for instructions.
3
To delete a group:
On the Groups + Policies page, click Delete next to the group you want to delete.
You cannot delete the Default group.
Designating group administrators
Group administrators oversee and manage the groups that you, the site administrator, assign to
them. When creating group administrators, you specify which groups they manage, a password
they use to access the SecurityCenter, and their access level.
Why use group administrators?
Create group administrators to distribute security management in large organizations.
Group administrators have fewer access rights than the site administrator. While the site
administrator can access all security information for all client computers in the account, group
administrators can access information only for client computers in the groups they are assigned
to.
72
Page 73

Enforced Client Product Guide Using Enforced Client
Designating group administrators
Figure 3-7 Site and group administrators
3
1
2
3
4
The site administrator communicates directly with the SecurityCenter to create policies,
check reports, and maintain the Enforced Client account.
The site administrator creates and manages group administrators.
Group administrators communicate directly with the SecurityCenter to access security data
for the groups they are assigned to.
Group administrators manage the client computers in their assigned groups. The management
tasks they can perform and the information they can access on the SecurityCenter depend on
the type of group administrator account set up for them.
45
The site administrator can manage all client computers in all groups.
73
Page 74

Enforced Client Product Guide Using Enforced Client
Designating group administrators
What can group administrators do?
The access level you assign determines which tasks group administrators can perform for their
groups.
3
Basic tasks for
Read Only
Access the SecurityCenter website (see
Getting started).
Note: No subscription information is visible.
Only the assigned groups are visible.
Manage from client computers (using the
administrative menu):
Manage quarantined files.
Disabling on-access scanning.
View computers from the SecurityCenter (see
Display details for a computer).
Check data in reports (see Viewing reports).
Additional tasks for
Read & Modify Reports
Install protection services.
View and manage computers from the
SecurityCenter (see Managing your
computers).
View policies (see Setting up policies).
Rename groups (see Create or edit a group).
Modify the information in listings and
reports:
Send email to computers.
Block computers from receiving updates.
Delete computers from your reports.
Move computers in and out of groups (see
Move computers into a group).
Send email to users.
Send reports to users in email (see Make the
most of your online data).
You specify the access level when you create the group administrator’s account, and you can
edit it at any time.
Create or edit a group administrator
Delete a group administrator
Create or edit a group administrator
Use the My Account page to manage group administrators. Up to six group administrators can be
listed on this page. If you have created more than six group administrator accounts, click
group administrators
To create or edit a group administrator:
1 On the My Account page, in the Group Administrator section, click Add or Edit.
2 On the Manage Group Administrators page, select Create New or select the name of an existing
group administrator.
3 Type the group administrator’s name, email address, and password.
The password you assign is used to log on to the SecurityCenter and must be different from
your password. Administrative rights based on the group administrator’s access level will be
assigned to this password.
4 Select an access level and which groups to manage.
5 Click Save to return to the My Account page.
6 On the line where the new group administrator’s name appears, click Email Password.
to display a complete listing.
All
74
Page 75

Enforced Client Product Guide Using Enforced Client
Setting up policies
Your local email application opens a preaddressed message explaining how to log on to the
SecurityCenter, assigned groups, and instructions for accessing information about their
responsibilities. (You can use this feature only if you have a local email application
installed.)
7 Send the email message.
Delete a group administrator
For security purposes, be sure to delete obsolete accounts for group administrators.
To delete a group administrator:
On the My Account page, in the Group Administrators section, click Delete.
Setting up policies
Policies are made up of security settings for all of your protection services. These settings define
how your services operate on client computers.
3
Why use policies?
Policies enable you to customize security settings for your entire organization or for different
computers in your organization. Each policy is assigned to a group of computers. If you have
created multiple groups, you can assign a unique policy to each group or allow them to share a
single policy.
For example, you might place all laptops used by traveling sales representatives into a single
group called Sales Team. You can then assign a policy with high security settings that will
provide greater protection against threats in unsecure networks such as airports and hotels.
Whenever you want to adjust those setting, simply change the policy. Your changes will be
applied to all the computers in the Sales Team group automatically. There is no need to update
each computer’s setting individually. See
Customized policies on page 19 for an illustration.
How can I manage policies?
Click the Groups + Policies tab to display the groups in your organization and the policies
assigned to them. If you have not created any groups or policies, only the
SonicWALL Default policy are displayed (see The SonicWALL Default policy). From this page,
Default group and the
you can:
Create or edit a policy
Assign a policy to a group
Restore default policy settings
Delete a policy
Can users change their security settings?
The policy determines whether users can change their security settings.
75
Page 76

Enforced Client Product Guide Using Enforced Client
Setting up policies
The SonicWALL Default policy
Until you create additional policies, all computers are assigned the SonicWALL Default policy,
which is configured with settings recommended by SonicWALL to protect many environments.
You cannot rename or modify the
When you create a new policy, the default settings appear as a guideline. This enables you to
configure only the settings you want to change without having to configure them all.
Tab Default setting
Virus Protection On-Demand Scan: Off
Spyware Protection Spyware Protection Status: On
Spyware Protection Mode: Prompt
Desktop Firewall Automatically install the desktop firewall on all computers using this
policy:
Use Smart Recommendations to automatically approve common
Internet applications:
Firewall Configuration: User configures firewall
Firewall Status: On
Firewall Protection Mode: Prompt
Connection Type: Untrusted
Browser Protection Automatically install browser protection on all computers using this
policy:
Advanced Settings Update client computers where users are not logged in: Enabled
Display support notifications on client computers: Enabled
Virus protection:
Enable outbreak response: Enabled
Enable buffer overflow protection: Enabled
Enable script scanning: Enabled
Scan email (before delivering to the Outlook Inbox): Enabled
Scan all file types during on-access scans: Enabled
Scan compressed archives during on-access scans: Disabled
Scan compressed archives during on-demand scans: Enabled
Check for updates every: 12 hours
Spyware protection:
All programs types are enabled.
SonicWALL Default policy.
Disabled
Enabled
Enabled
3
With the default Advanced Settings configuration, it is possible for an on-demand scan to detect
threats in archived files that are not detected during an on-access scan. This is because on-access
Note
scans do not look at compressed archives by default. If this is a concern for your organization,
you should enable this option.
76
Page 77

Enforced Client Product Guide Using Enforced Client
Setting up policies
Create or edit a policy
Use this procedure to name a policy and configure its security settings.
To create or edit a policy:
1 On the Groups + Policies page, click Add Policy (or click Edit to modify an existing policy).
2 In the Add Policy window, type a name in the Policy name box. (If you are editing an existing
policy, the name appears automatically in the
3 Configure the settings on each tab.
Initially, options are configured with the SonicWALL Default policy settings.
See Set basic virus protection options on page 95 and Set advanced virus protection
options on page 97 to configure virus protection settings.
See Set basic spyware protection options on page 99 and Set advanced spyware
protection options on page 102 to configure spyware protection settings.
See Configuring policies for firewall protection on page 112 to configure firewall
protection settings.
See Configuring browser protection from the SecurityCenter on page 130 to configure
browser protection settings.
Edit Policy window.)
3
See Update computers where no user is logged on on page 55 to prevent error logging for
computers that are unable to update automatically.
See Notifying users when support ends on page 28 to display a message on client
computers when support for the operating system is changing.
4 Click Save.
Assign a policy to a group
After you create a policy, assign it to a group by editing the group. See Create or edit a group
on page 72 for instructions.
Restore default policy settings
Use this procedure to change all settings on all tabs of a custom policy to the original SonicWALL
Default
policy settings.
To restore a policy to the SonicWALL Default settings:
1 On the Groups + Policies page, click Edit next to the policy you want to modify.
2 On any tab, click Reset to Defaults to restore all the settings for all tabs.
3 Make adjustments to any of the default settings as needed.
4 Click Save.
These changes do not take effect until you click Save. You have the opportunity to cancel the
changes or to modify individual settings before saving.
Caution
77
Page 78

Enforced Client Product Guide Using Enforced Client
Viewing reports
Delete a policy
Use this procedure to remove a policy you have created from your account. You cannot delete
the
SonicWALL Default policy.
To delete a policy:
On the Groups + Policies page, next to a policy name click Delete.
If you delete a policy that is assigned to one or more groups, the SonicWALL Default policy will
be assigned to those groups.
Note
Viewing reports
Whenever a client computer checks for updates, it also sends its scanning history, update status,
and detections to the SecurityCenter website in encrypted XML files. It uploads the data directly
through an Internet connection or via a relay server. You can view this data in reports accessed
from the
appear in the reports.
Reports page. All client computers on your account (using the same company key)
Figure 3-8 Reports page
3
78
Page 79

Enforced Client Product Guide Using Enforced Client
Viewing reports
Why use reports?
Reports provide valuable tools for managing your security strategy. Only the reports available
for the installed protection services appear on this page.
Use this report... To view...
Detections
Unrecognized
Programs
Inbound Events
Blocked by Firewall
Duplicate Computers
Computer Profiles
Detection History
Email Security Reports
The types of potentially malicious code or unwanted programs that have
been found on your network.
Use this report to manage detections of viruses and potentially unwanted
programs.
See View detections on page 103 for instructions.
Programs that your spyware protection or firewall protection detected on
your network.
Use this report to manage your potentially unwanted program detections and
Internet applications blocked by the firewall protection service.
See View unrecognized programs on page 105 and View unrecognized
Internet applications on page 123 for instructions.
Computers where inbound or outbound communications were blocked by
the firewall protection service.
Use this report to manage blocked communications.
See View inbound events blocked by the firewall on page 124 for
instructions.
Computers that appear more than once in administrative reports.
Use this report to track down obsolete computers and those where Enforced
Client has been incorrectly overinstalled and tracked as multiple
installations.
See View duplicate computers on page 80 for detailed instructions.
The version of the Windows operating system and the Internet Explorer web
browser running on each client computer.
Use this report to locate computers where you need to install software
patches for a specific browser or operating system.
See View computer profiles on page 81 for detailed instructions.
A graphical summary of the number of detections and the number of
computers where detections occurred on your network over the past year.
Use this report to evaluate the effectiveness of your security strategy.
See View your detection history on page 107 for instructions.
A page on the email security service’s portal, where you can access reports
on your site’s mailflow and detections.
Use these reports to monitor email activity and detections.
See Viewing reports for the email security service on page 141 for
instructions.
3
Can I customize reports?
Select the data to display (see Customize listings and reports on page 60).
Print a report, save it, or send it to users (see Make the most of your online data on page 59).
Add a customized logo (see Add your logo to reports on page 82).
79
Page 80

Enforced Client Product Guide Using Enforced Client
Viewing reports
View duplicate computers
Use the Duplicate Computers report to locate computers that are listed more than once in your
reports. Duplicate listings usually result when the Enforced Client client software has been
installed more than once on a single computer or when users install it on their new computers
without uninstalling it from their previous computers.
Figure 3-9 Duplicate Computers report
3
Select the information that appears in this report:
Groups — Display only the computers in a group or display all computers.
To delete a duplicate computer:
Select the duplicate computer in the report, then click Delete.
Deleting a computer does not uninstall the Enforced Client client software. If you mistakenly
delete a computer with working client software from the report, it automatically reappears in your
Note
listing the next time its report data is uploaded. However, you will no longer be able to view the
historical detection data for that computer.
To view details about a computer:
Click a computer name to display the Computer Details page.
The Computer Details page displays information about the computer, its service components, and
its detections. See
Display details for a computer on page 67 for information about tasks you can
perform from this page.
80
Page 81

Enforced Client Product Guide Using Enforced Client
Managing your correspondence
View computer profiles
Use the Computer Profiles report to view the version of the Windows operating system and the
Internet Explorer web browser running on client computers. This helps you locate computers for
maintenance, such as installing Microsoft software patches.
Figure 3-10 Computer Profiles report
3
Select the information that appears in this report:
Groups — Display only the computers in a group or display all computers.
Operating system version — Display computers running all Windows operating systems or
only those running the selected version.
Browser version — Display computers running all versions of Internet Explorer or only those
running the selected version.
Managing your correspondence
Use SecurityCenter features to simplify and customize your correspondence with users,
customers, and your service provider.
Send email to users
Update user email addresses
Update your account’s email address
Add your logo to reports
81
Page 82

Enforced Client Product Guide Using Enforced Client
Managing your correspondence
Send email to users
Use email to send important information about corporate security to your users:
Send reports or listings as an attached archived web page in .MHTM format (see Make the
most of your online data on page 59).
Send descriptions of security issues on client computers or instructions for required
maintenance (see Send email to computers on page 69).
You can use this feature only if you have a local email application installed.
Note
Update user email addresses
Users can enter their email address when installing Enforced Client. It is important for you to
update their email addresses as they change.
To update a user’s email address:
1 In any listing, click a computer name link.
2 On the Computer Details page, type a new email address, then click Save.
3
Update your account’s email address
Keep the email address for your account up-to-date to prevent lapses in receiving your status
emails and other account correspondence from your service provider.
To update your account’s email address:
1 On the My Account page, in the My Profile section, click Edit.
2 On the Customer Profile page, type your new email address in the first text box, then click
Save.
Add your logo to reports
To customize your correspondence, you can upload a logo that appears in the upper-right corner
of the SecurityCenter website, including reports you send to users.
Logo files can be .GIF, .JPEG, .JPG, or .PNG format. Logo dimensions must be 175 x 65 pixels with
a file size under 500
To upload a logo:
1 On the My Account page, in the My Logo section, click Edit.
2 On the Manage Logo page, click Upload Logo. (To replace an existing logo, click Upload New
Logo
.)
3 On the Upload Your Logo page, type the name of the file you want to upload or browse to
locate the file.
KB. Other dimensions will result in a stretched or shrunken logo.
4 In the Verification Code box, type the characters displayed in the black box. (Alphabetic
characters are not case-sensitive.)
5 Click Upload Logo.
82
Page 83

Enforced Client Product Guide Using Enforced Client
Managing your subscriptions
If your logo file is not the correct size, the SecurityCenter resizes it to fit the allotted area and
displays a preview of how it will appear on reports. Click
or
Delete and Resubmit to select a different file.
Approve to accept the resized logo,
6 Click Close Window.
To delete a logo:
1 On the My Account page, in the My Logo section, click Edit.
2 On the Manage Logo page, click Delete Logo.
3 Click Cancel to return to the My Account page.
Managing your subscriptions
The SecurityCenter includes tools to help you keep track of your service subscriptions.
View your service subscriptions
Update subscription information
3
Purchase, add, and renew services
Request a trial subscription
Receive subscription notifications
View your service subscriptions
Check the status of your subscriptions to ensure your protection services remain active and you
have the right number of licenses to protect new computers as your organization grows.
To view your protection services summary:
Click the My Account tab.
The Service Summary lists details about each subscription, including the number of licenses and
the expiration date.
To view your subscription history:
1 On the My Account page, in the Service Summary section, select View subscription history.
The Subscription History page lists details for each service subscription.
2 Select View Cancelled Subscriptions to display a list of subscriptions that are no longer current.
83
Page 84

Enforced Client Product Guide Using Enforced Client
Managing your subscriptions
Update subscription information
Use the Subscription History page to update the contact and account information for each of your
protection service subscriptions. This is useful for administrators who manage multiple
accounts.
Your service provider determines whether this feature is available to you. Typically, the Edit link
is available only to SonicWALL partners who oversee security for multiple accounts.
Note
To update information for a subscription:
1 On the My Account page, in the Service Summary section, select View subscription history.
The Subscription History page lists details for each service subscription.
2 In the listing, select Edit for the subscription you want to update.
3 In the Edit Subscription Information page, type new information for:
Email address
Company name
First name
3
Last name
4 Click Submit to return to the Subscription History page and view the updated entry.
Purchase, add, and renew services
To ensure that additional or renewed services remain on the same account with your existing
services, follow these guidelines:
Submit your order through the same SecurityCenter website you use to maintain your
original subscriptions.
Submit your order with the same email address you used to register and maintain your
original subscriptions.
If you customized an administrator email address that is different than the email address you used
to place your original order, be sure you use the original email address to place your new order.
Note
By keeping all your service subscriptions on the same account, all your client computers report
to the same SecurityCenter website, and your service provider sends all correspondence and
notifications to one email address.
To purchase, add, or renew services:
1 On the My Account page, locate the Service Summary section.
2 In the Add Service column, click Buy, Buy More, or Renew.
3 Follow the instructions on the Product Purchase page.
You can also access the Product Purchase page from the SecurityCenter page or the
Subscription History page.
Note
84
Page 85

Enforced Client Product Guide Using Enforced Client
Getting assistance
Request a trial subscription
To try a protection service free of charge for 30 days, you can request a trial subscription. You’ll
have the opportunity to try all the features. You can then purchase the service and continue using
it with no interruption in protection.
To request a free trial:
1 On the My Account page or the SecurityCenter page, click Buy or Try.
2 Follow the instructions on the Product Purchase page.
Receive subscription notifications
Configure your notification preferences to receive an email whenever the expiration date for a
service approaches. See
Sign up for email notifications on page 62 for more information.
Getting assistance
Click the Help tab to display the Help page, where you can access additional resources for
Enforced Client and your SecurityCenter website.
3
View printed and online documents
Download utilities
Contact product support
View printed and online documents
Several documents are available to assist you with installing, configuring, and using your
protection services.
To view online documents:
On the Help page, click a link for this Product Guide, the Quick Start Guide, or the Release
Notes.
To view context-sensitive online help:
Click the help link ( ? ) at the upper right of any page of the SecurityCenter to view information
specific for that page.
85
Page 86

Enforced Client Product Guide Using Enforced Client
Getting assistance
Download utilities
Access utilities to assist with installing client software and troubleshooting installation problems
from the
To download utilities:
On the Help page, click Utilities, then click a link.
Utilities page.
To do this... Click this link...
Silently install client
software on individual
client computers.
Install client software
remotely using the Push
Install utility.
Uninstall components left
from a previous
installation.
Enable users without
administrator rights to
install client software.
VSSetup
Downloads the silent installation package for deploying client software to
a single computer without user interaction. Download to the
administrative computer. Requires a method for moving the installation
package to a client computer, such as a third-party deployment tool, a
login script, a link to an executable file in an email message, or a portable
medium such as a CD.
See Silent installation on page 39 for more information.
Run the Push Install Utility
Downloads a utility for remotely deploying client software directly from
your service provider’s website to multiple computers simultaneously.
Download to the administrative computer.
See Push installation on page 42 for more information.
MVSUninstall
Downloads a utility that cleans up registry keys and files from a previous
installation of Enforced Client or competitive software. Download directly
to the client computer, then double-click.
installation agent
Downloads the standalone installation agent. Download directly to the
client computer and install locally, or download to the administrative
computer and use deployment tools to install on clients.
Required only when you want users without administrator rights to use the
URL method to install client software. You must have local administrator
rights on the client computer to install this file.
See Install the standalone installation agent on page 34 for more
information.
3
Contact product support
If you cannot find an answer to a question in the product documentation, send it directly to a
product support representative.
To contact product support:
On the Help page, click Contact Support to display a form where you can submit a description of
your problem to a product support representative.
86
Page 87

Using the Virus and Spyware Protection
4
Service
The virus and spyware protection service in Enforced Client safeguards client computers against
threats, such as viruses and potentially unwanted programs, by scanning files and email
messages as they are accessed.
This section describes features of the virus and spyware protection service:
Accessing client features (Scan Tasks menu)
Scanning client computers
Configuring policies for virus and spyware protection
Viewing reports for virus and spyware detections
Managing detections
Disabling on-access scanning
Accessing client features (Scan Tasks menu)
Use the Scan Tasks menu to access client features of the virus and spyware protection service.
You can also access advanced features from an administrative version of the menu.
To display the Scan Tasks menu:
On the client computer, click in the system tray, then select Scan Tasks.
OR
To display the administrative version of the menu, hold down Ctrl and Shift, click in the
system tray, then select Scan Tasks.)
87
Page 88

Enforced Client Product Guide Using the Virus and Spyware Protection Service
Accessing client features (Scan Tasks menu)
Figure 4-1 Scan Tasks menu
Select this command... To do this...
Scan... Select a location to scan (My Computer, My Documents Folder, or
Floppy A). Click Scan Folder... to browse to a folder of your
choice.
Quarantine Viewer
(administrative menu only)
View PUP Detections
Disable On-Access Scanner
(administrative menu only)
Open the quarantine folder, which contains possible threats
detected on the computer (see
page 109).
Display a list of potentially unwanted programs that the virus and
spyware protection service has detected (see
page 93).
Turn off the automatic on-access scanner. To re-enable the scanner,
reopen the administrative menu and select
Scanner
(see Disabling on-access scanning on page 110).
Note: The computer is vulnerable to attack if you disable the
on-access scanning feature. Be sure to enable the feature again as
soon as possible.
Manage quarantined files on
Scan for spyware on
Enable On-Access
4
88
Page 89

Enforced Client Product Guide Using the Virus and Spyware Protection Service
Scanning client computers
Scanning client computers
The virus and spyware protection service safeguards computers by automatically scanning for
viruses and spyware. At any time, users can perform manual scans of files, folders, or email, and
administrators can set up scheduled scans.
Scan automatically (on-access scans)
Scan manually (on-demand scans)
Schedule on-demand scans
Scan email
Scan for spyware
The behavior of the scanning features on client computers is defined in the policies that you
configure using the SecurityCenter. Policy settings determine the types of files, programs, and
other items detected; whether users can manage their detections; how frequently computers
check for updates; and when scheduled scans occur. See
spyware protection on page 95 for instructions on configuring these settings in policies.
Configuring policies for virus and
4
Scan automatically (on-access scans)
The virus and spyware protection service scans files and folders on client computers whenever
they are accessed, which is referred to as an on-access scan.
The default on-access scanning policy is:
All types of files are scanned when opened, and again when closed (if they were modified).
All email attachments are scanned when accessed and when saved to the hard drive,
protecting the computer from email infections.
Programs are scanned for spyware identifiers, to detect if a spyware program attempts to run
or a program attempts to install spyware.
To customize on-access scans, administrators can:
Exclude certain folders, file types, or programs from on-access scanning by configuring the
virus and spyware protection settings in policies (see Specify approved programs on
page 101).
Select an option to scan only files meeting the current file extension criteria specified in the
detection definition (
Select an option to scan compressed archives (see Set advanced virus protection options on
page 97).
Specify other options for scanning email attachments and spyware (see Configuring policies
for virus and spyware protection on page 95).
DAT) files (see Set advanced virus protection options on page 97).
How detections are handled
89
Page 90

Enforced Client Product Guide Using the Virus and Spyware Protection Service
Scanning client computers
Scan manually (on-demand scans)
The virus and spyware protection service automatically scans most files when they are accessed.
However, users can scan a particular drive or folder at any time. This is referred to as an
on-demand scan.
The default on-demand scanning policy is:
All processes running in memory are scanned.
All files are scanned.
All critical registry keys are scanned.
In addition, during an on-demand scan of My Computer, the drive where Windows is installed, or
the Windows folder:
All cookies are scanned.
All registry keys are scanned.
Administrators can set a schedule for some or all computers to run an on-demand scan
automatically. See
To perform a manual scan using the icon:
1 Click in the system tray, then select Scan Tasks.
Schedule on-demand scans on page 95 for more information.
4
2 Select Scan My Computer, Scan My Documents Folder, or Scan Floppy A:, or select Scan Folder
and browse for a drive or folder.
To perform a manual scan from Windows Explorer:
In Windows Explorer, click any drive or folder, then select Scan Now from the menu.
Figure 4-2 Scan Now option
View scan results
How detections are handled
View scan results
After completing an on-demand scan, Enforced Client stores results in a Scan Statistics report on
the computer where the scan was performed. The number and type of detections are uploaded to
the SecurityCenter for inclusion in administrative reports.
90
Page 91

Enforced Client Product Guide Using the Virus and Spyware Protection Service
Scanning client computers
To view results of a manual scan:
In the Scan Completed dialog box, click Report to display the Scan Statistics report.
What is in a Scan Statistics report?
The Scan Statistics report opens in the default browser and displays the following information:
Date and time the scan was started.
Elapsed time for the scan.
Version of the scanning engine software and DAT file.
Date of the last update.
Completion status of the scan.
Location of the scanned items.
Status for scanned files, registry keys, and cookies:
4
Scanned
Detected
Cleaned
Number of items scanned.
The item is still a threat and still resides on the system. For files, they are most
likely contained within a compressed archive (for example, a .
write-protected media. For registry keys and cookies, the file it is associated
with has a status of
The item was cleaned of the threat. An encrypted backup copy of the original
item was saved in a quarantine folder, where it can be accessed only with the
Detected.
ZIP archive) or on
Quarantine Viewer (see Manage quarantined files on page 109).
Deleted
The item could not be cleaned; it was deleted instead. An encrypted copy was
saved in a quarantine folder, where it can be accessed only with the
Viewer
(see Manage quarantined files on page 109).
Quarantine
How detections are handled
The type of threat and the policy settings determine how the virus and spyware protection service
handles a detection:
Items with detections How the service handles the detections
Files and programs Virus detections: The virus and spyware protection service attempts to
clean the file. If it can be cleaned, the user is not interrupted with an
Registry keys and cookies
alert. If it cannot be cleaned, an
deleted. A copy is placed in the quarantine folder.
Potentially unwanted program detections: If the virus and spyware
protection service is set to
deleted. If set to
Select a spyware protection mode on page 100 for details.
In all cases, an encrypted backup copy of the original item is saved in a
quarantine folder (see
all activity is uploaded to the SecurityCenter for use in reports.
Detections initially appear as Detected. See Scan for spyware on
page 93 for instructions on cleaning the detections. Cleaning detected
files also cleans their associated registry keys and cookies. Their status
is then reported as
Prompt mode, users must select the response. See
Cleaned.
alert appears, and the detected file is
Protect mode, detections are cleaned or
Manage quarantined files on page 109). Data for
91
Page 92

Enforced Client Product Guide Using the Virus and Spyware Protection Service
Scanning client computers
Schedule on-demand scans
Schedule an on-demand scan to occur at a specific date and time, either once or on a recurring
basis. For example, you might want to scan client computers at 11:00 P.M. each Saturday, when
it is unlikely to interfere with other client processes. Scheduled scans are configured as part of a
policy and run on all computers using that policy. See
At the start of an on-demand scan, all previous detections of potentially unwanted programs
Note
are cleared from the
Potentially Unwanted Program Viewer.
Schedule on-demand scans on page 95.
Scan email
By default, the virus and spyware protection service scans all email messages and attached files
as they are accessed. It also scans messages before they reach a user’s Inbox (see
optional protection on page 97).
Users can scan their Microsoft Outlook folders or individual messages manually.
To scan an email message manually:
1 In the Microsoft Outlook Inbox, highlight one or more messages in the right pane.
2 Under Tools, select Scan for Threats.
Enable
4
The On Demand Email Scan window displays any detections. If the window is empty, no
threats were detected.
Scan for spyware
As part of its automatic scans, the virus and spyware protection service scans for spyware
whenever programs are installed or run, and during manual scans. Its response to detections
depends on the spyware mode configured in the client computer’s policy (see
protection options on page 99). Three responses are possible:
Attempt to clean the program (Protect mode).
Prompt the user for a response (Prompt mode).
Log the detection and take no further action (Report mode).
Cookies and registry keys that indicate spyware are also detected. Deleting a potentially
unwanted program deletes any associated cookies and registry keys.
All detections are listed in administrative reports available from the SecurityCenter. On client
computers, you can view and manage detections using the
Note
Set basic spyware
Potentially Unwanted Program Viewer.
At the start of an on-demand scan, all previous detections of potentially unwanted programs
are cleared from the
detections remain in the
Potentially Unwanted Program Viewer. For on-access scans, previous
Potentially Unwanted Program Viewer.
To manage spyware detections on client computers:
1 On the client computer, open the Potentially Unwanted Programs Viewer. Either:
In the Detection Alert dialog box, click Yes.
Click in the system tray, then select Scan Tasks | View PUP Detections.
The Potentially Unwanted Program Viewer lists each detected program.
92
Page 93

Enforced Client Product Guide Using the Virus and Spyware Protection Service
Scanning client computers
2 Select one or more detections, then select an action:
4
Clean
Approve
Place an encrypted original copy of each selected item in a quarantine folder, then
attempt to clean it. If it cannot be cleaned, delete the item.
Add each selected item to the user’s list of approved programs. These programs
will not be detected as spyware during future scans. (Clicking
list of all currently approved programs on the client computer.)
Approved displays a
Close Allow the items to remain on the computer and close the Potentially Unwanted
Program Viewer
. They will be detected again during the next scan.
3 Check the status of each item, then click Close.
Action Required
Approved
Cleaned
Quarantined
Delete failed
You have not performed any action on this item since it was detected.
The item was added to the list of user-approved programs and will no longer
be detected as spyware on this computer.
The item was cleaned successfully and can be used safely. An encrypted,
backup copy of the original item was placed in a quarantine folder.
The item could not be cleaned. The original item was deleted, and an
encrypted copy was placed in a quarantine folder. If the item was a program,
all associated cookies and registry keys were also deleted.
Note: Items are placed into the quarantine folder in a format that is no longer a
threat to the computer. After 30 days, these items are deleted. You can manage
these items using the
page 109).
The item could not be cleaned or deleted. If it is in use, close it and attempt the
clean again. If it resides on read-only media, such as CD, no further action is
required. The virus and spyware protection service has prevented the original
item from accessing the computer, but it cannot delete the item. Any items
copied to the computer have been cleaned.
Note: If you are not sure why the item could not be cleaned, it is possible that
a risk still exists. If you cannot determine why the delete failed, contact
product support.
Quarantine Viewer (see Manage quarantined files on
93
Page 94

Enforced Client Product Guide Using the Virus and Spyware Protection Service
Configuring policies for virus and spyware protection
Configuring policies for virus and spyware protection
Policies define the operational settings for all your protection services. See Setting up policies
on page 75 for general information about using policies.
Three tabs are used to configure the features for virus and spyware protection. See The
SonicWALL Default policy on page 76 for a list of the virus and spyware protection settings in
the SonicWALL Default policy.
Set basic virus protection options
On the Groups + Policies page, use the Virus Protection tab to configure basic settings for virus
protection.
Schedule on-demand scans
Exclude files and folders from virus scans
Figure 4-3 Virus Protection policy tab
4
Schedule on-demand scans
You can force a computer to scan all files, folders, and programs by scheduling an on-demand
scan to occur at a specific date and time, once or on a recurring basis. These scans are performed
in addition to the regular on-access scans.
94
Page 95

Enforced Client Product Guide Using the Virus and Spyware Protection Service
Configuring policies for virus and spyware protection
To schedule an on-demand scan:
1 On the Groups + Policies page, click Add Policy (or click Edit to modify an existing policy).
2 Click the Virus Protection tab.
3 Under On-Demand Scan, click On.
4 Select a frequency, day, and time for the scan to run, then click Save.
Exclude files and folders from virus scans
You can create a custom list of files, paths, and file extensions to exclude from both on-access
and on-demand scans for viruses. By selecting a file here, you request that it not be scanned for
viruses.
You can exclude a particular type of file you know is not vulnerable to attack or a folder you
Tip
To specify exclusions:
1 On the Groups + Policies page, click Add Policy (or click Edit to modify an existing policy).
2 Click the Virus Protection tab.
know is safe. If you are unsure, we recommend not setting exclusions.
4
3 Under Excluded Files and Folders, select the type of exclusion you want to create.
4 Specify the value (browse for a file or folder, or type a file extension).
5 Click Add Exclusion.
The new exclusion appears in a list.
6 Click Save.
To remove an exclusion from the list:
1 On the Groups + Policies page, click Add Policy (or click Edit to modify an existing policy).
2 Click the Virus Protection tab.
3 Under Excluded Files and Folders, in the table listing for the exclusion you want to remove,
click
remove, then click Save.
95
Page 96

Enforced Client Product Guide Using the Virus and Spyware Protection Service
Configuring policies for virus and spyware protection
Set advanced virus protection options
On the Groups + Policies page, use the Advanced Settings tab to configure enhanced protection
and safeguard against additional threats lurking in out-of-the-way locations.
Select your update frequency
Enable optional protection
See Update computers where no user is logged on on page 55 for information about the Update
Note
client computers where users are not logged in
Figure 4-4 Advanced virus protection policy settings
policy setting.
4
Select your update frequency
By default, computers check for updates every 12 hours. You can specify that they check as often
as every four hours or as infrequently as once a day.
An update is not necessarily downloaded every time the computer checks for updates.
Note
Checking can reveal that no new update is available.
To select an update frequency:
1 On the Groups + Policies page, click Add Policy (or click Edit to modify an existing policy).
2 Click the Advanced Settings tab.
3 For Check for updates every, select a setting, then click Save.
Enable optional protection
Specify additional updates and advanced scanning to increase protection on client computers.
96
Page 97

Enforced Client Product Guide Using the Virus and Spyware Protection Service
Configuring policies for virus and spyware protection
To specify optional scans:
1 On the Groups + Policies page, click Add Policy (or click Edit to modify an existing policy).
2 Click the Advanced Settings tab, select each scan you want to enable, then click Save.
4
Enable outbreak response
Enable buffer overflow
protection
Enable script scanning
Scan email (before
delivering to the Outlook
Inbox)
Scan all file types during
on-access scans
Scan within archives during
on-access scans (e.g., .zip,
.rar, .tat, .tgz)
Scan within archives during
on-demand scans (e.g.,
.zip, .rar, .tat, .tgz)
Check for an outbreak DAT file every hour.
Detect code starting to run from data in reserved memory and
prevent that code from running. This feature protects against buffer
overflow in more than 30 most commonly used Windows-based
programs. SonicWALL updates this list as it adds buffer overflow
protection for additional programs.
Important: Buffer overflow protection does not stop data from
being written. Do not rely on the exploited application remaining
stable after being compromised, even if buffer overflow protection
stops the corrupted code from running.
Detect harmful code embedded in web pages that could cause
unauthorized programs to run on client computers.
Detect viruses and harmful code in email messages before they are
placed in the user’s Inbox.
Inspect all types of files, instead of only default types, when they are
downloaded, opened, or run. (Default file types are defined in the
DAT files.)
Detect viruses and harmful code in compressed archive files (such as
.
ZIP files) during on-demand scheduled or Scan Now scans.
Detect viruses and harmful code in compressed archive files (such as
.
ZIP files) as they are saved, uncompressed, or opened.
With the default settings, it is possible for an on-demand scan to detect threats in archived files
that are not detected during an on-access scan. This is because on-access scans do not look at
Note
compressed archives by default. If this is a concern for your organization, you should enable this
option.
97
Page 98

Enforced Client Product Guide Using the Virus and Spyware Protection Service
Configuring policies for virus and spyware protection
Set basic spyware protection options
On the Groups + Policies page, use the Spyware Protection tab to configure basic settings for
spyware protection.
Enable spyware protection
Select a spyware protection mode
Specify approved programs
Figure 4-5 Spyware Protection policy tab
4
Enable spyware protection
You can specify whether the virus and spyware protection service looks for spyware and other
potentially unwanted programs during scans. By default, this option is enabled.
To enable and disable spyware protection:
1 On the Groups + Policies page, click Add Policy (or click Edit to modify an existing policy).
2 Click the Spyware Protection tab.
3 For Spyware Protection Status, select On or Off, then click Save.
98
Page 99

Enforced Client Product Guide Using the Virus and Spyware Protection Service
Configuring policies for virus and spyware protection
Select a spyware protection mode
You can specify how the virus and spyware protection service responds to detections of
potentially unwanted programs on client computers.
Protect: It attempts to clean the detected item. If the item cannot be cleaned, a copy of the
item is placed in a quarantine folder and the original item is deleted.
Prompt: It displays a dialog box with information about the detection, and allows the user to
select a course of action. This option is the default.
Report: It reports detections to the SecurityCenter and takes no additional action.
For all modes, detections are reported to the SecurityCenter, where you can view information
about them in reports.
To prevent popup prompts from appearing on client computers when threats are detected, and
Tip
for highest security, we recommend using
To specify a response to potentially unwanted program detections:
1 On the Groups + Policies page, click Add Policy (or click Edit to modify an existing policy).
2 Click the Spyware Protection tab, select a Spyware Protection Mode, then click Save.
Protect mode.
4
Use the following table to determine how policy options are implemented in the different
protection modes.
Mode Behavior of protection service
Report No user prompts.
Detections reported to SecurityCenter.
Administrator can select approved programs, which are not reported as
detections.
Can be used as a Learn mode.
Prompt
Protect Users not prompted about detections.
If the policy is changed from Prompt mode to Protect mode or Report mode, the virus and
Note
spyware protection service saves user settings for approved programs. If the policy is then
changed back to
Users prompted about detections.
Detections reported to SecurityCenter.
Administrator can select approved programs. These programs are not reported
as detections, and users are not prompted for a response to them.
Users can approve additional programs in response to prompts. These are
reported to SecurityCenter.
Users notified about deleted or quarantined programs.
Detections reported to SecurityCenter.
Administrator can select approved programs. These programs are not reported
as detections.
Prompt mode, these settings are reinstated.
99
Page 100

Enforced Client Product Guide Using the Virus and Spyware Protection Service
Configuring policies for virus and spyware protection
Learn mode
Report mode can be used as a “learn mode” to help you determine which programs to approve
(see
Specify approved programs on page 101). In Report mode, the virus and spyware protection
service tracks but does not delete unrecognized programs. You can review detected programs in
the
Unrecognized Programs report (see View unrecognized programs on page 105) and approve
those that are appropriate for your policy. When you no longer see programs you want to
approve in the report, change the policy setting to
Prompt or Protect mode.
Specify approved programs
On client computers, the virus and spyware protection service maintains a list of approved
programs that are not identified as potentially unwanted programs. You can configure the list of
approved programs for all computers using a policy. In addition, users can approve programs for
individual client computers when the firewall protection service is set to
Exclude only programs you know are safe. If you are unsure about a program, we recommend
Caution
not adding it to the approved programs list.
To configure approved programs in a policy:
1 On the Groups + Policies page, click Add Policy (or click Edit to modify an existing policy).
Prompt mode.
4
2 Click the Spyware Protection tab.
3 Under Approved Programs, select the type of program (a detected program or a user-approved
program).
4 Select a program, then click Save.
The selected program is added to the list of allowed programs. (No list appears until you have
added at least one approved program to the policy.)
Use the Unrecognized Programs report to view a complete listing of all programs detected on
Tip
client computers.
To remove an approved program from a policy:
1 On the Groups + Policies page, click Add Policy (or click Edit to modify an existing policy).
2 Click the Spyware Protection tab.
3 In the list of Approved Programs, click remove for each program you want to delete from the
list, then click
Save.
Set advanced spyware protection options
On the Groups + Policies page, use the Advanced Settings tab to select the types of potentially
unwanted programs to search for during scans.
Threat type Description
Jokes
Remote admin tools
Programs designed to be mistaken for a virus. They might alarm or annoy a
user but do not harm files or data. They are intended to waste time and
resources.
Programs that can be used from a remote location to access a computer.
Some remote administration tools serve useful purposes, such as allowing
users to access their files from home, but others can be used by unauthorized
persons to monitor user activities and take control of a computer.
100
 Loading...