

Page 1

SonicProjects
Stringer
MANUAL
www.sonicprojects.ch
Page 2

Introduction
Congratulations on the purchase of the SonicProjects Stringer!
The Stringer is a top notch quality sample based string machine containing a
selection of six string machine sounds sampled from three classic vintage
hardware devices: the Logan String Melody II, the Arp Omni 2 and the Welson
Symphony. The unique and different tonal characters of these three machines
complement each other very well in layers ans splits. The sounds are available
in two independent engines (upper and lower) that can be mixed and splitted
over the keyboard and even can be sent to independent outputs.
Logan String Melody II:
Absolutely fabulous sonding string machine built in 1978 by the Italian
company „Logan“. In Germany, the String Melody II was distributed by Hohner.
The massive wood case and tons of built in electronics gave the device a
heavy weight. The string and organ sounds of this unit are absolutely fat, warm
and exciting. Unlike the ARP units every key had its own envelope. This string
machine got extremely rare and looked after in the last years.
Sampled for Stringer:
- Preset 0 (Chorus Strings)
- Organ
ARP Omni II:
The successor of the famous Solina String Ensemble and the Omni I. The
Solina strings were THE strings of the seventies and eighties, used on every
record and on every stage. The Omni units added some enhanced features, a
simple poly synth and a bass synth. Still availabe sometimes, but mostly in bad
shape. The electronics tend to break, and yes, the devices are quite heavy too.
The string sound is very clear and bright and does cut through every mix.
Sampled for Stringer:
- Strings (=Solina Strings)
- Strings without chorus (=synth like)
Welson Symphony:
Quite rare and as well as no info around about it. Built by WEBO electronics in
Passatempo / Italy. This unit has several sections like cello, violin, brass, piano
and harp that can be combined to rich stereo textures (left and right out
available). The sound is beautiful, warm and well balanced - not as aggressive
as the logan. The sounds are ideal for layering to the other to ensembles.
Sampled for Stringer:
- Brass (the lower part is darker)
- Strings (Violin)
Page 3

The sampling procedure:
To copy the original character of the instruments every single key was
sampled individually, with exeption of the Welson, where four keys per octave
were sampled. Especially in the logan every key has a slightly different sound,
so this method guarantees for the real feel.
The instruments' outputs went directly to an apogee rosetta a/d converter
(amongst the best available) and the keys were recorded at 24bit/44.1kHz. So
there's no loss in signal quality - it's all there as it was real - you have the full
signal without any coloration or bad clock treatment.
A lot of time went into restauration (de-noising and de-humming) and manual
search for the ideal loop point that matches the original beating. That's why
loop lengths are up to 10 seconds per sample.
The result of this expenditure is the presence of the absolutely original sound
in the virtual world as you have never eperienced before - but without noise
and with full sequencer and midi control.
Installation
1. Doubleclick the installer and follow the instructions.
The installer will look for the shared VST plugins folder. You also can browse
your computer for the VST plugins folder manually. In any case the plugin will
be installed into a subfolder called „SonicProjects“.
If you already have other SonicProjects plugins installed then point the installer
to the root VST folder (so the folder the SonicProjects folder resides in), then
the plugin will be installed into the existing SonicProjects folder without
creating a new one.
The installer also will create a folder called „SonicProjects“ in your start menu.
You will find the pdf manual and the uninstaller there.
Please don't move the plugin around manually after installing. It needs other
related files to run, and the uninstaller is linked to the existing location.
Note:
You need a vst host to run the plugin. It can't be run standalone. If you don't
have a one then have a look at our dedicated site where we have listed some
tested and recommended free vst hosts including short guides:
http://www.sonicprojects.ch/obx/freevsthost.html
Page 4

2. Load the plugin in your VST host and unlock it with your personal key
After first loading in your host you have to enter your personal id and key data.
Click into the blue window on the top left for this which will launch a registration
window.
Note: If no registration window pops up on clicking into the blue window then
close your host and restart it with administrator rights (right-click->run as
administrator)
After successful unlocking a „thank you for registering!“ will appear, but there
still won't be any sound. You have to reload the plugin now. From now on it will
work.
If the key data was not entered correctly nothing happens when you click on
„enter key“. If you have a user id including a number then be sure to enter the
whole line containing name AND four digits id number in the „User ID“ field, not
just the number:
Use copy and paste for the license key to avoid typing mistakes. Be sure not
to add any spacebars at the beginning and the end of the lines. 0 is always
zero, no letter. If you have problems with the reg window disappearing then
deactivate „always on top“ for your plugin window.
Note: If the host says „can't create license file“ or similar after clicking on enter
key then close your host and restart it with administrator rights (right-click->run
as administrator)
Remove the plugin:
Use the uninstaller in the „SonicProjects“ folder in the start menu.
License and copyright
The plugin, the sample data and the personal key are bound to the registered
user. It's not allowed to pass them on to third persons. Each plugin contains a
hiddden serial that allows to identify the original user in case of irregular
distribution.
Page 5

The Master Control section
VOLUME
Master volume. Its setting is stored with the preset. Set it to a lower level if you
can hear clipping (especially in layer mode)
TUNE
Master Tune. Adapts the instruments tuning to acoustic instruments which are
not in standard tune.
The SPLIT section
The Stringer has two sound engines - an upper (called A) and a lower one
(called B). They both contain all six sounds and can be used at the same time
for layering. The Stringer also allows to split the keyboard to access the B
engine by the lower keyboard section and the A engine by the upper keyboard
section. The two sections can also overlap each other if wished.
SPLIT Knob
Sets the split point on the keyboard. This is the border point between the B
and A section in split mode. Turn in right to move the split point to a higher
note, turn it left to move the split point to a lower note.
SPLIT Button
Activates keyboard splitting. The split settings are dependent on the position of
the SPLIT and OVER knobs.
Page 6

OVER
Split zone overlap. In standard mode (zero) the lower and upper split zone
don't overlap. When the split button is raised, the lower section is extended
into the upper section. In this region, the two split layers do overlap now.
SP OUT
Separate Out. When this button is activated, the upper (A) and the lower (B)
section are routed to individual stereo outs for separate treatment. In your
sequencers' mixer the outputs are named „Stringer A“ (upper section) and
„Stringer B“ (lower section). In standard (SP OUT not active) mode, both parts
are routed to the „Stringer A“ stereo output for global treatment. In some hosts
you need to activate the second output before it shows up in the mixer.
The ENVELOPES section
In this section, the attack and release times for the upper and the lower section
can be controlled. Long release times can cause higher cpu usage.
The small button between ATT and REL lets you choose between 3 different
envelope response modes indicated in the small black box on top:
NA = natural
LO = logarithmic
LN = linear
More about these response types on the next page. The „natural“ mode was
the default and only mode in the former versions.
Page 7

ATT
Attack. Sets the attack time (upper knob for the upper engine, lower knob for
the lower section individually).
REL
Release. Sets the release time (upper knob for the upper engine, lower knob
for the lower section individually).
Envelope modes button: NA - LO - LN
The small button between ATT and REL lets you choose between 3 different
envelope modes individually per engine. These modes and their individual
response curves can give the sound a specific character:
NA = Natural
In this mode the attack is hard and fast and the decay has a falling curve as in
a natural instrument with a long tail into near infinite zero.
This mode is convenient for snappy zero attack sounds with a natural and not
pushed release phase that keeps the sound defined and transparent with a felt
depth in it. Since the decay phase is natural logarithmic with no early cut this
mode also has the biggest cpu consumption. This mode isn't suitable for soft
slow attack sounds since the attack phase has an increasing speed.
LO = Logarithmic
In this mode the attack phase is soft and the decay is logarithmic as in NA but
with a cut away to save cpu. This mode is convenient for slow attack sounds
that still should have a logarithmic decay to avoid muddyness. The cpu
consumption of this mode is lower than in the NA mode.
LN = Linear
In this mode the attack phase is soft and the decay phase has a linear falling
curve as in some real vintage string machines. This gives a juicy light and
sweet sound since the decay level stays high longer than in logarithmic mode.
This gives this „cheap“ vintage sound that often just can be the right thing. The
LN mode has the least cpu consumption of the three.
Page 8

The Preset Chooser Section
In this section, the preset can be chosen for both sections individually. The two
sections can be used at the same time for layer sounds and splits.
The upper buttons row sets the preset for engine A (upper).
The lower buttons row sets the preset for engine B (lower).
LOGAN:
STR
Logan String. Preset 0 in the original. Every key sampled.
ORG
Logan Organ. Preset „Organ“ in the original. Every key sampled.
OMNI:
STR
Omni String. It's the famous Solina string sound. Preset „Violin“ in the original.
Every key sampled.
SYN
Omni Synth. It's the Violin sound with deactivated chorus button. Every key
sampled.
WELSON:
BRA
Welson Brass. Preset „Horn&Trumpet“ in the original. Four keys per octave
sampled.
STR
Welson Strings. Preset „Violin“ in the original. Four keys per octave sampled.
Page 9
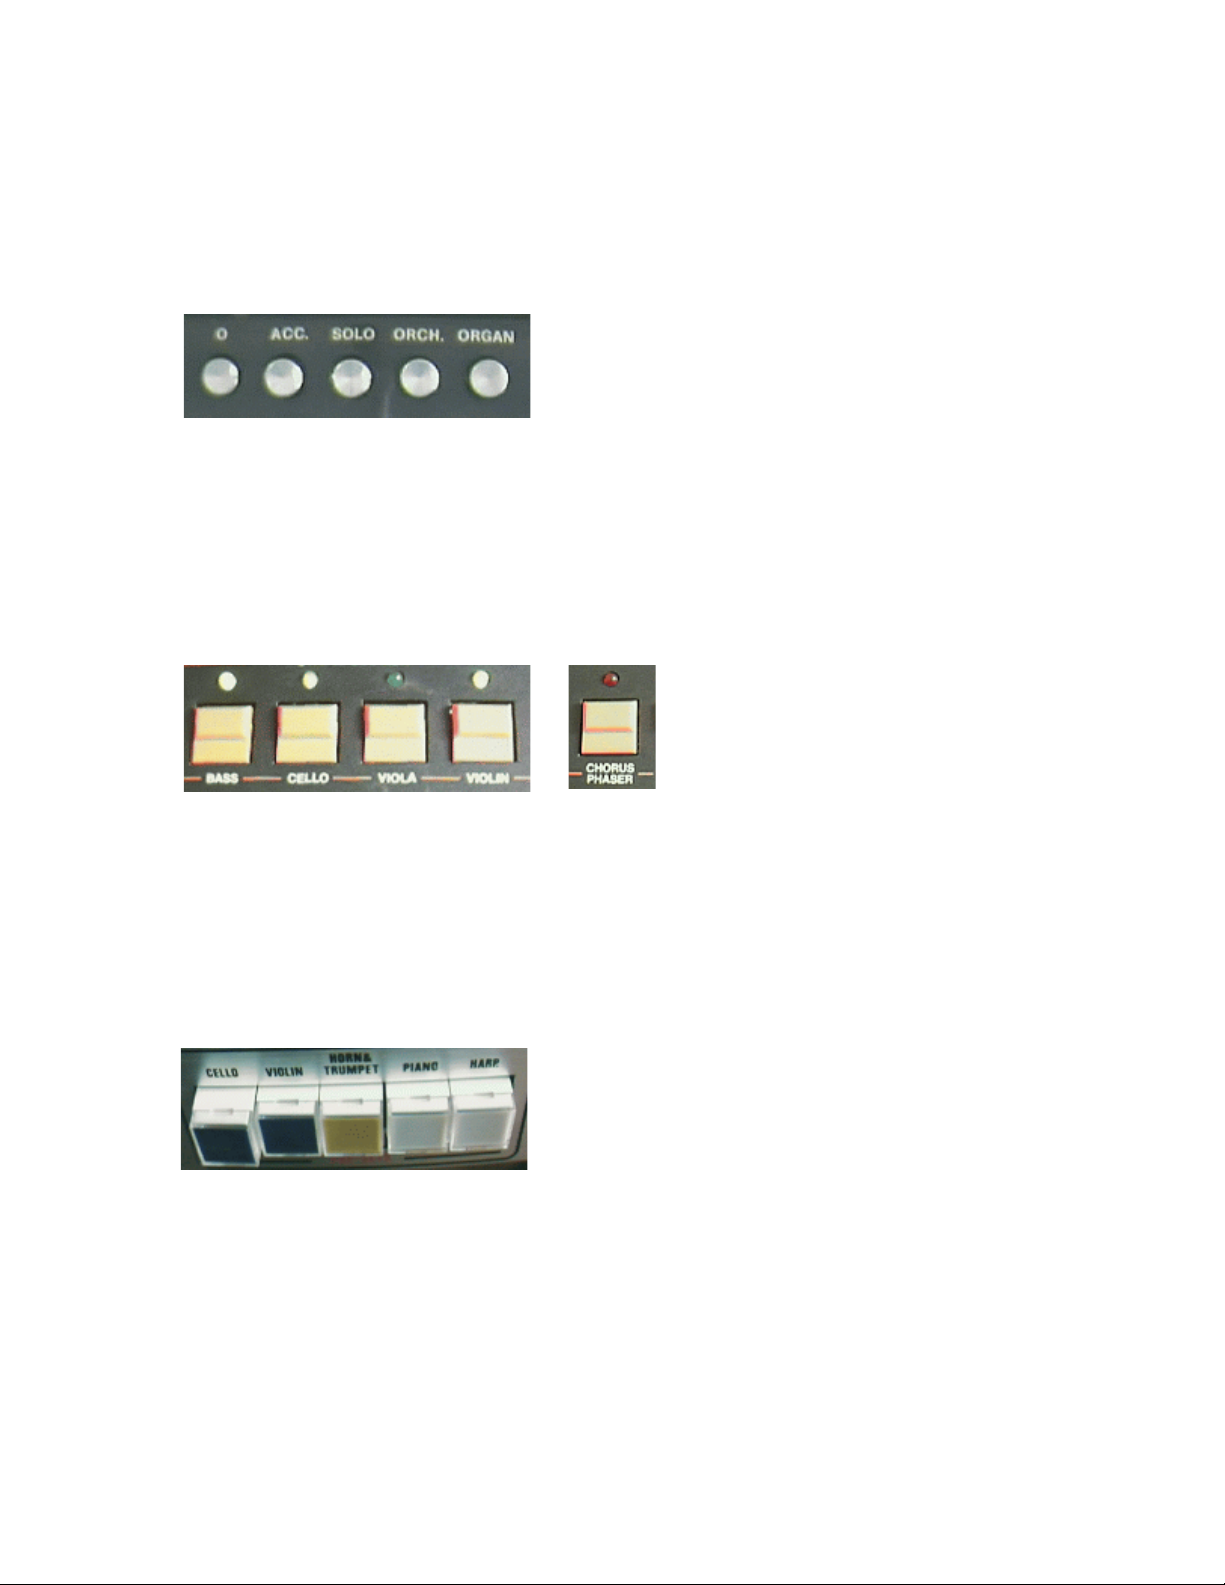
The referring sections in the originals:
Logan String Melody II:
Sampled presets:
- 0 Strings (STR)
- ORGAN (ORG)
ARP Omni 2:
Sampled presets:
- Violin (STR)
- Violin with deactivated chorus (SYN)
Welson Symphony:
Sampled presets:
- Horn&Trumpet (BRA)
- Violin (STR)
Page 10

The sections settings section:
Individual controls for the upper and the lower engine. These are especially
interesting when using both section in combination for rich layer sounds.
VOL
Individual volume of the section.
ON
Activates or deactivates the section without changing the controls.
OCT
Sets the octave (foot) of the section. Standard is center. The samples are not
altered, simply the keyboard is routed to a higher or lower octave in the
multisample. Don't change it while playing because already playing samples
will be pitch shifted and result in a strange sound.
Purpose:
-Octave layers (e.g. upper part omni string normal and lower part omni string
one octave down for the simulation of original violin-viola layer)
- Octave adaption of the lower section in split modus (to be able to access high
notes with the left hand)
DET
Fine tune of the section. Standard is zero.
Purpose:
Especially interesting if the upper and the lower section is set to the same
sound. A detuning of one of the sections will result in sort of a chorusing.
PAN
Sets the stereo pan of the section. Standard is center.
Purpose:
When the upper and lower sections are active, they can be spreaded away a
bit from the center which results in a wide and broad sound. Also great in
combination with the described detuning use in the DET section.
Page 11

MIDI CC Implementation
Stringer lets you remote control every single parametervia Midi Continous
Controller Data (Midi CC). This is normally handled by a midi keyboard
provoding controller knobs.
Some standard functions are Pro53 compatible and can be accessed
immediatly using a Pro53 preset. It's recommended to set up a custom preset
for useful remote access. The Pro53 filter and amplifier envelope knobs let you
control the most important parameters of each engine.
The full Midi CC Charts:
sorted by cc number
A = upper engine, B = lower engine
011 Master Vol. (VOL)
020 A Preset 1 (STR) Pro53: PolyMod Source Filt Env
021 A Preset 2 (ORG) Pro53: PolyMod Source Osc B
022 A Preset 3 (STR) Pro53: PolyMod Dest Freq A
023 A Preset 4 (SYN) Pro53: PolyMod Dest PWidth A
024 A Preset 5 (BRA) Pro53: PolyMod Dest Filter
025 A Preset 6 (STR) Pro53: LFO MIDI Sync
026 B Preset 1 (STR) Pro53: LFO Frequency
027 B Preset 2 (ORG) Pro53: LFO Sawtooth
028 B Preset 3 (STR) Pro53: LFO Triangle
029 B Preset 4 (SYN) Pro53: LFO Pulse
030 B Preset 5 (BRA) Pro53: LFO Envelope Trigger
031 B Preset 6 (STR)
040 Octave A (OCT) Pro53: Oscillator A Frequency
041 On A (ON) Pro53: Oscillator A Saawtooth
043 Detune A (DET) Pro53: Oscillator A PulseWidth
050 Octave B (OCT) Pro53: Oscillator B Frequency
051 Detune B (DET) Pro53: Oscillator B Freq Fine
052 On B (ON) Pro53: Oscillator B Sawtooth
072 Overlap (OVER) Pro53: Filter Envelope Amount
073 SplitPoint (SPLIT) Pro53: Filter Keyboard Follow
075 Attack A (ATT) Pro53: Filter Attack
076 Release A (REL) Pro53: Filter Decay
077 Volume A (VOL) Pro53: Filter Sustain
078 Pan A (PAN) Pro53: Filter Release
080 Attack B (ATT) Pro53: Amplifier Attack
081 Release B (REL) Pro53: Amplifier Decay
082 Volume B (VOL) Pro53: Amplifier Sustain
083 Pan B (PAN) Pro53: Amplifier Release
084 SplitOn (SPLIT) Pro53: Amplifier Hold
085 SepOut (SEP OUT) Pro53: Release On/Off
088 Master Tune (TUNE) Pro53: Master Tune
107 Envmode A Pro53: Delay Effect Depth
108 Envmode B Pro53: Delay Effect Rate
Page 12

sorted by function groups:
Master Section
011 Master Vol. (VOL)
088 Master Tune (TUNE) Pro53: Master Tune
Split Section
073 SplitPoint (SPLIT) Pro53: Filter Keyboard Follow
084 SplitOn (SPLIT) Pro53: Amplifier Hold
072 Overlap (OVER) Pro53: Filter Envelope Amount
085 SepOut (SEP OUT) Pro53: Release On/Off
Envelopes Section
upper (A):
075 Attack A (ATT) Pro53: Filter Attack
076 Release A (REL) Pro53: Filter Decay
107 Envmode A Pro53: Delay Effect Depth
lower (B):
080 Attack B (ATT) Pro53: Amplifier Attack
081 Release B (REL) Pro53: Amplifier Decay
108 Envmode B Pro53: Delay Effect Rate
Preset Chooser Section
Upper (A):
020 A Preset 1 (STR) Pro53: PolyMod Source Filt Env
021 A Preset 2 (ORG) Pro53: PolyMod Source Osc B
022 A Preset 3 (STR) Pro53: PolyMod Dest Freq A
023 A Preset 4 (SYN) Pro53: PolyMod Dest PWidth A
024 A Preset 5 (BRA) Pro53: PolyMod Dest Filter
025 A Preset 6 (STR) Pro53: LFO MIDI Sync
Lower (B):
026 B Preset 1 (STR) Pro53: LFO Frequency
027 B Preset 2 (ORG) Pro53: LFO Sawtooth
028 B Preset 3 (STR) Pro53: LFO Triangle
029 B Preset 4 (SYN) Pro53: LFO Pulse
030 B Preset 5 (BRA) Pro53: LFO Envelope Trigger
031 B Preset 6 (STR)
Page 13

Engines Control Section
Upper (A):
077 Volume A (VOL) Pro53: Filter Sustain
041 On A (ON) Pro53: Oscillator A Saawtooth
040 Octave A (OCT) Pro53: Oscillator A Frequency
043 Detune A (DET) Pro53: Oscillator A PulseWidth
078 Pan A (PAN) Pro53: Filter Release
Lower (B):
082 Volume B (VOL) Pro53: Amplifier Sustain
052 On B (ON) Pro53: Oscillator B Sawtooth
050 Octave B (OCT) Pro53: Oscillator B Frequency
051 Detune B (DET) Pro53: Oscillator B Freq Fine
083 Pan B (PAN) Pro53: Amplifier Release
Page 14

Trouble shooting
Problem1:
When starting the sequencer or loading the plugin there's an error message
saying „can't find stringer dat.sf2“
Solution1:
In this case you probably have moved the dll around manually which should
not be done. The dll needs all the other files that have been installed with it,
especially the ones in the accompanying identically named folder which too
conains the sample data which is the file reported as missing. So move the dll
back to where it was. Set the installer path to the final destination when you
install. If you really have to move the dll around then only together with the
accompanying folder. But you still will lose the uninstaller and pdf manual links
in the start menu then. So not recommended.
Problem2:
Although the lower section is active (ON) there's no sound coming out from it.
Solution2:
First check ist the VOL knob on the right is not set to zero. Then check if the
SP OUT button in the split section is on. If so, the lower section is sent to a
separate stereo out. Check your sequencers' mixer if this out (Stringer B) is
there and check the volume.
Problem3:
The CPU load gets very high occassionally.
Solution3:
The CPU load is dependent on the number of voices played. It gets higher
when the upper and lower engines are used simultaneously. Also check the
release time. A very long release time can make the CPU usage higher. For
lower CPU load use the LO or LN envelope modes which are much lighter on
CPU than the NA mode.
Problem4:
I can't see the second output (Stringer B) in the mixer of my sequencer.
Solution4:
In this case you need to activate it before in your host. Cubase 5: Click on the
small right arrow next to Stringer in the instruments rack and activate it.
Page 15

Impressum:
C++ programming and graphic design:
B. Maechler
Puplic relations and C++ programming:
P. Wiesler
Chassis 3d metal finish rendering:
Reuben Flounders
Mail:
info@sonicprojects.ch
Web:
www.sonicprojects.ch
 Loading...