

Page 1

SonicProjects
OP-X PRO-II
MANUAL
www.sonicprojects.ch
Page 2

Introduction
Congratulations on the purchase of SonicProjects OP-X PRO-II!
OP-X PRO-II an extended new version of OP-X PRO with doubled polyhony
and a lot of added features. It can load all former patches. It's no update but
an independent product, and too the new flagship in the OP series.
The technical structure of the OP-X engine is quite unique. It's based on totally
independent single voices which correspond to the voice boards of real analog
vintage synths. There's no digital voice cloning as it is usually the case in vst
instruments. Each voice is built separatly, each voice has its own signal path
and each voice differs slightly in its parameter settings - as it is present in real
voltage controlled polyphonic synths too. These imperfectnesses were one of
the main reasons for the organic and lively character of the old originals.
Although this is a great thing for some sounds (especially pads), it's not so
great for others (brass, fm, ...). While you had to tune the voice cards of the
originals by trimpot adjustments, the voices of the OP-X can be tuned by the
touch of four global buttons - separatly for oscillators, filters, envelopes and
portamento times. The originals did just provide an autotune button, which
normally only tuned the oscillators. The rest was permanently influenced by
temperature and aging processes. In the OP-X PRO you can additionally
tweak the tuning of the voices to your liking with many virtual trimpots. They
represent the real trimpots of the voice boards of real analog synths which
normally had to be tuned by a service technician from time to time.
With the the OP-X, you get total control over the tuning - as you might have
wished it from any analog synth of the past - without missing the organic
feeling. You can mix tuned oscillators, detuned filters etc. There are no limits.
Even the spread knob, which effects a continuous and proportinal detuning,
can be used for polyphonic sounds, also combined with switched detuning.
We call this concept Separate Voice Design (SVD).
You can learn more about it on this site which includes a lot of audio clips:
http://www.sonicprojects.ch/obx/separatevoicedesign.html
A welcome consequence of the separate voice design is the presence of
stereo pan controls for each voice channel. This popular feature of old analog
synths allows for mind blowing real stereo without deluting modulation effects.
A further thought had to go to the filter. The old discrete SEM filter was highly
appreciated because it didn't loose gain or thickness in high resonance
settings and had an extraordinary precious balanced sound and great depth.
The filter of OP-X is specially designed and tries to copy this character. The
OP-X PRO furthermore implements a parallel multimode filter with continuous
blending from high pass to band pass to notch. Like in the old SEM there's too
a continuous blending from the low pass mode (12/24dB switchable) to the
multimode filter with notch effect in 50/50 setting when blended to high pass.
Page 3

Installation
Doubleclick the installer and follow the instructions.
The installer will automatically look for the shared vst plugins folder and use
this location as default installation path. You can also browse your computer
for the vst plugins folder manually.
The plugin will be installed in a subfolder named „SonicProjects“. The installer
will also create a folder named „SonicProjects“ in your start menu. You will find
the pdf manual and the uninstaller linked there.
The installer places a plugin dll file as well as an accompanying folder named
the same as the dll that contains all additional soundbanks and too will be the
default place where new banks and presets will be written to and loaded from.
It also contains a lot of additional files which are needed by the plugin to run.
The OPXU00 subfolder contains the current MIDI mapping which can be
edited with the included MIDI learn function.
1. Launch the plugin:
You need a vst host to run the plugin. It can't be run standalone. If you don't
have a one then have a look at our dedicated site where we have listed some
tested and recommended free vst hosts including short guides:
http://www.sonicprojects.ch/obx/freevsthost.html
Windows Vista and Windows 7 users:
If your VST plugins location is within the system's „program files“ folder and
your vst host is not a Vista / 7 certified program then set the default running
mode to administrator before you launch it to license the plugin. The protection
scheme of windows otherwise can prevent the reg-window from popping up
and force the plugin to write banks to „VirtualStore“. To do so, right click on the
application shortcut, choose „Properties->Compatibility“ and here check „Run
as administrator“. Save this setting. This gives back full writing rights.
Now start your vst host and load the plugin. After first loading you have to
enter your personal id and key data to unlock the plugin by clicking into the
blue window, which sometimes pops up only after a few seconds:
2. Click in the blue window and enter your personal license data.
Page 4

If the license window does not pop up after clicking into the blue window then
set your vst host to administrator running mode as described on the previous
page section „Windows Vista and Windows 7 users“. Be careful to enter your
license data correctly. It's recommended to use copy and pase to avoid typing
mistakes. Be careful not to add any space bars at the beginning or at the end
of the lines. If you have a user ID that contains an additional number (format:
Prename Name ID:XXXX) then be sure to enter the whole user id line
containing name AND four digits id-number in the „User ID“ field.
If you enter the key manually in the lower field it's important to know that 0
always is zero, not a letter.
If the key data has not been entered correctly nothing will happen when you
click on „enter key“. When it has been entered correctly a „thank you for
registering“ will appear after clicking on „enter key“.
3. Reload the plugin
After sucessful unlocking there's still no sound. You have to reload the plugin
now. From now on it will work.
Unistall/remove the plugin:
Use the uninstaller in the „SonicProjects“ folder in the start menu.
If you should have created own new presets and banks they will remain
undeleted in the remaining folder with same name as the plugin, so they won't
be lost and still can be backuped. If you don't need the folder anymore you can
delete it as well to complete uninstallation.
License and copyright
The plugin is bound to the registered user. It's not allowed to pass it on to third
persons. Each plugin contains a hidden serial that allows to identify and trace
the original user in case of irregular distribution, with all legal consequences
this may have. So it's in your responsability to keep your files and license data
safe from unauthorized use.
Since it's a personally bound license you are allowed to license and use the
plugin on more than one computer if they are your own ones and it's only you
using the plugin. Otherwise a new license naming on the new user and bound
to his/her proper personal data has to be purchased.
Page 5

What's new
This introductory section is dedicated to former OP-X PRO users who want to
gain a brief oversight on what's all new compared to the standard OP-X PRO.
You may read the dedicated sections in the manual to learn all details related
to the brief listings here (which is still 4 full pages). For better oversight the
different changements are grouped into individual sections:
Popyphony and voice allocation:
The polyphony has been doubled to 12 voices by adding a second bank of 6
voices. The new lower bank shares the tuning trimpots, pan controls and mute
buttons with the upper bank. That's why we speak of 6 voice channels, each
for 2 voices. Polyphony can be switched between 6, 8 and 12 voices with the
blue square button next to „6“ on the right side of the levers. For the 8 and 12
voice mode the lower bank is involved too. In the eight voice setting the middle
two voices of the lower bank are involved to avoid sound repetitions since the
corresponding channel voices share their fine tunings.
The voice muting section now not only mutes the voices, but also completely
deactivates them. The voice allocation engine will distribute the voices only
between the active voices then, and this still always in rotating mode. This
allows for any custom polphony setting with any voices of choice involved, with
the belonging cpu usage dropping if fewer voices are involved. The only
limitation is that the two voices of the same channel only can be deactivated
both at the same time.
Patch Browser:
A new patch bowser allows for vts host independent loading, saving, renaming
and browsing of presets and banks, which are loaded and saved to a fixed
central location. This makes the creation of own custom banks fast and easy.
The increment/decrement buttons access the patch change smoother for
artefact free preset change, and the scroll list can be temporary up (left down
arrow) or locked (right down arrow). The file format is is still fxp/fxb.
MIDI Learn:
A MIDI Learn engine now allows for easy learning of external controllers to the
synth's controls, just by tweaking the controller and the GUI control that should
be learned to it, all still supporting full MIDI CC feedback. A pre-configured
standard mapping ist still available by default, to which you can return anytime
by performing a learn reset (RES - hold for 4 seconds until LED red).
MIDI CC Processor:
A new MIDI CC processor allows for relative (REL) and fetched (FET)
response to incoming MIDI CC data to get rid of parameter value jumps even
without endless rotary controls and MIDI feedback. The CC input and output
stream furthermore can be blocked on demand (BLO).
Page 6

Effects Unit:
There's an integradted effects unit included now, which offers a great sounding
reverb and a mono delay (0 - 1000 ms) with normal, triolic (triples) and dotted
synchronization option to both song tempo and arpeggiator. Sync switches to
arpeggiator automativcally when it's on. Apart from manual editing the unit
offers a bunch of built in presets (click on the small down arrow between the
delay and reverb parameter controls) that can initialize a suitable complex
setting with a single mouseclick for various applications. The effects unit can
be switched to dual engine mode on demand (with PP ON) so that the effects
of the previous preset can finish unchanged into the new preset after preset
change while the new setting can be used immediatly by the new preset.
LFO: New waveforms, manual trigger, delay and sampled vibrato
Two new waveforms, triangle and sawtooth, can be switched by different
combinations of the three wave buttons. The mixed waveforms sine & square
and square & s/h are still available. The rising sawtooth wave can be changed
to falling sawtooth by inverting it in the „Lfo Phase“ section. S/H now can be
turned into sampled vibrato by clicking on AMP two times (LED blue). In this
mode the S/H input is fed by the lever LFO instead of noise, which leads to
repeated clusters. The LFO now can be triggered by played notes on demand
by clicking on „Lfo Phase: OSC“ two times (blue mode). The starting phase
can be freely adjusted with the beat trimpot just above „CONTROL“. The LFO
furthermore can be delayed and faded in triggered by notes by clicking two
times on „Lfo Phase: PW-FILT“. A third click will additionally invert LFO to PWFILT as in normal (orange) mode. The delay time can be regulated with the
„Velo/Mode“ knob located on the right side of the voice mute buttons, the
fading in time with the „Stp/Speed“ knob next to it. The fading in will start only
after the delay.
Seamless control of detunings, oscillator and noise levels
The detunings (OSC/FILT/ENV/Porta DET) and the main oscillator and noise
levels (OSC1 on, OSC2 full, NOISE full) now can be continuously controlled on
demand by clicking into the dedicated text labels just above the buttons and
dragging the mouse vertically up or down. Small popping up digital displays will
show the current value ranging from 0 - 127. Those fine adjusted values
always will stay active in the background and can be saved with the patch. The
buttons' LED only changes its state when 50% is surpassed, so they just can
indicate if the fine adjusted value is in the lower (dark) or higher (shinig) half.
Clicking on the buttons as usual will reset the values to either 0 or 127. So the
buttons still can be used as you're used to, with the option to fine adjust the
value if needed. Deactivate the „HALF“ buttons to use full range of continuous
control since those still are only on/off and add their level to the sum value.
Wheel LFO: also exchanges pan mod LFOs
Apart from the wheel LFO this button now also exchanges the pan mod LFOs,
so that the wheel LFO instead of the main one modulates the panning.
Page 7

One-click calibration of trimpots, pan controls, master tune and envmod
The voice-based tuning trimpots (FILT, DEC/REL, POR), the filter trimpots, the
pan knobs, master tune and envmod controls now can be calibrated by simple
mouseclicks on pre-defined areas next to the controls. Filter trimpots: click into
the small blue area between the white line of the box and the black metal
background on the right to calibrate the trimpots to equally tuned, and click into
the corresponding area on the feft side of the trimpots block to return to the
standard detuning (all trimpots 12 o'clock again). DEC: Click on „C“ to tune the
trimpots, and on „D“ to return to the stadard detuning. REL: Click on „L“ to tune
the trimpots, and on „R“ to return to the stadard detuning. POR: Click on „R“ to
tune the trimpots, and on „P“ to return to the stadard detuning. Filter section:
Click on „OSC2“ to reset all trimpots to 0 for pure low pass mode. Voice pans:
Click on „Voice“ to set all pans to mono, click on „Pans“ and drag the mouse
vertically up or down to spread the pans countinuously, click on 1, 2, 3, 4, 5, or
6 to access various pre-configured pan setting presets. Master tune: Click on
„Tune“ to center it. OM/PM: Click on „OM“ and „PM“ to set them to 0.
Freely choosable pitch lever interval and further modes
Click into the number above the blue square button and drag the mouse
vertically up or down to access all intervals from 1 to 12 semitones and a lot of
further modes featuring different upbend/downbend intervals and different
functions for the modwheel (to filter, to pitch). Have a look at the table on page
69 (LEVERS: 2/12) to get to know all modes in detail. The square button still
lets you switch between the two mostly common modes (2 and 12 semitones).
Also new and improved: Pitch bend data from older masterkeyboards that only
has a range of 0 - 127, and so has no exact center position, is processed in
that way that it nevertheless produces an exact interval. For this the center
point has been slightly shiftet, which may ask for re-calibration of some older
patches that have a sensible setting (osc2 only and 12 semitones). For this
just move the lever, let it spring back and save the patch.
DMP: Two new bright modes available
The DMP button, formerly just used to reduce the general cutoff level by a
fixed amount for key tracking, now can access two further modes, which are
two bright modes, that are inspired by the brightness behaviour of very early
voltage controlled poly synths like OB-X, which could be very bright, and
sometimes even a bit brittle. The former DMP mode of course is still available
(LED orange/DMP). The blue (CLR) and red (BRL) mode are the two new
bright modes. CLR/blue: The filter opens up fully in maximum cutoff setting
which lets pass the oscillator signal uninfluenced (in normal mode it's always
tamed a bit when it passes the filter, even with cutoff set to max, like in e.g.
Minimoog), which leads to a brighter tone, also if the filter cutoff is driven by
modulation sources (envelope, LFO). BRL/red: Similar, but the top end
additionally receives some extra edge and brightness, which may be near to
brittle, very close the e.g. discrete OB-X. These two modes may be useful
when you try to copy a sound that needs this extra brightness to be authentic.
But in most cases the standard (NOR) mode will still be the most pleasing, fat
sounding and well balanced one, as you will notice by yourself.
Page 8

ENV: Two modes now, including linear amp env attack
Some sounds, especially juicy legato strings with very slow attack, can be too
impulsive with logarithmic attack, and work better with a linear attack segment,
which can be activated with the new second function if the ENV button: LIN
(LED blue): The attack segment of the amplifier envelope is switched to linear.
It's recommended to activate „Lega ON“ in this mode which now also has an
effect in polyphonic mode and forces the envelopes to start at 0.
Filter: Switchable self oscillation
Two clicks on „24db“ activates filter self oscillation, indicated by a small lamp.
Triangle waves for oscillators
If both oscillators are switched to sine waves, the sine waves can be tunrned
into triangle waves by increasing the pulse width knob to maximum.
LFO rate / Pitch1: wider ranges
LFO rate can be slower (very slow) now, and pitch 1 has 5 octaves now.
Filter ADSR: now invertable
The filter envelope now can be inverted (like in Jupiter 8) on demand by
clicking two times on the right one „\“ of the „Filterenv Modulation“ buttons
group, which sets the LED to blue mode. Inverted pw-envmod can't be
accessed then, but is rarely used anyway and also can be achieved with a
different default pulse width setting.
A new arpeggiator/MIDI processor
The new OP-X PRO features a very sophisticated new arpeggiator/MIDI
processor that is controlled with only the same controls as before plus
additionally with the two velocity knobs on the left. It offers 32 modes that can
be accessed and changed on the fly by turning the „Arpeg Mode“ knob. The
modes include all kinds of arpeggios, up/down/combined, 1-4 octaves, notes
sorted by input order (Order) or note pitch (Pitch), and some randomized. The
modes also include 3 different stepped modes (known from former OP-X) with
2 different repeated modes. Apart from the arpeggios there's a record mode
(record up to 8 notes, play them back, edit on the fly), a manual chord hold
mode (volatile), a preset chord mode with 16 chord presets (choosable with
„Chrd“), and a double mode that outputs two notes on one key for very fat
slightly detuned notes (use SPREAD and pans!). The preset chords and
doubled notes can be arpeggiated as well by clicking a second time on „ARP
ON“. The arpeggiator controls then are the two knobs on the left side. Apart
from using the „ARP On/Hold“ and „Hold VEL“ (for double/chord arpeggios)
button hold and playback for record can by activated and deactivated with the
damper pedal by quickly depressing and releasing it again within less than half
a second. This is very practical if both hands are busy with playing, and it still
allows to sustain notes by depressing it in a normal way.
Page 9
The TOP BAR
The new grey top bar probably is the most striking new controls section
compared to the former OP-X PRO.
It combines three different function areas:
1. Patch browser
2. Effects section
3. MIDI CC processing engine
Let's go to the individual sections:
Patch Browser
This section lets you browse, choose, rename, load and save presets and
banks in a very quick and easy way without the need to reach the vst host for
this task.
It lets you easily explore the inluded banks library and create own new custom
banks using existing or your own presets.
The presets and banks are still in fxp/fxb format, which guarantees for full
compatibility. You can still import banks and presets using your vst host if
needed (e.g. to import former banks) and treat them for further processing with
the integrated patch browser.
All banks and presets are loaded and saved from the same central location,
which is the folder with the same name as the plugin dll next to the dll which
also includes a lot of other files needed by the plugin. This is only important to
know if you want to manually place or remove banks or presets, or if you want
to make a backup copy of your custom banks and presets. This is also the
place where your custom banks and presets will remain after uninstalling the
plugin so that they don't get lost by mistake.
This central place structure has the big advantage that you never have to
browse around to save and load banks or presets. The browser always will
load and save from/to this place by default if the path has not been changed
before to browse around eslewhere. Of course you're nevertheless allowed to
create your own sub-folders in there to give some structure if needed.
Page 10

After the theory let's now come to the practical application. Let's have a look at
the single elements of the browser and what they do:
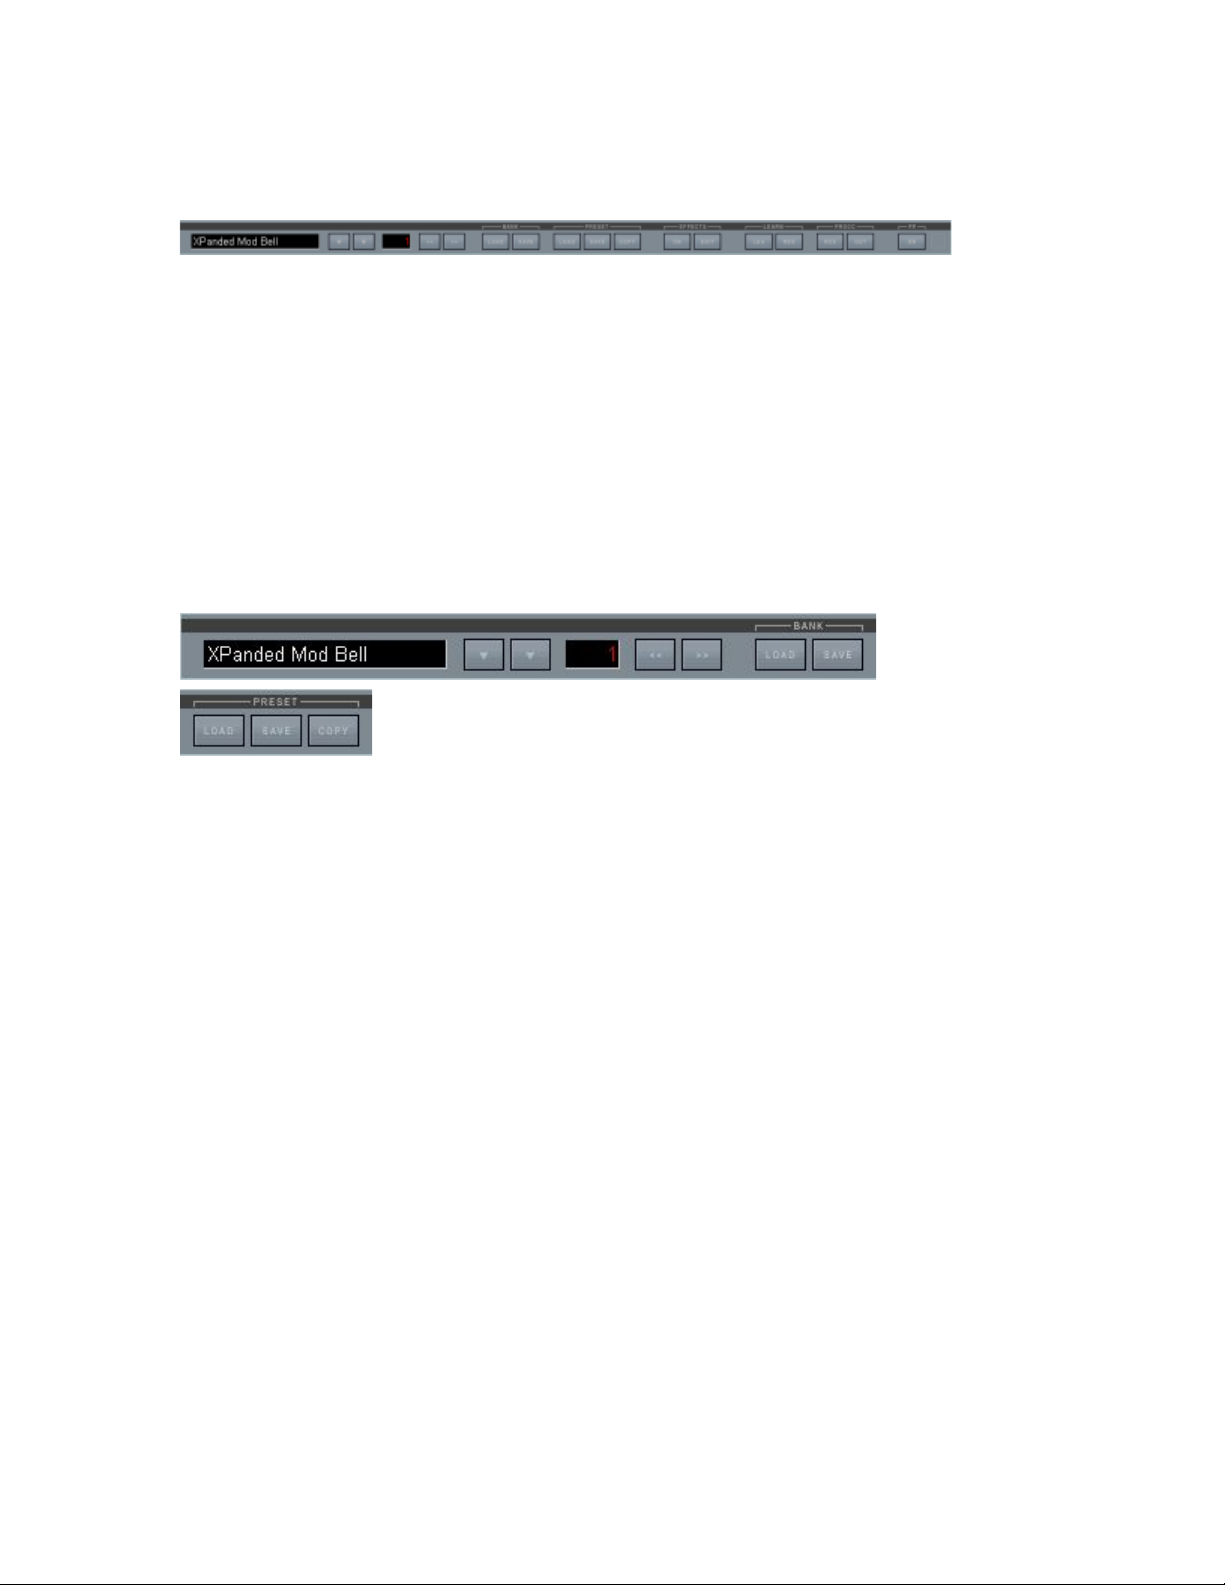
Name field:
The name field on the left on one hand shows the name of the chosen preset
within the loaded bank and on the other hand lets you rename the preset if you
want to create a new preset. For this click into the field and type in the new
name. If necessary confirm with „enter“.
In vst hosts with „always on top“ active it may be necessary to temporary
deactivate this state if any keyboard letters are mappeed to sequencer
functions (shortcuts).
The new name of course only will be persistent when you save the bank (to a
new one when it's a preset bank) or the single preset.
Down arrows:
These two arrows will launch a scrollable white on black preset list in the left
area of the GUI. These are the presets of the loaded bank (128). This allows
to have a quick oversight on what's available in this bank.
You of course can directly choose presets from the list. But be aware that the
patch change smoothing engine (see dedicated sections) will not be active
using this way of choosing presets. For completely smooth and artefact free
operation (e.g. in live events) use the increment/decrement buttons or MIDI
program change instead, which both feature smoothing.
But why are there two arrows?
Left down-arrow:
When the preset list is launched with this arrow, it will disappear again after
choosing a preset, which is convenient for quick directed grabs when you
already know where the preset is located.
Right down-arrow:
When the preset list is launched with this arrow, it will remain permanently on
top, even when you choose a preset, until the arrow is clicked on a second
time. This can be useful to browse around a bit to see what's there. You also
can lock the list afterwards with this arrow if it was launched with the left one.
Page 11

Number field:
This field indicates the ordinal number of the chosen preset within a bank,
going from 1 to 128. Note that MIDI program changes often refer to the sent
program change number, which reaches from 0 - 127 instead.
Increment / decrement arrows:
With these buttons you can switch presets forward or backward. Using this
method of preset change smooths the crossings with the patch change
smoother by quickly fading out the previous preset, releasing all notes and
quickly fading in again the new one, for smooth and artefact free changes,
which can be important in critical live application. Note that the same type of
smoothing is also performed using external MIDI program changes.
Load Bank:
Clicking on the „LOAD“ button below „BANK“ will open the file browser to
choose and load a bank. The default loading location is always the same,
which is located in the folder that has the same name of the dll next to the dll.
But you don't have to care about this, since all library banks are located here,
and, if you didn't change the path while saving, also your own custom banks.
Using this button only files in bank format (fxb) will be displayed, all other ones
(e.g. preset files) are invisible, which makes it easy to choose. You can einther
choose „open“ after having chosen a bank or just doubleclick it.
Dependent on the previous location within the old bank and the size of the new
bank it can take a second or two until the new bank is loaded completely.
Clicking on the bank load button always resets the chosen preset to preset 1,
so that you can start exploring the new bank beginning from preset 1
immediatly. This preset reset to 1 also will take place when no bank is loaded.
Save Bank:
Clicking on the „SAVE“ button below „BANK“ will open the file browser to save
the current bank to the standard location, which is located in the folder that has
the same name of the dll next to the dll. Read the introduction for more details
on this. If you don't want to overwrite anything existing (anyway not possible
for the library banks) give the bank a new name of your choice. The browser
always prescribes an introductory term, which is the name of the plugin, but
this can be edited or changed without a problem up to your liking.
Page 12

Load Preset:
Clicking on the „LOAD“ button below „PRESET“ will open the file browser to
choose and load a preset. There are no single presets available other than an
empty one by default since all available presets are collected in banks which is
more compact. So the preset file menu is mainly thought for saving your own
custom presets, which you may collect in a new custom bank later on.
The default loading location is always the same, which is located in the folder
that has the same name of the dll next to the dll. But you don't have to care
about this at all in fact. Using this button only files in preset format (fxp) will be
displayed, all other ones (e.g. bank files) are invisible, which makes it easy to
choose. You can einther choose „open“ after having chosen a preset or just
doubleclick it.
Save Preset:
Clicking on the „SAVE“ button below „PRESET“ will open the file browser to
save the currently chosen preset. The preset will be saved with all changes
you've done, including the name which you might edit too (text field) to make it
unique. The default file name is always the same as the preset name defined
in the text field, introduced by the name of the plugin as prefix. You of course
can edit or even delete this prefix if you don't like it as well edit the file name.
You however should know that the preset name as displayed in the text file
and the file name are not linked and can be different. So it might still be useful
to use the same file name as the preset name (if not conflicted by not allowed
characters), to avoid a mess.
The default saving location is always the same, which is located in the folder
that has the same name of the dll next to the dll. This is extremely handy since
you can save preset immediatly on the fly and don't need to care about file
locations. If the path is not changed you can always again immediatly recall
the preset again with „PRESET: LOAD“ which points to the same location. So
you can simply go ahead and collect presets on the fly while working, and
organize or collect them in new banks anytime later. Of course you're free to
create new sub-folders if needed. You only should be aware that presets by
default will be loaded and saved from the last location you've loaded or saved
from/to. The default loading location will only be reset to the root folder on relaunching the plugin again.
Copy Preset:
Lets you copy a preset to a defined new location in the current bank. This also
can be a whole area, which will clone the preset. A prefix „Copy“ will be added.
Page 13

Effects Section
Now let's have a look at the controls of the second area of the top bar, the
effects section.
The buttons related to the effects section that are viewable by default are ON
and EDIT below „EFFECTS“, and ON below „PP“ at the very right.
These however are just the upper level controls. By clicking on EDIT a lot of
further controls will appear that alow to edit effects in detail.
Lets have a look at the main upper level controls first:
EFFECTS: ON
With this button all effects can be globally switched on or off. Grey mode
means off, blue mode means on. This can be useful to compare the wet to the
dry signal, or to prepare an effect setting in the background, that can be
activated on demand. Some dry presets in the factory bank offer this option,
others don't. The color of the button also gives an immediate indication if a
preset uses effects or not. Don't forget to activate this button if you want to edit
effects, otherwise there will be no audible effect.
EFFECTS: EDIT
Clicking on this button brings the detailed effects controls to the foreground.
You can switch back anytime if you need to access the controls that are
hidden behind in this mode. This setting is not saved with the preset and
remains unchanged when changing presets.
PP: ON
This seems to be a somehow misterious control, and in fact it's more behind it
than one would guess. Setting this button to blue state (=active) activates dual
engine effects processing (PP = Parallel Processing). What is it? Normally, a
VSTi uses the same effects unit for all patches. Since the effects settings
normally are saved with the patch they will change immediatly when you switch
presets, and dependent on how different the settings are the remaining effects
finishing of the previous patch is cut immediatly. With parallel processing
activated two identical effect units will begin to work, which are allocated
alternately to the presets. So the previous preset keeps „its“ engine while the
new one drives the other „free“ one. This allows the previous preset to finish its
effects (e.g. delays) while the new one can be immetiatly used with the new
settings. This allows for seamless preset changes without cut effects. Too long
decays still can be cut by deactivating the PP button. Only use this feature with
fast CPUs, on older ones the small CPU peak can lead to audible artefacts.
Page 14

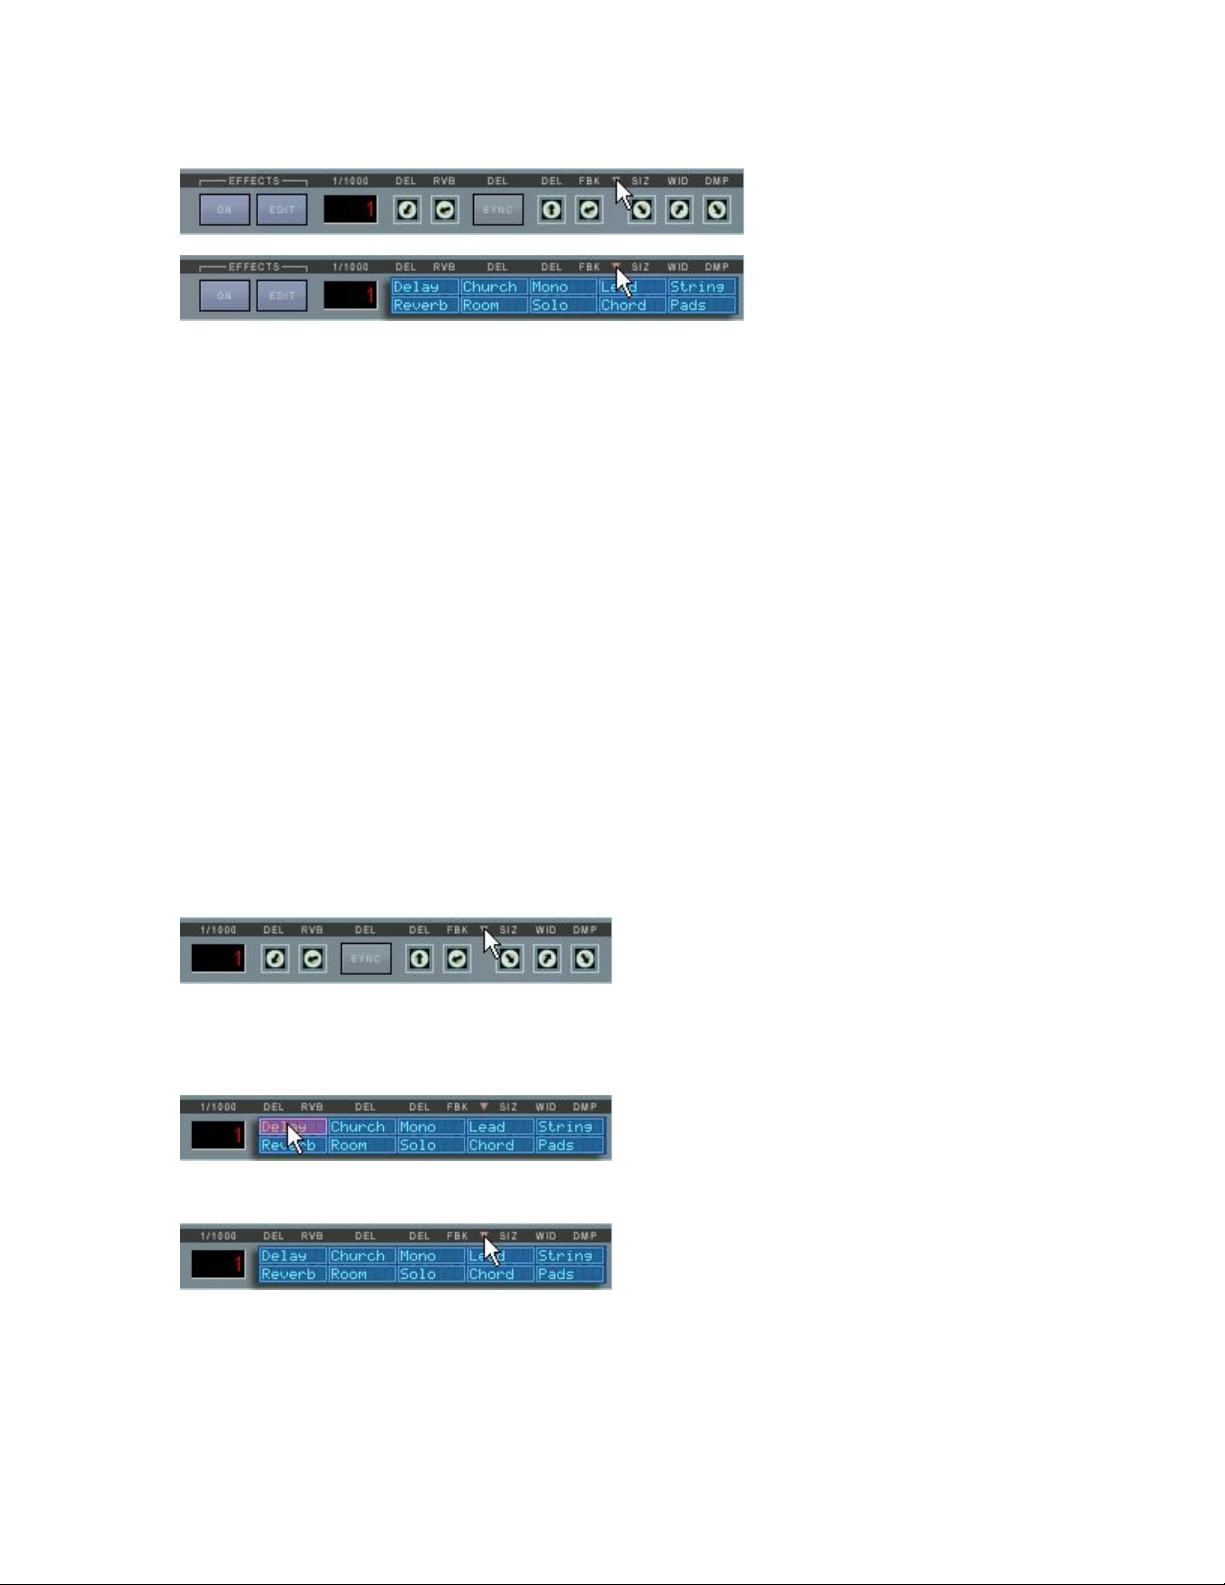
Now let's have a look at the detailed controls that can be accessed by clicking
on EDIT:
1/1000 DISPLAY
This display shows the delay time in milliseconds when clicking on the DEL
delay time trimpot on the right of the SYNC button. When the DEL trimpot is
not tweaked the display just shows an „1“ which has no meaning. Delay time
can vary from 0 to 1000 ms. If SYNC is on, the delay time only will change in
big quantized steps.
DEL
The left side „DEL“ trimpot regulates the amount of the delay effect, which is
always added to the dry signal. So it might be necessary sometimes to reduce
the main volume when the delay level is very high to avoid clipping. There will
only be an audible effect when „EFFECTS ON“ is active and the delay time is
greater than 0.
RVB
The left side „RVB“ trimpot regulates the amount of the reverb effect, which is
always added to the dry signal. So it might be necessary sometimes to reduce
the main volume when the reverb level is very high to avoid clipping. There will
only be an audible effect when „EFFECTS ON“ is active and the reverb size
parameter (SIZ) is greater than 0.
The effect parameters can be found on the right side of the SYNC knob. As
already mentioned the levels get inactive when EFFECTS ON is inactive, but
they are immediatly recalled when EFFECTS ON is active. So you can prepare
a whole effects setting including absolute delay and reverb levels and make it
active on demand with EFFECTS ON.
DEL: SYNC
With this knob you can synchronize the delay to the song tempo or to the
arpeggiator. If the arpeggiator is on it will be synced automatically to the
arpeggiator instead of to the song tempo. Since the arpeggiator itself can be
synchronized to the song tempo („ARP“ below „Sync to Songtemmpo“ below
the envelopes section), both can be synced at the same time. There are three
modes of synchronization:
SYNC (blue): even/normal synchronization
3: Triolic (triple note) synchronization
DOT: Dotted (punctuated) synchronization
When synchronization is on the delay time only will react in big steps, based
on the current metrum and mode. Delay time only can be regulated in a linear
way as long as the maximum delay time of 1000 ms is not overridden. If so the
delay time will be halfed which can lead to even mode again.
Page 15

Now let's advance to the controls on the right side of SYNC, which are the
actual effect parameters. The small triangle in the black bar between the delay
and reverb controls serves for launching a useful preset choice. More about
the presets on the next page
Left side: delay parameters:
DEL
Lets you regulate the delay time from 0 to 1000 ms. While clicking on it the
current value is displayed in the 1/1000 number display. The display will return
to 1 afterwards again, but the 1 has no meaning. Since it's only a mono delay
there's only one control for delay time. When SYNC is on, the delay time only
will change in big steps, determined by the song/arpeggiator tempo and the
used synchronization mode (even, triolic, dotted).
If the synchronization mode overrides the available maximum delay time of
1000 ms, the delay time automatically is halved, which can lead to even mode
instead of dotted or triolic. So use the lower possible setting then.
The delay is not interpolated, so delay time changes can't be performed
neathlessly. To avoid artefacts the delay output is automatically stopped as
long as the delay time is changed. So it's not suited for realtime tempo
changes in synchonized mode.
FBK
Lets you regulate the delay feedback. Set to maximum this can lead to
endlessly repeated delays, so be careful with it.
Preset triangle: See next page.
Right side: reverb parameters:
SIZ
Lets you regulate the reverb size from 0 to very big (cathedral like).
WID
Lets you regulate the stereo width of the reverb signal. Note that the reverb
has an m->s design, so also a mono sound can get stereo.
DMP
Lets you regulate the damping of the reverb, which in the real world is given by
the material of the reflecting walls. For very crisp sound you may use more
damping to avoid a harsh sounding reverb tail.
Delay and reverb always work in parallel, so they don't feed each other.
Page 16
As you will have noticed in your experiences so far it can take some time to set
the controls for a suitable effect setting for the current sound, including the
levels and the effect parameters, even if there only are a few, especially if the
controls all are in default 0 setting in untreated patches.
That's why we've implemented a very handy quick preset choice, which allows
to set all controls inluding levels by a single mouseclick.
The preset settings have been chosen based on favourized settings used in
already existing patches, and too with the aim to include often used standard
settings.
This lets you immediatly put an effect over a dry preset, and try out different
settings on the fly by stepping through the available presets.
The only pre-condition is that EFFECTS ON is set to active. Levels are set too
by choosing a preset, but not too high to rather stay subtle than forced, so you
may adjust them to a higher level once a preset is finally chosen.
The blue presets window can be opened and closed by clicking on the small
down arrow (or triangle) in the black bar between the effect units:
Now you can choose an effect by clicking into one of the preset rectangles.
The setting gets immediatly active. So you can check out different settings on
the fly and listen to the audible result while playing:
To close the window again click a second time on the down arrow:
Since the presets are very usable, either directly, or with a bit of additional
tweaking, you will quickly notice that you'll soon won't do without them any
more. Let's have a brief overview what's there:
Page 17

Delay only:
Delay:
A simple usable 500ms delay without any reverb
Reverb only:
Reverb:
A usable standard reverb with medium size
Church:
A very big and warm reverb with a long tail, like in a church or cathedral
Room:
A very short and transparent reverb, comparable to an empty room
Mono:
A vintage type mono reverb; can be a nice contrast to stereo presets
Reverb and Delay:
Solo:
Church reverb (warm and long) combined with some standard delay. Very well
suitable for all kinds of solo sounds that need to take off.
Lead:
A smaller and more transparent reverb combined with standard delay. Suitable
for less washed out rock leads that need to keep some bite.
Chord:
A fat sounding reverb/delay combination for punchy polyphonic patches similar
to Jump!
String:
A subtle and warm sounding reverb/delay combination that can give strings
some added room feeling.
Pad:
A fat and warm sounding reverb/delay combination that is especially suitable to
fatten pads and make them creamy and „hoovering“.
Of course these are only placative describtions to mke it easier to remember a
preset. Of course you can use any preset for anything if it suits well!
Page 18

MIDI CC Processing
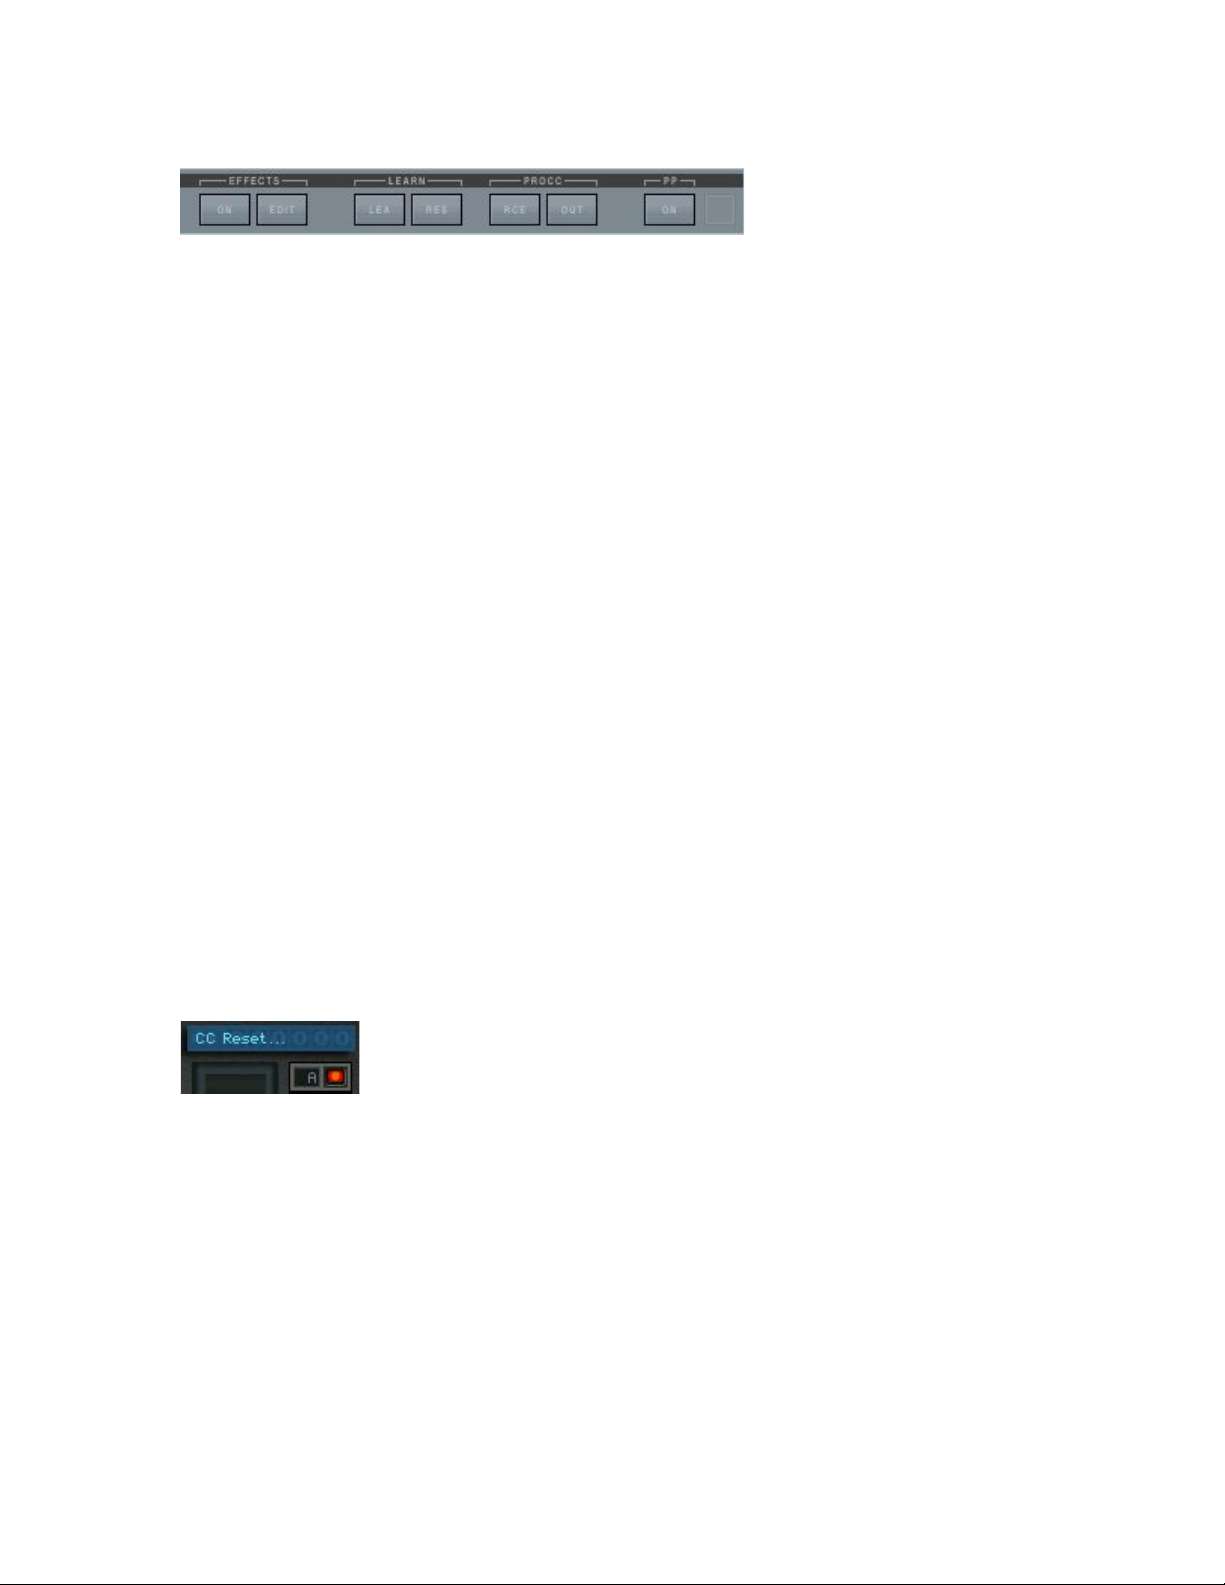
LEARN / PROCC
The four buttons below LEARN and PROCC are dedicated to MIDI Continuous
Controller (MIDI CC) processing, so the kind of MIDI data that is sent from
external hardware controls to remotely control a knob or button of OP-X PRO.
Tweaking parameters with external hardware controls is much more fun than
tweaking knobs with the computer mouse and can make the software feel like
a real hardware instrument.
As you will see OP-X PRO offers a lot of options for this, including fulll MIDI
feedback for endless rotary controls.
Let's have a look at the CC-related controls:
MIDI LEARN
OP-X PRO has a prepared standard MIDI CC mapping already with a
dedicated controller mapped to almost every control, following the common
Pro53 standard. This allows for immediate tweaking without the need of
assigning controllers first.
But given by your current setup you may nevertheless want to assign
controllers in a custom way, may it be to match an existing setup or to create
your own personal setup. To do so you can use MIDI LEARN.
The dedicated controls for this are LEA and RES below LEARN, but you also
can do it with the blue square button next to „A“ and „A“ in the levers section
alternatively (e.g. if the learn buttons are covered by the effects window). You'll
find a separate section in the manual for this way too.
LEARN: LEA
Using this button you can „learn“ an external hardware control to a knob or
button of OP-X PRO in a very easy way. When you click on LEA a small blue
bar in the levers section will appear saying: CC learn...
Now just move the external control you want to learn (only a tad bit is enough)
and then the control on OP-X PRO you want to assign to it. Finished! The
display will disappear again and the controls are learned to each other. It also
works vice versa. If nothing happens the chosen control can't be learned.
Page 19
You of course can do this for as many controls as you like, one after another.
The complete setting will be saved into a text file intside a subfolder of the
main accompanying plugin dll folder and will stay persistent even after closing
the plugin. Technically seen you even could make a backup copy of this
assignment file whis is called „MIDIControllers“ and can be found within the
folder „OPXP00“. But for normal application you don't have to care about it
You also can leave again the learn mode without having done anything by just
clicking a second time on LEA.
Since OP-X PRO allows for full MIDI feedback there are a few rules:
1. It's not possible to learn one external controller to several plugin controls.
This is because the feedback feature needs clear relations.
2. If you „steal“ the standard controller of a control to be learned to another
control, the original „holder“ will get inactive until it's learned itself to a new
controller.
3. The three state „ARP ON“ and „24 dB“ buttons have two controllers mapped
to them, one for the lower two states and one for the full range. Which range is
learned to an external controller is dependent on the end state after toggling
the GUI button before tweaking your external controller.
LEARN: RES
This button can be used to reset all allocations back to the standard factory
mapping. To complete the reset you need to keep the button depressed for
about 4 seconds until the blue LED in the levers section flashes red. This is a
protection against an unwanted reset by mistake.
As you can see learning controllers is fast, flexible and easy. You even can do
it on the fly while playing, if you should feel the urge of tweaking a chosen
knob with an external control immediatly. The learn engine also can't be
„tricked out“ to get unusable for MIDI feedback. It will always stay compatible
to this mode. Read more about in on the following page.
FFX / Wine users: It may be necessary to change the VFX bank (or unload the
plugin in running VFX mode) to make the learn mapping persistent. The plugin
must get aware that it's being closed that it can write down the mapping to a
non-volatile file (which is not the case when you just close VFX). This may also
be the case in other wine based hosts.
Page 20

CC PROCESSOR
The two buttons below PROCC (Process CC) are dedicated to processing
functions for incoming and outgoing MIDI CC messages. The left button is
responsible for the processing of incoming CCs, while the right one is for the
outgoing ones.
Left button: PROCC: RCE
States:
PROCC: RCE (grey)
In this standard mode (grey color) the incoming MIDI CCs stay unprocessed.
Advantage:
Immediate reaction, GUI knob imediatly has the same value
Disadvantage:
Annoying value jumps
PROCC: REL
REL means relative response. Incoming MIDI CCs don't change the controls
abruptly to the current value (which can lead to the well known value jumps),
but instead add or subtracts the relative movement of the external controller to
the GUI control. So there are no value jumps any more.
Advantage:
No value jumps, immediate reaction to a controller movement
Disadvantage:
You need to turn the knob fully up and down to again reach the full value
range, dependent on the direction and relative values
PROCC: FET
FET means fetch. Incoming MIDI CCs don't change the controls abrupltly to
the current value (which can lead to the well known value jumps), but will only
start to change the GUI control when it „fetches“ its current value, or in other
terms, goes over its value.
Advantage:
No value jumps, always access to full value range
Disadvantage:
Values only will start being changed after having „fetched“ the current value
Page 21

So, as you can see, the CC processing offers a lot of options to by-pass the
well known any annoying problem of value jumps when using non-endless
rotary controls, which are still the standard on most MIDI controllers or built in
controller knobs in MIDI master keyboards.
In fact, historically seen this is not a new problem of the virtual instruments'
age. Early voltage controlled analog synths with patch saving capabilities had
to solve this problem as well.
The controls of those machines were scanned by a cpu to send the values to
the analog voltage controlled engine. When a new preset was loaded from the
patch memory the controls of course did not match the new settings. So they
did use exactly the same methods as offered in the PROCC engine to allow
intuitive parameter control without value jumps. Some did use the relative
method (e.g. OB-X rev.2), others the fetch method.
If you own a controller device with endless rotary controls surrounded by LED
rings, then you can have the perfect solution using the MIDI feedback
capabilities of OP-X PRO which sends back the current values of all controls to
the controller which keeps all hardware controls updated to the current value.
This then is even better than in any vintage synth. Read more about it in the
MIDI CC control section of this manual.
PROCC: BLO
Blocks all incoming CCs, exept for damper pedal and modulation wheel. This
can be useful when you want to cut unwanted controller activities.
Right button: PROCC: OUT
States:
PROCC: OUT (grey)
In this standard mode all controls send their values to the MIDI output while
changing them, including a full dump of all values on preset change. This is
needed for MIDI feedback operation.
PROCC: BLO (blue)
In this mode all outgoing CC messages are blocked, including the full
parameter dumps on preset change. This may be useful if this data in any way
disturbs elemets in your setup or has unwanted effects. Don't block the output
if you're using OP-X PRO in a MIDI feedback setup.
Savability of the top-bar controls:
The current state of the ones that have a global fuction and keep their state
during preset changes are saved with a preset, but are only loaded once per
bank. So set the first preset to the wished settings and save the bank.
Page 22
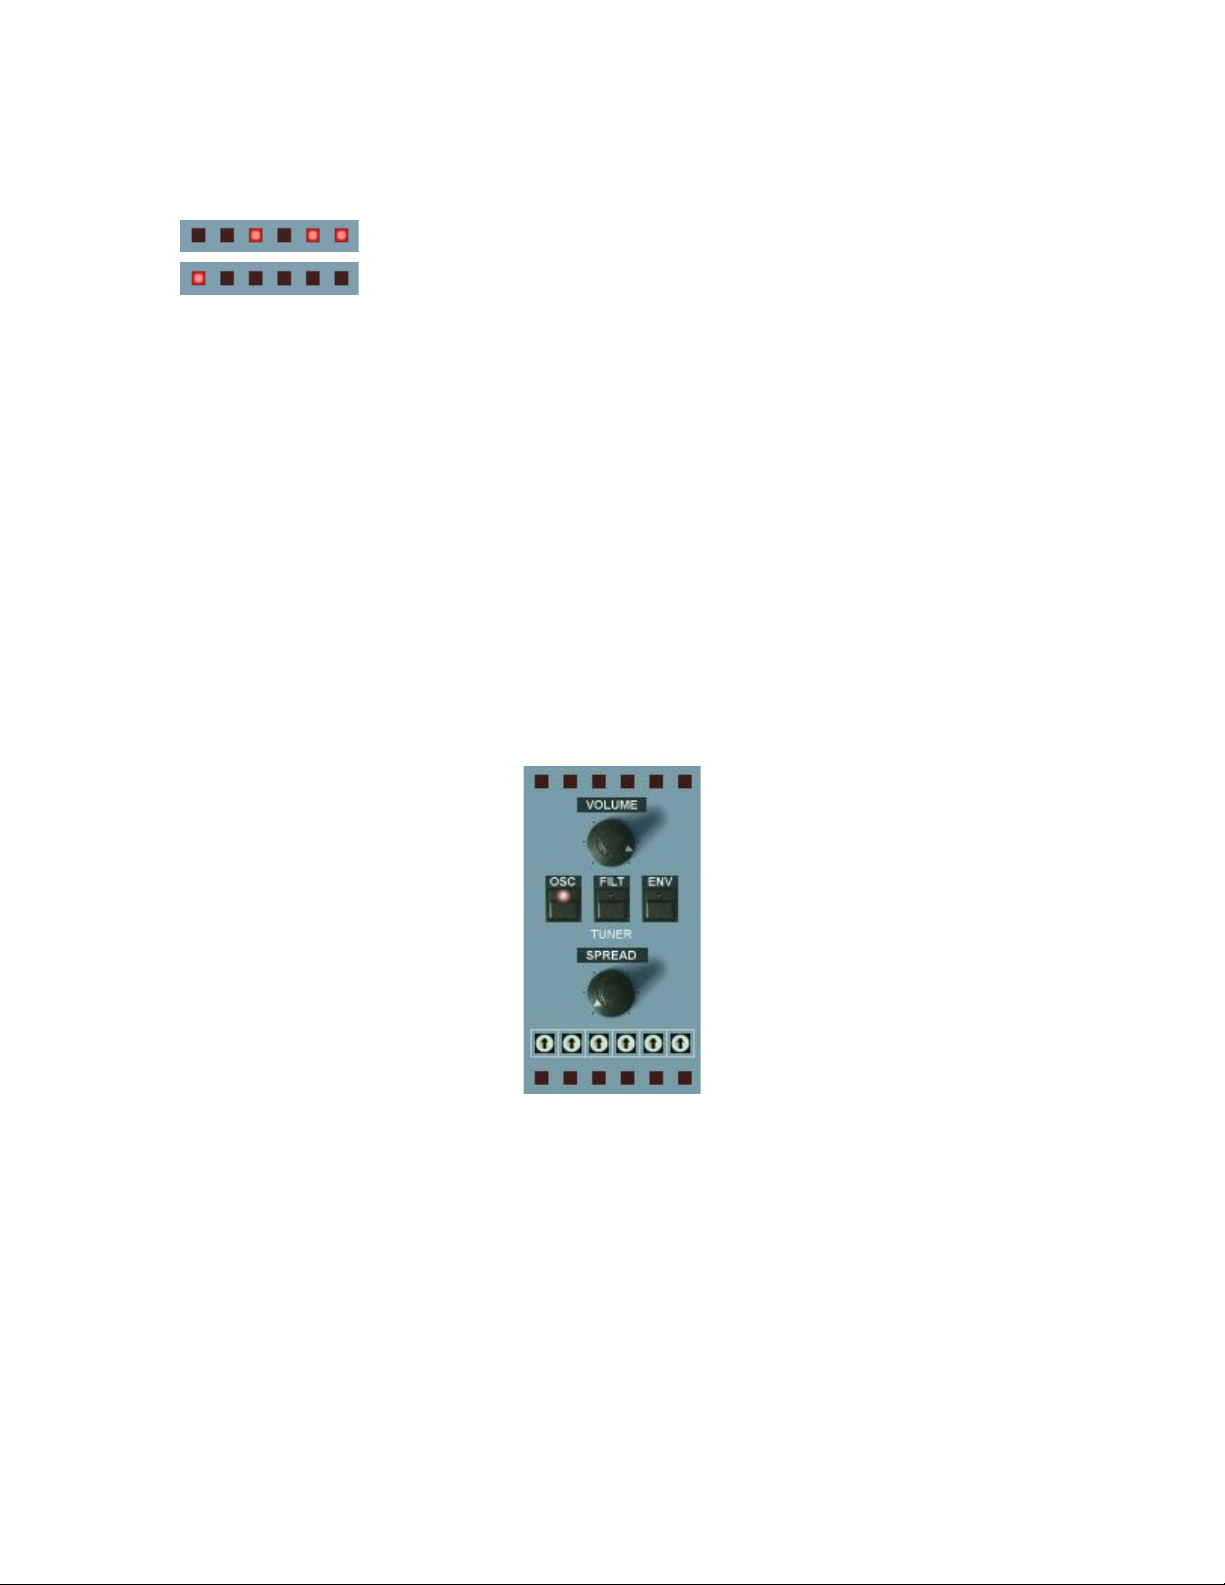
The voice LEDs
These LEDs indicate voice activity. Each voice has its propriate LED. That
means, when a voice is receiving trigger data to play, its propriate LED shines.
There are two rows of it, the upper one for voices 1 to 6 and the lower one for
the voices 7 to 12. Dependent on the polyphony setting (next to the levers) the
lower LEDs will show activity too. In the 8-Voice setting only the two middle
ones will show activity (voice 9 and 10).
In unisono mode, all six LEDs of the upper row are glowing at the same time.
Unisono always only uses the first six voices, so the lower LEDs won't shine,
independently from the current polyphony setting.
These LEDs are the digital counterpart of the activity control LEDs that often
were placed on the individual voice boards of vintage voltage controlled poly
synth to indicate that a voice was receiving trigger voltage.
The MANUAL section:
At the top and at the bottom there are placed the voice activity LEDs, the top
row for voices 1 to 6 and the bottom row for voices 7 to 12. The basic version
of OP-X PRO only has six voices. A second bank of additional six voices has
been added in OP-X PRO-II.
To keep the general overall sound untouched the tuning settings of the voices
7 - 12 always correspond to the settings of voices 1 - 6, which means: voice 7
sounds the same as voice 1, voice 8 the same as voice 2, and so on.
Have a look at the dedicated sections for more info.
Page 23
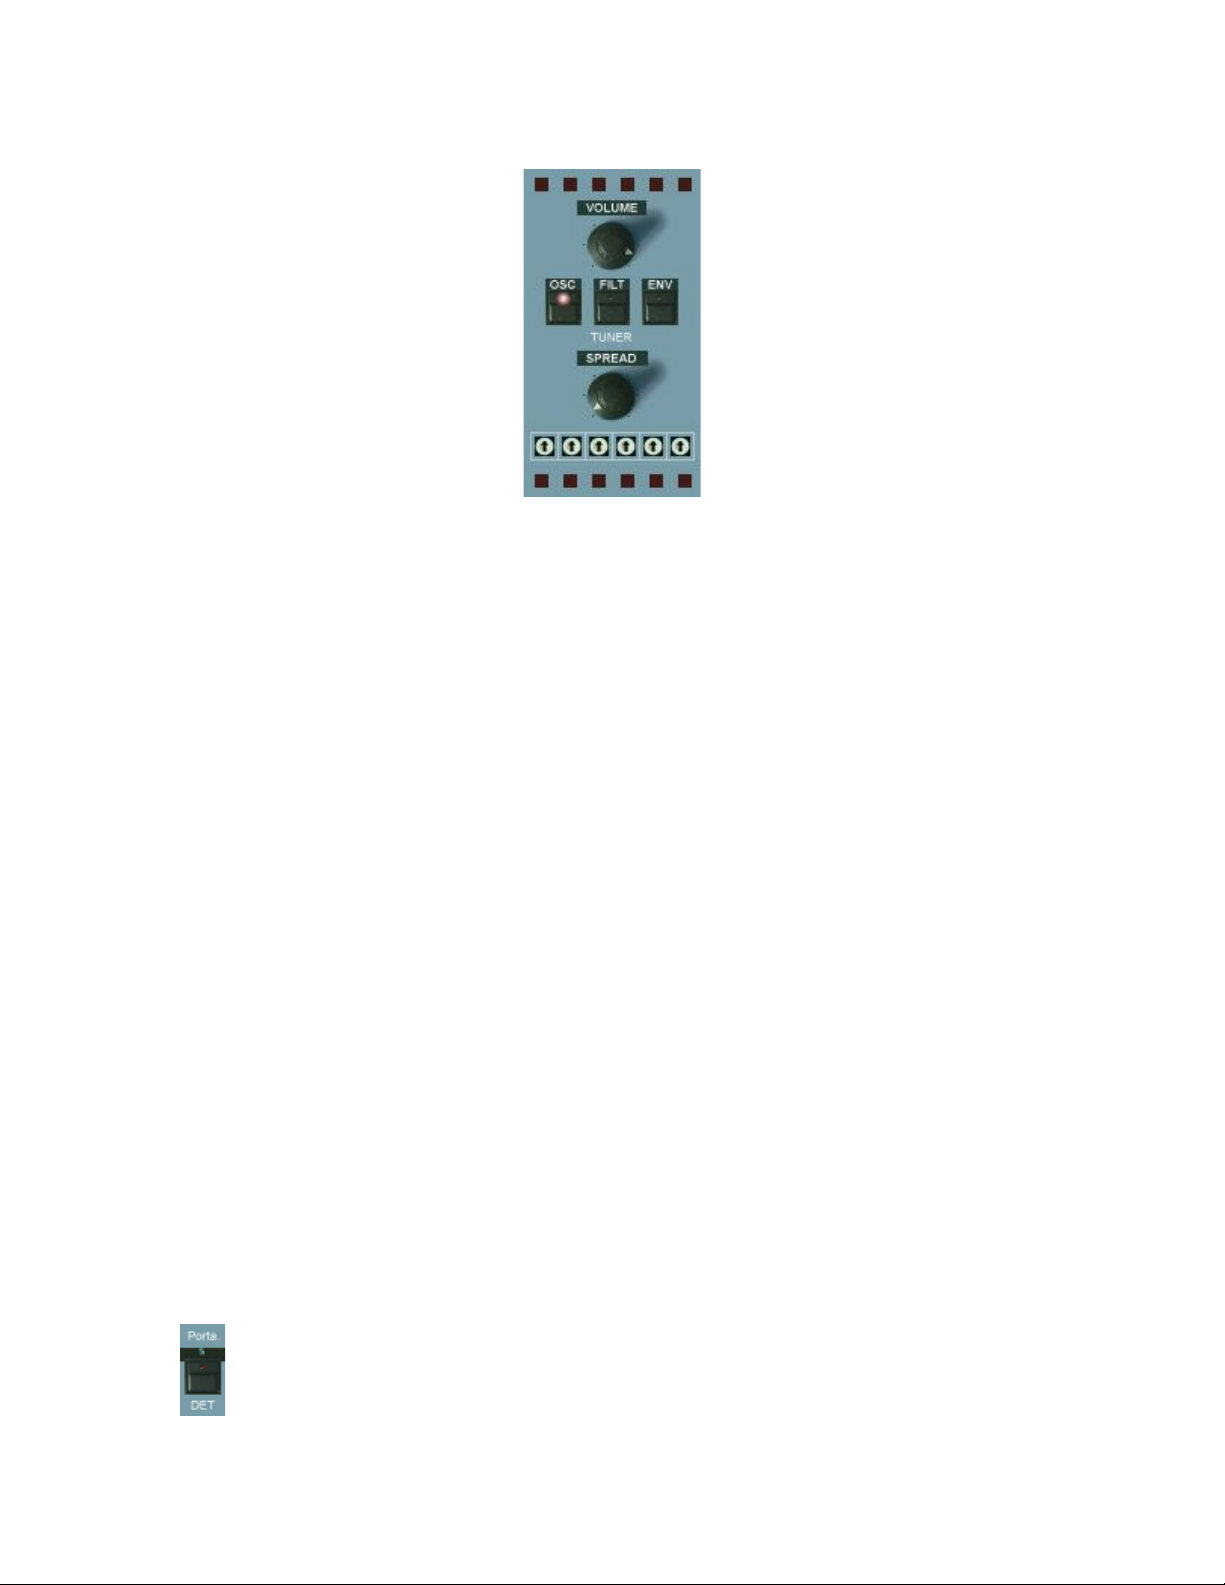
VOLUME
Master volume. Its setting is stored with the preset.
TUNER
The individually and slightly detuned voices can be tuned here. Read the intro
for comprehensive info on the backgrounds of voice tuning. Note: All detunings
now also can be continuosly controlled, more about it on the following page.
Here are the controls of this section:
OSC
Tunes the oscillators. In released state, each voice is slightly and individually
detuned as it would be on startup in the originals. More subtle detunings can
be achieved with the spread knob which also works in polyphonic mode.
FILT
Tunes the filters. In released state, the filter cutoff of every voice is slightly
different, as it is the case in every original device that is not freshly serviced.
These detunings can be altered for each voice with the FILT trimpot row in the
MANUAL section (see MANUAL and „Tuning Trimpots“).
ENV
Tunes the attack and decay times of the filter envelopes. In released mode,
the attack and release time of every voices' filter envelope is slightly different.
This gives organic life to pads and sweep sounds. These times can be tuned
with the DEC / REL trimpot rows above the keyboard. See „Additional Knobs
row“ and „Tuning Trimpots“ for more information.
The fourth element of the op-x' tuning capabilities is located in the addidional
functions section below the filters section: the portamento detuner "Port DET".
See "PORTAMENTO", "ADDITIONAL FUNCTIONS SECTION" and „Tuning
Trimpots“ section for detailed info.
Page 24

Continuous detuning control:
Based on many user requests the amount of tuning/detuning now also can be
controlled continuously instead of just on/off, for each of the four sections. This
allows to choose any amount of detuning influence based on the current
settings of the dedicated trimpots. This gives you incredibly detailed and subtle
control over detunings.
The continuos amount is hidden in the background and can be accessed and
adjusted by clicking into the text labels above the buttons and dragging the
mouse vertically up or down. A blue digital display will pop up then and show
the current values of each section.
The buttons of course still only are able to display two states. So LED dark
means anything lower than 50%, and the LED shining means the amount is
anything more than 50%. By clicking on the buttons themselbves (as usual)
the values will be reset to either 0 (LED dark) or maximum (=127, LED shinig).
So it's up to you if you just want to use the buttons as usual (on/off) or access
the hidden continuous control. The current value aways is saved with the
patch, may it be just 0 or 127, or anything between.
To fine adjust one section, just click into the dedicated text label just above the
button (OSC, FILT, ENV) and drag the mouse vertically up and down. The
popping up display will always show all three values:
The same can be done with the portamento detuning by clicking into the small
area just above the button and again drag the mouse vertically up or down.
The dedicated display will pop up in the filters section however:
Page 25

SPREAD
Spreads the oscillator tuning of the voices - good for fattening up unisono
sounds, but also for continuosly controlled detuning of polyphonic sounds in
order to give them a tad bit of analog type chromatical imperfection.
FILT Trimpots
These trimpots let you tune the filters of voice one to six, and at the same time
the ones of the corresponding voices in the second row. This setting is only
active when the FILT tune button is reseased (detuned mode). The standard
detuning is the 12 o'clock setting (and this means not tuned equally). You can
hear the settings with resonance set to a high amount. More info about the
trimpot tuning in the „Tuning Trimpots“ section of the manual.
The slightly different filter setting of the individual voices shows its strenght in
the following situations:
Unisono patches with high resonance setting:
The slightly different settings spreat the peaks a bit within the pitch spectrum
which leads to a more gentle and natural tone. If the filters are tuned
absolutely equally the peaks can add up to a too aggressive „one-frequency
peak“ which sounds stiff and one-dimensional.
Polyphonic filter-sweeps:
Sweeps will sound more organic and analog if filters are detuned a bit. The
bigger effect will have the ENV detune in this case, which causes the
envelopes not to rise and fall with the exactly same speed. However the
individual filter settings will be added to it.
Sequences: Fine-adjust the filter settings for the individual steps
Calibrate by mouseclick:
The filter trimpots now, as all other voice trimpots too, can be quickly
calibrated with a simple mouseclick. This makes it easy to find the „non
detuned“ starting point as base to create your own custom detunings, and to
quickly reset them to the standard detuning.
Calibrate to equally tuned: Click into the area on the right of the trimpots.
Reset to standard detuning: Click into the area on the left of the trimpots.
Page 26
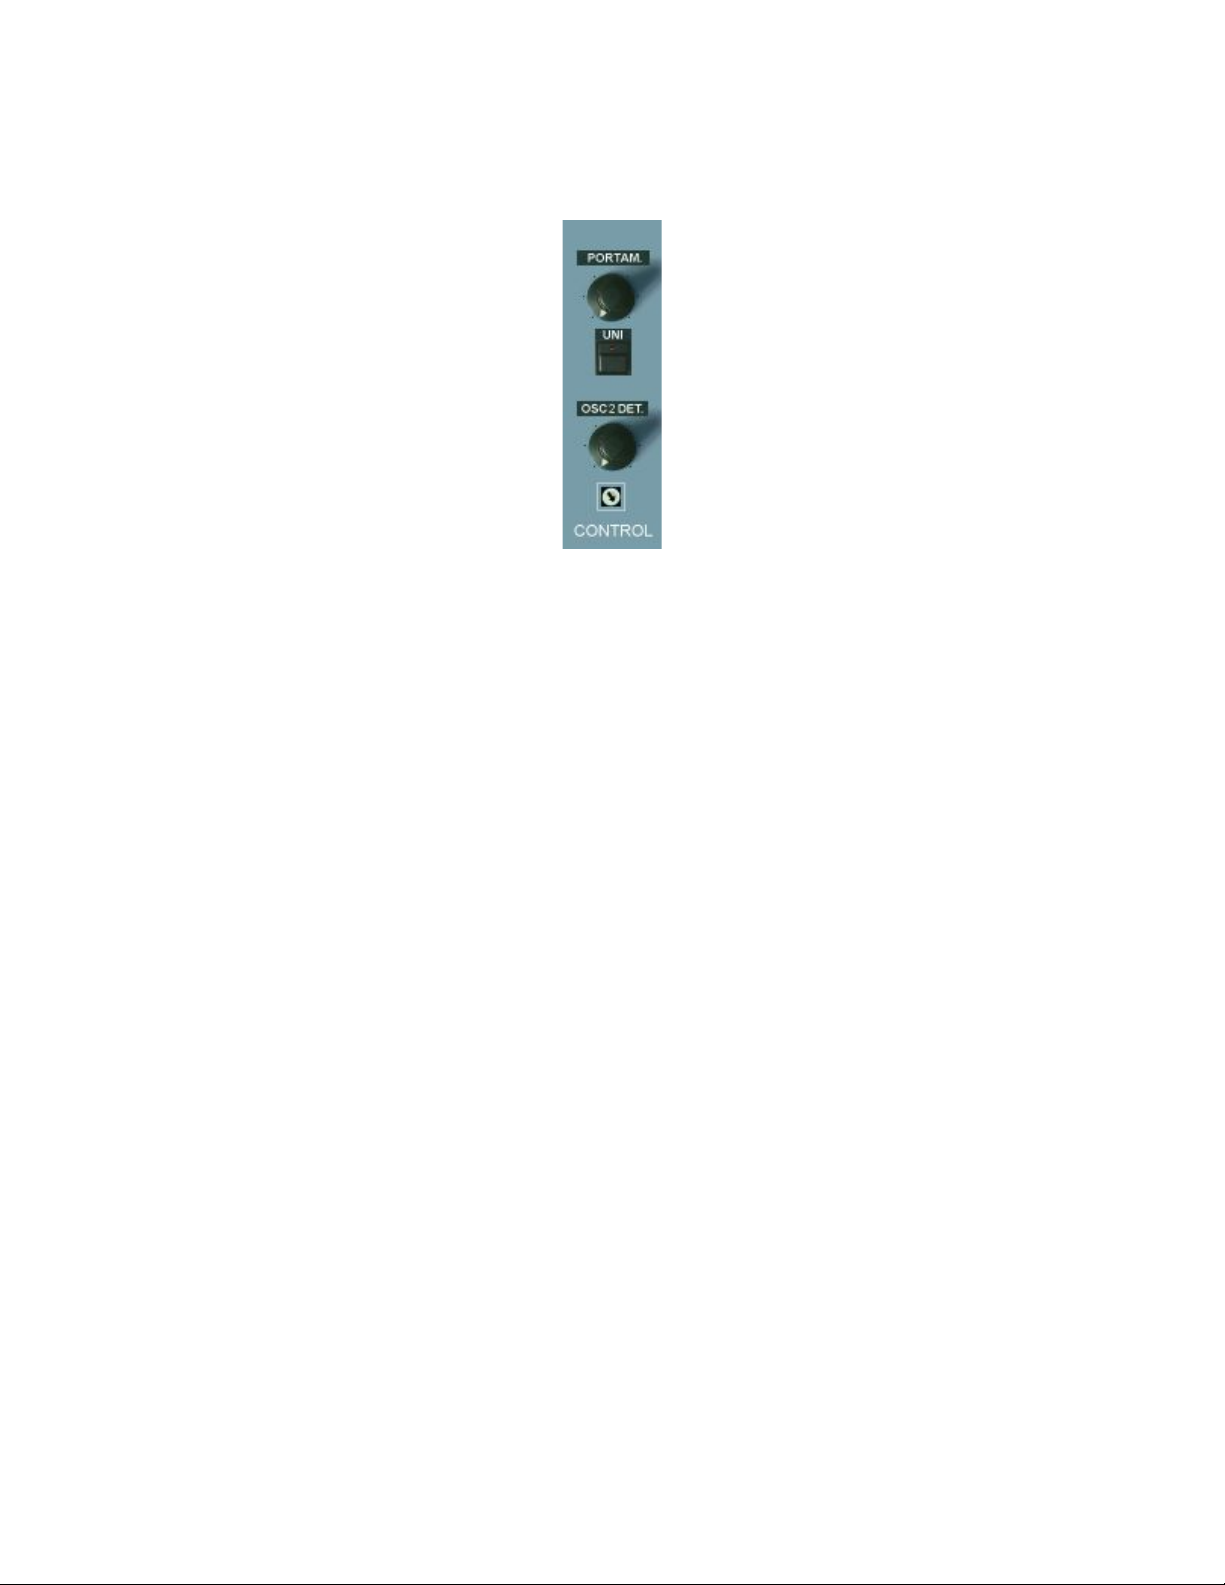
The CONTROL section
PORTAMENTO
Also called "glide" sometimes. Makes the pitch change continuously between
the notes. Short settings in unisono sounds makes the sound "squeak". The
function also works in polyphonic mode. The portamento can be detuned with
"Porta DET" in the additional functions section (below filters section). In
released "Porta DET" mode, the portamento times of each voice are equal. In
pushed mode the times slightly vary from voice to voice which was typical for
the originals. The sonic result in solo sounds is a special "depth" while gliding.
UNISON
Stacks all six voices of the first voice bank for fat solo sounds. Use the spread
knob or release the osc tune knob to fatten up the sound. The unisono mode
always uses 6 voices, independently from the polyphony setting.
OSC 2 DETUNE
Fine tuning for oscillator 2. This is used to produce beats when both oscillators
are on. This results in a fat and lively sound.
Trimpot
The trimpot below the detune knob lets you adjust the subtle beats between
oscillator 1 and 2. In zero setting this is really zero which is actually never the
case in real hardware devices. In this setting the sound is determined by the
random phase difference between oscillator 1 and 2. Fully turned right there
are subtle and individual beats for each voice as it is normally the case in
hardware devices even in „tuned“ mode. This setting brings back the real
hardware feel to the virtual world. For absolutely equal and not phase
determined tuning you have to use the „SYNC“ button in the oscillators
section. So there are three variants for „tuned“ mode in fact.
With manual LFO trigger activated („OSC“ button below „Lfo Phase“ in blue
mode), this trimpot becomes the control to adjust the starting phase of the
LFO wave. The influence on the beats is still active then, but is neglectable
then. Learn more in the dedicated section of this manual.
Page 27
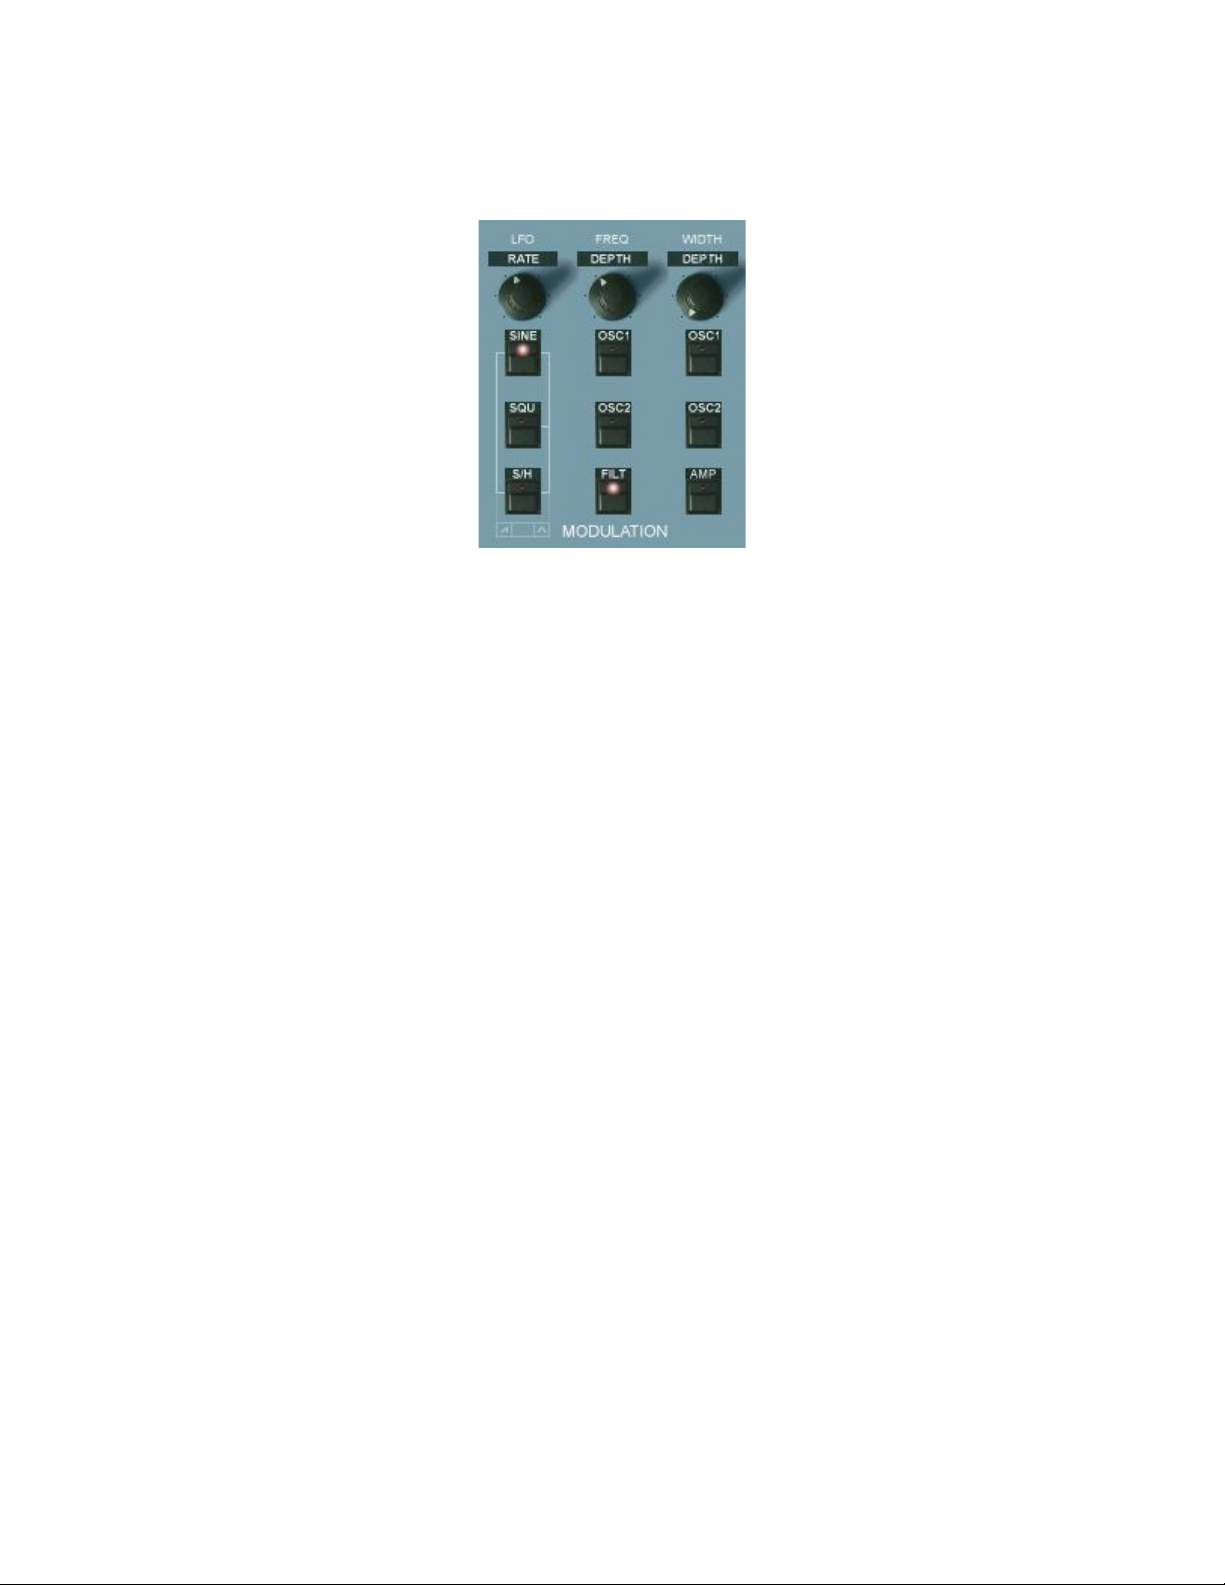
The MODULATION section
This is the section where the main LFO is controled and routed to the desired
modulation aims. For the modulation lever, there's a separate and independent
sine LFO (rate control above levers). The modulation lever can be switched
back to the main LFO (ADDITIONAL FUNCTIONS SECTION, "Wheel LFO") if
needed. The LFO on demand can be triggered by notes, delayed and faded in
(see „Lfo Phase“ in ADDITIONAL FUNCTIONS).
RATE
Regulates the LFO rate. The rate response is logarithmical. If the LFO is
synchronized to song tempo (which can be done in the ADDITIONAL
FUNCTIONS section with the LFO button, III for triolic behaviour), the knob will
react in three big steps (multiplied by the song tempo).
The waveforms: Several waveform buttons can be switched on at the same
time. This either will combine the chosen waveforms to a resulting new wave
by adding their outputs or, corresponding to the printed marking below the
buttons, it will result in a new pure waveform (sawtooth or triangle).
The available waveforms:
SINE
Switches on the sine wave of the LFO.
SQUARE
Switches on the square wave of the LFO.
S/H
Switches on the sample & hold wave of the LFO. Technically explained, white
noise is "sampled" with the speed of the LFO rate. This results in a random
step wave. Alternatively, the output of the lever LFO can be switched to the
input to be sampled, often called „sampled vibrato“ (e.g. OB-8). Switch the
„AMP“ button in this section to blue mode for this (two clicks), so until the LED
shines blue. This mode will lead to repeated patterns instead of randomized
ones. The result is dependent on the rates of both LFOs.
Page 28
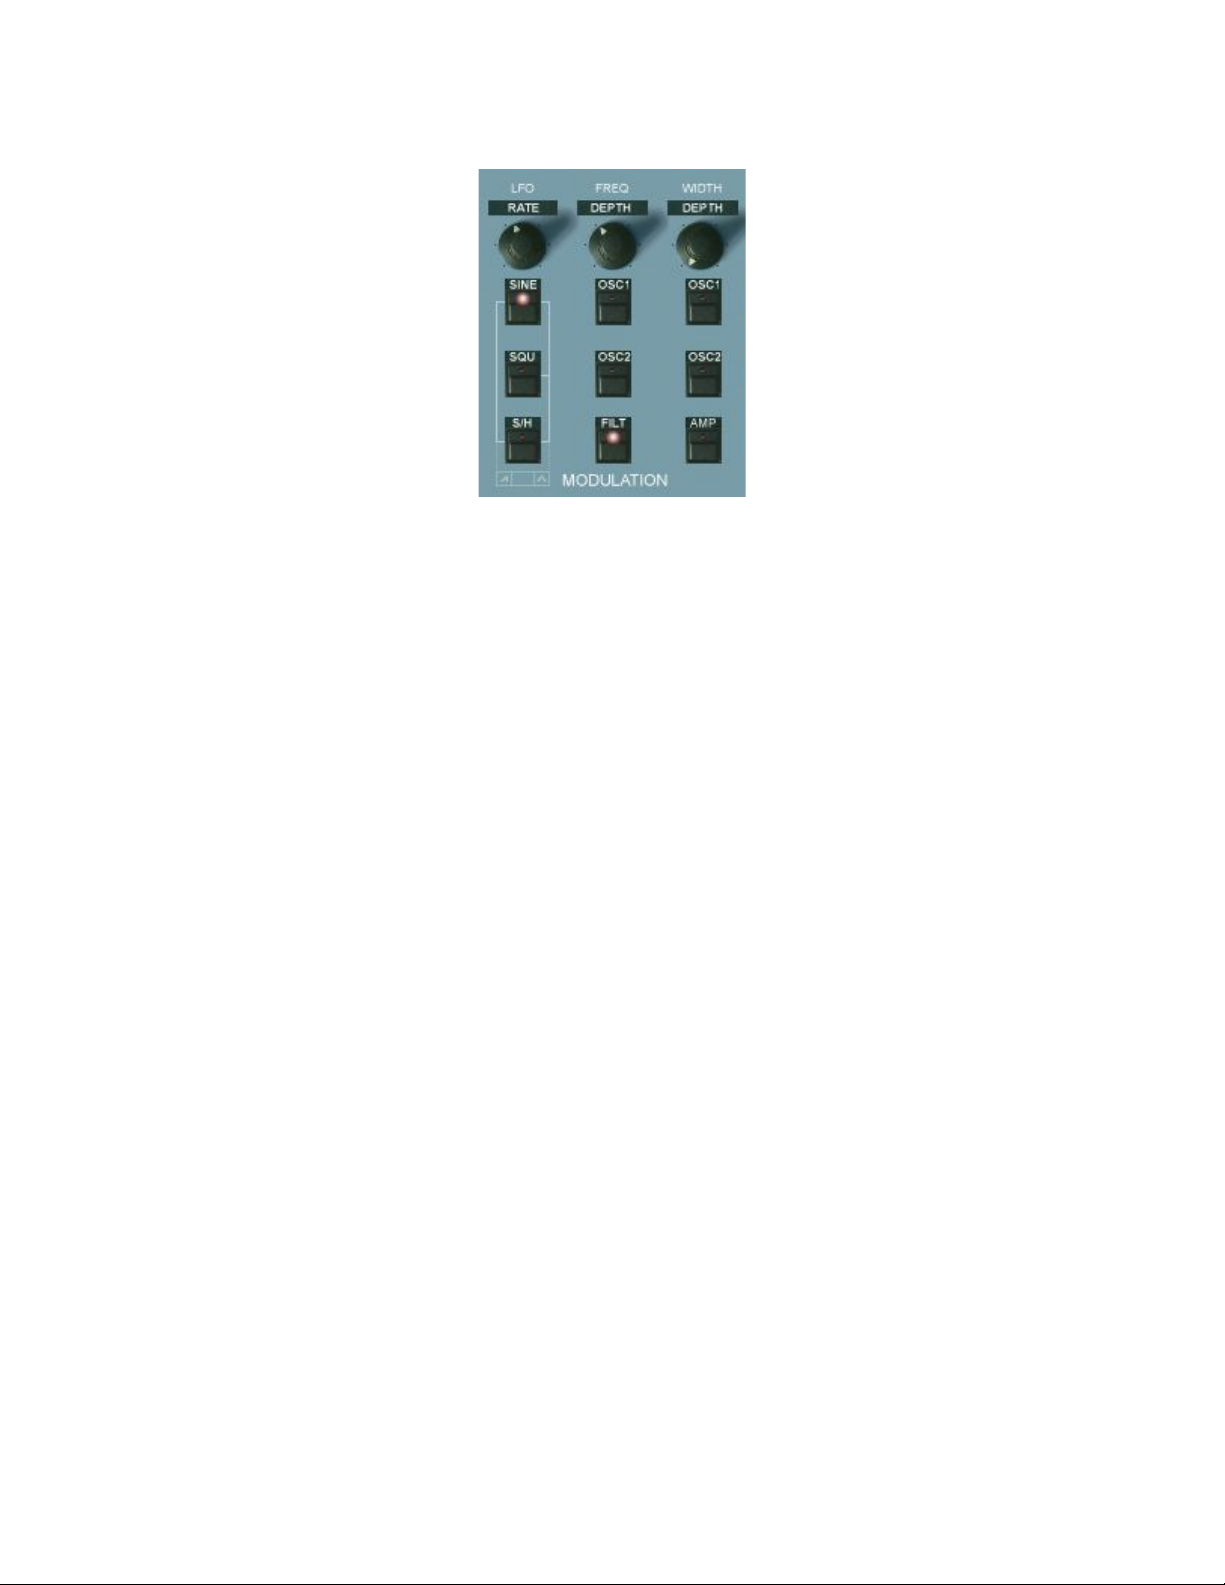
SAW: SINE & S/H
If the SINE and S/H button are activated at the same time, the LFO wave will
become a rising sawtooth. You can convert it to a falling sawtooth by activating
the Lfo Phase buttons (OSC, PW-FILT) in the additional buttons row (below
oscillators section). This can be done individually for the wave sent to the
oscillators and the one sent to filters, pulse width and amp. So one section can
receive a rising sawtooth while the other one receives a falling one.
TRIANGLE: SINE & SQU & S/H
If all three buttons are pushed, the LFO wave will become a triangle wave.
While this wave is similar to the sine wave it has a different behaviour in the
extreme positions. A triangle wave does keep its rising and falling speed
always the same and changes its direction abruptly at the max and min. A sine
wave does constantly change its rising anf falling speed. It's flat at the extreme
position and then becomes faster and faster until half way, then slows down
again. While a sine wave is more convenient for a natural sounding vibrato a
triangle is better for very slow modulations, e.g. of the filter cutoff frequency.
Combined with the very slow possible LFO speed this can lead to great
sounding slightly moving patches.
The other combinations will not switch on a new waveform. The waveforms will
be added then to each other, which will result in a combined waveform which
can deliver a quite interesting sonic result. Just experiment or try preset
patches using it.
So the left combinations are:
- Sine & Square (gives a wider modulation with rounded edges)
- Square & S/H (the square is being randomized with steps)
Page 29
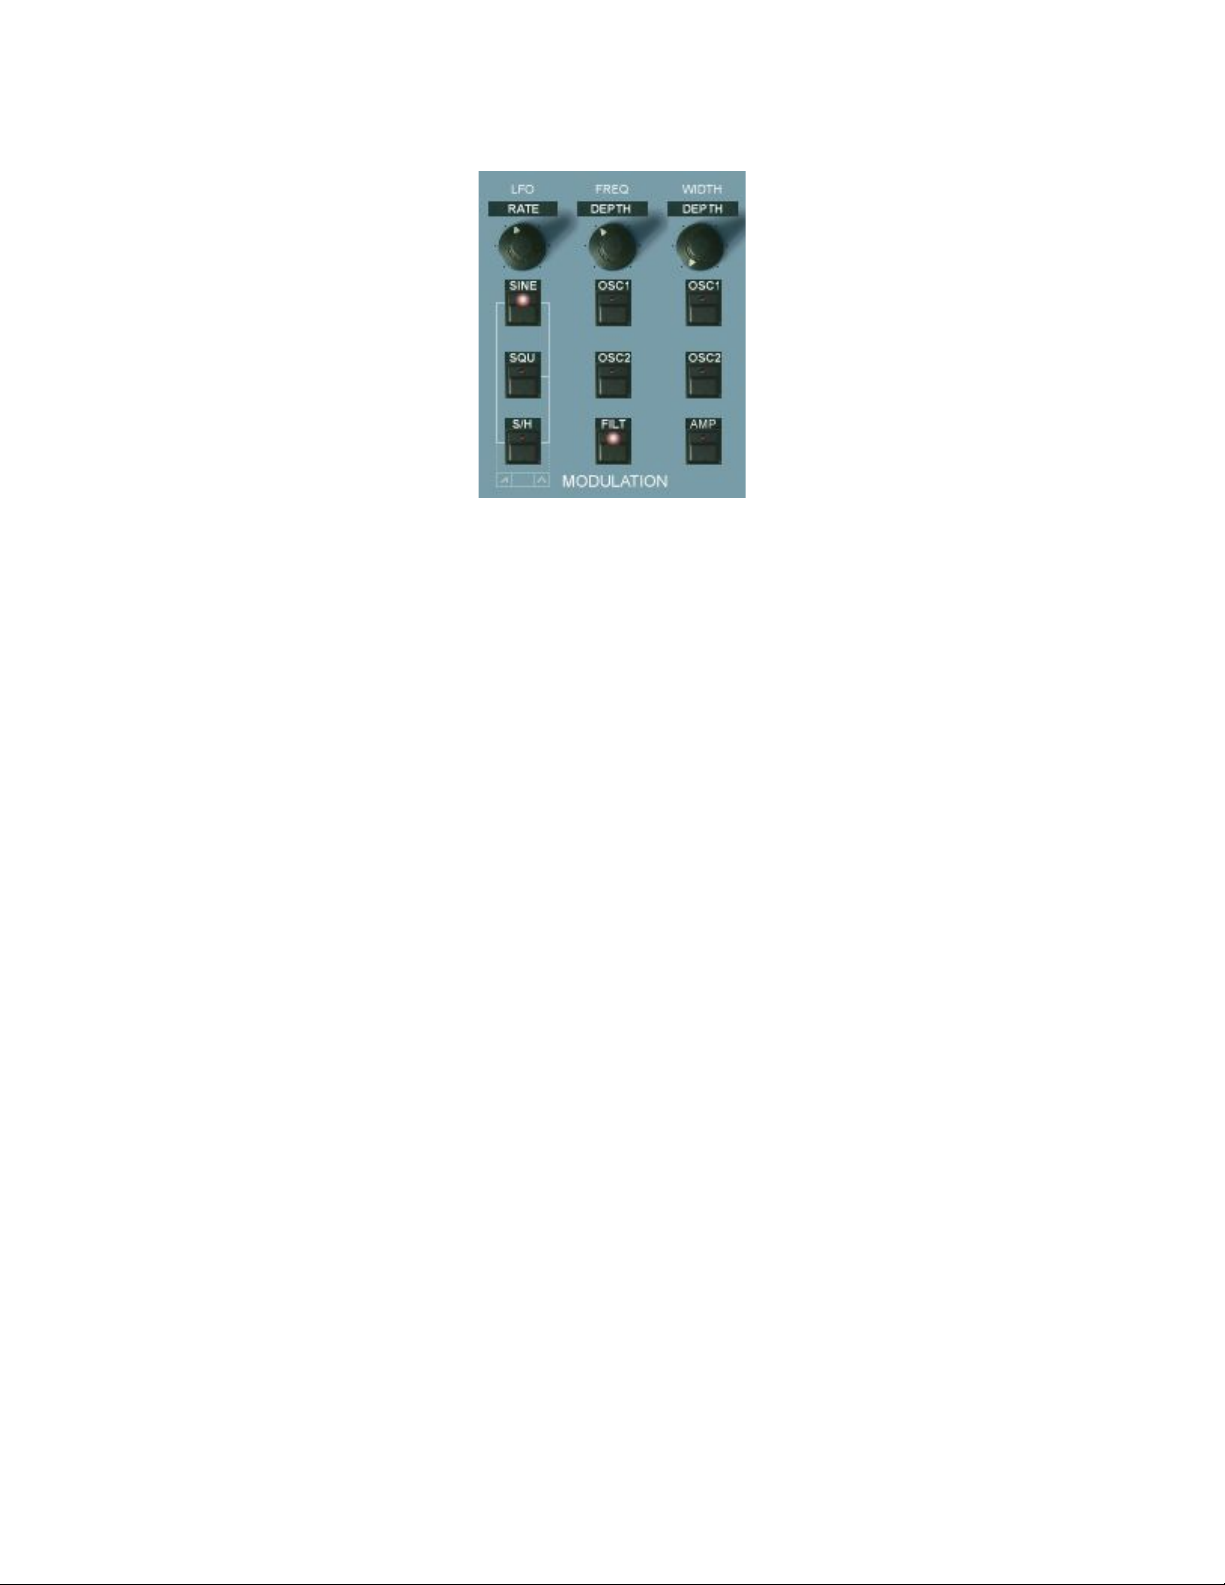
FREQUENCY DEPTH
Regulates the modulation intensity of the LFO to the oscillators and the filter.
The response of this knob is specially designed. In the first quarter, you have
double logarithmic response which allows to make finest adjustments in very
low modulation settings, e.g. for almoust imperceptible oscillator vibrato. The
rest of the scale does react linear for fast changes.
OSC 1
Switches the above regulated LFO output to oscillator 1 pitch.
OSC 2
Switches the above regulated LFO output to oscillator 2 pitch.
FILTER
Switches the above regulated LFO output to the filter cutoff. The influence
amount is dependent on the filter cutoff. Low cutoff settings result in lower LFO
influence. This is again a copied behaviour of the analog originals.
PULSE WIDTH DEPTH
Regulates the modulation intensity of the LFO output to the pulse width of the
oscillators' pulse waves and the amplifier. Its influence is added to the
"WIDTH" setting in the oscillators section.
OSC 1
Switches the above regulated LFO output to oscillator 1 pulse width.
OSC 2
Switches the above regulated LFO output to oscillator 2 pulse width.
AMP
Two funtions are mapped here now:
LED orange: Switches the above regulated LFO output to the amplifier.
LED blue: When S/H is on, the input of the S/H sampling unit is fed by the
modulation lever LFO (rate knob: just below lower voice LEDs row) instead of
noise. This often is called „sampled vibrato“ and results in repeated patterns
rather than randomized steps. Read more in the S/H section.
Page 30
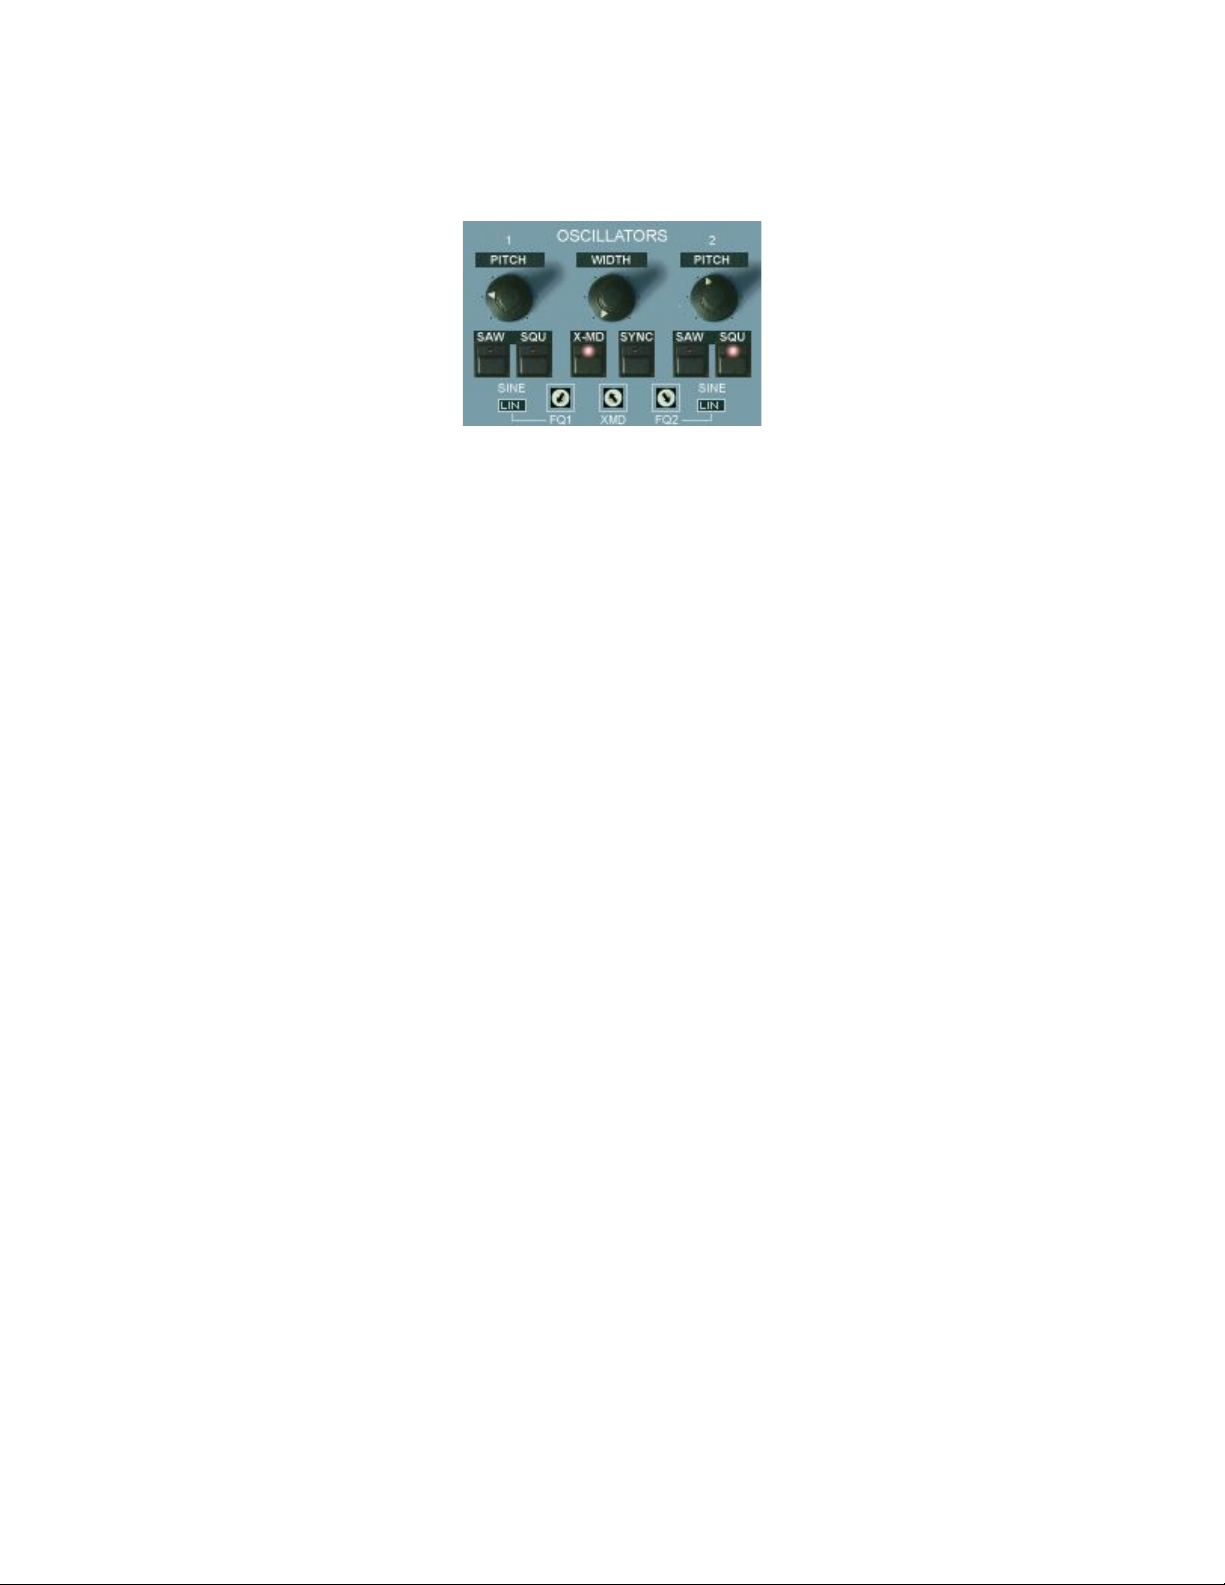
The OSCILLATORS section
PITCH 1
Sets the pitch of oscillator 1 in five octave steps (QUA mode). In LIN mode
the frequency can be adjusted continuously.
The waveforms:
You can choose between sawtooth, pulse and sine for each oscillator, or
triangle for both. SAW and SQU on leads to pulse (so not two waves).
SAW
Switches on the saw wave of oscillator 1
SQU
Switches on the pulse wave of oscillator 1
SINE
The SINE wave will be activated when both buttons are released.
WIDTH
Manual regulation of the pulse width of both pulse waves. Modulations for each
pulse wave are added individually.
PITCH 2
Sets the pitch of oscillator 2 in semitones. The range is five octaves and three
semitones. If sync is on, the sync spectrum can be controlled with this knob.
SAW
Switches on the saw wave of oscillator 2
SQU
Switches on the pulse wave of oscillator 2
SINE
The SINE wave will be activated when both buttons are released.
Triangle for both oscillators (new):
When both osillators are set to sine wave, the sine waves can be turned into
triangle waves when the WITH knob is set to maximum.
Page 31

X-MD
Cross modulation. This is sort of a simple frequency modulation between
oscillator 1 and oscillator 2. The result is a disharmonic spectrum. The sound
is determinate by the selected waves, the relation of the oscillators frequencies
to each other and the modulation amount, regulatable with "X-Md" trimpot . In
most cases, the pitch knob of oscillator 2 is used to regulate the sound. If the
frequency of oscillator is modulated (by LFO or filter envelope - described
later), the sound will change dynamically. If you want to hear only the FM
output, you can switch off oscillator 2. Switch the black osc2 control from
„QUA“ (quantized) to „LIN“ (linear) for continous tone search.
For yamaha type FM, release the wave buttons (both) for the SINE waves to
become active. For a little bit more presence, the wave of oscillator 2 can be
switched to SQU (Pulse). For even more clearness, the activation of ring
modulation (ADDITIONAL FUNCTIONS section, "RING") is recommended.
In the ADDITIONAL FUNCTIONS section, there is a special function to give
some additional movement to crossmod sounds: When you switch on the
"ENV" button, the modulation depth is influenced by the amp envelope. (The
same can be done with ring modulation - see later).
SYNC
Hard sync. Oscillator 2 is synchronized by oscillator 1. Everytime the oscillator
1 wave amplitude crosses zero, the oscillator 2 wave amplitude is set to zero
too. The sonic result is the well known and famous sync sound with rich
harmonics. As it is with cross modulation, changes of the oscillator 2 pitch
results in changes in the spectrum. The whole story gets especially interesting
when oscillator 2 is modulated by LFO or filter envelope.
QUA / LIN (black rectangles)
Click them to change from quantized (QUA; Osc1: octaves, Osc2: semi tones)
frequency control to continuous / linear (LIN) frequency control. This will have
an effect on both the main buttons and the trimpots.
FQ1 / FQ2
Fine adjustment of the frequencies of oscillator 1 and 2. The response is
dependent on the black rectangles setting (QUA / LIN - see above).
XMD
Sets the amount of switched on x-modulation (cross modulation) AND
switched on ring modulation (additional buttons section).
Page 32

The FILTER section
A specially designed 12/24db low pass filter with an accompanying parallel
multimode filter tries to do its best to emulate the famous SEM sound. The
SEM filters became famous with the beige SEM-Modules and the SEM based
Four- and Eightvoice. The OB-X was the last Ob. synth that was equipped with
this discrete design (but without multi mode). Later models, beginning with the
OB-Xa, got the standard Curtis Chips. One of the special things of the SEM
filters is that in high resonance settings the sound remains as fat as in zero
resonance settings. This is a wonderful thing for pads and sweeps. The old
SEM filters had no self oscillation. In the OP-X PRO you can switch it on if
needed either by pushing the 24dB-button (in the additional buttons section) a
second time (the self oscillation lamp next to the modes display will shine now)
or by clicking on the lamp itself (which will remotely-switch the 24dB button).
Self oscillation can only be activated in 24dB mode. The classic SEM design
(continous blending from 12bB lowpass to highpass which results in notch
filtering in the 50/50 setting - with separate choosable bandpass position) has
been enhanced with switchable 12/24 dB LP mode (24 dB switch in the
additional buttons section) and a continuously (!) adjustable multi-mode pole
(only high pass in the SEM) that lets you blend from high pass over band pass
to notch. Not enough with this the LP-multimode mix can be modulated by the
main LFO and the filter envelope. This all gives you tremendous subtle control
over tone as you have never experienced before.
CUTOFF
Regulates the filter cutoff frequency.
RESON.
Regulates the filter resonance. If self oscillation is activated (see above, small
lamp shines) the filter will produce a sine wave at the highest setting.
ENV AMT
Regulates the amount of the filter envelope influence on the cutoff frequency.
This is added to the cutoff setting.
Oscillators and noise levels:
As you can see the sources are switched by half or full amount to the filter.
New: The levels now alternatively also can be continuously controlled by
clicking into the text labels above the buttons and drag the mouse vertically up
or down. Works also with MIDI CC. Learn more about it on the next page.
Page 33

OSC1
Switches the full level of oscillator 1 to the filter.
New: The amount is also continously adjustable by clicking into the „OSC1“
label just above the button and drag the mouse vertically up or down. A small
display will pop up below „NOISE“ and show the value.
The buttons' LED of course only indicates in which half the current value in the
background is (dark: smaller than 50%, shining: greater than 50%).
But the current value in the background is always active and is also saved with
the preset. By clicking on the button the value is being reset again einter to 0
(LED dark) or maximum (LED shining = 127).
So you're free if you just want to use on/off or continuous level control. This
works also for OSC2 FULL and NOISE FULL.
OSC2 HALF
Switches half of the volume of oscillator 2 to the filter. No continuous control
here, since this can be done with the „OSC2 FULL“ button.
OSC2 FULL
Switches the full volume of oscillator 2 to the filter. If both knobs are activated,
there's a slight volume push. With this button, the level of osc2 alternatively too
can be continuously controlled in the same way as described in „OSC1“ above.
Switch off „OSC2 HALF“ for this, otherwise half the level is always added. For
continuos level adjustment click into the „FULL“ text label and drag the mouse
vertically up or down. Again, a popping up display will show the value:
Page 34

NOISE HALF
Switches half of the volume of the white noise generator to the filter.
NOISE FULL
Switches the full volume of the white noise generator to the filter. If both knobs
are activated, there's a slight volume push. With this button, the noise level
alternatively too can be continuously controlled in the same way as described
in „OSC1“ on the previous page. Switch off „NOISE HALF“ for this, otherwise
half the level is always added. For continuos level adjustment click into the
„FULL“ text label and drag the mouse vertically up or down. Again, a popping
up display will show the value:
KEY
Keyboard tracking. It makes the filter cutoff follow the key position, which
means that every note has the same amount of harmonics. When filter self
oscillation is switched on (two clicks on „24db) this can be heard the best. The
keyboard tracking amount can be adjusted with the „KEY“ trimpot. At
maximum setting the filter pich follows the keyboard chromatically.
MIX trimpot
This trimpot lets you blend from 12/24 dB low pass (left or zero position) to the
multimode filter (high pass - band pass - notch, dependent on the TYPE
setting). With the multimode filter set to high pass the 12 o'clock position of the
MIX trimpot results in classic SEM notch filtering (one small band missing). In
this notch mode resonance can be added without loss of contour (which is not
possible in the multimode filters' notch position).
TYP trimpot
Lets you continuously blend the multimode filter from high pass (left or 7
o'clock postion) to band pass (12 o'clock position) to notch (right position). The
blending curve is logarithmic so that the pure bandpass mode can be located
more easily. This continous blending option gives you the possibility to change
modes on the fly without hard sound steps and also lets you adjust tone and
high/low frequency amount very detailed. You can e.g. take a bit away the
lows of the lopass mode blending a bit towards the bandpass mode for a
slimmer sound. The modes in extreme positions:
Page 35

The modes in extreme positions:
HP (high pass): Filters away the low frequencies and leaves the high
frequencies. Used for slim and thin sounding stuff to fit the arrangement/mix.
BP (band pass):Only lets pass a narrow frequency band. The resulting sound
is well known from the guitar „wah-wah“ pedals. It sounds somehow similar to
lowpass filtering but with reduced lows.
NO (notch): This is the opposite to the bandpass filtering. It cuts off a narrow
band. It's quite a subtle effect. The resonance has to be set to zero to hear it
(if not the hole is filled by the peak). See above for SEM notch mode w/ res.
Self-Oscillation Lamp
The small square lamp next to the modes display indicates activated self
oscillation. Self oscillation is only possible in 24dB-Lowpass-mode. It can be
switched on either by pushing the already activated 24dB button (additional
buttons row) a second time (the button led itself won't change) or by directly
clicking on the lamp in activated 24dB mode. This will remotely-switch the
24dB knob to the corresponding state.
About self oscillation:
Self oscillation will make the filter produce a sine wave at highest resonance
setting. It's frequency is determined by the cutoff. It can be either used for filter
effects without any oscillator activated using all possible modulation options
routed to the cutoff frequency (LFO, keyboard pitch, aftertouch, filter envelope)
or for an additional harmonic to be added to the spectrum for e.g. organ or
celesta type sounds. Be sure to activate key tracking then with tracking amout
set to max that the pitch chromatically follows the keyboard.
For high resonant sweeps in 24dB mode self oscillation can be disturbing
since it can conquer with the amplified partial tones of the filtered wave. Switch
it off in that case (double push to return in 24dB mode since the switching is
cyclic).
With detuned filters and deactivated/muted voices you can create a great
variation of funny melodies that can be completely out of well tempered tuning.
A wide fiel for interesting experiments.
Page 36

KEY
Lets you adjust the amout of keyboard tracking. The keyboard tracking has to
be switched on for this (KEY button - see above). Keyboard tracking lets the
filter cutoff frequency follow the keyboard (dependent on the played note). In
max position this is chromatical (same as played notes), in zero position the
cutoff does not follow any more. Keyboard tracking is used to give all notes the
same (or weighted) amount of brightness or partials, often present in natural
instruments, or for chromatically playable fm sounds.
LFO (-MIX)
Lets the main LFO modulate the filter mix setting. The effect is dependent on
the MIX trimpot position. The audible result is less stiff than a simple cutoff
modulation. Great for never heard stuff.
ENV (-MIX)
Lets the filter envelope modulate the filter mix setting. The effect is dependent
on the MIX trimpot position. The audible result is less stiff than a simple cutoff
modulation. It can be combined with standard cutoff modulation. This option
can produce very flattering and subtle sweeps.
It's helpful to really learn to operate the filter with all its possibilities.
E.g. be sure to turn to zero all trimpots (exept the „key“ one) for the original 12db lowpass-mode of OP-X (which is the sound of OB-X), including the LFO
and ENV trims on the right (otherwise the blending will be modulated).
Apart from the distinct sound of a mode by itself the blending options also can
be used for making the sound fit a mix without eqing. If there's e.g. a bit too
much bass in the lowpass mode you can turn the mix-trimpot a bit in direction
of the multimode pole set to bandbass. Then the bass will get less boomy the
more you turn the trimpot clockwise. The sound will become more middy.
The filter of OP-X PRO lets you create almoust any color you can think of by
blending and mixing the modes and playing with resonance. So it's good to
know what the modes by themself actually do.
A final quiet tip, as a bonus for those who really read manuals: The filter
trimpots, exept for the key trimpot, can be zeroed all at once by clicking on the
white „OSC2“ text, in order to quickly return to perfect lowpass mode.
Page 37

The ENVELOPES section
Two standard ADSR envelopes, the upper one routed to the filter cutoff, the
lower one routed to the amplifier after the filter. ADSR of course means:
A Attack,
D Decay,
S Sustain,
R Release
Apart from the standard functionality there are several further options to use
the envelopes for other modulation destinations or to change their behaviour,
which are listed on the following two pages:
Filter ADSR to oscillator pitch and pulse width:
The filter envelope can be used to modulate the oscillators pitch and the pulse
width. The knobs for this can be found at the bottom left side named OM and
PM, combined with the „Filterenv Modulation“ buttons located in the additional
functions section. Learn more about it in the dedicated section.
Invert the filter ADSR:
OP-X PRO-II now allows to invert the filter envelope, as it could be done in e.g.
Jupiter 8. It can be inverted by clicking two times on the right one „\“ in the
filterenv buttons section. The LED will shine blue then:
The button normally is used to invert the influence of the filter envelope to the
pulse width (orange LED mode, in combination with the „Envmod“-knobs below
„CONTROL“). But this function is very rarely used and can be easily replaced
by setting the pulse width to a different default position. When invert is active
the filter ADSR will subtract its output from the cutoff instead of adding it, so
you need to rise the cutoff to have an audible effect.
Page 38

Linear amp ADSR attack:
For soft juicy slow attack strings it can be useful to have linear amp attack
response instead of logarithmic (standard). This will make slow attacks softer
and less impulsive. It's recommended to switch on legato mode („Lega ON“,
below „OSCILLATORS“) when using linear attack, which will avoid cutted
attacks and will force the envelope to start at zero for every new note. You can
activate linear amp ADSR attack by clicking two times on „ENV“ below the
„FILTER“ section until the LED shines blue and the small square shows „LNR“:
Filter ADSR to X-Mod and Ring Mod
When pushing the ENV button only one time (LED shining orange), the output
of the modulating oscillator for cross- or ringmodulation is taken after the amp,
which means that the amp envelope has an influence on the audible result.
The influence can be heard when the decay and release times are short.
Filter ADSR to Filter Mix:
By rising the „ENV“ trimpot in the filter section the filter envelope modulates
the filter mix setting. The effect is dependent on the MIX trimpot position. The
audible result is less stiff than a simple cutoff modulation. It can be combined
with standard cutoff modulation. This option can produce very flattering and
subtle sweeps. Read more about it in the „FILTER“ section.
Minimal attack and decay times:
The attack and decay times can be rather short, like in real voltage controlled
analog synths. You can check it out like this: Set all ADSR controls to zero,
switch on all tuning buttons in the tuner section (OSC, FILT, ENV), switch off
the oscillators and switch on noise instead, set resonance to almost maximum
position (but only almost to prohibit distortions), cutoff to zero and env amount
to max, and play repeated notes. You will hear very short clicks (better audible
with some reverb added). Increase then the amp envelope decay knob to max
(the click will get punchier since there's more room for it) and then increase the
cutoff (which brings punchy tonal bumps).
Page 39

The ADDITIONAL FUNCTIONS section (below filter)
This section, formerly used to save and recall presets, offers a lot of additional
functions, that often refer to the main sections. Several buttons now feature
multiple states, that activate different functions, and are distinguished by the
color of the shining LED, and for „DMP“ and „ENV“ additionally with a changing
black rectangle index.
The abbrevations below the buttons are designed to remember what the
specific button is for. We could not write a book below every button and mess
the GUI, so you have to know what the abbrevations refer to. You simply have
to learn it. It's easy to recall once you know it. Here's the list:
Lega ON
Used in unison mode:
Switches on legato mode when playing unisono patches. In legato mode the
pitch always jumps back to the remaining hold note and the notes are only
retriggered if all keys are released. In non legato mode the pitch doesn't jump
back and the notes are retriggered every time, which is suitable for e.g. unison
bass sounds.
The legato mode was the standard unisono mode in many old analog synths.
However the pitch normally only jumped back from one side (in the OB-X from
down to up) while in the OP-X PRO it jumps back from both sides to a hold
note - very practical. The legato mode was a common way of solo playing holding one key as a center point and filddle around in with the other fingers.
Lega ON also has an effect when using manual or preset chords (learn more
about it in the arpeggiator/midi processor section). For neathless legato match
polyphony (if needed by deactivating voices) to the used chord.
Used in polyphonic mode:
In the new OP-X PRO there's now also an effect in polyphonic mode. In
polyphonic mode „Lega ON“ set to active forces the envelopes to start at zero
on every new note, instead of overtaking the current envelope level of the
stolen note. This can be especially useful for patches with slow attack and low
polyphony, even more when the amp envelope attack is set to linear (ENV
button blue (LNR), see ENVELOPES section) . With „Lega ON“ the notes of
slow attack pads and strings will always start smoothly and melt into each
other without audible breaks. Just experiment and listen, and use what suits
you best for the given situation.
Page 40

DMP
DMP has become a multi functional button now, but is still dedicated to general
damping (DMP = damp) or brillance. It takes an influence on the general cutoff
level, the maximum filter opening level and the behaviour in this area. This all
can stamp a unique character to the used sound, and make the filter more
behave like the ones of early voltage driven synths, or a bit darker and rounder
ones of later generations. The black rectangle, visualy supported by the color
of the shining LED, indicates the chosen mode. By clicking into it and dragging
the mouse vertically upwards or downwards you can change between the
modes without the need of stepping through all modes every time.
NOR (LED dark) - Normal
This is the standard mode, which has been used for all former OP-X sounds
and probably still will be used for most sounds since it's perfectly usable and
gives the sound a warm and slightly dark character, which has given OP-X the
reputation of being one of the easiest to mix software synth available. In this
mode the filter even with fully opened cutoff always takes a small influence on
the oscillators, tames a little bit the highest frequencies, because the highest
possible cutoff frequency is still within the audible area. This is a similar
behaviour to many „old“ filters, e.g. the one of the Minimoog. The limitation of
the maximum cutoff frequency also means that all kind of modulations (e.g.
LFO) can't open the filter more and stay within this range. This guarantees for
a sound that always stays warm and pleasant, never brittle or harsh.
DMP (LED orange) - Damp
Damps / reduces the filter cutoff by a fixed amount. This can be necessary if
key tracking is switched on and the cutoff can't be lowered enough for very
high notes.
CLR (LED blue) - Clear
In this mode the filter, other than in NOR mode, can be opened fully, up into
the not any more audible area (infrasound area). This allows the oscillators to
pass the filter untouched when cutoff is set to maximum, or lfo/env modulation
intensity reaches into this area.
BRL (LED red) - Brilliant
The filter opens fully like in CLR mode, but the top addidionally gets an extra
edge for cutting brillance without the need of adding resonance. This mode is
very close to the behaviour of some of the older polysynths like OB-X. But
those synths also have the reputation of not being the easiest to mix, so be
careful with this mode and only use it when it's really needed.
Page 41

24dB
Switches the low pass filter effectiveness from 12bB (standard SEM mode) to
24 dB. The 24dB setting can be better for percussive sounds that need more
effective filtering. It generally sounds a bit more present but also a bit colder
and thinner. Not recommended for warm pads.
If the 24dB knob is pushed a second time in activated state this will enable self
oscillation at maximum resonance setting. The knob led will not change its
sate, but the self-oscillation lamp will get active in the filters section indicating
self oscillation. This lamp and the button are linked, so you can also click on
the lamp to do the same. Read more about it in the filters section.
Lfo Phase:
The two buttons related to this sub-section are multi-functional and take an
influence on the phase behaviour of the main LFO. Which function is active is
indicated by the color of the shining LED (orange or blue).
OSC
LED orange (one click):
Inverts the phase of the LFO modulation to the oscillators. This is helpful when
the LFO is synchronized to a sequencer. If you want the LFO rise on 2 and 4
instead of 1 and 3, just push this button. Saw will get falling instead of rising.
LED blue (two clicks):
In this mode the LFO is triggered by played notes. This can be useful if you
want to start the LFO on playing a note at always the same phase position of
the LFO wave (otherwise it can be anything since the LFO is free running in
standard mode). In this mode, the LFO will be triggered on the first note
played, and will keep the current phase state until all keys are released, or until
the damper pedal is released. So you can keep the current phase state fozen
by holding at least one note or by holding down the damper pedal. When you
play perfectly in rythm the phase of course won't change.
The great thing about this mode is that you can choose any phase position in
the active LFO waveform as starting position. This can be done with the small
trimpot below „OSC 2 DET“ („CONTROL“ section), which normally is used to
„randomize“ left beats in equal tuned mode, which is a very subtle effect and
has not too much meaning any more when the LFO is used.
Page 42

So in triggered LFO mode, you can adjust the starting phase state of the active
LFO waveform with this trimpot:
This is how the trimpot setting corresponds to the starting position within the
active LFO waveform:
Sine, Square, Triangle:
The zero position of the trimpot corresponds to the lowest point of the wave, in
the square wave it's right after the rising flank which is nore convenient, so that
the entire part of that pole is performed. For starting at the oposite position of
the chosen wave set the trimpot to 12 o'clock.
Sawtooth:
Since the OSC invert function can't be accessed in the manual trigger mode,
the phase trimpot can access all phase states of both the rising and the
inverted falling sawtooth. The left half, from zero to almost 12 o'cklock lets the
starting point shift through the rising sawtooth wave. In the right half, the wave
is inverted, and so is the mapping. To start the falling sawtooth at it's top value
set the phase trimpot to the maximum value. You can shift through the falling
sawtooth by turning the trimpot from maximum back to almost 12'oclock.
As you can see the trimpot was mapped to the phase sates in the most usefull
way, which means that in the zero position there's always the most common
starting phase state.
To get to know the phase shifting functionality a bit better you can e.g. activate
LFO to oscillators, maybe half amount, with very slow LFO rate, and try out the
trimpot's behaviour with different LFO waves. Don't forget to activate the
manual trigger mode before (LED blue), otherwise there will be no effect.
Sync to songtempo:
With sync to songtempo activated for the LFO the manual triggered mode gets
inactive since the LFO is already triggered by the host clock. With the blue
LED active you however still have the possibility to change the starting phase
with the phase trimpot as described above.
Page 43

PW-FILT
Also the second button of the „Lfo Phase“ section has a dual functionality,
indicated by the different color of the shining LED.
LED orange (one click):
The LFO phase sent to the pulse width and the filter is inverted. If you want the
LFO rise on 2 and 4 instead of 1 and 3, just push this button. Very important
function again when synchronized to song tempo. Saw again will get falling
instead of rising.
LED blue (two clicks):
In this mode the LFO can be delayed and faded in with an adjustable delay
time and rising time. The modulation starts when a new note is played when
no other note is being held. The delay time and rising time can be adjusted
individually with the two „Velo/Stp“ knobs in the arpeggiator section, which
together with this have triple functionality (velocity sensitivity, chord arpeggio
mode and speed, lfo delay time and rising time):
Velo/Mode:
Adjust the LFO starting delay from 0 - 10 seconds.
Stp/Speed:
Adjust the LFO modulation depth rising time from 0 to 10 seconds.
The rising curve will only start after the delay. So if you want to fade in the LFO
from the moment a key is depressed set the delay to 0 and the rising time to
something larger than 0.
LED blue (three clicks):
As you may have noticed the LED color still remains blue instead of going out
after a third click. This in fact is a third mode, which is the same as the first
blue mode, but with the LFO phase for pulse width and filter inverted, which
amongst other things makes sawtooth falling instead of rising.
It was necessary to implement this inverted version since the PW FILT invert
mode (LED orange) can't be accesed any more in the blue mode.
Page 44

Filterenv Modulation:
OSC2
Makes the filter envelope modulate oscillator 2 only (if env modulation is
activated). This is important for modulated sync- and crossmod sounds.
\
Inverts the effect oft the filter envelope modulation to the oscillators (if env
modulation is activated).
PW1
Makes the filter envelope modulate pulse width 1 only (if env modulation is
activated).
\
This button now features two different states, orange and blue, which have
different functions each:
LED orange (one click):
Inverts the effect of the filter envelope modulation to the pulse width (if env
modulation is activated).
LED blue (two clicks):
With this state active the output of the filter envelope (ADSR) is inverted, as it
could be done e.g. in Jupiter 8. This means the ADSR output is not any more
added to the cutoff, but subtracted.To have an audible effect you have to rise
the cutoff to something higher to 0, otherwise the filter will stay closed since
the modulation takes place in the lower than 0 range which means completely
closed.
RING
Switches on ring modulation. Ring modulation means, that the output of one
oscillator is multiplied by the output of the other (not the pitch as it is with xmod). This sounds a bit different to the cross modulation. Please note that
both oscillators have to be switched on to hear a result. The amount of ring
modulation is set in the oscillators section with the „X-MD“ trimpot (which also
regulates the X-Mod amount). The ring modulation often can be used to
brighten up sounds a bit, especially sine fm sounds.
Page 45

ENV
This button too has two functions mapped to it now, indicated by the black
rectangle and visualy distinguished by the color of the shining LED (orange or
blue). By clicking into the black rectangle and dragging the mouse vertically
upwards or downwards you can change between the modes without the need
of stepping through all modes every time.
NOR (led dark) - Normal: Functions inactive (normal state)
MOD (led orange) - Modulation:
A very special feature that can be interesting in arpeggiator mode: When
pushing this button, the output of the modulating oscillator for cross- or
ringmodulation is taken after the amp, which means that the amp envelope
has an influence on the sonic result. The influence can be heard when the
decay and release times are short.
LNR (led blue) - Linear:
In this mode the attack segment of the amplifier envelope (lower ADSR) is
switched to linear instead of logarithmic (standard).
This will make slow attacks softer and less impulsive. This can be useful for
juicy soft strings or pads with very slow attack. It's recommended to switch on
legato mode („Lega ON“, below „OSCILLATORS“) when using linear attack,
which will avoid cutted attacks and will force the envelope to start at zero for
every new note. You can activate linear amp ADSR attack by clicking two
times on „ENV“ below the „FILTER“ section until the LED shines blue and the
small square shows „LNR“:
Wheel LFO
In activated state this knob causes two LFO routings to change at the same
time:
1. The main lfo is routed to the lever (wheel) lfo modulation instead of the extra
wheel lfo (speed control above levers). This can be useful if you want to
control the main lfo's pitch modulation with the lever (wheel) or generally want
the added modulation to have the same speed as the one of the main lfo.
2. The lever (wheel) LFO ist routed to the panning modulation instead of the
main lfo. This can be useful if you want to have a panning modulation speed
independent from the main lfo which is e.g. used for other important stuff. This
allows e.g. to have a relatively fast vibrato modulation and at the same time
very slow motion panning.
Page 46

Hold / VEL
In normal state this button switches velocity sensivity on. The velocity will have
an effect on the filter envelope. Combined with the filterenv modulation, not
only the cutoff can be velocity controlled, but also pitch and pulse width
(dependent on the OM and PM settings). The velocity range and response
can be regulated in the additional knobs row with the two knobs connected to
„Velo“, the left one for the minimum (called „Floor“ as parameter) and the right
one for the max (called „Ceil“ as parameter).
In arpeggiated chord mode (Double or Preset Chord with double-activated
ARP-ON button - led shining red) this button is used for hold instead of the
Hold/ARP-ON button (because of the double function). Velocity is not available
then anyway, so this button is free for another function. Read more about it in
the Arpeggiator section. Note that you alternatively can activate hold remotely
controlled with the damper pedal, see dedicated section.
Porta DET
Portamento detune. In released "Porta DET" mode, the portamento times of
each voice are equal for snappy "squeek". In pushed mode, the times vary
from voice to voice which was typical in the original. The sonic result in solo
sound is a special sort of "depth" while gliding. If you really need to you can
alter the voices' individual portamento detunings with the dedicated trimpot row
in the levers section (POR). Have a look at the „Levers“ and „Tuning Tutorial“
section in this manual for more details. Portamento detune is absolutely
essential to capture the magic of many old polyphonic analog synths.
Portamento detune now also can be continuously controlled on demand by
clicking into the small area just above the button (small number) and dragging
the mouse vertically up or down. Read more in the „TUNER“ section.
Sync to Songtempo:
LFO
Synchronizes the LFO to the song tempo of the sequencer. In this mode, the
RATE knob will react in three big steps only, dependent on the tempo. Note,
that the phases of the individual LFO sections can be inverted (OSC / PF).
III
Switches on triolic synchronization mode (multiples of three notes per beat).
ARP
Synchronizes the Arpeggiator to the song tempo of the sequencer. In this
mode, the Speed knob will react in three big steps only, dependent on the
song tempo.
Page 47

Sync to Songtempo: LFO phase
When the LFO is synchronized to the songtempo (LFO), the pase is matched
to the bar starts and always starts at 0. There are however several options to
adapt the phase state to your liking:
1. With „OSC / PW-FILT“ below „Lfo Phase“
With these two knobs you can invert the pase of the LFO separatly for the
oscillators (pitch) and the pulse width and filters (cutoff). This allows to operate
the LFO off-beat or change the relative behaviour of both groups by 180
degrees, which can be useful sometimes.
2. With the phase trimpot when OSC is blue (manual LFO trigger)
When the LED state of the OSC button below „LFO Phase“ is blue (two clicks),
the phase of the LFO can be freely adjusted with the trimpot in the CONTROL
section. Manual triggering is automatically set to inactive when the LFO is
synchronized to the songtempo since the LFO already is triggered by the
sequencer clock.
For details on how the trimpot setting corresponds to the phase state of the
different LFO waves read the „Lfo Phase“ section of this manual.
ARP ON
This button has several functions, dependent on the environment:
1. Switch on the Arpeggiator/MIDI-Processor. Learn more about it in the
Arpeggiator/MIDI-Processor section.
2. Hold a non-chord (normal) arpeggio by clicking a second time on it. The
color of the led will turn to red. Hold also can be activated remotely controlled
with the damper pedal, just by depressing and again releasing it again within
less than about half a second. More about it the dedicated section.
3. Switches / indicates record ready and play mode for the arpeggiator presets
.3 (Manual Chord) and .4 (Step Sequencer). Orange led means: record ready.
In this state you can play and hold your chord or enter the notes for the
sequence. In led-red mode (led shines brighter and red after pushing the
button a second time) the chord is being fixed or the sequence will be played
back. Learn more about it in the Arpeggioator/MIDI-Processor section.
Find more details on the arpeggiator/midi processor in the dedicated section of
this manual.
Page 48

The ADDITIONAL KNOBS row (above Keyboard)
You won't find the knobs above the keyboard in the originals. These are all
additional functions or functions which were only accessible after opening the
case of a device or not at all. From left to right:
LFO
Regulates the speed of the separate modwheel sine LFO. It's routed to the
modulation lever (or wheel in modern terms). This LFO can be switched to the
panning modulation instead with the „Wheel LFO“ button in the additional
buttons section if you need a separate lfo for it. Then the main lfo will be
routed to the lever modulation instead. If „sampled vibrato“ is on (ENV button
blue in LFO section & SH on), this LFO is the SH sampling source.
Aftertouch:
A Vib.
Regulates the aftertouch (key pressure) influence on the oscillator vibrato. This
is driven by the LFO switched to the modulation wheel.
A Filt.
Regulates the aftertouch (key pressure) influence on the filter cutoff. Great for
expression.
Envmod:
OM
Regulates the amount of the filter envelope modulation to the oscillators. Have
a look at the ADDITIONAL FUNCTIONS section description for further options
(OSC, \ ). Handy feature: You can click on „OM“ to set it to 0.
PM
Regulates the amount of the filter envelope modulation to the pulse width.
Have a look at the ADDITIONAL FUNCTIONS section description for further
options (PW, \ ). Handy feature: You can click on „PM“ to set it to 0.
TUNE
Master tune. The default setting is center (mid). The pitch can be adjusted up
to one half tone down (turn left) or up (turn right) to adapt the overall pitch to
acoustic instruments with deviating tuning. To set the knob back to exact
center position (standard tuning) simply click on „Tune“.
Page 49

DEC / REL
Trimpot controls for the decays (DEC) and releases (REL) of the filter
envelope. These trimpots let you tune the slightly different decay and release
settings of the filter envelopes in detuned mode (ENV button in tuner section
released) for each voice channel (1 to 6 from left to right). This setting will only
have an effect in detuned mode (ENV released). The envelopes in real old
hardware synths never did close for each voice with the exact same speed
which gave sweeps a special life and richness. This could be annoying for
brass (and other) sounds however, so the envelopes detuning can be switched
off with one button in the OP-X for these sounds (with the „ENV“ button in the
MANUAL section). The manual tuning of the filter envelopes is definitively
something for specialists or folks that want to copy their hardware device 1:1.
Especially in downsweeping stacked unisono sounds these settings have a
huge effect on the overall sound - a good example for it is the famous „Tom
Sawyer“ sound from Rush. Without these slightly different envelope times this
famous sweep will sound stiff and unreal because all old analog synths had
these slight offsets. For a detailed tutorial for envelope tuning have a look at
the „Tuning Trimpots“ section of this manual.
Calibrate by mouseclick (new):
The trimpots now easily can be calibrated with a simple mouseclick:
Click on „C“:
The „DEC“ trimpots are tuned to equal times for all voices, which is the same
as if the „ENV“ button in the „TUNER“ section is active. This can be useful to
have a neutral starting base to adjust them to own custom detunings.
Click on „D“:
Resets all „DEC“ trimpots to the implemented standard detuning.
The same for the „REL“ trimpots:
Click on „L“: Calibrates all „REL“ trimpots to equal times (same as tuned)
Click on „R“ to reset all „REL“ trimpots again to the standard detuning.
Page 50

Voice mute
These six buttons, corresponding to the 6 voice channels, let you individually
mute and now at the same time also deactivate single voices. If polyphony is
switched to more than six voices (8 or 12) the buttons will also mute the
corresponding voices in the second row.
1: Mutes and deactivates voices 1 and 7
2: Mutes and deactivates voices 2 and 8
3: Mutes and deactivates voices 3 and 9
4: Mutes and deactivates voices 4 and 10
5: Mutes and deactivates voices 5 and 11
6: Mutes and deactivates voices 6 and 12
With complete deactivation instead of just muting now the voice allocation
engine distributes the incoming voices only within the left active voices, and
this still always in rotating mode.
Application for custom polyphony settings:
Apart from disco light type flashing effects (can be very nice, especially using
the sequencer!) this also can be used to realize any polyphony setting apart
from the main 6/8/12 ones, with any voices you want to have involved. This
allows to create real 2/3/4/5/any - voice polysynths, as well as real monosynth
using just one voice of your choice. The computer's processor only will be
charged with the active voices, so a monosynth will have dramatically lowered
cpu usage compared to just muting the voices (as it could be done in OP-X
PRO). The only limitation is that the corresponding upper and lower voices
share the same deactivation button, so the only can be activated/deactivated
both at the same time.
Application for voice tuning:
Apart from polyphony / custom synth application the muting/deactivation of
voices also can be used for tuning purpose, so for tuning individual voices by
listening to them alone and comparing them to other ones (also switch unisono
mode for this). Read more about it in the comprehensive tuning tutorial section
of the manual.
For normal application it's however still recommended to use the „all voices
active“ mode combined with the standard 6/8/12 polyphony switch in the levers
section, since detunings have been adjusted to work together.
Page 51

Grouped multi functional knobs with display:
The next group of four buttons with number display in between are mainly
dedicated to the Arpeggiator/MIDI-Processor which will be described in an
extensive separate section. They have several functions, depending on the
state. The first two knobs also serve as control for the velocity amount, and in
delayed LFO mode („Lfo Phase:PW-FILT“ blue) also to control the delay and
rising time. Read more about this feature in the LFO section. The reason for
this packing is that the new Arpeggiator/MIDI-Processor was implemented
additionally in OP-X PRO-II without adding any further controls to keep the
patches fully compatible to the standard version.
Dependent on the current state the display will show different values which
represent a certain mode or state. This allows to handle the multitude of
packed features in a very fast and intuitive way.
A brief overlook including the functions not related to the Arpeggiator before
we will get into it deeper in the extra Arpeggiator/MIDI-Processor section:
Velo: Velocity Amount:
With the two knobs joined with lines to „Velo“ the velocity amount to the filter
envelope can be controlled in detail. These knobs only have an effect if the
VEL button above is activated and velocity is available. In running arpeggio
mode velocity is not available. Then these two knobs will receive other
functions, dependent on the current mode (see next page).
Left knob: Floor
Sets the lowest point of velocity - it's the filter envelope (=cutoff) setting if
velocity is zero.
2nd function: Arpeggio mode in double/chord arpeggio mode
3rd function: LFO delay in LFO delay mode (Lfo Phase: PW-FILT blue)
Right knob: Ceil.
(Ceiling) This sets the maximum influence position of the velocity towards the
filter envelope.
2nd function: Arpeggio speed in double/chord arpeggio mode
3rd function: LFO rise time in LFO delay mode (Lfo Phase: PW-FILT blue)
Page 52

Arpeggiator / MIDI-Processor
Exept for the „foreign“ functions of the two knobs on the left of the display for
velocity control (see above) this group of four knobs with accompanying
display is dedicated to control the Arpeggiator/MIDI-Processor.
This processor has been completely re-programmed for OP-X PRO-II and was
„packed“ into the synth without adding or changing any controls to stay fully
compatible patch-wise to former versions.
This is also the reason why there are some double functions. But you will see
that you never have to think about it since the functions will change
automatically dependent on the current state. The added number display and
double inscriptions make the handling as comfortable and fast as it wouldn't
even be with more controls.
That's even more amazing if you have a look at the plentora of features
packed into this little machine:
Arpeggio modes:
Notes sorted by input order, notes sorted by pitch, random mode, available
directions: up, down, up & down, range 1 to 4 octaves, stepped mode, repeat
MIDI-Processor functions:
Manual chord hold, preset chords, double mode, sequencer
This allows to imitate almoust all important arpeggiators of the old days,
including the respected jupiter 8 one (which did not sort the notes by pitch but
by their input order and did not compress them to one octave) as well as some
other nice features like chord memory (ob-x), on the fly note sequencer
(synthex, ems synthi a) and double mode (two notes played at the same time,
e.g. crumar bit99) for fat notes without unisono.
In good old sonicprojects tradition we did not stop here. Apart from the
possibility to hold and play a chord with one key we implemented a bunch of
pre-saved preset cords, the ones used most of the time anyway, with the
possibility to arpeggiate them as well. You'll also find again the old OP-X step
sequencer, with steps variable from 1 to 8 and two repeated modes, and with
switchable hold mode. All modes can be changed while playing on the fly
without interruption. This modes morphing even can be automated.
Another handy feature ist the ability to activate an deactivate arpeggio hold
remotely controlled by the damper pedal. See next page, bottom.
Page 53

Arpeggiator/MIDI-Processor introduction: see previous page
So let's have a brief look first at the involved buttons and knobs before we get
into the description af all the available modes:
ARP ON
This button has several functions, dependent on the environment:
Start arpeggio, hold, record, play
1. Switch on the Arpeggiator/MIDI-Processor.
What happens then depends on the current mode (set by right mode knob).
For chord hold and sequencer this also means: record ready
2. After a second click the knob's led turns to deep red.
In non-chord arpeggio mode this causes the arpeggio to hold. The hold also
can be activated remotely controlled with the damper pedal, by depressing and
again releasing it within less than half a second. Read more on page 52.
In the „Manual Chord“ and „Step Sequencer“ mode this state will fix the chord
or play back the recorded sequence.
In the „Double“ and „Preset Chord“ mode this state causes the chord or double
note to arpeggiate. The arpeggiator controls for mode and speed then are the
two knobs on the left side since the mode has to be kept and the speed knob
on the right side is used to change the preset chord. Hold can be activated
then with the „Hold VEL“ button:
You can activate and deactivate hold in both normal and chord or double
arpeggio mode all remotely-controlled by quickly pressing and again releasing
the damper pedal within less than half a second. This still allows for normal
pedal use without (de)activating hold at the same time.
Page 54

After describing the buttons let's have a look at the dedicated knobs. The
center of all and main knob is the „Arpeg Mode“ knob.
It sets the main mode which causes all other controls to change their function
accordingly, dependent on the chosen mode:
Arpeg Mode:
This one is the only uni-functional of the four. It lets you choose one of the 32
Arpeggiator/MIDI-Processor modes (only active when the ARP ON knob is
switched on). There are two groups of 16 presets, the first group indicated with
a green point. Have a look at the modes list in this manual to learn which
number belongs to which mode.
Chrd / Speed:
In normal arpeggio mode this knob sets the arpeggio speed. In synced-tosongtempo mode (with ARP button below „Sync to Song Tempo“ active) in will
only react in big steps, dependent on the song tempo. In the Preset Chord
mode (.2), this knob serves for choosing one of 16 preset chords. Have a look
at the chords list in this manual. If the chord is being arpeggiated (second click
on „ARP ON“), the speed knob (as well as the mode knob) is the one on the
left side instead (Stp/Speed). Hold is then „Hold VEL“ (see page 26).
Number display:
Shows the number of the chosen mode. Click on the „Arpeg Mode“ knob to
see the actual name and function of the preset. This display will also show the
preset number, mode number or steps number of other knobs while clicking on
them.
Right side: These two knobs normally are used for velocity amount control. In
apreggiated double or chord mode and hold steps mode they change their
dedication to:
Mode (Velo above)
In arpeggiated Double- and Preset-chord mode (modes .1 and .2 with ARP ON
button pushed to hold/red state) this knob lets you choose the arpeggio mode.
The current mode number is shown in the number display when you click on
the knob. Have a look at the modes list for more details.
Stp / SPEED
In arpeggiated Double- and Preset-chord mode (modes .1 and .2 with ARP ON
button pushed to hold/red state) this knob regulates the arpeggio speed. In the
main modes 1 - 3 (Steps), this knob is used to set the amount of steps (which
are only active in hold mode). The number display will show the number of
steps while klicking on the knob then.
Page 55

So, after introducing all the involved controls let's finally describe all the modes
in detail, how they work and how to use them:
The main modes:
(switched by „Arpeg Mode“)
First of all the definition of a few terms appearing in all arpeggio modes:
Order:
The notes are played back in the same order as they were played in, like in the
old jupiter 8 arpeggiator, leaving them in their original octave. Suitable for
interesting, experimental and wild arpeggios.
Pitch:
The notes are auto-sorted by note pitch before they are arpeggiated, the
common way of arpeggiating. Suitable for „Chopin-Style“ chord arpeggios or
contolled electronic (double-note) arpeggios.
Rand:
Random play, which means the notes are sorted with a random function. This
can be quite inspiring and animated. The jupiter had this feature too.
Up:
The notes are arpeggiated upwards, octaves change upwards too. In order
mode it's simply the original order.
Down:
The notes are arpeggiated downwards, octaves change downwards too,
beginning from the highest point back to the base. In order mode the playing
order is changing its direction.
Up Down:
Both combined, take the place of each others sequentially. The notes at the
changing direction points are not repeated. Think of Chopin's piano etudes,
played perfectly, without any ecercise.
Page 56

So now finally the listing and explanation of the main modes:
The main modes:
(switched by „Arpeg Mode“)
There are two banks of 16 presets, the first bank marked with a green point in
front of the number.
.1: Double
Causes one key to play two notes at the same time with the same pich. The
additional note is distributed to the next free voice, in circular mode, as usual.
Since no voice sounds exactly the same this makes the tone fat and lively. You
can fatten in up by the „Spread“ knob which will cause a wider difference of the
pitch between the two notes. Polyphony is halved of course, so it's useful to
switch to 12-voice mode to still have a six-voice polyphony. The double mode
can be arpeggiated by clicking a second time on „ARP ON“ (red state). The
mode and speed controls are the ones on the left then, hold is „Hold VEL“.
.2: Preset Chord
One played key causes a pre-saved interval or chord being played. There are
16 presets available which can be chosen with the „Chrd / Speed“ knob. The
chord can be arpeggiated by clicking on the „ARP ON“ button a second time
which will turn the led deep red. The controls for the arpeggio mode and
speed are to find now on the left. The arpeggio can be held with the „Hold
VEL“ button instead of the normal way, or with the damper pedal.
The chord pesets (chosen by „Chrd“ knob):
.1: Oct : one added lower octave
.2: Oct double: the same, but doubled
.3: Oct Lower Upper: a lower plus an upper octave added
.4: Oct Unison: the same, but triple, using all six voices in 6-voice mode
.5: Fourth: a fourth added
.6: Fourth Double: the same but doubled
.7: Fourth Unison: the same, but triple, using all six voices in 6-voice mode
.8: Fourth Oct: a fourth plus and octave added
.9: Fifth: a fifth added
.10: Fifth Double: the same but doubled
.11: Fifth Unison: the same, but triple, using all six voices in 6-voice mode
.12: Fifth Oct: a fifth plus and octave added
.13: Major Chord: a major triad added
.14: Minor Chord: a minor triad added
.15: Minor Seven: a minor triad with a small seventh added
.16: Penta Oct: four octaves added, two below and two above
Page 57

Arpeggiate Double and Preset Chord mode:
Click a second time on „ARP ON“ for this. The led will shine deep red now.
The controls for mode and speed are the two on the left side of the number
display now (because the regular ones have different funtions in these modes).
The button for holding the arpeggio is now „Hold VEL“ in the buttons row on
the left side of „ARP ON“. Alternatively you can also activate hold all remotely
controlled with the damper pedal, by quickly depressing and again releasing it
within less than half a second. Read more about it in the introduction.
The chord arpeggio modes:
The terms are the same as in normal (non-chord) arpeggio mode. The modes
have been reduced to the 16 most important ones that also make sense in
combination with chords. For details read the introduction of the arpeggiator
section. Remember the three terms concerning order of playing which are not
self declaring in any case:
Pitch:
The notes are automatically sorted by note pitch before being played
Order:
The notes are played back in the same order as they were played in
Rand:
Random play, which means the notes are sorted with a random function
The modes:
.1: Pitch 1 Oct Up
.2: Pitch 2 Oct Up
.3: Pitch 3 Oct Up
.4: Pitch 3 Oct Down
.5: Pitch 2 Oct Down
.6: Pitch 1 Oct Down
.7: Pitch 1 Oct Up Down
.8: Pitch 2 Oct Up Down
.9: Pitch 3 Oct Up Down
.10: Order 1 Oct Up
.11: Order 2 Oct Up
.12: Order 2 Oct Down
.13: Order 2 Oct Up Down
.14: Order 3 Oct Up Down
.15: Rand 2 Oct Up Down
.16: Rand 1 Oct Up
The directions (up, down, up down) always lead to the base. Up means the
notes are played upwards beginning from the origin. Down means they are
played downwards beginning at the highest octave towards the origin. In order
mode, down direction causes the octave internal playing order being inverted.
Page 58

.3: Manual Chord
This mode allows to temporary hold a chord and play it with a single key. This
feature can be found in some vintage polyphonic analog synth. In the OB-X
this feature was hidden and handled with the hold and reset buttons. As in the
original, the chord will get lost after changing the mode or switching the plugin
off. It's a realtime feature which can't be saved within a preset. Use the chord
presets for this.
How to hold an play back a chord:
Record chord:
The normal active state (led orange) of the „ARP ON“ button means record
ready. Be sure you have not entered any notes already after switching into the
step sequencer mode. Otherwise release the button completely (led dark) and
set it in record mode again. Play and hold a chord on the keyboard. The
reference point is always the middle c (C3, Note 60 or C'). This means: What
will be saved is the relative distance to this reference note. If you need both
hands for your chord you can also hold it with the damper pedal.
While holding the chord (manually or with pedal) click a second time on the
„ARP ON“ button which causes the led to shine deep red. The chord is fixed
now and is ready to be played. You can release the keys or the pedal now.
When you hit a single key now the entered notes will be played together with
the played note, causing a chord. Of course this will reduce polyphony
accordingly. So it can be helpful to switch to 12-voice mode (next to the
levers). Of course you can play the chords also polyhonic, however voices will
be used up quite fastly like that. Nevertheless this can lead to extremely rich
and fat chords which would not be possible with normal playing.
If you want to clear the current chord just release the „ARP ON“ button, set it
active again (orange) and enter a new chord. If nothing is entered then the
saved chord remains until mode is switched. If some notes of the old chord
should remain nevertheless then do the same and additionaly switch the mode
forward and back again. If you have used preset chords before the last used
preset chord will remain in the chord memory. That's because the two modes
share the temporary chord memory.
Manual chords can't be permanently saved or arpeggiated. Use the preset
chords (mode .2) for this.
Page 59

.4: Record
A nice little feature which can be quite funny. It's a very simple note sequencer
with 8 steps at most. You can record a short sequence of notes, play them
back then with variable speed and edit it on the fly using the keyboard by just
entering new notes. It's similar to the former OP-X sequencer, but playback will
only start after activating it. This makes it easier to enter the perfect line.
Recording, playing back and editing work like this:
Record notes:
The normal active state (led orange) of the „ARP ON“ button means record
ready. Be sure you have not entered any notes already after switching into the
step sequencer mode. Otherwise release the button completely (led dark) and
set it in record mode again. Play a short line of 8 notes at most (but it can be
less), one note after each other (chords are not supported). The speed of
entering does not matter, each new note will simply be saved within the next
memory place. If you made a mistake, just release the „ARP ON“ knob once
more completely (led dark) and set it to record active again.
Play back and edit sequence:
If you are pleased with your entered line then click a second time on „ARP ON“
which will cause the led to shine deep red. The line will be repeadedly played
back now. You can set the playback speed with the „Chrd / SPEED“ knob. You
can edit the sequence on the fly by just entering new notes on the keyboard.
Editing work in circular mode, which means that every newly entered note
causes the next step to be ready for overwriting. The lenght of the sequence
will stay fixed to the lenght of initial entering. Alternatively, and that's very
handy, you can start and stop the playback by quickly depressing and
releasing the damper pedal within less than 1/2 seconds.
Of course you can synchronize the speed to the song tempo, just activate the
„ARP“ button below „Sync to Song Tempo“ for this (III additionally for triolic
mode). The speed knob will react now in big steps, dependent on the song
tempo.
Now the „normal“ (exept mode 1, 2 and 3) arpeggio modes will follow. They all
can be synchronized to song tempo as well (read section right above):
.5: Pitch 4 Oct Down
Arpeggiate, notes sorted by pitch, range 4 octaves, direction down
.6: Pitch 3 Oct Down
Arpeggiate, notes sorted by pitch, range 3 octaves, direction down
.7: Pitch 2 Oct Down
Arpeggiate, notes sorted by pitch, range 2 octaves, direction down
Page 60

.8: Pitch 1 Oct Down
Arpeggiate, notes sorted by pitch, range 1 octave, direction down
.9: Pitch 1 Oct Up Down
Arpeggiate, notes sorted by pitch, range 1 octaves, direction up & down
.10: Pitch 2 Oct Up Down
Arpeggiate, notes sorted by pitch, range 2 octaves, direction up & down
.11: Pitch 3 Oct Up Down
Arpeggiate, notes sorted by pitch, range 3 octaves, direction up & down
.12: Pitch 4 Oct Up Down
Arpeggiate, notes sorted by pitch, range 4 octaves, direction up & down
.13: Pitch 4 Oct Up
Arpeggiate, notes sorted by pitch, range 4 octaves, direction up
.14: Pitch 3 Oct Up
Arpeggiate, notes sorted by pitch, range 3 octaves, direction up
.15: Pitch 2 Oct Up
Arpeggiate, notes sorted by pitch, range 2 octaves, direction up
.16: Pitch 1 Oct Up
Arpeggiate, notes sorted by pitch, range 1 octave, direction up
Second bank (without green point):
1: Order 4 Oct Down
Arpeggiate, notes sorted by input order, range 4 octaves, direction down
2: Order 3 Oct Down
Arpeggiate, notes sorted by input order, range 3 octaves, direction down
3: Order 2 Oct Down
Arpeggiate, notes sorted by input order, range 2 octaves, direction down
One octave down was left out because it only will cause the playing order
being inverted which is rather irritating than being useful.
4: Order 1 Oct Up Down
Arpeggiate, notes sorted by input order, range 1 octave, direction up & down
5: Order 2 Oct Up Down
Arpeggiate, notes sorted by input order, range 2 octaves, direction up & down
Page 61

6: Order 3 Oct Up Down
Arpeggiate, notes sorted by input order, range 3 octaves, direction up & down
7: Order 4 Oct Up Down
Arpeggiate, notes sorted by input order, range 4 octaves, direction up & down
8: Order 4 Oct Up
Arpeggiate, notes sorted by input order, range 4 octaves, direction up
9: Order 3 Oct Up
Arpeggiate, notes sorted by input order, range 3 octaves, direction up
10: Order 2 Oct Up
Arpeggiate, notes sorted by input order, range 2 octaves, direction up
11: Order 1 Oct Up
Arpeggiate, notes sorted by input order, range 1 octaves, direction up
Radom presets:
12: Rand 3 Oct Up Down
Arpeggiate, notes sorted by random function, range 3 octaves,
direction up & down
13: Rand 1 Oct Up
Arpeggiate, notes sorted by random function, range 1 octave,
direction up
Step modes:
These were overtaken from the former OP-X arpeggiator, but made easier
handlable with switchable hold, steps number range from 1 to 8 and optional
single or double note repreat for all step numbers. The stepped mode is only
active when hold is switched on („ARP ON“ red). The number of steps in hold
mode is limited then by the setting of the „Stp“ (Speed below) knob on the left
side of the number display. The current number of steps is showed in the
display while clicking on the „Stp“ knob.
Steps mode is similar to the step sequencer mode, but playback is always on.
Entered notes are written into the step sequencer's memory places in circular
mode (one step after another, returning to the first one after the last one). The
number of played back steps is being limited by the „Stp“ knob. Range is from
1 to 8. The sequencer's memory places are free by default, so they have to be
filled before the maximum number of steps is blayed back. If the number of
steps is being reduced, the upper notes wil be cropped (but they stay in the
memory). This steps mode e.g. can be interesting if you want to have a fixed
amount of used notes in an arpeggio to fit a specific metrum without risking to
leave the groove by playing too many notes in a chord. But it can also be
interesting for one-finger „free hand“ playing and interesting new lines.
Page 62

Now the three available step modes (be sure to read the introduction about the
step modes on the previous page):
14: Steps Rep 2
Steps mode (read introduction on prevoius page);
The steps are played back upwards and downwards repeatedly, plus the
steps at the extreme positions are repeated.
The steps mode is only active when hold is on („ARP ON“); The number of
steps can be set with the „Stp“ (Speed) button on the left
15: Steps Rep 1
Steps mode (read introduction on prevoius page);
The steps are played back upwards; the first step is being repeated;
(with „Stp“ set to 7 this is the original OP-X mode at maximum steps setting)
The steps mode is only active when hold is on („ARP ON“); The number of
steps can be set with the „Stp“ (Speed) button on the left
16: Steps
Steps mode (read introduction on prevoius page);
The steps are played back upwards;
This is the way the original OP-X arpeggiator used to work from steps 2 - 6;
(for step 7 take mode .15 with steps set to 7)
The steps mode is only active when hold is on („ARP ON“); The number of
steps can be set with the „Stp“ (Speed) button on the left
If hold is not active all three step modes will behave the same as mode 11
(Order 1 Oct up).
Final thoughts on the Arpeggiator/MIDI-Processor:
You will see once you have learned in which mode you find the controls for
what it's a breeze to use. The sequence of modes has been arranged to get as
smooth morphing between the modes as possible (that's why the octave range
is rising and falling rather than always beginning from one while switching
through the modes). Often used presets, first of all the double mode, are
placed at the extreme positions, so you can access them in any situation in a
very short time without precise tweaking (for Double mode: just turn the modes
knob fully left and activate „ARP ON“, then you're there already).
Also give polyphony a thought. In most cases there's no use to switch on more
voices than six, especially when the release phase is cropped anyway. for
some stuff however extended polyphony can be useful.
If you are in six-voice mode, you almoust have a six-step sequencer with
controls for each of the six steps. E.g. you can set then the filters individually in
detuned mode with the white trimpots on the left. Also experiment with
oscillator detuning, the „Spread“ function, the pan settings and the pan
modulation which can make your sequence pretty animated.
Page 63

P-Md
This knob replaces the X-Md knob of the OP-X which has moved into the
oscillators section. This knob allows you to modulate the voice pans of each
voice. In standard mode the modulation source is the sine wave of the main
LFO. If „Wheel LFO“ (see page 20) is activated the source is the wheel LFO
for independent treatment. Although all pans are modulated by the same LFO,
the effect is independend for each voice and is determined by its individual pan
setting. The pan will be modulated from the present pan setting to the opposite
pan side to the same maximum amount as the original side - like a mirror,
going through the 12 o'clock setting. So if the voice pan is set to 12 o'clock
itself the pan modulation will have no effect. If the pan is in the minimal or
maximum setting the modulation will have the maximum effect. The direction is
always determined by the „start“ position, so the modulation directions can be
opposite for each voice. This gives you tremendous possibilities that go
beyond the already great „fixed“ individual panning option. Examples:
1. All pans set to full left: this will result in a classic panning tremolo effect
2. Alternately left / right setting (the best not full) for each voice: this will result
in a lively and slightly moving stereo impression; this will even improve if some
pans are set to 12 o'clock or if each pan is slightly different.
Turning the P-Md knob from zero (manual and fixed panning) to right there will
be a point of „kicking in“ of the effect. From this point on the modulation depth
is increased. For „normal“ and manual pan setting this knob must be set to
zero. So set tis knob back to full zero for normal (manual) panning.
The voice pans:
This was a very popular feature in old analog synths. In contrast to many old
synths, the controls can be accessed on the surface and also can be stored
with the preset. The panpots can also be automated. In the original devices,
these pots sat on a board in the inside of the case. For non modulated manual
setting the P-Md knob on the left has to be set to zero (section see above).
The second bank voices (voices 7 to 12) share their output channels with the
corresponding voices of the first bank, so they also share the pan setting:
1 Pan setting for voice 1 and 7
2 Pan setting for voice 2 and 8
3 Pan setting for voice 3 and 9
4 Pan setting for voice 4 and 10
5 Pan setting for voice 5 and 11
6 Pan setting for voice 6 and 12
Page 64

One-click-calibration:
For immediate handling or checking out various pan settings on the fly, e.g.
during a running arpeggio, there's now the possibility to calibrate all six pan
controls by single mouseclicks on defined areas. Presets:
Mono
Click on „Voice“ to reset all pan controls to perfect mono. This is maybe the
most useful preset since setting all pans to mono one after another if needed
can be annoying.
Variable Stereo
Click on „Pans“ and drag the mouse vertically up or down to spread all controls
at the same time continuously to stereo, both directions allowed. This can be
useful to check out variable stereo with in a preset.
Preset 1: Standard Stereo
Click on „1“ to calibrate the controls to an often used stereo setting
Preset 2: All Pans Left
Click on „2“ to set all pans to full left. Can be useful in combination with
panning modulation to achieve a tremolo-like effect.
Preset 3: Experimental 1
Click on „3“ to calibrate the controls to this experimental setting
Preset 4: Experimental 2
Click on „4“ to calibrate the controls to this experimental setting
Preset 5: Left to right
Click on „5“. Lets arpeggios move from left to right in the stereo field
Preset 6: Alternating
Click on „6“. Lets arpeggios continuously travel between left and right
Despite this comfortable calibration options don't forget that not absolutely
symmetric setings as resulting by manual tweaking is still much more suitable
for lively and organic sounding patches. So don't just use these presets.
Page 65

The LEVERS section
The levers section contains several global controls, including keyboard
animation, polyphony setting, pitch and modulation levers with dedicated
controls, midi learn plus the octave setting.
Lets's check the available controls in this section:
POR
Portamento tuning trimpots
The OP-X does handle the portamento for each voice separatly (like in real
hardware). So the portamento times can be different for each voice. In old
analog hardware synths the prtamento times almoust always were differing
slightly which resulted in a rich and „smeary“ portamento sound especially in
stacked unison mode. While this effect is subtle when using short portamento
times (but nevertheless makes a huge difference) it gets very obvious when
the portamento time is increased. Some voices will „land“ earlier while others
follow a bit later. This was very typical for old OB synths and it's present too in
the OP-X since the internal structure is almoust the same.
In detuned mode (with activated Porta. DET button in the additional buttons
row) the voices' individual slightly different portamento times can be tuned with
these trimpots to fit your needs. Have a look at the „Tuning Trimpots“ section
in this manual for a short tuning tutorial.
As all other voice trimpots too, the POR trimpots now can be calibrated with a
single mouseclick:
Click on „R“:
The portamento times are tuned the same as in tuned mode (Porta DET not
active). This is almost equally tuned, but still with a slight offset.
Click on „P“: Resets the trimpots to the standard detuning.
Page 66

LEVERS
A speciality of old OB series synths was that they had two vertically working
levers instead of the popular wheels invented by moog. The modulation lever
is on the left side. In the originals it only worked downwise. In the OP-X, it can
be moved up- and downwise. Upwise, the modulation is inverted (hearable
only in a realtive time context). The pitch lever is on the right side. It reacts
vice versa than a popular wheel. Downwise movement highers pitch, upwise
movement lowers pich.
Lever automation:
The levers can be automated now in OP-X PRO-II Some hosts don't write
down the exact center value at the beginning which can cause the pitch being
very slightly detuned when reading automation before having moved the pitch
levers. This won't be audible in normal case, but if the pitch lever interval is
switched to a high value (e.g. 12) and Os2 is activated, you will notice it
because the beats between oscillator 1 and 2 will be slightly faster or slower
than they should be. So just move and release the pitch lever at the very
beginning of the automation track which will set the value to the correct center
point. Also avoid writing midi and automation at the same time because the
effects will be added then.
A
The blue square button next to „A“ activates MIDI learn mode. When it's active
(blue popup up) you can tweak a GUI control and a control on your hardware
control device to learn them to each other. The blue popup will disappear when
learn is completed. You can leave the learn mode without changing anything
by clicking a second time on the blue square button.
By clicking on „A“ (on the left) and holding it for 4 seconds until the square
button turns red for a second you can reset all controls to the default mapping.
Please read the chapter „MIDI Learn“ for details. MIDI learn also can be done
in the top bar (LEARN) with identical effect.
Page 67

Let's go to the lower button of the two, indicated with a number on the left:
Polyphony switch
With this button the standard polyphony (6) can be switched to eight (8) or
twelve (12) voices. This can be done on the fly while playing, even when the
arpeggiator is on.
The standard version only had 6 voices, a second bank of 6 voices has been
added now in PRO-II, which will be very welcome in several situations.
The second bank of six voices has the exactly same structure and default
detuning settings as the first bank, but all still with the much praised separate
voice design.This means you have actually twelve extremely complex separate
mono synths with separate signal path and slightly different sound, controlled
by the same global interface and patches memory unit.
Instead of spending each of the additional six voices own controls for detuning
which would have messed up the gui, had made the patches incompatible and
would have got too complicated to handle we decided to combine two
corresponding voices at the same time to one channel.
The LEDs of two corresponding voices are always placed one below the other
which makes the general oversight very easy. The two corresponding voices
share the same tuning trimpots and pan control. They also have the same
default detuning setting (if detuned).
Apart from being easier handlable this way there's a further advantage:
When polyphony is switched to twelve (12) the exact order and setting of
variable detunings while stepping through the voices does stay the same, it
simply will be repeated when you enter the second bank of voices, which will
leave the overall sound untouched, but, due to the doubled polyphony, without
note stealing. The eight (8) voice setting will activate the center voices 9 and
10 of the second bank instead of the first two. The reason for this is that this
doesn't lead to an odd repetition of voice settings 1 und 2 (which would be the
case otherwise because voices 1, 2 and 7, 8 share their tuning).
Further polyphony settings can be achieved by murting/deactivating voices.
Read more about it in the „Voice mute“ section of this manual.
Page 68

CPU-load:
Only switch on more than 6 voices when you really need it. CPU load will rise
with every additional voice used. Often, 8 voices will be a good compromise.
Some patches even live from voice stealing (e.g. Intro Squaremod Synthi) and
will get muddy with more than six voices activated.
Unisono:
Independent from the polyphony setting, unisono patches will always only use
the first six voices. There are two reasons for this:
1. Unisono patches with twelve (24 oscillators) voices playing at the same time
are too much of the good, they're simply too fat and can get muddy
2. Since the detunings of the second bank of voices can't be set independently
the additional voices would not be spread into empty sections, they would
simply be added to the corresponding voice causing unpleasant add ups or
clear outs. It would also be too complicated to keep the oversight over the
individual settings of twelve separate voices.
So with these small compromises you have the best of two worlds: a separate
voice design with detailed tuning features combined with extended polyphony
which does not mess up the gereral character and sound.
Voice allocation:
The voice allocation unit is working in circular mode, which means that for
every new note a new voice is triggered as it was the case in the OB series
too. Because no voice sounds exactly the same (even in tuned mode) this
results in a rich, lively and never stiff sound. The voice allocation is adapted on
the fly when additional voices of the second voice bank become active. The
notes will step through the voices beginning from the first voice of the upper
bank further on to the second bank after the last voice of the upper bank. You
only have to care about it when you want to tune individual voices. Have a look
at the comprehensive tuning tutorial in this manual for this.
Custom polyphony settings using voice mute:
Since the voice mute buttons now not only mute a voice (or better said: a voice
pair, namely the two belonging to the same channel) but also comletely
deactivate it, you can use the voice mute buttons to set up any custom
polyphony setting with any voices of choice you want to have involved. The
voice distributor will allocate incoming notes only to the currently active voices,
and still always in rotating mode, with the belonging cpu drop. Read more
about it in the „voice mute“ section of this manual.
Page 69

Os2
Oscillator 2 only. When switched on, the pitchwheel (or whatever it is called)
does change the pitch of oscillator 2 only. This is great for controlling sync or
fm sounds. Try the preset "SyncSolo" to explore this.
2-12
This button serves for setting the pitchwheel interval. PRO-II offers now a wide
range of possible intervals and further pitchwheel / modwheel functions. There
are two ways of switching the interval:
- clicking on the blue led button switches between the two standard modes 2
half tones and one octave. This can be done on the fly as usual.
- clicking in to the small number display just above the button and dragging the
mouse vertically up and down gives access to a wide range of other intervals,
interval combinations and modwheel functions. In live application you could
directly access dedicated modes by sending suitable CC values.
2 semitones up / dn 8 semitones up / dn 1 semitone down
1 semitone up / dn 9 semitones up / dn 1 octave down
2 semitones up / dn 10 semitones up /
dn
3 semitones up / dn 11 semitones up /
dn
4 semitones up / dn 2 octaves up / dn 2 semitones down
5 semitones up / dn 3 octaves up / dn 1 semitone up / dn
6 semitones up / dn 4 octaves up / dn 2 semitones up / dn
7 semitones up / dn 2 semitones down
1 semitione up
2 semitiones up
1 semitione up
1 octave down
2 semitiones up
1 semitone down
1 octave up
1 octave up
modwheel to filter
modwheel to filter
7 semitones up / dn
modwheel to filter
1 octave up / dn
modwheel to filter
2 dn / 1 up
modwheel to filter
1 dn / 2 up
modwheel to filter
1 oct dn / 2 st up
modwheel to filter
p-wheel dn to vib, 2
st up, mod to filter
1 oct dn, 1 st up,
mod 2 st up
1 st dn, 1 oct up,
mod 2 st up
1 octave up / dn
Oct.
Switches the octave. It will affect key tracking, so better use the octave transpose
function of your midi keyboard to achieve deeper ranges.
Page 70

Tuning Trimpots
This section will make you familiar with the handling of the added tuning
trimpots in OP-X PRO.
In real vintage voltage controlled synths similar tuning trimpots could be found
on the voice boards in the inside of the devices. They had to be tuned from
time to time by a service technician or the experienced musician. The goal of
this procedure was to make all voices sound identical. From the todays' point
of view the slight imperfectnesses and differences in sound between the
voices, caused by device tolerances and aging processes, gave those old
analog synths the organic, rich and lively character that got lost a bit in the
newer synths with digitally controlled voltages.
These fixed slight differences were furthermore overlapped by the warming up
drift which got normally stable after some minutes.
For some sounds these slight detunings were great, especially for pads and
slow sweeps, but also for stacked solo sounds which sound way more rich and
smooth if not only the oscillators but also the filters, the envelopes and the
portamento times are spread a bit - you can try this out in the OP-X PRO to
hear the difference. For other sounds however these detunings were annoying,
especially for fm (which needs absolutely equal tuning for chromatic playing)
and snappy brass sounds which need precise settings. So in the past there
was no other way than changing the synth for those different tonal characters
since a full tuning was a very time intensive process.
In the OP-X PRO you have all this too, but with total immediate control, one
fingertip tuning and saving option. So every preset can sound like a different
synth in fact, with variable age or service state.
The consequence of this is that OP-X PRO does really feel and sound like real
hardware and can also be tuned like the old glorious analog synths.
The detuning options are split up into four independent sections that can be
individually tuned or detuned: oscillators (common for osc1 and osc2), filters
(cutoff), filter envelopes (decay and release times) and portamento times.
Each of these sections can be individually tuned or detuned, either just on/off,
or now too continuously to achieve any state between tuned and detuned by
clicking into the text labels of the dedicated buttons and dragging the mouse
vertically. All this can be done in the MANUAL section (OSC/FILT/ENV) and
the additional buttons section (Porta. DET). In detuned mode the tuning is
represented by the settings of the dedicated trimpots (one per voice channel),
in tuned mode these have no effect any more. It's important to know that the
standard 12 o'clock setting of the trimpots means not tuned at all - this setting
represents the standard detuning implemented by Sonicprojects.
Page 71

In the OP-X PRO you have now the possibility to alter these detunings to your
liking. If you e.g. feel that the filter of one voice opens a bit to high for your
taste you can tweak it down a bit. The detuning settings will be saved with the
current patch and have no global effect. That means every patch can have its
own individual complex detuning setting.
The buttons to switch the sections from tuned to detuned mode:
Oscillators, filters and filter envelopes:
In released mode the sections are in detuned mode, in pushed mode (led
shining) the sections are tuned and will override the trimpot settings
Portamento times:
This button does react vice versa: in pushed mode the portamento times are
detuned (trimpots setting), in released mode the times are tuned and will
override the trimpot settings.
In pushed (=detuned) mode you will get that famous smeary portamento
sound from the old days which gives a special depth.
Continuous detunig:
There's now too the possibility to seamlessly choose any state of detuning
between completely detuned and tuned for each of the four sections
individually. This can be done by clicking into the text labels just above the
involved button and drag the mouse vertically up or down. A blue popping up
display will show the current value. OSC, FILT and ENV share a common
three value display while „Porta DET“ has a separate display in the filters
section (which is also used to show oscillators and noise levels):
Page 72

Tuning Tutorial
The following section will get you acquaint with the tuning procedure for each
of the four sections. In fact a full tuning is not necessary in the OP-X PRO
since you can tune the sections by a fingertip with the above described buttons
or the new quick-calibration. But it will help you to understand the functionality
of the trimpots so that you can make use of them when you need to.
Filter trimpots:
Most important and probably used sometimes for immediate tweaking or
experimental sequencer lines. In monophonic mode (only one voice active) the
trimpots also can be used for very detailed cutoff control.
Env trimpots:
Probably not used most of the time, but very useful if one voice sweeps down
a bit too slow for your taste in a dedicated patch.
Portamento trimpots:
Only for real cracks that want to copy their hardware devices 1:1.
All three trimpot sections offer now one-click quick calibration, which allows to
set all voice trimpots to equal tuned mode or again back to the standard
detuning (which is 12 o'clock for all trimpots).
Quick-calibrate the filters:
Calibrate to equally tuned: Click into the area on the right of the trimpots.
Reset to standard detuning: Click into the area on the left of the trimpots.
Quick-calibrate the filter envelopes:
Click on „C“: Calibrates all „DEC“ trimpots to equal times (same as tuned)
Click on „D“ to reset all „DEC“ trimpots again to the standard detuning.
The same for REL with „L“ and „C“:
Quick-calibrate the portamento times:
Smililar: „R“ tuned, „P“ back to the standard detuning.Click on „R“.
Page 73

Oscillators tuning
There are no trimpots to tune the oscillators. The reason for this is that the
detuning can be controlled continously by the spread knob which is also active
in polyphonic mode.
So there are four choices actually:
1. OSC tune button released, spread set to zero. In this state the OP-X sounds
like a hardware device after switching on before the autotune process. Can be
great for very dirty sounds.
2. OSC tune button pushed, spread set to zero. This is the fully tuned mode,
good for polyphonic sounds that should be purely tempered.
3. OSC tune button pushed, spread set to a variable amount. In this setting the
spread knob gives you continuous control from fully tuned (zero) to detuned.
You can make polyphonic sounds slightly unpure like this and fatten up
stacked unisono sounds.
4. Last but not least you can even mix spread and button detune with not
always predictable result.
A further thought went to the relative detunings between oscillator 1 and 2 for
each voice. The „normal“ way to handle this is the OSC2 Detune (OSc2 Det.)
knob in the CONTROL section.
The detuning of oscillator 2 will produce beats with increasing frequency from
zero to max position that will fatten up the sound and make it lively.
While in software synths the zero setting really allows absolutely equal tuning
this was almoust impossible in real hardware synths. There were always slow
beats remaining even in the „equally tuned“ position, caused by temperature
drifts and the fact that no voice did have the exactly same zero point.
If you want to have back this in the software OP-X PRO you have to turn the
white trimpot below the osc2 det knob to max position. In this setting there will
be left very slow beats even if the osc2 det knob is set to zero. The frequency
of these beats also are a bit different from voice to voice, just like in a real
hardware device. It has to be mentioned that in absolutely equally tuned mode
(trimpot and osc2 det det to zero) there nevertheless will be different relative
phase settings between osc1 and 2 for each voice which are accidental and
will have an influence on sound. For asolutely even phase equal tuning you
have to depress the „SYNC“ button in the oscillators section additionally.
Page 74

Filters tuning
Slightly different cutoff settings for each voice can result in a more lively and
rich sound for both pads and stacked unisono sounds. In released FILT tune
button mode, the filter settings of the OP-X PRO vary slightly from voice to
voice by default. This standard detuning corresponds to the 12 o'clock setting
of the FILT trimpots. So 12 o'clock setting does not mean tuned.
To hear the filter settings of each voice set the resonance to a high level and
reduce the cutoff to about 13 o'clock. You will hear the filter resonance „sing“
now, and stepping through the voices (playing repeated notes) will result in a
little „melody“. With self oscillation switched on you will hear it the best. Which
voice is presently playing you can see looking at the voice leds. The trimpots
correspond to voices one to six from left to right in the upper bank and at the
same time to voices seven to twelve in the lower bank. So you do your settings
always on a six voice base which will repeat itself in the lower bank of voices
which can be activated/added on demand for extended polyphony. Tweak the
trimpots on the fly to change the „melody“ or stop repeating notes and hold
one note and then tweak the dedicated trimpot.
If you want to know how much the detuned mode differs from the tuned one
for each voice you just have to push and release again the FILT tune button
while holding a note. Switching there and back from detuned to tuned mode
you can alter the voice's trimpot until the tuning is tuned and detuned mode is
equal. Then you can see the offset difference.
This can be done even more comfortably without stepping through the voices
and stopping when you activate the unisono mode (which will play all voices at
the same time) and then mute all voices exept the one you want to tune.
If you want to act as a service technician of the old analog days then take the
challenge to tune all filters from voice one to six like this. Once tuned you can
set up your own individual filters detuning. Don't forget to save it with the
current ptach since this won't have a global effect.
If you want to exactly copy the sound of your old six voice hardware synth (e.g.
XPander or six voice OB-X / OB-Xa / Prophet 5 etc.) then you simply have to
match the settings from voice to voice from the hardware device to the OP-X
PRO. So you will have to set your hardware synth to the same resonance and
cutoff setting as the OP-X before tweaking the trimpots of the OP-X. You can
save then the patch as a root patch for a dedicated synth sound. It's all up to
your phantasy in fact.
After successful tuning the trimpots will look like this:
Page 75

Envelopes tuning
Slightly different decay and release times in the filter envelopes of each voice
can give long downsweeps a more organic and lively character. Unisono
downsweeps with detuned times are broader, fatter and richer as it would be
with absolutely equal times. These slight detunings were very typical for old
polyphonic analog synths and can be heard going on in in many famous
sounds.
However there are sounds where these differences are unwished or even
disturbing - e.g. brass. So the detunings can be switched off by the touch of a
button (ENV in the MANUAL section).
The OP-X PRO furthermore lets you alter the implemented standard detuning
to your liking - should this be to copy a particular sound in every detail or to
copy the behaviour of an existing real analog synth. The standard detuning
corresponds to the 12 o'clock setting of the ENV trimpots, again on a six voice
base which repeats itself in the lower bank of voices. So 12 o'clock setting
means not tuned. The trimpots setting will only have an effect when the ENV
tune button is released.
The meaning of the abbreviations:
DEC: Decay - tunes the decay time of the voice's filter envelope
REL: Release - tunes the release time of the voice's filter envelope
If you want to tune the envelopes you do it the best always comparing one
envelope to a reference one. First release the ENV tune button in the
MANUAL section to get in detuned mode. Switch to unisono mode then and
mute all voices exept your chosen reference voice and the one you want to
compare to it. Set the resonance to a high level, set cutoff to zero and env
amount to max. In the envelopes section set the filter envelope attack and
sustain to zero, the amp envelope attack to zero too and the sustain and decay
to max. If you want to tune the release times you also have to set the amp
release to max. Then you can e.g. take decay 1 as a reference point and
compare a chosen voice to it. Then tweak the decay or release trimpot of the
voice you want to tune. You will clearly hear when the two voices close in the
same speed. The tuning is always done on a six voice base which will repeat
itself in the lower bank of voices.
After full tuning procedure your trimpots will look like this:
Page 76

Portamento tuning
Although it was not an intention actually the portamento times of old voltage
controlled analog synths always did differ a bit from voice to voice. This results
in kind of a „smeary“ glide sound in stacked unisono patches which is very
charming and was very typical. Using extremely long portamento times this
also had an effect in polyphonic sweeps over several octaves - some voices
did „land“ earlier and others „went home“ later - also very typical.
You can activate this effect with the „Porta. DET“ button in the additional
buttons row. In released mode the portamento times of all voices are equally
tuned. If the button is pushed the portamento times differ a bit from voice to
voice - just as it is in the real world. This standard detuning setting is
represented by the 12 o'clock setting of the POR tune trimpots - so 12 o'clock
means not tuned.
The trimpots allow you to alter these times to your liking - may it be to copy
your favourite sound or an existing hardware synth in all its individual
behaviour.
In most cases however the standard setting will be perfectly usable since it's
adjusted to copy some well known sounds.
If you nevertheless really want to tune the portamento times by yourself you do
this the best again in unisono mode always comparing two voices to each
other (one as reference point). If the two times are equal the glide won't
“smear” any more.
To choose the right reference point it might help to know how the trimpots
would look if they were equally tuned to the tuned mode:
So it's recommended to take voice 5 as reference point since this one is as
well as not detuned. This will leave enough action headroom for tweaking the
trimpots. Remember that the tuning is always done on a six voice base which
will repeat itself in the lower bank of voices which only will get involved when
extended polyphony is switched on.
Final note:
If you should have missed to read the introduction of this tuning tutorial or the
individual sections of the trimpot groups in this manual it may be mentioned
once more at this place that the tuning trimpots too can be calibrated by single
mouseclicks now. Read more in the dedicated sections.
Page 77

CREATE YOUR OWN SOUNDS AND BANKS
The new patch browser of OP-X PRO-II now makes it very easy to create and
save own new sounds, and collect them into new custom banks which you
may use e.g. as custom soundset for your live performances, so that you just
have to increase the program number by one step to have ready the sound for
the next song or the next playing part.
Of course you can still do this as you're used to with your vst host, but you will
quickly see that it's much more comfortable to do with the integrated patch
browser, since it offers direct one-click access to all needed file operations,
easy patch-renaming (some vst hosts can't do this at all), and loads and saves
all presets and banks to the same central location by default, which means you
don't have to browse around to find your banks and presets, they're always
directly accessible, and you don't need to care about the path when saving a
preset on the fly since it will be saved to this central location where you'll also
be able to find and load it again anytime. The default path only will be changed
when you browse for files elsewhere (so change the path), e.g. when you've
created own sub-folders within the root one (which is allowed). Then the files
will be loaded to and saved from the last used location. But the default path will
be re-set when the plugin is closed and launched again. Read more about the
patch browser in the dedicated section (Top Bar -> Patch Browser).
How to create own new banks of selected or edited presets:
1. Save single presets
First of all you have to save the single presets you want to put into the new
bank, which can be unedited factory presets, or edited ones / own new
creations. If you've created a new preset / edited a one then it's highly
recommended to give it a new unique name in the text field for easy recall
before you save it. You may deactivate „always on top“ for the plugin window if
your sequencer reacts to character shortcuts in writing mode. The file name by
default will have the plugin name prefix followed by the preset name which
allows for easy and fast saving without the need to edit file names first. This is
allowed of course, but be aware that the file name can be different than the
finally showed preset name. So it's recommended to just click PRESET:SAVE
and ok, which is very fast and easy.
2. Load the empty bank and load the single presets into it
There's a bank called „Empty“ which is dedicated for creating own new banks.
All locations are labeled „empty“ with all controls set to produce no sound. Now
load the before saved presets in any order you like into the preset locations of
the new bank, by before selecting the location to load to (using << >> or scroll
list), and load a preset of choice using PRESET:LOAD. Repeat this step for
each preset you want to load into the bank.
3. Save the bank with a new custom name. Use BANK:SAVE for this. You can
leave, edit or remove the default prefix and give the bank a suitable name.
Page 78

TIPS AND TRICKS
Some collected experience based tips and tricks that we'd like to share to help
you to make the best possible use of the synth:
Fine tuning of button parameters
While many button based parameters are only two state on the gui, they are in
fact continuous inside the engine. This allows to fine tune them using vst
automation or midi cc and you can also save this setting with the preset. Some
selected parameters also allow for fine tuning directly on the GUI by clicking
into the white text label just above the button and drag the mouse vertically up
or dow. A small popup display will indicate the current value ranging from 0 to
127 then. This can be done with: All detuning buttons (OSC/FILT/ENV/Porta
DET), main oscillator and noise levels (OSC1 ON, OSC2 FULL, NOISE FULL).
This e.g. allows for continuous mixing of the oscillators and noise to the filter
instead of just off/half/full. If you e.g. only want to have a tad bit of noise then
deactivate NOISE HALF, click into the FULL label of the noise full button and
drag the mouse vertically up until it fits. The knob state on the gui will only
change when the fifty percent amount is surpassed. This of course also allows
continous automation or cc control of a two-state parameter.
Using ring modulation for more presence and dirt
Apart from the „normal“ application the ring modulation feature can be used to
give a sound just a tad bit more presence and dirt. Just set the x-mod amout
trimpot to its minimum level (or a very small amount) and activate ring
modulation. Carefully increase the amount for a little bit more effect (but still
just a tad bit). Apart from the multiple detuning features this is another tool for
subtle manipulation of the tone.
Explore the additional banks
Although the default factory bank is a collection of some of the best and most
useful sounds from all categories, carefully selected in a time consuming
selection process, it's highly recommended to take the time to check out too
the additional banks which are delivered with the synth and can be loaded with
BANK:LOAD. OP-X PRO is able to produce an incredible wide palette of
sounds, probably more than you would suppose. It can sound like a Jupiter 8,
Prophet 5, Synthex, SH-2000 - just check the dedicated banks. It can sound
big and powerful, but also smooth and even innocent. Check the „Famous“
bank if you are out for all those famous 80ies sounds. Also check out the
factory banks of the smaller brothers OP-X and OP-X PLAYER, as well as the
V-Machine bank, which will immediatly turn OP-X PRO into these synths or
sound generators, with 100% identical sound (in the V-Machine banks we even
did recreate the effects settings 1:1). Also check the user area of OP-X PRO
then and when - we regularly release new sounds and banks for free download
here. You can put them manually or use either the file menu of your vst host
(recommended to keep the default path unchanged) or the one of OP-X PRO:
http://www.sonicprojects.ch/opxpro/userarea.html
Page 79

Using the filter trimpots for animated sequencer lines
Apart for subtle manipulation of polyphonic and stacked unisono sound, the
filter trimpots can be „abused“ to fine adjust the cutoff settings of each of the
involved steps individually while using the sequencer mode (arp on pushed to
red). Lower the main cutoff, rise resonance, release the „FILT“ button in the
tuner section and play around with the trimpots. You will be able to produce
nice animated sequencer lines with this trick.
Using the detuning features to fine tune sounds
The multiple detuning features are one of the most powerful tools of OP-X
PRO if you learn to use them. You won't find those in this form in another
synth. They allow the synth to sound lively, organic, natural and smooth - just
like a real analog polysynth. So it's highly recommended to take some time to
really get to know and understand those features. Once understood you will
begin to use them intuitively on the fly, and you will ask yourself how you could
live without them before.
We've set up a dedicated website that tries to describe the strenghts and use
of the separate voice design (SVD) with a lot of illustrating audio clips:
http://www.sonicprojects.ch/obx/separatevoicedesign.html
Remember the detuning features cover four parameter groups:
- oscillator frequencies
- filter cutoffs
- filter envelope times
- portamento times
A short summary (details on the website above) of possible situations where
sounds benefit from the separate voice design with its slighly different (and
tunable) settings for each of the six voices:
Sweeps:
Slighly different rising and falling times of the filter envelopes for each voice
make the sound more lively and organic.
Pads:
Slighly different cutoff settings and a tad bit detuned (using spread) oscillators
make the sound more analog, lively and characterful
Solos:
High resonant stacked solo sounds sound much more gentle and less stiff with
spreaded cutoffs. Otherwise they can sum up and sound stiff.
Portamento:
Detuned portamento times give that famous „smear“ known from old analog
unisono sounds and real analog feel in polyphonic use.
Page 80

Compatibility to the 6-voice OP-X PRO
The OP-X PRO-II is fully compatible to the 6-voice version which means that it
can load all of the former patches and the patches also will sound exactly the
same, due to the fact that the 12-voice version uses the same parameters
whose value ranges either were extended to map new funtions to the extended
values or can access new parameters in dedicated combinations (like in the
LFO). Once loaded you can treat your old sounds then with all the new
features, add effects, increase polyphony etc. But be aware that sounds are
only upwards compatible, not downwards.
The exeption is the arpeggiator whose settings does not translate to the same
behaviour because it has been completely rewritten for the 12-voice version.
However the „old“ modes are there as preset in the new one - it's the presets
16 (Steps) and 15 (Steps Rep 1) with activated hold. Have a look at the
arpeggiator section for more details. Effects parameters always are zero.
There's one parameter that has to be adjusted in some special situations: it's
the pitch bender (lever). The center point of it has been altered a tad bit in the
12-voice version for exact behaviour if the midi keyboard only sends 128
values (which actually have no exact center point). In normal situations this
can't be perceived at all, but if the pitch lever interval (2-12) is one octave
(imported from 6-voice version) and the „Os2“ (pitch lever to oscillator 2 only)
is on, the tiny detuning can be perceived because of slightly different beats
between oscillator 1 and 2 (example: „Floyd Signs Of Life Pad“). But it's easy
to fix: simply move the pich lever and let it return to the center position (either
directly on the GUI or with your midi keyboard) and re-save the patch. The
center pont will be correct now.
Program change
Because of the separate voice design the 12-voice OP-X PRO has to reinitialize 12 x 118 parameters (= 1416) on each patch change which can cause
a small audible „bump“ if the preset is switched manually. That's why we've
built in a sophisticated patch change smoother which does remove those
artefacts when the patch is changed by midi program change or with the patch
browser's incremenr/decrement buttons. The master volume and amp release
are fastly faded out and in again then on program change and active notes are
released. The program change itself is slightly delayed so that it's placed
exactly into the zero point. Program changes are completely smooth and
inaudible then which is great for live use. So it's highly recommended to switch
patches using MIDI program change or with the switch buttons.
Using the SPREAD knob
It's important to know that the spread knob also works in polyphonic mode. It
can be used then to give polyphonic patches a tad bit of unpure tuning for
analog feel. In double mode (more about it below) it can be used to detune the
single notes of the note pairs to each other which will result in a fat and lively
sound with added beats.
Page 81

Using the Double mode
The double mode is another way to make use of the extended 12-voice
polyphony. It's an extremely interesting feature to make sounds even fatter
and more lively as they already are while keeping at least six-voice polyphony.
Double mode will trigger two neighbouring voices on one midi note. Due to the
separate voice design the two notes will only sound (at least almoust) exactly
the same if all detunings are deactivated. So double mode does result in a
fattened up sound that even can be tweaked (more below).
To activate double mode just turn the arpeggiator mode knob (the one on the
right sind of the number display) fully anti-clockwise (number will be .1) and
activate „ARP ON“ (led orange).
We've chosen the extreme mode position that double mode can be accessed
fastly in any situation because it will be used or at least checked quite often
once you've discovered it.
If the „ARP ON“ button is pushed a second time the LED will turn into red and
the double notes are arpeggiated (speed and mode on the left now). Read
more about it in the dedicated section of this manual.
Once activated you can play now with the „SPREAD“ knob which - because it
works also in polyphonic mode - will detune the two notes to each other and
cause beats. The more the SPREAD knob is being turned clock-wise the fatter
the sound will get with increasing beats going on.
You will see that this feature easily can lead to obsession. Once discovered
you will probably want to fatten up every single sound with it. But after a while
you will see that it's not good in any situation - the fatter a sound is the more
difficult it is too to mix. A slim and simple sound can be way more effective in
many situations. So be careful with this feature and look at it as a further
option for situations or sounds that really profitate from it.
Remotely controlled arpeggio hold with the damper pedal:
There's quite a handy feature which allows for activating and deactivating
arpeggio hold remotely controlled with the damper pedal. Just quickly depress
and again release the damper pedal within less than half a second in arpeggio
mode. Then hold will be activated. If you're in normal arpeggio mode, the „ARP
ON“ button LED will turn deep red. If you're in preset chord or double arpeggio
mode, the „Hold/Vel“ will get active instead. You can deactivate hold again with
the same action. This also can be used to start and stop playback in record
mode. Due to the dependency on the operation speed you can use normal
pedal driven long release (sustain) without activating hold, both in non-hold
and hold mode. So you can e.g. add sustain by holding down the damper
pedal during a held arpeggio. This is a quite practical feature when your hands
are busy playing a cool arpeggio line and you want to „freeze“ (hold) it without
grabbing again the mouse or a controller button to activate hold. You'll going to
love this feature once you've learned how to use it. Promised!
Page 82

VST automation
Every single parameter of the OP-X PRO-II can be vst automated as you know
it from other vstis. How this is done depends on your vst sequencer. Example
Cubase: Push the write button on top of the vst plugin window (R), start the
sequencer and tweak the controls you want to automate. To read the written
data, go back to the zero position, push the read button on top (R) and start
the sequencer. The automated controls will move now according to the written
data which itself also can be edited.
While knob automation always works fine, some sequencers have problems
with button automation (not only with the OP-X). They only react to changes
and don't write down the buttons' beginning state. You can tweak the wiritten
curves manually to fix the problem, which could include setting the correct
starting states.
MIDI CC Implementation
The OP-X PRO-II lets you remotely control most parameters using Midi
Continuous Controller Data (Midi CC). This is normally handled by a midi
keyboard featuring built in knobs or by a separate controller device.
OP-X PRO-II is capable for parameter feedback to work together with endless
rotary controls and led-buttons. This allows for value-jump-free remote control
with the controller's knobs and buttons always representing the current
parameter state. For this the GUI controls not only receive controller data, but
also send controller data to the MIDI output of the plugin when they are moved
or when they change their state after a program change.
For parameter feedback to work you need to route back the MIDI output of
OP-X PRO-II to your controller device. One of many working methods is
creating a separate midi track for sending and receiving MIDI which are
configurated like this:
MIDI Track 1 (for receiving): Input = „All“, Output = „OP-X PRO-II“
MIDI Track 2 (for sending): Input = „OP-X PRO-II“, Output = „Controller
Device“
If you use USB for two-way MIDI connection to your controller device (which is
recommended) and generic drivers (no extra driver installed), „Controller
Devide“ e.g. could read „USB Audio Device [Emulated]“.
For fast handling and first trials, there's a default MIDI CC Implementation that
follows the popular standard Pro53 implementation, which is present as preset
in almost every midi keyboard or controller. Have a look at „MIDI CC Tables“
to learn which is the standard mapping. The standard mapping can be edited
to fit your environment using MIDI learn. When your controller device is able
for learning itself you can also learn it to the plugin and leave the standard
mapping untouched which may be better.
Page 83

MIDI Learn
You can override the standard mapping as listed in „MIDI CC Tables“ on
demand by learning the controls to different CCs. MIDI learn also can be
accessed with the two „LEARN“ buttons in the top bar.
Learn a control on OP-X PRO to an external controller:
1. Click on the blue button on next to „A“ in the levers section or the „LEA“
button in the top bar. A blue popup will appear reading „CC learn...“
2. Move the control on OP-X PRO that you want to learn to a new controller.
3. Move the controller on your controller device which you want to learn to it.
The popup menu will disappear now which means: learning successfully
completed. The control on OP-X PRO is now linked to the external controller.
It's not important if you tweak the external controller first and then the control
on the plugin or vice versa. The order does not depend. The learn unit simply
does expect one input from both sides to complete the learning.
You can also leave the learn mode without doing anything by clicking a second
time on the blue square button. The popup will disappear then without having
changed anything.
Rules: It's not possible to learn one external controller to several plugin
controls. This is because the feedback feature needs clear relations. If you
„steal“ the standard controller of a control to be learned to another control, the
original „holder“ will get inactive until it's learned itself to a new controller. The
three state „ARP ON“ and „24 dB“ buttons have two controllers mapped to
them, one for the lower two states and one for the full range. Which range is
learned to an external controller is dependent on the end state after toggling
the GUI button before tewaking your external controller.
Reset all controls back to the default values (as listed in „MIDI CC Tables“):
1. Click on „A“ next to the blue button or on „RES“ in the top bar and keep the
mouse holding down. A blue popup will appear reading „CC reset...“
2. Keep „A“ or „RES“ holding down for about 4 seconds until the blue led turns
red for a short time.
Reset is completed now. You can release „A“ or „RES“. The time delay is a
protection against unwanted resetting by accidentally clicking on „A“.
Page 84

MIDI CC Tables
This is the default mapping of the GUI controls to external controllers, which
follows the popular Pro53 standard. Note that it can be customized to fit your
needs using midi learn (see above). There's only a small number of controls
that can't be remotely controlled, including the trimpots for filters, envelopes
and portamento times, the octave toggle switch and the sync to song tempo
buttons. The saved CCs were spent to more important functions. Please also
read the section „Fine tuning of button parameters“ on page 49.
Information for former OP-X PRO standard users: The controllers for Sync to
Song Tempo and Octave switches have been reassigned to more important
real time functions. Octaves can be more comfortably switched with the
transpose function of your master keyboard. The controller for volume has
been transposed to standard seven. On the other hand the CC implementation
has been completed. Almoust every parameter exept the tuning trimpots is
now remotely controllable.
The full Midi CC Charts:
sorted by cc number *different order control present
001 Modulation Lever Pro53: compatible
003 Polyphony
005 Portamento Pro53: compatible
007 Volume
016 Wheel LFO Rate
017 Aftertouch Vib
018 Aftertouch Filt
020 LFO Freq Depth Pro53: PolyMod Source Filt Env
021 LFO PW Depth Pro53: PolyMod Source Osc B
022 OscTune Pro53: PolyMod Dest Freq A
023 FiltTune Pro53: PolyMod Destb PWidth A
024 EnvTune Pro53: PolyMod Dest Filter
025 Port Detune Pro53: LFO Midi Sync
026 LFO Rate Pro53: compatible
027 LFO Sine Pro53: compatible *
028 LFO Square Pro53: compatible *
029 LFO S/H Pro53: compatible *
030 Damp Pro53: LFO Envelope Trigger
033 PM
034 OM Pro53: WheelMod LFO-Noise Mix
035 LFO to Osc1 Pro53: compatible
036 LFO to Osc2 Pro53: compatible
037 LFO to PW1 Pro53: compatible
038 LFO to PW2 Pro53: compatible
039 LFO to Filter Pro53: compatible
040 Pitch Osc1 Pro53: compatible
041 Saw Osc1 Pro53: compatible
042 Pulse Osc1 Pro53: compatible
043 Pulse Width Pro53: compatible (OSC A)
Page 85

044 Sync Pro53: compatible
045 Osc1 On Pro53: compatible (can be continuous)
046 Osc2 Full Pro53: compatible (can be continuous)
047 Noise Full Pro53: compatible (can be continuous)
048 Arp Speed / Chrd Pro53: Mixer External Imput
049 Arp Mode (main)
050 Pitch Osc2 Pro53: compatible
051 Osc2 Detune Pro53: compatible
052 Saw Osc2 Pro53: compatible
053 Osc2 only Pro53: Oscillator B Triangle
054 Pulse Osc2 Pro53: compatible
055 X-Mod Depth Pro53: Oscillator B Pulse Width
056 X-Mod Pro53: Oscillator B Low Freq
057 Ring Pro53: Oscillator B Key Follow
058 LFO to Amp
059 Unisono Pro53: compatible
060 Velo / Mode
061 Velo / Stp / Speed
062 ARP Hold Full range (see p. 54, 52)
063 P-Mod
068 Lega ON
070 Cutoff Pro53: compatible
071 Resonance Pro53: compatible
072 Env Amt Pro53: compatible
073 Key Track Pro53: compatible (not continuous)
074 Osc2 Half Pro53: Filter HPF Mode
075 A Filter Pro53: compatible
076 D Filter Pro53: compatible
077 S Filter Pro53: compatible
078 R Filter Pro53: compatible
079 Noise Half Pro53: Filter Envelope Invert
080 A Amp Pro53: compatible
081 D Amp Pro53: compatible
082 S Amp Pro53: compatible
083 R Amp Pro53: compatible
084 2-12 Pro53: Amplifier Hold
085 Arp On Pro53: Release on/off
086 Velocity / Hold Pro53: compatible
087 Spread Pro53: Analog
088 Master Tune Pro53: compatible
089 ENV
090 O2o
091 OM neg.
092 P1o
093 PM neg.
094 LFO Osc Phase
095 PW-FILT Phase
096 W-LFO 1/2
097 24 dB
104 Self Reso (24dB) Full range (see p. 52)
105 Filter Mix Pro53: Delay Effect Time
106 Filter Type Pro53: Delay Effect Spread
Page 86

107 LFO to Filter Mix Pro53: Delay Effect Depth
108 ENV to Filter Mix
109 Key Track Amt
111 Pan1 Pro53: Delay Effect Low Cut
112 Pan2 Pro53: Delay Effect High Cut
113 Pan3 Pro53: Delay Effect Invert (not continuous)
114 Pan4
115 Pan5 Pro53: Delay Effect On (not continuous)
116 Pan6 Pro53: Delay Effect Wet
sorted by function groups:
manual
007 Volume
022 OscTune Pro53: PolyMod Dest Freq A
023 FiltTune Pro53: PolyMod Destb PWidth A
024 EnvTune Pro53: PolyMod Dest Filter
087 Spread Pro53: Analog
control
005 Portamento Pro53: compatible
059 Unisono Pro53: compatible
051 Osc2 Detune Pro53: compatible
modulation
026 LFO Rate Pro53: compatible
020 LFO Freq Depth Pro53: PolyMod Source Filt Env
021 LFO PW Depth Pro53: PolyMod Source Osc B
027 LFO Sine Pro53: compatible *
028 LFO Square Pro53: compatible *
029 LFO S/H Pro53: compatible *
035 LFO to Osc1 Pro53: compatible
036 LFO to Osc2 Pro53: compatible
039 LFO to Filter Pro53: compatible
037 LFO to PW1 Pro53: compatible
038 LFO to PW2 Pro53: compatible
058 LFO to Amp
Page 87

oscillators
040 Pitch Osc1 Pro53: compatible
043 Pulse Width Pro53: compatible (OSC A)
050 Pitch Osc2 Pro53: compatible
041 Saw Osc1 Pro53: compatible
042 Pulse Osc1 Pro53: compatible
056 X-Mod Pro53: Oscillator B Low Freq
055 X-Mod Depth Pro53: Oscillator B Pulse Width
044 Sync Pro53: compatible
052 Saw Osc2 Pro53: compatible
054 Pulse Osc2 Pro53: compatible
filter
070 Cutoff Pro53: compatible
071 Resonance Pro53: compatible
072 Env Amt Pro53: compatible
045 Osc1 On Pro53: compatible (can be continuous)
074 Osc2 Half Pro53: Filter HPF Mode
046 Osc2 Full Pro53: compatible (can be continuous)
079 Noise Half Pro53: Filter Envelope Invert
047 Noise Full Pro53: compatible (can be continuous)
073 Key Track Pro53: compatible (not continuous)
105 Filter Mix Pro53: Delay Effect Time
106 Filter Type Pro53: Delay Effect Spread
104 Self Reso (24dB)
109 Key Track Amt
107 LFO to Filter Mix Pro53: Delay Effect Depth
108 ENV to Filter Mix
envelopes
075 A Filter Pro53: compatible
076 D Filter Pro53: compatible
077 S Filter Pro53: compatible
078 R Filter Pro53: compatible
080 A Amp Pro53: compatible
081 D Amp Pro53: compatible
082 S Amp Pro53: compatible
083 R Amp Pro53: compatible
Page 88

additinal functions
068 Lega ON
030 Damp Pro53: LFO Envelope Trigger
097 24 dB
104 24dB Self Reso Full range (see p. 52)
094 LFO Osc Phase
095 PW-FILT Phase
090 O2o
091 OM neg.
092 P1o
093 PM neg.
057 Ring Pro53: Oscillator B Key Follow
089 ENV
096 W-LFO 1/2
086 Velocity / Hold Pro53: compatible
025 Port Detune Pro53: LFO Midi Sync
Sync to Sontempo: not remote controllable
085 ARP On Pro53: Release on/off
062 ARP Hold Full range (see p. 54, 52)
additinal knobs
016 Wheel LFO Rate
017 Aftertouch Vib
018 Aftertouch Filt
034 OM Pro53: WheelMod LFO-Noise Mix
033 PM
088 Master Tune Pro53: compatible
060 Velo / Mode
061 Velo / Stp / Speed
049 Arp Mode (main)
048 Arp Speed / Chrd Pro53: Mixer External Imput
063 P-Mod
111 Pan1 Pro53: Delay Effect Low Cut
112 Pan2 Pro53: Delay Effect High Cut
113 Pan3 Pro53: Delay Effect Invert (not continuous)
114 Pan4
115 Pan5 Pro53: Delay Effect On (not continuous)
116 Pan6 Pro53: Delay Effect Wet
Page 89

levers
001 Modulation Lever Pro53: compatible
003 Polyphony
053 Osc2 only Pro53: Oscillator B Triangle
084 2-12 (interval) Pro53: Amplifier Hold
Octave: not remote controllable; use your master keyboards' transpose
function for this
Page 90

Impressum:
Programming, puplic relations, graphic design and sound design:
P. Wiesler
Programming and graphic design:
B. Maechler
Additional programming:
D. Haupt
Chassis design and 3d renderings:
Reuben Flounders
www.affinity3d.com
Company contacts:
Mail:
info@sonicprojects.ch
Web:
www.sonicprojects.ch
Sounbase contributors:
Adam Borseti, Georges Poropat, Marc Sauvageau, Mariano Saulino,
Bill Whitney
Special thanks go to:
David Haupt, Reuben Flounders, Mariano Saulino, Jeff McClintock, Rod
McQuarrie, Katsunori Ujiie, Georges Poropat, Robin Adams, J.M. Maechler,
Matthew Basset, Muse Research, SM Pro Audio, and everyone else who has
contibuted to the OP-X PRO development in any way
We'd also like to thank our customers for their enthusiasm and support
Page 91

Chapters
Introduction............................................................................................................ 2
Installation............................................................................................................. 3
License and copyright............................................................................................ 4
What's new............................................................................................................ 5
Popyphony and voice allocation:....................................................................... 5
Patch Browser................................................................................................... 5
MIDI Learn........................................................................................................ 5
MIDI CC Processor........................................................................................... 5
Effects Unit........................................................................................................ 6
LFO: New waveforms, manual trigger, delay and sampled vibrato................... 6
Seamless control of detunings, oscillator and noise levels............................... 6
Wheel LFO: also exchanges pan mod LFOs.................................................... 6
Quick one-click calibration of trimpots and pan controls................................... 7
Freely choosable pitch lever interval................................................................. 7
DMP: Two new bright modes available............................................................. 7
ENV: Two modes now, including linear amp env attack................................... 8
Filter: Switchable self oscillation........................................................................ 8
Triangle waves for oscillators............................................................................ 8
LFO rate / Pitch1: wider ranges......................................................................... 8
Filter ADSR: now invertable.............................................................................. 8
A new arpeggiator/MIDI processor.................................................................... 8
TOP BAR............................................................................................................... 9
Introduction....................................................................................................... 9
Patch Browser................................................................................................... 9
Name field................................................................................................... 10
Down arrows............................................................................................... 10
Number field................................................................................................ 11
Increment/decrement.................................................................................. 11
Load Bank................................................................................................... 11
Save Bank................................................................................................... 11
Load Preset................................................................................................. 12
Save Preset................................................................................................. 12
Copy Preset................................................................................................ 12
Effects Section................................................................................................ 13
EFFECTS: ON............................................................................................ 13
EFFECTS: EDIT.......................................................................................... 13
PP: ON........................................................................................................ 13
1/1000 DISPLAY......................................................................................... 14
DEL............................................................................................................. 14
RVB............................................................................................................. 14
DEL: SYNC................................................................................................. 14
DEL............................................................................................................. 15
FBK............................................................................................................. 15
SIZ............................................................................................................... 15
WID............................................................................................................. 15
DMP............................................................................................................ 15
Page 92

MIDI CC Processing........................................................................................ 18
MIDI LEARN................................................................................................ 18
LEARN: LEA........................................................................................... 18
LEARN: RES.......................................................................................... 19
CC PROCESSOR....................................................................................... 20
PROCC: RCE ........................................................................................ 20
PROCC: REL.......................................................................................... 20
PROCC: FET.......................................................................................... 20
PROCC: BLO.......................................................................................... 21
PROCC: OUT......................................................................................... 21
PROCC: BLO.......................................................................................... 21
Voice LEDs.......................................................................................................... 22
MANUAL section................................................................................................. 22
VOLUME......................................................................................................... 23
TUNER............................................................................................................ 23
OSC................................................................................................................ 23
FILT................................................................................................................. 23
ENV................................................................................................................. 23
SPREAD......................................................................................................... 25
FILT Trimpots.................................................................................................. 25
CONTROL section............................................................................................... 26
PORTAMENTO............................................................................................... 26
UNISON.......................................................................................................... 26
OSC 2 DETUNE.............................................................................................. 26
Trimpot............................................................................................................ 26
MODULATION section........................................................................................ 27
RATE............................................................................................................... 27
SINE................................................................................................................ 27
SQUARE......................................................................................................... 27
S/H.................................................................................................................. 27
SAW: SINE & S/H........................................................................................... 28
TRIANGLE: SINE & SQU & S/H..................................................................... 28
FREQUENCY DEPTH..................................................................................... 29
OSC 1............................................................................................................. 29
OSC 2............................................................................................................. 29
FILTER............................................................................................................ 29
PULSE WIDTH DEPTH.................................................................................. 29
OSC 1............................................................................................................. 29
OSC 2............................................................................................................. 29
AMP................................................................................................................ 29
OSCILLATORS section....................................................................................... 30
PITCH 1.......................................................................................................... 30
SAW................................................................................................................ 30
SQU................................................................................................................ 30
SINE................................................................................................................ 30
WIDTH............................................................................................................ 30
PITCH 2.......................................................................................................... 30
SAW................................................................................................................ 30
Page 93

SQU................................................................................................................ 30
SINE................................................................................................................ 30
X-MD............................................................................................................... 31
SYNC.............................................................................................................. 31
QUA / LIN (black rectangles)........................................................................... 31
FQ1 / FQ2....................................................................................................... 31
XMD................................................................................................................ 31
FILTER section.................................................................................................... 32
CUTOFF.......................................................................................................... 32
RESON........................................................................................................... 32
ENV AMT........................................................................................................ 32
OSC1.............................................................................................................. 33
OSC2 HALF.................................................................................................... 33
OSC2 FULL..................................................................................................... 33
NOISE HALF................................................................................................... 34
NOISE FULL................................................................................................... 34
KEY................................................................................................................. 34
MIX trimpot...................................................................................................... 34
TYP trimpot..................................................................................................... 34
Self-Oscillation Lamp...................................................................................... 35
KEY................................................................................................................. 36
LFO................................................................................................................. 36
ENV................................................................................................................. 36
ENVELOPES section.......................................................................................... 37
Filter Envelope................................................................................................ 37
Loudness Envelope......................................................................................... 37
ADSR.............................................................................................................. 37
Extended ADSR Functions: Invert................................................................... 37
Extended ADSR Functions: Linear / MOD / ENV............................................ 38
ADDITIONAL FUNCTIONS section (below filter)................................................ 39
Lega ON.......................................................................................................... 39
DMP................................................................................................................ 40
24dB................................................................................................................ 41
OSC................................................................................................................ 41
PW-FILT.......................................................................................................... 43
OSC2.............................................................................................................. 44
\....................................................................................................................... 44
PW1................................................................................................................ 44
\....................................................................................................................... 44
RING............................................................................................................... 44
ENV................................................................................................................. 45
Wheel LFO...................................................................................................... 45
Hold / VEL....................................................................................................... 46
Porta DET....................................................................................................... 46
LFO................................................................................................................. 46
III..................................................................................................................... 46
ARP................................................................................................................. 46
ARP ON.......................................................................................................... 47
Page 94

ADDITIONAL KNOBS row................................................................................... 48
LFO................................................................................................................. 48
A Vib................................................................................................................ 48
A Filt................................................................................................................ 48
OM.................................................................................................................. 48
PM................................................................................................................... 48
TUNE.............................................................................................................. 48
DEC / REL....................................................................................................... 49
Left knob: Floor............................................................................................... 51
Right knob: Ceil............................................................................................... 51
Arpeggiator / MIDI-Processor.............................................................................. 52
Introduction..................................................................................................... 52
ARP ON.......................................................................................................... 53
Arpeg / Mode................................................................................................... 54
Crd / Speed..................................................................................................... 54
Number Display............................................................................................... 54
Velo / Mode..................................................................................................... 54
Stp / Speed..................................................................................................... 54
Main Modes..................................................................................................... 55
Modes 1 - 32................................................................................................... 54
VOICE PANS...................................................................................................... 63
P-Md................................................................................................................ 63
LEVERS section.................................................................................................. 65
A...................................................................................................................... 66
6: Polyphony Switch........................................................................................ 67
Os2.................................................................................................................. 69
2-12................................................................................................................. 69
Oct................................................................................................................... 69
Tuning Tutorial.................................................................................................... 72
Oscillators tuning............................................................................................. 73
Filters tuning.................................................................................................... 74
Envelopes tuning............................................................................................. 75
Portamento tuning........................................................................................... 76
CREATE YOUR OWN SOUNDS AND BANKS................................................... 77
TIPS AND TRICKS.............................................................................................. 78
Fine tuning of button parameters.................................................................... 78
Using ring modulation...................................................................................... 78
Explore the additional banks........................................................................... 78
Using the filter trimpots for sequencer lines.................................................... 79
Using the detuning features............................................................................ 79
Using the filter trimpots for sequencer lines.................................................... 80
Using the filter trimpots for sequencer lines.................................................... 81
VST automation................................................................................................... 82
MIDI CC Implementation..................................................................................... 82
MIDI Learn........................................................................................................... 83
MIDI CC Tables................................................................................................... 84
sorted by cc number........................................................................................ 84
sorted by function groups................................................................................ 86
Page 95

Index
\ 37, 44
2-12 69
24dB 41
A 66
A Filt. 48
A Vib. 48
ADDITIONAL FUNCTIONS 39
ADDITIONAL KNOBS 48
Aftertouch 48
AMP 29
ARP 46
ARP ON 47, 53
Arpeg 54
Arpeg Mode 54, 56
Arpeggiate Chord 57
Arpeggiate Double 57
Arpeggiator 52
Arpeggiator / MIDI-Processor 52
Attack, 37
automation 82
band pass 35
beats 26
BLO 21
BRL 40
Chrd 54, 56
Chrd / Speed 54
CLR 40
Continuous detuning 24
CONTROL 26
Copy Preset 12
CPU-load 68
Create Bank 77
CUTOFF 32
DEC 49
Decay, 37
DEPTH 29
DMP 40
Double 56
Down 55
Effects Section 13
EFFECTS: EDIT 13
EFFECTS: ON 13
ENV 23, 36, 38, 45
ENV AMT 32
ENVELOPES 37
Envelopes tuning 75
Envmod 48
FET 20
FILT 23, 25, 29
filter 2, 23, 26, 29, 31ff., 37, 39, 44,
46, 48, 87
FILTER 32
Filterenv Modulation 44
Filters tuning 74
FQ1 31
FREQ 29
glide 26
high pass 35
hold 46
Hold 47
Hold / VEL 46
Hold VEL 57
III 46
Installation 3
installer 3
interval 69
Invert 37
KEY 34, 36
Keyboard tracking 34
LEA 18
LEARN 18
LEARN: LEA 18
LEDs 22
Left knob: Floor 51
Lega 39
Lever automation 66
LEVERS 65, 66
LFO 27, 36, 46, 48
Lfo Phase 41
LIN 31
Linear 38
linear amp attack 38
Linear Attack 38
LNR 38, 45
Load Bank 11
Load Preset 12
low pass 34
MANUAL 22
Manual Chord 58
Master tune 48
Page 96

MIDI CC 82, 84
Midi CC Charts 84
MIDI CC Processing 18
Midi Continuous Controller 82
MIDI Learn 83
MIDI LEARN 18
MIDI-Processor 52
MIX 34
MOD 38, 45
Mode 54
MODULATION 27
modulation lever 66
multimode filter 34
NOISE FULL 34
NOISE HALF 34
NOR 40, 45
notch 35
Number display 54
Oct. 69
octave 69
OM 48
Order 55
Os2 69
OSC 23, 41
OSC 1 29
OSC 2 29
OSC 2 DETUNE 26
OSC2 FULL 33
OSC2 HALF 33
OSCILLATORS 30
Oscillators tuning 73
OUT 21
P-Md 63
panning modulation 45
Patch Browser 9
phase 26, 42, 47
Pitch 55
PITCH 2 30
pitch lever 66
play 47
Play 59
PM 48
Polyphony 67
Polyphony switch 67
POR 65
Porta DET 46
Portamento 65
PORTAMENTO 26
Portamento tuning 76
PP: ON 13
Preset Chord 56
PROCC 20
pulse width 29f., 37, 44, 46, 48
Pulse Width 84f., 87
PULSE WIDTH 29
PULSE WIDTH 29
PW-FILT 43
QUA 31
Rand 55
RATE 27
RCE 20
record 47
Record 59
REL 20, 49
Release 37
remote control 82
RES 19
RESON. 32
resonance 32
Right knob: Ceil. 51
RING 44
S/H 27
sampled vibrato 27, 29
Save Bank 11
Save Preset 12
SAW 30
SAW: SINE & S/H 28
self oscillation 32, 35, 41
SEM 2, 35
separate voice design 79
Separate Voice Design 2
SINE 27, 30
Speed 54
SPREAD 25
SQU 27, 30
SQUARE 27
Step modes 61
Steps 61f.
Steps Rep 1 62
Steps Rep 2 62
Stp / SPEED 54
Sustain, 37
SVD 2
SYNC 31
Page 97

Sync to Song Tempo 59
Sync to Songtempo 46
The TOP BAR 9
Triangle 30
TRIANGLE: SINE & SQU & S/H 28
TUNE 48
TUNER 23
tuning 2, 23, 25f., 48
Tuning Trimpots 70
Tuning Tutorial 72
TYP 34
ultra wide 69
uninstaller 4
UNISON 26
Unisono 68
Up 55
Picture Index:
Click on the control in the GUI picture you want to learn more about, and the link
navigator will take you to the dedicated section in the manual:
Up Down 55
VEL 46, 51
Velo 51
velocity 46
velocity amount 51
Voice allocation 68
voice LEDs 22
Voice mute 50
voice pans 63
voices 2, 23, 25f.
VOLUME 23
VST automation 82
Wheel LFO 45
wheels 66
WIDTH 30
X-MD 31
 Loading...