

Page 1
SonicProjects
OP-X
MANUAL
www.sonicprojects.ch
Page 2

Introduction
Congratulations on the purchase of the SonicProjects OP-X!
The technical structure of this synth ist quite unique. The enigine is based on
six totally independent voices which correspond to the voice boards of the
original godfather. There's no voice cloning used to achieve polyphony as it is
usually the case in vst instruments. Like in the real analog hardware, each
voice is built separatly, each voice has its own signal path and each voice
differs slightly in its parameter settings and sound - as it is present too in the
original. This imperfectness was one of the main reasons for the organic and
lively character of the old faithfull original.
Although this is a great thing for some sounds (especially pads), it's not so
great for others (brass, fm, ...). While you had to tune the voice cards of the
original by trimpot adjustments, the voices of the op-x can be tuned by the
touch of four global buttons - separatly for oscillators, filters, envelopes and
portamento times. The original did just provide an autotune button, which
tuned the oscillators. The rest was influenced by temperature and aging
processes.
With the the op-x, you get total control over the tuning - as you might have
wished it from any analog synth of the past - without missing the organic
feeling. You can mix tuned oscillators, detuned filters etc. There are no limits.
Even the spread knob, which effects a continuous and proportinal detuning,
can be used for polyphonic sounds, also in combination with the knob detune.
We call this concept Separate Voice Design (SVD).
You can learn more about it on this site which includes a lot of audio clips:
http://www.sonicprojects.ch/obx/separatevoicedesign.html
A welcome consequence of the separate voice design is the presence of
stereo pan controls for each voice. This popular feature of old analog synths
allows mind blowing real stereo without deluting chorus or delay effects. As
every other parameter, the pans can be automated as well.
With cross modulation, oscillator synchronisation, sine based frequency
modulation, ring modulation, filterenvelope modulation and noise, the op-x'
potential for experimental and disharminic sounds is enormous. Especially the
combination of fm and ring modulation is a sonic bomb.
A further thought had to go to the filter. The old SEM filter was highly
appreciated because it didn't loose gain or thickness in high resonance
settings and had an extraordinary precious balanced sound and great depth.
The filter of the op-x is specially designed and tries to copy this character as
good as possible.
Page 3
Installation
Doubleclick the installer and follow the instructions.
The installer will look for the shared vst plugins folder. You can also browse
your computer for the vst plugins folder manually. The plugin will be installed in
a subfolder named „SonicProjects“. The installer will also create a folder
named „SonicProjects“ in your start menu. You will find the pdf manual and
the uninstaller there.
Note: You need a vst host to run the plugin. It can't be run standalone. If you
don't have a one then have a look at our dedicated site where we have listed
some tested and recommended free vst hosts including short guides:
http://www.sonicprojects.ch/obx/freevsthost.html
After first loading in your host you have to enter your personal id and key data
to unlock the plugin. After successful unlocking the plugin loads, but still
without sound. You have to reload the plugin now. From now on it will work.
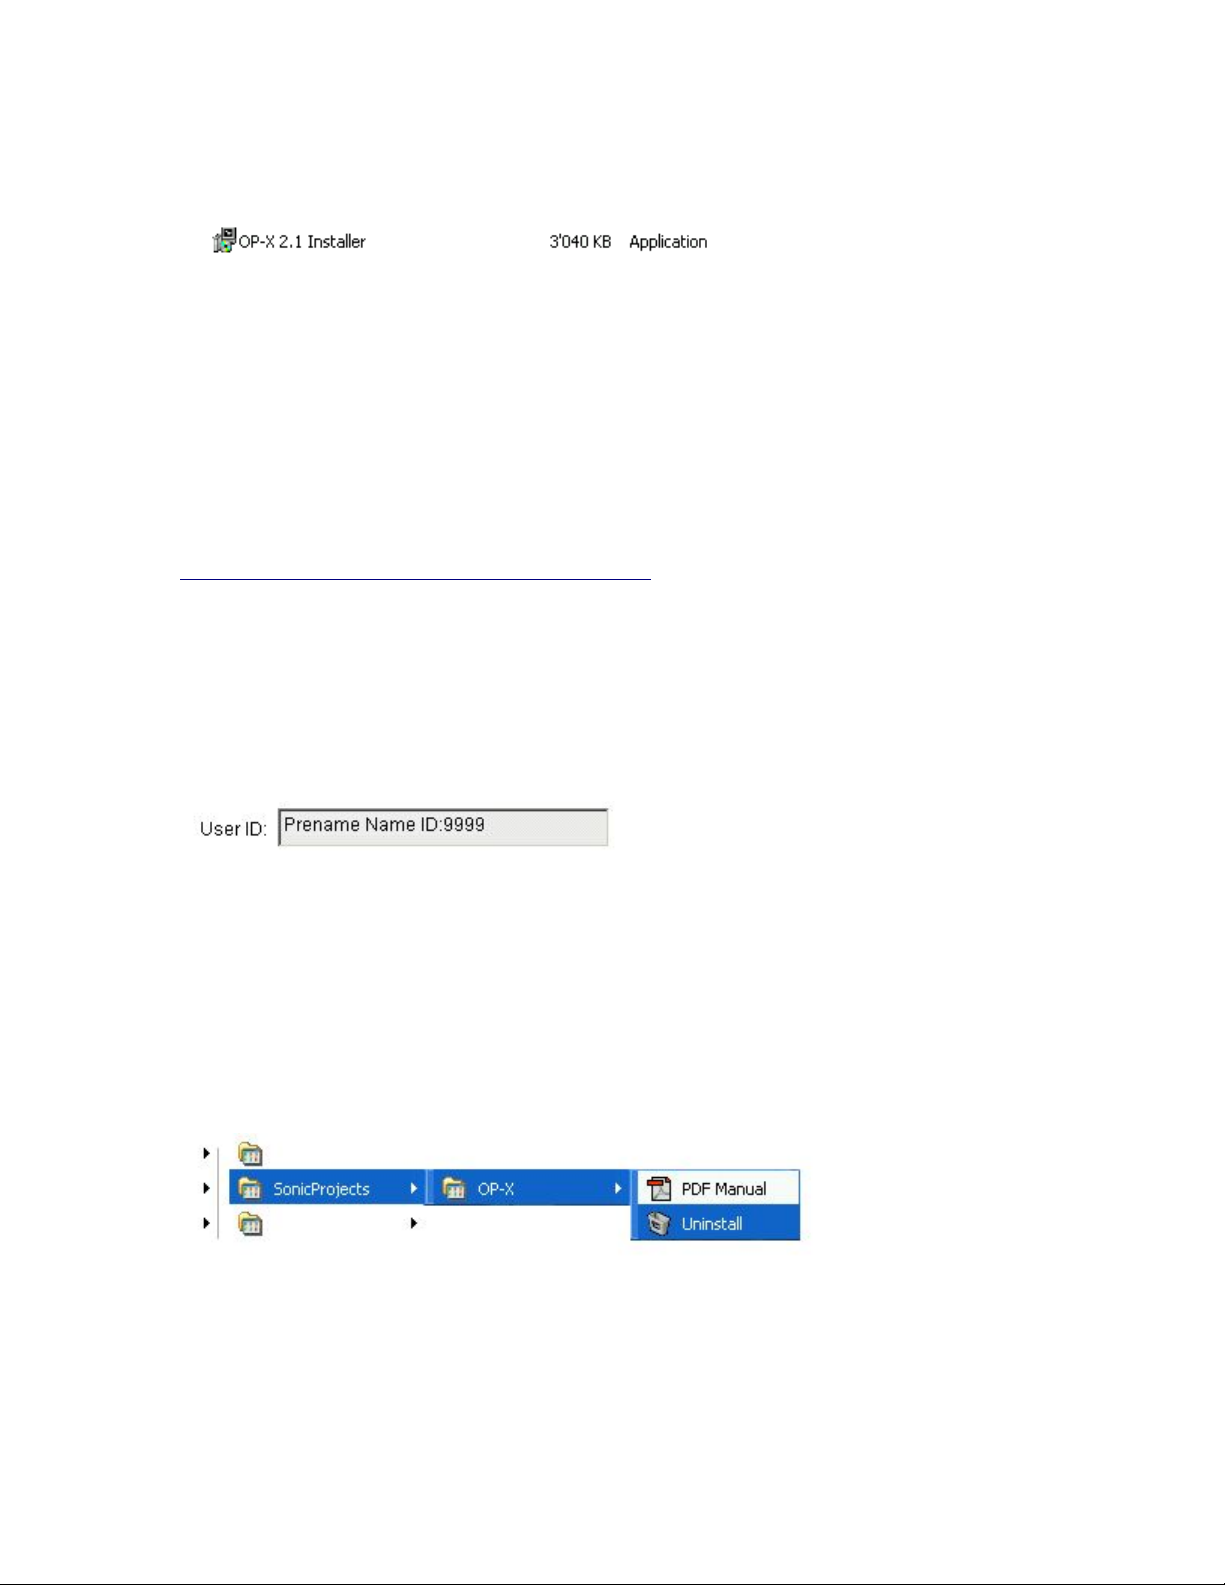
If the key data was not entered correctly nothing happens when you click on
„enter key“. Be sure to enter the whole line containing name AND four digits id
number in the „User ID“ field:
Use copy and paste for the license key to avoid typing mistakes. If you have
problems with the reg window disappearing then deactivate „always on top“ for
your plugin window. You can alternatively load the plugin first by clicking on
„try demo“ and then enter your data by clicking on the blue window.
Remove the plugin:
Use the uninstaller in the „SonicProjects“ folder in the start menu.
License and copyright
The plugins are bound to the registered user. It's not allowed to pass them on
to third persons. Each plugin contains a hiddden serial that allows to identify
and trace the original user in case of irregular distribution.
Page 4
The voice LEDs
These LEDs indicate voice activity. Each voice has its propriate LED. That
means, when a voice is receiving trigger data to play, its propriate LED shines.
In unisono mode, all six LEDs are glowing at the same time. The original has
this LEDs too, but mounted on the individual voice boards in the inside of the
device. With their help, you could see that a voice was working correctly.
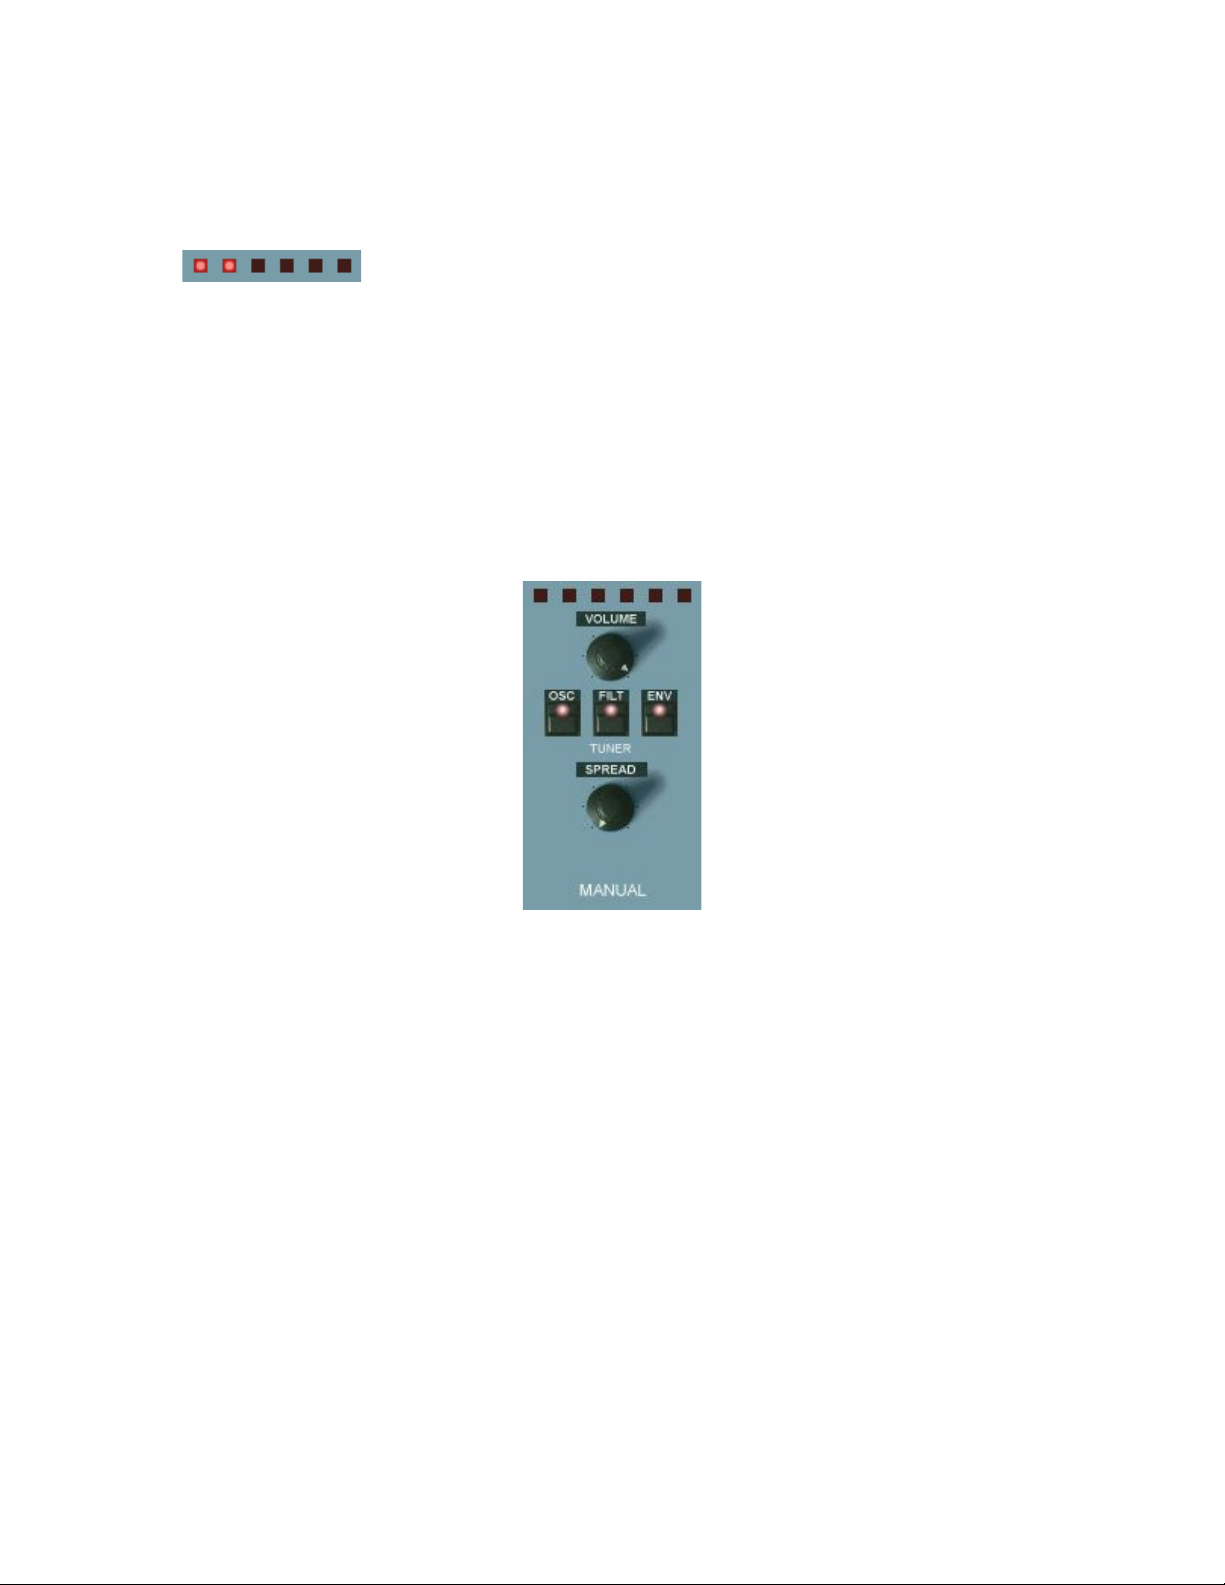
The MANUAL section:
VOLUME
Master volume. Its setting is stored with the preset.
TUNER
The individually and slightly detuned voices can be tuned here. Read the intro
for comprehensive info on the voice tuning.
OSC
Tunes the oscillators. In released state, each voice is slightly and individually
detuned as it would be on startup in the original.
FILT
Tunes the filters. In released state, the filter cutoff of every voice is slightly
different, as it is the case in every original device that is not freshly serviced.
Page 5

ENV
Tunes the attack and decay times of the filter envelopes. In released mode,
the attack and release time of every voices' filter envelope is slightly different.
This gives organic life to pad and sweep sounds.
The fourth element of the op-x' tuning capabilities is located in the addidional
functions section below the filters section: the portamento detuner "Port DET".
See "PORTAMENTO" or "ADDITIONAL FUNCTIONS SECTION".
SPREAD
Spreads the oscillator tuning of the voices - good for fattening up unisono
sounds, but also usable for more controlled detune of polyphonic sounds.
The CONTROL section
PORTAMENTO
Also called "glide" sometimes. Makes the pitch change continuosly between
the notes. Short settings in unisono sounds makes the sound "squeak". The
function also works in polyphonic mode. The portamento can be detuned with
"Porta DET" in the additional functions section (beyond filters section). In
released "Porta DET" mode, the portamento times of each voice are equal. In
pushed mode, the times vary from voice to voice which was typical for the
original. The sonic result in solo sound is a special sort of "depth" while gliding.
UNISON
Stacks all six voices for fat solo sounds. L in the levers section activates legato
mode if needed (last note priority, pitch returns to hold note, no retrigger). Use
the spread knob or release the osc tune knob to fatten up the sound.
Page 6
OSC 2 DETUNE
Fine tuning for oscillator 2. This is used to produce beats when both oscillators
are on. This results in a fat sound.
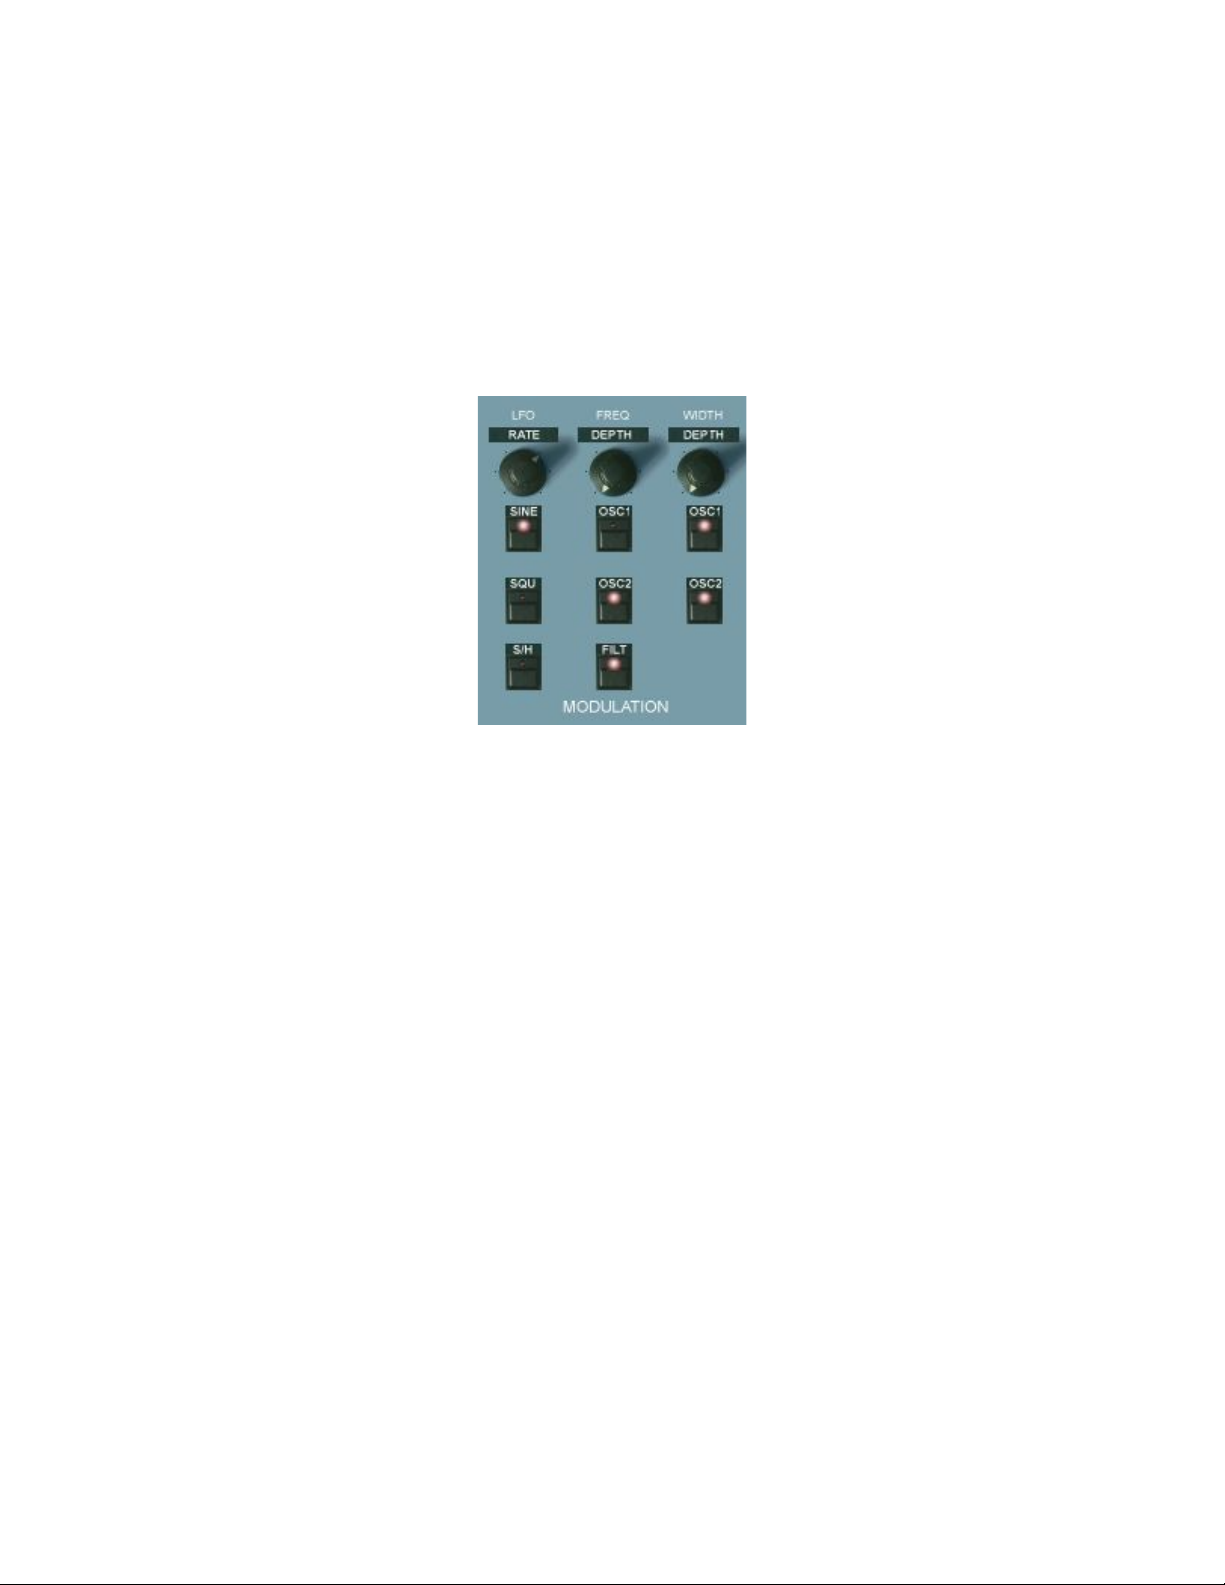
The MODULATION section
This is the section where the main LFO is controlled and routed to the desired
modulation aims. For the modulation lever, there's a separate and independent
sine LFO (rate control above leavers). If wished, the modulation lever can be
switched back to the main LFO as it is in the original device (ADDITIONAL
FUNCTIONS SECTION, "Wheel LFO").
RATE
Regulates the LFO rate. The response is logarithmical. If the LFO is
synchronized to song tempo (which can be done in the ADDITIONAL
FUNCTIONS section with the LFO button, III for triolic behaviour), the knob will
react in three big steps (multiplied by the song tempo).
The waveforms: All three waveforms can be chosen at the same time. For the
reason of problem free vst automation, it were done without "radio button"
switching behaviour. To jump from one waveform to another, the old one has
to be released and the new one pushed. This might be a bit ardous on one
hand, but on the other and it allows mixing various waves.
SINE
Switches on the sine wave of the LFO.
SQUARE
Switches on the square wave of the LFO.
Page 7

S/H
Switches on the sample & hold wave of the LFO. Technically explained, white
noise is "sampled" with the speed of the LFO rate. This results in a random
step wave.
FREQUENCY DEPTH
Regulates the modulation intensity of the LFO to the oscillators and the filter.
The response of this knob is specially designed. In the first quarter, you have
double logarithmic response which allows to make finest adjustments in very
low modulation settings, e.g. for almoust imperceptible oscillator vibrato. The
rest of the scale does react linear for fast changes.
OSC 1
Switches the above regulated LFO output to oscillator 1 pitch.
OSC 2
Switches the above regulated LFO output to oscillator 2 pitch.
FILTER
Switches the above regulated LFO output to the filter cutoff. The influence
amount is dependent on the filter cutoff. Low cutoff settings result in lower LFO
influence. This is again a behaviour copied from the original.
PULSE WIDTH DEPTH
Regulates the modulation intensity of the LFO output to the pulse width of the
oscillators' pulse waves. Its influence is added to the "WIDTH" setting in the
oscillators section.
OSC 1
Switches the above regulated LFO output to oscillator 1 pulse width.
OSC 2
Switches the above regulated LFO output to oscillator 2 pulse width.
Page 8
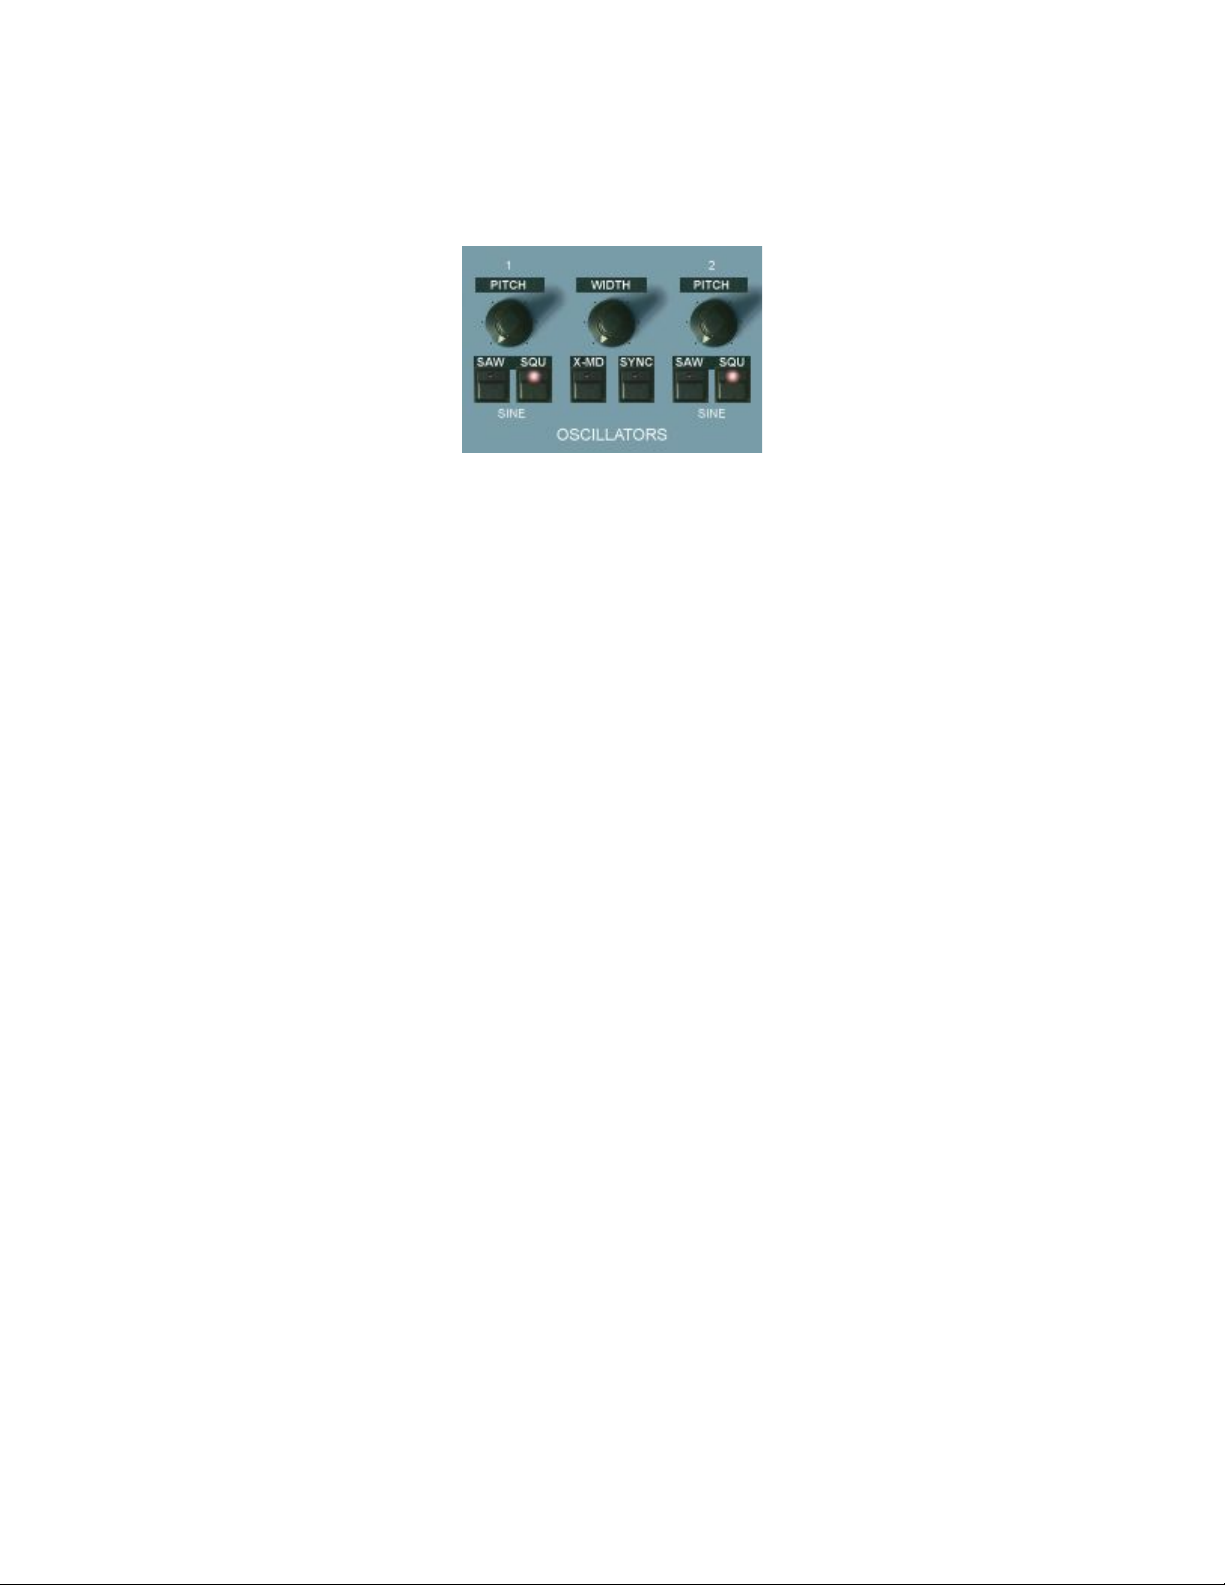
The OSCILLATORS section
PITCH 1
Sets the pitch of oscillator 1 in four octave steps.
The waveforms:
Other than in the original both waveforms can be switched on at the same
time. This is again for problem free VST automation. Both waves activated
results in pulse wave (the same as squ pushed only). However, both buttons
released results in a SINE wave. This is designed for yamaha type FM.
SAW
Switches on the saw wave of oscillator 1
SQU
Switches on the pulse wave of oscillator 1
SINE
The SINE wave will be activated when both buttons are released.
WIDTH
Manual regulation of the pulse width of both pulse waves. Modulations for each
pulse wave are added individually.
PITCH 2
Sets the pitch of oscillator 2 in semitones. The range is five octaves and three
semi tones. If sync is on, the sync spectrum can be controlled with this knob.
SAW
Switches on the saw wave of oscillator 2
SQU
Switches on the pulse wave of oscillator 2
SINE
The SINE wave will be activated when both buttons are released.
Page 9

X-MD
Cross modulation. This is sort of a simple frequency modulation between
oscillator 1 and oscillator 2. The result is a disharmonic spectrum. The sound
is determinate by the selected waves, the relation of the oscillators frequencies
to each other and the modulation amount (regulatable in the ADDITIONAL
KNOBS SECTION with "X-Md", just above the keyboard . In most cases, the
pitch knob of oscillator 2 is used to regulate this. If the frequency of oscillator is
modulated (by LFO or filter envelope - described later), the sound will change
dynamically over time. If you want to hear only the FM output on its own just
switch off oscillator 2.
For yamaha type FM, release the wave buttons (both) for the SINE wave to
become active. For a little bit more presence, the wave of oscillator 2 can be
switched to SQU (Pulse). For even more clearness, the activation of ring
modulation (ADDITIONAL FUNCTIONS section, "RING") is recommended.
In the ADDITIONAL FUNCTIONS section, there is a special function to give
some additional movement to crossmod sounds: When you switch on the
"ENV" button, the modulation depth is influenced by the amp envelope. (The
same can be done with ring modulation - see later).
SYNC
Hard sync. Oscillator 2 is synchronized by oscillator 1. Everytime the oscillator
1 wave amplitude crosses zero, the oscillator 2 wave amplitude is being set to
zero too. The sonic result is the well known and famous sync sound with rich
harmonics. As it is with cross modulation, changes of the oscillator 2 pitch
results in changes in the spectrum. The whole thing gets interesting too if
oscillator 2 is modulated.
Page 10

The FILTER section
A specially designed 12db Filter tries to do its best to emulate the famous SEM
sound. The SEM filters got famous with the beige SEM-Modules and the SEM
based Four- and Eightvoice. The OB-X was the last Ob. synth that was
equipped with this discrete design. Later models, beginning with the OB-Xa,
got the standard Curtis Chips. One of the special things of the SEM filters is
that in high resonance settings, the sound remains as fat as in zero resonance
settings. This is a wonderful thing for pads and sweeps. The old SEM filters
had no self oscillation, so you won't find it here too.
CUTOFF
Regulates the filter cutoff frequency.
RESON.
Regulates the filter resonance. As already described, there is no self oscillation
but still very fat and full tone even at the highest resonance setting.
ENV AMT
Regulates the amount of the filter envelope influence on the cutoff frequency.
This is added to the cutoff setting.
OSC1
Switches oscillator 1 to the filter.
OSC2 HALF
Switches half of the volume of oscillator 1 to the filter.
OSC2 FULL
Switches the full volume of oscillator 1 to the filter.
If both knobs are activated, there's a slight volume push. In vst automation,
these parameters are continuous, so you can do fine adjustments here and
save it with the preset. This by the way also works with other buttons.
NOISE HALF
Switches half of the volume of the white noise generator to the filter.
Page 11

NOISE FULL
Switches the full volume of the white noise generator to the filter.
If both knobs are activated, there's a slight volume push. Also here, you can do
fine adjustments using vst automation where the parameters are continuous.
KEY
Keyboard tracking. It makes the filter cutoff follow the key position, which
means that every note has the same amount of harmonics. When the
rersonance is in a high setting, you can hear the filters' beginning feedback
pitch follow the keyboard. Try the preset named "Noise Whistle" to hear this.
The ENVELOPES section
Nothing spectacular here, just an ADSR envelope for the filter on top and an
ADSR envelope for the amp at the bottom. But nevertheless there is one thing
to mention: The filter envelope can be used to modulate the oscillators pitch
and the pulse width. The knobs for this are at the bottom left side named OM
and PM (described later). This function was not present in the original.
A last thing: If the arpeggiator is on in polyphonic mode (unisono button not
on), you have to regulate down the amp sustain to zero to separate the voices
from each other.
ADSR of course means :
A Attack
D Decay
S Sustain
R Release
Page 12

The ADDITIONAL FUNCTIONS section (below filter)
In former days, you could save your settings here in 32 (4 x 8) memory
locations. There was a casette interface to backup the memory. Today, 27
years later, in the virtual world, we don't need this section anymore. This
allows us to equip these free buttons with the control for various additional
functions.
The abbrevations below the buttons are designed to remember what the
specific button is for. We could not write a book below every button, so you
have to know what the abbrevations refer to. You simply have to learn this (not
a big deal):
Lfo Phase:
OSC
Inverts the phase of the LFO modulation to the oscillators. This is helpful when
the LFO is synchronized to a sequencer. If you want the LFO rise on 2 and 4
instead of 1 and 3, just push this button.
PW-FILT
The same for pulse width and filter. The LFO phase to these two destination is
inverted. Very important function again when synchronized to song tempo.
Filterenv Modulation:
OSC2
Makes the filter envelope modulate oscillator 2 only (if env modulation is
activated). This is important for moving sync- and crossmod sounds.
\
Inverts the effect oft the filter envelope modulation to the oscillators (if env
modulation is activated).
PW1
Makes the filter envelope modulate pulse width 1 only (if env modulation is
activated).
\
Inverts the effect of the filter envelope modulation to the pulse width (if env
modulation is activated).
Page 13

RING
Switches on ring modulation. Ring modulation means that the volume of one
oscillator is multiplied by the output of the other (not the pitch as it is with xmod). This sounds a bit different than cross modulation. Please note that both
oscillators have to be switched on to hear a result. The amount is too regulated
with the x-md amount knob above the keyboard. Using a moderate amount
ring modulation can be used to brighten up a sound a bit.
ENV
A very special feature that can be interesting in arpeggiator mode: When
pushing this button, the output of the modulating oscillator for cross- or
ringmodulation is taken after the amp, which means that the amp envelope
has an influence on the sonic result. The influence can be heard when the
decay and release times are short.
Wheel LFO
The extra modulation wheel LFO can be switched off here. In this case, the
wheel is routed to the main lfo (as it was in the original device).
VEL
Switches velocity sensivity on. The velocity does have an effect on the filter
envelope. Combined with the filterenv modulation, not only the cutoff can be
velocity controlled, but also pitch and pulse width (dependent on the OM and
PM settings).
Porta DET
Portamento detune. In released "Porta DET" mode, the portamento times of
each voice are equal for snappy "squeek". In pushed mode, the times vary
from voice to voice which was typical for the original. The sonic result in solo
sound is a special sort of "depth" while gliding
Sync to Songtempo:
LFO
Synchronizes the LFO to the song tempo of the sequencer. In this mode, the
RATE knob will react in three big steps only, dependent on the tempo. Note,
that the phases of the individual LFO sections can be inverted (OSC / PF).
III
Switches on triolic synchronization mode (multiples of three notes per beat).
ARP
Synchronizes the Arpeggiator to the song tempo of the sequencer. In this
mode, the Speed knob will react in three big steps only, dependent on the
song tempo.
Page 14

ARP ON
This button switches the arpeggiator on. A second click (led shines red)
causes the arpeggiator to switch to hold sequence mode.
Normal arpeggio (led orange):
The notes are played back in the same order and place as they were played
in. The range is one octave. The speed can be varied with the „Speed“ knob
above the keyboard. You can also synchronize the arpeggiator to the song
tempo with the „ARP“ button below „Sync to song tempo“. The arpeggio can
be hold with the damper pedal. You have to adjust sustain and release for this
mode if the hold line should sound exactly the same.
Step sequencer mode (led red):
When you play a new note, it will be saved in one of the memory locations of a
six step sequencer. Every new note is saved in the next memory location.
When all six locations are full, it will be saved to location 1 again. Right above
the keyboard you can find two dedicated knobs: The Speed knob regulates the
playback speed. The Steps button varies the amount of steps repeatedly
played. In the minimal setting, this number is 2, in the max 7. In the 7-mode
the first step of the 6-step sequencer is being repeated.
The arpeggiator can be used in unison and polyphonic mode. If you are in
polyphonic mode, you have to turn the amp envelope sustain to zero to
separate each voice from the others. Done so, you can play with the filter
envelope, the amps attack and decay and also with the voice pans.
The ADDITIONAL KNOBS row (above Keyboard)
The knobs above the keyboard you won't find in the original. These are all
addidional functions or functions that were only accessible after opening the
device.
From left to right:
LFO
Regulates the speed of the additional modwheel sine-LFO. This LFO can be
switched off in the PROGRAMMER section as already described.
Aftertouch:
A Vib.
Regulates the aftertouch (key pressure) influence on the oscillator vibrato. This
is driven by the LFO switched to the modulation wheel.
Page 15

A Filt.
Regulates the aftertouch (key pressure) influence on the filter cutoff. Great for
expression.
Envmod:
OM
Regulates the amount of the filter envelope modulation to the oscillators. Have
a look at the ADDITIONAL FUNCTIONS section description for further options
(OSC, \ ). This is a prophet synth speciality.
PM
Regulates the amount of the filter envelope modulation to the pulse width.
Have a look at the ADDITIONAL FUNCTIONS section description for further
options (PW, \ ). This is a prophet synth speciality too.
TUNE
Master tune. The defaut setting is center (mid). The pitch can be adjusted up
to one half tone down (turn left) or up (turn right) to match acoustic instruments
with deviating tuning.
Sequencer controls:
STEP
Regulates the number of played back steps in step sequencer mode (ARP
ON: red). From min to max: 2,3,4,5,6,7 (7 is actually 6 with step 1 repeated).
More details in the ADD FUNCTIONS: ARP ON section
SPEED
Regulates the speed of the arpeggiator. In sync mode, it will react in three big
steps. Have a look at the arpeggiator description (ADD FUNCTIONS: ARP ON)
in this manual for more details.
X-Md
This knob regulates the X-Md (cross modulation) amount. In the minimal
setting, the amount is not fully zero. The higher the amount, the more
harmonics are added (especially well hearable if yamaha type sine wave
modulation is used).
Page 16

The voice pans:
This was a very popular feature amongst old analog synths. In contrast to
many old synths, the controls can be accessed on the surface and also can be
stored with the preset. The panpots can also be automated. In the original
device, these pots were placed on a board in the inner device.
1
Pan setting for voice 1
2
Pan setting for voice 2
3
Pan setting for voice 3
4
Pan setting for voice 4
5
Pan setting for voice 5
6
Pan setting for voice 6
Some possible ways of using the pans:
1. Wide stereo in polyphonic mode:
Set the pans repeatedly fully left and fully right (1 left, 2 right, 3 left...)
2. Wide stereo in polyphonic mode with analog flavour:
Set the pans repeatedly fully left and fully right (1 left, 2 right, 3 left...) and alter
the settings a bit from voice to voice
3. Analog mono:
Set the pans to center, but not exactly - vary the settings a bit from voice to
voice - the sound will become more natural like this
4. Broad unisono:
Set the pans repeatedly fully left and fully right (1 left, 2 right, 3 left...) - the
unisono patch will become smooth, big and broad
5. Panning arpeggio:
Set the pans increasingly from fully left (voice 1) to fully right (voice 6). The
arpeggio will move now from far left to far right in the stereo field.
Page 17

The LEVERS section
A speciality of old oberheim synths was that they had two vertically working
levers instead of the popular wheels invented by moog. The modulation lever
is on the left side. In the original it only worked downwise. In the OP-X, it can
be used up- or downwise. Upwise, the modulation is inverted (noticeable only
in a realtive time context). The pitch lever is on the right side. It reacts vice
versa than a popular wheel. Downwise movement highers pitch, upwise
movement lowers pich, just as it was in the original.
A
Switches off the keyboards' response to midi data. This is recommended in
very slow daws since keyboard animation can cause slighty higher cpu usage.
L
Remotely switches the „Lega ON“ button for legato mode (no retrigger). More
about it in „ADD BUTTONS: Lega ON“ in this manual.
Os2
Oscillator 2 only. When switched on, the pitchwheel (or whatever it is called)
does change the pitch of oscillator 2 only. This is great for controlling sync
sounds. Try the preset "SyncSolo Pitchwheel" to explore this.
+12
This button serves for switching the pitchwheel interval from a third (standard)
to an octave (12 semitones).
Oct.
Switches the keyboard octave (three octave range). Be careful handling it in
vst automation mode because of the "radio button" switch mode. If the buttons
don't react correctly just click one time on the active led before switching.
When keyboard tracking is on, the octave setting will have an influence on the
harmonics. So better use your master keyboard's transpose function to extend
playing range without altering the harmonics.
Why six voices?
The original godfather of this project has six voices too. The original could be
purchased with 4, 6 or 8 voices. Every device had sockets for eight voice
boards. So the voices could be expanded by mounting further voiceboards.
Page 18

LOAD AND SAVE SOUNDS
OP-X comes with a huge collection of additional soundbanks in steinberg fxb
format. This is the standard format and can be read by almoust all existing vst
hosts. The banks collection is included in the download package. Put it to a
place that suits you best.
The banks folder contains an text info file where the contents of the banks are
briefly described. The names of the bank always begin with the prefix “opx_”
followed by the name of the bank.
New additional banks are published for free download in the user area:
http://www.sonicprojects.ch/obx/userarea.html
The banks are not being loaded by the plugin itself. This has to be done with
your vst host. Almoust all vst hosts support loading of fxb banks. So you have
to browse and load the banks from your vst host.
How this is done depends on your vst host. Generally look for “load or import
(fxb) bank”. This function in most cases can be accesed either by an icon or
menu in the plugin window itself or can be found in the vst hosts' “plugin”
menu. Some examples:
Cubase/Nuendo:
File -> Load bank (on top of the plugin window)
Herman Seib VSTHost:
Plugin -> Load bank
Orion Platinum:
Click on folder icon on the right of the presets chooser
Ableton Live:
Click on chooser below title bar
Create custom patches:
1. Tweak an existing preset or set up a new sound from scratch
2. Save the preset as fxp to a place you like and give it a name
Load the fxps:
You can load the fxps (presets) into any location of an existing bank by file ->
load preset or plugin -> load program. There's an empty bank in the banks
collection called “opx_empty” that can serve as empty root bank.
Create your own banks:
1. Load the opx_empty bank
2. Load your saved presets (see above) into this bank
2. Load your saved presets (see above) into this bank
Page 19

VST automation
Every single parameter of the OP-X can be vst automated as you know it from
other vstis. How exactly this is done depends on your vst sequencer. Example
Cubase: Push the write button on top of the vst plugin window (R), start the
sequencer and tweak the controls you want to automate. To read the written
data, go back to the zero position, push the read button on top (R) and start
the sequencer. The automated controls will move now according to the written
data which itself also can be edited.
While knob automation always works fine, some sequencers have problems
with button automation (not only with the op-x). They only react to changes
and don't write down the buttons' beginning state. You can tweak the wiritten
curves manually to fix the problem.
MIDI CC Implementation
The OP-X lets you remote control every single parameter via Midi Continuous
Controller Data (Midi CC). This is mostly handled by a knobs and button
equipped midi keyboard.
For fast handling and first trials, the MIDI CC Implementation follows the
popular standard Pro53 implementation, which is present as preset in almoust
every midi keyboard. So if you load the Pro53 preset in you midi keyboard, you
can access the most important controls (but not all) immediatly. Volume is
standard seven only in the Receptor version since some hosts tend to reset
this controller all the time. The previous version's mapping to cc 118 is still
there too so that controller assignments can be kept. OP-X now supports full
midi cc feedback for endless encoders with parameter settings dump on every
program change. This allows for complete remote control without value jumps.
The midi output of the plugin has to be routed back to the controller device for
this application. It's designed to work on all midi channels.
The full Midi CC Charts:
sorted by cc number *different order control present
001 Modulation Lever Pro53: compatible
005 Portamento Pro53: compatible
007 Volume Receptor version (see intro)
011 Volume Standard version (see intro)
016 Oct Low
017 Oct Mid
018 Oct High
020 LFO Freq Depth Pro53: PolyMod Source Filt Env
021 LFO PW Depth Pro53: PolyMod Source Osc B
022 OscTune Pro53: PolyMod Dest Freq A
023 FiltTune Pro53: PolyMod Destb PWidth A
024 EnvTune Pro53: PolyMod Dest Filter
025 Port Detune Pro53: LFO Midi Sync
Page 20

026 LFO Rate Pro53: compatible
027 LFO Sine Pro53: compatible *
028 LFO Square Pro53: compatible *
029 LFO S/H Pro53: compatible *
030 LFO Sync Pro53: LFO Envelope Trigger
031 III Arp LFO
032 Arp Sync
033 PM
034 OM Pro53: WheelMod LFO-Noise Mix
035 LFO to Osc1 Pro53: compatible
036 LFO to Osc2 Pro53: compatible
037 LFO to PW1 Pro53: compatible
038 LFO to PW2 Pro53: compatible
039 LFO to Filter Pro53: compatible
040 Pitch Osc1 Pro53: compatible
041 Saw Osc1 Pro53: compatible
042 Pulse Osc1 Pro53: compatible
043 Pulse Width Pro53: compatible (OSC A)
044 Sync Pro53: compatible
045 Osc1 On Pro53: compatible (not continuous)
046 Osc2 Full Pro53: compatible (not continuous)
047 Noise Full Pro53: compatible (not continuous)
048 Arp Speed Pro53: Mixer External Imput
049 Arp Steps
050 Pitch Osc2 Pro53: compatible
051 Osc2 Detune Pro53: compatible
052 Saw Osc2 Pro53: compatible
053 Osc2 only Pro53: Oscillator B Triangle
054 Pulse Osc2 Pro53: compatible
055 X-Mod Depth Pro53: Oscillator B Pulse Width
056 X-Mod Pro53: Oscillator B Low Freq
057 Ring Pro53: Oscillator B Key Follow
059 Unisono Pro53: compatible
062 Arp Hold
068 Legato On
070 Cutoff Pro53: compatible
071 Resonance Pro53: compatible
072 Env Amt Pro53: compatible
073 Key Track Pro53: compatible (not continuous)
074 Osc2 Half Pro53: Filter HPF Mode
075 A Filter Pro53: compatible
076 D Filter Pro53: compatible
077 S Filter Pro53: compatible
078 R Filter Pro53: compatible
079 Noise Half Pro53: Filter Envelope Invert
080 A Amp Pro53: compatible
081 D Amp Pro53: compatible
082 S Amp Pro53: compatible
083 R Amp Pro53: compatible
084 +12 Pro53: Amplifier Hold
085 Arp On Pro53: Release on/off
086 Velocity Pro53: compatible
Page 21

087 Spread Pro53: Analog
088 Master Tune Pro53: compatible
089 ENV
090 O2o
091 OM neg.
092 P1o
093 PM neg.
094 LFO Osc Phase
095 PW-FILT Phase
096 W-LFO 1/2
105 W-LFO Rate Pro53: Delay Effect Time
106 A.Touch Vib. Pro53: Delay Effect Spread
107 A.Touch Filt. Pro53: Delay Effect Depth
111 Pan1 Pro53: Delay Effect Low Cut
112 Pan2 Pro53: Delay Effect High Cut
113 Pan3 Pro53: Delay Effect Invert (not continuous)
114 Pan4
115 Pan5 Pro53: Delay Effect On (not continuous)
116 Pan6 Pro53: Delay Effect Wet
118 Volume Pro53: Delay Effect Midi Sync (not continuous)
sorted by function groups:
manual
007 Volume Receptor version (see intro)
011 Volume Standard version (see intro)
118 Volume Pro53: Delay Effect Midi Sync (not continuous)
022 OscTune Pro53: PolyMod Dest Freq A
023 FiltTune Pro53: PolyMod Destb PWidth A
024 EnvTune Pro53: PolyMod Dest Filter
087 Spread Pro53: Analog
control
005 Portamento Pro53: compatible
059 Unisono Pro53: compatible
051 Osc2 Detune Pro53: compatible
Page 22

modulation
026 LFO Rate Pro53: compatible
020 LFO Freq Depth Pro53: PolyMod Source Filt Env
021 LFO PW Depth Pro53: PolyMod Source Osc B
027 LFO Sine Pro53: compatible *
028 LFO Square Pro53: compatible *
029 LFO S/H Pro53: compatible *
035 LFO to Osc1 Pro53: compatible
036 LFO to Osc2 Pro53: compatible
039 LFO to Filter Pro53: compatible
037 LFO to PW1 Pro53: compatible
038 LFO to PW2 Pro53: compatible
oscillators
040 Pitch Osc1 Pro53: compatible
043 Pulse Width Pro53: compatible (OSC A)
050 Pitch Osc2 Pro53: compatible
041 Saw Osc1 Pro53: compatible
042 Pulse Osc1 Pro53: compatible
056 X-Mod Pro53: Oscillator B Low Freq
044 Sync Pro53: compatible
052 Saw Osc2 Pro53: compatible
054 Pulse Osc2 Pro53: compatible
filter
070 Cutoff Pro53: compatible
071 Resonance Pro53: compatible
072 Env Amt Pro53: compatible
045 Osc1 On Pro53: compatible (not continuous)
074 Osc2 Half Pro53: Filter HPF Mode
046 Osc2 Full Pro53: compatible (not continuous)
079 Noise Half Pro53: Filter Envelope Invert
047 Noise Full Pro53: compatible (not continuous)
073 Key Track Pro53: compatible (not continuous)
Page 23

envelopes
075 A Filter Pro53: compatible
076 D Filter Pro53: compatible
077 S Filter Pro53: compatible
078 R Filter Pro53: compatible
080 A Amp Pro53: compatible
081 D Amp Pro53: compatible
082 S Amp Pro53: compatible
083 R Amp Pro53: compatible
additinal functions
094 LFO Osc Phase
095 PW-FILT Phase
090 O2o
091 OM neg.
092 P1o
093 PM neg.
057 Ring Pro53: Oscillator B Key Follow
089 ENV
096 W-LFO 1/2
086 Velocity Pro53: compatible
025 Port Detune Pro53: LFO Midi Sync
030 LFO Sync Pro53: LFO Envelope Trigger
031 III Arp LFO
032 Arp Sync
085 Arp On Pro53: Release on/off
062 Arp Hold
Page 24

additinal knobs
105 W-LFO Rate Pro53: Delay Effect Time
106 A.Touch Vib. Pro53: Delay Effect Spread
107 A.Touch Filt. Pro53: Delay Effect Depth
034 OM Pro53: WheelMod LFO-Noise Mix
033 PM
088 Master Tune Pro53: compatible
049 Arp Steps
048 Arp Speed Pro53: Mixer External Imput
055 X-Mod Depth Pro53: Oscillator B Pulse Width
111 Pan1 Pro53: Delay Effect Low Cut
112 Pan2 Pro53: Delay Effect High Cut
113 Pan3 Pro53: Delay Effect Invert (not continuous)
114 Pan4
115 Pan5 Pro53: Delay Effect On (not continuous)
116 Pan6 Pro53: Delay Effect Wet
levers
068 Legato On
053 Osc2 only Pro53: Oscillator B Triangle
084 +12 Pro53: Amplifier Hold
016 Oct Low
017 Oct Mid
018 Oct High
Page 25

Impressum:
Programming and graphic design:
B. Maechler
Programming, puplic relations and sound design:
P. Wiesler
Mail:
info@sonicprojects.ch
Web:
www.sonicprojects.ch
Chassis design and 3d models:
Reiben Flounders
Web:
www.affinity3d.com
Sounbase contributors:
G. Poropat, M. Sauvageau, M. Saulino, B. Whitney
Special thanks go to:
Reuben Flounders, Mariano Saulino, Jeff McClintock, Rod McQuarrie,
Robin Adams, J.M. Maechler, Matthew Basset and everyone else who
has contibuted to the OP-X PRO development in any way
We'd also like to thank our customers for their enthusiasm and support
Page 26

Chapters
Introduction............................................................................................................ 2
Installation............................................................................................................. 3
License and copyright............................................................................................ 3
The voice LEDs..................................................................................................... 4
The MANUAL section............................................................................................ 4
VOLUME........................................................................................................... 4
TUNER.............................................................................................................. 4
OSC.................................................................................................................. 4
FILT................................................................................................................... 4
ENV................................................................................................................... 5
SPREAD........................................................................................................... 5
The CONTROL section......................................................................................... 5
PORTAMENTO................................................................................................. 5
UNISON............................................................................................................ 5
OSC 2 DETUNE................................................................................................ 6
The MODULATION section................................................................................... 6
RATE................................................................................................................. 6
SINE.................................................................................................................. 6
SQUARE........................................................................................................... 6
S/H.................................................................................................................... 7
FREQUENCY DEPTH....................................................................................... 7
OSC 1............................................................................................................... 7
OSC 2............................................................................................................... 7
FILTER.............................................................................................................. 7
PULSE WIDTH DEPTH.................................................................................... 7
OSC 1............................................................................................................... 7
OSC 2............................................................................................................... 7
The OSCILLATORS section.................................................................................. 8
PITCH 1............................................................................................................ 8
SAW.................................................................................................................. 8
SQU.................................................................................................................. 8
SINE.................................................................................................................. 8
WIDTH.............................................................................................................. 8
PITCH 2............................................................................................................ 8
SAW.................................................................................................................. 8
SQU.................................................................................................................. 8
SINE.................................................................................................................. 8
X-MD................................................................................................................. 9
SYNC................................................................................................................ 9
The FILTER section............................................................................................ 10
CUTOFF.......................................................................................................... 10
RESON........................................................................................................... 10
ENV AMT........................................................................................................ 10
OSC1.............................................................................................................. 10
OSC2 HALF.................................................................................................... 10
OSC2 FULL..................................................................................................... 10
Page 27

NOISE HALF................................................................................................... 10
NOISE FULL................................................................................................... 11
KEY................................................................................................................. 11
The ENVELOPES section................................................................................... 11
The ADDITIONAL FUNCTIONS section (below filter)......................................... 12
OSC................................................................................................................ 12
PW-FILT.......................................................................................................... 12
OSC2.............................................................................................................. 12
\....................................................................................................................... 12
PW1................................................................................................................ 12
\....................................................................................................................... 12
RING............................................................................................................... 13
ENV................................................................................................................. 13
Wheel LFO...................................................................................................... 13
VEL................................................................................................................. 13
Porta DET....................................................................................................... 13
LFO................................................................................................................. 13
III..................................................................................................................... 13
ARP................................................................................................................. 13
ARP ON.......................................................................................................... 14
The ADDITIONAL KNOBS row........................................................................... 14
LFO................................................................................................................. 14
A Vib................................................................................................................ 14
A Filt................................................................................................................ 15
OM.................................................................................................................. 15
PM................................................................................................................... 15
TUNE.............................................................................................................. 15
STEP............................................................................................................... 15
SPEED............................................................................................................ 15
X-Md................................................................................................................ 15
The voice pans................................................................................................ 16
The LEVERS section........................................................................................... 17
A...................................................................................................................... 17
L...................................................................................................................... 17
Os2.................................................................................................................. 17
+12.................................................................................................................. 17
Oct................................................................................................................... 17
Polyphony info..................................................................................................... 17
LOAD AND SAVE SOUNDS............................................................................... 18
VST automation................................................................................................... 19
MIDI CC Implementation..................................................................................... 19
sorted by cc number........................................................................................ 19
sorted by function groups................................................................................ 21
Impressum........................................................................................................... 25
Index.................................................................................................................... 28
Page 28

Index
\ 12
+12 17
A Filt. 15
A Vib. 14
ADDITIONAL FUNCTIONS 12
ADDITIONAL KNOBS 14
ADSR 11
Aftertouch 14
A 17
ARP 13
Arpeggiator 14
ARP ON 14
Attack 11
automation 19
CONTROL 5
CUTOFF 10
Decay 11
DEPTH 7
ENV 5, 13
ENV AMT 10
ENVELOPES 11
Envmod 15
FILT 4, 7
filter 2, 4f., 7, 9ff., 22
FILTER 10
Filterenv Modulation 12
FREQ 7
glide 5
hold 14, 23
III 13
Installation 3
installer 3
KEY 11
Keyboard tracking 11
LEDs 4
L 17
legato 17, 24
LEVERS 17
LFO 6, 13f.
Lfo Phase 12
load bank 18
load sounds 18
MANUAL 4
Master tune 15
MIDI CC 19
Midi CC Charts 19
Midi Continuous Controller 19
MODULATION 6
modulation lever 17
NOISE FULL 11
NOISE HALF 10
Oct. 17
OM 15
Os2 17
OSC 4, 12
OSC 1 7
OSC 2 DETUNE 6
OSC 2 7
OSC2 FULL 10
OSC2 HALF 10
OSCILLATORS 8
PITCH 2 8
pitch lever 17
PM 15
Porta DET 13
PORTAMENTO 5
pulse width 7f., 11ff., 15
Pulse Width 20, 22, 24
PW-FILT 12
RATE 6
Release 11
remote control 19
RESON. 10
resonance 10
RING 13
S/H 7
SAVE SOUNDS 18
SAW 8
Sequencer 15
SINE 6, 8
SPEED 15
Speed 14
SPREAD 5
SQU 6, 8
SQUARE 6
STEP 15
steps 15
Steps 14
Sustain 11
SYNC 9
Sync to Songtempo 13
TUNE 15
TUNER 4
tuning 2, 4ff., 15
uninstaller 3
UNISON 5
VEL 13
velocity 13
voice LEDs 4
voice pans 16
voices 2, 4f., 11, 17
VOLUME 4
VST automation 19
Wheel LFO 13
wheels 17
WIDTH 8
X-Md 15
X-MD 9
 Loading...