

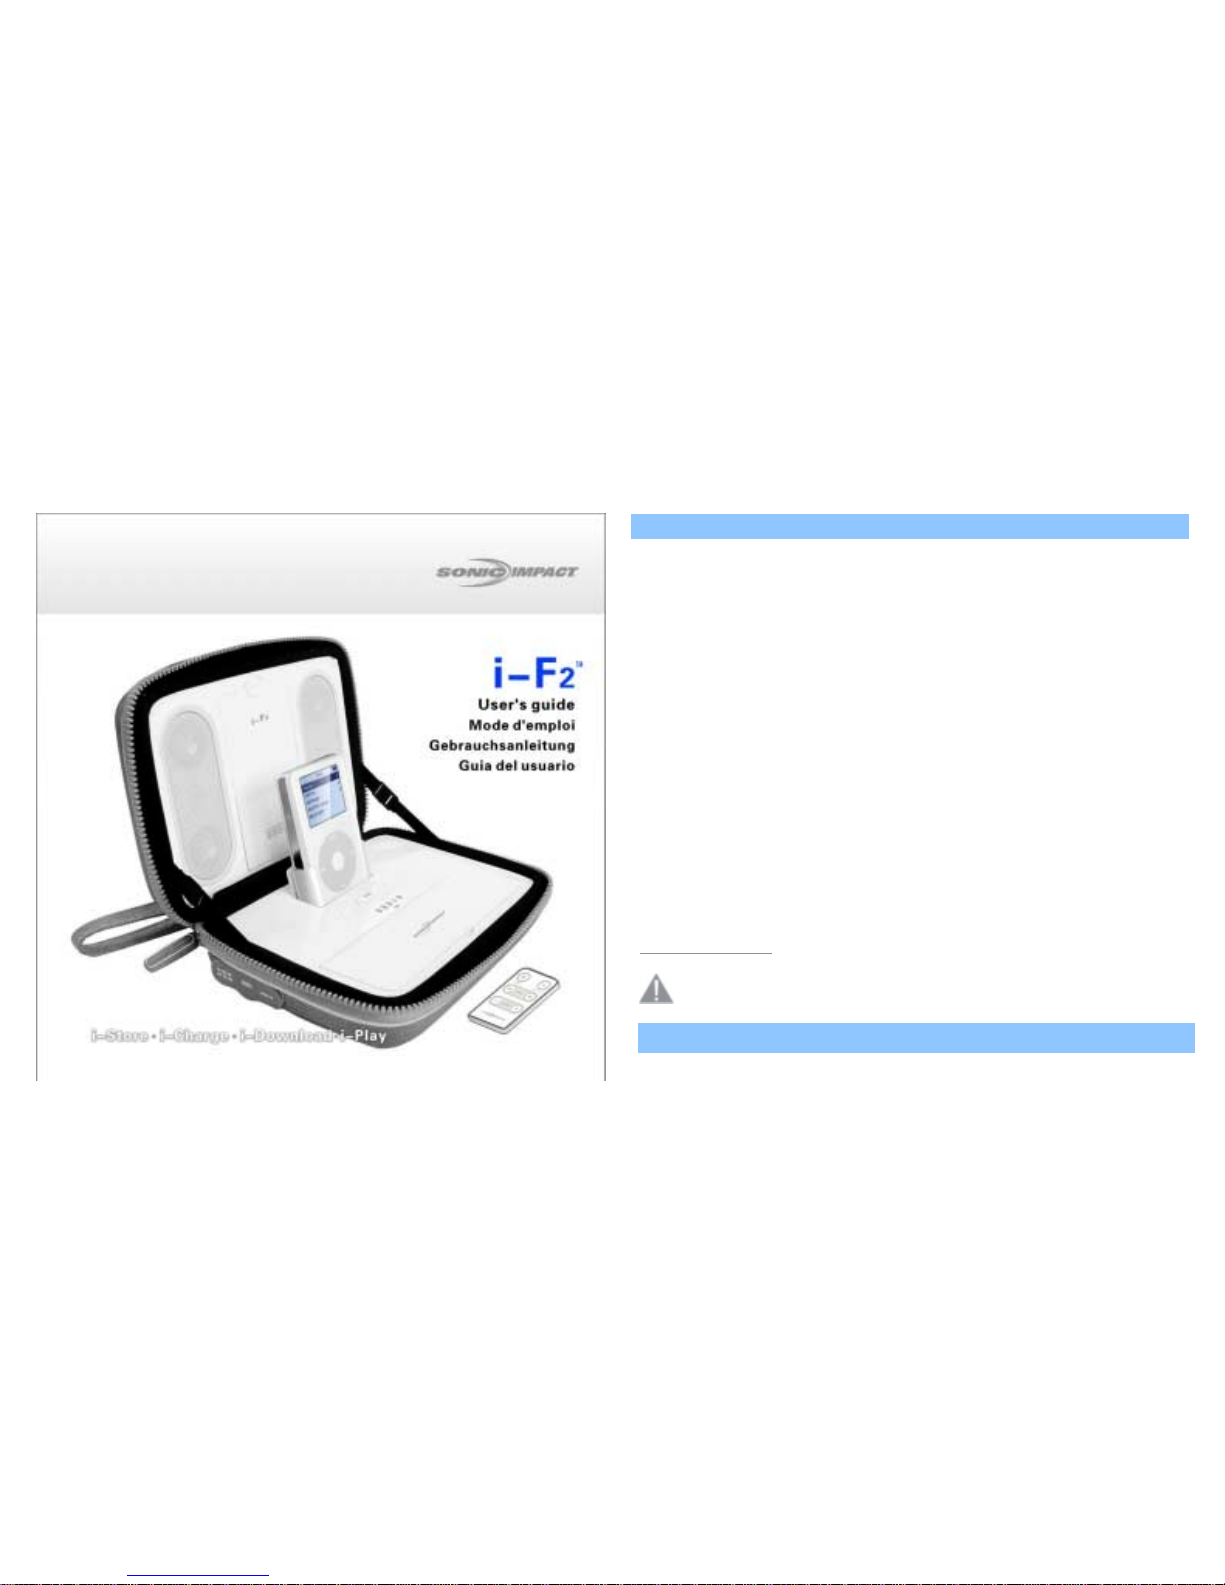
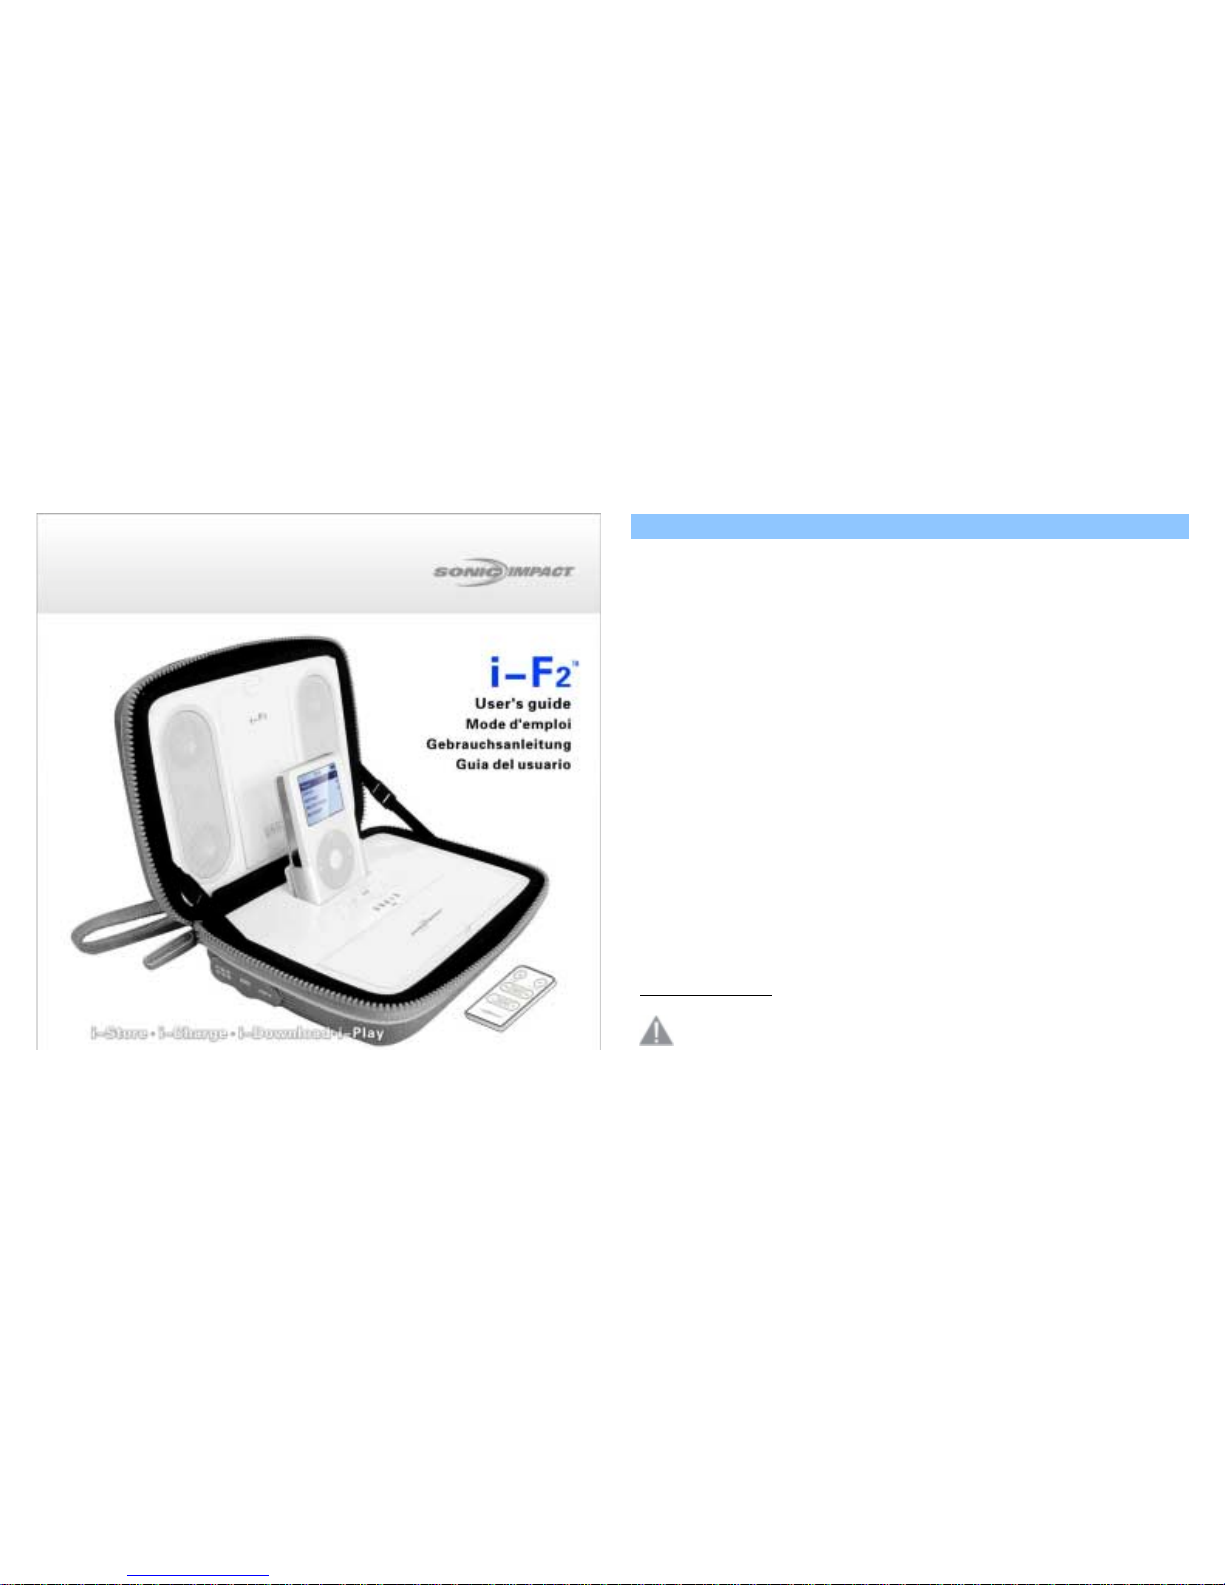
Page 1
i-F2 FCC Regulations
FCC Declaration of Conformity Statement
This device complies with Part 15 of the FCC Rules. Operation is subject to the following two
conditions: (1) this device may not cause harmful interference, and (2) this device must accept any
interference received, including interference that may cause undesired operation.
Radio and Television Interference
This equipment has been tested and found to comply with the limits for a Class B digital devi ce,
pursuant to Part 15 of the FCC Rules. These limits are designed to provide reasonable protection against
harmful interference in a residential installation. This equipment generates, uses, and can radiate radio
frequency energy and, if not installed and used in accordance with the instructions, may cause harmful
interference to radio communications. However, there is no guarantee that interference will not occur
in a particular installation. If this equipment does cause interference to radio or television reception,
which can be determined by turning the equipment off and then on, the user is encouraged to try to
correct the interference by one or more of the following measures:
• Increase the separation between the equipment and receiver.
• Connect the equipment to a different outlet so that the equipment and receiver are on
different branch circuits.
• Consult the dealer or an experienced radio/TV technician for help.
Changes or modifications not expressly approved by Sonic Impact could void the user’s authority to
operate the equipment.
THIS CLASS B DIGITAL APPARATUS COMPLIES WITH CANADIAN ICES-003.
Sonic Impact Technologies LLC ©Sonic Impact Technologies LLC
2555 State Street i-F2 is a trademark of Sonic
San Diego, California 92101 Impact Technologies LLC
USA iPod® is trademark o f Apple
Computer, Inc., registered in the
www.si-technologies.com
U.S. and other countries
Important operating and maintenance (servicing) instructions.
CAUTION: To prevent electrical shock do not use the (polarized) plug with an extension cord, receptacle
or other outlet unless the blades can be fully inserted to prevent blade exposure.
Page 2
WARNING: TO REDUCE THE RISK OF FIRE OR ELECTRIC SHOCK, DO NOT EXPOSE THIS I-F2 TO RAIN OR
MOISTURE
IMPORTANT i-F2 SAFETY INSTRUCTIONS
1. Read instructions --All Safety and operating instructions should be read before the i-F2 is used.
2. Retain instructions--The operating instructions should be retained for future reference.
3. Heed warnings--All warnings in the operating instructions should be read and adhered to.
4. Follow instructions--All operating instructions should be followed.
5. WARNING: Avoid water and moisture--Keep away from all liquids. To reduce the risk of fire or
electric shock, do not expose the i-F2 to rain or moisture.
6. Location--The i-F2 should be placed in a stable, level location, away from external heat sources
and with adequate ventilation. Do not expose the i-F2 to temperature or humidity extremes.
Protect from exposure to dirt, sand, and dust. Note that the speakers are magnetically shielded to
prevent distortion of TVs and computer monitors, but keep magnetic storage media at least four
inches from the i-F2 to avoid data loss.
7. Power supply--When not powering off the internal rechargeable battery, the i-F2 should only be
connected to the power supply provided with your unit or as described in the operating
instructions and as marked on the i-F2.
8. Power cord use and care--Power cords should be located so that they are not likely to be walked on
or crushed by placing other objects on top of them. Check all attachments regularly. Do not
bypass the proper grounding or polarization of the power plug. If your i-F2 is not to be used for an
extended period of time, unplug and stow the power cord.
9. TO PREVENT THE RISK OF ELECTRIC SHOCK AND DAMAGE TO THE UNIT, DO NOT REMOVE THE
SPEAKER GRILLES OR OPEN THE UNIT FOR SERVICING EXCEPT TO REPLACE THE RECHARGEABLE
LITHIUM ION AS INSTRUCTED IN THIS MANUAL. PLEASE REFER SERVICING TO QUALIFIED SONIC
IMPACT PERSONNEL.
10. Cleaning--Use only a soft dry cloth. Do not use cleaning chemicals of any kind.
11. Lightning Storms--Un plug the apparatus during lightning storms to pr event accidental damage.
12. Accessories--Only use attachment accessories specified by Sonic Impact Technologies.
13. Damage Requiring Service--The i-F2 should be serviced by qualified service person when:
· The power -supply cord or the plug has been damaged.
· Objects have fallen onto or liquid has been spilled into the i-F2 .
· The i-F2 has been exposed to rain.
· The i-F2 does not appear to operate normally or exhibits a marked change in performance.
· The i-F2 has been dropped or the enclosure has been damaged.
14. Servicing--The user should not attempt to service the i-F2 themselves. Servicing should be referred
to a qualified service person or returned to the dealer. For questions about warranty and service
call Sonic Impact Technologies, LLC at service@si-technologies.com
.
ONE-YEA R LIMITED W A R RANTY
Sonic Impact Technologies warranties that all of its products are free from defects in material and
workmanship in the course of normal and reasonable use for a term of one year from the date of
purchase.
This warranty is the exclusive and only warranty in effect relative to Sonic Impact Technologies
powered i-F2 speaker system and any other warranties, either expressed or implied, are invalid. Neither
Sonic Impact Technologies, LLC nor any authorized Sonic Impact Technologies, LLC reseller are
responsible for any incidental damages incurred in the use of the speakers. (This limitation of incidental
or consequential damage is not applicable where prohibited.)
Sonic Impact Technologies, LLC’s obligation under this warranty does not apply to any defect,
malfunction or failure as a result of misuse, abuse, improper installation, use with faulty or improper
equipment or the use of the speaker systems with any equipment for which they were not intended.
The terms of this warranty apply only if the i-F2 speaker systems are returned to the respective
authorized Sonic Impact Technologies, LLC reseller where they were purchased.
CUSTOMER SERVICE
For service or warranty of the electronics please contact:
service@si-technologies.com
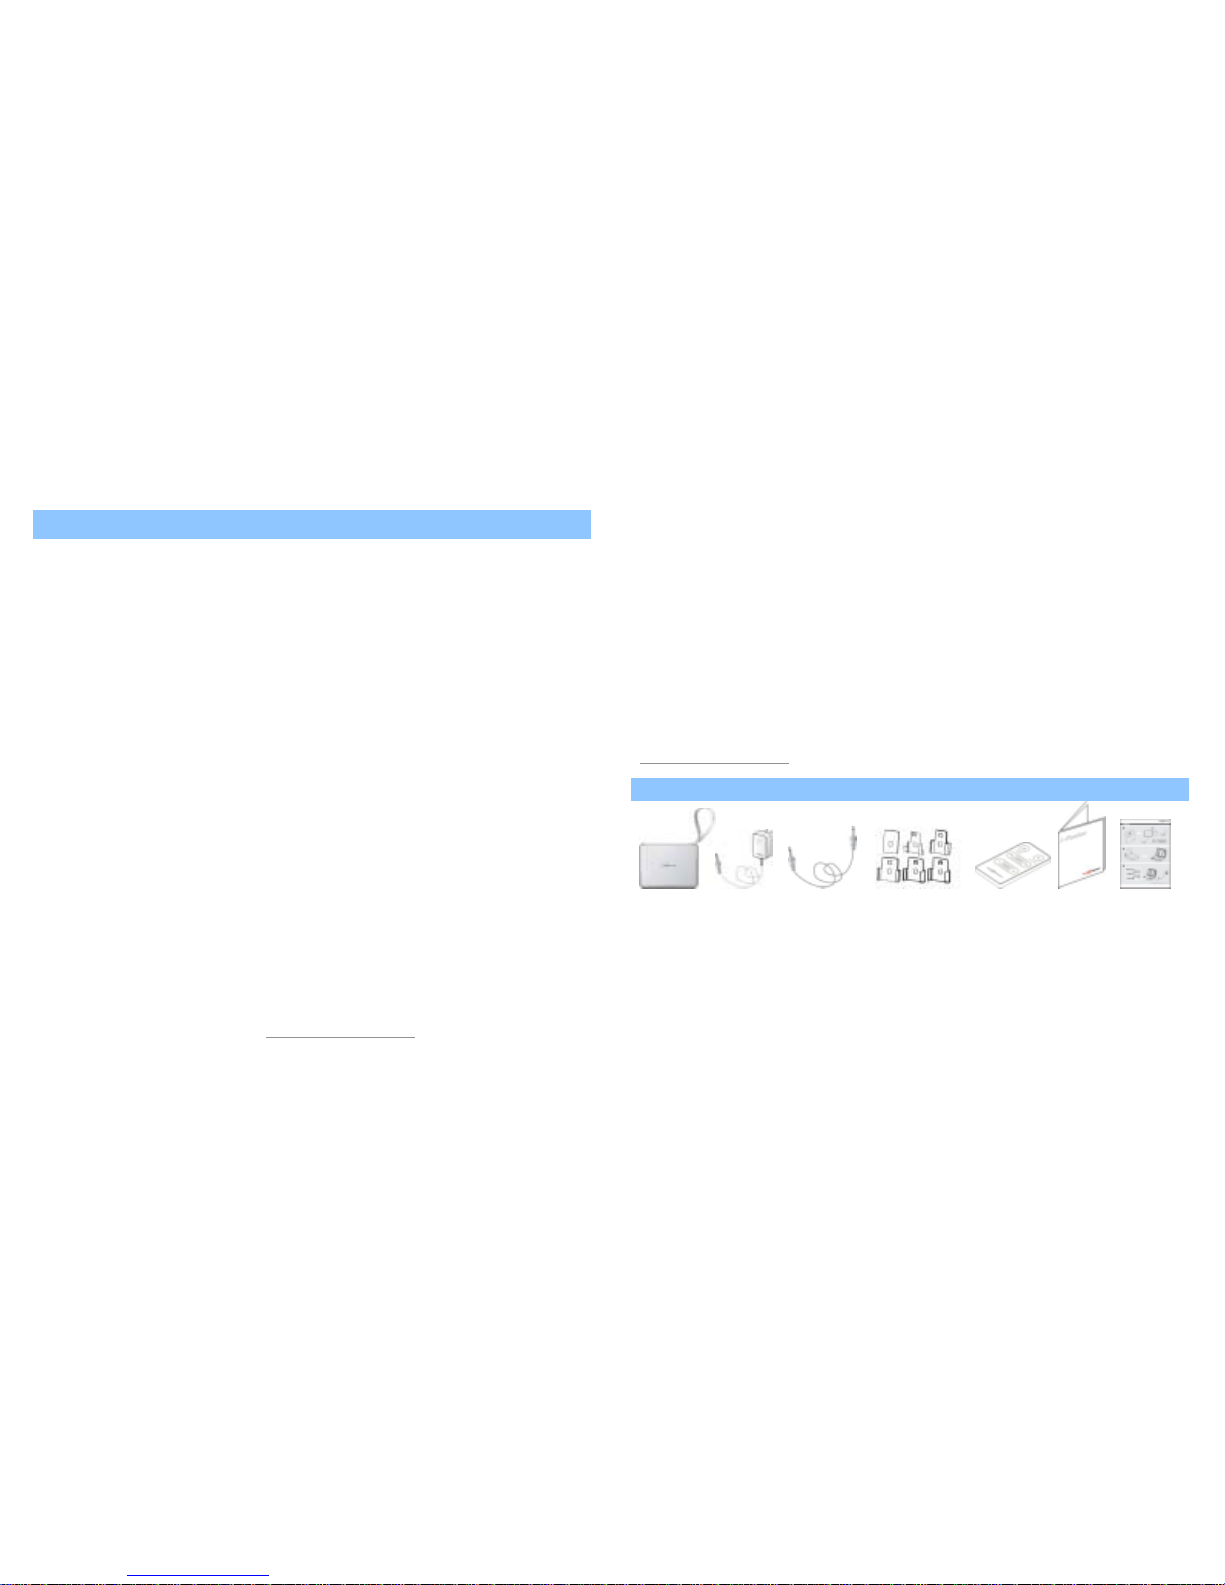
PACKAGE CONTENTS
i-F2 System AC Power Stereo iPod® Adapter Remote Manual Quick
Adapter Cable Sleeves Connect
Instructions
· Built-in lithium ion battery
· 9V@2.0A power adapter
· 3.5mm stereo cable
· iPod 3G/ iPod 4G / iPod Photo/iPod nano/iPod Mini/ iPod video adapter sleeves
· Instruction manual
· Remote
· Quick connect instructions
Page 3

i-F2 Diagram:
1. Compartment Lo ck
2. Speaker Driver UniPod
3. iPod®30 Pin Docking Station
4. Input Jacks
5. Volume Controls
6. Headphone/Remo te Co m p a rtm ent
7. iPod ® Storage Compar tment
8. iPod ® Storage Compar tment Door iPod
9. Power On/Off and LED
10. Battery Life Indicator LED
11. Battery Co ver Lid
12. Lithium Ion Battery
13. Remote
LOCATING AND SETTING UP YOUR i-F2 SYSTEM
Position i-F2 system on a stable, level surface. The i-F2 system can be placed close to video displays
such as TVs and computer monitors without distorting the image, but keep magnetic storage media
(such as drives, disks, and tapes) at least four inches away to avoid data loss.
Make sure that the plastic clips securing the hinge straps are secure. If necessary, adjust the tension of
the release button on the clips by pressing in through the hole on the back of the clip, using the tip of a
ball point pen. Note that you can open the i-F2 completely flat by releas ing both clips.
CONNECTING TO YOUR i-F2
War nin g: Ensure that i-F2 system is in the POWER OFF mode before making any connections and before
docking the iPod into the i-F2 system. To ensure proper operation, please carefully follow the
connection sequence as described below and in the order in dicated.
Attach the iPod adapter sleeve, provided with your i-F2, that matches the model of your iPod. Each
sleeve will be marked with the iPod models. An iPod model with a 30 PIN connector can be connected
directly to the 30 pin docking sta tion located on the i-F2 system. An older iPod model without a 30 PIN
connector can be connecte d via the AUDIO IN port located at the side of your i-F2 case and by using the
3.5 mm stereo cable, included. When you’re sure that either method of connection has been made you
are ready to play the i-F2 speakers.
POWER
The i-F2 can operate using the rechargeable built-in Lithium ion battery. You may bypass the battery
and use the external AC 9V@1.8A power adapter included with your i-F2. The AC adapter will power
your unit, recharge the Lithium ion battery and recharge your iPod in the 30 pin connector station all
simultaneously.
To use external p ower by power adapter:
When the iPod is connecte d to the i-F2 system, insert the AC adapter barrel connector into the jack
marked DC IN 9V
, and then insert the universal power adaptor blade end into your AC power
Page 4
wall jack. Your i-F2 is ready to play. When docked, your iPod will also recharge when using the AC
adapter.
T o use the rechargeable, built-in, Lithium ion battery supply:
The i-F2 system has a powerful, rechargeable Lithium ion battery built into the case. Utilizing this
independent power source, you can play your iPod for hours between charges. Please note that
recharging of the iPod does not occur when powering off the Lithium ion battery.
START PLAYING
1. With your iPod seated in the docking station, or connected via the 3.5 mm stereo cable, slide the
power switch
on the front panel to “AUTO ON” position to turn the i-F2 on. The LED
display will turn green.
2. Turn on your iPod, adjust the volume using the volume adjustmen t on the i-F2, and play your
favorite tunes. (Note that the iPod’s volume control is bypassed when docked in the i-F2.)
VOLUME CONTROL
The buttons on the front panel are the master volume controls for the i-F2 system. Press and
hold “+”to increase the volume and then “-”to decrease the volume. The volume will start at the
volume position every time you re-start the i-F2 system.
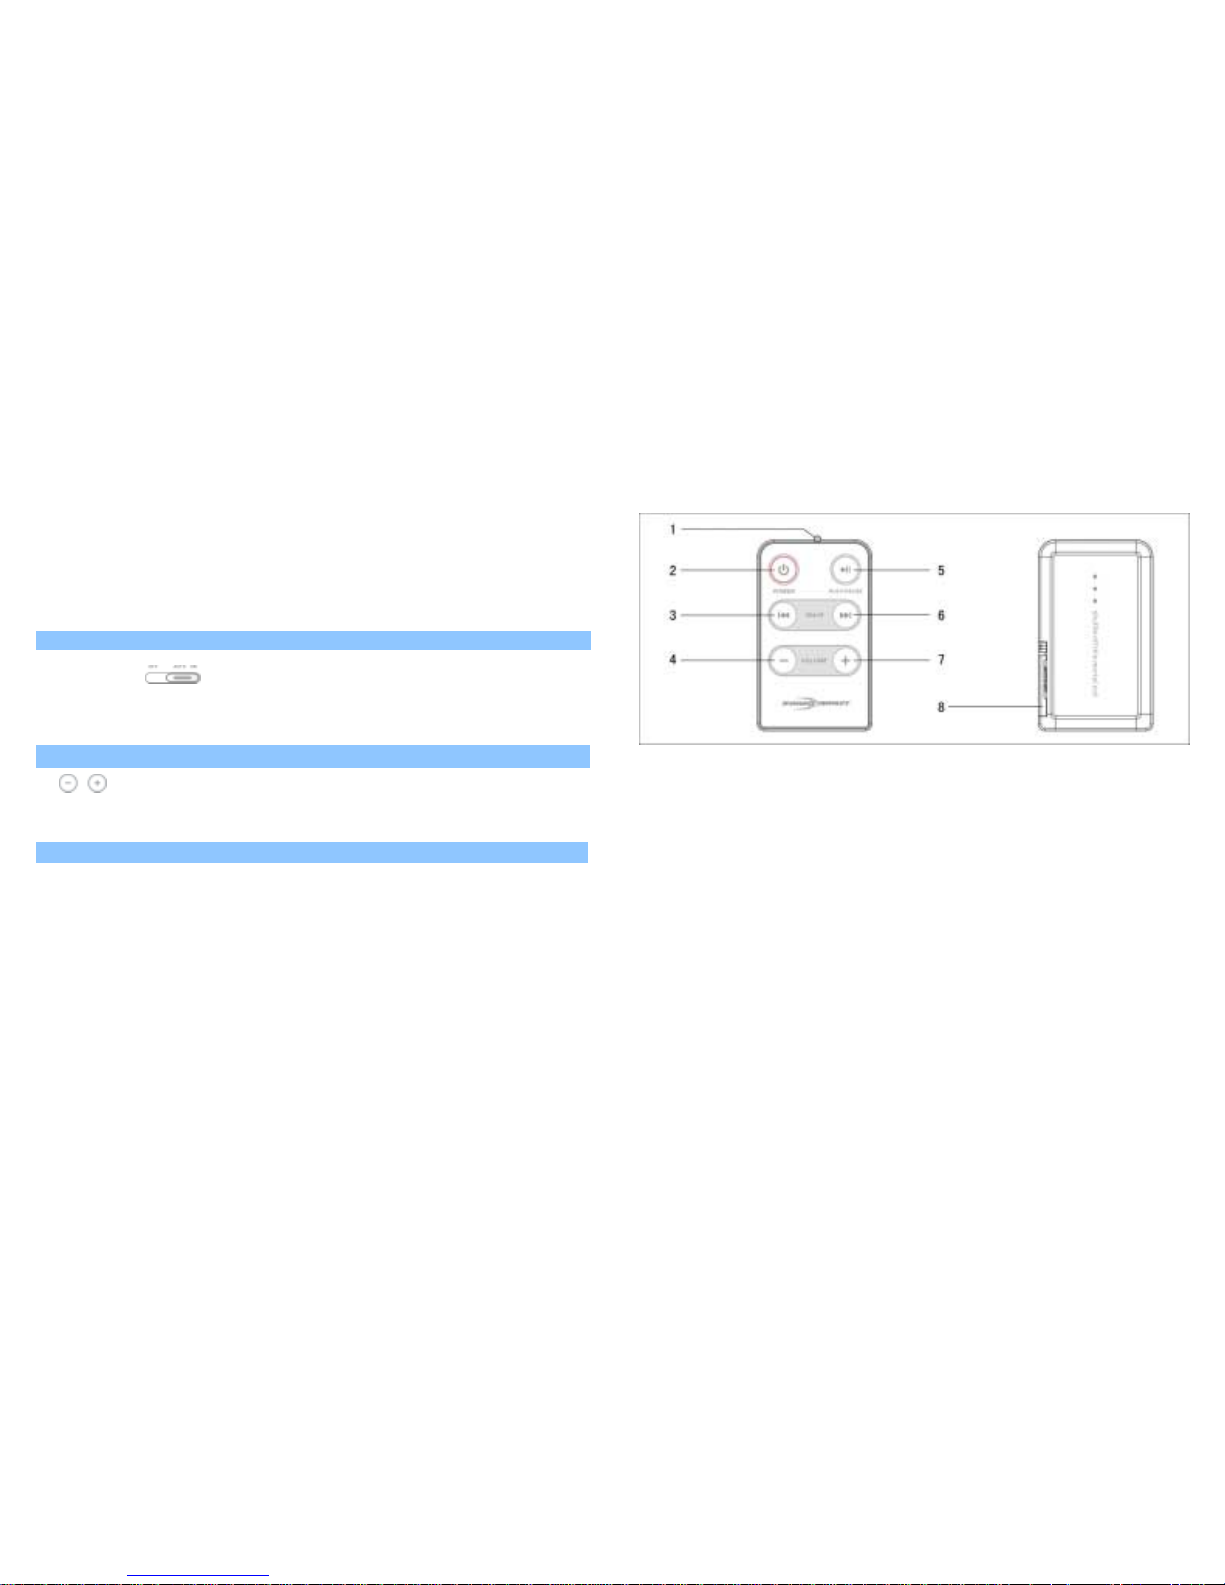
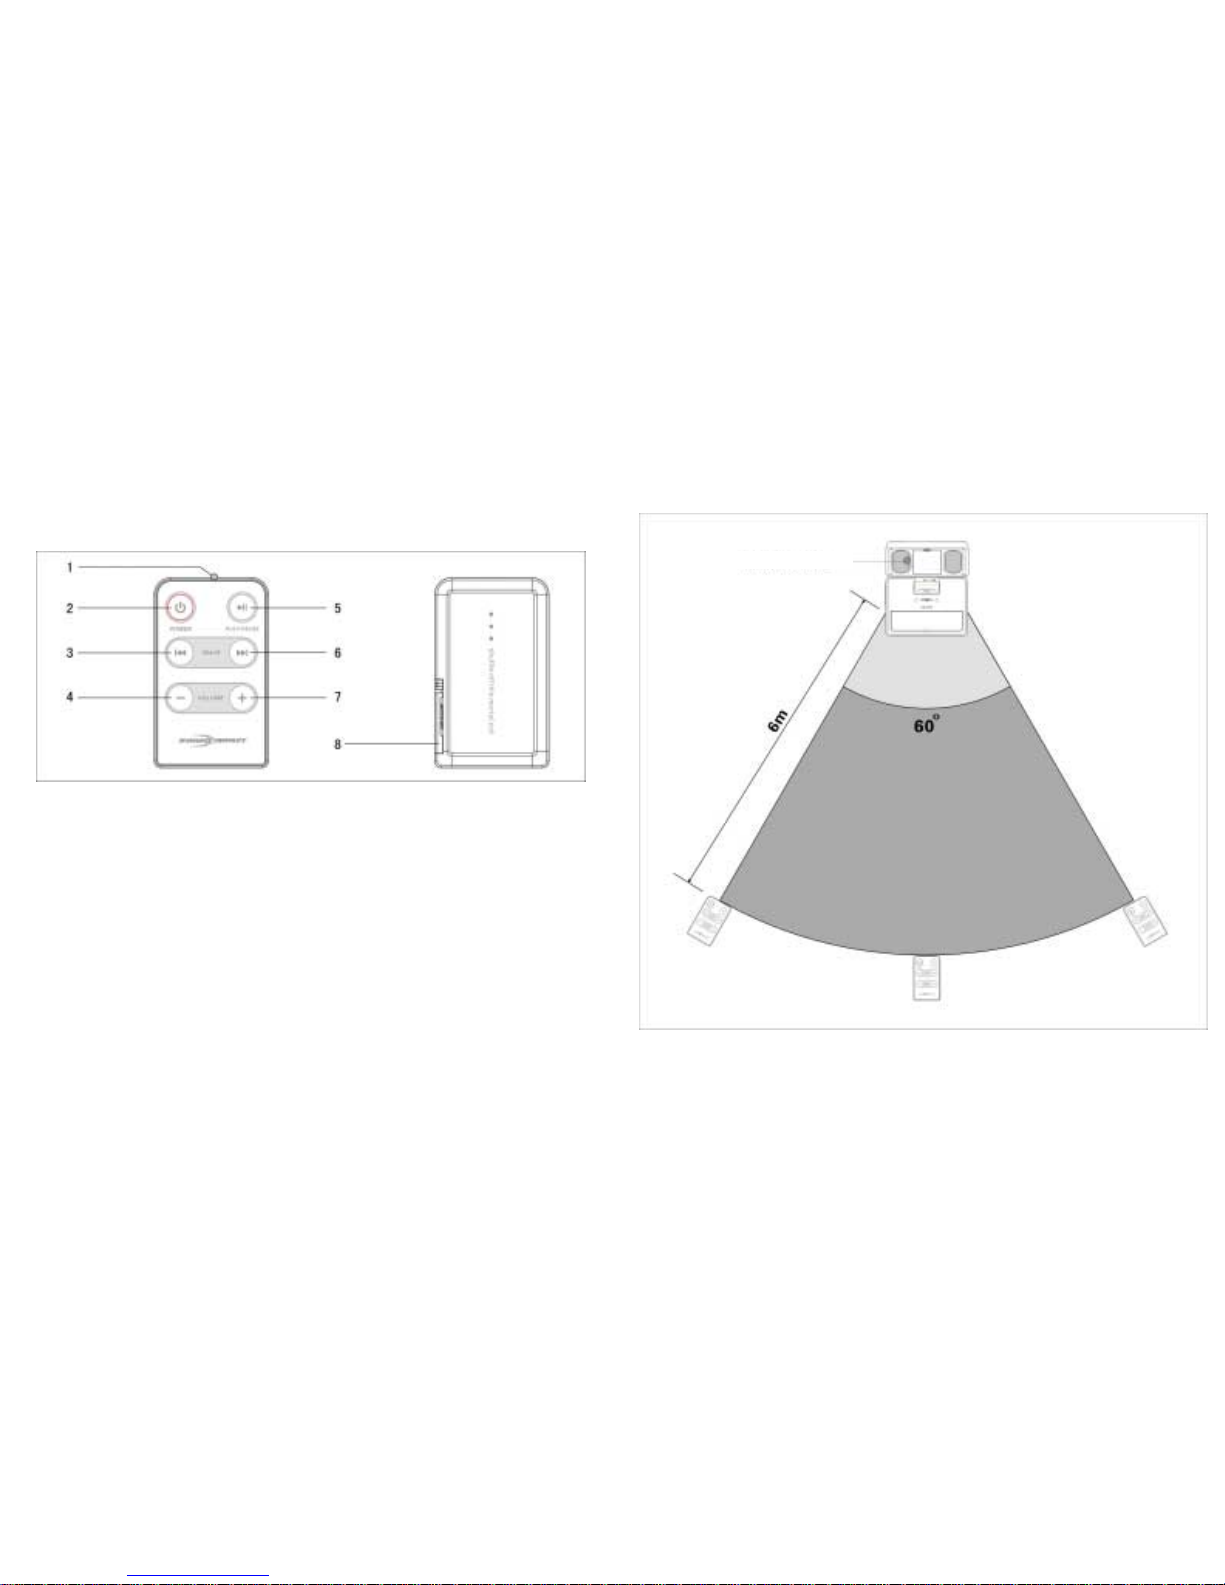
REMOTE USAGE
Specified remote included in i-F2 system can do normal operations to ipod player
and i-F2 system
1. Remote is located in the Headphone & Remote compartment. Please follow the
illustration in the Quick Connect instruction to take it out or put it in
2. Special remote uses one butto n battery to fully realize the functi ons of the audio
system. Plea s e r efer to t he i llustr a t ion in t he Quick Connec t instruc t ion to replace
the dead battery
1. Infrared Transmit Head
2. Power On/ Power Off
3. Prev
4. Vol-
5. Play/ Pause
6. Next
7. Vol+
8. Battery Nog
3. While using the remote, please ensure that the Infrared transmit head is rightly
aimed at the re ceptio n head on the i- F2 syste m, at the di stance of 6M , at the an gle
of 60℃.The area shadowed in the graph is the valid scope for the remote.
Page 5
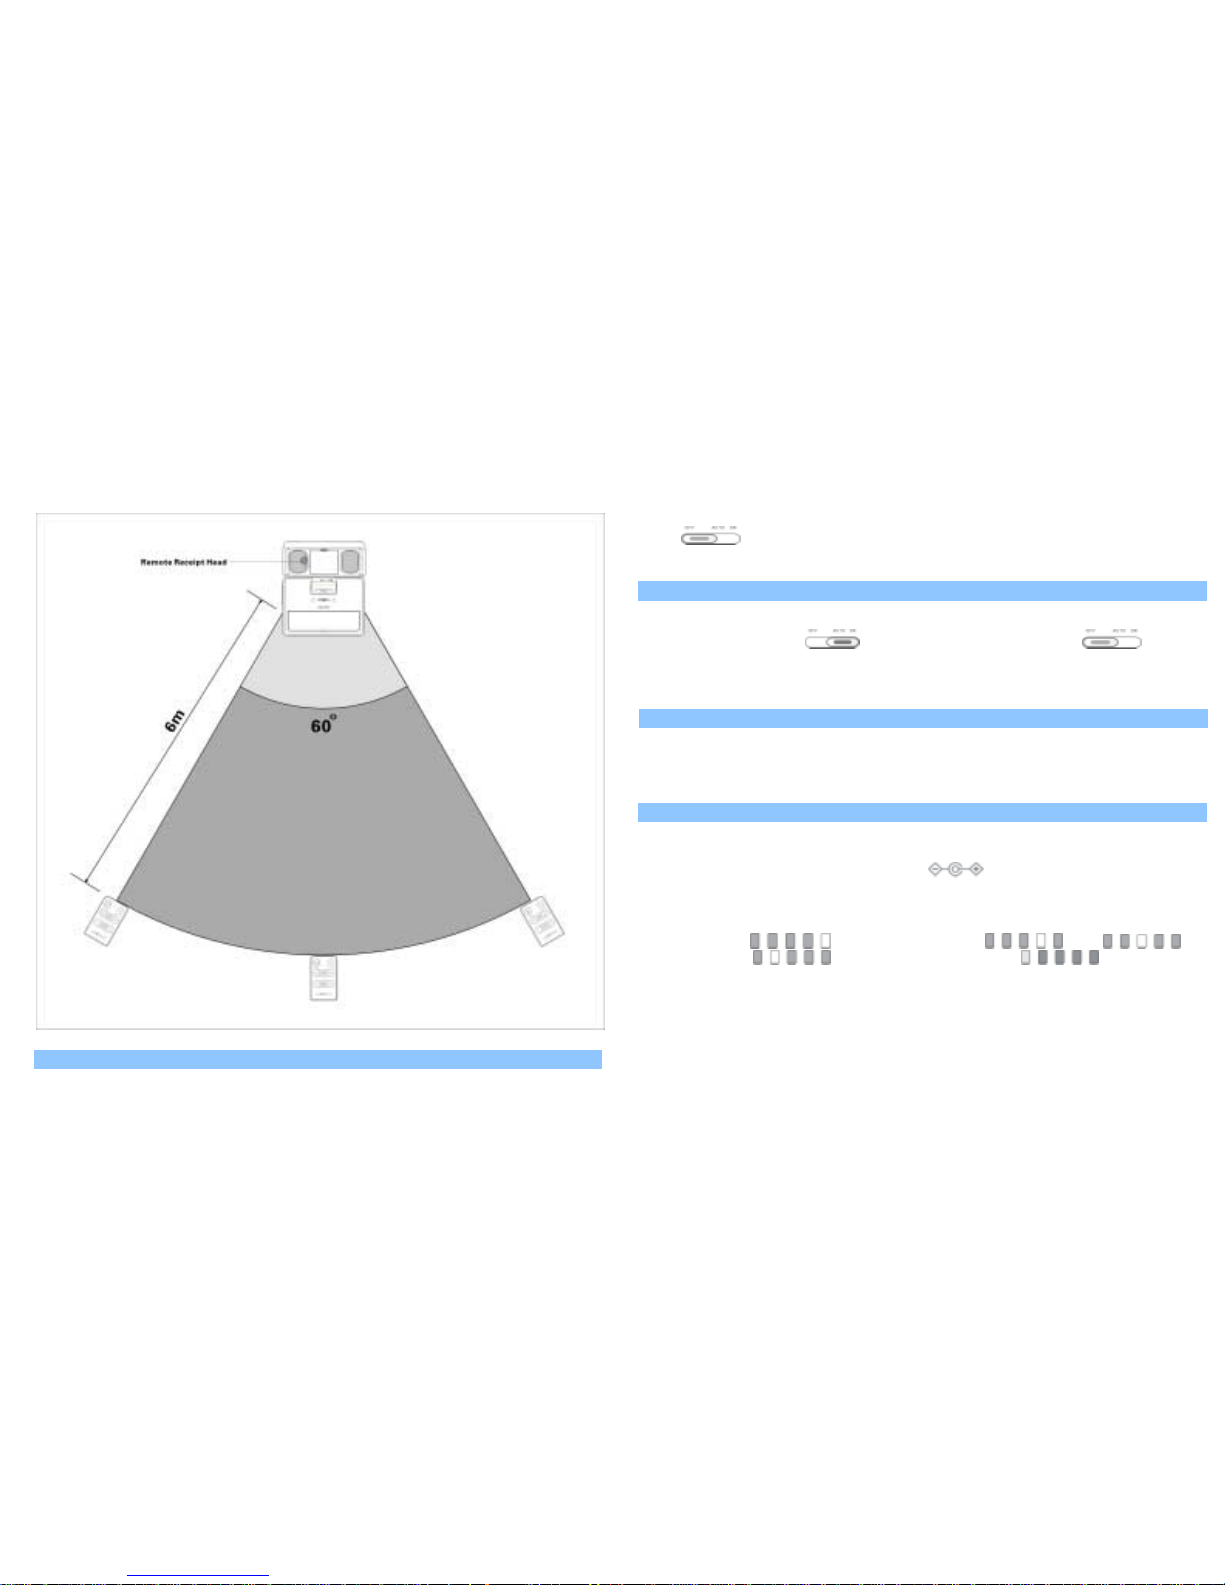
4. Put the remote back to the compartment after using to avoid any loss
POWER OFF
When not in use and to minimize power consumption, please set the power switch to the “OFF”
position
. Please note that the i-F2 has an “AUTO SHUT-DOWN (STANDBY) function which
prevents excess power consumption during idle play.
AUTO SHUT-DOWN (STANDBY):
When the power switch is set at the “AUTO ON”position, the i-F2 system will shut down automatically
and goes in to standby mode if an audio signal is not detected within 5 minutes. The LED on the power
switch will then turn to red
The LED will automatically turn to green when an
audio signal is detecte d and the i-F2 system will automatically power on. Power consumption will be
reduced in this “standby” mode, but we suggest that you shut down the i-F2 system completely when
not in use for an extended period o f time to save battery life.
DA TA TRANSFER
DATA TRANSFER:
Note that you can download and upload music while your iPod is docked in the i-F2’s docking station,
using the iPod Dock Connector to Fire Wire Cable that came with your iPod. Simply plug that ca ble into
the port located on the left side of the i-F2, and plug the other end into your compu ter. Follow the
instructions that were included with your iPod to download, upload, and manage your music
BUILT-IN LITHIUM BATTERIES
1. The i-F2 system uses a rechargeable built-in 8.4V @2000mAH Lithium ion battery.
2. A. Prior to your first use of the i-F2 powered off of the Lithium ion battery, you must fully charge
the battery. Plug in the 9V@2.0A AC into an AC wall outlet and insert the barrel connector at the
end of the adapter cable into the socket marked
on the side of i-F2 system. A first time
full charge will take 6-8 hours.
B. To recharge, connect the AC power adapter as described above. A full recharge will take 4-6
hours. With the iPod docked, both the battery and the iPod will be recharged simultaneously,
3. The i-F2 system has a row of LED lights that serve as battery life indicators.
high power
moderate power
slight power
WARNING: charge required:
4. The i-F2 system has a low power warning function. When the “charge required” indicator turns red,
it is a warning that the system will soon go into the SHUT-DOWN mode. The system will operate
again after power has been charged and the unit is turned back on.
5. While the i-F2 system is being charged, the power indicator lights will blink in sequence until the
last light at the right end sto ps blinking. The charging is now completed. Under normal use, the i-
F2 Lithium battery can last 8 hours
Page 6
6. When the built-in Lithium ion battery no longer charges or lasts a ver y short time after charged, it
implies that the effective battery life is coming to an end and a replacement is necessary. (Please
refer to the section Battery Replacement).
7、 Specs for built-in lithium ion battery: Nominal Voltage:7.0V
Nominal Capacity:2000mAh Max.Charging Voltage:8.4V
GB/T 18287-2000
Warning:
·Re-charge using only the assigned adapter included with the i-F2 and as described in the user manual.
Over-charge and reverse
charging of the battery is prohibited.
·Use battery only for the specified i-F2 device.
·Short circuit is prohibited; the discharge voltage is no t allowed to go below 5.0V
. Use i-F2 system and battery recharged should be between -5° – 30° C, within 70% humidity condition
·Do not expose the battery to fire or excessive heat. Do not pierce the battery, strike with a hard object
or subject it to heavy impact. Avoid
direct contact of the terminals with water or me tal objects. Disassemble, refit and solder of battery
is prohibited.
·Storage and charging should be between -5° – 25° C and within 70% humidity, battery life indicators
should be moderate power. Battery should be recharged and discharged completely every three
months.
·Don’t use the built-in lithium ion battery if you detect a peculiar smell,
color change or change o f the physical shape
·If liquid leaks from the battery and comes in contact with the skin, immediately rinse the li quid from
the skin with water.
·The battery should be recycled or disposed of properly
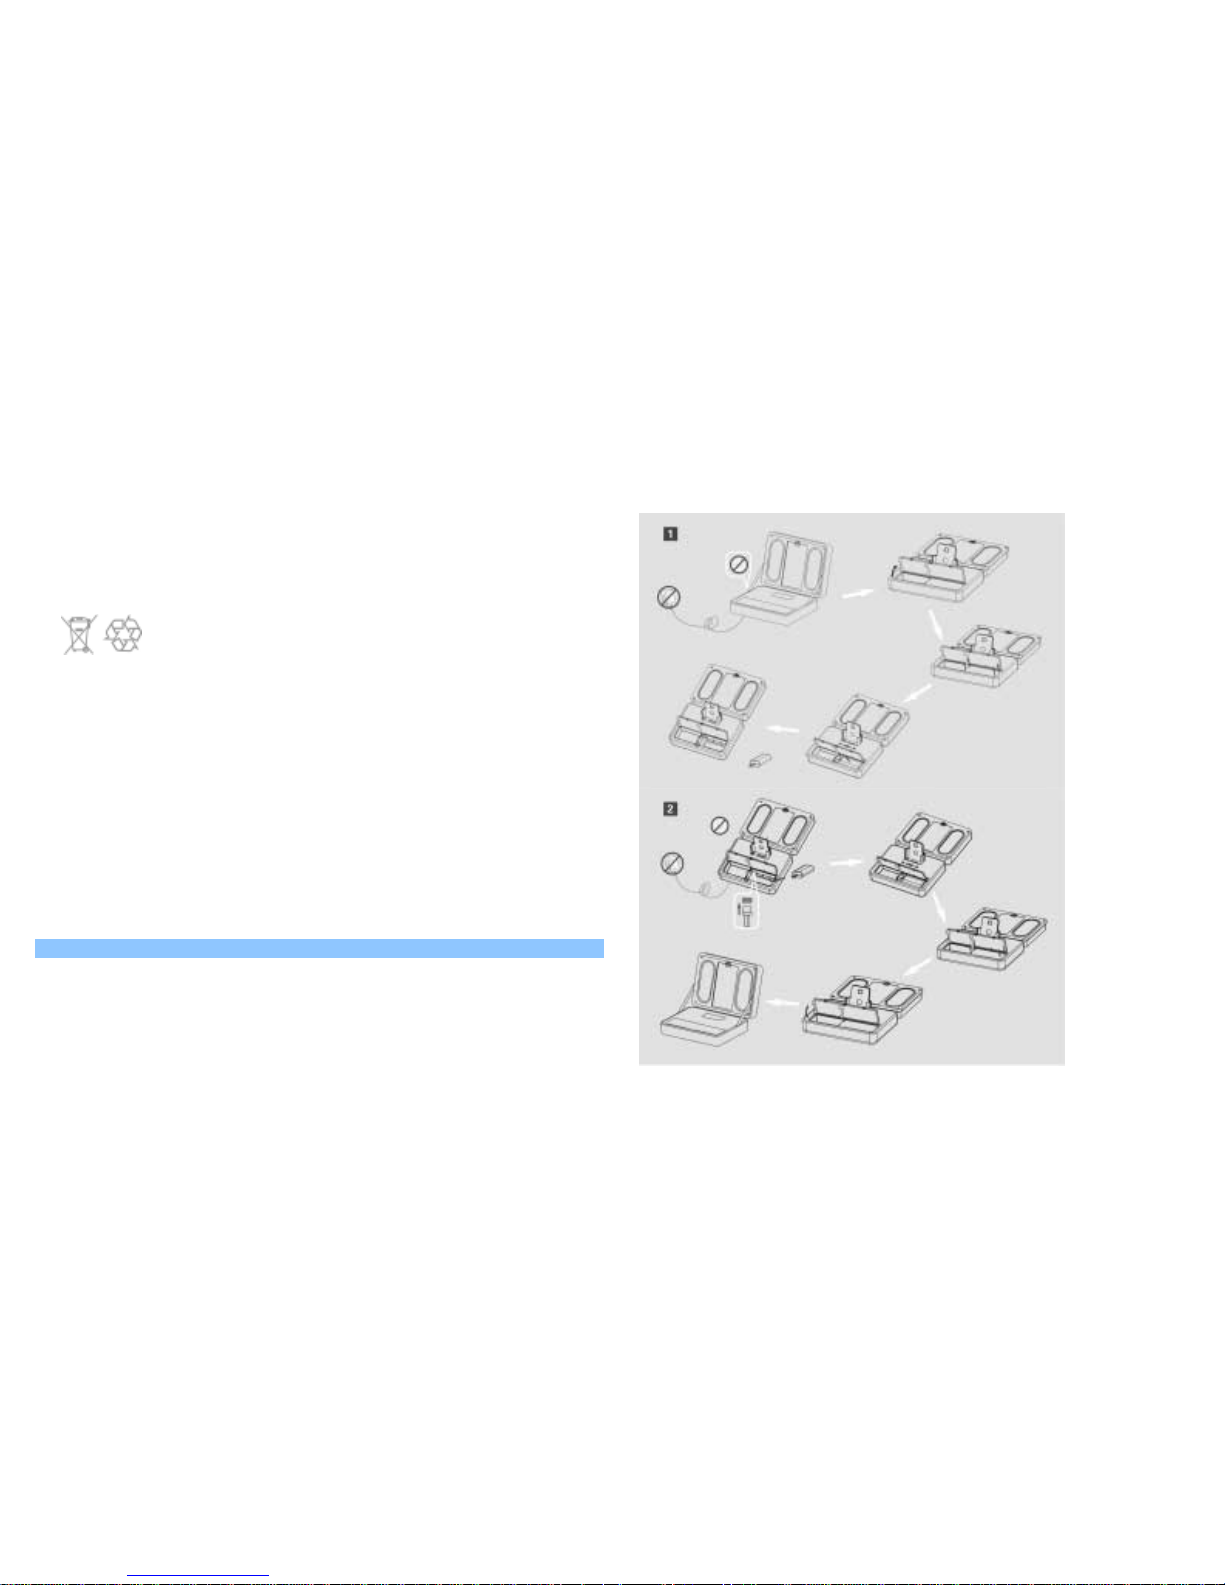
BATTERY REPLACEMENT
Please note the following illustration on how to replace the rechargeabl e built-in Li –ion batteries.
Page 7

SPECIFICATION
The excellent sound quality of the i-F2 comes from our highly professional design, which includes a
customized Hi-Fi Neodymium driver, digital amp, and the latest digital equalizer circuitry
Specifications:
Power output: 2W*2
Speaker channel: 2 channel stereo output
Impedance: 12Ω
Frequency:120 Hz-20KHz
Signal to noise ratio: 85dB±2 (0.5M & 1W)
Speaker Drivers:neodymium - magnetic drivers @ 1.25” X 4
TROUBLE SHOOTING
SYMPTOM POSSIBLE PROBLEM SOLUTION
Power is not turned on Position the power switch to the “on” position.
Universal power supply
cord isn’t connected to
a wall outlet and/ or
the power supply
connector is not
plugged into jack on
the back of the i-F2
system.
Plug the universal power supply into a wall outlet and plug
the power supply connector into AC input jack on the side of
the i-F2 system.
Surge protector (if
used) isn’t powered
on.
If the universal power supply cord is plugged in to a surge
protector, make sure the surge protector is switched on.
Power
LED not
lit when
AC
adapter
plugged
in
Wall outlet is not
functioning.
Plug another device into a wall outlet (same outlet) to
confirm the outlet is working.
SYMPTOM POSSIBLE PROBLEM SOLUTION
The
battery
life
indicator
at the left
end turns
red
Warni ng : Ch ar ge
required.
Charge the batteries before re-playing i–Fusion system.
Remote t is out of the
valid scope
Remove it to the valid scope
Some object disturbs
between the i-F2 and
the remote
Remove the object or remove the remote to the valid scope
w/o any distu rbance between.
Remote
no
function
The battery inside the
remote is dead
Replace the battery(Refer to the illustrations in the Quick
Connect instruction for detail operation)
Verify the universal power supply cord is plugged into a wall
outlet and the AC input jack on the side of the i-F2 system.
Verify rechargeable battery is charged if the universal power
supply isn’t being used.
Power is not turned on.
Verify the power switch has been positioned to the “ON”
position, the stand-by button has been pushed and the LED is
illuminated.
Press the “+” button to increase the volume. Volume is set too low.
Check volume le vel on alternate audio source device and set
at mid-level.
No sound
from the
speakers
iPod is not seated into
the docking station.
Remove iPod and re-seat it in the docking station.
Page 8

SYMPTOM POSSIBLE PROBLEM SOLUTION
Power is not turned on. Verify the universal power supply cord is plugged into a wall
outlet and the AC input jack on the side of the i-F2 system.
Verify rechargeable battery is charged if the universal power
supply isn’t being used.
Verify the power switch has been positioned to the “ON”
position, the stand-by button has been pushed and the LED is
illuminated.
Volume is set too low. Press the “+” button to increase the volume.
Check volume le vel on alternate audio source device and set
at mid-level.
iPod is not seated into
the docking station.
Remove iPod and re-seat it in the docking station.
3.5mm stereo cable is
not connected to an
audio source (when not
using docking station).
Connect 3.5mm stereo cable to the audio source. Make sure
the signal cable is inserted firmly into the correct j acks.
3.5mm stereo cable is
connected to wrong
output on audio source
When not using
docking station).
Make sure the 3.5mm stereo cable is connected and fully
inserted in the “line-out”, “audio out”, or the headphone
jack on your sound card or other audio source.
No sound
from the
speakers
Problem with audio
source.
Test the speakers on another audio source by removing the
3.5mm stereo cable from the audio source and connecting it
to the “line out”, “audio out” or the headphone jack of a
different audio source (e.g., portable CD, cassette player or
FM radio).
Crackling
sound
from
speakers
Bad connection Check if iPod is properly seated in the docking station. Check
connection of the 3.5mm stereo cable if not using the
docking station. Make sure it is connected to “Line out”,
“audio out”, or the headphone jack on your sound card or
other audio source – and NOT “speaker-out”.
SYMPTOM POSSIBLE PROBLEM SOLUTION
A pro bl em wi th yo ur
audio source
Unplug the 3.5mm stereo cable from the audio source. Plug
the cable into the headphone jack o f an altern ate source
(e.g., Walkman, Discman or FM radio).
Crackling
sound
from
speakers
(when
connecte
d to PC or
laptop).
Volume level in
operating system is set
too high.
Check the operating system volume level and decrease it if
necessary.
Volume level on i-F2
system is set too high.
Decrease the volume in the i-F2 system.
Sound source is
distorted.
WAV and MID files are often of poor quality; therefore
distortion an d noise are easily noticed with high-powered
speakers. Try a different audio source such as a music CD.
Sound is
distorted
Battery power is low.
Recharge battery and/or use AC adapter.
Sound is
distorted
(when
connecte
d to PC or
laptop)
Volume level in
operating system is set
too high.
Check the operating system volume level and decrease it if
necessary.
Radio
interferen
ce
Too close to a radio
tower
Move your speakers to see if the interference goes away.
Page 9

SYMPTOM POSSIBLE PROBLEM SOLUTION
Clips
securing
hinge
straps
releasing.
Tension of release
button needs
adjustment.
Insert the tip of a ball point through the hole in the back of
the clip and push in. This will tighten the tension on the
release button.
Page 10
[i-Ranger•i-Chargez•i-Télécharger•i-Lecture]
i-F2 et règlement de la FCC
Déclaration de conformité FCC
Cet appareil est conforme à la section 15 du règlement de la FCC. Son utilisation est sujette aux
deux conditions suivantes : (1) cet appareil ne doit causer aucune interférence nuisible, et (2) cet
appareil doit accepter toute interférence reçue, y compris les interférences pouvant affecter son
fonctionnement.
Interférenc es a vec la radio et l a tél évis ion
Les tests réalisés sur cet appareil ont montré qu'il respecte les limites imposées aux dispositifs
numériques de Classe B, conformément à la section 15 du règlement de la FCC. Ces limites ont pour
objet d'assurer une protection raisonnable contre les interférences nuisibles dans les installations chez
les particuliers. Cet appareil génère, utilise et peut émettre de l’énergie radiofréquence et, s’il n’est
pas installé et utilisé conformément aux instructions, peut provoquer des interférences nuisibles dans
les communications radio. Cependant, il n'est pas garanti qu'aucune interférence ne se produira dans
une installation donnée. Dans le cas où cet appareil émettrait des interférences affectant la réception
de programmes radiophoniques ou télévisés, ce qui peut s'observer en éteignant puis en rallumant
l’appareil, l'utilisateur peut tenter de corriger cette interférence en adoptant une ou plusieurs des
mesures suivantes :
• Augmentez la distance entre l’appareil et le récepteur.
• Branchez l’appareil dans une autre prise de courant que celle où le récepteur est branché.
• Consultez le distributeur ou un technicien radio/télévision qualifié pour toute assistance.
Tout changement ou modification non expressément approuvé(e) par Sonic Impact peut retirer le droit
d'utiliser cet appareil.
CET APPAREIL NUMÉRIQUE DE CLASSE B EST CONFORME AUX NORMES CANADIENNES
ICES-003.
Sonic Impact Technologies LLC ©Sonic Impact Technologies LLC
2555 State Street i-F2 est une marque commerciale de Sonic
San Diego, California 92101 Impact Technologies LLC
USA iPod® est une marque commerciale appartenant à Apple, Inc., déposée
aux États-Unis et dans d'autres pays
www.si-technologies.com
Instructions d’utilisation et de maintenance (réparation) importantes.
Page 11

ATTENTION : afin de prévenir tout risque d’électrocution, n’utilisez pas la fiche (polarisée) avec une
rallonge ou une prise de courant si la fiche ne peut pas y être complètement insérée.
AVERTISSEMENT : AFIN DE RÉDUIRE LE RISQUE D’INCENDIE OU D’ÉLECTROCUTION, N’EXPOSEZ L'I-F2 NI À
LA PLUIE NI À L’HUMIDITÉ.
INSTRUCTIONS DE SÉCURITÉ IMPORT ANTES CONCERNANT L’i-F2
1. Lisez les instructions--Toutes les instructions de sécurité et de fonctionnement doivent être lues
avant d’utiliser l’i-F2.
2. Conservez les instructions--Les instructions d’utilisation doivent être conservées pour toute
référence future.
3. Tenez compte des avertissements--Tous les avertissements figurant dans les instructions
d’utilisation doivent être lus et pris en compte.
4. Suivez les instructions--Toutes les instructions d’utilisation doivent être suivies.
5. AVERTISSEMENT : évitez l’eau et l’humidité--Maintenez votre appareil éloigné de tout liquide. Afin
de réduire le risque d’incendie ou d’électrocution, n’exposez l’i-F2 ni à la pluie ni à l’humidité.
6. Emplacement--L’i-F2 doit être posé sur une surface stable et horizontale, éloigné de toute source
de chaleur externe et avec une ventilation adéquate. N’exposez pas l’i-F2 à une température ou à
une humidité extrême. Protégez-le de la saleté, du sable et de la poussière. Notez que les hautparleurs sont blindés magnétiquement pour prévenir la distorsion des téléviseurs et des moniteurs
d’ordinateur. Maintenez tout dispositif de stockage magnétique à au moins 10 cm de l’i-F2 afin
d’éviter toute perte de données.
7. Alimentation--Lorsqu’il n'est pas alimenté par la batterie interne rechargeable, l’i-F2 ne doit être
branché qu’à l’aide du câble d’alimentation fourni a vec votre unité ou comme décrit dans les
instructions d'utilisation et comme indiqué sur l’i-F2.
8. Utilisation et entretien du câble d’alimentation--Les câbles d’alimentation doivent être placés de
sorte qu’on ne risque pas de marcher ni de poser d’objets dessus. Vérifiez régulièrement toutes les
connexions. Ne déjouez pas les fonctions de mise à la terre et de polarisation de la fiche
d’alimentation. Si votre i-F2 ne sera pas utilisé pendant une période prolongée, débranchez et
rangez le câble d’alimentation.
9. AFIN D’ÉVITER TOUT RISQUE D’ÉLECTROCUTION ET DE DOMMAGES À L’UNITÉ, NE RETIREZ PAS LES
GRILLES DES HAUT-PARLEURS ET N’OUVREZ PAS L’UNITÉ POUR ESSAYER DE LA RÉPARER, SAUF POUR
REMPLACER LA BATTERIE LITHIUM-ION RECHARGEABLE COMME DÉCRIT DANS CE MANUEL. VEUILLEZ
CONFIER LES RÉPARATIONS AU PERSONNEL QUALIFIÉ DE SONIC IMPACT.
10. Nettoyage--Utilisez uniquement un chiffon doux et sec. N’utilisez aucun type de produit chimique
de nettoyage .
11. Orages--Débranchez l’appareil pendant les orages afin d’éviter tout dommage accidentel.
12. Accessoires--N’utilisez que les accessoires indiqués par Sonic Impact Technologies.
13. Dommages nécessitant réparation--L’i-F2 doit être réparé par une personne qualifiée dans les cas
suivants :
· Le câble d’alimentation électrique ou la fiche a été endommagé(e).
· Des objets ou des liquides sont tombés sur l’i-F2.
· L’i-F2 a été exposé à la pluie.
· L’i-F2 ne semble pas fonctionner normalement ou présente un changement notable dans ses
performances.
· L’i-F2 est tombé ou le boîtier a été endommagé.
15. Réparation--L’utilisateur ne doit pas essayer de réparer lui-même l’i-F2. La réparation doit être
confiée à une personne qualifiée, ou bien l’appareil doit être renvoyé au revendeur. Pour toute
question sur la garantie et les services, contactez Sonic Impact Technologies, LLC à service@sitechnologies.com.
GARANT IE LIMITÉE D 'UN AN
Sonic Impact Technologies garantit que tous ses produits sont exempts de vices de matériaux ou de
fabrication, dans le cadre d’une utilisation normale et raisonnable, pour une durée d’un an à partir de
la date d’achat.
Cette garantie est la seule et unique garantie en vigueur pour le système de haut-parleurs i-F2
alimenté de Sonic Impact Technologies. Aucune autre garantie, expresse ou tacite, n’est valide. Sonic
Impact Technologies, LLC ainsi que tous les revendeurs agréés de Sonic Impact Technologies, LLC
déclinent toute responsabilité en cas de dommages accessoires survenus lors de l’utilisation des hautparleurs. (Cette exclusion des dommages accessoires ou indirects n’est pas applicable là où la loi
l’interdit.)
La responsabilité de Sonic Impact Technologies, LLC, dans le cadre de cette garantie, ne sera pas
engagée en cas de défaut, dysfonctionnement ou panne résultant d’une mauvaise utilisation, d’un abus,
d’une installation incorrecte, d’une utilisation avec un équipement défectueux ou inapproprié, ou de
l’utilisation du système de haut-parleurs avec un équipement autre que ceux pour lesquels il a été
conçu.
Les termes de cette garantie ne sont applicables que si le système de haut-parleurs i-F2 est
renvoyé au revendeur agréé de Sonic Impact Technologies, LLC auprès duquel il a été acheté.
SERVICE CLIENTÈLE
Pour tout service ou pour la garantie de l’appareil, veuillez contacter :
service@si-technologies.com
Page 12

CONTENU DE L'EMBALLAGE
Système i-F2 Adaptateur Câble Adaptateurs Télécommande Manuel Instructions
CA Stéréo pour iPod® de connexion rapide
· Batterie lithium-ion intégrée
· Adaptateur d’alimentation de 9 V à 2,0 A
· Câble stéréo de 3,5 mm
· Adaptateurs pour iPod 3G/ iPod 4G / iPod Photo/iPod nano/iPod Mini/ iPod vidéo
· Manuel d’instructions
· Télécommande
· Instructions de connexion rapide
Schéma du i-F2 :
14. Verrou du comp artiment
15. Haut-parleurs à double équipage mobile
16. Station d'ancrage à 30 broches pou r l'iPod®
17. Prises d’entrée
18. Commandes du volume
19. Compartiment pour l e casq ue / la télécommande
20. Compartiment de rangement de l’iPod®
21. Porte du compartiment de rangement de l’iPod®
22. Marche / Arrêt et voyant
Page 13

23. Voyant d e la batterie
24. Cache de la batterie
25. Batterie lithium-ion
26. Télécommande
EMPLACEMENT ET CON FIGURA TION DE VOTRE SYSTÈME i-F2
Posez votre système i-F2 sur une surface stable et horizontale. Le système i-F2 peut être placé à côté
d’écrans vidéo tels que des téléviseurs et des moniteurs d’ordinateur sans entraîner de distorsion de
l’image, mais maintenez les dispositifs de stockage magnétique (tels que les disques durs, disquettes et
cassettes) à au moins 1 0 cm afin d’éviter toute perte de données.
Assurez-vous que les pinces en plastique qui maintiennent les bandes charnière sont bien fermées. Si
nécessaire, réglez la tension du bouton d’ouverture des pinces en insérant la pointe d’un stylo-bille dans
l’orifice situé à l’arrière de la pince, puis en appuyant. Notez que vous pouvez ouvrir l’i-F2
complètement en ouvrant les deux pinces.
CONNEXION À VOTRE i-F2
Avertissement : assurez-vous que le système i-F2 est dans le mode POWER OFF (ARRÊT) avant de réaliser
toute connexion et d’ancrer l’iPod. Afin d’assurer un fonctionnement correct, veuillez suivre
attentivement les instructions de connexion décrites ci-dessous ainsi que l’ordre indiqué.
Connectez l’adaptateur pour iPod, fourni avec votre i-F2, qui correspond à votre modèle d'iPod. Chaque
adaptateur por te le nom du modèle d’iPod auquel il correspond. Les modèles d’iPod avec un connec teur
à 30 broches peuvent être connectés directement à la station d’ancrage à 30 broches située sur le
système i-F2. Les modèles plus anciens d’iPod dépourvus de connecteur à 30 broches peuvent être
connectés via le port AUDIO IN (ENTRÉE AUDIO), situé sur le côté du boî tier de votre i-F2, en utilisant le
câble stéréo de 3,5 mm fourni. Une fois la connexion réalisée au moyen de l'une ou l'autre de ces
méthodes, vous êtes prêt à écouter de la musique sur les haut-parleurs du i-F2.
ALIMENTATION
L’i-F2 peut fonctionner en utilisant la batterie lithium-ion rechargeable intégrée. Au lieu d'utiliser la
batterie, vous pouvez utiliser l’adaptateur d’alimentation CA de 9 V à 1,8 A fourni avec votre i-F2.
L’adaptateur CA alimentera votre unité, rechargera la batterie lithium-ion et rechargera votre iPod dans
la station d’ancrage à 30 broches, le tout simultanément.
Pour utiliser une source d’alimentation externe à l’aide de l’adaptateur :
Lorsque l’iPod est connecté au système i-F2, insérez le connecteur de l’adaptateur CA dans la prise
libellée DC IN 9V (ENTRÉE CC 9 V)
, puis branchez la fiche située à l’autre extrémité de
l’adaptateur d’alimentation universel dans une prise de courant CA murale. Votre i-F2 est prêt à
fonctionner. Lorsqu’il est ancré, votre iPod se recharge quand vous utilisez l’adaptateur CA.
Pour utiliser l’alimentation de la batterie lithium-ion rechargeable intégrée :
Le système i-F2 possède une puissante batterie lithium-ion rechargeable intégrée. Cette source
d’alimentation indépendante vous permet d’utiliser votre iPod pendant plusieurs heures entre les
charges. Veuillez noter que votre iPod ne se recharge pas lorsque l’alimentation provient de la batterie
lithium-ion.
COMMENCER LA LECTURE
3.
Avec votre iPod installé dans la station d’ancrage, ou connecté à l’aide du câble stéréo de 3,5 mm,
mettez l’interrupteur d’alimentation
situé sur le panneau frontal sur la position
« AUTO ON » (MARCHE AUTOMATIQUE) pour allumer l’i-F2. Le voyant s’allume en vert.
4.
Allumez votre iPod, réglez le volume en utilisant les commandes de réglage du volume situées sur
l’i-F2, et écoutez vos airs favoris. (Notez que le réglage du volume de l’iPod est ignoré lorsqu’il
est ancré dans l’i-F2.)
RÉGLAGE DU VOLUME
Les boutons situés sur le panneau frontal sont les commandes de réglage du volume maître
pour le système i-F2. Maintenez la touche « + » appuyée pour augmenter le volume, et la touche « - »
pour le baisser. À chaque fois que vous allumerez le système i-F2, le volume démarrera à 30 % du
volume maximal.
UTILISATION DE LA TÉLÉCOMMANDE
La télécommande fournie avec le système i-F2 peut être utilisée pour
toutes les opérations normales de l'iPod et du système i-F2.
1. La télécommande est située dans le compartiment prévu pour le casque
et la télécommande. Veuillez vous référer à l'illustration figurant dans
les instructions de connexion rapide pour la sortir ou la ranger.
2. La télécommande utilise une pile bouton pour contrôler toutes les
fonctions du système audio. Veuillez vous référer à l'illustration figurant
dans les instructions de connexion rapide pour remplacer la pile
lorsqu'elle est vide.
Page 14
9. Tête d'émission infrarouge
10. Marche / Arrêt
11. Précédent
12. Vol-
13. Lecture / Pause
14. Suivant
15. Vol+
16. Cache du compartiment de la pile
3. Pour utiliser la télécommande, veillez à ce que la tête d'émission
infrarouge soit orientée directement vers la tête de réception du système
i-F2, à une distance inférieure à 6 mètres et à un angle de moins de 60º.
La zone grisée du schéma ci-contre illustre le secteur de fonctionnement
de la télécommande.
4. Après l'emploi, remettez la télécommande dans son compartiment pour
éviter de la perdre.
Tête de recept ion Télécommande
Page 15

ARRÊT
Lorsque vous ne l’utilisez pas, afin de minimiser la consommation d’énergie, mettez l’interrupteur
d’alimentation sur la position « OFF » (ARRÊT)
. Veuillez noter que l’i-F2 possède un e
fonct io n « AUTO S HU T-DOWN (S TAN DBY) » (ARRÊ T A UTO MATI QU E) qu i p ermet d’év iter de c on so mm er de
l’énergie lorsqu’il n’est pas utilisé.
ARRÊT AUTOMATIQUE (VEILLE) :
Lorsque l’interrupteur d’alimentation est réglé sur la position « AUTO ON », le système i-F2 s’éteint
automatiquement et se met en mode de veille si aucun signal audio n’est détecté pendant 5 minutes. Le
voyant situé sur l’interrupteur d’alimentation deviendra rouge
. Le voyant redeviendra
automatiquement vert
dès qu’un signal audio sera détecté, et le système i-F2 s’allumera
automatiquement. Dans le mode de « veille », la consommation d’énergie sera réduite, mais nous vous
conseillons d’éteindre complètement le système i-F2 lorsque vous ne l’utilisez pas pendant une période
prolongée, afin d’économiser au maximum la batterie.
TRANSFERT D E D ON N ÉES :
Notez que vous pouvez télécharger de la musique depuis et vers le serveur lorsque votre iPod est ancré
dans la station d’ancrage de l’i-F2, en reliant le connecteur d’ancrage de l’iPod au câble FireWire fourni
avec votre iPod. Il vous suffit de relier ce câble au port situé sur le côté droit de l’i-F2, puis de relier
l’autre extrémité à votre ordinateur. Suivez les instructions fournies avec votre iPod pour télécharger
depuis et vers le serveur, et gérer votre musique.
BATTERIES LITHIUM-ION INTÉGRÉES
1. Le système i-F2 utilise une batterie lithium-ion rechargeable intégrée de 8,4 V à 2 000 mAH.
2. A. Avant d’utiliser pour la première fois l’i-F2 en l'alimentant avec la batterie lithium-ion, vous
devez charger complètement la batterie. Branchez l’adaptateur CA de 9 V à 2,0 A dans une prise
de courant CA murale, puis insérez le connecteur situé à l’autre extrémité du câble de
l’adaptateur dans la prise portant le symbole
située sur le côté du système i-F2. La
batterie met 6 à 8 heures à se charger complètement pour la première fois.
B. Pour recharger la batterie, connectez l’adap tateur d’alimentation CA comme décrit ci-dessus.
L’appareil met 4 à 6 heures à se recharger. Lorsque l'iPod est dans la station d'ancrage, la batterie
et l'iPod se rechargent simultanément.
3. Le système i-F2 possède une rangée de voyants lumineux qui indiquent l’état de charge de la
batterie.
charge élevée
charge moyenne
charge faible AVERTISSEMENT : charge requise :
4. Le système i-F2 possède une fonction d’avertissement de charge faible. Lorsque que le voyan t
« charge requise » devient rouge, il s’agit d’un avertissement indi quant que le système va bientôt
passer au mode SHUT-DOWN (ARRÊT). Le système fonctionnera à nouveau une fois la batterie
chargée et l’unité rallumée.
5. Tant que le système i-F2 est en train de se charger, les voyants lumineux clignotent en séquence
jusqu’à ce que le dernier voyant situé le plus à droite arrête de clignoter. Le chargement est alors
terminé. En usage normal, la batterie lithium de l'i-F2 peut durer 8 heures.
6. Lorsque la batterie lithium-ion intégrée ne se charge plus ou dure très peu de temps après avoir
été chargée, cela signifie que la vie utile de la batterie est arrivée à sa fin et qu’il faut la
remplacer. (Veuillez vous reporter à la section Remplacement de la batterie.)
7. Caractéristiques techniques de la batterie lithium-ion intégrée : Tension nominale : 7,0 V
Capacité nominale : 2000 mAh Tension de charge maximale : 8,4 V
GB/T 18287-2000
Avertissement :
·Ne rechargez la batterie qu’en utilisant l’adaptateur assigné fourni avec l’i-F2 et en respectant les
indications du manuel de l’utilisateur. Il est interdit de surcharger la batterie ou d'inverser sa
polarité pour la charger.
·N’utilisez la batterie que pour le dispositif i-F2 spécifié.
·Il est interdit de créer un court-circuit ; la tension résiduelle ne doit pas descendre en dessous de 5,0 V.
. Utilisez le système i-F2 et la batterie rechargée entre -5 °C et 30 °C, à un taux d'humidité inférieur à
70 %.
·N’exposez pas la batterie au feu ou à une chaleur excessive. Ne percez pas la batterie, ne la heurtez
pas avec un objet dur, et évitez tout impact important. Évitez également tout contact direct des bornes
avec de l’eau ou des objets métalliques. Il est interdit de démonter, de remonter ou de souder la
batterie.
·Conservez et chargez la batterie entre -5 °C et 25 °C, à un taux d'humidité inférieur à 70 % ; les
voyants de la batterie doivent indiquer une charge moyenne. La batterie doit être rechargée et
déchargée complètement tous les trois mois.
·N'utilisez pas la batterie lithium-ion intégrée si vous détectez une odeur bizarre, un changement de
couleur ou un changement de forme physique
·Si du liquide coule de la batterie et entre en contact avec la peau, rincez immédiatement la peau avec
de l’eau.
·La batterie doit être recyclée ou éliminée de façon appropriée.
REMPLACEMENT D E LA BATTERIE
Veuillez observer l’illustration suivante pour remplacer la batterie lithium-ion rechargeable intégrée.
Page 16

CARACTÉRISTIQUES
L’excellente qualité de son de l’i-F2 est le résultat de notre conception hautement professionnelle, qui
inclut un moteur néodyme Hi-Fi personnalisé, un amplificateur numérique et des circuits d’égaliseur
numérique de pointe.
Caractéristiques :
Puissance de sortie : 2W*2
Nombre de voies des haut-parleurs : Sortie stéréo à 2 voies
Impédance : 12 Ω
Fréquence : 120 Hz - 20 KHz
Rapport signal/bruit : 85dB±2 (0,5 M & 1 W)
Équipages mobiles des haut-parleurs : équipages mobiles magnétiques au néodyme à 1,25 po X 4
DÉPANNAGE
PROBLÈME CAUSE POSSIBLE SOLUTION
L’a pp are il n’e st p as
allumé.
Mettez l’inte rrupteur d’alimentation sur la position « ON »
(MARCHE).
Le voyant
d’alimentati
on ne
s’allume pas
lorsque
l’adaptateur
CA est
branché.
Le câble
d’alimentation
universel n’est pas
branché dans une
prise de courant
murale et/ou le
connecteur
d'alimentation
électrique n’est pas
relié à la prise située
sur le côté du
système i-F2.
Branchez le câble d’alimentation universel dans une prise de
courant murale et reliez le connecteur de ce câble à la prise
d’entrée CA située sur le côté du système i-F2.
Page 17

PROBLÈME CAUSE POSSIBLE SOLUTION
Le parasurtenseur (le
cas échéant) n’est
pas allumé.
Si le câble d’alimentation universel est branché à un
parasurtenseur, assurez-vous que celui-ci est allumé.
La prise de courant
murale ne fonctionne
pas.
Branchez un autre dispositif dans l a prise de courant murale
afin de vérifier si celle-ci fonctionne.
Le voyant
gauche de la
batterie
devient
rouge.
Avertissement :
charge requise.
Chargez la batterie avant d’utiliser à nouveau le système i–
F2.
La télécommande est
en dehors de son
secteur de
fonctionnement.
Amenez la télécommande dans son secteur de
fonctionnement.
Un objet se dresse en
obstacle entre l'i-F2
et la télécommande.
Retirez l'objet ou amenez la télécommande dans son secteur
de fonctionnement en veillant à ce qu'il n'y ait aucun
obstacle.
La
télécomman
de ne
fonctionne
pas.
La pile de la
télécommande est
vide.
Remplacez la pile (reportez-vous aux illustrations figurant
dans les instructions de connexion rapide pour la procédure
détaillée).
PROBLÈME CAUSE POSSIBLE SOLUTION
Vérifiez que le câble d'alimentation universel est branché
dans une prise de courant murale et que le connecteur de
ce câble est relié à la prise d'entrée CA située sur le côté du
système i-F2.
Si vous n’utilisez pas le câble d’alimentation universel,
vérifiez que la batterie rechargeable est chargée.
L’a pp are il n’e st p as
allumé.
Vérifiez si l ’interrupteur de marche est sur la position
« ON » (MARCHE), si le bouton stand-by (veille) a été
enfoncé et si le voyant est allumé.
Appuyez sur le bouton « + » pour augmenter le volume. Le volume est trop
bas.
Vérifiez le réglage du volume sur le dispositif de la source
audio et réglez-le sur un volume moyen.
Aucun son
ne sort des
hautparleurs.
L’i Po d n ’es t pas
installé dans la
station d’an crage.
Retirez l’iPod, puis réinstallez-le dans la station d’ancrage.
L’a pp are il n’e st p as
allumé.
Vérifiez que le câble d'alimentation universel est branché
dans une prise de courant murale et que le connecteur de
ce câble est relié à la prise d'entrée CA située sur le côté du
système i-F2.
Si vous n’utilisez pas le câble d’alimentation universel,
vérifiez que la batterie rechargeable est chargée.
Vérifiez si l ’interrupteur de marche est sur la position
« ON » (MARCHE), si le bouton stand-by (veille) a été
enfoncé et si le voyant est allumé.
Le volume est trop
bas.
Appuyez sur le bouton « + » pour augmenter le volume.
Vérifiez le réglage du volume sur le dispositif de la source
audio et réglez-le sur un volume moyen.
Aucun son
ne sort des
hautparleurs.
L’i Po d n ’es t pas
installé dans la
station d’an crage.
Retirez l’iPod, puis réinstallez-le dans la station d’ancrage.
Page 18

PROBLÈME CAUSE POSSIBLE SOLUTION
Le câble stéréo de
3,5 mm n’est pas
relié à une source
audio (lorsque vous
n’utilisez pas la
station d’an crage).
Reliez le câble stéréo de 3,5 mm à la source audio. Assurezvous que le câble du signal est fermement relié aux prises
correctes.
Le câble stéréo de
3,5 mm est relié à la
mauvaise sortie sur
la source audio
(lorsque vous
n’utilisez pas la
station d’an crage).
Assurez-vous que le câble stéréo de 3,5 mm est relié et
correctement inséré dans la prise « line-out » (sortie de
ligne), « audio out » (sortie audio) ou dans la prise du
casque de votre carte son ou autre source audio.
Problème avec la
source audio.
Testez les haut-parleurs avec une autre source audio en
retirant le câble stéréo de 3,5 mm de la source audio et en
le reliant à la prise « line-out » (sortie de ligne), « audio
out » (sortie audio) ou à la prise du casque d’une autre
source audio (par exemple, un baladeur CD, un
magnétophone ou une radio FM).
Mauvaise connexion. Vérifiez que l’iPod est correctement installé dans la station
d’ancrage. Si vous n’utilisez pas la station d’ancrage,
vérifiez la connexion du câble stéréo de 3,5 mm. Assurezvous qu’il est relié à la prise « line-out » (sortie de ligne),
« audio out » (sortie audio) ou à la prise du casque de votre
carte son ou autre source audio – et PAS à la prise « speakerout » (sortie haut-parleur).
Le son
venant des
hautparleurs
grésille.
Le problème vient de
votre source audio.
Déconnectez le câble stéréo de 3,5 mm de la source audio.
Reliez le câble à la prise du casque d’une autre source audio
(par exemple, un baladeur, un baladeur CD ou une radio
FM).
PROBLÈME CAUSE POSSIBLE SOLUTION
Le son
venant des
hautparleurs
grésille
(lorsqu’ils
sont
connectés à
un PC ou
ordinateur
portable).
Le volume du
système
d’exploitation est
réglé trop fort.
Vérifiez le volume du système d’exploitation et baissez-le si
nécessaire.
Le volume de l’i-F2
est réglé trop fort.
Baissez le volume du système i-F2.
Une distorsion de la
source audio se
produit.
Les fichiers WAV et MID sont souvent de faible qualité ; c’est
pourquoi on remarque facilement une distorsion et du bruit
avec des haut-parleurs à forte puissance. Essayez une source
audio différente, telle qu’un CD de musique.
Une
distorsion du
son se
produit.
La charge de la
batterie est faible.
Rechargez la batterie et/ou utilisez un adaptateur CA.
Une
distorsion du
son se
produit
(lorsque le
système est
connecté à
un PC ou
ordinateur
portable).
Le volume du
système
d’exploitation est
réglé trop fort.
Vérifiez le volume du système d’exploitation et baissez-le si
nécessaire.
Page 19

PROBLÈME CAUSE POSSIBLE SOLUTION
Interférence
s radio.
Vous êtes trop près
d’un pylône radio.
Déplacez vos haut-parleurs pour voir si les interférences
disparaissent.
Les pinces
retenant les
bandes se
desserrent.
La tension du bouton
d’ouverture a besoin
d’être réglée.
Insérez la pointe d'un stylo-bille dans l'orifice situé à
l'arrière de la pince et appuyez. Ceci augmentera la tension
sur le bouton d'ouverture.
Page 20

i-F2-FCC-Bestimmungen
FCC-Konformitätserklärung
Dieses Gerät erfüllt Abschnitt 15 der FCC-Normen. Der Betrieb ist unter den zwei folgenden Bedingungen
zugela ssen: (1 ) d as Gerä t da rf k e ine schä dl i che n Inter fe re nz en ve r ur sac he n und (2 ) d a s Gerä t m us s all e emp fan ge ne n
Interferenzen annehmen, einschließlich Interferenz en, die une rwünschten Betri eb verur sa chen können.
Radio- und Fernseh-Interferenz
Dieses Gerät wurde getestet und erfüllt die Grenzwerte für ein Digitalgerät der Klasse B gem. Abschnitt 15
der FCC-Normen. Diese Grenzwerte wurden erstellt, um einen angemessenen Schutz gegen schädliche Interferenzen
bei Insta lla tione n in Wohngebiet en zu gewä hrle iste n. Di eses Gerät erze ugt u nd ver wend et Hoc hfre que nzene rgi e und
kann di ese a bgeben, und es ka nn schä dl i che Int er fe re nzen mit Funk ü bert ra g ungen auslöse n, we nn e s nic ht ge mäß d er
Anleitung installiert und betrieben wird. Es besteht jedoch keine Garantie dafür, dass es in Einzelfällen nicht doch zu
Interferenzen kommen kann. Ob dieses Gerät Interferenzen mit Radio- oder Fernsehempfang verursacht, kann
festgestellt werden, indem das Gerät aus- und wieder eingeschaltet wird. Der Benutzer wird angehalten, die
Interferenzen d urch eine oder mehrere der folgenden Maßnahmen zu beheben:
• Vergrößerung des Abstands zwischen Gerät und Empfänger.
• Anschluss des Geräts an eine andere Steckdose, sodass Gerät und Empfänger an zwei verschiedene
Endst romk reise angeschlo ssen sind.
• Den Händler oder einen qualifizierten Radio/TV-Techniker um Hilfe bitten.
Änderun gen od er M odif ika tione n ohne die ausdrüc kli che Ge neh migu ng von So nic Impac t kö nnen d azu fü hren, d as s
die Befugnis des Benutzers zum Betrieb des Geräts erlischt.
DIESES DIGITALGERÄT DER KLASSE B ERFÜLLT DIE KANADISCHE NORM ICES-
003.
Sonic Impact Technologies LLC ©Sonic Impact Technologies LLC
2555 State Street i-F2 ist e ine Marke von Sonic
San Diego, California 92101, USA Impact Technologies LLC
USA iPod® ist eine Ma rke von Apple
Computer, Inc., eingetragen in den
www.si-technologies.com
USA und anderen Ländern.
Wichtige Hinweise zu Betrieb und Instandhaltung (Wartung).
ACHTUNG: Um Stromschläge zu vermeiden, den (polarisierten) Stecker nicht mit Verlängerungskabeln,
Steckverbi ndern oder anderen Steckdosen verwenden, bei denen die Zungen nicht komplett eingeführt werden
können.
Page 21

WARNUNG: UM DIE GEFAHR VO N ENTZÜN DUNG ODER STROMS CHLÄGE N ZU VERR INGERN, D ARF
DAS I-F2-SY STEM WEDER REG E N NOCH FEUCHTIGKEIT AUSGESETZT WERDEN.
WICHTIGE SICHERHEITSHINWEISE FÜR DAS i-F2-SYSTEM
1. Anleitung lesen -- Alle Anweisungen zu Sicherheit und Betrieb vor erstmaliger Verwendung des i-F2-Systems
sorgfältig durchlesen.
2. Anleitung aufbewahren -- Die Anleitung zur späteren Bezugnahme aufbewahren.
3. Warnungen beachten -- Alle Warnhinweise in der Bedienungsanleitung lesen und befolgen.
4. Anleitung befolgen -- Alle Hinweise zur Bedienung befolgen.
5. WARNUNG: Wasser und Fe uchtigke it vermei den -- Von all en Flüs sigkeite n fernha lten. U m die Gefa hr von
Entzündung oder Stromschlägen zu verringern, darf das i-F2-System weder Regen noch Feuchtigkeit ausgesetzt
werden.
6. Aufstellungsort – Das i-F2-System möglichst auf eine stabile, ebene Oberfläche an einem Ort aufstellen, der
von Wärmequellen entfernt ist und über eine angemessene Lüftung verfügt. Das i-F2-System weder
Extremtemperaturen noch übermäßiger Feuchtigkeit aussetzen. Vor Schmutz, Sand und Staub schützen. Die
Lautsprec her sind magneti sch abge schirmt, u m Interfe renzen mit Fernseh geräten und Compute rmonit oren zu
vermeiden. Magnetische Datenträger trotzdem mindestens 10 cm vom i-F2-System entfernt halten, um
Datenverlust zu vermeiden.
7. Netzanschluss -- Wenn das i-F2-System nicht über den internen Akku gespeist wird, das Gerät nur mit dem
mitgelieferten Netzteil oder wie in der Anleitung beschrieben und a uf dem i-F2 markier t anschließen.
8. Verwendung und Pflege des Netzkabels -- Netzkabel so platzieren, dass nicht auf sie getreten wird und dass sie
nicht versehentlich durch schwere Gegenstände zerdrückt werden. Alle angeschlossenen Teile regelmäßig
prüfen. Die Er dung od er P olar isieru ng d es Netz ste cke rs nic ht u mgehen. Wenn Sie d as i-F2 -Syst em fü r eine n
längeren Zeitraum nicht verwenden, das Netzkabel ausstöpseln und sicher verwahre n.
9. UM DIE GEFAHR VO N STR OM SC HL Ä GEN UND B ESCHÄDIGUN GE N A M GER ÄT ZU VER M E IDEN,
DIE LAUTSPRECHERGITTER NICHT ABNEHMEN UND DAS GERÄT NICHT ZU
WARTUNGSZWECKEN ÖFFNEN, AUSGENOMMEN DAS AUSWECHSELN DER AUFLADBAREN
LITHIUM-IONEN-BATTERIE WIE IN DIESER ANLEITUNG BESCHRIEBEN. BITTE WENDEN SIE
SICH FÜR D IE WARTUNG AN QUALIFIZIERTES PERSONAL VON SONIC IMPACT.
10. Reinigung -- Zum Reinigen nur ein weiches, trockenes Tuch verwe nden. Keine Chemikalien verwenden.
11. Gewitter -- Den Netzschalter des Geräts bei Gewitter aus der Steckdose ziehen, um Beschädigungen zu
vermeiden.
12. Zubehör -- Verwenden S ie nur von Sonic Impact Technologies spezifizierte Zubehör teile.
13. Repa rat ur be i Schäd en -- Da s i-F2 - Sy ste m mu ss vo n qual i fiz i ert e m Wartungspe r sona l repa ri ert werd en, we nn:
· Das Netzkabe l oder der Stecker besc hädigt ist.
· Gegenstände auf das i-F 2-System gefallen sind oder F lüssigkeiten in d as Gerät einge treten sind.
· Das i-F2-System Regen ausgesetzt war.
· Das i-F2-System nicht normal zu funktionieren scheint oder eine deutlich veränderte Leistung zeigt.
· Das i-F2-Syst em fallen gelassen oder das Gehäuse beschädigt wurde.
16. Reparaturen -- Reparaturen am i-F2-System sind nicht vom Benutzer selbst durchzuführen. Reparaturen
müssen von qualifiziertem Fachpersonal ausgeführt oder über den Händler abgewickelt werden. Bei Fragen zu
Garantie und Reparaturen wenden Sie sich bitte an Sonic Impact Technologies, LLC unter service@sitechnologies.com.
BESCHRÄNKTE EINJAHRESGARANTIE
Sonic Impact Technologies gewährleistet, dass alle seine Produkte bei sachgemäßer Verwendung frei von
Material- und Herstellungsfehlern sind. Die Garantie hat eine Gültigkeit von einem Ja hr ab Kaufdatum.
Diese Garantie ist die einzige und ausschließlich geltende Gewährleistung, die für das i-F2Lautsprechersystem von Sonic Impact Technologies gilt, und alle anderen ausdrücklichen oder impliziten Garantien
sind ungültig. Weder Sonic Impact Technologies, LLC noch autorisierte Vertragshändler von Sonic Impact
Technologies, LLC haften für zufällige, bei Verwendung der Lautsprecher entstandene Schäden. (Diese
Haftungsbeschränkung für zufällige oder Folgeschäden findet keine Anwendung in Ländern, in denen sie gesetzlich
unzuläs sig ist.)
Die Verpflicht ung vo n Sonic Impact Technologi es, LL C im Ra hmen d ieser Garant ie erstre ckt si ch nic ht auf
Defekte , Störunge n oder Aus fälle, welche als F olge von un sachgemä ßer oder missbrä uchlicher Verwendung, ni cht
ordnungsgemäßer Installation, Verwendung mit fehlerhafter oder nicht ordnungsgemäßer Ausstattung, oder der
Verwendung des Lautsprechersystems mit nicht bestimmungsgemäßer Ausstattung entstehen.
Die Bed ingungen dieser Ga rantie haben n ur dann Gültigkeit, wenn das i-F2-Lautsprechersystem zu dem
offiziellen Sonic Impact Technologies, LLC-Händler zurückgebracht wird, bei dem es gekauft wurde.
KUNDENDIENST
Für Reparatur oder Garantieleistungen wenden Sie sich bitte an:
service@si-technologies.c om
VERPACKUNGSINHALT
i-F2-System WS- Stereo- iPod® Adapter- Fernbedie nung Handbuch Schnell-
Adapter kabel hülsen anschluss- Anleitung
· Eingebaute Lithium-Io nen-Batterie
· 9V/2,0A-Stromadapter
· 3,5-mm-Stereokabel
Page 22

· iPod 3G/ iPod 4G / iPod Photo/iPod na no/iPod Mini/ iPod-Videoad apterhülsen
· Bedienungsanleitung
· Fernbedienung
· Schnellanschluss-Anleitung
i-F2-Diagramm:
27. Fachverriegelung
28. Doppellautsprechertreiber
29. iPod® 30-polige Dockingstation
30. AV- B u c h s e n
31. Lautstärkeregler
32. Kopfhörer-/Fernbedienungsfach
33. iPod® Fach
34. Tür des iPod® Fachs
35. Netzansc hl ussa nzeig e und LED
36. LED-Anzeige Akkudauer
37. Deckel Batteriefach
38. Lithium-Ionen-Batterie
39. Fernbedienung
AUFSTELLEN UND EINSTELLEN IHRES i-F2-SYSTEMS
Stellen Sie das i-F2-System auf einer stabilen, ebenen Fläche auf. Das i-F2-System kann in der Nähe von Geräten wie
Fernseha pparaten und Computermo nitoren plat ziert werden, oh ne Bildstö rungen zu verur sachen. Datent räger wie
Festplatten, CD-ROMs und Kassetten sollten allerdings mindestens zehn Zentimeter vom Gerät entfernt aufbewahrt
werden, um Datenverlust zu vermeiden.
Vergewissern Sie sich, dass die Plastikklammern, mit denen die Scharnierbänder gehalten werden, fest und sicher
sitzen. Falls erforderlich, die Spannung des Freigabeknopfs auf den Klammern lockern, indem mit einer
Kugelschreiberspitze durch die Öffnung an der Klammerrückseite gedrückt wird. Beachten Sie, dass das i-F2-System
vollkommen flach geöffnet werden kann, indem beide Klammern gelöst werden.
ANSCHLIESSEN IHRES I-F2-SYSTEMS
Achtung: Sicherstellen, dass das i-F2-System sich im Modus POWER OFF (ausgeschaltet) befindet, bevor
Anschlüsse vorgenommen und der iPod an das i-F2-System angedockt wird. Zur Gewährleistung eines
ordnungsgemäßen Betriebs die folgende Verbindungssequenz in der entsprechenden Reihenfolge sorgfältig beachten.
Die für Ihr i Pod-Modell passende Adapterhülse, die im Liefe rumfang des i-F2-Systems enthalten ist, anbringen. Jede
Hülse ist mit einem iPod-Modell gekennzeichnet. Jedes iPod-Modell mit einem 30-poligen Steckverbinder kann
direk t an der 30 -poligen Docki ngstat ion a m i-F2 ange schlo ssen werden. Al le ält eren iP od-Mod elle, die noch ni cht
mit einem 30-poligen Steckverbinder ausgestattet sind, werden über den AUDIO IN-Port an der Seite des i-F2Gehäuses mit dem im Lieferumfang enthaltenen 3,5-mm-Stereokabel angeschlossen. Wenn Sie sichergestellt haben,
dass eine der Anschlussmethoden angewandt wurde, sind die i-F2-Lautsprecher einsatzbereit.
Page 23

STROMVERSORGUNG
Das i-F2- S yst e m ka nn mit d e r e inge ba ut e n au fl ad ba ren L i thi u m- Io nen- Ba tt e ri e b e tri e ben werd en. Sta tt d er Spei su ng
über Batterie kann auch der mitgelieferte externe 9V/1,8A-WS-Adapter verwendet werden. Der WS-Adapter
versorgt das Gerät mit Strom, lädt die Lithium-Ionen-Batterie auf und lädt gleichzeitig Ihren iPod, der mit dem 30poligen St eckverbinder an de r Dockingstation angeschl ossen ist.
Stromversorgung über externe Quelle mit Stromadapter:
Wenn der iPod an das i-F2-Lautsprechersystem angeschlossen wurde, den Crimpsteckverbinder des WS-Adapters in
die AV-Buchse mit der Kennzeichnung DC IN 9V
einstöpseln. Danach die Zunge des Universaladapters
in die Wandsteckdose stecken. Ihr i-F2-System ist jetzt einsatzbereit. Wenn der iPod angedockt ist, wird er
automatisch vom WS-Adapter mitgeladen.
Verwendung der eingeb auten, aufladbaren Lithium-Ionen-Batterie:
Das i-F2-System ist mit einer leistungsstarken, wiederaufladbaren Lithium-Ionen-Batterie ausgestattet, die in das
Gehäuse integriert ist. Mit dieser unabhängigen Stromquelle kann der iPod mehrere Stunden abgespielt werden, be vor
ein erneutes Aufladen erforderlich wird. Bitte beachten Sie, dass der iPod bei Betrieb mit Lithium-Ionen-Batterie
nicht aufgeladen wird.
ABSPIELEN STARTEN
5.
Den iPod in die Dockingstation setzen oder mit dem 3,5-mm-Stereokabel anschließen. Den Netzschalter
an der Vorderseite auf „AUTO ON“ stel l en und d e n i- F2 e in scha l te n. Di e LE D -A nze ige l euc ht et
grün auf.
6.
Schalten Sie den iPod ein, regulieren Sie die Lautstärke am i-F2-System und hören Sie sich Ihre
Lieblingssongs an. (Der Lautstärkeregler des iPods ist nicht aktiv, wenn das Gerät am i-F2-System angedockt
ist.)
LAUTSTÄRKEREGELUNG
Die -Tasten an der Vorderseite dienen zur Lautstärkeregelung am i-F2-System. Die Taste „+“ gedrückt
halten, um die Lautst ärke z u erhö hen; mit der Taste „-“ wird d ie La utstärk e ve rringer t. Die Lautst ärke beginnt bei
jedem Neustart des i-F2-Systems bei der zuletzt eingestellten Lautstärke.
FERNBEDIENUNG
Mit der im Lie feru mfang d es i- F2-Sys tems entha ltene n Fer nbedi enu ng kön nen die
normalen Funktionen des iPod-Players und i-F2-Systems gesteuert werden.
1. Die Fernbedienung befindet sich im Kopfhörer-/Fernbedienungsfach. Bitte
richten Sie sich bei Entnahme bzw. Einlegen nach der Abbildung in der
Schnellanschluss-Anleitung.
2. Die Fernbedienung enthält eine Knopfbatterie zur umfassenden Ausnutzung der
Funktionen des Audiosystems. Bitte richten Sie sich beim Ersatz der
verbrauchten Batterie nach der Abbildung in der Schnellanschluss-Anleitung.
17. Infrarot-Übertragungskopf
18. Ein-/Ausschalten
19. Vorheriger
20. Lautstärke 21. Abspielen/Pause:
22. Nächster
23. Lautstärke +
24. Batteriefachtür
3. Stellen Sie bei der Verwendung der Fernbedienung sicher, dass der Infrarot-
Übertragungskopf direkt auf den Empfangskopf am i-F2-System in einer
Entfernung von 6 m und im Winkel von 60 Grad gerichtet ist.
Page 24

Der in der nachstehenden Abbildung schattiert dargestellte Bereich ist die gültige
Reichweite der Fernbedienung.
4. Um Verlust vorzubeugen, legen Sie Fernbedienung nach dem Gebrauch wieder in
das Fach zurück.
AUSSCHALTEN DES GERÄTS
Wenn das Gerät nicht verwendet wird, zur Senkung des Energieverbrauchs den Netzschalter auf „OFF“
stellen. Bitte denken Sie daran, dass das i-F2-System eine „AUTO SHUT-DOWN“ (STANDBY)-Funktion hat, mit
der überflüssiger Stromverbrauch im Standby-Betrieb vermieden wird.
AUTO SHUT-DOWN (STANDBY):
Wenn der Netzschalt er auf „ AUTO ON“ steht, schaltet das i-F2-System automatisch in den Standby-Modus, wenn
fünf Minuten lang kein Audiosignal erfasst wird. Die LED-Anzeige am Netzschalter schaltet dann auf rot
.
Die LED-Anzeige schaltet automatisch wieder auf grün
, wenn ein Audiosignal entdeckt wird. Das i-F2Lautsprec hersyste m schalt et sich dann a utomati sch ein. Der E nergieve rbrauch i m Standby-M odus ist geri nger, es
wird aber trotzdem empfohlen, das i-F2-System ganz abzuschalten, wenn es nicht benutzt wird, um die Batterie zu
schonen.
DATENÜBERTRAGUNG:
Beachten Sie bitte, dass Sie Musik hoch- und herunterladen können, während Ihr iPod in der Dockingstation des iF2-Systems sitzt. Dazu verwenden Sie das im Lieferumfang Ihres iPods enthaltene Verbindungskabel für den
Anschluss zwischen dem Dock-Steckverbinder und dem Fire Wire. Das Kabel einfach an den Ausgang an der linken
Seite des i-F2-Systems anschließen und das andere Ende an Ihren Rechner anschließen. Folgen Sie der Anleitung
Ihres iPods zum Herunterladen, Hochladen und Verwalt en Ihrer Musi kstücke.
EINGEBAUTE LITHIUM-BATTERIE
1. Das i-F2-System funktioniert mit einer eingebauten wieder aufladbaren 8,4 V/2000mAH-Lit hium-Ionen-Batterie.
2. A. Vor der ersten Verwendung des i-F2-Systems mit Speisung durch die Lithium-Ionen-Batterie muss die
Batterie vollständig aufgeladen werden. Den 9V/2,0A-WS in eine WS-Netzsteckdose stecken und den
Crimpsteckverbinder am Ende des Adapterkabels in den mit
gekennze ichneten E ingang a n der
Seite des i-F2-Gehäuses einstecken. Der erste komplette Ladevorgang dauert zwischen sechs bis acht Stunden.
B. Zum erne uten A uflad en den W S-Ada pter wie oben be schri eben a nschl ieße n. Ein k omplett er Lad evorga ng
dauert z wischen vier bis sechs Stunde n. Wenn de r iPod anged ockt ist, werd en der iPod und die Batteri e
gleichzeitig aufgeladen.
3. Das i-F2-System hat eine Reihe mit LED-Anzeigen, mit denen die Batterielaufzeit angezeigt wird.
hohe Ladung
mittlere Ladung
geringe Ladung
WARNUNG: Aufladen erforderlich
4. Das i-F2-System hat eine Warnfunktion bei niedriger Batterieladung. Wenn die Anzeige „Aufladen
erforderlich
“ rot aufleuchtet, ist dies ein Warnhinweis, dass das System kurz davor ist, in den SHUT-DOWN-
Modus zu schalten. Das System funktioniert wieder, sobald die Batterie aufgeladen und das Gerät wieder
eingeschaltet wurde.
Fermbedienung-Empfangskopf
Page 25

5. Während des Ladevorgangs des i-F2-Systems blinken die Ladeanzeigen nacheinander auf, bis die letzte
Ladeanzeige rechts zu blinken aufhört. Das zeigt an, dass der Aufladevorgang beendet ist. Bei normalem
Gebrauch kann die i-F2-Lithium-Batterie 8 Stunden lang Strom liefern.
6. Wenn die eingebaute Lithi um-Ionen- Batteri e sich nicht mehr a ufladen lässt ode r die La dung nur kurze Zeit hält,
bedeutet dies, dass ihre Lebensdauer abgelaufen ist und sie ausgewechselt werden muss. (Siehe dazu den
Abschnitt „Auswechseln der Batterie“.)
7、 Technische Dat en der eingebauten Lithium-I onen-Batterie: Nennspannung: 7,0 V
Nennleistung: 2000 mAh Max. Ladespannung: 8,4 V
GB/T 18287-2000
Achtung:
·Verwenden Sie zum erneuten Aufladen nur den zu diesem Zweck vorgesehenen im Lieferumfang des i-F2-Systems
enthaltenen Adapter gemäß den Beschreibungen im Benutzerhandbuch. Überladen und Tiefentladen der
Batterie ist untersagt.
·Verwenden Sie die Batterie nur für das spezifizierte i-F2-Gerät.
·Das Kurzschließen ist untersagt und die Entladespannung darf nicht unter 5,0 V fallen.
. Das i-F2-System und die neu aufgeladene Batterie sollten bei 5° – 30° C bei 70 % Luftfeuchtigkeit verwendet
wer den.
·Batterie keinem offenen Feuer oder übermäßiger Wärme aussetzen. Die Batterie darf nicht durchstochen oder
Schlägen mit einem harten Gegenstand oder starkem Aufprall ausgesetzt werden. Direkten Kontakt der Anschlüsse
mit Wasser oder Metall gegenständen ve rmeiden. Ause inanderneh men, er neutes Zusam menba uen oder Löte n der
Batterie ist untersagt.
·Lageru ng u nd La dung de r Ba tte rie sollten bei -5° - 25° C und bei 70 % Luftfeuchtigkeit erfolgen, und die Anzeige
der Lebe n sda ue r d er Ba t te ri el ad ung s ollte die mittlere Ladung sein. Die B at te ri e mu ss al le d re i M ona te v oll stä ndi g
aufgeladen und entladen werden.
Bei Wahrnehmung eines eigenartigen Geruchs, Farbveränderung oder Veränderung der physischen Form darf die
eingebaute Lithium-Ionen-Batte r ie nicht mehr verwendet werden.
·Falls die Batterie ein Leck aufweist und die austretende Flüssigkeit mit der Haut in Kontakt kommt, Flüssigkeit
unverzüglich mit Wasser von der Haut abwaschen.
·Die Batterie muss korrekt recycelt und entsorgt werden.
AUSWECHSELN DER BATTERIE
Die folgende Abbildung zeigt, wie die eingebauten Lithium-Ionen-Batterien ausgewechselt werden.
Page 26

TECHNISCHE DATEN
Die ausgezeichnete Tonqualität des i-F2-Systems verdankt das Gerät seinem professionellen Design, zu dem ein
speziell entwickelter Hi-Fi-Neodymiumtreiber, Digital-Amp und die modernsten digitalen Equalizer-Schaltkreise
gehören.
Technische M erkmale:
Ausgangsleistung: 2 W*2
Lautsprecherkana l: 2-Kanal-Stereo-Ausgang
Impedanz: 12Ω
Frequenz:120 Hz - 20 kHz
Signal-Rausch-Verhältnis: 85 dB±2 (0,5 M & 1W)
Lautsprechertreiber: Neodymium-Magnettreiber 1,25” x 4
BEHEBUNG VON STÖRUNGEN
SYMPTOM MÖGLICHE URSACHE LÖSUNG
Gerät nicht eingeschaltet. Netzschalter auf „ON“ stellen.
Das Netzkabel steckt nicht
in der Steckdose und/oder
der Steckverbinder des
Kabels steckt nicht in der
Buchse an der Seite des iF2-Gehäuses.
Netzkabel in die Steckdose stecken und Steckverbinder des
Kabels in die Buchse an der Seite des i-F2-Gehäuses einstöpseln.
Überspannungsschutz (falls
verwendet) ist nicht
angeschaltet.
Wenn das Netzkabel an einen Übers pannungsschutz
angesc hlossen ist, prüfen, ob die Schutzvorri chtung eingeschaltet
ist.
Netzlanzeige
leuchtet
nicht, wen n
WSAdapter
eingestöpselt ist.
Die Wan dsteckdos e
funktioniert nic ht.
Ein anderes Gerät an dieselbe Steckdose anschließen, um den
Betrieb der Steckdose zu prüfen.
Die
Anzeige des
Batterie-
Achtung: Aufladen
erforderlich.
Batterie laden, bevor das i -F2-System neu gestartet wird.
SYMPTOM MÖGLICHE URSACHE LÖSUNG
stands an
der linken
Seite
leuchtet rot
auf.
Fernbedienung a ußer
Reichweite zum Gerät.
In vorgeschriebener Reich weite hal ten.
Gegenstände zwischen dem
i-F2-System und der
Fernbedienung wirken als
Hindernisse.
Die Gegenstände entfernen oder die Fernbedienung so in
Reichweite vom Gerät halten, dass keine Hindernisse dazwischen
liegen.
Fernbedienung
funktioniert nicht.
Die Batterie der
Fernbedienung i st
aufgebraucht.
Batterie austau sc hen (siehe Abbildungen in der SchnellanschlussAnleitung für Einzelheiten zum Vorgehen).
Prüfen, ob das Netzkabel in der Steckdose steckt und der
Steckverbinder des Kabels in die Buchse an der Seite des i-F2Gehäuses eingestöpselt ist.
Ladung des Akkus prüfen, wenn das Universalnetzteil nicht
verwend et wird.
Gerät nicht eingeschaltet.
Prüfen, ob der Netzschalter auf „ON“ steht, die Standby-Taste
gedrüc kt ist und d ie LED-Anzeige leuchtet.
Die Taste „+“gedrückt halten, um die Lautstärke zu erhöhen. Lautstärke ist zu niedrig
eingestellt.
Das Lautstärkeniveau mit einer ander en Audioquell e prüfen und
mittlere Lautstärke einstellen.
Aus den
Lautsprechern
kommt kein
Ton.
iPod sitzt nicht richtig in
der Dockingstation.
iPod herausnehmen und wieder in die Dockingstation einsetzen.
Page 27

SYMPTOM MÖGLICHE URSACHE LÖSUNG
Gerät nicht eingeschaltet. Prüfen, ob das Netzkabel in der Steckdose steckt und der
Steckverbinder des Kabels in die Buchse an der Seite des i-F2-
Gehäuses eingestöpselt ist.
Ladung des Akkus prüfen, wenn das Universalnetzteil nicht
verwend et wird.
Prüfen, ob der Netzschalter auf „ON“ steht, die Standby-Taste
gedrüc kt ist und d ie LED-Anzeige leuchtet.
Lautstärke ist zu niedrig
eingestellt.
Die Taste „+“gedrückt halten, um die Lautstärke zu erhöhen.
Das Lautstärkeniveau mit einer ander en Audioquell e prüfen und
mittlere Lautstärke einstellen.
iPod sitzt nicht richtig in
der Dockingstation.
iPod herausnehmen und wieder in die Dockingstation einsetzen.
Das 3,5-mm-Stereokabel ist
nicht an der Audioquelle
angesc hlossen (wenn die
Dockingstation nicht
benutzt wird).
3,5-mm-Stereokabel an die Audioquelle anschließen.
Sicherstellen, dass das Signalkabel fest in den richtigen
Anschlu ssb uc hse n ste c kt .
Das 3,5-mm-Stereokabel ist
am falschen Ausgang der
Audioquelle angeschlossen
(wenn die Dockingstation
nicht benutzt wird).
Sicherstellen, dass das 3,5-mm-Stereokabel fest in den
entsprechenden Anschlussbuchsen der Soundkarte oder einer
anderen Audioquelle st eckt („line-out“, „audio out“ oder
Kopfhörerbuchse).
Aus den
Lautspreche
rn kommt
kein Ton.
Gestörte Au dioqu elle. Lautsprecher an einer anderen Audioquelle testen. Dazu das 3,5-
mm-Stereokabel von der Audioquelle entfernen und an die „line
out“-, „audio out“- oder Kopfhörerb uchse einer anderen
Audioquelle anschließen (z .B. tragbarer CD-Player,
Kassettenrecorder oder UKW-Radio).
SYMPTOM MÖGLICHE URSACHE LÖSUNG
Schlechte Verbindung. Prüfen, ob der iPod richtig in der Dockingstation sitzt. Anschluss
des 3,5-mm-Stereokabels prüfen, wenn die Dockingstation nicht
verwendet wird. Das Kabel muss entweder an die „line out“-,
„audio out“- oder Kopfhöre r buchse der Soundka r te bzw. der
anderen Audioquelle angeschlossen werden, NICHT an die
Ausgangsbuchse für Lautsprecher.
Störgeräusche
vom
Lautspreche
r.
Gestörte Au dioqu elle. 3,5 - m m-Stereoka bel von der Audioquelle entfernen. Das Kabel in
die Kopfhörerbuchse einer anderen Quelle einstecken (z.B.
Walkman, Discman oder U KW-Radio).
Störgeräusche von
Lautsprechern (bei
Anschluss
an PC oder
Laptop).
Die Lautstärke des
Betriebssystems ist zu hoch
eingestellt.
Lautstärkeniveau des Betriebssystems prüfen und ggf. senken.
Die Lautstärke des i-F2Syst e ms ist zu hoch
eingestellt.
Lautstärke am i-F2-Syste m verringern.
Tonquelle ist gestört.
WAV- und MID-Dateien sind oft qualitativ mangelhaft, daher sind
bei leistungsstarken Lautsprechern Verzerrungen und
Störgeräusche lei cht hörbar. Versuchen Sie es mit einer anderen
Audioquelle, z.B. einer Musik-CD.
Ton ist
gestört.
Batterieladung ist niedrig.
Batterie aufladen und/oder WS-Adapter verwenden
Ton ist
verzerrt (bei
Anschluss
an PC oder
Laptop).
Die Lautstärke des
Betriebssystems ist zu hoch
eingestellt.
Lautstärkeniveau des Betriebssystems prüfen und ggf. senken.
Page 28

SYMPTOM MÖGLICHE URSACHE LÖSUNG
Funkinterferenzen.
Gerät zu nahe an einem
Funkturm.
Verschieben Sie die Lautsprecher, um zu testen, ob die
Interferenzen verschwinden.
Klammern
an Scharnieren sind
locker.
Spannung des
Freigabeknopfs neu
einstellen.
Die Spitze eines Kugelschreibers in die Öffnung an der
Klammerrückseite drücken.
Damit wird die Spannung des Freigabeknopfs erhöht.
Page 29

[i-almacenar•i-icargar•i-bajar•i-tocar]
Reglamento de la FCC para el i-F2
Declaración de conformidad con la FCC
Este dispositivo cumple con la sección 15 de las normativas de la FCC. Su funcionamiento está
sujeto a las dos condiciones siguientes: (1) este dispositivo no puede causar interferencias perjudiciales,
y (2) debe aceptar cualquier interferencia recibida, incluyendo aquéllas que pudiesen provocar un
funcionamiento indeseado.
Interferenc i a s d e radio y televisión
Este equipo se ha sido puesto a prueba y se comprobó que cumple con los límites de un
dispositivo digital de clase B, de acuerdo con la sección 15 de las normativas de la FCC. Estos límites se
han diseñado para ofrecer una protección razonable contra interferencias perjudiciales en una
instalación doméstica. Este equipo genera, emplea y puede irradiar energía de frecuencia de radio y, si
no se instala y utiliza de acuerdo con las instrucciones, puede causar interferencias perjudiciales en las
comunicaciones de radio. De todos modos, no hay garantía alguna de que no se produzcan
interferencias en una instalación en particular. Si el equipo causa interferencias en la recepción de radio
o televisión, lo cual pu ede determinarse apagando el equipo y después encendiéndolo de nuevo,
aconsejamos al usuario que trate de corregir dichas interferencias tomando una o más de las siguientes
medidas:
• Aumente la separación entre el equipo y el receptor.
• Conecte el equipo en otra toma de corriente de modo que el equipo y el receptor estén en
circuitos distintos.
• Consulte al distribuidor o a un técni co experto de radio/televisión para solicitar ayuda.
La realización de cambios o modificaciones no aprobados expresamente por Sonic Impact podría
invalidar la autoridad del usuario para usar el equipo.
ESTE APARATO DIGITAL DE CLASE B CUMPLE CON EL ICES-003 (Servicio Internacional
de Evaluaci ón d e C redenciales) DE CANADÁ.
Sonic Impact Technologies LLC ©Sonic Impact Technologies LLC
2555 State Street i-F2 es un marca comercial de Sonic
San Diego, California 92101 Impact Technologies LLC
USA iPod® es una marca comercial de Apple
Computer, Inc., registrada en los
www.si-technologies.com
stados Unidos y otros países
Page 30

Instrucciones importantes sobre el funcionamiento y el mantenimiento
(reparación).
PRECAUCIÓN: A fin de evitar posibles descargas eléctricas, no conecte la clavija (polariz ada) a un cable
de prolongación, receptáculo u otra toma de corriente a menos que los polos puedan insertarse por
completo y no queden expuestos.
ADVERTENCIA: PARA REDUCIR EL RIESGO DE INCENDIO O CHOQUE ELÉCTRICO, NO EXPONGA ESTE I-F2 A LA
LL UV IA N I A L A HUMED AD
IMPORT ANT ES INSTRUCCIONES DE SEGURIDAD PARA EL i-F2
1. Lea las instrucciones --Deben leerse todas las instrucciones de seguridad y funcionamiento antes de
usar el i-F2.
2. Conserve las instrucciones—Las instrucciones de funcionamiento deben conservarse para poder
consultarlas en el futuro.
3. Haga caso de las adverten cias—Todas las advertencias de las instrucciones de funcionamiento
deben leerse y observarse.
4. Siga las instrucciones—Todas las instrucciones de funcionamiento deben seguirse.
5. ADVERTENCIA: Evite el agua y la humedad—Mantenga el equipo alejado de cu alquier líquido. Para
reducir el riesgo de incendio o choque eléctrico, no exponga este i-F2 a la lluvia ni a la humedad
6. Ubicación--El i-F2 debe colocarse en un lugar estable, a nivel, lejos de fuentes externas de calor y
con ventilación adecuada. No exponga al i-F2 a tem peratura o humedad extremas. Proteja el
equipo de la exposición a la suciedad, la arena y el polvo. Note que los altavoces tienen
protección magnética para evitar la distorsión de los televisores y de los monitores de ordenadores;
mantenga los medios de alm acenamiento magnéticos a una distanci a de al menos cuatro pulgadas
(10 cm) del i-F2 para evitar la pérdida de datos.
7. Fuente de energía--Cuando no está alimentado por la batería recargable interna, el i-F2 sólo debe
conectarse a la fuente de energía suministrada con la unidad o de la manera descrita en las
instrucciones de funcionamiento y según lo marcado en el mismo i-F2.
8. Uso y cuidado del cable eléctrico—Los cables eléctri cos deben disponerse de modo que no sea
probable pisarlos o aplastarlos al colocar encima otros objetos. Compruebe todos los puntos de
conexión con regularidad. No cambie el sentido correcto de la toma de tierra o la polarización del
enchufe eléctrico. Si no va a usar el i-F2 durante un período prolongado, desenchúfelo y guarde el
cable.
9. A FIN DE EVITAR EL RIESGO DE DESCARGA ELÉCTRICA O DAÑOS EN LA UNIDAD, NO RETIRE LAS
REJILLAS DE LOS ALTAVOCES NI ABRA EL APARATO PARA TRATAR DE REPARARLO EXCEPTO CUANDO
DEBA SUSTITUIR LA BATERÍA RECARGABLE DE IONES DE LITIO TAL COMO SE INDICA EN ESTE MANUAL.
POR FAVOR, DEJE QUE EL PERSONAL CALIFICADO DE SONIC IMPACT SE ENCARGUE DE LAS
REPARACIONES.
10. Limpieza—Emplee únicamente un paño suave y seco. No utilice productos químicos de limpieza de
ninguna clase.
11. Tormentas eléctricas—Desconecte el aparato de la corriente durante las tormentas eléctricas para
evitar daños accidentales.
12. Accesorios—Use sólo los accesorios especificados por Sonic Impact Technologies.
13. Daño que requiere reparación--El i-F2 debe ser reparado por un técnico calificado cuando:
· El cable o el enchufe de la fuente de alimentación haya sufrido daños.
· Hayan caído objetos o se haya derramado líquido encima del i-F2.
· El i-F2 ha ya sido expuesto a la lluvia.
· El i-F2 no parezca funcionar normalmente o evidencie un cambio apreciable en su desempeño.
· El i-F2 se haya caído o el alojamiento haya sido dañado.
17. Reparación--El usuario no debe tratar de reparar el i-F2. En caso que la unidad deba repararse,
entregue el equipo a un técnico calificado o devuélvalo al distribuidor. Si tiene preguntas acerca
de la garantía y del servicio, comuníquese con Sonic Impact Technologies, LLC, en la dirección
service@si-technologies.com
.
GARANTÍA LIMIT ADA DE UN AÑO
Sonic Impact Technologies ofrece una garantía de materiales defectuosos y mano de obra para
todos sus productos, siempre que su uso sea normal y razonable, durante un período de un año a partir
de la fecha de la compra.
Ésta es la única y exclusiva garantía en efecto en relación al sistema de altavoces i-F2 de Sonic
Impact Technologies, y cualquier otra garantía, ya sea expresa o implícita, no es válida. Ni Sonic Impact
Technologies, LLC ni ningún revendedor autorizado de Sonic Impact Technologies, LLC son responsables
de ningún daño incidental en que se incurra al usar los altavoces. (Esta limitación de daños incidentales
o resultantes no tendrá aplicación donde esté prohibida.)
La obligación de Sonic Impact Technologies, LLC bajo esta garantía no se aplica a cualquier
defecto, funcionamiento erróneo o fallo debido al uso indebido, el maltrato, la instalación incorrecta o
el uso del sistema de altavoces con otros equipos defectuosos, inapropiados o para los cuales no estaba
previsto.
Las condiciones de esta garantía se aplican sólo si los sistemas de altavoces i-F2 se devuelven al
revendedor autorizado de Sonic Impact Technologies, LLC donde se compraron.
SERVIC IO AL CLIEN TE
Para la reparación o garantía de los componentes electrónicos, contacte con:
service@si-technologies.com
Page 31

CONTENIDO DEL PAQUETE
Sistema i-F2 Energía CA Estéreo iPod® Adaptador Remoto Manual Conexión
Adaptador Cable Manguitos rápida
Instrucciones
· Batería de iones de litio incorporada
· Transformador de 9 V@2.0 A
· Cable estéreo de 3,5 mm
· Manguitos adaptadores para iPod 3G/ iPod 4G / iPod Photo/iPod nano/iPod Mini/ iPod vídeo
· Manual de instrucciones
· Control remoto
· Instrucciones de conexión rápida
Diagrama del i-F2:
40. Cierre del compartimento
41. Controlador de altavoces UniiPod
42. Estación de acoplamiento de 30 clavijas iPod®30
43. Conectadores de entrada
44. Controles de volumen
45. Compartimento de auriculares/control remoto
46. Compartiment o d e almace namiento del iPod®
47. Puerta del compar ti mento de almacenamient o d el iPod®
48. Botón de encendido/apagado y luz piloto
Page 32

49. Indicador luminoso de la carga de batería
50. Tapa de la cubierta de la batería
51. Batería de iones de litio
52. Control rem o to
UBICACIÓN Y PREPARACIÓN DEL SISTEMA i-F2
Coloque el sistema i-F2 en una superficie estable que esté a nivel. El sistema i-F2 puede colocarse cerca
de pantallas de vídeo como te levisores y monitores de ordenador sin distorsionar la imagen, pero se
deben mantener los medios de almacenamiento magnéticos (como unidades, discos y cintas) a una
distancia de al menos cuatro pulgadas (10 cm) para evitar la pérdida de datos.
Asegúrese que las horquillas de plástico que sujetan las correas de las bisagras estén firmes. Si fuera
necesario, ajuste la tensión del botón de desenganche de las horquillas presionando con la punta de un
bolígrafo a través del orificio de la parte posterior de éstas. Tenga en cuenta que puede abrir el i-F2
completamente liberando ambas horquillas.
CÓMO CONECTARSE AL i-F2
Advertencia: Asegúrese que el sistema i-F2 esté en la modalidad de APAGADO antes de realizar las
conexiones y antes de enchufar el iPod en el sistema i-F2. Para garantizar un funcionamiento correcto,
siga minuciosamente la secuencia de conexión tal como se describe a continuación y en el orden
indicado.
Conecte el manguito adaptador de iPod, suministrado con el i-F2, que corresponda al modelo del iPod.
Cada adaptador estará marcado con los modelos de iPod. Un modelo de iPod con un conector de 30
clavijas pue de contectarse directamente con la estación de acoplamiento de 30 clavijas del sistema i-F2.
Se puede conectar un modelo de iPod anterior sin conector de 30 clavijas por me dio del puerto de
ENTRADA DE AUDIO que se encuentra en el costado del estuche del i-F2, usando el cable estéreo de 3,5
mm incluido. Cuando esté seguro que cualquiera de los métodos de conexión se haya realizado, está
listo para usar los altavoces i-F2.
ALIMENTACIÓN
El i-F2 puede funcionar usando la batería de iones de litio recargable incorporada. Se puede obviar la
batería y usar el tr ansformador externo de 9V@1.8A de CA incluido con el i-F2. El transformador
alimentará la unidad, recargará la baterí a de iones de litio y recargará el iPod en la estación de
acoplamiento de 30 clavijas simul táneamente.
Para usar alimentación externa con el adaptador de energía:
Cuando el iPod esté conectado con el sistema i-F2, introduzca el conector cilíndrico del transformador
en el conectador marcado DC IN 9V
, y luego intro duzca el extremo de la patilla del adaptador
de energía universal en el enchufe de CA de la pared. El i-F2 está listo para usar. Cuando esté acoplado,
su iPod también se recargará al utilizar el transformador.
Para utilizar la bate ría recargable de ion e s d e li ti o incorporada:
El sistema i-F2 tiene una potente batería de iones de litio recargable incorporada en el alojamiento. Al
emplear esta fuente de alimentación independiente, usted puede utilizar su iPod durante horas entre
una y otra carga. Por favor, tenga en cuenta que el iPod no se recarga cuando se desactiva la batería de
iones de litio.
COMIENCE A UTILIZAR LOS ALTAVOCE S
7. Con el iPod asentado en la estación de acoplamiento, o conectado por medio del cable estéreo de
3,5 mm, deslice el interruptor
en el panel delantero a la posición de “ENCENDIDO
AUTOMÁTICO” para encen der el i-F2 . La pantalla luminosa se mostrará en verde .
8. Encienda el iPod, ajuste el volumen usando el ajuste de volumen del i-F2, y reproduzca sus
melodías favoritas. (Tenga en cuenta que el control de volumen del iPod se pone en derivación
cuando está conectado al i-F2.)
CONTROL DE VOLUMEN
Los botones en el panel delantero son los controles maestros del volumen del sistema i-F2.
Pulse y mantenga pulsado “+”para aumentar el volumen y luego “-”para reducir el volumen. El
sonido comenzará en la misma posición del volumen cada vez que se encienda el sistema i-F2.
USO REMOT O
El control remoto especificado en el sistema i-F2 puede realizar operaciones
normales en el reproductor iPod y el sistema i-F2.
1. El control remoto se encuentra en el compartimento de auriculares y control
remoto. Siga la ilustración en la instrucción de conexión rápida para retirarlo o
colocarlo.
2. El control remoto especial usa una batería de botón para realizar todas las
funciones del sistema de audio. Consulte la ilustración en la instrucción de
conexión rápida para reemplazar la batería agotada.
Page 33

25. Cabezal transmisor infrarrojo
26. Encendido/ Apagado
27. Prev
28. Vol-
29. Reproducción/ Pausa
30. Próximo
31. Vol+
32. Nog de batería
3. mientras esté usando el control remoto, asegúrese que el cabezal transmisor
infrarrojo esté apuntado correctamente hacia el cabezal receptor del sistema i-F2, a
una distancia de 6M y un en ángulo de 60℃. El área sombreada del gráfico es el
alca nc e vá l ido del co nt rol remo to.
4. Ponga el control remoto en el compartimento después de usarlo para no perderlo.
Cabezal receptor del control remoto
Page 34

APAGADO
Cuando no esté en uso, para minimizar el consumo energético, ponga el interruptor en la posición de
“APAGADO”
. Tenga en cuenta que el i-F2 tiene la función “DESCONEXIÓN AUTOMÁTICA" (EN
ESPERA) que evita el consumo excesivo de energía durante períodos inactivos.
DESCONEXIÓN AUTOMÁTI CA (EN ESPERA):
Cuando se pone el interruptor en la posición de “DESCONEXIÓN AUTOMÁTICA”, el sistema i-F2 se apaga
automáticamente y entra en una modalidad de espera si no detecta una señal de audio en 5 minutos. El
LED del interruptor se pondrá en rojo
El LED se pondrá en verde automáticamente
cuando se detecte una señal de audio y el sistema i-F2 se encenderá automáticamente. El
consumo de energía se reducirá en esta modalidad "en espera", pero sugerimos que apague el sistema iF2 completamente cuando no lo use durante un período prolongado para no acortar la vida de la baterí a.
DA TA TRANSFER
TRANSFERENCIA DE DATOS:
Tenga en cuenta que se puede bajar y subir música mientras el iPod está en la estación de acoplamiento,
usando el cable de incendios incluido con el iPod. Enchufe ese cable en el puerto ubicado del lado
izquierdo del i-F2, y enchufe el otro extremo en la computadora. Siga las instrucciones incluidas con el
iPod para bajar, subir y manejar la música.
BATERÍAS DE LITIO INCORPO RAD AS
1. El sistema i-F2 usa una batería de iones de litio de 8,4V @2000m AH.
2. A. Antes de usar el i-F2 por primer a vez alimentado por l a batería de iones de litio, debe cargar la
batería del todo. Enchufe el dispositivo de 9V@2.0A CA en la pared e introduz ca el conector
cilíndrico del extremo del cable del adaptador en la toma de corriente marcada
del
lado del i-F2. Una primera carga completa se realizará en 6-8 horas.
B. Para recargar, conecte el transformador tal como se ha descrito anteriormente. Una recarga
completa se efectuará en 4-6 horas. Cuando el iPod está conectado, tanto la batería como el iPod
se recargan simultáneamente.
3. El sistema i-F2 tiene una hilera de luces LED que funcionan como indicadores de la vida de la
batería.
mucha potencia
potenci a moderada
poca potencia
ADVERTENCIA: se requiere carga:
4. El sistema i-F2 tiene una función de advertencia de poca potenci a. Cuando el indicador “se
requiere carga” se muestra en rojo, es un aviso de que el sistema entrará pronto en el modo de
DESCONEXIÓN. El sistema volverá a funcionar cuando la batería se haya cargado y la unidad se
active de nuevo.
5. Mientras se está cargando el sistema i-F2, las luces indicadoras de potencia parpadean en
secuencia hasta que la última luz en el extremo derecho deja de parpadear. En ese momento, la
carga ya estará completa. Bajo uso normal la batería de li tio i-F2 puede durar 8 horas
6. Cuando la batería de iones de litio in corporada deje de cargar o su carga dure mu y poco significará
que la vida efectiva de la batería está terminando y es necesario sustituirla. (Por favor, consulte
la sección Sustitución de la batería).
7、 Especificaciones de la batería de iones de litio incorporada: Voltaje nominal: 7,0 V
Capacidad nominal: 2000 mAh Voltaje de carga máx.: 8,4 V
GB/T 18287-2000
Advertencia:
·Sólo recargue con el adaptador asignado incluido con el i-F2, según lo descrito en el manual del usuario.
Está prohibido sobrecargar e invertir a carga de la batería.
·Usar la batería sólo para el dispositivo i-F2 especificado.
·Está prohibido provocar un cortocircuito; aparte, no está permitido que el voltaje de descarga sea
inferior a 5 V.
. El uso del sistema i-F2 y la recarga de la pila deben realizarse a una temperatura de -5° a 30° C, con
una humedad por debajo del 70%.
·No exponga la batería al fuego o un nivel excesivo de calor. No perfore la batería, ni la golpee con un
objeto duro, ni permi ta que reciba cualquier golpe fuerte. Evite el contacto dire cto entre los terminales
y objetos de metal. Está prohibido desmontar, reparar o soldar la batería.
·El almacenamiento y la carga deben re alizarse a una temperatura entre -5° y 25°C, con menos del 70%
de humedad; los indicadores de la b atería deben estar en potencia moderada. La batería debe
recargarse y descargarse completamente cada tres meses.
·No use la batería de iones de litio incorporada si detecta un olor raro, un cambio de color o un cambio
en la forma física.
·Si la batería pierde líquido y éste entra en contacto con la piel, lave inmediatamente la zona afectada
con agua abundante.
·La batería debe reciclarse o desecharse correctamente.
SUSTITUCIÓN DE LA BATERÍA
Observe la siguiente ilustración acerca de la manera de cambiar las baterías de iones de litio
incorporadas.
Page 35

ESPECIFICACIÓN
La excelente calidad del sonido del i-F2 se debe a nuestro diseño altamente profesional, que incluye un
controlador de neodimio Hi-Fi a medida, amp digital y lo más novedoso en circuitos ecualizadores
digitales.
Especificaciones:
Potencia disponible: 2 W*2
Canal de altavoz: salida en estéreo de 2 canales
Impedancia: 12 Ω
Frecuencia: 120 Hz-20 KHz
Relación señal-ruido: 85 dB±2 (0,5 M & 1 W)
Controladores de altavoz:controladores magnéticos de neodimio @ 1.25” X 4
RESOLUCIÓN DE PROBLEM AS
SÍNTOMA POSIBLE PROBLEMA SOLUCIÓN
El equipo no está
encendido
Coloque el interruptor en la posición “on” (encendido). El piloto
de
encendido
no se
ilumina al
conectar
el
transform
ador
El cable de la fuente
de alimentación
universal no está
enchufado en la pared
y/o el conector de la
fuente de alimentación
no está enchufado en
el conector en la parte
trasera del sistema iF2.
Enchufe la fuente de alimentación universal en un enchufe y
enchufe el conector de la fuente de alimentación en un
conector de entrada de CA en el costado del sistema i-F2.
Page 36

SÍNTOMA POSIBLE PROBLEMA SOLUCIÓN
El protector de
sobrecarga (si se
utiliza) no está
encendido.
Si el cable del transformador está enchufado a un protector
de sobrecarga, asegúrese que éste esté encendido.
La toma de corriente
no funciona.
Conecte otro dispositivo a esa misma toma de corriente para
confirmar que funciona.
El
indicador
de nivel
de carga
de la
batería
de la
izquierda
se
muestra
en rojo
Advertencia: Se
requiere carga.
Cargue la batería antes de volver a utilizar el sistema i-
Fusion.
El control remoto está
fuera del alcance
válido
Llévelo dentro del alcance válido
Algún objeto obstruye
la trayectoria entre el
i-F2 y el control
remoto
Quitar el objeto o mover el control remoto dentro del
alcance váli do sin obstrucciones.
El control
remoto no
funciona
La batería del control
remoto está agotada
Cambie la batería (Consulte las ilustraciones en la instrucción
de conexión rápida para ver el funcionamiento detallado)
SÍNTOMA POSIBLE PROBLEMA SOLUCIÓN
Verifique que el cable de la fuente de alimentación universal
esté enchufado en la pared y en el conectador de entrada de
CA en el costado del sistema i-F2.
Verifique que la batería recargable esté cargada si no está
utilizando el transformador.
El equipo no está
encendido.
Verifique que el interruptor esté en la posición “ON”
(encendido), el botón del modo “en espera” se haya pulsado
y el piloto esté iluminado.
Pulse el botón “+” para subir el volumen. El volumen está
demasiado bajo.
Compruebe el nivel de volumen del dispositivo origen de
sonido altern ativo y ajústelo a un nivel medio.
No sale
sonido de
los
altavoces
El iPod no est á
asentado en la
estación de
acoplamiento.
Retire el iPod y vuelva a insertarlo en la estación de
acoplamiento.
El equipo no está
encendido.
Verifique que el cable de la fuente de alimentación universal
esté enchufado en la pared y en el conectador de entrada de
CA en el costado del sistema i-F2.
Verifique que la batería recargable esté cargada si no está
utilizando el transformador.
Verifique que el interruptor esté en la posición “ON”
(encendido), el botón del modo “en espera” se haya pulsado
y el piloto esté iluminado.
El volumen está
demasiado bajo.
Pulse el botón “+” para subir el volumen.
Compruebe el nivel de volumen del dispositivo origen de
sonido altern ativo y ajústelo a un nivel medio.
No sale
sonido de
los
altavoces
El iPod no est á
asentado en la
estación de
acoplamiento.
Retire el iPod y vuelva a insertarlo en la estación de
acoplamiento.
Page 37

SÍNTOMA POSIBLE PROBLEMA SOLUCIÓN
El cable estéreo de 3,5
mm no está conectado
a una fuente de sonido
(cuando no se utilice la
estación de
acoplamiento).
Conecte el cable estéreo de 3,5 mm a la fuente de sonido.
Asegúrese que el cable de señal esté insertado firmemente
en los conectadores correctos.
El cable estéreo de 3,5
mm está conectado
con la salida
equivocada en una
fuente de audio
(cuando no se usa la
estación de
acoplamiento).
Asegúrese que el cable estéreo de 3,5 mm esté conectado y
totalmente introducido en el conectador “line-out” (línea de
salida), "audio out" (salida de sonido) o de auriculares de su
tarjeta de sonido u otr a fuente de sonido.
Problema con la fue nte
de sonido.
Pruebe los altavoces en otra fuente de sonido, sacando el
cable estéreo de 3,5 mm de la fuente de sonido e
insertándolo en el conectador “line-out” (línea de salida),
"audio out" (salida de sonido) o de auriculares de una fuente
de sonido distinta (por ejemplo, un reproductor portátil de
CD o casetes, o una radio de FM).
Mala conexión Compruebe que el iPod esté insertado correctamente en la
estación de acoplamiento. Compruebe la conexión del cable
estéreo de 3,5 mm si no utiliza la estación de acoplamiento.
Asegúrese que el cable esté insertado en el conectador “lineout” (línea de salida), "audio out" (salida de sonido) o de
auriculares de su tarje ta de sonido u otra fuente de sonido –
y NO en el conectador “speaker-out” (salida de altavoces).
Sale ruido
de los
altavoces
Un problema con su
fuente de sonido
Desconecte el cable estéreo de 3,5 mm de la fuente de
sonido. Introduzca el cable en el conectador de auriculares
de una fuente alternativa (por ejemplo, un Walkman, un
Discman o una radio de FM).
SÍNTOMA POSIBLE PROBLEMA SOLUCIÓN
Sale ruido
de los
altavoces
(al
conectar
el equipo
a un
ordenador
de
escritorio
o
portátil).
El nivel de volumen del
sistema operativo es
demasiado alto.
Compruebe el nivel de volumen del sistema operativo y
bájelo si fuese necesario.
El nivel de volumen del
sistema i-F2 está
demasiado alto.
Reduzca el volumen del sistema i-F2.
La fuente de sonido
está distorsionada
A menudo, los archivos WAV y MID son de baja calidad; por
tanto, al emplear altavoces de altas prestaciones, la
distorsión y el ruido se aprecian fácilmente. Pruebe una
fuente de audio distinta, como un CD de música.
El sonido
está
distorsion
ado
La carga de la batería
es baja.
Recargue la bate ría y/o utilice el transformador.
Page 38

SÍNTOMA POSIBLE PROBLEMA SOLUCIÓN
El sonido
está
distorsion
ado (al
conectar
el equipo
a un
ordenador
de
escritorio
o
portátil).
El nivel de volumen del
sistema operativo es
demasiado alto.
Compruebe el nivel de volumen del sistema operativo y
bájelo si fuese necesario.
Interferen
cias de
radio
Demasiada proximidad
a un equipo de radio.
Aleje sus altavoces para ver si las interferencias
desaparecen.
Las
horquillas
que
sujetan
las
correas
de las
bisagras
se
sueltan.
La tensión del botón
de desenganche no
está bien ajustada.
Introduzca la punta de un bolígrafo en el agujero en el dorso
de la horquilla y empuje. Esto ajustará la tensión en el botón
de desenganche.
Page 39

i-F2 FCC Regulations
FCC の適合宣言
本装置は FCC 規則パート 15 に適合しています。本装置の動作は次の 2 つの条件を前提としています。(1)本装
置が受信障害の原因とならないこと、さらに(2)望ましくない動作の原因となり得る受信障害を含め、本装置はあらゆる受
信障害を受け入れなければならないこと。
ラジオおよび テレビの受信障害
本装置は、FCC 規則パート 15 に従い、クラス B デジタル装置の制限に適合するこ とが試験で証明されています。
これらの制限は、住宅地域で設置した場合、受信障害に対し妥当な保護を提供するよう意図されています。本装置は、
無線周波エネルギー を発生・使用し、放射する可 能性があるので、取扱 説明書に従わない で設置して使用する場合には、
無線通信への受信障害の原因となることがあります。ただし、特定の設置状況では受信障害を引き起こさないという保証
はありません。本装置が、テレビやラジオの受信障害の原因となっているかどうかは、装置の電源を一旦切り再度電源を入
れ直すことで確認できます。本装置が受信障害 の原因である場合は以下の 1 つ以上の措置で受信障害の是正を試み て
ください。
• テレビまたはラジオと本装置の間の距離を離す。
• テレビま たはラジオとは別の回路にあるコン セントに装置を接続 する。
• 販売店またはテレビ、ラジオの修理業者に相談する。
Sonic Impact 社が明示的に承認しない変更や改変を加えた装置の使 用は禁止されています。
本クラス B デジタル機器はカナダの ICES-003 に適合しています。
Sonic Impact Technologies LLC ©Sonic Impact Technologies LLC
2555 State Street i-F2 は Sonic
San Diego, California 92101 Impact Technologies LLC の商標です。
USA iPod®は
米国および他の国々で登録されている Apple Computer, Inc.の
www.si-technologies.com
商標です。
使用・メンテナンス(修理)に関する重要な説明
注意: 感電を防止するため、プラグの金属差 込部が露出せずに完全に挿入されていない限り、分極プラグを延長コードと併
用しないでください。
Page 40

警告: 火災や感電の危険性を減少するため、雨水や湿気に i-F2 を曝さないでください。
i-F2 に関する重要な安全上の説明
1. 説明書をお読みください。 -- i-F2 のご使用前に、必ず安全上および操作上の説明をすべてお読みください。
2. 説明書を保管してください。 -- 後で参照できるよう取扱説明書を保管してくださ い。
3. 警告事項に留意してください。 -- 取扱説明書内の警告事項をすべて読み、従 ってください。
4. 説明書に従ってください。 -- 取扱説明書のすべ ての内容に従ってください。
5. 警告: 水気や湿気を避けてください。どんな液体に も近づけないでください。火災や感電の危険性を減少するため、
雨水や湿気に i-F2 を曝さないでください。
6. 場所 -- i-F2 は、外部の熱源から離れ十分に換気された状態の安定した水平な場所に置いてください。i-F を極度
の高温や低温、過度の湿気に曝さない でください。土、 砂、埃などから保護してください。TV やコンピュータモニターの
ひずみ防止のためス ピーカーは磁気遮蔽されていますが、データの喪失を防ぐため、磁気記録媒体は i-F2 から最低
約 10 cm 放してくださ い。
7. 電源装置--内部充電 式バッテリの電源を切っていない場合、装置付属、またはその取扱説明書に記載され、i-F2
に記されている電源装置以外には i-F2 を接続しないでくださ い。
8. 電源コードの使用とお手入れ -- 踏 まれたり、他の物が上に置かれて押しつぶ されないような場所に電源コードを配
置してくださ い。すべての付属品は定期的にチェッ クしてください。適切な接地や電源プラグの分極 を迂回しないでく だ
さい。長期間 i-F2 を使用しない場合は、プラグを抜き、電源コードを収納してください。
9. 感電の危険性や装置の損傷を避けるため、本取 扱説明書で説明されている充電 式リチウムイオンの交換時以外は、
修理を目的にスピーカーグリルを取り外したり、装置を 開けないでください。SONIC IMPACT 社公認修理業者に修
理をご依頼ください。
10. クリーニング -- 柔らかい乾燥した布以外は使用しないでください。いかなる種類のクリーニング用化学薬品も絶対に
使用しないでくだ さい。
11. 雷雨 -- 損傷事故を防止するた め雷雨の間は装置の電源プラグを抜いてく ださい。
12. 付属品 -- Sonic Impact Technologies 社指定の取付付属品のみを使用してください。
13. 修理の必要な損傷 -- 以下の場合は有資格 の修理業者に i-F2 を修理しても らってください。
· 電源装置のコードまたはプラグが損傷している場合。
· i-F2 に物が落下したり、液体がこぼれた場合。
· i-F2 が雨で濡れた場合。
· i-F2 が正常に動作しなかったり、性能に著しい変 化が見られた場合。
· i-F2 を落としたり、ケースが損傷した場合。
18. 修理 -- 自分で i-F2 の修理を試みな いでください。修理は 有資格の修理業者に依頼するか、販売店に返品してく
ださい。 保証や修理についてのご質問はservice@si-technologies.com
で Sonic Impact Technologies, LLC 社ま
でご連絡ください。
1 年間限定保証
Sonic Impact Technologies 社は、購入日から 1 年間、通常で適 切な使用において全製品が材料上および製造
上の不具合がないことを保証いたします。
本保証は、Sonic Impact Technologies 社電気式 i-F2 スピーカーシステムに関する独占的で唯一の保 証であり、
明示または暗 示に関わらず、その他の保証は無効です。Sonic Impact Technologies, LLC 社または Sonic Impact
Technologies, LLC 社認定再販業者のい ずれも、スピーカーの使用において生じた付随的損害については責任を負いか
ねます。(地域によって付随的損害または間接的損害についてこの制限が禁止されている場合、この制限は適用されませ
ん。)
本保証における Sonic Impact Technologies, LLC 社の責任は、誤用、乱用、不適切な設置、故障した装置もし
くは正しくない装置との併用、または意図されていない装置とスピーカーシステム の併用の結果発生した不具合、 誤動作、
または故障には適用されません。
i-F2 スピーカーシステムの購入元である各 Sonic Impact Technologies, LLC 社認定再販業者にスピーカーシステ
ムを返品いただいた場合に限り、本保証の条件が適用されます。
お客様サービス
電子機器の修理や保証については下記 までご連絡ください。
service@si-technologies.com
梱包内容
i-F2 システム AC 電源 ステレオ iPod® アダプタ リモート 取扱説明書 クイック
アダプタ ケーブル スリーブ コネクト
説明書
· 内蔵リチウムイオン・バッテリ
· 9V@2.0A 電源アダプタ
· 3.5mmステレオケーブル
· iPod 3G/ iPod 4G / iPod Photo/iPod nano/iPod Mini/ iPod のビデオアダプタ・スリーブ
· 取扱説明書
· リモート
· クイックコネクト説明書
Page 41

i-F2 図:
53. 収納部ロック
54. デュアル・スピーカー ドライバ
55. iPod®30 ピン・ドッキングステーション
56. 入力ジャッ ク
57. 音量調節
58. ヘッドフォン/リモート収納部
59. iPod®収納部
60. iPod®収納部ドア
61. 電源オン/オフおよび LED
62. バッテリ寿命表示 LED
63. バッテリカバー
64. リチウムイオン・バッテリ
65. リモート
i-F2 システムの設置とセットアップ
安定した水平な場所に i-F2 を置 いてください。i-F2 システムはテレビやコンピュータモニターなどのビデオ ディスプレーの近くに
置いても画像の歪みは生 じませんが、データ の喪失を防ぐため、磁気記録媒体(ドライブ、ディスク、テープなど)は i-F2 から
最低約 10 cm 離してください。
ヒンジストラップを固定するプラスチッククリップがしっかりと取り付けられていることを確認してく ださい。必要に 応じて、ボールペ
ンの先でクリップ背面の穴を押し、クリップのリリ ースボタンの張力を調整します。両方のクリップを取り外すと i-F2 が 180 度に
開くことがあるのでご注意ください。
i-F2 への接続
警告: i-F2 システムが POWER OFF (電源オフ)モードの状態であることを確認してから接続し、iPod を i-F2 システムに設
置してださい。正しく動作させるためには、下記 の説明通りの接続順序および指示された順番に厳格に従ってください。
お手持ちの iPod モデルと一致する i-F2 に付属の iPod アダプタスリーブを取り付けてください。各スリーブには iPod モデルが
記載されています。30 ピンコネクタ付きの iPod モデルは、i-F2 システム上にある 30 ピン・ ドッキングステーションに直接接続
できます。30 ピンコネクタの付いていな旧型 iPod モデルは、 付属の 3.5 mm ステレオケーブルを使用して、i-F2 ケース側面
にある AUDIO IN ポートに接続できます。 上記いずれかの接続方法で接続したら、i-F2 スピーカーをプレーできます。
電源
i-F2 は内蔵リチウムイオン・バッテリでも動作可能です。バッテリを使用せずに、i-F2 付属の外付け AC 9V@1.8A 電源アダ
プタを使用できます。 AC アダプタによる装置への電力投入、リチウムイオン・バッテリの 充電、30 ピン・ドッキングステーションで
の iPod の充電がすべて同時に行われます。
電源アダプタで外部電源を使用する には:
iPod を i-F2 システムに接続したら、AC アダプタ・バーレルコネクタを DC IN 9V
と示されたジャッ クに挿入し、壁の
Page 42

AC 電源コンセントにユニバーサル電 源アダプタの金属部 を差し込みま す。これで i-F2 をプレ ーできます。AC アダプタ使用の
際、ドッキングステーションに設置している間、iPod が同時に充電されます。
内蔵リチウムイオン充電式バッテリを使用するには:
i-F2 システムのケースには強力なリチウム イオン充電式バッテリが内蔵されています。この独立した電源を使用して、充電中
に何時間も iPod をプレーできます。リチウムイオン・バッテリの電源が切れている場合、iPod は充電されませんのでご注意く
ださい。
再生の開始
9.
iPod をドッキングステーションに設置した状態または 3.5 mm ステレオケーブルで接続した状態で、フロントパネルのス
イッチ
を「AUTO ON」の位置にし、i-F2 の電源をオン にします。LED 表示が緑色になります。
10.
iPod の電源をオンにし、i-F2 の音量調節で音量を調節し、 お好きな曲を再生し てください。(i- F2 のドッキングステー
ションに設置されていると きは、iPod の音量調節は機能しないことにご注意ください。)
音量調節
フロントパネルにある のボタンは i-F2 システムの主要音量調節です。音量を上げるには「+」を、音量を下げるには
「-」を押し続けます。i-F2 システムを再起動する度に、30%の音量位置で再生が開始されます。
リモートの使用
i-F2 システム付属の特定のリモートで ipod プレーヤーと i-F2 システムの通常の操作が
できます。
1.ヘッドフォン/リモート収納部にリモートが入っています。リモートの取り出しや収納には
『クイックコネクト説明書』の図解に従ってください。
2. この特別なリモートで音響システムの機能を完全に利用するためには、ボタン電池 1
個が必要です。使用済みバッテリの交換には『クイックコネクト説明書』の図解に従っ
てください。
33. 赤外線送信ヘッド
34. 電源オン/オフ
35. 戻る
36. 音量ダウン
37. Play/ Pause (再生/一時停止)
38. 次へ
39. 音量アップ
40. バッテリドア
3. リモートご使用の際は、6 メートルの距離で角度 60 度の範囲で赤外線送信ヘッドが
i-F2 システムの受信ヘッドに正しく向いていることを確認してください。図の灰色部分がリ
モートの有効な範囲です。
Page 43

4. リモート使用後は紛失しないよう収納部に戻してください。
電源オフ
使用中でないときは電 力消費を最低限に抑えるため、電源スイッチを「OFF」位置 にしてください。i-F2 には、ア
イドルプレー中の過剰な電力消費を防止する「自動シャットダウン(スタンバイ)」機能が搭載されていることにご留意ください。
自動シャットダウン(スタンバイ):
電源スイッチが「AUTO ON (自動オン)」に設定されている場合、i-F2 システムは自 動的に電源がオフになり、 5 分以内に
音響信号が検知されないときはスタンバイモードになります。電源スイッチの LED は赤色
になります。音響信号
が検知されると LED は自 動的に緑色
になり、i-F2 システムの電源は 自動的にオンになります。この「スタンバ
イ」モードで電力消費は減少しますが、バッテリ寿命を延ばすため、長期間ご使用でないときは、i-F2 システム の電源を完
全にオフにしてください。
DA TA TRANSFER
データ伝送
iPod に付属の iPod Dock Connector to Fire Wire Cable (ファイヤ・ワイヤケーブルへの iPod ドックコネクタ)を使用し て、
iPod を i-F2 のドッキングステーションに設置している場合、音楽 をダウンロード・アップロードできます。i-F2 左側にあるポート
にそのケー ブ ルを差し込み、もう一方のケー ブルの端をコンピュータに接続します。音楽のダウンロード、アップロ ード、管理に
は、iPod に付属の説明書に従ってくだ さい。
内蔵リチウムバッテリ
1. i-F2 システムは 8.4V 2000mAH 内蔵リチウムイオン充電式バッテリを使用します。
2. A. i-F2 を初めてご使用になる 前に、リチウムイオン・バッテリの電源をオフにしてバッテリを完全に充電してくださ い。壁
の AC コンセント に 9V 2.0A AC を差 し込み、i-F2 システム側面に
と記されたソケットにアダプタケーブルの
端にあるバーレルコネクタを挿入します。初回の完全充電には 6~8 時間かかります。
B. 再充電するには、上記の通 りに AC 電源アダプタを接続してくだ さい。完全充電には 4~6 時間かかります。iPod
をドッキングステーションに設置した状態で、バッテリと iPod の両方が同時に充電されます。
3. i-F2 システムにはバッテリ寿命表示として一連の LED ライトがあります。
バッテリ高
バッテリ中
バッテリ低
警告: 要充電:
4. i-F2 システムには電力低下を警告する機能が 備わっています。「要充電」表示が赤色になっ たら、システムが間もなく
シャットダウンモードになることを警告しています。充電され、装置の電源がオンになった後、システムは再度動作しま
す。
5. i-F2 システム の 充電中、電力表示ライトが順に点滅していき、右端の最後 のライトが点滅しな くなりま す。これで充
電は完了です。通常の使用 では、i-F2 リチウムバッテリは 8 時間もちます。
6. 内蔵リチウムイオン・バッテリが充電で きなくなったり、 充電後わずかしかもたな い場合、 バッテリ有効期間が切れ、交
換の必要があることを示しています。(「バッテリの交換」の項 を参照。)
Page 44

7 内蔵リチ ウムイオン・バッテリの仕様: 公称電圧: 7.0V
公称容量: 2000mAh 最大充電電圧: 8.4V
GB/T 18287-2000
警告:
· i-F2 に付属の専用アダ プタのみを使用し、取扱説明書の通りに充電してください。 バッ テリの過充電や逆充電は絶対に
しないでください。
· 指定の i-F2 装置専用のバッテリを使用してください。
· 短絡させないでください。放電電圧が 5.0V 未満にならないようにし てください。
· i-F2 システムの使用とバッテリ充電は、温度-5~30℃、湿度 70%以内で行ってください。
· バッテリは火気や高温 に曝さないでください。 バッテリに穴を開けたり、固い物質でたたいたり、 大きな衝撃を与えたりしない
でください。 水や金属体が端子 に直接触れないよう にしてく ださい。バッ テリの分解、修理、はん だ付けは絶対にしないでくだ
さい。
· 保管と充電は、温度-5~25℃、湿度 70%以内で行い、バッテ リ寿命表示はバッテリ中である必要があります。3 ヶ月毎に
バッテリを完全に充電・放電してください。
· 内蔵リチウムイオン・バッテリに異臭、変色、変形が見られたら、使 用しないてください 。
· バッテリが液洩れし、液が 皮膚についた場合、直ちに水で液を皮膚から洗い流してください。
· バッテリはリサイクルする か、正しく廃棄してください。
バッテリの交換
内蔵リチウムイオン充電式バッテリの交換方法については以下の図解を参照してください。
Page 45

仕様
i-F2 の卓越した音質は、カスタムの Hi-Fi ネオジムドラ イバ、デジタルアンプ、および最新のデジタ ルイコライザー回路を搭載
した高度な専門的設計により実現しています。
仕様:
電力出力: 2W*2
スピーカーチャネル: 2 チャネルステレオ出力
インピーダンス: 12Ω
周波数:120Hz~20KHz
信号対雑音比: 85dB±2 (0.5M & 1W)
スピーカードライバ:ネオジム磁石 ドライバ @ 1.25” X 4
トラブルシューティング
兆候 考えら れる原因 解決策
電源がオンになってない。 電源ス イッチを「ON」の位置にします。
ユニバーサル電源装置コー
ドが壁のコンセント に接続
されていないか、電源装置
コネクタが i-F2 システム背
面にあるジ ャックに差し込ま
れてない。
ユニバーサル電源装置 を壁のコンセントに差し込み、i-F2 システム側面
にある AC 入力ジャックに電源装置コネクタを差し込みます。
サージプロ テクタ(使用して
いる場合) の電源がオンに
なっていない。
ユニバー サル電源装置コードがサージ プ ロ テクタに差し込まれている場
合、サージプロテクタの電源がオンになっ ていることを確認し てください。
AC アダプタ
挿入時 に
電源 LED
が点灯しな
い。
壁のコンセント が機能 して
いない。
壁のコンセント(同じコンセント)に別の装置を差し込み、そのコンセントが
機能していることを確認してください。
左端のバッ
テリ寿命表
警告: 充電が必要。 i-F2 システムを再プレーする前に バッテリを充電してください。
兆候 考えら れる原因 解決策
示が赤色に
なる。
リモートが機能する範囲内
にない。
リモートを有効範囲に移動します。
i-F2 とリモートの間に障害
物がある。
障害物を排除するか、障害のない有効範囲にリモートを移動する。
リモートが
機能しな
い。
リモート内のバッテリ が消耗
している。
バッテリを交換します(詳細は『クイックコネクト説明書』の図解を参照)。
ユニバーサル電源装置コードが壁のコンセントおよび i-F2 システム背面
の AC 入力ジャックに差し込まれていることを確認してください。
ユニバーサ ル電源 装置が使用 さ れていない場合、充 電式バッテ リが充
電されていることを確認します。
電源がオンになってない。
電源スイッチが「ON 」の位置になっており、スタンバイボタン を押 し、LED
が点灯したことを確認します。
「+」ボタンを押して音量を上げてくださ い。 音量設定が低すぎる。
代替の音源で音量をチェックし、中の音量 に設定してください。
ス ピ ーカー
から音が出
ない。
iPod がドッキングステーショ
ンにしっかりと設置されてい
ない。
iPod を取り外し、ドッキングステーションに設置し直 してください。
電源がオンになってない。 ユニ バーサル電源装置コードが壁のコンセントおよび i-F2 システム背面
の AC 入力ジャックに差し込まれていることを確認してください。
ユニバーサル電源 装置が使用 さ れていない場合、充 電式バッテリ が充
電されていることを確認します。
電源スイッチが「ON 」の位置になっており、スタンバイボタンを押 し、LED
が点灯したことを確認します。
音量設定が低すぎる。 「+」ボタンを押して音量を上げてくださ い。
代替の音源で音量をチェックし、中の音量に設 定してください。
ス ピ ーカー
から音が出
ない。
iPod がドッキングステーショ
ンにしっかりと設置されてい
ない。
iPod を取り外し、ドッキングステーションに設置し直 してください。
Page 46

兆候 考えら れる原因 解決策
(ドッキングステーションを使
用していないとき) 3.5mm
ステレオケーブルが音 源に
接続されていない。
3.5mm ステレオケーブルを音源に接続してください。信号ケーブルが正し
いジャックにし っかりと挿入されていることを確認してく ださい。
(ドッキングステーションを使
用していないとき) 3.5mm
ステレオケーブ ルが音源の
間違 った出力に接続され
ている。
3.5mm ステレオケーブルがサウンドカードまたは他の音源にある「line-out
(ライン出力端子)」、「audio-out (オーディオ出力端子)」、またはヘッ ドフ
ォンジャックに完全に接続されていることを確認してください。
音源に問題がある。 音源から 3.5mm ステレオケーブ ルを取り外し、そのケーブルを別の音源
(携帯型の CD、カセットプレーヤー、または FM ラジ オなど)の「line-out
(ライン出力)」、「audio-out (オーディオ出力)」、またはヘッドフォンジャック
に接続し、別の音 源でスピーカーを試験してください。
接続不良 iPod がドッキングステーション に正しく設置されていることをチェ ックしてくだ
さい。ドッキングステーションを使用していない場合、3.5mm ステレオケー
ブルの接続を チェックしてください。「speaker-out (スピーカー出力)」では
なく、サウンドカードまたは他の音源にある「line-out (ライ ン出力) 」、
「audio-out (オーディオ出力)」、またはヘッドフォンジャックに接続されて い
ることを確認してください。
ス ピ ーカー
からパチ パ
チ という音
がする。
音源に問題がある。 3.5mm ステレオケーブルを 音源から抜いてください。ケーブルを別の音源
(Walkman、Discman、または FM ラジオなど) のヘッドフォンジャックに挿 入
してください。
兆候 考えら れる原因 解決策
(パ ソ コンま
たはラップト
ッ プに接続
していると
き)ス ピ ーカ
ーからパチ
パ チ という
音がする。
オペレーティ ングシステムの
音量設定が高すぎる。
オペレーティングシステムの音量をチェッ クし、必要に応じで音量を下げて
ください。
i-F2 システム の音量設定
が高すぎる。
i-F2 システムの音量を下げてください。
音源に歪みがある。
WAV ファイルおよび MID ファイルの質が悪いことがよくあり、高性能スピー
カーでは歪みやノイズが顕著にな ります。音楽 CD など異なった音源を
試してください。
音に歪みが
ある。
バッテリ 電力 が低下してい
る。
バッテリを充電するか、AC アダプタを使用 してください。
(パ ソ コンま
たはラップト
ッ プに接続
していると
き ) 音が 歪
む。
オペレーティ ングシステムの
音量設定が高すぎる。
オペレーティングシステムの音量をチェッ クし、必要に応じで音量を下げて
ください。
電 磁 波障害 無線塔に近すぎる。 スピーカーを移動し、電磁波障害がなくなるか試してください。
ヒ ンジを固
定するクリッ
プが外 れ
る。
リリースボタンの張力調整
が必要である。
ボールペンの先をクリップ背面の 穴に挿入し押します。 これ によってリリー
スボタンの張力が増しま す。
 Loading...