

Page 1

INTRODUCTION
1
INTRODUCTION
INTRODUCING SOUND FORGE XP
Sound Forge XP is a compact, easy-to-use digital audio editing solution for the
Windows platform.With a Windows-compatible sound card, Sound Forge XP
gives you the ability to record, edit and process professional-quality digital
audio files. Sound Forge XP supports an extensive set of file formats, allowing
you to develop audio for training and business presentations, Web content,
musical recordings, computer games, and digital video productions.
The latest version of Sound Forge XP offers expanded file format support,
including Microsoft Video for Windows (AVI), RealAudio and RealVideo (RA,
RM), and Active Streaming Format (ASF) files using Microsoft NetShow. Its
new features include improved processing speeds, additional effects, and
support for adding regions and markers to sound files.
Sound Forge XP was developed with input from musicians, sound editors,
multimedia and game designers, and studio engineers, among others. Although
Sound Forge XP includes features specific to these applications, they can also
be applied in many other creative ways.
Sound Forge XP is a deep program.There are many features which you may not
discover immediately, and others that may seem overwhelming. Don’t let this
scare you. Remember, there’s always the Undo command! The best advice for
using Sound Forge XP is to jump in and start using it. Pick up the manual now
and then, read through a section to learn a few new tricks, and then go back
and try what you’ve learned.
READING THE MANUAL
In developing Sound Forge XP, one of our primary goals was to make the
interface as easy to use as possible. However, some features may not be
immediately apparent, so we hope you take some time to at least page quickly
through the manual.That way, you won’t miss any of Sound Forge XP’s creative
potential.
Page 2

This manual is designed to function both as a reference guide and tutorial. It
is divided into six chapters and seven appendices; chapters 2-5 contain stepby-step instructions on using Sound Forge XP’s functions, chapter 6 contains
reference information. Highlighted throughout the text, you will find Tips
outlining particularly important information to help you quickly find what
you need to get started.
CHAPTER 1 INTRODUCTION
The Introduction briefly describes Sound Forge XP, includes installation,
registration and help information, and provides a general overview of digital
sound for those who have no previous experience producing digital audio.
CHAPTER 2 SOUND FORGE XP BASICS
Chapter 2 is designed to provide you with an introduction to working within
the Sound Forge XP interface using a combination of descriptions and
tutorials.
CHAPTER 3 EDITING AND NAVIGATION
This chapter provides explanations and tutorials covering Sound Forge XP’s
editing functions and how to navigate through sound files.
CHAPTER 4 FILE FORMATS AND ATTRIBUTES
Chapter 4 describes how to work with file formats, including AVI and Internet
files, and file attributes.
CHAPTER 5 RECORDING AND SOUND PROCESSING
Chapter 5 introduces the recording functions of Sound Forge XP, and explains
how to employ processes and effects.
CHAPTER 6 SOUND FORGE XP REFERENCE
The Reference chapter details all Sound Forge XP menus and dialogs.
INTRODUCTION
2
Page 3

APPENDICES A-G
The Appendices are designed to provide in-depth technical and reference
information. They include:
Appendix A Optimizing Sound Forge XP
Appendix B Troubleshooting
Appendix C Shortcuts
Appendix D Sound Formats
Appendix F Object Linking and Embedding (OLE)
Appendix G Using CSOUND, MTU, IRCAM, BICSF and EBICSF Files
GETTING STARTED
The first thing you should do is register Sound Forge XP by filling out
the enclosed registration card and returning it to Sonic Foundry within
30 days of purchase.Alternately, you will be given the option to register
via your modem at the end of the installation process.
You must be registered for us to provide you with technical support and
upgrade information.
SYSTEM REQUIREMENTS
In order to use Sound Forge XP, you will need:
• Intel Pentium or Alpha AXP microprocessor
• Microsoft Windows 9x or Windows NT 4.0 or later
• Windows-compatible sound card
• VGA display
• CD-ROM drive
• 16 MB RAM
• 5 MB of hard-disk space for program installation
INTRODUCTION
3
NOTE
Page 4

INSTALLATION
The install utility SETUP.EXE on the setup CD creates any necessary directories
and copies all files required by Sound Forge XP.
1. After placing the Sound Forge XP CD-ROM in the drive, AutoPlay will bring
an installation menu into focus. Simply follow the instructions.
2. If you have disabled the CD-Rom AutoPlay feature, run Setup from the Start
menu as indicated below. Click OK to continue.
REGISTRATION
If you have an Intel-based system you may register online via your modem and
a toll free number. At the end of Sound Forge XP setup, choose Yes when asked
whether or not to register.
1. Enter user information and survey information.
2. Follow the dialog instructions.
3. Watch your mail for future Sound Forge XP products and upgrades.
ACTIVATION
After you click OK in the initial Welcome menu, you will be asked to enter
your activation code.This code can be found on the inside cover of your Sound
Forge XP manual.You must have this activation code whenever you wish to run
the setup program.
Sound Forge XP comes with only one copy protection requirement: you must
use the activation code whenever you run the setup program. Please allow us
to continue this policy by abiding by the license agreement and giving your
friends our phone number rather than a copy of the software.
INTRODUCTION
4
Page 5

GETTING HELP
ONLINE HELP
A variety of help functions are included in the Sound Forge XP program.There
are three methods for accessing online Help:
• Find information about any program function by selecting Contents under
the Help menu or pressing F1.This will take you straight to the Help table
of contents. From this dialog, you can search by topic or get information
about using online Help.
• Find information about a specific dialog by pressing the Help button in the
dialog or the F1 function key.
• Find information about a specific menu command by pressing the F1
function key while selecting a menu item.
You will find that online Help is extremely useful as a quick reference guide.
Since many topics are cross-linked, it’s easy to navigate through all of the Help
material available on a topic. Once you have become familiar with Sound
Forge XP, you’ll probably never have to refer to this manual to find
information. All you’ll need is the online Help.
TECHNICAL SUPPORT
If you experience problems while using Sound Forge XP, our technical support
department is always ready to help you.
INTRODUCTION
5
Page 6

BEFORE YOU CALL
So that we are able to provide you with the best possible support, please check
the following before calling:
• Make sure you have registered online or sent in your registration card.
• Check to see that the information you need isn’t already covered in the
manual. Appendix B, Troubleshooting, addresses many commonly asked
questions about using Sound Forge XP.
• Verify that you’ve installed your sound card properly in Windows. Refer to
your Windows manual or your sound card’s instructions for information on
correctly installing sound cards.
• Confirm that you have enough editing space available on your hard drive
for the sounds you are editing.
• Have your serial number and type of sound card available to you.
• Use a phone near your computer so that our technicians can walk you
through the answer to your question step-by-step if necessary.
REACHING TECHNICAL SUPPORT
Technical support is free for the 90 days following your first call. After 90 days,
there are a variety of support plans available. For more information on
extended support plans, contact us using any method below.
WEB
www.sonicfoundry.com
Our web page is a valuable resource for program updates, technical
information and support.
INTERNET MAIL
support@sonicfoundry.com
You may also send us email via the Internet.
FAX
(608) 256-7300
You can fax us 24-hours a day.
INTRODUCTION
6
Page 7
INTRODUCTION
7
PHONE
(608) 256-5555
Call our technical support line between the hours of 9 AM and 6 PM Central
Standard Time, Monday through Friday.
FAX ON DEMAND
(608) 256-3133
Our Fax on Demand service is available 24 hours a day as an option on the
main Sonic Foundry phone line.
OVERVIEW OF DIGITAL SOUND
If you are new to digital sound editing, it will be well worth your time to
become familiar with some basic concepts. This section covers the most
important fundamentals. However, we strongly recommend that you page
through a book on digital audio and sound recording if you want to get the
most out of Sound Forge XP’s editing and digital signal processing features.
SOUND WAVES
When you hear a sound, you are sensing changes in the air pressure around
your eardrum. You can think of air pressure as the density of air molecules.
When an object vibrates or moves, it displaces air molecules causing a pressure
change. This in turn causes other air molecules to move. We don’t hear air
pressure changes caused by the weather. Instead, we hear air pressure
differences that vary rapidly over time.
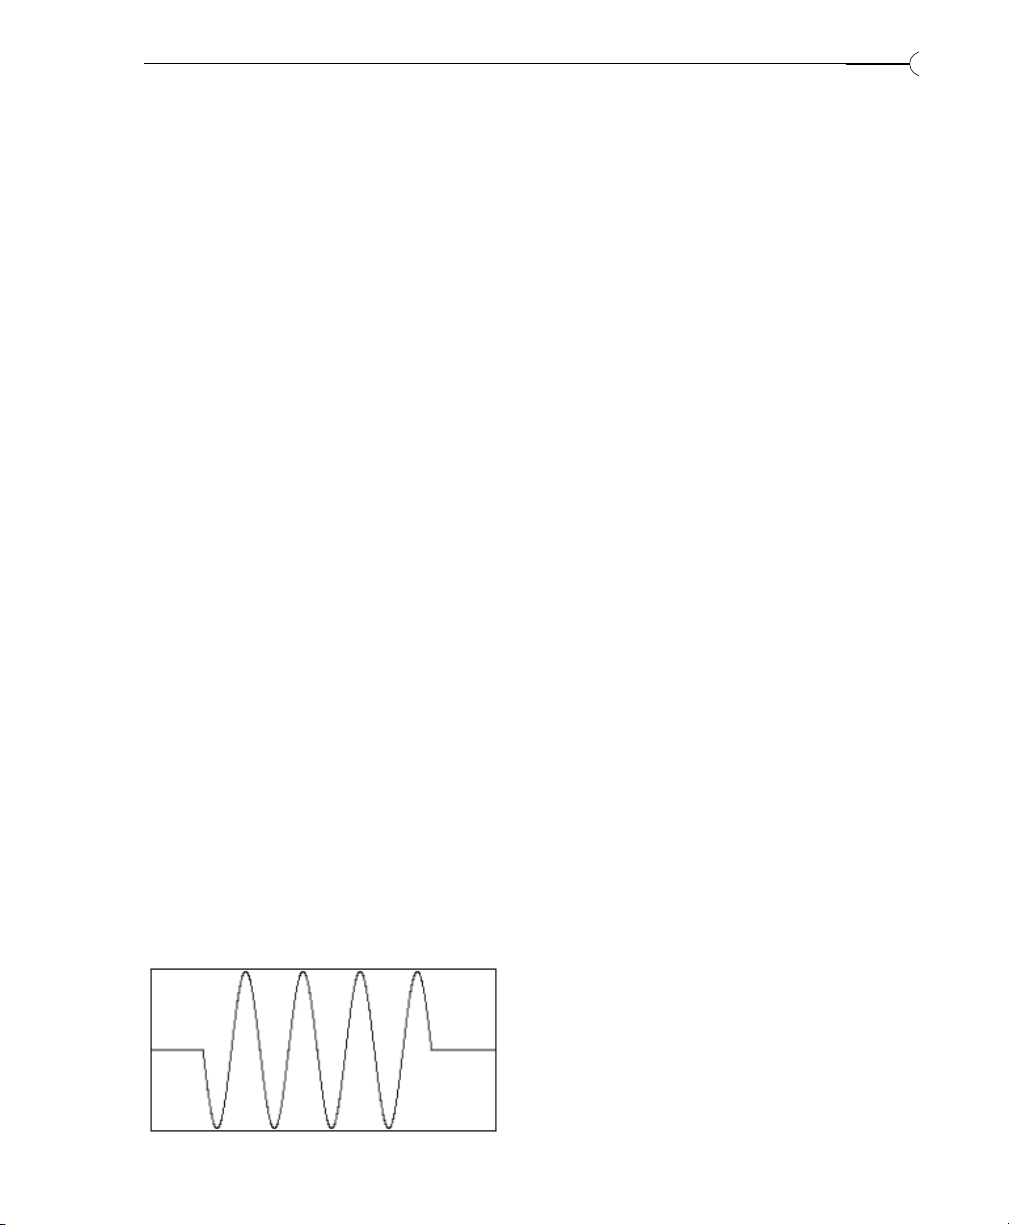
These rapid vibrations are picked up by your ears and converted to electrical
signals that your brain interprets as sound. If we were to graph the air pressure
at your eardrum as a function of time while you were listening to a short
sound, it might look like the waveform below.
Page 8
LOUDNESS AND PITCH
When the air pressure is constant there is no sound.You perceive constant air
pressure as silence. When something causes a sound, the air pressure around
your eardrum changes above and below the normal atmospheric level. You
perceive the amount of change as the loudness of the sound.The loudness of a
sound, called its amplitude, is usually measured as a fraction of a standard
level, often in decibels (dB).
You perceive the rate of change in the air pressure as the pitch of the sound.
In scientific terms, this term corresponds to the frequency of the wave. The
frequency is usually measured in Hertz (Hz), or cycles per second.
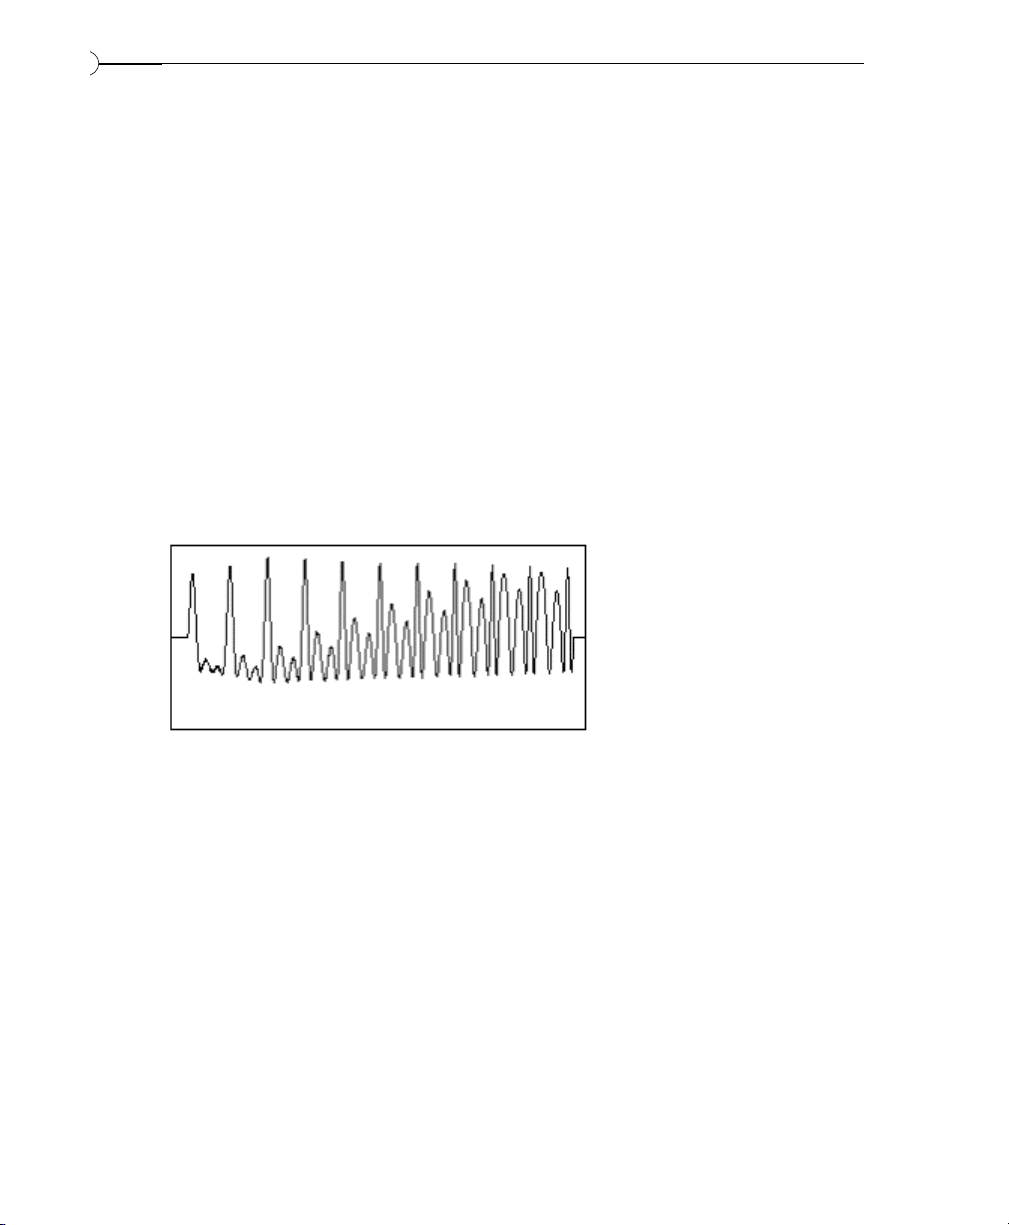
Sounds in nature are not as simple as the above sine wave. In reality, a sound
would look something like the one below. This irregular waveform does not
have a periodic amplitude or frequency.
TIMBRE
Complex waveforms like the one shown above are constructed by combining
a number of simple waveforms (like the one in the first drawing) of different
amplitudes and frequencies. This is why we perceive both high and low
pitched sounds at once when we hear most natural sounds.
The characteristic sound of a waveform (be it produced by a grand piano or a
violin) is called its timbre. Timbre, also referred to as tone color, is said to be
rich or full when there are many different frequencies in a sound. Most people
consider a sound from a sine wave dull since it only has one frequency.
INTRODUCTION
8
Page 9

INTRODUCTION
9
The different frequencies in a sound, combined with the varying amplitudes
of each frequency, make up the spectral content of a waveform. The spectral
content, which you might say is the more scientific term for timbre, usually
varies over time. Otherwise, the sound remains static and again sounds dull.
The spectral characteristic of a waveform over time is the signature of a tone
that allows you to describe it as string-like or horn-like.
ANALOG RECORDING AND PLAYBACK
Let’s say you’re recording with a microphone. As you hold the microphone up
in the air and talk, the microphone converts the changes in air pressure into
changes in electrical voltage.This is called an analog signal.
If you were to graph the changing voltage inside a microphone cord, it would
look exactly like the graph of the air pressure going up and down. To record
your voice, you would send the signal to a medium, such as magnetic tape, that
can store a replica of the analog signal.
To play back your recording, you need something to create the differences in
air pressure, which our ear interprets as sound, i.e., an audio speaker. Speakers
operate by moving a cone from one position to another in a consistent
manner. In order to move the cone either forward or backward the speaker
must be driven by an electrical current. During playback, a tape or record
player generates a current, which is then fed to an amplifier. When connected
to a speaker, the current moves the speaker in a way that reproduces the
pressure changes sensed by the microphone during recording.
Until recently, sound was always recorded as an analog signal on magnetic tape
or vinyl grooves. One problem with storing a signal in this form is that it is
hard to accurately record the analog signal without adding noise. When you
make copies of your recording you have to convert it to an electrical signal and
then re-record it, adding even more noise. Listen to a third generation cassette
recording and you’ll know what we’re talking about. Also, editing with tape is
a not an easy task, since you must always be fast-forwarding or rewinding to a
section, splicing, etc. Tape-based editing is called linear editing.
Page 10

DIGITAL RECORDING
With recent advances in computer technology, it has become efficient and
economical to record sound waves using a process called digital sampling. In
digital sampling, the analog signal of the sound wave is divided and stored as
numbers that represent the amplitude of the wave over very small segments
of time.
For a moment, let’s take a look at another process that is very similar to the
way our computer makes sound – the making of movies and television. Given
a scene with a person walking, we can slow down the speed at which the
pictures are shown and see that each movement is captured by a different
picture.As we speed up the rate of the pictures passing by, the motion becomes
more fluid and eventually we stop noticing each individual picture. If we keep
speeding up the movie the person appears to walk faster and faster and
eventually ends up looking quite humorous. The important point is that a
movie is just a collection of individual pictures.
So how do people record a movie? Obviously they pick up a movie camera and
film the action. The movie camera takes a series of pictures at a fast rate and
saves them on the film. The movies we see are simply a collection of pictures
that are played back in rapid succession.
When we record a sound through the sound card in a computer (also called
digitizing or sampling) we do much the same thing as the movie camera.The
computer rapidly checks what position the microphone is in and saves it in the
computer. When done recording, the computer has a collection of individual
positions (normally called samples) which it can use to recreate the sound we
have recorded. Individually, the samples are almost meaningless, much like an
individual picture in a movie, but together they make up the recorded sound.
This method of recording and playing sound is known as digitized sound.
INTRODUCTION
10
Page 11

INTRODUCTION
11
THE PC SPEAKER
A simple model for a digital system is one where a speaker cone can be in one
of two positions, either in or out, corresponding to the numbers 1 and 0 stored
in a computer. The normal position, in, is when the speaker is sitting at rest
with no current applied.The speaker isn’t moving and we don’t hear anything.
When current is applied the speaker cone moves to the other position, out. As
the speaker moves to the out position it forces the air around it to move and
we hear a small click or pop. If we leave the speaker sitting in the out position
we again hear nothing since the speaker only produces sound when it is
moving, not when it is stationary.
Now if we move back and forth between the in and out positions we will hear
a tone. As we move it faster and faster between the two positions (increasing
the frequency) we will hear the tone increase in pitch.This model of a simple
digital speaker system is exactly how the speaker inside your PC operates.
Programs can put the speaker in either the in or out position to make sounds.
Although there are more complicated methods to allow this type of system to
produce sounds other than tones, they are beyond the scope of this
introductory text.
EXPANDING THE MODEL
Instead of using just the two-position model, let’s suppose we had a system
that allowed us to have 100 positions or even more. If this were the case then
we would be able to make much more complex sounds. We could move the
speaker just a little bit or we could move it all the way out. This would allow
us to have more precise control of the amplitude of the waveform. The more
positions we have, the more flexibility we have in producing sound. For
example, if we were to represent amplitude as a number from one to four, any
values that fell in between positions would be rounded to the closest value.
This rounding error is called quantization noise. When more positions are
available, rounding errors become smaller.
Page 12

You will often see a sound card referred to as 8-bit or 16-bit. We can directly
relate this to the number of positions in which we can place the speaker.With
an 8-bit card we can place it in 256 different positions and with a 16-bit card
we can place it in any of 65,536 positions. Although you might think that a
16-bit card should have twice as many positions as an 8-bit card, this is not
the case. It actually has 256 times as many positions. Even though 16-bit
samples take up twice as much space as 8-bit samples, it is recommended that
when at all possible you use 16-bit samples to minimize quantization noise.
SAMPLING RATE
The number of times a sound waveform is checked each second is the
sampling rate.The sampling rate is similar to the frame rate in movies. As you
can imagine, with higher sampling rates you store more information about the
sound’s changing amplitude. This gives you more fidelity.
As a matter of fact, it is impossible to accurately record frequencies above onehalf of the sampling rate. This threshold frequency is called the Nyquist
frequency, and should be considered when selecting a sampling rate.
Frequencies higher than the Nyquist frequency show up as noise.
The downside to very high sampling rates is that since each sample takes up
space in memory (1 byte for 8-bit samples, 2 bytes for 16-bit samples), higher
sampling rates will fill up your hard drive faster than lower sampling rates. For
instance, a stereo digitized sound of 44,100 Hz 16-bit data (approximately
what your CD player uses) lasting 10 seconds takes up almost 2 megabytes of
space! This means if you have a 40 megabyte hard drive you couldn’t even store
4 minutes of sound data, and that’s without having any programs or other data
on your system.
INTRODUCTION
12
Page 13

INTRODUCTION
13
ADVANTAGES OF DIGITAL EDITING
The advantages of digital editing far outweigh the enormous storage
requirements. Once you’ve recorded a sound as a digital sample on your hard
drive, you have the ability to perform edits like copying, cutting, and pasting
without losing any fidelity and, as some people like to brag, with accuracy of
up to 0.000023 seconds (single sample spacing at 44,100 Hz sampling rate).
With a visual editor like Sound Forge XP, you can actually see a representation
of the waveform to navigate through the sound file quickly and accurately.
Another advantage of storing sound digitally is the availability of digital signal
processing (DSP) techniques. Digital signal processing techniques can be used
for filtering, simulating room acoustics, and other special effects to restore or
enhance the original recorded sound.
Finally, with a tool like Sound Forge XP, you can open and save your sound files
to and from a number of different computer platforms and sound cards.
Now get in there and have some fun with Sound Forge XP!
Page 14

This page was intentionally left blank.
14
Page 15

XP BASICS
15
CHAPTER 2:
SOUND FORGE XP BASICS
Chapter 2 provides an introduction to working within the Sound Forge XP. Use
of the interface is illustrated using a combination of descriptions and tutorials.
The material is divided into two main sections:
• Main Screen Basics
• Data Window Basics
MAIN SCREEN BASICS
This section will introduce you to the Sound Forge XP screen and cover the
most basic operations, including:
• Using the Mouse
• The Main Screen
• Toolbars
• The Data Window
• ToolTips
Many commonly used functions in Sound Forge XP can be performed in
a number of different ways. Sound Forge XP has been designed to allow
you to choose how you want to work – it doesn’t force you to work in a
certain way. To avoid confusion in the tutorials, every method of
accomplishing a task will not always be described. Refer to chapter 6,
Sound Forge XP Reference and Appendix C, Shortcuts, for more
information on each feature.
NOTE
Page 16

USING THE MOUSE
Although using the mouse in Sound Forge XP is not required, it will make
your editing sessions easier. Once you become familiar with Sound Forge XP
you will probably want to use some of the built-in shortcuts provided by the
mouse and the keyboard. (For a complete listing of shortcuts, see Appendix C.)
The following list of terms will help you when reading the manual.
Pointing Moving the mouse pointer over an item.
Clicking Pointing to an item and quickly pressing and
releasing the left or right mouse button. The
manual will indicate whether to right-click or
left-click on an item to execute a specific
function. When there is no left or right
specification, use the left mouse button. Rightclicking is often used to reach shortcut menus.
Double-clicking Clicking the mouse button twice in quick
succession. Double-clicking always employs the
left mouse button.
Triple-clicking Clicking the mouse button three times in quick
succession. Triple-clicking also always employs
the left mouse button.
Toggle-clicking Clicking the right mouse button repeatedly
while holding the left mouse button to toggle
through various options. This is a great shortcut
for procedures such as drag and drop and
changing the Magnify Tool mode of operation.
XP BASICS
16
Page 17

Shift-clicking Clicking the mouse while holding down the
Shift key on the keyboard. Shift-clicking is used
mainly to skip dialogs so that you can quickly
repeat operations.
Control-clicking Clicking the mouse while holding down the
Control key on the keyboard. Control-clicking is
used to modify the operation of a normal click.
Dragging Holding down the mouse button while you
move the mouse. Dragging is used to quickly
move sections of data between separate
windows and to move trackbars, scrollbars and
faders.
Slow-dragging Holding down both the right and left mouse
buttons while moving the mouse. Using this
with trackbars and faders increases the
resolution of the movement. This is especially
helpful when making fractional adjustments to
parameters in a dialog.
Dropping Releasing the mouse button in another area of
the screen after clicking on and dragging an
object. Dragging and dropping is used to speed
up operations like mixing or cross-fading.
XP BASICS
17
Page 18
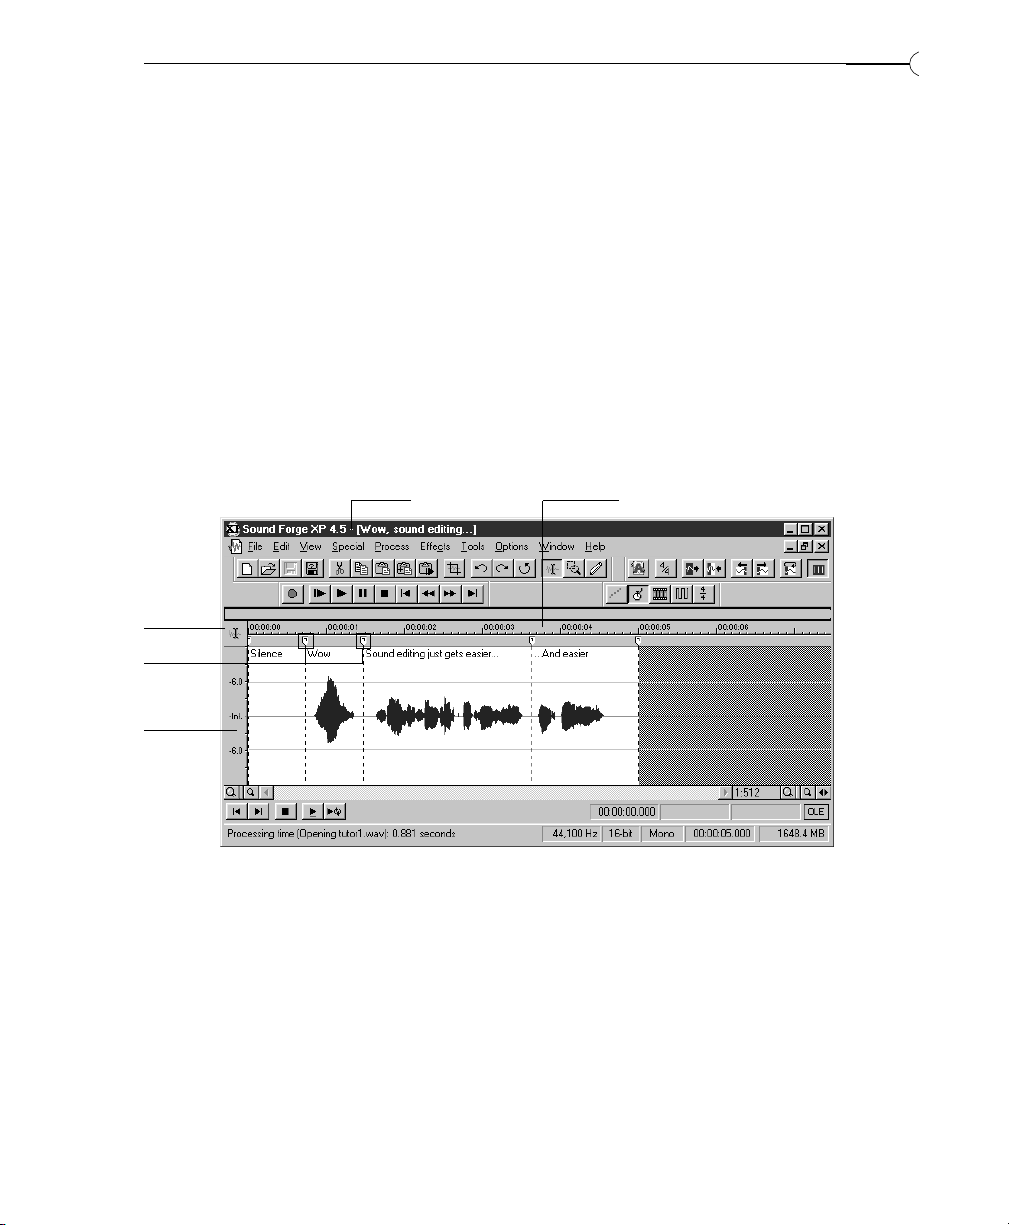
THE MAIN SCREEN
When you start Sound Forge XP, the main screen, or workspace, opens.This is
where you will do all of your sound editing. The very first time you open
Sound Forge XP, no data windows are open and you will need to either open
an existing sound file or create a new one. There are a variety of ways to do
this, which are all described below.
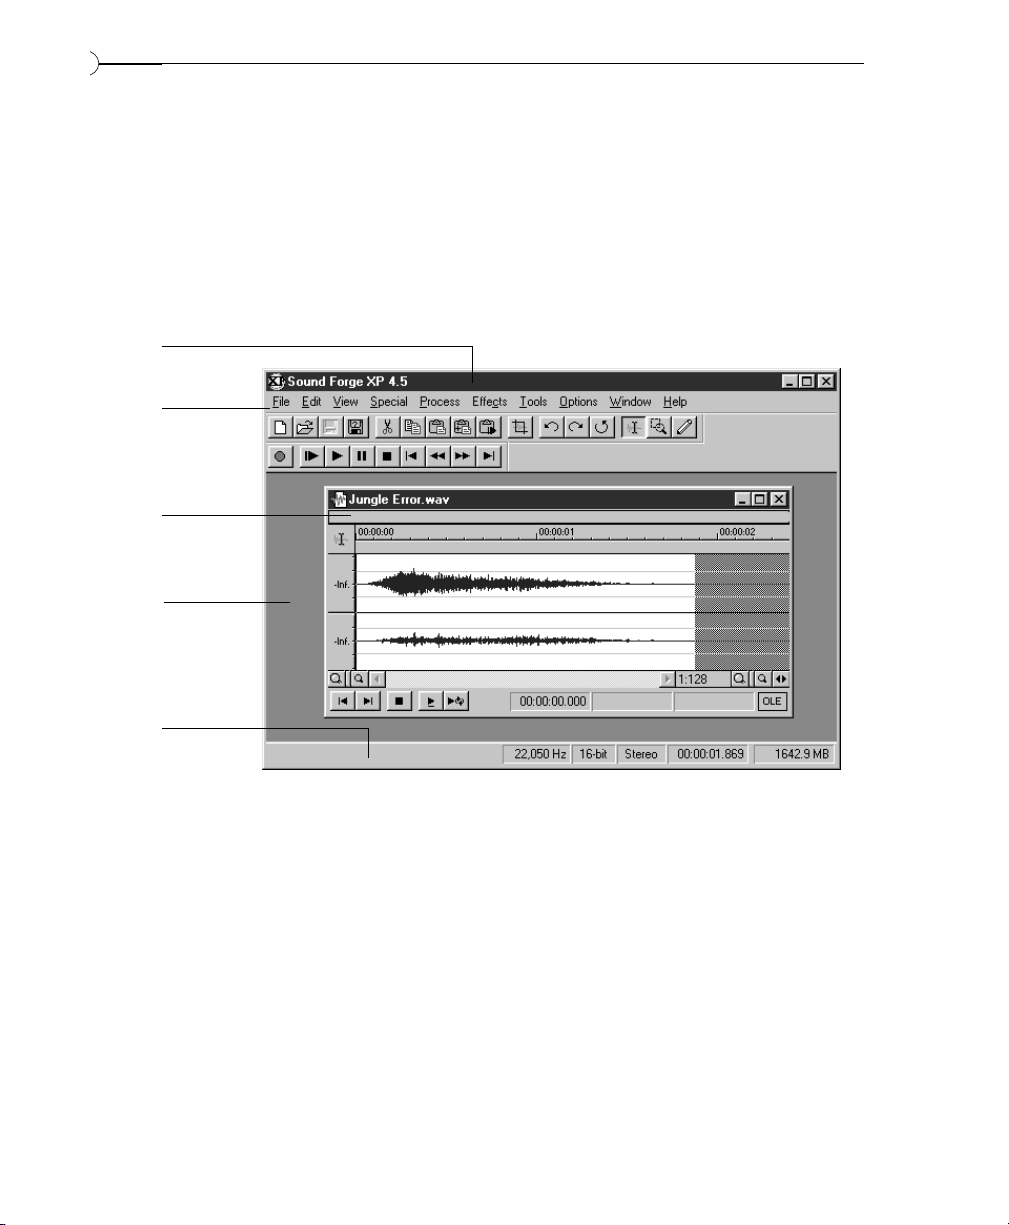
The important parts of the Sound Forge XP screen are labeled in the above
diagram.The following list briefly describes how each functions.
Program Title Bar Shows the program name and the name of the
currently active data window (if the data
window is maximized within the workspace).
Data Window When a sound file is opened, it is graphically
displayed within its own data window. Data
windows can be arranged, resized, or
minimized.
XP BASICS
18
program
title bar
menu bar
data
window
status bar
Sound
Forge
workspace
Page 19
Menu Bar Shows the menu headings for the available
functions. When no data windows are open, the
Process, Effects, and Tools menus are not listed;
these contain functions that require an open
data window.
Status Bar On the left, help (see p. 24) and processing
information (see p. 21) are displayed.The fields
on the right show the playback sample rate,
sample size, mono/stereo, total length of the
active data window, and the total free storage
space. These fields can be edited by doubleclicking or right-clicking on them (except for
the free storage space). When no data windows
are open, the fields are blank.
Workspace The background area behind the data windows.
You can drag and drop sections of sound data
here to create new data windows.
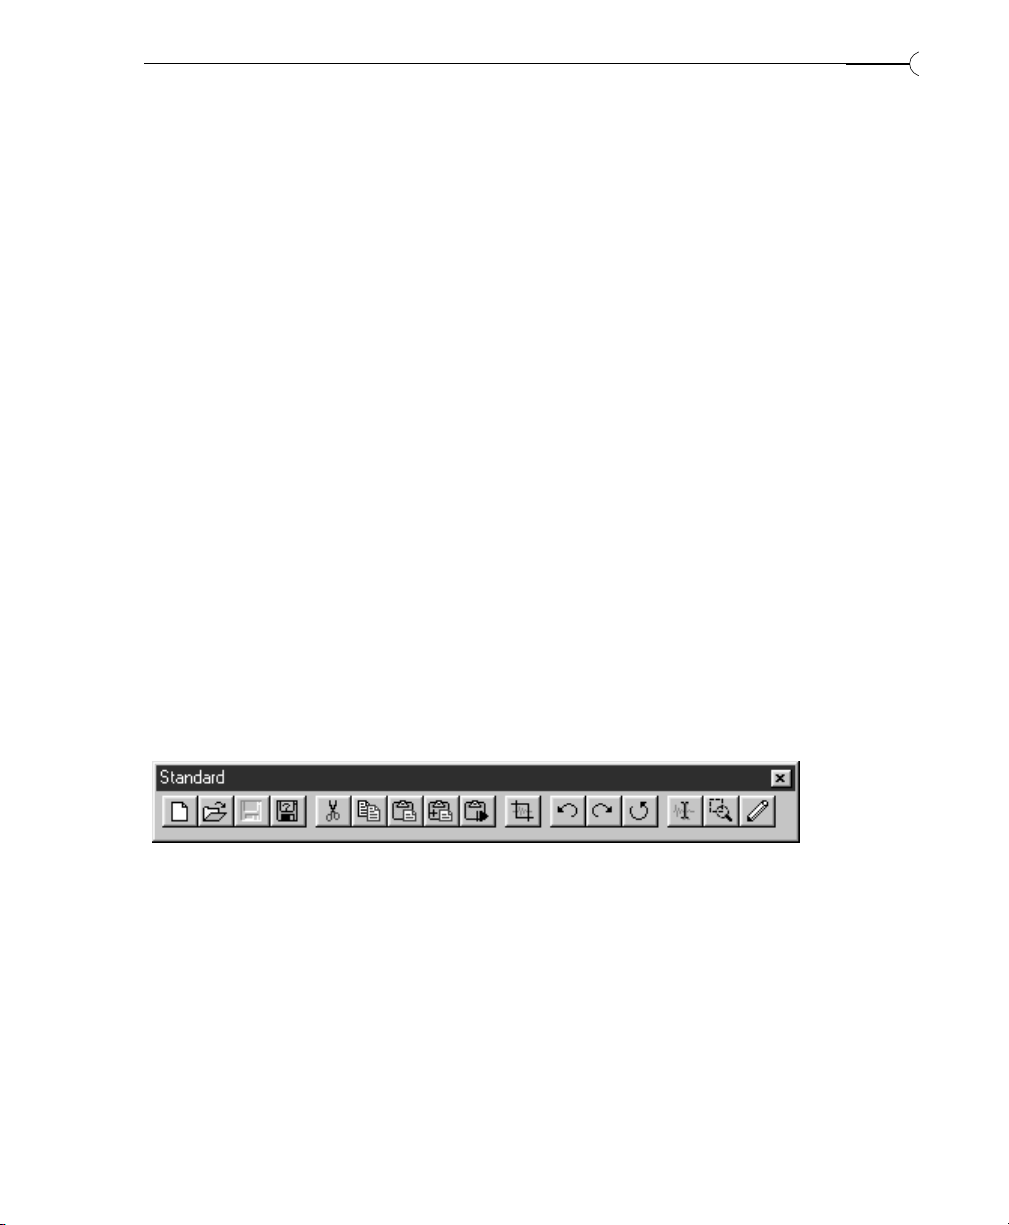
TOOLBARS
The first time you open Sound Forge XP, two toolbars appear on the screen:
the Standard and Transport toolbars. The toolbars contain buttons that quickly
execute commands.
Standard Provides quick access to many common Sound
Forge XP functions. These functions are also
available on the File and Edit menus. For a
complete reference to these commands, see
Chapter 6.
XP BASICS
19
Page 20
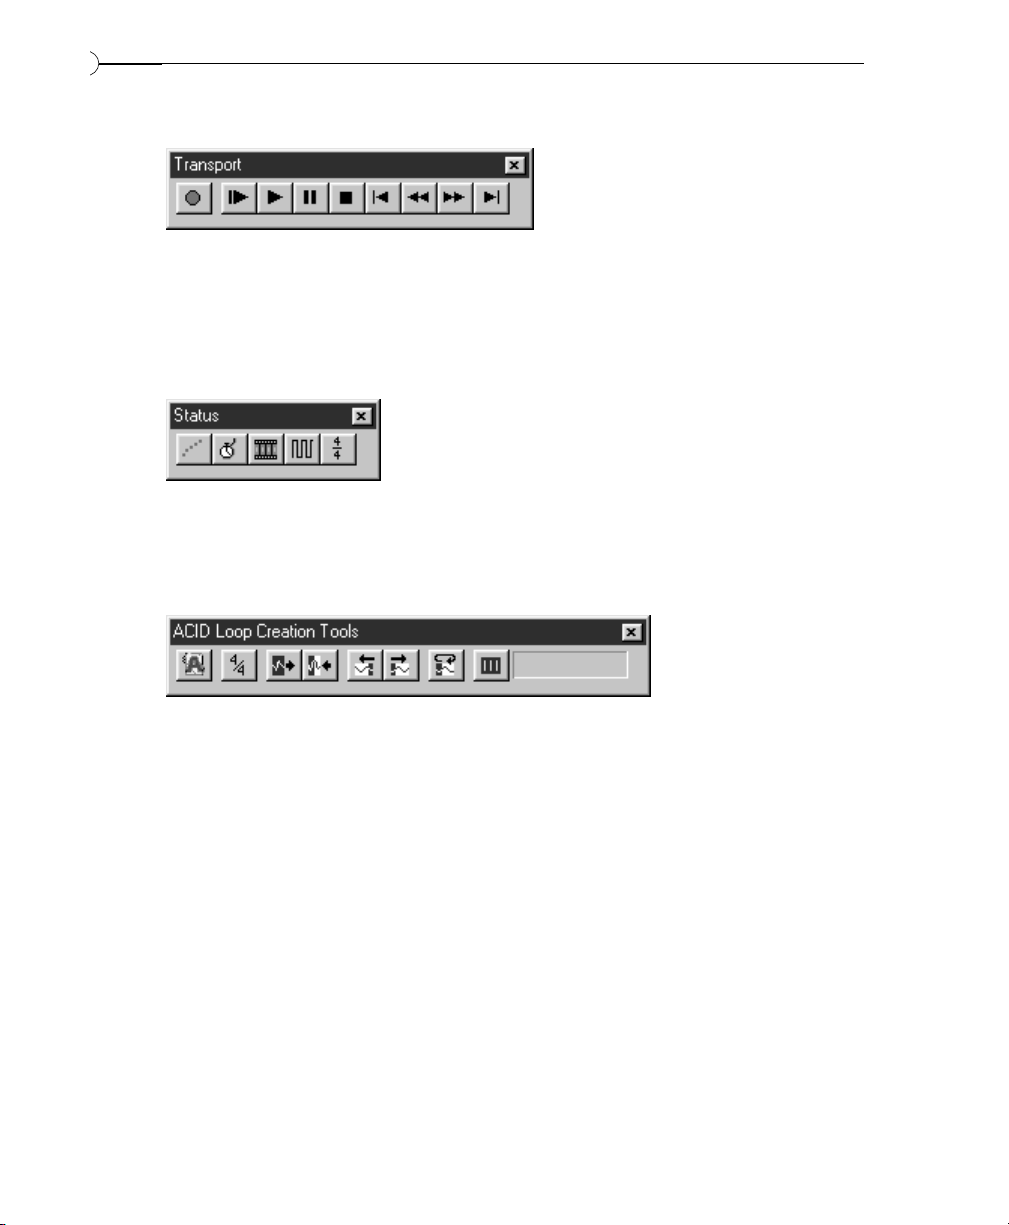
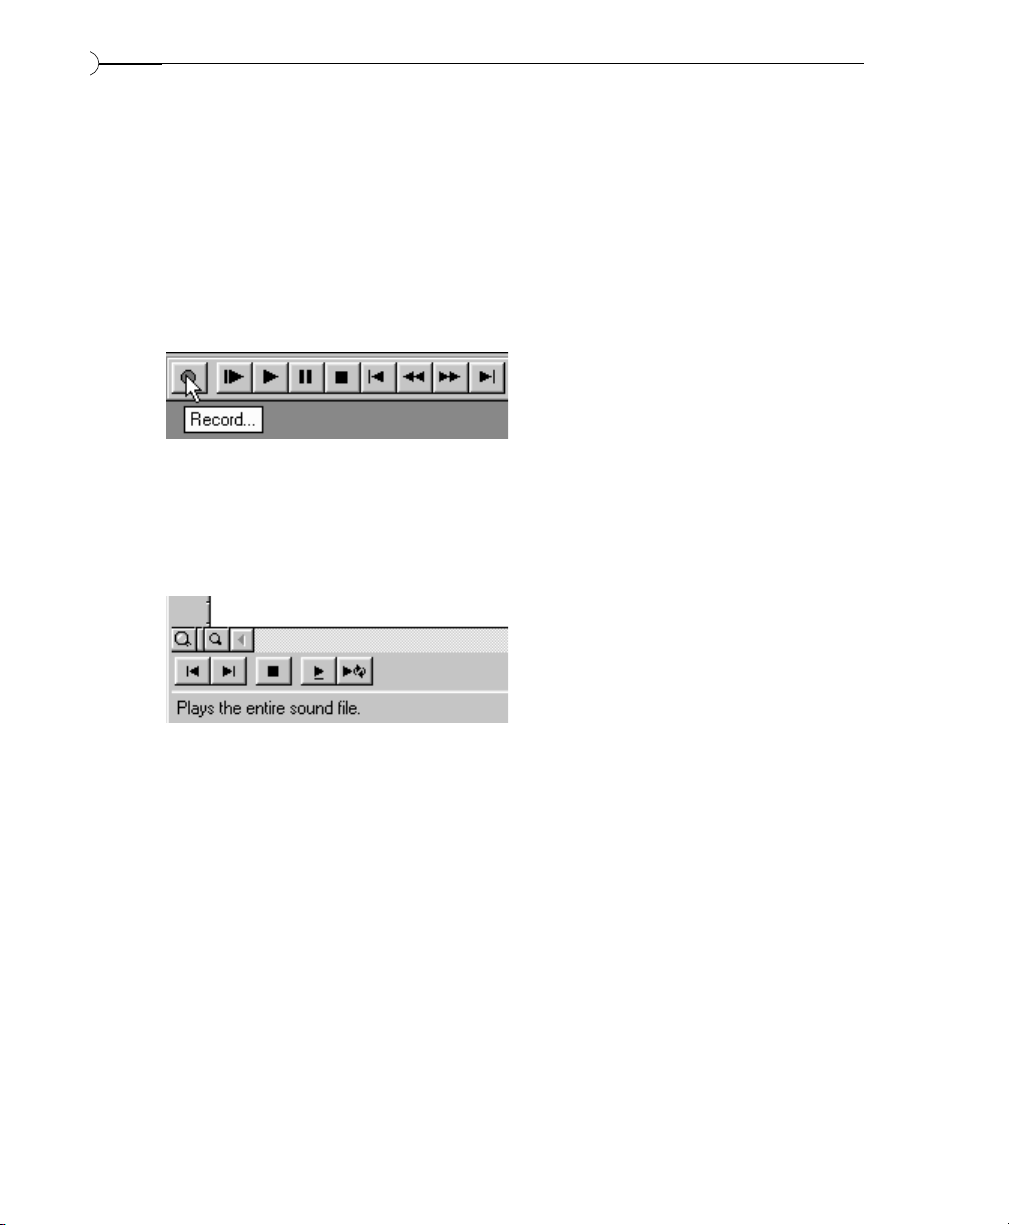
Transport Includes the audio transport buttons: Record,
Play All, Play, Pause, Stop, Go to Start, Rewind,
Forward, and Go to End.
Two more toolbars are also available, but not automatically displayed when
Sound Forge XP is opened.
Status Contains operations to set the display Status. For
a complete reference of these commands, see
Chapter 6.
ACID Sound Forge XP offers tools that are especially
designed to help you create seamless loops
which can be used in Sonic Foundry’s ACID or
any other application that requires perfect loops.
These tools can be accessed from the ACID
Toolbar.These eight buttons will be explained in
this chapter, and they include: the Edit Acid
Properties, the Edit Tempo, the Double Selection,
Halve Selection, Shift Selection Left, Shift
Selection Right, Rotate Selection and Selection
Grid Lines tools.
You can drag and drop a toolbar anywhere on the screen. When you drag a
toolbar to any side of the main window, it docks, or attaches to the side. If you
drag a toolbar away from a side, it becomes a floating toolbar.Toolbars are also
resizable and removable.To hide a floating toolbar, just click on its Close button.
XP BASICS
20
Page 21
XP BASICS
21
To select from the list of available toolbars, select Preferences under the Options
menu and look on the Toolbars page (or Toolbars in the View menu). To show a
toolbar, check the box next to the toolbar you wish to use and then select OK.
The number of open toolbars and their position on the screen is entirely up
to you.
THE DATA WINDOW
Data windows contain sound data.These windows contain a number of subwindows and controls that you will use in editing and viewing your sound
data. Many parts of the data window lead to shortcut menus, dialogs, and other
operations.
The important components of the data window are labeled in the diagram
above. The following list briefly describes each part and possible mouse
operations:
Title Bar Shows the file name or, if present, the title stored
in the Summary information of WAV files. Doubleclick to maximize and restore the window.
Level Ruler Shows the amplitude of the waveform. Right-
click to reach the Level Ruler shortcut menu.When
using the Level Zoom In feature, click and drag the
ruler up or down to shift the view vertically.
title bar time ruler
level
ruler
ruler
tags
edit tool
selector
Page 22

Time Ruler Shows the current location in the data window
as well as ruler tags. Right-click to reach the Time
Ruler shortcut menu. Drag to scroll the data
window.
Ruler Tags Indicates the position of region end points and
markers. Right-click to reach the Ruler Tag
shortcut menu. Drag to change their locations.
Double-click anywhere in the region to select.
Edit Tool Selector Use this button to toggle between the Edit,
Magnify, and Pencil Tools.
The Pencil Tool requires that the zoom ratio be between 1:1 and 1:16.
Playbar On the left side of the playbar are the following
audio transport buttons: Go to Start,Go to End, Stop,
Play Normal, and Play Looped. To the right are the
playbar’s selection status fields.
Selection Status Fields Shows the beginning, end, and length of a data
selection. If no portion of the waveform has
been selected (highlighted), only the cursor
position (also known as the insertion point) is
displayed. Double-click on the left-most field to
reach the Go To dialog. Double-click on either of
the other two fields to reach the Set Selection
dialog. Right-click to reach the Status Format
shortcut menu.
Waveform Display Shows a graphical representation of the sound
file.The horizontal axis represents time (marked
in the Time Ruler) and the vertical axis represents
amplitude (marked in the Level Ruler). Right-
click anywhere on the waveform display to
reach the Waveform Display shortcut menu.
Position Scroll Bar Use this to scroll the sound file forward and
backward in time to see parts of the file not
currently visible in the waveform display.
XP BASICS
22
NOTE
Page 23

XP BASICS
23
Overview Allows for quick navigation and playback of any
part of the file. Overview also shows the fraction
of the waveform on the waveform, as well as the
selected region. Left-click to move the cursor.
Double-click to center the cursor in the
waveform display. Right-click to start playback
or pause. Left-click and drag to activate the Audio
Event Locator.
Time Zoom (Also called Zoom Ratio) Specifies the number of
samples of data represented by each point on the
screen horizontally.
Resolution This determines the length of time that is shown
in the waveform display. With a small resolution
value (1:1, 1:2, 1:4,...), a shorter length of time
is displayed.
Time Zoom In/Out Use these to change the zoom resolution for the
time axis. Between these buttons is a spinner
that allows you to continuously change the time
zoom resolution.
Level Zoom In/Out Use these to change the zoom resolution for the
level (vertical) axis. Between these buttons is a
spinner that allows you to continuously change
the level zoom resolution.
Maximize Width Pressing this button stretches the width of the
data window to fit within the Sound Forge XP
workspace.
OLE Drag Source Drag from this section of the data window into
another application, such as Microsoft Word, to
link the sound file to other documents.
Page 24
TOOLTIPS
If you hold the mouse over a toolbar button or status bar field for more than
one second, you will notice a small box appears next to the mouse pointer
containing text. This text is a quick description of the button or field’s
function. Using ToolTips is an easy way to learn your way around the Sound
Forge XP screen. You can disable this function by selecting Toolbars under the
View menu and clearing Show ToolTips.
When you click (on) and hold a button in a toolbar or select a menu item, you
will see a one-line description of the command in the left side of the status
bar. This gives you a little more information about the function of a button. If
you release the mouse button outside of a toolbar or menu item, the toolbar
command will not be performed.
DATA WINDOW BASICS
With Sound Forge XP, you can have multiple sound files open simultaneously
on the screen. Each file has its own data window that shows a graphical
representation of the waveform and other information about the file. This
section covers the following topics:
• Opening an Existing File
• Playing a File
• Playing a Section
• Using the Transport Toolbar vs. the Data Window Playbar
• Creating a New Window
XP BASICS
24
Page 25

XP BASICS
25
• Active Windows vs. Inactive Windows
• Copying Data to a New File
• Saving a File
OPENING AN EXISTING SOUND FILE
To open an existing sound file:
1. Select the Open command from the File menu. Sound Forge XP displays the
Open dialog. Use this dialog to select and open a file.
2. By default, Sound Forge XP plays a file when you select it in the dialog.You
can turn off this feature by clearing the Auto play check box. If the Auto play
feature is disabled, you can preview WAV files by pressing the Play button in
the Open dialog. During playback, the label on the Play button changes to Stop.
Pressing the Stop button stops the playback.
3. Use the Files of type list to select different types of data files. If Sound Forge
XP recognizes the file type when it is highlighted in this list, it will display
its information in the bottom half of the dialog.
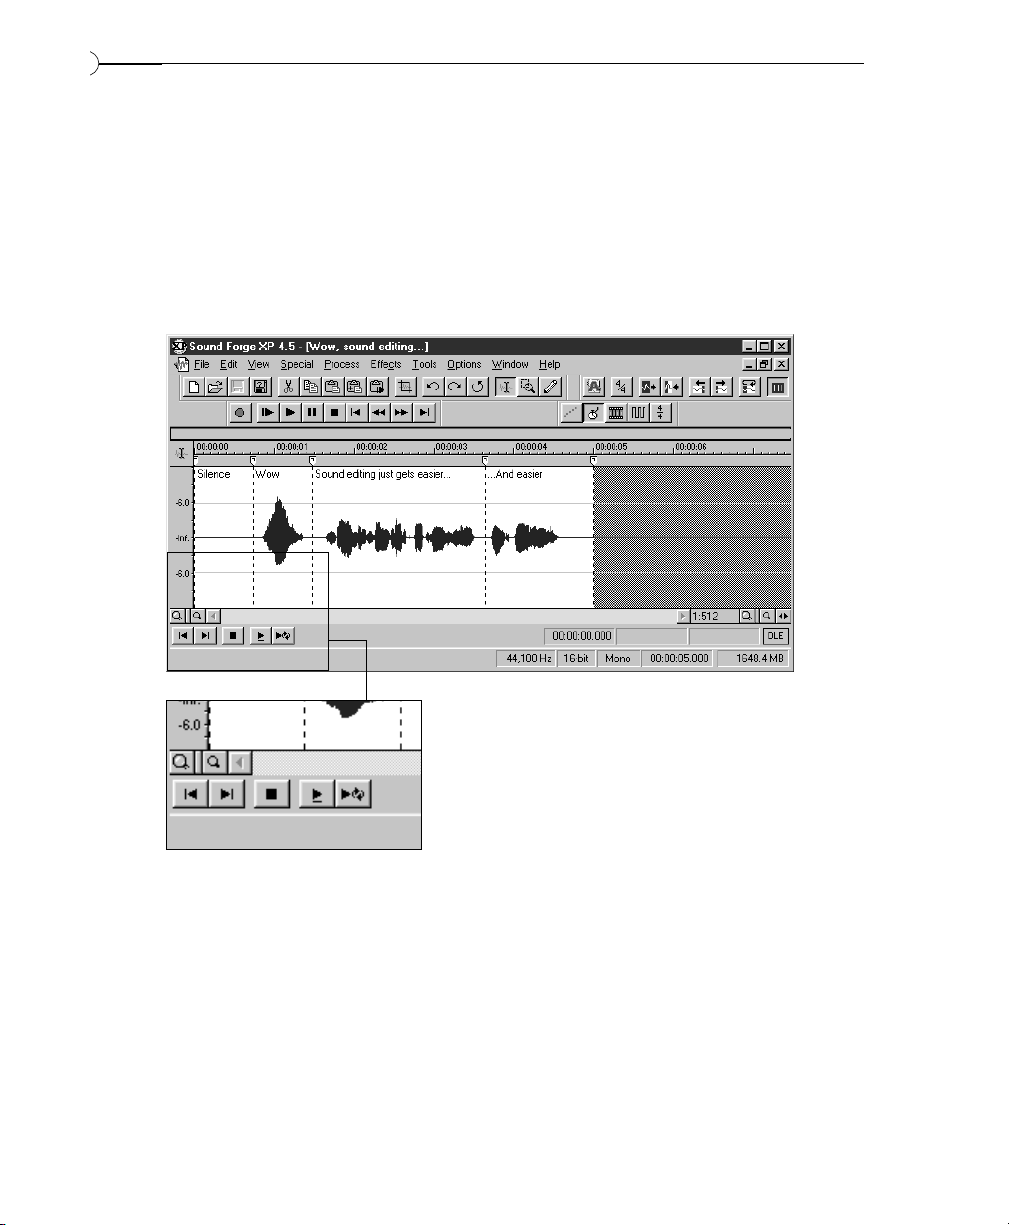
4. For this exercise, open the file TUTOR1.WAV. This file is located in the
directory where you installed Sound Forge XP.
You will now see a data window containing TUTOR1.WAV. This file is a
recording of someone saying, “Wow, sound editing just gets easier and easier.”
Notice that, although the file name is TUTOR1.WAV, the name of the data
window is “Wow, sound editing...” This is because a title for the file is stored
within the WAV file itself. Sound Forge XP allows you to embed descriptive
titles as well as copyright information and other text fields for any WAV file.
Sound files in Sound Forge XP can have a title different from the file
name.To edit the title, use the Summary page of the Properties folder
(File menu).You can quickly get to the Summary dialog by pressing
Alt+Enter.
NOTE
Page 26
PLAYING A FILE
To play an opened sound file:
1. Click on the Play All button on the Transport toolbar.
2. While the file is playing, a pointer will move along the data window
showing the current position.You will also see the current position in the
first selection status field in the playbar.
3. Play the TUTOR1 file now.You will hear the words “Wow, sound editing just
gets easier and easier.”
You can begin play from any point in the window by moving the cursor.
1. Move your mouse pointer to the silence section right after the “Wow”
portion of the file. Left-click (make sure you don’t drag the mouse) and you
will see the flashing cursor in the silence area after the word “Wow.” Click
the Play button on the Transport toolbar and now you will only hear “sound
editing just gets easier and easier.”
2. If you don’t hear anything, you may have accidentally selected a small
portion of data by dragging the mouse. To see whether you’ve made a
selection, look at the three right-hand status fields in the data window
status bar. If only the first one is filled, then no data is selected. If they all
have values, click in the data window again to clear the selection.
XP BASICS
26
Page 27

XP BASICS
27
PLAYING A SECTION
You can also play parts of the sound data by selecting a portion of the
waveform display with the mouse.To play a section:
1. Click and drag the left mouse button starting at the section of silence prior
to “Wow.” Drag the mouse until you are in the portion after the “Wow.”
Notice that as you drag the data, the background appears in another color.
Release the mouse button and you will now have a highlighted section of
data.
2. Click the Play button. You should now hear just the “Wow” portion of the
file.
3. While selecting waveform data, notice that the three selection status fields
on the right side of the playbar display values. These values show you the
start (Selection Left), end (Selection Right), and length (Selection Length) of the
selection you have made. When no data is selected, the cursor position (also
called the insertion point) is displayed.
Clear the selection and put the cursor back at the start of the file. To do this,
click on the Go to Start button in the Transport toolbar.
Page 28
USING THE TRANSPORT TOOLBAR
VS. THE DATA WINDOW PLAYBAR
There are a number of ways to play your sound files in Sound Forge XP. The
most common method is to use one of the Play buttons located either on the
Transport toolbar or the playbar in the data window.This section describes both
methods.
THE PLAYBAR BUTTONS
On the left-side of the playbar at the bottom of every data window are five
buttons. These buttons allow you to play the sound data in a variety of ways.
The first two buttons allow you to set the cursor to the start or end of the
current file. These are the Go to Start and Go to End buttons. The third button is
the Stop button, which you can use at any time to stop playback.
XP BASICS
28
Page 29
XP BASICS
29
The last two buttons play the sound in different ways and, at the same time, set
the default play mode. The first button is the Play Normal button. This button
plays the currently selected section of data. If there is no data selected, pressing
the Play Normal button plays from the current cursor position to the end of the
file.
The next button is the Play Looped button.This button plays the selected section
in a continuous loop or, if no data is selected, the entire file in a continuous
loop. In addition, while the Play Looped button is selected, playback will follow
any new cursor position or selection that is made.
Whenever you play a file using playbar buttons, you will notice a small line
that appears underneath the arrow in the Play button you have selected.This is
the current play mode, which will be used whenever you select the Play button
in the Transport toolbar (or hit the Spacebar). Play Normal is the current play mode
in the playbar graphic shown above.
To change the current play mode, press the corresponding playbar button or
use Control+Spacebar.
Page 30
THE TRANSPORT TOOLBAR
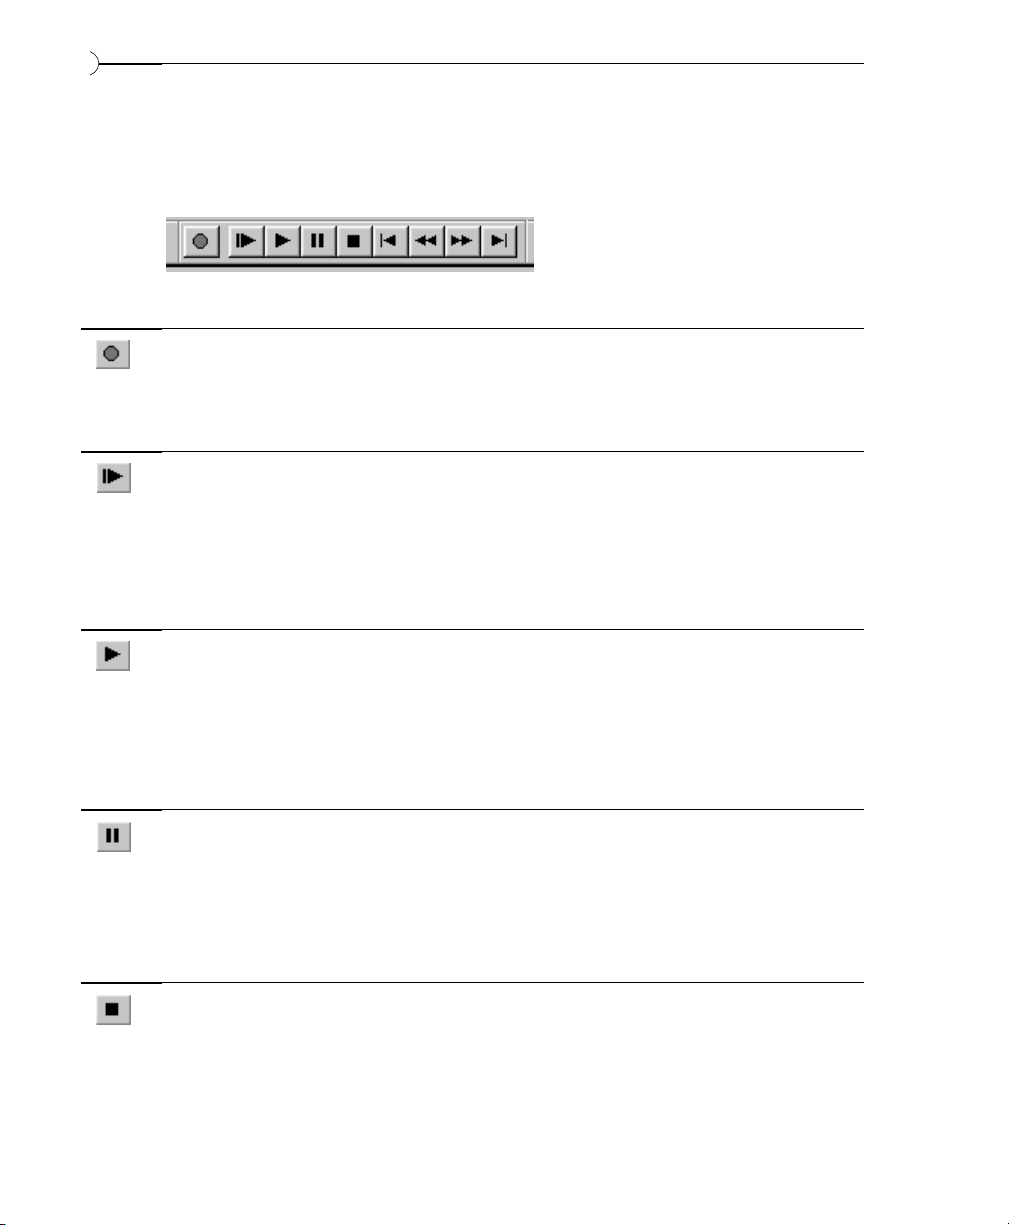
The Transport toolbar has nine buttons.
The Transport toolbar buttons are described below from left to right:
Record Brings up the Record dialog, which allows you to
record to either a new or existing window.
Shortcut: Control+R
Play All Plays the entire sound file from beginning to
end. This allows you to hear the entire sound
even if you have a selection or the cursor
positioned somewhere other than the start of
the data. Shortcut:Shift+Spacebar
Play Plays the file using the current play mode.To set
the play mode select one of the two play buttons
on the playbar as described in the above section
(The Playbar Buttons).The last button used becomes
the active play mode. Shortcut: Spacebar
Pause Works like the Stop button in that it stops play of
the current file. However when selecting Pause,
the cursor is placed at the current play position
rather than back to where it was when play was
selected. Shortcut:Enter during playback
Stop Stops play and positions the cursor where it was
prior to selecting play. Shortcut: Spacebar during
playback
XP BASICS
30
Page 31
XP BASICS
31
Go to Start Places the cursor at the beginning of the sound
file. Shortcut: Control+Home
Rewind Shuttles the cursor backward in the sound file.
Shortcut: Control+Left Arrow
Forward Shuttles the cursor forward in the sound file.
Shortcut: Control+Right Arrow
Go to End Places the cursor at the end of the sound file.
Shortcut: Control+End
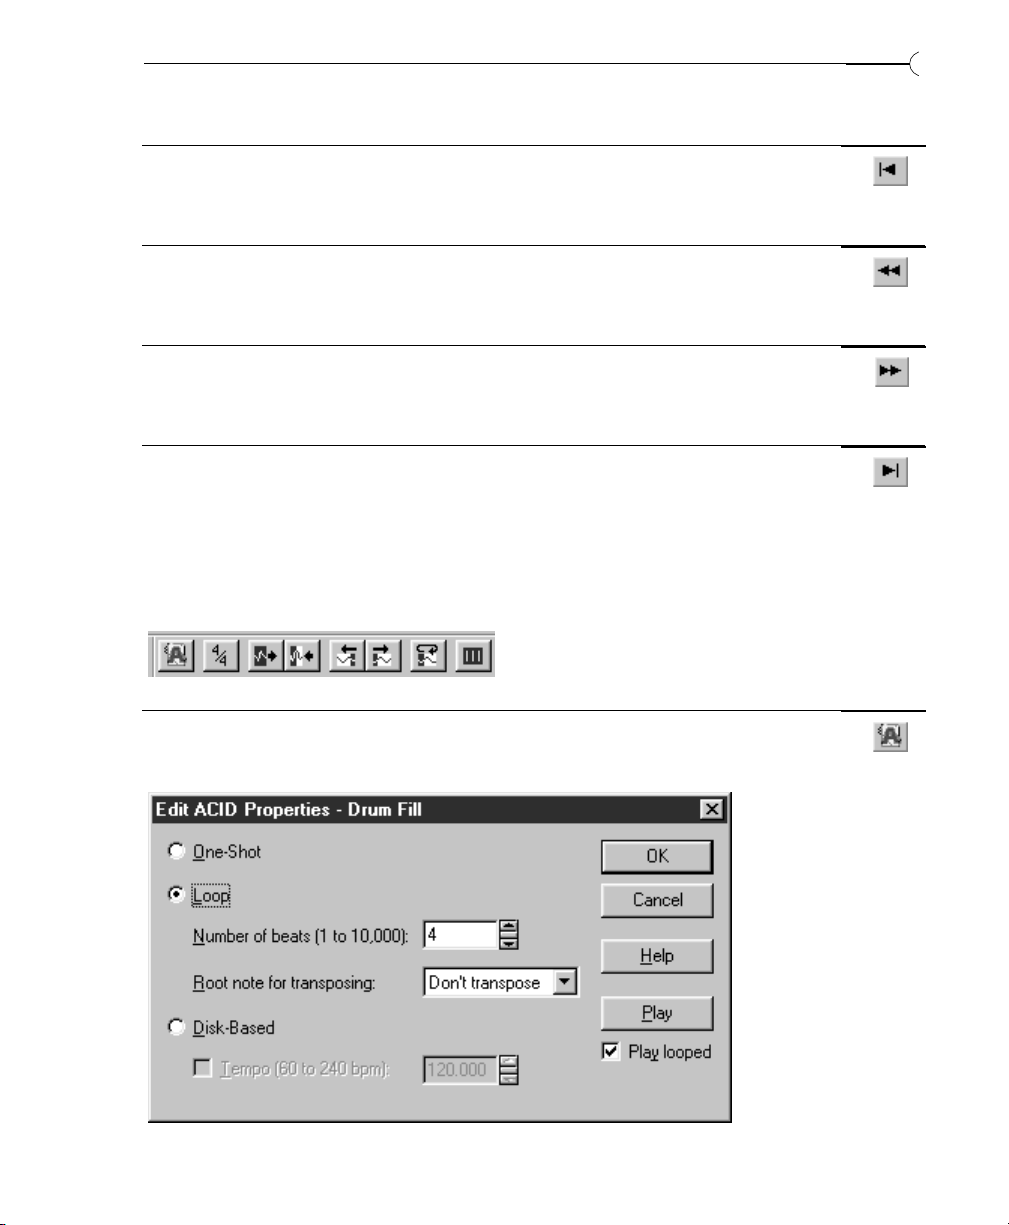
THE ACID TOOL BAR
The ACIDToolbar has eight buttons which are detailed from left to right in this
section.
The Edit ACID Properties button opens a menu which can be used to
manipulate ACID specific information in the wave file. Shortcut: Apostrophe
Page 32

ONE-SHOT
One-Shots do not stretch with tempo or change pitch with the ACID project’s
key. Sounds such as cymbal crashes and vocal samples are usually played as
One-Shots.
LOOP
Loops stretch with tempo, and may also change pitch with the ACID project’s
key. Loops are the most common types of samples used in ACID.
NUMBER OF BEATS
This option determines the length, in beats, of the Loop. If a 16-beat Loop is
specified as an eight beat Loop, it will play twice as fast as it should in ACID.
You can type a new length number directly in the field, or use the up and down
arrows to the right of the field to change the length number.
ROOT NOTE FOR TRANSPOSING
This option determines the root note that ACID will use to pitch the Loop to
the project key. If the root note is A, and the project key is C, the Loop will be
transposed up three semitones. You can change the note by clicking on the
down arrow to the left of the field and clicking on a new root note in the list.
DISK-BASED
Disk-Based files can stretch with tempo, but will not change pitch with the
ACID project’s key. Long files like vocal tracks are usually considered DiskBased.
TEMPO
Disk-Based tracks can stretch to the tempo of the project, but the original
tempo must be specified. If a tempo is not specified, the Disk-Based track will
not stretch.
The Edit Tempo key will open dialog which will automatically calculate the
musical tempo (Beats per minute) from the current selection.
XP BASICS
32
Page 33

XP BASICS
33
To use Edit Tempo, first highlight a selection in the waveform display. The
selection made should be equal in size (or an integer multiple) to the length
of a beat or measure. The easiest way to tune a selection to be exactly one
measure long is to play the selection looped and change the selection points
until a constant downbeat is heard.
Sound Forge XP uses the current tempo to display measures in the Time Ruler.
START, END, LENGTH, INPUT FORMAT
Determines the selection used to calculate the tempo based on the Input Format.
SELECTION LENGTH IN BEATS
Sound Forge XP calculates the current selection’s length in beats.
BEATS PER MINUTE (1.0 TO 1000.0)
Sound Forge XP calculates this tempo value depending on your selection
length, selection type (Measures or Beats), and Beats per Measure.
BEATS PER MEASURE (1 TO 32)
Use to specify the number of beats in a measure when selecting a measure (e.g.,
4 for most pop music). It can also be used to specify beats per selection length
if the selection is larger than one measure.
Page 34

The default tempo (Default: 120) can be changed on the Status page of
the Preferences folder (Options menu).
Double Selection The Double Selection button does exactly what
its name implies – it doubles the current
selection. When you are creating loops, it is very
handy to be able to select (highlight) a single
measure and then use the Double Selection tool
to automatically increase the selection to two or
four measures. Shortcut: Apostrophe
Half Selection The Half Selection tool is as logical; it halves the
current selection. Again, it is rather convenient
to select a four measure section and then reduce
that selection to one or two measures. Shortcut:
Semi-colon
Shift Selection Left, Right The Shift Selection Left and Shift Selection Right
buttons perform tasks which mirror each other.
Once you have selected (highlighted) a portion
of the track, you can move it left (Shift Selection
Left) or right (Shift Selection Right) by the
length of the selection using the appropriate tool.
Because the exact length of the selection is
maintained, this tool is perfect for moving the
selection a beat or measure at a time. Shortcut(Shift
Left): Less Than Symbol.Shortcut(Shift Right): Greater Than
Symbol
Rotate Audio The Rotate Audio tool is best used to change the
feel of a given loop. It works by taking selected
audio at the beginning or end of the file and
moving to the other end of the file. Shortcut: Colon
XP BASICS
34
NOTE
Page 35

XP BASICS
35
For example, if you had a drum part that went BOOM, BOOM, BANG, BOOM
and you selected the first BOOM and selected Rotate Audio, the resulting drum
part would go BOOM, BANG, BOOM, BOOM. Get it? If there is no selection,
the file will rotate by 1/16thof its length.
Selection Grid Lines The Selection Grid Lines creates (imagine this!)
a grid of lines on the area selected. These lines
are superimposed on any selection and divide it
into four equal parts. When creating loops from
raw material, lining up the lines on visible
transient peaks in the waveform can help
immensely.
After you have made a selection, press the <Z> key on the keyboard to
snap the edges of the selection to the nearest zero crossing. This will
eliminate any clicks at the loop points.
CREATING A NEW WINDOW
In this exercise, you will create a new data window with the same data format
as the file TUTOR1. To create a new data window:
1. Select the New command from the File menu. You can also press Ctrl-N.
Sound Forge XP displays the New Window dialog.
2. Select the new data format in the New Window dialog. Set the Sample size to 16bit, the Channels to Mono, and the Sample rate to 44,100.
3. Notice the Maximum editing time line at the bottom of the dialog.The numbers
in this line show the hours, minutes, and seconds of time available for
recording and editing. For example, if you see 00:51:49 on the New Window
dialog, you can work with sounds that last up to 51 minutes and 49 seconds.
The time depends on a number of factors including the amount of storage
on your system and the format of the sound data.
NOTE
Page 36

4. Click the OK button. A new window will appear titled Sound2. This is an
empty data window into which you will place data from TUTOR1.
ACTIVE WINDOWS VS. INACTIVE WINDOWS
When you have multiple windows on the screen, only one window is
considered the active window. This is the window in which you are currently
working. Any operations you perform will only affect this window.
To make a window the active window click anywhere on the window with the
left mouse button. The window’s title bar will change to the color you have
defined as the active window color in Control Panel in Windows.
COPYING DATA TO A NEW FILE
To copy data to a new window:
1. Make “Wow, sound editing...” the active window by clicking on its title bar.
If you don’t have the word “Wow” selected, select it again as described
above.
2. From the Edit menu, select the Copy command. This will copy the sound
data for “Wow” onto the clipboard.
3. Make Sound2 the active window by clicking on its title bar. (If the title bar
is covered by another window, you can always activate a data window by
selecting it from the list at the bottom of the Window menu.)
4. Select the Paste command from the Edit menu and the “Wow” data will
appear in the Sound2 window. If you press the Play button, you can hear
how our new file sounds with just the word “Wow.”
Other methods of copying data from one window to another, or from an
existing window to a new window, are covered later.
XP BASICS
36
Page 37

XP BASICS
37
SAVING A FILE
To save a data window:
1. Make sure the Sound2 window is active.
2. Select the Save command from the File menu. Because the Sound2 window
is a new file, Sound Forge XP displays the Save As dialog. If the file had been
opened or previously saved by Sound Forge XP, the file would be saved
immediately.
3. Type a file name into the File name field in the Save As dialog and select the
OK button. Save the new sound file, Sound2, as MYFIRST – Sound Forge XP
will add the file extension, WAV, automatically.
The Save As dialog also allows you to change file types, data format, and set
summary information fields. This is covered later.
Page 38

38
This page intentionally left blank.
Page 39

EDITING AND NAVIGATION
CHAPTER 3:
EDITING AND NAVIGATION
Chapter 3 provides explanations and tutorials covering Sound Forge XP’s
editing functions and how to navigate through sound files. Sections covered
include:
• Simple Editing and Navigation
• Advanced Editing and Navigation
• Regions and Markers
SIMPLE EDITING AND NAVIGATION
This section will describe the basic editing operations of Sound Forge XP.You
will learn about:
• Common Edit Operations
• Status Formats
39
• Magnification and Zooming
COMMON EDIT OPERATIONS
The edit operations used most often include Cut, Copy, Paste, Crossfade, Mix,
Clear/Delete, and Trim/Crop. Most of these make use of the clipboard, which is a
temporary storage area.The clipboard can also be used to move data from one
window to another. The following list provides a brief description of each
operation:
Cut Deletes a selected portion of data and copies it
onto the clipboard. Shortcut:Control+X
Copy Copies a selected portion of data onto the
clipboard. Shortcut: Control+C
Paste Inserts the contents of the clipboard into a data
window at the current cursor position or
replaces the current selection. Shortcut:Control+V
Page 40

40
EDITING AND NAVIGATION
Crossfade Crossfades the contents of the clipboard with the
current data in a window starting at the current
cursor position. Shortcut:Control+F
Mix Mixes the contents of the clipboard with the
current data in a window starting at the current
cursor position or at the start of a selection.
Shortcut: Control+M
Clear/Delete Deletes a selected portion of data but doesn’t
copy it onto the clipboard. Shortcut: Delete
Trim/Crop Deletes all data in a window except the selected
section. Shortcut:Control+T
SELECTING WAVEFORM DATA
To make a data selection:
1. Open the TUTOR1.WAV file as described in the previous chapter. Make sure
that TUTOR1 is the active data window by clicking on its title bar.
2. Make sure you are using the Edit Tool. To do this, look under the Edit menu
for the Tool function and select Edit (it should already be checked).
3. Select (highlight) the word “Wow” with the mouse by clicking and
dragging as described in the previous chapter. You can verify you have the
right section of data by pressing the Play button to hear it.
COPYING DATA ONTO THE CLIPBOARD
To copy data:
• Make a data selection as described above.
• From the Edit menu, choose the Copy command.This will copy the selected
data onto the clipboard. You will see no change since the Copy command
does not change the data; it only copies it to the clipboard.
Page 41

EDITING AND NAVIGATION
PASTING DATA FROM THE CLIPBOARD
To paste data:
1. Move the cursor to the beginning of the TUTOR1 file by selecting the Go to
Start button on the playbar
2. Choose the Paste command from the Edit menu. You should now see the
data for the word “Wow” appear at the beginning of the window. Press the
Play button just to make sure. You should hear “Wow Wow Sound editing
just gets easier and easier.”
You have just made your first edit in Sound Forge XP! There are quicker ways
to copy and paste data with Sound Forge XP – you’ll find these described in
the Advanced Editing section.
PASTING DATA TO ANOTHER WINDOW
Data on the clipboard remains there until it is replaced by another operation
that places data onto the clipboard. Therefore, you can continue pasting the
data anywhere you want.
41
To paste data to a new window:
1. Create a new window by selecting New from the File menu.
2. Again, select the Paste command from the Edit menu.You should now have
a new data window with the data for the word “Wow.”You can also do this
by selecting the Paste to New option from Paste Special on the Edit menu. This
creates a new window and fills it with the clipboard contents in one easy
step.
CUTTING DATA
To cut data:
1. Select a section of data you want to cut. Select one of the “Wow” words
(you should have two if you have been following the examples) from
TUTOR1.
2. Now select the Cut command from the Edit menu. This will remove the
selected data and place it on to the clipboard.
Page 42

42
EDITING AND NAVIGATION
UNDOING AN EDIT OPERATION
You can reverse the effects of any editing operation.
To undo the above “cut”:
1. Select Undo Cut from the Edit menu. You will see the original two “Wow”
words in the TUTOR1 window.
REDOING AN EDIT OPERATION
If you change your mind and decide you really liked an edit you undid, you
can repeat the edit operation you last undid.
To redo an operation:
1. Select Redo Cut from the Edit menu. In this case, the second “Wow” has been
cut from TUTOR1 file again.
TRIMMING/CROPPING
Trim (also called Crop) allows you to single out a section of data and cut
everything else out of the window except that section.You can use this feature
with the Play button to hear selections until you have just the right amount of
data and then cut everything else using Trim/Crop.
To trim data:
1. Select the “Wow, sound editing” section in the TUTOR1 window, but don’t
select “just gets easier and easier.” Remember you can use the Play button to
hear how the selection sounds at any time.
2. Select Trim/Crop in the Edit menu.After cropping you will have only “Wow,
sound editing” left in the window.
3. Close the “Wow, sound editing” window. Either click on the close box of the
TUTOR1 window, or select the Close command from the File menu.You will
be asked whether you want to save the changes that you have made to
TUTOR1. Select the No button to close without saving your changes.
Also close any other windows you may have open, like MYFIRST.WAV.
Page 43

EDITING AND NAVIGATION
MIXING
Mixing is a powerful and useful edit operation that you will use often. Mixing
allows you to combine two sounds together into one window so you can
create composite sounds.
To mix data:
1. Open two files, TUTOR1.WAV and TUTOR2.WAV, as described in the
previous sections.TUTOR2 is a file that contains the sound of a snare drum
and crash cymbal. You are going to mix this sound with TUTOR1, the
“Wow, sound editing...” window.
2. Before mixing data, make sure the Status Format is set to Time to make finding
the mixing points a little easier. To do this, select Time from Status Format
under the Options menu.You will need to do this for both data windows
since Sound Forge XP keeps track of the format type for each individual
window.
3. To make the windows easier to view during the mix operations you may
want to maximize Sound Forge XP by pushing the Maximize Window button
in the upper right-hand corner and selecting Tile Vertically from the Window
menu. This will arrange the windows vertically and make it easier to see
your work.
43
4. If you examine each of the TUTOR windows you will notice that the length
of TUTOR1 is 5.0 seconds long and TUTOR2 is 3.0 seconds long. (You can
see the length of a file by placing the cursor at the end of the sound data
and examining the status bar. You should see a field that shows the length
of the file in hours, minutes, and seconds.) For this example, the drum hit
should occur just before the “Wow.” You could just copy the drum hit
sound onto the clipboard and then paste it before the “Wow,” but this
would increase the length of TUTOR1 to 8.0 seconds. Instead, use the Mix
command.
5. Select all the data in Drum Hit by making it the active window and then
double-clicking in the waveform display with your left mouse button (or
use Select All under the Edit menu). Now copy the data onto the clipboard
by selecting the Copy command from the Edit menu.
6. Make TUTOR1 the active window and then select the Go to Start button on
the playbar.This will put the cursor at the beginning of TUTOR1. Select Mix
from the Paste Special command in the Edit menu.
Page 44
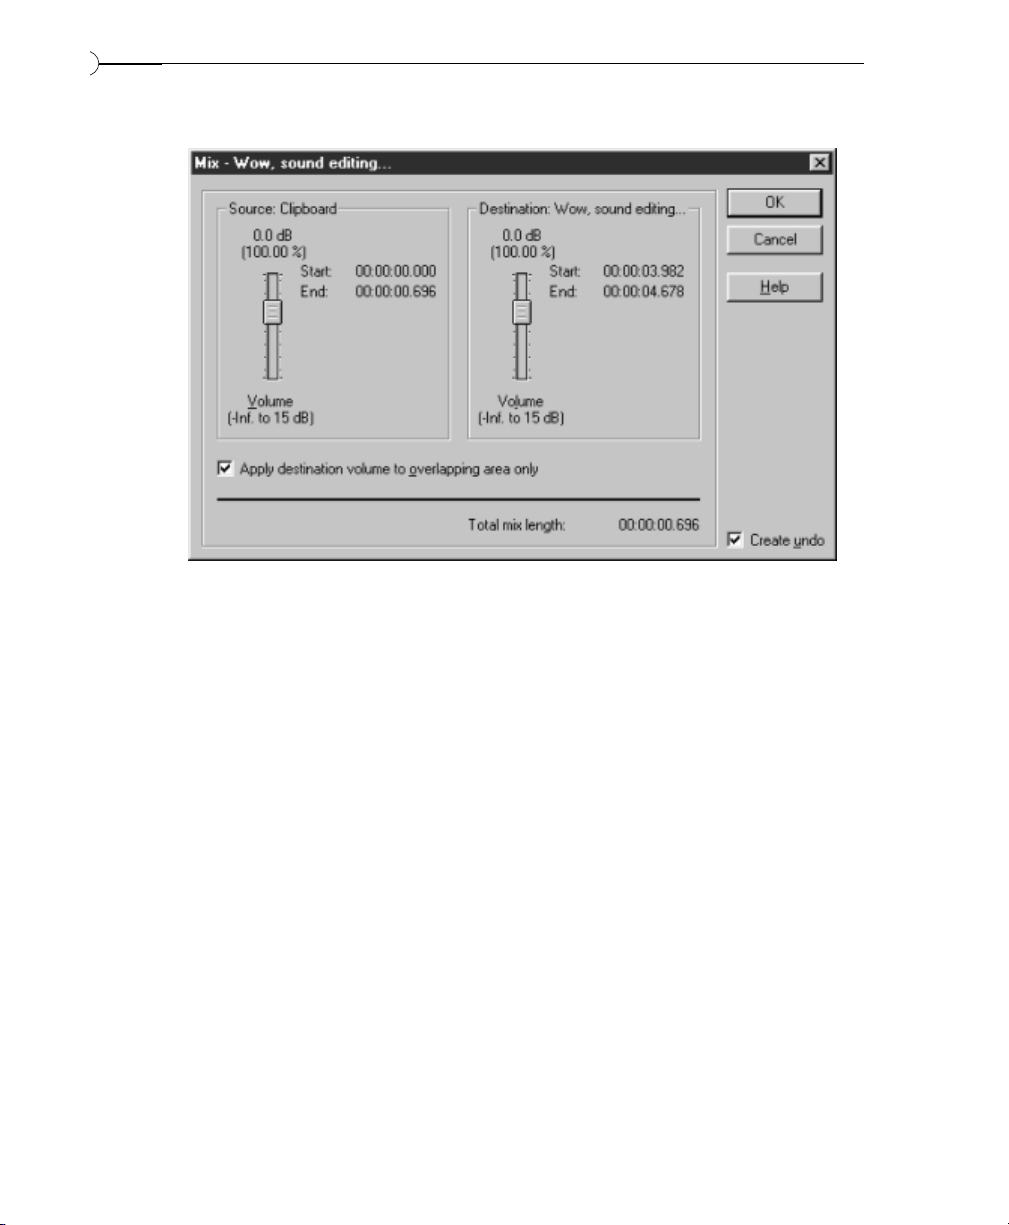
44
EDITING AND NAVIGATION
7. The Mix dialog now appears. Keep both levels at 0 dB and select OK.
8. The drum hit sound has been mixed into the TUTOR1 window and the
length of TUTOR1 is still 5.0 seconds. Press the Play button to hear the
results.
9. Select the Undo Mix command from the Edit menu to return TUTOR1 to its
original state.
10. This time, mix the drum hit sound closer to the “Wow” portion of
TUTOR1. The “Wow” occurs at about 0.8 seconds into TUTOR1, so move
your cursor in the TUTOR1 window to approximately 0.8 seconds.You do
this by clicking with the left mouse button in the data window of TUTOR1
and watching the cursor position status field on the status bar (the leftmost field).You don’t have to be exact. Once you’ve positioned the cursor,
select the Mix command again and then hit Play for the result. Notice how
the drum hit sound and the “Wow” sound overlap each other.
Page 45

EDITING AND NAVIGATION
STATUS FORMATS
By right-clicking on the Time Ruler and selection status fields on the playbar,
files can be set to different status formats. By changing the format, you can
coordinate sound files with other events measured in that format, or use a
timing base most familiar to you. Lengths and positions can be displayed in a
variety of formats including Samples, Time, Seconds, Frames, Measures and Beats, and
SMPTE.
SELECTING A STATUS FORMAT
To select a format, choose the Status Format command from the Options menu.
This shows the ten different formats available. Choosing one of these options
sets the status format for the current data window.
The available formats are:
Samples Number of samples
Time Hours, minutes, seconds and milliseconds
Seconds Seconds and fractions thereof
45
Time & Frames Hours, minutes, seconds and frames as defined
by the Edit Frame Rate (Special Menu) command
Absolute Frames Frames and fractions thereof
Measures & Beats Measures, beats and quarters of a beat
SMPTE Non-Drop SMPTE at 30 or 29.97 frames per second (fps)
non-drop
SMPTE Drop SMPTE at 30 fps with drop frames
SMPTE EBU SMPTE at 25 fps
SMPTE Film Sync SMPTE at 24 fps
In this exercise, you will see how the status formats affect values in the status
display fields.
1. Using the TUTOR1 file, select Samples from Status Format under the Options
menu.
2. Now select all of the data in the TUTOR1 window. To do this, choose the
Select All command from the Edit menu.You can also double-click the left
mouse button anywhere in the waveform display of the data window.
Page 46

46
EDITING AND NAVIGATION
3. In the selection status fields on the playbar (at the lower right-hand side of
the data window) you should see the values of 0, 220,506, and 220,507.
This means that the first selected sample (Selection Left) is sample 0, the last
selected sample (Selection Right) is 220,506, and the total number of samples
in the selection (Selection Length) is 220,507.
4. Now select the Time option from Status Format under the Options menu.You
will see that all these values change to values specified in hours, minutes,
and seconds rather than samples. You can see that a sound containing
220,507 samples with a sample rate of 44,100 Hz will play for about 5.0
seconds. You can experiment with each of the status formats to see how
each format is displayed.
CONFIGURING FRAMES AND MEASURES & BEATS
When setting the status format to Frames or Measures & Beats, you customize how
these values are displayed.The Edit Frame Rate dialog in the Special menu allows
you to change the frames per second. In the Edit Tempo dialog from the Special
menu, you can specify the Beats per minute and Beats per measure values used to
calculate measures and beats.The default values for Frames and Beats are set on
the Status page in the Preferences folder (Options menu).
MAGNIFICATION AND ZOOMING
When sound data is drawn on the screen, it is necessary to represent many
samples of data for each horizontal point on the screen. There are almost
always many more samples in a sound file than there are horizontal points
(pixels) on the screen. Depending on the editing operations you need to use,
you may want to view the entire file at once, or you may want to look at only
a small portion in greater detail. This is where the magnification, or zoom,
ratio comes in.
TIME RULER ZOOMING
In the bottom right corner of the data window, just above the data window
playbar, is the current time magnification ratio. The Zoom Ratio defines how
many samples of sound data are squeezed into each horizontal point on the
screen. This setting is shown as a value of 1:XX , where XX is the number of
samples represented by each horizontal point on the screen.
Page 47
EDITING AND NAVIGATION
For example, if the setting is 1:1 then each point on the screen is one sample.
With this setting, a very short length of time is shown on the waveform display.
You might not be able to see the cursor or selection because you are seeing it
at such close range. If the setting is 1:1,024, then there are 1,024 samples
represented by each point on the screen and a longer length of time can be
seen. By dragging the Time Ruler right or left, you can easily scroll the data
window. The further you drag in either direction, the faster the window will
scroll.
47
If you right-click on the waveform display you can quickly select various
Zoom commands from the Data Window shortcut menu.
When Sound Forge XP opens a file it sets the horizontal magnification to the
value specified by the Normal zoom ratio set on the Display page in the Preferences
folder, unless the file is too small.
To increase or decrease the Zoom Ratio, use the Zoom In/Out spinner control
found on each data window next to the ratio. Clicking on either of the
magnifying glasses increases or decreases the zoom ratio by single steps. If you
drag the small rectangular button between the two magnifying glasses, you can
spin the zoom ratio by larger amounts.
LEVEL RULER ZOOMING
In the bottom left corner of the data window, just above the Go To Start button,
is the spinner control for zooming in and out vertically in the data window.
Zooming in along the level axis allows for more precise editing at the lower
levels (where many edits start and end).
NOTE
Page 48

48
EDITING AND NAVIGATION
The labels for this axis can be either in decibels or in percent and are switched
by right-clicking on the Level Ruler. When zoomed in, only the lower level
samples can be seen; the peaks of the waveform will have moved beyond the
scope of the data window.To view these peaks, drag the Level Ruler up or down.
NOTE
NOTE
To optimize the level scaling of a selection, double-click on the Level
Ruler. Double-click again to zoom out to the normal level.
USING ZOOM SELECTION AND ZOOM OUT
To quickly magnify a section of a data window horizontally, use the Zoom
Time/Selection command in the View menu or in the Data Window shortcut menu.
To use the Zoom Time/Selection command you must first select an area of data to
magnify. After selecting Zoom Time/Selection, Sound Forge XP will calculate the
minimum zoom ratio that will allow the full selection to fit on the screen and
then center the selection within the waveform display.
This will not affect the zoom ratio of the Level Axis. Only the Zoom
Selection command in the Level Ruler shortcut menu will zoom the
selection both vertically and horizontally.
To display all data in a window at one time, use the Zoom Time/Out Full
command in the View Menu. This command sets the Zoom Ratio to the lowest
value needed to display all of the data at once in the waveform display.
If you wish to set the zoom factor to its maximum magnification (1:1), use the
Zoom Time/In Full command also found in the View menu or the Data Window
shortcut menu (Zoom In Full).You will then be able to see the actual waveform
oscillations that correspond to physical sound waves when played through
your speakers.
MAGNIFY TOOL
Another way to zoom in to a particular section of the sound file is to use the
Magnify Tool. You can select this tool from the Edit menu (Tool/Magnify) or by
clicking on the Edit Tool selector (upper left-hand corner of data window) until
the magnifying glass appears.
Page 49

EDITING AND NAVIGATION
When the Magnify Tool is enabled, instead of making a selection, the mouse
cursor will become a magnifying glass and a dotted square will appear when
dragging the cursor. The zoom will take place within this dotted square. The
three different modes of operation for the Magnify Tool can be selected by
toggle-clicking (see Using the Mouse in chapter 2). These allow you to time
zoom, level zoom or zoom both simultaneously. You must then return to the
Edit Tool mode to do edit operations.
You can also enter this Magnify mode temporarily by holding down the Control
key when making a selection. If you drag the mouse while still holding the
Control key, you can select a region that will then be magnified to a “best fit”
ratio within the waveform display.
49
ADVANCED EDITING AND NAVIGATION
This section will show you how to use the advanced editing and navigation
operations of Sound Forge XP.You will learn about:
• Go To
• Making a Data Selection Using the Set Selection Dialog
• Making a Data Selection with Markers
• Adjusting Selection Points
• Using the Overview
• Drag and Drop Operations
• Editing Stereo Files
Page 50

50
EDITING AND NAVIGATION
GO TO
To quickly move the cursor to a specific point and center it in the waveform
display, use the Go To command.You can reach the Go To dialog in a number of
different ways:
• Select the Go To command from the Edit menu
• Right-click on the waveform display and select Go To from the shortcut
menu
• Double-click on the left-most selection status field
• Press Control+G
The Go To dialog is much like the Set Selection dialog described below. You can
type in the location where you want to go or use one of the predetermined
locations from the list.
MAKING A DATA SELECTION USING THE SET
SELECTION DIALOG
If you need to select data at specific points, the Set Selection dialog allows you to
type in selection points or choose a selection from a list of regions. To reach
the Set Selection dialog, choose the Selection command from the Edit menu.
Page 51

EDITING AND NAVIGATION
In the Set Selection dialog, you can modify the Start, End, Length, and Channel of the
selection. Pre-determined regions can also be chosen from the Selection dropdown list.
51
MAKING A DATA SELECTION WITH MARKERS
Sound Forge XP has numerous techniques for selecting sound data. The drag
and drop method and the Set Selection dialog are described above. The next
section covers the various keyboard shortcuts you can use for selecting data.
Of all the selection methods, markers are unique. A marker is a placeholder
that you drop in a sound file to define the beginning or end of a selection.The
unique thing about markers is that you can use them in real time.That is, you
can select portions of an audio file while you’re listening to it.
Sound Forge XP has two corresponding marker functions:
• Press [ (the left bracket key) to mark the beginning of a selection. You can
also choose Mark In from the Special menu.
• Press ] (the right bracket key) to mark the end of a selection.You can also
choose Mark Out from the Special menu.
Although the bracket keys and the menu options are equivalent, the keyboard
is probably easier for working in real time.
Page 52

52
EDITING AND NAVIGATION
For example, you might have a sound clip of three events: a pool cue hitting a
ball, the first ball hitting a second one, and the second ball falling into the
pocket. Using markers, you can select the middle sound as you listen during
playback.After you hear the cue hitting the ball, you would press [ to mark the
beginning of the selection. After you hear the first ball hit the second one, you
would press ] to mark the end.The result is that the middle section of the data
appears highlighted as a normal selection.
Although markers are helpful during playback, you can use them when the
sound isn’t playing. For example, you could mark the beginning of a selection
before you’re sure of where it should end.Then you might perform a number
of tests or sound processing functions. Once you know where the end of the
selection should come, you would drop the second marker.
For more information about markers, see Regions and Markers later in this
chapter.
ADJUSTING SELECTION POINTS
EXTENDING A SELECTION WITH THE MOUSE
After selecting a portion of sound data, you will sometimes find that the start
or end points are not exactly where you want them to be. You could just reselect the data, but it is often difficult to get the start or end points just right.
Page 53

EDITING AND NAVIGATION
Sound Forge XP allows you to update the selection by grabbing a selection edge
and moving it. Once you have established a data selection, place the mouse over
the selection start or end point.You will notice that the cursor changes to a bidirectional arrow. Once this arrow appears, you can press the left mouse
button and move the selection to a new position. The new position will be
updated once you release the mouse button.
SELECTING WITH THE KEYBOARD
The keyboard selection controls allow you to quickly select data or update a
selection accurately. For example, if you want to extend the selection end by a
small amount, first make sure that the cursor is at the end of the selection.You
can move the cursor from one end of the selection to another by pressing the
Home (moves to the start) and End (moves to the end) keys. You can then use
the Shift+Right arrow and Shift+Left arrow combinations to extend the selection
end point by small increments.
The following list shows the available keyboard commands for selecting data.
Press To select from cursor to . . .
Shift+Right arrow the next screen pixel.
53
Shift+Left arrow the previous screen pixel.
Shift+End the last sample visible in the waveform display.
Shift+Home the first sample visible in the waveform display.
Press To select . . .
Shift+Page Up 10% of the current view previous to the cursor
position.
Shift+Page Down 10% of the current view past the cursor position.
Shift+Control+Right arrow 2% of the current view past the cursor position.
Shift+Control+Left arrow 2% of the current view previous to the cursor
position.
Shift+Numpad + the next sample.
Shift+Numpad - the previous sample.
Shift+Control+Numpad + 10 samples past the current position.
Shift+Control+Numpad - 10 samples previous to the current position.
Page 54

54
EDITING AND NAVIGATION
NOTE
Due to a limitation in Windows 95, the last two commands work only
in Windows NT.
As you can see from the above lists, Sound Forge XP has extensive keyboard
support for selecting data. You will find that almost any operation has an
equivalent keyboard shortcut which advanced users find invaluable. For a
complete listing of keyboard and menu shortcuts, see Appendix C.
To see how some of these keys function:
1. Open the file TUTOR1.WAV. Make sure that you’re using the Edit Tool by
selecting it from Tool under the Edit menu. Now make a data selection that
encompasses the word “Wow” with a generous amount of space on each
side of the word. After pressing the Play button you should hear a little bit
of silence, “Wow,” and a little more silence.
2. Choose the Zoom Selection command from either Zoom Level or Zoom Time in the
View menu. This will fit the selection on the screen with the best possible
resolution.
3. Now adjust the right side of the selection. Grab the end of the selection
with the mouse and drag to the right.Adjust the selection to be close to the
end of the word “Wow” and release the mouse button. Now do the same
operation with the keyboard. Hold down the Shift key and press the right
arrow key. The selection will extend to the right by one screen pixel. If you
hold down the Shift key and press the left arrow key, the selection will
decrease by one pixel. One screen pixel is equal to the number of samples
shown in the Zoom Ratio field.You can move the end of the selection in this
manner until you’ve got the selection just right.
4. Now adjust the start of the selection. Since the cursor is at the end of the
selection, any keys you press for selecting data will adjust the end. Put the
cursor at the front of the selection by pressing the Home key.You will see the
cursor jump to the start point of the selection. Now, use the selection keys
to adjust the start of the selection.
If you’re working in Windows NT, you can use the keyboard to select samples
as well as pixels. As noted in the above list, the Shift + Numpad + (plus) and -
(minus) keys select individual samples. This technique allows you to get the
exact selection you need without having to change the Zoom Ratio.
Page 55

EDITING AND NAVIGATION
RESTORING A SELECTION
When you change the cursor position (with the mouse or keyboard) without
holding the Shift key down, you lose your selection and only the cursor is
displayed. If you want to return to the last selection, select the Toggle Selection
command under the Special menu or press the ‘S‘ key.
SHIFTING A SELECTION
Sometimes it is necessary to move a selection’s position without changing the
length of the selection.This can be accomplished in one of two ways.
The first is to use the mouse. Hold down the Shift key and grab the edge of the
selection. Now, when you move the mouse left or right, the selection will move
as a block and the length will be preserved.
The second way is more mathematical. Using the ACID Loop creation tools,
you can shift a selection forward or backward by the length of the selection.
This is very useful if you have exactly a beat or a measure selected and you
want to jump ahead to the next beat or measure. Select Shift Selection Left or Right
from the ACID Loop Creation fly-out menu under the Special menu and the
whole selection will jump forward or backward by the length of the selection.
55
USING THE OVERVIEW
While making data selections and navigating through sound files, you probably
noticed the overview (the thin bar directly underneath the title bar) change.
The overview represents the length of the entire sound file, as if you were
zoomed out all the way. From the overview, you can determine what section of
the entire sound file is being displayed, the data selection made, and the cursor
location.
GETTING THE WHOLE PICTURE
To view zooming using the overview:
1. Zoom out all the way on the TUTOR1 window (Zoom Out Full in the Data
Window shortcut menu) and select the waveform data corresponding to the
word “Wow.” Notice that the entire overview has brackets above and below
it, since the entire sound file is being displayed. Also notice how the
selection and the cursor are displayed on the overview.
Page 56

56
EDITING AND NAVIGATION
2. Now press the Zoom In button a few times (the large magnifying glass in the
lower right-hand corner of the data window) and notice how the brackets
become smaller.This corresponds to the smaller fraction of the entire sound
file that you can see when you zoom in on the waveform display. The
selection size, however, remains the same and does not move. Even when
you can’t see them on the waveform display, you always know where the
cursor or the selection are in the sound file by referring to the overview.
You can also change the cursor position by left-clicking anywhere on the
overview. As always, when you change the cursor, you lose your selection.
Remember you can use Toggle Selection if you want to restore it.
FAST NAVIGATION AND PLAYBACK
When you left-click outside the bracketed region in the overview, you will not
be able to see the cursor on the waveform display. However, double-clicking
anywhere on the overview will move the cursor and center the waveform
display to the selected position in the sound file.
Page 57

EDITING AND NAVIGATION
You can also play back the sound file starting from the current cursor position
by right-clicking anywhere on the overview. Right-clicking again pauses
playback. Left-clicking in the overview also moves the cursor position. Also
note that left-clicking on the overview during playback moves the cursor to
the point where you clicked and continues playback at that point. These
navigation tools make it very easy to find sections in large files.
As an example, if you wanted to move the cursor to the beginning of a phrase
in a speech, you can right-click on the overview bar to begin playback and
then left-click at different positions within the overview until you find the
right start point. Once you find the start point, you can press the Stop button
to stop playback.
AUDIO EVENT LOCATOR
Holding down the left mouse button and dragging it in the overview bar will
begin playback of small looped portions of audio around the cursor position.
This is similar to a scrub function in that it allows you to hear brief segments
of audio material in order to quickly scan or locate events within the sound file.
57
DRAG AND DROP OPERATIONS
You can perform a mix, paste, or crossfade by dragging a selection from one
data window and dropping it on another.
To drag and drop:
1. Open both TUTOR1.WAV and TUTOR2.WAV and select Tile Vertically from
the Window menu to make them easier to work with. One will be called
the source window and the other the destination window.
2. Press and hold the left mouse button in the selected area of the source data
window. While holding the mouse button down, move the cursor until it
changes to an arrow dragging a little box.
3. Drag the cursor onto the destination window. You will see a shaded block
that represents the range of the source material.You will also see that the
little box accompanying the cursor now contains an “M”(Mix), “C”
(Crossfade), or “P” (Paste). Position the block at the place in the destination
window where you would like the mix, paste, or crossfade to occur.
Page 58

58
EDITING AND NAVIGATION
4. Let go of the left mouse button. This will bring up the Mix dialog. To
perform a crossfade instead of a mix, hold the Control key down while letting
go of the mouse button. Holding down the Alt key when dropping performs
a paste.
NOTE
An easier way to select a mix,paste, or crossfade is to drag the block to
the destination window.Then, while holding the left mouse button, click
the right mouse button to toggle between the Mix, Paste, or Crossfade
functions.You will see the block change according to the method; a mix
will look like a solid block,a crossfade will look like an “X” (or perhaps,
a butterfly), and a paste will be represented by a segmented vertical line
rather than a block.
DRAG AND DROP MIXING
To mix using drag and drop:
1. As in the previous example, open TUTOR1.WAV and TUTOR2.WAV. Again,
to make the windows easier to view you may want to select the Tile Vertically
command from the Window menu. For this exercise,TUTOR1.WAV will be
the destination window and TUTOR2.WAV the source window.
2. Highlight all the data in TUTOR2 by making it the active window and
double-clicking in the waveform display. Now drag the selected section by
pressing and holding the left mouse button in the data window of the
TUTOR2 window. Notice that the cursor changes to a pointer with a small
box when you begin dragging. Drag the block to the beginning TUTOR1
data window and let go of the mouse button to drop the section.
3. When you let go of the mouse in the TUTOR1 window, you will see a dialog
that shows the TUTOR2.WAV window as the source and TUTOR1.WAV as
the destination. Leave the levels at 0 dB, and select OK.You will see that again
the drum hit sound has been mixed into the TUTOR1 window. Press the Play
button to hear the results.
Page 59

EDITING AND NAVIGATION
DRAG AND DROP CROSSFADING
To Crossfade using drag and drop:
1. Undo the last operation.
2. Select all of TUTOR2 and drag it toward the end of TUTOR1.
3. Press and hold the Control key to see the crossfade block.This X-shaped block
shows you where one sound begins to fade out and the other to fade in. By
dragging the crossfade block left or right from the end of the destination
file or the end of a data selection, you can adjust the length of the crossfade.
4. Once you have determined where you would like the crossfade to begin, let
go of the mouse button. When you press the Play button, you should hear
the end of TUTOR1 fade out as the beginning of TUTOR2 fades in.
DRAG AND DROP PASTING
To paste using drag and drop:
1. Undo the last operation.
2. Select all of TUTOR2 and drag it over to TUTOR1. Hold the Alt key down
while you position the paste point at the beginning of TUTOR1.
59
3. Let go of the mouse button. If everything was done correctly, you should
have pasted the data from TUTOR2 at the insert position in TUTOR1.
CREATING A NEW WINDOW WITH DRAG AND DROP
A very useful feature of drag and drop is the ability to quickly create a new
window from a data selection. Make a selection in a data window and drop it
on an empty area of the Sound Forge XP workspace. A new data window is
automatically created containing the data from the selection.
EDITING STEREO FILES
When editing stereo files you have two channels of data on which to work.The
upper channel is the left channel and the lower channel is the right channel.
In the following examples, both labels (left/upper, right/lower) will be used.
Page 60

60
EDITING AND NAVIGATION
SELECTING DATA IN STEREO FILES
When selecting data in stereo files, Sound Forge XP allows you to select either
the left channel, right channel or both channels for playing, editing, and effects
processing.
When editing a stereo file, the waveform display showing the two channels is
split into three logical sections for selection with the mouse.The upper quarter
of the waveform display is the left channel section, the lower quarter is the
right channel section, and the middle half selects both channels. When
selecting data with the mouse, the cursor location determines what channel(s)
will be selected.
To select data in a stereo file:
1. Open the TUTOR1.WAV file.
2. Convert the file to stereo by editing the Format under Properties in the File
menu or by right-clicking on the Channels playbar field and selecting Stereo.
Set the Channels to Stereo and press OK. Select Both Channels for the destination
in the Mono to Stereo dialog. You should now have a stereo version of
TUTOR1.WAV.
3. Move the mouse pointer near the top of the left channel and select the word
“Wow.” Notice the change to the left channel selection cursor, and that only
the left channel of the data becomes highlighted. Do the same thing in the
middle half of the window near the top of the right channel and the
bottom of the left channel. This time you should see both channels being
selected. Do this one more time near the bottom of the waveform display
and you should see only the right channel being selected.
4. The cursor will change to reflect which channel(s) are being selected:
Cursor when selecting both channels of a stereo file or when in
a mono file.
Cursor when selecting the left channel of a stereo file.
Cursor when selecting the right channel of a stereo file.
Page 61

EDITING AND NAVIGATION
TOGGLING CHANNEL SELECTIONS
Once you have made a selection in a stereo file you can switch between
channel selections by pressing the Tab key. The Ta b key will cycle between
selections of Left Channel, Right Channel, and Both Channels. You can also set the
channel selection by using the Channel drop-down list in the Set Selection dialog
(Edit menu).
PREVIEWING CHANNELS
Selecting a single channel allows you to hear a preview of a single channel in
the stereo file.
To preview a channel:
1. Triple-click in the TUTOR1 window to select all the data (or use Select All
from the Edit menu). Press the Play button and listen to the clip.
2. Press the Tab key to toggle the channel selection into a single channel and
press the Play button again. Do this one more time to hear the other
channel.
61
SINGLE CHANNEL EDITING
Stereo data files are tied together by the nature of their format. In other words,
they always play together. This means that there are some edit operations, such
as Cut and Paste, that you can’t use on a single channel. It would leave one
channel shorter or longer than the other.This is usually not a problem in real
world editing situations. To shift a single channel in time by small amounts,
you can use the Delay/Echo function.
You can copy a selection from a single channel to the clipboard by selecting
the data in either the left or right channel and using the Copy command. This
will place a mono clip on the clipboard.You can then paste the mono clip to
a mono file, both channels of a stereo file, or you can mix it into a single
channel or both channels of a stereo file. When mixing mono clipboard data
to a stereo file you will be asked with a dialog whether you wish to mix to a
single channel or both channels.
Page 62

62
EDITING AND NAVIGATION
REGIONS AND MARKERS
This section covers Sound Forge XP’s ability to create regions and markers in a
data window. Each data window can have its own Regions List stored along with
the sound data when saved in the WAV file format.
Sections covered are:
• Using the Regions List
• Creating Regions
• Editing a Region
• Using Markers
USING THE REGIONS LIST
The most basic use of the Regions List is for dividing a sound file into separate
named regions.These regions can then be quickly played or highlighted in the
data window.You can also mark important time positions with markers so that
you can navigate through large files faster.
CREATING REGIONS
This section will describe how to create regions within a sound file.
CREATING A REGION USING MENU COMMANDS
As with most features in Sound Forge XP, you can create a region in your sound
file in a number of different ways. One of the simplest ways is to drag a
selection from a data window into the Regions List.
To create a region:
1. Open the TUTFILL.WAV file.
2. Open the Regions List window by selecting Regions List from the View menu.
You can also open this window by pressing Alt+1. There should be no
regions in the Regions List; creatinging one is what we are setting out to do!
3. To create a region, listen to the file by pressing Play and then select the
cymbal crash at the end of the file. Next, select Add from the Regions List
command in the Special menu.The Add Marker/Region dialog will appear.
Page 63

EDITING AND NAVIGATION
4. Name the region Cymbal Crash and then select OK. A region will be created
and placed in the Regions List. Each region in the Regions List has a Play button
that you can use to play that particular region. In addition, Region Tags that
show the location of the region appear in the Time Ruler.
63
OTHER WAYS OF CREATING REGIONS
There is also a shortcut menu to let you quickly create regions.
1. Select the beginning part of the TUTFILL.WAV file with the drum roll and
then right-click on the ruler. From the Ruler shortcut menu, select Add
Marker/Region and the Add Marker/Region dialog will appear.
2. Name this region Drum Roll. Notice that if you click on Drum Roll or Cymbal
Crash, in the Regions List window, the region is selected in the data window.
3. The easiest way of creating regions is to drag them from a data window and
drop them directly into the Regions List window.
Page 64

64
EDITING AND NAVIGATION
4. In the TUTFILL.WAV file, select the portion of data between the Drum Roll
and Cymbal Crash regions and then drag it to the Regions List window and
release the mouse button. The Add Marker/Region dialog will immediately
appear upon releasing the mouse button. Name this region Toms and press
OK.
5. Pressing “R” after making a data selection will create a region as well.This
is a very fast method of creating regions, however, the Add Regions dialog
won’t pop up. This means the region will be named automatically by its
time boundaries.You can change the region name later (see below).
EDITING A REGION
This section describes how to edit an existing region in a sound file.
EDITING REGIONS WITH THE RULER REGION TAGS
Changing the end points of a region is as simple as sliding the region tags on
the data window ruler (above the waveform display). When you left-click on
a region tag, the corresponding region end point tag is also highlighted. Also,
the name of the region is displayed in the left side of the status bar. Doubleclicking on a region tag changes the selection points to the region area.
To perform region edit operations, right-click on the region tags.This brings
up the Marker/Region shortcut menu. You can then choose from the following
options:
Select Modifies the current selection points to be equal
to the region end points.
Delete Deletes the region, not the sound data, from the
Regions List.
Edit Takes you to the Edit Marker/Region dialog for
manually editing region attributes.
Update Modifies the region end points to be equal to the
current selection.
Page 65

EDITING AND NAVIGATION
EDITING REGIONS IN THE REGIONS LIST
Another way to edit region points is to double-click on a region name in the
Regions List.This brings up the Edit Marker/Region dialog, which allows you to type
in region parameters. Also, right-clicking on the Regions List allows you to
choose from various commands in the Regions List shortcut menu.
USING MARKERS
While regions specify a section in a sound file, a marker is a location in the
sound file you wish to use as a reference point. Markers are often used to tag
important file locations, making it easier to navigate around the sound file.
CREATING A MARKER WITH THE RULER SHORTCUT MENU
A marker can be created in the same ways discussed earlier for making regions.
The fastest way is to place the cursor where you want the marker and then
right-click anywhere on the ruler.This will bring up the Ruler shortcut menu,
where you then select the Add Marker/Region option. In the Add Marker/Region
dialog, type in a name for the marker and select OK. If no data is selected,
Sound Forge XP will automatically create a marker at the cursor position. If
you have selected data, Sound Forge XP defaults the Type to Region in the Add
Marker/Region dialog.
65
EDITING MARKERS
Markers can be edited in the same way as regions (see above section). The
marker tags in the ruler can be moved back and forth, and shortcut menus
appear when you right-click on the tag.
STARTING PLAYBACK FROM A MARKER LOCATION
To play the sound file beginning at a marker location, press the small Play
button to the left of the marker name in the Regions List window.
Page 66

66
EDITING AND NAVIGATION
DROPPING MARKERS WHILE PLAYING OR RECORDING
Another useful feature in Sound Forge XP is the ability to create markers as you
listen to the sound file.To do so, first start playback on any sound file.A marker
will be created each time you press the ‘M‘ key. When finished, you can then
rename each marker to whatever you wish.
While recording, you can press the Drop Marker button (to the right of the Play
button) in the Record dialog.After pressing this button once, pressing the Spacebar
will create other markers.
Page 67
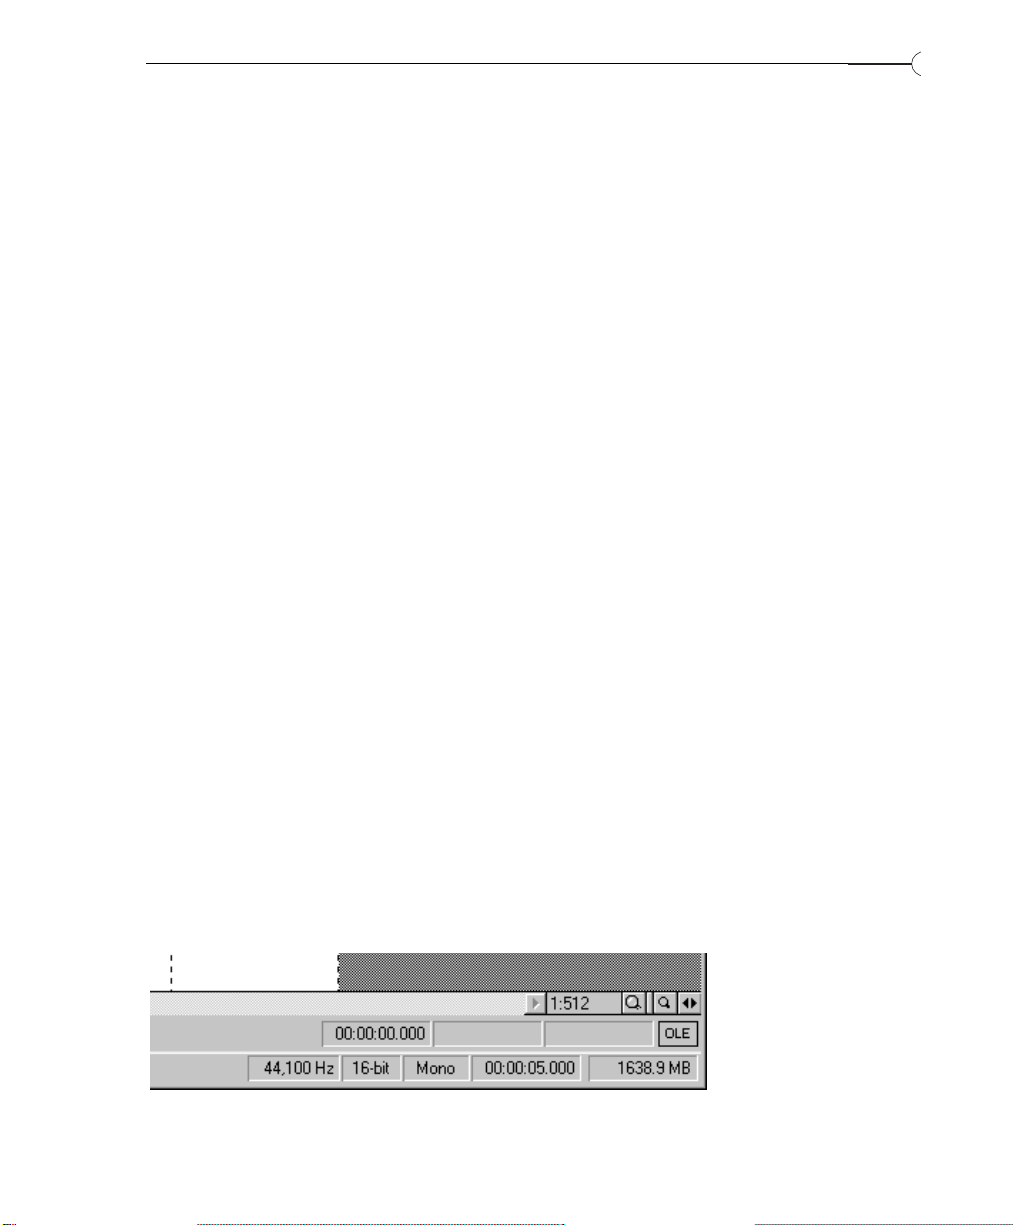
FILE FORMATS AND ATTRIBUTES
CHAPTER 4:
FILE FORMATS AND ATTRIBUTES
This chapter describes how to work with file formats, including AVI and
Internet files, and file attributes. The sections are:
• Working with Sound File Formats
• Working with AVI Files
• Working with Internet Media Formats
WORKING WITH SOUND FILE FORMATS
This section will show you how to deal with many different sound formats.
You will learn about:
• Changing the Format of a Sound File.
• Converting Between Stereo and Mono.
67
• Converting Sound Files from 16-bit to 8-bit.
• Converting Files from One Format to Another.
• Embedding Summary Information.
CHANGING THE FORMAT OF A SOUND FILE
When you open a file or create a new data window, the format for the window
is shown on the first three status fields of the main status bar at the bottom of
the program window. The format parameters consist of the Sample Rate, Sample
Size, and number of Channels (Mono or Stereo).The last status fields display the
Total Length of the sound data, and the amount of Free Storage available.
Page 68

68
FILE FORMATS AND ATTRIBUTES
NOTE
Changing the sample rate will make your sound play faster or slower and
with a higher or lower pitch.If you want the file to sound the same at a
different sample rate, use the Resample command under the Process
menu.
When you right-click on any of the three format fields, a shortcut menu will
pop up at the current mouse location allowing you to change that parameter.
You can also change all three parameters at one time by selecting
Properties/Format under the File menu.The Properties folder can also be invoked by
double-clicking on any of the format fields, or by right-clicking on the
waveform display of the data window and selecting Properties in the shortcut
menu.
Page 69

FILE FORMATS AND ATTRIBUTES
CONVERTING BETWEEN MONO AND STEREO
To convert a file from mono to stereo:
1. Open the TUTOR1.WAV file. Right-click on the status field, which has the
word Mono, and select Stereo from the shortcut menu.
2. When you convert from mono to stereo, the Mono to Stereo dialog will appear,
asking you where you want to put the data.Your choices are:
Left Channel The mono data is placed in the left channel.The
right channel is set to silence.
69
Right Channel The mono data is placed in the right channel.
The left channel is set to silence.
Both Channels The mono data is copied into both channels.
When performing stereo to mono conversions, the following options are
available:
Left Channel Mono data is taken only from the left channel of
the stereo file.
Right Channel Mono data is taken only from the right channel
of the stereo file.
Mix Channels Mono data is created by mixing both channels of
the stereo file.
3. For this exercise, put the data in the left channel to see how the function
works. Click the radio button next to Left Channel and select the OK button.
Page 70

70
FILE FORMATS AND ATTRIBUTES
4. You will now have data in the upper half of the data window (the left
channel) and silence in the right channel. Press the Play button and you will
hear “Wow, sound editing just gets easier and easier” in only the left
channel.
NOTE
NOTE
If your sound card supports only mono data you will still be able to play
stereo files if you set your playback device to Sound Mapper on the Wav e
page in the Preferences (Options menu).
5. Now go back to a mono sound file, but do it in a different manner. Select
Properties from the shortcut menu that appears when you right-click on the
waveform display. In the Properties folder select the Format page. This page
allows you to change all the parameters at once. Set the radio button for
Channels to Mono and select the OK button. Select the Left Channel for the
source channel in the Stereo to Mono dialog and you’re back where you
started.
The above steps were used as an illustration. Using Undo would have
been the more efficient option.
CONVERTING SOUND FILES FROM 16-BIT TO 8-BIT
To save storage space, 16-bit sound files are often converted to 8-bit files.
However, when you represent a sound file with only 8 bits, an audible
distortion referred to as quantization error becomes very prominent. To
minimize quantization error, there are things you can do to the 16-bit sound
file before converting it to 8-bit.You can:
• Apply a Noise Gate (Effects menu) to completely mute out the silent parts in
a sound file. Often, a low level signal in a 16-bit sound file will become
noise after the 16- to 8-bit conversion, so it’s best to have complete silence
between the sound parts.
• Normalize (Process menu) the sound to 0 dB (peak). This ensures that the
entire dynamic range available in 8-bit samples is used and lowers the signal
to noise ratio.
Page 71

FILE FORMATS AND ATTRIBUTES
Once you have performed the above operations, you should use Convert to 8-Bit
in the Process menu to do the 16- to 8-bit conversion. Sound Forge XP
provides three different 16- to 8-bit conversion options; Truncate, Round, and
Dither.
Truncate removes the lower 8 bits and they are lost forever. Round is similar to
Truncate, only some attempt is made to represent the highest of the low bits by
rounding up if possible. Dithering is used to mask the quantization noise with
less obtrusive noise. In the Convert to 8-Bit dialog, set the Dither bit depth to a low
value (like 0.1) and increase the value slowly until you reach an acceptable
sound.
Remember, an 8-bit sound file will always sound noisier than a 16-bit sound
file, so whenever possible, stick with 16-bit. When trying to save space, it is
possible to get better results from lowering the sample rate than using 8-bit
samples. For more information, see Resample under the Process menu in chapter
6, Sound Forge XP Reference.
CONVERTING FILES FROM ONE FORMAT TO ANOTHER
When producing audio files you may find that you need to work with a variety
of file formats. For example, WAV files could have data formats such as 8-bit
mono, 16-bit stereo, or even ADPCM.You may need the files converted to Raw
data, VOC, or some other PC format. You may even need to convert to a
different platform like Macintosh AIF files or Amiga SVX.
71
In the previous sections you’ve seen that you can quickly convert between
mono/stereo, 8-/16-bit, and change the sample rate with Sound Forge XP.You
can also use the Save As command to save the file to a new name, or you save it
in a new file format.
To convert file formats:
1. Open the TUTOR1.WAV file. Select the Save As command from the File
menu.The Save As dialog will be displayed.
Page 72

72
FILE FORMATS AND ATTRIBUTES
2. In the Save As dialog, there are three controls that are used for file
conversion: Save as type, Format, and Attributes.
The Save as type is the list of all available output file types.The Save as type will be
set to the type from which the file was opened.The default for new files is Wa v e
(Microsoft) (*.wav). You can change to the type of file you want to save by
selecting the new type from the Save as type list. Notice that the extension of the
file name will be changed to reflect the type of file you are saving.
Page 73

FILE FORMATS AND ATTRIBUTES
The Format drop-down list shows the format of the data that will be saved in
the file. Usually this will be PCM (Pulse Code Modulation), which is the standard
for most file types. PCM is a standard format for normal uncompressed audio.
If you are saving a file to a file type that supports other formats, they are
displayed in the drop-down list. Other formats are typically used when saving
audio data in a compressed form.
The Attributes drop-down list shows the sample size, channels, and sample rate
that will be stored when saving this file. Examples include 11,025 Hz, 8-bit
Mono or 44,100 Hz 16-bit stereo.You can quickly change the attributes of the
data by selecting one of the options available in the drop-down list. When you
change from a mono file to a stereo file using the Attributes field, that data is
copied to both channels. If you change a stereo file to a mono file, the data is
mixed to one channel.
When you change the Save as type you may notice that the Format and Attributes
fields will also change.This is because not all file types support the same types
of sound data. For example the Dialogic VOX format only supports 16-bit
mono Dialogic ADPCM files.This means you can’t store stereo 8-bit data in this
file. Don’t worry, in most cases Sound Forge XP automatically converts any file
you save to an acceptable format.
73
EMBEDDING SUMMARY INFORMATION
Several important sound formats let you include text information with sound
data.These formats include:
•WAV
• AVI (Microsoft Video for Windows)
• ASF (Active Streaming Format files using Microsoft NetShow)
• RM (RealMedia, including RealAudio and RealVideo)
When you create one of these files, you can include over 30 text fields
including, Creation Date, Copyright, Keywords, and a variety of other informational
text data. Sound Forge XP supports viewing and editing any of these fields.
Page 74
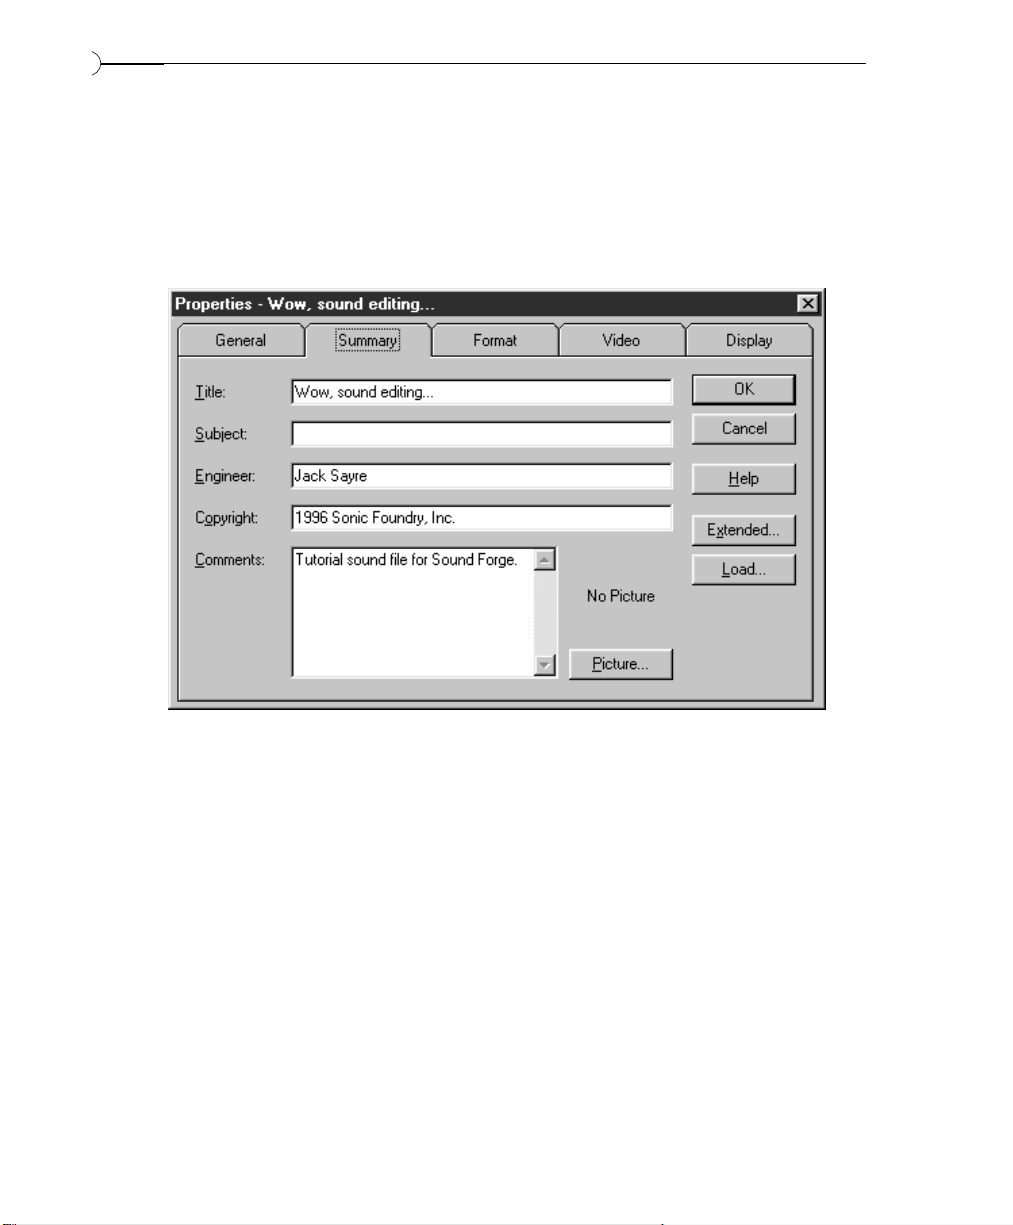
74
FILE FORMATS AND ATTRIBUTES
SUMMARY INFORMATION
Use the Summary properties to view or change summary information for a file.
To see these options, choose Properties from the File menu and select the Summary
page.
EXTENDED SUMMARY INFORMATION
To see the Extended Summary dialog, click Extended on the Summary page. The
Extended Summary dialog contains a list of available fields, each of which may or
may not have attached text. The Fields list shows the abbreviation of the field
type and a short description. If the field is currently empty, the word Empty
appears after the description. Below the list of fields is the Contents, which
shows the contents of that field. At the bottom of the dialog is a longer
description of the current field.
Page 75
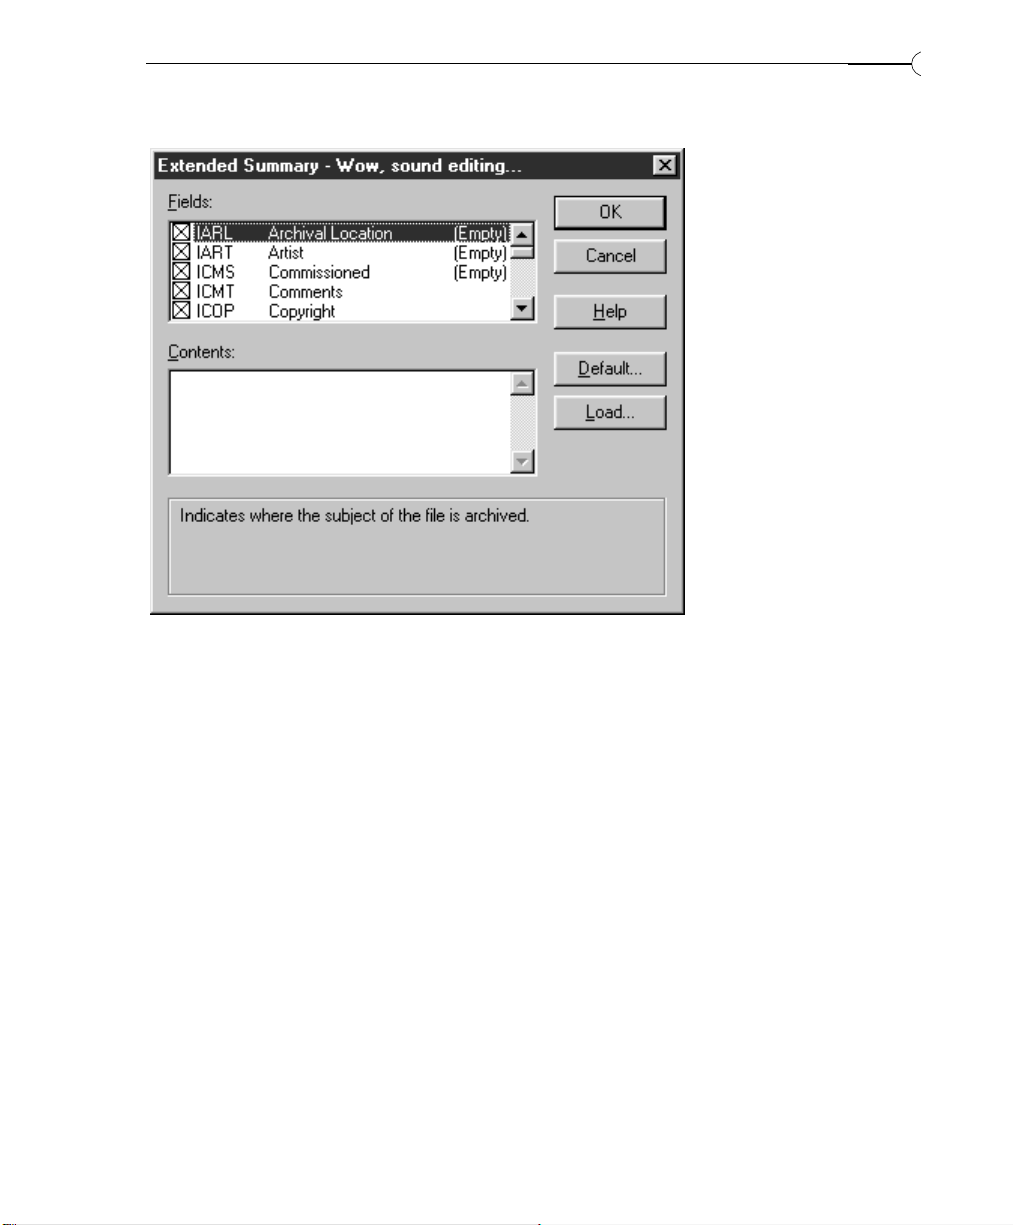
FILE FORMATS AND ATTRIBUTES
75
To the left of each field in the list is a check box, which is used to enable or
disable fields of this type when saving files.The field is enabled or disabled by
clicking on the check box. If a field is empty, i.e., has no text, enabling the
check box has no effect on a saved file. Field information is only saved if text
information exists for that field.
The Save Summary Information in file (.WAV, .AVI, .ASF, .RM) check box in the Save As
dialog is used to quickly enable/disable saving of all summary fields to a file
during a Save As operation. This allows you to quickly strip all summary
information from a file.
For a description of the fields available, refer to Properties in the File menu in
chapter 6, Sound Forge XP Reference.
Page 76

76
FILE FORMATS AND ATTRIBUTES
DEFAULT
If the Default button is selected, the text in the summary fields is saved with the
default fields that are automatically filled when creating a new WAV file. The
Creation date field (ICRD) is always filled with the current date for new files.
Saving a custom default setup is handy for saving copyright and engineer
information for new files created at your site.
To view extended summary information:
1. Open the TUTOR1.WAV file.
2. Select the Summary page from Properties in the File menu.This will show you
the Summary dialog.
3. Press the Extended button. Notice that the default for saving summary
information is to have all fields enabled. The fields that have already been
filled in for TUTOR1.WAV are Comments, Copyright, Creation Date, Engineer,
Name/Title, and Software.
4. Scroll to and select each field. You will see the embedded text for each of
these fields.
NOTE
ADDITIONAL EMBEDDED INFORMATION
You can also embed non-text data in a WAV, AVI, ASF, or RM file. If you open
and edit a file which has additional information created by other software,
Sound Forge XP will keep track of this data and place it back in the file when
you save to the original format.
If you wish to add or remove additional data (such as embedded bitmaps,
metafiles, etc.), you can use the Save As command from the File menu. When
you save data using the Save As option, Sound Forge XP will ask you if you wish
to copy the additional non-audio information to the new file. At this point
you can answer either Yes to place the additional information in the new file
or No to save only audio data and any additional data types you have selected.
Sound Forge XP will only prompt you to save if such data exists.
Page 77

FILE FORMATS AND ATTRIBUTES
WORKING WITH AVI FILES
Sound Forge XP lets you work with Microsoft Audio and Video Interleave (AVI) files.
You can edit the audio tracks of a video with single frame accuracy.This section
covers:
• Opening an AVI File
• AVI Navigation
• Attaching a Video to a Sound File
• Saving an AVI file
• AVI Video Compression
• Editing Audio in AVI Files
OPENING AN AVI FILE
To open an AVI file, choose Open from the File menu and select Video for Windows
(*.avi) from the Files of type list.Then, double-click on the file you wish to open.
If the AVI file being opened in Sound Forge XP contains exactly one video
stream and one audio stream, it will open these streams automatically.
However, if no audio is present an audio stream will be created containing only
silence for the entire length of the video.
77
HANDLING MULTIPLE STREAMS
AVI files can contain more than one video or audio stream. A stream is not the
same as a track in a multi-track video or audio editor. Multiple streams are
most commonly used to contain different versions of a video or audio track.
For example, you could have an AVI file with one video stream and multiple
audio streams in different languages. An AVI player, such as Microsoft’s Media
Player, can detect which language version of Windows your computer is using
and automatically play the correct audio stream for that language.
If more than one stream exists, the Video Stream dialog will be displayed when
opening the file. In this dialog, you must select a video and audio stream to
open by using the Stream Selectors (black diamonds) to the left of each stream.
Once you’ve selected one of each, press OK.
Page 78

78
FILE FORMATS AND ATTRIBUTES
AVI NAVIGATION
VIDEO STRIP
When you open an AVI file, you will notice the video strip on top of the
waveform display. When you use Zoom Out to view the waveform, all of the
frames in an AVI will not be displayed.The left edge of the displayed frames are
aligned with the audio in time. If you’d like to see the frame numbers appear
on the frames, activate the Video Strip shortcut menu by right-clicking on the
video strip and select Number Frames.
NOTE
To resize the video strip, drag its lower edge up or down.
To enable frame animation in the video strip, select Animate frames from the
Video Strip shortcut menu.When this option in enabled, moving the cursor will
cause the nearest frame to be displayed above it. During playback, you will see
the active frame window play the video as the cursor moves past it.
VIDEO PREVIEW
Selecting Video Preview from the View menu opens theVideo Preview window.The
frame closest to the cursor (during editing or playback) will always be
displayed in this window.
At the top of the window, the original frame size and current display size (in
parenthesis) are displayed, along with the frame rate and current frame
number. An asterisk (*) by a frame number indicates that the frame is a key
frame (see the section on compression below).
ATTACHING A VIDEO TO SOUND FILE
To attach a video to an opened sound file:
1. Select Properties from the File Menu and go to the Video page. Pressing the
Attach button will display the Attach Video dialog, where you can select an AVI
file as a source of video.
Page 79
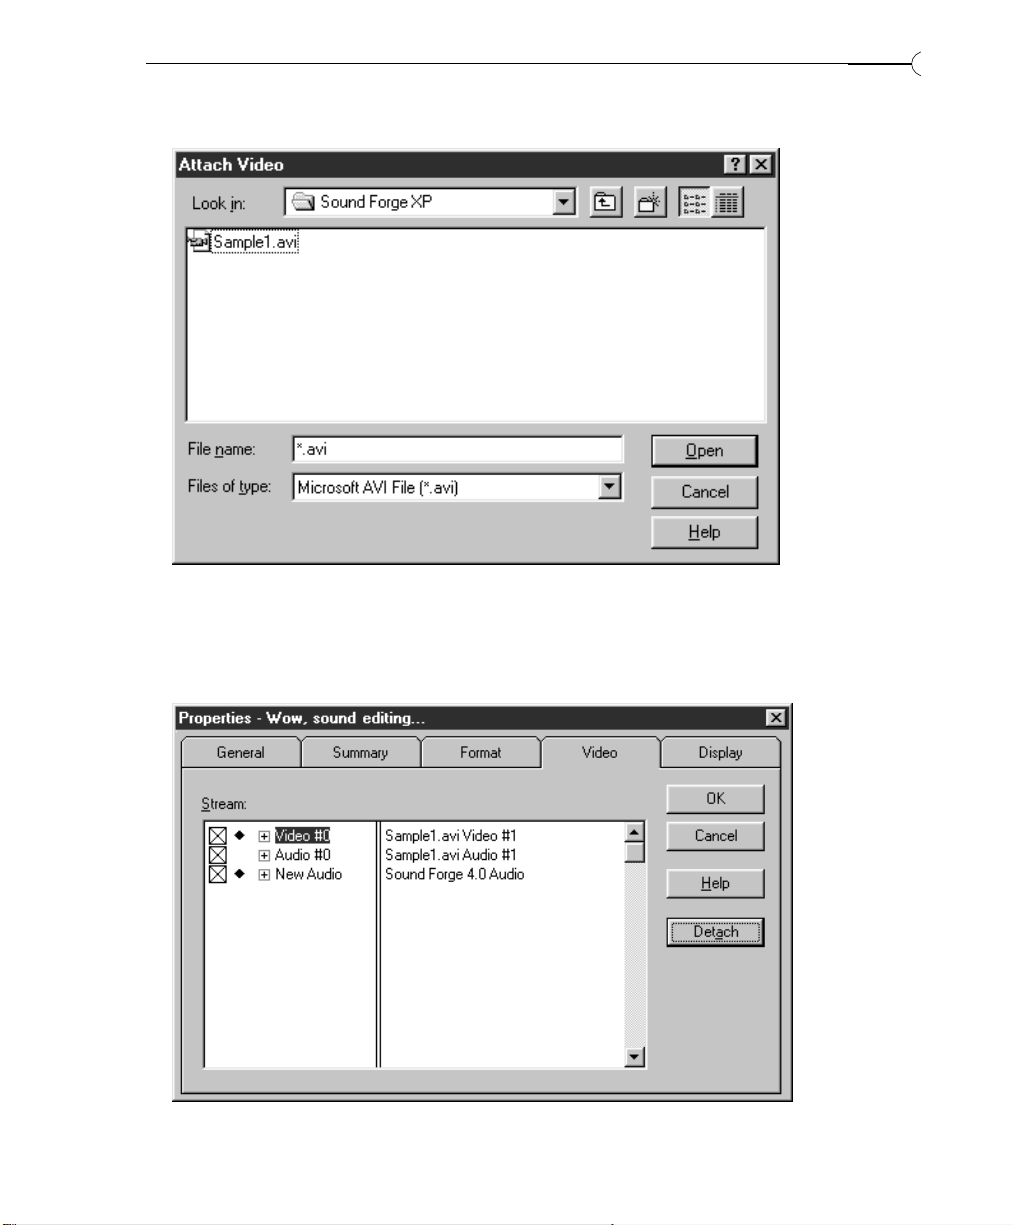
FILE FORMATS AND ATTRIBUTES
2. Press Open after selecting an AVI file with a video stream. The Video Properties
will now display the audio and video streams in the AVI file.An AVI file can
contain multiple streams, but in most cases you’ll have one audio stream
and one video stream.
79
Page 80

80
FILE FORMATS AND ATTRIBUTES
3. The check box to the left of each stream indicates which streams will be
stored when you save your file. The black diamond next to it is the Stream
Selector, which indicates which streams are currently being used in Sound
Forge XP.
4. Press OK and you should now see the video strip above the waveform
display. Once you’re done editing, you must save the file in AVI format if you
want to store the video.
SAVING AN AVI FILE
To save an opened file in the AVI file format:
1. Select Save or Save As from the File menu. From the Save As dialog, select Video
for Windows (*avi) from the Save as type drop-down list. After naming the file
and selecting attributes, select Save.
2. The Video Save Options dialog appears next. Here, you can select which streams
to store in the AVI file by checking the square check box to the left of each
stream. In this dialog, it is also possible to edit the titles of the streams.
Page 81
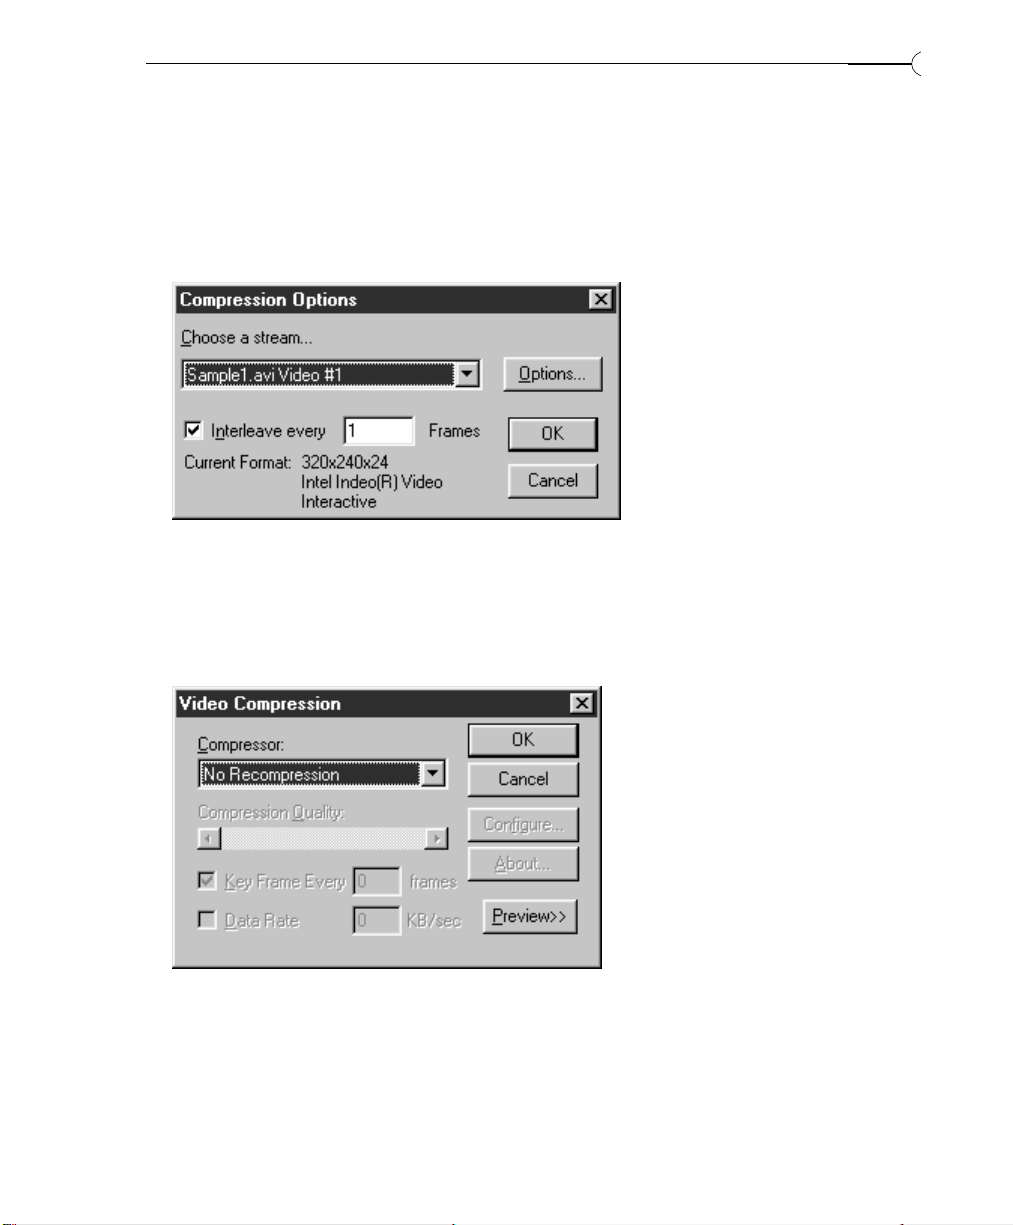
FILE FORMATS AND ATTRIBUTES
3. Pressing OK will take you to the Compression Options dialog. Here, you can
select a compression scheme for each audio and video stream.To change the
options for a stream, select it and press the Options button. By checking the
Interleave every _ Frames option, you can specify how frequently the audio
chunks are interwoven with the video.
4. If you pressed the Options button, yet another dialog, Video Compression, lets
you select from different compression algorithms, and even go to another
dialog to set specific compression configuration parameters. For more
information on compression, see the next section. Selecting No Recompression
saves the stream in its original format, which is the Sound Forge XP default.
81
5. Once you’re done setting compression options, selecting OK will complete
the process. If the video is long and/or the compression scheme selected is
slow, saving the file might take a while. However, if you didn’t change any
video compression formats, the save will be much faster, since no
recompression takes place.
Page 82

82
FILE FORMATS AND ATTRIBUTES
AVI VIDEO COMPRESSION
If you thought audio files chewed up your hard-disk space quickly, wait until
you start using video! CD quality audio takes up about 10 MB of hard-drive
space per minute (60 seconds x 44,100 samples per second x 2 tracks for stereo
x 2 bytes per 16-bit sample). However, typical video for multimedia use can
easily take up about 200 MB per minute for a small window of video (60
seconds x 15 frames per second x 320 x 240 x 3 bytes for 24 bit pixels). Using
uncompressed video as a final distribution format is out of the question for
most practical purposes. Video compression is a necessary evil.
COMPRESSION ALGORITHMS
Many different compression algorithms exist and many more will continue to
be created in the next several years. With all algorithms, there will be tradeoffs between video quality, size reduction, and compression/decompression
processing time. Compressing by large amounts quickly will generally produce
visual artifacts such as jumpy or grainy video.
When saving an AVI file in Sound Forge XP, you can select from all of the
compressors installed in your system. Included with Windows are Cinepak by
Radius (cvid), Intel Indeo (IV32), and Microsoft Video 1 (CRAM). These can
be selected from the Video Compression dialog (see section above).
NOTE
COMPRESSION SETTINGS
Many compressors use key frames during compression and decompression. A
key frame is a frame in the video stream that is not inter-frame compressed.
The following compressed frames are derived from the closest key frame.
Having fewer key frames will make the video size smaller. However, it will take
a lot more time to display the frames,especially when jumping around the end
video.
When editing AVI files in Sound Forge XP, the display speed will suffer
greatly if there is only one key frame in the entire file. In such cases,
Sound Forge XP needs to scan all preceding data when drawing every
single frame.
Page 83

FILE FORMATS AND ATTRIBUTES
Also in the Video Compression dialog, you can specify the Data Rate of the video,
which relates directly to the final size of the file. Different compressors do
different things with this value, since it’s only an expected value. In most cases
you should leave this unchecked. If you have very limited playback data rates,
such as with a single-spin CD-ROM, you might then want to set this value.
However, note that the Compression Quality control setting will also affect the
output size.
83
Use the Preview button to get an idea of the video’s output quality and
compression amount.
EDITING AUDIO IN AVI FILES
When doing any operations on the soundtrack of an AVI file, the video stream
is always left untouched. For example, doing a cut or paste on a sound file will
not change the duration of the video stream.
In Sound Forge XP, the video stream and audio stream will always start
together, and you will see the video frames only where audio exists.Therefore,
if you want to view the entire video stream, you should use Insert Silence to add
enough audio to run the entire length of the video.You can then later mix into
the file any needed sounds.
WORKING WITH INTERNET MEDIA FORMATS
Sound Forge supports two different formats for creating files that are
optimized for streamed playback over (usually) slow networks such as the
Internet. RealNetwork’s RealAudio and RealVideo (.RM,.RA), and Microsoft’s
NetShow Advanced Streaming Format (.ASF) files can be created in Sound
Forge. To play these files, you must have the appropriate player application
installed in your computer.
NOTE
This section covers the following topics:
• Using Sound Forge XP to create RealMedia files
• Using Sound Forge XP to create ASF files.
Page 84

84
FILE FORMATS AND ATTRIBUTES
USING SOUND FORGE XP TO CREATE REALMEDIA FILES
Sound Forge XP gives you the ability to save sound files in RealMedia formats
(RealAudio and RealVideo) along with editing tools that help maximize the
audio’s fidelity.This section first explains how to save files in RealAudio format,
then covers saving files in RealVideo format.All of the tips for converting files
to RealAudio also apply for converting AVI files to RealVideo. For more
information on authoring RealMedia content, refer to Progressive Networks’
RealMedia home page (www.real.com).
PREPARING REALAUDIO FILES
Preparing RealAudio files is a three-step process:
1. Recording the audio.
2. Preparing a sound file for RealAudio encoding.
3. Setting the RealAudio text fields.
RECORDING THE AUDIO
To record a sound file:
1. Click the Record button.The Record dialog appears displaying the settings from
the last clip recorded.
Page 85

FILE FORMATS AND ATTRIBUTES
2. Use the defaults or click the New button to change the Sample Rate, Sample Size
or number of channels of the source file.
3. Check the Monitor box and play the clip to be encoded. Check for clipping.
You want the levels to be mostly in the green area, a little in the yellow and
only occasionally in the red. If Sound Forge XP displays a red Clip warning
above the Monitor, you should:
4. Stop the input source.
5. Click the Reset button.
6. Lower the volume of the input source either by turning down the output
of your sound source or by turning down the input volume on your sound
card’s mixer window. In general, you don’t want any of your levels too high
or too low.
7. Check the levels again. It is better to be conservative with the starting levels.
8. Click the Record button to re-record.
9. When the file is recorded completely or when you click the Stop button, a
graphical display of the wave file appears.
85
10.Click the Close button to close the Record dialog.
PREPARING A SOUND FILE FOR REALAUDIO ENCODING
When you have finished recording a file, it is recommended that you
normalize and compress the file before saving it in RealAudio format.
Normalize
When you have finished recording a new file or opening pre-existing files, it
is recommended that you perform the following processes on the file before
saving the file in a RealAudio format.
Sound Forge allows you to save preset settings for each of these processes.
So once you set them up the first time, you can always use the same
settings.
NOTE
Page 86

86
FILE FORMATS AND ATTRIBUTES
This process ensures that the loudest part of the file is at the maximum level.
Follow these steps to normalize a file
1. Press Ctrl-A to select the entire file.
2. Select Normalize from the Process menu.The Normalize dialog appears.
3. Move the Normalize fader to -.50 dB (94.41%).
4. Select OK. Sound Forge XP normalizes the file.
Compress
If you have not already audio compressed the file you can do so now.
RealAudio files benefit from compression because it increases the overall
volume and intelligibility of the sound. The suggested settings use very light
compression. Follow the steps below to compress the clip:
1. Press Ctrl-A to select the entire file.
2. Click on the Effects menu, followed by the Dynamics option.
3. Move the Threshold slider to -10.00 dB and the Ratio slider to 2.0:1.
4. Finally, set the Attack control to 1.0 milliseconds, and the Release control to
300.0 milliseconds.
5. Click the OK button.
Page 87

FILE FORMATS AND ATTRIBUTES
SETTING REALAUDIO TEXT FIELDS
RealAudio and RealVideo files can store information about the title, author
and copyright of the clip.To set the RealAudio and RealVideo text fields, follow
these steps:
1. Choose Properties from the File menu.The Properties window for the current
file displays.
2. Click the Summary tab.
87
3. Enter the Title, Engineer, and Copyright information. This information
appears in the Title, Author, and Copyright text boxes on the RealPlayer.
4. Press the OK button, and the fields are transferred in to the RealAudio or
Video file when it is saved.
SAVING AN AUDIO FILE AS REALAUDIO
To save an audio file as RealAudio, follow these steps:
1. Click on the File menu, followed by the Save As option. The Save As dialog
displays.
2. Enter the file name of the file you are saving.
3. Select RealMedia (*.rm;*.ra) as the Save as type.The default extension for this
type of file is .rm.To save using the .ra extension, type .ra at the end of the
file name.
Page 88

88
FILE FORMATS AND ATTRIBUTES
4. Next, click the Save button. The RealMedia Save Options dialog box opens.
This dialog box is explained in detail in the reference chapter in the “Save
As” section.
5. Select the Audio compression type from the drop-down list.A brief description
of the highlighted compression type displays below this list.
6. If the file you recorded was stereo, and you selected a mono compression
type, select the appropriate Stereo to mono conversion option. It is recommend
that you use the Both Channels option.
7. Click the OK button. After the file has been saved, a message appears, asking
whether you want to listen to the saved file through the RealPlayer. This
message verifies that you have saved the file in RealAudio or RealMedia
format.You can listen to the file by clicking the Yes button if you have the
RealPlayer installed.
SAVING AN AVI FILE AS REALVIDEO
To save an AVI file as RealVideo, follow these steps:
1. Click on the File menu, followed by the Save As option.The Save As dialog
displays.
2. Enter the file name of the file you are saving.
3. Select RealMedia (*.rm;*.ra) as the Save as type.
4. Click the Save button and the RealMedia Save Options dialog displays. This
dialog box is explained in detail in the reference chapter in the “Save As”
section.
5. If you wish to include the audio in the new RealVideo file, make sure the
Save Audio Stream option is checked. Next,select the Audio compression type from
the drop-down list.A brief description of the highlighted compression type
displays below this list.
6. If you wish to include the video in the new RealVideo file, make sure the
Save Video Stream option is checked. Next, select the Video compression type from
the drop-down list. For a brief description of the two compression types,
see the reference chapter’s “Save As” section.
7. Specify the Desired maximum data rate in total kilobits per second (Kbps).This
option is only available if you are saving a video stream. Refer to the
documentation for “Desired Maximum Data Rate” in the “RealMedia Save
Options” section for more information.
Page 89

FILE FORMATS AND ATTRIBUTES
8. Click the OK button. After the file has been saved, a message appears, asking
whether you want to listen to the saved file through the RealPlayer. This
message verifies that you have saved the file in RealVideo format.You can
view the file by clicking the Yes button if you have the RealPlayer installed.
REALMEDIA SAVE OPTIONS
This dialog is reached when you select RealMedia (*.rm;*.ra) from the Save as type
list in the Save as dialog.
89
Enable selective record capabilities
When checked, RealMedia-compatible players can allow users to save (record)
RealMedia streams to their hard drives. Use this option only if it is acceptable
for users to create copies of the RealMedia file. The RealPlayer Plus from
Progressive Networks supports Selective Record capabilities.
Page 90

90
FILE FORMATS AND ATTRIBUTES
Enable PerfectPlay capabilities
When this option is enabled, users connected with standard modems can select
to download a higher quality version or the audio and/or video that is
normally only available over ISDN or LAN connections.The higher bandwidth
RealMedia stream is then played back from the user’s hard disk after the
download process is complete.The RealPlayer Plus from Progressive Networks
supports PerfectPlay capabilities.
Create event file (RAE) from Marker and Region labels
When this option is enabled, events can be embedded from the Regions List
(View menu) into the RealMedia stream.
To embed an event, create a marker or region with a label starting with one of
the below prefixes followed by a colon.
RM URL: Specifies a URL (web address) to open.
RM Title: Sets the Title field in the RealPlayer.
RM Author: Sets the Author field in the RealPlayer
RM Copyright: Sets the Copyright field in the RealPlayer
For example, if you create a marker with the label RM URL:http://
www.sonicfoundry.com, the RealPlayer would open the Sonic Foundry
home page at the marker’s location in the file during playback. You can just
as easily open specific web pages. For example, RM URL:http://
www.sonicfoundry.com/realaudio.html would open the realaudio.html page
on Sonic Foundry’s web site.
Progressive Networks publishes extensive information on RealMedia events on
their web site (www.real.com). However, Sound Forge XP is capable of
generating all event files automatically rather than requiring several tools as
described in Progressive Networks’ documentation.
Save audio stream
When checked, the file’s audio stream will be converted and saved into the
RealMedia file.
Audio compression
This option selects the RealAudio compressor that is used when saving the file.
If you need to save RealAudio files with Bandwidth Negotiation capabilities,
you can automate the process using Sonic Foundry’s Batch Converter Plug-In.
Page 91

FILE FORMATS AND ATTRIBUTES
When a compression type is selected, a brief description of it is displayed
below the list box. The frequency response parameter of the description
indicates how wide, in Hertz, the bandwidth of the audio in the RealMedia file
will be.The bandwidth of a normal human’s hearing is about 20,000 Hz or 20
kHz.
Stereo to mono conversion
If the source audio file is stereo and you choose to convert to a mono
RealAudio format, you will need to decide what channel(s) to use for the
mono signal. Selecting Both channels will evenly mix the signal together. If you
are unsure of this option, always choose Both Channels.
Save video stream
When checked, the file’s video stream will be converted and saved into the
RealMedia file.
Video compression
Currently there are two types of RealVideo compression: RealVideo (Standard)
and RealVideo (Fractal). Each type is optimized for different types of video and
transfer rates. Detailed information on the two types is available on the
RealMedia home page (www.real.com).
91
Video compression quality (1 to 100)
This option allows you to compromise between quality of compression and
lowest possible data transfer rate. Setting this level at 100 provides the best
quality video with the greatest required bandwidth to stream. A setting of 1
gives you the lowest quality video but requires the least bandwidth to stream
effectively.
Frames per second (0.050 to 1000)
This setting allows you to change the frame rate of the video that is being
compressed. A lower frame rate, such as three or five frames per second, will
greatly lower the bandwidth requirements for streaming the video. Type the
desired frames per second into the edit box, or choose one of the presets from
the drop-down list.
Page 92

92
FILE FORMATS AND ATTRIBUTES
Desired maximum data rate (1.0 to 500.0 Kbps)
This setting is available only if you are saving a video stream. The data rate
specifies the desired total kilobits per second (Kbps) for the RealMedia file
(including audio and video).To increase the bandwidth available for streaming
the video, you can either lower the data rate for the audio, or increase the
desired maximum data rate. Note that you must allow some room for
inconsistent transfer rates. For example, a 28.8 modem cannot sustain 28.8
Kbps. Instead, you should target your maximum data rate for between 20.0 and
22.0 Kbps. The allowed data rates are displayed next to the Audio/Video
compression options. After the file has been saved, statistics about the actual data
rate will be displayed. Use this information to adjust parameters as necessary.
USING SOUND FORGE TO CREATE
MICROSOFT NETSHOW FILES
This tutorial shows how to create Advanced Streaming Format (ASF) files using
Sound Forge. ASF is a multimedia file format used for streaming information
across the Internet using Microsoft NetShow. With ASF files, you can deliver
multimedia content, audio or video, open Web pages, or deliver scripting
commands to the client computer.
Sound Forge includes support for saving WAV and AVI files, as well as their
associated markers and script commands, in an ASF file. ASF files can be played
off of your local drive, streamed off of an HTTP server, or optimally stored and
streamed off of a NetShow server.
NETSHOW REQUIREMENTS
In order to play ASF files, you must install the Microsoft NetShow Player and Tools.
These components install all of the necessary audio and video codecs for saving
ASF files. Both of these components are available on the Sound Forge CD-ROM
and can also be downloaded free of charge from the NetShow web page at
www.microsoft.com/netshow.
To install the NetShow Player, select Microsoft NetShow Player from the list in the
main setup program on the Sound Forge XP CD-ROM. This will run
Microsoft’s setup program for the player.
Page 93

FILE FORMATS AND ATTRIBUTES
To install the ASF authoring and conversion tools, select Microsoft NetShow Tools
from the list in the main setup program on the Sound Forge XP CD-ROM.This
will run Microsoft’s setup program for the NetShow Tools.
Further documentation for this software is available on the NetShow web page.
At this time, the components shipped on the Sound Forge CD-ROM are for the
x86 and Pentium platforms only. See Microsoft’s web page for availability of
components for other platforms.
USING THE BUILT-IN TEMPLATES
Sound Forge contains a number of built-in templates for saving AVI or WAV
files as ASF files. These templates have been designed by Microsoft to be
optimized for certain bandwidths.To use these templates, follow these steps:
1. Open Sample1.avi from the Tutorial Files\NetShow folder on the Sound
Forge CD-ROM. This file is a short video clip that uses the Intel Indeo
Interactive VCM video codec installed with the NetShow Player. The Intel
codec is well-suited for mid to high bit-rate video. The audio track in this
file is PCM.
2. Click on the File menu, followed by the Save As option.
93
3. Select Advanced Streaming Format from the Save as type drop-down list.
4. Click the Save button. The NetShow Settings dialog appears.
5. A high bit rate ASF file can be created from this file by simply choosing a
built-in template. The numbers preceeding the names of the templates
indicate the target bandwidth for the ASF file. Higher numbers require
wider bandwidth conncetions.
For this file, choose the 100 Presentation Video template from the Template list.
This template is designed for a Dual ISDN connection and a “talking head”type video like Sample1.avi.
5. Click the Save button, and the AVI is saved.
Page 94

94
FILE FORMATS AND ATTRIBUTES
CREATING CUSTOM TEMPLATES
Custom templates can also be created in the NetShow Settings dialog and saved for
future use.To create a custom template, follow these steps:
1. Follow steps 1-4 in the section above.
2. Click the Custom button.The NetShow Encoder Template wizard starts and guides
you through the template creation process.
3. Type the name of your custom template in the Template Name field.
4. Click the Next button to continue.
5. Select the desired bandwidth for the output file.The bandwidth selected in
this step determines what compression options are available in the next
step.You can enter a custom bandwidth in bits per second by selecting the
Custom option.
NOTE
NOTE
A bandwidth selection of 14.4 will not allow you to save a video stream
due to the amount of bandwith required for video.
6. Choose the audio and video codecs you wish to use.
7. Click the Finish button. Each audio codec will have a set of Formats that are
available, depending on the bandwidth that was selected in the previous
dialog.
Microsoft provides a free Content Creation Guide on their web site at
www.microsoft.com/netshow. This guide is a great resource for
understanding which codecs work best in certain situations.
Page 95

FILE FORMATS AND ATTRIBUTES
ADDING MARKERS AND SCRIPT COMMANDS
Sound Forge can embed markers in ASF files. These markers can be used for
navigation in the file or for triggering events or custom script commands.
ADDING NAVIGATION MARKERS
Open Sample1.avi from the Tutorial Files\NetShow folder on the Sound Forge
XP CD-ROM if you haven’t already done so. If you want viewers to have the
ability to jump to certain parts of the ASF file, you will want to add markers
in the source file. To learn how to add markers, follow these steps:
1. Find the part of the AVI file where John says, “No, not gonna do that.”
2. Place the cursor right before that point and press the <M> key on your
keyboard.The Edit Marker/Region displays.
3. Type “No, not gonna do that” in the Name field.
4. Click the OK button.You now have a named marker in the file.
5. Click on File menu, followed by the Save As option.
6. Select the Advanced Streaming Format option from the Save as type drop-
down list.
95
7. Click the Save button. The NetShow Services Settings dialog displays.
8. Choose the 100 Presentation Video template from the Template list.
9. Make sure that the Use markers in source file checkbox is checked.
10.Click on the Save button.
11. When the file is done saving, click the Yes button to open the ASF file. If you
look just above the copyright information part of the NetShow Player
window, there is a drop-down list that contains all of the markers that have
been saved in the file.The marker you just added should now appear in that
list.
12.Select your marker from the list, and click the Play button. Playback should
now start from that point in the ASF file.
Page 96

96
FILE FORMATS AND ATTRIBUTES
ADDING SCRIPT COMMANDS
Markers are also used to store script commands that are embedded in the ASF
file. The most popular of these is the URL flip. This command causes the
opened web browser to open specified pages as the ASF file reaches certain
points in the file.
Sound Forge has a special function to automatically add certain script
commands, but regular markers work just as well. Using the built-in function
simply saves you from remembering the syntax for basic commands. To learn
how to store script commands in a marker, follow these steps:
1. Open Sample1.avi again.
2. Put the cursor close to the beginning of the file, and choose ASF
Marker/Command|Add from the Special menu. Notice that the name of the
new marker has already been filled in with the correct syntax for a URL flip
(http://). After “http://”, type the following: www.sonicfoundry.com/
SoundForge.
3. Click the OK button. A new marker is inserted into the file.
4. Click on File menu, followed by the Save As option.
NOTE
5. Select the Advanced Streaming Format option from the Save as type drop-
down list.
6. Click the Save button. The NetShow Services Settings dialog displays.
7. Choose the 100 Presentation Video template from the Template list.
8. Make sure that the Use script commands in source file checkbox is checked.
9. Click on the Save button.
10. After the file is saved, choose Ye s to listen to the file in the NetShow Player.
As the file is played, you will notice that your default web browser has been
opened and the Sound Forge page of the Sonic Foundry web site has been
loaded.
If you aren’t already connected to the internet, the time it takes to
connect will, of course, throw off the timing of the URL flip.Ideally, the
viewer of the ASF file will already be online and the URL flip will be
more accurate.
Page 97

FILE FORMATS AND ATTRIBUTES
SAMPLE HTML USING AN ASF FILE
We have included an example HTML file on the Sound Forge XP CD-ROM,
showing how to use the NetShow ActiveX control to add an ASF file to a web
page. You can find the example in the \SAMPLES\NETSHOW folder on the
CD-ROM.
97
The HTML sample requires Microsoft Internet Explorer v3.0 or better.
Follow these steps to use this example:
1. Copy SAMPLE.HTM to the folder on your hard drive that contains the ASF
file you wish to use.
2. Modify the FILENAME parameter within the NSOPlay object to reference
your local ASF file (a fully qualified path is required).
3. Open the edited SAMPLE.HTM file within your browser.
4. Continue with the additional instructions listed on the example page.
CONVERTING A HIGH BIT-RATE AVI FILE TO ASF FORMAT
This section of the tutorial demonstrates how you can create high bit-rate
video content and convert it to ASF.SAMPLE1.AVI is a short video clip that uses
the Intel Indeo Interactive VCM video codec installed with the NetShow Player.
The Intel codec is well suited for mid to high bit-rate video. The audio track
in this file is PCM format.
1. From the File menu, open SAMPLE1.AVI from the \SAMPLES\NETSHOW
folder on the Sound Forge XP CD-ROM. From the File menu select Properties.
Select the Format page and set the audio Sample Size to 16 bits. Make sure that
Channels is set to mono. Select OK.
NOTE
Note that editing and playback performance of an AVI file will suffer
greatly unless you first copy it to your hard drive. It is strongly
recommended that you always copy AVI files that you are editing onto
your hard disk.
NOTE
Page 98

98
FILE FORMATS AND ATTRIBUTES
2. From the Process menu select the Resample command. The Resample dialog
will appear. Set the new sample rate to 8,000 Hz and select OK.
3. From the Process menu select the Normalize command and select OK.
4. Now convert the edited AVI file to an ASF file by saving it on your hard
drive. Select the Save As command from the File menu. Select Active Streaming
Format (*.asf) from the Save as type drop-down list.
5. The NetShow Player installs the Lernout & Hauspie CELP 4.8kbit/s ACM
codec (see previous section), which is excellent for low bit-rate voice
audio. Select this codec from the Format drop-down list. Select Save. (Note
that it is not a requirement of ASF to convert the audio from PCM. We
perform the conversion as part of this tutorial to demonstrate how to take
advantage of the installed codecs.)
6. The ASF Save Options dialog presents the settings for the Active Streaming
Format file. Select OK to select all the default settings.
7. Next, the Video Save Options dialog appears. It allows you to view the audio
and video properties of the AVI file. Select OK.
8. The Compression Options dialog presents the available video compression
options. Press OK to select the Indeo codec.
9. When the ASF file has been created Sound Forge XP will prompt you to play
it. Select Yes .This will start the NetShow Player.
Page 99

FILE FORMATS AND ATTRIBUTES
10.From the File menu in the NetShow Player select Properties. Note the
following Properties pages:
The General page contains the general information contained within the
AVI file.
The Details page shows that the ASF file has a bit-rate of 875,000 bps.
The Codecs page displays information about the codecs being used with
the file.
AUTHORING A LOW BIT-RATE ASF FILE
This section of the tutorial creates a low bit-rate video suitable for playback on
the Internet at 28.8 Kbps. SAMPLE2.AVI is a smaller version of SAMPLE1.AVI.
It uses the Intel Indeo Interactive codec and has been re-sized to 160 x 120 at
6 frames per second with one key frame every 36 frames. The VDOnet
VDOWave codec and the Intel Indeo Interactive codec require that the video
frame size be a multiple of 16 (i.e., 160 x 120, 320 x 240, etc.).The audio track
in this file is PCM.The steps below describe how to use the VDOnet VDOWave
video codec, which is an exceptional codec for low bit-rate content.
99
1. From the File menu, open SAMPLE2.AVI from the \SAMPLES\NETSHOW
folder on the Sound Forge XP CD-ROM. You will be prompted with a
message from Sound Forge XP asking if you want to disable the video strip.
Select No.
2. Note that editing and playback performance of an AVI file will suffer greatly
unless you first copy it to your hard drive. It is strongly recommended that
you always copy AVI files that you are editing onto your hard disk.
3. From the File menu select Properties. Select the Format page and set the audio
Sample Size to 16 bits and verify that Channels is set to mono. Select OK.
4. From the Process menu select the Resample command. In the Resample dialog,
set the New Sample Rate to 8,000 and select OK.
5. From the Process menu select the Normalize command and select OK.
Page 100

100
FILE FORMATS AND ATTRIBUTES
6. Now add Markers and ASF Script Commands. From the Special menu select
Region List/Add. Add the following three Markers:
Type Name Time
Marker ASF CAPTION:John is here to… 00:00:01.000
Marker This is the middle of my ASF 00:00:09.000
Marker ASF CAPTION:John is not here… 00:00:10.000
7. Note that you can drag and drop the markers along the time line once they
have been created and during playback. Markers that start with the preface
ASF are processed as stored as script commands within the ASF file. For
more information, see Sound Forge XP online Help.
8. Now save the edited AVI file to an ASF file. Select the Save As command from
the File menu. In the Save As dialog, Select Active Streaming Format (.asf) from
the Save as type drop-down list.
9. The NetShow Player installs the Lernout and Hauspie CELP 4.8kbit/s ACM
codec, which is excellent for low bit-rate voice oriented audio. Select this
codec from the Format drop-down list. Select Save.The ASF Save Options dialog
presents the settings for the ASF file.
10.Set the Maximum Lead Time setting to 5,000 and select OK. Note that 5,000 is
the lead time setting that should be use when authoring low bit-rate video
ASF files.
11. Select OK to close the Video Save Options dialog.
12.The Compression Options dialog presents the available video compression
options. Select the Options button, and in the Video Compression dialog select
the VDOnet VDOWave codec from the Compressor drop-down list.
13.Select the Configure button to bring up the Encoder Configuration dialog. This
dialog allows you to set the specific bit-rate for the video stream. Drag the
slider to the left until it is at the 14 Kbit/sec setting. Select OK.
 Loading...