

Page 1

MultilingualPrismPTI.book Page i Tuesday, March 6, 2001 8:30 PM
TM
G
UÍA
R
ETTING
G
ANUEL
M
ÁPIDA DE
DEL
UIDA INTRODUTTIVA
G
R
S
D’
I
UTILISATION
INFÜHRUNG
E
NSTALACÍON
EPRODUCTOR
TARTED
Page 2

MultilingualPrismPTI.book Page ii Tuesday, March 6, 2001 8:30 PM
TM
Page 3

MultilingualPrismPTI.book Page iii Tuesday, March 6, 2001 8:30 PM
TM
Table of Contents
Page iii
Table of Contents
UK English
INTRODUCTION ............................................................3
Important information...........................................4
SETTING UP YOUR RIO.................................................8
Step 1: Unpack package contents .........................8
Step 2: Power up your Rio..................................13
Step 3: Install the software..................................16
Step 4: Plug in the USB cable.............................18
Step 5: Register your Rio and software ..............19
Step 6: Check out the User Guide.......................20
USING THE RIO SOFTWARE........................................21
Rio Audio Manager (PC)....................................21
SoundJam MP (Mac) ..........................................27
ACCESSING CUSTOMER CARE ....................................31
Page 4

MultilingualPrismPTI.book Page iv Tuesday, March 6, 2001 8:30 PM
TM
Table of Contents
Page iv
Français
INTRODUCTION ..........................................................35
Informations importantes....................................36
INSTALLATION DU RIO ..............................................40
Étape 1 : Déballage du coffret ............................40
Étape 2 : Alimentation du Rio ............................46
Étape 3 : Installation du logiciel .........................49
Étape 4 : Branchement du câble USB.................51
Étape 5 : Inscription du lecteur Rio et
des logiciels...................................................52
Étape 6 : Lecture du manuel d’utilisation...........53
UTILISATION DU LOGICIEL RIO .................................54
Rio Audio Manager (PC)....................................54
SoundJam MP (Mac) ..........................................61
ACCÈS À L’ASSISTANCE CLIENTÈLE ..........................65
Page 5

MultilingualPrismPTI.book Page v Tuesday, March 6, 2001 8:30 PM
TM
Table of Contents
Page v
Deutsch
EINFÜHRUNG .............................................................69
Wichtige Informationen......................................70
EINRICHTEN DES RIO.................................................75
Schritt 1: Gerät auspacken ..................................75
Schritt 2: Rio starten ...........................................81
Schritt 3: Software installieren ...........................84
Schritt 4: USB-Kabel anschließen ......................87
Schritt 5: Rio und Software registrieren .............88
Schritt 6: Benutzerhandbuch lesen .....................89
VERWENDEN DER RIO-SOFTWARE ............................90
Rio Audio Manager (PC)....................................90
SoundJam MP (Mac) ..........................................97
ZUGANG ZUM KUNDENDIENST................................101
Page 6

MultilingualPrismPTI.book Page vi Tuesday, March 6, 2001 8:30 PM
TM
Table of Contents
Page vi
Español
INTRODUCCIÓN........................................................105
Información importante ....................................106
INSTALACIÓN DE RIO ..............................................110
Paso 1: Desembalaje del producto ....................110
Paso 2: Encendido del reproductor Rio ............116
Paso 3: Instalación del programa ......................119
Paso 4: Conexión del cable USB ......................122
Paso 5: Registro del reproductor y
el programa Rio ..........................................123
Paso 6: Consulta de la guía del usuario ............124
USO DEL PROGRAMA RIO ........................................125
Rio Audio Manager (PC)..................................125
SoundJam MP (Mac) ........................................131
ACCESO AL SERVICIO DE ATENCIÓN AL CLIENTE ....135
Page 7

MultilingualPrismPTI.book Page vii Tuesday, March 6, 2001 8:30 PM
TM
Table of Contents
Page vii
Italiano
INTRODUZIONE ........................................................139
Informazioni importanti....................................140
IMPOSTAZIONE DEL RIO ..........................................145
Fase 1: Apertura della confezione.....................145
Fase 2: Accensione del Rio...............................151
Fase 3: Installazione del software.....................154
Fase 4: Collegamento del cavo USB ................156
Fase 5: Registrazione del Rio e del software....157
Fase 6: Lettura del Manuale dell’utente............158
USO DEL SOFTWARE RIO ........................................159
Rio Audio Manager (PC)..................................159
SoundJam MP (Mac) ........................................165
ACCESSO ALL’ASSISTENZA CLIENTI........................169
Page 8

MultilingualPrismPTI.book Page viii Tuesday, March 6, 2001 8:30 PM
TM
Table of Contents
Page viii
Page 9

MultilingualPrismPTI.book Page 1 Tuesday, March 6, 2001 8:30 PM
TM
GETTING STARTED
Page 10
MultilingualPrismPTI.book Page 2 Tuesday, March 6, 2001 8:30 PM
TM
Page 2
Rio 600 Getting Started Guide
©
2000-2001 SONICblue, Incorporated. All Rights Reserved.
SONICblue, Incorporated does not assume any responsibility for errors
or omissions in this document or make any commitment to update the
information contained herein.
Rio is a registered trademark of RioPort, Inc. in the USA and/or other
countries and is used under licence.
Microsoft, Windows Media, and the Windows Logo
are trademarks or registered trademarks of Microsoft
Corporation in the United States and/or other
countries.
All other product names may be trademarks of the
companies with which they are associated.
Fourth Edition, February 2001.
Part Number 52260029-004
Page 11
MultilingualPrismPTI.book Page 3 Tuesday, March 6, 2001 8:30 PM
TM
Introduction
Page 3
Introduction
Congratulations on your purchase of the Rio 600 portable digital audio
player! Rio is the perfect companion for active people—delivering skipfree music for people on the go. The Rio connects easily to your PC or
Mac for downloading compressed digital audio tracks. Use the Rio
software to convert tracks from your audio CDs for playback on the Rio
or to download tracks from the Internet.
Take a few minutes to review the information in the following pages.
Before you can listen to your favourite music with your Rio you must
first:
1
2
3
Install the battery.
Install the Rio software from the CD-ROM.
Connect the Rio to the USB port on your computer.
The Getting Started Guide shows you the basics of how to set up and
start using your Rio. Do you want to learn more?
• Check out the Rio User Guide on the CD-ROM for in-depth
information on using your Rio, frequently asked questions,
warranty information, a glossary of digital audio terms, and more.
Page 12

MultilingualPrismPTI.book Page 4 Tuesday, March 6, 2001 8:30 PM
TM
Introduction
Page 4
• Click on the Rio Audio Manager or SoundJam software Help
menus for detailed instructions on using the software to download
digital audio tracks, convert tracks from CD-ROM or transfer
tracks to and from your Rio.
• Visit the Rio Web site at: www.riohome.com
Important information
This product was designed to meet the requirements applicable to the
following Directives:
Low Voltage Directive
Low Voltage Directive ( 72/23/EEC ) as modified by amending
Low Voltage DirectiveLow Voltage Directive
Directive ( 93/68/EEC ) thereby covering the standards of:
• IEC 950 / EN60950 2nd Edition, 1991+Amd.1, 1992+Amd.2,
1993+Amd.3, 1995+Amd.4, 1996. Safety Requirements of
Information Technology Equipment
• IEC 60065 6th Edition, 1998-07 Audio, Video and Similar
Electronic apparatus Safety requirements
EMC Directive
EMC Directive ( 89/336/EEC ) as modified by amending Directive
EMC DirectiveEMC Directive
( 93/68/EEC )
Page 13

MultilingualPrismPTI.book Page 5 Tuesday, March 6, 2001 8:30 PM
TM
Introduction
Page 5
• EN55022: 1998, Information technology equipment-Radio
disturbance characteristics-Limits and methods of measurement
• EN55024: 1998, Information technology equipment-Immunity
characteristics-Limits and methods of measurement
• EN50082-1: 1998, Electromagnetic compatibility-Generic
Immunity Standard Part1
• EN50332-1: 2000, Maximum Sound Pressure level measurement
methodology and limit considerations
Warning
• Risk of electric shock—Do not open
Risk of electric shock—Do not open. To avoid potential electric
Risk of electric shock—Do not openRisk of electric shock—Do not open
shock, do not disassemble or modify your Rio. No user-serviceable
parts are inside. Refer servicing to qualified personnel.
• To reduce the chance of shock or injury, do not use or operate
your Rio in or near water or wet locations. Do not spill liquid on
your Rio.
• Do not use in places exposed to strong magnetic or electrostatic
fields (close to TV or speakers). Do not use in places where the
humidity is excessively low.
Page 14

MultilingualPrismPTI.book Page 6 Tuesday, March 6, 2001 8:30 PM
TM
Introduction
Page 6
Caution
• Batteries may explode or leak if disposed of in fire, mixed with a
different battery type, inserted backwards or disassembled. See the
Rio User Guide Accessories section for a list of approved Rio 600
replacement alkaline batteries.
• Use of headphones while operating a vehicle is not recommended
and is illegal in some areas. Be careful and attentive while driving,
biking or walking near traffic. Stop listening to your Rio if you find
it disruptive or distracting while operating any type of vehicle. To
listen to your Rio in the car, use the car cassette adapter accessory.
• Listening to music at full power over extended periods of time can
damage your hearing. If you experience ringing in your ears,
discontinue use!
Care of your Rio
• Exposure to extreme hot or cold temperatures may cause damage to
your Rio or cause it to malfunction. Do not expose your Rio to
direct sunlight continuously or leave it in a vehicle with the doors
and windows closed. The case may become deformed, discolored
or malfunction. Do not use your Rio near open flame.
Page 15

MultilingualPrismPTI.book Page 7 Tuesday, March 6, 2001 8:30 PM
TM
Introduction
Page 7
• If moving from a cold environment to a warm environment, let the
Rio’s temperature stabilize before operation.
• Keep dirt, sand, dust and moisture from entering your Rio. Do not
use in areas of excessive dust. Do not use in places where the
humidity is excessively high.
• Do not drop or subject your Rio to shock.
• If radio or TV interference occurs near such devices move your Rio
away from them.
• Do not clean your Rio with solvents, chemicals or abrasive
cleaners. If necessary, use a soft cloth to clean your Rio.
Page 16

MultilingualPrismPTI.book Page 8 Tuesday, March 6, 2001 8:30 PM
TM
Setting up your Rio
Page 8
Setting up your Rio
Step 1: Unpack package contents
The Rio 600 package includes the following items:
• Rio 600 portable digital audio player with battery backpack and
RioTone
• One AA-size alkaline battery.
• Earphones.
TM
colour cover.
• Getting Started Guide.
• Software CD-ROM.
• Universal Serial Bus (USB) cable.
• Carrying case.
• Other printed materials.
Page 17
MultilingualPrismPTI.book Page 9 Tuesday, March 6, 2001 8:30 PM
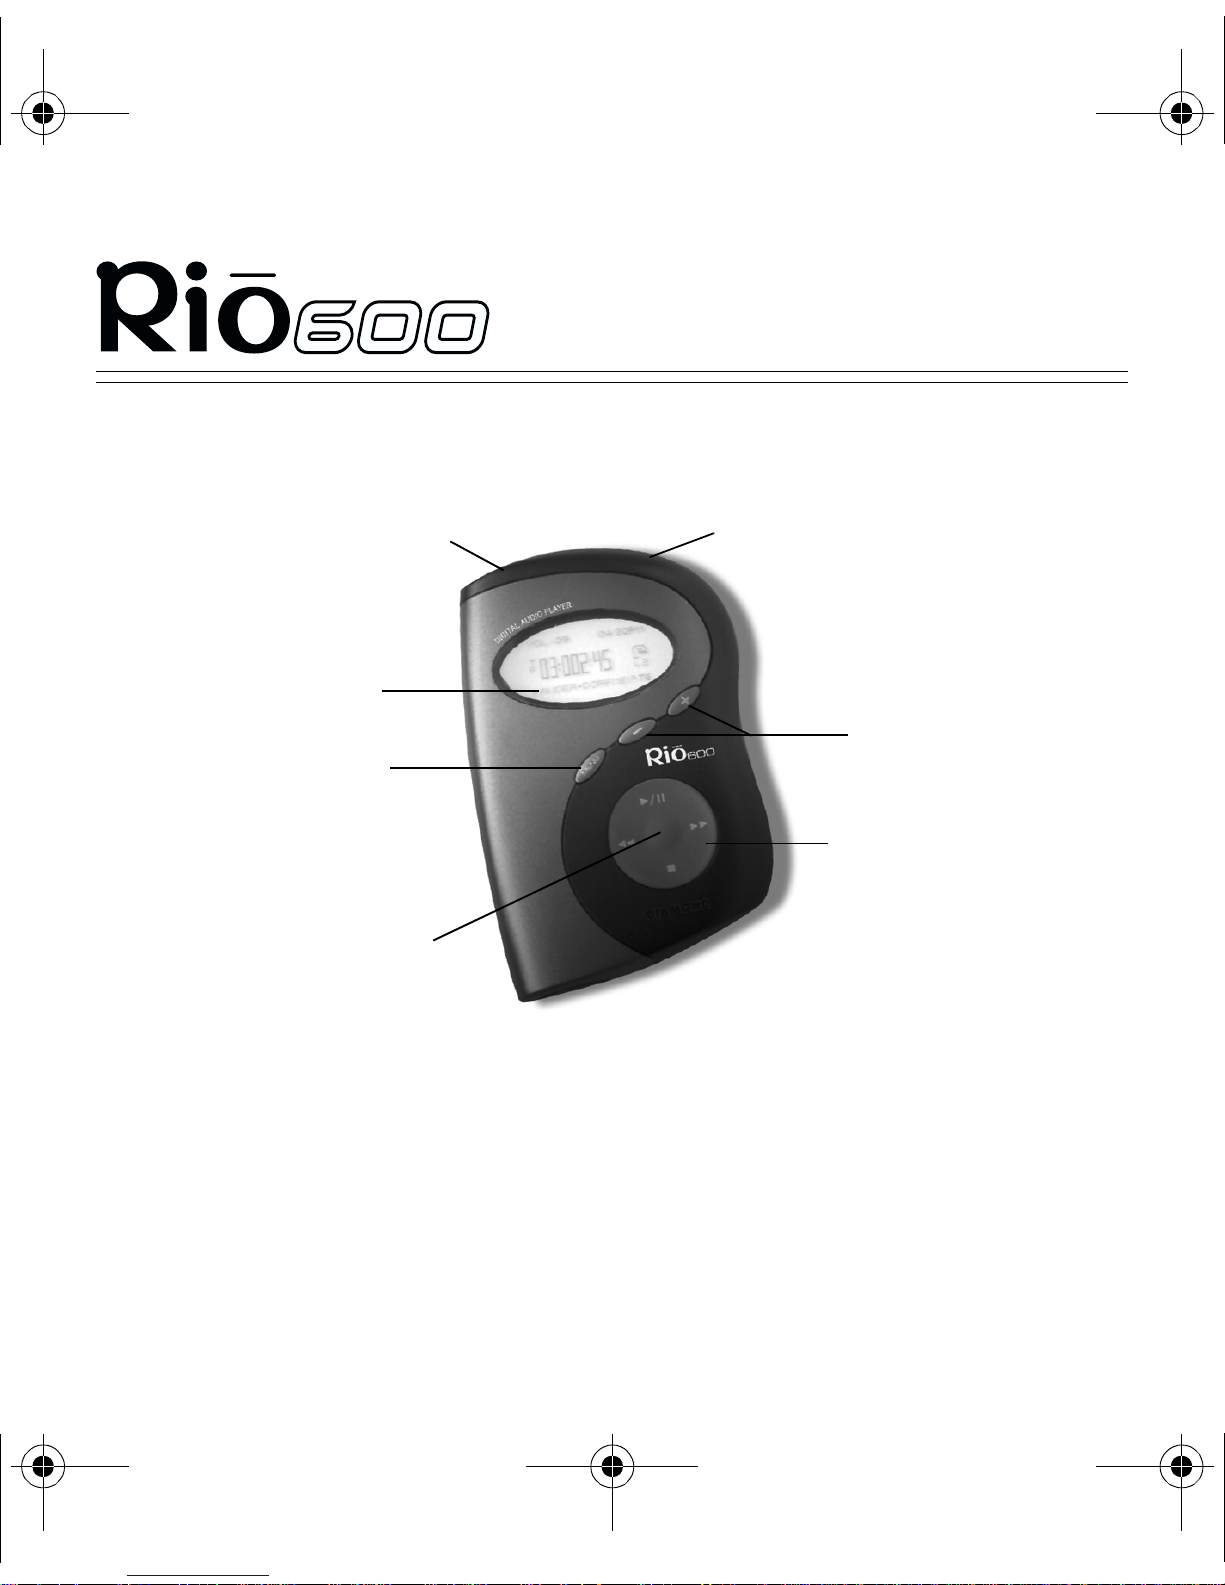
Using your Rio
Multifunction port
LCD
Menu
TM
Setting up your Rio
Page 9
On/Hold/Off
Volume
Joypad
Select
Joypad includes (clockwise from top) Play/Pause >/||,
Forward >>, Stop ■, Reverse <<, and Select.
Page 18

MultilingualPrismPTI.book Page 10 Tuesday, March 6, 2001 8:30 PM
TM
Setting up your Rio
Page 10
Using buttons and controls
• On/Hold/Off (Power): Slide this switch on top of your Rio to turn
the power on and off or to put the Rio settings in Hold mode. Hold
temporarily locks all buttons on your Rio except the Power switch.
• Multifunction port: Plug the headphones or the USB cable into
this port on top of the Rio.
•
• Menu: Press Menu to display Audio, Player, Prefs and About
+
and
-
(Volume): Press + to increase the volume; press - to
decrease the volume.
options. Press
>/||, >>, ■,
and
options. Press Select to select a menu option.
Note: For step-by-step instructions on using Rio menu options and
settings, see the Rio 600 User Guide on the CD-ROM.
• Joypad clockwise from the top:
(Play/Pause): In play mode, press >/|| once to play a track;
•
>/||
press it again to pause. When paused, the play/pause icon
appears as two flashing vertical bars on the LCD. If your Rio is
left in Pause mode for an extended period of time, it goes into
<<
to navigate through the menu
Page 19
MultilingualPrismPTI.book Page 11 Tuesday, March 6, 2001 8:30 PM
TM
Setting up your Rio
Page 11
sleep mode to conserve battery life. Press >/|| to reactivate your
Rio from sleep mode.
>>
•
(Forward): In play mode, press and release >> to skip to
the next track on your Rio. Press and hold >> to fast-forward
through the track currently playing.
• ■ (Stop): In play mode, press ■ to stop playing the current
track. Press and hold ■ for about two seconds to switch your
Rio to sleep mode to conserve battery life.
•
<<
(Reverse): In play mode, press and release << to skip to the
beginning of the track currently playing on your Rio. Press and
hold << to fast-rewind through the current track
• Select (the centre button on the joypad): In Menu mode, press
Select to choose a menu or dialog option.
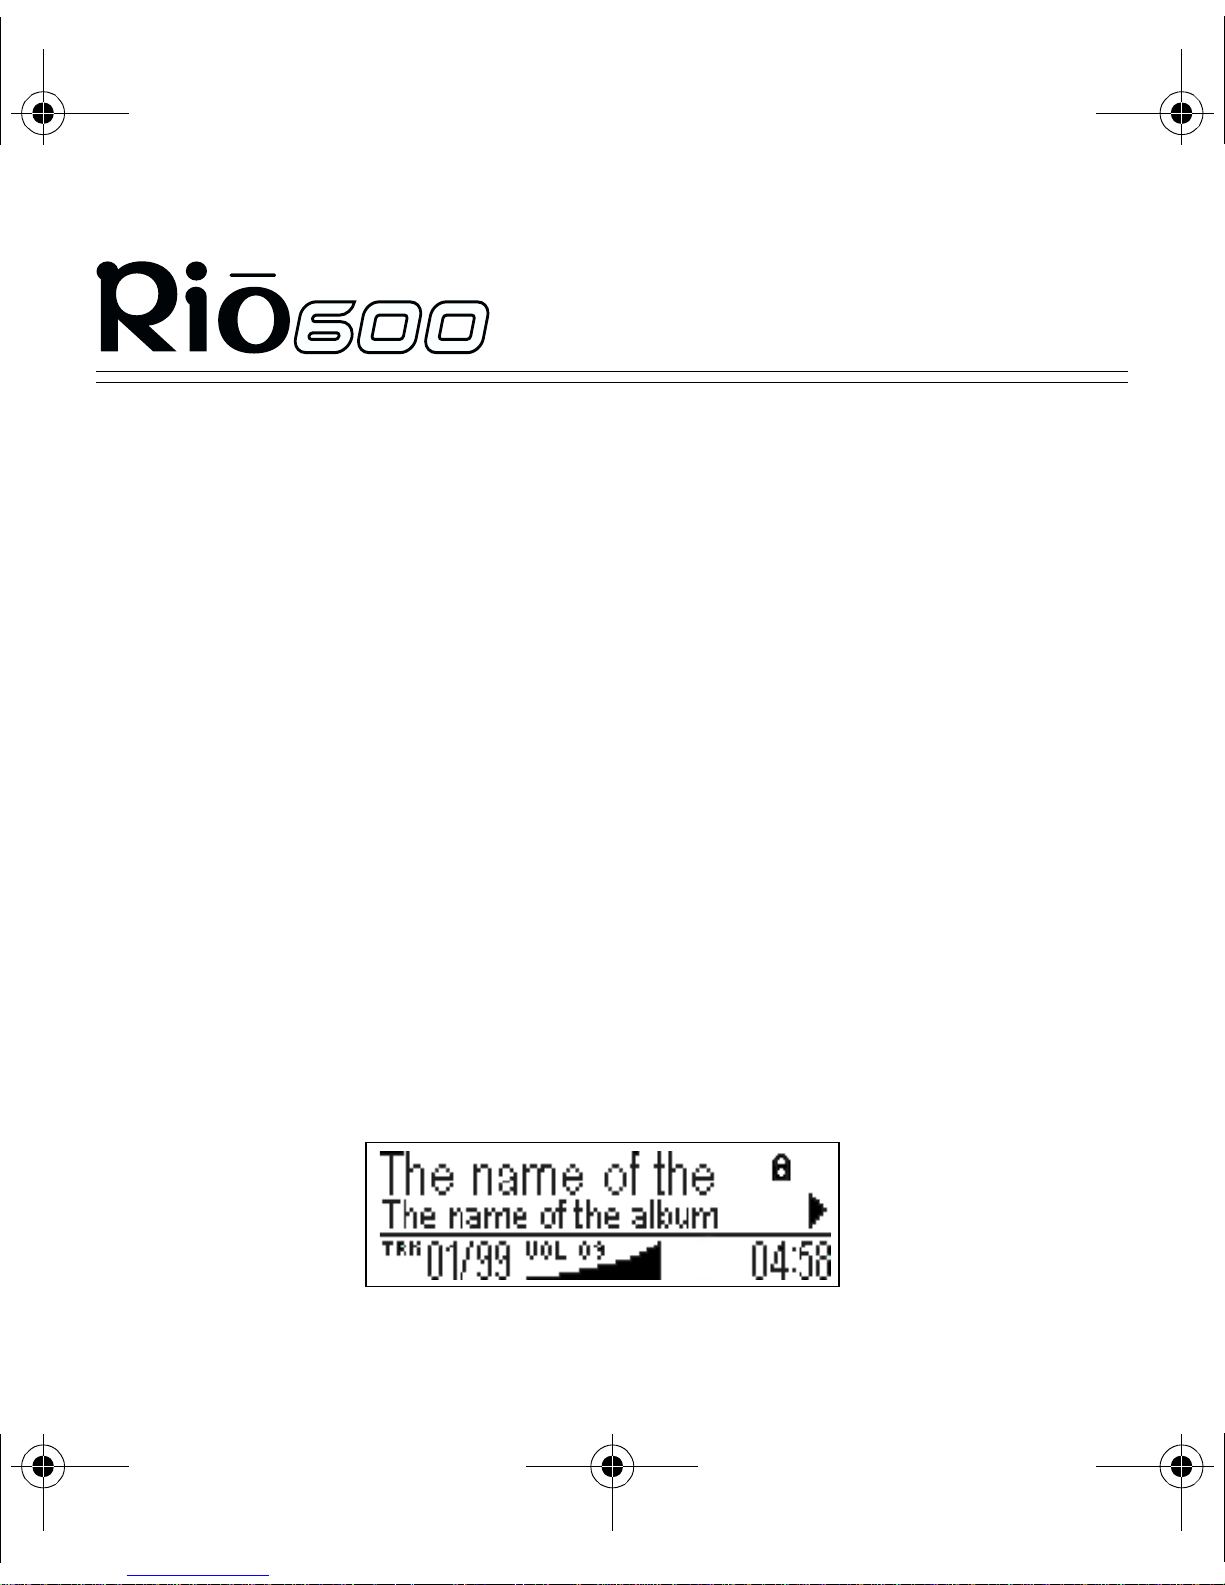
• Liquid Crystal Display (LCD): In play mode, the LCD provides
the following information—clockwise from top left:
Page 20

MultilingualPrismPTI.book Page 12 Tuesday, March 6, 2001 8:30 PM
TM
Setting up your Rio
Page 12
• Song name: Displays the title of the currently selected track.
• Hold icon (lock): Appears if the player is set to Hold mode.
Play/Pause icon: Displays either a “play” icon (triangle) or a
“pause” icon (two vertical bars), to show the current action of
the player.
• Divider line: Serves as a visual break to organise the display.
• Current song position: Displays the play location in the current
track in minutes:seconds (mm:ss) form.
• Volume level: Displays the volume setting in both digital and
graphic form. Volume level ranges from 0-20.
• Track display: Displays the number of the currently selected
track and the total number of tracks on the player.
• Album name/track information/artist name: Displays album
name, track information, and artist name. Album name is
displayed for a few seconds, followed by track information,
followed by artist name. Track information includes the codec
type (MP3, WMA and so on), the bit rate (XXX kbps) and the
file size (XX:XX MB).
Page 21
MultilingualPrismPTI.book Page 13 Tuesday, March 6, 2001 8:30 PM
TM
Step 2: Power up your Rio
1
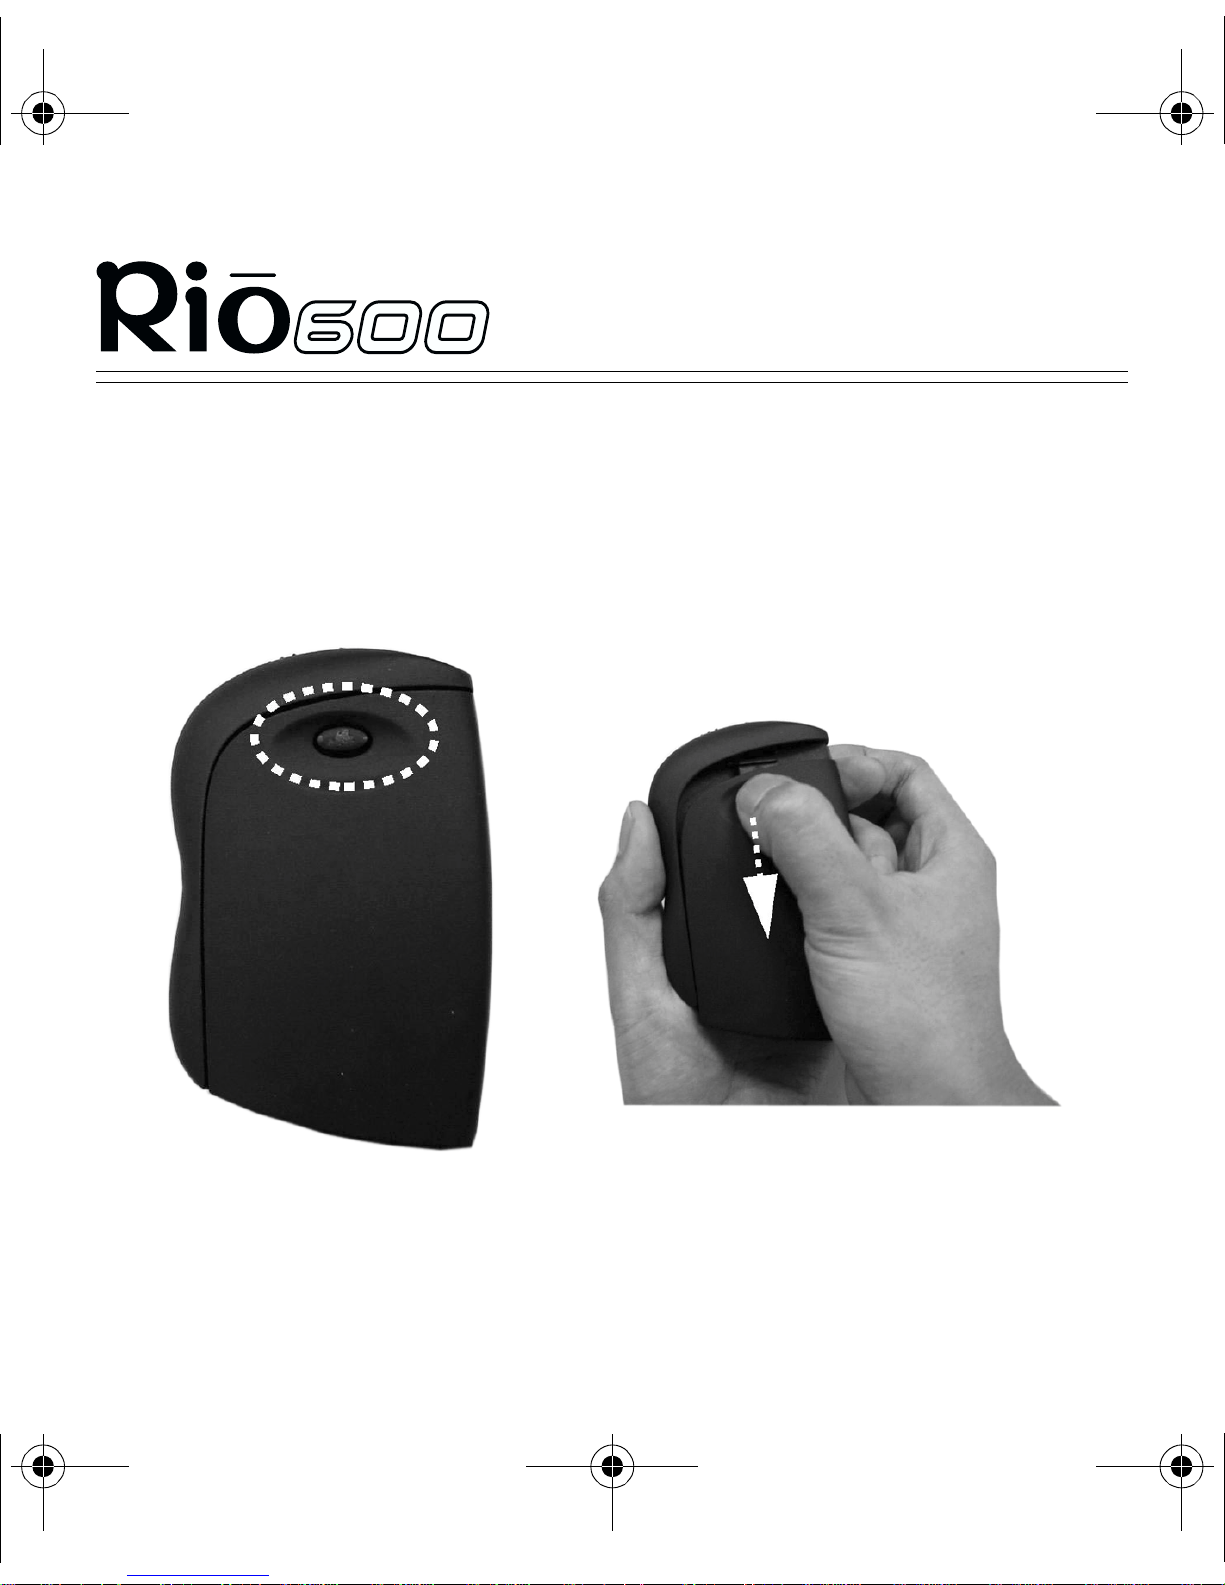
2
Firmly press the button on the back of the Rio 600 and slide the
backpack towards the bottom of the player to detach the backpack.
Remove the backpack from the Rio 600.
Setting up your Rio
Page 13
Tip: The serial number (S/N) required to register your Rio is
located on the back of the Rio under the backpack.
Page 22
MultilingualPrismPTI.book Page 14 Tuesday, March 6, 2001 8:30 PM
3
TM
Setting up your Rio
Page 14
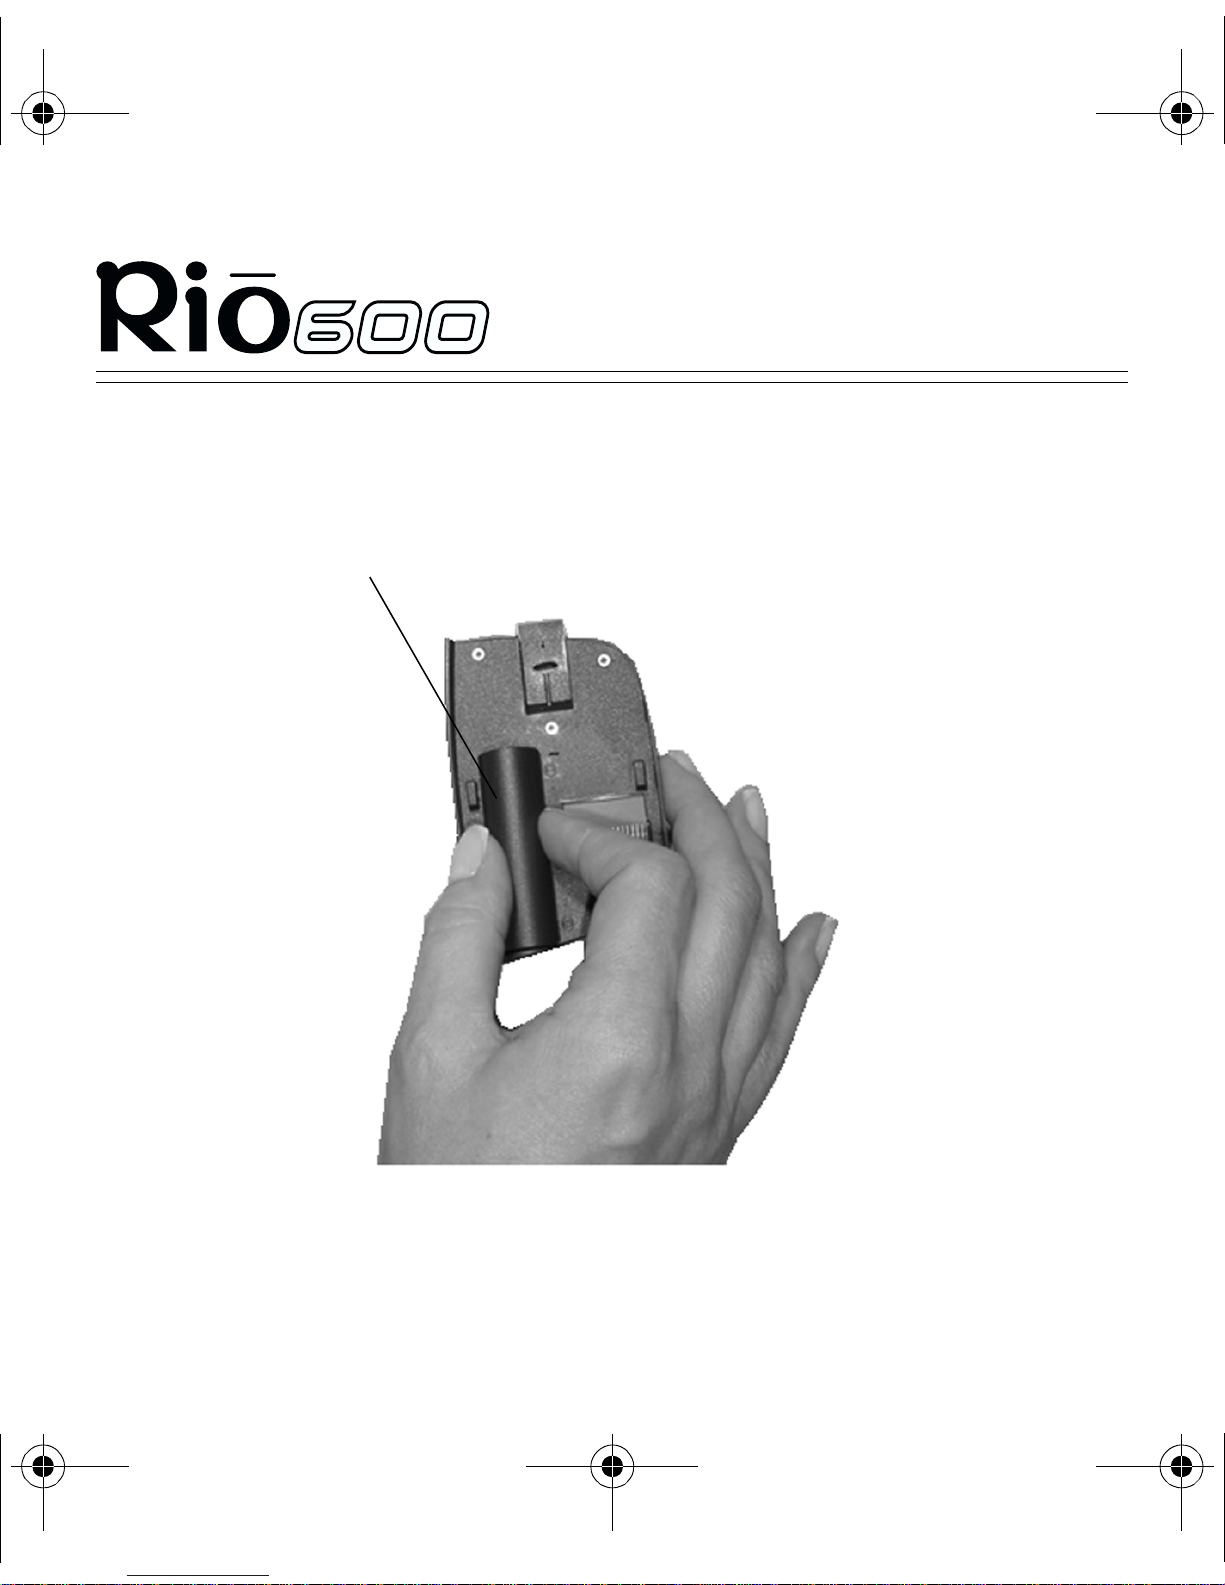
Remove the cover over the backpack battery compartment. Lightly
squeeze the cover to unsnap the tabs that hold it in place.
Battery compartment cover
Page 23
MultilingualPrismPTI.book Page 15 Tuesday, March 6, 2001 8:30 PM
4
5
TM
Setting up your Rio
Page 15
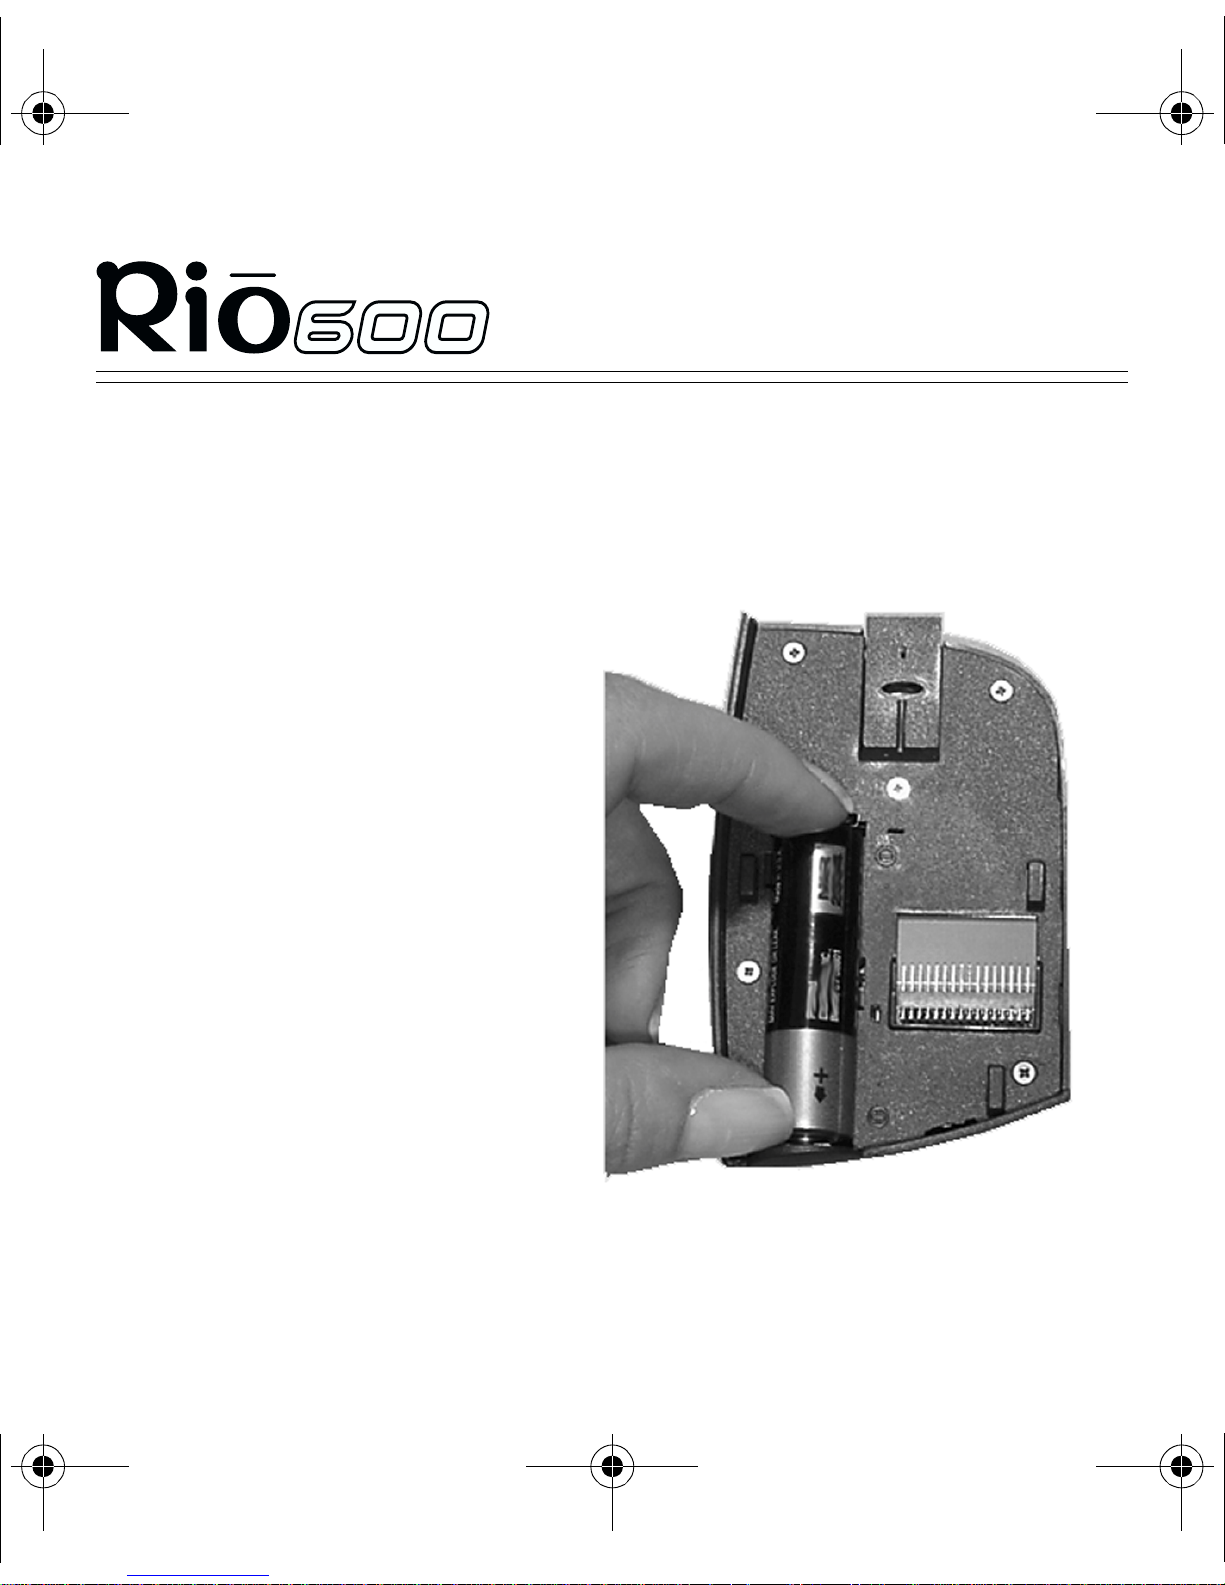
Insert the AA-size alkaline battery into the backpack battery
compartment. Match the + and - ends on the battery to the symbols
shown beside the battery compartment.
Replace the battery
compartment cover. Lightly
squeeze the cover and
position the two small tabs
first, then snap the large tab
into place.
6
7
Reattach the backpack to the
Rio. Slide the backpack
from the bottom of the
player towards the top.
Plug the earphones into the
port on top of the Rio, slide
the power switch to On, and
press
>/||
(Play/Pause) to
listen to the introduction
message.
Page 24
MultilingualPrismPTI.book Page 16 Tuesday, March 6, 2001 8:30 PM
TM
Step 3: Install the software
PC
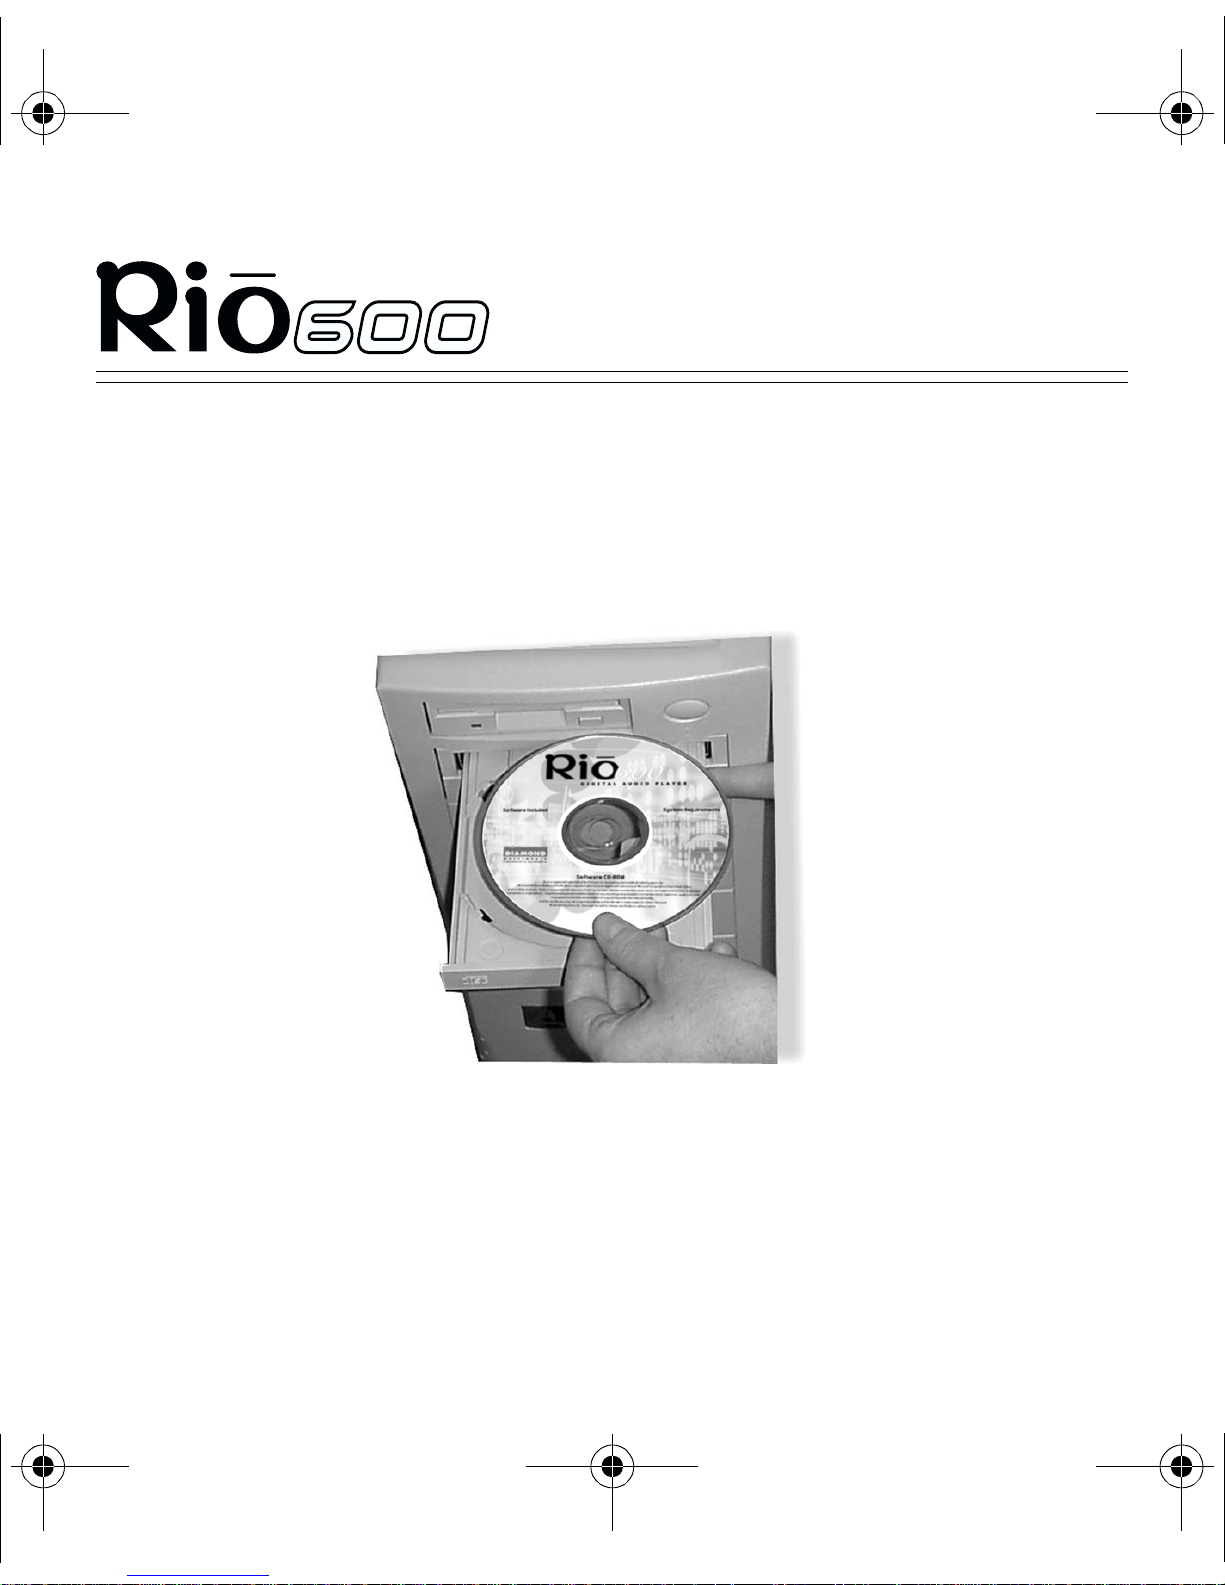
1
Place the software CD in the CD-ROM drive on your computer.
After a few seconds, the installation menu is displayed.
Setting up your Rio
Page 16
2
3
4
Select your language.
Click on the Install option in the installation menu. Select Rio
Audio Manager. Follow the on-screen instructions.
Reboot your computer when installation is complete.
Page 25
MultilingualPrismPTI.book Page 17 Tuesday, March 6, 2001 8:30 PM
TM
If the installation menu is not displayed automatically, follow these
steps to begin installation manually:
1
2
3
Click on the Start button in the bottom left corner of the computer
screen and select Run...
Type d:\setup32.exe in the field marked Open. If your computer’s
CD-ROM drive uses a letter other than “d”, substitute that letter
for “d”.
Click on the OK button and follow the on-screen instructions.
Setting up your Rio
Page 17
Mac
1
2
3
4
5
6
Place the software CD in the CD-ROM drive on your computer.
The CD contents are displayed automatically. To manually display
the CD contents, double-click on the icon on your computer’s
desktop.
Double-click on the Install button. The installation menu is displayed.
Choose your language.
Click on the SoundJam button to begin installation.
Reboot your computer when installation is complete.
Page 26

MultilingualPrismPTI.book Page 18 Tuesday, March 6, 2001 8:30 PM
TM
Setting up your Rio
Step 4: Plug in the USB cable
1
2
Page 18
1
2
Tip: The Rio 600 USB connection can only be inserted one way. Do not
try to force the connection.
Plug one end of the USB cable into the multifunction port on top of
the Rio.
Plug the other end of the USB cable into the USB port on your
computer. On the Mac, the USB port is typically located on the
keyboard.
Page 27

MultilingualPrismPTI.book Page 19 Tuesday, March 6, 2001 8:30 PM
TM
Setting up your Rio
Page 19
Step 5: Register your Rio and software
To register your Rio, click on the Register button in the installation
menu. Remove the backpack to see the serial number (S/N) located on
the back of the Rio player under the backpack.
You can complete software registration during installation or at a later
date. For online software registration, your Rio must be connected to the
computer with the USB cable and turned on.
Rio Audio Manager allows 50 MP3 encodes prior to a free upgrade that
unlocks the software for unlimited MP3 encoding. The default setting
for encoding CDs, WMA, is unlimited requires no upgrade. In addition,
to unlock unlimited CD writing after the first 25 tracks, you must
upgrade Rio Audio Manager for a small fee. To upgrade and register
Rio Audio Manager, click the software Help menu, then click Upgrade
Online
Online. Register the software on each computer you plan to use it with.
OnlineOnline
Upgrade
Upgrade Upgrade
The SoundJam software prompts you to register online when you first
open the program. SoundJam allows you to convert 50 free tracks from
CD-ROM prior to registration.
Page 28

MultilingualPrismPTI.book Page 20 Tuesday, March 6, 2001 8:30 PM
TM
Setting up your Rio
Page 20
Step 6: Check out the User Guide
Do you want to learn more about your Rio? Click on the User Guide
button in the installation menu. The User Guide contains:
• Detailed instructions on using Rio 600 menu options and settings.
• Accessory information.
• A glossary of digital audio terms.
• Frequently asked questions (FAQ) and troubleshooting
information.
• Warranty and regulatory information.
• Customer care information.
Tip: Use Adobe Acrobat Reader version 4.0—available on the Rio
software CD-ROM—to view the User Guide. The User Guide is in the
Manual folder on the CD-ROM.
Page 29

MultilingualPrismPTI.book Page 21 Tuesday, March 6, 2001 8:30 PM
TM
Using the Rio software
Page 21
Using the Rio software
Rio Audio Manager (PC)
The Rio Audio Manager creates, stores and organises your digital audio
tracks. The software incorporates tools for you to manage digital audio
content from your PC. Click on the buttons along the top of the Rio
Audio Manager window to use the various tools. Use Rio Audio
Manager to:
• Create and organise the audio content on your computer.
• Organise the audio content on your Rio.
• Write an audio CD. Rio Audio Manager allows you to write 25
tracks to CD free of charge. Note: To unlock unlimited CD writing,
you must upgrade the software for a small fee.
• Create compressed digital audio tracks from your music CDs. You
can convert your entire CD collection into compressed digital
format. Note: The software allows 50 free MP3 encodes prior to a
free upgrade that unlocks Rio Audio Manager for unlimited MP3
encoding.
• Search for and download digital audio from the Internet.
Page 30
MultilingualPrismPTI.book Page 22 Tuesday, March 6, 2001 8:30 PM
TM
Using the Rio software
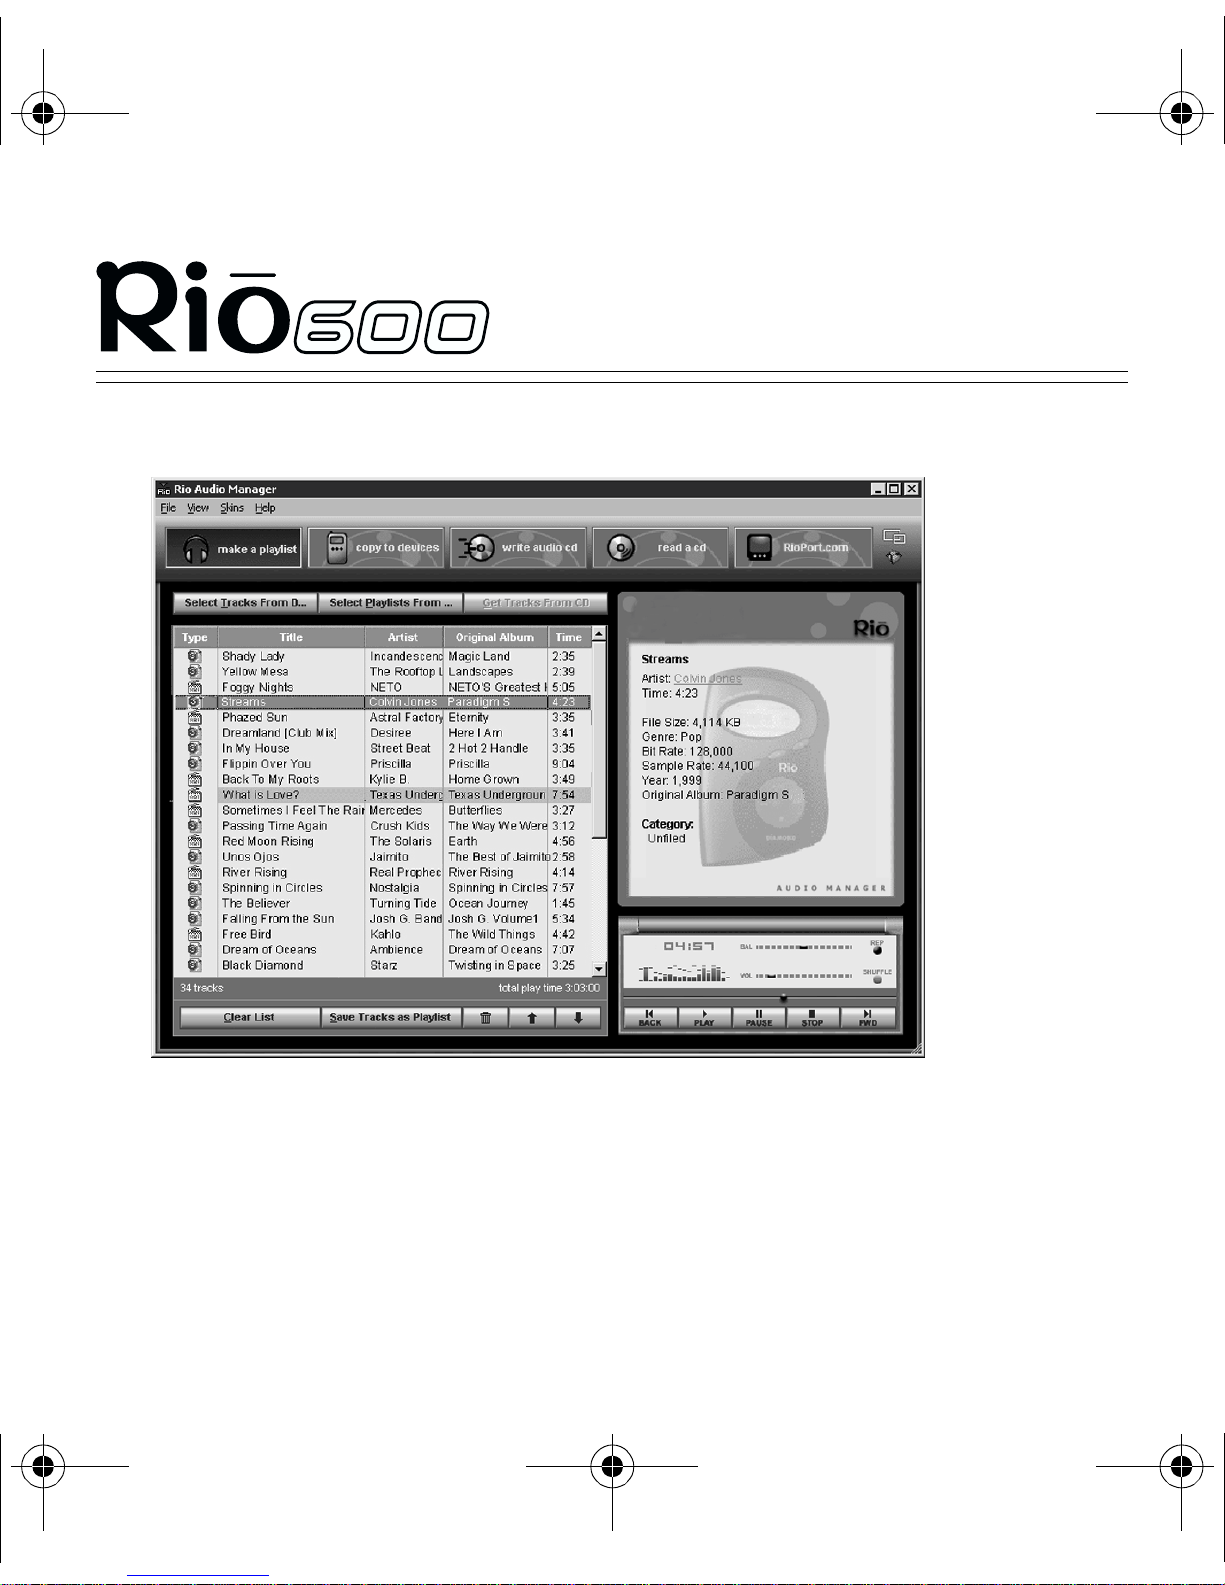
Rio Audio Manager main window
Page 22
Tip: For in-depth instructions on using Rio Audio Manager, click
on the software Help menu, then click on Help Topics.
Page 31

MultilingualPrismPTI.book Page 23 Tuesday, March 6, 2001 8:30 PM
TM
Using the Rio software
Page 23
Rio Audio Manager buttons
Make a playlist
Click on this button to organise audio tracks on your computer into
playlists. Listen to playlists directly from your PC.
1
2
3
Click on the make a playlist button. The empty window is
displayed.
Click on the Select Tracks from Database or the Select Playlists
from Database button.
Select tracks you wish to listen to by clicking on the check box to
4
the left of the song title. Scroll down as necessary to find a track.
Click on the OK button. The main screen displays the selected
tracks.
Page 32

MultilingualPrismPTI.book Page 24 Tuesday, March 6, 2001 8:30 PM
TM
Using the Rio software
Page 24
Copy to devices
Click on this button to organise the content on your Rio. Download
tracks to your Rio for playback on the go.
1
2
3
4
Plug the USB cable into the multifunction port on top of the Rio
600; plug the other end of the cable into the USB port on your PC.
Slide the power switch on top of the Rio to On.
Click on the copy to devices button.
Click on the Select Tracks from Database or the Select Playlists
from Database button.
5
6
7
Select the tracks you want to download from your playlist by
clicking on the check box to the left of the song title.
Click on the OK button.
Click on the Copy to Portable button.
Page 33

MultilingualPrismPTI.book Page 25 Tuesday, March 6, 2001 8:30 PM
TM
Using the Rio software
Page 25
Write an audio CD
Create custom CDs from your favourite tracks and playlists stored in the
database. See the Rio Audio Manager online help topics, and your
computer’s software and hardware documentation for detailed
instructions on writing audio CDs.
Read a CD
Take your favourite songs from a CD and convert them into compressed
digital audio tracks for playback on your Rio or PC. Click on the Get
Track Titles button to connect to the Gracenote Web site—formerly CD
Database (CDDB)—for title, artist and track information.
1
2
3
4
Insert an audio CD in your computer’s CD-ROM drive.
The software prompts you to go online to the Gracenote Web site.
• If you have an Internet connection, click on Ye s to immediately
connect to Gracenote.
• If you do not have an Internet connection, click on No.
Select the tracks you want to convert by clicking on the check box
to the left of the song title.
Click on the Start Reading button.
Page 34

MultilingualPrismPTI.book Page 26 Tuesday, March 6, 2001 8:30 PM
TM
Using the Rio software
Page 26
Rioport.com
The built-in Internet browser connects you to sites such as the RioPort
Web site at www.rioport.com. Search for your favourite audio tracks
on the Web and download them directly to your computer.
To download a track from the RioPort Web site:
1
2
Click on the title.
Click on the Download button.
Use the help system to learn more
The Rio Audio Manager software includes a complete online Help
manual. To learn more about using Rio Audio Manager:
1
2
3
Click on the Help Menu at the top of the Rio Audio Manager
screen.
Click on Help Topics.
Click on the topic you are interested in for detailed step-by-step
instructions on using Rio Audio Manager.
Page 35

MultilingualPrismPTI.book Page 27 Tuesday, March 6, 2001 8:30 PM
TM
Using the Rio software
Page 27
SoundJam MP (Mac)
SoundJam MP player and encoder converts music into compressed
digital quality MP3s from CD, MP2, AIFF, QuickTime™, SMD, Sound
Designer and WAV formats. The SoundJam software allows 50 free
tracks converted from CD-ROM prior to registration.
Master Playlist
Use the Master Playlist editor to:
• Search your audio collection stored on your Mac.
• Build and manage custom playlists.
Page 36

MultilingualPrismPTI.book Page 28 Tuesday, March 6, 2001 8:30 PM
TM
Using the Rio software
Main Window
Use the SoundJam MP Main Window to:
• Listen to audio on your Mac.
• Play music files from your playlist or CD-ROM.
Page 28
Page 37

MultilingualPrismPTI.book Page 29 Tuesday, March 6, 2001 8:30 PM
TM
Using the Rio software
Page 29
Converter
Use the Converter window to:
• Encode audio CDs.
• Save tracks into MP3 format to be transferred to and played on the
Rio.
Page 38

MultilingualPrismPTI.book Page 30 Tuesday, March 6, 2001 8:30 PM
TM
Using the Rio software
Page 30
Rio 600 Connector
Use the Rio 600 Connector window to:
• Manage the content on your Rio.
• Export audio to the Rio. Choose the track or playlist by selecting
“Add...” or drag the desired track to the view window.
Use the Help system to learn more
The SoundJam software includes online Help. To learn more about
using the SoundJam MP software:
1
Click on the Help Menu.
2
Select SoundJam MP Help.
• Click on the topic you are interested in for detailed step-by-
step instructions.
• Click on How To Use This Help System to understand the
basics of using SoundJam Help.
For more information about SoundJam, visit the SoundJam Web site at
www.soundjam.com
Page 39

MultilingualPrismPTI.book Page 31 Tuesday, March 6, 2001 8:30 PM
Accessing customer care
Hours of Operation
Monday to Friday
8.00 until 19.00 GMT
Saturday
8.00 until 15.00 GMT
Telephone Support all Products
+44-(0)870-870-5727
TM
Accessing customer care
Page 31
Postal Address
SONICblue/Diamond
European Customer Care Center
P.O. Bo x 52
7500 AB Enschede
The Netherlands
Fax Support- all Products
+31-53-484-9536
Web site
http://www.diamondmm.co.uk
Page 40

MultilingualPrismPTI.book Page 32 Tuesday, March 6, 2001 8:30 PM
Page 41

MultilingualPrismPTI.book Page 33 Tuesday, March 6, 2001 8:30 PM
TM
MANUEL D’UTILISATION
Page 42

MultilingualPrismPTI.book Page 34 Tuesday, March 6, 2001 8:30 PM
TM
Page 34
Manuel d’utilisation — Rio 600
©
2000-2001 SONICblue, Incorporated. Tous droits réservés.
SONICblue, Incorporated n’assume aucune responsabilité concernant
les erreurs ou omissions qui se seraient glissées dans ce document ni ne
s’engage à mettre à jour les informations qu’il contient.
Rio est une marque déposée de RioPort, Inc. aux États-Unis ou dans
d’autres pays et est utilisée sous licence.
Microsoft, Windows Media et le logo Windows sont
des marques commerciales ou déposées de
Microsoft Corporation aux États-Unis ou dans
d’autres pays.
Toutes les autres marques sont la propriété des
sociétés qui leur sont associées.
Quatrième édition, février 2001.
Référence nº 52260029-004
Page 43

MultilingualPrismPTI.book Page 35 Tuesday, March 6, 2001 8:30 PM
TM
Introduction
Page 35
Introduction
Merci d’avoir acheté le lecteur audionumérique portable Rio 600 ! Rio
est le compagnon indispensable des personnes actives en leur
permettant d’écouter de la musique sans le moindre saut. Le Rio se
connecte facilement sur un PC ou un Macintosh pour télécharger des
pistes audionumériques compressées. Utilisez le logiciel Rio pour
convertir les pistes de vos CD audionumériques en format lisible sur le
Rio ou pour télécharger des morceaux de musique de l’Internet.
Prenez quelques minutes pour lire les pages suivantes. Avant d’écouter
votre musique préférée avec le Rio, vous devez d’abord :
1
2
3
installer la pile ;
installer le logiciel Rio à partir du CD-ROM ;
connecter le Rio au port USB de votre ordinateur.
Ce Manuel d’utilisation explique comment installer et démarrer le Rio.
Voulez-vous en savoir plus ?
• Reportez-vous au manuel d’utilisation Rio sur le CD-ROM pour
obtenir des détails sur l’utilisation de l’appareil, les questions les
plus fréquemment posées, les informations concernant la garantie,
le glossaire des termes audionumériques, etc.
Page 44

MultilingualPrismPTI.book Page 36 Tuesday, March 6, 2001 8:30 PM
TM
Introduction
Page 36
• Cliquez sur les menus d’aide des logiciels Rio Audio Manager ou
SoundJam pour obtenir des instructions détaillées sur l’utilisation
de ces logiciels, et notamment sur le téléchargement des pistes
audionumériques, la conversion des pistes de CD-ROM ou le
transfert des pistes à destination ou en provenance du Rio.
• Visitez le site Web de Rio à l’adresse www.riohome.com
Informations importantes
Ce produit a été conçu pour répondre aux normes des directives
suivantes :
Directive de basse tension
Directive de basse tension (72/23/CEE), modifiée par la directive
Directive de basse tensionDirective de basse tension
amendée (93/68/CEE), couvrant les normes suivantes :
• IEC 950 / EN60950 2
e
Édition, 1991+Amd.1, 1992+Amd.2,
1993+Amd.3, 1995+Amd.4, 1996. Exigences de sécurité des
équipements des technologies de l’information
e
• EC 60065 6
Édition, 1998-07. Exigences de sécurité des appareils
audio, vidéo et autres appareils électroniques
Directive EMC
Directive EMC (89/336/CEE) modifiée par la directive amendée
Directive EMCDirective EMC
(93/68/CEE)
Page 45

MultilingualPrismPTI.book Page 37 Tuesday, March 6, 2001 8:30 PM
TM
Introduction
Page 37
• EN55022 : 1998, Limites et méthodes de mesure des caractéristiques
d’interférences radioélectriques liées aux équipements des technologies de
l’information)
• EN55024 : 1998, Limites et méthodes de mesure des caractéristiques
d’immunité liées aux équipements des technologies de l’information.
• EN50082-1 : 1998, Compatibilité électromagnétique, norme d’immunité
générique, section 1
• EN50332-1 : 2000, Considérations sur les limites et les méthodes de
mesure des niveaux de pression acoustique maximum
Avertissement
Risque d’électrocution : ne pas ouvrir
•
Risque d’électrocution : ne pas ouvrir
Risque d’électrocution : ne pas ouvrirRisque d’électrocution : ne pas ouvrir
. Pour éviter les risques
d’électrocution, le Rio ne doit pas être démonté ou modifié. Il ne contient
pas de pièces réparables par l’utilisateur. L’entretien et les réparations
doivent être effectués par un personnel qualifié.
• Pour éviter les risques d’électrocution et de blessures, le Rio ne doit jamais
être utilisé ou manipulé dans l’eau ou à proximité d’emplacements
humides. Ne pas verser de liquide sur le Rio.
• Ne pas placer le Rio à proximité de champs électrostatiques ou
magnétiques puissants (près d’un téléviseur ou de haut-parleurs
par exemple). Ne pas utiliser dans un endroit où le taux d’humidité est
extrêmement faible.
Page 46

MultilingualPrismPTI.book Page 38 Tuesday, March 6, 2001 8:30 PM
TM
Introduction
Page 38
Attention
• Les piles sont susceptibles d’exploser ou de fuir quand elles sont
détruites par le feu ; elles ne doivent pas être mélangées à d’autres
types de piles, montées à l’envers ni ouvertes. Se reporter à la
section Accessoires du manuel d’utilisation Rio pour la liste des
piles alcalines de rechange agréées pour le Rio 600.
• Usage des écouteurs au volant d’un véhicule n’est pas recommandé ;
il est illégal dans certaines régions. Faire preuve de prudence et
d’attention au volant, sur une bicyclette ou en marchant près de la
circulation. Le conducteur doit arrêter le Rio si son fonctionnement
le dérange ou le distrait pendant la conduite du véhicule. Pour
écouter le Rio en voiture, utilisez l’adaptateur d’auto-radio.
• L’écoute de la musique à plein volume pendant des périodes
prolongées peut endommager l’ouïe. Arrêtez de vous servir du Rio
en cas de problèmes auditifs !
Page 47

MultilingualPrismPTI.book Page 39 Tuesday, March 6, 2001 8:30 PM
TM
Introduction
Page 39
Entretien du Rio
• Exposition à des températures extrêmes chaudes ou froides risque
d’endommager ou d’entraîner le mauvais fonctionnement du Rio. Ne
pas exposer le Rio aux rayons du soleil pendant une période
prolongée ou ne pas le laisser dans un véhicule avec les portes et les
fenêtres fermées. Le boîtier risquerait de se déformer, de se décolorer
ou de mal fonctionner. Ne pas utiliser le Rio à proximité d’une
flamme.
• En cas de passage d’un environnement froid à un environnement
chaud, patientez quelques instants pour permettre la température du
Rio de se stabiliser.
• Ne pas laisser poussière, saleté, grains de sable ou humidité pénétrer
dans le Rio. Ne pas utiliser le Rio dans un endroit trop poussiéreux.
Ne pas utiliser dans un endroit où le taux d’humidité est extrêmement
élevée.
• Ne pas faire tomber ni heurter votre Rio.
• En cas d’interférences radiophonique ou de la télévision, éloignez le
Rio de ces appareils.
• Ne pas nettoyer le Rio en utilisant des solvants, des produits
chimiques ou abrasifs. Pour nettoyer le Rio, utiliser un chiffon doux.
Page 48

MultilingualPrismPTI.book Page 40 Tuesday, March 6, 2001 8:30 PM
TM
Installation du Rio
Page 40
Installation du Rio
Étape 1 : Déballage du coffret
Le coffret du Rio 600 contient les articles suivants :
• Lecteur audionumérique portable Rio 600 avec un module à piles et
un couvercle couleur RioTone
• Une pile alcaline de taille < AA >
• Écouteurs
TM
• Manuel d’utilisation
• CD-ROM des logiciels
• Câble de bus série universel (USB)
• Sacoche de transport
• Autres documents imprimés
Page 49

MultilingualPrismPTI.book Page 41 Tuesday, March 6, 2001 8:30 PM
Utilisation du Rio
Port multifonctions
Affichage à
cristaux liquides
Menu
TM
Installation du Rio
Page 41
On/Hold/Off
(Marche/Maintien/Arrêt)
Volume
Disque
Sélection
Le disque de commande comprend (dans le sens des
aiguilles d’une montre à partir du haut) les commandes
Lecture/Pause > /||, Avance rapide, >>Arrêt ■,
Retour rapide << et Sélection.
Page 50

MultilingualPrismPTI.book Page 42 Tuesday, March 6, 2001 8:30 PM
TM
Installation du Rio
Page 42
Utilisation des touches et des commandes du Rio
• On/Hold/Off (Marche/Maintien/Arrêt) (Alimentation) : Faites
glisser cet interrupteur au sommet du Rio pour allumer et éteindre
l’appareil, ou pour maintenir les réglages du Rio (mode de
maintien). La fonction Hold verrouille temporairement les touches
du Rio à l’exception de la touche d’alimentation.
• Port multifonctions : Branchez les écouteurs ou le câble USB dans
le port multifonctions au sommet du Rio.
•
+ et -
(Volume) : Appuyez sur + pour augmenter le volume ;
appuyez sur
-
pour le baisser.
• Menu : Appuyez sur Menu pour afficher les options de menu
Audio, Player, Prefs, About et Record (Audio, Lecteur, Préférences,
À propos de et Enregistrer). Appuyez sur
>/||, >>, ■ et <<
pour
naviguer parmi les options de menu. Appuyez sur la touche
Sélection pour choisir une option de menu.
Remarque : Reportez-vous au manuel d’utilisation Rio 600 sur le
CD-ROM pour lire des instructions détaillées sur l’utilisation des
réglages et des options de menu du Rio.
Page 51

MultilingualPrismPTI.book Page 43 Tuesday, March 6, 2001 8:30 PM
TM
Installation du Rio
Page 43
• Disque de commande dans le sens des aiguilles d’une montre, en
partant du haut :
(Lecture/Pause) : En mode de lecture, appuyez une fois sur
•
>/||
la touche >/|| pour écouter une piste ; appuyez de nouveau pour
interrompre (pause) la lecture. Pendant une pause, l’icône
Lecture/Pause s’affiche comme deux barres verticales
clignotantes sur l’affichage à cristaux liquides. Si le Rio est
laissé en mode de pause pendant une durée assez prolongée, il
passe automatiquement en mode d’économie d’énergie afin de
prolonger la durée d’utilisation de la pile. Appuyez sur la
touche >/|| pour sortir le Rio du mode d’économie d’énergie.
•
>>
(Avance rapide) : En mode de lecture, appuyez sur la
touche >> puis relâchez-la pour passer à la piste suivante du
Rio. Appuyez sur la touche >> et maintenez-la enfoncée pour
avancer rapidement dans la piste en cours.
• ■ (Arrêter) : En mode de lecture, appuyez une fois sur la
touche ■ pour arrêter l’écoute de la piste en cours. Appuyez
sur la touche ■ et maintenez-la enfoncée pendant à peu près
deux secondes pour faire passer le Rio en mode d’économie
d’énergie afin de prolonger la durée d’utilisation de la pile.
Page 52

MultilingualPrismPTI.book Page 44 Tuesday, March 6, 2001 8:30 PM
TM
Installation du Rio
Page 44
•
<<
(Retour rapide) : En mode de lecture, appuyez sur la
touche << puis relâchez-la pour revenir au début de la piste
actuelle du Rio. Appuyez sur la touche << et maintenez-la
enfoncée pour revenir rapidement dans la piste en cours.
• Sélection (au milieu du disque de commande) : En mode de
menu, appuyez sur la touche Sélection pour choisir une option
de dialogue ou de menu.
• Affichage à cristaux liquides (Ecran LCD) : En mode de lecture,
l’écran LCD fournit les informations suivantes, dans le sens des
aiguilles d’une montre à partir du haut à gauche :
• Nom de la chanson : Affiche le titre de la piste actuellement
sélectionnée.
• Icône Hold (Maintien) : Apparaît si le lecteur est en mode Hold
(Maintien).
Page 53

MultilingualPrismPTI.book Page 45 Tuesday, March 6, 2001 8:30 PM
TM
Installation du Rio
Page 45
• Icône Lecture/Pause : Affiche soit une icône de
“lecture” (un triangle) ou de “pause” (deux barres verticales)
pour indiquer l’action du lecteur.
• Ligne de division : Sert de ligne de rupture visuelle pour
organiser l’affichage.
• Position actuelle de la chanson : Affiche l’emplacement de
lecture dans la piste actuelle, exprimé en nombre de minutes et
de secondes (mm:ss).
• Niveau du volume : Affiche le réglage du volume en format
graphique et numérique. La plage du volume s’étend de
0 á 20.
• Affichage de la piste : Affiche le numéro de la piste
actuellement sélectionnée et le nombre total des pistes sur
le lecteur.
• Nom de l’album / informations sur la piste / nom de l’artiste :
Affiche le nom de l’album, les informations sur la piste et le nom
de l’artiste. Le nom de l’album s’affiche dans ce champ pendant
quelques secondes, suivi du nom de l’artiste. Les informations sur
la piste comprennent entre autres le type de codec (MP3, WMA,
etc.), le taux de compression (XXX kbps) et la taille du fichier
(XX:XX Mo).
Page 54

MultilingualPrismPTI.book Page 46 Tuesday, March 6, 2001 8:30 PM
TM
Étape 2 : Alimentation du Rio
1
2
Appuyez fermement sur la touche á l’arrière du Rio 600 et glissez
le module vers le bas du lecteur pour le détacher.
Retirez le module du Rio 600.
Installation du Rio
Page 46
Conseil : Le numéro de série (S/N) nécessaire pour enregistrer
votre appareil se trouve sur la partie arrière du Rio, sous le module.
Page 55

MultilingualPrismPTI.book Page 47 Tuesday, March 6, 2001 8:30 PM
3
TM
Installation du Rio
Page 47
Retirez le capot recouvrant le compartiment de la pile du module.
Appuyez légèrement sur le capot pour détacher les languettes qui le
maintiennent en place.
Capot du compartiment de la pile
4
Introduisez une pile alcaline AA dans le compartiment de la pile du module
en faisant correspondre les polarités + et - aux symboles apposés à
l’intérieur du compartiment de la pile.
Page 56

MultilingualPrismPTI.book Page 48 Tuesday, March 6, 2001 8:30 PM
5
6
TM
Replacez le capot du
compartiment de la pile.
Pressez légèrement sur le
capot pour introduire les
deux petites languettes en
premier, puis la grosse
en dernier.
Fixez le module au Rio.
Faites le glisser du bas du
lecteur vers le haut.
Installation du Rio
Page 48
7
Branchez les écouteurs dans
le port en haut du Rio, faites
glisser l’interrupteur
d’alimentation électrique
sur On et appuyez sur la
touche
>/||
(Lecture/Pause)
pour écouter le message d’introduction.
Page 57

MultilingualPrismPTI.book Page 49 Tuesday, March 6, 2001 8:30 PM
TM
Installation du Rio
Étape 3 : Installation du logiciel
PC
1
Placez le CD des logiciels dans le lecteur de CD-ROM de votre
ordinateur. Le menu d’installation s’affiche après quelques secondes.
Page 49
2
3
4
Sélectionnez votre langue (français).
Cliquez sur Install sur le menu d’installation. Sélectionnez Rio
Audio Manager. Respectez les consignes qui s’affichent sur
l’ecran ordinateur.
Réamorcez l’ordinateur une fois l’installation terminée.
Page 58

MultilingualPrismPTI.book Page 50 Tuesday, March 6, 2001 8:30 PM
TM
Si le menu d’installation n’apparaît pas directement, effectuez les opérations
suivantes pour lancer l’installation en mode manuel :
1
2
3
Cliquez sur
l’ordinateur et choisissez
Tapez d:\setup32.exe dans le champ
CD-ROM utilise une autre lettre d’identification que “d” sur votre
ordinateur, indiquez la lettre qui convient à la place de “d”.
Cliquez sur
’
écran.
à l
Démarrer
OK
et respectez les consignes qui s’affichent
dans le coin inférieur gauche de l’écran de
Exécuter...
Ouvrir
Installation du Rio
Page 50
. Si le lecteur de
Mac
1
2
3
4
5
6
Placez le CD des logiciels dans le lecteur de CD-ROM de
votre ordinateur.
Le contenu du CD s’affiche automatiquement. Pour afficher manuellement
le contenu du CD, double-cliquez sur l’icône sur le bureau de l’ordinateur.
Double-cliquez sur l’icône
Sélectionnez votre langue (français).
Cliquez sur
Réamorcez l’ordinateur une fois l’installation terminée.
SoundJam
Install
pour lancer l’installation.
. Le menu d’installation apparaît.
Page 59

MultilingualPrismPTI.book Page 51 Tuesday, March 6, 2001 8:30 PM
TM
Installation du Rio
Étape 4 : Branchement du câble USB
1
2
Page 51
1
2
Conseil : La connexion USB du Rio 600 ne s’adapte que dans un sens.
N’essayez pas de forcer la connexion.
Branchez une fiche du câble USB dans le port multifonctions en
haut du Rio.
Branchez l’autre fiche du câble USB dans le port USB de votre
ordinateur. Sur le Macintosh, le port USB est normalement situé sur
le clavier.
Page 60

MultilingualPrismPTI.book Page 52 Tuesday, March 6, 2001 8:30 PM
TM
Installation du Rio
Page 52
Étape 5 : Inscription du lecteur Rio et
des logiciels
Pour enregistrer votre Rio, cliquez sur Register (S’inscrire) sur le menu
d’installation. Enlevez le module pour apercevoir le numéro de série
(S/N) qui se trouve au dos du lecteur Rio, sous le module.
Vous pouvez effectuer l’inscription du logiciel pendant l’installation ou
plus tard. Pour enregistrer le logiciel en ligne, le Rio doit être connecté à
l’ordinateur avec le câble USB et mis sous tension.
Rio Audio Manager permet de convertir 50 pistes MP3 gratuites d’un
CD et d’enregistrer 25 pistes gratuites sur CD avant l’inscription. Pour
enregistrer Rio Audio Manager, cliquez sur le menu d’aide du logiciel,
puis sur Upgrade Online (Mise à niveau en ligne). Enregistrez Rio
Audio Manager sur chaque ordinateur auquel il est associé.
Le logiciel SoundJam vous demande de vous inscrire en ligne la
première fois que vous ouvrez le programme. Le logiciel SoundJam
autorise la conversion de 50 pistes gratuites avant de devoir enregistrer
le logiciel.
Page 61

MultilingualPrismPTI.book Page 53 Tuesday, March 6, 2001 8:30 PM
TM
Installation du Rio
Page 53
Étape 6 : Lecture du manuel d’utilisation
Voulez-vous en savoir plus sur le Rio ? Cliquez sur
User Guide (Manuel d’utilisation) sur le menu d’installation. Le
guide d’utilisation contient :
• Des instructions détaillées sur les réglages et les options de menu
du Rio 600.
• Des informations sur les accessoires.
• Un glossaire des termes audionumériques.
• Les questions les plus fréquemment posées (FAQ) et des
informations concernant le dépannage.
• La garantie et les informations sur la réglementation.
• Les informations sur l’assistance à la clientèle.
Conseil : Utilisez Adobe Acrobat version 4.0 — disponible dans le
CD-ROM du logiciel Rio pour visualiser le Manuel d’utilisation. Ce
manuel se trouve dans le dossier Manual (Manuel) du CD-ROM.
Page 62

MultilingualPrismPTI.book Page 54 Tuesday, March 6, 2001 8:30 PM
TM
Utilisation du logiciel Rio
Page 54
Utilisation du logiciel Rio
Rio Audio Manager (PC)
Le Rio Audio Manager crée, mémorise et organise vos pistes
audionumériques. Il comprend des outils logiciels pour vous permettre
de gérer le contenu audionumérique du PC. Cliquez sur les boutons en
haut de la fenêtre du Rio Audio Manager pour utiliser les divers outils
de gestion audionumérique. Utilisez le Rio Audio Manager pour :
• créer et organiser le contenu audio de l’ordinateur ;
• organiser le contenu audio du Rio ;
• créer un CD audionumérique ; Rio Audio Manager permet d’écrire
gratuitement 25 pistes sur un CD. Remarque : Pour déverrouiller
le blocage d’écriture illimitée sur CD, vous devez mettre à niveau le
logiciel moyennant une somme modique.
• créer des pistes audionumériques compressées à partir de vos CD
audio. Vous pouvez convertir votre entière collection de CD au
format compressé numérique. Remarque : le logiciel autorise 50
conversions MP3. Pour pouvoir effectuer librement des encodages
MP3, vous devez mettre à niveau Rio Audio Manager. Cette mise à
niveau est gratuite ;
• rechercher et télécharger les sons audionumériques de l’Internet.
Page 63

MultilingualPrismPTI.book Page 55 Tuesday, March 6, 2001 8:30 PM
TM
Utilisation du logiciel Rio
Fenêtre principale de Rio Audio Manager
Page 55
Conseil : Pour des informations détaillées concernant l’utilisation
de Rio Audio Manager, cliquez sur le menu Help (Aide) du logiciel,
puis cliquez sur Help Topics (Rubriques d’aide).
Page 64

MultilingualPrismPTI.book Page 56 Tuesday, March 6, 2001 8:30 PM
TM
Utilisation du logiciel Rio
Page 56
Fonctions de Rio Audio Manager
Make a playlist (Créer une liste de sélections)
Cliquez sur ce bouton pour organiser les pistes audio de l’ordinateur en
listes de sélections. Écoutez directement les listes de sélections sur
votre PC.
1
2
Cliquez sur make a playlist. Une fenêtre vide apparaît.
Cliquez sur Select Tracks from Database (Sélectionner les pistes
de la base de données) ou Select Playlists from Database
(Sélectionner les listes de sélections de la base de données).
3
4
Sélectionnez les pistes à écouter en cochant la case en regard du
titre de la chanson. Faites défiler la liste si nécessaire pour trouver
une piste.
Cliquez sur OK. L’écran principal affiche les pistes sélectionnées.
Page 65

MultilingualPrismPTI.book Page 57 Tuesday, March 6, 2001 8:30 PM
TM
Utilisation du logiciel Rio
Page 57
Copy to devices (copier vers des périphériques)
Cliquez sur ce bouton pour organiser le contenu du Rio. Téléchargez les
pistes vers le lecteur Rio pour les écouter pendant vos déplacements.
1
2
3
4
Branchez le câble USB dans le port multifonctions au sommet
du Rio 600 ; branchez l’autre extrémité du câble dans le port USB du PC.
Faites glisser l’interrupteur d’alimentation du haut du Rio sur
On (Marche).
Cliquez sur copy to devices.
Cliquez sur Select Tracks from Database (Sélectionner les pistes
5
6
7
de la base de données) ou Select Playlists from Database
(Sélectionner les listes de sélections de la base de données).
Sélectionnez les pistes à télécharger de la liste de sélections en
cochant la case en regard du titre de la chanson.
Cliquez sur OK.
Cliquez sur Copy to Portable (Copier vers un portable).
Page 66

MultilingualPrismPTI.book Page 58 Tuesday, March 6, 2001 8:30 PM
TM
Utilisation du logiciel Rio
Page 58
Write audio CD (Création d’un CD audionumérique)
Créez des CD personnalisés de vos pistes et listes de sélections
préférées mémorisées dans la base de données. Reportez-vous aux
rubriques d’aide en ligne du logiciel Rio Audio Manager, ainsi qu’à la
documentation du matériel et du logiciel de l’ordinateur pour obtenir de
plus amples informations sur la création de CD audio.
Read a CD (Lecture d’un CD)
Récupérez vos chansons préférées d’un CD et convertissez-les en
format audionumérique compressé pour pouvoir les lire sur le Rio ou
sur le PC. Cliquez sur Get Track Titles (acquérir les titres
des pistes) pour vous connecter au site Web Gracenote — appelé
précédemment CD Database (CDDB) — pour récupérer les
informations sur les pistes, les artistes et les titres.
1
Introduisez un CD audio dans le lecteur de CD-ROM de votre
ordinateur.
2
Le logiciel vous invite à visiter le site Web Gracenote.
• Si vous disposez d’un accès à l’Internet, cliquez sur Yes (Oui)
pour vous connecter immédiatement au site Gracenote.
Page 67

MultilingualPrismPTI.book Page 59 Tuesday, March 6, 2001 8:30 PM
TM
Utilisation du logiciel Rio
Page 59
• Si vous ne disposez pas d’un accès à l’Internet, cliquez sur
No (Non).
3
Sélectionnez les pistes à convertir en cochant la case en regard du
titre de la chanson.
4
Cliquez sur Start Reading (Lancer la lecture).
Rioport.com
Le navigateur Internet intégré permet de vous connecter au site
Web RioPort à www.rioport.com. Recherchez vos pistes audio
préférées sur le Web et téléchargez-les directement sur votre ordinateur.
Pour télécharger une chanson du site Web RioPort :
1
2
Cliquez sur son titre.
Cliquez sur Download (Télécharger).
Page 68

MultilingualPrismPTI.book Page 60 Tuesday, March 6, 2001 8:30 PM
TM
Utilisation du logiciel Rio
Page 60
Utilisation de l’aide pour obtenir de plus
amples informations
Le logiciel Rio Audio Manager contient un manuel complet d’aide en
ligne. Pour obtenir de plus amples informations sur l’utilisation du
logiciel Rio Audio Manager :
1
2
3
Cliquez sur le menu Help (Aide) en haut de la fenêtre de
Rio Audio Manager.
Cliquez sur Help Topics (Rubriques d’aide).
Cliquez sur la rubrique souhaitée pour obtenir des instructions
détaillées sur l’utilisation de Rio Audio Manager.
Page 69

MultilingualPrismPTI.book Page 61 Tuesday, March 6, 2001 8:30 PM
TM
Utilisation du logiciel Rio
Page 61
SoundJam MP (Mac)
L’encodeur et lecteur SoundJam MP convertissent la musique en
fichiers MP3 compressés de qualité numérique à partir des formats CD,
MP2, AIFF, QuickTime™, SMD, Sound Designer et WAV. Le logiciel
SoundJam autorise la conversion de 50 pistes gratuites avant d’exiger
l’enregistrement du logiciel.
Master Playlist (Liste de sélections principale)
Utilisez l’éditeur Master Playlist pour :
• explorer votre sonothèque stockée sur votre Mac ;
• créer et gérer des listes de sélections personnalisées.
Page 70

MultilingualPrismPTI.book Page 62 Tuesday, March 6, 2001 8:30 PM
TM
Utilisation du logiciel Rio
Fenêtre principale
Utilisez la fenêtre principale SoundJam MP pour :
• écouter des fichiers audio sur un Mac ;
• écouter les fichiers musicaux de votre liste de sélections
(ou compilations) ou d’un CD-ROM.
Page 62
Page 71

MultilingualPrismPTI.book Page 63 Tuesday, March 6, 2001 8:30 PM
TM
Utilisation du logiciel Rio
Page 63
Converter (Convertisseur)
Utilisez la fenêtre Converter pour :
• encoder des CD audionumériques ;
• enregistrer des pistes en format MP3 pour les transférer et les
écouter sur le Rio.
Page 72

MultilingualPrismPTI.book Page 64 Tuesday, March 6, 2001 8:30 PM
TM
Utilisation du logiciel Rio
Page 64
Connecteur Rio 600
Utilisez la fenêtre du connecteur Rio 600 pour :
• gérer le contenu du Rio ;
• exporter des sons vers le Rio, choisissez la piste ou la liste de
sélections en sélectionnant “Add...” (Ajouter) ou faites glisser la
piste vers la fenêtre de visualisation.
Utilisation de l’aide pour obtenir de plus
amples informations
Le logiciel SoundJam contient une aide en ligne. Pour obtenir de plus
amples informations sur l’utilisation du logiciel SoundJam MP :
1
2
cliquez sur le menu d’aide ;
sélectionnez SoundJam MP Help.
• Cliquez sur la rubrique souhaitée pour obtenir des instructions
détaillées.
• Cliquez sur How To Use This Help System (Utilisation du
système d’aide) pour apprendre à utiliser le programme d’aide
de SoundJam.
Pour plus d’informations à ce sujet, visitez le site Web SoundJam à
l’adresse www.soundjam.com
Page 73

MultilingualPrismPTI.book Page 65 Tuesday, March 6, 2001 8:30 PM
TM
Accès à l’assistance clientèle
Accès à l’assistance clientèle
Page 65
Heures d’ouverture
Du lundi au vendredi
de 9 h 00 à 20 h 00
Le samedi de 9 h 00 à 16 h 00
Téléphone - tous les produits
+33-1-55-38-16-16
Télécopie - tous les produits
+31-53-484-9536
Adresse Internet
http://www.diamondmm.fr
(page d’assistance uniquement)
Adresse postale
SONICblue/Diamond
Centre d’assistance
clientèle européen
P.O. Bo x 52
7500 AB Enschede
Pays-Bas
Page 74

MultilingualPrismPTI.book Page 66 Tuesday, March 6, 2001 8:30 PM
TM
Accès à l’assistance clientèle
Page 66
Page 75

MultilingualPrismPTI.book Page 67 Tuesday, March 6, 2001 8:30 PM
TM
EINFÜHRUNG
Page 76

MultilingualPrismPTI.book Page 68 Tuesday, March 6, 2001 8:30 PM
TM
Seite 68
Rio 600 Einführungshandbuch
©
2000-2001 SONICblue, Incorporated. Alle Rechte vorbehalten.
SONICblue, Incorporated haftet nicht für Fehler oder Auslassungen in
diesem Handbuch und übernimmt keinerlei Verpflichtung, die darin
enthaltenen Informationen zu aktualisieren.
Rio ist ein in den USA und/oder in anderen Ländern eingetragenes
Warenzeichen von RioPort, Inc. und wird unter Lizenz verwendet.
Microsoft, Windows Media und das Windows-Logo
sind Warenzeichen oder eingetragene Warenzeichen
der Microsoft Corporation in den Vereinigten
Staaten und/oder anderen Ländern.
Alle anderen Produktnamen sind möglicherweise
Warenzeichen der entsprechenden Firmen.
Vierte Auflage, Februar 2001.
Bestellnummer 52260029-004
Page 77

MultilingualPrismPTI.book Page 69 Tuesday, March 6, 2001 8:30 PM
TM
Einführung
Seite 69
Einführung
Wir gratulieren Ihnen zum Erwerb des tragbaren digitalen Audioplayers Rio
600! Rio ist der perfekte Begleiter für aktive Menschen und liefert
unterbrechungsfreie Musik für unterwegs. Rio kann einfach an einen
PC oder Mac angeschlossen werden, um komprimierte digitale Audiotitel
herunterzuladen. Mit der Rio-Software können Sie Titel Ihrer Audio-CDs in
Wiedergabeformate für den Rio konvertieren oder Titel vom Internet
herunterladen.
Nehmen Sie sich ein paar Minuten Zeit, und lesen Sie die Informationen auf den
folgenden Seiten. Bevor Sie Ihre Lieblingsmusik mit dem Rio abspielen können,
müssen Sie die folgenden Schritte ausführen:
1
2
3
Installieren Sie die Batterie.
Installieren Sie die Rio-Software von der CD-ROM.
Schließen Sie den Rio am USB-Anschluss des Computers an.
Diese Einführung gibt Ihnen allgemeine Informationen zum Einrichten und
Starten des Rio. Möchten Sie mehr erfahren?
• Das Rio-Benutzerhandbuch auf der CD-ROM enthält detaillierte
Informationen über die Verwendung des Rio, Antworten auf häufig
gestellte Fragen, Garantieinformationen, ein Glossar der Fachbegriffe aus
dem digitalen Audiobereich, und mehr.
Page 78

MultilingualPrismPTI.book Page 70 Tuesday, March 6, 2001 8:30 PM
TM
Einführung
Seite 70
• Wenden Sie sich an die Hilfemenüs der Anwendungen Rio Audio
Manager und SoundJam für detallierte Anweisungen für die
Verwendung der Software zum herunterladen von digitalen
Audiotiteln, konvertieren der Audiotitel von CD-Rom, oder
kopieren der Titel vom und zu Ihrem Rio.
• Besuchen Sie dieWebsite von Rio unter www.riohome.com
www.riohome.com.
www.riohome.comwww.riohome.com
Wichtige Informationen
Bei der Entwicklung dieses Produkts wurde darauf geachtet, dass es die
Anforderungen der folgenden Richtlinien erfüllt:
Niederspannungsverordnung
Niederspannungsverordnung (72/23/EEC) in der ergänzten
NiederspannungsverordnungNiederspannungsverordnung
Richtlinienfassung (93/68/EEC), wodurch die folgenden Normen erfüllt
werden:
• IEC 950 / EN60950 2. Auflage, 1991 + Erg. 1, 1992 + Erg. 2, 1993
+ Erg. 3, 1995 + Erg. 4, 1996. Sicherheitsanforderungen für
Informationstechnologiegeräte
• IEC 60065 6. Auflage, 1998-07 Sicherheitsanforderungen für
Audio-, Video- und ähnliche elektronische Geräte
Page 79

MultilingualPrismPTI.book Page 71 Tuesday, March 6, 2001 8:30 PM
TM
Einführung
Seite 71
EMC-Richtlinie
EMC-Richtlinie (89/336/EEC) in der ergänzten Richtlinienfassung
EMC-RichtlinieEMC-Richtlinie
(93/68/EEC)
• EN55022: 1998, Informationstechnologiegeräte
– Funkstörungseigenschaften – Grenzwerte und Messmethoden
• EN55024: 1998, Informationstechnologiegeräte
– Immunitätseigenschaften – Grenzwerte und Messmethoden
• EN50082-1: 1998, Elektromagnetische Kompatibilität –
Grundlegende Immunitätsnorm, Teil 1
• EN50332-1: 2000, Messmethode und Grenzwerterwägungen für
maximale Schalldruckpegel
Warnung
• Stromschlaggefahr - Nicht öffnen. Wenn der Rio zerlegt oder
verändert wird, besteht Stromschlaggefahr. Im Inneren befinden
sich keine vom Benutzer wartbaren Teile. Die Wartung muss von
qualifiziertem Personal durchgeführt werden.
• Der Rio darf nicht in Wasser eingetaucht oder in der Nähe von
Wasser bzw. an nassen Orten verwendet oder betrieben werden, da
Stromschlag- und Verletzungsgefahr besteht. Das Verschütten von
Flüssigkeiten auf dem Rio ist zu vermeiden.
Page 80

MultilingualPrismPTI.book Page 72 Tuesday, March 6, 2001 8:30 PM
TM
Einführung
Seite 72
• Der Rio darf nicht in der Nähe von starken magnetischen oder
elektrostatischen Feldern (bei Fernsehern oder Lautsprechern)
verwendet werden. Der Einsatz an Orten mit extrem geringer
Feuchtigkeit wird nicht empfohlen.
Vorsicht
• Batterien können explodieren oder auslaufen, wenn sie mit Feuer in
Berührung kommen, mit einer anderen Batterieart kombiniert,
verkehrt herum eingesetzt oder auseinander genommen werden.
Eine Liste der zugelassenen Ersatz-Alkalibatterien für den Rio 600
finden Sie im Rio-Benutzerhandbuch im Abschnitt über Zubehör.
• Die Verwendung von Kopfhörern während des Betriebs eines
Fahrzeugs wird nicht empfohlen und ist in einigen Gebieten
verboten. Verhalten Sie sich vorsichtig und aufmerksam, wenn Sie
mit dem Auto, dem Fahrrad oder zu Fuß unterwegs sind. Schalten
Sie den Player aus, wenn Sie finden, dass Sie gestört oder abgelenkt
werden, während Sie ein Fahrzeug lenken. Verwenden Sie den
Autokassettenadapter, wenn Sie den Rio im Auto benutzen.
Page 81

MultilingualPrismPTI.book Page 73 Tuesday, March 6, 2001 8:30 PM
TM
Einführung
Seite 73
• Das Anhören von Musik mit voller Lautstärke über einen längeren
Zeitraum kann zu Hörschäden führen. Falls Sie ein Klingelgeräusch in den
Ohren wahrnehmen, sollten Sie den Rio nicht länger über Kopfhörer
abspielen!
Pflege des Rio
• Extrem hohe oder niedrige Temperaturen können den Rio
beschädigen oder zu Störungen führen. Setzen Sie den Rio nicht
über längere Zeit direkter Sonnenstrahlung aus, und lassen Sie ihn
nicht in einem Fahrzeug mit geschlossenen Türen und Fenstern
liegen. Das Gehäuse kann sich verformen oder verfärben, und es
können Funktionsstörungen auftreten. Der Rio darf nicht in der
Nähe von offenem Feuer eingesetzt werden.
• Bei plötzlichen Übergängen von kalten zu warmen Temperaturen
sollten Sie vor dem Einschalten des Rio abwarten, bis sich das
Gerät an die geänderte Temperatur angepasst hat.
• Schmutz, Sand, Staub und Feuchtigkeit dürfen nicht in das Innere
des Rio eindringen. Das Gerät darf nicht in extrem staubigen
Umgebungen eingesetzt werden. Der Einsatz an Orten mit extrem
hoher Feuchtigkeit wird nicht empfohlen.
Page 82

MultilingualPrismPTI.book Page 74 Tuesday, March 6, 2001 8:30 PM
TM
Einführung
Seite 74
• Durch Herunterfallen oder harte Stöße kann der Rio beschädigt
werden.
• Bei Interferenzen in der Nähe von Funk- und Fernsehgeräten
müssen Sie den Rio in größerer Entfernung zu diesen Geräten
einsetzen.
• Der Rio darf nicht mit Lösungsmitteln, Chemikalien oder
Scheuermitteln gereinigt werden. Wischen Sie den Rio bei Bedarf
mit einem weichen Tuch ab.
Page 83

MultilingualPrismPTI.book Page 75 Tuesday, March 6, 2001 8:30 PM
TM
Einrichten des Rio
Seite 75
Einrichten des Rio
Schritt 1: Gerät auspacken
Die Verkaufsverpackung für den Rio 600 enthält die folgenden Teile:
• Tragbarer digitaler Audioplayer Rio 600 mit Batterie-Backpack
und RioTone
• Eine Alkali-Mignon-Batterie (AA)
•Kopfhörer
TM
-Farbabdeckung
• Einführungshandbuch
• CD-ROM mit Software
• USB-Kabel
•Tragetasche
• Andere gedruckte Unterlagen
Page 84

MultilingualPrismPTI.book Page 76 Tuesday, March 6, 2001 8:30 PM
Verwenden des Rio
Mehrfunktionsanschluss
LCD-Display
Menü
TM
Einrichten des Rio
Seite 76
Ein/Sperren/Aus
Lautstärke
Joypad
Auswählen
Auf dem Joypad befinden sich die folgenden Tasten
(im Uhrzeigersinn von oben) Wiedergabe/Pause >/||,
Vorwärts >>, Stop ■, Zurück << und Auswählen.
Page 85

MultilingualPrismPTI.book Page 77 Tuesday, March 6, 2001 8:30 PM
TM
Einrichten des Rio
Seite 77
Verwenden der Tasten und Steuerelemente
• Ein/Sperren/Aus (Betriebsschalter): Verschieben Sie diesen
Schalter (On/Hold/Off) oben auf dem Rio, um das Gerät ein- und
auszuschalten oder die Rio-Einstellungen zu sperren. Im
Sperrmodus werden alle Tasten des Rio außer dem Betriebsschalter
gesperrt.
• Mehrfunktionsanschluss: Schließen Sie die Kopfhörer oder das
USB-Kabel an diesen Anschluss oben auf dem Rio an.
•
+
und
–
(Lautstärke): Drücken Sie +, um die Lautstärke zu
erhöhen, und
–
, um die Lautstärke zu verringern.
• Menü: Drücken Sie auf Menu (Menü), um die Optionen „Audio“,
„Player“, „Prefs“ (Voreinstellungen) und „About“ (Info)
anzuzeigen. Drücken Sie auf
>/||, >>
, ■ und
<<
, um zwischen
Menüoptionen zu wechseln. Durch Drücken von Auswählen
können Sie eine Option in einem Menü auswählen.
Hinweis: Schrittweise Bedienungsanweisungen für die
Menüoptionen und Einstellungen des Rio finden Sie im
Benutzerhandbuch für den Rio 600 auf der CD-ROM.
Page 86

MultilingualPrismPTI.book Page 78 Tuesday, March 6, 2001 8:30 PM
TM
• Joypad im Uhrzeigersinn von oben:
(Wiedergabe/Pause): Drücken Sie im Wiedergabemodus
•
>/||
einmal auf >/||, um einen Titel abzuspielen. Drücken Sie die
Taste noch einmal, um die Wiedergabe anzuhalten. Bei
angehaltener Wiedergabe erscheinen anstelle des Wiedergabe/
Pause-Symbols auf dem LCD-Display zwei blinkende
vertikale Striche. Wenn sich der Rio für längere Zeit im
Pausenmodus befindet, schaltet das Gerät in den Ruhemodus
um, um die Batterie zu schonen. Drücken Sie >/||, um den
Ruhemodus des Rio aufzuheben.
Einrichten des Rio
Seite 78
•
>>
(Vorwärts): Drücken Sie im Wiedergabemodus auf >>,
und lassen Sie die Taste wieder los, um zum nächsten Titel auf
dem Rio zu wechseln. Wenn Sie die Taste >> gedrückt halten,
wird der aktuelle Titel im Schnellvorlauf abgespielt.
• ■ (Stop): Drücken Sie im Wiedergabemodus auf ■, um die
Wiedergabe des aktuellen Titels abzubrechen. Drücken Sie ■,
und halten Sie die Taste ungefähr zwei Sekunden lang
gedrückt, um den Rio in den Ruhemodus umzuschalten und die
Batterie zu schonen.
Page 87

MultilingualPrismPTI.book Page 79 Tuesday, March 6, 2001 8:30 PM
TM
Einrichten des Rio
Seite 79
•
<<
(Rückwärts): Drücken Sie im Wiedergabemodus auf <<,
und lassen Sie die Taste wieder los, um zum Anfang des
gerade auf dem Rio wiedergegebenen Titels zurückzukehren.
Wenn Sie die Taste << gedrückt halten, wird der aktuelle Titel
im Schnellrücklauf abgespielt.
• Auswählen (mittlere Taste auf dem Joypad): Drücken Sie im
Menümodus auf Auswählen, um eine Menü- oder
Dialogoption auszuwählen.
• Flüssigkristallanzeige (LCD-Display): Im Wiedergabemodus
werden die folgenden Informationen auf dem LCD-Display
angezeigt (im Uhrzeigersinn von links oben):
• Name des Liedes: Zeigt den Titel des gegenwärtig
ausgewählten Stücks an.
Page 88

MultilingualPrismPTI.book Page 80 Tuesday, March 6, 2001 8:30 PM
TM
Einrichten des Rio
Seite 80
• Sperrsymbol: Erscheint, wenn der Player in den Sperrmodus
geschaltet wurde.
• Wiedergabe/Pause-Symbol: Je nach aktuellem Betriebszustand des
Rio wird entweder ein „Wiedergabe“-Symbol (Dreieck) oder ein
„Pause-Symbol“ (zwei vertikale Striche) angezeigt.
• Trennlinie: Dient zur optischen Trennung der Displaykomponenten.
• Aktuelle Position im Titel: Gibt die Wiedergabeposition im
aktuellen Titel im Format Minuten:Sekunden (mm:ss) an.
• Lautstärke: Gibt die Lautstärkeeinstellung in digitaler und grafischer
Form an. Der Lautstärkepegel reicht von 0 – 20.
• Titelanzeige: Zeigt die Nummer des gegenwärtig ausgewählten
Titels und die Gesamtanzahl aller Titel auf dem Player an.
• Albumname/Titelinformationen/Interpretenname: Zeigt den Namen
des Albums, Informationen zum Titel und den Namen des
Interpreten an. Zuerst wird der Albumname für ein paar Sekunden
eingeblendet, danach erscheinen Informationen zum Titel und
anschließend der Name des Interpreten. Die Titelinformationen
schließen den Codec-Typ (MP3, WMA usw.), die Bitrate (XXX
Kbps) und die Dateigröße (XX:XX MB) ein.
Page 89

MultilingualPrismPTI.book Page 81 Tuesday, March 6, 2001 8:30 PM
TM
Schritt 2: Rio starten
1
2
Drücken Sie fest auf die Taste auf der Rückseite des Rio 600,
und schieben Sie den Backpack nach unten, um ihn vom Player
zu lösen.
Entfernen Sie den Backpack vom Rio 600.
Einrichten des Rio
Seite 81
Tipp: Die Seriennummer, die Sie zum Registrieren des Rio benötigen,
befindet sich auf der Rückseite des Rio unter dem Backpack.
Page 90

MultilingualPrismPTI.book Page 82 Tuesday, March 6, 2001 8:30 PM
3
TM
Einrichten des Rio
Seite 82
Nehmen Sie den Deckel vom Backpack-Batteriefach ab. Drücken Sie
leicht auf den Deckel, damit die Befestigungslaschen ausrasten.
Deckel des Batteriefachs
Page 91

MultilingualPrismPTI.book Page 83 Tuesday, March 6, 2001 8:30 PM
4
5
TM
Einrichten des Rio
Seite 83
Legen Sie die Alkali-Mignonbatterie (AA) in das Backpack-Batteriefach
ein. Achten Sie dabei darauf, dass der Plus- (+) und Minuspol (–) auf der
Batterie mit den Markierungen neben dem Batteriefach übereinstimmen.
Setzen Sie den Deckel des
Batteriefachs wieder auf.
Drücken Sie leicht auf den
Deckel, und führen Sie zuerst
die beiden kleinen Laschen ein,
bevor Sie die große Lasche
einrasten lassen.
6
7
Bringen Sie den Backpack
wieder am Rio an. Schieben Sie
den Backpack von unten auf
den Player.
Stecken Sie die Kopfhörer in
den Anschluss oben auf dem
Rio, schieben Sie den
Betriebsschalter auf die
Position
>/||
Sie
On
(Ein), und drücken
(Wiedergabe/Pause), um den Einführungstext abzuspielen.
Page 92

MultilingualPrismPTI.book Page 84 Tuesday, March 6, 2001 8:30 PM
TM
Schritt 3: Software installieren
PC
1
Legen Sie die Software-CD in das CD-ROM-Laufwerk des Computers
ein. Nach einigen Sekunden erscheint das Installationsmenü.
Einrichten des Rio
Seite 84
2
3
4
Wählen Sie die gewünschte Sprache (Deutsch).
Klicken Sie im Installationsmenü auf die Schaltfläche Install
(Installieren). Wählen Sie Rio Audio Manager. Gehen Sie dann nach
den Anweisungen auf dem Computer-Bildschirm vor.
Starten Sie den Computer neu, wenn die Installation abgeschlossen ist.
Page 93

MultilingualPrismPTI.book Page 85 Tuesday, March 6, 2001 8:30 PM
TM
Wenn das Installationsmenü nicht automatisch angezeigt wird, können
Sie die Installation mit den folgenden Schritten manuell ausführen:
1
2
3
Klicken Sie links unten auf dem Computer-Bildschirm auf die
Schaltfläche Start, und wählen Sie Ausführen...
Geben Sie „d:\setup32.exe“ in das Feld Öffnen ein. Wenn Ihr
CD-ROM-Laufwerk anstelle von „d:“ einen anderen
Laufwerksbuchstaben verwendet, geben Sie diesen Buchstaben ein.
Klicken Sie auf OK, und folgen Sie den Anweisungen auf dem
Bildschirm.
Einrichten des Rio
Seite 85
Mac
1
2
3
Legen Sie die Software-CD in das CD-ROM-Laufwerk des
Computers ein.
Der Inhalt der CD wird automatisch angezeigt. Doppelklicken Sie
auf das CD-Symbol auf dem Desktop des Computers, um den
Inhalt der CD manuell anzuzeigen.
Doppelklicken Sie auf die Schaltfläche Install (Installieren). Das
Installationsmenü wird geöffnet.
Page 94

MultilingualPrismPTI.book Page 86 Tuesday, March 6, 2001 8:30 PM
4
5
6
TM
Einrichten des Rio
Seite 86
Wählen Sie die gewünschte Sprache (Deutsch).
Klicken Sie auf die Schaltfläche SoundJam, um die Installation
einzuleiten.
Starten Sie den Computer neu, wenn die Installation
abgeschlossen ist.
Page 95

MultilingualPrismPTI.book Page 87 Tuesday, March 6, 2001 8:30 PM
TM
Einrichten des Rio
Schritt 4: USB-Kabel anschließen
1
2
Seite 87
1
2
Tipp: Das USB-Kabel für den Rio 600 kann nur in einer Richtung
angeschlossen werden. Versuchen Sie nicht, den Stecker mit Gewalt
einzustecken.
Stecken Sie ein Ende des USB-Kabels in den
Mehrfunktionsanschluss oben auf dem Rio ein.
Stecken Sie das andere Ende des USB-Kabels in den USBAnschluss des Computers ein. Auf dem Mac befindet sich der
USB-Anschluss normalerweise an der Tastatur.
Page 96

MultilingualPrismPTI.book Page 88 Tuesday, March 6, 2001 8:30 PM
TM
Einrichten des Rio
Seite 88
Schritt 5: Rio und Software registrieren
Klicken Sie im Installationsmenü auf die Schaltfläche Register
(Registrieren), um den Rio zu registrieren. Entfernen Sie den Backpack
vom Player, um die unter dem Backpack befindliche Seriennummer
(S/N) abzulesen.
Sie können die Software während der Installation oder auch später
registrieren. Der Rio-Player muss über das USB-Kabel mit dem
Computer verbunden und eingeschaltet sein, damit Sie die Software
online registrieren können.
Vor der Registrierung gestattet Rio Audio Manager 50 kostenlose
Konvertierungen von MP3-Titeln von CD-ROM und das Schreiben von
25 Titeln auf CD. Klicken Sie im Hilfemenü der Software auf Upgrade
Online (Online-Aktualisierung), um Rio Audio Manager zu
registrieren. Registrieren Sie Rio Audio Manager auf jedem Computer,
mit dem Sie das Programm verwenden möchten.
Die SoundJam-Software fordert Sie beim ersten Start der Anwendung
zum Registrieren auf. SoundJam gestattet vor der Registrierung 50
kostenlose Konvertierungen von Titeln einer CD-ROM.
Page 97

MultilingualPrismPTI.book Page 89 Tuesday, March 6, 2001 8:30 PM
TM
Einrichten des Rio
Seite 89
Schritt 6: Benutzerhandbuch lesen
Möchten Sie mehr über den Rio erfahren? Klicken Sie im
Installationsmenü auf die Schaltfläche User Guide
(Benutzerhandbuch). Das Benutzerhandbuch enthält:
• Detaillierte Anweisungen für die Verwendung der Menüoptionen
und Einstellungen des Rio 600
• Informationen über das Zubehör
• Ein Glossar für Begriffe aus dem digitalen Audiobereich
• Häufig gestellte Fragen („FAQ“) und Informationen zur
Fehlerbehebung
• Garantieinformationen und behördliche Vorschriften
• Informationen zum Kundendienst
Tipp: Verwenden Sie Adobe Acrobat Reader Version 4.0 (auf der CD
mit der Rio-Software) zum Anzeigen des Benutzerhandbuchs. Das
Benutzerhandbuch befindet sich im Ordner „Manual“ (Handbuch) auf
der CD-ROM.
Page 98

MultilingualPrismPTI.book Page 90 Tuesday, March 6, 2001 8:30 PM
TM
Verwenden der Rio-Software
Seite 90
Verwenden der Rio-Software
Rio Audio Manager (PC)
Mit dem Rio Audio Manager können Sie digitale Audiotitel erstellen,
speichern und ordnen. Die Software bietet Tools zur Verwaltung digitaler
Audioinhalte auf dem PC. Klicken Sie auf die Schaltflächen am oberen
Rand des Fensters für den Rio Audio Manager, um die verschiedenen
Tools zu verwenden. Der Rio Audio Manager bietet folgende Funktionen:
• Erstellen und Organisieren von Audioinhalten auf dem Computer.
• Organisieren der Audioinhalte auf dem Rio.
• Brennen von Audio-CDs. Mit dem Rio Audio Manager können bis
zu 25 Titel kostenlos auf CD gebrannt werden. Hinweis: Gegen eine
geringe Aktualisierungsgebühr erhalten Sie die Möglichkeit zum
Brennen beliebig vieler CDs.
• Erstellen von komprimierten digitalen Audiotiteln von Ihren MusikCDs. Sie können Ihre gesamte CD-Sammlung in ein komprimiertes
digitales Audioformat konvertieren. Hinweis: Die Software erlaubt
vor der Registrierung 50 kostenlose MP3-Codierungen. Danach
müssen Sie Rio Audio Manager zuerst kostenlos aktualisieren, bevor
Sie unbegrenzt MP3-Codierungen durchführen können.
• Suchen und Herunterladen von digitalen Inhalten aus dem Internet.
Page 99

MultilingualPrismPTI.book Page 91 Tuesday, March 6, 2001 8:30 PM
TM
Verwenden der Rio-Software
Hauptfenster von Rio Audio Manager
Seite 91
Tipp: Detaillierte Anweisungen für den Rio Audio Manager finden
Sie über das Hilfemenü. Öffnen Sie das Hilfemenü, und klicken Sie
auf „Help Topics“ (Hilfethemen).
Page 100

MultilingualPrismPTI.book Page 92 Tuesday, March 6, 2001 8:30 PM
TM
Verwenden der Rio-Software
Seite 92
Schaltflächen im Rio Audio Manager
Make a playlist (Wiedergabeliste erstellen)
Klicken Sie auf diese Schaltfläche, um die Audiotitel auf Ihrem
Computer in Wiedergabelisten zusammenzustellen. Sie können die
Wiedergabelisten auf dem PC abspielen.
1
2
3
4
Klicken Sie auf die Schaltfläche make a playlist (Wiedergabeliste
erstellen). Ein leeres Fenster erscheint.
Klicken Sie auf Select Tracks from Database (Titel aus
Datenbank wählen) oder Select Playlists from Database
(Wiedergabelisten aus Datenbank wählen).
Wählen Sie die Titel aus, die Sie hören wollen, indem Sie auf das
Kontrollkästchen links neben den gewünschten Titeln klicken.
Rollen Sie gegebenenfalls nach unten, um einen bestimmten Titel
zu finden.
Klicken Sie auf OK. Der Hauptbildschirm zeigt die ausgewählten
Titel an.
 Loading...