

Page 1
Page 2

Page 2
Rio One Getting Started Guide
Copyright © 2001 SONICblue Incorporated. All Rights Reserved.
SONICblue Incorporated does not assume any responsibility for errors or
omissions in this document or make any commitment to update the information contained herein. Rio is a registered trademark of RioPort, Inc. in the USA
and/or other countries and is used under license.
The RealPlayer and the RealJukebox are included under license from RealNetworks, Inc. Copyright 1999. RealNetworks, Inc. Patents pending. All rights
reserved.
This product is iTunes ready. iTunes is provided by Apple Computer, Inc.
Copyright © 2001 Apple Computer, Inc. All rights reserved. iTunes is a trademark of Apple Computer, Inc.
Microsoft, Windows Media, and the Windows Logo are
trademarks or registered trademarks of Microsoft Corporation in the United States and/or other countries.
All other product names may be trademarks of the companies with which they are associated.
First Edition, May 2001.
Part Number 52260056-001
Page 3

Contents
INTRODUCTION....................................................................5
SETTING UP YOUR RIO ONE...............................................7
Step 1: Unpack package contents ............................7
Step 2: Install the battery.........................................12
Step 3: Install the software......................................13
Step 4: Using the software.......................................15
Step 5: Plug in the USB cable ..................................16
Step 6: Register your Rio One ...............................17
Step 7: Check out the User Guide ........................17
S
AFETY AND PRODUCT CARE............................................19
YSTEM REQUIREMENTS ......................................................22
S
CUSTOMER CARE ................................................................23
Page 3
Page 4

Page 4
Page 5

Introduction
Page 5
Introduction
Congratulations on your purchase of the Rio One portable digital audio
player! Rio is the perfect companion for active people—delivering skipfree music for people on the go. Your Rio connects easily to a PC or
Mac for downloading compressed digital audio tracks. Use the included
software to convert tracks from your audio CDs or to download
tracks from the Internet for playback on your new Rio One.
It only takes four steps to start playing your digital audio tracks on your
Rio One:
1 Install the battery.
2 Install the Rio software from the software CD.
3 Connect your Rio to the USB port on your computer.
4 Use the Rio software to download digital audio tracks into your
Rio’s flash memory.
Take a few minutes to review the information in the following pages.
The Getting Started Guide shows you the basics of how to set up and
start using your Rio One. Do you want to learn more?
Page 6

Introduction
Page 6
• Check out the User Guide on the Rio One software CD for more
information on using your Rio, an introduction to the Rio software,
frequently asked questions, warranty information, and more.
• Click on the RealJukebox or iTunes software Help menus for
detailed instructions on using the software to download digital
audio tracks, convert tracks from CD-ROM or transfer tracks to
your Rio One.
• Visit the Rio Web site at: www.riohome.com
Page 7

Setting up your Rio One
Setting up your Rio One
Step 1: Unpack package contents
Your Rio One package includes the following items:
• Rio One portable digital audio player.
• One 1.5 volt AA size alkaline battery.
• Universal Serial Bus (USB) cable.
• Headphones.
• Getting Started Guide.
• Rio One software CD.
• iTunes software CD (for Mac users).
• Other printed materials.
Page 7
Page 8
Setting up your Rio One
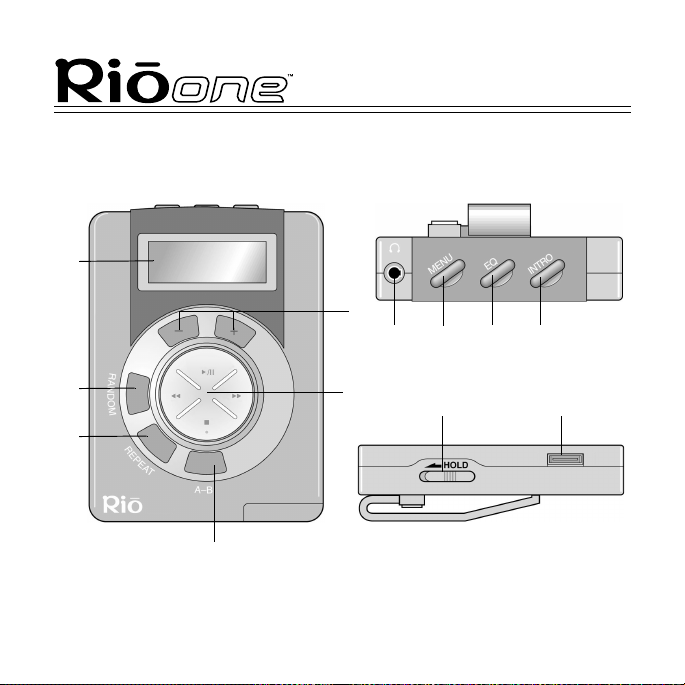
Rio One buttons and controls
6
1
7
89
Page 8
10
5
4
3
2
11 12
Page 9

Setting up your Rio One
Page 9
1 + and - (Volume): Press + to increase the volume; press - to
decrease the volume. Volume level ranges from 0-20.
2 Playback control button includes (clockwise from top) Play/
Pause/Power On , Forward , Stop/Power Off , and
Reverse .
• : Press once to turn on the Rio and begin Play; press again
to pause the current track.
• : Press and hold to move forward within the current track;
press and release to skip to next track.
• : Press once to stop playback; press again to turn the Rio
off.
• : Press and hold to move backward within the current
track; press and release to skip to the start of the current
track.
Note: To preserve battery life, the Rio turns itself off
after a few minutes of no activity.
Page 10

Setting up your Rio One
Page 10
3 A-B: Marks a selection for repeated playback. Press once to start
(A-B symbol displays with “B” blinking); press again to complete
the selection (“B” stops blinking); press again to cancel.
4 Repeat: Press once to repeat the current track; press again to
repeat all tracks; press again to cancel.
5 Random: Press to mix the play order of all tracks. Press again to
cancel.
6 LCD: Liquid crystal display. See the Rio One User Guide on the
software CD for details.
7 Headphone connector: Plug your headphones into this port.
8 Menu: In Stop mode, press Menu to monitor internal and
external memory flash memory and firmware version. Press to
display total internal memory (Ti), total external memory (Te), and
then firmware version number. Press Menu again to hide the
display.
Page 11

Setting up your Rio One
Page 11
9 EQ: Press to change equalization (EQ) settings. There are four EQ
settings to choose from:
• Normal.
• Classic.
• Jazz.
• Rock.
10 Intro: Press to play the first 10 seconds of each track.
11 Hold: Slide to temporarily lock the buttons on your Rio. This is a
useful feature during activities when the Rio buttons can be
bumped, for example, while exercising.
12 USB connector: Plug the USB cable into this connector.
Note: Do not connect your Rio to the computer
before you install the software. This can disrupt the
normal installation process.
Page 12

Setting up your Rio One
Page 12
Step 2: Install the battery
1 Hold the Rio carefully in your hand, and use your thumb to slide
open the battery compartment lid.
2 Insert the 1.5v AA alkaline battery into the battery compartment.
3 Close the battery compartment lid.
Page 13

Setting up your Rio One
Page 13
Step 3: Install the software
PC
1 Place the Rio One software CD in your computer’s CD-ROM
drive. After a few seconds, the installation menu displays.
Note: If the
installation menu does
not display
automatically, skip to
the next page for
instructions.
2 Follow the instructions on
the computer screen.
3 Reboot your computer
when the installation is
complete or when you are prompted to do so.
Page 14

Setting up your Rio One
Page 14
If the installation menu does not display automatically, follow these
steps to begin the installation manually:
1 Click the Start button in bottom left corner of the computer
screen and choose Run...
2 Type d:\setup32.exe in the field labeled Open. If your computer’s
CD-ROM drive uses a letter other than “d”, substitute that letter
for “d”.
3 Click the OK button and follow the on-screen instructions.
Mac
1 Place the iTunes software CD in your computer’s CD-ROM drive.
2 The CD contents display automatically. To manually display the
CD contents, double-click the icon on your computer’s desktop.
3 Install the iTunes software.
4 Reboot your computer when the installation is complete or you
are prompted to do so.
Page 15

Setting up your Rio One
Page 15
Step 4: Using the software
See the User Guide on the Rio One software CD for an introduction
to the Rio software. For detailed instructions, refer to the PC and Mac
software online help manuals. To use the online help:
PC
Click the Help menu at the top of the RealJukebox software window.
While using RealJukebox, you can also:
1 Click the Home button.
2 Scroll down to RealJukebox Help and click
• Using RealJukebox or
• Frequently Asked Questions.
Mac
1 Click the Help menu.
2 Choose iTunes Help.
Page 16

Setting up your Rio One
Step 5: Plug in the USB cable
Page 16
1
1 Plug one end of the USB cable into the USB port on your Rio.
2 Plug the other end of the USB cable into the USB port on your
computer. On the Mac, the USB port is typically located on the
keyboard.
Tip: The Rio One USB connection only fits one way.
Do not try to force the connection.
2
Page 17

Setting up your Rio One
Page 17
Step 6: Register your Rio One
To register the Rio, click the Register button on the installation menu.
The serial number (S/N) is located on the back of the Rio player.
You can complete software registration during installation or at a later
date. For online software registration, your Rio must be connected to
the computer with the USB cable and turned on.
Step 7: Check out the User Guide
Do you want to learn more about your Rio One? Click the User
Guide button on the installation menu. The Rio One User Guide con-
tains:
• More information on using your Rio, including information on
using 3.3 volt external flash memory cards, and in-depth
information about the Rio One display.
• An introduction to the Rio software.
• A glossary of digital audio terms.
• Frequently asked questions (FAQ) and troubleshooting
information.
Page 18

Setting up your Rio One
• Warranty and regulatory information.
• Customer care information.
Tip: Use Adobe Acrobat Reader version 4.0—
available on the Rio One software CD—to view the
User Guide. The User Guide is in the Manual folder
on the software CD.
Page 18
Page 19

Safety and product care
Page 19
Safety and product care
Warning
• Risk of electric shock—Do not disassemble. To av o i d
potential electric shock, do not disassemble or modify your Rio.
No user-serviceable parts are inside. Refer servicing to qualified
personnel.
• To reduce the chance of shock or injury, do not use or operate
your Rio in or near water or wet locations. Do not spill liquid on
your Rio.
• Do not use in places exposed to strong magnetic or electrostatic
fields (close to TV or speakers). Do not use in places where the
humidity is excessively low.
Caution
• Batteries may explode or leak if disposed of in fire, inserted
backwards or disassembled. See the Rio One User Guide FAQ
section for a list of approved Rio One replacement alkaline
batteries.
Page 20

Safety and product care
Page 20
• Use of headphones while operating a vehicle is not recommended
and is illegal in some areas. Be careful and attentive while driving,
biking or walking near traffic. Stop listening to your Rio if you find
it disruptive or distracting while operating any type of vehicle.
• Listening to music at full power over extended periods of time can
damage your hearing. If you experience ringing in your ears,
discontinue use.
Care of your Rio
• Exposure to extreme hot or cold temperatures may cause damage
to your Rio or cause it to malfunction. Do not expose your Rio to
direct sunlight continuously or leave it in a vehicle with the doors
and windows closed. The case may become deformed, discolored
or malfunction. Do not use your Rio near open flame.
• If moving from a cold environment to a warm environment, let the
Rio’s temperature stabilize before operation.
• Keep dirt, sand, dust and moisture from entering your Rio. Do not
use in areas of excessive dust. Do not use in places where the
humidity is excessively high.
• Do not drop or subject your Rio to shock.
Page 21

Safety and product care
Page 21
• If radio or TV interference occurs near such devices move your
Rio away from them.
• Do not clean your Rio with solvents, chemicals or abrasive
cleaners. If necessary, use a soft cloth to clean your Rio.
Page 22

System requirements
Page 22
System requirements
PC
• Microsoft Windows 98, Windows 98 Second Edition, Windows
2000 or Windows Me.
• Pentium 166 or higher with 32 MB RAM.
• USB port.
• CD-ROM drive (for encoding from CD).
• 35 MB of available hard drive space.
• Internet connection.
Mac
• Mac OS 9.0.4 or later.
• 32 MB RAM.
• Built-in USB port.
• CD-ROM drive (for encoding from CD).
• 35 MB of available hard drive space.
• Internet connection.
Page 23

Customer care
TECHNICAL SUPPORT
Hours of Operation
Monday-Friday 5am-7pm PT
Saturday 8am-4pm PT
Email
customersupport@riohome.com
Te l e p h o n e
New product support
(541) 967-2450
TDD
(541) 967-2451
Fax
(541) 967-2401
Web si t e
www.riohome.com
Customer care
Page 23
CUSTOMER SERVICE
Hours of Operation
Monday-Friday 6am-5pm PT
Email
customersupport@riohome.com
Te l e p h o n e
1-800-468-5846 or
(541) 967-2450
Fax
(541) 967-2485
Page 24

Rio One Getting Started Guide
52260056-001
 Loading...