

Sonic Radiant miniRITE T R, Radiant 100, RT100 MNR T R, Radiant 80, RT80 MNR T R User's Manual
...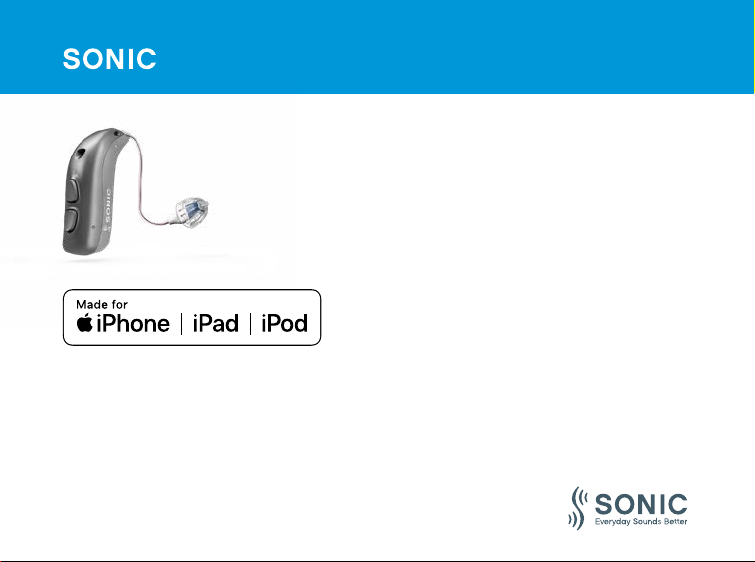
Radiant miniRITE T R
Instructions for Use
www.sonici.com


Model overview
This booklet is valid for the Sonic Radiant™ family in the following
hearing aid models:
FW 1
Sonic Radiant 100 - RT100 MNR T R 05714464011377
Sonic Radiant 80 - RT80 MNR T R 05714464011384
Sonic Radiant 60 - RT60 MNR T R 05714464011391
The following speakers are available for the above model:
Speaker 60
Speaker 85
Speaker 100 (Power Instrument)
Power receiver mold speaker 100 (Power Instrument)
Power receiver mold speaker 105 (Power Instrument)

Introduction to this booklet
This booklet guides you on how to use and maintain your new hearing
aid. Ensure you read this booklet carefully, including the Warnings
section. This will help you get the most benefit from your hearing aid.
Your hearing care professional has adjusted the hearing aid to meet
your needs. If you have additional questions, contact your hearing care
professional.
A hearing care professional (hearing aid professional, audiologist, ENT
(ear, nose and throat) doctor, and hearing aid dispenser) is a person who
is appropriately educated, and has proven competency in professionally
assessing hearing, selecting, fitting and delivering hearing instruments
and rehabilitation care to persons with hearing loss.
The education of the hearing care professional is in accordance with
national or regional regulations.

For your convenience, this booklet contains a navigation bar to help you
navigate through the different sections.
About Start-up Handling Options Tinnitus Warnings More info
Intended use
Intended use
The hearing aid is intended to amplify and transmit
sound to the ear.
Indications for use
Bilateral or unilateral impaired hearing of sensorineural,
conductive or mixed type ranging from a slight (16 dB
HL*) to profound (95 dB HL*) degree of hearing loss,
with an individual frequency configuration.
Intended user
Person with hearing loss using a hearing aid and their
caregivers. Hearing care professional responsible for
adjusting the hearing aid.
Intended user group
Use environment
Contraindications
Adults and children older than 36 months.
Indoor and outdoor.
Not suitable for infants below 36 months. Users of
active implants must pay special attention when
using the hearing aid. For more information read the
Warnings section.
Clinical benefits
The hearing aid is designed to provide better speech
understanding to help ease communication with the aim
of improving quality of life.
* As specified by the American Speech-Language-Hearing Association, asha.org, using pure-tone average
of 0.5, 1 and 2 kHz.

IMPORTANT NOTICE
The hearing aid amplification is uniquely adjusted and optimized for your
personal hearing capabilities during the hearing aid fitting performed by your
hearing care professional.

In short
Charging
Ensure you charge the hearing aid every night. The LED light on the
hearing aid turns ORANGE when the hearing aid is charging and GREEN
when fully charged.
It takes three hours to fully charge the hearing aid.
ON/OFF
The hearing aid turns ON when you remove it from the charger.
The hearing aid turns OFF when you place it in the charger.
Ensure you always leave the charger connected to a power source when
the hearing aid is seated in the charging port.
Turning OFF the charger makes the hearing aid turn ON and start using
battery power.

Table of contents
About
Your hearing aid, speaker and earpiece 12
Hearing aid 14
Start-up
Charging time 16
Battery performance 17
Turn hearing aid ON / OFF using the charger 18
Turn hearing aid ON / OFF using the push button 19
Low battery indication 20
Identify left and right hearing aid 21
Put on hearing aid 22
Continues on next page

Table of contents
Handling
Cleaning 24
Replace standard earpieces 26
ProWax miniFit filter 28
Clean customized earpieces 30
Replace ProWax filter 31
Hearing aid storage 32
Flight mode 34
Options
Optional features and accessories 36
Change volume 37
Change program 38
Mute your hearing aid 40
Using your hearing aid with iPhone, iPad and iPod 41
Using your hearing aid with Android devices 42
Pairing and compatibility 43
Wireless accessories and other options 44

Tinnitus
Warnings
More info
Tinnitus SoundSupport™ (optional) 46
Sound options and volume adjustments 48
Limitation on use time 50
Tinnitus SoundSupport warnings 53
General warnings 54
Troubleshooting 64
Water & dust resistant (IP68) 68
Conditions of use 69
Technical information 70
Mobile phone 72
Warranty 79
Your individual hearing aid settings 80
Sound and LED light indicators 83
Technical Data 88

Your hearing aid, speaker and earpiece
Ear grip
(optional)
The hearing aid uses one of the following speakers:
Standard
speakers
12
About Start-up Handling Options Tinnitus Warnings More info
60 85 100 100
Power mold
speakers
105
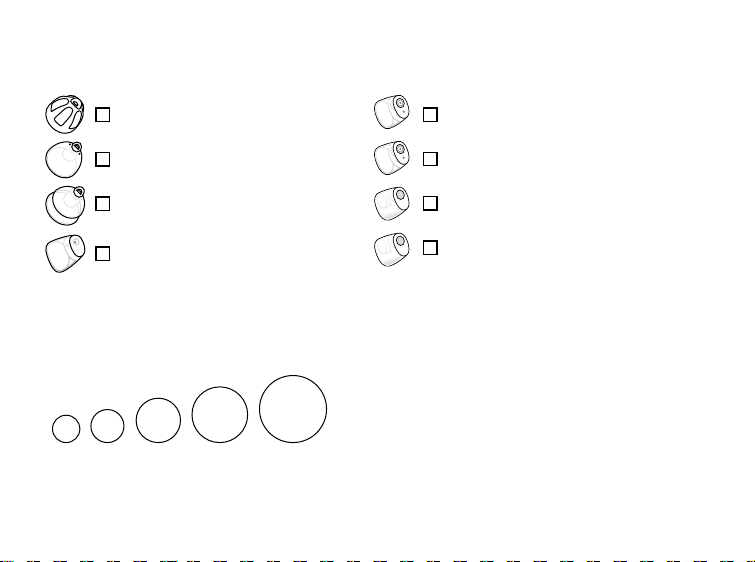
The speakers use one of the following earpieces:
Standard earpieces Customized earpieces
OpenBass dome
Bass dome, double vent
Power dome
Grip Tip
Available in small and large, left and
right, with or without vent.
Dome sizes
6 mm5 mm* 8 mm 10 mm 12 mm
*Only as OpenBass dome for speaker 60
MicroMold
LiteTip
VarioTherm® MicroMold
VarioTherm® LiteTip
VarioTherm® is a registered trademark
of Dreve.
Note
For details on replacing the dome, see the Replace
standard earpieces section.
13
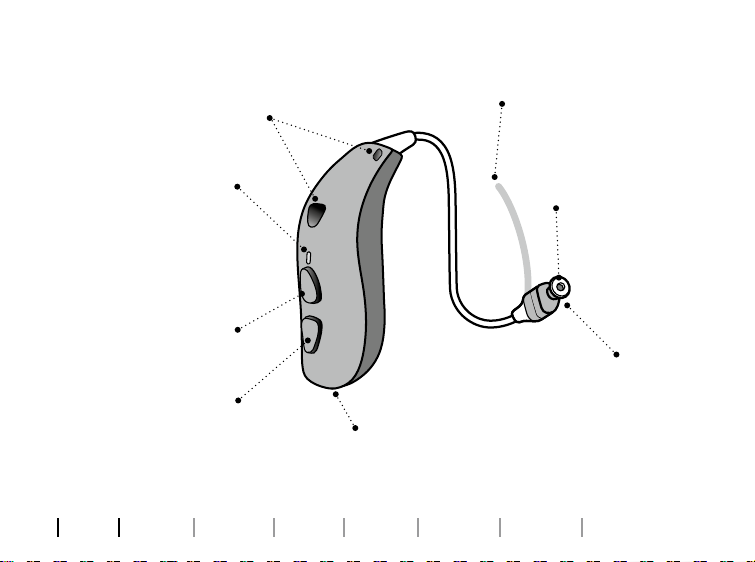
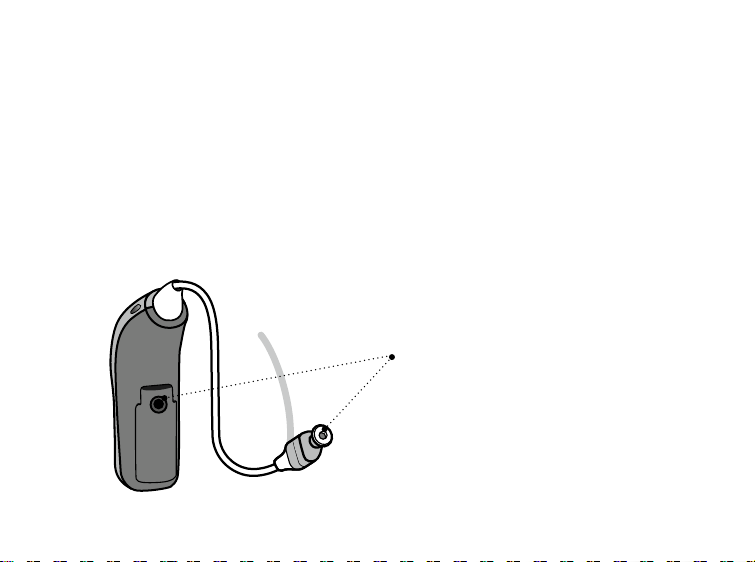
Hearing aid
What it is and does
Microphones
Sound in
Ear grip
Holds the speaker
in place (optional)
Charging, ON, OFF,
Flight mode status
ON, OFF, Flight mode,
14
About Start-up Handling Options Tinnitus Warnings More info
LED light
Push button
Upper part:
Volume up,
program change
Lower part:
volume down,
program change
Rechargeable battery
Can only be replaced by the
hearing care professional
Wax filter
Protects the
speaker from
earwax
damage
Speaker
Sound out

Charging time
Ensure you fully charge your hearing aid before first time use.
Charge your hearing aid every night. That ensures you start your
day with a fully charged hearing aid. If your hearing aid’s battery is
completely drained, the normal charging time is:
3 hours 1 hour 0.5 hour
Fully charged 50% charged 25% charged
When the battery is fully charged, the charging process stops
automatically. Leave the hearing aid in the charger when you do not use
it and remember to keep the charger connected to a power source at all
times.
Be aware that charging time may vary depending on the remaining
capacity of the battery and between the left / right hearing aid.
For instructions on how to use your charger, see the charger’s
Instructions for use.
16
About Start-up Handling Options Tinnitus Warnings More info

Battery performance
The daily battery performance varies depending on your individual use
and hearing aid settings.
Streaming sound from e.g. TV, mobile phone or connectivity devices can
influence daily battery performance.
If your hearing aid runs out of battery, ensure you recharge it by placing
it in the charger. Be aware that restarting the hearing aid does not give
you more usage time.
For the best charging conditions, ensure the room temperature is in the
range of +10°C and +35°C (50°F and 95°F).
If your hearing aid does not perform for a full day, you may need to
replace the battery. If so, contact your hearing care professional.
17

Turn hearing aid ON / OFF using the charger
Your hearing aid automatically turns ON when removed from the
charger.
The hearing aid LED light turns GREEN after approximately six seconds,
confirming that it is ready for use. Depending on your hearing aid
settings, you may also hear a start-up jingle.
Your hearing aid automatically turns OFF when placed in the charger and
starts charging. The hearing aid LED light turns ORANGE.
IMPORTANT NOTICE
Ensure you always leave the charger connected to a power source when the
hearing aid is seated in the charging port. Turning the charger OFF makes the
hearing aid turn ON and start using battery power.
18
About Start-up Handling Options Tinnitus Warnings More info

Turn hearing aid ON / OFF using the push button
The hearing aid can be turned ON / OFF using the push button.
To turn ON
Press and hold the lower part of the push button for
approximately two seconds.
Release the button and wait until the hearing aid LED
light turns GREEN.
The hearing aid is now turned ON. Depending on your
hearing aids’ settings, you may hear a start-up jingle.
To turn OFF
Press and hold the lower part of the push button for
approximately three seconds until the hearing aid
LED light turns ORANGE. The hearing aid plays four
descending tones. Release the push button and the
hearing aid is turned OFF.
For information regarding tones, see the Sound and LED light
indicators section.
19
Low battery indication
When the battery is running low, you hear three alternate beeps. This
gives you approximately two hours before the hearing aid runs out of
battery.
The beeps are repeated every 30 minutes. Just before the battery runs
out, you hear four descending tones.
Be aware that if you are streaming audio to your hearing aid (from e.g.
TV or mobile phone) and you hear three alternate beeps, you have
approximately one hour before the hearing aid runs out of battery.
To extend battery performance, ensure you stop any streaming taking
place.
Three alternate beeps
= The battery is running low.
Four descending tones
= The battery has run out.
LED light (optional)
Continuous ORANGE blinks indicate low battery.
20
About Start-up Handling Options Tinnitus Warnings More info
Identify left and right hearing aid
It is important to distinguish between the left and the right hearing aid,
as they may be programed differently.
You can find left/right color indicators on the hearing aid itself and on
60 and 85 speakers as shown. Indicator markings (either L or R) can
also be found on 100 speakers and some earpieces.
For 105 speakers, the indicator is found on the earpiece.
A RED indicator marks the
RIGHT hearing aid.
A BLUE indicator marks
the LEFT hearing aid.
21

Put on hearing aid
Step 1 Step 2 Step 3
Ear grip
(optional)
Place the hearing aid
behind your ear.
You should always use
the speaker with an
earpiece attached.
Ensure you only use
parts designed for
your hearing aid.
22
About Start-up Handling Options Tinnitus Warnings More info
Hold the bend of the
speaker wire between
your thumb and index
finger.
The earpiece should
point toward the
opening of the ear
canal.
Gently push the
earpiece into your ear
canal until the speaker
wire sits close to your
head.
If the speaker has an
ear grip, place it in the
ear so it follows the
contour of the ear.

Cleaning
The MultiTool contains a brush and wire loop for cleaning and removing
earwax. If you need a new MultiTool, contact your hearing care
professional.
Wire loopMagnet
Brush
IMPORTANT NOTICE
The MultiTool has a built-in magnet. Keep the MultiTool at least
30 centimeters (1 foot) away from credit cards and other magneticallysensitive devices.
24
About Start-up Handling Options Tinnitus Warnings More info
Do not drop your hearing aid when handling it. Ensure you hold it over
a soft surface to avoid damage while cleaning it.
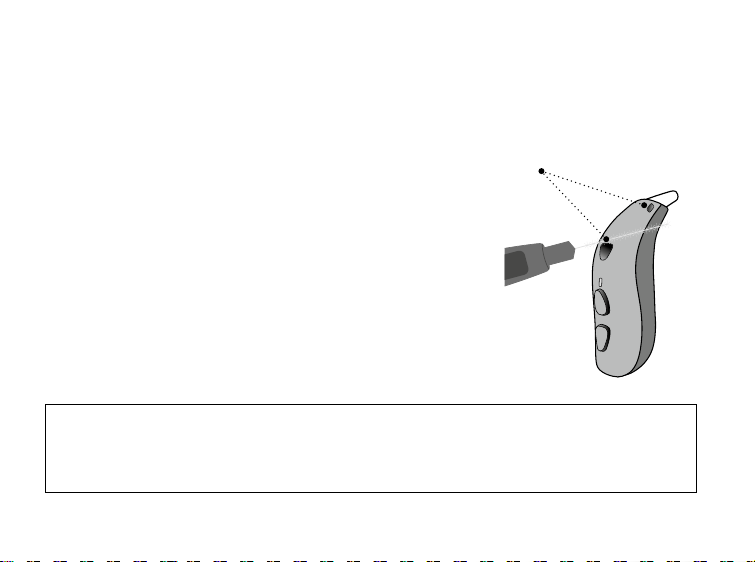
Clean the microphone openings
Use the MultiTool brush to carefully brush
debris away from the openings and the
Microphone
openings
surface around the openings.
Ensure that you do not forcefully squeeze
parts of the MultiTool into the microphone
openings. This may damage the hearing aid.
IMPORTANT NOTICE
To clean the hearing aid, use a soft, dry cloth. The hearing aid must never be
washed or immersed in water or other liquids.
25
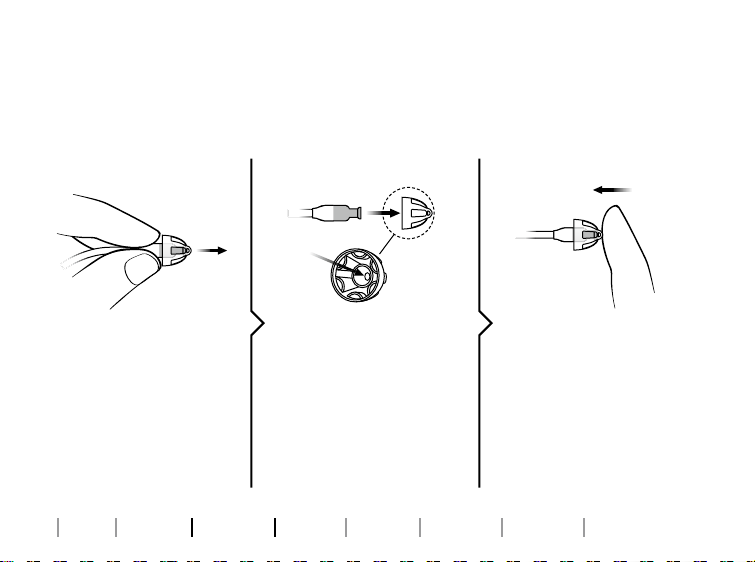
Replace standard earpieces
It is important that you do not clean the standard earpiece (dome and
Grip Tip). If the earpiece is filled with earwax, replace it with a new one.
Grip Tip needs to be replaced at least once a month.
Step 1 Step 2 Step 3
Hold on to the speaker
and pull off the
earpiece.
26
About Start-up Handling Options Tinnitus Warnings More info
Insert the speaker
exactly into the
middle of the earpiece
to get a secure fit.
Push firmly to ensure
that the earpiece is
securely fastened.

IMPORTANT NOTICE
If the earpiece is not on the speaker when removed from the ear, the
earpiece may still be in the ear canal. For further instructions, consult your
hearing care professional.
27
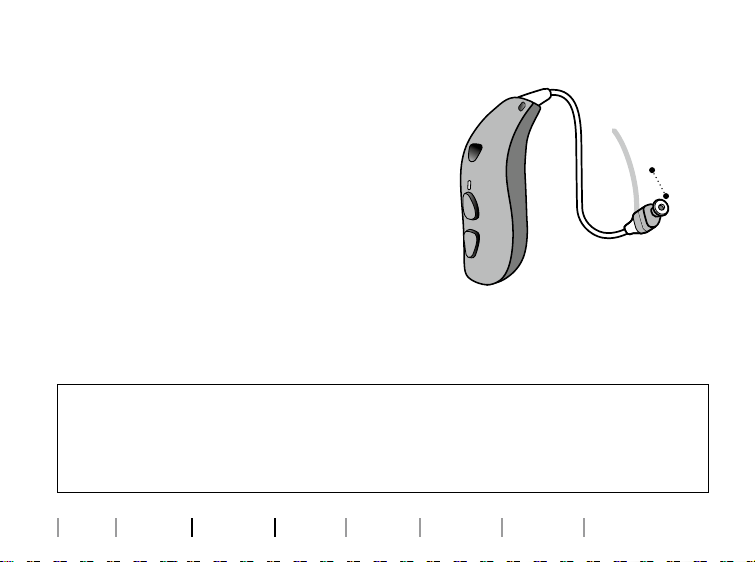
ProWax miniFit lter
The speaker has a white wax filter
attached to the end where the earpiece is
attached. The wax filter keeps earwax and
debris from damaging the speaker.
Ensure you replace the filter when
clogged, or if the hearing aid does not
sound normal. Alternatively, contact your
hearing care professional. Ensure you
remove the earpiece from the speaker
before replacing the wax filter. To do this,
see the Replace standard earpieces
section.
IMPORTANT NOTICE
Ensure you always use the same type of wax filter as originally supplied
with the hearing aid. If you are in doubt about the use or replacement of
wax filters, contact your hearing care professional.
28
About Start-up Handling Options Tinnitus Warnings More info
ProWax filter
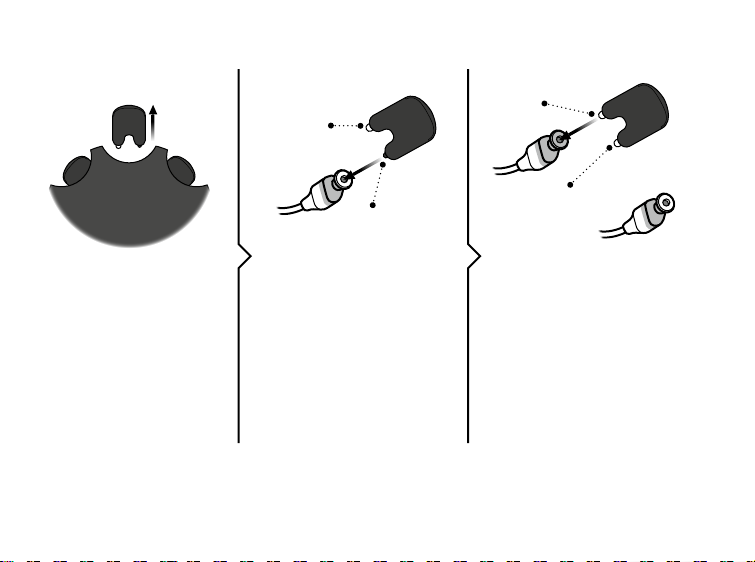
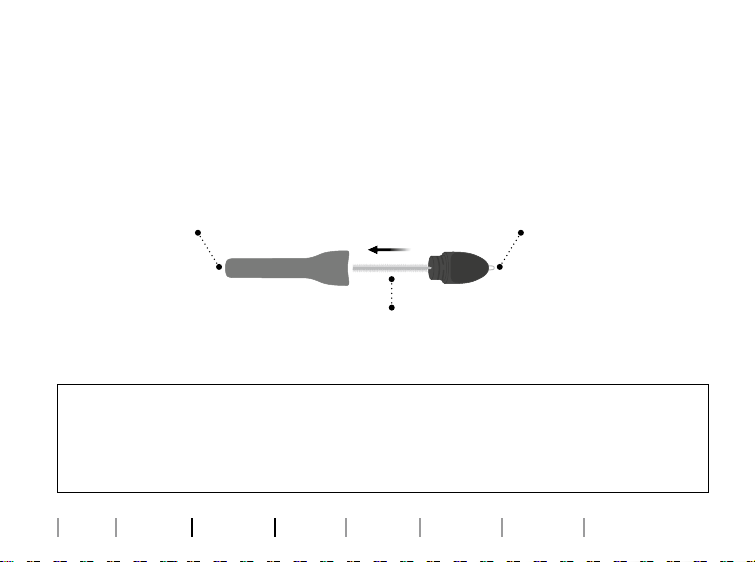
Replace ProWax miniFit lter
1. Tool
2. Remove 3. Insert
New
New
filter
filter
Old
Empty
filter
pin
Remove the tool from
the shell. The tool has
two pins, one empty
for removal and one
Insert the empty pin
into the wax filter in
the speaker and pull
it out.
Insert the new wax
filter using the other
pin, remove the tool,
and throw it out.
with the new wax
filter.
Note
If you use a mold or LiteTip, your hearing care professional must replace the wax filter in the speaker.
Final
29
 Loading...