

Page 1

pep
Step up with
pep
Fitting Guide
Page 2

Page 3

Sonic · Step up with Pep 3
Table of Contents
Introduction
Pep Hearing Instrument Overview 4
Pep BTE Hearing Instruments 6
Acoustic options 6
Thin Tube lengths 6
Attaching and removing the earhook or Thin Tube adapter 7
Changing Thin Tube domes 7
Installing left and right instrument markers 8
Replacing the battery door 9
Pep ITE Hearing Instruments 10
Replacing the Wax Guard 10
Wind screen for Pep ITC instruments 11
Programming Pep with EXPRESSfit 12
Attaching programming cables 12
Programming Pep Using the EXPRESSfit Fitting Software 13
Open EXPRESSfit 13
Ordering Information 20
This document introduces you to the Pep hearing instrument family.
Here you will find step by step instructions on everything from
exchanging the Thin Tubes and earhooks, to fine tuning adjustments
in the EXPRESSfit fitting software. For additional information,
please contact your local Sonic customer care department.
Page 4
4 Sonic · Step up with Pep
VR_ILU_microBTEwithSpira_BW_HI
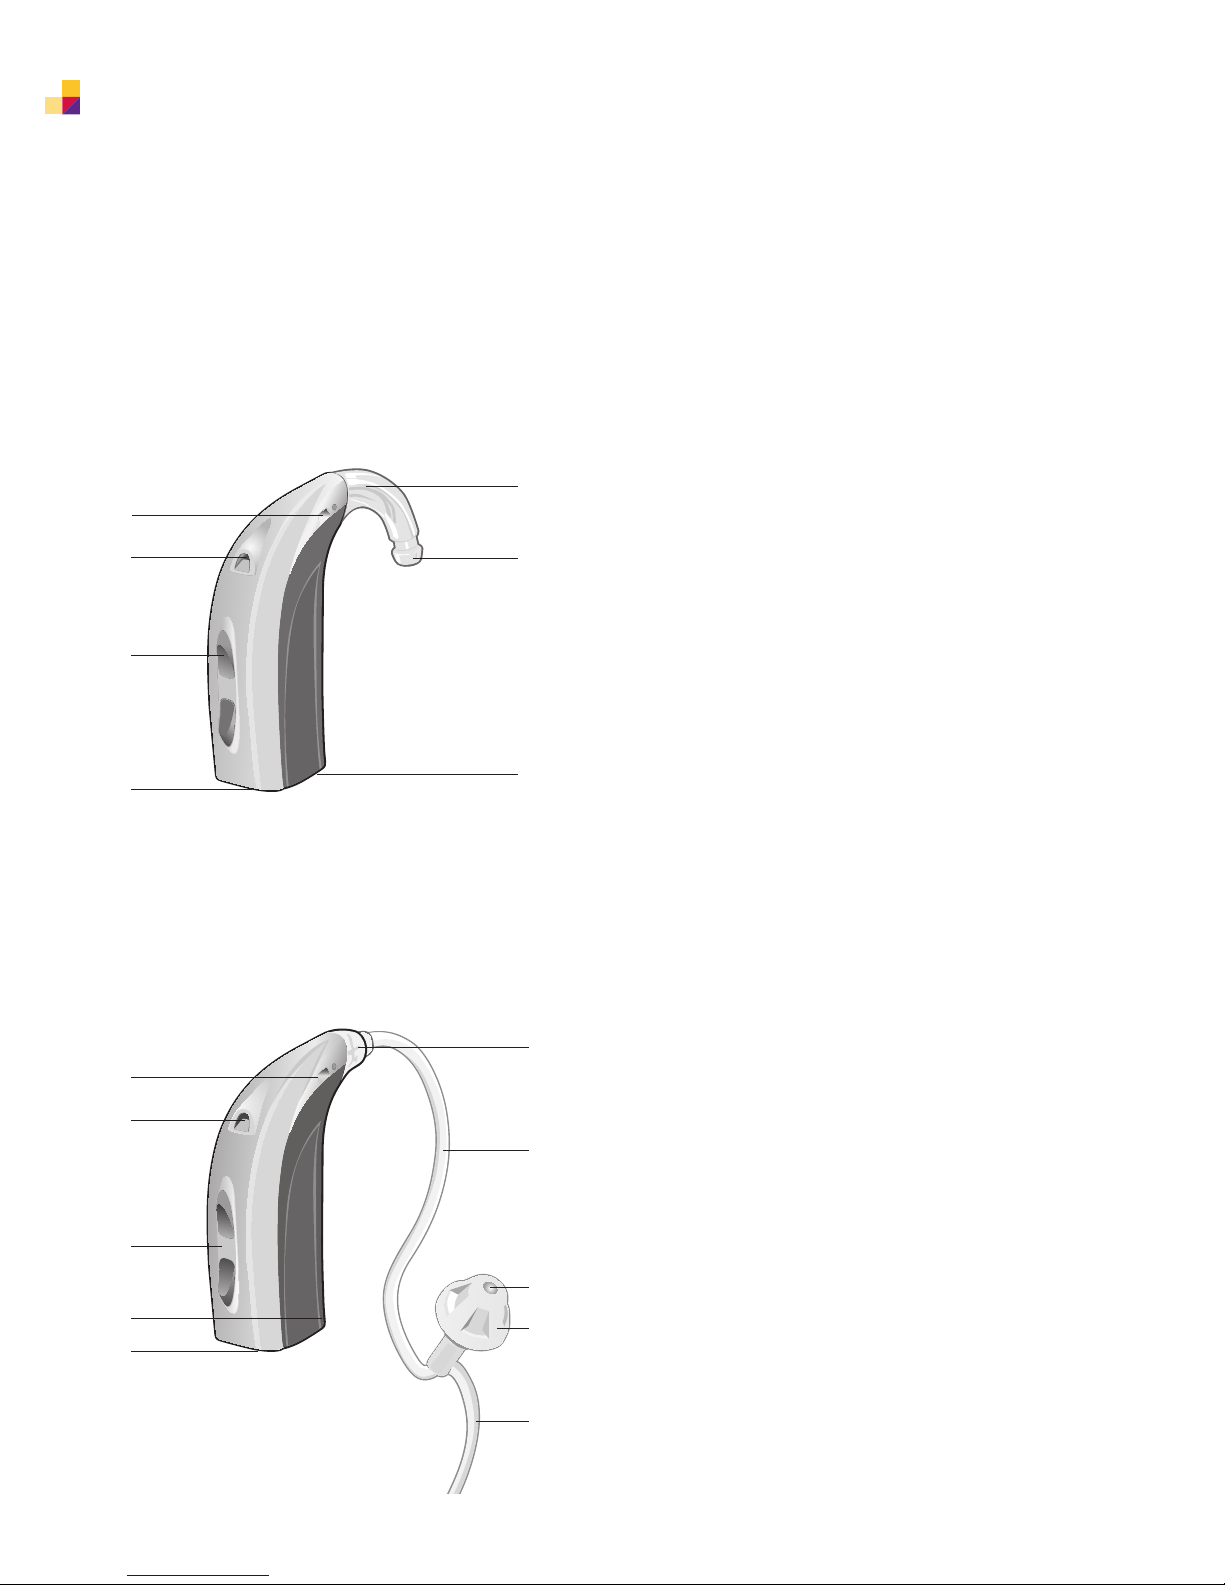
Pep Hearing Instrument
Overview
Pep Power BTE
(Shown with Earhook – Thin Tube also available as an option)
2
2
4
5
Pep BTE
(Shown with the optional Thin Tube – Earhook available as standard)
2
2
4
7
8
1
3
6
1
3
5
6
1 Earhook
2 Microphones
3 Sound outlet
4 Multi control
5 Battery door
6 Direct Audio Input
1 Adapter
2 Microphones
3 Thin Tube
4 Multi control
5 Sound outlet
6 Dome
7 Battery door
8 Direct Audio Input
(with an optional DAI adapter)
9 Retention lock
9
Page 5
Sonic · Step up with Pep 5
VR_ILU_ITC1overview_BW_HI
VR_ILU_ITC2overview_BW_HI
VR_ILU_CICoverview_BW_HI
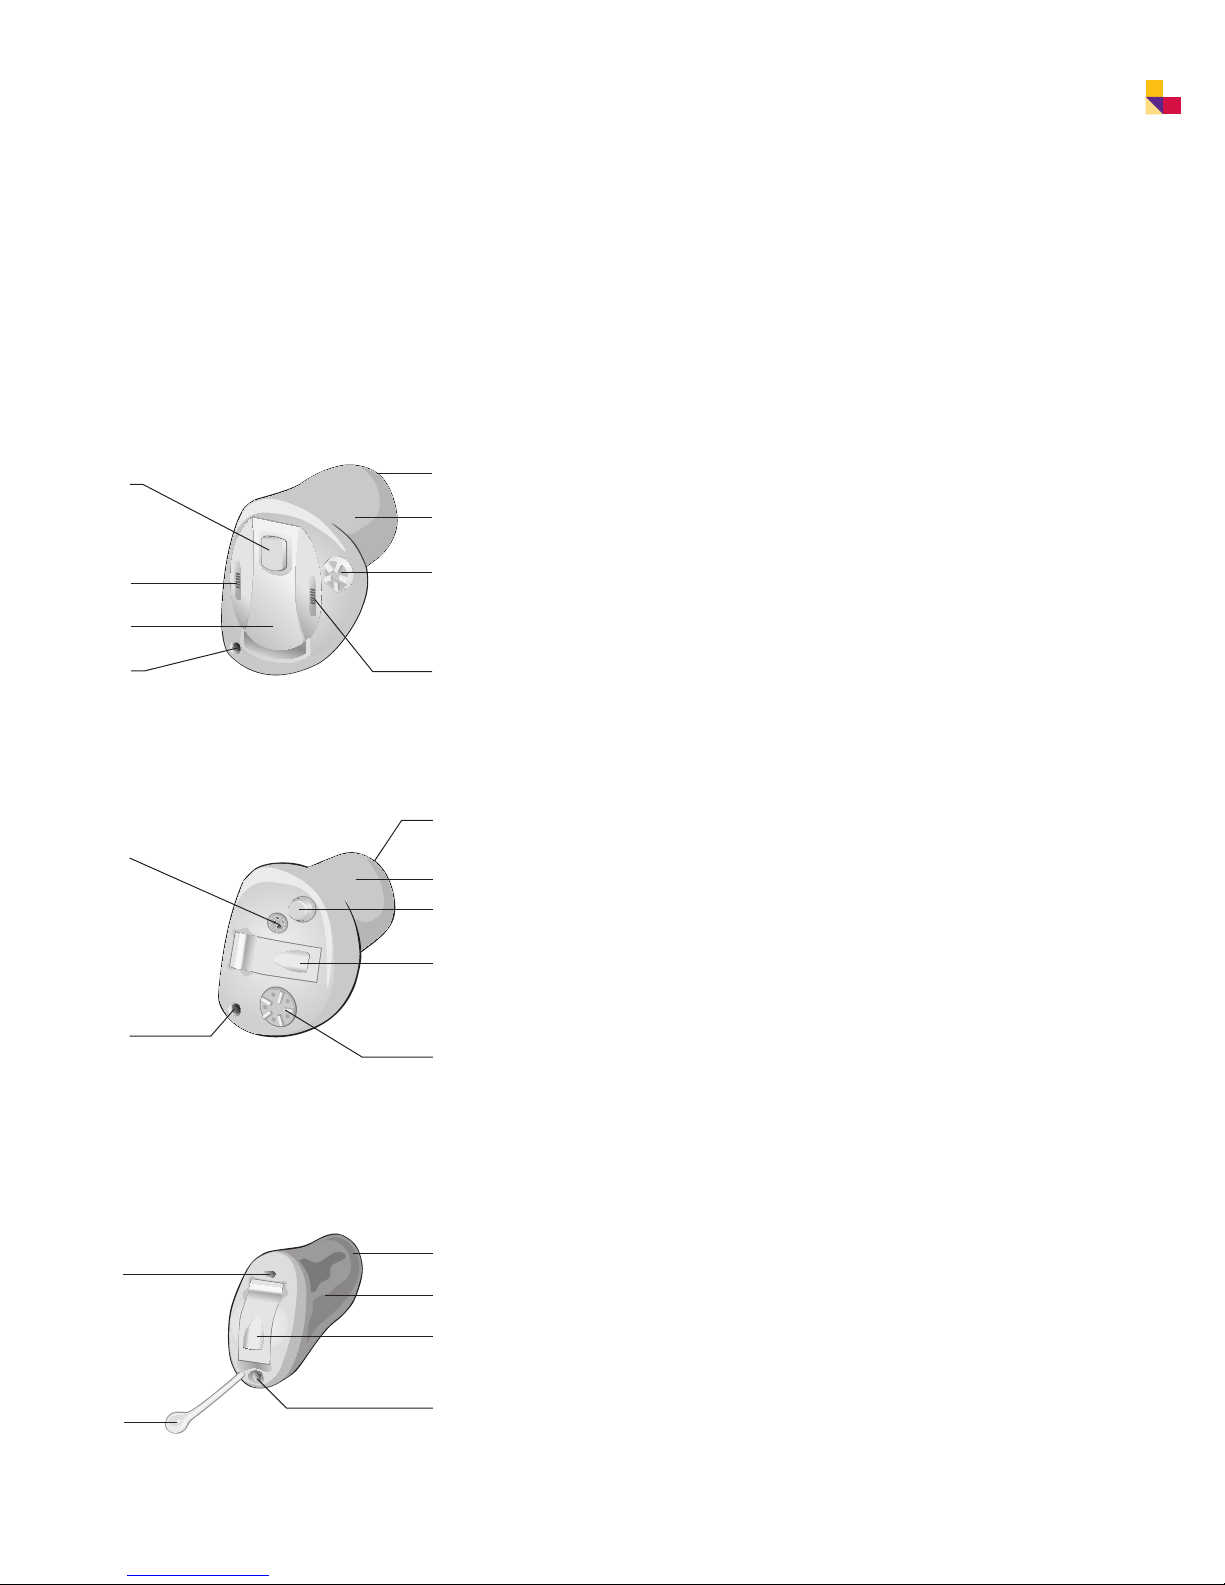
Pep ITCD
6
8
5
1
Pep ITC
4
1
3
2
1 Vent
2 Canal
3 Sound outlet with wax protection
4 Microphone opening
7
5 Battery door
6 Push button (optional)
7 Volume control (optional)
8 Second microphone opening
4
3
2
6
1 Vent
2 Canal
3 Sound outlet with wax protection
4 Microphone opening
5
5 Battery door
6 Push button (optional)
7 Volume control (optional)
7
Pep CIC
4
6
1 Vent
3
2 Canal
3 Sound outlet with wax protection
2
5
4 Microphone opening
5 Battery door
6 Removal cord
1
Page 6
6 Sonic · Step up with Pep
VR_ILU_MicroCompactBTERemoveHook_BW_HI
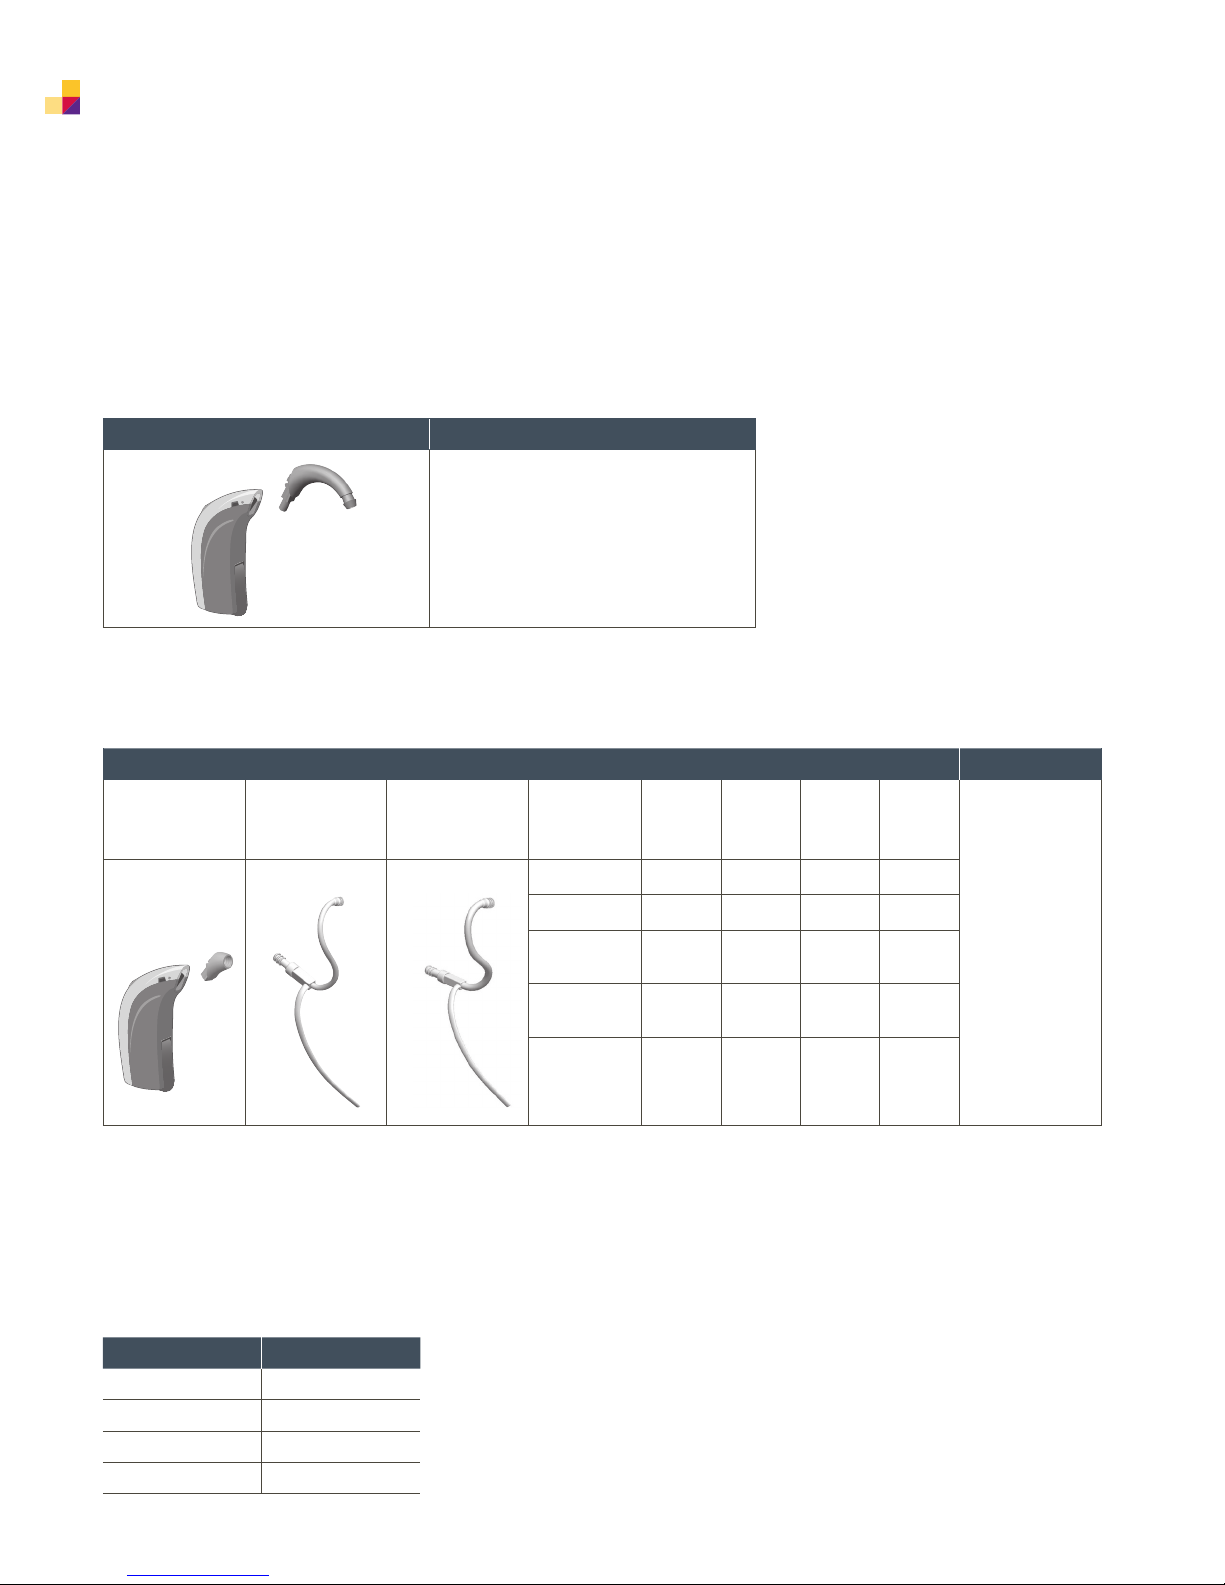
Pep BTE Hearing Instruments
All Pep BTE hearing instruments can be fit with either a conventional earhook or a Thin Tube.
Conventional Earhook Custom Fit
Various Custom Molds available
Acoustic options
Thin Tube Domes Custom Fit
Thin Tube
system
0.9 mm 1.3 mm 6 mm
(XS)
8 mm
(S)
10 mm
(M)
12 mm
(L)
(optional)
Open Dome
Tulip Dome
Dome,
Large Vent
Dome,
Small Vent
Power
Dome
● ● ●
● ● ●
● ● ●
● ● ●
●
Custom Molds
Various
available
Thin Tube lengths
To ensure a secure fitting with maximum patient comfort, the proper Thin Tube length should be selected
for each patient before fitting a Pep BTE. Sonic Thin Tubes come in four different lengths, and a red (Right)
or blue (Left) marker on the Thin Tube identifies the orientation.
Length Size Code
XShort 0
Short 1
Medium 2
Long 3
Page 7
Sonic · Step up with Pep 7
VR_ILU_MicroCompactBTERemovePin_CMYK_HI
VR_ILU_MicroCompactBTERemoveHook_BW_HI
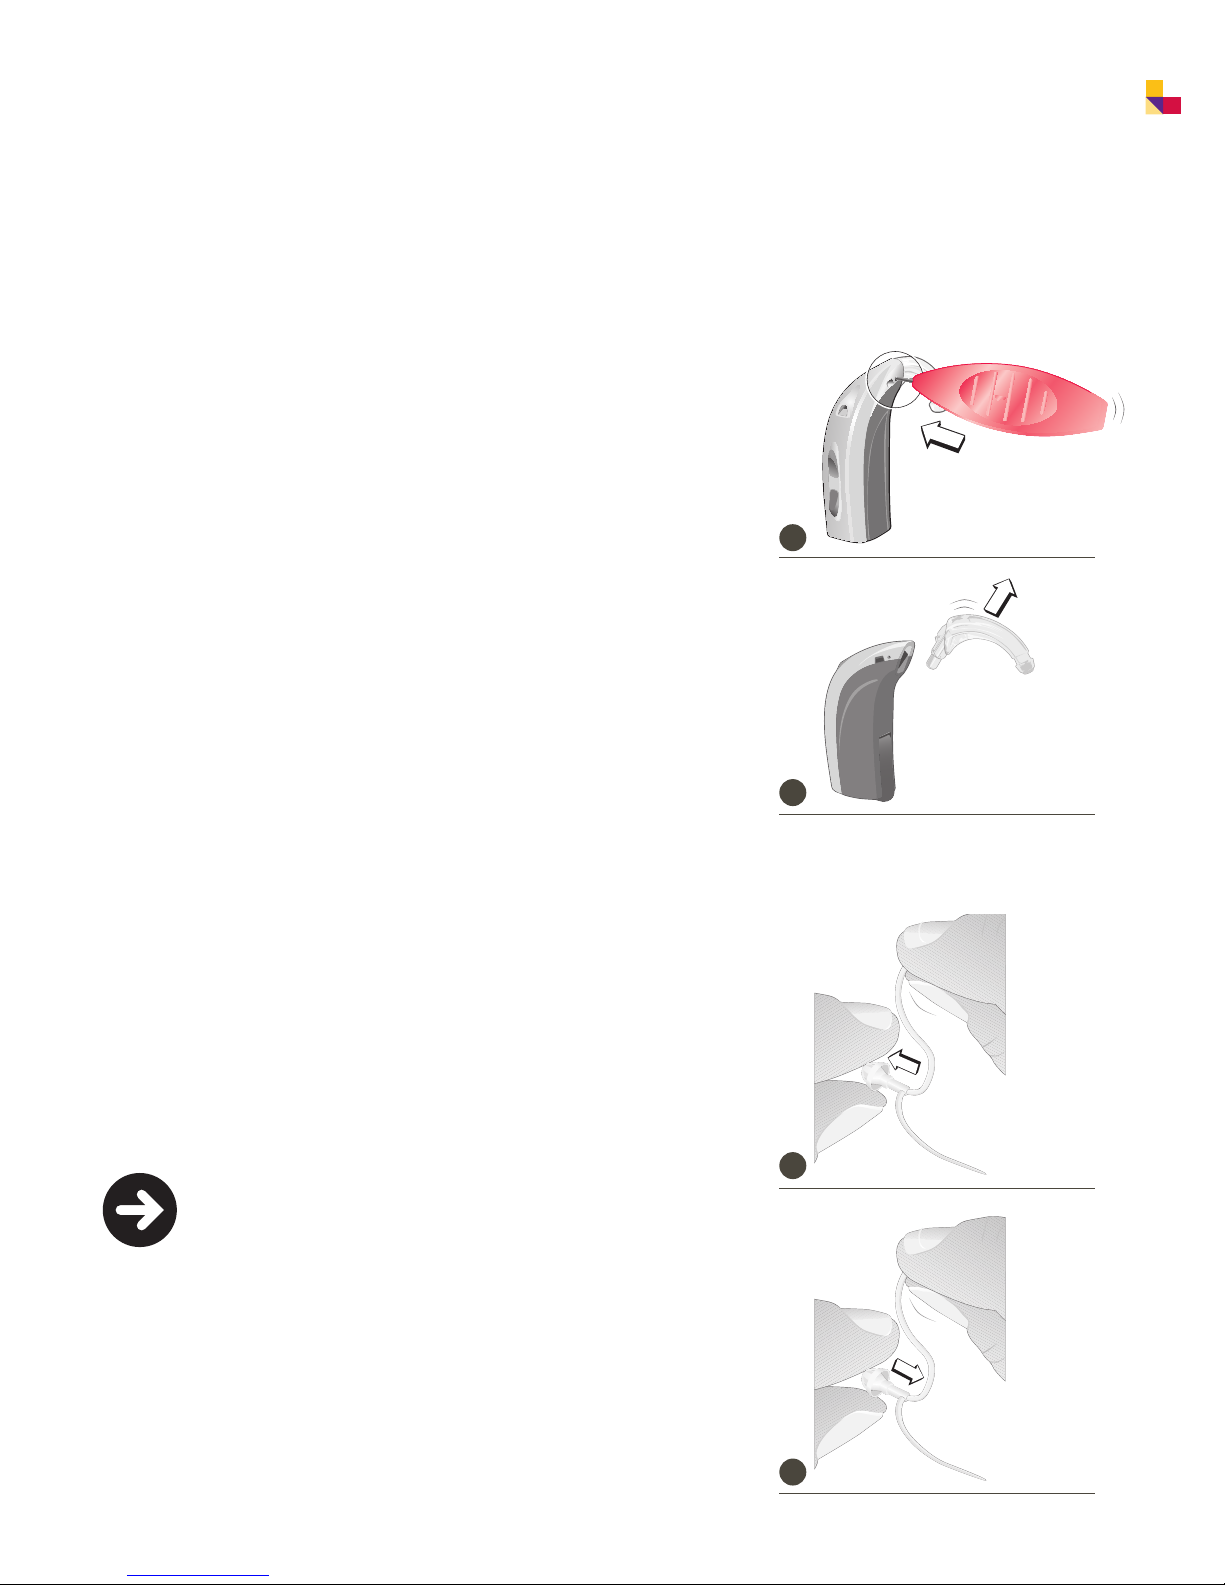
Attaching and removing the earhook
or Thin Tube adapter
1 Use the pointed end of the disassembly tool to push the lock pin free.
2 Replace the hook or the adapter with the desired part.
3 Replace the lock pin (tweezers make this easier).
Changing Thin Tube domes
1 Pull the used dome off the tube and discard.
2 With clean hands, firmly push a new dome onto the tube
as far as it will go.
1
2
Note! If the dome is not pushed all the way onto the tube,
it could fall off in the ear canal.
1
2
Page 8
8 Sonic · Step up with Pep
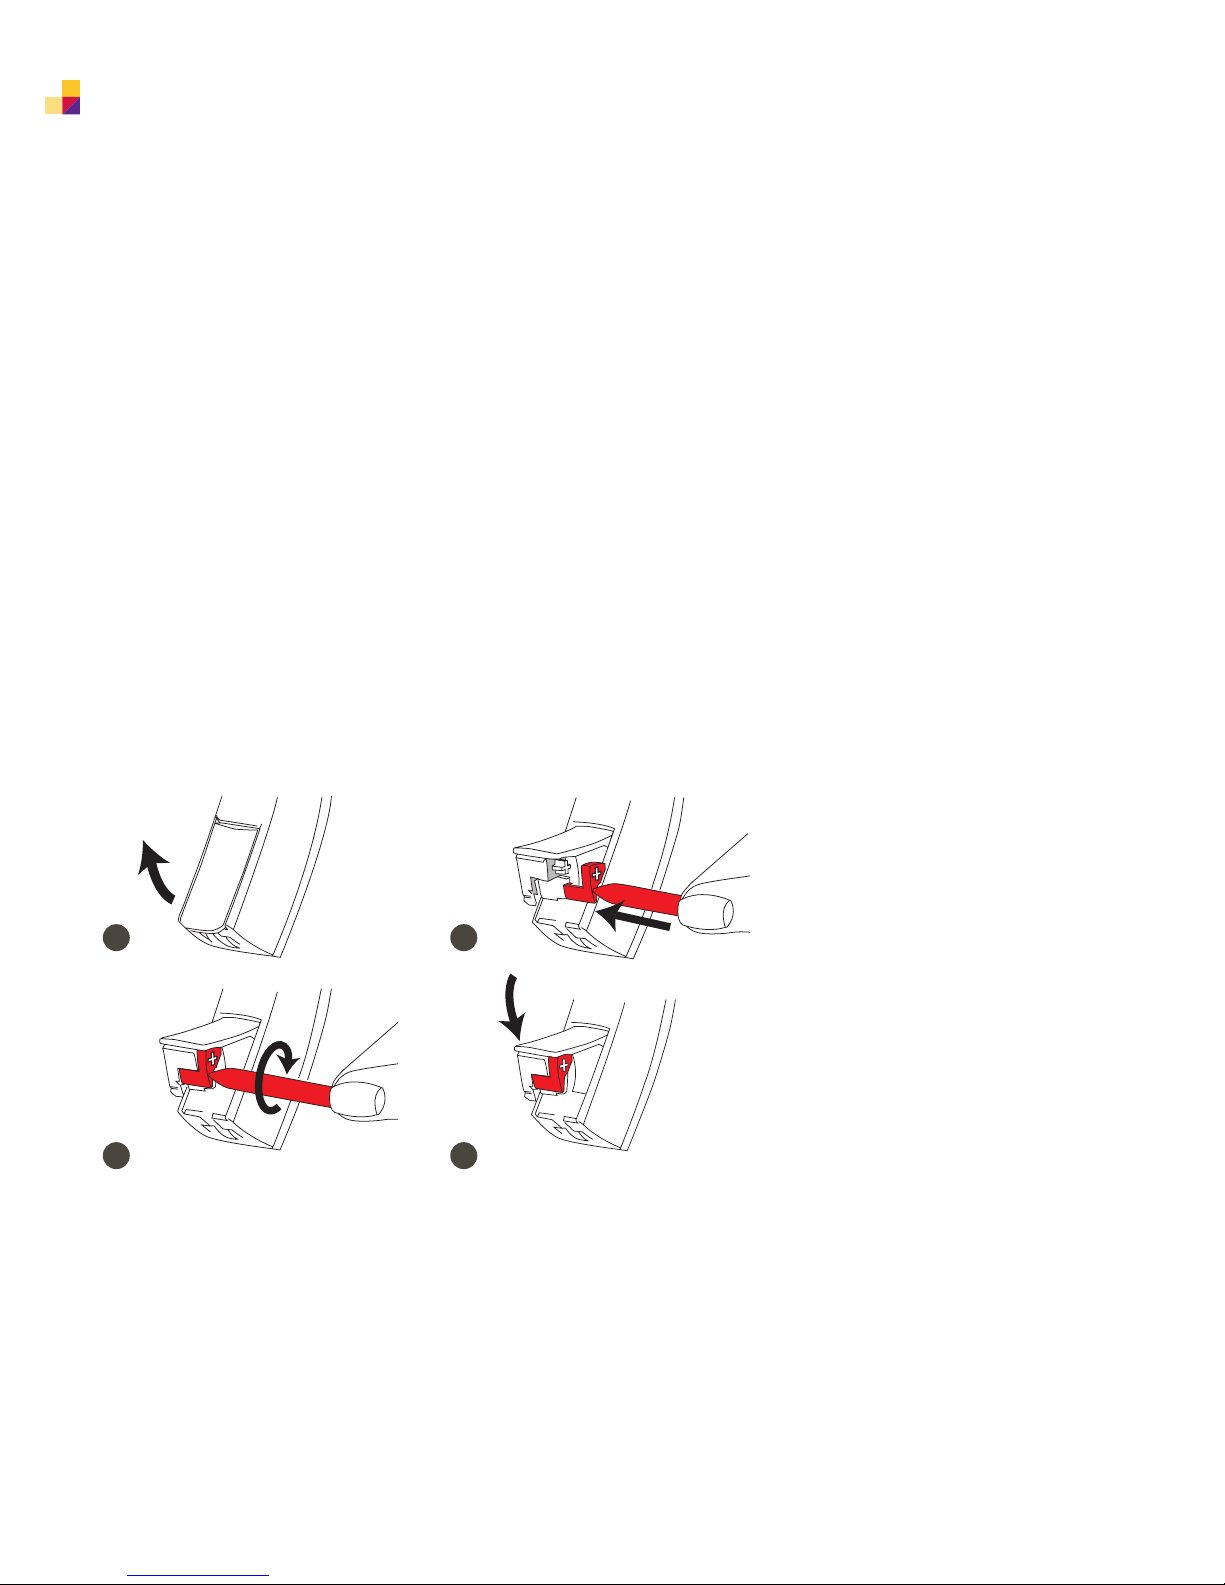
Installing left and right instrument markers
1 Open the battery door of the Pep BTE hearing instrument to expose
the receptacle for the Left/Right marker.
2 Insert the end of the red (Right) or blue (Left) marker into the slot
until it firmly fits as shown.
3 Twist and break off the long post of the marker tool, ensuring that
the red or blue marker remains in the instrument’s opening.
4 Close the battery door.
1 2
3 4
Page 9

Sonic · Step up with Pep 9
Replacing the battery door
1 Open the battery door and place the battery removal tool as shown
in the instruction.
2 Gently pull the battery door off.
3 Snap the new battery door in place and close.
Note! The Pep BTE instruments have an optional tamper
resistant battery door that can be ordered separately.
1
2
3
Page 10

10 Sonic · Step up with Pep
Pep Custom Hearing Instruments
Replacing the Wax Guard
All Pep custom models are supplied with the NoWax wax protection system.
1 Take a new Removal Tool from the package.
2 Insert the removal prong of the tool into the instrument’s existing
Wax Guard and extract the old Wax Guard.
3 Insert the new Wax Guard into the instrument and pull out the
Removal Tool.
4 Discard the removal tool and old Wax Guard.
1 2
3 4
Page 11

Sonic · Step up with Pep 11
VR_ILLU_ITC_WindScreen_Place2_CMYK_HI
VR_ILLU_ITC_WindScreen_Place1_CMYK_HI
VR_ILLU_ITC_WindScreen_Removal_CMYK_HI
• • • ••• • ••• • • • •••• • •• •• • • • • • • • •••••••••••••••••••••••••••••••
Wind screen for Pep ITC instruments
Locate the microphone opening on the face plate.
1 With the dome side facing up, grasp the wind screen
with a pair of tweezers.
2 Snap the windscreen into the hole.
3 To remove, carefully insert the tweezers into
the wind screen and pop it out.
Dome side Rear side
1
2
3
Page 12

12 Sonic · Step up with Pep
VR_ILU_DaiFMAdapterOnMicroBTE_BW_MOD_HI
VR_ILU_MicroCompactBTEprogramAdapter_BW_HI
VR_ILU_ITCDinsertPill1_BW_HI
Programming Pep with EXPRESSfit
Pep can be programmed using EXPRESSfit Fitting Software version 2012.1
or later, and may be used with the EXPRESSlink3, NOAHlink, or HI-PRO
programming interfaces. The ‘New Standard’ (no.2) programming
cables are required. A fresh battery (or battery pill adapter for ITCD only)
must be inserted into a Pep hearing instrument prior to programming.
Attaching programming cables
Pep BTE hearing instruments
1 Open the battery door fully and slide the programming adapter into
the slot unit it lines up with the instrument.
2 Close the battery door (with a fresh battery included) again and
plug in the cable end into the programming socket as pictured.
Pep custom hearing instruments
1 For Pep ITCD instruments, insert the battery pill with the red indicator
pointing to the + sign and close the battery door.
2 For Pep ITC and CIC instruments insert a fresh battery. Open the battery
door slightly. With the black dot facing up, insert the end of the Flex Strip
into the space between the battery door and the hinge until the black dot
touches the faceplate. Close the battery door.
3 Place the instrument in the client’s ear and drape the strip over
and behind the ear.
1
2
1 2 3
Page 13

Sonic · Step up with Pep 13
Programming Pep
Using the EXPRESSfit Fitting Software
To begin programming Pep instruments, insert a fresh battery and
connect programming cables to your EXPRESSlink3, HI-PRO,
nEARcom, or NOAHlink device. Launch the EXPRESSfit fitting software
to proceed.
Open EXPRESSfit
When starting a new fitting,
press Detect on the Product
Overview screen if instruments
are connected, or select an
instrument family for simulation.
Detection
With the instrument detected,
follow the prompts to start a new
fitting with the hearing instrument.
Page 14

14 Sonic · Step up with Pep
Acoustics
EXPRESSfit will recommend
acoustic options based on the
patient’s audiogram. You can
accept the recommendations by
clicking Apply or modify the
acoustics by selecting the Thin
Tubes or Earhook, and Ear Piece
to be used for your patient.
Navigation Toolbar
Use the toolbar located on the
left side of your screen to navigate
through the fitting process.
The main screens for each segment
will be reviewed in the following
pages.
Page 15

Sonic · Step up with Pep 15
Edit Hearing Instrument
On the Edit Hearing Instrument
screen you can change the
acoustics or the selected hearing
instrument.
Page 16

16 Sonic · Step up with Pep
Edit Client Info
This screen allows you to review and select your patient’s personal data,
and customize the client experience level and fitting rationales.
The default fitting rationale is Best Fit Fast.
Your patient’s audiogram and the selected fitting rationale will determine
the gain and frequency response for the Pep fitting. You may also wish
to perform In Situ measurements or include additional audiometric
data to further customize the fitting. These functions are accessible by
clicking on the appropriate tab at the bottom of the screen.
Manage Programs
The Manage Programs screen
allows you to add, copy, swap,
and remove listening programs.
To view or change features,
select the appropriate program,
then select the Features tab
near the bottom of your screen.
The Universal program is available
in slot 1 only. P1 Universal and
P2 Telephone are set by default.
Page 17

Sonic · Step up with Pep 17
Features
Optimize the features specific
to each program on the Features
screen. The buttons at the bottom
of the screen allow you to easily
switch between programs.
Page 18

18 Sonic · Step up with Pep
Fit Hearing Instrument
Use the Fit Hearing Instrument
screen to make gain adjustments
and view the hearing instrument’s
frequency response relative
to prescribed targets. To adjust
the levels of fine tuning, click
the Simplified, Standard, or
Advanced tabs.
Click the icon to select whether
these changes are made for a
single program or for all listening
programs.
You may also measure the feedback
margin by clicking the Feedback
Manager tab near the bottom of
your screen.
Click Measure and follow the
prompts to complete measurements for one or both ears.
Page 19

Sonic · Step up with Pep 19
Finish Session
Options
In this section you will find
access to all local controls,
including volume control range
configurations and program
selector settings.
Audible Indicators
Select and demonstrate audible
indicators on this screen.
The frequency and level of these
tones can be customized for
better recognition.
Save and Quit
Review program and feature
settings, and save your session
here. There is also space
available for optional comments
on this screen.
Page 20

20 Sonic · Step up with Pep
Ordering Information
Thin Tubes 0.9 mm
Product Quantity per packaging Order reference number
Thin Tube 0.9, 0L, Spira Flex 5 589-25-070-00
Thin Tube 0.9, 0R, Spira Flex 5 589-25-060-00
Thin Tube 0.9, 1L, Spira Flex 5 589-25-071-00
Thin Tube 0.9, 1R, Spira Flex 5 589-25-061-00
Thin Tube 0.9, 2L, Spira Flex 5 589-25-072-00
Thin Tube 0.9, 2R, Spira Flex 5 589-25-062-00
Thin Tube 0.9, 3L, Spira Flex 5 589-25-073-00
Thin Tube 0.9, 3R, Spira Flex 5 589-25-063-00
Thin Tubes 1.3 mm
Product Quantity per packaging Order reference number
Thin Tube 1.3, 0L, Spira Flex 5 589-25-090-00
Thin Tube 1.3, 0R, Spira Flex 5 589-25-080-00
Thin Tube 1.3, 1L, Spira Flex 5 589-25-091-00
Thin Tube 1.3, 1R, Spira Flex 5 589-25-081-00
Thin Tube 1.3, 2L, Spira Flex 5 589-25-092-00
Thin Tube 1.3, 2R, Spira Flex 5 589-25-082-00
Thin Tube 1.3, 3L, Spira Flex 5 589-25-093-00
Thin Tube 1.3, 3R, Spira Flex 5 589-25-083-00
BTE Earhooks and Thin Tube Adapters
Product Quantity per packaging Order reference number
BTE Thin Tube adapter #3 10 589-25-160-00
BTE earhook 10 571-01-130-00
BTE earhook, child 1 105116
Page 21

Sonic · Step up with Pep 21
Ordering Information
Thin Tube Domes
Product Quantity per packaging Order reference number
Dome, Open, 6 mm 10 570-07-410-00
Dome, Open, 8 mm 10 570-07-411-00
Dome, Open, 10 mm 10 570-07-412-00
Dome, Tulip 10 589-25-100-00
Dome, Large Vent, 8 mm 10 123310
Dome, Large Vent, 10 mm 10 12 3311
Dome, Large Vent, 12 mm 10 12 3 312
Dome, Small Vent, 8 mm 10 123307
Dome, Small Vent, 10 mm 10 123308
Dome, Small Vent, 12 mm 10 123309
Dome, Power, 6 mm 10 123293
Dome, Power, 8 mm 10 123305
Dome, Power, 10 mm 10 123306
Programming Cables
Product Quantity per packaging Order reference number
Programming cable, No. 2 New
Standard (HI-PRO) Blue, left
Programming cable, No. 2 New
Standard (HI-PRO) Red, right
Programming cable, No. 2 New
Standard (NoahLink) Blue, left
Programming cable, No. 2 New
Standard (NoahLink) Red, right
Programming Adapters
Product Quantity per packaging Order reference number
Programming adapter
for BTE models
Programming adapter
for ITCD models
Flex Strip/Flex Connect
for ITC and CIC models
1 12090 0
1 120902
1 3003388
1 3003387
1 399-50-640-00
1 390-01-040-00
1 390-01-180-05
Page 22

22 Sonic · Step up with Pep
Ordering Information
DAI/FM Adapters
Product Quantity per packaging Order reference number
DAI adapter 1 399-50-522-00
FM adapter 1 399-50-591-00
Tools
Product Quantity per packaging Order reference number
Disassembly tool for lock pin 1 890-22-270-00
Battery door removal tool
for BTE instruments
Measurement Tool for selecting
the Thin Tube length
NoWax System 10 discs with
1 101484
1 890-21-222-00
689-30-302-08
6 filters each
Wind Screens
Product Quantity per packaging Order reference number
Wind screen for
ITC instruments, beige, BE
Wind screen for
ITC instruments,
light brown, LB
Wind screen for
ITC instruments,
medium brown, MB
Wind screen for
ITC instruments,
dark brown, DB
25 543-09-020-00
25 543-09-021-00
25 543-09-022-00
25 543-09-023-00
Page 23

Page 24

24 Sonic · Step up with Pep
www.sonici.com
06.12 | 125240 | US
 Loading...