

Page 1

Sonic · Fitting Gui de 1
www.sonici.com
Celebrate
Fitting Guide
Page 2

Page 3

Sonic · Fitting Gui de 3
Fitting Guide
Table of Contents
miniRITE Overview 4
miniBTE Overview 5
Custom Instruments Overview 6
Acoustic Performance 8
Fitting ranges 8
miniRITE and miniBTE Hearing Instruments 10
Acoustic options 10
Speaker and Thin Tube lengths 11
Determining the proper Speaker and
Thin Tube length 11
miniRITE Hearing Instruments 12
Attaching a miniFit Speaker on the miniRITE 12
Detaching a miniFit Speaker from the miniRITE 13
60- and 85-Speaker Units 14
Custom Mold and Lite Tip for the 60- and 85-Speaker 15
Attaching the Custom Mold and the Lite Tip to the 60- and 85-Speaker 16
Detaching the Custom Mold and the Lite Tip
from the 60- and 85-Speaker 17
100- and 105-Speaker Units 17
Attaching the Wire to the Power Mold 18
Detaching the Wire from the Power Mold 19
Changing the Wax Filters on the Speaker Unit and Custom Mold 20
miniBTE Hearing Instruments 21
Attaching and removing the Earhook or Thin Tube Adapter from the
miniBTE 21
Attaching and removing a miniFit Thin Tube from the miniBTE 22
Removing the DAI Adapter – miniBTE 22
Attaching the DAI Adapter – miniBTE 22
Custom Hearing Instruments 23
Changing the Wax Filters on custom hearing instruments 23
Changing the microphone protection cap 24
Fitting Sonic Hearing Instruments with EXPRESS
fit 26
Fitting a miniRITE 26
Fitting a miniBTE 27
Fitting a custom hearing instrument 28
CIC and IIC 28
All other custom hearing instruments 29
Ordering Information 30
Page 4
4 Sonic · Fitting Gui de
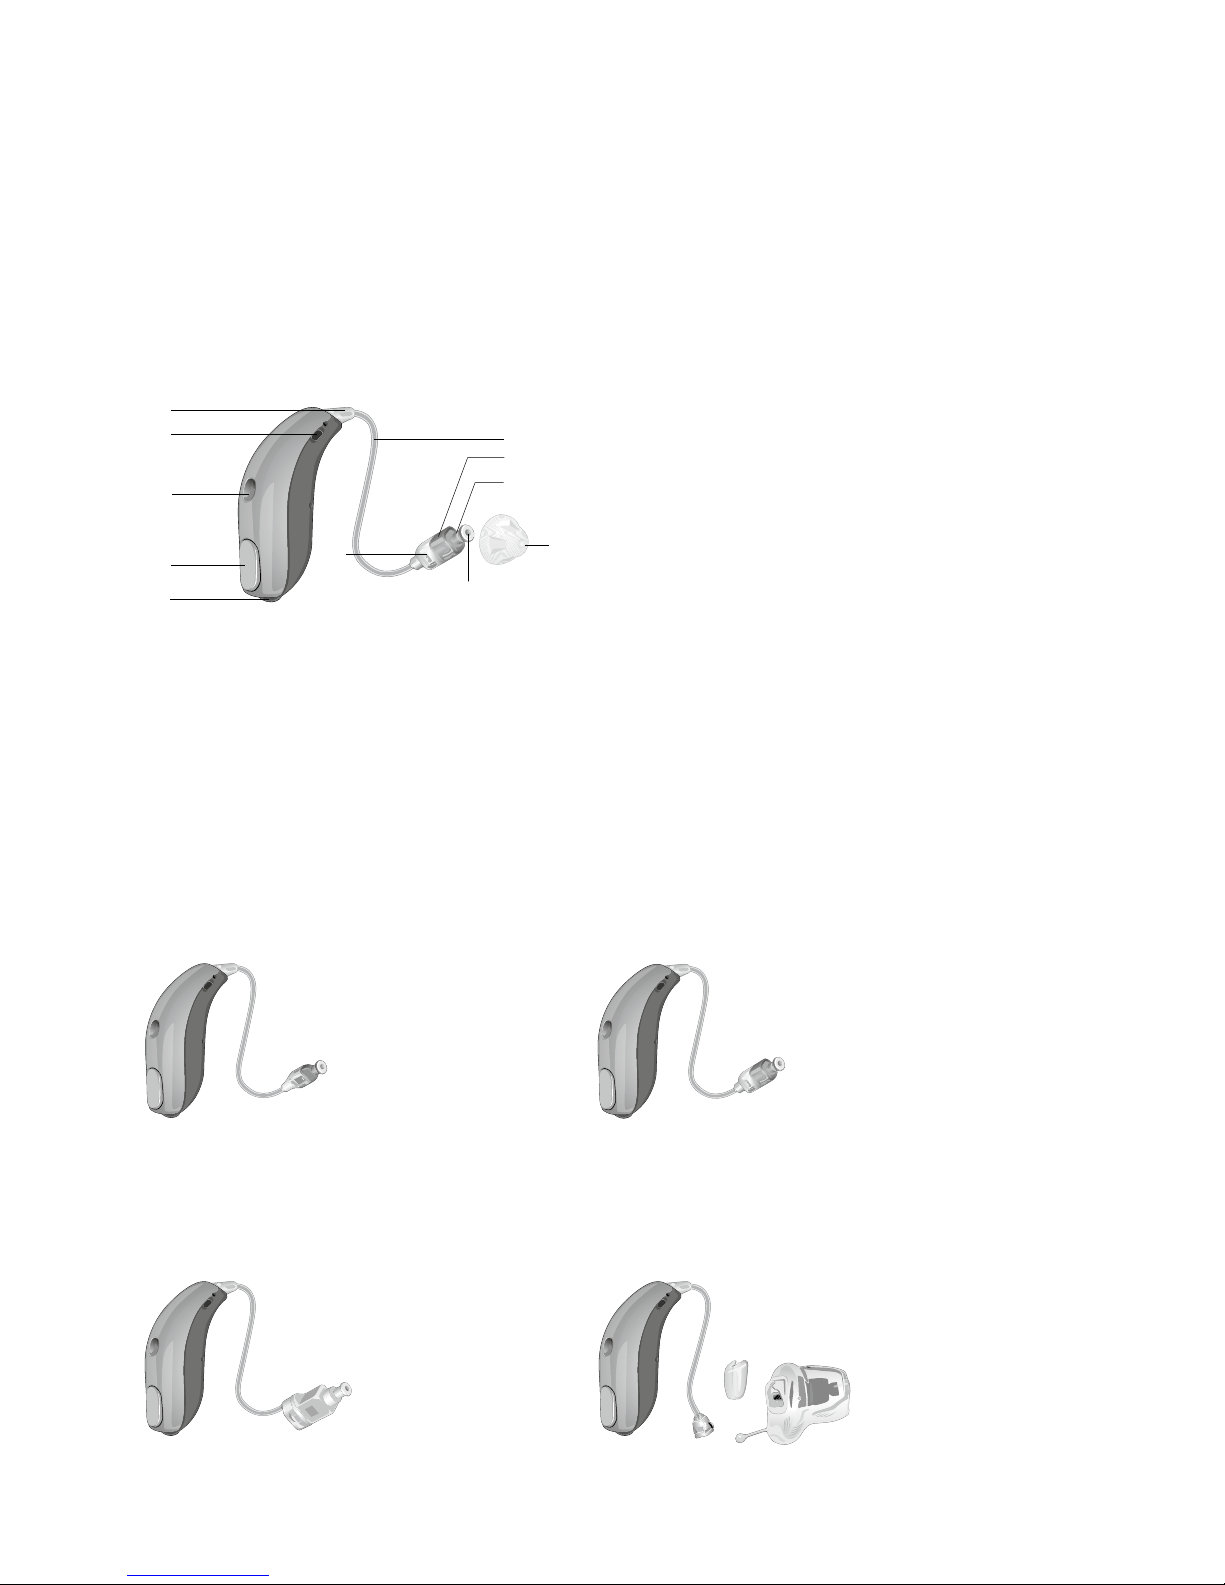
miniRITE
Overview
miniRITE hearing systems offer four speaker units:
· The 60-Speaker, which is appropriate for mild to moderate
hearing losses
· The 85-Speaker, which is appropriate for moderate to moderately
severe hearing losses
· The 100- and 105-Speakers, which provide additional power
for severe and profound hearing losses
1
2a
2
4
5
6
10
8
9
3
7
1 Program Button
2 Microphone
2a Second microphone
3 Connector plug
4 Wire
5 Left/right indicator
6 Speaker
7 Sound outlet
with wax filter
8 Speaker unit size marking
9 Battery door
10 Dome
miniRITE with 60-Speaker
miniRITE with 100-Speaker – Instant Fit
miniRITE with 85-Speaker
miniRITE with 100- and 105-Speaker – Custom Fit
Page 5
Sonic · Fitting Gui de 5
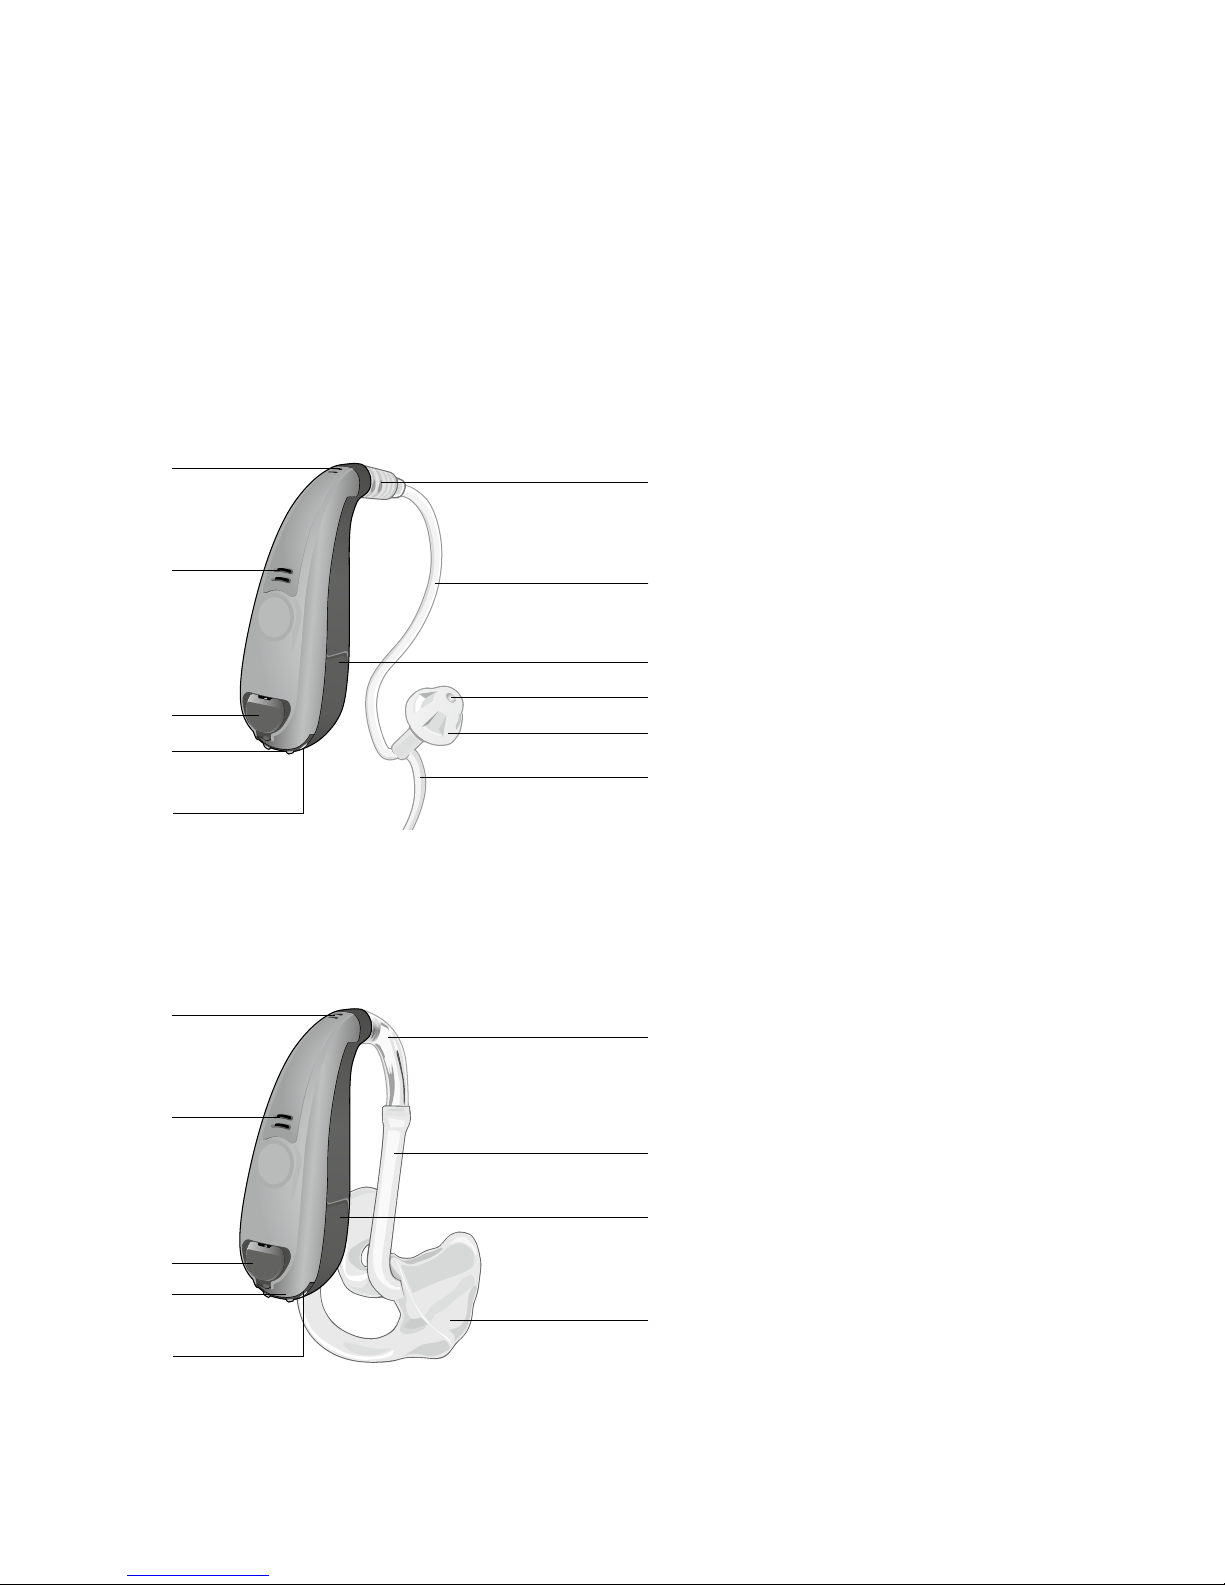
miniBTE
Overview
Earhook and Earmold
1 Front microphone
2 Thin Tube Adapter
3 Rear microphone
4 Thin Tube
5 Battery door
6 Sound outlet
7 Program Button
8 Dome
9 Tamper-resistant lock
10 Retention lock
11 DAI Port
3
7
10
8
6
8
5
4
2
1 Front microphone
2 Earhook
3 Rear microphone
4 Earmold tubing
5 Battery door
6 Program Button
7 Tamper-resistant lock
8 Earmold
9 DAI Port
3
6
5
2
4
Thin Tube and Dome
9
7
1
1
11
9
Page 6
6 Sonic · Fitting Gui de
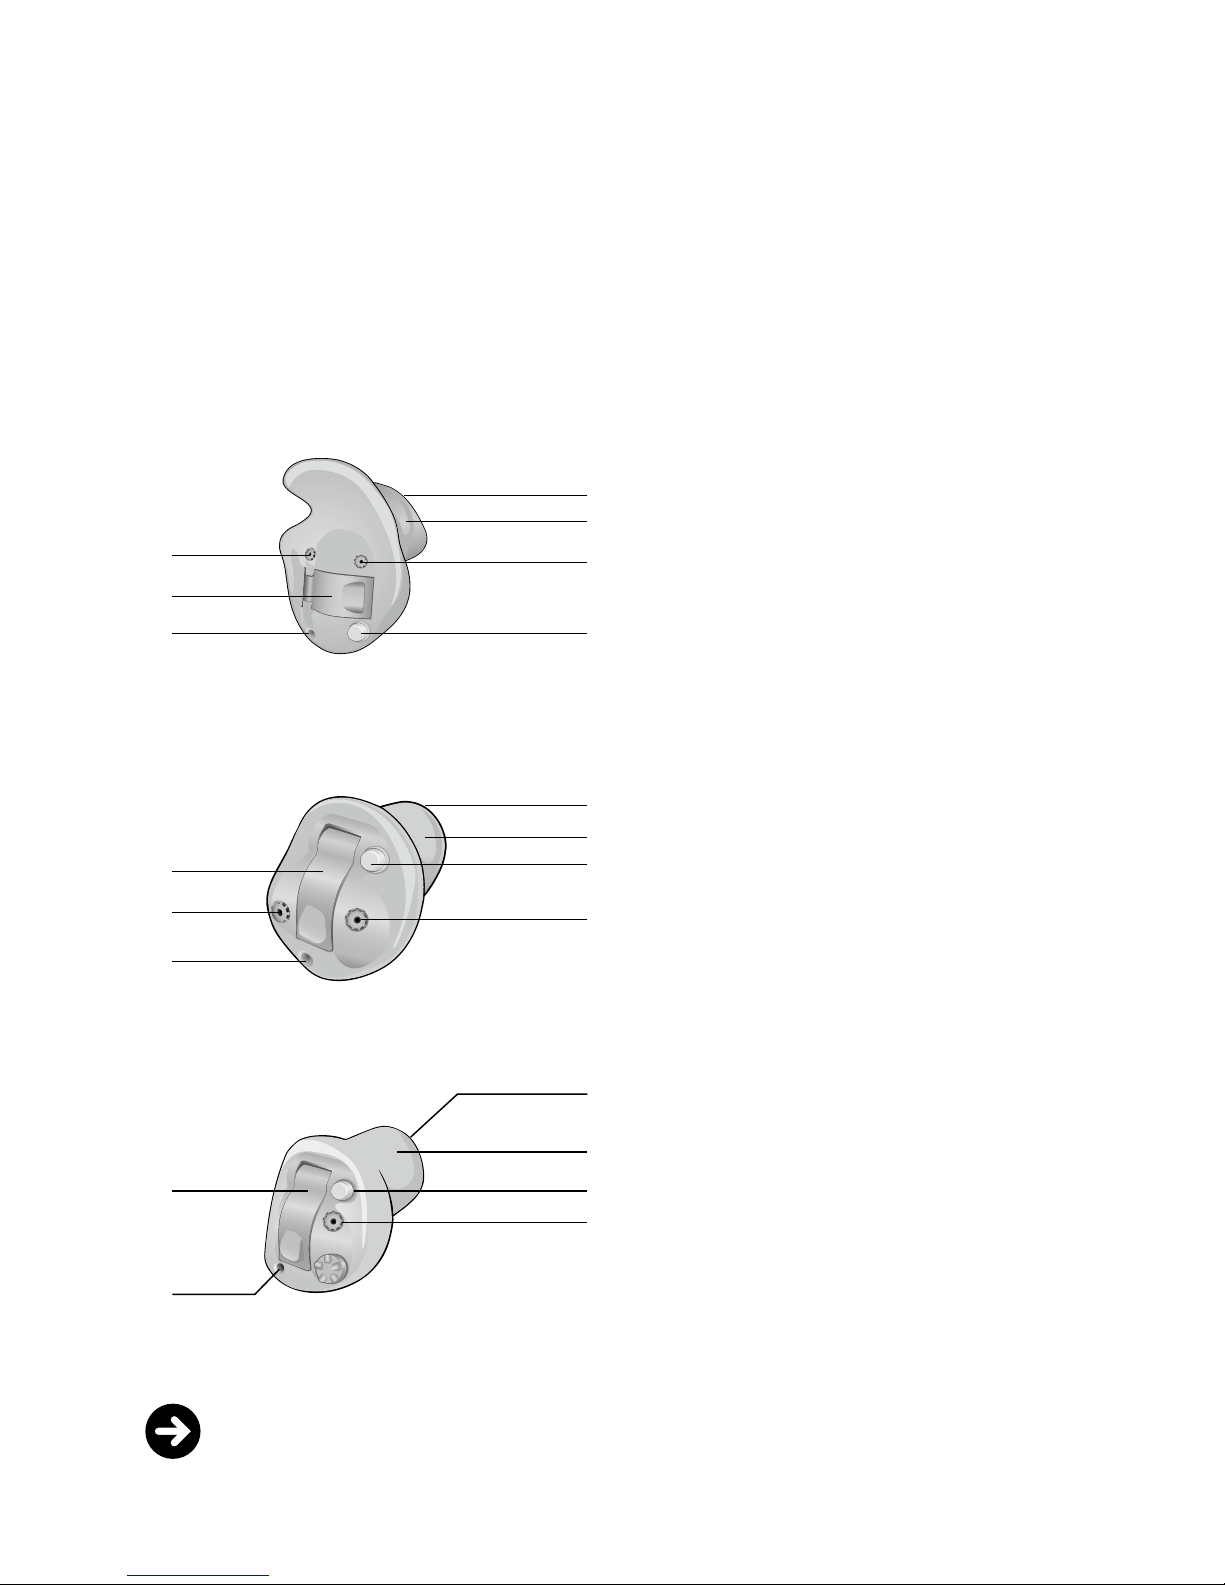
Custom Instruments
Overview
1 Sound outlet with
wax protection
2 Canal
3 Microphone openings
with O-Cap filter
4 Battery door
5 Vent
6 Program Button (optional)
3
4
5 6
3
2
1
ITEPDW | ITED
1 Sound outlet with
wax protection
2 Canal
3 Program Button (optional)
4 Battery door
5 Microphone openings
with O-Cap filter
6 Vent
1 Vent
2 Canal
3 Sound outlet with
wax protection
4 Microphone opening
with O-cap filter
5 Battery door
6 Program Button (optional)
4
5
6
3
5
2
1
ITCPDW | ITCD
ITCW | ITC
4
6
3
2
5
1
Note! The ITED, ITCD, and ITC can be built with an optional volume
control.
Page 7
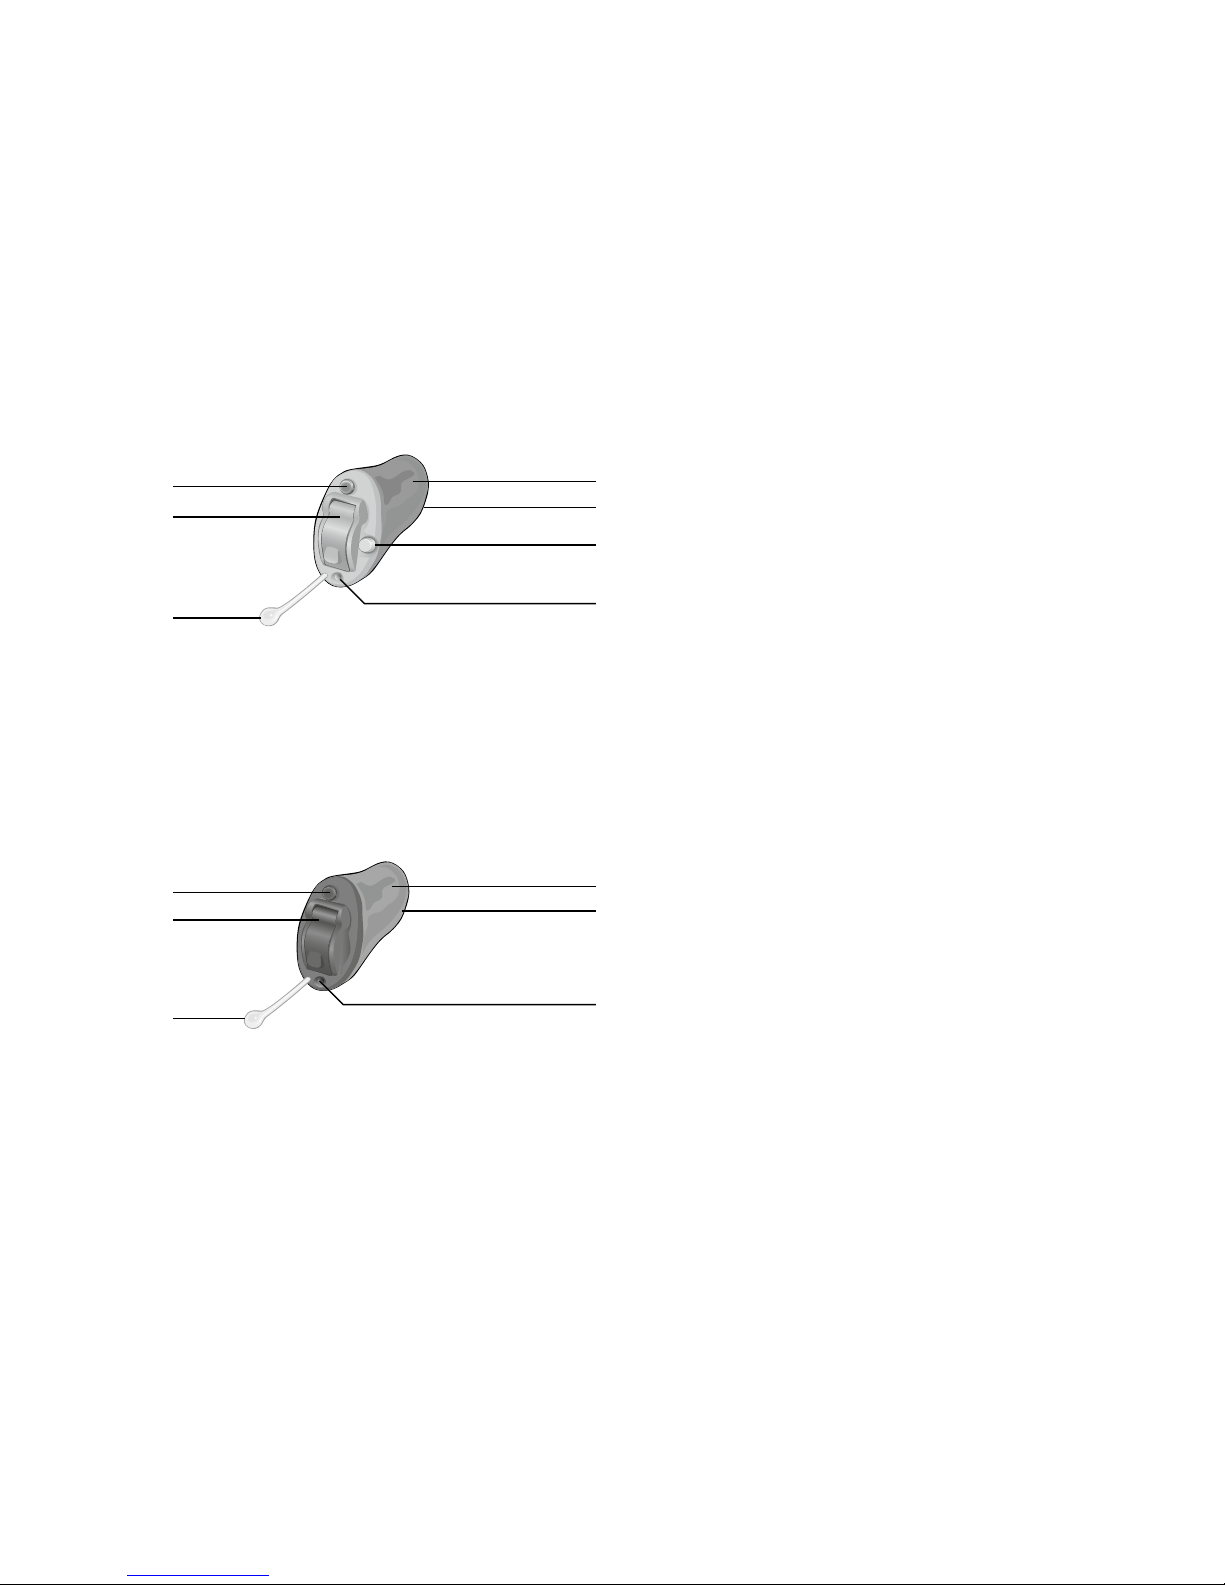
Sonic · Fitting Gui de 7
1 Vent
2 Canal
3 Sound outlet with
wax protection
4 Microphone opening
with T-cap filter
5 Battery door
6 Program Button (optional)
7 Removal (pull-out) string
CICPW | CICW | CIC
1
6
2
3
4
7
5
1 Vent
2 Canal
3 Sound outlet with
wax protection
4 Microphone opening
with T-cap filter
5 Battery door
6 Removal (pull-out) string
IICW/IIC
4
6
1
2
3
5
Page 8

8 Sonic · Fitting Gui de
Acoustic Performance
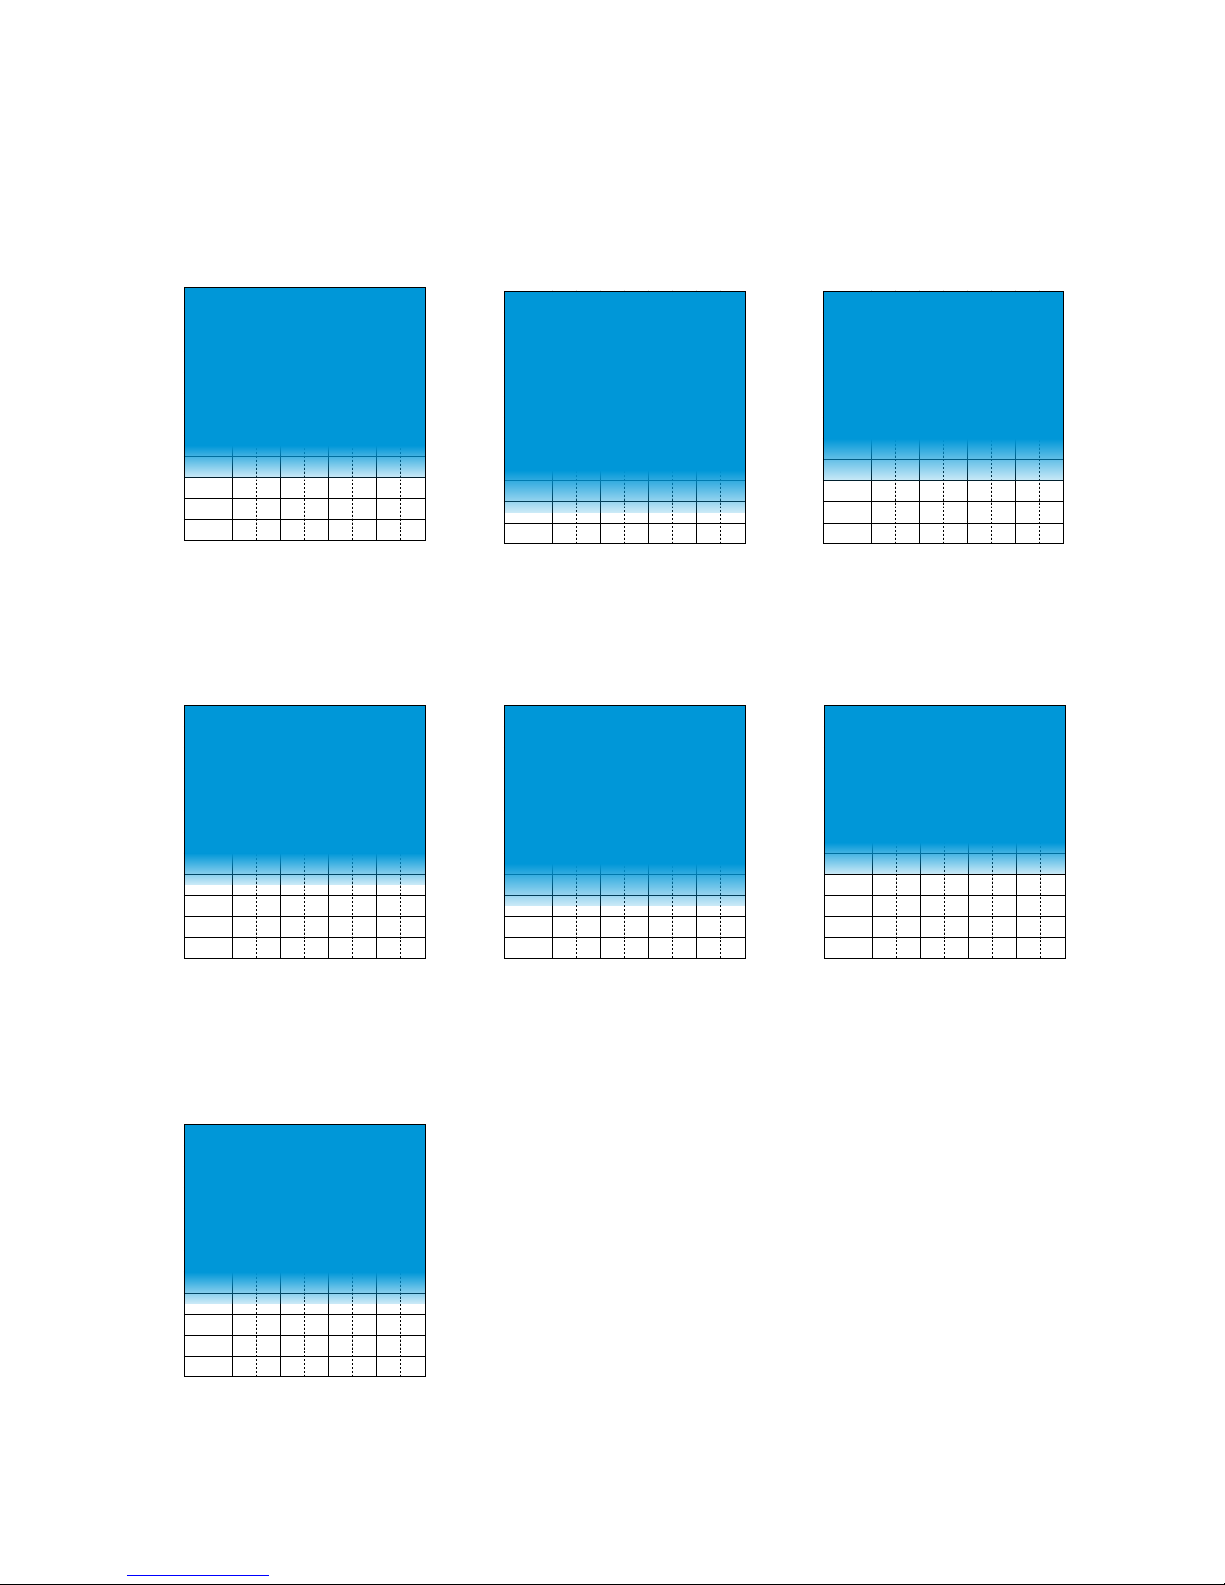
Fitting ranges
The following fitting ranges will help you select the appropriate hearing
instrument model and acoustic configuration for your patient’s specific
hearing needs.
0
10
20
30
40
50
60
70
80
90
100
110
120
250
500
750
1000
1500
2000
3000
4000
6000
8000
15 miniRITE 60
miniRITE
60-Speaker
Frequency (Hz)
dB HL
0
10
20
30
40
50
60
70
80
90
100
110
120
250
500
750
1000
1500
2000
3000
4000
6000
8000
30 miniRITE 105
miniRITE
105-Speaker
Frequency (Hz)
dB HL
0
10
20
30
40
50
60
70
80
90
100
110
120
250
500
750
1000
1500
2000
3000
4000
6000
8000
14 miniRITE 85
miniRITE
85-Speaker
Frequency (Hz)
dB HL
0
10
20
30
40
50
60
70
80
90
100
110
120
250
500
750
1000
1500
2000
3000
4000
6000
8000
13 miniRITE 100
miniRITE
100-Speaker
Frequency (Hz)
dB HL
Page 9
Sonic · Fitting Gui de 9
0
10
20
30
40
50
60
70
80
90
100
110
120
250
500
750
1000
1500
2000
3000
4000
6000
8000
33 miniBTE
miniBTE
Frequency (Hz)
dB HL
0
10
20
30
40
50
60
70
80
90
100
110
120
250
500
750
1000
1500
2000
3000
4000
6000
8000
18 ITCPDW
ITEPDW | ITCPDW
Frequency (Hz)
dB HL
0
10
20
30
40
50
60
70
80
90
100
110
120
250
500
750
1000
1500
2000
3000
4000
6000
8000
17 ITED
ITED
Frequency (Hz)
dB HL
0
10
20
30
40
50
60
70
80
90
100
110
120
250
500
750
1000
1500
2000
3000
4000
6000
8000
20 ITCD
ITCD | ITCW | ITC
Frequency (Hz)
dB HL
0
10
20
30
40
50
60
70
80
90
100
110
120
250
500
750
1000
1500
2000
3000
4000
6000
8000
34 IICW
IICW | IIC
Frequency (Hz)
dB HL
0
10
20
30
40
50
60
70
80
90
100
110
120
250
500
750
1000
1500
2000
3000
4000
6000
8000
22 CICPW
CICPW
Frequency (Hz)
dB HL
0
10
20
30
40
50
60
70
80
90
100
110
120
250
500
750
1000
1500
2000
3000
4000
6000
8000
23 CICW
CICW | CIC
Frequency (Hz)
dB HL
Page 10
10 Sonic · Fitting Gui de
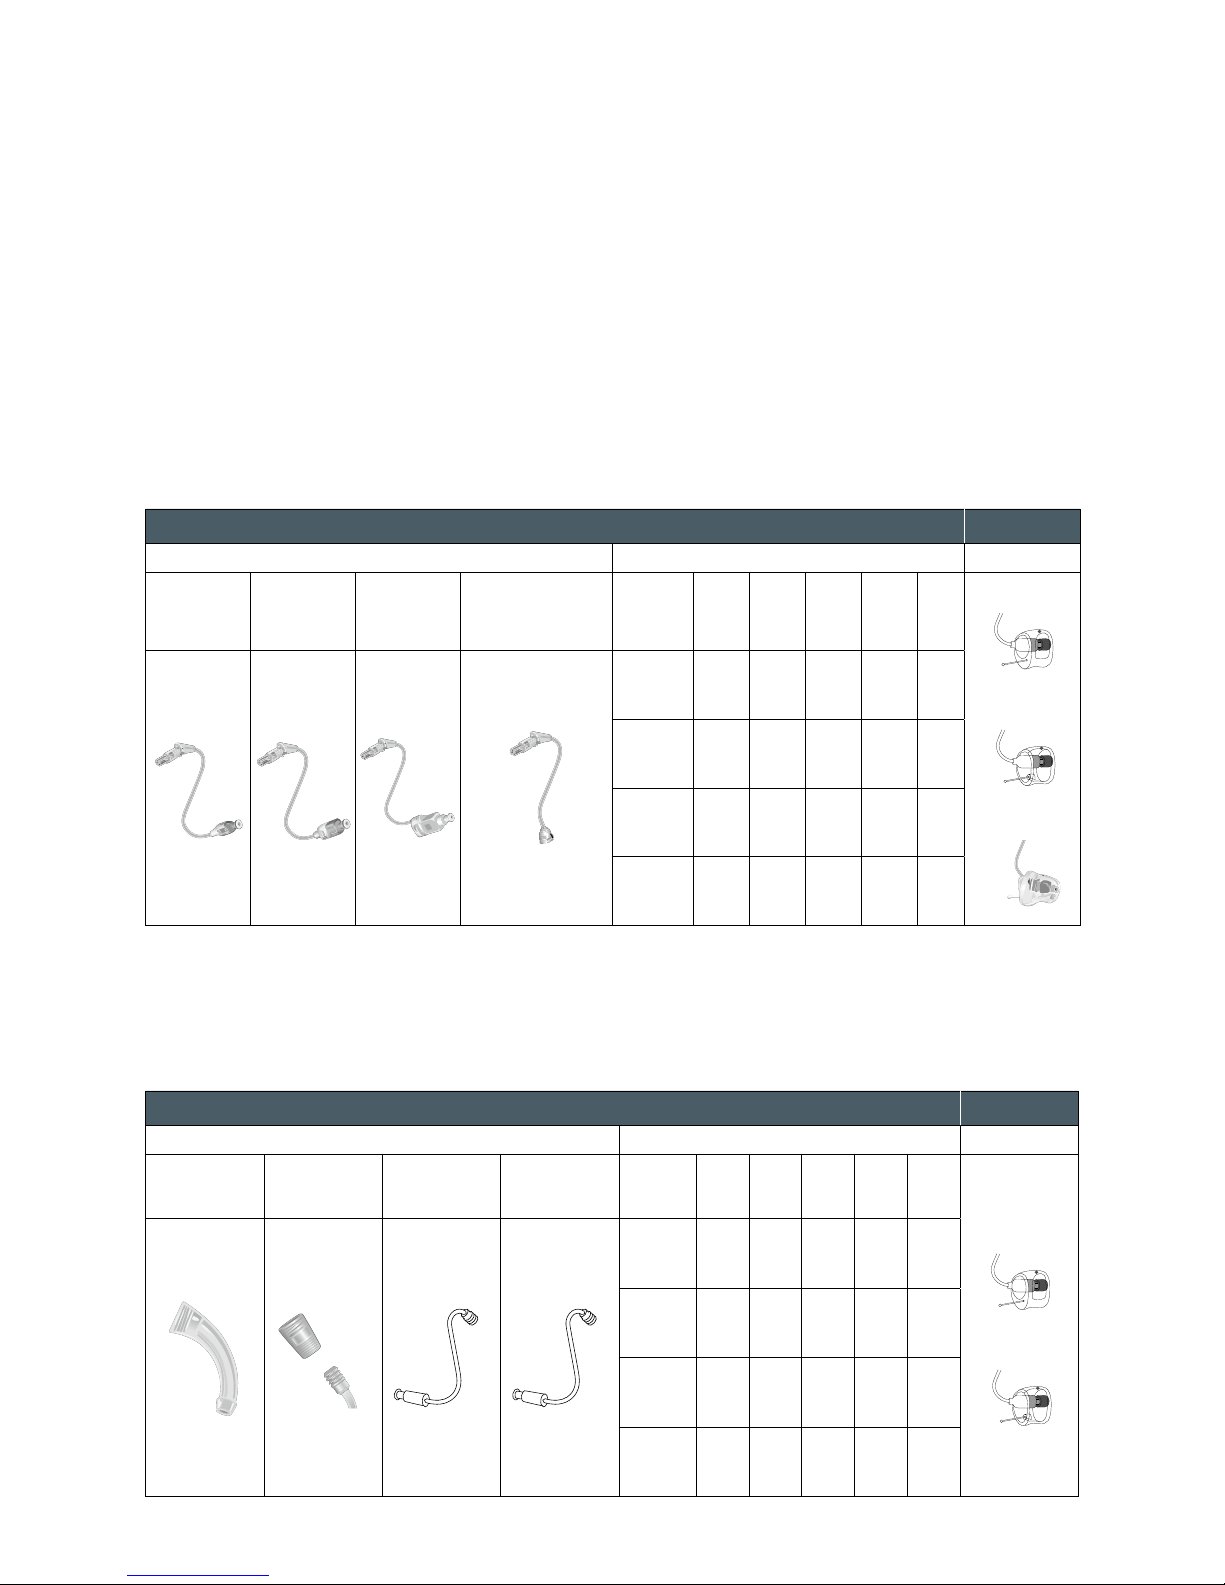
Acoustic options
The miniRITE hearing instruments are available with the miniFit Speaker
system which allows instant fittings through the miniFit Dome system and
custom fittings.
The miniBTE instruments are available with either a conventional Earhook
or the miniFit Thin Tube and Dome system. The miniBTE also allows
custom fittings with a Custom Mold and Lite Tip.
miniRITE and miniBTE
Hearing Instruments
Available Acoustic Options Custom Fit
miniFit Thin Tubes miniFit Domes
Conventional
Earhook
Thin Tube
Adapter
Thin Tube
0.9 mm
Thin Tube
1.3 mm
5 mm6 mm8 mm10 mm12
mm
Custom Mold
Lite Tip
Open
● ● ● ●
Bass,
Double
Vent
● ● ● ●
Bass,
Single
Vent
● ● ● ●
Power
● ● ● ●
Available Acoustic Options
Custom Fit
miniFit Speaker Units miniFit Domes
60-Speaker 85-Speaker 100-Speaker
100-Speaker and
105-Speaker for
custom fittings**
5
mm
6 mm8 mm10 mm12
mm
Power Mold
Lite Tip
Custom Mold
Open*
● ● ● ●
Bass,
Double
Vent
● ● ● ●
Bass,
Single
Vent
● ● ● ●
Power
● ● ● ●
* Open Domes can be fitted with the 60- and 85-Speaker only. Note: 5 mm domes compatible with 60-speaker only.
** The 100-Speaker and 105-Speaker for custom fitting are for use with the Power Mold only.
Page 11
Sonic · Fitting Gui de 11
Speaker and Thin Tube lengths
To ensure a secure fitting with maximum patient comfort, the proper
Speaker and Thin Tube length should be selected for each patient before
fitting a miniRITE or miniBTE.
Sonic miniFit Speakers come in four different lengths, and a red (Right)
or blue (Left) marker on the receiver identifies the orientation.
Sonic miniFit Thin Tubes come in four different lengths, and a red (Right)
or blue (Left) marker on the Thin Tube identifies the orientation.
Determining the proper Speaker and
Thin Tube length
To determine which Speaker and Thin Tube length is most appropriate
for your patient, use the fitting tool from your Sonic miniFit Kit and
Sonic miniFit Thin Tube Kit.
Length Size Code
XShort 0
Short 1
Medium 2
Long 3
Length Size Code
XShort 1
Short 2
Medium 3
Long 4
Note! Right and left markings on the fitting tools indicate which
hand to use and which ear to measure. Four sightlines indicate
the proper tubing length, according to the tables above.
0
1
2
3
4
3
2
1
Nano RITE
Fitting tool for
miniFit Thin Tubes
Fitting tool for
miniFit Speakers
Page 12

12 Sonic · Fitting G uide
miniRITE
Hearing Instruments
Note! Speaker units can easily sustain internal damage if dropped.
Before you attach the speaker unit, please place a dome on the
speaker to protect it.
Attaching a miniFit Speaker
on the miniRITE
1 Slide the connector plug into the connector socket
of the instrument.
click
2
3
1
2 Ensure that the snap on the connector plug is
completely inserted into the opening on the hearing
instrument housing.
3 To test the attachment of the speaker unit to the
hearing instrument, gently pull the speaker wire
near the connection to the hearing instrument as
shown. If the speaker comes off, then it was not
attached properly.
Page 13

Sonic · Fitting Gui de 13
Note! Do not attempt to detach the speaker unit by pulling on the
wire. This could damage both the speaker unit and the hearing
instrument.
Detaching a miniFit Speaker
from the miniRITE
1 Hold the instrument firmly with one hand, and with
the other hand hold the multi tool. Place the pointed
end of the tool underneath the locking snap and
push it up until the connector plug is free.
2 Gently pull the connector plug out of the socket.
If it does not come out easily, verify that the snap is
completely free.
1
2
Page 14

14 Sonic · Fitting Gui de
60- and 85-Speaker Units
The 60- and 85-Speaker units are suitable for mild to moderately severe losses and come in four lengths.
They can be used for instant and custom fittings.
To obtain a more secure hold in the ear canal, an ear grip should be used. There are two different types of
ear grips: one for the 60-Speaker and one for the 85-Speaker. Ensure that you apply the proper ear grip with
the corresponding speaker.
If the ear grip seems too long, it may be trimmed to the desired length. Be careful not to leave a sharp end
when cutting since this could cause irritation on the skin.
Attaching the Ear Grip to the 60-Speaker
1 Bring the tip of the speaker close to the ear grip opening.
2 Push the speaker through the opening.
3 The left/right marking on the speaker unit must be completely uncovered.
1
2
3
1
2
Attaching the Ear Grip to the 85-Speaker
1 Bring the tip of the speaker close to the ear grip opening.
2 Push the speaker through the opening as far as possible.
Page 15

Sonic · Fitting Gui de 15
Note! A Custom Mold and Lite Tip built for one type of speaker
unit, cannot be attached to another one.
Custom Mold and Lite Tip for
the 60- and 85-Speaker
For custom fittings, two different types of molds can be attached to the 60- and 85-Speaker, the Custom
Mold and the Lite Tip. Both come with an adapter already inserted, colored red (right) or blue (left) to indicate
which ear. The color dot on the top of the custom mold indicates the front and top position in the ear canal.
1 Front-top indicator
2 Speaker adapter
3 ProWax filter
4 Pull-out string
5 60-Speaker
6 Left/Right indicator
7 ProWax miniFit filter
8 85-Speaker
Custom Mold
5
6
7
1 2 34
Lite Tip
7
6
8
14 2
3
Page 16

16 Sonic · Fitting G uide
Attaching the Custom Mold and the Lite Tip
to the 60- and 85-Speaker
There are two separate tools that can be used to attach and detach the
60- and 85-Speaker. A marking on the tool indicates for which speaker type
it is intended.
1 Use the tool which is appropriate for the speaker. Place the receiver into
the cup pin of the tool and push the wire into the groove to obtain a
stable attachment. The cur ve of the speaker and the tool should face
the same direction. Make sure that the ProWax miniFit is on the receiver (refer to page 20).
2 Before inserting the receiver into the mold, turn the receiver so that the
wire and “up” marking on the mold are properly aligned. Carefully
center the receiver in the middle of the adapter before pushing it in.
Insert the receiver into the Custom Mold/Lite Tip. Place the mold
against the table and push the receiver firmly in place. Gently pull the
wire to make sure that the speaker is inserted properly. Cover the
sound outlet with a ProWax filter.
3 Make sure that the mold sits correctly in the patient’s ear and check the
position of the wire. If necessary, the wire is bendable by heating.
1
2
2
Page 17

Sonic · Fitting Gui de 17
The 100- and 105-Speaker for custom fittings come pre-attached in a
custom Power Mold that fits the ear canal. The wire is attached separately
to the mold. The wire can be replaced via a connector system on the Power
Mold faceplate.
100- and 105-Speaker Units
The 100- and 105-Speaker units are unit are intended for severe and
profound hearing losses. The 100-Speaker comes in two versions:
one version is for instant fittings and one version is for custom fittings.
The 105-Speaker is for custom fittings only.
1 100-Speaker unit
2 Sound outlet with ProWax miniFit
100-Speaker for Instant Fittings with Domes 100- and 105-Speaker for Custom Fittings
1
2
2
click
3
Detaching the Custom Mold and the Lite Tip
from the 60- and 85-Speaker
1 Remove the ProWax from the Custom Mold/Lite Tip (refer to page 20).
2 Press the pointed end of the tool into the mold to release the speaker
unit while firmly holding the mold.
3 Push the tool into the mold. The mold will disengage with a click.
1
Page 18

18 Sonic · Fitting Gu ide
Attaching the Wire to the Power Mold
1 Plug the wire into the Power Mold connector.
2 Slightly press with the thumb, to stabilize the connection.
3 Put the cover on.
4 Press with the thumb until it clicks.
5 Connect the complete assembly to the hearing instrument.
Click!
CAUTION
132 dB SPL output
Click!
1
4
2
5
3
Page 19

Sonic · Fitting Gui de 19
Detaching the Wire from the Power Mold
A specific tool should be used to attach and detach the wire from the
Power Mold.
1 Remove the cover by very gently sliding the special screwdriver-like blade of
the tool between the wire and the faceplate and then apply a slight upwards pressure.
2 Insert the other end of the tool into the notch which is on the connector, making
sure that the tool is attached firmly.
3 Gently rotate the tool in the direction of the arrow.
1 32
Page 20

20 Sonic · Fittin g Guide
Changing the Wax Filters
on the Speaker Unit and Custom Mold
The miniRITE hearing instrument offers two types of wax filters, the ProWax and the ProWax miniFit.
ProWax miniFit miniFit Speaker Units
60-Speaker
85-Speaker
100- Speaker
for instant fittings
ProWax Custom Fittings
Custom Mold
Lite Tip
Power Mold
The wax filters should be changed as needed, to ensure efficient wax protection, and to prolong the life of the
speaker unit. Visually inspect the filters. If they are clogged or there is no sound coming from the device,
replace them.
1 Remove a tool from the turtle.
2 Insert its empty end into the old filter and pull it out.
3 Push a new filter into the sound outlet.
4 Discard the used tool. It cannot be reused.
ProWax
1
3
2
4
ProWax miniFit
1
3
2
4
Page 21

Sonic · Fitting Gui de 21
miniBTE
Hearing Instruments
Note! Be careful not to over-rotate (more than 3 full rotations) the
Earhook or Thin Tube Adapter.
Attaching and removing the Earhook
or Thin Tube Adapter from the miniBTE
1 Remove the Earhook or Thin Tube Adapter from the hearing instrument by unscrewing it
(counter-clockwise).
2 Replace the Earhook or Thin Tube Adapter with the desired part.
3 To attach either the Earhook or Thin Tube Adapter, screw it
(clockwise) onto the hearing instrument.
1 1
33
Page 22

22 Sonic · Fitting Guide
Attaching and removing a miniFit Thin Tube
from the miniBTE
If the Thin Tube becomes discolored, stiff or brittle, it should be replaced.
1 Pull firmly to remove the old Thin Tube.
2 Hold the instrument by the Thin Tube Adapter and grasp the Thin Tube
close to the threaded connector.
3 Attach the new Thin Tube by pushing it firmly into the Thin Tube
Adapter.
Removing the DAI Adapter – miniBTE
1 Pull the DAI/Euro Plug or FM Receiver out of the DAI Adapter.
2 Grasp the DAI Adapter as shown. Pull the miniBTE up and out of the
Adapter with your other hand. A slight twisting motion will help free the
DAI Adapter from the miniBTE.
Attaching the DAI Adapter – miniBTE
1 Slip the DAI Adapter over the miniBTE.
When it is fully seated you will feel it click into place.
2 Insert the DAI/Euro Plug or FM Receiver of the assistive
listening device into the DAI Adapter.
Page 23

Sonic · Fitting Gui de 23
Custom
Hearing Instruments
Changing the Wax Filters on custom hearing instruments
CIC and IIC models are supplied with the ProWax miniFit system.
All other custom hearing instruments are supplied with the ProWax filters.
ProWax miniFit
Custom hearing
instrument models
IIC
CIC
ProWax
Custom hearing
instrument models
IICW
CICW
CICPW
ITCW
ITC
ITCD
ITCPDW
ITED
ITEPDW
1 Take a new removal tool from the package.
2 Insert the removal prong of the tool into the instrument’s existing
wax filter and extract the old one.
3 Insert the new filter into the instrument and pull out the removal tool.
4 Discard the removal tool and old ProWax
1 2
3 4
Page 24

24 Sonic · Fitting Gui de
BL_ILLU_miniBTE_O_Cap2_BW_Hi
A
BL_ILLU_miniBTE_O_Cap3_BW_Hi
A
BL_ILLU_miniBTE_O_Cap4_BW_Hi
B
1
2
1
Changing the microphone protection cap
All custom models are supplied with either the T-Cap or O-Cap for
microphone protection.
O-Cap filter for ITEPDW, ITED, ITCPDW, ITCD, ITCW, ITC
The tool has two ends, one for removal of the O-Cap (A) and one with the
new O-Cap attached (B).
1 Using the removal end (A), insert it into the opening of the used O-Cap
and pull it out slowly. Keep the stick straight.
2 Using the other end of the tool (B), insert the new O-Cap into the
opening and gently remove the stick.
3 Discard the tool and the used O-Cap filter.
A
B
Page 25

Sonic · Fitting Gui de 25
A
A
BL_ILLU_miniBTE_T_Cap4_BW_Hi
B
1 2
3
T-Cap filter for CICPW, CICW, CIC, IICW, IIC
The tool has two ends, one for removal of the T-Cap (A) and one with
the new T-Cap attached (B).
1 Using the removal end (A), place it under the T-Cap edge, and push it
under the top edge of the used T-Cap.
2 Lift the used T-Cap up and out.
3 Using the other end of the tool (B), insert the new T-Cap into the
opening and slightly twist the handle so that the new T-Cap is free.
4 Discard the tool and the used T-Cap filter.
A
B
Page 26

26 Sonic · Fitting G uide
Fitting Sonic Hearing
Instruments with EXPRESS
fit
Sonic hearing instruments are programmed with EXPRESS
fit
using
new standard (no.2) programming cables (HI-PRO, EXPRESSlink 3).
Please always insert a fresh battery prior to programming.
For your convenience, wireless Sonic hearing instruments are
also compatible with the FittingLINK and nEARcom wireless
programming systems.
1
2
3
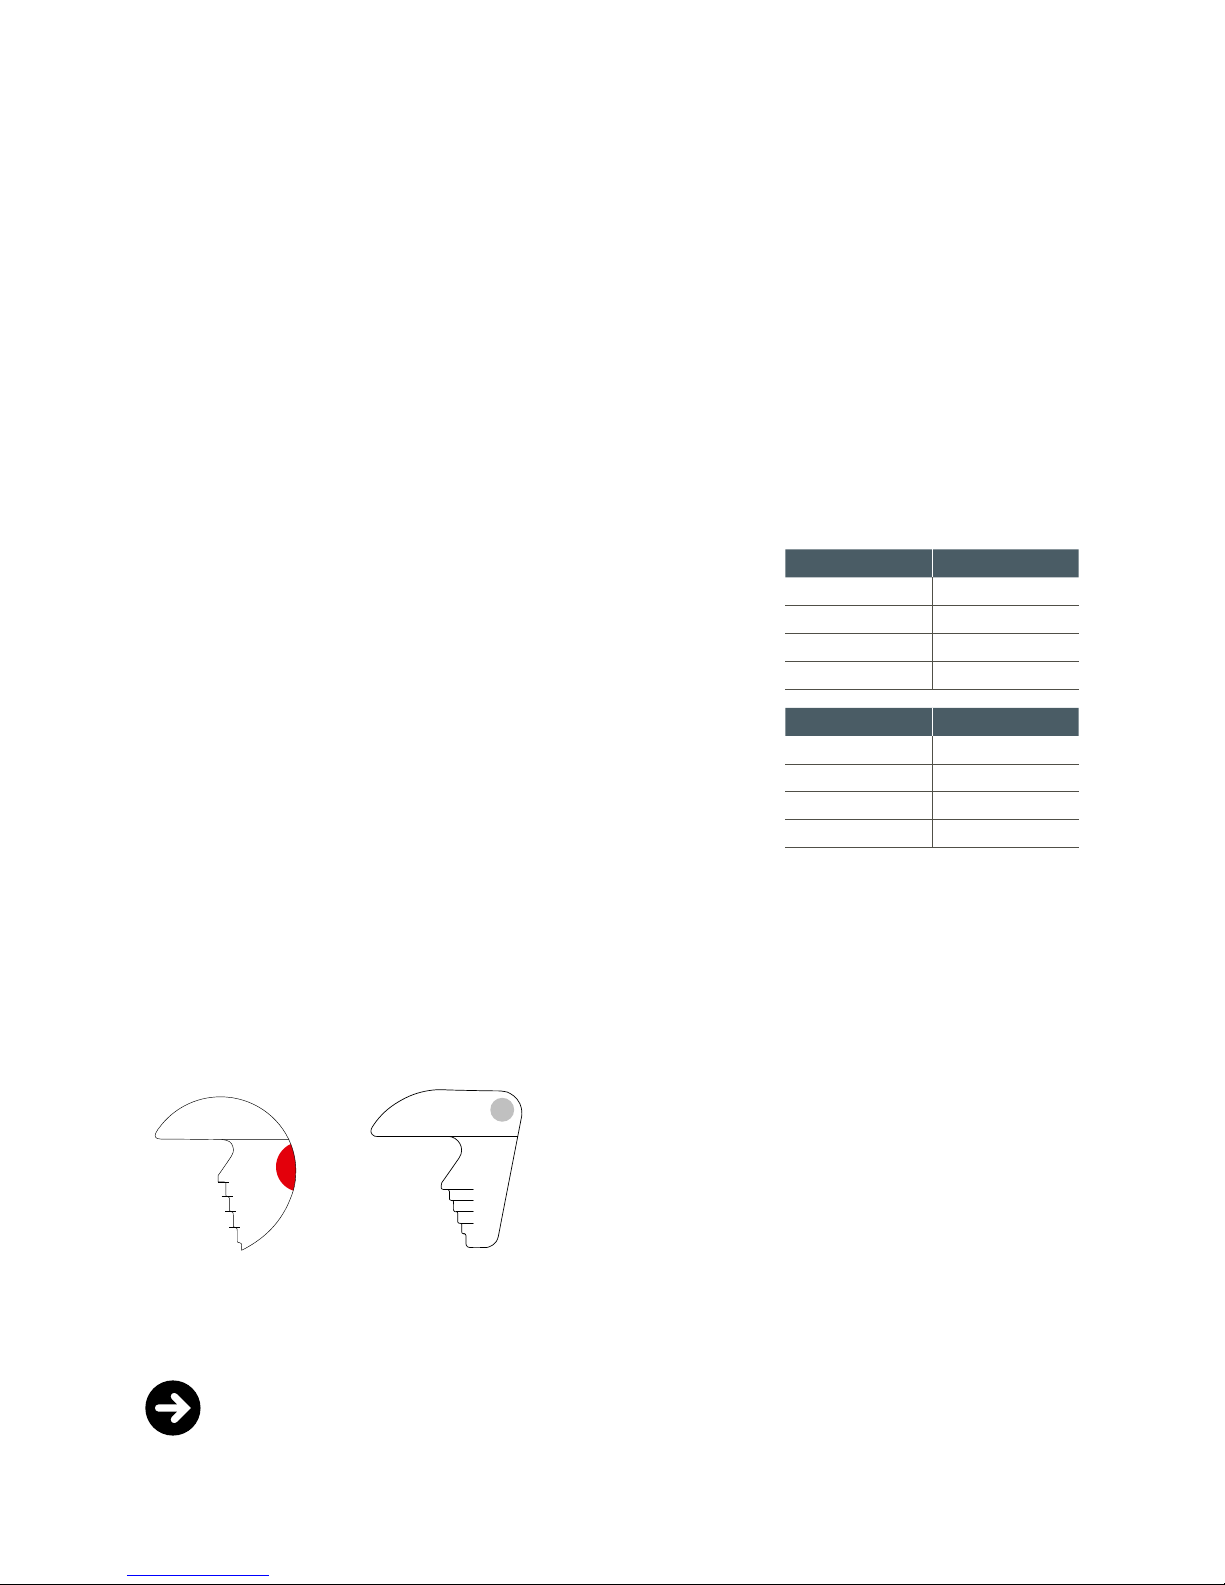
Fitting a miniRITE
Do not use FlexConnect Mini
Not ok
Ok
Use FlexConnect
1 Open the battery drawer slightly. With the black dot facing up, insert the end of the FlexConnect
into the space between the battery door and the hinge until the black dot touches the housing.
Close the drawer.
2 Place the instrument in the client’s ear.
3 Plug the programming cable into the FlexConnect strip.
Page 27

Sonic · Fitting Gui de 27
Fitting a miniBTE
1 Open the Program Button door fully to reveal the programming socket.
2 Plug the end of the cable into the programming socket as pictured.
1
2
Page 28

28 Sonic · Fitting G uide
Fitting a custom
hearing instrument
CIC and IIC
CIC and IIC are programmed with the Programming Adapter Mini.
1 Gently remove the battery door by pulling it up and away from the instrument as shown
on the picture below. Do not use a twisting action.
2 Attach the battery-like end of the Programming Adapter Mini to the instrument.
Ensure that the hinge pin on the hearing instrument is connected to the adapter.
3 Gently push the adapter in the direction shown, similar to the way that you would
normally close the batter drawer.
4 Once the adapter is in the position shown, it is ready to be used with the fitting software.
When finished programming, detach the Programming Adapter Mini as you did in step 1
then reattach the battery drawer.
1
2 3 4
Page 29

Sonic · Fitting Gui de 29
1
2 3
All other custom hearing instruments
Except the CIC and IIC, all other custom hearing instrument models should be
fitted using the FlexConnect Mini.
Use FlexConnect Mini Do not use FlexConnect
Not ok
Ok
1 Open the battery door slightly. With the black dot facing up, insert the end of the FlexConnect
Mini into the space between the battery door and the hinge until the black dot touches the faceplate.
Close the battery door.
2 Plug the end of the cable into the FlexConnect Mini programming socket.
3 Place the instrument in the patient’s ear and drape the strip over and behind the ear.
Page 30

30 Sonic · Fitting G uide
Ordering Information
miniFit Dispensing Kits
Product Quantity Part Number
miniFit Thin Tube Kit (miniBTE) 1 1565 57
miniFit Speaker Kit (miniRITE) 1 152606
Thin Tubes 0.9 mm (miniFit)
Product Quantity Part Number
Thin Tube, 0.9 mm size 0 left 5 156522
Thin Tube, 0.9 mm size 1 left 5 156523
Thin Tube, 0.9 mm size 2 left 5 156524
Thin Tube, 0.9 mm size 3 left 5 156525
Thin Tube, 0.9 mm size 0 right 5 156526
Thin Tube, 0.9 mm size 1 right 5 156527
Thin Tube, 0.9 mm size 2 right 5 156528
Thin Tube, 0.9 mm size 3 right 5 156529
Thin Tubes 1.3 mm (miniFit)
Product Quantity Part Number
Thin Tube, 1.3 mm size 0 left 5 156533
Thin Tube, 1.3 mm size 1 left 5 156534
Thin Tube, 1.3 mm size 2 left 5 156535
Thin Tube, 1.3 mm size 3 left 5 156536
Thin Tube, 1.3 mm size 0 right 5 156 5 37
Thin Tube, 1.3 mm size 1 right 5 156538
Thin Tube, 1.3 mm size 2 right 5 156539
Thin Tube, 1.3 mm size 3 right 5 156540
60-Speaker Units (miniFit)
Product Quantity Part Number
Speaker Unit, 1R 60 1 149271
Speaker Unit, 1L 60 1 149272
Speaker Unit, 2R 60 1 149273
Speaker Unit, 2L 60 1 149274
Speaker Unit, 3R 60 1 149275
Speaker Unit, 3L 60 1 149276
Speaker Unit, 4R 60 1 149277
Speaker Unit, 4L 60 1 149278
Page 31

Sonic · Fitting Gui de 31
85-Speaker Units (miniFit)
Product Quantity Part Number
Speaker Unit, 1L 85 1 149279
Speaker Unit, 1R 85 1 149280
Speaker Unit, 2L 85 1 149281
Speaker Unit, 2R 85 1 149282
Speaker Unit, 3L 85 1 149283
Speaker Unit, 3R 85 1 149284
Speaker Unit, 4L 85 1 149285
Speaker Unit, 4R 85 1 149286
100-Speaker Units (miniFit)
Product Quantity Part Number
Speaker Unit, 1L 100 1 149287
Speaker Unit, 1R 100 1 149288
Speaker Unit, 2L 100 1 149289
Speaker Unit, 2R 100 1 149290
Speaker Unit, 3L 100 1 149291
Speaker Unit, 3R 100 1 149292
Speaker Unit, 4L 100 1 149293
Speaker Unit, 4R 100 1 149294
100- and 105-Speaker Wires (miniFit)
Product Quantity Part Number
Wire for Speaker, 1L 1 149302
Wire for Speaker, 1R 1 149301
Wire for Speaker, 2L 1 149300
Wire for Speaker, 2R 1 149299
Wire for Speaker, 3L 1 149298
Wire for Speaker, 3R 1 149297
Wire for Speaker, 4L 1 149296
Wire for Speaker, 4R 1 149295
miniFit Domes (miniBTE & miniRITE)
Product Quantity Part Number
Open Dome miniFit 5 mm
Not compatible with 85- and 100-Speaker
10 173494
Open Dome miniFit 6 mm 10 149303
Open Dome miniFit 8 mm 10 149304
Open Dome miniFit 10 mm 10 149305
Page 32

32 Sonic · Fitting G uide
Bass Dome Double Vent miniFit 6 mm 10 149306
Bass Dome Double Vent miniFit 8 mm 10 149307
Bass Dome Double Vent miniFit 10 mm 10 149308
Bass Dome Double Vent miniFit 12 mm 10 149309
Bass Dome Single Vent miniFit 6 mm 10 149310
Bass Dome Single Vent miniFit 8 mm 10 149 311
Bass Dome Single Vent miniFit 10 mm 10 149312
Bass Dome Single Vent miniFit 12 mm 10 149313
Power Dome miniFit 6 mm 10 149314
Power Dome miniFit 8 mm 10 149315
Power Dome miniFit 10 mm 10 149316
Power Dome miniFit 12 mm 10 149317
Wax Filters
Product Quantity Part Number
ProWax miniFit filter Turtle with 6 filters 130091
ProWax filter Turtle with 6 filters 123 459
Tool s
Product Quantity Part Number
Tool, Lite Tip/Micro Mold 85-Speaker 1 126977
Tool, Lite Tip/Micro Mold 60-Speaker 1 127816
Multi-tool 1 890-60-232-00
Multi-tool, extension 1 890-60-320-00
Measurement tool for Speaker wire 1 890-21-291-00
Measurement tool for Thin Tubes 1 890-21-222-00
Faceplate plug Transparent 3 127908
Faceplate plug Beige 3 127909
Faceplate plug Light Brown 3 127910
Faceplate plug Medium Brown 3 12 7 911
Faceplate plug Dark Brown 3 127912
Faceplate plug Black 3 127913
Ear Grip, 60-Speaker miniFit 5 149876
Ear Grip, 85-Speaker miniFit 5 149877
Page 33

Sonic · Fitting Gui de 33
Earhook
Product Quantity Part Number
Hook, Damped (miniBTE) 1 124 5 42
Thin Tube Adapter
Product Quantity Part Number
Adapter 1, So Thin Tube (miniBTE) 1 123 4 46
Microphone Protection
Product Quantity Part Number
T-Cap, Black 1 pack of 8 filters 123467
T-Cap, Dark Brown 1 pack of 8 filters 123468
T-Cap, Medium Brown 1 pack of 8 filters 123469
T-Cap, Light Brown 1 pack of 8 filters 123476
T-Cap, Beige 1 pack of 8 filters 123477
O-Cap, Beige 1 pack of 8 filters 128009
O-Cap, Light Brown 1 pack of 8 filters 128010
O-Cap, Medium Brown 1 pack of 8 filters 128 011
O-Cap, Dark Brown 1 pack of 8 filters 128012
DAI Adapter
Product Quantity Part Number
DAI Adapter, miniBTE 1 129574
Programming Cables
Product Quantity Part Number
Flex Connect Mini 1 1174 6 8
Flex Connect (miniRITE) 1 390-01-180-05
Programming Adapter Mini 1 164237
NOAH Link Prog Cables set 1 60 01157
NOAH Link Prog cable blue/left 1 3003388
NOAH Link Prog cable red/right 1 3003387
HiPro/EXPRESSlink 3
Prog cable Nr. 2 blue/left
1 1209 02
HiPro/EXPRESSlink 3
Prog cable Nr. 2 red/right
1 120 900
Page 34

Notes
Page 35

Page 36

36 Sonic · Fitting G uide
www.sonici.com
09.16 | 152620 | UK
 Loading...