

Page 1

SONIC
™
DVD PRODUCER
USER GUIDE
™
Page 2

© 2001-2002 Sonic Solutions. All rights reserved.
DVD Producer User Guide — Sonic Part Number 800193 Rev A (05/02)
This manual, as well as the software described in it, is furnished under license and may only be used or copied in accordance with
the terms of such license. The information in this manual is furnished for informational use only, is subject to change without
notice, and should not be construed as a commitment by Sonic Solutions. Sonic Solutions assumes no responsibility or liability for
any errors or inaccuracies that may appear in this book.
Except as permitted by such license, no part of this publication may be reproduced, stored in a retrieval system, or transmitted,
in any form or by any means, electronic, mechanical, recording, or otherwise, without the prior written permission of Sonic
Solutions.
SONIC SOLUTIONS, INC. (“SONIC”) MAKES NO WARRANTIES, EXPRESS OR IMPLIED, INCLUDING WITHOUT LIMITATION THE
IMPLIED WARRANTIES OF MERCHANTABILITY AND FITNESS FOR A PARTICULAR PURPOSE, REGARDING THE SOFTWARE.
SONIC DOES NOT WARRANT, GUARANTEE, OR MAKE ANY REPRESENTATIONS REGARDING THE USE OR THE RESULTS OF
THE USE OF THE SONIC SOFTWARE IN TERMS OF ITS CORRECTNESS, ACCURACY, RELIABILITY, CURRENTNESS, OR
OTHERWISE. THE ENTIRE RISK AS TO THE RESULTS AND PERFORMANCE OF THE SONIC SOFTWARE IS ASSUMED BY YOU.
THE EXCLUSION OF IMPLIED WARRANTIES IS NOT PERMITTED BY SOME STATES. THE ABOVE EXCLUSION MAY NOT APPLY
TO YOU.
IN NO EVENT WILL SONIC, ITS DIRECTORS, OFFICERS, EMPLOYEES, OR AGENTS BY LIABLE TO YOU FOR ANY
CONSEQUENTIAL, INCIDENTAL, OR INDIRECT DAMAGES (INCLUDING DAMAGES FOR LOSS OF BUSINESS PROFITS,
BUSINESS INTERRUPTION, LOSS OF BUSINESS INFORMATION, AND THE LIKE) ARISING OUT OF THE USE OR INABILITY TO
USE THE SOFTWARE EVEN IF SONIC HAS BEEN ADVISED OF THE POSSIBILITY OF SUCH DAMAGES. BECAUSE SOME
STATES DO NOT ALLOW THE EXCLUSION OR LIMITATION OF LIABILITY FOR CONSEQUENTIAL OR INCIDENTAL DAMAGES,
THE ABOVE LIMITATIONS MAY NOT APPLY TO YOU.
Sonic, Sonic Solutions, the Sonic logo, sonic.com, AutoCadence, AutoDVD, cDVD, ConstantQ, DVD Presenter, DVD Producer,
DVD Ready, DVD Studio, Edit-on-DVD, First in DVD, hDVD, MyDVD, OneClick DVD, OpenDVD, PrePlay, SonicCare, Sonic Cinema,
The Business of DVD, The Easiest Way to Publish on DVD, The Easiest Way to Record on DVD, The Smartest Way to Publish on
DVD, and Where DVD Meets the Internet are trademarks of Sonic Solutions.
AuthorScript, eDVD, DVD Creator, DVDit!, ReelDVD, and Scenarist are registered trademarks of Sonic Solutions.
Dolby Digital is a trademark of Dolby Laboratories, Inc. Dolby Laboratories encourages use of the Dolby Digital trademark to
identify soundtracks that are encoded in Dolby Digital. This is an effective way to inform listeners of the soundtrack format, and
the use of a standard logo promotes easy recognition in the marketplace. However, like any trademark, the Dolby Digital logo may
not be used without permission. Dolby Laboratories therefore provides a standard trademark license agreement for companies
who wish to use Dolby trademarks. This agreement should be signed by the company that owns the program material being
produced. Recording studios or production facilities which provide audio production or encoding services for outside clients
generally do not require a trademark license. If you would like more information on obtaining a Dolby trademark license, please
contact Dolby Laboratories Licensing Corporation. Information on trademark licensing plus instructions for using the Dolby Digital
trademark and marking audio formats can also be found online at http://www.dolby.com.
Microsoft, Microsoft Windows XP, ME, 2000, 98 and 95, Internet Explorer, and the Microsoft logo are registered trademarks of the
Microsoft Corporation, Inc.
Apple, the Apple logo, Finder, Macintosh, Power Macintosh and QuickTime are registered trademarks of Apple Computer, Inc.
Photoshop is a registered trademark of Adobe Systems Inc.
TARGA is a trademark of Pinnacle Systems, Inc.
CinePlayer is a trademark of RAVISENT Technologies Inc.
All other company or product names are either trademarks or registered trademarks of their respective owners.
Written and designed at Sonic Solutions, 101 Rowland Way, Novato, CA 94945, USA
Page 3

Contents
1
2
3
Introduction
About the Documentation . . . . . . . . . . . . . . . . . . . . . . . . . . . . . . . . . . . . . . . . . . . . . . 1
Sonic on the Web. . . . . . . . . . . . . . . . . . . . . . . . . . . . . . . . . . . . . . . . . . . . . . . . . . . . . 2
Installing DVD Producer
Installation Overview. . . . . . . . . . . . . . . . . . . . . . . . . . . . . . . . . . . . . . . . . . . . . . . . . . 4
Step 1: Installing the Software . . . . . . . . . . . . . . . . . . . . . . . . . . . . . . . . . . . . . . . . . . . 7
Step 2: Installing the SD-1000 Encoder. . . . . . . . . . . . . . . . . . . . . . . . . . . . . . . . . . . . . 9
Step 3: Connecting the Stereo Audio I/O to the Computer . . . . . . . . . . . . . . . . . . . . 11
Step 4: Connecting Peripheral Devices . . . . . . . . . . . . . . . . . . . . . . . . . . . . . . . . . . . 13
Step 5: Launching DVD Producer the First Time . . . . . . . . . . . . . . . . . . . . . . . . . . . . 17
Removing DVD Producer. . . . . . . . . . . . . . . . . . . . . . . . . . . . . . . . . . . . . . . . . . . . . . 20
Planning the Project
DVD Producer Overview . . . . . . . . . . . . . . . . . . . . . . . . . . . . . . . . . . . . . . . . . . . . . . 21
What Is a DVD Producer Project?. . . . . . . . . . . . . . . . . . . . . . . . . . . . . . . . . . . . . . . . 26
Calculating Bit Rates . . . . . . . . . . . . . . . . . . . . . . . . . . . . . . . . . . . . . . . . . . . . . . . . . 35
Creating, Saving, and Opening Projects . . . . . . . . . . . . . . . . . . . . . . . . . . . . . . . . . . . 39
Page 4

4 Contents
4
Preparing Media Files
Video Parameters . . . . . . . . . . . . . . . . . . . . . . . . . . . . . . . . . . . . . . . . . . . . . . . . . . . 44
Audio Parameters . . . . . . . . . . . . . . . . . . . . . . . . . . . . . . . . . . . . . . . . . . . . . . . . . . . 46
Graphics Parameters. . . . . . . . . . . . . . . . . . . . . . . . . . . . . . . . . . . . . . . . . . . . . . . . . 47
Creating Menu Graphics in Adobe Photoshop . . . . . . . . . . . . . . . . . . . . . . . . . . . . . 51
Creating Motion Menus . . . . . . . . . . . . . . . . . . . . . . . . . . . . . . . . . . . . . . . . . . . . . . 55
5
Encoding Video and Audio
Encoding Overview . . . . . . . . . . . . . . . . . . . . . . . . . . . . . . . . . . . . . . . . . . . . . . . . . 58
Preparing to Encode . . . . . . . . . . . . . . . . . . . . . . . . . . . . . . . . . . . . . . . . . . . . . . . . . 61
Encoding Video and Audio . . . . . . . . . . . . . . . . . . . . . . . . . . . . . . . . . . . . . . . . . . . . 64
Creating and Editing Video and Audio Sets . . . . . . . . . . . . . . . . . . . . . . . . . . . . . . . . 66
Audio Encoding Parameters . . . . . . . . . . . . . . . . . . . . . . . . . . . . . . . . . . . . . . . . . . . 73
6
Getting Media Files into DVD Producer
Using the Palette Window . . . . . . . . . . . . . . . . . . . . . . . . . . . . . . . . . . . . . . . . . . . . 78
Importing Media Files . . . . . . . . . . . . . . . . . . . . . . . . . . . . . . . . . . . . . . . . . . . . . . . . 81
Deleting Files from the Project . . . . . . . . . . . . . . . . . . . . . . . . . . . . . . . . . . . . . . . . . 82
Missing Media Files and Projects. . . . . . . . . . . . . . . . . . . . . . . . . . . . . . . . . . . . . . . . 82
7
Building the Project Structure
The List Window . . . . . . . . . . . . . . . . . . . . . . . . . . . . . . . . . . . . . . . . . . . . . . . . . . . 84
Creating Movies and Menus . . . . . . . . . . . . . . . . . . . . . . . . . . . . . . . . . . . . . . . . . . . 85
Setting the First Play . . . . . . . . . . . . . . . . . . . . . . . . . . . . . . . . . . . . . . . . . . . . . . . . . 87
Editing Menus and Movies in the List window . . . . . . . . . . . . . . . . . . . . . . . . . . . . . 89
8
Working with Menus
How DVD Producer Creates Menus and Menu Buttons . . . . . . . . . . . . . . . . . . . . . . 94
The Menu Editor window. . . . . . . . . . . . . . . . . . . . . . . . . . . . . . . . . . . . . . . . . . . . . 95
Editing Menus with Floating Buttons . . . . . . . . . . . . . . . . . . . . . . . . . . . . . . . . . . . . 96
Editing Photoshop-Created Menus . . . . . . . . . . . . . . . . . . . . . . . . . . . . . . . . . . . . . 104
Editing Buttons, Graphics, and Text . . . . . . . . . . . . . . . . . . . . . . . . . . . . . . . . . . . . 109
Page 5

Creating Button Links . . . . . . . . . . . . . . . . . . . . . . . . . . . . . . . . . . . . . . . . . . . . . . . 121
Adding, Replacing, and Deleting Menu Audio . . . . . . . . . . . . . . . . . . . . . . . . . . . . . 126
Changing Menu Properties . . . . . . . . . . . . . . . . . . . . . . . . . . . . . . . . . . . . . . . . . . . 127
9
Working with Movies
The Movie Timeline Window. . . . . . . . . . . . . . . . . . . . . . . . . . . . . . . . . . . . . . . . . . 136
Editing the Video Track . . . . . . . . . . . . . . . . . . . . . . . . . . . . . . . . . . . . . . . . . . . . . . 138
Creating and Editing Chapter Points . . . . . . . . . . . . . . . . . . . . . . . . . . . . . . . . . . . . 138
Multiple Audio Tracks . . . . . . . . . . . . . . . . . . . . . . . . . . . . . . . . . . . . . . . . . . . . . . . 141
Changing Audio Tracks in Simulation . . . . . . . . . . . . . . . . . . . . . . . . . . . . . . . . . . .144
Importing Subtitles . . . . . . . . . . . . . . . . . . . . . . . . . . . . . . . . . . . . . . . . . . . . . . . . . 145
Working with Subtitles in the Timeline . . . . . . . . . . . . . . . . . . . . . . . . . . . . . . . . . . 149
Subtitles in Simulation . . . . . . . . . . . . . . . . . . . . . . . . . . . . . . . . . . . . . . . . . . . . . . . 150
Changing Movie Properties . . . . . . . . . . . . . . . . . . . . . . . . . . . . . . . . . . . . . . . . . . . 152
10
Proofing the DVD Project
DVD Producer’s Playback Options . . . . . . . . . . . . . . . . . . . . . . . . . . . . . . . . . . . . . 157
Proofing the DVD Project . . . . . . . . . . . . . . . . . . . . . . . . . . . . . . . . . . . . . . . . . . . . 158
Contents 5
11
Creating DVDs
Choosing an Output Format. . . . . . . . . . . . . . . . . . . . . . . . . . . . . . . . . . . . . . . . . . . 162
Creating a DVD Volume. . . . . . . . . . . . . . . . . . . . . . . . . . . . . . . . . . . . . . . . . . . . . . 165
Creating a Disc Image . . . . . . . . . . . . . . . . . . . . . . . . . . . . . . . . . . . . . . . . . . . . . . . 167
Creating a DVD Disc . . . . . . . . . . . . . . . . . . . . . . . . . . . . . . . . . . . . . . . . . . . . . . . . 168
Creating a DVD Master. . . . . . . . . . . . . . . . . . . . . . . . . . . . . . . . . . . . . . . . . . . . . . . 171
Creating a DVD-ROM . . . . . . . . . . . . . . . . . . . . . . . . . . . . . . . . . . . . . . . . . . . . . . . . 173
A
Television Standards and DVD Regions
What Is a Television Standard? . . . . . . . . . . . . . . . . . . . . . . . . . . . . . . . . . . . . . . . . . 175
NTSC Countries . . . . . . . . . . . . . . . . . . . . . . . . . . . . . . . . . . . . . . . . . . . . . . . . . . . . 176
PAL Countries . . . . . . . . . . . . . . . . . . . . . . . . . . . . . . . . . . . . . . . . . . . . . . . . . . . . . 177
DVD Regions and TV Systems for All Countries/Territories . . . . . . . . . . . . . . . . . . . 178
Page 6

6 Contents
B
Digital Compression Primer
Four Factors of Digital Video. . . . . . . . . . . . . . . . . . . . . . . . . . . . . . . . . . . . . . . . . . 189
Major Digital Video Storage Formats. . . . . . . . . . . . . . . . . . . . . . . . . . . . . . . . . . . . 193
Factors Affecting Compression. . . . . . . . . . . . . . . . . . . . . . . . . . . . . . . . . . . . . . . . 193
MPEG Overview . . . . . . . . . . . . . . . . . . . . . . . . . . . . . . . . . . . . . . . . . . . . . . . . . . . 195
Additional Information . . . . . . . . . . . . . . . . . . . . . . . . . . . . . . . . . . . . . . . . . . . . . . 203
C
Audio Connector Wiring
AES/EBU Digital Input. . . . . . . . . . . . . . . . . . . . . . . . . . . . . . . . . . . . . . . . . . . . . . . 205
Balanced Analog Inputs and Outputs . . . . . . . . . . . . . . . . . . . . . . . . . . . . . . . . . . . 206
Unbalanced Analog Inputs and Outputs . . . . . . . . . . . . . . . . . . . . . . . . . . . . . . . . . 208
Glossary
Index
Page 7

1
Introduction
Welcome to DVD Producer, a professional DVD production system that integrates encoding,
authoring, and disc creation into a single, easy-to-use application. DVD Producer takes MPEG
video, graphics, and PCM, Dolby Digital and MPEG sound files, and helps you to quickly
build stunning, professional DVD presentations.
About the Documentation
DVD Producer includes the following documentation:
DVD Producer User Guide
DVD Producer software and hardware, and how to use DVD Producer to author DVD discs,
which includes project planning, asset preparation and importing, building and authoring
projects, proofing, and writing to disc.
DVD Producer Tutorial
typical DVD authoring workflow; also included is a quick reference section listing all of DVD
Producer’s shortcuts. It is highly recommend that you read this document before you begin
using DVD Producer to create DVD presentations.
(This User Guide) Documents how to install and configure the
Contains several tutorials that introduces DVD Producer and the
Page 8

2 Chapter 1, Introduction
DVD Producer Quick Start Guide
those who just can’t wait!).
SonicCare Card
Before You Begin
You should understand basic Windows operations, such as using a mouse, clicking, doubleclicking and Right-clicking, dragging, and selecting items from menus, as well as using dialog
boxes and other Windows elements. If these are unfamiliar terms, please review the
Windows online help or documentation that came with your computer.
Sonic on the Web
Sonic’s Web site (www.sonic.com) contains a wealth of information about Sonic products
and DVD authoring.
technology, are available at:
http://www.sonic.com/support/whitepapers.htm
A quick overview of installing and using DVD Producer (for
Complete guide to the technical support options for Sonic products.
White Papers
, providing additional background on Sonic products and
If you have specific questions about using DVD Producer that aren’t answered by the
documentation, a
http://support.sonic.com/KBsearch.asp
Sonic continually tests and qualifies computer systems and peripherals for use DVD
Producer. For the latest
Sonic Web site at:
http://www.dvdproducer.sonic.com
Support Knowledgebase
Configuration Guide
is available at:
on supported systems and devices, visit the
Page 9

2
Installing DVD Producer
This chapter contains instructions for installing and configuring DVD Producer. It covers
both hardware and software.
DVD Producer comes in three configurations:
•
Integrated authoring and encoding workstation (DVD-4001)
•
Authoring only (DVD-4000)
•
Encoding only (DVD-4025)
This chapter covers installation for each of these configurations. If you are installing a
system for authoring only, you only need to read the sections on installing and registering
the software. For the other two configurations, you should read the entire chapter.
Page 10

4 Chapter 2, Installing DVD Producer
Installation Overview
What’s Included with DVD Producer
DVD Producer is available either as an authoring-only software application or as an
authoring and encoding system. Systems that include the SD-1000 Encoder include the
following hardware:
SD-1000 Encoder
Sonic Stereo Audio I/O
Breakout cable
The authoring-only application comes with a dongle that you must connect to the
computer’s USB port.
Page 11

Installation Overview 5
System Requirements
In addition to the Sonic hardware, you need a suitable computer and peripheral devices. The
DVD Producer Configuration Guide
latest list of recommended devices.
(available at www.dvdproducer.sonic.com) has the
Basic Steps
These steps provide an overview of the installation process. See the following sections for
more details on each step.
1 Install the DVD Producer software, then shut down the computer.
2 Install the SD-1000 Encoder.
3 Connect the Stereo Audio I/O to the computer.
4 Connect the remaining peripheral devices.
5 Restart or power up your computer, then register and configure DVD Producer
according to the hardware configuration.
Tools Required
•
Phillips #2 screwdriver
•
Static protection wristband (included)
Page 12

6 Chapter 2, Installing DVD Producer
Grounding Precautions
For your safety and to prevent damage to the hardware components, please observe these
precautions:
•
Before making any connections, shut down your computer and any peripheral
equipment that is already connected to it. Never connect or disconnect components
while the power is on unless you are certain that they are hot-swappable.
•
Use only 3-pin grounded AC outlets and, if in doubt, test them before using to ascertain
that they are properly wired.
•
Never use ground-lifting adapters to defeat the earth ground connection; this can result
in a hazardous condition.
•
Use surge-protected outlets to prevent damage from power surges.
•
Where possible, connect all components to the same AC circuit; this will minimize the
possibility of ground voltage differentials.
•
Handle circuit cards by the edges only, and use the static protection wristband
(included) to avoid damaging sensitive components.
Page 13

Step 1: Installing the Software
You should install the DVD Producer software before installing the encoding hardware. The
installer installs the DVD Producer program files, drivers for the SD-1000 Encoder, Ravisent’s
CinePlayer DVD software, and the Sentinel SuperPro dongle drivers (for authoring-only
systems).
Upgrading from an Earlier Version of DVD Producer
If upgrading from an earlier version of DVD Producer (or DVD Fusion for Windows), make
sure to first uninstall the old version.
To uninstall DVD Producer:
1 From the Windows Start menu, choose Settings > Control Panel. The Control Panel
window opens.
2 Double-click the Add/Remove Programs icon.
Step 1: Installing the Software 7
3 Select DVD Producer (or DVD Fusion) and click Change/Remove.
4 Follow the on-screen instructions.
Note:
on your computer.
Make sure to also uninstall any MPEG-2 decoders and DVD players currently installed
Page 14

8 Chapter 2, Installing DVD Producer
Installing DVD Producer
To install DVD Producer:
1 Insert the DVD Producer Installation disc. The Setup program launches automatically.
2 Follow the on-screen instructions to install the program files for DVD Producer.
3 If prompted to install the Sentinel SuperPro dongle driver, do one of the following:
•
If your system does not have the Sentinel driver installed, click Install Service.
•
If your system already has the Sentinel driver installed, click Quit.
4 Click Finish to exit the DVD Producer installer.
5 After installing DVD Producer, you are prompted to install Ravisent’s CinePlayer DVD.
You
must
6 Follow the on-screen instructions.
7 Click Finish to exit CinePlayer DVD Installer.
8 Eject the DVD Producer Installation disc, then do one of the following:
install this software to be able to use MPEG-2 video streams.
•
For SD-1000 systems, shut down your computer and proceed to “Step 2: Installing the
SD-1000 Encoder” on page 9.
•
For authoring-only systems, restart your computer and proceed to “Registering DVD
Producer (Authoring-Only Systems)” on page 19.
Page 15
Step 2: Installing the SD-1000 Encoder
To install the encoder:
1 After shutting down, power off your computer and disconnect the power cord.
2 Put on the static protection wristband and attach the wire to a grounded terminal.
3 Open your computer (following the manufacturer’s instructions) and locate the PCI
expansion slots. Look for an empty slot.
4 Remove the slot cover screw and slot cover if necessary.
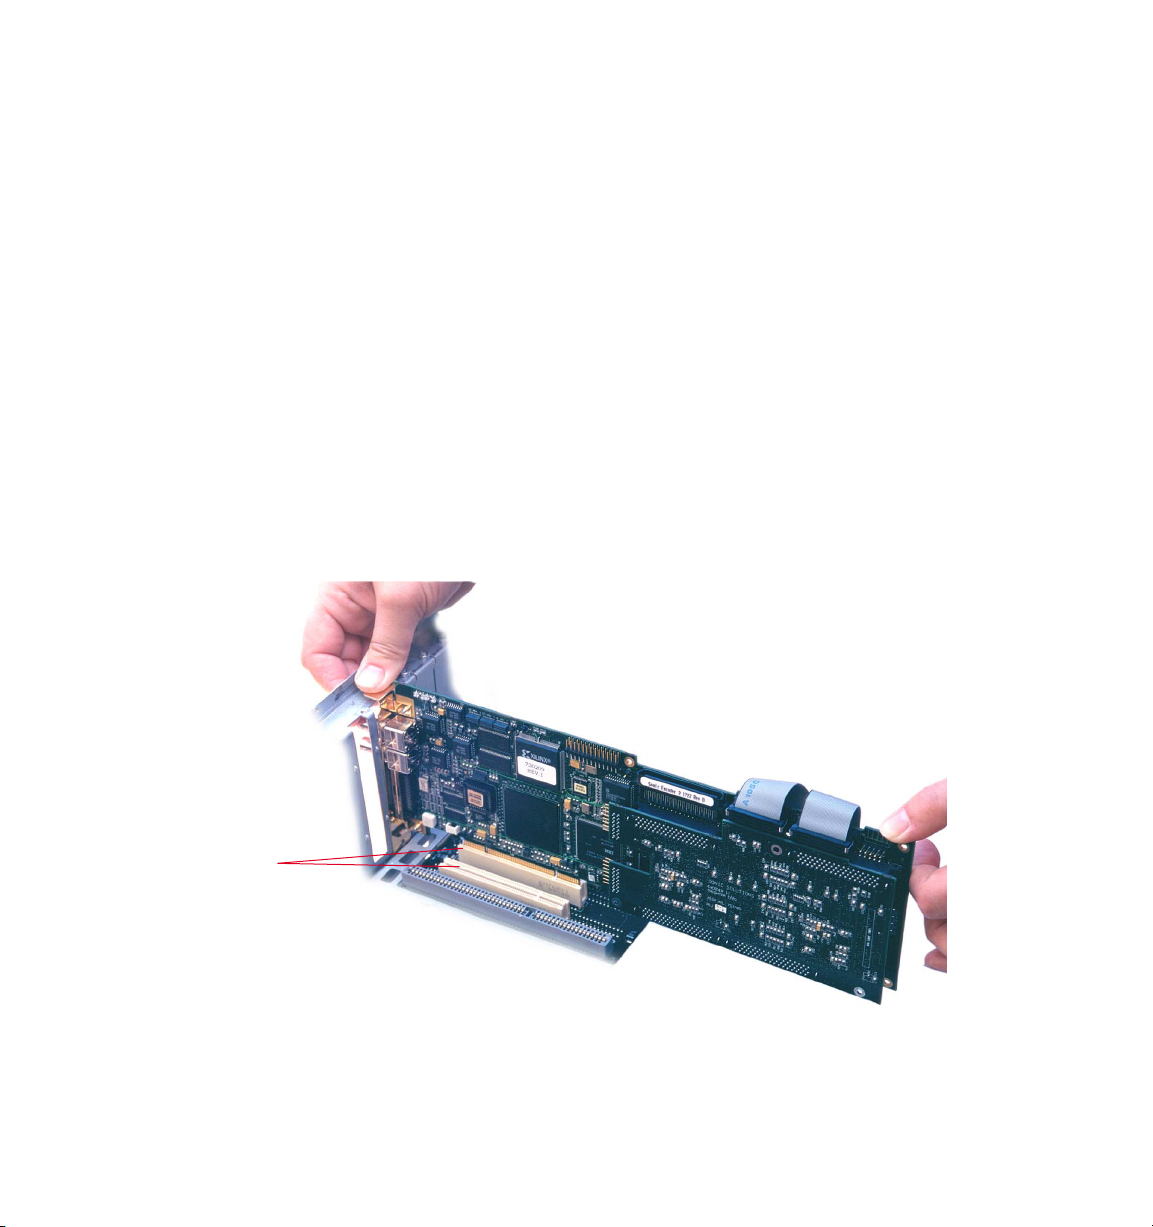
5 Remove the SD-1000 Encoder from its static-proof bag. Handle the card by its edges;
don’t touch the gold connectors or on-board components.
6 Align the card’s connector fingers with the PCI slot and press down until the card is
seated properly.
Step 2: Installing the SD-1000 Encoder 9
PCI slots
Page 16
10 Chapter 2, Installing DVD Producer
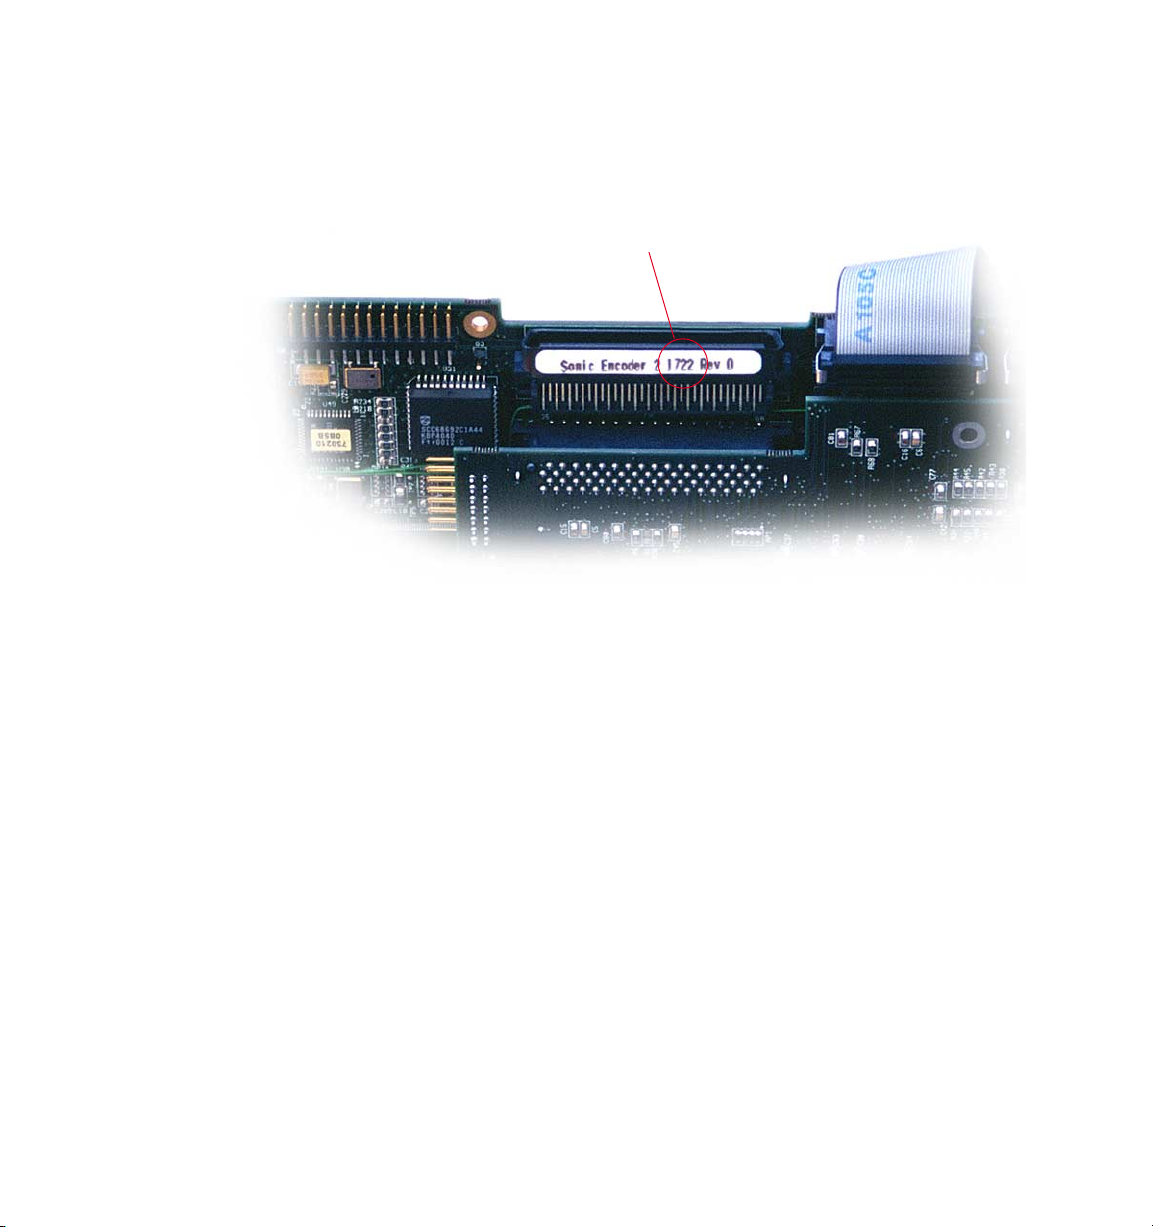
At this point you should make a note of the Encoder card’s serial number, which is
located on the connector at the top edge of the card.
You’ll need this number when you launch DVD Producer the first time (see “Registering
and Configuring DVD Producer (SD-1000 Systems)” on page 17). You may also be asked
for this number when contacting Sonic Customer Support.
Serial number
7 Replace the slot cover screw to hold the card in place, then close up the computer.
8 Reconnect the computer’s power cord. This ensures that the computer is grounded and
thus prevents damage from differing ground potentials or stray electrostatic charges.
Page 17
Step 3: Connecting the Stereo Audio I/O to the Computer 11
Step 3: Connecting the Stereo Audio I/O to the Computer
You use the breakout cable to connect the Stereo Audio I/O to the Encoder.
To connect the Stereo Audio I/O:
1 Make sure that both the Stereo Audio I/O and the computer are plugged into a grounded
power supply and powered off.
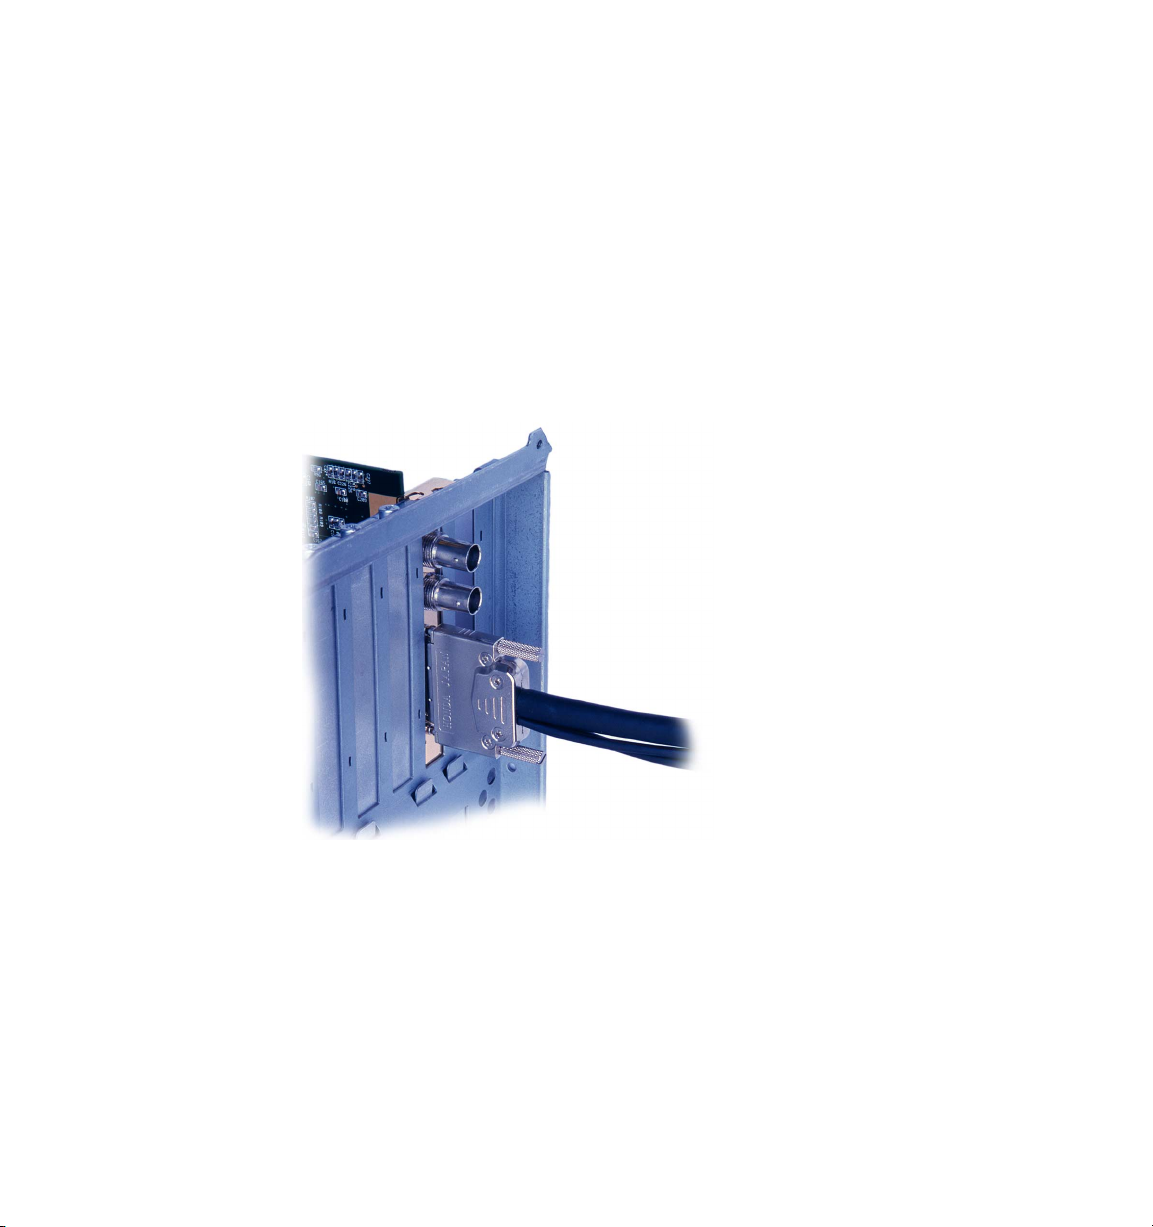
2 Connect the micro 68 DIN connector to the SD-1000 Encoder.
Page 18
12 Chapter 2, Installing DVD Producer
3 Connect the SCSI-3 connector on the breakout cable to the Sonic I/O socket on the back
panel of the Stereo Audio I/O.
Page 19
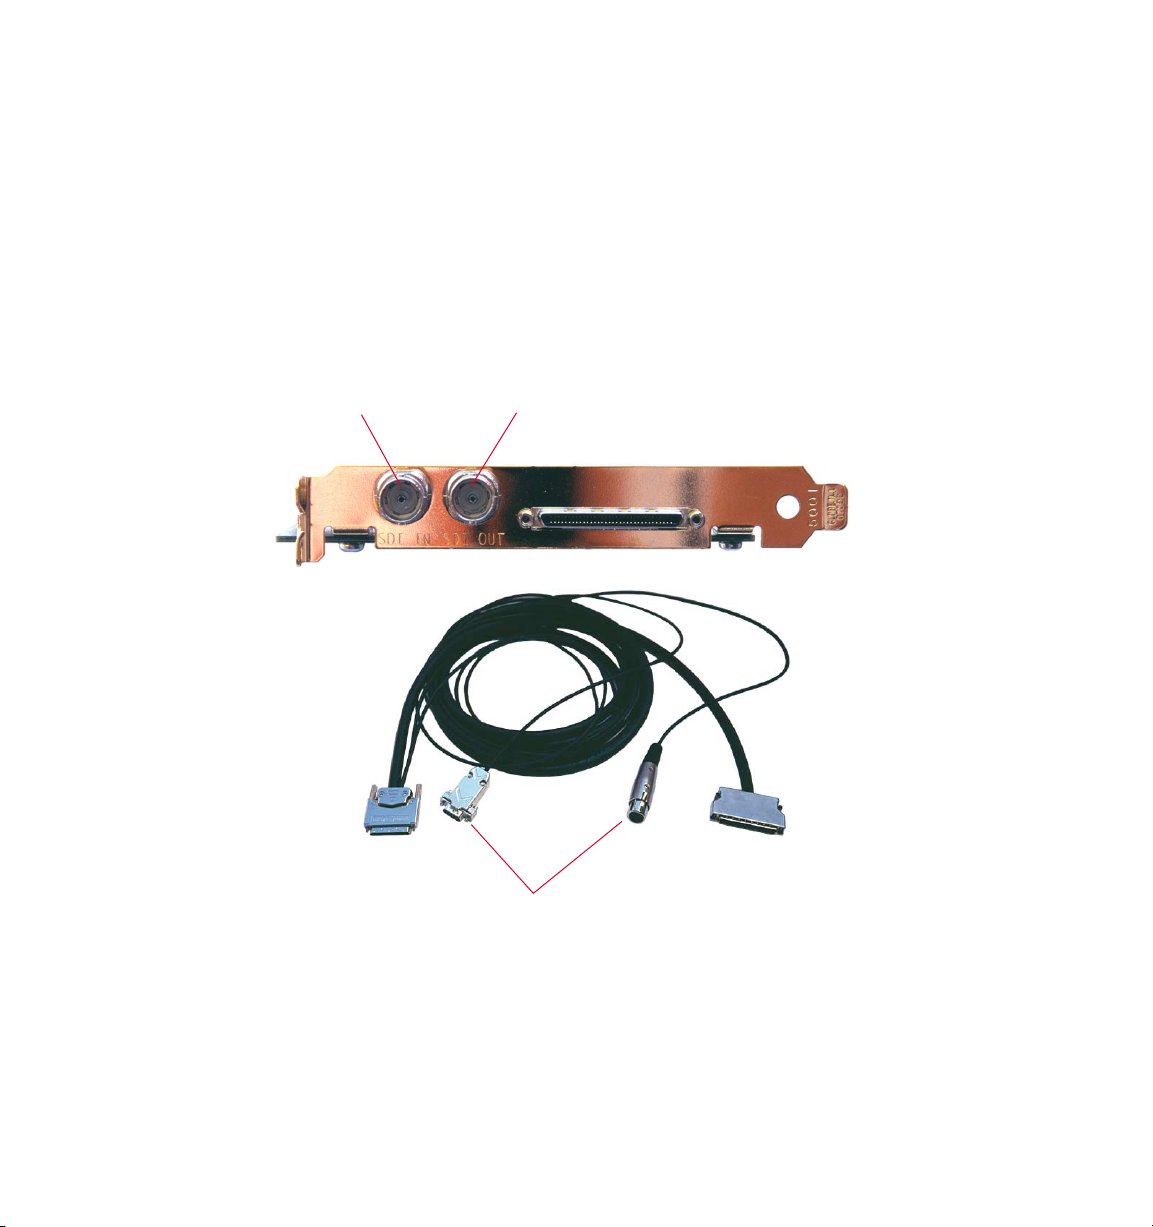
Step 4: Connecting Peripheral Devices
Video Connections
The SD-1000 Encoder has two BNC sockets for connecting a videotape deck and an external
monitor. The breakout cable provides an XLR connector and a 9-pin RS 422 connector for
timecode and machine control.
Video input Video output
Step 4: Connecting Peripheral Devices 13
Timecode/machine control connectors
•
Use a BNC-to-BNC video cable to connect the videotape deck’s SDI output to the SD1000 Encoder’s SDI In. If the deck provides only analog outputs, use an analog-to-digital
converter to convert the signal.
Page 20
14 Chapter 2, Installing DVD Producer
•
Use a BNC-to-BNC video cable to connect the SD-1000 Encoder’s SDI Out to an external
video monitor’s SDI input. If the monitor accepts only analog inputs, use a digital-toanalog converter to convert the signal.
You can use either the female XLR or the RS-422 connector for timecode and machine
control. The XLR (longitudinal timecode) connection gives the most accurate timecode.
•
Connect the female XLR on the breakout cable to the videotape deck’s timecode output.
You can use an adapter if the deck provides a different connector, such as BNC.
•
Connect the 9-pin RS 422 connector on the breakout cable to the videotape deck’s RS
422 In/Remote 9P input.
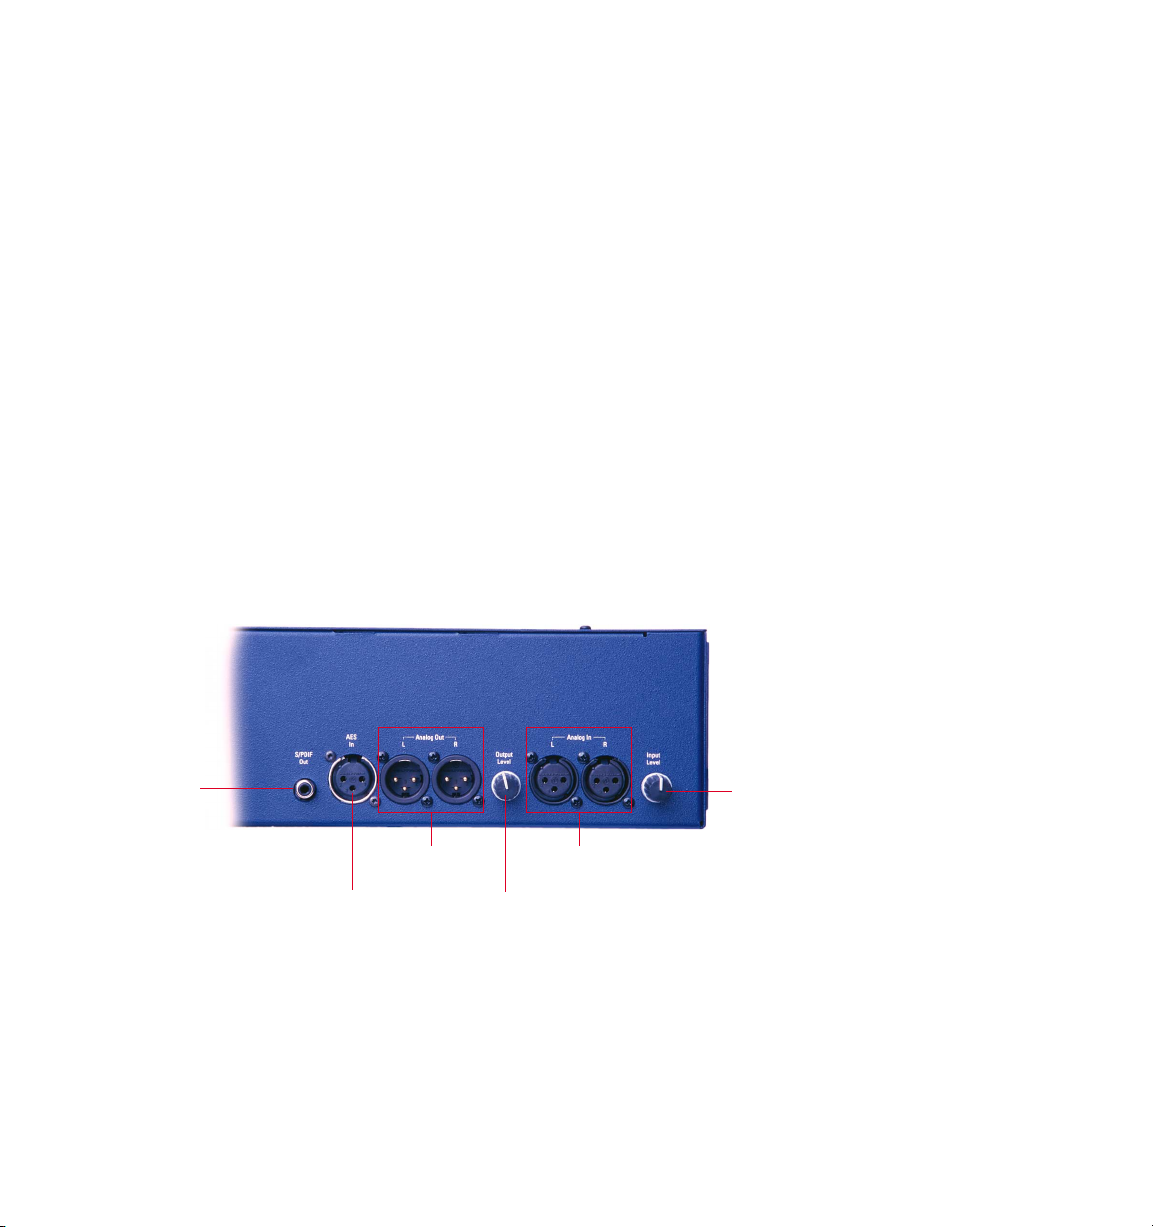
Audio Connections
The Stereo Audio I/O provides both digital and analog connections to the videotape deck
and audio monitoring systems:
S/PDIF
digital output
AES digital
input
Analog
output
Analog input level
Analog
input
Analog
output level
Page 21

Step 4: Connecting Peripheral Devices 15
Inputs
•
If your videotape deck has an AES/EBU digital audio output, connect it to AES In on the
Stereo Audio I/O using a digital-grade XLR cable.
•
If the deck provides only analog audio outputs, connect them to Analog In on the Stereo
Audio I/O using either balanced or unbalanced XLR cables (pin 2 hot). The maximum
input level is +25 dBu.
•
If you use the analog inputs, set the Input Level control on the Stereo Audio I/O
according to the videotape deck’s nominal output level. For +4 dBu (professional
equipment), turn the control fully clockwise; for –10 dBv (consumer equipment), turn
the control fully counter-clockwise.
Outputs
•
If you have a Dolby Digital decoder or a digital-to-analog converter, you can connect it to
S/PDIF Out using a digital-grade RCA-to-RCA cable.
•
You can connect an analog audio monitoring system to Analog Out on the Stereo
Audio I/O using either balanced or unbalanced XLR cables (pin 2 hot). The maximum
output level is +25 dBu.
•
If you use the analog outputs, set the Output Level control on the Stereo Audio I/O
according to your audio system’s requirements. For a +4 dBu nominal output level
(professional equipment), turn the control fully clockwise; for –10 dBv (consumer
equipment), turn the control fully counter-clockwise.
Page 22

16 Chapter 2, Installing DVD Producer
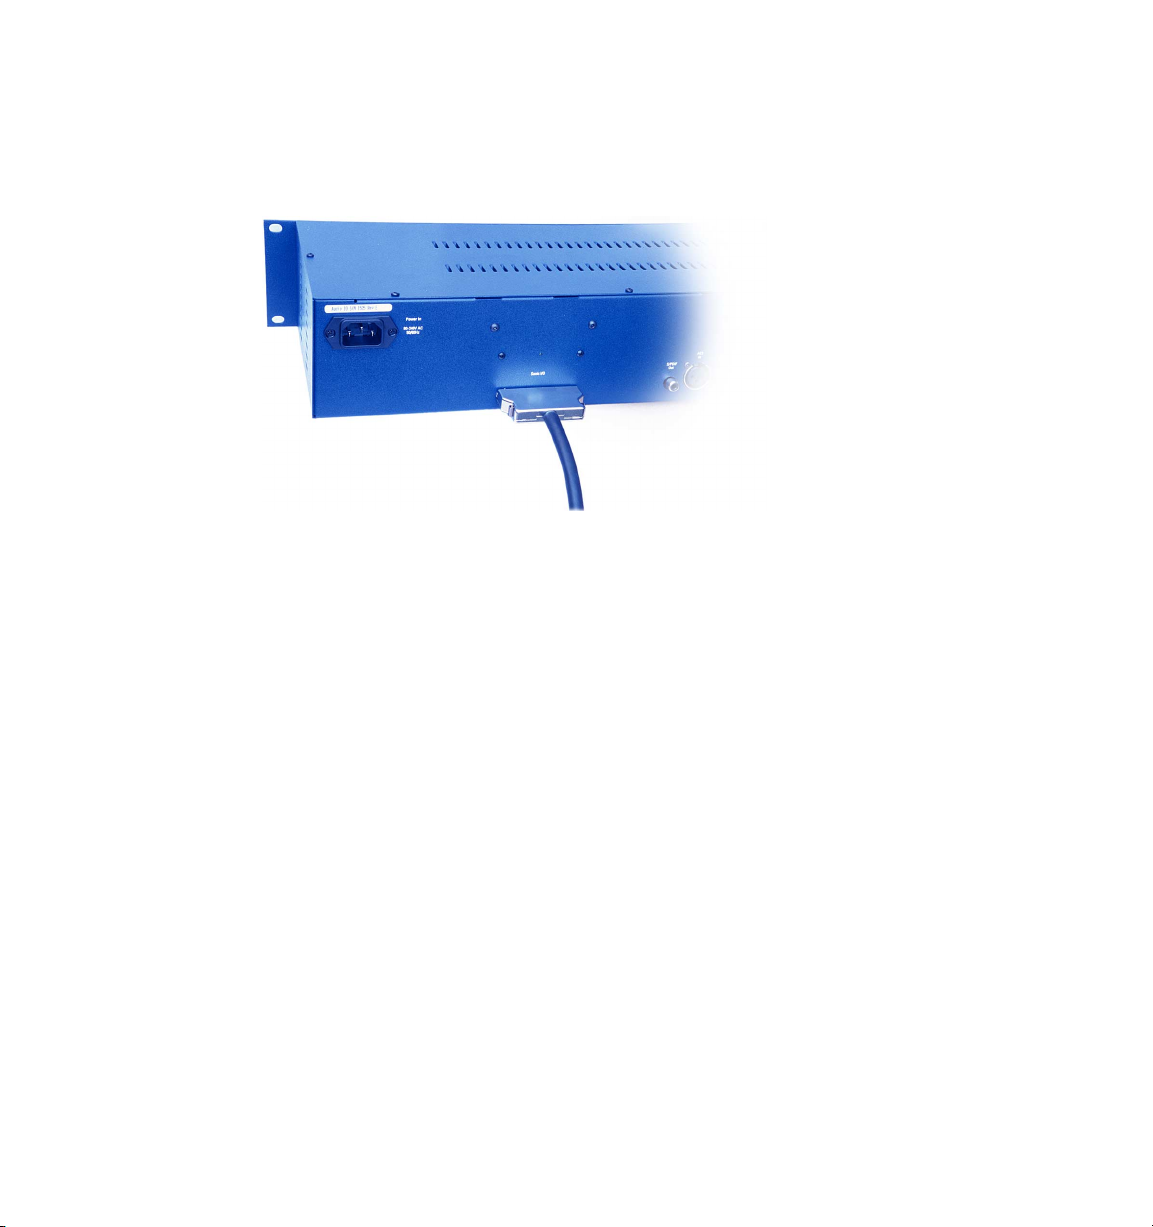
Stereo Audio I/O front panel
The LEDs on the Stereo Audio I/O front panel indicate the analog audio levels and the digital
input status:
Adjusting the Analog Input Levels
The Audio Level LEDs indicate the transient input and output levels. If the 0 dB (red)
indicators light, it means clipping may occur; adjust the Input Level or Output Level control
on the back panel (turn the control counter-clockwise) to reduce the level and prevent
distortion.
Audio Levels Audio Lock
Checking the Digital Input Status
The Audio Lock LED indicates the digital audio input status:
Unlit
No digital input signal detected.
Yellow
Green
Note:
Digital input signal is present.
Stereo Audio I/O is locked to the digital input signal clock.
If you are using the analog inputs, the Audio Lock LED does not light.
Page 23

Step 5: Launching DVD Producer the First Time 17
Step 5: Launching DVD Producer the First Time
Registering and Configuring DVD Producer (SD-1000 Systems)
After installing the encoding hardware, you must restart the computer and then launch and
configure DVD Producer.
To launch DVD Producer the first time:
1 Power on the Stereo Audio I/O and any other peripheral devices.
2 Restart or power up your computer.
The first time you restart after installing the SD-1000 Encoder card, the Windows
Hardware Installation wizard launches to install the Encoder driver. Follow the on-screen
instructions to find and install the required driver.
3 From the Windows Start menu, choose Programs > DVD Producer > DVD Producer. The
Register DVD Producer screen appears.
4 If you don’t have an Activator Code, or don’t have the SD-1000 Encoder card installed,
you can click “Run in Trial Mode” to run DVD Producer in trial mode. In trial mode you
can’t save projects or write DVDs; in addition, encodes are limited to two minutes.
– or –
5 Click Register Now. The Register dialog opens (if the SD-1000 Encoder card is installed,
your
serial number
DVD Producer package, then click OK.
•
If the Activator Code was entered correctly, DVD Producer opens.
•
If the Activator Code was entered incorrectly, you can try again. If you don’t have an
Activator Code (or don’t have the correct one), click the Web link in the Register dialog
to retrieve one online, or contact Sonic Customer Support.
Note:
reason you don’t have the SD-1000 Encoder card installed, or don’t have an Activator Code,
you can run the program in trial mode and later register by choosing Help > Register.
You don’t have to register DVD Producer the first time you launch it. If for some
appears in this screen). Enter the Activator Code included with your
Page 24
18 Chapter 2, Installing DVD Producer
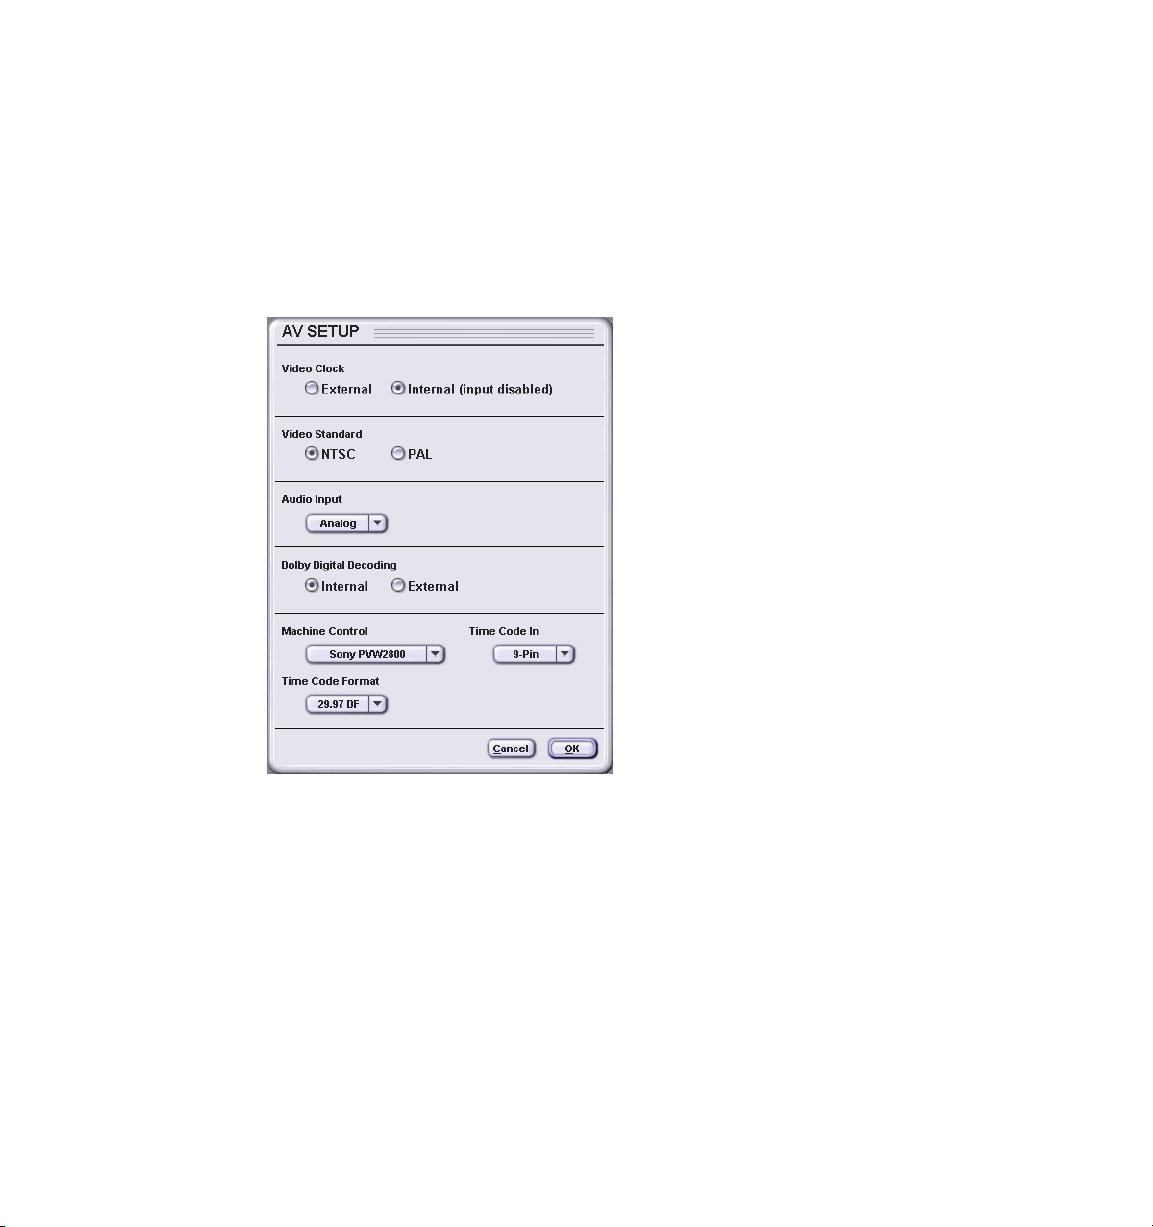
After registering DVD Producer, you are ready to configure the encoding hardware.
To configure the encoding hardware in DVD Producer:
1 Choose File > Encode > Hardware Setup or press Control+H. The AV Setup window
opens.
2 Configure the settings based on your hardware setup:
•
Set the Video Clock to External if a video source is connected to the SD-1000 Encoder’s
SDI In connector. Select Internal if no video source is connected.
•
Set the Video Standard to NTSC or PAL, depending on the video deck’s video format.
•
Set the Audio Input to either Analog or Digital.
•
Set Dolby Digital Encoding to External if you have a Dolby Digital decoder connected to
the Stereo Audio I/O’s S/PDIF output. Otherwise, select Internal.
•
From the Machine Control menu, select your video deck. If your deck is not listed, select
Auto. If no deck is connected, select None.
Page 25

Step 5: Launching DVD Producer the First Time 19
•
Set Time Code In to 9-Pin if the video deck does not provide a timecode output
connection If the deck provides a timecode output connection, select either 9-Pin or
LTC, depending on the type of timecode you want. LTC (longitudinal timecode) is more
accurate
•
If using NTSC, set the Time Code Format to 29.97 DF for drop-frame video or 29.97 NDF
for non-drop-frame video (depending on the individual videotape).
3 Click OK to save the new settings.
Registering DVD Producer (Authoring-Only Systems)
To launch DVD Producer the first time:
1 Attach the SuperPro dongle to any available USB port on your computer. Windows scans
for the device and activates the installed dongle driver.
2 From the Windows Start menu, choose Programs > DVD Producer > DVD Producer. The
Register DVD Producer screen appears.
3 If you don’t have an Activator Code, or don’t have the SuperPro dongle installed, you can
click “Run in Trial Mode” to run DVD Producer in trial mode. In trial mode you can’t save
projects or write DVDs; in addition, encodes are limited to two minutes.
– or –
4 Click Register Now. The Register dialog opens (if the SuperPro dongle is installed, your
serial number
Producer package, then click OK.
•
If the Activator Code was entered correctly, DVD Producer opens.
•
If the Activator Code was entered incorrectly, you can try again. If you don’t have an
Activator Code (or don’t have the correct one), click the Web link in the Register dialog
to retrieve one online, or contact Sonic Customer Support.
Note:
reason you don’t have your dongle or Activator Code, you can run the program in trial mode
and later register by choosing Help > Register.
You don’t have to register DVD Producer the first time you launch it. If for some
appears in this screen). Enter the Activator Code included with your DVD
Page 26

20 Chapter 2, Installing DVD Producer
Removing DVD Producer
If you need to uninstall DVD Producer, you can use the Windows Add/Remove Programs
control panel.
To uninstall DVD Producer:
1 From the Windows Start menu, choose Settings > Control Panel. The Control Panel
window opens.
2 Double-click the Add/Remove Programs icon.
3 Select DVD Producer and click Change/Remove.
4 Follow the on-screen instructions.
Note:
any imported files, project files, or DVD builds in the DVD Producer folder. You can delete
these files using Windows Explorer.
The uninstaller removes only the DVD Producer application files. It does not delete
Page 27

3
Planning the Project
There are several aspects you must consider when beginning a DVD project. Some of these
affect how you prepare the media files you will use in the project, others control your
choice of output media and therefore the maximum size of the project. This chapter
includes:
•
DVD Producer overview
•
What is a DVD project?
•
Calculating bit rates
• Creating, saving, and opening projects
DVD Producer Overview
DVD Producer is an all-in-one tool for DVD premastering. It combines:
• Encoding, for creating “DVD-legal” video and audio files
• Authoring, for assembling media files into a DVD-Video presentation
• Formatting, for multiplexing the individual media files into DVD streams and writing
those streams to a variety of media
Page 28

22 Chapter 3, Planning the Project
What is DVD Premastering?
Premastering is the process of taking media files (video, audio, and graphics) and turning
them into the final DVD disc, or into a DVD master that will be sent to a replication plant.
This process can be broken down into the following key steps:
• Project planning (this chapter)
• Preparing video, audio, and graphics:
– Chapter 4, “Preparing Media Files”
– Chapter 5, “Encoding Video and Audio”
– Chapter 6, “Getting Media Files into DVD Producer”
• Authoring the project:
– Chapter 7, “Building the Project Structure”
– Chapter 8, “Working with Menus”
– Chapter 9, “Working with Movies”
• Testing the project to ensure that it works as you expect:
– Chapter 10, “Proofing the DVD Project”
• Building the final output:
– Chapter 11, “Creating DVDs”
Page 29

DVD Producer Overview 23
What Does DVD Producer Output?
DVD Producer lets you create three kinds of DVD: DVD-ROM, DVD-Video, and “Hybrid”
DVD. The type of DVD you create affects the amount of space available and therefore the
project length.
DVD-ROM
This is the “base” from which all other formats (including DVD-Video) derive. The DVD-ROM
format defines the physical and logical characteristics of the DVD disc; basically, every disc
is a DVD-ROM and contains computer-readable files. The format imposes constraints on the
file structure and file names so that the discs can be used with all computer operating
systems.
All the data on the DVD-ROM are contained in a DVD Volume, which fills one side of the
disc. A DVD Producer project is equivalent to a DVD Volume.
In DVD Producer, you can create a data-only DVD-ROM by selecting a single folder; all files
and folders within that folder will then be placed on the DVD-ROM.
DVD-Video
This is a video presentation that plays in a set-top DVD player or on a computer with a
software DVD player. The DVD-Video standard specifies where the DVD-Video files must be
located physically on the disc so that set-top players can recognize and play the disc. On a
computer, the DVD-Video section of the disc is represented by a folder named “VIDEO_TS”.
Page 30
24 Chapter 3, Planning the Project
Viewers use a remote control to navigate through the DVD-Video content. Every remote
control should include the standard set of buttons:
Title button
Menu button
Arrow keys
Previous/
Rewind
Pause
Play
Subtitles
on/off
Select subtitle
stream
Enter button
Next/
Fast forward
Stop
Skip to End Action
Select video angle
Select audio stream
Numeric Keypad
Page 31

DVD Producer Overview 25
Manufacturers can also add buttons for functions that are specific to a particular model of
DVD player.
How the standard buttons work depends partly on the DVD player and partly on how you
author the disc. For example, when the viewer presses the Menu button, the DVD player
displays a menu, but you decide which menu is displayed.
The amount of video you can store on a single-sided DVD depends on factors such as the
video quality and the type of audio. Replication plants can produce double-sided discs,
which are essentially two single-sided discs stuck together. The viewer must turn the disc
over to play the other side, so you must create two separate projects if you want to use a
double-sided disc.
Hybrid DVD
A hybrid DVD has a DVD-Video section and a separate “ROM” section containing data files.
The data files are “invisible” to set-top players but can be read by computers. You can create
hybrid DVDs that contain extra content for viewers using computers, such as applications,
video clips, scripts, and Web pages. In DVD Producer, you create a hybrid DVD by adding a
folder full of files and folders to a DVD-Video presentation. The more data files you include
on the disc, the less room there will be for the DVD-Video section, which constrains the
length of the presentation.
Page 32

26 Chapter 3, Planning the Project
What Is a DVD Producer Project?
A DVD project brings together all the items that will go into a single DVD Volume. Since the
DVD Volume fits on one side of a DVD disc, the DVD project contains the data for one side
of a disc. If you want to create a double-sided disc, you must create two projects—one for
each side.
The DVD-Video presentation basically consists of movies and menus that are linked together
in different ways. Movies and menus have some similarities and some important differences.
Movies
A movie contains a video track together with up to eight audio tracks and 32 subtitle tracks.
It also contains instructions that tell the DVD player what to do when the movie finishes or
the viewer presses buttons on the remote control.
In DVD Producer, the Movie Timeline window shows the movie contents:
Zoom buttons
Chapter point Subtitle track
The video track holds a single video clip; and audio track can hold one audio clip containing
mono, stereo or surround audio; and subtitle tracks contain text data for multi-language
videos or text captions.
Timeline ruler
Video trackAudio track
Page 33

What Is a DVD Producer Project? 27
Note: You cannot place multiple clips in a single track. If you have several clips that you
want to play in sequence, you can either join them together in a video editing application
and import the resulting clip into DVD Producer, or create a separate movie for each clip
and link the movies together. If you want the clips to run together seamlessly (without
pausing between one clip and the next), you should join them together outside DVD
Producer.
A movie plays until the video track ends or the viewer jumps somewhere else using the
remote control. When a movie finishes, an instruction called an end action tells the DVD
player which material to display next. See “End Actions” on page 30 for more information.
Chapter Points
Movies also contain chapter points, which are markers in the video track. When you create
a movie, DVD Producer creates a chapter point at the start of the video, and you can add
more chapter points anywhere in the timeline.
The viewer can navigate to a chapter point either by pressing the Next or Previous button
on the remote control while the movie is playing, or by choosing a menu button that has
been linked to the chapter point. For example, many Hollywood DVDs contain “scene
selection” menus. In these menus, each menu button links to a different chapter point
within the same movie so that the viewer can jump directly to a particular scene by
selecting the appropriate menu button.
Menus
Menus provide a way for viewers to jump to specific parts of the presentation. A menu
contains
• A background image
• At least one button that links either to a chapter point within a movie, or to another
menu
• Instructions that tell the DVD player which button to select when the menu is first
displayed, or when the viewer presses the remote control’s selection buttons.
Page 34

28 Chapter 3, Planning the Project
For example, the following menu contains a background image and four text buttons.
Note: DVD Producer will not let you create DVDs from a project if it contains a menu
without any button links.
The viewer uses the remote control to select and activate the menu buttons. Each menu
button has a subpicture overlay graphic that changes color to indicate when the button is
unselected, selected, or activated. For example:
Unselected Selected Activated
You can specify which colors appear for each of these states. You can also specify the
opacity of each color.
Page 35

What Is a DVD Producer Project? 29
Usually, menus remain onscreen until the viewer activates a button, but you can create
menus that “time out” after a set period; an end action then tells the DVD player to display
some other material. For example, you could direct the DVD player to display instructions to
the viewer, clips from the movie, or to start the movie.
Menu Buttons
DVD Producer gives you two different ways to create menu buttons. One way is to create
buttons by dragging graphic and text objects onto a menu background and linking chapter
points or other menus to the graphic and text objects. The other way is to create all the
menu artwork in Adobe Photoshop or another graphics application, then draw buttons on
the artwork in DVD Producer and link them to chapter points and menus.
Menus created in Photoshop or a graphics application tend to look better, because you have
much finer control over the menu’s appearance. See “Creating Menu Graphics in Adobe
Photoshop” on page 51 for instructions on creating menu artwork in Photoshop.
Each menu button links to a single chapter point or menu. You can add extra instructions to
the button to override the settings in the movie or menu to which it is linked. This lets you
link to the same menu or movie from different places, and have different things happen
depending on which link is used.
Button Numbering
Every button on a menu is numbered starting from 1. Viewers have two ways to select a
button:
• Press the arrow keys on the remote control until the correct button is selected
• Press the number keys on the remote control that correspond to the button number
You can specify which button is number 1, 2, 3, and so on. If you do, you should also label
the buttons on the menu, so that the viewer knows which number key to press.
Page 36

30 Chapter 3, Planning the Project
Links
In a DVD-Video project created in DVD Producer, there are four kinds of links or jumps:
• End actions
• Button links
• Menu and Title links
• Next and previous links
End Actions
The end action is a link that executes automatically when a movie (or a menu that “times
out” after a set period) finishes playing. The end action tells the DVD player which menu or
movie (or chapter point within a movie) to display next.
The default end action for a movie is to do nothing—when the movie finishes, the disc
stops playing. You can change this end action to link to any other menu or to any chapter
point. Menus do not have a default end action, because normally they display indefinitely. If
you create a menu that times out, you must specify the end action for that menu.
You set the end action using the Properties window. See “Changing Movie Properties” on
page 152 information on changing movie end actions. See “Changing Menu Properties” on
page 127 for information on changing menu end actions.
Button Links
Button links execute when the viewer activates a button on a menu. You can override the
settings of the movie or menu to which the button links:
• If the button links to a movie, you can override the default audio and/or subtitle track
settings
• If the button links to another menu, you can specify which button should be selected
when that menu is displayed
Page 37

What Is a DVD Producer Project? 31
• For links to both movies and menus, you can override the linked movie or menu end
action with another end action
See “Creating Button Links” on page 121 for details on creating button links and overriding
default settings.
Menu and Title Links
These links execute when the viewer presses the MENU or TITLE button on the remote
control while a movie is playing.
Title Link
Pressing the TITLE button causes the DVD player to display the Title menu. There is only one
Title menu; in DVD Producer, this is the menu at the top of the Menus column in the List
window:
Title menu
In most DVDs, the Title menu is the most important menu in the menu hierarchy.
Page 38

32 Chapter 3, Planning the Project
Menu Link
Pressing the Menu button causes the DVD player to display a particular menu. For each
menu, you can specify which menu will be displayed and which button will be selected in
that menu.
You can also override the Menu button setting for individual chapters within a movie. For
example, you might want the DVD player to return to the previous menu if the viewer
presses the Menu button early in the movie, but display a different menu if the view presses
the Menu button later in the movie. You would do this by overriding the Menu button
action for each chapter point in the movie.
You change the Menu button action in the movie properties (see “Changing Movie
Properties” on page 152).
Next and Previous Links
Next and Previous links execute when the viewer presses the NEXT/SKIP or PREVIOUS buttons
on the remote control while a movie is playing.
Next Link
Pressing the NEXT button on the remote control causes the DVD player to skip forward to
the next chapter point in the movie. If there are no more chapter points, nothing happens
when the viewer presses the NEXT button.
Previous Link
In most DVD players, pressing the PREVIOUS button on the remote control causes the DVD
player to skip back to the beginning of the current chapter, and pressing Previous
repeatedly causes the player to skip back to earlier chapter points. You cannot skip back
past the beginning of the movie.
Page 39

What Is a DVD Producer Project? 33
First Play
Most DVD-Video discs start automatically when the viewer inserts the disc in a DVD player.
This behavior is controlled by an instruction on the disc called First Play. If the disc does
not have this instruction, the player will do nothing until the viewer presses the PLAY button
on the remote control.
For example, a typical Hollywood DVD displays a brief FBI warning when you insert the disc
in a player. This is usually a First Play movie containing a still or short video; after this, the
DVD’s main (Title) menu usually appears.
On the other hand, if you are developing a disc for a presentation, you might prefer that the
disc not start until the presenter is ready; in this case, you would not have a First Play. As
part of planning the project, you must decide which menu or movie will be the First Play
(or whether you will have a First Play at all).
For information on setting First Play, see “Setting the First Play” on page 87.
Video Formats
DVD-Video is based on the MPEG-2 video compression standard; it also allows the use of
MPEG-1 video. The MPEG parameters allow a wide range of video resolutions, aspect ratios,
and so on, but the DVD-Video format allows only a limited subset of these parameters to be
used. Many third-party MPEG encoders are not designed specifically to produce “DVD-legal”
files, so you must ensure that you use the correct settings when encoding video and audio.
See Chapter 4, “Preparing Media Files” for the “DVD-legal” MPEG settings. For an overview of
how MPEG compression works, see Appendix , “.”
Part of project planning involves setting the video encoding bit rate. See “Calculating Bit
Rates” on page 35 for details.
Page 40

34 Chapter 3, Planning the Project
NTSC and PAL
DVD projects can be either NTSC or PAL format, but not both. The choice of video format
depends on the countries where you expect the disc to be used. Appendix A lists the
countries and territories that use each system. Most PAL DVD players can handle both
formats, but few NTSC players can handle PAL.
Note: If the disc is intended only for playback on computers, the video format is not
important. Software-based DVD players can handle either format.
If you want to create a disc containing both NTSC and PAL formats, you can create a
separate project for each format, then have the replication plant master a double-sided
(DVD-10) disc with the NTSC project on one side and the PAL project on the other side. The
viewer will have to place the disc in the player the right way round, so you must ensure that
the viewer knows that one side is for PAL and the other is for NTSC.
Audio
DVD Producer supports PCM (WAVE) audio, Dolby Digital audio, and MPEG-1 Layer II audio.
If you have the SD-1000 Encoder installed, you can encode MPEG-1 and Dolby Digital audio
within DVD Producer.
PCM is uncompressed audio; it is not used often in commercial DVDs because it requires a
much higher bit rate than other kinds of audio and consequently there is less room for
video. Generally you should use PCM only when audio quality is paramount, or when you
have no choice.
Dolby Digital and MPEG-1 Layer II audio are both compressed, and both provide similar
levels of quality—as good as uncompressed audio for most purposes. Dolby Digital has
become the de-facto standard for audio on most DVDs. MPEG-1 audio is less commonly
used.
Note: You must not use MPEG-1 audio in NTSC-format projects. You should use Dolby
Digital instead. PAL-format projects can use any audio.
See Chapter 4, “Preparing Media Files” for the “DVD-legal” audio parameters.
Page 41

Calculating Bit Rates
The Bit Budget
The final step in planning involves calculating the bit rates you will use when encoding
video and audio—this is called a bit budget.
There are two factors that constrain your choice of bit rates. One factor is the type of disc
you will use and, therefore, how many bits are available for each second of the content. The
other factor is the maximum bit rate allowed by the DVD-Video standard. This is 9.8 MBps
(millions of bits per second), which must be divided between the video and audio streams.
The bit budget calculation produces two values that you must use when encoding video:
• Maximum video bit rate
• Average video bit rate
Since video usually requires the largest bandwidth, the best way to calculate a bit budget is
to subtract the audio requirements from the available bandwidth to get the maximum and
average video bit rates. The bit rate for audio depends on the number of audio channels and
the type of audio.
Calculating Bit Rates 35
To calculate the bit budget:
1 Calculate the combined average bit rate for video and audio (see “Output Media
Capacities” on page 36 for DVD disc sizes):
Disc size: __________ Mbits ÷ Total length of presentation: _________ seconds
Average bit rate = __________ Mbps
Note: If you are creating a hybrid DVD, you must reduce the Disc size by the size of the
ROM content.
Page 42

36 Chapter 3, Planning the Project
2 Calculate the average video bit rate by subtracting the audio requirements (see “Audio
Bit-Rate Requirements” on page 38 for the bit-rate requirements for different types of
audio):
Average bit rate: ________ Mbps – Audio bit rate: ________ Mbps
Average video bit rate = __________ Mbps
3 Calculate the maximum video bit rate (for variable bit-rate (VBR) encodes only):
9.8 MBps – Audio bit rate: ________ Mbps
Maximum video bit rate = __________ Mbps
When you create a video set (see “Working with Video Sets” on page 66), enter the value
from step 2 for the Target Bit Rate and the value from step 3 for the Max Bit Rate.
See “Sample Bit Budget Calculation” on page 39 for an example of this calculation.
Output Media Capacities
DVD Producer lets you output projects to a wide variety of media. The choice of media is
driven by the project’s purpose, length, and budget. Table 1 lists the available media and
explains how to best use each type.
Use the values in the Disc size (millions of bits) column when you calculate encoding bit
rates. Use the values in the Computer disc size column when calculating how much data
will fit on a DVD-ROM.
For hybrid DVDs, subtract the size of the ROM content (in bits) from the Disc size, then use
the resulting value as the disc size in the bit-rate calculation.
Note: The “official” DVD disc sizes are confusing because they do not follow the
conventions used for other digital media. In the DVD world, 1 Gigabyte is 1,000,000,000
(109) bytes, whereas in the computer world, 1 Gigabyte is 1,073,741,824 (230) bytes.
Therefore a 4.7 GB computer hard disk contains about 330 MB more data than a 4.7 GB
DVD.
Page 43

Table 1: Media capacities
Calculating Bit Rates 37
Type Official
disc size
(see Note)
Computer
disc size
Disc size in
Mbps
(less 4% for
headroom)
DVD-R 3.95 GB
DVD-RW 4.7 GB 4.38 GB 36,096
DVD+RW 4.7 GB 4.38 GB 36,096
DVD-5 4.7 GB 4.38 GB 36,096
DVD-10 9.4 GB
DVDRAM
4.7 GB
(4.7 × 2)
4.7 GB
5.2 GB
(2.6 × 2)
3.68 GB
4.38 GB
8.75 GB
(4.38 × 2)
4.38 GB
4.84 GB
(2.42 × 2)
30,336
Mbits
36,096
Mbits
Mbits
Mbits
Mbits
2 × 36,096
Mbits
36,096
Mbits
2 × 19,968
Mbits
Typical
program
length
100 min.
120 min.
120 min.
120 min.
120 min.
2 × 120
min.
120 min.
2 × 70
min.
Notes on use
Good for small production runs, test and
demo discs. The discs work with most settop players and DVD-ROM drives.
Some replication plants can accept DVD
masters on
DVD-R discs.
3.95 GB discs seem to be more compatible
with older players, but are becoming rare.
Same as DVD-R, but discs are rewritable,
like CD-RW.
Same as DVD-RW, but you can overwrite
part or all of the existing content, rather like
recording on videotape.
Mass-produced from a DVD master sent to
a replication plant. The discs work with all
set-top players and DVD-ROM drives.
Double-sided disc mass-produced from two
DVD masters sent to a replication plant. This
requires two projects, one for each side. The
viewer must turn the disc over to play the
other side.
Can be used only in computers with DVDRAM drives, although set-top players may
become available in the future.
5.2 GB discs are double-sided (2.6 GB per
side). A project must fit on one side; to use
both sides you need two projects.
CD-R/RW 682 MB
734 MB
650 MB
700 MB
5,238 Mbits
5,637 Mbits
15 min.
18 min.
Suitable for very short projects.
Playable on almost all computers with a
DVD-ROM or CD-ROM drive.
Page 44

38 Chapter 3, Planning the Project
Audio Bit-Rate Requirements
Dolby Digital
No. of
Channels
1 (1/0) 0.064 0.448 –
2 (2/0) 0.096 0.448 0.192
Min. Bit Rate
(Mbps)
Max. Bit Rate
(Mbps)
Recommended Bit
Rate (Mbps)
MPEG Audio
No. of
Channels
1
2
Min. Bit Rate
(Mbps)
0.064 0.192 –
0.096 0.384 0.192
Max. Bit Rate
(Mbps)
Recommended
Bit Rate (Mbps)
PCM Audio
Bits Per Sample No. of Channels Bit Rate (Mbps)
16 1 0.768
2 1.536
20 1 0.96
2 1.92
Page 45

Creating, Saving, and Opening Projects 39
Sample Bit Budget Calculation
If you have a 100-minute (6000-second) presentation with Dolby Digital stereo audio, and
you want to place it onto a DVD-5 disc, here’s how you determine the bit budget:
1 Calculate the average bit rate for both video and audio:
Disc size: 36096 Mbits ÷ Total length of presentation: 6000 seconds
Average bit rate = 6.0 Mbps
2 Calculate the average video bit rate by subtracting the audio requirements:
Average bit rate: 6.0 Mbps – Audio bit rate: 0.192 Mbps
Average video bit rate = 5.808 Mbps
3 Calculate the maximum video bit rate:
9.8 MBps – Audio bit rate: 0.192 Mbps
Maximum video bit rate = 9.608 Mbps
In this example, when creating a video set (see “Working with Video Sets” on page 66), you
would enter the “5.808” for Target Bit Rate and “9.0” for the Max Bit Rate.
Note: Although in this case you could set the maximum video bit rate to 9.608 Mbps, it is
recommended that you always set the maximum to less than or equal to 9.0 MBps.
Creating, Saving, and Opening Projects
After you’ve planned the presentation, you can launch DVD Producer and do one of the
following:
• Create a new project
• Open an existing project for editing
• Don’t create a project (for example, if you just want to encode video and audio)
Page 46

40 Chapter 3, Planning the Project
To launch DVD Producer:
1 Double-click the DVD Producer icon on the desktop, or from the Windows Start menu,
choose Programs > DVD Producer > DVD Producer.
2 In the New Project dialog, do one of the following:
• To create a new project, select the TV Standard you will use (NTSC or PAL) and click OK.
The Palette and List windows open.
• To open an existing project or start an encoding session, click Cancel.
To create a new project while DVD Producer is running:
1 If another project is already open and you want to save any changes made to it, choose
File > Close or press Control+F4.
2 Choose File > New > New Project or press Control+N.
3 In the New Project dialog, select the TV Standard you will use (NTSC or PAL) and click
OK. The Palette and List windows open
To save a project:
1 Choose File > Save or press Control+S.
If this is the first time you’ve saved the project, the Save As dialog opens.
2 Navigate to the hard drive location where you want to save the project, type a File, and
click Save.
In the specified location, DVD Producer creates a folder with the name that you typed.
Within the folder are two folders named “Cache” and “Sources” and a file named “xxx.as”,
where “xxx” is the file name that you entered in the Save As window. This is called the
project file.
Page 47

Creating, Saving, and Opening Projects 41
To open an existing project:
1 Choose File > Open or press Control+O. The Open dialog opens.
2 Navigate to the project (“.as”) file and double-click the file, or select it and click Open.
Alternatively, double-click the “.as” file in Windows. (This will also launch DVD Producer
if it is not already running.)
To save the project under a new name:
1 Choose File > Save As or press Control+Shift+S. The Save As dialog opens.
2 Navigate to the hard drive location where you want to save the project, type a File name,
and click Save.
Page 48

42 Chapter 3, Planning the Project
Page 49

4 Preparing Media Files
DVD Producer has specific requirements for the video, audio and graphics files you can use.
This chapter describes these requirements, and gives advice on creating suitable images. It
includes:
• Video parameters
• Audio parameters
• Graphics parameters
• Creating menu graphics in Adobe Photoshop
• Creating motion menus
Page 50

44 Chapter 4, Preparing Media Files
Video Parameters
You can create video files from a wide variety of sources, including video captured from
analog video tapes and cameras, digital video cameras, video editing applications, and even
some graphics applications. DVD Producer supports MPEG-1 and MPEG-2 video files,
providing they meet the requirements of the DVD-Video specification. You can use both
formats in the same project.
MPEG (Moving Pictures Expert Group) is a set of international standards for compressing
video and audio. The MPEG standards permit a wide range of image sizes, aspect ratios, bit
rates, video frame rates, and so on. There are about forty different parameters that you can
set when encoding MPEG video alone.
The DVD-Video format uses a limited subset of the MPEG standards, permitting only certain
specific image resolutions, frame rates, aspect ratios, and other parameters. DVD Producer
lets you import only “DVD-legal” MPEG files, so when you encode video using a third-party
encoder, you must make sure that you set the parameters correctly.
MPEG video streams must have the parameter settings listed in the following sections.
MPEG-1 Stream Parameters
Parameter NTSC (525 lines/60 Hz) PAL (625 lines/50 Hz)
Picture size (width x height) 352 x 240 352 x 288
Output frame rate 29.97 fps 25 fps
GOP size 18 frames maximum
15 frame recommended
Aspect ratio 4:3
Bit rate (CBR or VBR) 1.15 – 1.856 MBps
GOP Sequence header interval 1 GOP
Filename extension .m1p, .m1v, .mp1, .mpg, .mpeg, .mpv
15 frames maximum
12 frames recommended
Page 51

MPEG-2 Stream Parameters
Parameter NTSC (525 lines/60 Hz) PAL (625 lines/50 Hz)
Picture size (width x height) 720 x 480 720 x 576
Output frame rate 29.97 fps 25 fps
Video Parameters 45
GOP size (see Note) 36 fields/18 frames maximum
30 fields/15 frame
recommended
Aspect ratio 4:3 (standard TV) or 16:9 anamorphic (widescreen TV).
Bit rate
(CBR or VBR)
Profile and level Main profile and main level (MP@ML)
VBV buffer size 224 KB (1,835,008 bits)
GOP Sequence header
interval
Filename extension .m2p, .m2v, .mp2, .mpg, .mpeg, .mpv
Minimum 2.0 MBps.
Maximum 9.8 MBps for combined video and audio streams.
If you use PCM audio, the maximum video bit rate is 8 MBps. If
you use Dolby Digital or MPEG audio, the maximum video bit rate
is 9.4 MBps.
1 GOP (1 sequence header before every GOP)
30 fields/15 frames maximum
24 fields/12 frames
recommended
Note: Some encoders can generate MPEG-2 streams with variable GOP sizes. DVD
Producer supports these streams, providing the GOP size does not exceed the maximum
size allowed.
Page 52

46 Chapter 4, Preparing Media Files
Audio Parameters
DVD Producer supports PCM (WAVE) audio, Dolby Digital audio, and MPEG-1 Layer II audio
files. For NTSC-format presentations, only PCM audio and Dolby Digital audio are allowed.
Audio files must have the parameter settings listed in the following sections.
WAVE Audio
Sample rate
Sample size
Number of audio streams
Number of audio channels
Filename extension
48 kHz
8, 16, or 20 bits/sample
1
1 (mono) or 2 (stereo)
.wav
Note: DVD Producer does not support compressed WAVE files.
Dolby Digital Audio
Sample rate
Sample size
Number of audio channels
(front/rear)
Bit rate
Filename extension
48 kHz
8, 16, or 20 bits/sample
1/0 (mono)
2/0 (stereo)
1/0: 56 – 448 kbps
2/0: 96 – 448 kbps
.ac3
Page 53

MPEG-1 Layer II Audio
Graphics Parameters 47
Sample rate
Sample size
Number of audio channels
(front/rear)
Bit rate
Filename extension
Graphics Parameters
In addition to video and audio, you need graphics for creating menus. DVD Producer
supports a wide variety of graphics file formats, including bitmap, JPEG, PICT, TIFF, and
Photoshop.
Recommended Image Sizes
Images for use as menu backgrounds and overlays should be 720 x 480 pixels (width x
height) for NTSC, or 720 x 576 pixels for PAL. This is the 4:3 aspect ratio of standard TV.
(The pixels on a TV screen are not square, like they are on a computer monitor; NTSC pixels
are taller than they are wide, whereas PAL pixels are wider than they are tall.)
48 kHz
8, 16, or 20 bits/sample
1/0 (mono)
2/0 (stereo)
96 – 448 kbps
.abs, .mpa
The best way to create background images is to first create the artwork at 720 x 540 pixels,
then resize the image to the appropriate resolution in your graphics editing application
before you import it into DVD Producer.
Page 54

48 Chapter 4, Preparing Media Files
If you use other images sizes, DVD Producer scales the image to fit the screen, which can
lead to unwanted stretching, shrinking, or artifacts.
Images used as buttons and other graphic elements should be at least 70 x 60 pixels.
Windows Bitmap Parameters
Bit depth
Color mode
Filename extension
1, 4, 8, 16, 24, or 32 bits per pixel uncompressed
1, 4, or 8 bits per pixel RLE compressed
RGB, indexed, grayscale, and monochrome
.bmp, .rle
JPEG Parameters
Bit depth
Color mode
Filename extension
Grayscale: 8 bits per pixel
Color: 24 and 32 bits per pixel
RGB, grayscale and CMYK
.jpg, .jpeg
Macintosh PICT Parameters
Bit depth
Color mode
Filename extension
1, 4, 8, 16, 24, and 32 bits per pixel
RGB, indexed, grayscale and monochrome
.pct, .pic, .pict
Page 55

Photoshop Parameters
Graphics Parameters 49
Bit depth
Color mode
Filename extension
24 and 32 bits per pixel
RGB and CMYK
.psd
You can use the layers in Photoshop files to create DVD menus. You can also create button
artwork on separate layers within a single file, and use each layer separately within DVD
Producer. See “Creating Menu Graphics in Adobe Photoshop” on page 51 for details.
PNG (Portable Network Graphic) Parameters
Bit depth
Color mode
Filename extension
PNG files can contain an alpha channel (mask) for transparency effects. You can use the
alpha channel to create non-rectangular buttons.
1, 4, 8, 16, 24, and 32 bits per pixel
RGB, indexed, grayscale, and monochrome
.png
Page 56

50 Chapter 4, Preparing Media Files
TIFF (Tagged Image File Format) Parameters
Bit depth
Color mode
LZW compression
Filename extension
1, 2, 3, 4, 5, 6, 7, 8, 16, 24, and 32 bits per pixel
RGB, CMYK, Lab, indexed, grayscale, and monochrome
Not supported
.tif, .tiff
TIFF files can contain an alpha channel (mask). You can use the alpha channel to create nonrectangular buttons.
Truevision Targa Parameters
Bit depth
Color mode
Filename extension
8, 16, 24, and 32 bits per pixel
RGB, indexed, grayscale, and monochrome
.tga, .vda, .icb, .vst
Page 57

Creating Menu Graphics in Adobe Photoshop 51
Creating Menu Graphics in Adobe Photoshop
You can use Photoshop’s layers and transparency both to create complete menus and to
create non-rectangular buttons.
Creating Complete Menus in Photoshop
A DVD menu has three layers: a background layer, a subpicture overlay layer, and a highlight
layer:
Highlight layer
Background layer
Subpicture overlay layer
Page 58

52 Chapter 4, Preparing Media Files
The background layer contains full-color artwork, including graphic elements that represent
buttons. The subpicture overlay layer contains simple graphics that are used to indicate to
the viewer which button is selected or activated. The highlight layer contains the actual
“buttons”; each button is an invisible rectangle:
Background
image
++ =
Overlay
graphic
Highlight
rectangle
Button=++
Each highlight rectangle controls the color and opacity of any overlay graphics that it
encloses. When the button is not selected (in DVD Producer, this is called the “normal”
state), the DVD player displays the overlay graphics using one set of colors. If the viewer
selects the button (the “selection” state), the DVD player changes the overlay graphics
within the rectangle to another set of colors. And if the viewer activates the button (the
“activation” state), the DVD player changes the overlay colors again:
“Normal” state “Selection” state “Activation” state
Page 59

Creating Menu Graphics in Adobe Photoshop 53
You can create the background and subpicture overlay layers in a graphics application and
import them into DVD Producer, where you add the highlight layer and specify the colors
and opacities for the unselected, selected, and activated states. The background and overlay
can be separate files, but it is much easier to create them as layers in a single Adobe
Photoshop file. The major advantage of using Photoshop layers is that you can be sure that
the overlay graphics are in the correct position over the background before you import the
file into DVD Producer.
To create a menu in Adobe Photoshop:
1 In Photoshop, choose File > New. In the New dialog, enter the following parameters:
Width 720 pixels
Height 540 pixels
Mode RGB color
Contents White
2 Select Window > Show Layers. In the Layers window, double-click the Background layer
to open the Make Layer window.
3 Change the layer Name to “Background” (without the quotes) and click OK. The Layers
window displays the layer name “Background” in bold instead of italic.
4 On the Background layer, create the full-color menu artwork, including any buttons, text
labels, and other elements.
5 Click the triangle in the upper right of the Layers window and choose New Layer. The
New Layer window opens.
6 Change the Name for the new layer to “Overlay” (without the quotes) and click OK.
Page 60

54 Chapter 4, Preparing Media Files
7 On the Overlay layer, create the overlay graphics using only red, blue, and black (DVD
Producer will ignore all other colors).
It is not necessary to use all three colors. Most overlays use only one color. The ability to
use up to overlay three colors only allows more flexibility. Until you become familiar
with the way overlay graphics are used, you can use just one color for the menu overlay
graphics.
8 If you use additional layers in this Photoshop file, make sure to merge the extra layers
once the image is complete, so the file contains only the “Background” and “Overlay”
layers. If the file contains extra layers, DVD Producer will not be able to use it to create
a menu.
9 Choose Image > Image Size. In the Image Size window, do the following:
• Deselect the Constrain Proportions option.
• Select the Resample Image option.
• For NTSC, set the Pixel Dimensions Height to 480 and Resample Image to Bicubic.
• For PAL, set the Pixel Dimensions Height to 576 and Resample Image to Nearest
Neighbor.
10 Choose File > Save As and save the file in the Photoshop format (.psd).
For details on how to use a Photoshop file to create a menu, see “Editing Photoshop-Created
Menus” on page 104.
Page 61

Creating Motion Menus 55
Creating Menu Buttons in Photoshop
Adobe Photoshop can create files with background transparency. You can therefore create
non-rectangular buttons, even buttons with holes in them. Photoshop also uses layers to
separate parts of an image; you can use these layers to create multiple buttons in the same
file, with one button on each layer.
To create menu buttons in Photoshop:
1 In Photoshop, choose File > New. In the New dialog, select Transparent and click OK. A
new file is created with a transparent background.
2 Create the artwork for a single button in Layer 1.
3 To create another button, add a new layer and create the button in the new layer. You
can create as many layers and buttons as needed.
4 Choose File > Save As and save the file in the Photoshop format (.psd).
When you import the file into DVD Producer, each layer from the file can be displayed
separately in the Palette window. You can then drag any individual layer onto a menu
background to create a button. If you drag the whole file onto a menu, DVD Producer
flattens all the layers into one button.
Creating Motion Menus
You can create motion menus in a program that has video compositor features, such as
Adobe Premiere or on an Avid system. The video compositor lets you add text or graphics to
a video and then output a file you can use in DVD Producer. Once the video is complete,
save the first frame in Adobe Photoshop format (.psd)
Page 62

56 Chapter 4, Preparing Media Files
Remember that menus are composed of three layers—the background layer, the subpicture
overlay layer, and the highlight layer. In a still menu, you can add button graphics on the
background layer. In a motion menu you cannot add anything that would need to be
recomposited in the video on that layer. However, you can add a subpicture overlay layer to
indicate to the viewer which button is selected or activated, and a highlight layer containing
invisible hot spots that respond to a viewer’s actions. The background layer created from the
video frame can act as a guide for placing the buttons.
To create an overlay file for a motion menu:
1 In Photoshop, open the Photoshop file you created from the video’s first frame.
2 Select Window > Show Layers. The Layers window opens.
3 Click the triangle in the upper right of the Layers window and choose New Layer. The
New Layer window opens.
4 Change the Name for the new layer to “Overlay” (without the quotes) and click OK.
5 On the Overlay layer, create the overlay graphics using only red, blue, and black (DVD
Producer will ignore all other colors).
It is not necessary to use all three colors. Most overlays use only one color. The ability to
use up to three overlay colors provides more flexibility. Until you become familiar with
menu overlay graphics, you can start with just one color.
Note: The Background layer is only a guide to assist placing the overlay graphics. To add
graphics or text to the background, you must do so with video compositor software, resave
the first video frame, and begin again.
6 Choose File > Save As and save the file in the Photoshop format (.psd).
For details on how to use a Photoshop file in a motion menu, see “Editing PhotoshopCreated Menus” on page 104.
Page 63

5 Encoding Video and Audio
This chapter describes how to use DVD Producer’s built-in encoder to capture video and
audio from tape. To encode, you must have the SD-1000 Encoder card and peripheral
hardware installed (see “Step 2: Installing the SD-1000 Encoder” on page 9).
This chapter includes:
• Encoding overview
• Preparing for encoding
• Encoding video and audio
• Creating and editing video and audio sets
Page 64

58 Chapter 5, Encoding Video and Audio
Encoding Overview
Digital Video Formats
DVD Producer uses the MPEG-2 video compression standard to compress full-resolution
video signals. Through the use of the MPEG standard, 120+ minute titles (with audio and
subtitles) can be stored on a single 4.7 GB DVD disc.
MPEG-1 and MPEG-2
MPEG-1 is the format that preceded MPEG-2 and is limited to 325 x 240 (NTSC) or 352 x
288 (PAL) resolution. MPEG-2 offers higher-quality video and is, therefore, recommended for
feature-length films. Due to its lower quality, MPEG-1 video is recommended for titles where
storage is an issue (MPEG-1 video takes up less space on the disc than MPEG-2 video).
VBR and CBR Encoding
VBR (variable bit-rate) encoding and CBR (constant bit-rate) encoding are two options for
encoding video. Bit rate is the speed at which the video, audio, and commands streams off
the disc. The maximum allowed encoding bit rate for DVD-compliant MPEG-2 streams is
9.8 MBps, but must be lowered to allow for audio and subpicture assets. Be sure to consider
the combined encoded bit rate of all your assets before choosing an encoding bit rate.
CBR encoding allots the same number of bits per scene through the entire encode with no
variations. With this process, you can fit about 75 minutes of video on a 4.7 GB disc at a bit
rate of 8 MBps.
To get more video in the same amount of disc space, VBR encoding is used. The VBR
encoding process allots only as many bits per scene as are needed. The amount needed is
based on an analysis pass of the source video, where the encoder determines what content
is difficult or easy to compress. The result is a lower average bit rate, but the same high
quality. With VBR, you can get about two hours of video on the same 4.7 GB disc with
overall quality similar to an 8 MBps CBR encode.
Page 65

Encoding Overview 59
While set-top DVD players can display the specification’s maximum bit rate of 9.8 MBps,
some computer hardware cannot keep up with this bit rate. If your DVD title will be used
on desktop computers, keep the maximum bit rate at 6.0 MBps or lower. Occasional bursts
above this level may display correctly.
Note: VBR encodes can take longer to complete than CBR encodes. For example, a onepass CBR encode takes the duration of the material to complete. A VBR encode is a two-pass
process. The encoder uses the first pass to analyze the material and determine how to
allocate the bit rate.
Digital Audio Formats
You can encode audio into two stereo digital audio formats:
• Dolby Digital, the primary compressed surround audio format.
• MPEG Audio, an alternate compressed stereo audio format.
Dolby Digital Audio
Dolby Digital offers five full-range channels in what is sometimes referred to as the “3/2”
configuration: 3 front channels (left, center, and right) and 2 surround channels. A sixth low
frequency effects (LFE or Subwoofer) channel is also provided, giving rise to the term “5.1
channels”.This format (shown in Figure 1) is often abbreviated as LCRSS.
C
L
Screen
Sub
LS
Figure 1: LCRSS
R
RS
Page 66

60 Chapter 5, Encoding Video and Audio
Dolby Digital’s compression algorithm can deliver 5.1 surround sound at a lower bit rate and
smaller file size than the standard compact disc format of 44.1 kHz, 16-bit stereo audio. It
does so by removing sound from frequency bands which, over time, contain limited signal
energy. In addition, a noise shaping scheme is used to remove audio information in
frequency areas where humans are less apt to hear missing sound. Dolby Digital also uses a
scheme of cross-correlation in which the various channels are compared, and the difference
between the channels is stored while the redundant information is eliminated.
DVD Producer can create Dolby Digital files within the following parameters:
Bit Rate .064 MBps – 0.448 MBps
Frequency 48 kHz
Channel configuration 1/0 or 2/0
Page 67

Preparing to Encode
Before you start encoding, you must set up the hardware and check the tape to find the start
and end timecodes for each encode.
Configuring the Hardware
After the initial setting up, you will not need to change most of the configuration settings
again unless you change the hardware connected to the PC. The only configuration setting
that you may need to change for individual tapes is the timecode format (for NTSC-format
video only).
Drop-Frame and Non-Drop-Frame Timecode
NTSC-format video can contain either drop-frame or non-drop-frame timecode. In dropframe video, frames 0 and 1 are omitted (dropped) from the timecode count at the start of
every minute except 0, 10, 20, 30, 40, and 50 minutes. This is done to keep the timecode
count synchronized with a 24-hour clock.
Preparing to Encode 61
In non-drop-frame video, no frames are dropped from the timecode count, and the timecode
counter goes gradually out of sync with a normal clock. This is because the NTSC frame-rate
is 29.97 frames per second, but the timecode counter on the videotape deck displays 30
frames per second. Thus every second displayed on the timecode counter is slightly longer
(0.03 frames longer) than a real second.
If you are not sure whether the tape contains drop-frame or non-drop-frame timecode, scrub
through the tape and watch the deck’s timecode counter as it goes from the end of one
minute to the start of another (for example, from 00:00:59:29 to 00:01:00:00). If the counter
changes from 00:00:59:29 to 00:01:00:02, the tape contains drop-frame timecode. If it
changes from 00:00:59:29 to 00:01:00:00, the tape contains non-drop-frame timecode.
Page 68

62 Chapter 5, Encoding Video and Audio
To change the timecode format (for NTSC video only):
1 Find out whether the tape contains drop-frame or non-drop-frame timecode.
2 Choose File > Encode > Hardware Setup. The AV Setup window opens.
3 Change the Time Code Format setting to 29.97 DF for drop-frame video or 29.97 NDF for
non-drop-frame video.
4 Click OK.
Page 69

Preparing to Encode 63
Finding Start and End Timecodes
Every encode has a start timecode and an end timecode. You must enter these timecodes
into DVD Producer so that it knows where to begin encoding and where to stop. You
cannot control a videotape deck manually from within DVD Producer, so you must set the
deck to local mode and play the tape using the deck’s own controls while you find the start
and end timecodes for the section you want to encode.
Because the SD-1000 Encoder produces a video signal only while it is encoding video or
playing back a project, you must connect the videotape deck directly to the video monitor
while you use the deck in local mode. Most decks provide several outputs and most
monitors provide several inputs, so you can connect one output from the deck to the SD1000 and another output directly to the monitor, then switch the monitor from one input to
the other.
To find the timecodes:
1 Load the source tape into the deck.
2 Set the videotape deck to local mode.
3 Switch the video monitor to display the signal coming directly from the deck.
4 Using the videotape deck’s controls, play through the tape. Note down the timecodes
where you want DVD Producer to begin and end encoding.
5 Set the videotape deck to remote (9-pin) mode. You must do this; DVD Producer cannot
control the deck if it is in local mode.
6 Switch the monitor to display the signal coming from the SD-1000 encoder.
You are now ready to begin encoding.
Page 70

64 Chapter 5, Encoding Video and Audio
Encoding Video and Audio
To start an encode:
1 Choose File > Encode > New Encode or press Control+E. The Encode Setup window
opens.
2 Click Browse, and navigate to a suitable hard drive location in the Save As window.
3 Enter a name for the encode and click Save.
DVD Producer creates a new folder with this name in the selected location and the
encoded files are placed in this new folder. In the Encode Setup window, the path to the
new folder appears in the Encode Folder field.
Page 71

Encoding Video and Audio 65
4 Enter the Start Time and the Stop Time for the encode. Use the one of the following
formats:
• For PAL video or non-drop-frame NTSC video, hh:mm:ss:ff
• For drop-frame NTSC video, hh;mm;ss;ff
5 If encoding video, select the Video checkbox, then choose an existing video set from the
drop-down list or create a new video set (see “Working with Video Sets” on page 66 for
details).
6 If encoding audio, select the Audio checkbox, then choose an existing audio set from the
drop-down list or create a new audio set (see “Working with Audio Sets” on page 71 for
details).
7 Click OK. The Encode Setup windows closes and the Encode Progress window opens.
8 Click Start Encode. DVD Producer performs some checks, then it displays a message
asking you to verify that the tape is inserted.
9 Click OK.
DVD Producer takes control of the videotape deck and begins encoding. The Encode
Progress window displays a bar indicating the encode status. While an encode is in progress,
you cannot use the PC for any other tasks.
When the encode completes, the Encode Progress window closes. You can then import the
encoded files into DVD Producer to check their quality. See Chapter 6, “Getting Media Files
into DVD Producer” for information on importing and previewing media files.
To cancel an encode while it is in progress:
1 Click Cancel in the Encode Progress window.
2 When prompted, do one of the following:
• Click OK to stop the encode and close the Encode Progress Window.
• Click Cancel to continue encoding.
Page 72

66 Chapter 5, Encoding Video and Audio
Creating and Editing Video and Audio Sets
DVD Producer stores the encoding parameters, such as bit rate and encode type, in video
sets and audio sets. Video and audio sets save you time, because instead of entering all the
encode parameters every time you encode, you can save sets of parameters that you use
frequently, and use or modify them whenever required.
Working with Video Sets
You can create a new video set by copying the parameters from an existing set and
changing them. You can also edit or delete existing video sets.
To create a new video set:
1 In the Encode Setup window, select the Video checkbox and choose the video set you
want to use as a basis for the new set (or leave the Default Video Set selected).
2 Choose New Set from the drop-down list. The Edit Video Set window opens and displays
the parameters from the set chosen in the previous step.
Page 73

Creating and Editing Video and Audio Sets 67
3 Adjust the parameters as necessary. See “Video Encoding Parameters” on page 68 for a
description of each parameter.
4 Enter a Name for the new set (DVD Producer always gives new sets the default name of
“Copy of xxx” where “xxx” is the original set’s name). It’s a good idea to give the set a
name that reflects the settings.
5 Click OK to save the new video set. The new set appears in the Encode Setup window.
To edit an existing video set:
1 In the Encode Setup window, select the Video checkbox and choose the video set you
want to edit from the drop-down list.
2 Choose Edit Set from the drop-down list. The Edit Video Set window opens.
3 Change the parameters as necessary. See “Video Encoding Parameters” on page 68 for
details of each parameter.
4 Click OK.
Note: It is not possible to alter the default video set parameters. If you choose Edit Set
when the default video set is selected, DVD Producer creates a new video set that can be
edited.
To delete a video set:
1 In the Encode Setup window, select the Video checkbox and choose the video set you
want to delete from the drop-down list.
2 Choose Delete Set from the drop-down list. DVD Producer deletes the set; the next set in
the drop-down list appears in the Encode Setup window.
Page 74

68 Chapter 5, Encoding Video and Audio
Video Encoding Parameters
Video Type Tab
Parameter Description Recommended setting
Compression MPEG-2 compression produces better quality video than
MPEG-1, but requires more disc space.
Resolution Horizontal resolution in pixels. 720
Aspect Ratio This is the ratio between the picture’s width and its
height. 4:3 is the aspect ratio of standard video. 16:9 is
the aspect ratio of widescreen and high-definition TV.
MPEG-2
Depends on the video
source’s aspect ratio.
Page 75

Creating and Editing Video and Audio Sets 69
Bit Rate Tab
Parameter Description Recommended setting
Encode
style
CBR
passes
Target Bit
rate
Min Bit
rate
Max Bit
rate
CBR (constant bit-rate) encoding encodes video by
allocating the same number of bits to each frame.
VBR (variable bit-rate) encoding encodes video by
allocating a different number of bits to each frame
depending on its complexity.
VBR encodes produce better quality video than CBR
encodes using the same amount of disc space, or equal
quality video using less disc space. However, VBR
encodes take longer, since the process requires multiple
passes of the material.
2-pass encodes allow the encoder to analyze the video’s
complexity before encoding, and thus produce better
quality video. However, a 2-pass encode takes twice as
long as a 1-pass encode.
The target bit rate determined from the bit-budget
calculation, measured in Mbps. See Chapter 3,
“Planning the Project” for the bit-rate calculation.
The minimum bit rate (for VBR encodes only). At least 2.5 MBps for most
The maximum bit rate determined from the bit-budget
calculation (for VBR encodes only). See Chapter 3,
“Planning the Project” for the bit-rate calculation.
Depends on the project
requirements
Depends on the project
requirements
Depends on the project
requirements.
material.
For very clean, high-quality
source video, you can go
as low as 1.5 MBps
Depends on the project
requirements
Page 76

70 Chapter 5, Encoding Video and Audio
GOP Tab
Parameter Description Recommended setting
Auto Scene
Detection
Picture
Sequence
GOP Length The number of frames in each GOP. Larger GOP sizes
In 2-pass CBR encodes, this enables the encoder to
place an I-picture when it detects a scene change in the
source video. This lets you insert a chapter point at the
frame where the scene changes.
Changes the number of B (bi-directional) pictures in an
MPEG group of pictures (GOP).
help to compress the video more, since there are fewer
I-pictures per second of video (there is only one I-picture
in a GOP). Smaller GOP sizes let you place chapter
points with more precision (since the I-picture is the only
point where you can insert a chapter point).
Unavailable for 1-pass
CBR encodes.
Selected for 2-pass
encodes
IBBPBBP
13
Advanced Tab
Parameter Description Recommended setting
Picture
Structure
When set to Field, the encoder compresses video fields
to individual compressed pictures. This generally
provides lower compression per bit than when set to
Frame, but produces fewer motion artifacts in scenes
that contain large amounts of movement between video
fields.
Use Field for content
shot directly to video.
Use Frame for content
that originated on film.
Page 77

Creating and Editing Video and Audio Sets 71
Working with Audio Sets
To create a new audio set:
1 In the Encode Setup window, select the Audio checkbox and choose the audio set you
want to use as a basis for the new set (or leave the Default Audio Set selected).
2 Choose New Set from the drop-down list. The Edit Audio Set window opens and displays
the parameters from the set chosen in the previous step.
3 Select the Audio Format (MPEG Audio or Dolby Digital) and specify the appropriate
settings for the format. See “Audio Encoding Parameters” on page 73 for a description of
the parameters for each format.
Page 78

72 Chapter 5, Encoding Video and Audio
4 If encoding Dolby digital audio, you can fine-tune the Dolby parameters; click Dolby
Setup to open the Dolby Digital Setup window.
See “Advanced Dolby Digital Parameters” on page 74 for descriptions of the advanced
Dolby Digital settings. It is recommended that you use the default settings.
5 Enter a Name for the new set (DVD Producer always gives new sets the default name of
“Copy of xxx” where “xxx” is the original set’s name). It helps to give the set a name
that reflects the settings.
6 Click OK to save the new audio set. The new set appears in the Encode Setup window.
Page 79

Audio Encoding Parameters 73
To edit an existing audio set:
1 In the Encode Setup window, select the Audio checkbox and choose the audio set you
want to edit from the drop-down list.
2 Choose Edit Set from the drop-down list. The Edit Audio Set window opens.
3 Change the parameters as necessary. See “Audio Encoding Parameters” on page 73 for
details of each parameter.
4 Click OK.
Note: It is not possible to alter the default audio set parameters. If you choose Edit Set
when the default audio set is selected, DVD Producer creates a new audio set that can be
edited.
To delete an audio set:
1 In the Encode Setup window, select the Audio checkbox and choose the audio set you
want to delete from the drop-down list.
2 Choose Delete Set from the drop-down list. DVD Producer deletes the set; the next set in
the drop-down list appears in the Encode Setup window.
Audio Encoding Parameters
MPEG Audio
Parameter Description Recommended setting
Bit rate Audio encoding bit rate, measured in kbps 224
Export 44.1 Creates standards MPEG audio streams at 44.1 KHz.
that are not compatible with DVD, but can be used to
create VCDs and SVCDs
Unselected
Page 80

74 Chapter 5, Encoding Video and Audio
Dolby Digital Audio
Parameter Description Recommended setting
Channel configuration Number of channels to encode Depends on audio source
LFE Adds ow frequency effects channel. Depends on project
Bit rate Audio encoding bit rate, measured in kbps. 224
Advanced Dolby Digital Parameters
It is recommended that you use the default Dolby Digital parameters. However, if necessary
you can alter the default settings by clicking Dolby Setup in the Edit Audio Set window. The
options at the top of the Dolby Digital Setup window are the same as those in the Edit Audio
Set window.
If you change the default Dolby Digital parameters and want to revert to the default settings,
click Stereo Defaults at the bottom of the Dolby Digital Setup window.
requirements
Bit Stream Information Tab
Parameter Description Recommended setting
Bit Stream
Mode
Dolby
Surround
Mode
Type of service that the bitstream conveys. Most of
these options are used mainly for HDTV broadcast.
Indicates whether the soundtrack contains Dolby
Surround encoded material (for use with a Dolby
ProLogic Surround decoder).
Choose Complete Main
(CM) for all purposes
except karaoke. Choose
Voice Over (VO) Karaoke
for projects with karaoke
audio.
Depends on the audio
source
Page 81

Audio Encoding Parameters 75
Parameter Description Recommended setting
Center Mix
Level
Surround Mix
Level
Dialog
Normalization
Include Audio
Production
Information
Mix Level Acoustic sound pressure level of the dialog level
Room Type Type and calibration of the mixing room used for the
Mix level of the center channel with respect to the
left and right channels. Used when a 5.1 mix is played
in a stereo environment. The Dolby Digital decoder
mixes the 5.1 channels to stereo by sending the
center channel to the left and right speakers. Because
this would double the perceived level of the center
channel, this channel’s level must be lowered.
Mix level of the surround channels with respect to
the left and right channels.
Indicates the average volume level of the spoken
dialog in the soundtrack, relative to the peak (0 dB)
level. The DVD player’s Dolby Digital decoder uses
this value to adjust the gain automatically when
playing different discs, so that the dialog volume
remains constant from disc to disc and the viewer
doesn’t have to keep adjusting the volume.
Select to include the Mix Level and Room Type
information in the Dolby digital bitstream.
during the final audio mixing session.
final audio mixing session. This value is normally not
used within the Dolby Digital decoding algorithm, but
may be used by other parts of the audio reproduction
equipment.
–3.0 dB
–3.0 dB
–27 dB
Unselected
25
Small room
Copyrighted
Material
Original
Bitstream
Indicates whether the material is copyright protected
(not the same as copy management protection).
Indicates whether this is the original material or a
copy.
Depends on the material
Selected
Page 82

76 Chapter 5, Encoding Video and Audio
Preprocessing Tab
Parameter Description Recommended setting
Dynamic Range
Compression
RF
Overmodulation
Protection
DC Highpass
Filter
LFE Lowpass
Filter
Bandwidth
Lowpass Filter
Digital
Deemphasis
90 Degree
Phase Shift
3 dB
Attenuation
Specifies how much compression will be used if the
viewer activates the Dynamic Range Control (or
“Midnight Mode”) on the decoder. Choose according to
the type of audio.
Used for audio that will be decompressed and
broadcast, to keep within a certain bandwidth.
Highpass filter that removes the DC component of an
audio signal.
120 Hz lowpass filter applied to the LFE input channel
(subwoofer).
Lowpass filter that removes high-frequency material that
will not be encoded anyway.
If the source material is emphasized, this setting flags
the stream so that the Dolby Digital decoder can handle
it correctly.
90º phase-shift to the surround channels at the input.
This feature is useful for generating multi-channel Dolby
Digital streams that may be downmixed in an external 2channel decoder to create a true Dolby Surround
compatible output.
Attenuates the surround channels of a multi-channel film
soundtrack by 3 dB when it is being transferred onto a
format for consumer home theater playback.
Film Standard
Deselected
Selected
Selected for encodes
that include an LFE
channel
Selected
Depends on the
audio source
Selected
Deselected
Page 83

6 Getting Media Files into DVD Producer
After planning the project and preparing the media files, you must import the files into DVD
Producer. This chapter includes:
• Using the Palette window
• Importing files
• Previewing imported files
• Deleting files
• Finding missing files
Page 84

78 Chapter 6, Getting Media Files into DVD Producer
Using the Palette Window
The Palette window opens automatically whenever you create a new project. It lists all the
media files you have imported into the project and all the fonts installed on the PC. You use
the Palette window to import and organize media files, and to select files and fonts when
creating movies and menus.
To show or hide the Palette window:
• Choose Window > Show/Hide Palette Window or press F7.
To hide the media file thumbnails:
1 Right-click in the media list and choose Small Icons View from the pop-up menu.
The Image column disappears. DVD Producer displays the list with the standard
Windows file icons instead, which compresses the list so that more files can be
displayed.
2 To display the thumbnails, Right-click in the media list and choose Large Icons View from
the pop-up menu.
Page 85

Using the Palette Window 79
Graphics
thumbnail
Video
thumbnail
Audio
thumbnail
Photoshop
menu file:
Main
Background
Overlay
Photoshop
button file
Main
Individual
Layers
Drag to move
window
Click column header to sort by that column.
Click again to sort in reverse order (clicking
the Image column has no effect)
Drag to scroll list
Drag to scroll
columns
Displays
Media list
Palette window
Drag sides or bottom
to resize window
Displays
Font list
Page 86

80 Chapter 6, Getting Media Files into DVD Producer
The Font List
The font list opens when you click the Palette window button. It shows all the True Type
fonts installed on the PC. You can select fonts from the list when creating text in menus.
Font list
To add or remove fonts:
• Exit DVD Producer and install or remove the fonts (see Windows Help for details). The
font list is updated when you restart DVD Producer.
Page 87

Importing Media Files
DVD Producer makes it simple to import files. You can either select files from a dialog or
drag files from Windows onto the Palette window.
DVD Producer stores the link to the media files in the project (.as) file. If you move or
rename a media file after importing it into a project, DVD Producer will prompt you to find
the file the next time you open the project.
To add new files to the project:
1 Click the Media button to display the Palette window’s media list.
2 Right-click in the media list and select Add Files to Project from the pop-up menu.
Importing Media Files 81
3 Select the files you want to import and click Open. The imported files appear in the
media list.
Page 88

82 Chapter 6, Getting Media Files into DVD Producer
To drag files into the project from the Windows desktop:
1 Click the Media button to display the Palette window’s media list.
2 Switch to Windows.
3 Drag any files and folders to the Palette window. The files appear in the media list.
Deleting Files from the Project
When you delete a file from a project, DVD Producer removes the file from the media list. It
does not delete the original file from the PC.
To delete a media file from a project:
1 In the List window, Right-click any menus or movies that reference the media file and
choose Delete from the pop-up menu.
2 In the Palette window, Right-click the media file and choose Delete from the pop-up
menu. The file is removed from the media list.
Note: DVD Producer will not delete a file if it is being used in the project.
Missing Media Files and Projects
Once media files have been imported to a project, the files must not be deleted or moved
from their hard drive location. Doing so will make them unavailable to the project. If you
want to delete a media file from your hard drive, references to the file should first be
deleted from your DVD Producer project (see “Deleting Files from the Project” on page 82).
Page 89

7 Building the Project Structure
After importing the media files into DVD Producer, you can start creating the movies and
menus that are the building blocks of the DVD project. This chapter describes how to create
and edit menus and movies. It includes:
• The List window
• Creating movies and menus
• Setting the First Play
• Editing movies and menus in the List window
Page 90

84 Chapter 7, Building the Project Structure
The List Window
The List window opens automatically when you create a new project. Use it to create,
select, and organize movies and menus:
Title menu
Menu tiles
Drag to move window
Drag to scroll
menu list
Drag to scroll
movie list
Movie tiles
First Play indicator
Drag to resize window
List window
To show or hide the List window:
• Choose Window > Show/Hide List Window or press F9.
Page 91

Creating Movies and Menus
You create movies and menus by dragging video clips and images onto the List window. This
action creates a menu/movie tile and, for movies, fills the movie’s video track.
Another way to create a menu/movie tile is by duplicating an existing one. This copies the
tile’s contents to a new tile.
Note: You can also create movies by dragging video clips onto menus. See Chapter 8,
“Working with Menus” for details.
To create a movie:
• Drag a video file from the Palette window to the List window’s Movies column.
DVD Producer displays a progress window while it creates the movie, after which a new
tile appears in the Movies column. The tile shows a thumbnail of the image or the first
video frame.
Creating Movies and Menus 85
You can now add audio to the movie, create chapter points, and link the movie to menu
buttons. See Chapter 9, “Working with Movies” for details.
Page 92

86 Chapter 7, Building the Project Structure
To create a menu:
• Drag an image file from the Palette window to the List window’s Menus column. You can
drag a normal, single-layer image file (such as a TIFF), or a Photoshop file containing a
“Background” and “Overlay” layer.
DVD Producer creates a new tile in the Menus column. The tile shows a thumbnail of the
menu background.
Drag main file,
not Background
or Overlay
You can now complete the menu by adding buttons and links, see Chapter 8, “Working with
Menus” for details.
Page 93

To duplicate an existing movie or menu:
1 Select the tile you want to duplicate.
2 Do one of the following:
• Choose Edit > Duplicate.
• Press Control+D.
• Right-click the tile and choose Duplicate from the pop-up menu.
DVD Producer creates a new tile at the end of the Menus or Movies column. The new menu
or movie is identical to the original.
Setting the First Play
The First Play is an instruction that makes a DVD player play a specific menu or movie
automatically when the viewer inserts the disc in the player. If the disc does not contain this
instruction, nothing happens when the disc is inserted; the viewer must press the remote
control’s P
LAY button to start playback.
Setting the First Play 87
First Play
indicator
Generally, you should use the First Play instruction, since most viewers expect DVDs to start
playing automatically. However, in some situations you’ll want to create discs without a First
Play—for example, for a presentation where the presenter controls when the disc starts.
DVD Producer automatically adds the First Play instruction to the first movie or menu you
create. You can change this to any other movie or menu, or remove the instruction
altogether. The First Play is indicated by a green triangle superimposed on the menu or
movie thumbnail in the List window.
Page 94

88 Chapter 7, Building the Project Structure
To change the First Play menu or movie:
1 Right-click the menu or movie tile you want to be the First Play and choose Make First
Play from the pop-up menu.
2 When prompted, click OK to confirm the operation. The First Play marker appears on
the tile.
To remove the First Play instruction from the project:
1 Right-click the current First Play tile and choose Remove First Play from the pop-up
menu.
2 When prompted, click OK to confirm the operation. The First Play marker is removed
from the tile.
Note: If you delete the First Play movie or menu tile, DVD Producer reassigns the First Play
instruction to another tile, usually the tile at the top of the same column as the tile you
deleted.
Page 95

Editing Menus and Movies in the List window 89
Editing Menus and Movies in the List window
Renaming Menus and Movies
When you create a menu or movie, DVD Producer labels the menu/movie tile “Menu x” or
“Movie x”, where x is a number. You can change this name, for example to something that
indicates the menu’s or movie’s purpose or contents. Names can be up to 32 characters,
although only about the first 10 characters appear on the tile.
To rename a menu or movie tile:
1 Click the name on the tile. The name becomes highlighted.
2 Type a new name and press Enter.
You can also rename menus and movies in the Properties window. See Chapter 8, “Working
with Menus” and Chapter 9, “Working with Movies” for details.
Page 96

90 Chapter 7, Building the Project Structure
Organizing the Menus and Movies Columns
You can move tiles up and down within the Menus and Movies columns. This has two
purposes: it lets you rearrange the tiles to suit your needs, and it lets you specify which
menu is the Title menu (the menu that displays when the viewer presses the Title button on
the remote control).
To rearrange menu or movie tiles in the List window:
• Drag a tile up or down in its column. When you release the mouse button, the other tiles
move down the column to make room for the dragged tile.
The purple bar indicates where
the tile will go when you release
the mouse button
To set the Title menu:
1 Locate the menu tile that you want to become the Title menu.
2 Drag the tile to the top of the Menus column.
Page 97

Editing Menus and Movies in the List window 91
Deleting Menus and Movies
To delete a menu or movie:
1 In the List window, select the menu or movie tile you want to delete.
2 Do one of the following:
• Choose Edit > Clear.
• Press Control+Delete.
• Right-click the selected tile and choose Delete from the pop-up menu.
3 If you deleted the First Play menu or movie, click OK to confirm the operation.
DVD Producer deletes the menu or movie and removes its tile from the List window. If
any menu buttons were linked to the menu/movie, DVD Producer either deletes the
links or deletes the buttons, depending on how they were created:
• If the button was auto-generated by dragging a movie/menu thumbnail or chapter point
onto the menu background, DVD Producer deletes the button
• Other kinds of buttons that link to the menu/movie are not deleted, but DVD Producer
deletes the link
Page 98

92 Chapter 7, Building the Project Structure
Page 99

8 Working with Menus
Once you’ve created a menu in the List window (see “Creating Movies and Menus” on
page 85), you must add button links to the movies and other menus in the project.
This chapter includes:
• How DVD Producer creates menus and menu buttons
• The Menu Editor window
• Editing menus containing “floating” buttons
• Editing Photoshop-created menus
• Editing buttons, graphics, and text
• Creating button links
• Adding, replacing, and deleting menu audio
• Changing menu properties
Page 100

94 Chapter 8, Working with Menus
How DVD Producer Creates Menus and Menu Buttons
You can have two types of menus in DVD Producer—still menus or motion menus. Still
menus are easier to create and edit. Motion menus require more work, but can make your
product look more professional and polished.
DVD Producer gives you two basic ways to create menus and menu buttons.
One method involves dragging images and fonts onto a menu background to create
“floating” graphics and text blocks, then linking movie chapter points and other menus to
the graphics or text to create buttons (this method also includes dragging movies or menus
directly onto the background to auto-generate buttons).
When you build a DVD from the project, DVD Producer flattens the all graphics and text
onto the menu’s background layer, and uses the individual button shapes to create overlay
graphics in the subpicture overlay layer and button highlight areas in the highlight layer.
The other method involves creating the menu background and overlay layers in a graphics
application such as Adobe Photoshop. The background and overlay can be contained in
separate graphics files, or can be separate layers in a single Photoshop file. You create the
menu using the background graphic or Photoshop file, then draw button highlight areas
over the background and overlay and link chapter points and other menus to the highlight
rectangles. See “Creating Menu Graphics in Adobe Photoshop” on page 51 for information
on creating Photoshop menus.
Creating motion menus for DVD Producer is more complicated. Since DVD Producer
doesn’t include a motion video compositor, you cannot add image files, text, or create
thumbnails on a motion menu. Instead, you should create a motion menu in another
application, such as Adobe Premiere or on an Avid system and then import it into your
project. You can then work on the subpicture overlay and highlight layers as you do with
still menus. For more information, see “Creating Motion Menus” on page 55.
 Loading...