

Page 1
www.sonici.com
Celebrate
Cheer
™
miniRITE
User Guide
Page 2

Page 3

03
USER GUIDE MINIRITE
Table of Contents
Hearing Aid Description 07
Step-by-Step Instructions for
Using Your Hearing Aid 10
Step 1: Inserting the Battery 10
Step 2: Turning the Hearing Aid ON 12
Step 3: Inserting Your Hearing Aid 13
Step 4: Changing the Volume 16
Step 5: Changing the Programs 18
Step 6: Muting Your Hearing Aid 20
Step 7: Removing Your Hearing Aid 21
Step 8: Turning the Hearing Aid OFF 22
Step 9: Changing the Battery 22
Tamper-Resistant Battery Door (optional) 23
Features of Your Hearing Aid 24
Caring for Your Hearing Aid 25
Common Problems and Solutions 32
Accessories 34
Page 4

04
SONIC
Warnings 36
International Warranty 43
Mobile Phone 45
Technical Information 47
Information and Explanation of Symbols 51
Page 5

05
USER GUIDE MINIRITE
The following Sonic hearing aid models are covered
within this booklet:
Celebrate 100 | 80
CL100 MNR, with wireless functionality
CL80 MNR, with wireless functionality
Cheer 60 | 40
CR60 MNR, with wireless functionality
CR40 MNR, with wireless functionality
Page 6

06
SONIC
This booklet guides you on how to use and
maintain your new hearing aid. Please read the
booklet carefully including the warning section.
This will help you to achieve the full benefit of
your new hearing aid.
Your hearing care professional has adjusted the hearing
aid to meet your needs. If you have additional questions,
please contact your hearing care professional.
Indication for Use / Intended Purpose
The hearing aids are intended to amplify and transmit
sound to the ear and thereby compensate for impaired
hearing. The hearing aids are intended to be used by
children (> 36 months) and adults.
Important Notice
The hearing aid amplification is uniquely adjusted and
optimized to your personal hearing capabilities during
the fitting performed by your hearing care
professional.
Page 7

07
USER GUIDE MINIRITE
Hearing Aid Description
There are several earpieces that can be attached to the
speaker unit on your hearing aids. Please identify your
earpiece. This will make it easier for you to navigate
through this booklet.
A miniRITE can come with a 60-Speaker, an 85-Speaker,
or a 100-Speaker and different earpieces.
A dome or a Custom
Mold can be
attached to the
60-Speaker
A dome or a Custom
Mold can be
attached to the
85-Speaker
A dome or a Power
Mold can be
attached to the
100-Speaker
Instant Fitting Custom Fitting
Open
Dome
Bass Dome
Double Vent
Bass Dome
Single Vent
Power
Dome
Custom
Mold
Lite
Tip
Power
Mold
Page 8
08
SONIC
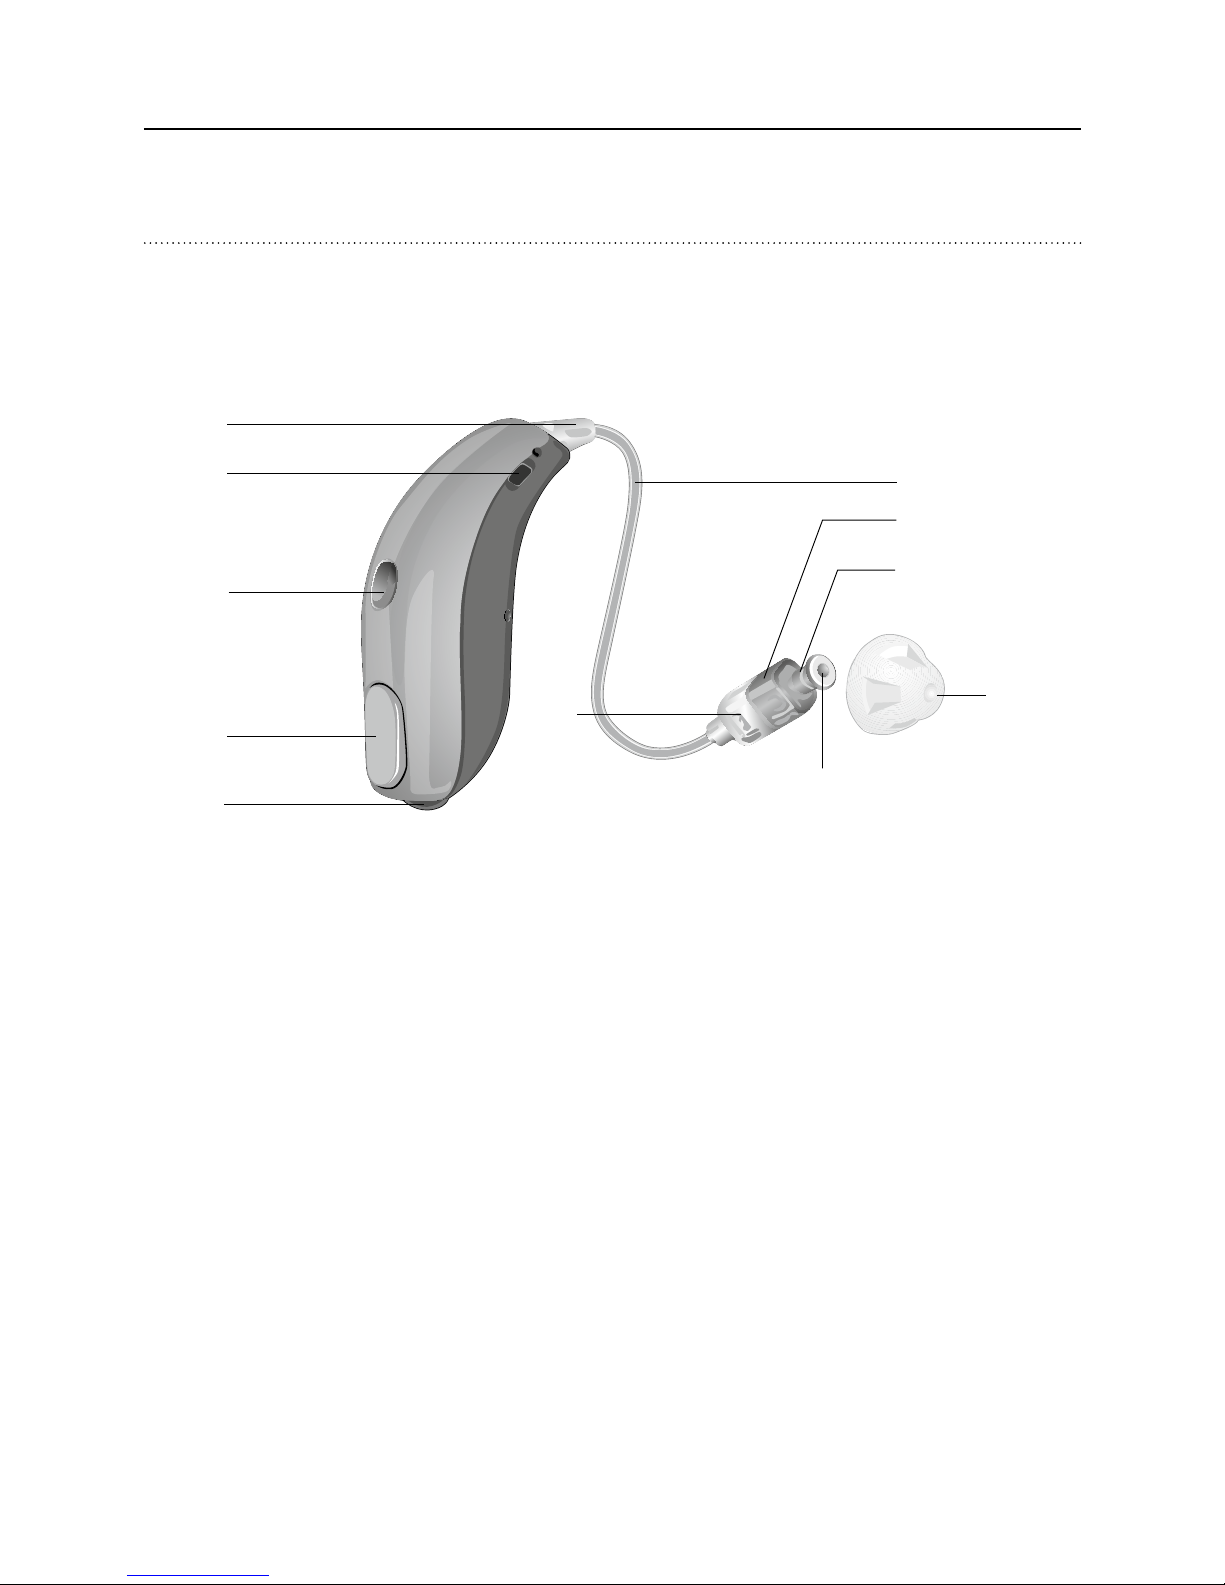
miniRITE Model
Option A: with speaker unit and dome
1
2a
2
4
5
6
9
7
8
3
10
1 Push button
2 Microphone
2a Second microphone
3 Connector plug
4 Wire
5 Left/right indicator
6 Speaker
(85-Speaker shown)
7 Speaker unit size
marking
8 Battery door
9 Dome
(Open Dome shown)
10 Wax filter
Page 9
09
USER GUIDE MINIRITE
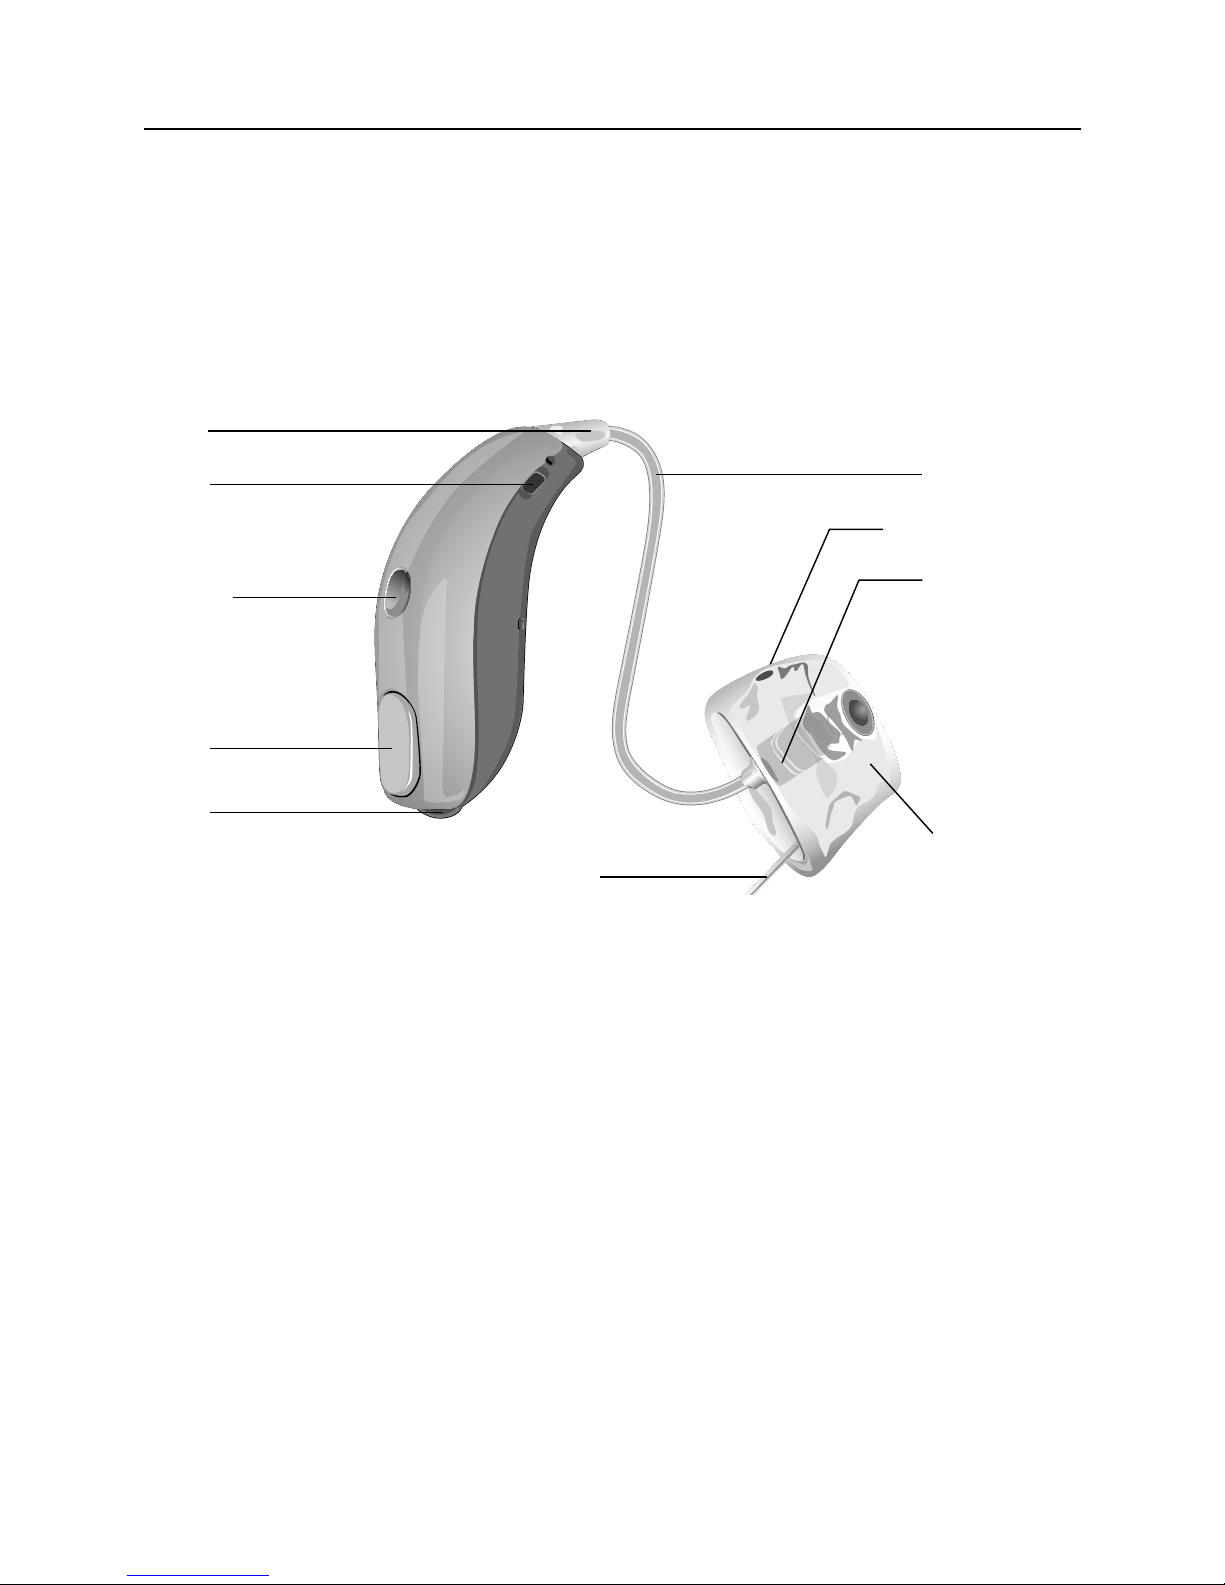
Option B: with speaker unit and custom mold
2a
2
3
4
5
9
1
6
8
7
1 Push button
2 Microphone
2a Second microphone
3 Connector plug
4 Wire
5 Left/right indicator
6 Speaker
(85-Speaker shown)
7 Pull out cord
8 Battery door
9 Custom mold
(Lite Tip shown)
Page 10
10
SONIC
Step-by-Step Instructions for Using Your
Hearing Aid
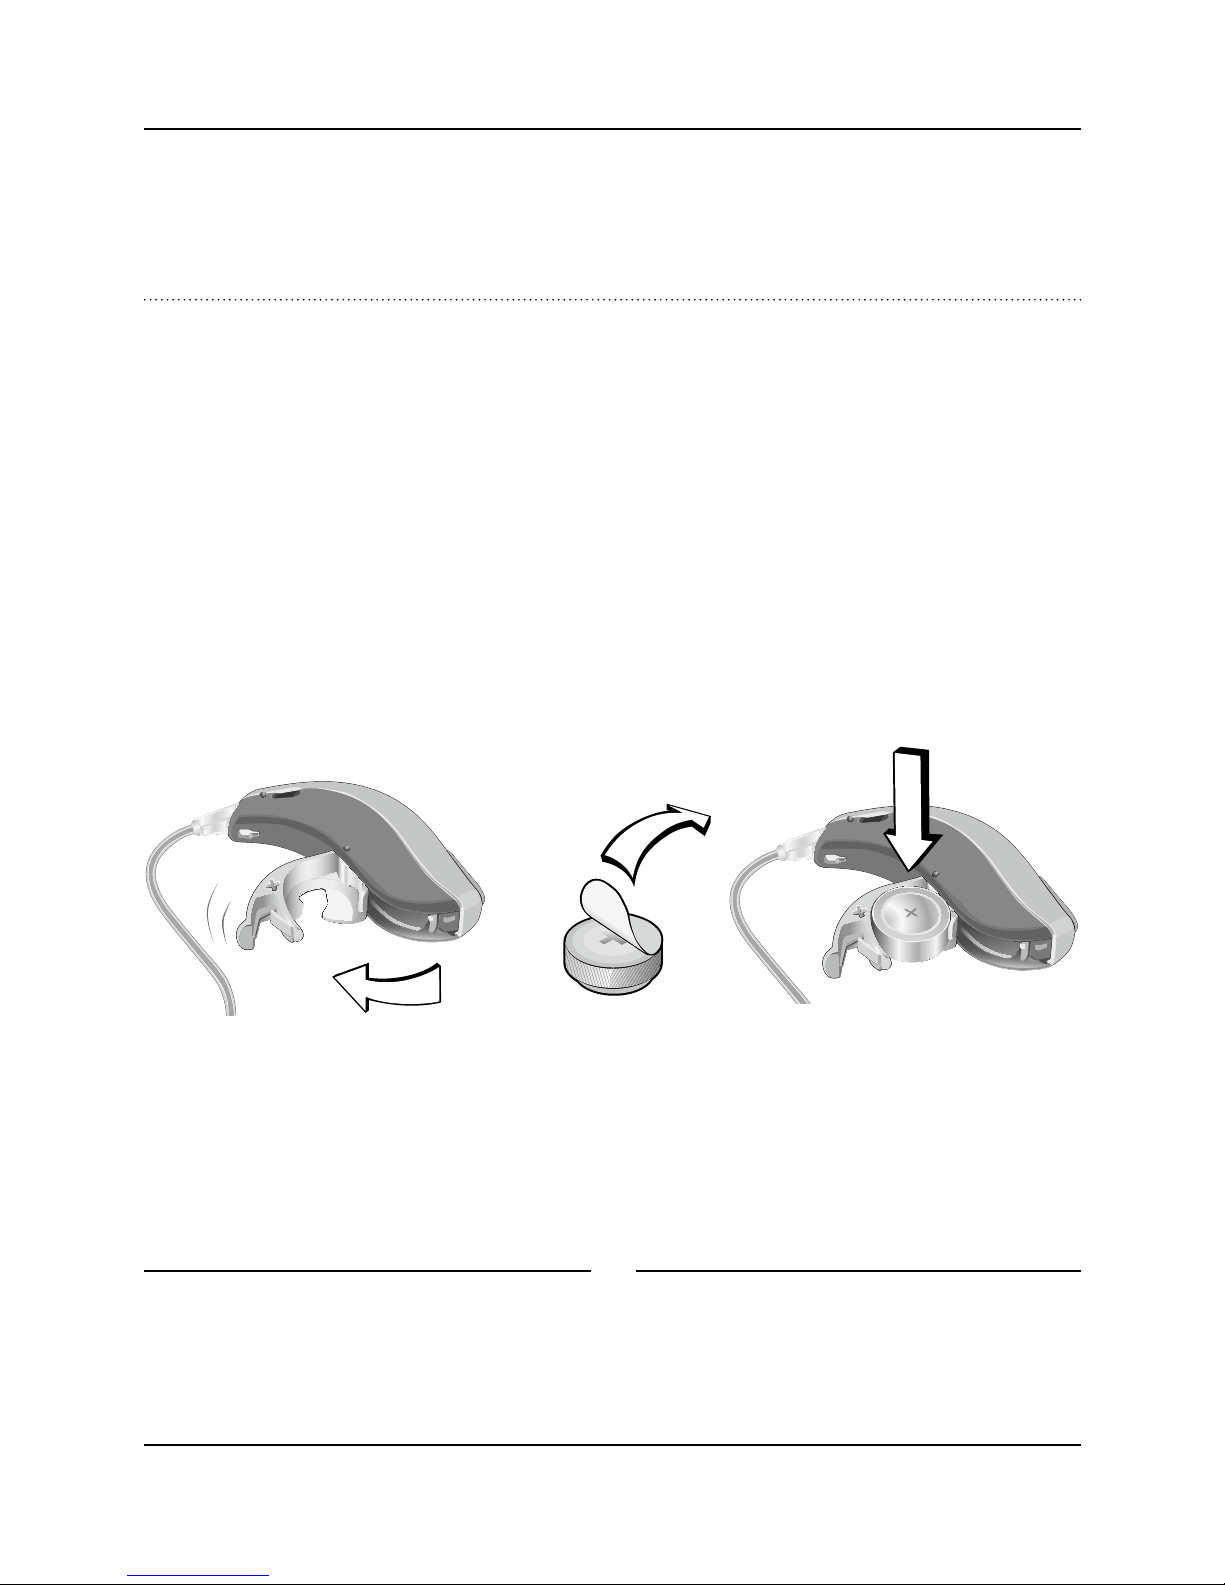
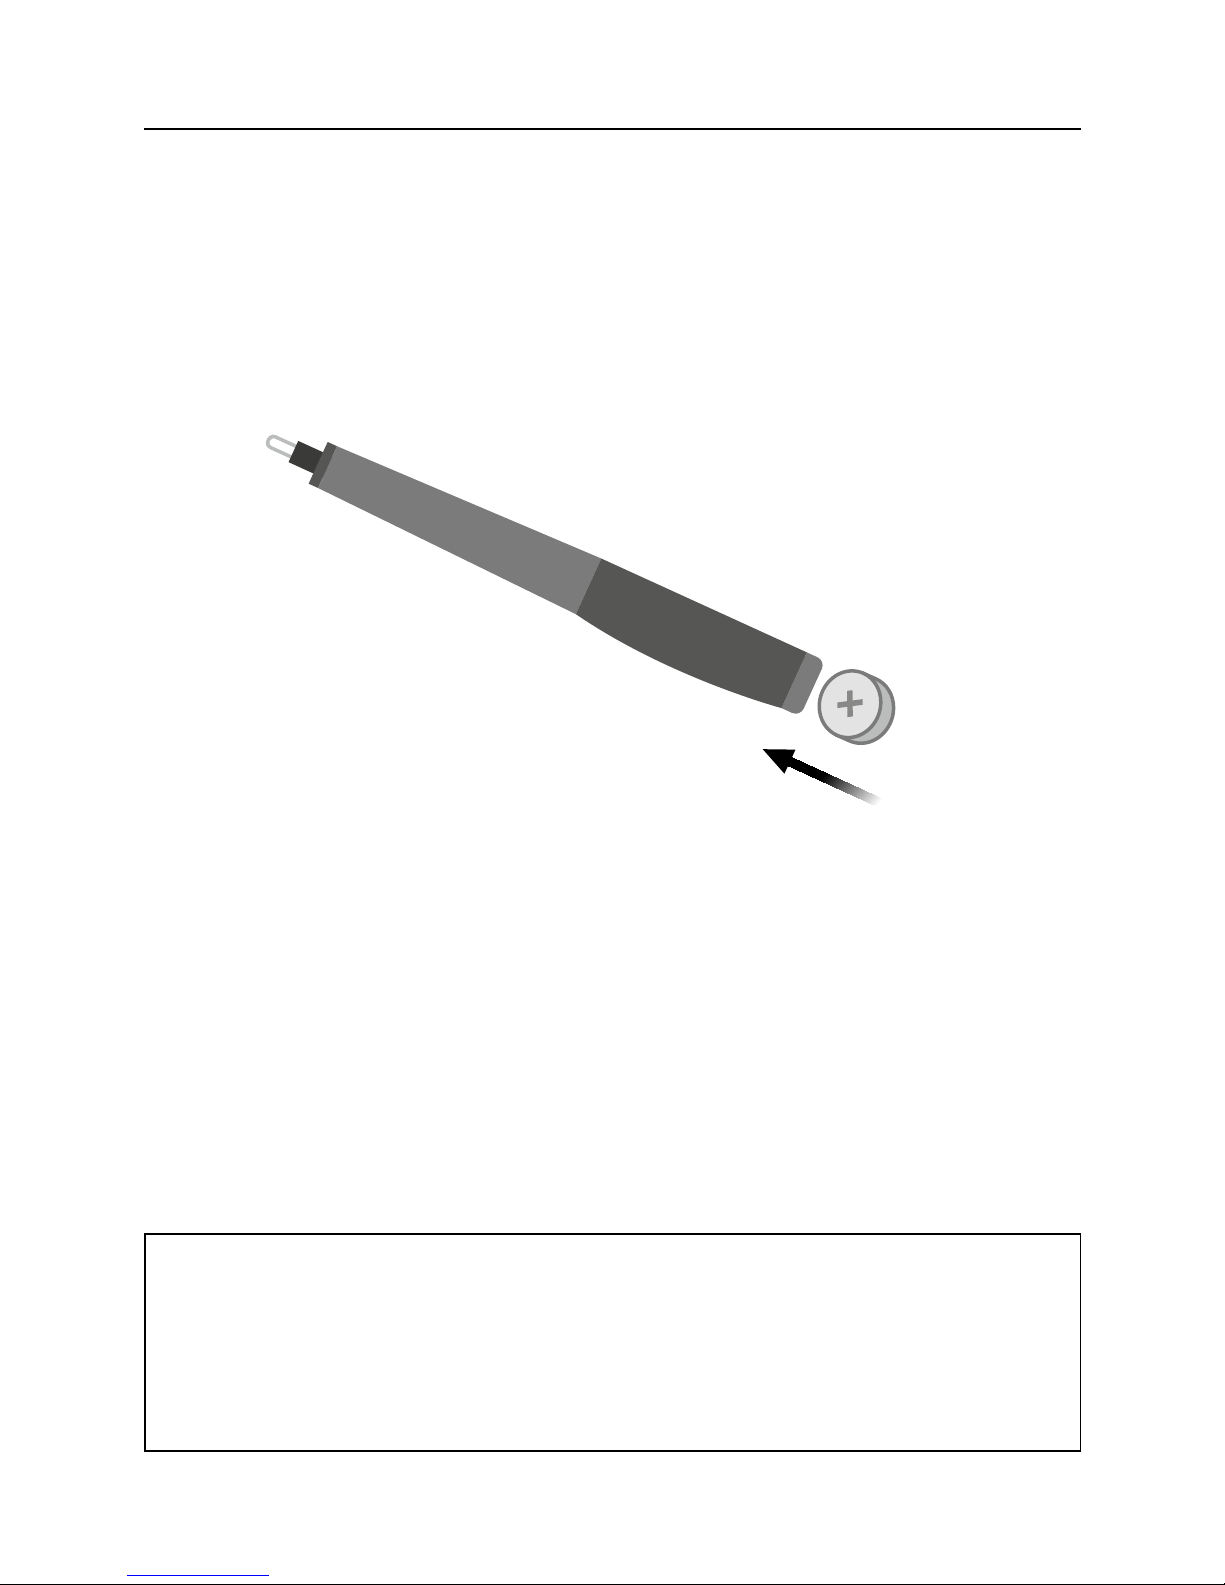
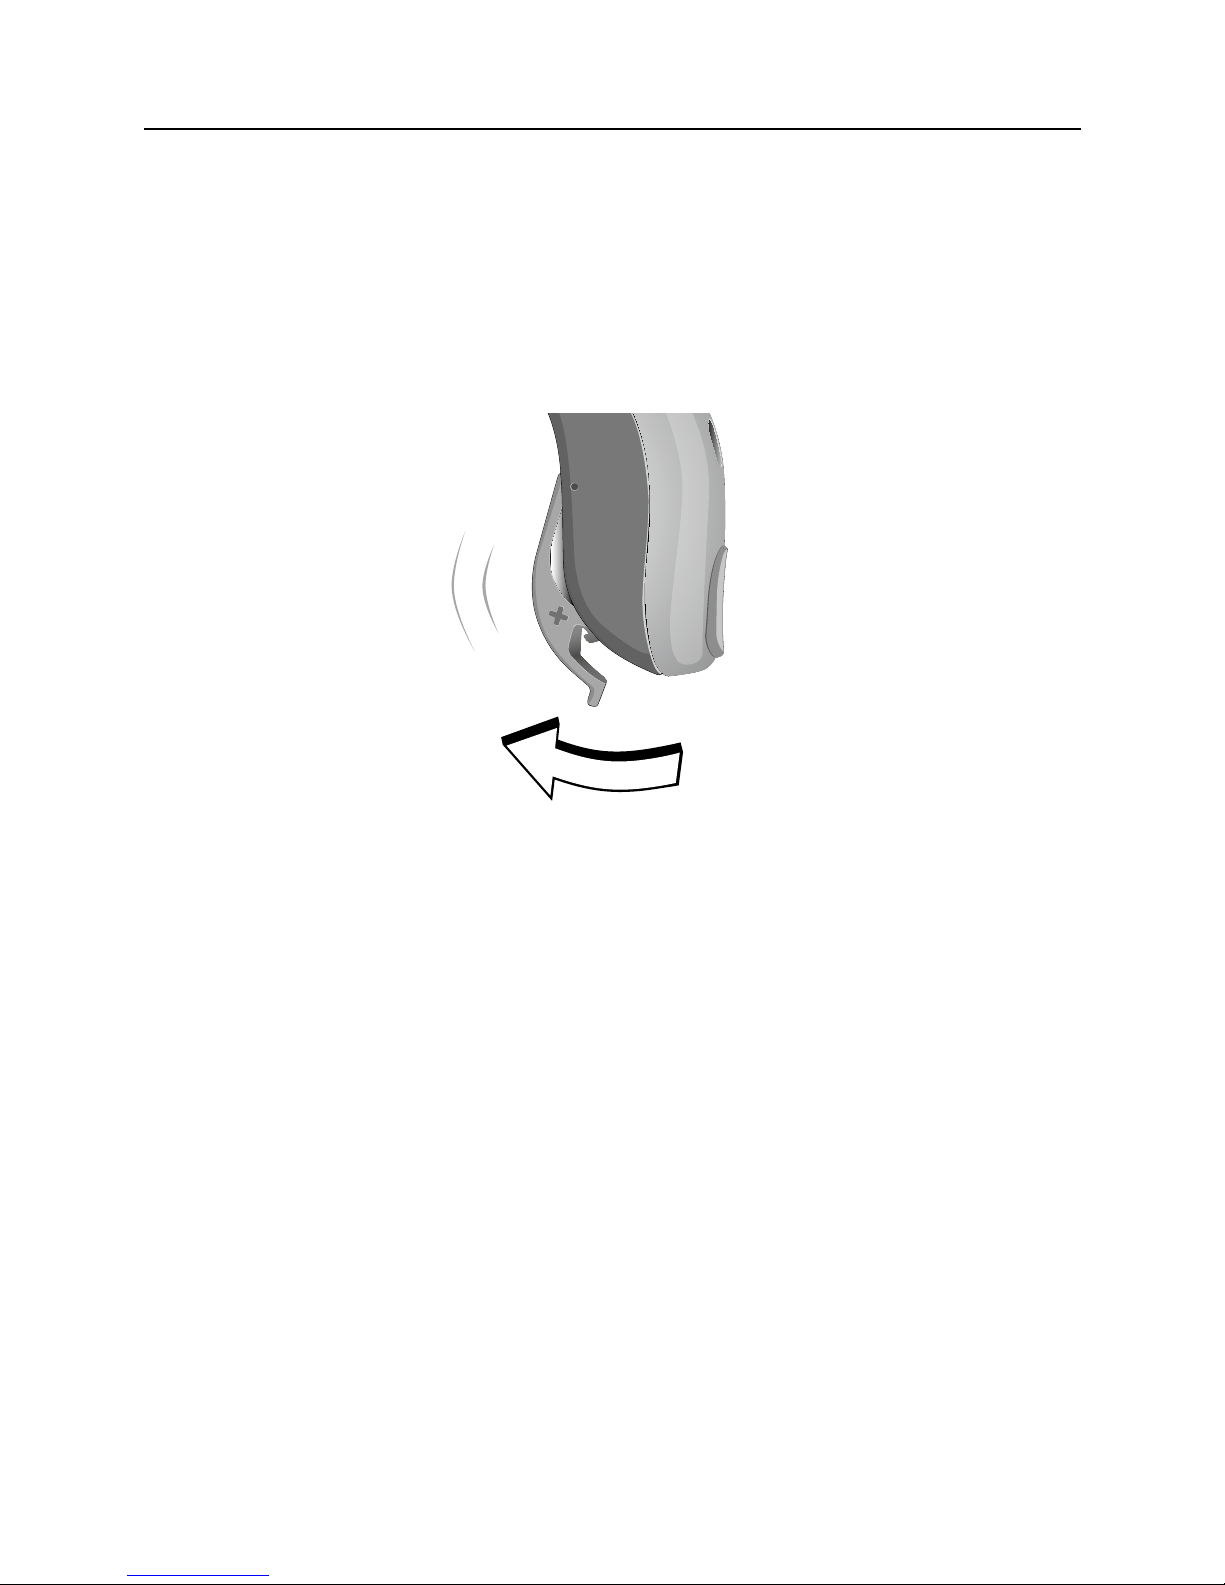
Step 1: Inserting the Battery
· Gently swing the battery door fully open,
but do not force it (A)
· Remove the sticker from the new battery (B)
· Place the battery into the empty compartment.
The + sign on the battery should face up. (C)
✼
For maximum power, allow the battery to be aired for
30 seconds before placing it into the empty
compartment.
A B C
Page 11
11
USER GUIDE MINIRITE
The MultiTool can be used for battery change.
Use the magnetic end to remove and insert batteries.
The MultiTool is provided by your hearing care
professional.
Important Notice
Your MultiTool has a built-in magnet. Keep the
MultiTool 30 cm away from credit cards and other
magnetically sensitive devices.
MultiTool
Page 12
12
SONIC
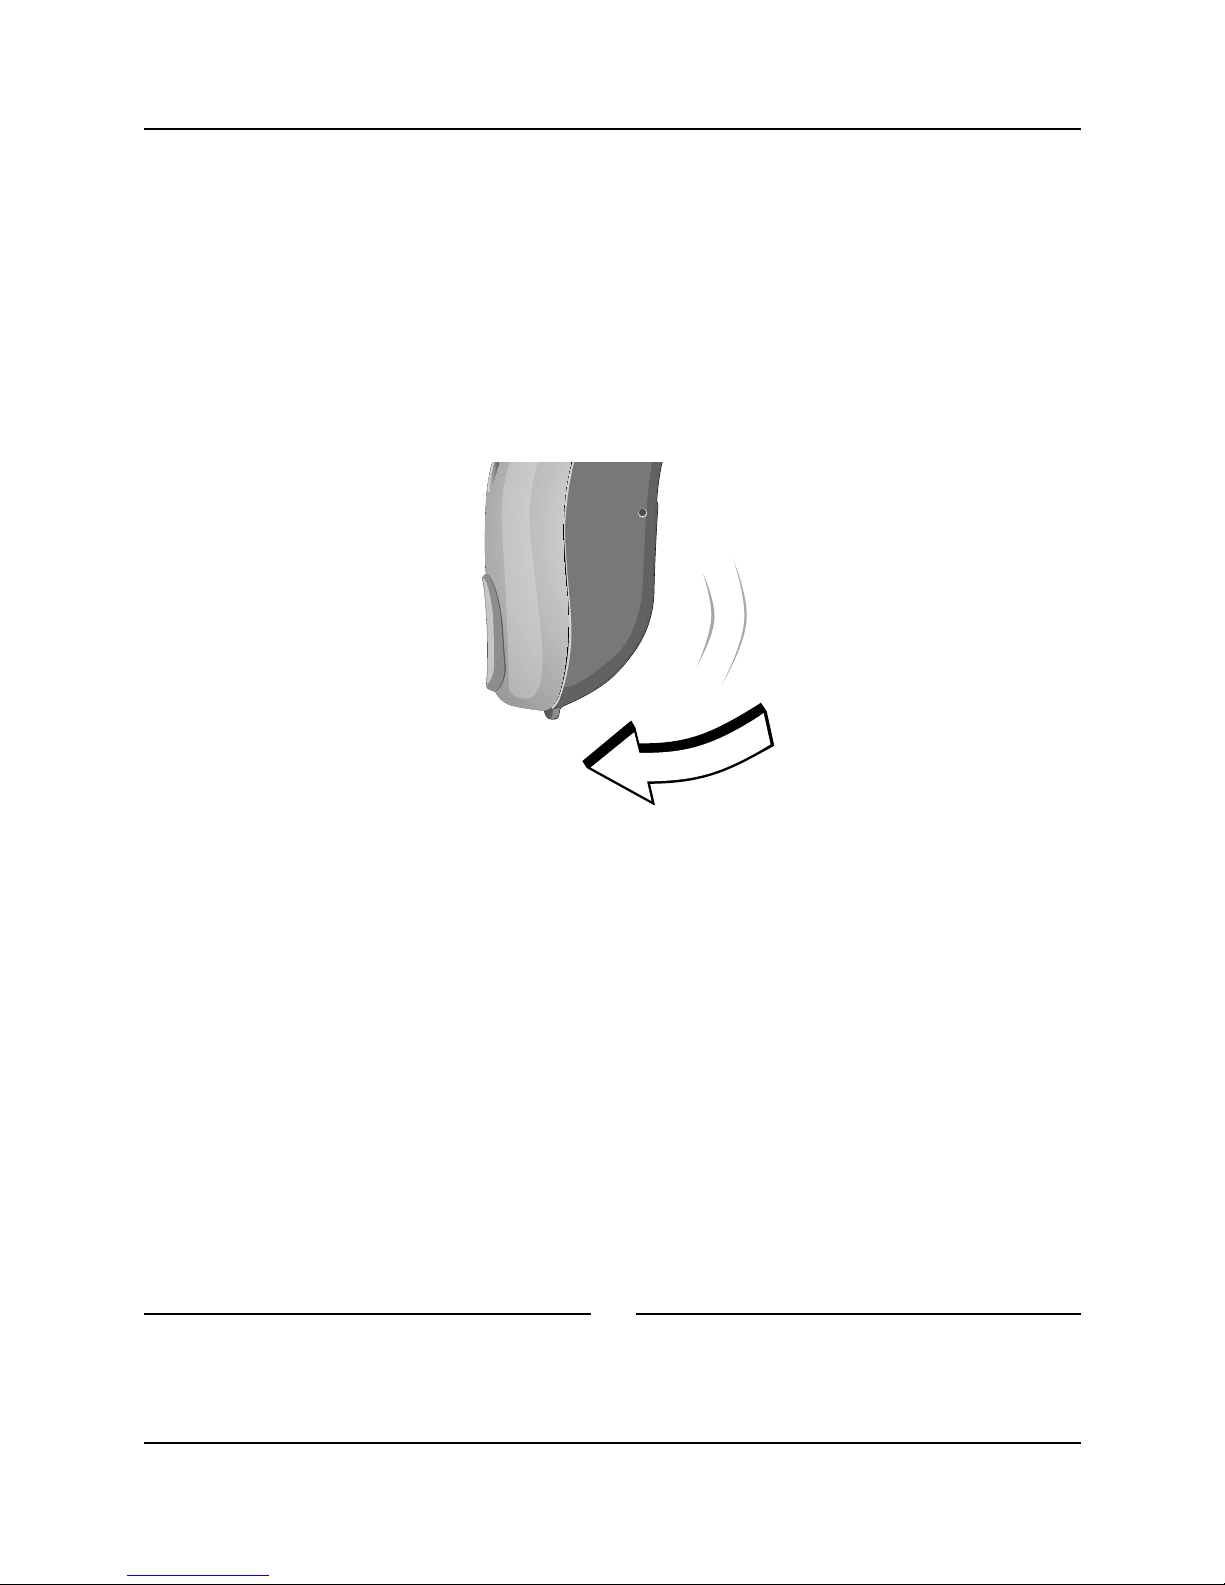
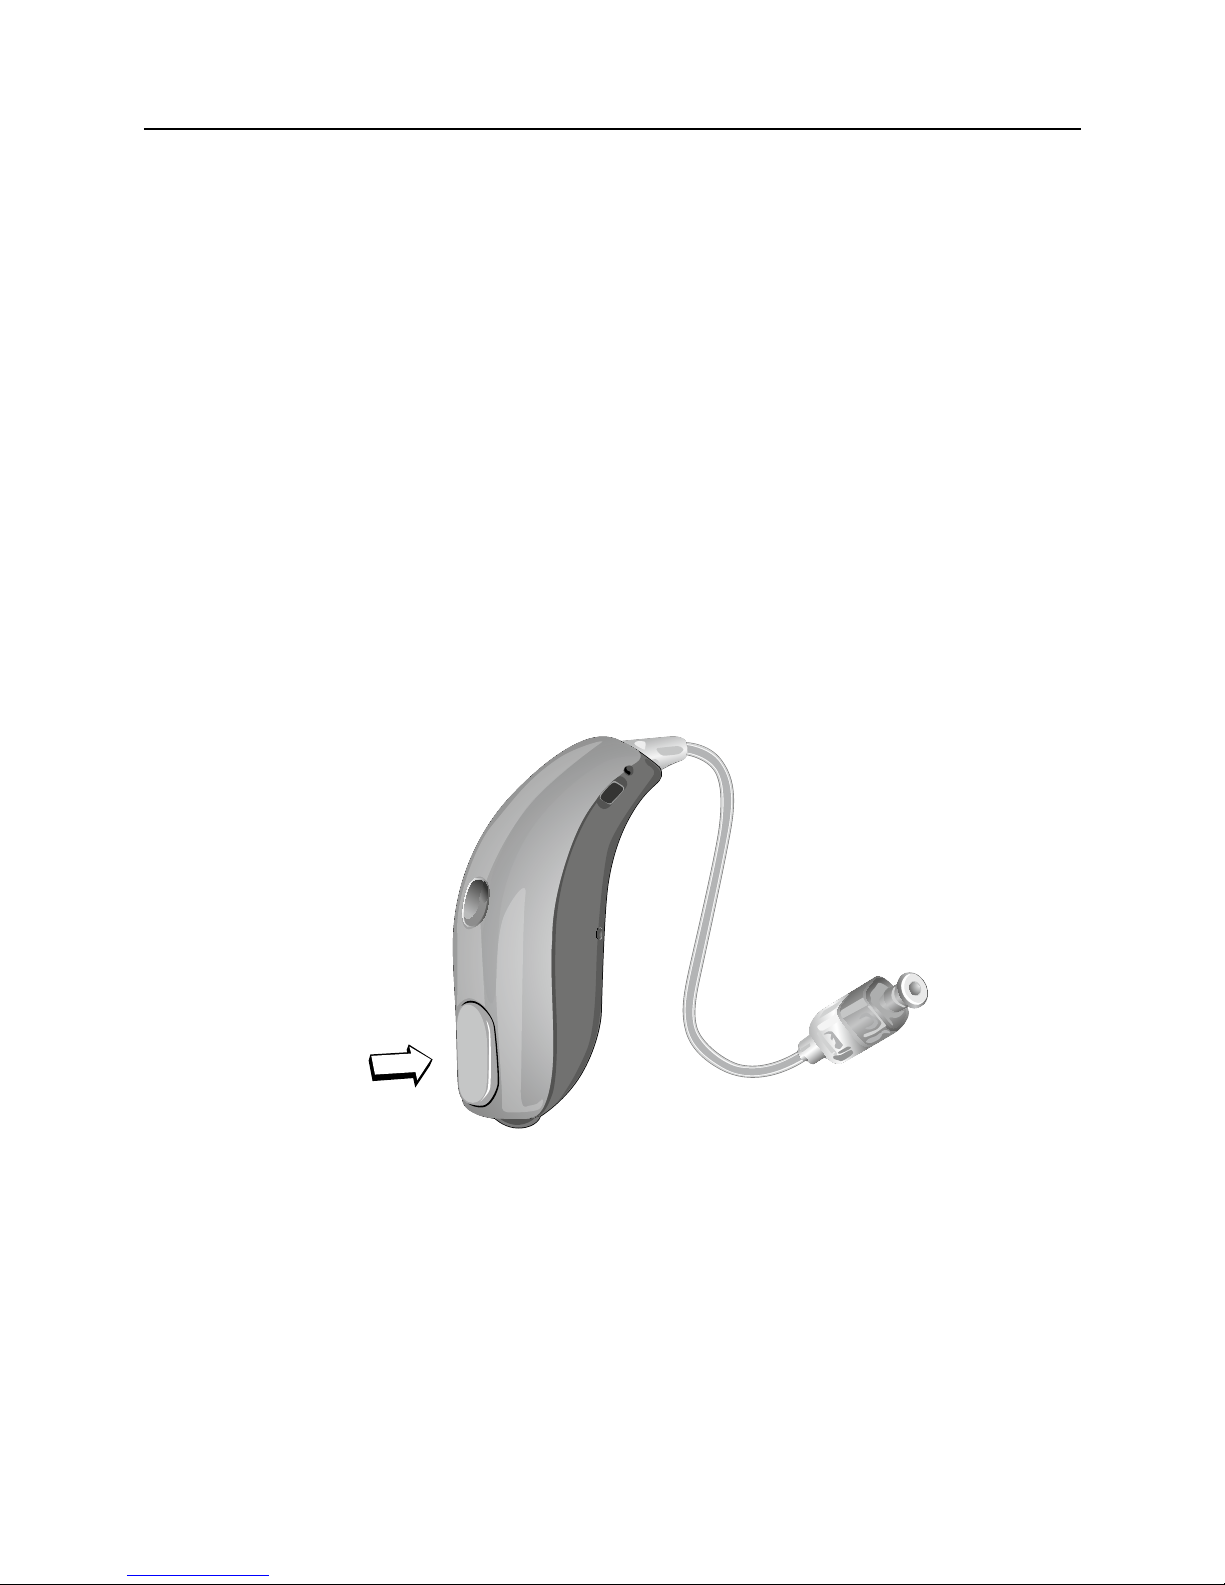
Step 2: Turning the Hearing Aid ON
Close the battery door completely. You should notice a
click. The hearing aid is now ON.
✼
Never use excessive force to open or close the
battery door.
Click “ON”
Page 13
13
USER GUIDE MINIRITE
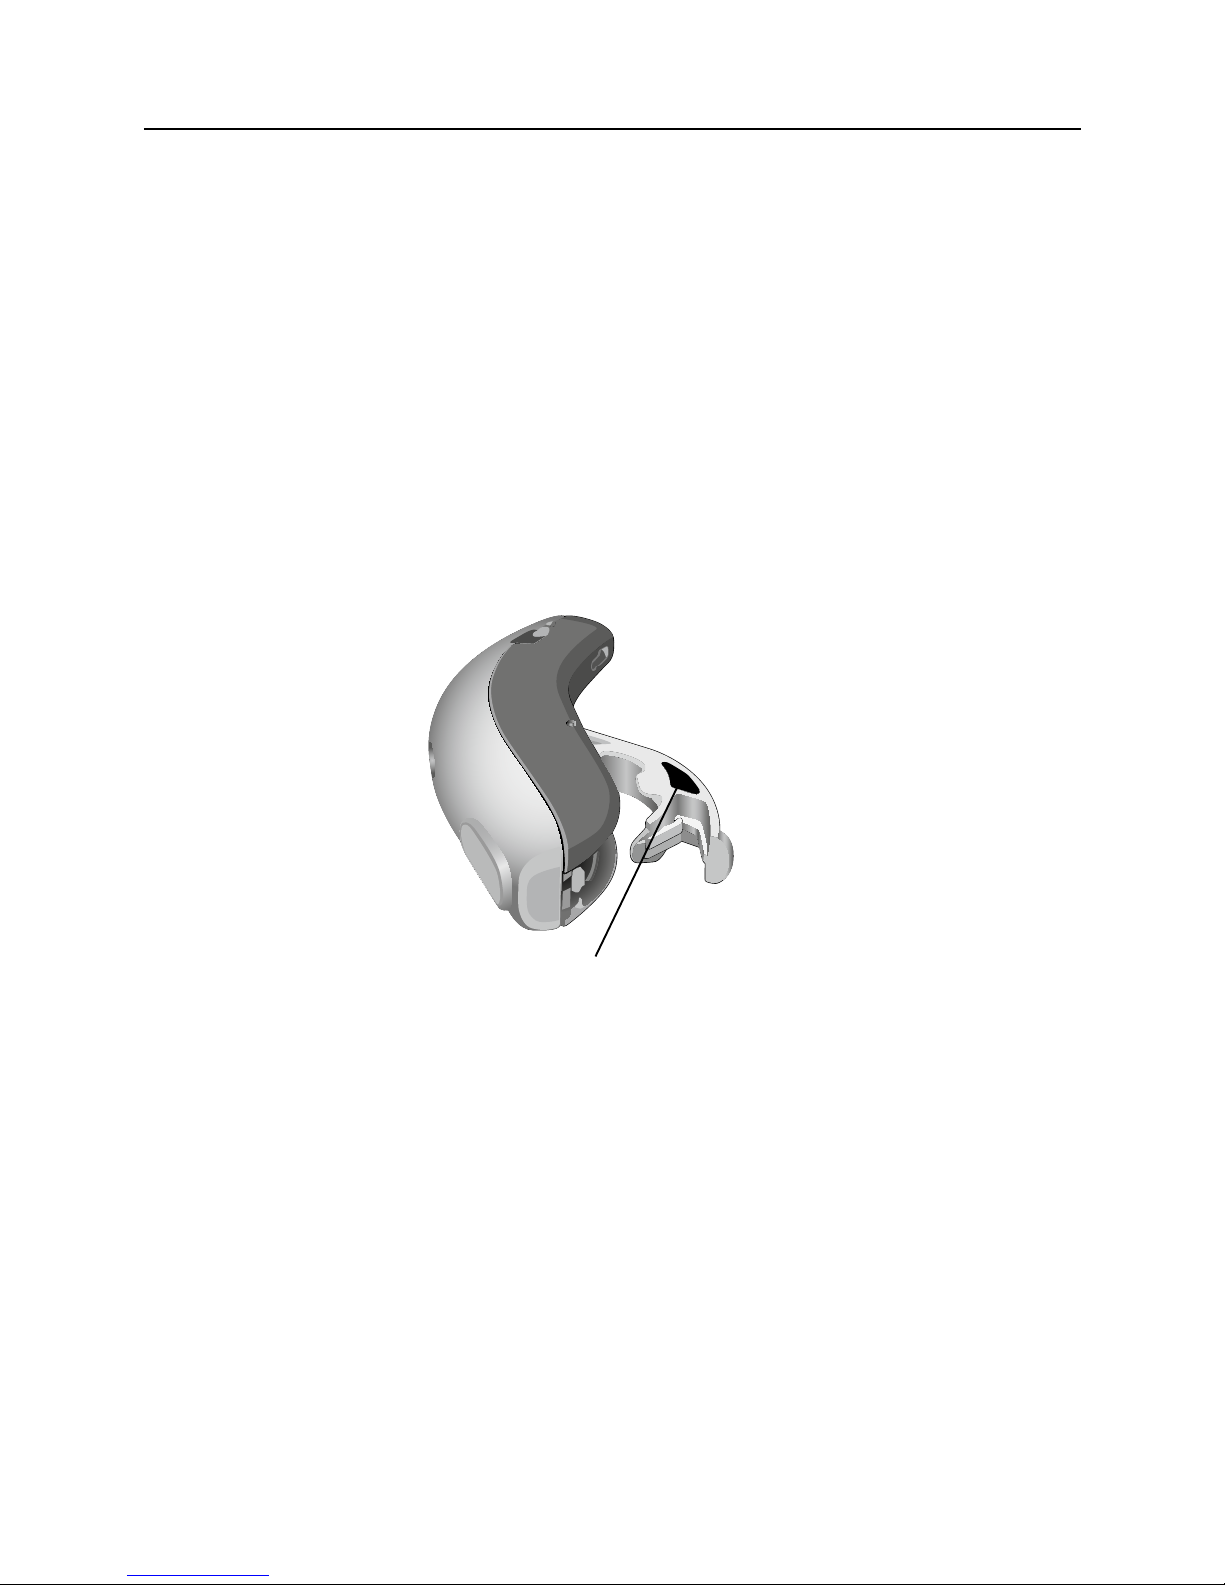
Step 3: Inserting Your Hearing Aid
Your hearing aid has been programmed individually for
your right or left ear.
You will see a color marking inside the battery door. This
can help you to distinguish between the left and right
hearing aid.
Red = right
Blue = left
Page 14
14
SONIC
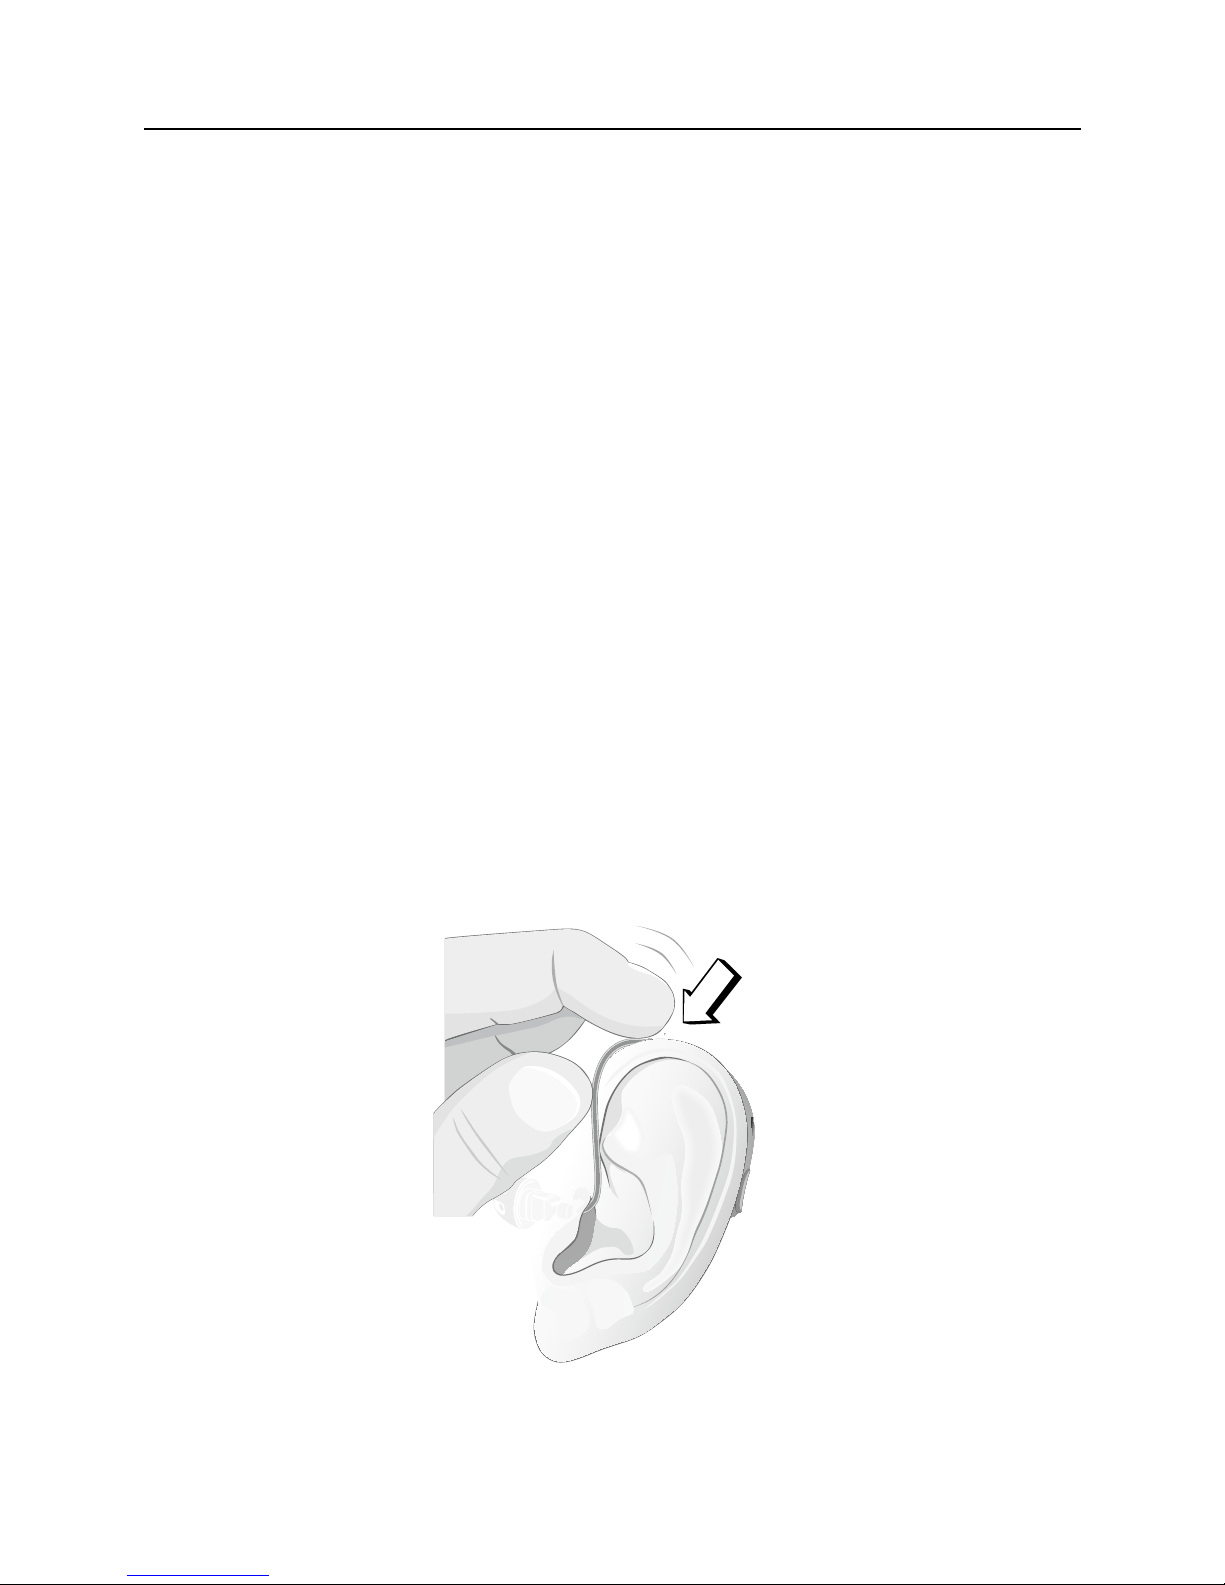
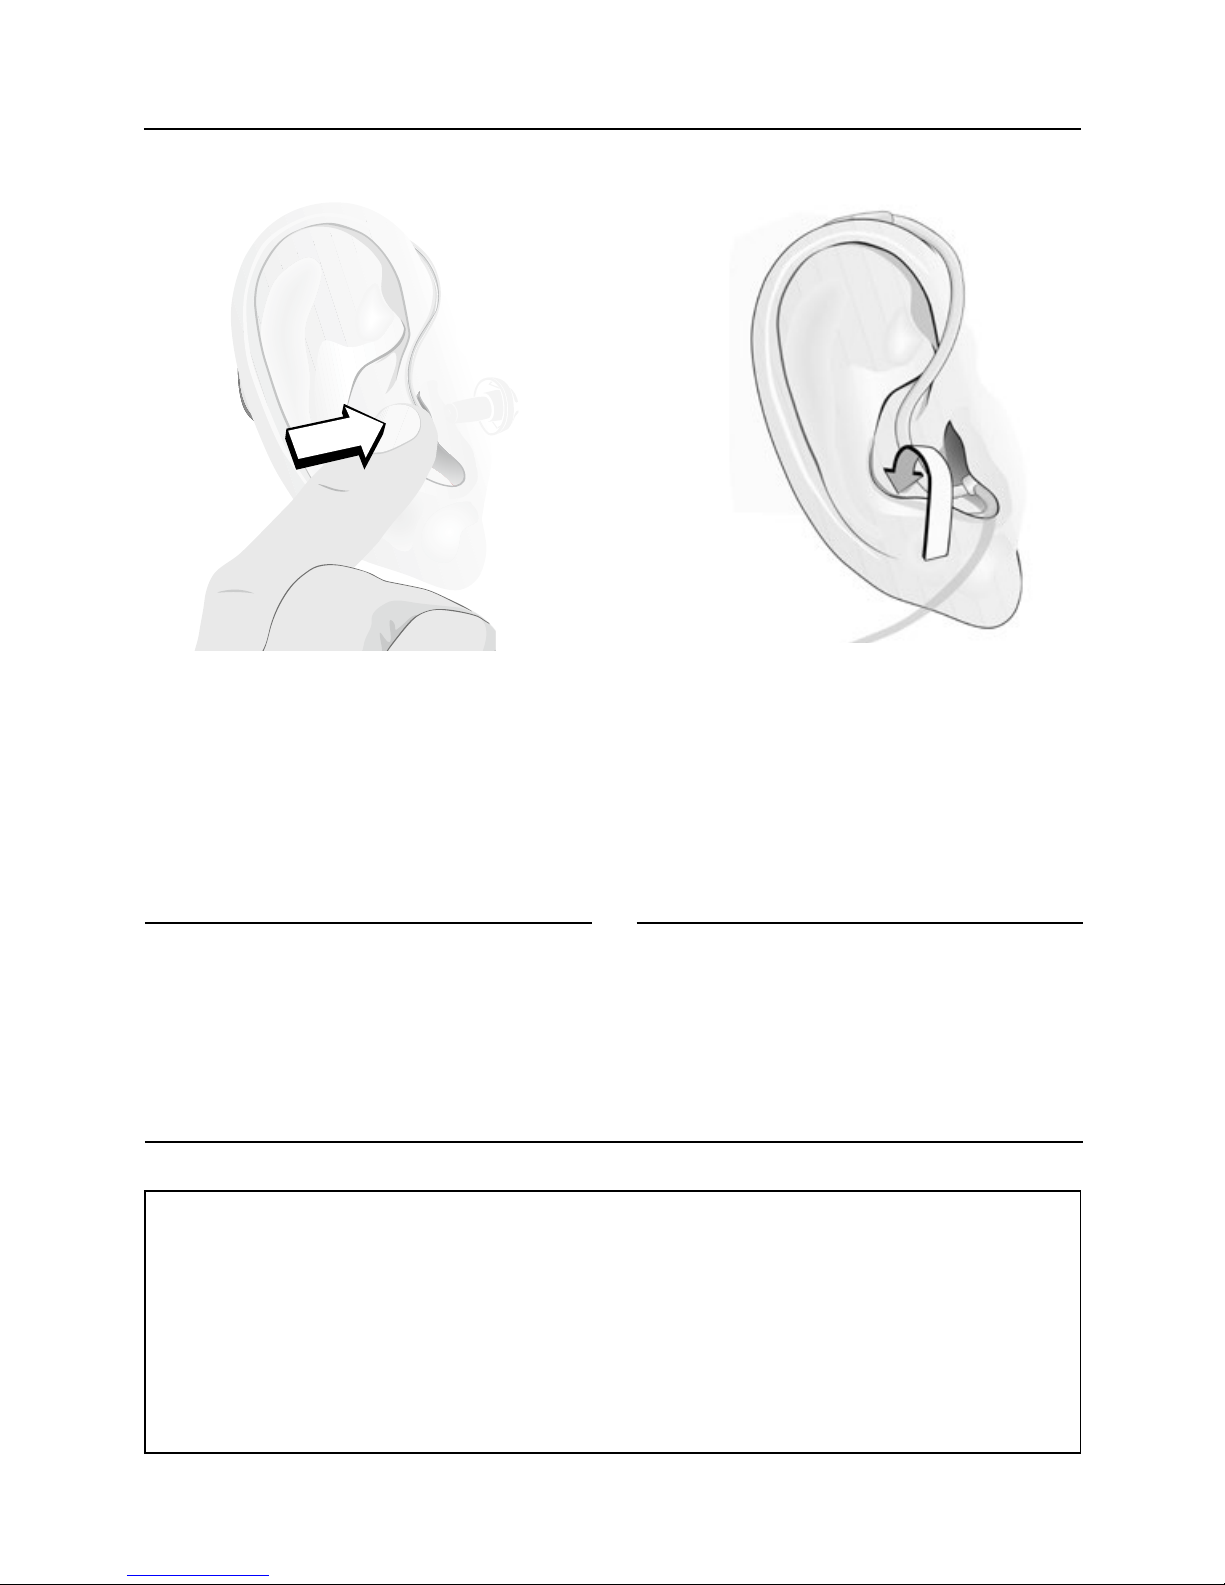
· Make sure the dome is pushed firmly onto the speaker
· Position the hearing aid behind your ear (A)
· Grasp the speaker between your thumb and index
finger. The dome or custom mold should point towards
the ear canal opening.
· Gently push the speaker into your ear canal, until the
wire sits flush against the side of your head (B)
· If you have an ear grip attached to the speaker, push the
ear grip into the bowl of your ear. If the ear grip is
sticking out, it has not been positioned correctly. Try
adjusting it again. (C)
When looking in the mirror, the speaker should be
difficult to see.
A
Page 15
15
USER GUIDE MINIRITE
CB
Important Notice
If the dome is not on the speaker when removed from
the ear, the dome might still be in the ear canal.
Consult your hearing care professional for further
instructions.
✼
Never insert the speaker in the ear canal without the
dome attached. Do not force the speaker too deeply
into your ear canal. Do not apply any lubrication to the
earpiece as this may damage the speaker.
Page 16

16
SONIC
Step 4: Changing the Volume
Your hearing aids are programmed to be at a
comfortable volume level for your hearing loss. They are
designed to automatically adjust to changes in the sound
environment.
If you have purchased an optional remote control or
SoundGate accessory, you can use it to make small
volume changes to get a natural and comfortable sound.
Please ask your hearing care professional for further
information on optional accessories.
Page 17

17
USER GUIDE MINIRITE
✼
Your hearing aid automatically returns to a preset
loudness level when it starts, the battery is low, or
when the program is changed. If you find that the
volume is not adequate, your hearing care professional
may need to adjust your hearing aid settings.
Page 18
18
SONIC
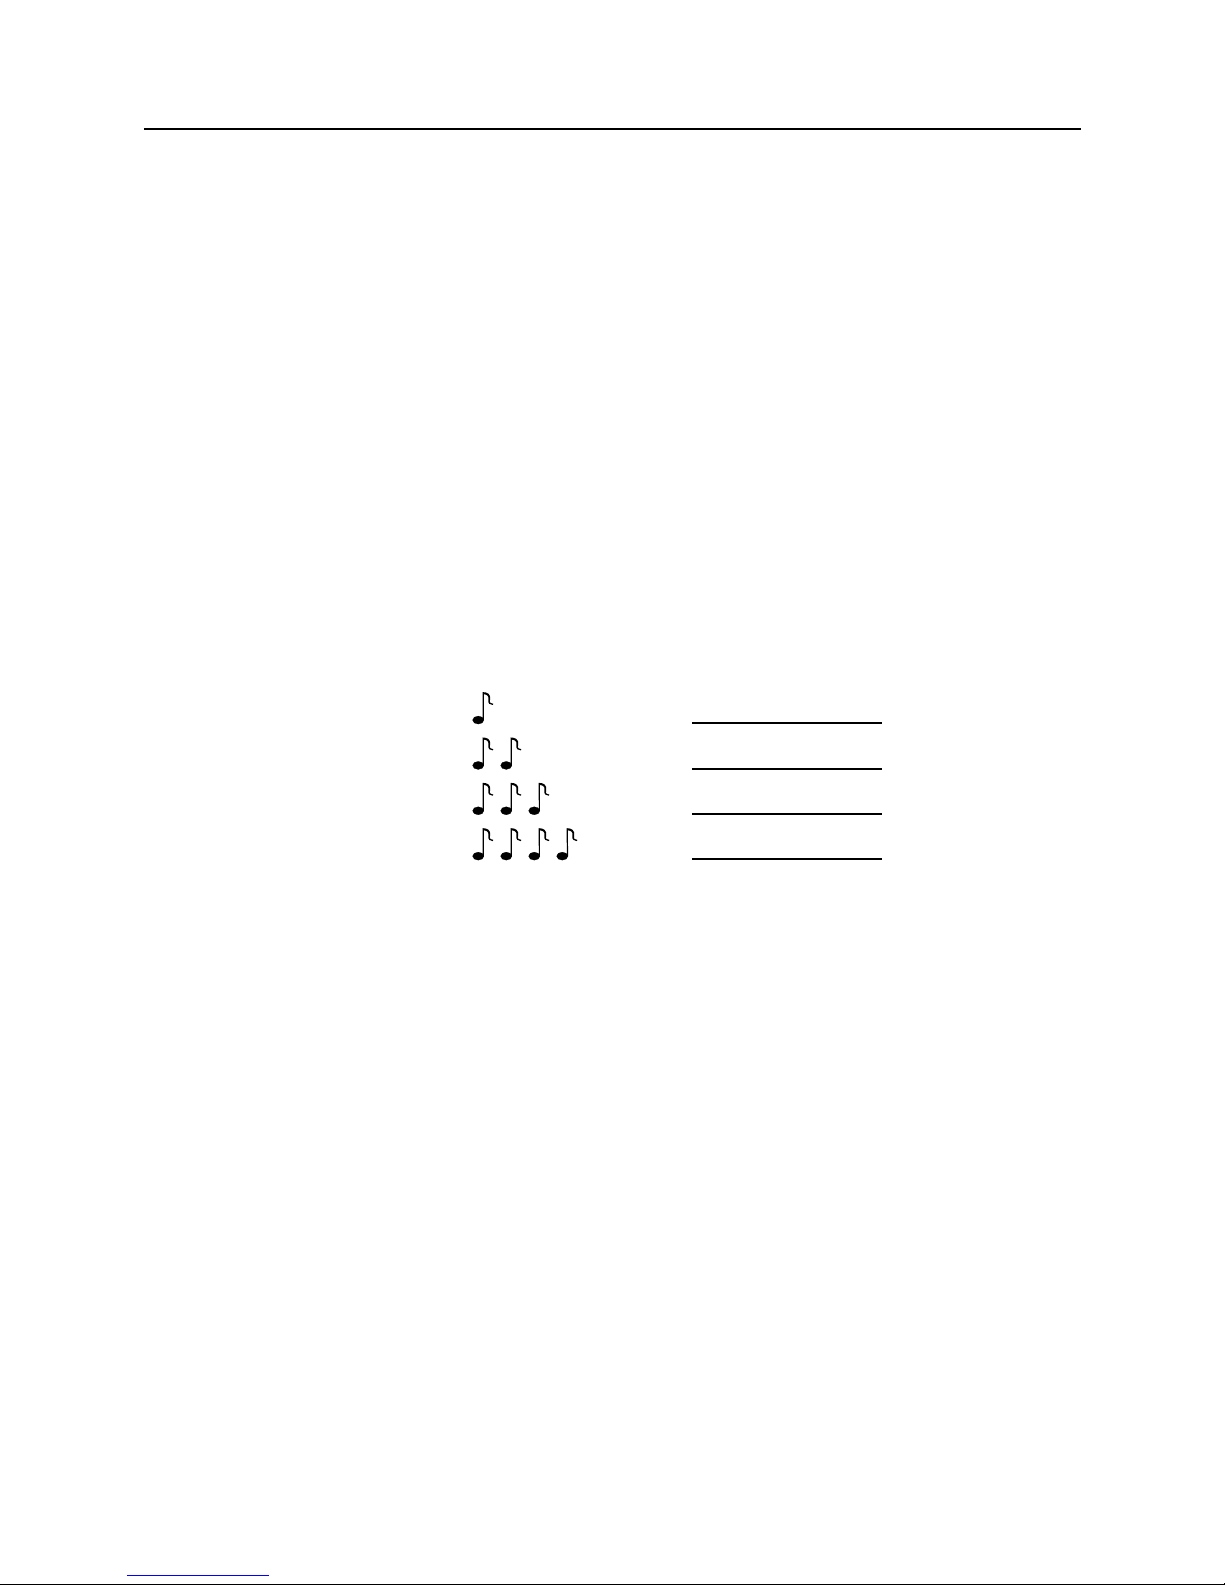
Step 5: Changing the Programs
A short press (about 1 second) on the Push Button will
cause the listening program to change. You will hear the
same number of beeps as the program you are in each
time you push the button. When you turn the hearing aid
off and then on, it will automatically return to your
default listening program (program 1).
Push
button
Bernafon Veras IFU micro BTE
VR_ILU_MultiControlMicroBTE_BW_HI
Page 19
19
USER GUIDE MINIRITE
Up to 4 listening programs can be configured by your
hearing care professional depending on your hearing aid.
Please ask your hearing care professional about the
programs that are available with your hearing aid.
Available Programs
(to be filled in by your hearing care professional)
Program Beeps Function
1 1
2 2
3 3
4 4
Page 20
20
SONIC
Important Notice
Do not use the mute function as an off switch, as the
hearing aid still draws from the battery in this mode.
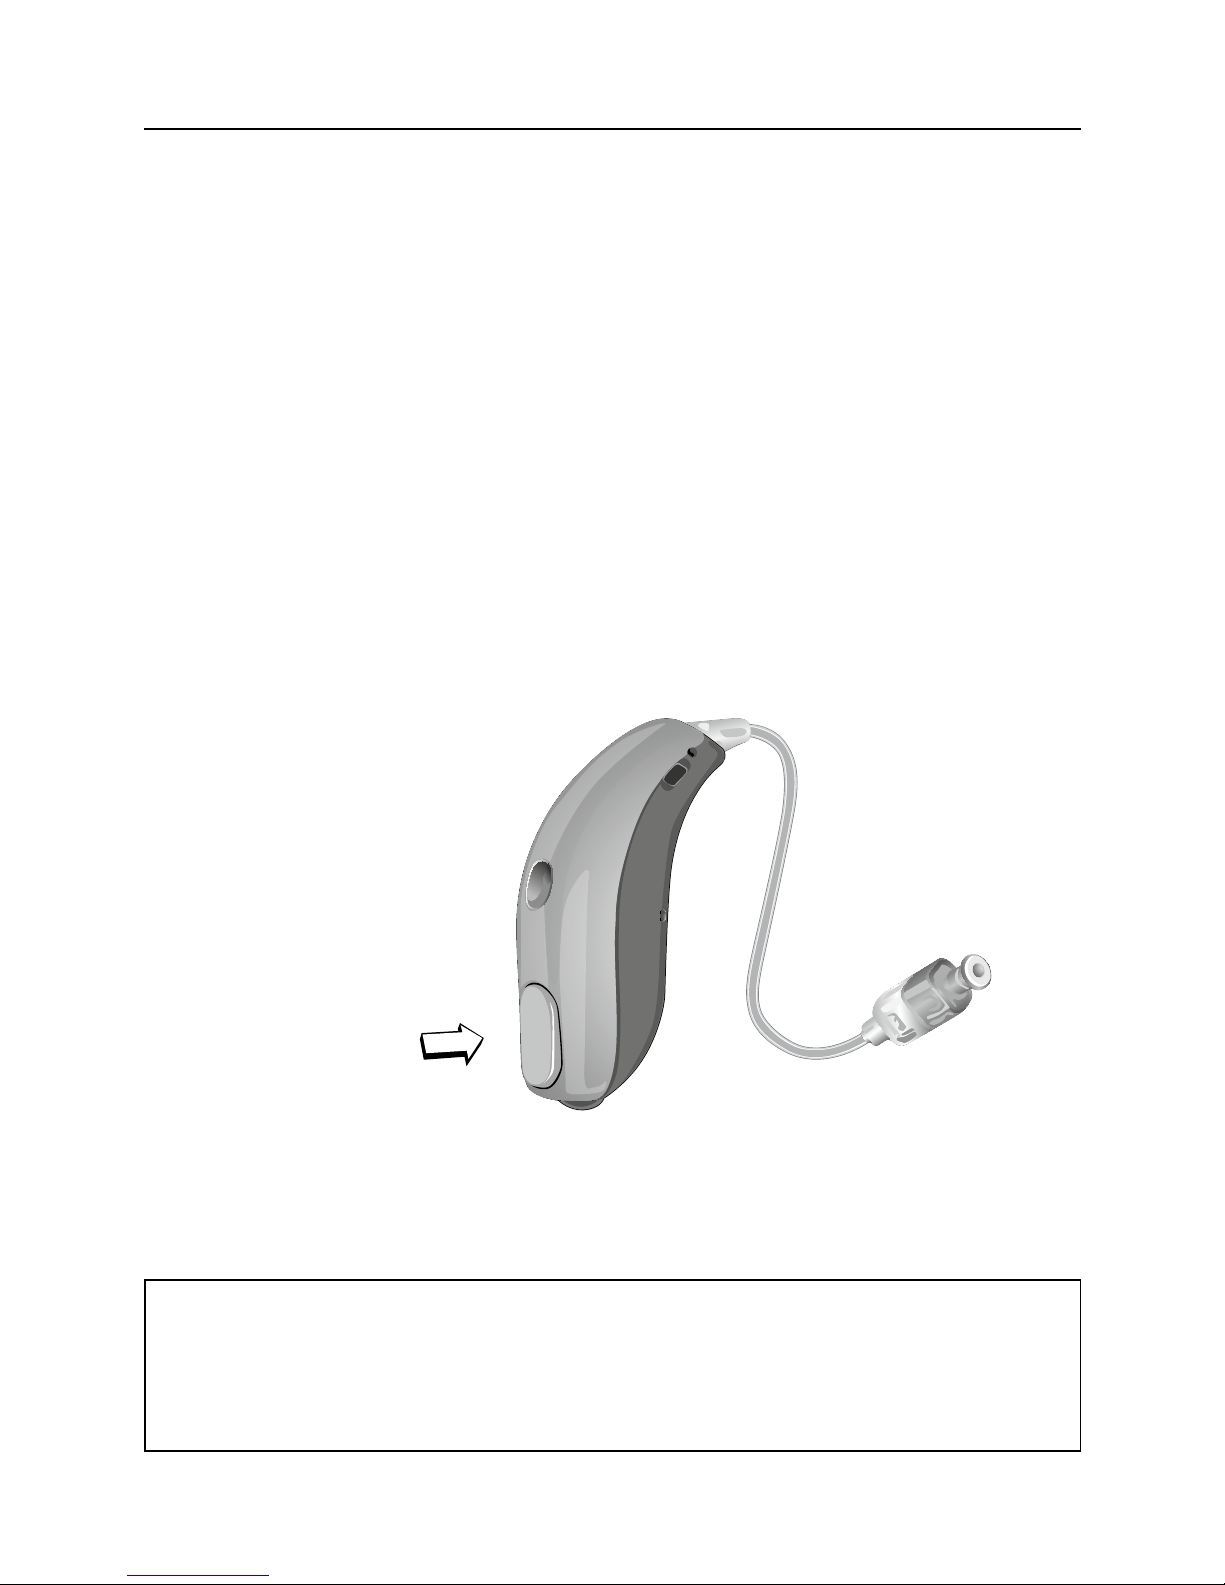
Step 6: Muting Your Hearing Aid
Your hearing aid may have the mute function. Please ask
your hearing care professional if this function is available
with your hearing aid.
A long press (about 2 seconds) on the push button will
cause your hearing aid to mute.
To un-mute the hearing aid, give any control on the
hearing aid a push.
Push
button
Bernafon Veras IFU micro BTE
VR_ILU_MultiControlMicroBTE_BW_HI
Page 21

21
USER GUIDE MINIRITE
Step 7: Removing Your Hearing Aid
· Grasp the wire of the speaker unit between your thumb
and index finger. Do not pull on the ear grip.
· Gently pull the speaker out of your ear
✼
Do not remove by pulling on the hearing aid, as the
speaker may be damaged at the connector.
Page 22
22
SONIC
Step 8: Turning the Hearing Aid OFF
Open the battery door slightly until a click is felt.
The hearing aid is now OFF.
Step 9: Changing the Battery
When the battery is running out, the hearing aid will
beep at regular intervals. You should be prepared to
replace the battery. The time until the hearing aid stops
working depends on the battery type and manufacturer.
Mercury-free batteries generally cause earlier warning
beeps.
Click “OFF”
Page 23
23
USER GUIDE MINIRITE
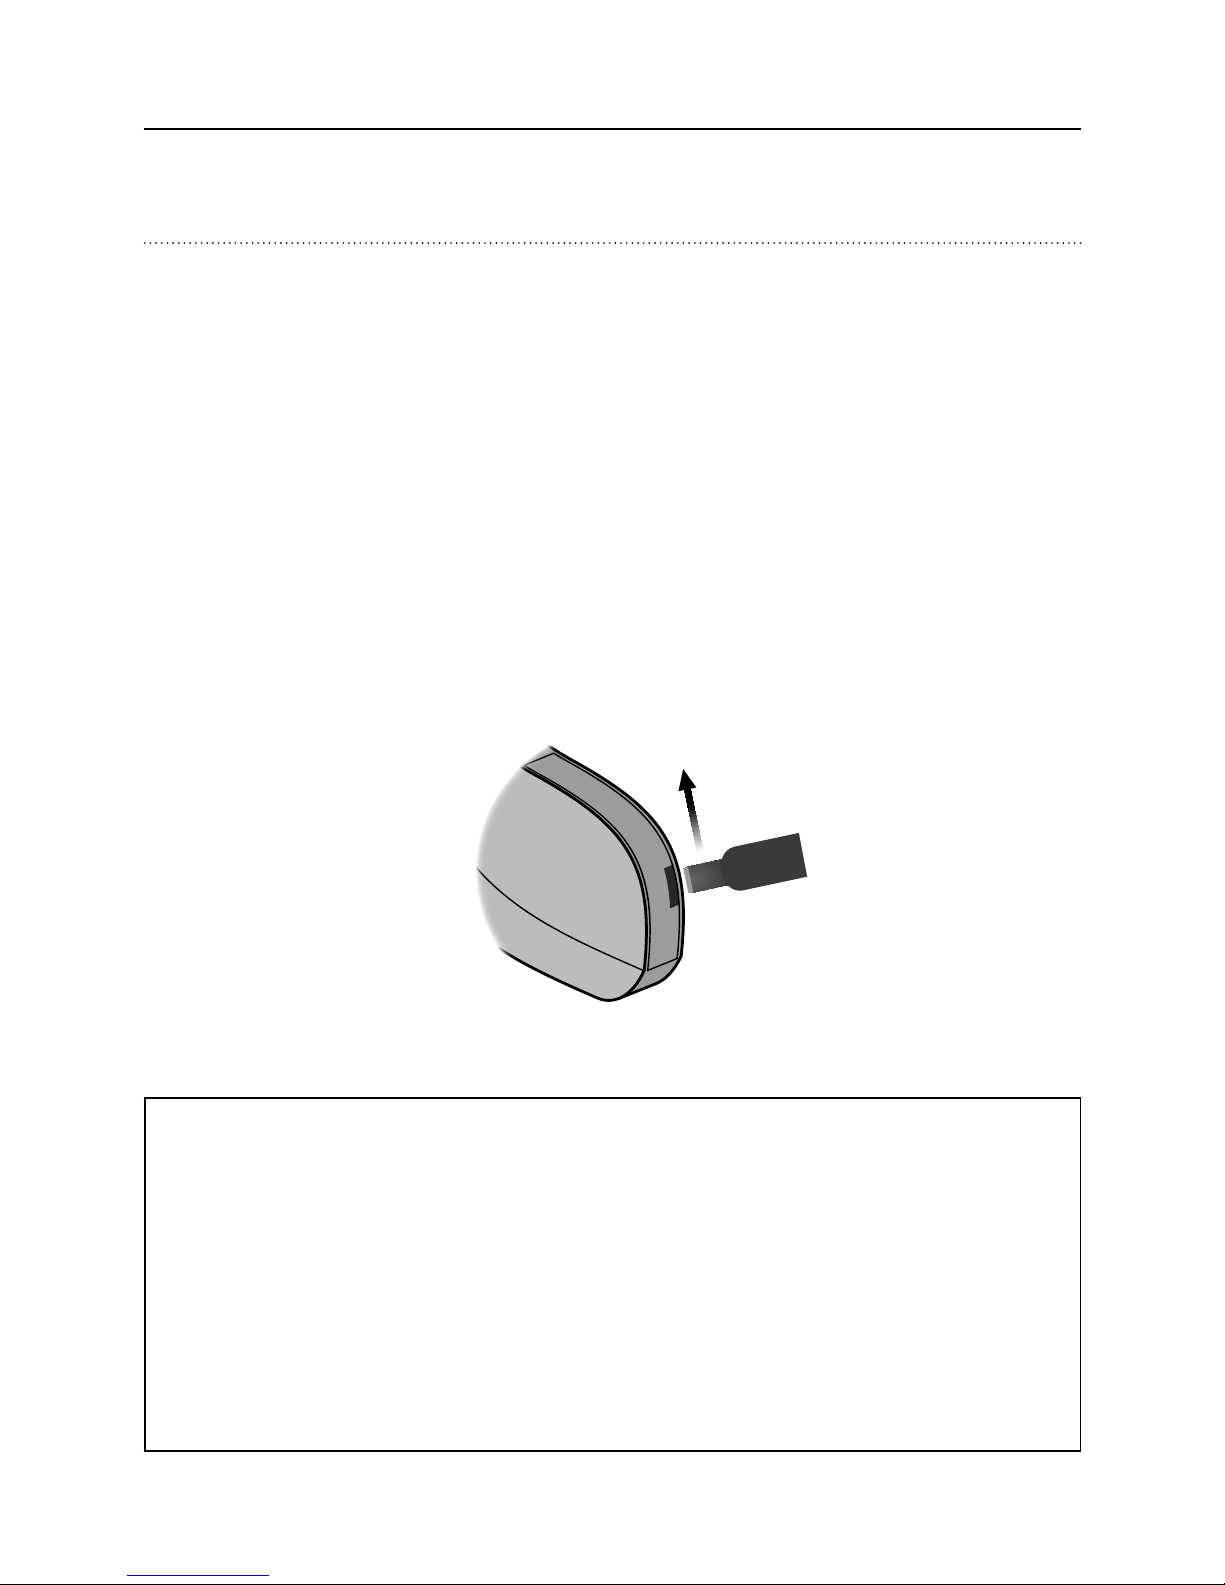
Tamper-Resistant Battery Door (optional)
To keep the battery out of reach of small children,
specifically those 0 – 36 months and people with learning
difficulties, a tamper-resistant battery door should be
used.
Use a small screwdriver to open the battery door. Insert
the screwdriver into the slit on the back of the hearing
instrument. Close the door using your fingers. Make sure
the door is completely closed.
Important Notice
Avoid excessive force to open the battery door when in
the locked position. Do not force the battery door
beyond its fully opened position. Make sure to insert
the battery correctly. Please contact your hearing care
professional if you suspect the tamper-resistant
effectiveness and locking ability is damaged.
Page 24

24
SONIC
Features of Your Hearing Aid
The following feature may be activated in your hearing
aid. Please consult your hearing care professional to find
out how your hearing aid is configured.
Auto Telephone can automatically activate a phone
program in the hearing aid, if your telephone has a
dedicated magnet.
The magnet needs to be placed at
your telephone next to the sound
outlet
Page 25

25
USER GUIDE MINIRITE
Caring for Your Hearing Aid
Healthy ears produce a waxy substance that can clog
your hearing aid. Please follow these cleaning
instructions to prevent wax build-up and ensure optimal
performance of your hearing aid.
For further information on the care of your hearing aid,
please consult your hearing care professional or watch
our instructional videos, available on our website
www.sonici.com in the section “Product Support”.
General Care Instructions
Treat your hearing aid like any other delicate electronic
device (check the safety guidelines on page 42) and
make sure that the hearing aid and the speaker do not
come in contact with moisture or water.
· Always clean and dry your hands thoroughly before
handling the hearing aid
· Do not use your hearing aid without a dome or mold
Page 26

26
SONIC
Should your hearing aid come in contact with water and
stop working, please follow these guidelines:
· Gently wipe off any water on the outside of the hearing
aid
· Open the battery door and remove the battery
· Gently wipe off any water in the battery door
· Let the hearing aid dry with the battery door open for
approximately 30 minutes
· Insert a new fresh battery and close the battery door.
Your hearing aid should work normally again.
Important Notice
Do not wear your hearing aid while showering or
participating in water activities. Do not immerse your
hearing aid in water or other liquids.
Page 27

27
USER GUIDE MINIRITE
Daily Care Instructions
· Check your hearing aid for ear wax and wipe it clean
with a cloth or tissue
· Clean your custom mold after every use by wiping it
with a clean dry cloth
· Open the battery door fully to allow air to circulate
· A dry storage kit is recommended to remove any
moisture that may have accumulated in the hearing aid.
Always remove zinc-air batteries before drying your
hearing aid with a drying kit. Drying out zinc-air
batteries shortens their lifetime.
Important Notice
Use a soft, dry cloth to clean the hearing aid. It must
never be washed or immersed in water or other
liquids.
Page 28
28
SONIC
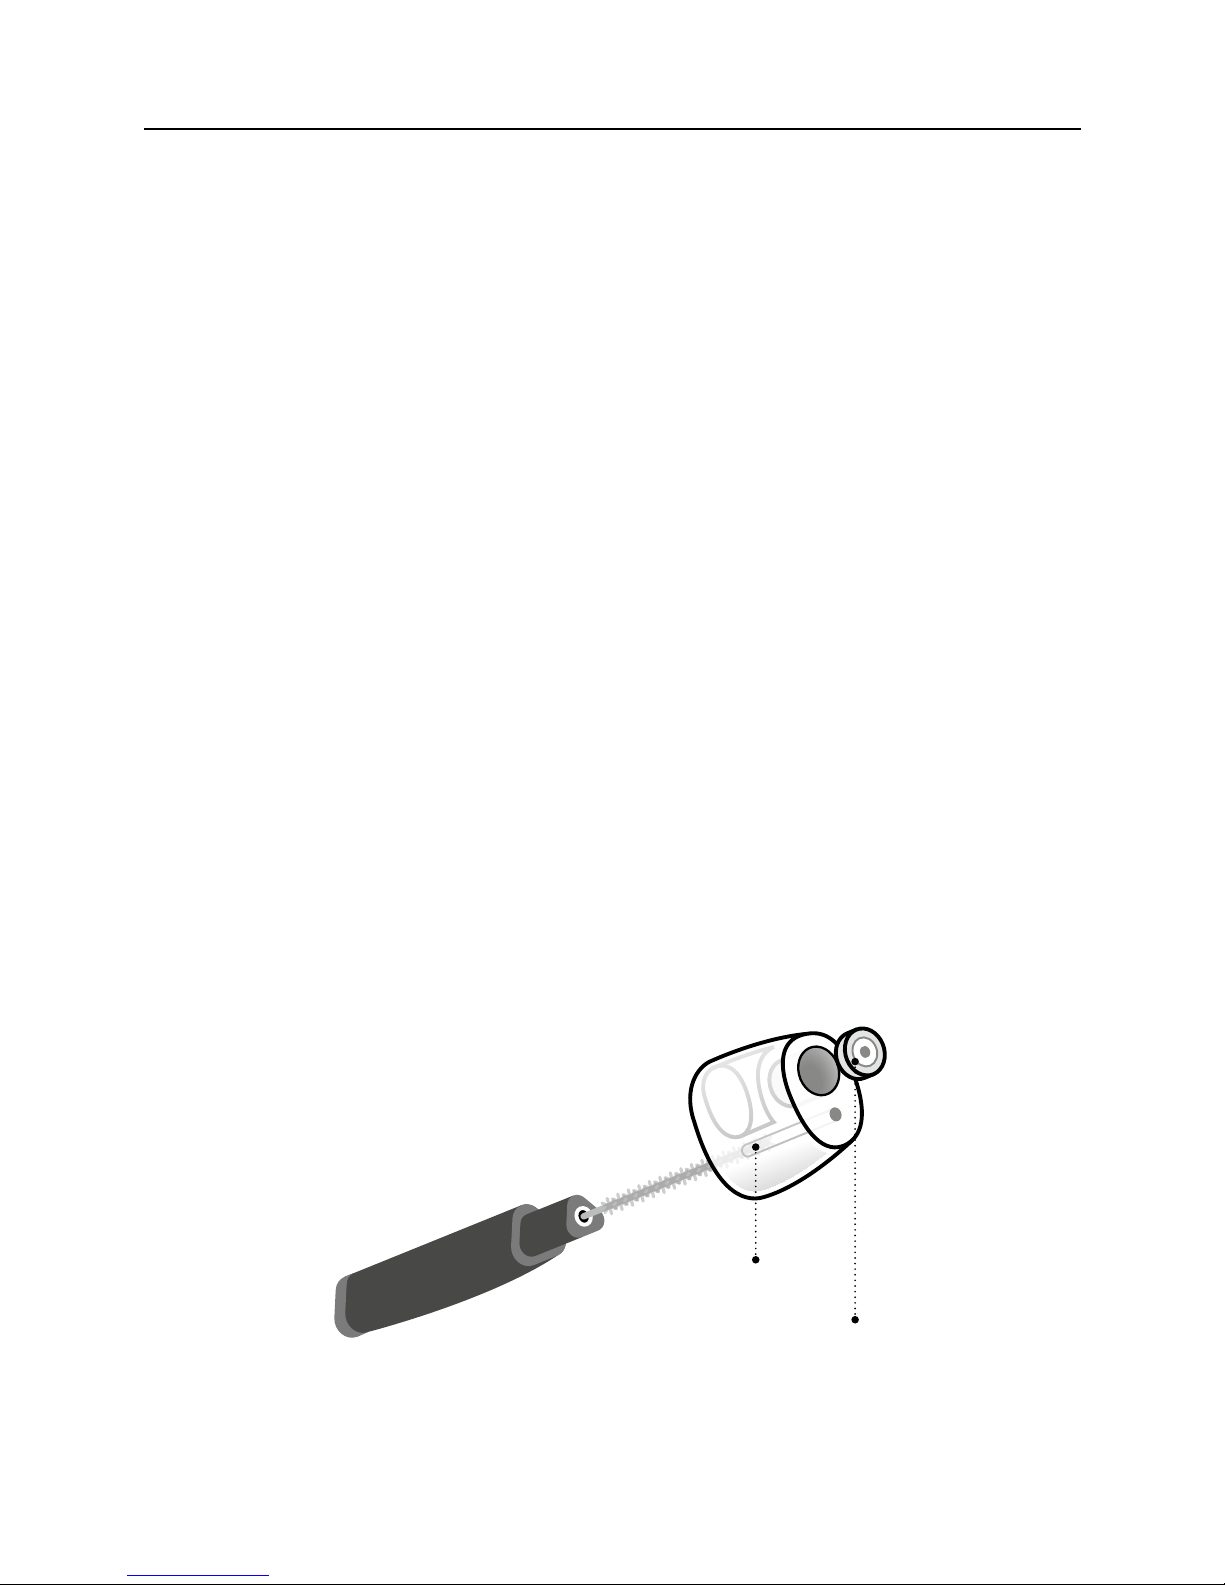
Specific Care Instructions
A: How to Clean Your Custom Mold or Power Mold
In most cases, there is a hole through the mold (below
the speaker unit). This is the vent. The vent should never
be clogged with ear wax.
Use the brush of the MultiTool to clean the vent in your
ear piece.
· Press the brush through the hole
· Twist the brush slightly to clean the vent
The MultiTool is provided by your hearing care
professional.
Vent
Wax filter
Page 29

29
USER GUIDE MINIRITE
B: How to Exchange the Wax Protection Filter on your
Custom Mold or Power Mold
The wax filter in the ear piece should be replaced when
clogged or when the hearing aid does not sound normal.
Use the wax filter delivered by your hearing care
professional.
C: How to Exchange the Dome
Inspect your hearing aid’s dome for yellowing, hardening
and cracks. In the case of these changes, consider
replacing your dome or contacting your hearing care
professional. Spare domes may be obtained from your
hearing care professional.
Clean your hands thoroughly before replacing the dome.
Never change the dome with wet or dirty fingers.
Page 30
30
SONIC
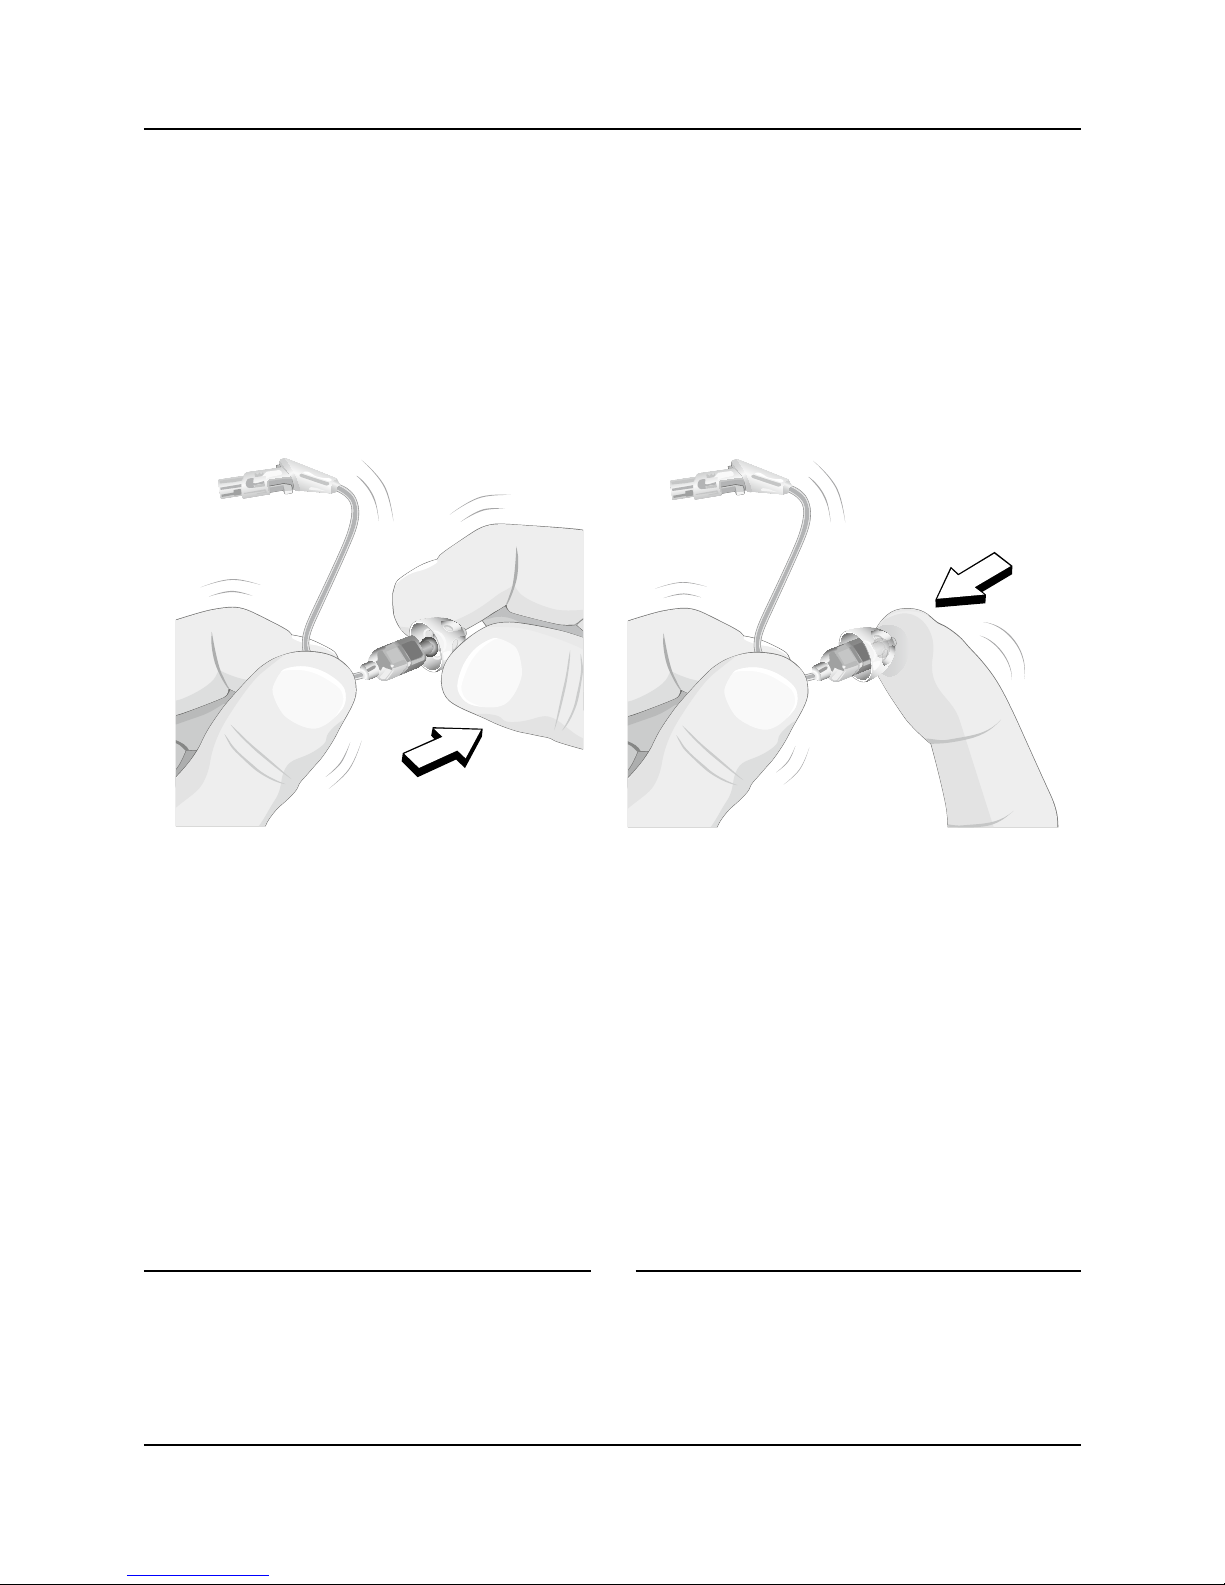
✼
Never remount a used dome on the speaker.
A remounted dome is more likely to fall off in the
ear canal.
· Hold the end of the dome between your fingers and pull
it off (A)
· Push a new dome as far as possible onto the speaker
(B)
A B
Page 31
31
USER GUIDE MINIRITE
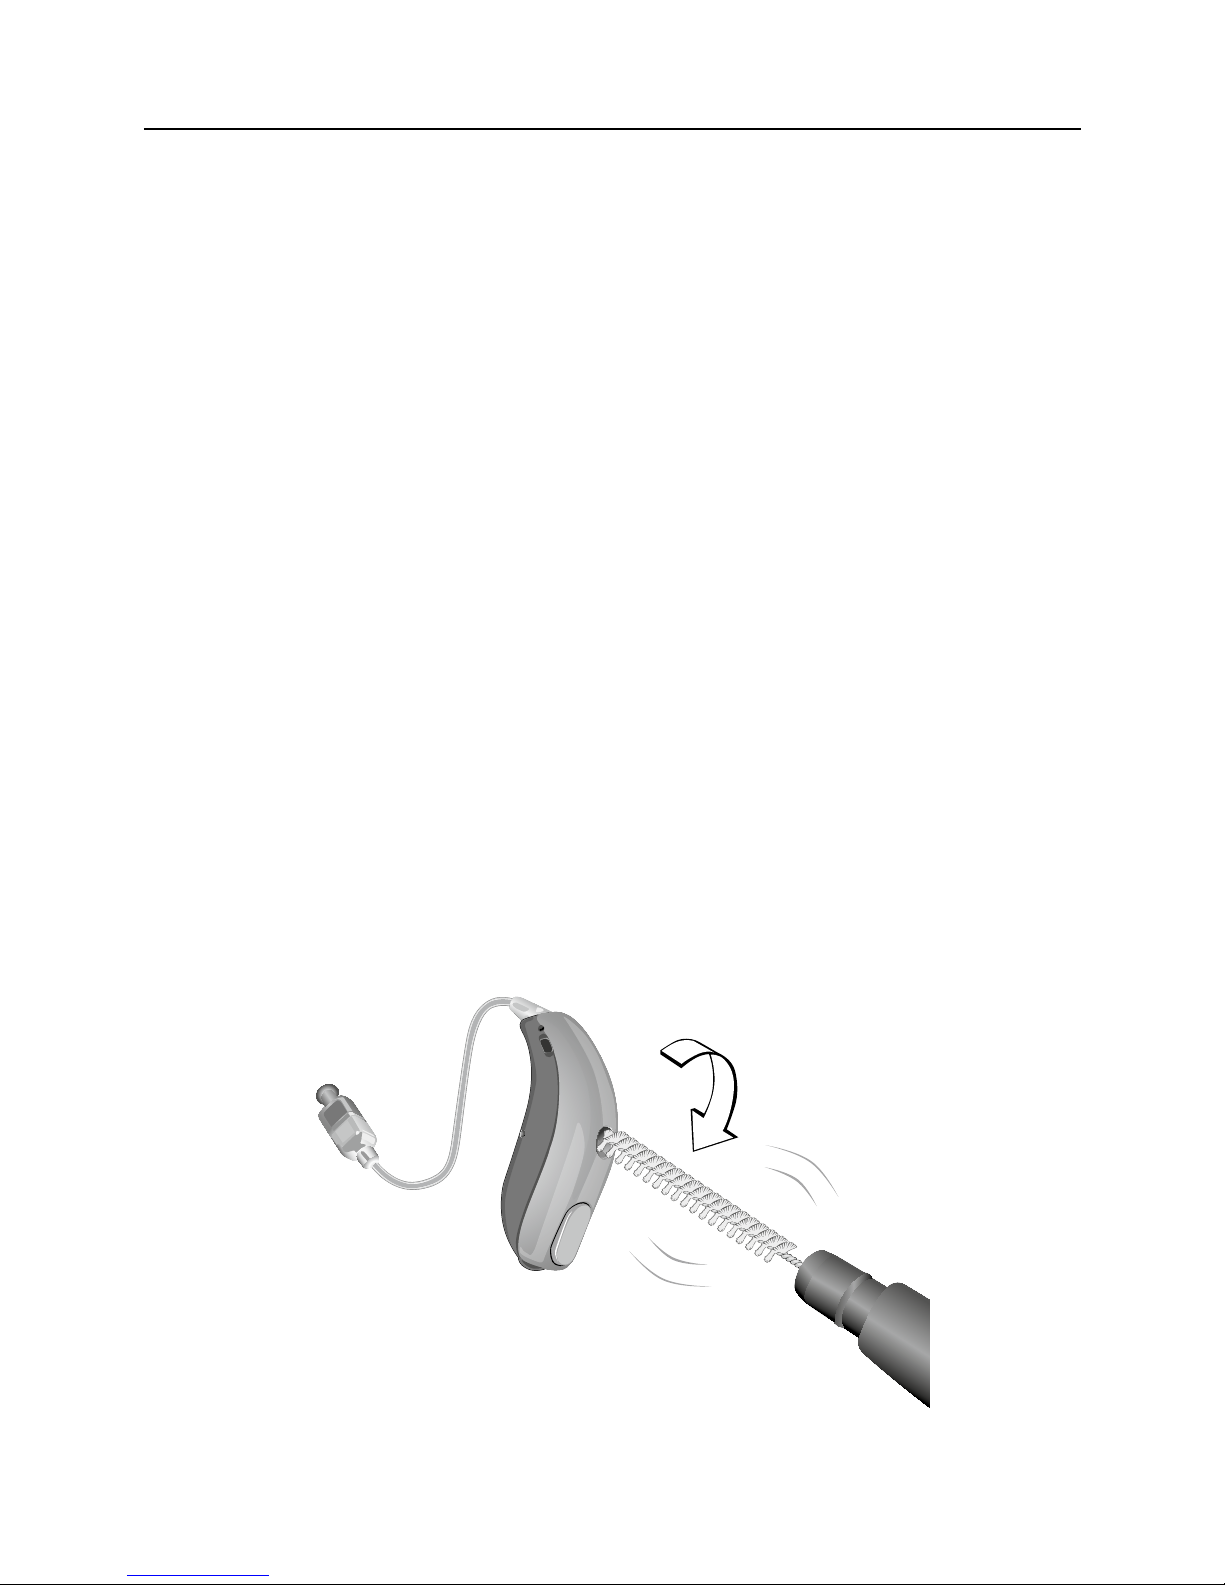
D: How to Exchange the Wax Protection Filter on Your
Speaker Unit
The wax filter in the speaker unit should be replaced
when clogged or when the hearing aid does not sound
normal. Use the wax filter delivered by your hearing care
professional.
E: How to Clean the Microphone Openings
Make sure that the microphone openings are not clogged
by dust or dirt. Carefully brush away visible signs of
debris from the openings. Brush only on the surface and
make sure the hairs of the brush are not pressed into the
openings. Be careful not to push debris into the
microphone openings, as this can affect the
performance of the hearing aid.
Page 32

32
SONIC
Common Problems and Solutions
Hearing aid whistles or squeals
Check that the earpiece is inserted correctly. If this is the
case and the hearing aid still whistles or squeals, please
consult your hearing care professional.
No volume, level too soft or humming noise
Check if the volume level is too soft and adjust by
increasing the volume level with the optional remote
control or SoundGate if available. If you have no volume
at all, check whether the hearing aid is in mute position.
If the problem still occurs, check that the battery door is
closed completely. Also check if the battery is inserted
correctly. If the problem still remains, change the
battery. If the problem still persists, contact your hearing
care professional.
Page 33

33
USER GUIDE MINIRITE
Whirring noise, fading, weak or motor-boating sounds
Open and close the battery door several times or clean
the battery contacts carefully with a dry cotton swab.
If the problem still occurs, change the battery. If the
problem still remains, contact your hearing care
professional.
Hearing aid switches from ON to OFF periodically
Your battery is running down. Please change the battery.
Hearing aid beeps without any action from you
Your battery is running down. Please change the battery.
Other problems with your hearing aid
If other problems occur with your hearing aid which are
not listed, contact your hearing care professional.
Page 34

34
SONIC
Accessories
Sonic offers a wide range of optional accessories that
may be purchased to enhance your hearing aid.
Depending on the hearing aid family and local
regulations, the following accessories are available:
Remote control
SoundGate communication device (for wireless
connection to mobile phones, music players, etc.)
SoundGate Mic (for wireless external microphone
connection via the SoundGate)
TV Adapter (for wireless connection to your television
via the SoundGate)
Phone Adapter (for wireless connection to your
landline phone via the SoundGate)
Tamper-resistant battery door (recommended when
fitting infants, small children, and vulnerable
persons)
For further information on accessories, please contact
your hearing care professional.
Page 35

35
USER GUIDE MINIRITE
Call
Phone
Adapter
TV Adapter
SoundGate
Remote
Control
Bluetooth
®
-
enabled devices
SoundGate Mic
Page 36

36
SONIC
Warnings
You should familiarize yourself fully with the following
general warnings and the entire contents of this booklet
before using your hearing aid to ensure personal safety
and correct use.
Consult your hearing care professional if you experience
unexpected operations or events with your hearing aid.
Please note that a hearing aid will not restore normal
hearing and will not prevent or improve a hearing
impairment resulting from organic conditions.
Furthermore, note that in most cases, infrequent use of
a hearing aid does not permit a user to attain full benefit
from it.
Page 37

37
USER GUIDE MINIRITE
Usage of Hearing Aids
· Hearing aids should be used only as directed and
adjusted by your hearing care professional. Misuse can
result in sudden and permanent hearing loss.
· Never allow others to wear your hearing aid as incor-
rect usage could cause permanent damage to their
hearing
Choking Hazards and Risk of Swallowing Batteries
· Hearing aids, their parts, and batteries should be kept
out of reach of children and anyone who might swallow
these items, or otherwise cause injury to themselves
· Batteries have occasionally been mistaken for pills.
Therefore check your medicine carefully before swallowing any pills.
· Most hearing aids can be supplied with a tamper-resis-
tant battery drawer upon request. This is strongly
recommended for infants, small children, and people
with learning difficulties. Ask your hearing care professional if a tamper-resistant battery drawer is available
for your hearing aid.
If a battery or other small parts are swallowed, see a
doctor immediately.
Page 38

38
SONIC
Battery Use
· Always use batteries recommended by your hearing
care professional. Batteries of low quality may leak and
cause bodily harm.
· Never attempt to recharge your batteries and never
dispose of batteries by burning them. There is a risk
that the batteries will explode.
Dysfunction
· Be aware of the possibility that your hearing aid may
stop working without notice. Keep this in mind when
you depend on warning sounds (e.g., when you are in
traffic). The hearing aids may stop functioning, for
instance if the batteries have expired or if the tubing is
blocked by moisture or ear wax.
Active Implants
· Caution must be taken with active implants
· If your hearing aid has a wireless transmission, keep
the hearing aid at least 15 cm away from the implant,
e.g. do not carry it in a breast pocket. In general, please
follow the guidelines recommended by the manufacturers of implantable defibrillators and pacemakers on
use with mobile phones.
Page 39

39
USER GUIDE MINIRITE
· Your Autophone magnet or MultiTool (which has a
built-in magnet) should be kept more than 30 cm away
from the implant, e.g. do not carry it in a breast pocket.
In general, please follow the guidelines recommended
by the manufacturer of implantable defibrillators and
pacemakers on use with magnets.
· If you have an active brain implant, please contact the
manufacturer of your implantable device for
information about the risk of disturbance
Explosives
· The power source in your hearing aid has insufficient
energy to cause fire in normal usage conditions. The
hearing aid has not been tested for compliance with
international standards concerning explosive
environments. We recommended not to use your
hearing aid in areas where there is a danger of explosions.
Page 40

40
SONIC
X-ray, CT, MR, PET Scanning and Electrotherapy
· Remove your hearing aid for example during X-ray,
CT / MR / PET scanning electrotherapy or surgery as
your hearing aid may be damaged when exposed to
strong fields
Avoiding Heat and Chemicals
· Your hearing aid must never be exposed to extreme
heat e.g., left inside a parked car in the sun
· Your hearing aid must not be dried in microwave ovens
or other ovens
· The chemicals in cosmetics, hairspray, perfume, after
shave lotion, suntan lotion and insect repellent can
damage your hearing aid. Always remove your hearing
aid before applying such products and allow time to dry
before putting it on.
Power Instrument
· Special care should be exercised in selecting,
fitting and using a hearing aid where maximum sound
pressure capability exceeds 132 dB SPL
(IEC 60318-4), as there may be risk of impairing the
remaining hearing of the hearing instrument user
Page 41

41
USER GUIDE MINIRITE
For information of whether your instrument is a power
instrument, please ask your hearing care professional.
Possible Side Effects
· Hearing aids, moulds or domes may cause an
accelerated accumulation of ear wax
· The otherwise non-allergenic materials used in
hearing aids may in rare cases cause a skin irritation or
other side effects
Please seek consultation with a physician if these
conditions occur.
Interference
· Your hearing aid has been thoroughly tested for inter-
ference, according to the most stringent
international standards. However, interference with
your hearing aid and other devices may occur,
(e.g., some mobile telephones, citizens band
systems,and shop alarm systems). If this occurs,
increase the distance between the hearing aid and
the device.
Page 42

42
SONIC
Connection to External Equipment
· The safety of the use of the hearing aid with an auxiliary
input cable is determined by the external signal source.
When the input cable is connected to equipment
plugged into a wall outlet, this equipment must comply
with IEC 60601, IEC 60065 or equivalent safety standards.
Safety Information
· Hearing aids should be adjusted by a trained hearing
care professional
· Never insert cleaning tools into the sound outlet or
microphone inlet. This could damage the hearing aid.
· Remove your hearing aid before sleeping
· Keep your hearing aid in the case for protection when
you are not wearing it
· Be aware of the possibility that the directional micro-
phone in your hearing aid may reduce the volume of
some warning sounds coming from behind you
Page 43

43
USER GUIDE MINIRITE
International Warranty
Your hearing aid is covered by an international limited
warranty issued by the manufacturer from the date of
delivery.
This limited warranty covers manufacturing and
material defects in the hearing aid itself, but not
accessories such as batteries, tubing, ear wax filters etc.
Problems arising from improper handling or care,
excessive use, accidents, repairs made by an
unauthorized party, exposure to corrosive conditions,
physical changes in your ear, damage due to foreign
objects entering the device, or incorrect adjustments are
NOT covered by the limited warranty and may void it.
The above warranty does not affect any legal rights that
you might have under applicable national legislation
governing sale of consumer goods. Your hearing care
professional may have issued a warranty that goes
beyond the clauses of this limited warranty. Please
consult him/her for further information.
If you need service
Take your hearing aid to your hearing care professional,
who may be able to sort out minor problems and
adjustments immediately.
Page 44

44
SONIC
✼
Do not attempt to repair your hearing aid yourself.
Date: Model:
Warranty period:
Model L: Model R:
Serial no.: Serial no.:
Battery size: Battery size:
Hearing Centre
Page 45

45
USER GUIDE MINIRITE
Mobile Phone
Some hearing aid users have reported a buzzing sound
in their hearing aid when they are using mobile phones,
indicating that the mobile phone and hearing aid may not
be compatible.
The ANSI C63.19 standard determines the prediction of
compatibility between a specific hearing aid and a mobile
phone by adding the numerical value of the rating for the
hearing aid immunity to the numerical value of the rating
for the mobile phone emissions. A sum of 4 would
indicate that the combination of wireless device and
hearing aid is usable; a combined rating that equals 5
would provide normal use; a combined rating of 6 or
greater would indicate excellent performance.
Whereas all hearing aids have acoustic coupling, only the
larger instruments have the physical space for telecoil
(inductive) coupling. These two types of coupling have
different rating scales (M1-M4 for acoustic coupling and
T1-T4 for telecoil coupling, respectively) and both ratings
are therefore relevant when predicting the compatibility
of a particular instrument.
Page 46

46
SONIC
For a hearing aid with both acoustic coupling and telecoil
coupling with a rating of M4/T2 and with a telephone
rating of M3/T3, the combined rating is 7 (M4 + M3) for
the acoustic coupling and 5 (T2 + T3) for the telecoil
coupling. According to the guideline given above, both
types of coupling will thereby be acceptable, with the
acoustic coupling indicating excellent performance and
the telecoil coupling indicating normal use. The above
equipment performance measurements, categories and
system classifications are based upon the best
information available, but it cannot be guaranteed that
all users will be satisfied.
The immunity of all Sonic hearing instrument models
covered by these instructions for use is at least M2.
Important Notice
The performance of individual hearing instruments
may vary with individual cell phones. Therefore, please
try this hearing instrument with your mobile phone or,
if you are purchasing a new phone, be sure to try it
with your hearing instrument prior to purchase. For
additional guidance, please ask your cell phone
provider for the booklet entitled “Hearing Aid
Compatibility with Digital Wireless Cell Phones”.
Page 47

47
USER GUIDE MINIRITE
Technical Information
The hearing aid contains a radio transmitter using short
range magnetic induction technology working at
3.84 MHz. The magnetic field strength of the transmitter
is < –42 dBμA/m @ 10m.
The emission power from the radio system is well below
international emission limits for human exposure. For
comparison, the radiation of the hearing aid is lower than
unintended electromagnetic radiation from for example
halogen lamps, computer monitors, dishwashers, etc.
The hearing aid complies with international standards
concerning Electromagnetic Compatibility.
Due to the limited space available on the hearing aid all
relevant approval markings are found in this document.
Page 48

48
SONIC
Celebrate hearing aid models: CL100 MNR, CL80 MNR;
Cheer hearing aid models: CR60 MNR, CR40 MNR
The device contains:
FCC ID : ZTOF2RITE3
IC: 9799A-F2RITE3
The device complies with Part 15 of the FCC rules and
RSS-210 of Industry Canada.
Operation is subject to the following two conditions:
1. This device may not cause harmful interference.
2. This device must accept any interference received,
including interference that may cause undesired
operation.
Changes or modifications not expressly approved by the
party responsible for compliance could void the user’s
authority to operate the equipment.
Page 49
49
USER GUIDE MINIRITE
Hereby, Sonic Innovations, Inc. declares that the hearing
aids covered in this booklet are in compliance with
Directives 93/42/EEC, 1999/5/EC and 2011/65/EU.
The full text of the declaration of conformity is available
at the following internet address:
www.sonici.com
0543 0682
Waste from electronic
equipment must be handled
according to local regulations.
E2832
Page 50

50
SONIC
Notes
Page 51
51
USER GUIDE MINIRITE
Information and Explanation of Symbols
The CE marking indicates compliance to all
applicable European Directives. The 4-digit
numbers after the CE marking correspond to
the identification number of notified bodies.
This symbol indicates that the products
described in these instructions for use adhere
to the requirements for an applied part of Type
B of EN 60601-1. The surface of the hearing aid
is specified as applied part of Type B.
IP58
This symbol indicates the class of protections
against harmful ingress of water and particulate
matter according to EN 60529:1991/A1:2000.
IP5X indicates dust protection.
IPX8 indicates the protection against the effects
of continuous immersion in water.
Page 52
52
SONIC
The crossed-out wheeled bin indicates the
European Directive 2011/65/EU on waste of
electronic equipment applies. Please recycle
your hearing aid and batteries according to
your local regulations or return them to your
hearing care professional for disposal.
This symbol indicates to follow the
instructions for use in this booklet
E2832
EMC and Radio communications
compliance label Australia and New Zealand
Manufacturer
Keep dry
REF
Catalogue number
SN
Serial number
Authorised Representative in the European
Union
Page 53
53
USER GUIDE MINIRITE
Temperature Humidity
Operating
Conditions
+1°C – +40°C
5% – 93%
Non condensing
Storage and
transportation
conditions
–25°C – +60°C
Page 54

160765 | UK
Page 55

< 15 mm >
< >
8,15 m m
< >
9.0 mm
< 19 mm >
Placeholder
for FSC logo
Page 56
www.sonici.com
World Headquarters
Sonic Innovations, Inc.
2501 Cottontail Lane
Somerset, NJ 08873 USA
+1 888 423 7834
International
Sonic AG
Morgenstrasse 131
3018 Bern, Switzerland
+41 31 560 21 21
Sonic Innovations, Inc.
2501 Cottontail Lane
Somerset, NJ 08873 USA
+1 888 423 7834
Sonic AG
Morgenstrasse 131
3018 Bern, Switzerland
+41 31 560 21 21
Australia
Sonic Innovations Pty Ltd
Wholesale and Equipment Division
Suite 4, Level 4, Building B
11 Talavera Rd
North Ryde, NSW, 2113
Australia
+61 2 9857 8288
Canada
Sonic Innovations Canada
500 Trillium Drive Unit 15
Kitchener, Ontario N2R 1A7
+1 800 667 7664
New Zealand
Sonic Manufacturing
Level 7, 142 Lambton Quay
Wellington - 6011
+61 7 3250 0369
10.15 | 160765 | UK
0000160765000001
 Loading...