

Page 1
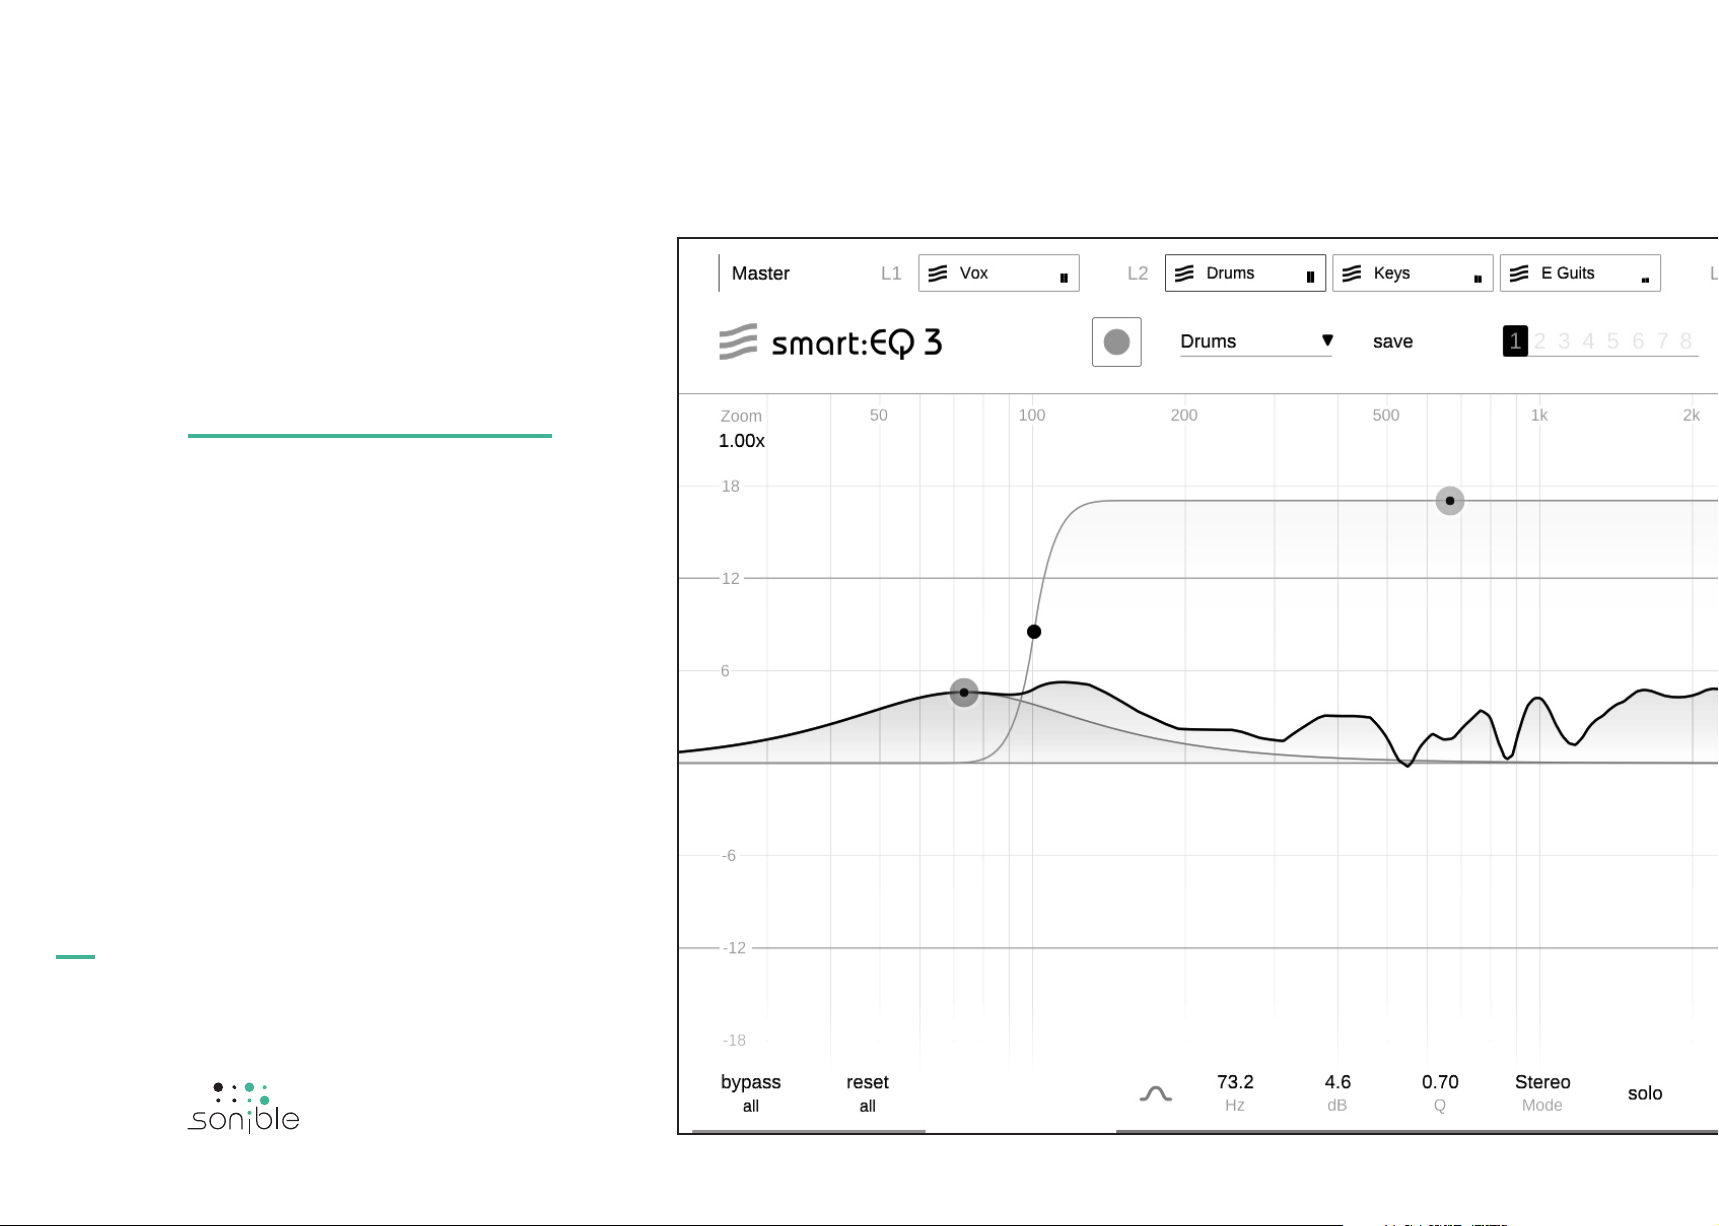
smart:EQ3 smart:EQ3
manualmanual
The intelligent equalizerThe intelligent equalizer
manual
smart:EQ 3
1
Page 2

contents
Welcome to smart:EQ 3 3
Install 4
Authorization 5
User Interface 6
Working with standard filters 7
overview
contents
manual
smart:EQ 3
Filter parameter section 8
The smart:filter 9
Controlling the smart:filter 10
Working with Profiles 11
Profile management 12
Working with groups 13
Group View 14
Add instances to group 16
Create a hierarchy with layers 17
Visual control & monitoring 19
Analyzer 20
States and Presets 21
M/S processing and output 22
Settings 23
Profile Management and Licensing 24
2
Page 3

welcome to smart:EQ 3
manual
smart:EQ 3
Welcome to smart:EQ 3
smart:EQ 3 is an A.I.-powered EQ that creates a spectral balance in single audio
tracks and assists users in establishing transparent arrangements of multiple
channels with intelligent cross-channel processing.
It only takes a single click for smart:EQ 3 to analyze any given audio track and correct spectral deficiencies,
such as disturbing resonances, unwanted notches or an overall spectral imbalance. The computed smart:filter
can be adapted to the user’s needs and leads to a clean, detailed sound – the ideal basis for further creative
steps.
smart:EQ 3 also offers a group view with intelligent cross-channel processing that corrects cluttered and
clashing frequency regions within a group of up to six channels. Multiple audio tracks can be arranged by the
user in a sonic hierarchy of three layers. Each track is then analyzed to detect and fix masking effects. smart:EQ
3’s A.I.-powered algorithms utilize spectral mixing techniques that ensure each track gets its assigned space
within an overall transparent arrangement.
Get started with smart:EQ 3 and enjoy a whole new world of EQing possibilities!
3
Page 4
Install
System requirements
CPU
RAM
Operating systems
minimum requirements | Windows | OSX
install
You will need admin privileges to
successfully install the smart:EQ 3
plug-in.
Please note that smart:EQ 3
requires the PACE iLok License
manual
smart:EQ 3
Manager. Download the software
from www.ilok.com and install
it on your system. You don’t
need an iLok or an iLok account.
This application allows us to ensure
the integrity of our products for a
better user experience.
Intel Core i5
4GB
Windows 10 (64 bit)
Mac OSX 10.12
or higher
Windows
To start the installation process, extract the downloaded zip-file sonible_smarteq3_1.0.0.zip
onto your hard disk and run the installer.
The installer will now guide you through the
necessary steps to install smart:EQ 3 on your
computer.
During installation, you can select which version(s)
of smart:EQ 3 you want installed. You can also
select custom installation folders for the VST
version or simply use the default folder suggested
by the installer.
The VST3 and AAX versions of the plug-in will be automatically installed in their respective default folders.
Default folders:
VST3
C:\Program Files\Common Files\VST3\
VST
C:\Program Files\Common Files\VST\
AAX
C:\Program Files\Common Files\Avid\Audio\
Plug-Ins
Mac OSX
To start the installation process, please open the
disk image sonible_smarteq3_mac_1.0.0.dmg.
This will mount the image and open a finder window
showing the content of the installation package.
To install smart:EQ 3 on your system, run the installation file smarteq3.pkg.
The installer will now guide you through the
necessary steps to install smart:EQ 3 on your
computer. smart:EQ 3 will automatically be
installed in the default locations for audio plug-ins.
Default folders:
Audio Unit
/Library/Audio/Plug-Ins/Components/
VST
/Library/Audio/Plug-Ins/VST/
VST3
/Library/Audio/Plug-Ins/VST3/
AAX
/Library/Application Support/Avid/Audio/
Plug-Ins/
4
Page 5
Authorization
Licensing system
You can select between two licensing systems:
machine-based or iLok (USB dongle).
By creating a user account on www.sonible.com
and registering your products – if they are not
already visible in your Dashboard – you can manage
your plug-in activations.
licensing system | unlocking | trial version
authorization
Machine-based
Each license key allows you to install smart:EQ 3
on two computers with unique system IDs. These
system IDs are registered during license activation.
The same license can be used by multiple users, but
each user has to individually unlock the full version
of smart:EQ 3 under their account.
In the case of a system-ID being changed (e.g.
replacement of the hard drive), you can revoke/
activate the plug-in next to the respective system-ID
in the Dashboard of your sonible user account.
Unlocking
If you purchased a license for smart:EQ 3 online,
you will receive your license key via email.
Machine-based unlocking
When opening smart:EQ 3 for the first time, a notification window will be displayed asking you to
unlock smart:EQ 3 with a valid license key.
Please make sure that your computer is connected
to the internet before starting the registration
process.
Enter your license key and click "register." The
plug-in will now communicate with our server to
check if the license is valid. If it is – enjoy!
iLok
If you transferred your license to an iLok, simply
attach the iLok to your computer. The plug-in will
then be automatically registered – enjoy!
Trial version
To run smart:EQ 3 in demo-mode, simply click "try"
and you will then be able to use smart:EQ 3 for a
couple of days without any limitations. (Please refer
to our website to find out more about the current
demo period of smart:EQ 3)
When the demo period expires, you will need to
purchase a full license in order to continue using
the plug-in.
manual
smart:EQ 3
5
iLok
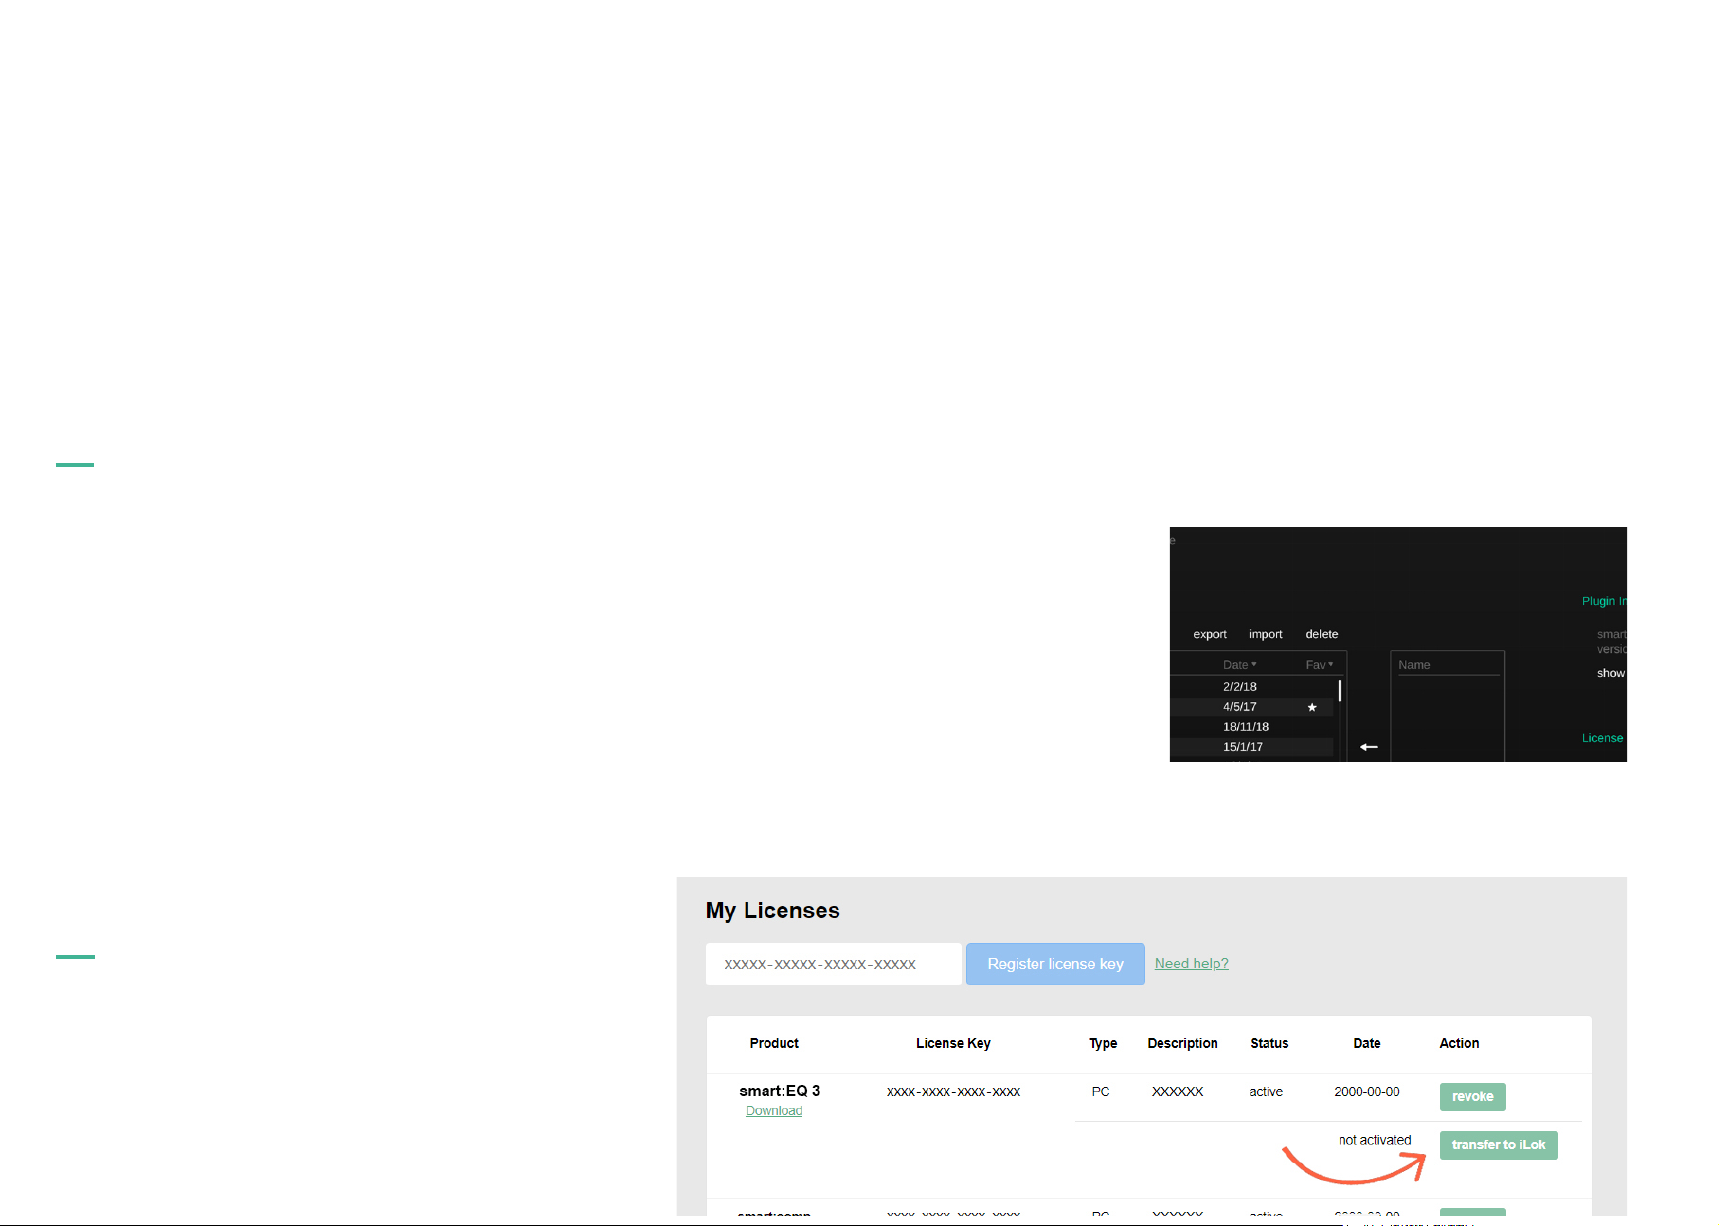
If you want to transfer one activation to your iLok,
first make sure the plug-in is registered in your
sonible user account. Click on the button "transfer
to iLok" next to the plug-in in your Dashboard and
follow the instructions.
Note: 1st gen iLok dongles and the iLok Cloud are
currently not supported.
If you don’t receive the email within minutes please
check your junk folder first before contacting our
support ([email protected]).
Page 6
User Interface
States
user interface
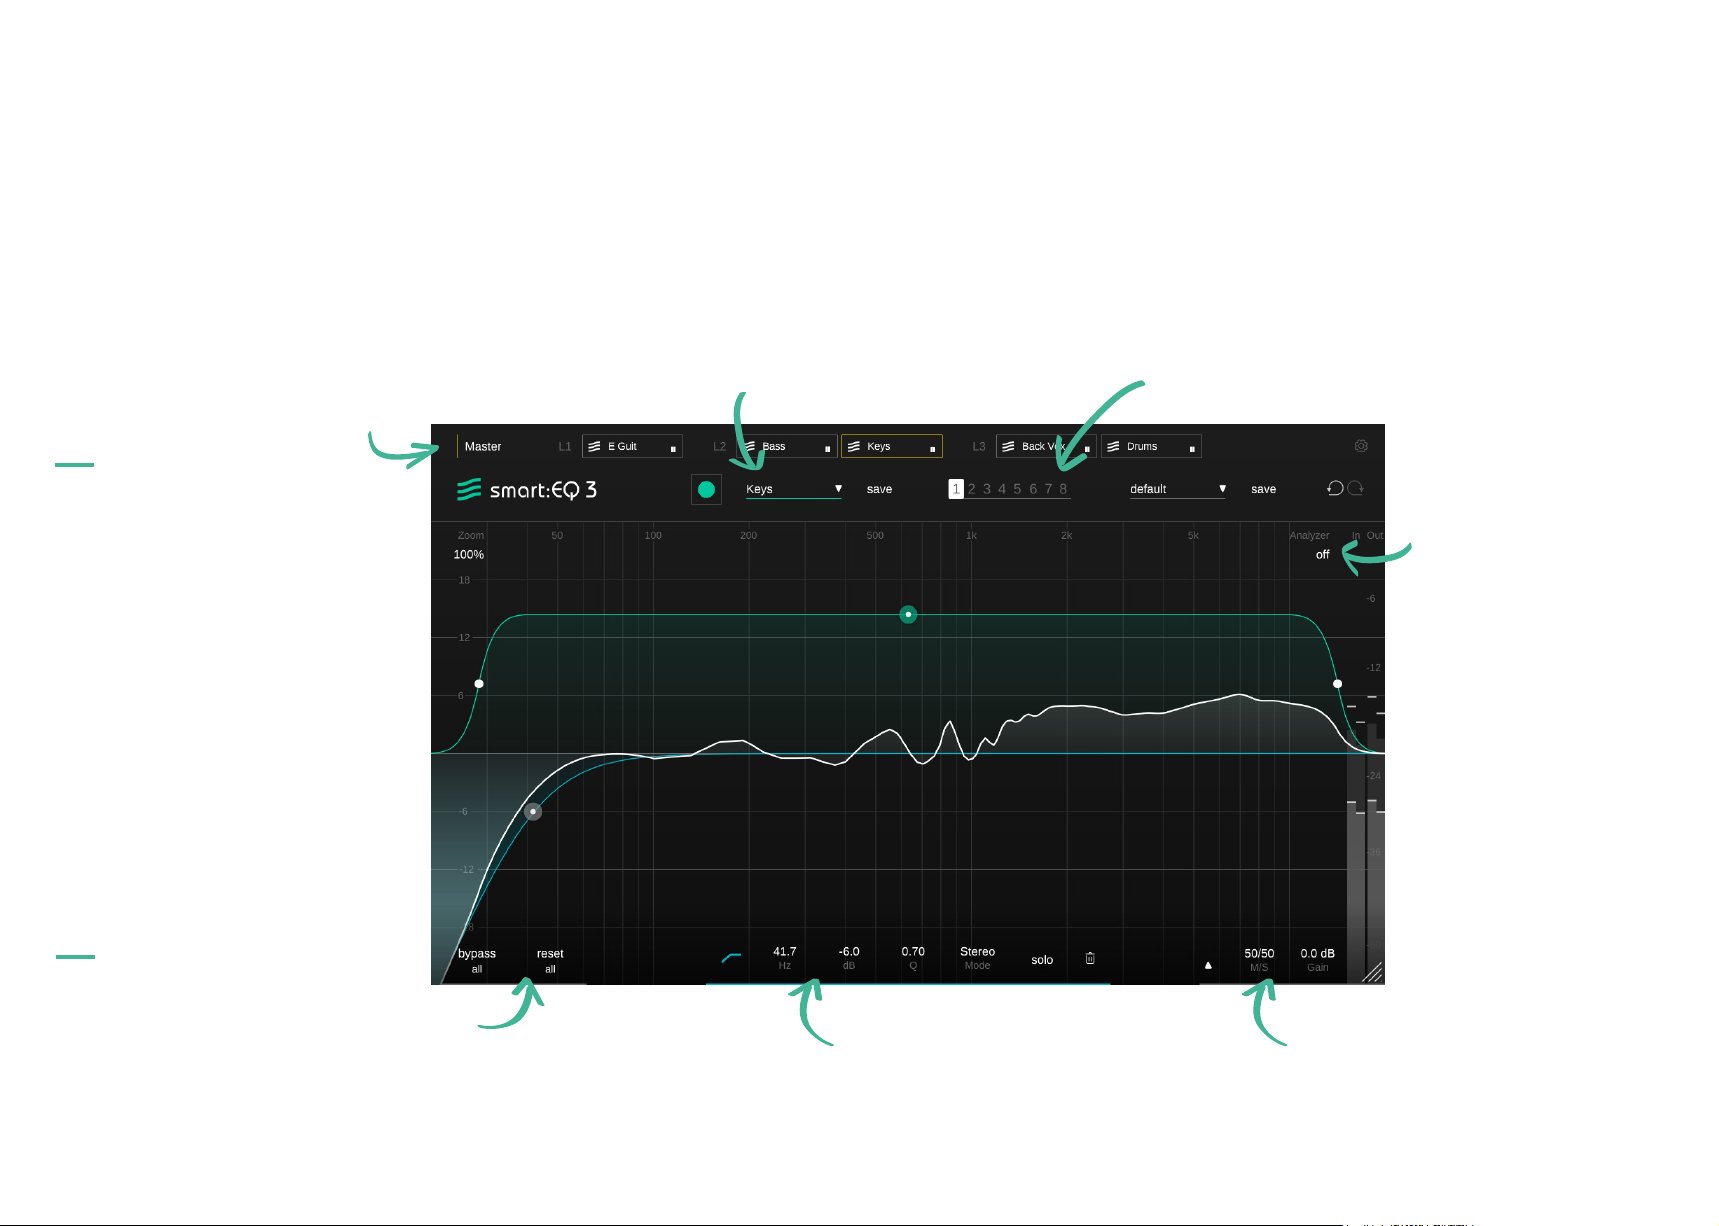
overview
Group info
Switch to group view or
rename your group.
Learning section
Initiate the learning process, select
profiles and save custom profiles.
Use up to 8 different states
to store parameter settings
for different sections of
your audio material.
Analyzer
Enable an analyzer
for the current signal
and other signals of a
group.
manual
smart:EQ 3
6
Bypass & reset
Selectively bypass the processing
and reset parameters.
Filter parameters
Monitor and control the parameters
of the currently selected filter.
Output section
Control global M/S settings
and output gain.
Page 7
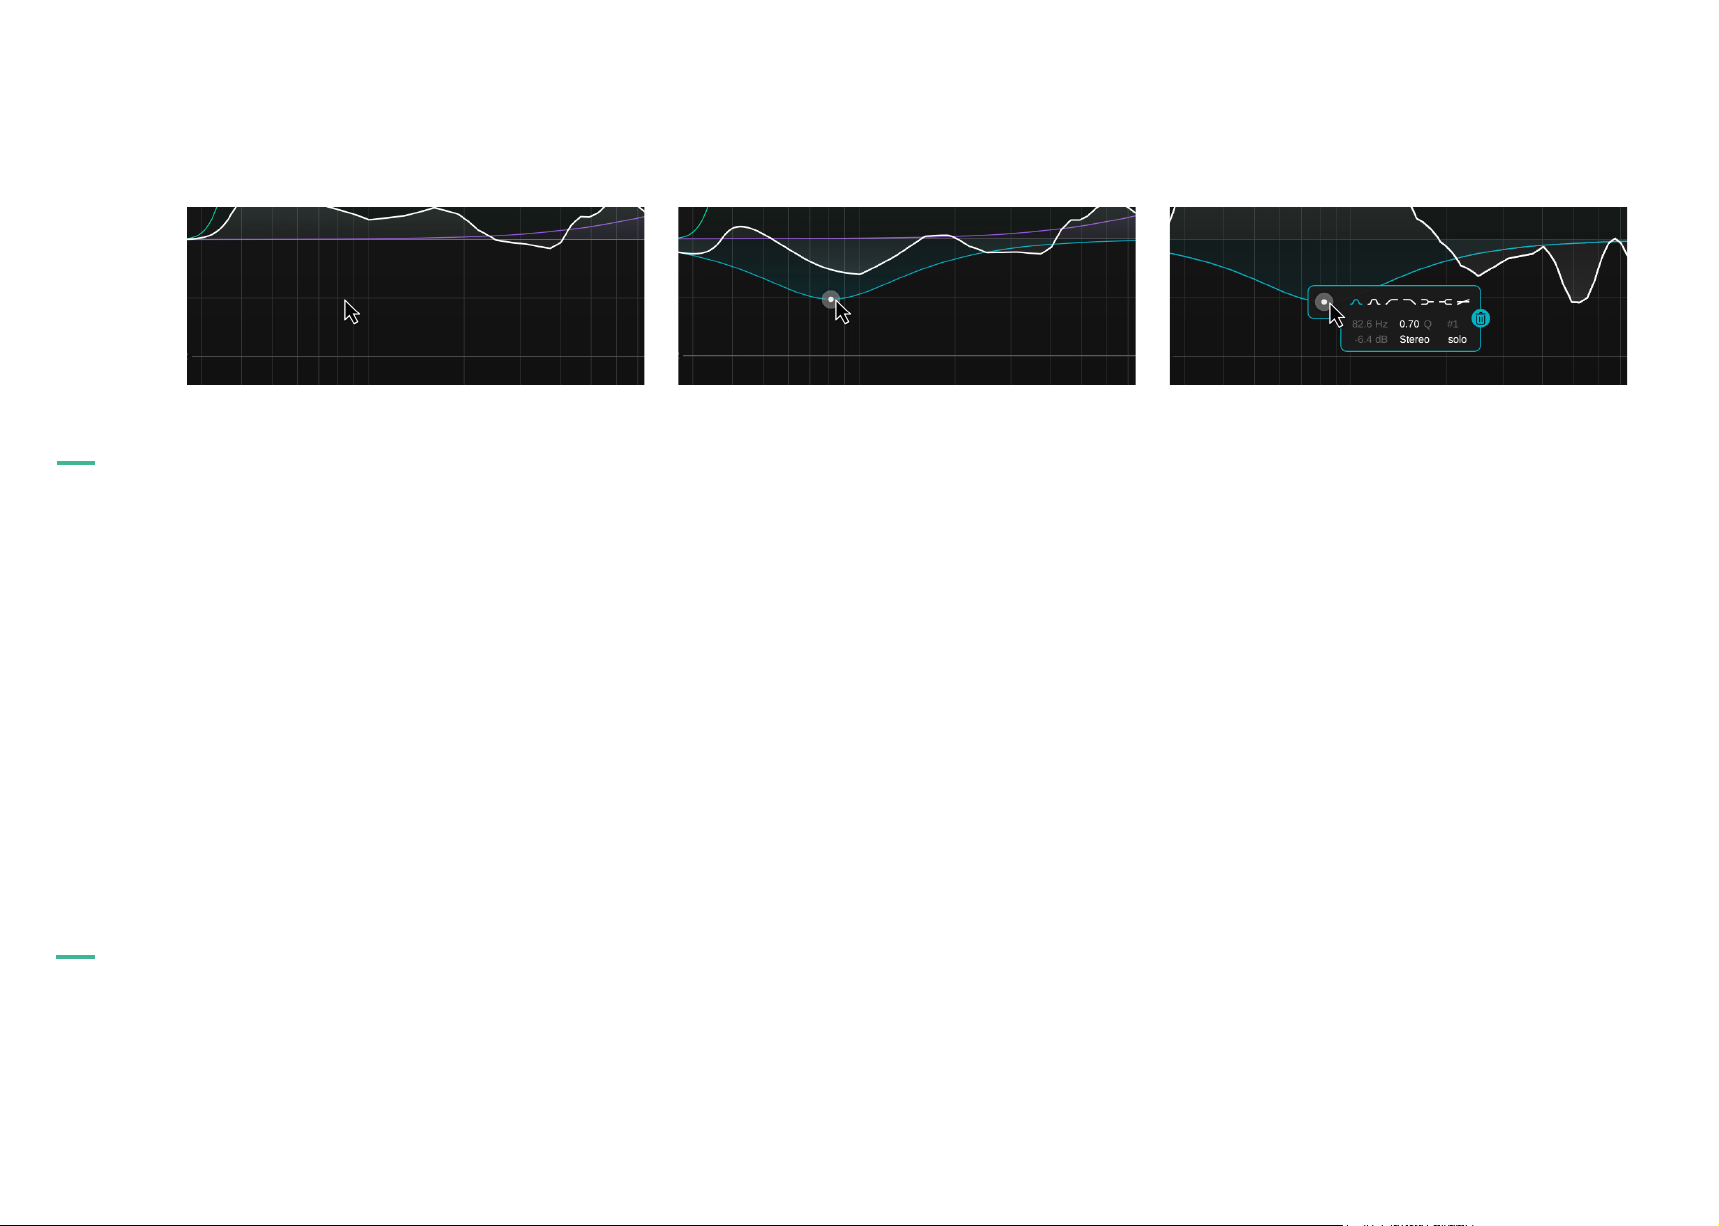
Working with standard filters
overview
standard filters
manual
smart:EQ 3
Add or remove a filter
To add a new filter at a specific position, simply
double-click anywhere in the equalizer display.
To delete a filter, double-click on the filter thumb or
use the trash can in the filter widget.
Control filter parameters
horizontal or
vertical drag
change quality alt + drag or
lock frequency shift + drag
solo band cmd + drag (mac)
delete filter double click
open filter widget right-click thumb
change frequency or gain
mouse wheel
ctrl + drag (win)
Filter widget
Right-click a filter thumb to show the filter widget.
The widget allows you to change the filter type and
to solo or delete a standard filter. For a detailed list
of controllable parameters, refer to the next section.
7
Page 8
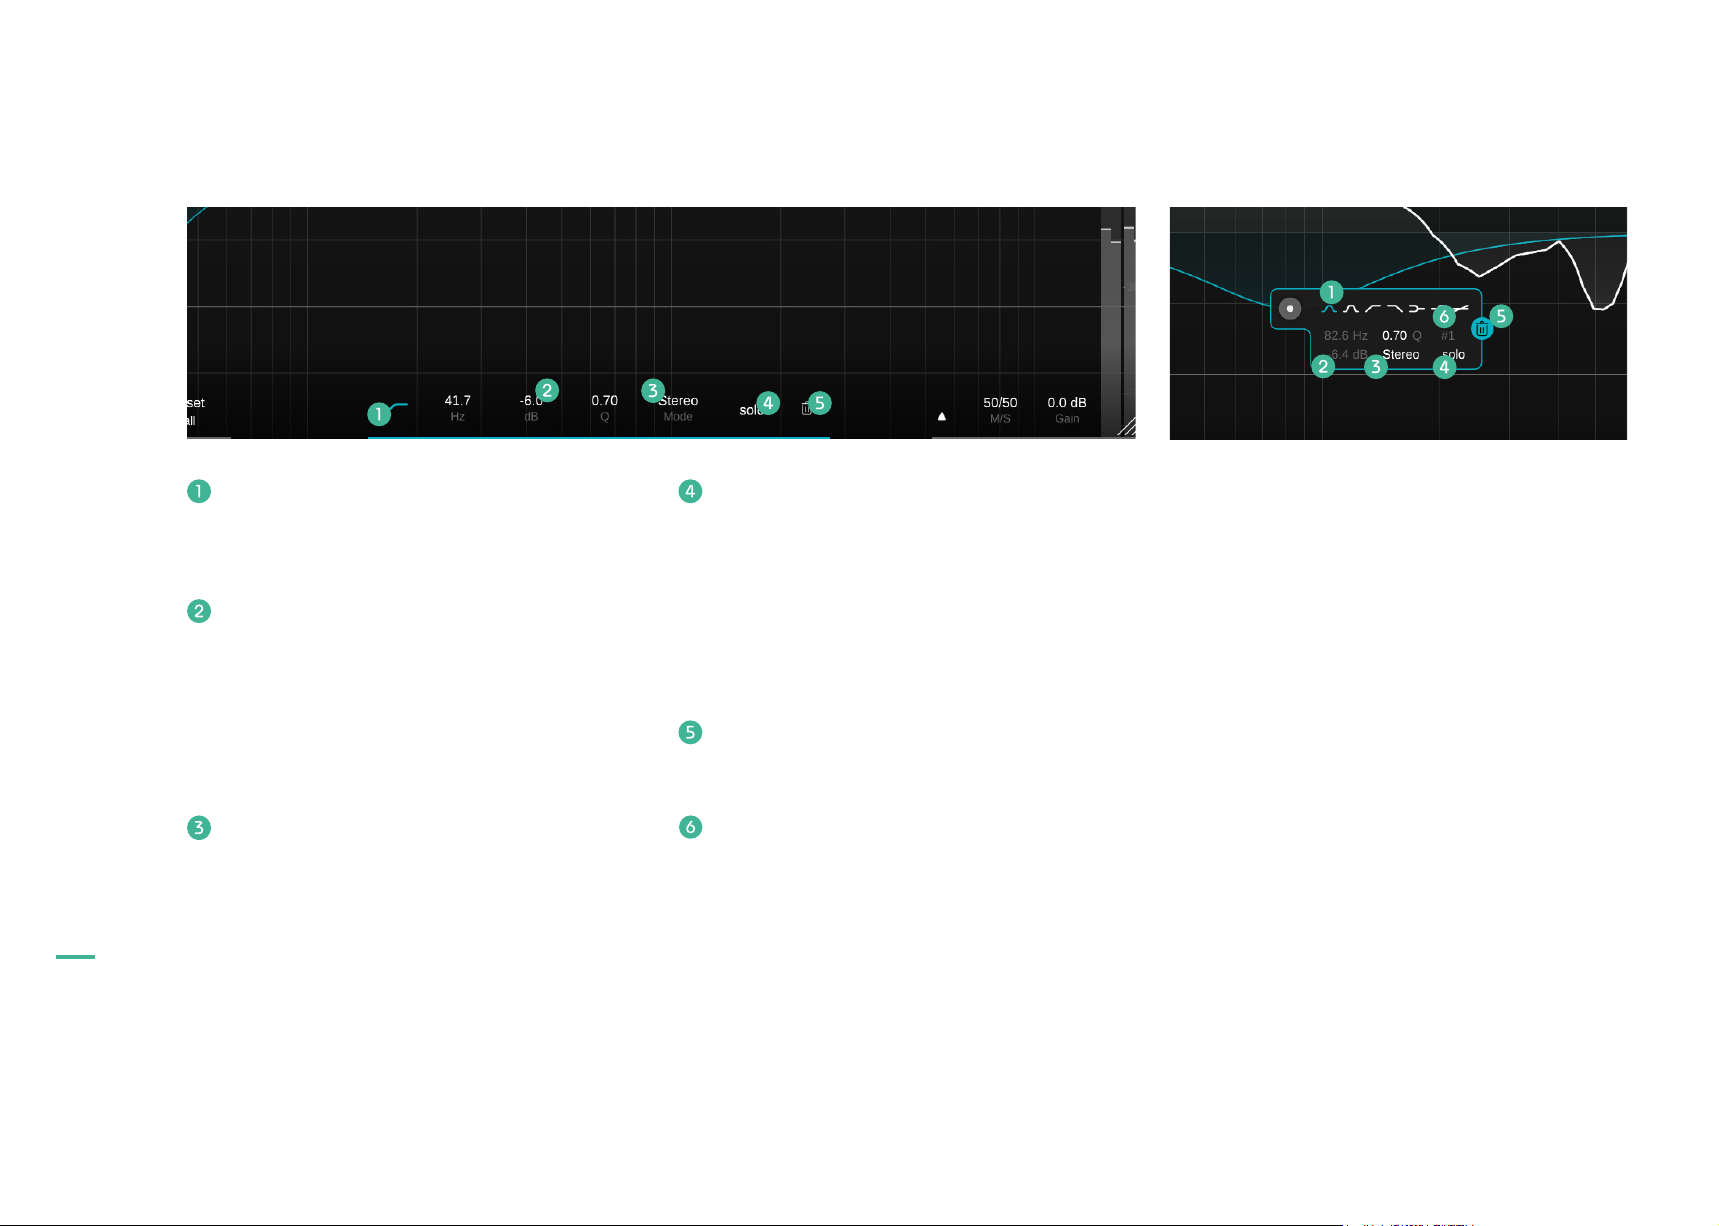
Filter parameter section and widget
manual
smart:EQ 3
Filter type
Click to enable/disable a standard filter. RightClick to select another filter type.
Filter parameters
Monitor and modify all standard filter parameters. The parameters can be changed by
holding down your mouse button and dragging
the value up and down or by entering a value. A
double-click resets the parameter to its default
value.
Processing mode
Select the processing mode of the filter: Stereo,
Mid or Side. As soon as a filter is set to Mid or
Side mode, the sum curve inside the equalizer
display will be split into two curves (a yellow
one indicating the current sum curve for the
side signal and a white one for the mid signal).
Solo
Listen to the frequency range of your currently
selected filter.
NOTE: You can enable the option “solo on
touch” in the settings menu (page 23). If
enabled, the plug-in will automatically solo a
filter when moving the respective thumb.
Trash can
Delete a filter by clicking the trash can icon.
Filter Number
Displays the filter band number for automation
in your DAW.
8
Page 9
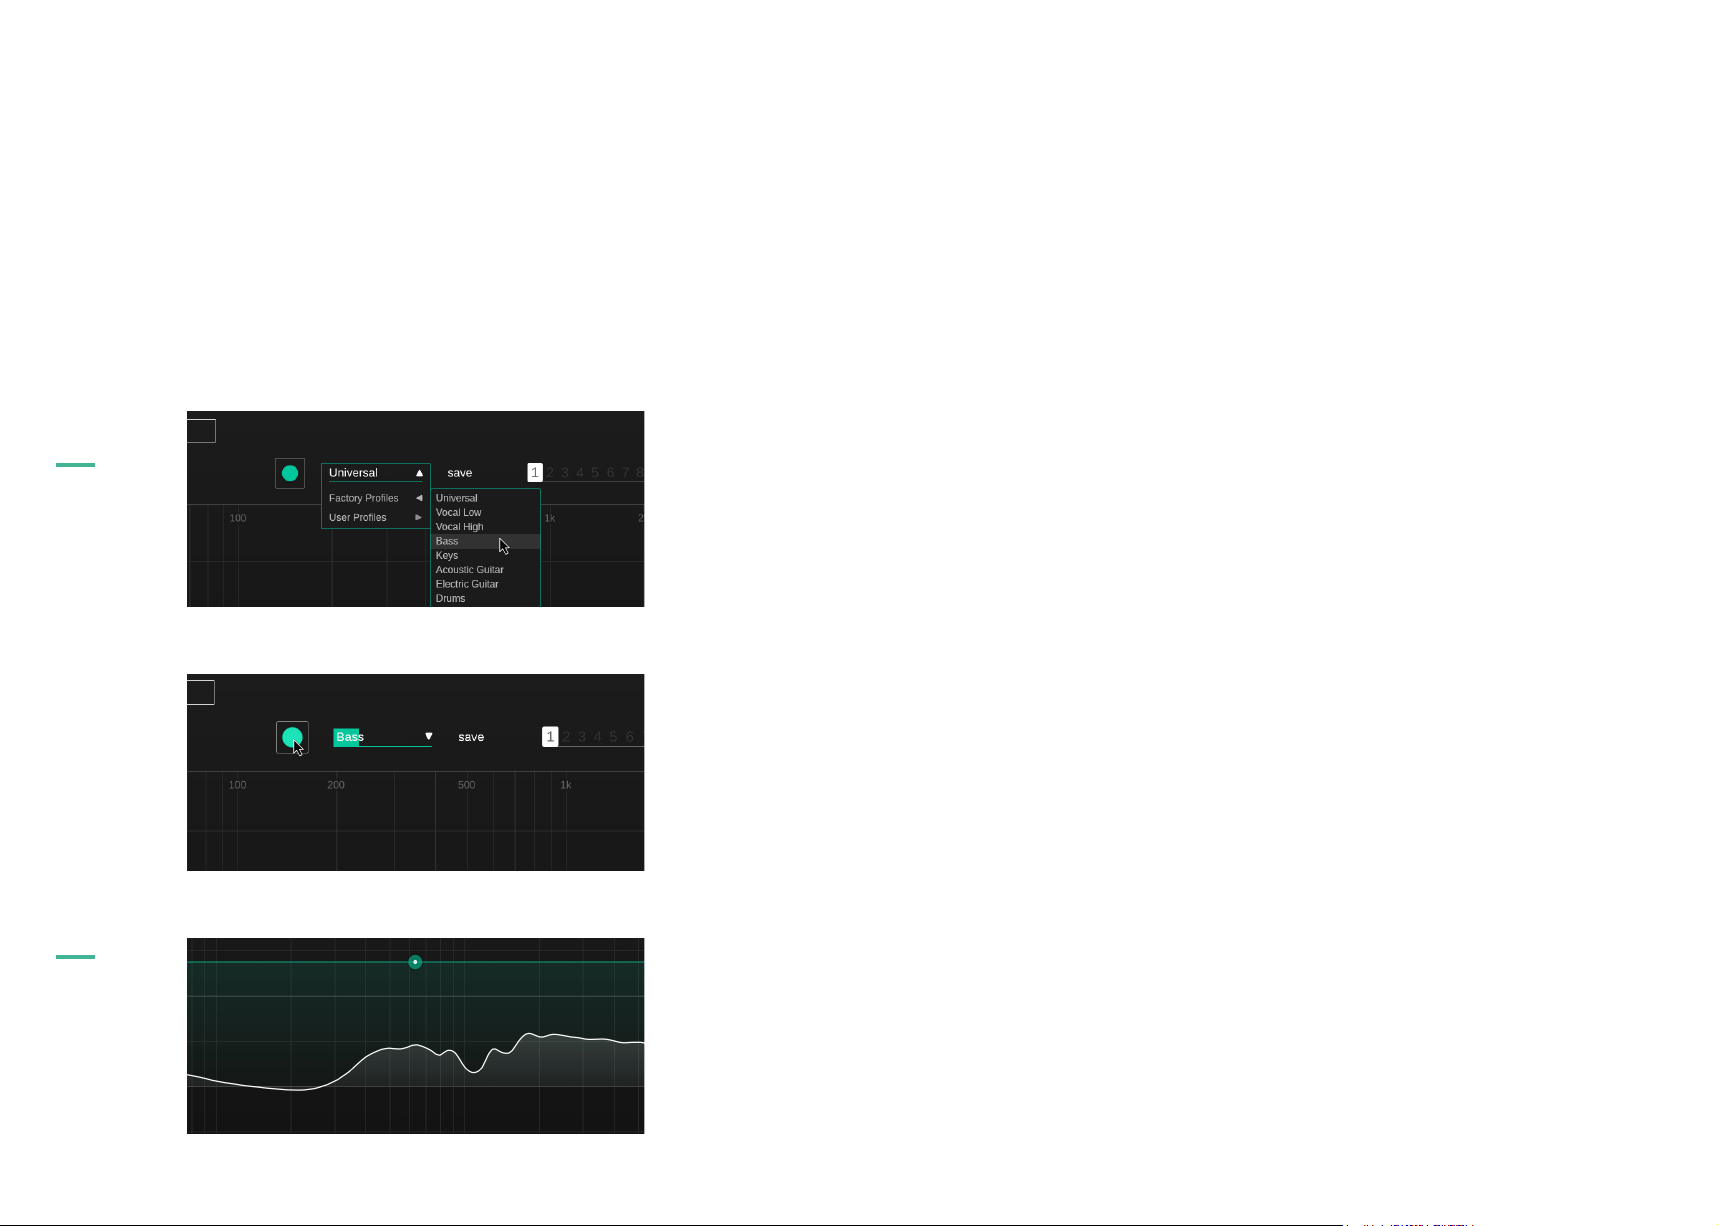
the smart:filter
The smart:filter
At the heart of smart:EQ 3 is its smart:filter. The smart:filter learns which areas of the frequency spectrum
need attention by analyzing your input signal. It automatically suggests a filter curve to compensate for
possible spectral imbalances.
When activated, an additional green curve will appear inside the equalizer display. It looks similar to a
standard filter, but is in fact the weighting curve for the computed smart:filter.
Step 1
Select a Profile
A profile calibrates the processing of smart:EQ 3 to a specific sound source. You can always start the
learning process with the “Universal” profile and switch to a more specific profile later. Please refer to the
section ”Working with Profiles” (page 11) for more information.
Step 2
Start the audio playback & initiate learning
manual
smart:EQ 3
9
smart:EQ 3 needs an incoming audio signal for the learning process. Once the playback has started, click
the green record button. The pulsating record icon and a progress bar inside the profile dropdown indicate
that smart:EQ 3 is actively learning from your signal.
Step 3
Done!
Once the learning process is finished, smart:EQ 3 applies the corrective smart:filter. Its impact can be controlled via the green weighting curve.
Page 10
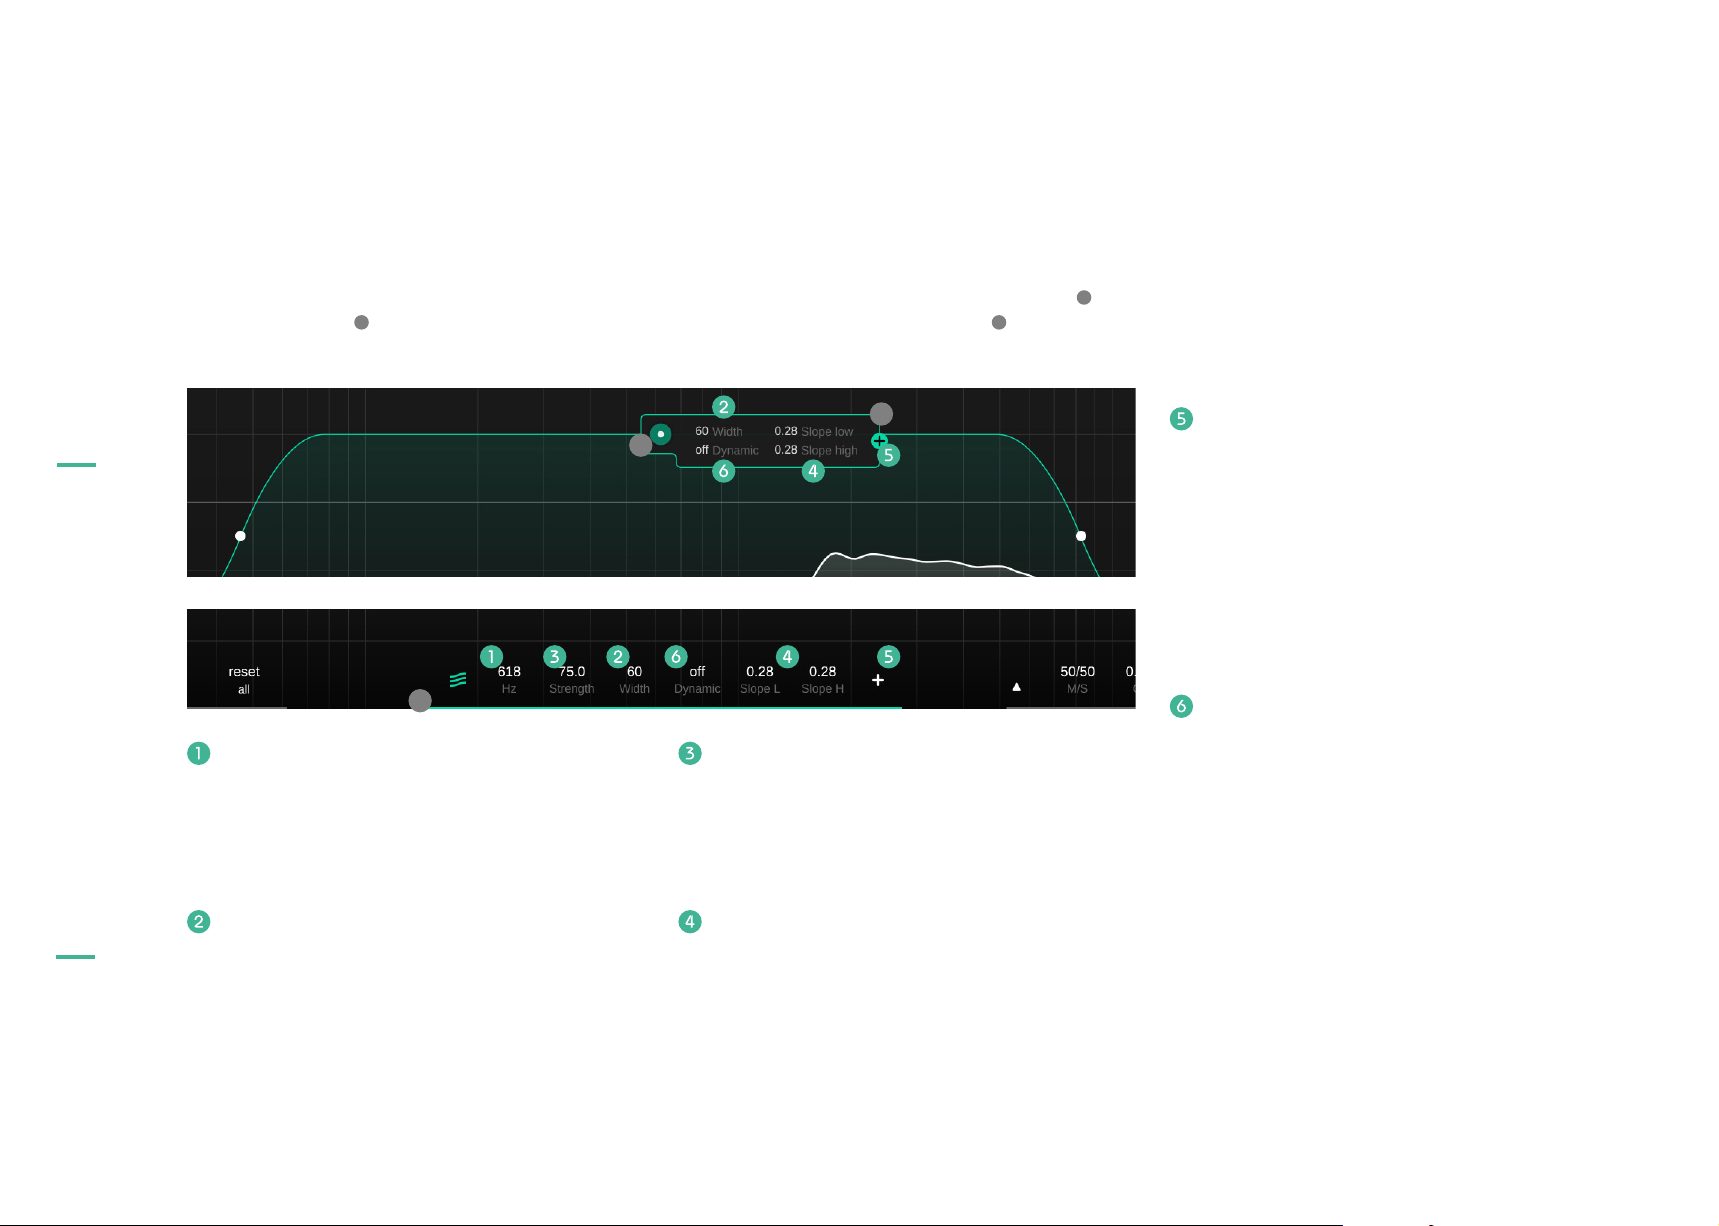
Controlling the smart:filter
You can use the green weighting curve to control the impact of a computed smart:filter in different frequency
regions. Additionally, you can set the filter to dynamic mode for continuous adaption.
The shape and position of the green weighting curve is controlled using the interactive thumbs , the
smart:filter widget (expandable by a right-click on the thumb) or the parameter section .
controlling the smart:filter
Center Frequency
Move the green thumb left or right to select the
frequency region where the smart:filter should
be applied. Alternatively, set a specific value in
the parameter section.
A
B
B
A
C
Impact level
Move the green thumb up or down to increase
or decrease the impact of the smart:filter. Alternatively, set a specific value in the parameter
section.
C
Add a second weighting curve
You can add a second weighting curve if you
want to use different settings for the smart:filter in different frequency regions. Click the
plus icon in the smart:filter widget or the filter
parameter section to split the current curve.
The second weighting curve can be removed
by clicking the trash can icon that will now be
in place of the plus icon.
Dynamic Adaption
smart:EQ 3 provides the option to dynamically adapt the computed smart:filter to the
incoming audio signal over the entire length
of the track. You can control the amount of
dynamic adaption in either the filter widget or
the parameter section.
manual
smart:EQ 3
10
Width
Hover over the green thumb and move the
mouse-wheel to change the overall width of
the curve. You can also extend the width of the
curve by horizontally moving the small white
thumbs on the left and right side of the curve,
or by setting a value in the parameter section or
widget of the smart:filter.
Slope
Hover over the small white thumbs left and
right of the curve and use your mouse-wheel
to change the respective slope. Alternatively,
set the Low and High Slope in the parameter
section or widget of the smart:filter.
When dynamic adaption is enabled, smart:EQ
3 analyzes your audio signal continuously
and modifies the smart:filter accordingly. This
helps to maintain maximum consistency when
working with heterogeneous audio content.
Page 11
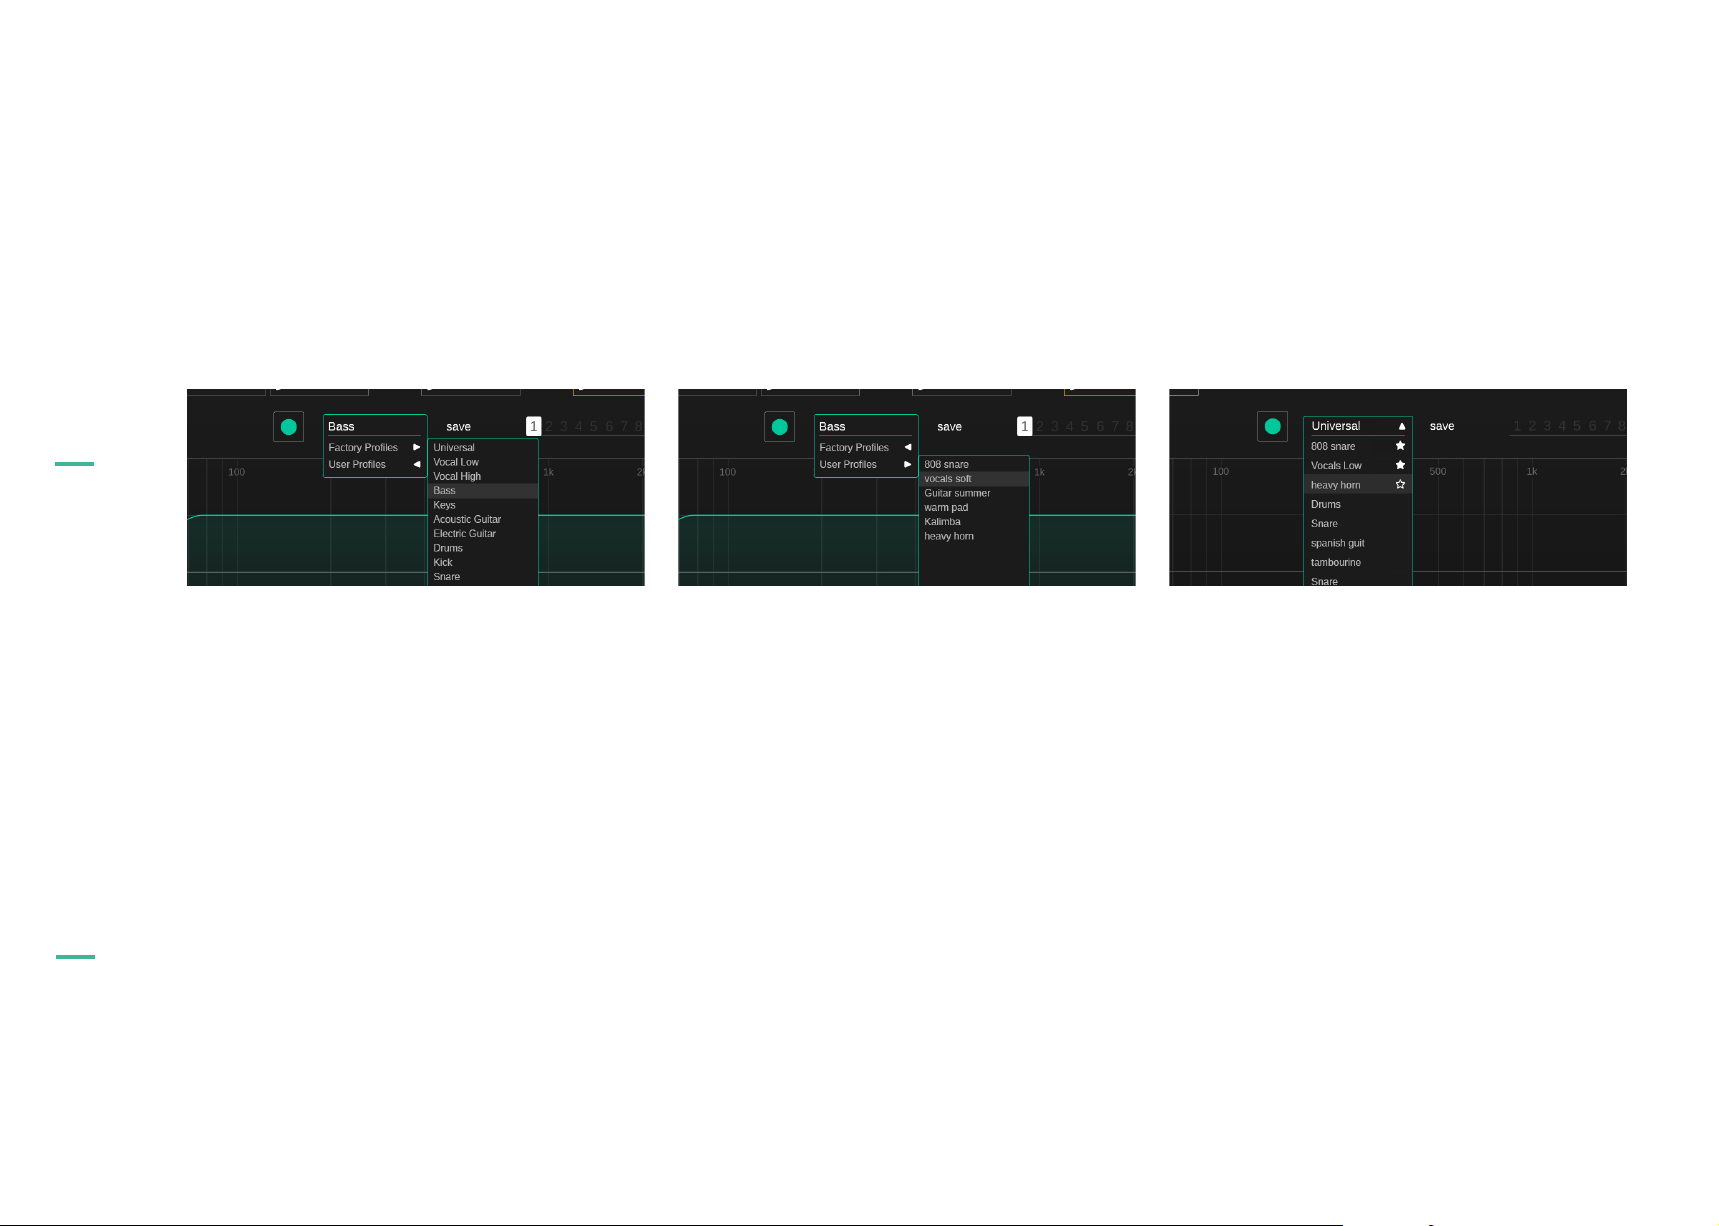
profiles
Working with Profiles
A profile primes the learning process of smart:EQ 3 for a certain sound source. Different profiles ensure a
more focused processing of the plug-in as per the nature of the input signal.
smart:EQ 3 is equipped with a list of well-designed profiles for common source signals. You can also
generate your own custom profiles based on any factory profile, which you can even share with friends.
manual
smart:EQ 3
11
Factory Profiles
A factory profile is the perfect starting point to prime
the processing of smart:EQ 3 for a specific source
signal.
Custom Profiles
If a smart:filter, computed according to a certain
profile, does not perfectly suit your personal taste,
you can easily generate custom profiles and use
them for future learning processes.
Step 1
Learn a smart:filter based on any profile.
Step 2
Adapt the sound with standard filters to match
your personal taste.
Step 3
Click on “save” next to the profile drop-down and
enter a name for the new profile.
Recently used Profiles and favorites
To speed up your workflow, the 10 most recently
used profiles will be displayed inside the profiles
drop-down. In addition, you can mark up to 5
profiles as favorites. You just need to hover over the
name of the profile in the recently used profiles list
and click on the grayed-out star behind the profile
name.
Page 12
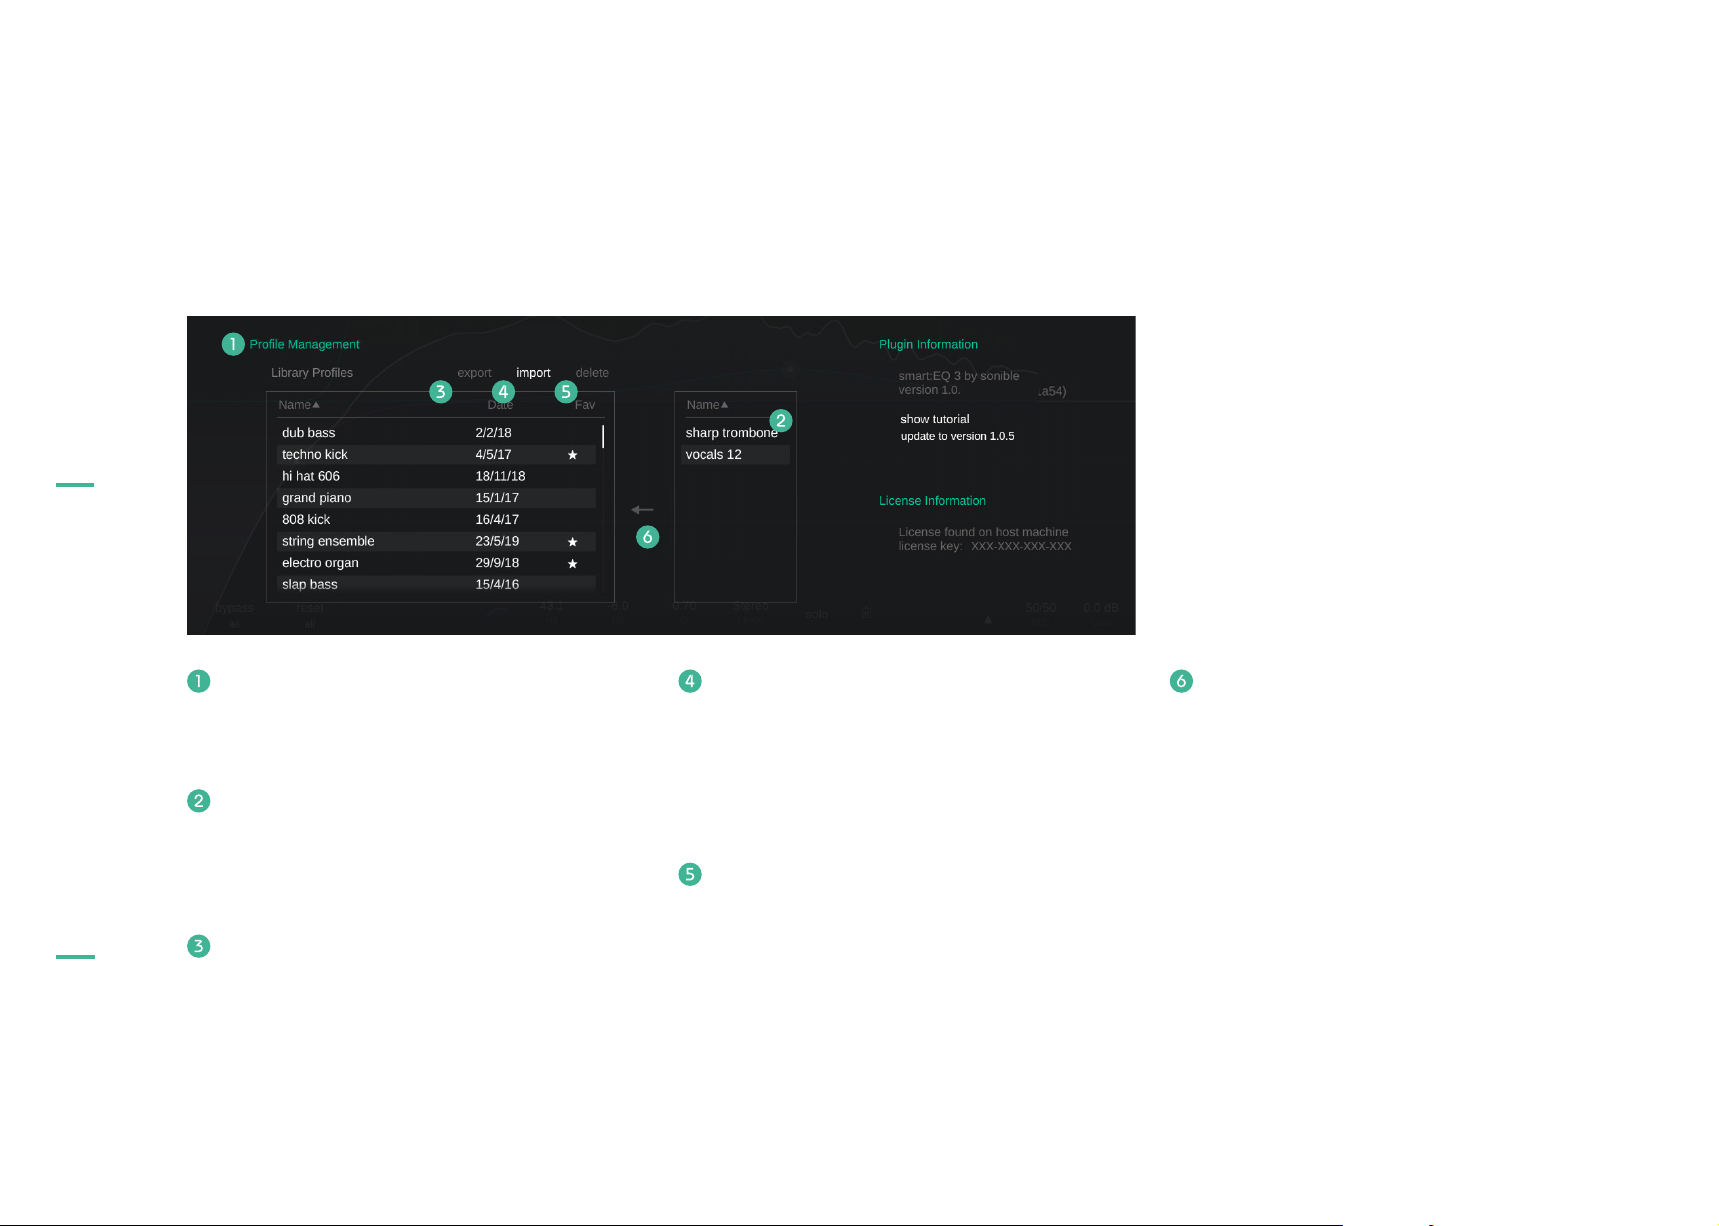
Profile management
Once you have created a custom profile, it’s easy to use it in different sessions or share it with friends. You
can manage all your custom profiles on the settings page of smart:EQ 3 (see page 23).
profile management
manual
smart:EQ 3
12
Profile Library
A list of all profiles on your system. You can
sort them by name or date.
Unsaved Profiles
A list of all profiles that are currently used in
your session, but are NOT part of your local
library.
Exporting Profiles
To share a custom profile with someone, please
select the profile (in your Profile Library) and
click the „export“ button. You can now choose
a filename and a location for the profile. The file
extension of the profile will be “.spf”.
Importing Profiles
If someone has shared a profile with you, you
can easily import their profile into your local
library. Click the ”import” button and browse
for the profile. After validating the profile name,
the profile will be stored to your local library.
Deleting Profiles
If you want to remove a profile from your local
library, select the profile and click the ”delete”
button. Please be careful, as the deletion of a
profile cannot be undone.
Transfer Profile
Transfer an unsaved custom profile (only
available during the current session) to your
local library.
Page 13
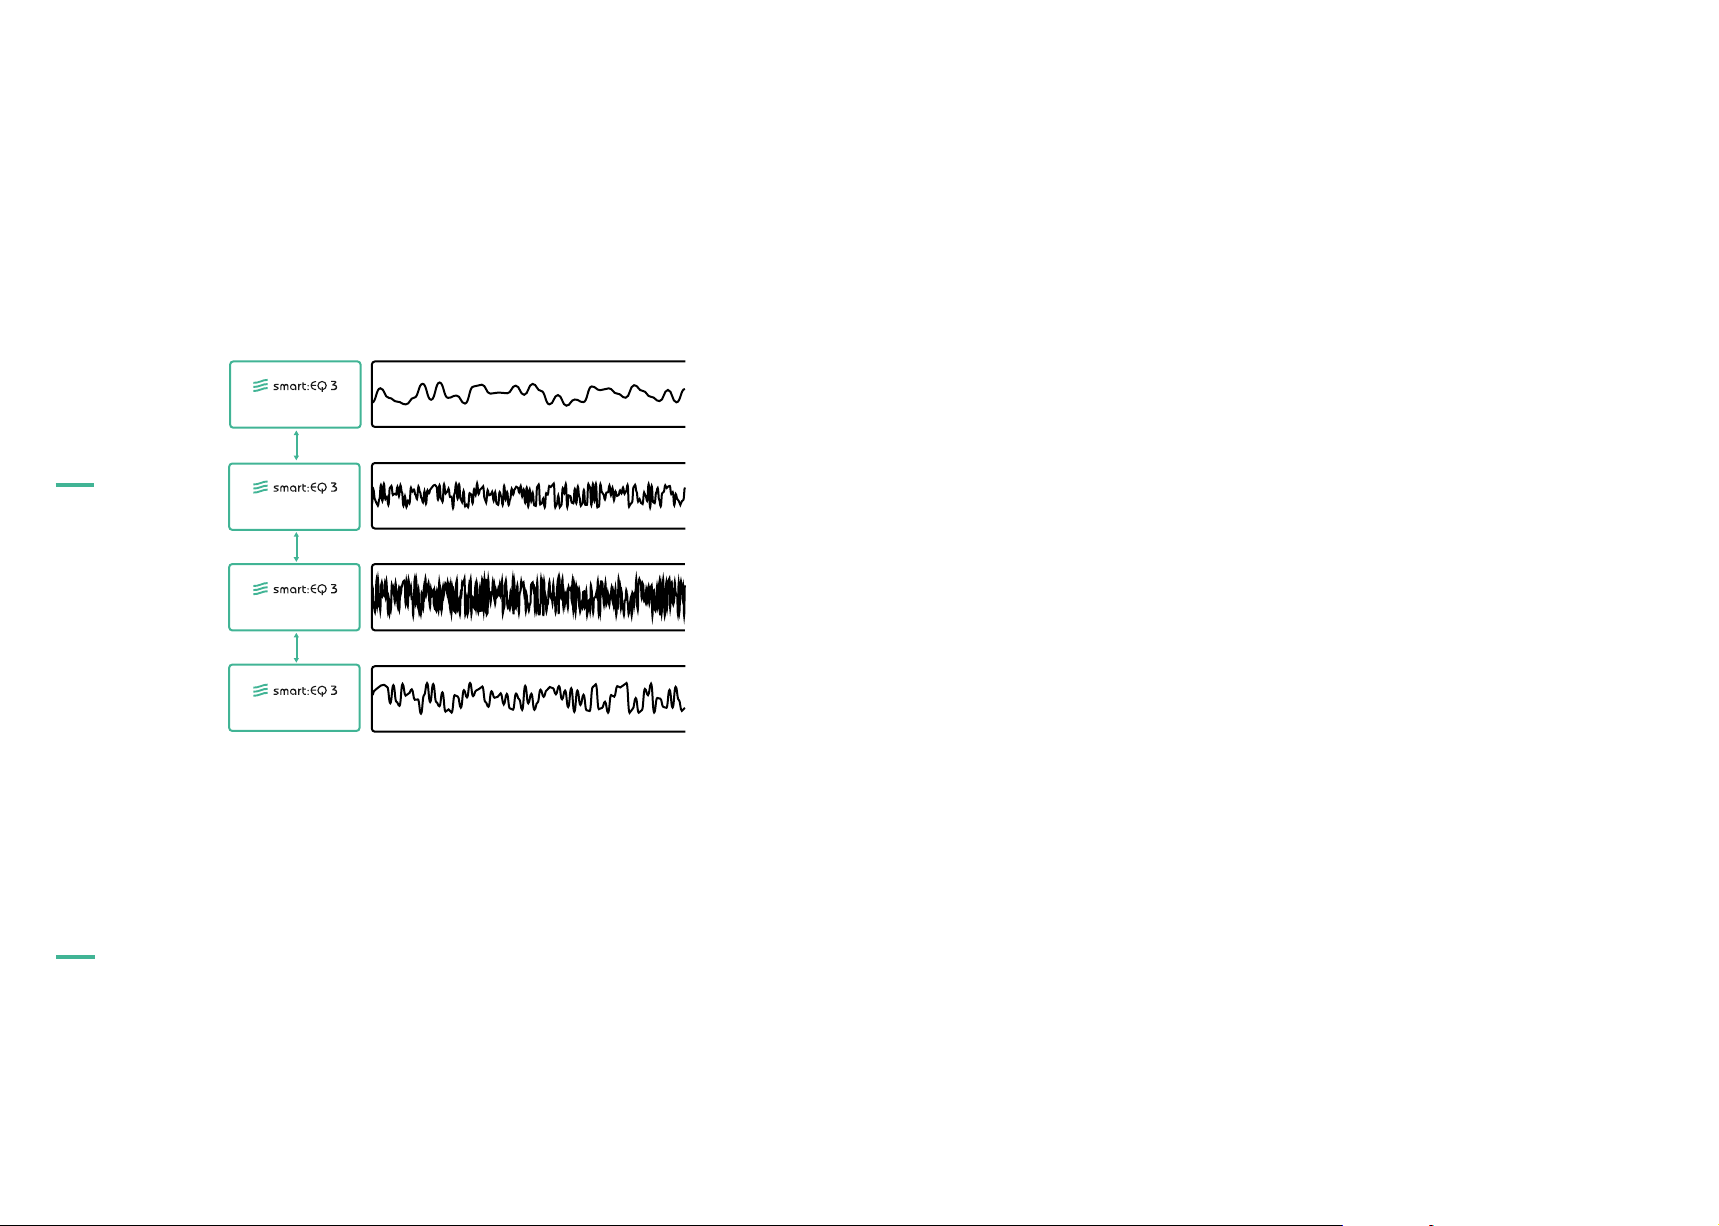
Working with groups
One of smart:EQ 3’s main features is the group view that allows you to easily create a hierarchical arrangement of up to 6 tracks using intelligent cross-channel processing.
Track 1
working with groups
manual
smart:EQ 3
Instance 1
Instance 2
Instance 3
Instance 4
Track 2
Track 3
Track 4
How Does it work?
Multiple instances of smart:EQ 3 loaded into different channels are able to communicate and
share data among each other. By connecting these multiple instances, spectrally balanced groups
of up to 6 tracks or busses can be created.
When a group is created, smart:EQ 3 combines the spectral information from all tracks added to
the group in order to detect and amend masking effects. Using spectral mixing techniques, the
grouped tracks can be arranged in a hierarchy of three layers and each track gets its assigned
space within a transparent arrangement. This way, smart:EQ 3 helps to avoid cluttered and
clashing frequency regions when computing new smart:filters.
13
Page 14
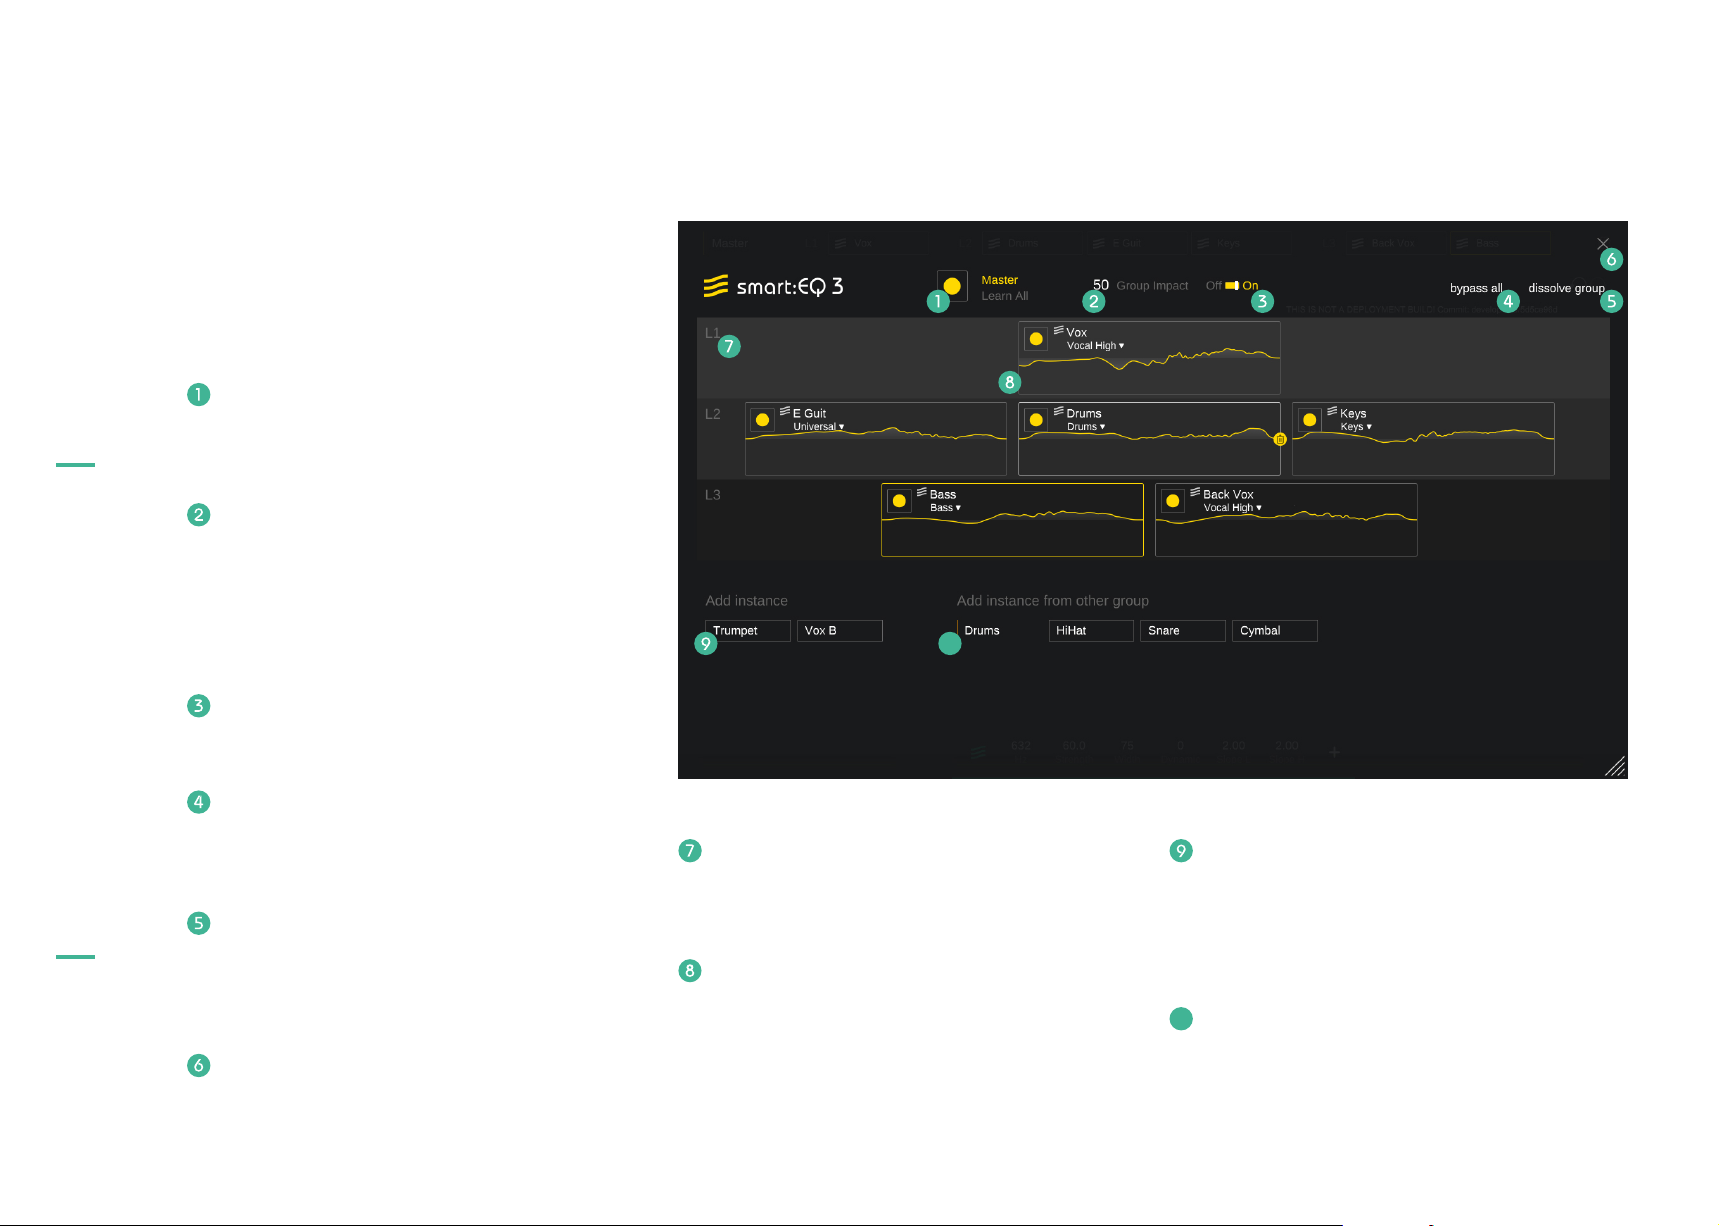
Group View
Global Learning (page 18)
group view
manual
smart:EQ 3
Start learning process for all instances of the
group.
Group Impact
Control the impact level of the cross-channel
processing. The higher the value, the more
impact the cross-channel processing will have
on the computed smart:filters of all group
members.
On / Off
Disable cross-channel processing.
Bypass all
Bypasses all instances inside your group for
easy A/B listening.
Dissolve group
Remove all instances from the group. You
will immediately return to the EQ view of your
current track.
Close Group View
Return to EQ view.
10
Layer Containers (page 17)
Add group instances to different layers (L1, L2,
L3) to create a sonic hierarchy.
Track Info Box (page 18)
Drag tracks between layer containers to
determine their place in the arrangement. Use
the track info box to monitor every instance.
Free instances
List of all channels equipped with smart:EQ 3
that have not yet been added to any group.
Drag an instance into a layer container to add it
to your current group.
10
Instances assigned to groups (page 16)
List of all existing groups and group members.
Drag an instance into a layer container to move
it to your current group.
14
Page 15
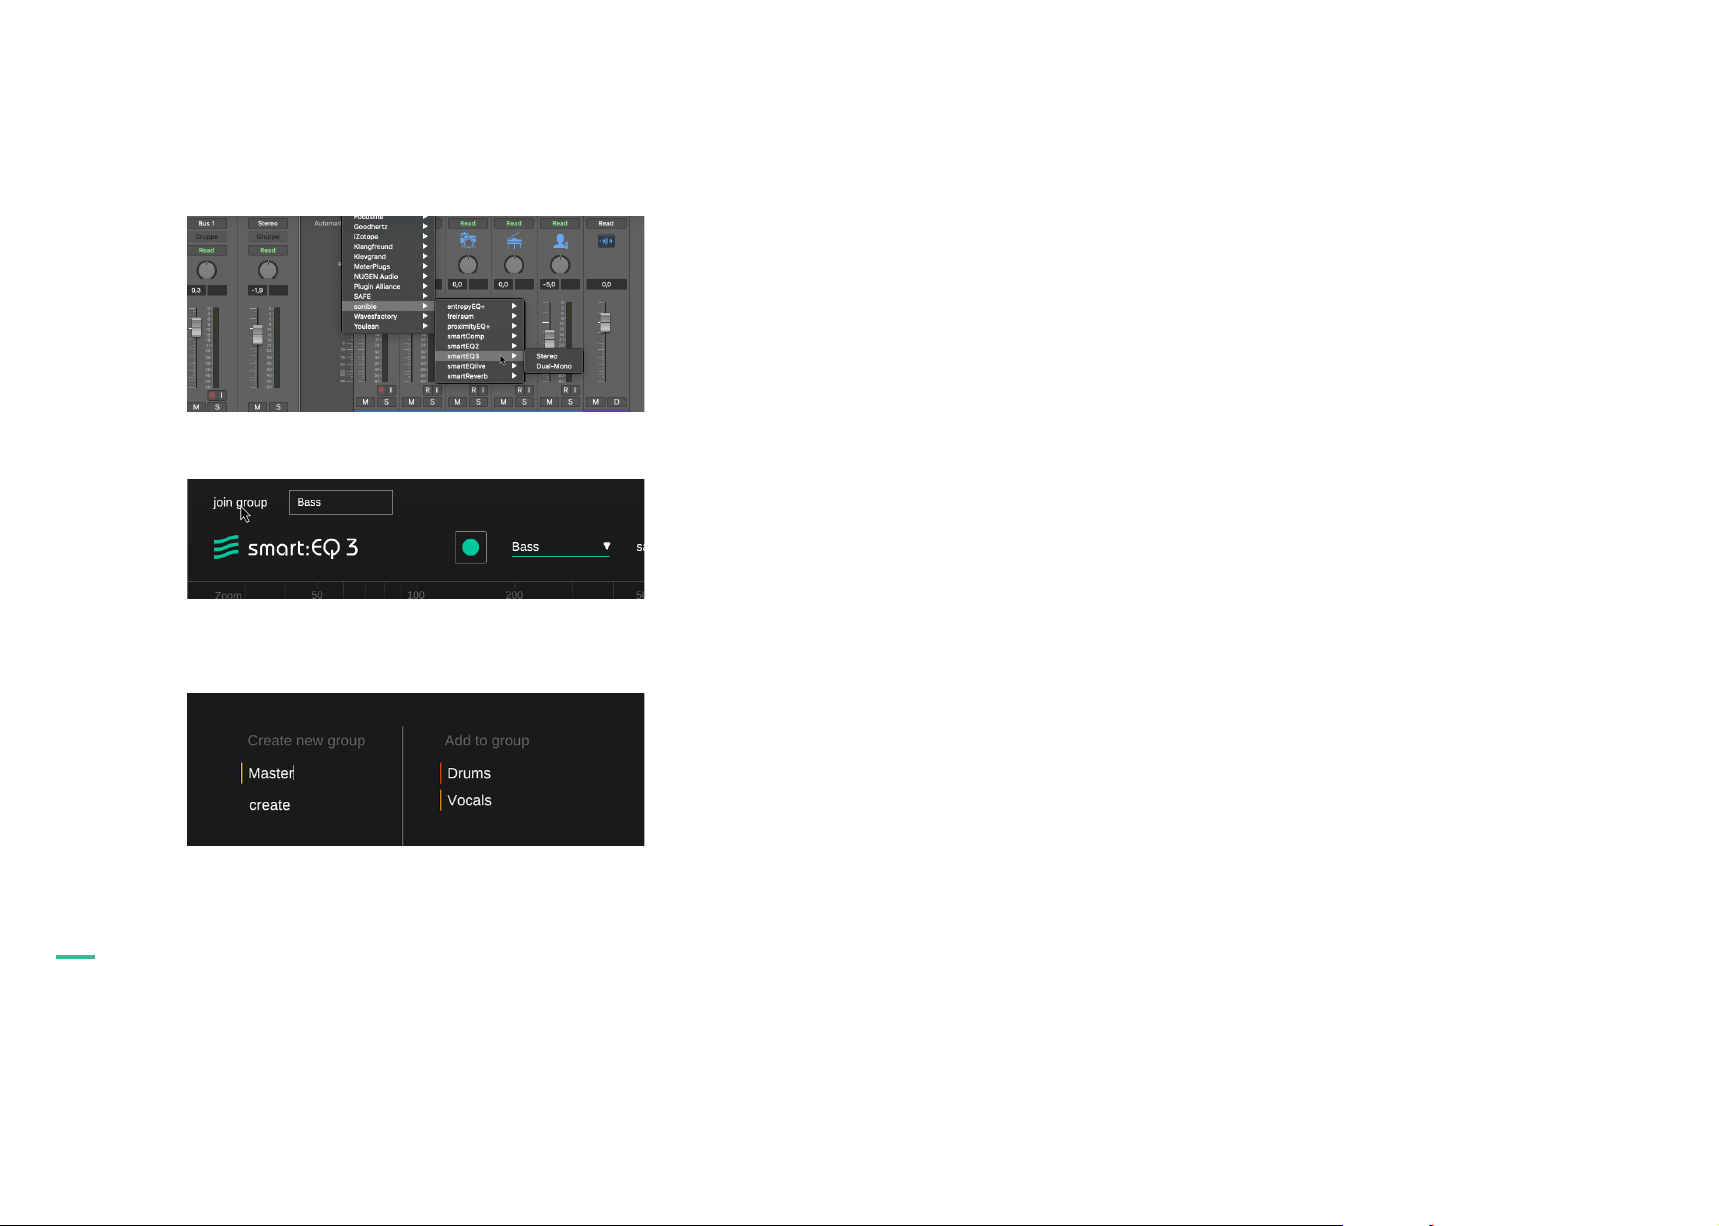
Create your first group
Step 1
Load an instance of smart:EQ 3 onto every channel (up to 6) you want to add to your group.
Step 2
Open the GUI of one of the instances you just created.
Step 3
Click “Join Group” to open the group creation window.
Step 4
manual
smart:EQ 3
15
Enter a suitable name for your new group and click “create”.
In the following sections you will learn how to add other instances to this group
and how to arrange them in three hierarchical layers.
Page 16
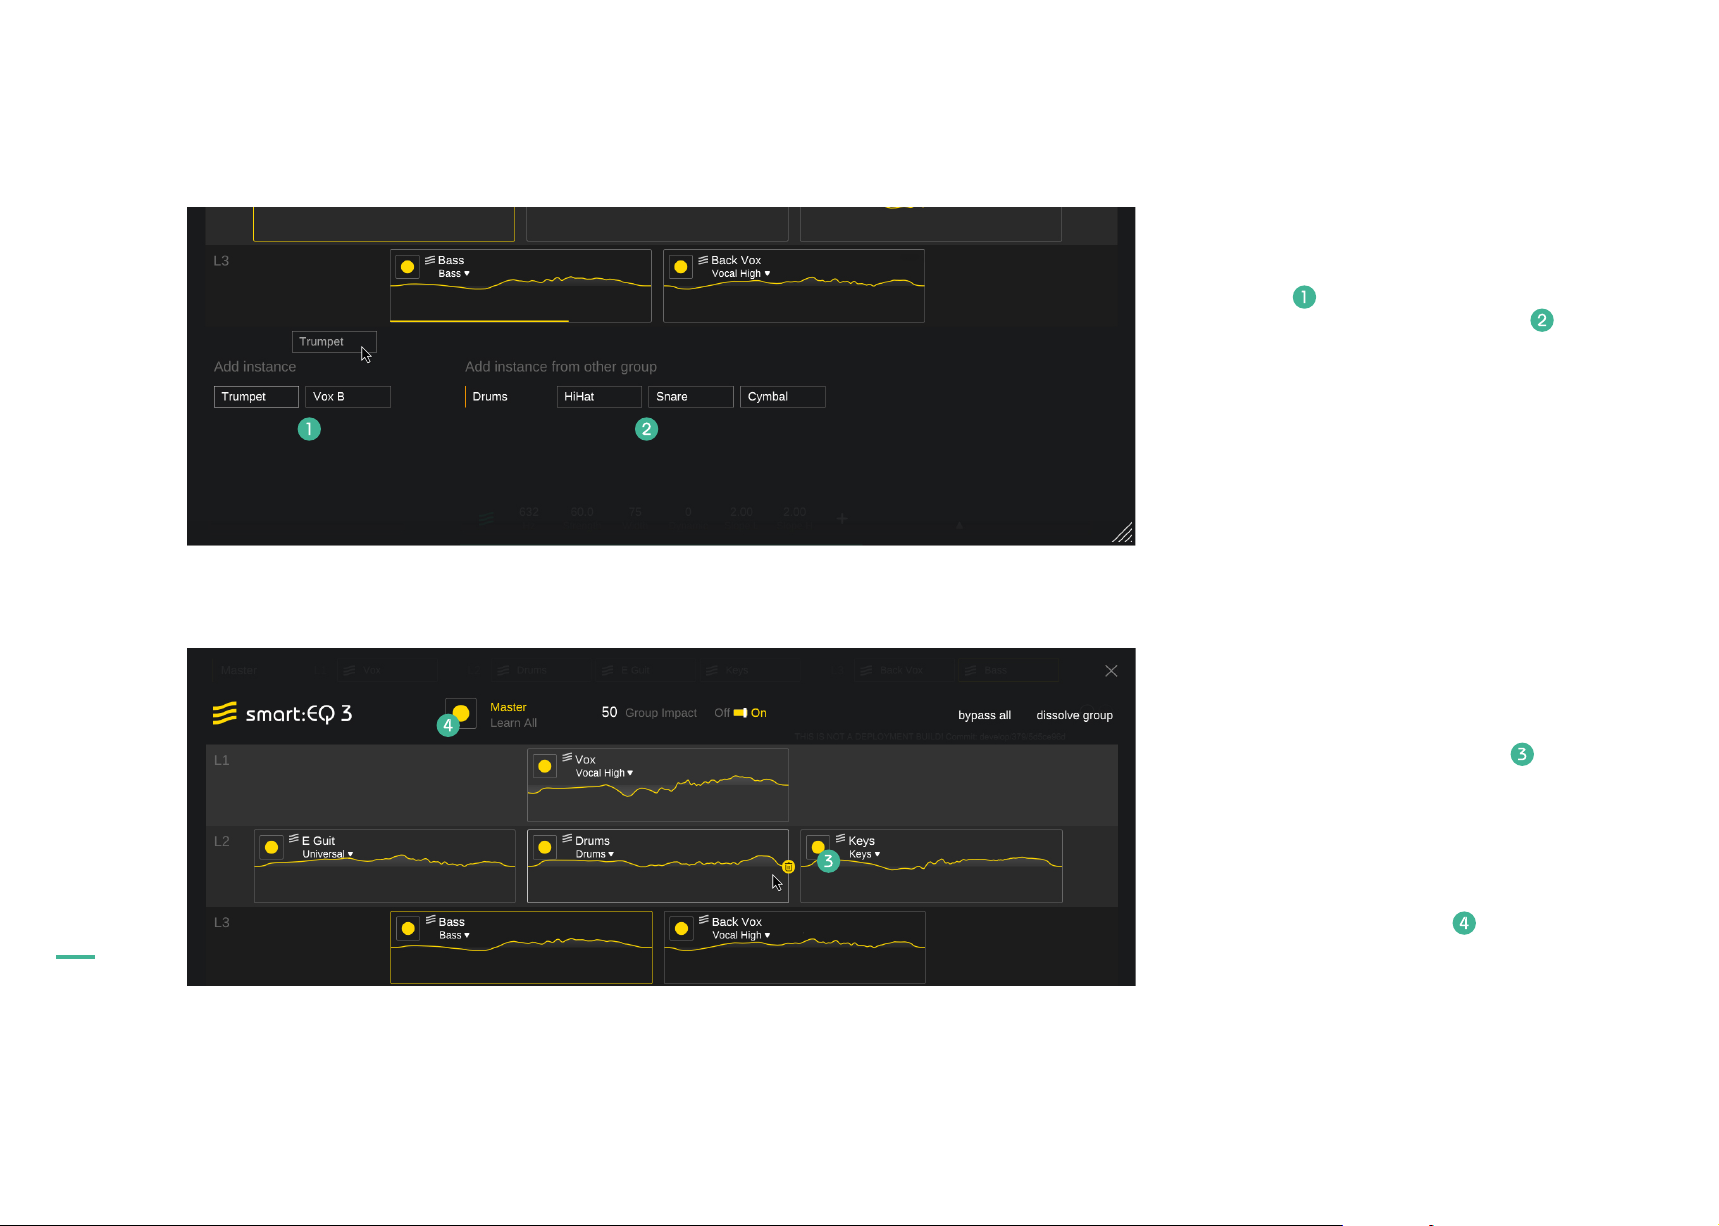
Add instances to group
To add tracks to a group, simply drag and drop new
instances into the desired layer containers. You can
either add instances that have not yet been added
to any group or you can move instances from
existing groups to your current group. Since
every instance can only be part of one group, this
action will remove the instance from its original
group.
Activating Cross-Channel Processing
All instances inside a group need to be learned
for the cross-channel processing to work. Learn
instances with the small record button inside the
track info box.
manual
smart:EQ 3
16
Adding a learned instance to your group will instantly
update it’s processing to ensure spectral balance.
Relearn all instances inside your group at once with
the big ‘Learn all‘ record button .
Page 17
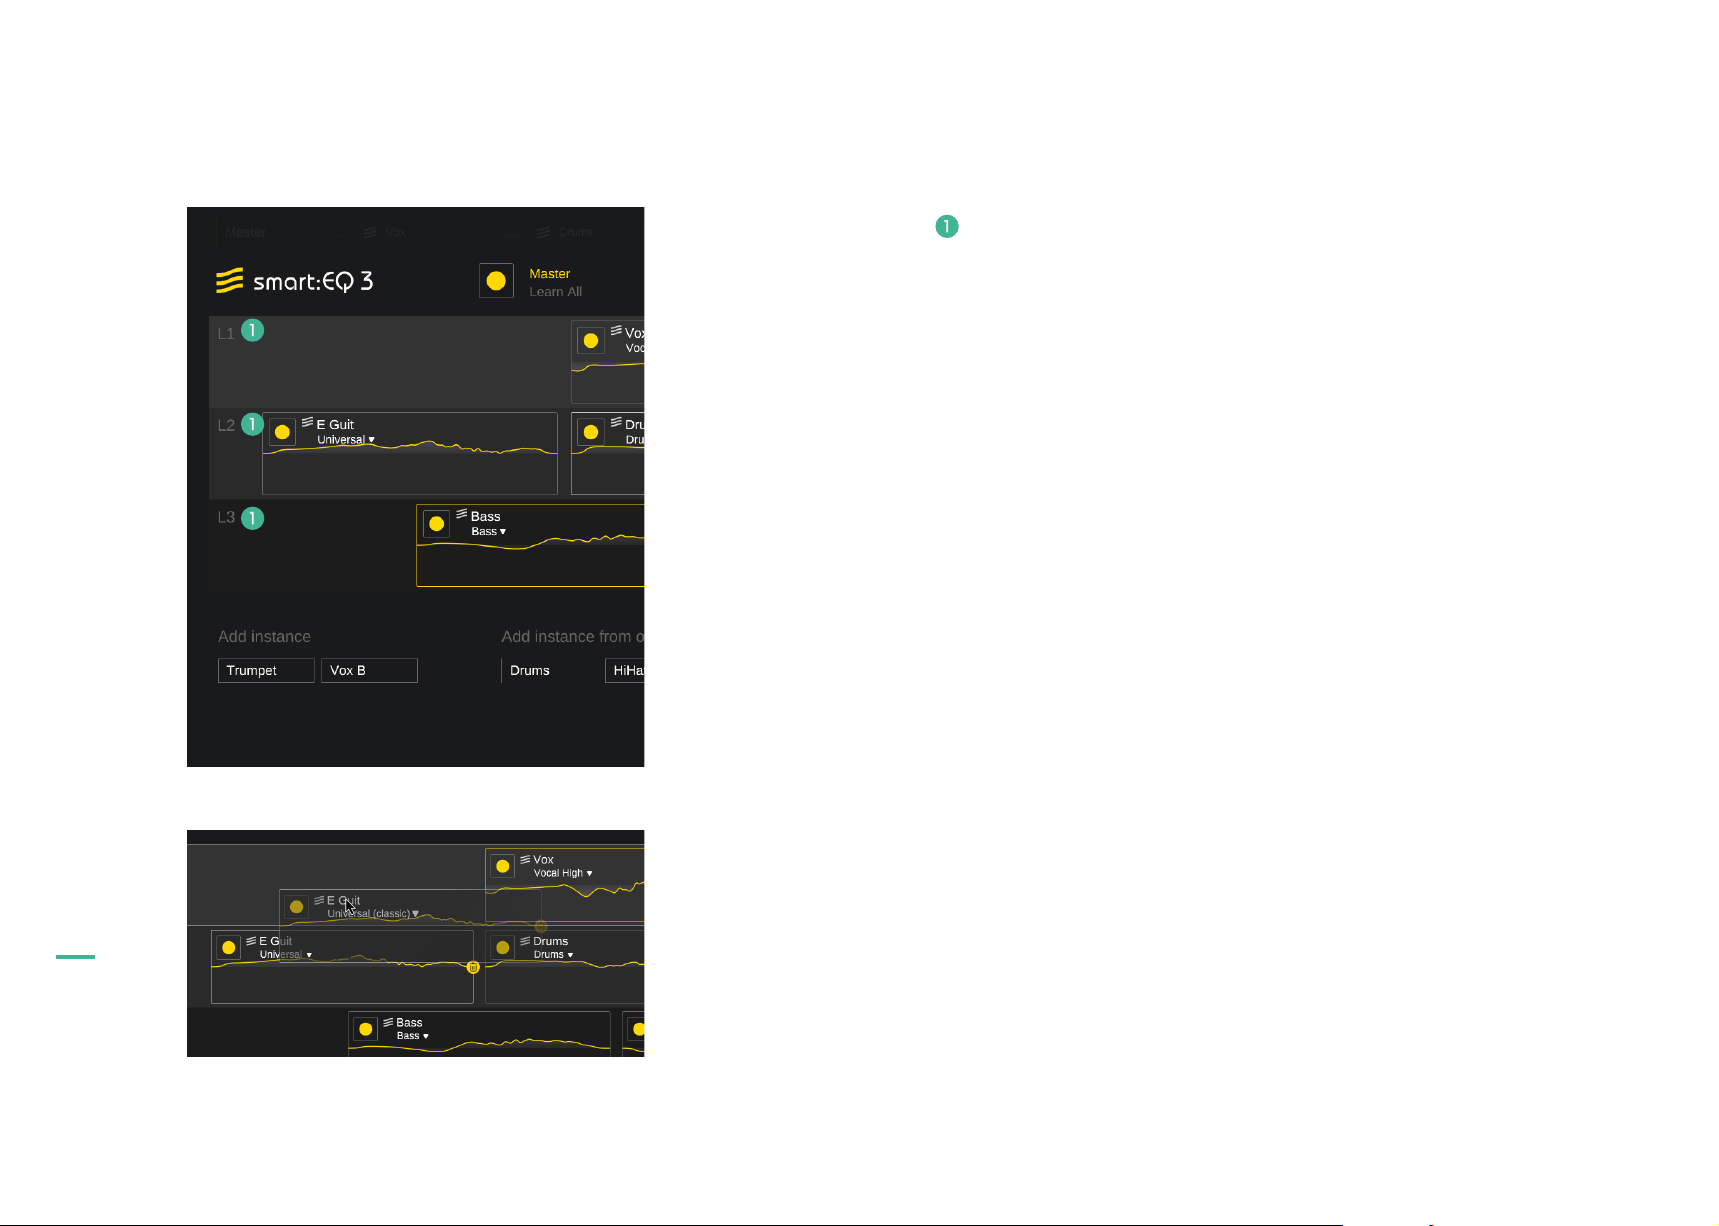
Create a hierarchy with layers
The three layers (L1, L2, L3) allow you to define different mixing priorities for the tracks of your group.
The higher the priority of a layer, the more space a track added to this layer will have inside the spectrum.
For example, smart:EQ 3 will make sure that tracks added to layer 1 (L1) are not masked by tracks added
to layers with a lower priority (L2 or L3) when computing the smart:filter for each track.
L1: Lead
Layer 1 has the highest priority. Hence, smart:EQ 3 will keep them in the limelight when it computes the
smart:filter for each track. You will typically use this layer for lead vocals or lead instruments that should not
be masked by accompanying signals.
L2: Support
Tracks in L2 will blend well with all other tracks and may take the lead when there are no spectral clashes
with leading tracks present. You will typically use this layer for accompanying instruments and drums.
L3: Background
L3 should contain tracks that are supposed to be heard in the background. Such tracks build a solid foundation but don’t stick out in the mix. You will typically use this layer for backing vocals or backing instruments and synth layers.
manual
smart:EQ 3
17
Switching layers
To change the hierarchy of tracks, simply drag and drop the respective track info box into the desired
layer container. This will immediately update the smart:filters of all group members incorporating the new
hierarchy into their spectral structure.
Page 18
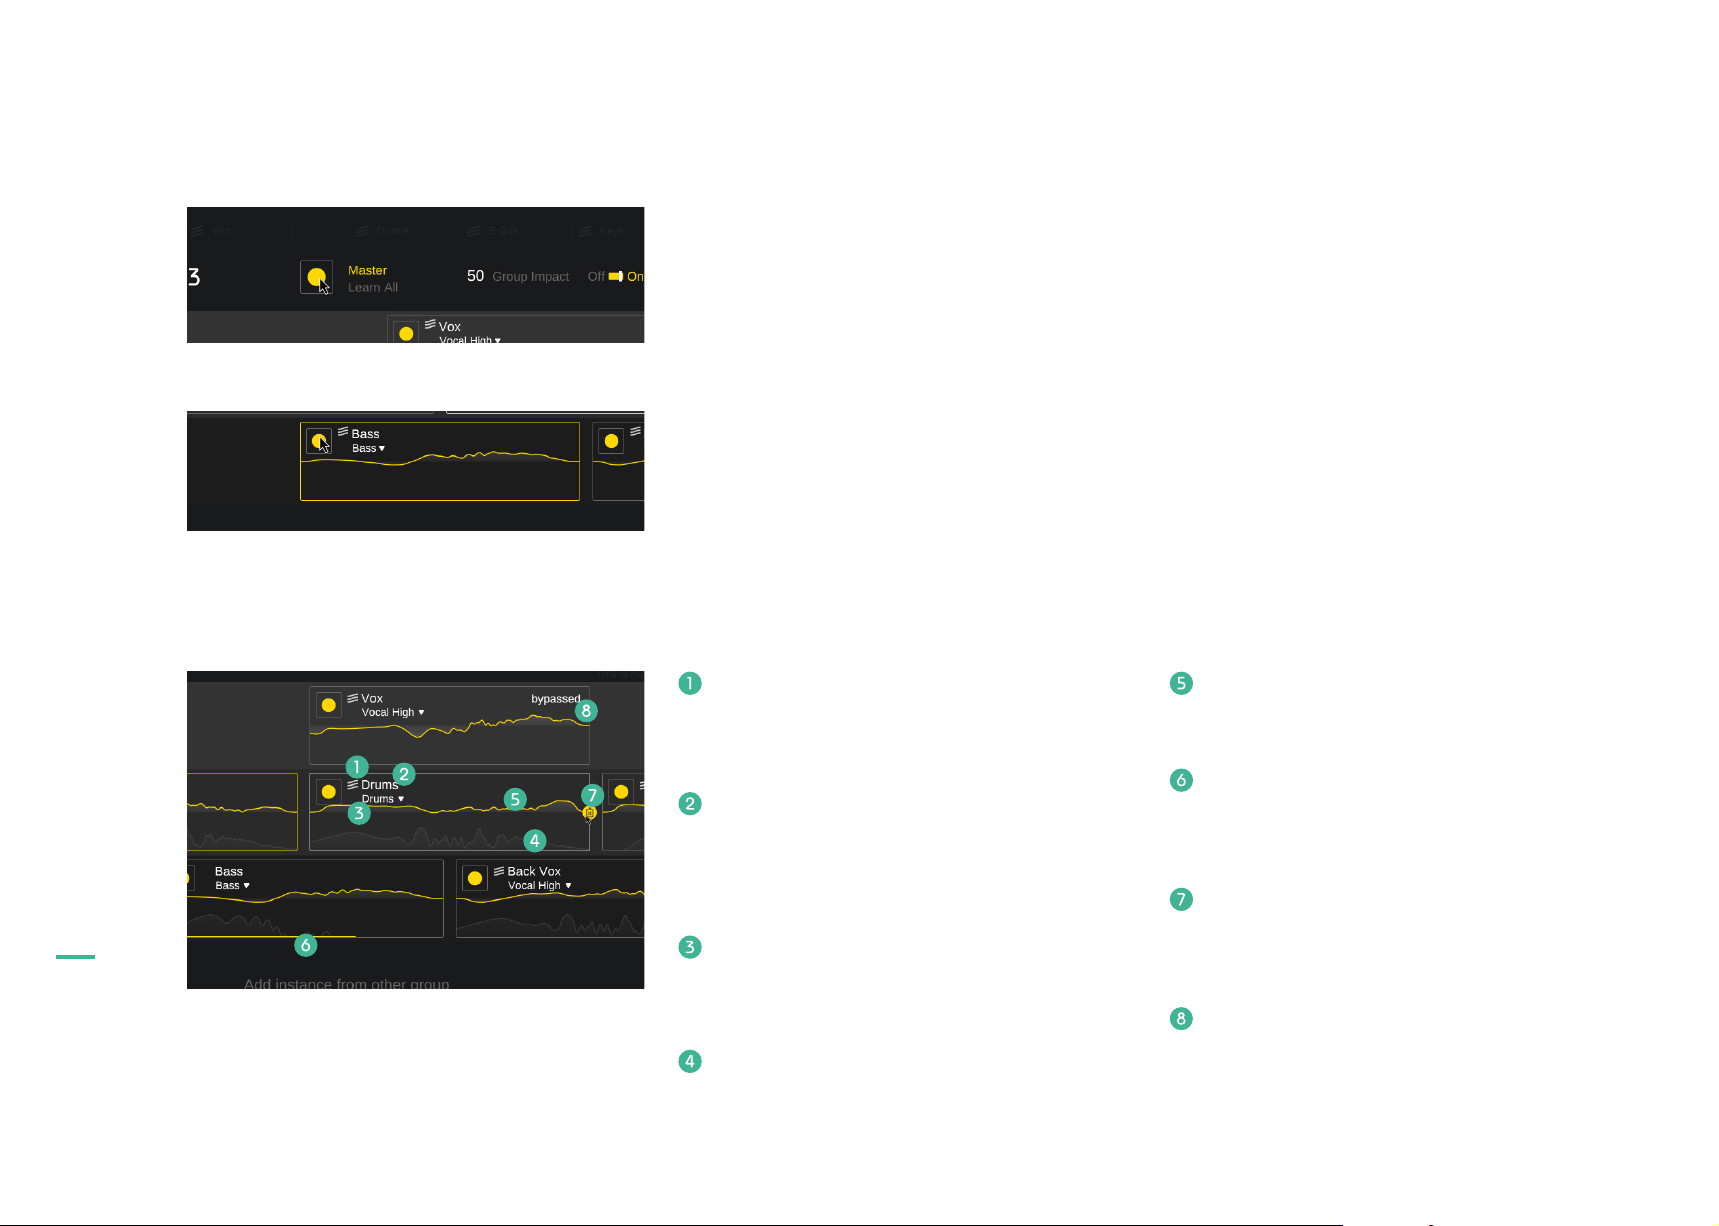
Learning
Track Info Box
Learn all group members
You can (re)learn all instances of a group at once using the master learning button. Since smart:EQ 3 needs
audio input during learning, the time needed to finish the learning process may differ between instances
depending on the audio content of the respective track.
Learn a single group member
Using the small recording button inside each track info box, you can start a new learning process for the
respective instance. The progress of the learning process is indicated by a progress bar at the bottom of
the track info box.
manual
smart:EQ 3
18
smart:EQ 3 logo
The logo indicates that smart:EQ 3 already
learned a smart:filter for this track.
Track name
Double-click on the track name to change it.
Profile Dropdown
View and change the selected instance for
each profile
Analyzer
Current output spectrum.
Filter curve
EQ sum curve applied to the track.
Progress bar
The progress bar indicates the progress of a
currently active learning process.
Trash can
Remove the track from the current group. Only
visible on hover.
Bypassed warning
Indicates that an either all bands or the smart_
filter are bypassed in an instance.
Page 19
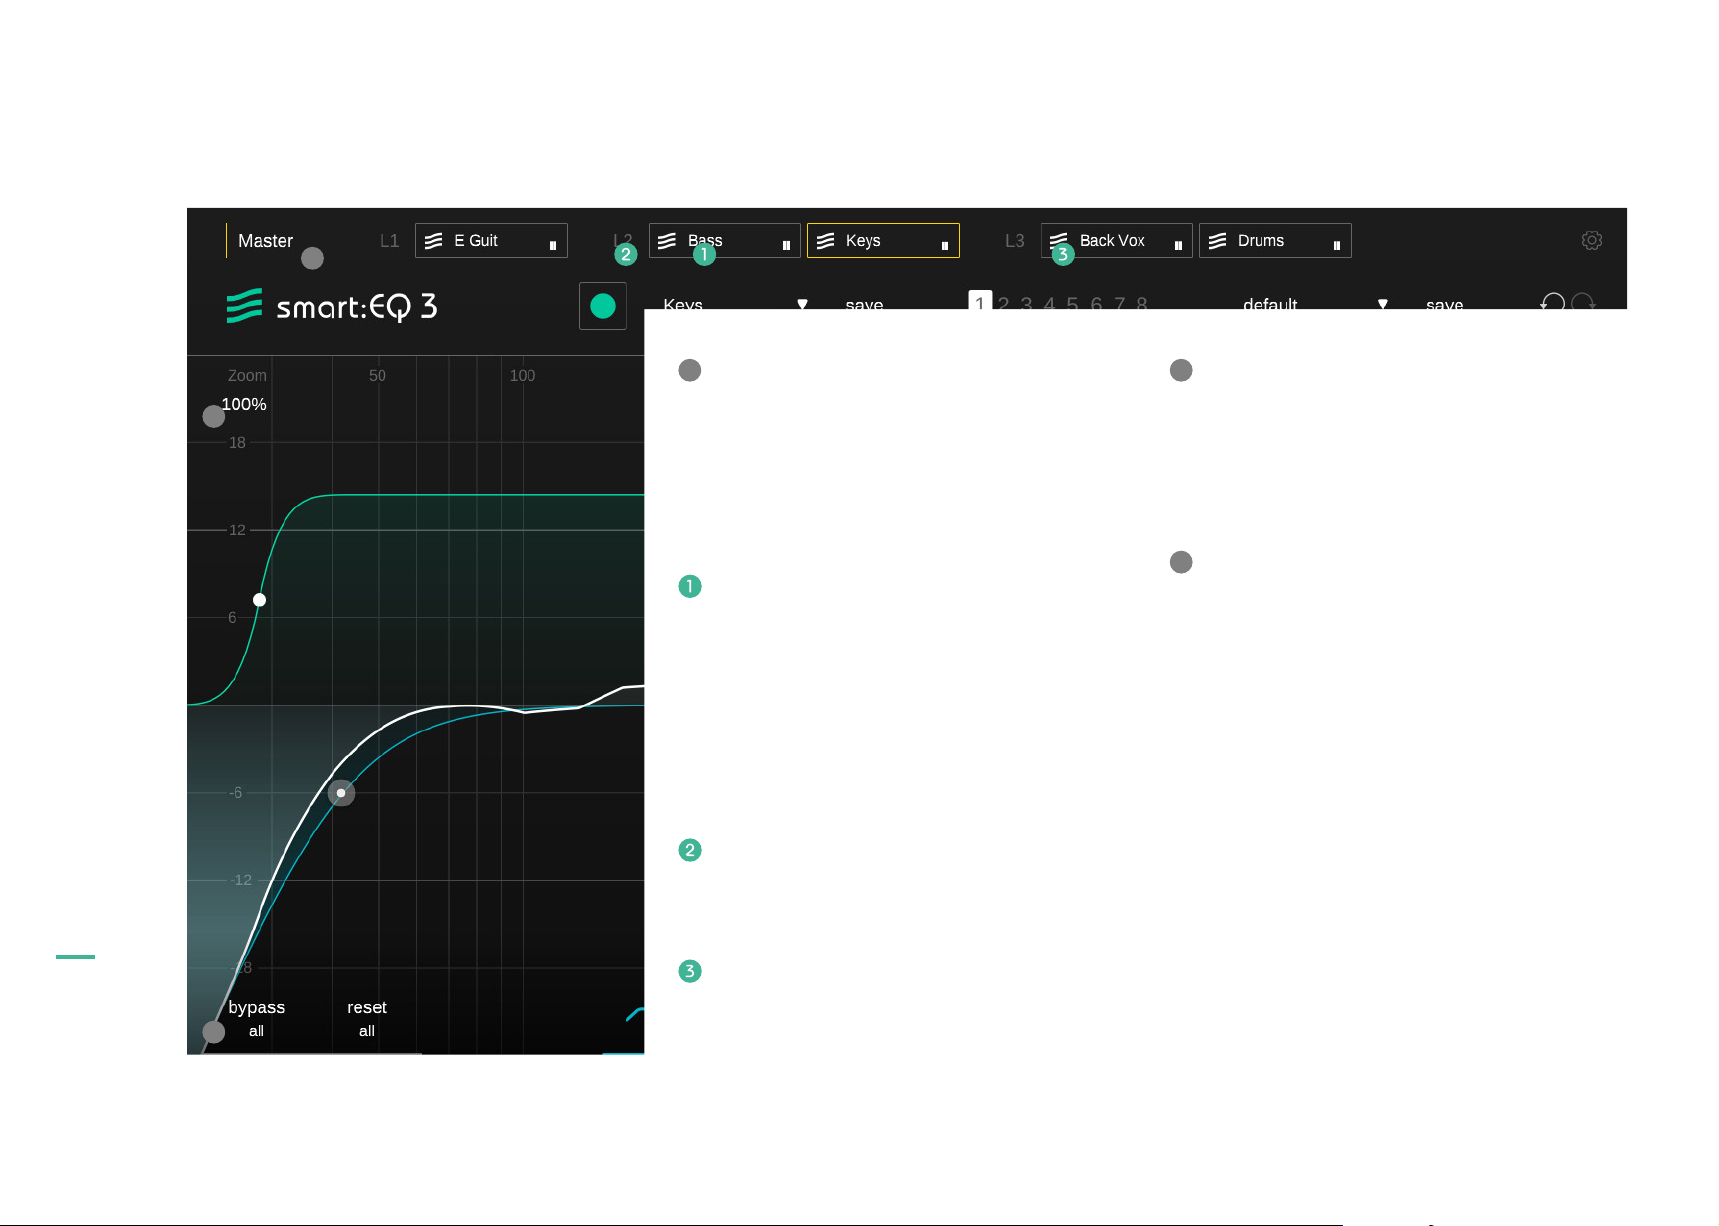
Visual control & monitoring
A
manual
smart:EQ 3
A
Layer overview
B
Use the layer overview to quickly change the
placement of the group members in the sonic
hierarchy. To add/remove group members,
please switch to group view (see page 14).
Name
Name of the instance. In some DAWs, this
name will automatically match the name of the
channel where the instance is located. Double-click the name to change it.
Note: We highly recommend that you name
each instance. Otherwise, it may be difficult to
keep track of all instances in group view.
smart:EQ 3 logo
The logo indicates that smart:EQ 3 has already
learned this track.
Progress bar
B
Precision mode
To zoom the y-axis (gain values), select the
appropriate gain range (24dB, 12dB, 6dB)
inside the drop-down. Be aware that this does
not affect the processing in any way – it is only
a visual aid for more precise handling.
C
Bypass & reset
You can use different modes for the bypass
and reset button. Change the mode by clicking
on the currently active mode (e.g. all) below the
respective button.
all bypass or reset the whole plug-in
standard bypass or reset all standard filters
smart bypass or reset the smart:filter
19
C
The progress bar indicates the progress of the
currently active learning process.
Page 20
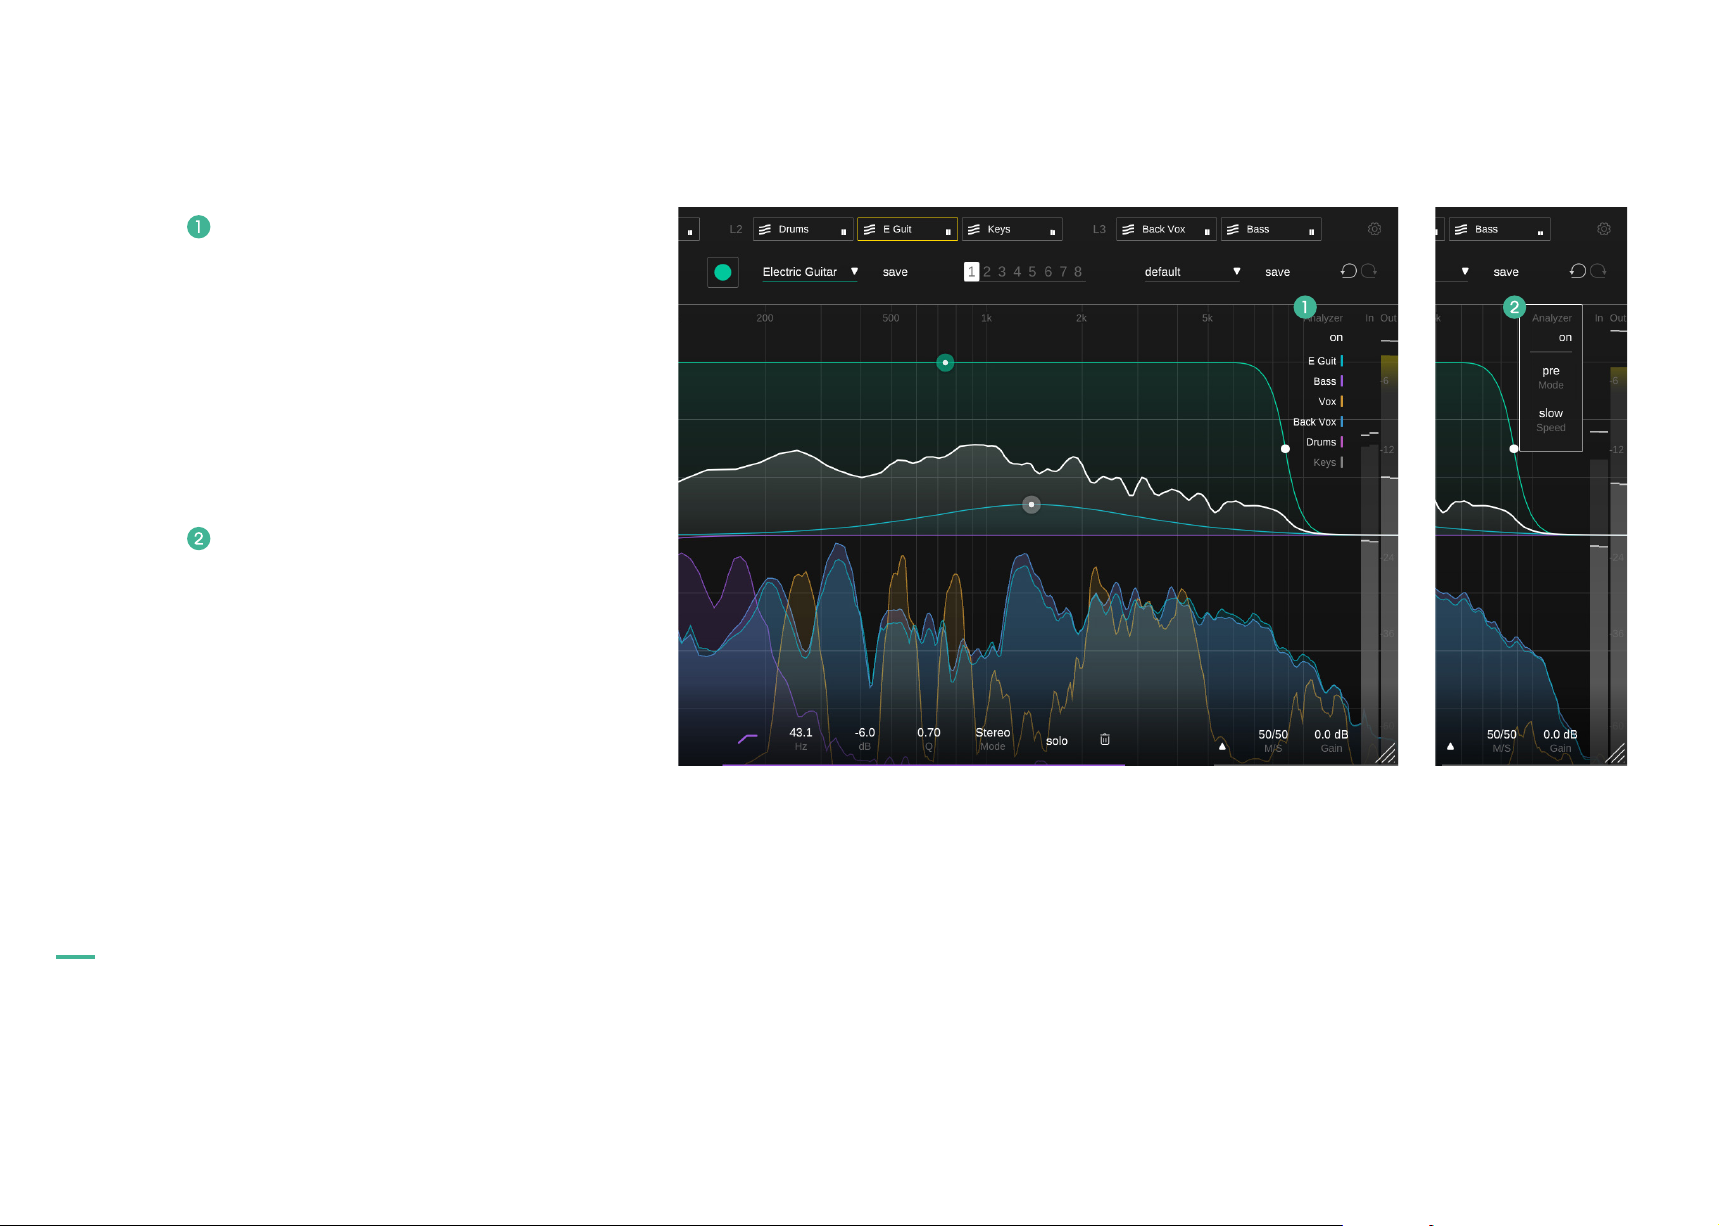
Analyzer
Analyzer
Click to enable/disable the spectral analyzer
Right-click to open the analyzer widget
Sources
If your currently selected instance of smart:EQ
3 is part of a group, you’ll be able to display
a color coded real-time spectrum for every
member of your group. Toggle instances on/off
by clicking their name.
Analyzer widget
Acess the analyzer widget by right-clicking the
analyzer on/off button.
Mode
Switch the analyzer mode between “pre” (prefilter), “post” (post-filter), “both” (pre & post) or
“off”.
manual
smart:EQ 3
20
Speed
Change the ballistics of the analyzer between
“slow”, “medium”, “fast” or “avg” (average).
When ”avg” is enabled, the analyzer will
compute the average spectrum over the entire
observation period.
Page 21
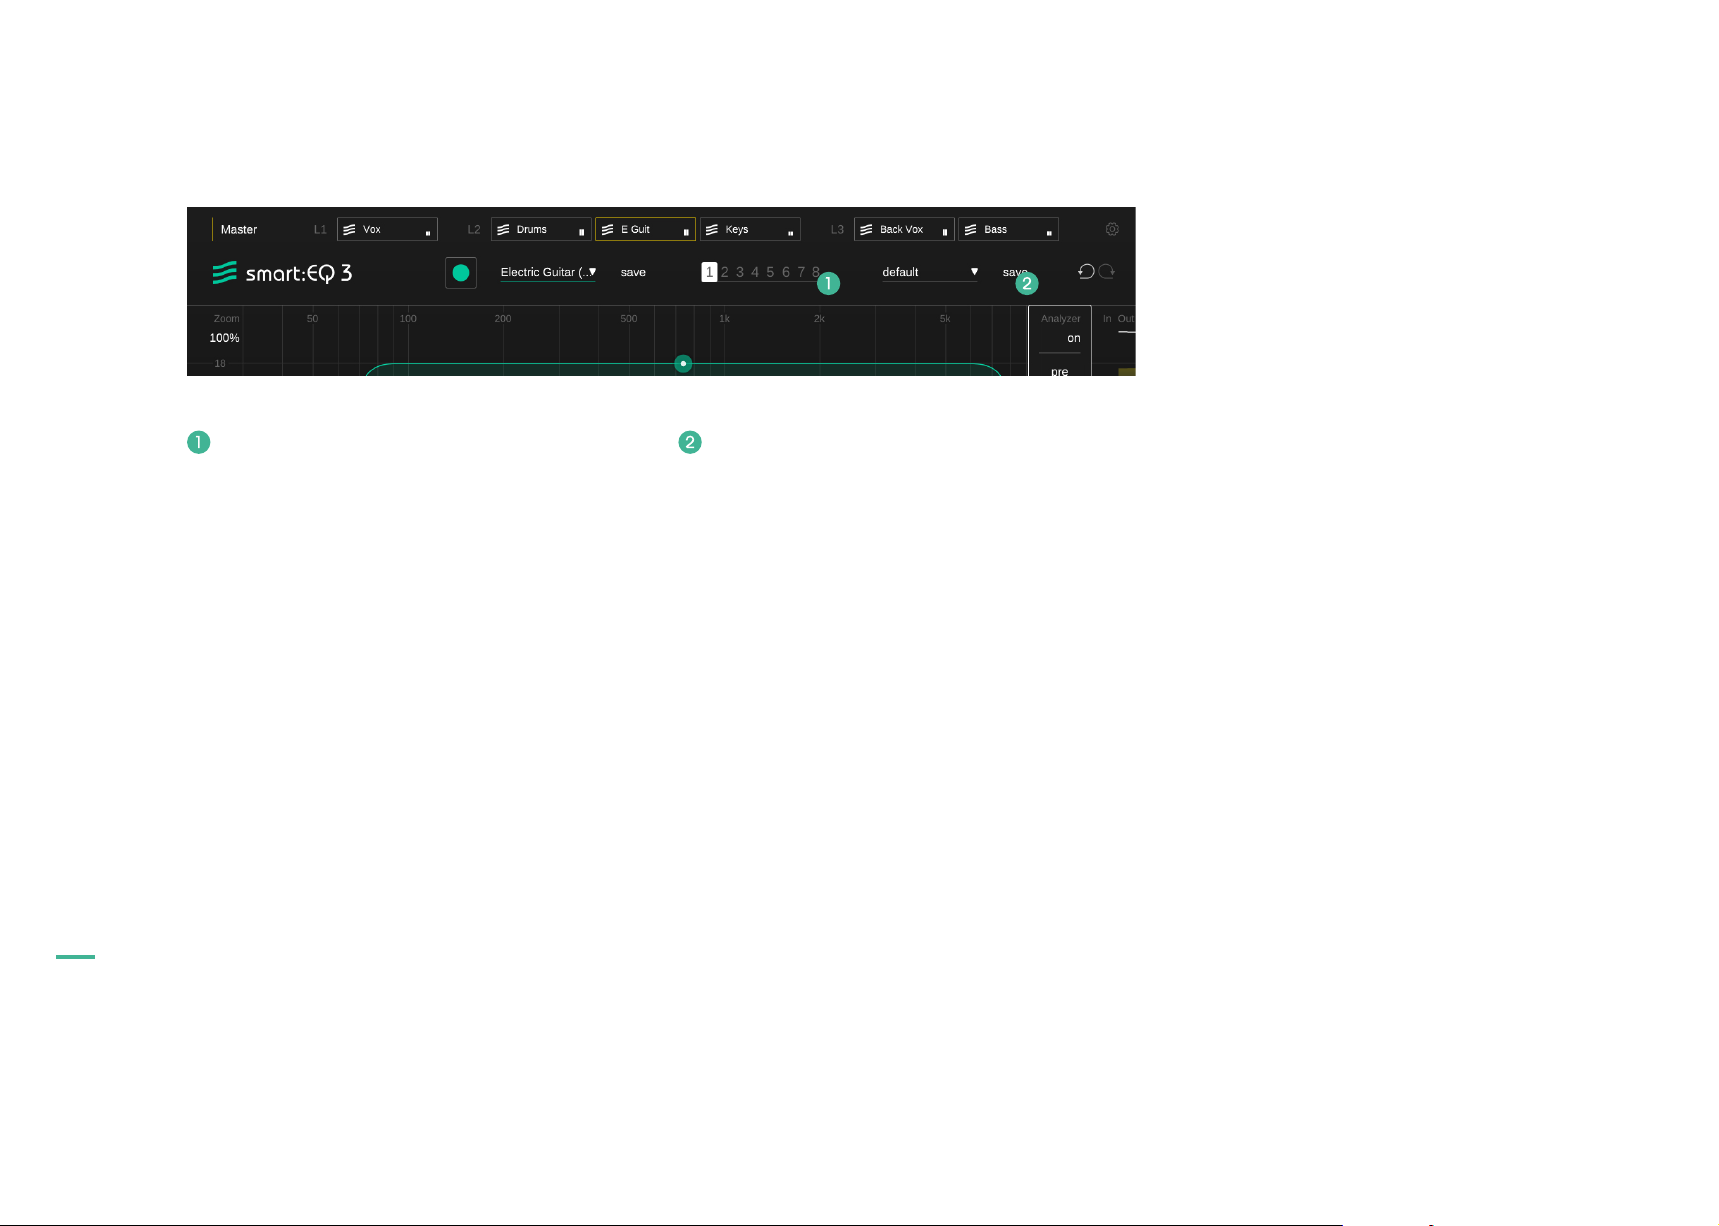
States and Presets
manual
smart:EQ 3
States
You can use states to store multiple parameter
settings. States allow for easy comparing
between different settings (similar to the A/B
feature of most plug-ins) or to store multiple
smart:filters for different sections of your song.
Working with states
1. Each state is initially empty (default parameters settings of smart:EQ 3).
2. Select a state by clicking the respective
state button.
3. You can easily copy one state to another
state via drag and drop. This may be useful
if you want to compare different changes to
a certain setting.
4. To clear a state, hover over the number
and click the trash can icon that will appear
below.
Presets
A preset saves all parameter settings and can
be accessed from all plug-in instances.
• To save your parameter settings as a
preset, click “save” next to the preset dropdown.
• To load a saved preset, choose the respective preset name from the dropdown.
• To delete a preset or change its name, go to
the preset folder in your local file explorer.
You can easily share your presets among
different workstations. All presets are saved
with the file extension “.spr” in the following
folders:
Preset Folders
OSX:
~/Library/Audio/Presets/sonible/smartEQ3
21
Windows:
My Documents\Presets\sonible\smartEQ3
Page 22
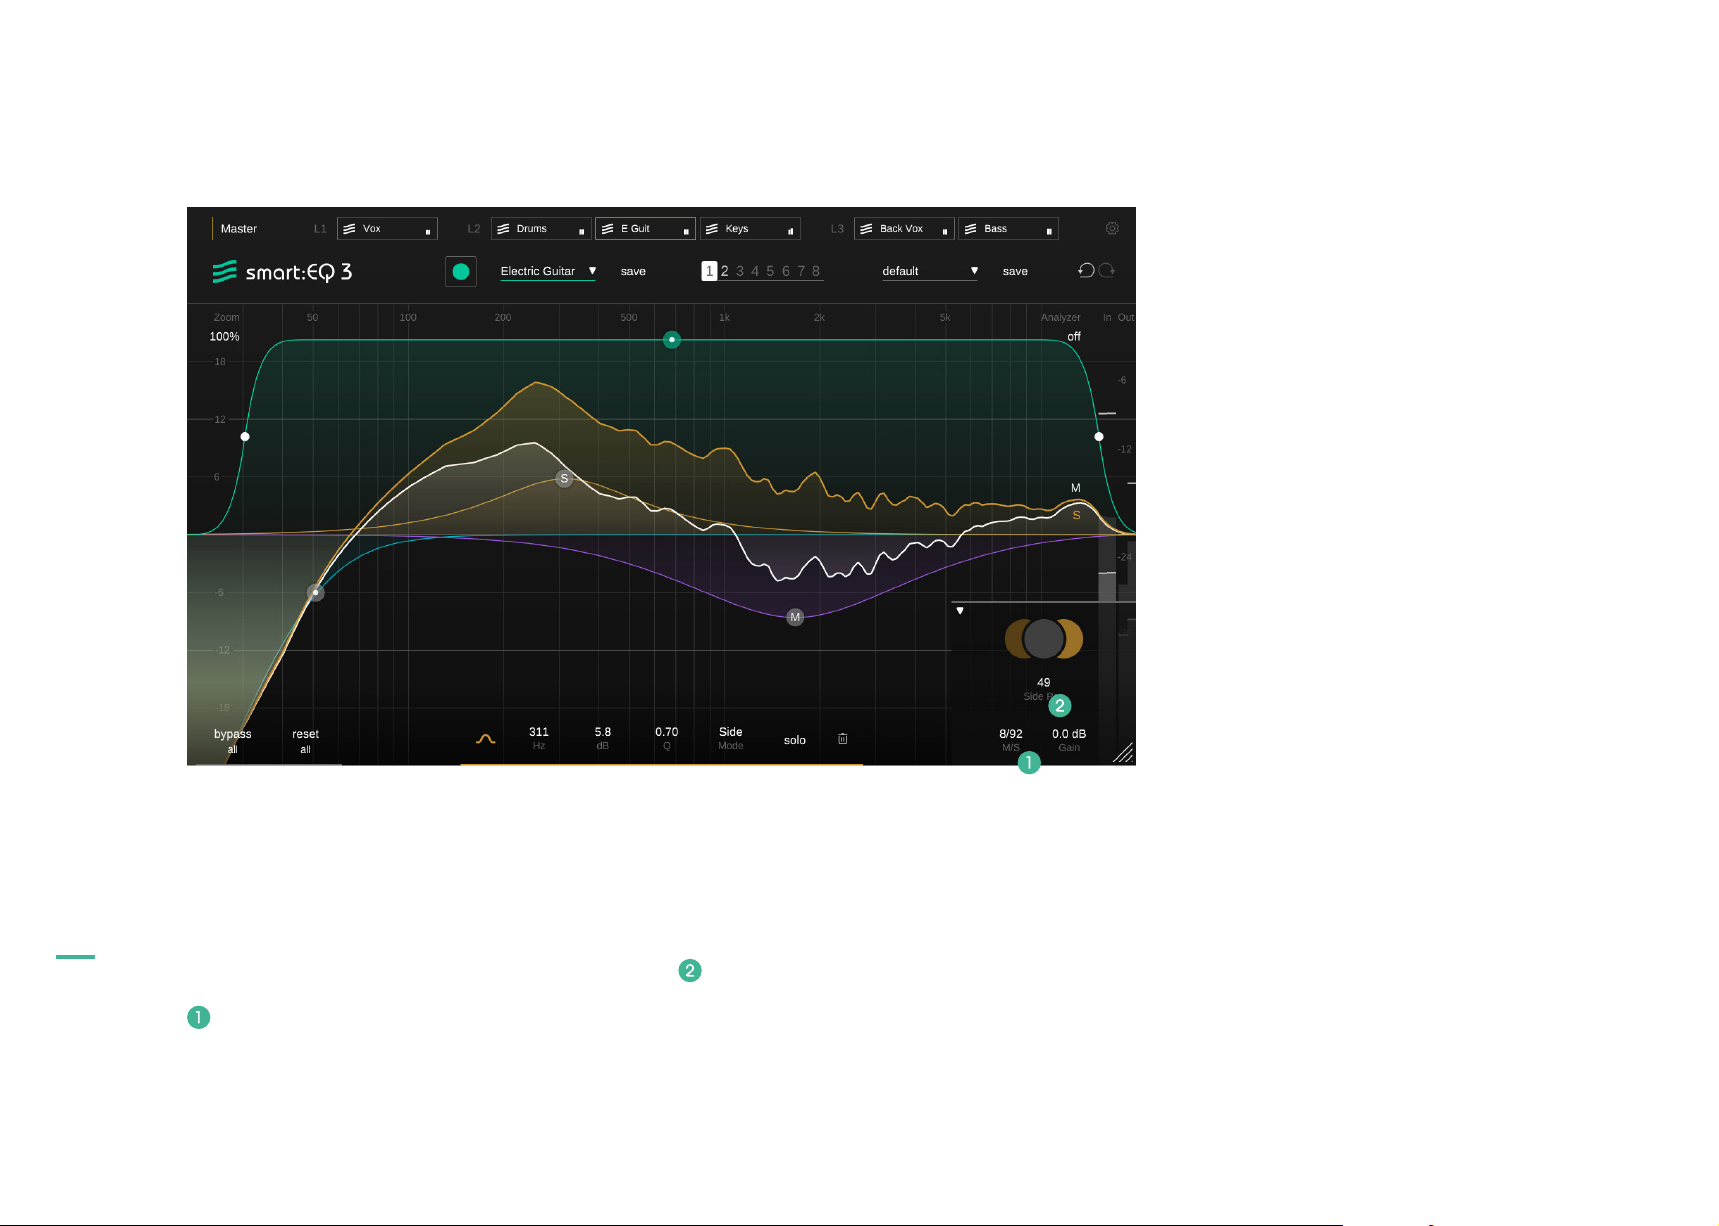
M/S processing and output
manual
smart:EQ 3
22
smart:EQ 3 offers full M/S processing. Each filter
can either be used in stereo, mid or side mode.
Additionally, the output section offers unique tools
for controlling the stereo image using the M/S
balance and the side pan slider. Please note that
these sliders can be used even if all filters have
been set to stereo mode.
M/S Balance
The M/S balance slider allows you to freely
adjust the relation of the mid and side signal in
the stereo output. Using the controller, it is easy
to play with the spaciousness of a recording
(e.g. more side signal typically boosts all
ambient components) or to ”tighten up” a mix
(e.g. more mid signal boosts the correlated/
direct components).
Side Pan
The side pan slider allows to pan the side signal
to either the left or right stereo channel. This
way, the ambient components of a stereo track
(side signal) can be panned without affecting
the stable center (mid signal).
You can click on the mid or side section to solo
the respective signal component.
M/S input or output
You can use smart:EQ 3 as an M/S encoder/
decoder. On the settings page (see page 23)
you can define the input and output format
(M/S or stereo) of the plug-in.
Page 23
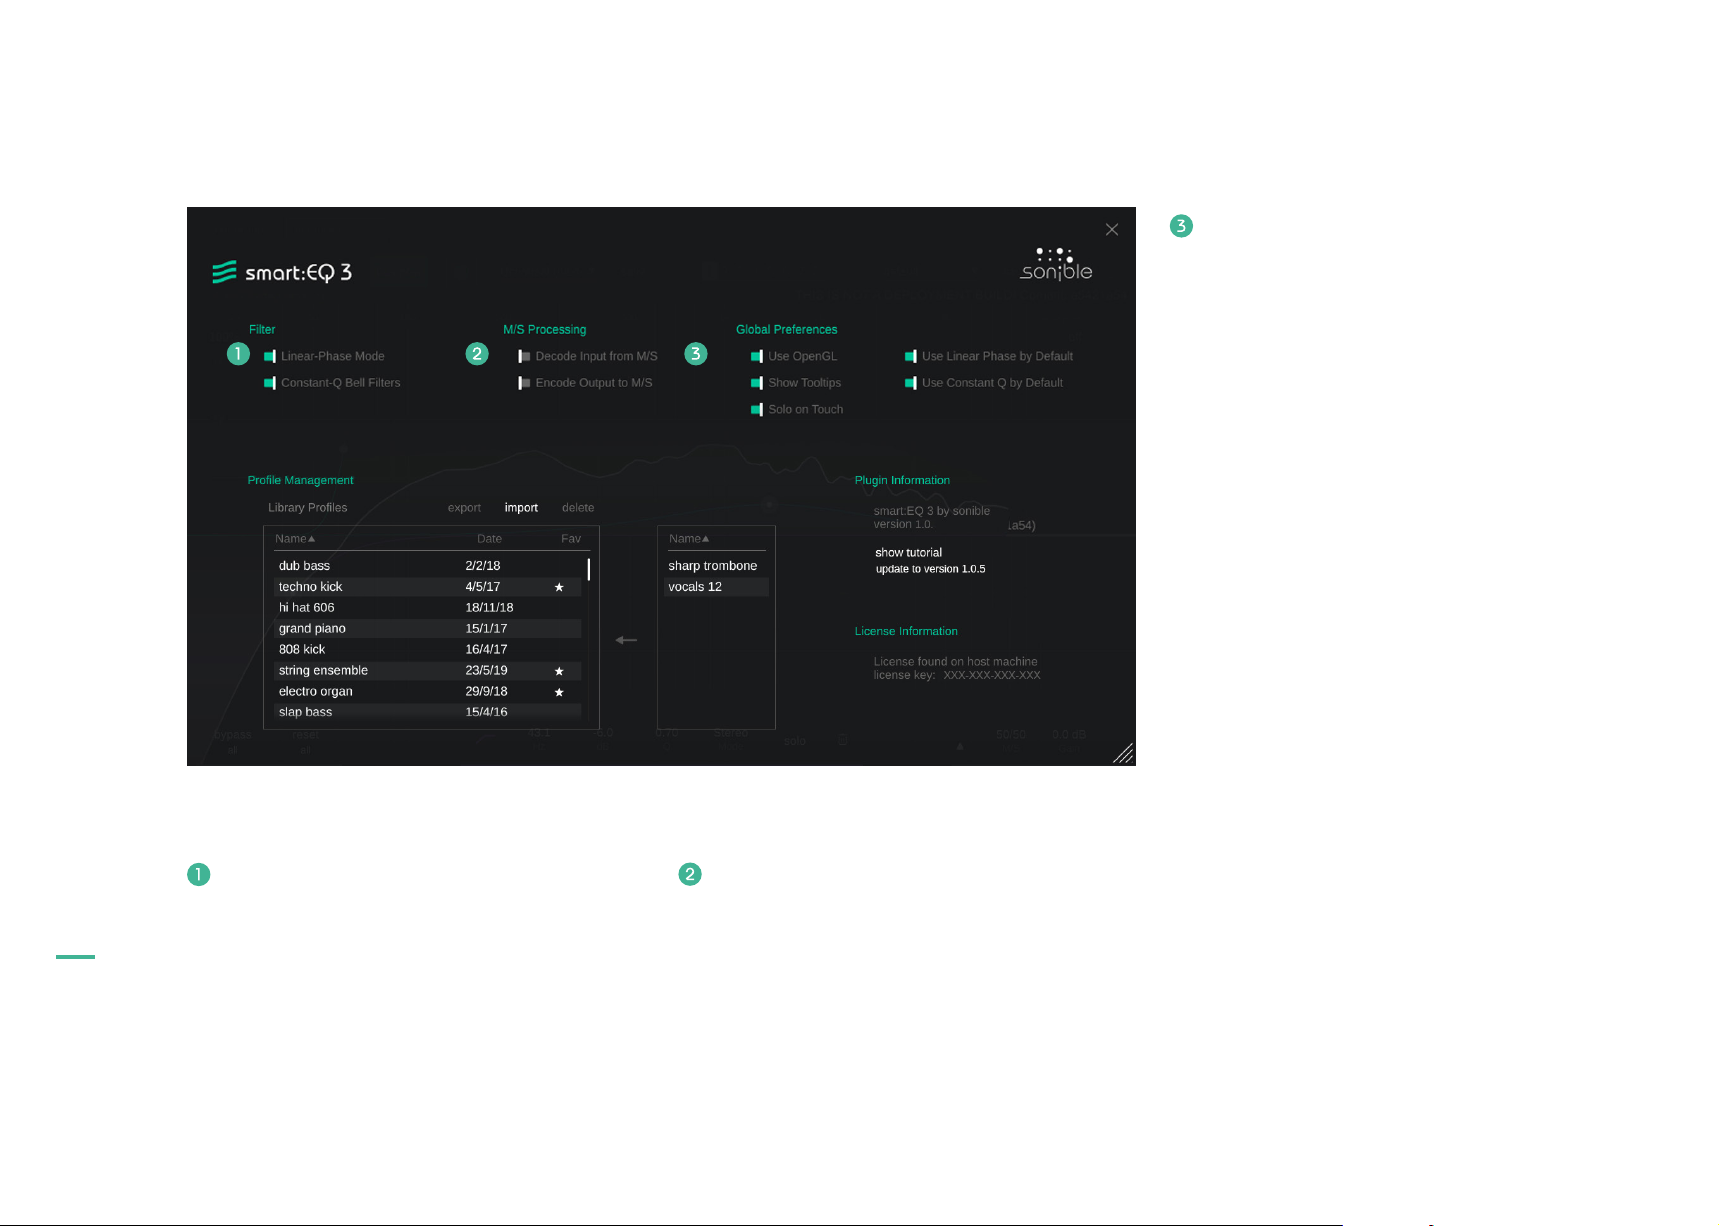
Settings
Global Preferences
These settings will be applied to every new
instance of smart:EQ 3 by default.
Enable OpenGL
OpenGL might cause rendering issues on
certain computer hardware. Use this option to
disable OpenGL.
Show Tooltips
Enable/Disable tooltips on hover.
Solo on Touch
This setting will solo the filter band you’re
currently working on.
Use Constant Q by default
Automatically enable the ‘Constant-Q bell
filters‘ for every new smart:EQ 3 instance.
manual
smart:EQ 3
23
To visit the settings page, click the little cogwheel in
the upper right corner of the plug-in.
Filter settings
Constant-Q bell filters
Constant-Q bell filters will lead to steeper
notches for negative gain values.
Linear phase mode
Linear phase mode induces a processing
latency but does not lead to any phase distortion. You may use this mode to avoid phase
Use Linear Phase by default
Automatically enable the ‘Use Linear Phase
Mode‘ for every new smart:EQ 3 instance.
problems when working with complex signals
in postproduction.
M/S settings
Receive M/S input
When enabled, the plug-in expects an M/S
input signal (NOT a regular stereo track).
Send M/S Output
When enabled, the plug-in will output an M/S
signal (and NOT a regular stereo track).
Page 24
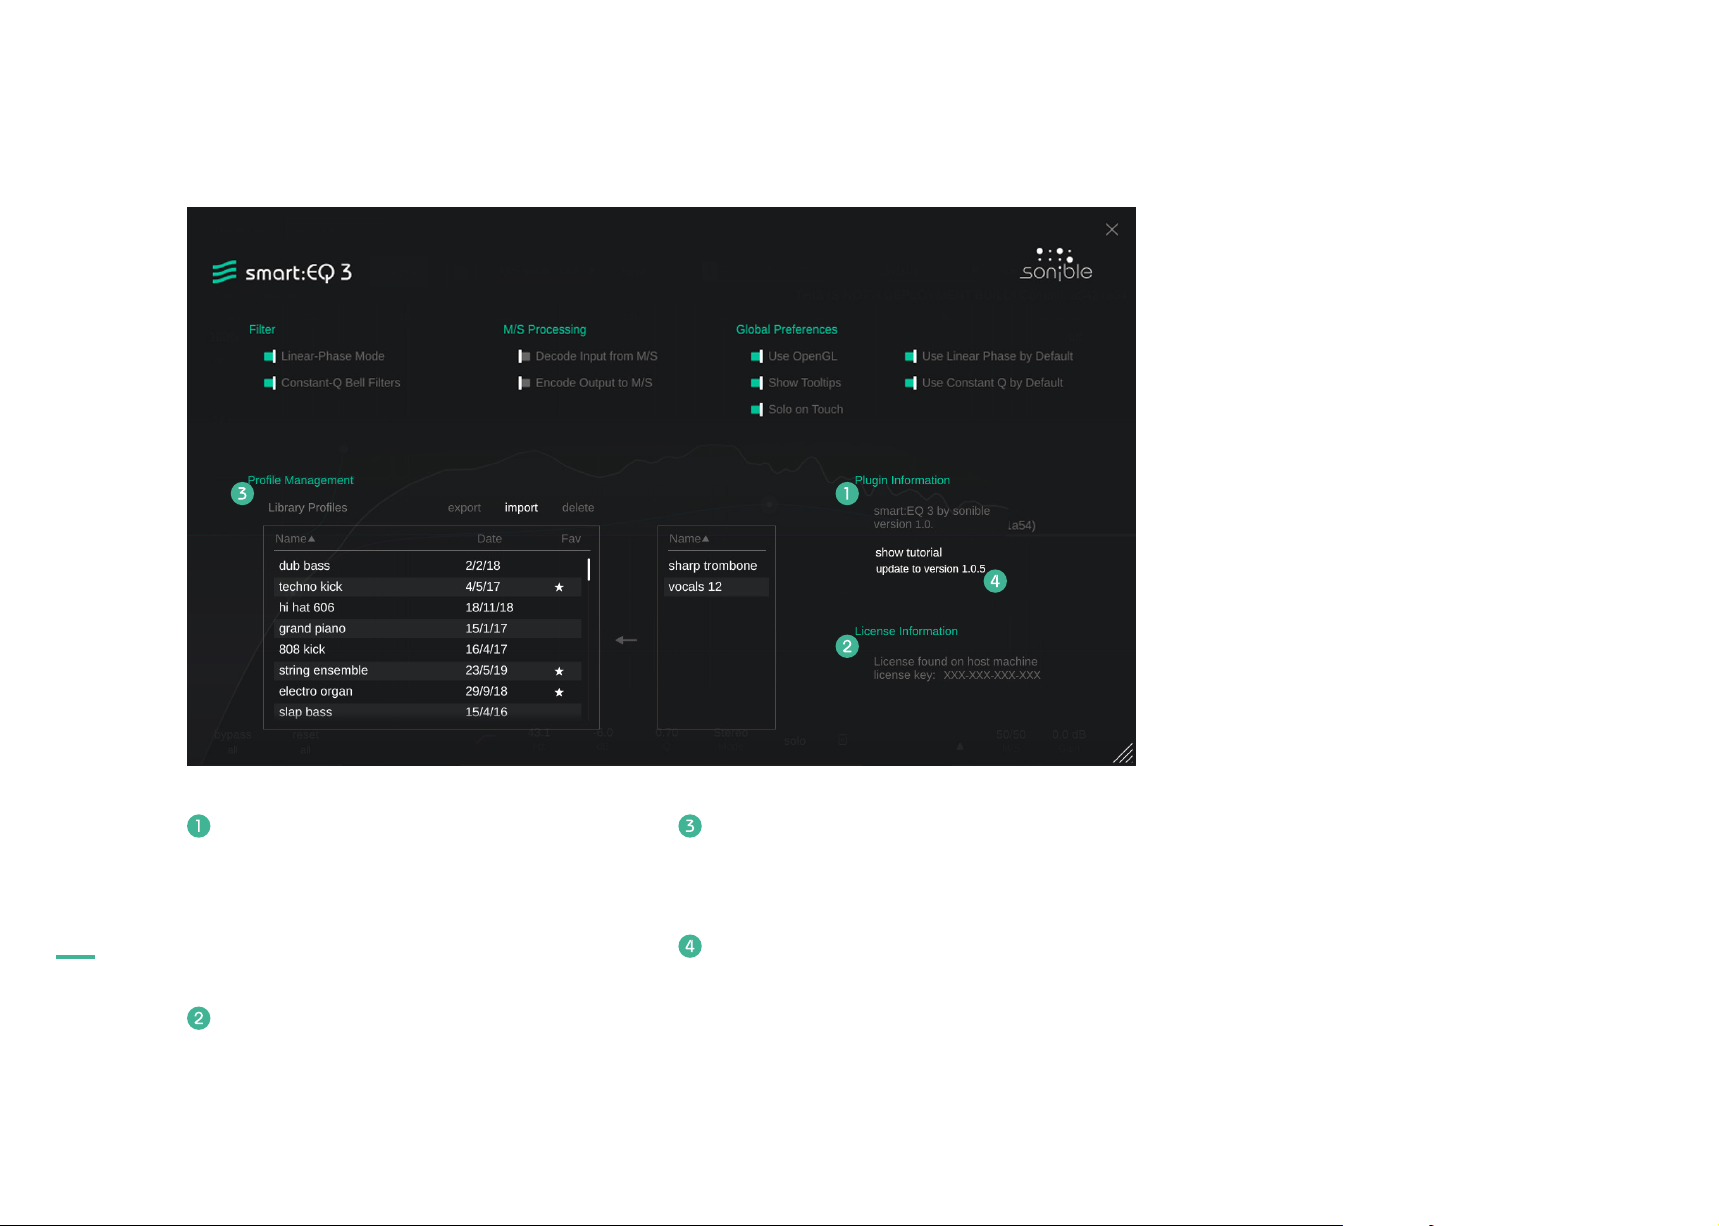
Profile Management and Licensing
manual
smart:EQ 3
24
Plug-in information
Check the name and version of your plug-in
and find the latest available update.
You can restart the welcome tour by clicking on
”show tutorial”.
License Information
Check your license state and number (if not
licensed via iLok).
Profile Management
Manage your custom profiles. See page 12 for
more details.
Update notice
When a new update of the plug-in is available,
you‘ll receive a notification on the smart:EQ
3 settings page. Click on the blue label to
download the latest version of the plug-in.
Page 25
www.sonible.com/smartEQ3
manual
smart:EQ 3
25
sonible GmbH
Haydngasse 10/1
8010 Graz
Austria
phone: +43 316 912288
[email protected]
www.sonible.com
All specifications are subject to change without notice.
©2021, sonible GmbH. All rights reserved.
Engineered & designed by sonible in Austria.
 Loading...