

Page 1
smart:comp
s
g
7
0%
h
S
p
l
n
8dB
d
4:1
o
Attack
20ms
e
manual
The spectro-dynamic
Threshol
compressor
Rati
Releas
ectra
Compressio
Strengt
idechain duckin
Page 2

contents welcome to smart:comp
smart:comp is a unique spectro-dynamic compressor; finding the parameters for
welcome to smart:comp
install 4
authorization 5
user interface 6
3
well-balanced compression results in just a few seconds. Through frequency-selec-
tive processing, smart:comp also ensures unparalleled transparency. With this multi-
dimensional approach, compression has evolved to the next level.
overview
contents
manual
smart:comp
time-domain compression 7
shape & detection focus 8
automatic parametrization 9
spectral compression 10
sidechain ducking 11
global parameters 12
states handling 12
output section 12
settings 13
smart:comp is the synergy of intelligently enhanced time-domain compression and trail-
blazing spectral compression. Behind the user-friendly and intuitive interface of the new
plug-in, runs the smart:engine – an A.I.-based, content-aware system designed on the
basis of psychoacoustic principles as well as extensive hands-on mixing experience.
The time-domain compressor recommends the most appropriate settings for threshold,
ratio, attack and release with a single click, while the spectral compression dynamically
keeps an eye on the tonal balance of the input signal.
The interrelated nature of compression parameters can make the crucial task of compres-
sion time-consuming and tedious. smart:comp significantly speeds up the process and
delivers results with greater precision than ever, making it a valuable assistant for mixing
welcome to smart:comp
manual
smart:comp
and mastering professionals and aspiring talents alike.
2
3
Page 3
install
authorization
System requirements
CPU
RAM
Operating systems
minimum requirements | Windows | OSX
install
You will need admin privileges to
successfully install the smart:comp
plug-in.
manual
smart:comp
Intel Core Duo, i5
2GB
Windows 7 (32/64 bit)
Windows 10 (32/64 bit)
Mac OSX 10.7+
Windows
To start the installation process, extract the
downloaded zip-file sonible_smartComp_win.zip
on your hard disk and run the installation file
smartComp_installer.exe.
The installer will now guide you through the necessary
steps to install smart:comp on your computer.
During installation, you can select which version(s)
of smart:comp should be installed. You can also
select custom installation folders for the VST version
or simply use the default folder suggested by the
installer.
The VST3 and AAX versions of the plug-in will
automatically be installed in their respective default
folders.
Default folders:
VST3 (on a 64 bit operating system):
..\Program Files\Common Files\VST3\
..\Program Files(x86)\Common Files\VST3\
AAX (on a 64 bit operating system)
..\Program Files\Common Files\Avid\Audio\Plug-Ins
..\Program Files(x86)\Common Files\Avid\Audio\Plug-Ins
Mac OSX
To start the installation process, please open the disk
image sonible_smartComp_osx.dmg. This will mount
the image and open a finder window showing the content
of the installation package.
To install smart:comp on your system, run the installation
file smartComp_installer.mpkg.
The installer will now guide you through the necessary
steps to install smart:comp on your computer. smart:comp
will automatically be installed at the default locations for
audio plug-ins.
Default folders:
Audio Unit
/Library/Audio/Plug-Ins/Components/
VST
/Library/Audio/Plug-Ins/VST/
If you need to change the location of the plug-in, drag the
corresponding file(s) manually to the designated folder
after the installation has finished.
Licensing system
You can select between two licensing systems:
machine-based or iLok (USB dongle).
Machine-based
Each license key allows you to install smart:comp
on two computers with unique system IDs. These
system IDs are computed during license activation.
The same license can be used by multiple users, but
each user has to individually unlock the full version
of smart:comp under their account.
If a system-ID is changed (e.g. replacement of the hard
disk), please contact us ([email protected])
and ask for instructions to re-activate the license.
iLok
If you want to use your iLok, please contact us and
provide the purchased license key and your iLok
account name.
Please double-check your spelling!
We will deduct one activation from your license pool
which will then reside in your iLok account from that
time on.
Unlocking
If you purchased a license for smart:comp online,
you receive your license key via email.
Machine-based unlocking
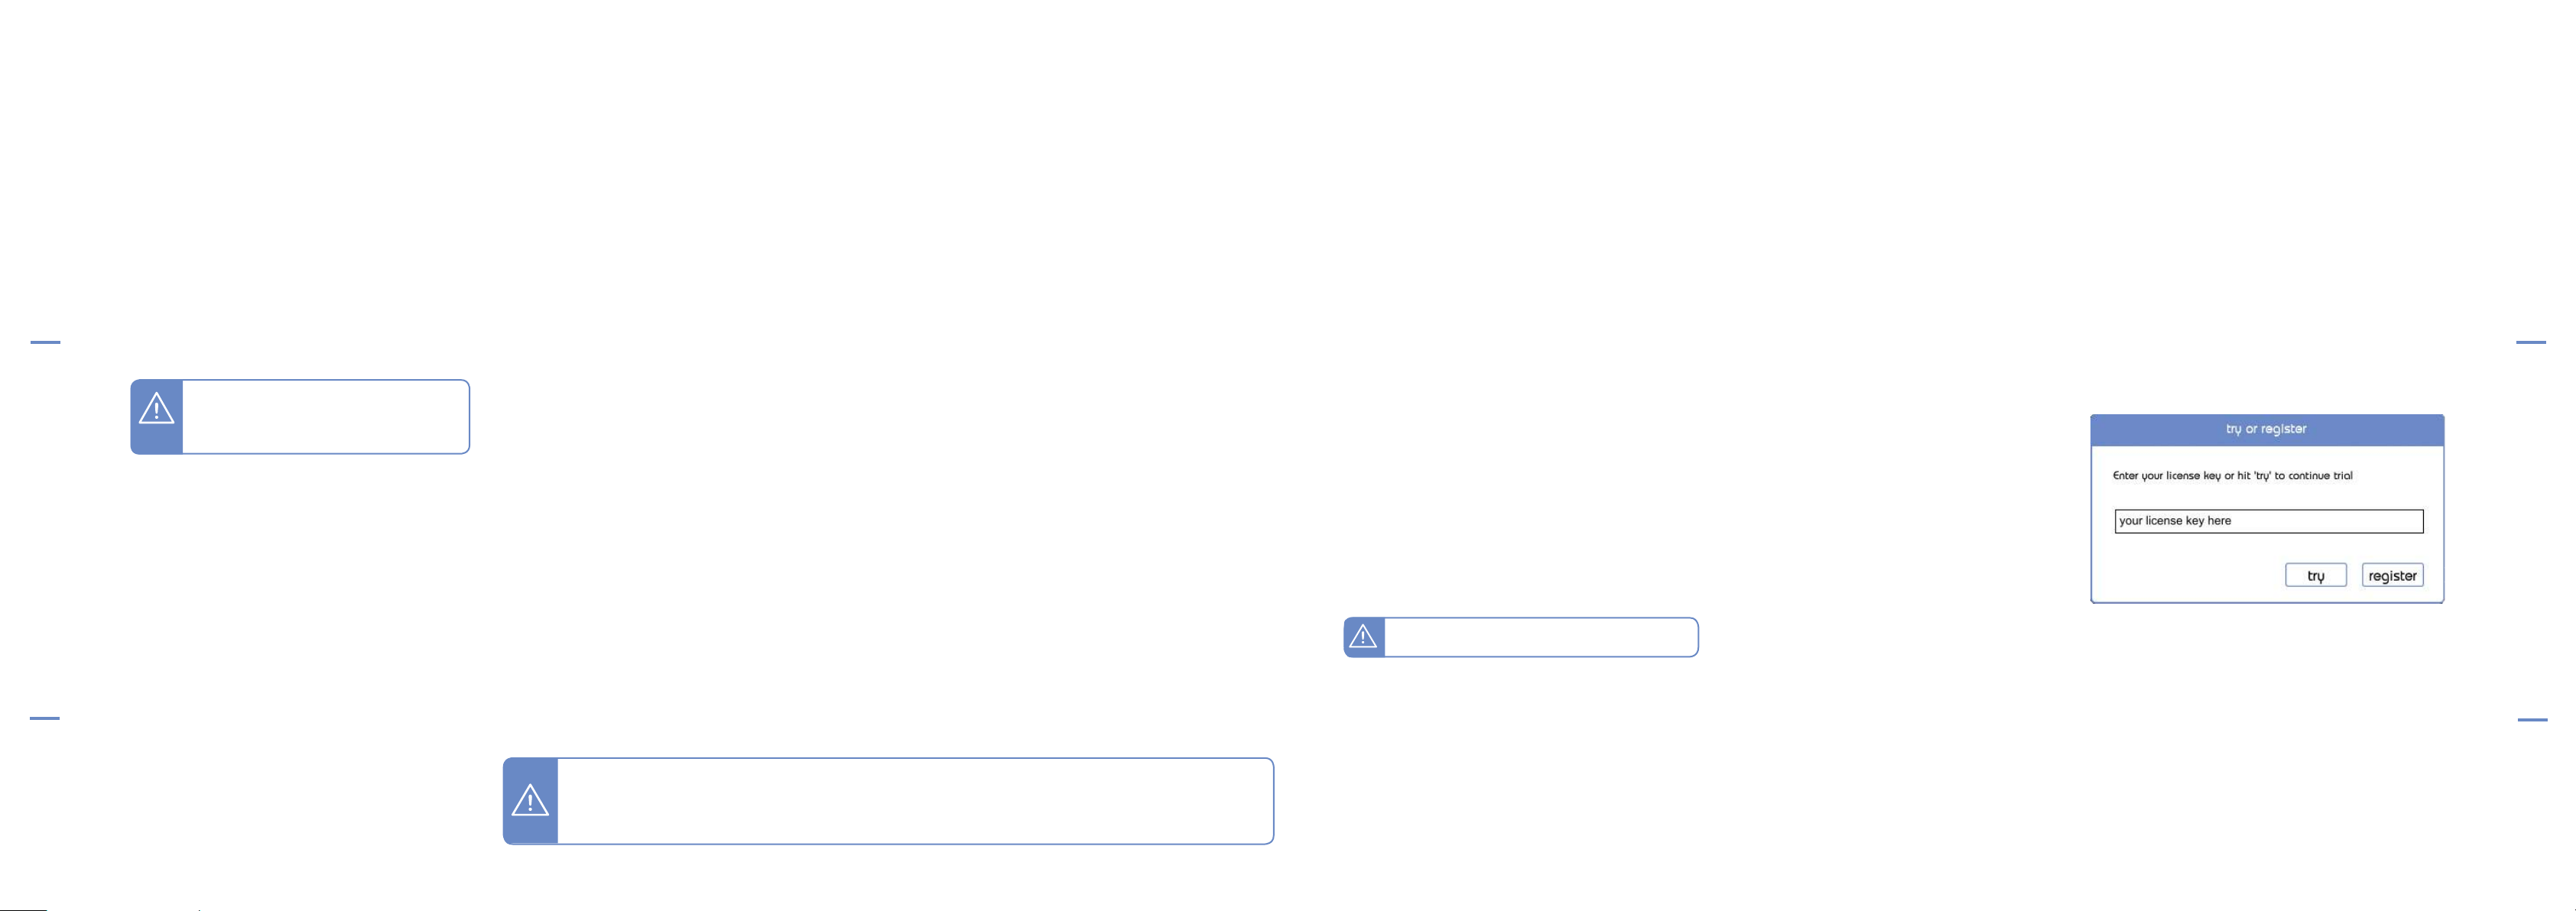
When opening smart:comp for the first time, a notification window will be displayed asking you to unlock
smart:comp with a valid license key.
• Please make sure that your computer is
connected to the internet before starting the
registration process.
• Enter your license key and click „register.“ The
plug-in will now communicate with our server to
check if the license is valid. If it is – enjoy! :)
iLok
If you transferred your license to an iLok, simply
attach the iLok to your computer. The plug-in will
then be automatically registered – enjoy!
If you don’t receive the email within minutes please
check your junk folder first before contacting our
support ([email protected]).
Trial version
To run smart:comp in demo-mode, simply click ”try”
and you will then be able to use smart:comp for a
couple of days without any limitations. (Please refer
to our website to find out more about the current
demo period of smart:comp)
When the demo period expires, you will need to
purchase a full license in order to continue using the
plug-in.
licensing system | unlocking | trial version
authorization
manual
smart:comp
Please note that smart:comp requires the
from www.ilok.com and install it on your system. You don’t need an iLok or an iLok account.
This application allows us to ensure the integrity of our products for a better user experience.
4
PACE iLok License Manager. Download the software
You can move the activation to different iLoks
or computers the way you’re used to via the iLok
License Manager.
5
Page 4
user interface
time-domain compression
user interface
overview
manual
smart:comp
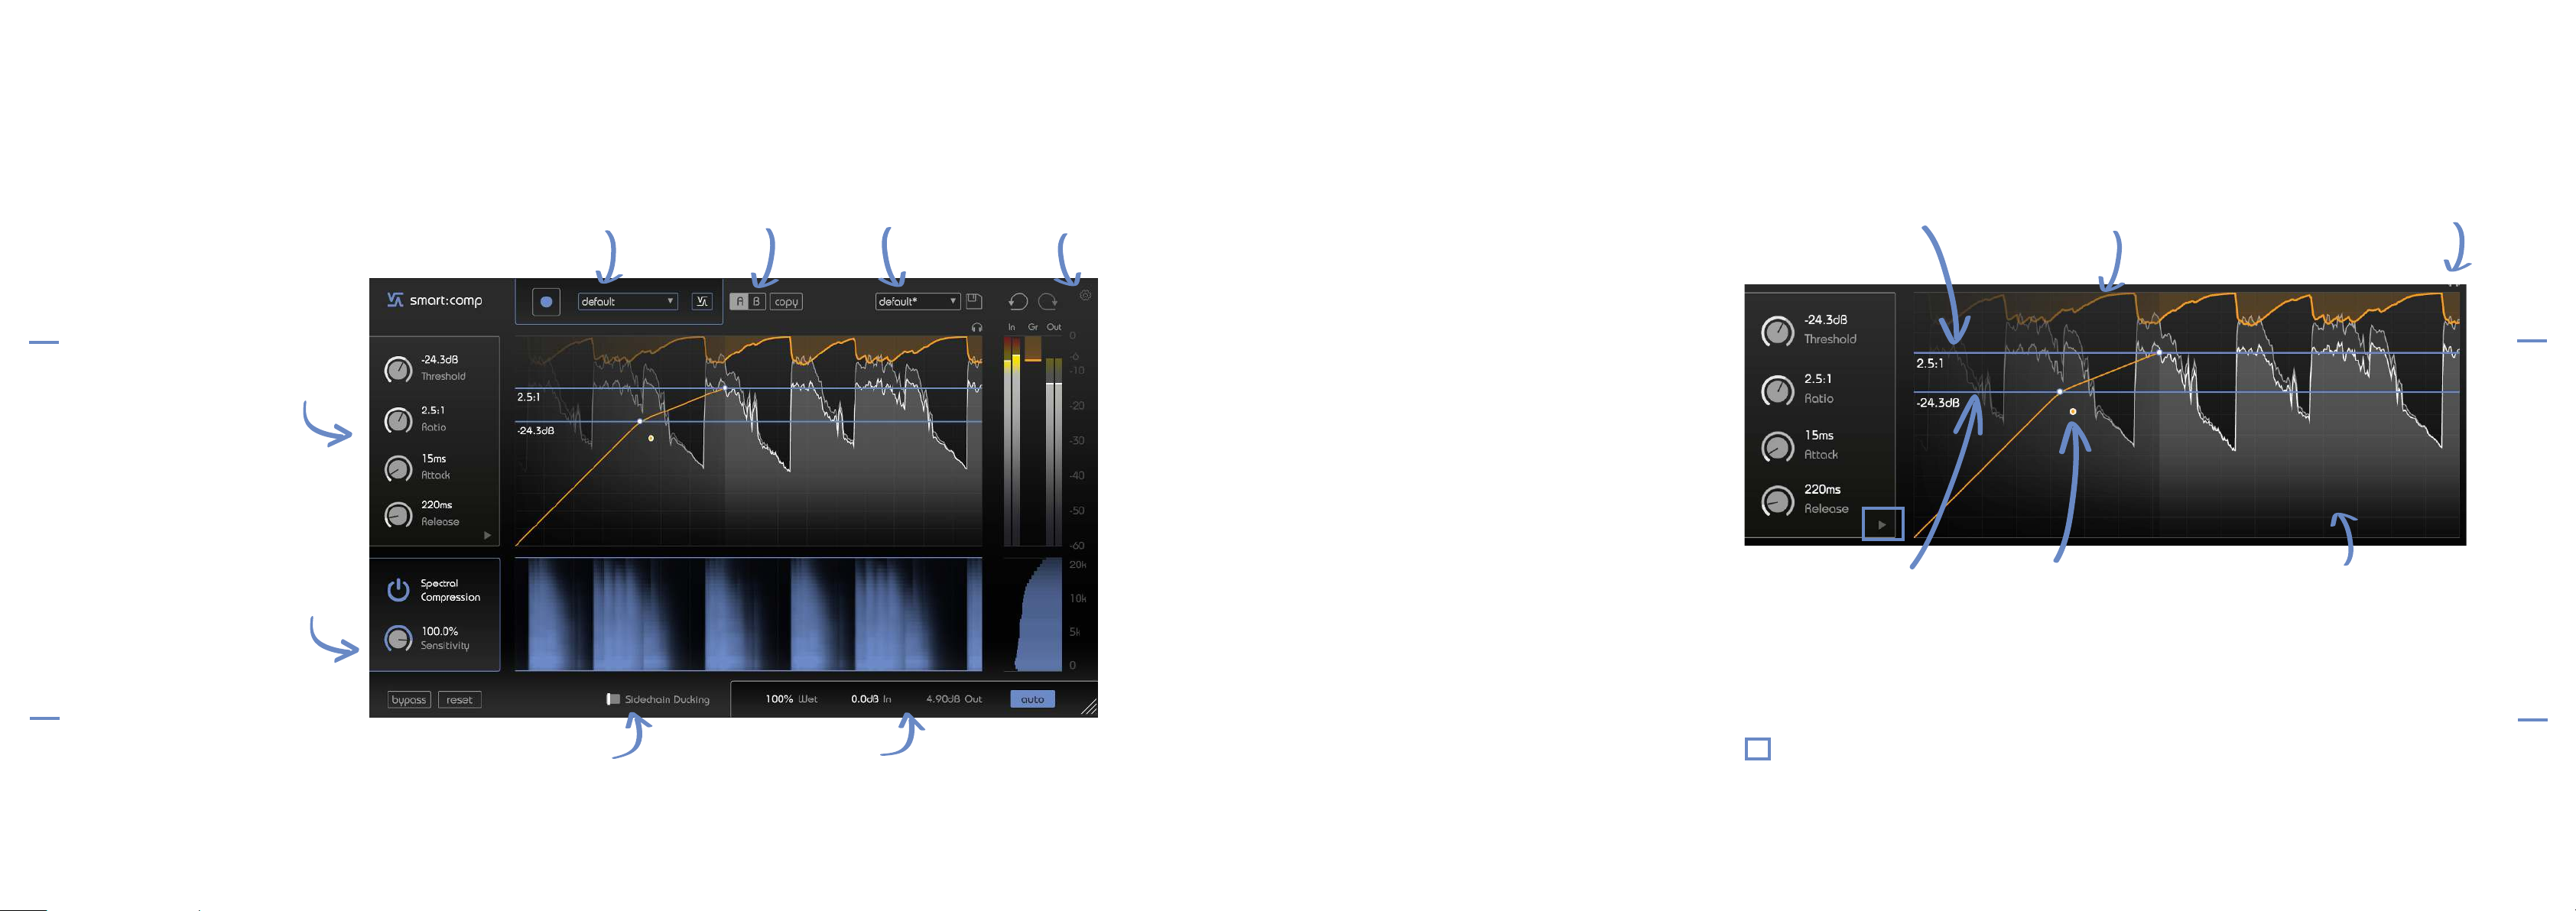
Learning section
The learning section includes all controls for
learning and recalling smart compression
parameters. -> see page 9 for more details
Time-domain compression
Control all parameters for the
time-domain compression.
-> see page 7 for more details
Spectral compression
Activate, monitor and control the
spectral compression.
-> see page 10 for more details
State handling
Save different states of parameter settings
for easy A/B comparison or to store personal
presets. -> see page 12 for more details
Sidechain ducking
Enable the sidechain mode for
(frequency-dependent) ducking.
-> see page 11 for more details
Settings
Access the settings page.
-> see page 13 for more details
Mix & gain
Set the wet/dry mix for easy parallel
compression and control of the (auto) gain.
-> see page 12 for more details
At its core, smart:comp is a high-quality time-domain
compressor. You can either set all compression
parameters manually using the controls outlined
on this page or you can use the unique learning
ability of smart:comp to let the plug-in find the most
appropriate threshold, ratio, attack and release
settings with a single click (see page 9).
To manually set parameters, you can access the
most important values directly from the main window
(see image on the right):
Threshold
Threshold defines the level of the input signal at
which the compression effect is engaged. It must be
set below the maximum level of the input signal.
Ratio
Ratio determines how much compression is applied
to any signal that goes over the threshold.
Attack
Attack defines the time it takes for the signal to become
fully compressed after exceeding the threshold level.
Release
Release defines the time it takes for the signal to
recover from its compressed state to its original
non-compressed state.
Knee
Depending on the knee shape, smart:comp
commences gain reduction, after the signal has
exceeded the threshold level, either gradually (soft
knee) or rather abruptly (hard knee). The softer the
knee, the slower the compression approaches the
defined ratio as the signal level increases.
Ratio line
Visually set the ratio for
the compressor.
Threshold line
Visually set the threshold for
the compressor. To trigger
compression, you have to make
sure that the peak-levels of the input
signal are above the threshold.
Shape & detection focus
You can expand the compressor parameter box
(click the
fine-tune the characteristics of the compressor
(see page 8).
little arrow at the lower right) to further
Gain reduction
Visual history of recent
compression values.
Knee control
Modify the knee of the
compressor transfer function.
Pulling the thumb away from
the threshold line leads to a
softer knee.
Listen to difference signal
Listen to the difference between
the input and output signal.
Input & output signal
Recent history of the input
signal (background) and the
processed output signal
(foreground).
overview
time-domain compression
manual
smart:comp
6
7
Page 5
Shape & detection focus
shape & focus
time-domain compression
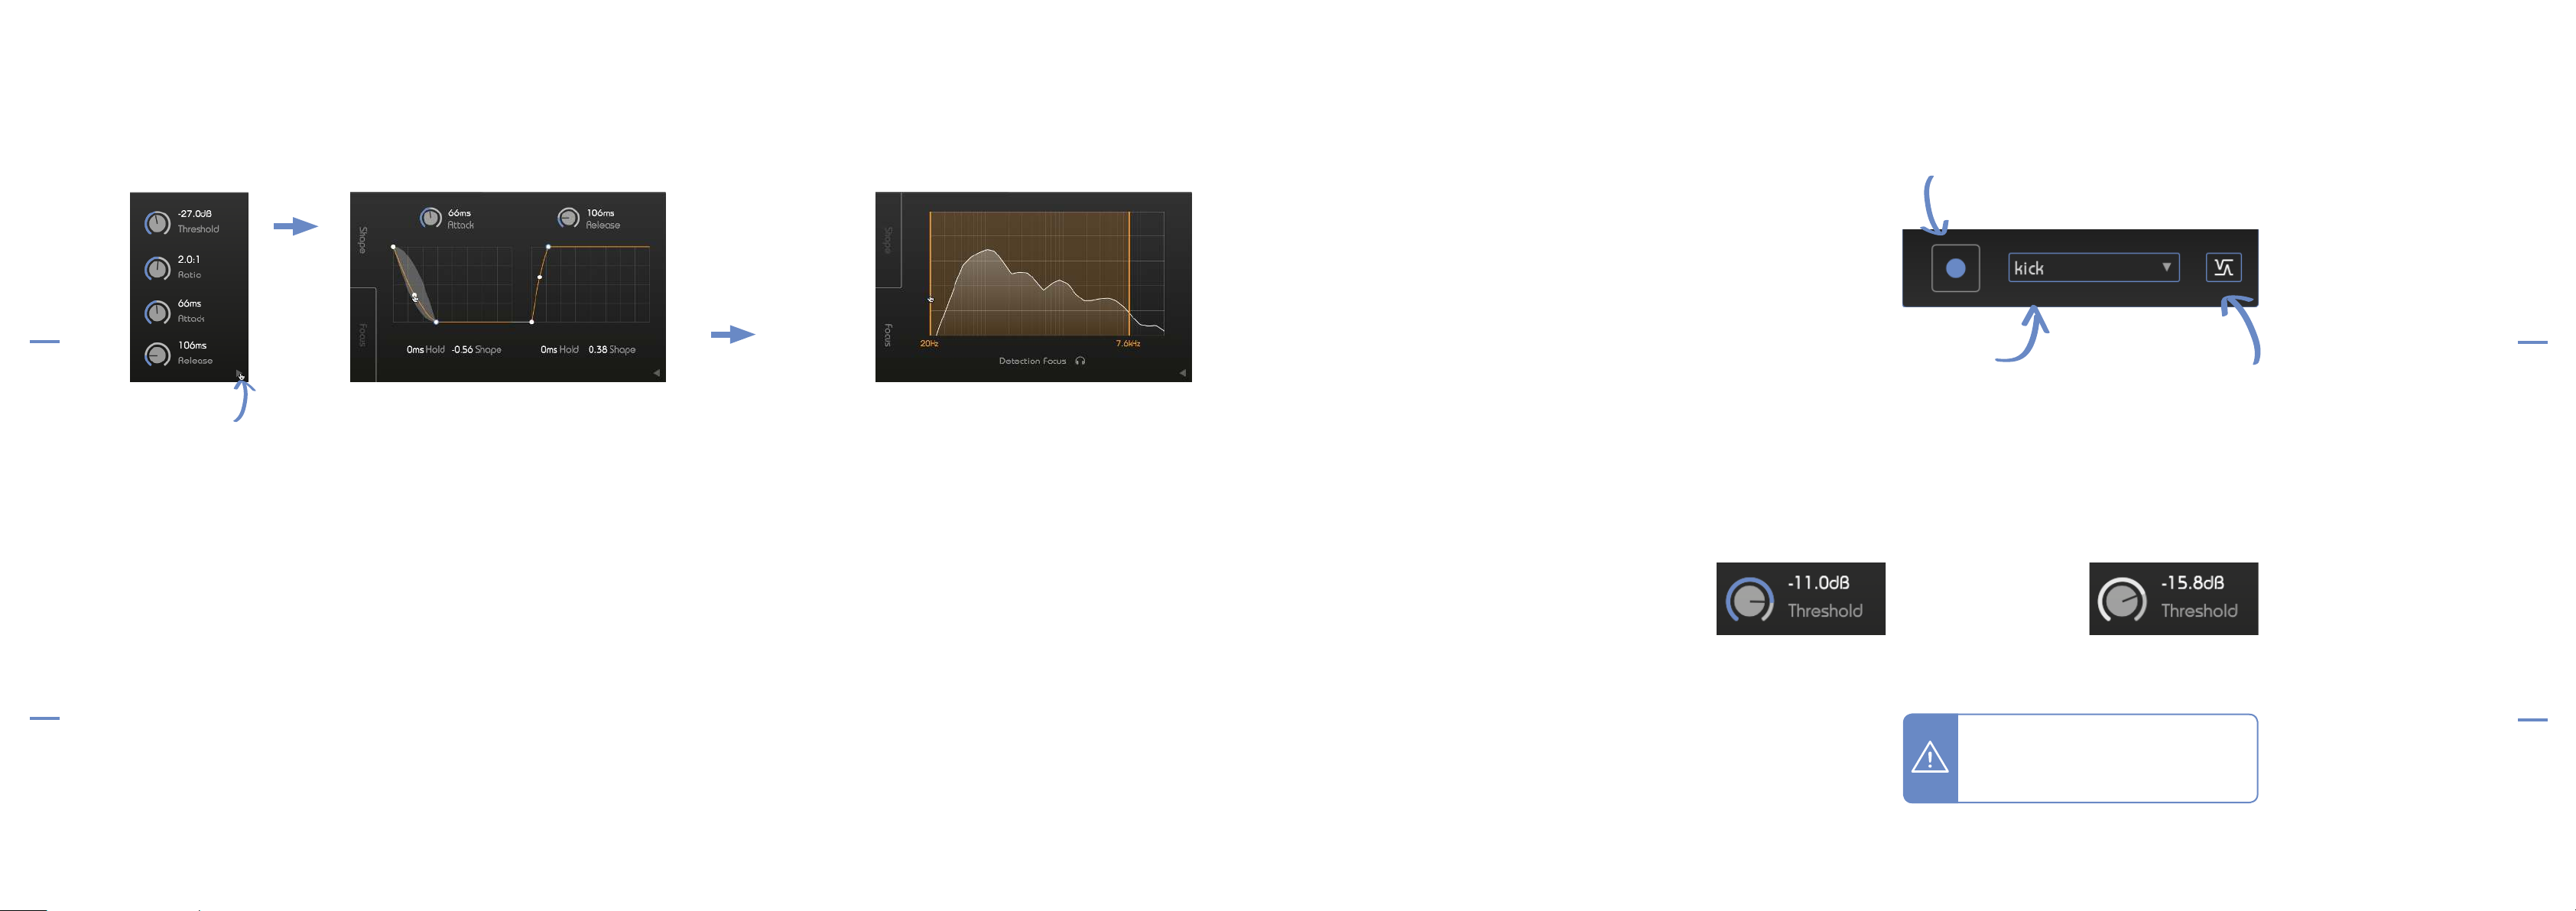
Shape | attack and release shaper
click to expand
Focus | detection focus
Automatic parametrization
smart:comp is equipped with a unique learning
feature that finds the right parameters for well-balanced compression results in just a few seconds.
While learning mode is activated, the plug-in analyzes
the incoming audio signal and recommends settings
for threshold, ratio, attack and release.
The learning process
1. Select a profile (optional)
A profile calibrates the processing of smart:comp to
a specific sound source.
Please note that you can always start the learning
process with the ”default” profile and switch to more
specific profiles later.
2. Start the audio playback & start learning
Learning
Click the record button to start or pause
learning. While learning, a pause symbol will
be displayed instead of the record button.
Profile dropdown
Expand the dropdown menu to
select a profile that best matches
your audio material.
Smart state button
This button indicates if you are currently in a smart
state (the button is BLUE, all compressor parameters are set to their automatically learned values) or
if one or multiple parameters have been manually
modified (the button turns BLACK).
automatic parametrization
time-domain compression
manual
smart:comp
8
The attack and release behavior of smart:comp
can be configured visually in the attack and release
shaper. The ability to fine-tune smart:comp’s attack
and release characteristics is great for sound design
and for sculpting transients.
Attack shape
The attack shape defines how fast the signal will
reach maximum compression during the attack time
after exceeding the threshold level.
Attack hold
The attack hold defines the amount of time the
compressor waits until the compression kicks in
once the signal goes above the threshold.
Release shape
The release shape defines how fast the signal
recovers from its compressed state during the
release time.
Release hold
The release hold defines the amount of time the
compressor waits until the signal starts to recover
from its compressed state after falling below the
threshold.
In the focus tab, you can set the focus of the
detection filter. Drag the lines to set the focus to a
specific frequency range. Now the compressor will
only be triggered by signal energies in the defined
region (e.g. just the low bass).
To listen to the frequency region selected by the
detection filter, click the little headphone icon below
the frequency range display.
smart:comp needs incoming audio material for the
learning process. Once the playback started, click
the blue record button. Now, a pulsating pause icon
indicates that smart:comp is actively learning.
While learning, a progress bar inside the profile
dropdown indicates the progression of the process.
3. Done!
When the learning process is finished, smart:comp
will automatically set all learned parameters (you can
disable the ”auto apply” feature on the settings page)
and the smart state button as well as all learned
parameter sliders will turn blue.
Smart parameter
A blue slider color
indicates automatically
set parameters.
Hint: When the learning process is
finished, smart:comp also activates the
spectral compression (see section
Spectral Compression for more details).
Modified parameter
A white slider color
indicates manually
modified parameters.
manual
smart:comp
9
Page 6
spectral compression
sidechain ducking
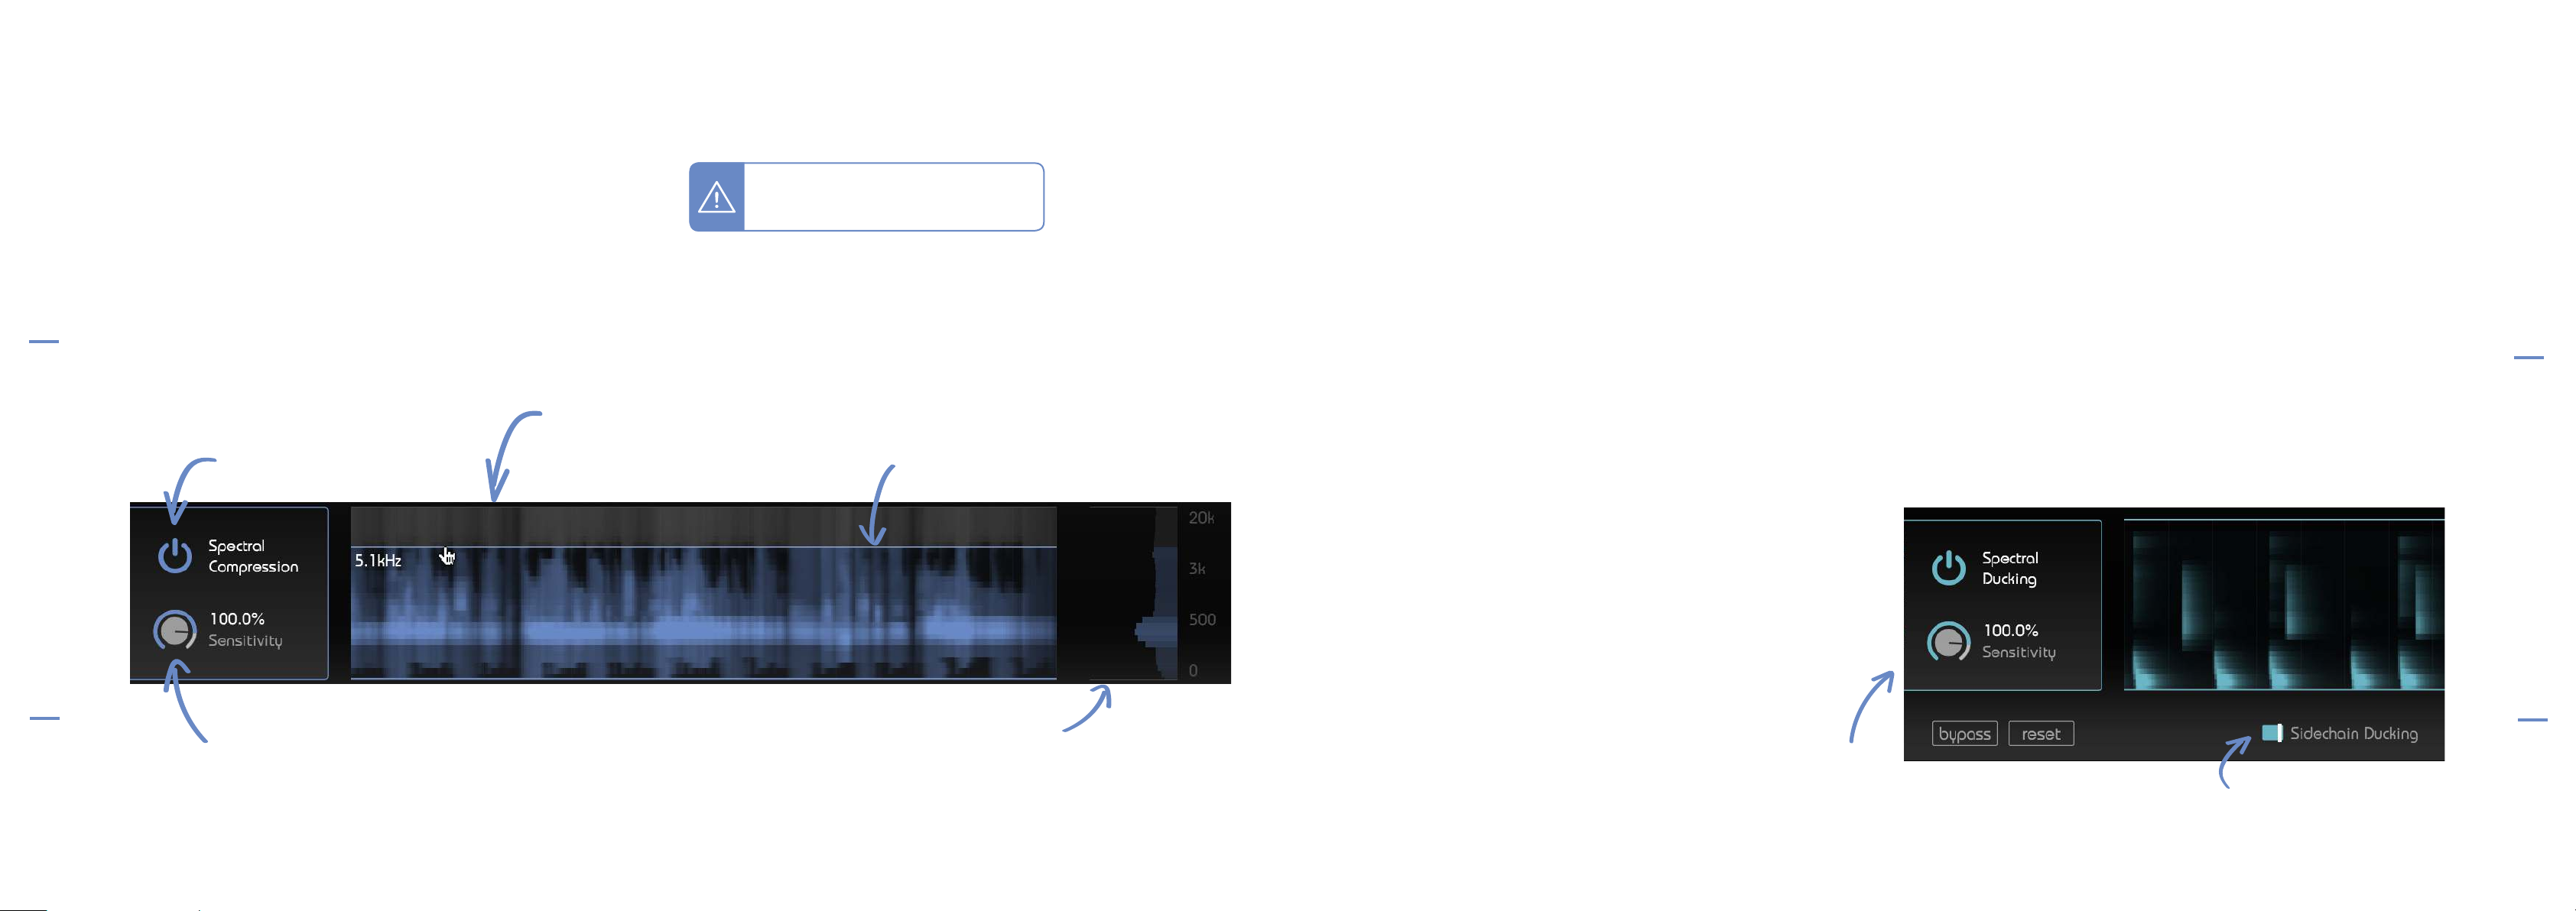
Spectral compression is all about giving a track the
best possible definition and maximum transparency.
By continuously analyzing the input signal across
more than 2000 bands, smart:comp acts like an
intelligent, ultra-high-resolution multiband compressor that dynamically smoothes out tonal imbalances.
It only applies compression where it’s really needed
overview
spectral compression
and therefore ensures a consistent tonal as well as
dynamic balance at all times.
Enable/disable
Click to enable spectral
compression.
Hint: To enable spectral compression
you need to first finish the learning
process. (see Page 10).
Spectral compression display
You can observe the optimizations made in
the spectral compressor: the more intense
the color is, the more necessary changes
were made.
Frequency selection
Use the frequency drag lines to limit the spectral
compression to a certain frequency range
(blue color). Outside the selected region, only
broadband compression will be applied (gray
color).
In sidechain mode, the gain reduction of smart:comp
is controlled by an external signal that is routed to
the sidechain of the plug-in.
smart:comp provides two ways of working with
a sidechain signal: broadband ducking (spectral
ducking disabled) or frequency-dependent ducking
(spectral ducking enabled).
Sidechain ducking (broadband)
1. Route a signal to the sidechain input
Route the signal you want to give space in the
spectrum to the input of smart:comp. This signal will
control the ducking process.
2. Enable sidechain ducking
Click the sidechain ducking switch to enable
sidechain ducking. The color of all blue control
elements will now turn turquoise to indicate the new
processing mode.
Spectral ducking (frequency-dependent)
In order to seamlessly merge signals that are
competing for attention within the same spectral
regions, smart:comp provides a unique frequency-dependent sidechain mode.
In this mode, smart:comp ‘listens’ for potential
spectral clashes between the input and the sidechain
signals. By dynamically ducking affected frequency
regions of the input signal, it creates space for the
sidechain signal.
To enable spectral ducking, (1) follow the steps
outlined for broadband ducking and (2) start a
learning process (for more details on the learning
process, please refer to page 9.)
The spectral compressor display will now show
where smart:comp compresses the input signal to
give space to the signal routed to the sidechain input.
To control the impact of the spectral ducking
process, use the sensitivity dial. If you are using a
sensitivity close to 0%, the spectral ducking process
will become more and more broadband and less
frequency-selective.
overview
sidechain ducking
manual
smart:comp
10
Sensitivity
Controls the sensitivity of the spectral
compression. Higher sensitivity values
guarantee a more precise spectral processing, lower values lead to more ”classical“
broadband compression results.
Spectral compression meter
The spectral compression meter shows the current
compression value for each frequency.
If spectral compression is turned off, the spectral compression meter turns gray and smart:comp acts like a ”classical”
broadband compressor. That means that all frequencies
are compressed equally.
As well, the sidechain signal will be displayed in
turquoise in the interactive compressor display and
the input meter will show the level of the sidechain
signal.
Now the (broadband) gain reduction of smart:comp
will be controlled by the level of the sidechain signal.
Sensitivity
Control the sensitivity of the spectral ducking. Higher
sensitivity values guarantee a very subtle merging of the
input and the sidechain signal, lower values lead to a more
”classical“ broadband ducking effect.
Enable/disable
Click to enable sidechain ducking.
manual
smart:comp
11
Page 7
global parameters
settings
parameters & output
user interface
State handling Output section
Parameter States
A/B switch
By clicking on the A/B-button, you can switch
between two different states of the plug-in.
Copy
Use to copy the parameter settings of the active
state (e.g. A) to the other one (e.g. B).
Smart state
After finishing the learning process, the smart state
retains all automatically learned parameters (for
more information please refer to page 9).
Presets
To save a preset (all parameter values), click the
floppy disk icon. To load a saved preset, choose the
respective preset name from the dropdown.
Wet
Control the ratio of wet signal to dry signal. At 100%
you will only hear the wet (compressed) signal. By
reducing the wet control, the plug-in will automatically blend the wet and dry signals.
For example, at a setting of 50%, you will hear a mix
of 50% compressed signal and 50% dry input signal.
This makes it very easy to apply parallel compression techniques without any additional routing.
In/out (input/output gain)
Since compression reduces the maximum level of a
signal (all signal components above the threshold are
compressed), the output gain (often called make-up
gain) helps bring the average overall level back up so
that the signal fits the mix. smart:comp will automatically set the right make-up gain when auto gain is
enabled.
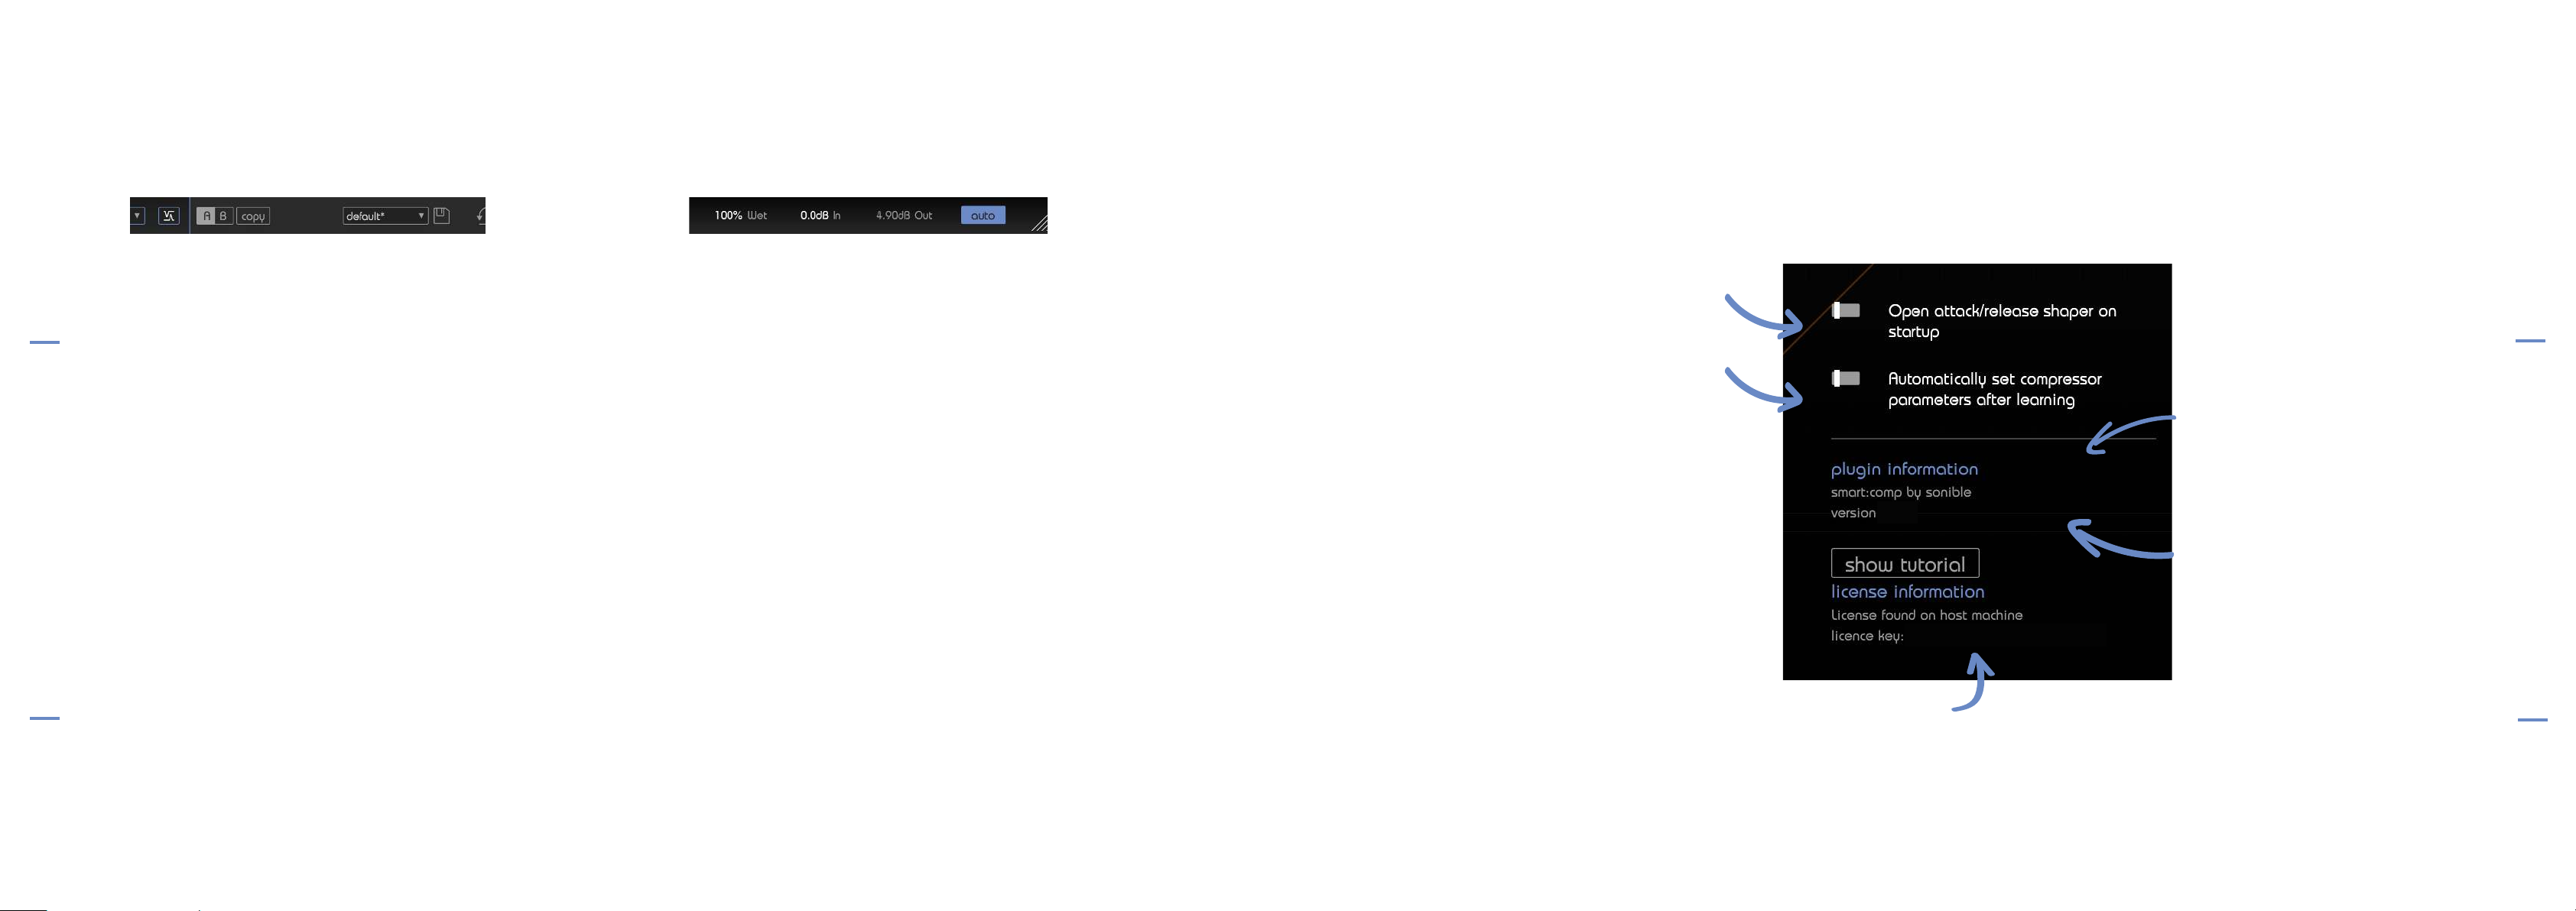
To visit the settings page, click the little cogwheel in
the upper right corner of the plug-in.
Default view*
Enable this switch if you are a fan of the attack and
release shaper. If enabled, the plug-in will, by default,
show the extended controls when a new instance is
loaded.
Auto parametrization*
Enable this switch if you want the newly learned
compressor parameters to be automatically set after
learning.
Disable auto parametrization if you want to manually
set newly learned parameters. This may help, if you
want to parametrize the time-domain compressor
manually and only need the learning process to enable
the spectral compression or ducking.
1.0.0 (update available)
0000-0000-0000-0000
Plug-in information
Here you can find the name and version of your plug-in. You can start the
welcome tour by clicking on ”show
tutorial”.
Update notice
If a new release of the plug-in is
available, you‘ll get a notification on
smart:comp settings page. Click on
the blue label to download the latest
version of the plug-in.
settings
user interface
manual
smart:comp
12
If you want to delete a preset or change its name, go
to the preset folder with your local file explorer. You
can also easily share your presets among different
workstations. All presets are saved with the file
extension ”.spr” to the following folders:
OSX: ~/Library/Audio/Presets/sonible/smartComp
Windows: My Documents\Presets\sonible\smartComp
Auto gain
Enable the auto gain function. Auto gain automatically sets the output gain (make-up gain) to compensate for the level reduction caused by compression.
After finishing the learning process, the button turns
blue and the auto gain becomes a smart auto gain
that guarantees a perfect matching of input and
output RMS levels.
* These parameters are global settings.
This means that they will be applied to ALL
instances of smart:comp (in all your projects).
License information
This will display your
license state and
number (when not
licensed via iLok).
manual
smart:comp
13
Page 8
www.sonible.com/smartcomp
sonible GmbH
Haydngasse 10/1
8010 Graz
Austria
phone: +43 316 912288
[email protected]
www.sonible.com
All specifications are subject to change without notice.
©2019, sonible GmbH. All rights reserved.
Engineered & designed by sonible in Austria.
 Loading...