

Page 1
USER MANUAL
THERMAL IMAGERS
KT-80 and KT-145
Page 2

Page 3
USER MANUAL
THERMAL IMAGER
KT-80 and KT-145
SONEL S. A.
Wokulskiego 11 Str.
58-100 Świdnica, Poland
Version 1.02 21.09.2017
Page 4

THERMAL IMAGER SONEL KT-80 and KT-145
2
Thank you for purchasing our thermal imager. KT series thermal imager is a modern, easy
and safe to use measuring device. Please acquaint yourself with the present manual in
order to avoid measuring errors and prevent possible problems related to operation of the
imager.
All products of Sonel S.A. are manufactured in accordance with Quality Management System which
is approved to ISO9001:2008 for the design, manufacturing and servicing.
Due the continuous development of our products, we reserve the right to introduce changes and improvements in the thermal imaging camera and in the software described in this manual without prior
notice.
Copyrights
© Sonel S.A. 2015. All rights reserved.
Page 5

USER MANUAL
3
TABLE OF CONTENTS
1 SAFETY .................................................................................................................... 5
2 DESCRIPTION OF THE CAMERA ...................................................................... 7
2.1 DESCRIPTION OF CAMERA BODY FEATURES ............................................................. 7
3 FUNCTION BUTTONS AND ON-SCREEN MENU ............................................ 8
3.1 BUTTONS LAYOUT. .................................................................................................. 8
3.2 DISPLAY................................................................................................................. 9
3.3 ARRANGEMENT OF INFORMATION ON THE SCREEN................................................. 10
4 OPERATION INSTRUCTIONS AND THE CAMERA ADJUSTMENT ......... 11
4.1 TURNING THE CAMERA AND THE DISPLAY ON/OFF ................................................. 11
4.2 FOCUS ADJUSMENT ................................................................ .............................. 12
4.3 ENLARGING THE IMAGE – ZOOM (X2) (ONLY IN KT-145) ....................................... 12
4.4 TEMPERATURE RANGE .......................................................................................... 13
4.5 CAPTURING AND SAVING IMAGEES ........................................................................ 15
4.6 MENU, SETTINGS, FEATURES................................................................................. 16
4.6.1 Full screen ................................................................................................... 17
4.6.2 Temperature Analysis .................................................................................. 18
4.6.3 Emissivity ..................................................................................................... 22
4.6.4 Palette .......................................................................................................... 24
4.6.5 Temperature settings (temperature measurement settings) ......................... 26
4.6.6 System Settings ............................................................................................ 30
4.7 FILES – BROWSING AND DELETING ........................................................................ 36
4.8 INFORMATION ON HARDWARE AND FIRMWARE VERSION ................................ ......... 40
4.9 SD CARD ............................................................................................................. 41
4.10 POWER SUPPLY, CHARGING BATTERIES ................................................................. 42
4.10.1 Battery installation/removal ........................................................................ 43
4.10.2 Using AC adapter ........................................................................................ 43
4.10.3 Battery power supply ................................................................................... 44
4.10.4 Charging batteries ................................ ................................ ....................... 44
4.10.5 General rules of using Lithium (Li-On) batteries. ....................................... 45
4.11 INSTALLING CAMERA DRIVER ................................................................................ 45
4.11.1 Hardware requirements ............................................................................... 45
4.11.2 Installation ................................................................................................... 46
4.12 READING DATA FROM EXTERNAL MEMORY (SD CARD) ........................................... 46
4.13 TRANSFERING THERMAL IMAGE VIA USB (ONLY IN KT-145) .................................. 47
4.14 DATA ANALYSIS .................................................................................................... 48
5 SPECIFICATIONS ................................................................................................ 49
6 EXAMPLARY EMISSIVITY COEFFICIENT VALUES .................................. 51
Page 6

THERMAL IMAGER SONEL KT-80 and KT-145
4
7 CLEANING AND MAINTENANCE ................................................................... 52
8 CALIBRATION ..................................................................................................... 52
9 STORAGE .............................................................................................................. 52
10 EQUIPMENT ......................................................................................................... 53
10.1 KT-80 STANDARD ACCESSORIES ........................................................................... 53
10.2 KT-145 STANDARD ACCESSORIES ......................................................................... 53
10.3 ADDITIONAL EQUIPMENT..................................................................................... 54
11 DISMANTLING AND DISPOSAL ...................................................................... 55
12 MANUFACTURER ............................................................................................... 55
Page 7

USER MANUAL
5
1 Safety
Before you proceed to operate the camera, acquaint yourself thoroughly with the present
manual and observe the safety regulations and specifications defined by the manufacturer.
Any application that differs from those specified in the present manual may result
in a damage to the device and constitute a source of danger for the user.
The camera must not be used in rooms where special conditions are present e.g.
fire and explosion risk.
It is forbidden to use damaged or malfunctioning camera and is partially or fully
out of order.
In case the camera is not used for a long time, its batteries should be removed.
It is not allowed to use the camera with half-closed or opened battery cover and
do not use any other power adapter than the one supplied with the camera.
Repairs may be carried out only by an authorised service point.
.
KT-145 (KT-80) Thermal Imager is designed to measure and record the images in the infrared. The camera is constructed in a manner which gives you maximum performance
and safe-ty at work, however the following precautions must be adhered to at all times (in
addition to any advised precautions applicable at the relevant work-site or work area):
Keep the camera steady during operation.
Do not use the camera in ambient temperatures exceeding its operation and storage
temperature ranges.
Do not direct the camera toward very high intensity radiation sources such as
the sun, lasers or welding arcs etc.
Do not expose the camera to dust and moisture. When operating the device near wa-
ter, ensure that it is adequately guarded against splashes,
When the camera is not in use or is to be transported, ensure that the unit and its ac-
cessories are stored in the protective carry case.
Do not re-switch on the imager before 15 seconds after switching it off.
Do not throw, knock or shake intensely the camera and its components in order to
avoid the damage.
Do not attempt to open the imager's body, as this action will void the warranty.
Keep the SD memory card for the exclusive use of the camera.
During operation, if the camera is to be moved from hot/cold place to cold/hot place,
e.g. from inside/outside to outside/inside of a room, switch the imager off and leave it
in the new workplace for 20 minutes, then turn it on and start normal operation with an
accurate temperature measurement. Sudden and rapid changes in ambient tempera-
ture may cause fault temperature measurement and even damage camera’s IR detec-
tor.
Page 8
THERMAL IMAGER SONEL KT-80 and KT-145
6
Detector calibration - autocalibration, of 2 seconds duration, performs automaticly dur-
ing operation of the device, and is dependent on external conditions and i salso indicated by „calibration” word displayed on screen.
NOTE!
Use only standard and additional accessories,
listed in "Equipment" section. Using other accessories does not ensure
proper operation of the camera and may cause its damage.
NOTE!
Due to the continuous development of the device, the design
of the display and its certain features may be slightly different than presented
in this manual.
NOTE!
KT-145 (KT-80) Thermal imager has no parts that could
be repaired by its user. Never attempt to dismantle or modify the device.
Opening up the unit invalidates the warranty.
NOTE!
To maintain required parameters of rechargeable batteries, unused rechargeable batteries should be charged every 3 months. If the device is not used for
a longer period of time, the batteries must be removed from it and stored
separately.
Page 9
USER MANUAL
7
2 Description of the camera
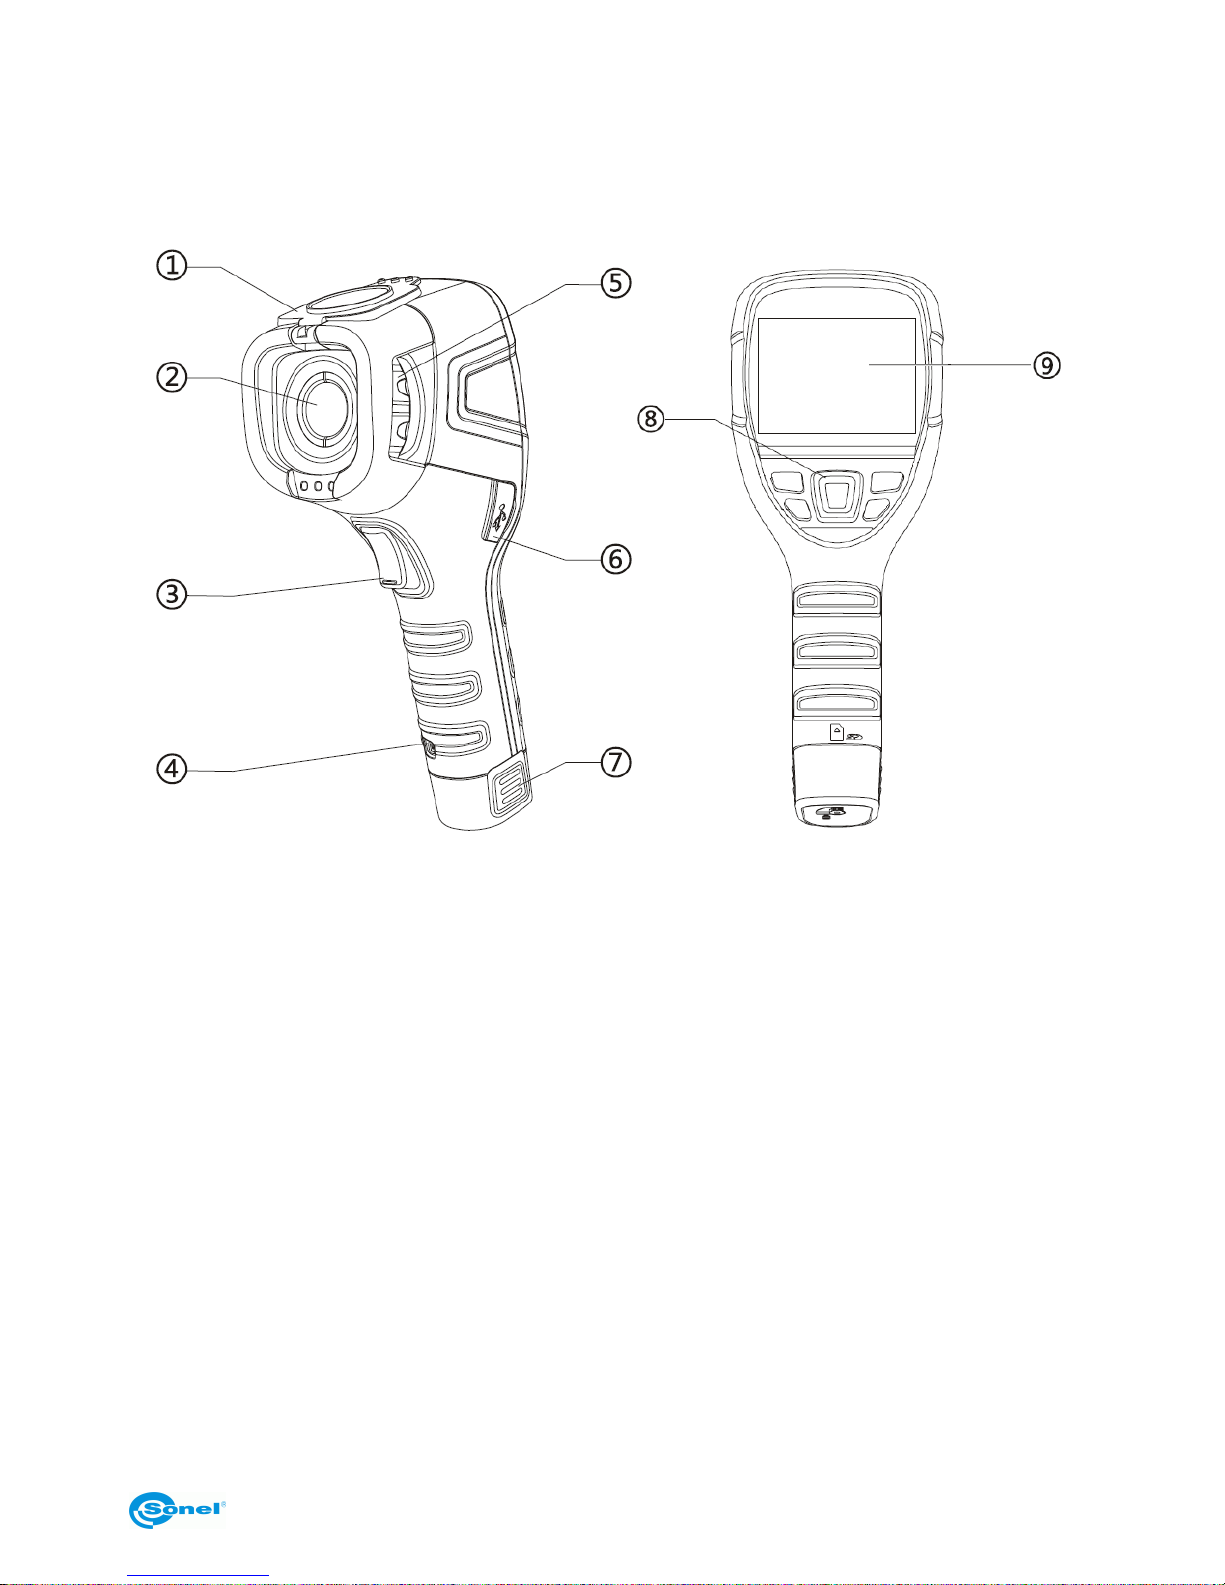
2.1 Description of camera body features
1. Lens cover (built-in magnet)
2. Lens.
3. Trigger buton.
4. Strap holder.
5. Focus ring.
6. micro-USB port.
7. Li-ion battery (after removing the battery – SD card slot)
8. Function button.
9. LCD Display.
Page 10
THERMAL IMAGER SONEL KT-80 and KT-145
8
3 Function buttons and on-screen menu
3.1 Buttons layout.
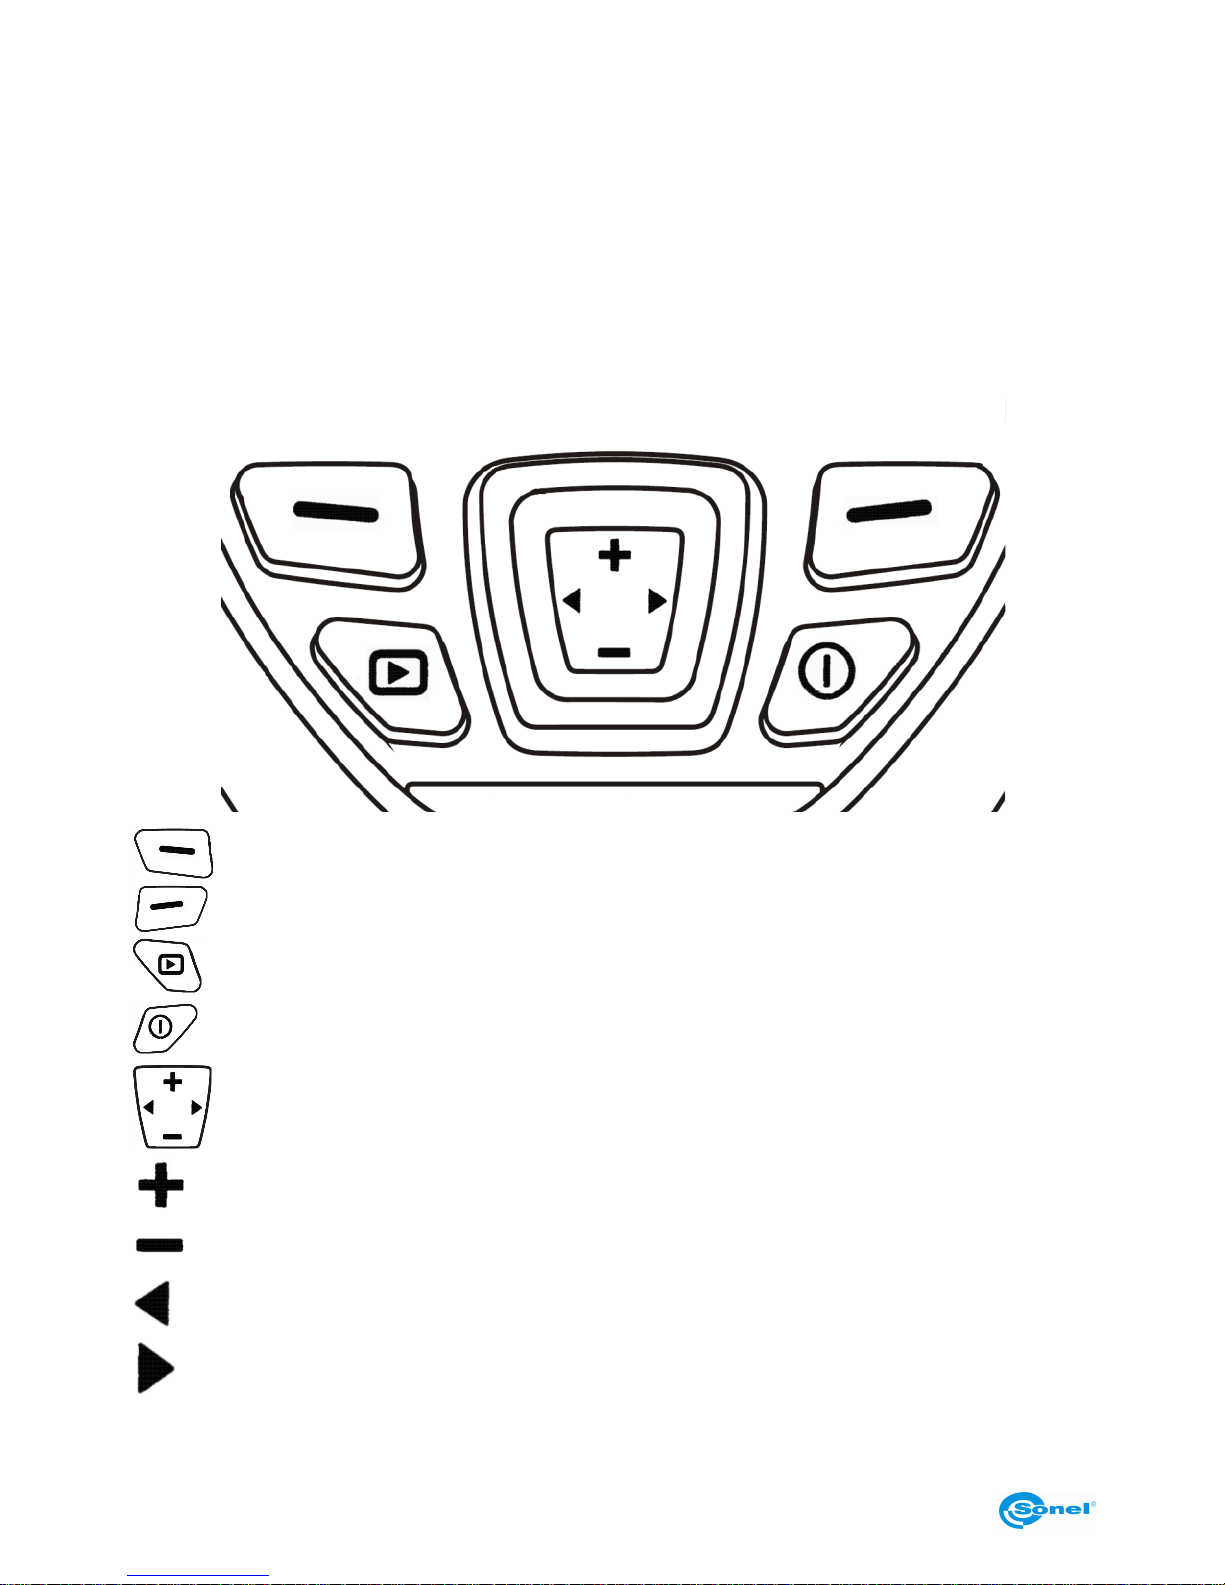
Access to the camera's functions is provided through the buttons located below the LCD
screen as well as a trigger button (3).
Funtion buttons are arranged as shown below:
Left function button,
right function button,
SD card browser button,
turning the camera and display on/off,
multifunction cursor :
zoom in (only in KT-145), increasing selected numbers, move up,
zoom out (only in KT-145), decreasing selected numbers, move down,
move left,
move right.
Page 11
USER MANUAL
9
3.2 Display
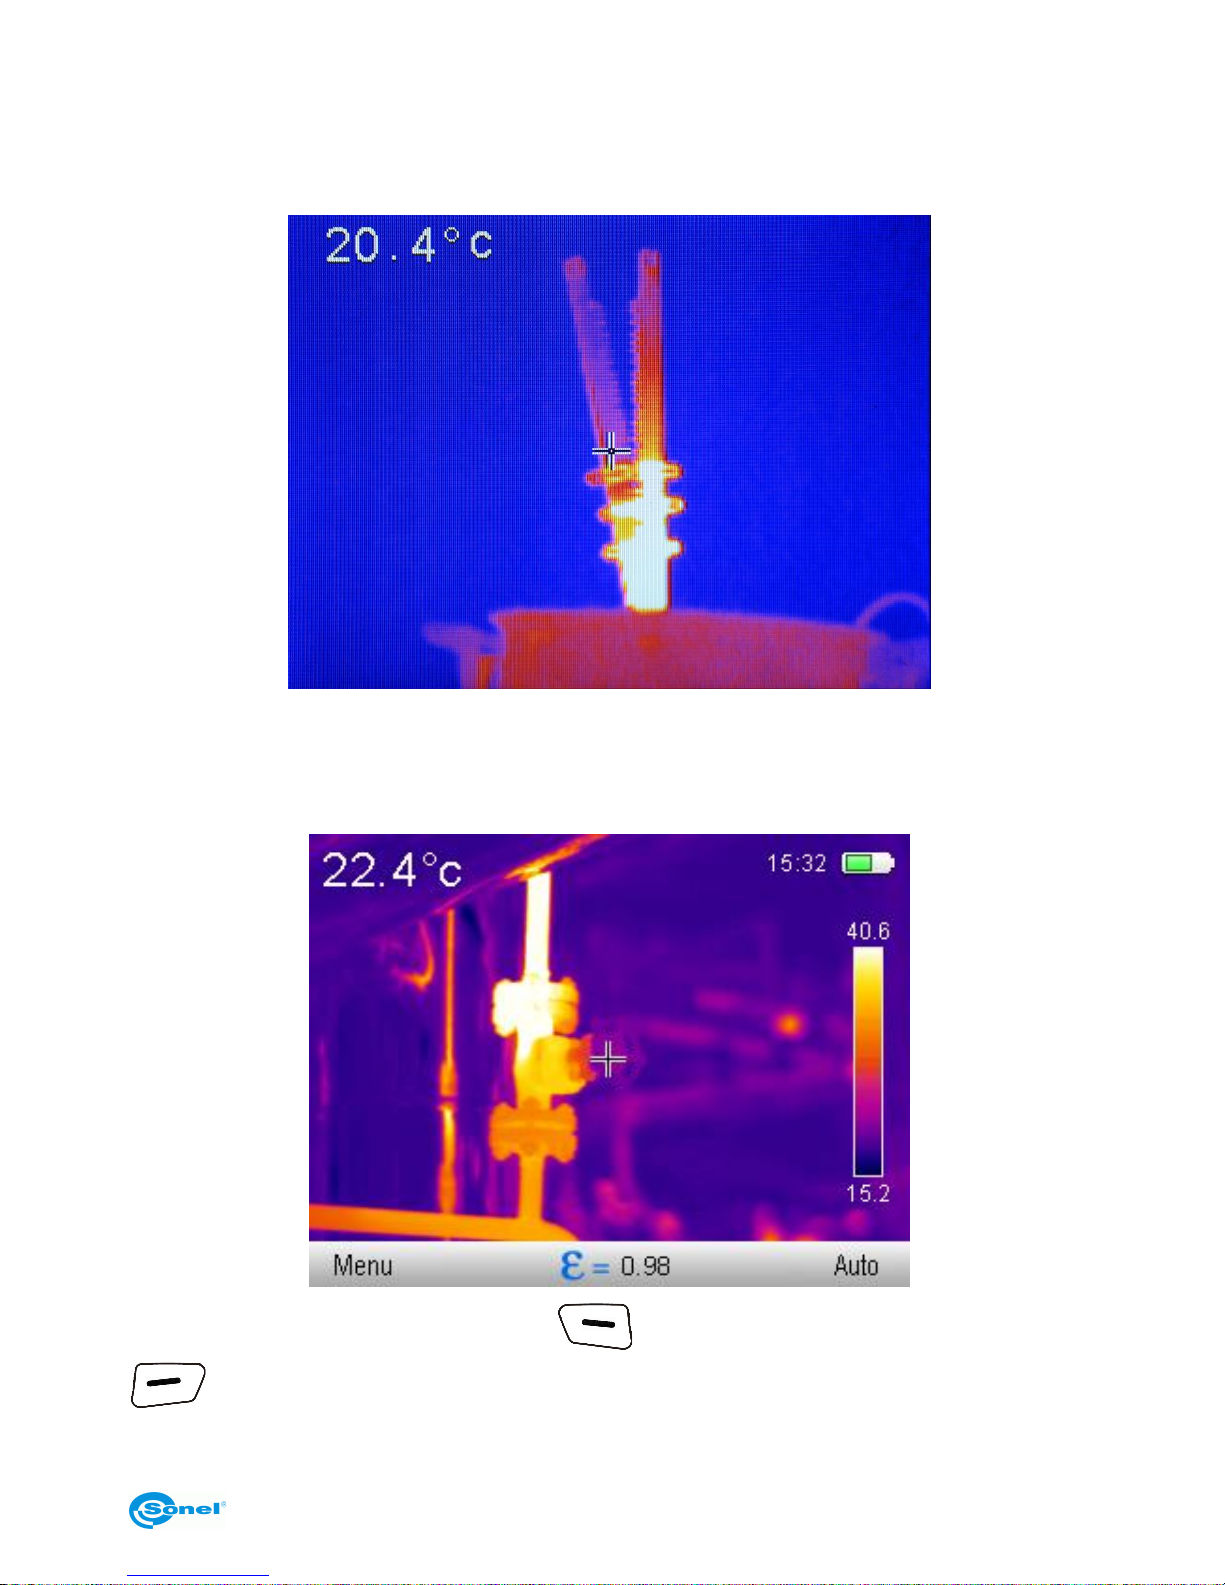
During operation of the camera, the infrared image is shown on the screen (9 ) in real time.
The value of temperature at the central point of the screen is always displayed in the upper left corner of the screen.
After activating any function or performing a measurement, in the right side of the screen
a temperature range bar appears, color-coded for the corresponding temperatures on
screen. In the bottom part of the screen a menu appears, where each of the available
functions is executed with one of the two corresponding buttons.:
In the above example, the left button, , is linked to „Menu”, and the right buton,
, is linked to „Auto”.
Page 12
THERMAL IMAGER SONEL KT-80 and KT-145
10
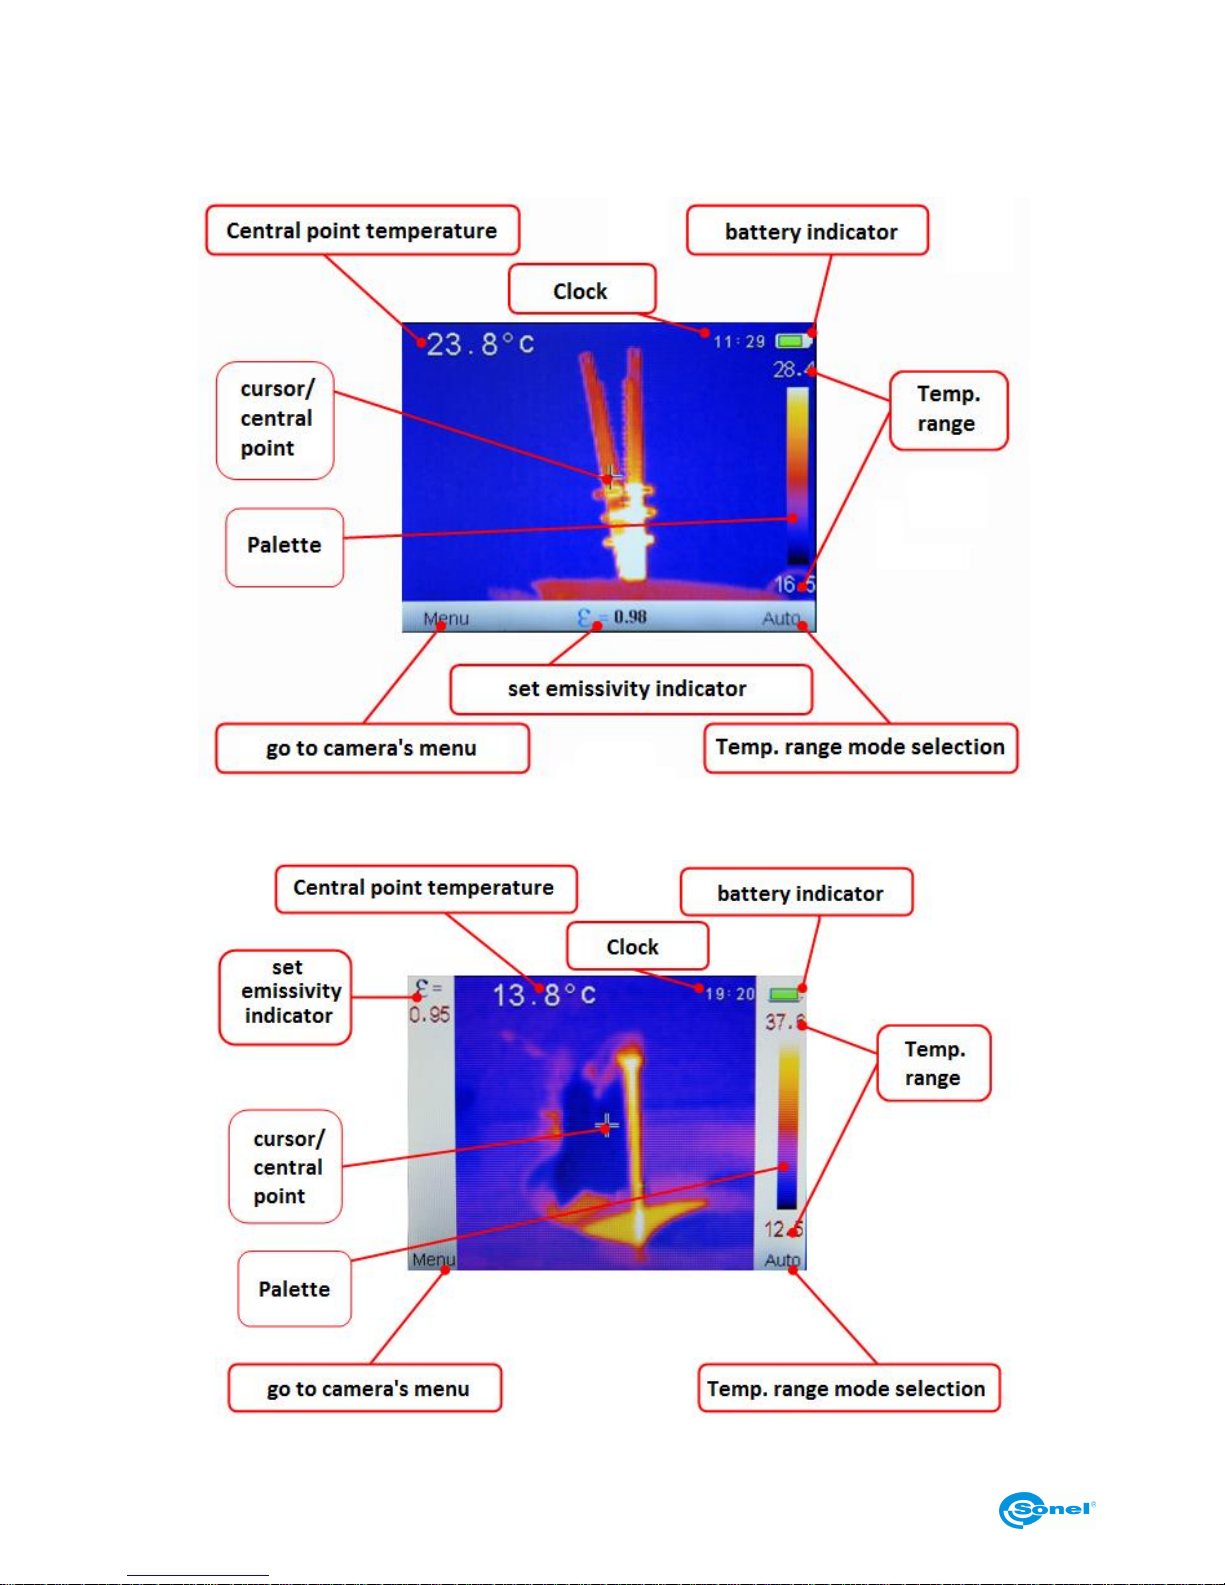
3.3 Arrangement of information on the screen
KT-145 screen:
KT-80 screen:
Page 13
USER MANUAL
11
4 Operation Instructions And The Camera Adjustment
Handling of KT-80 and KT-145 is similar, so this manual describes operational principles
of the imagers based on KT-145 model, due to its superior features. The differencess between the two models are clearly marked in this manual. Operating of KT-80 is the same
as the one described below (Features unavailable in KT-80 are marked as well).
4.1 Turning the camera and the display on/off
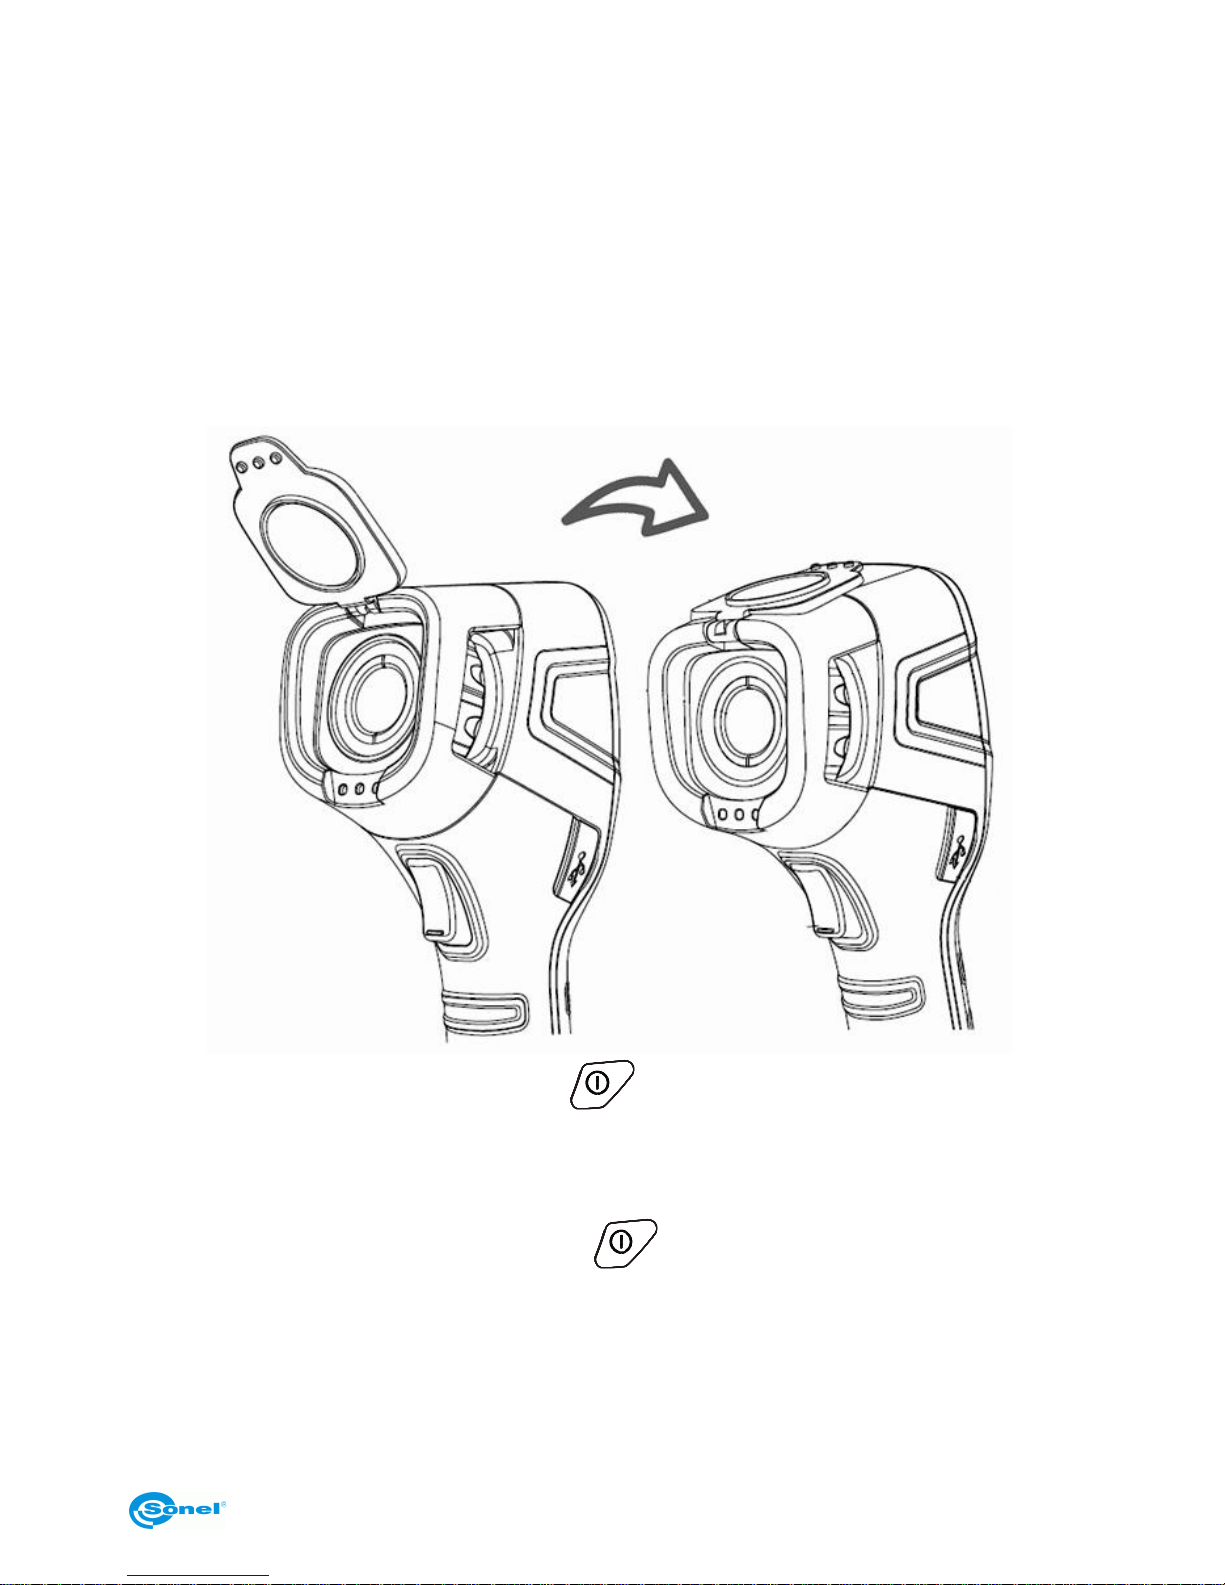
Before turning on the camera flip the lens cover open:
To switch on the camera, press and hold buton for longer than 3 seconds.
A welcome logo will be displayed, followed by the self-test results of the instrument. When
the procedure is completed, the camera is ready to be used, and real time infrared image
display mode is on.
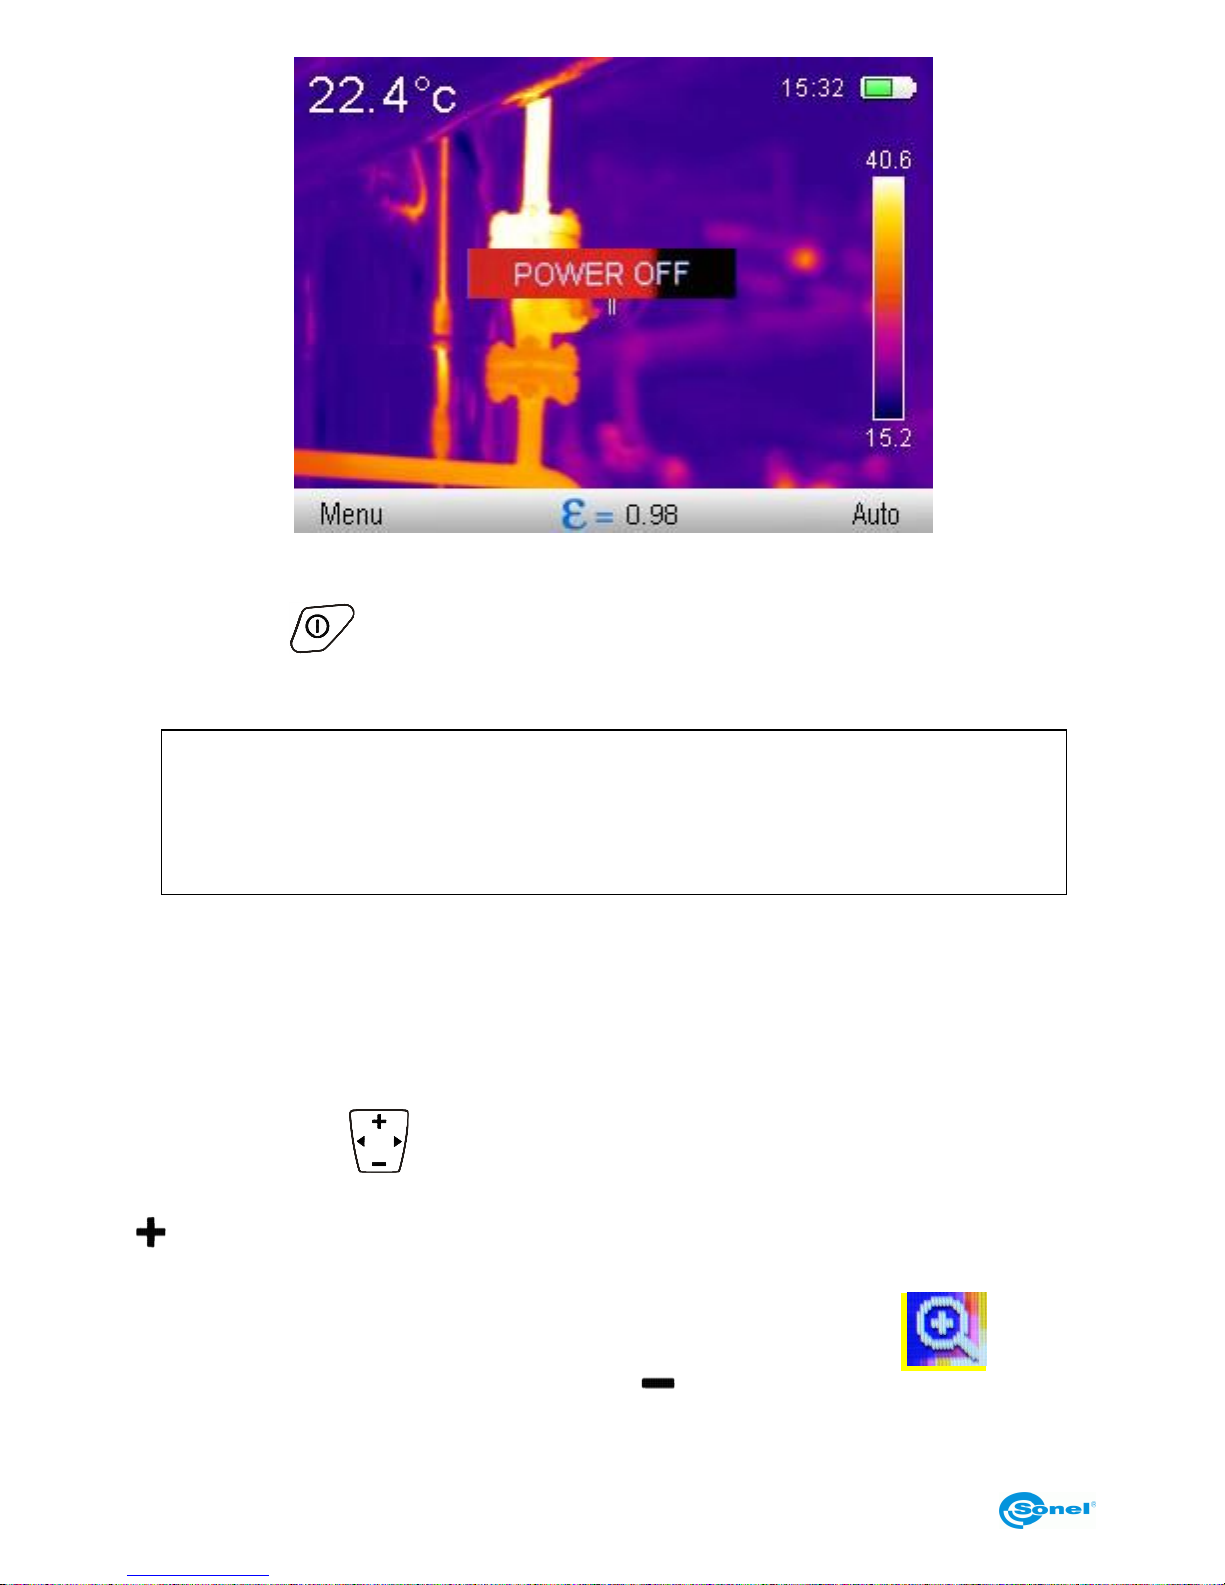
To switch off the camera, press and hold button, and Power Off progress bar will
appear on the screen (POWER OFF).
Page 14
THERMAL IMAGER SONEL KT-80 and KT-145
12
The buton must be hold until the screen turns off (switching off doesn’t work in Full Screen
mode ).
Brief press of buton switches on/off the screen. To save battery, it is advised to use
this feature when times between each measurement are short. When the camera is not
used for longer period is advised to switch it off completely.
NOTE!
In order to eliminate potential errors in temperature measurement af-
ter switching off the camera, it is advised to wait 15 seconds before
switching the camera on again.
4.2 Focus adjusment
After directing the camera towards the examined object, turn the focus adjustment ring (5)
to set the best focus of image.
4.3 Enlarging the image – Zoom (x2) (only in KT-145)
Multifunction cursor is used for zoom adjustment. When no menu (Full screen mode
- described in other part of this manual) is displayed on the screen, pressing the button
will cause switching to the zoom mode - the image on the screen will be digitally mag-
nified two times. In this mode sharpness can be precisely adjusted, but no other features
are available at this point. Entering zoom mode is indicated by magnifier symbol in
the bottom, middle part of the screen. Pressing buton restores normal image mode.
Page 15
USER MANUAL
13
4.4 Temperature range
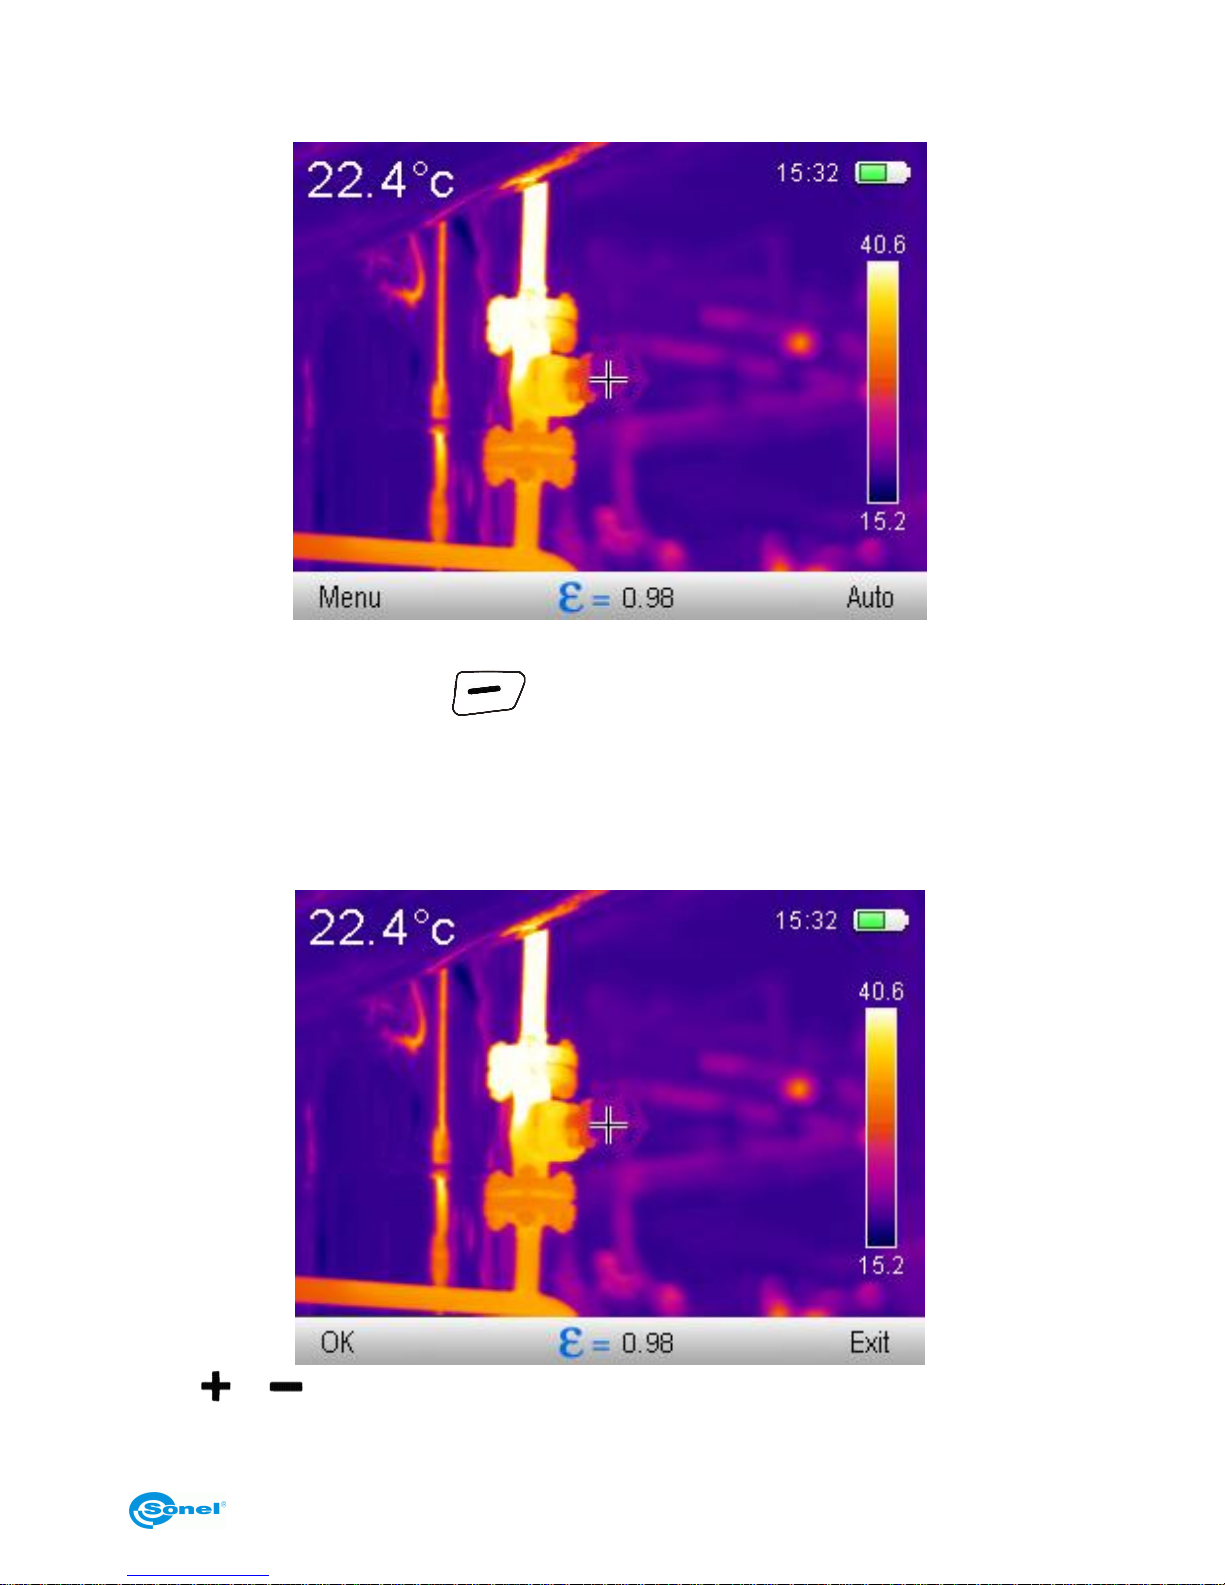
The camera offers both manual and auto mode for temperature range selection.
The indication of the temperature range mode that is currently on, is shown in the bottom,
right part of the screen. press buton to select:
- automatic adjustment of displayed temperature range - the minimal and maximal temperatures will be automatically adjusted by the instrument while the measurement is performed, depending on the range of temperatures detected in the observed area.,
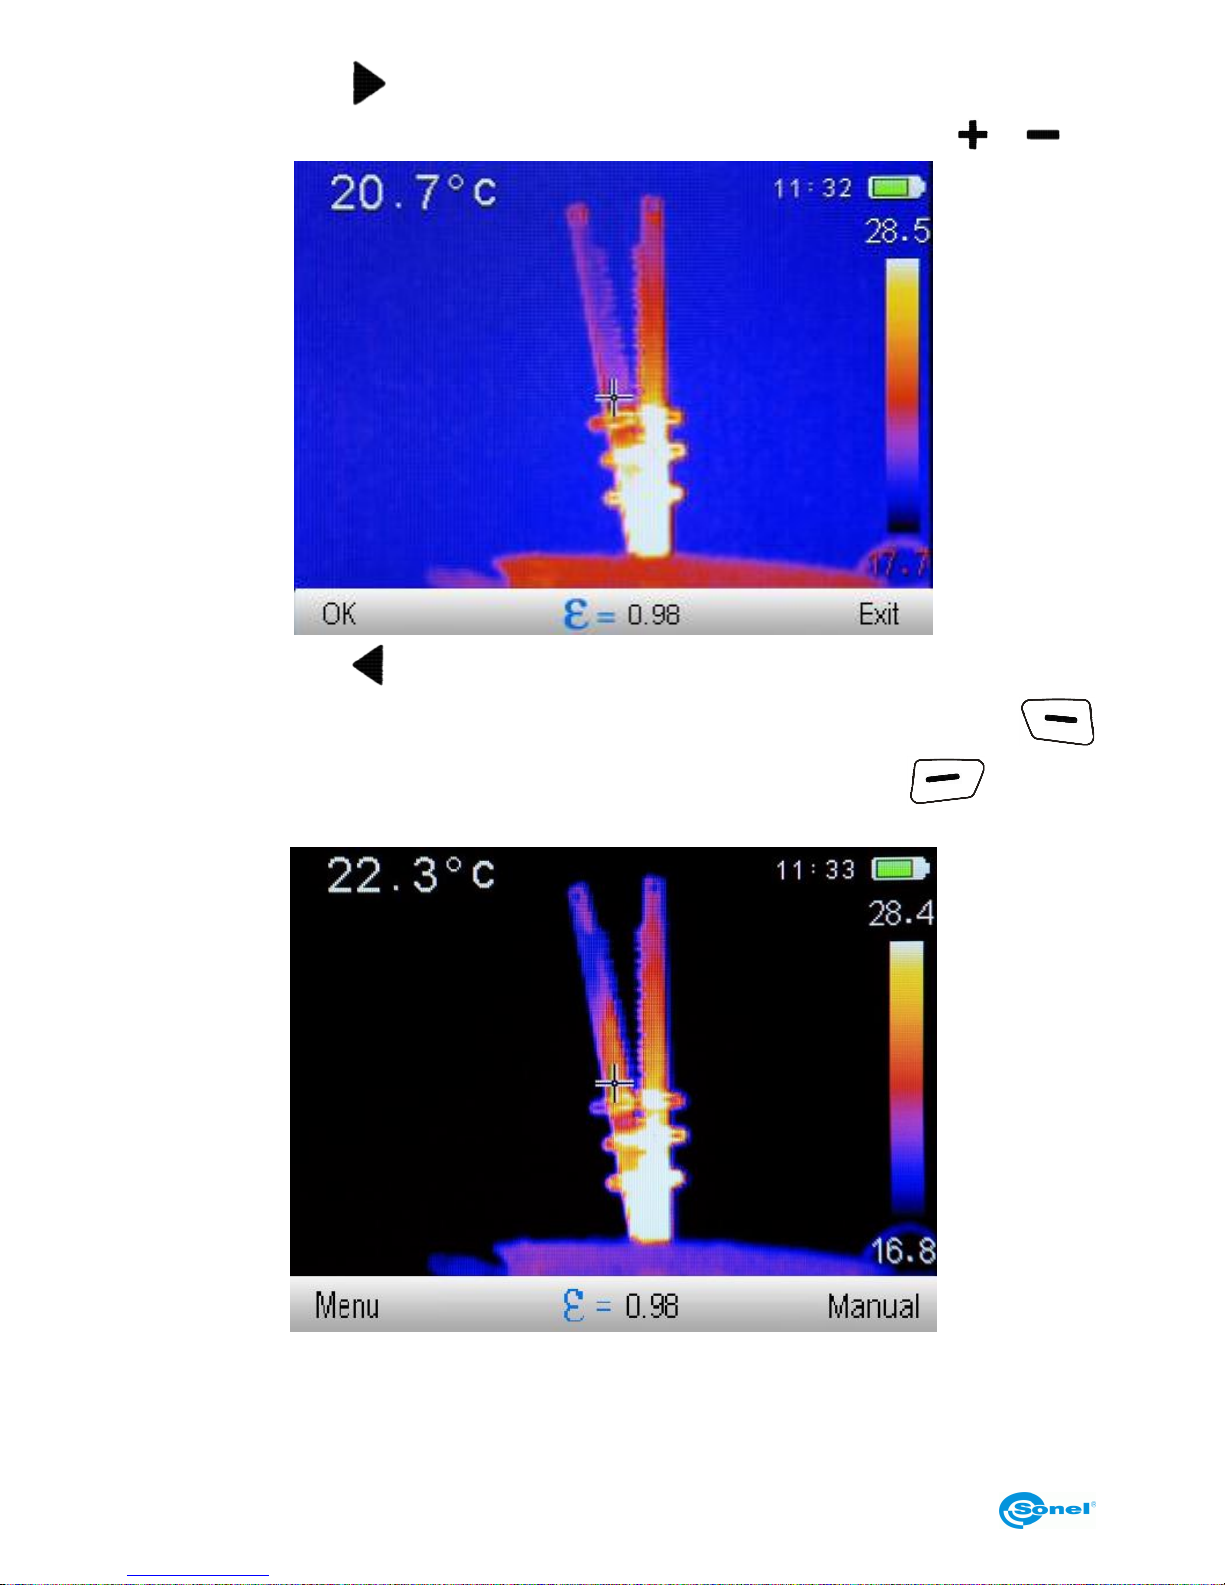
- manual adjustment of temperature range. Select this mode to activate a menu where
setting of the upper limit of the temperature (Tmax) can be done.:
Press or buttons to increase/decrease the displayed upper limit of the temperature
range (the changed value is additionally marked by a red frame).
Page 16
THERMAL IMAGER SONEL KT-80 and KT-145
14
Pressing the button causes switching over to setting the lower limit of the temperature
range, Tmin, which can, just like the upper limit, be adjusted with the buttons or :
Pressing the button effects in switching over to setting the upper limit of the temperature range. The manually selected temperature range is confirmed by pressing
button. Current temperature range setting can be cancelled by pressing „Exit” button.
Page 17
USER MANUAL
15
4.5 Capturing and saving imagees
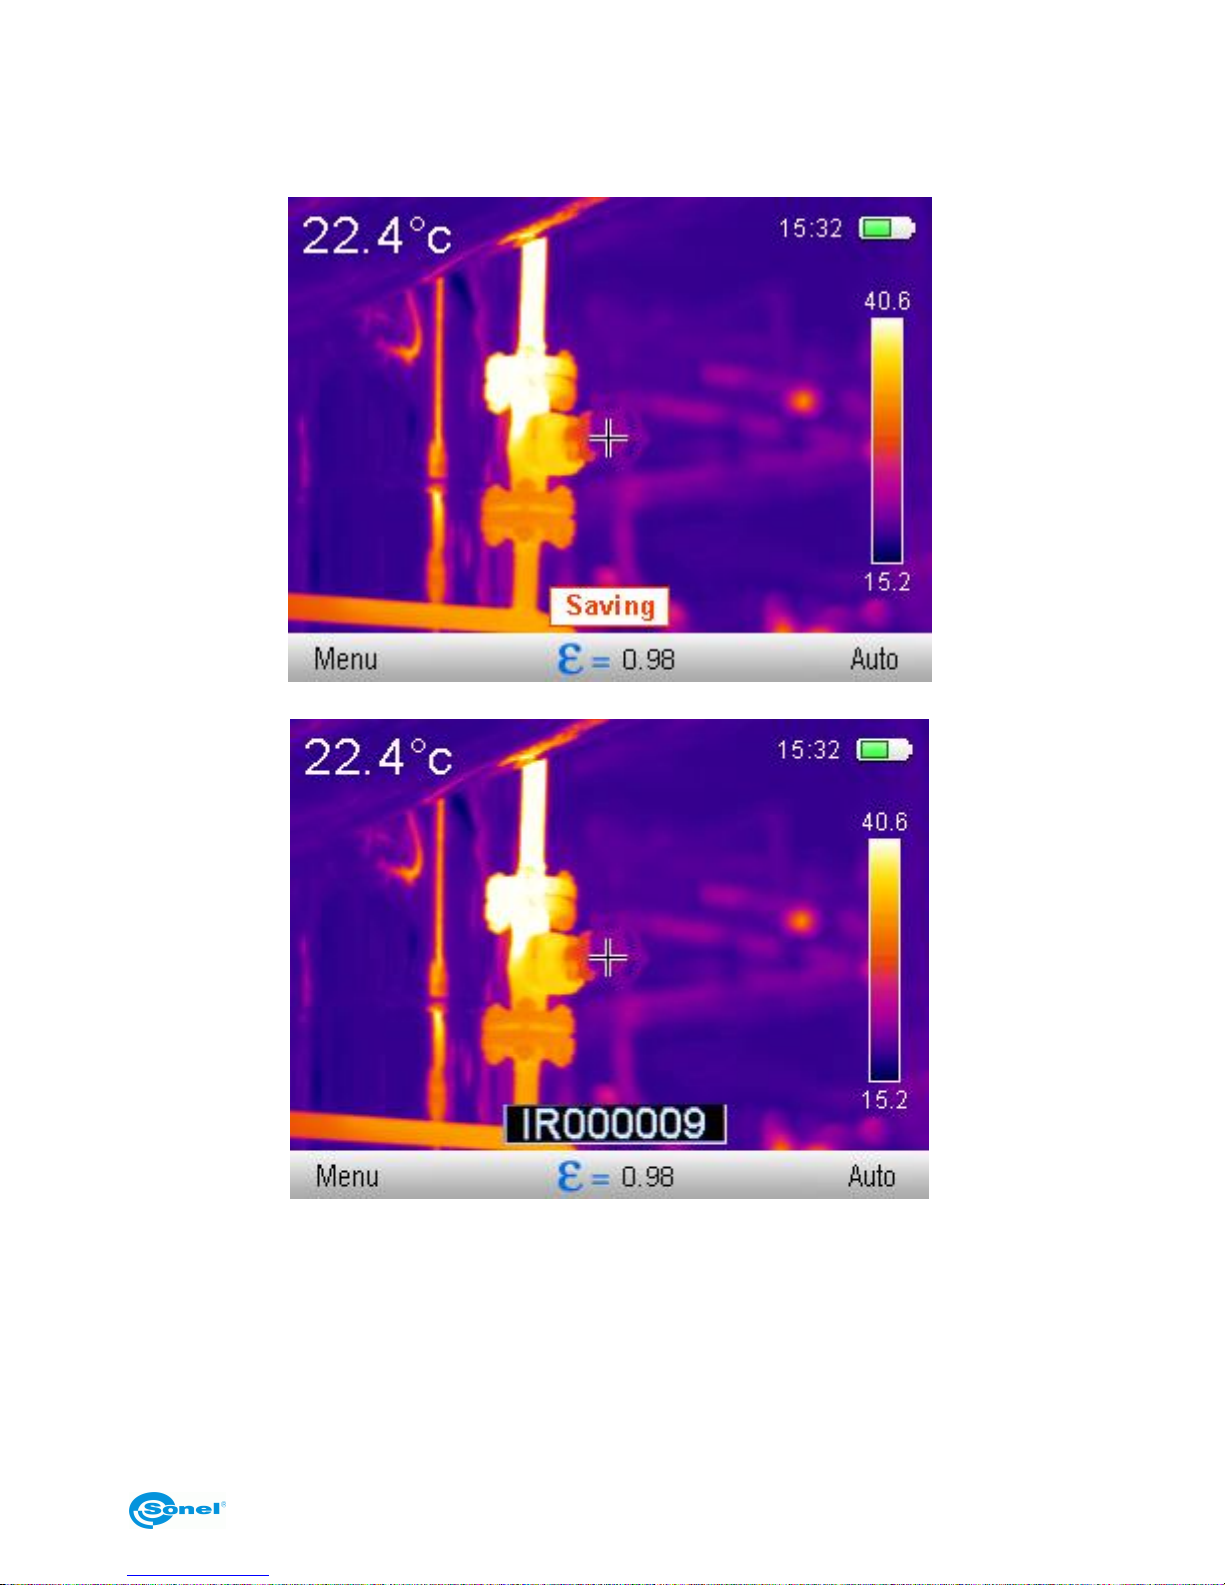
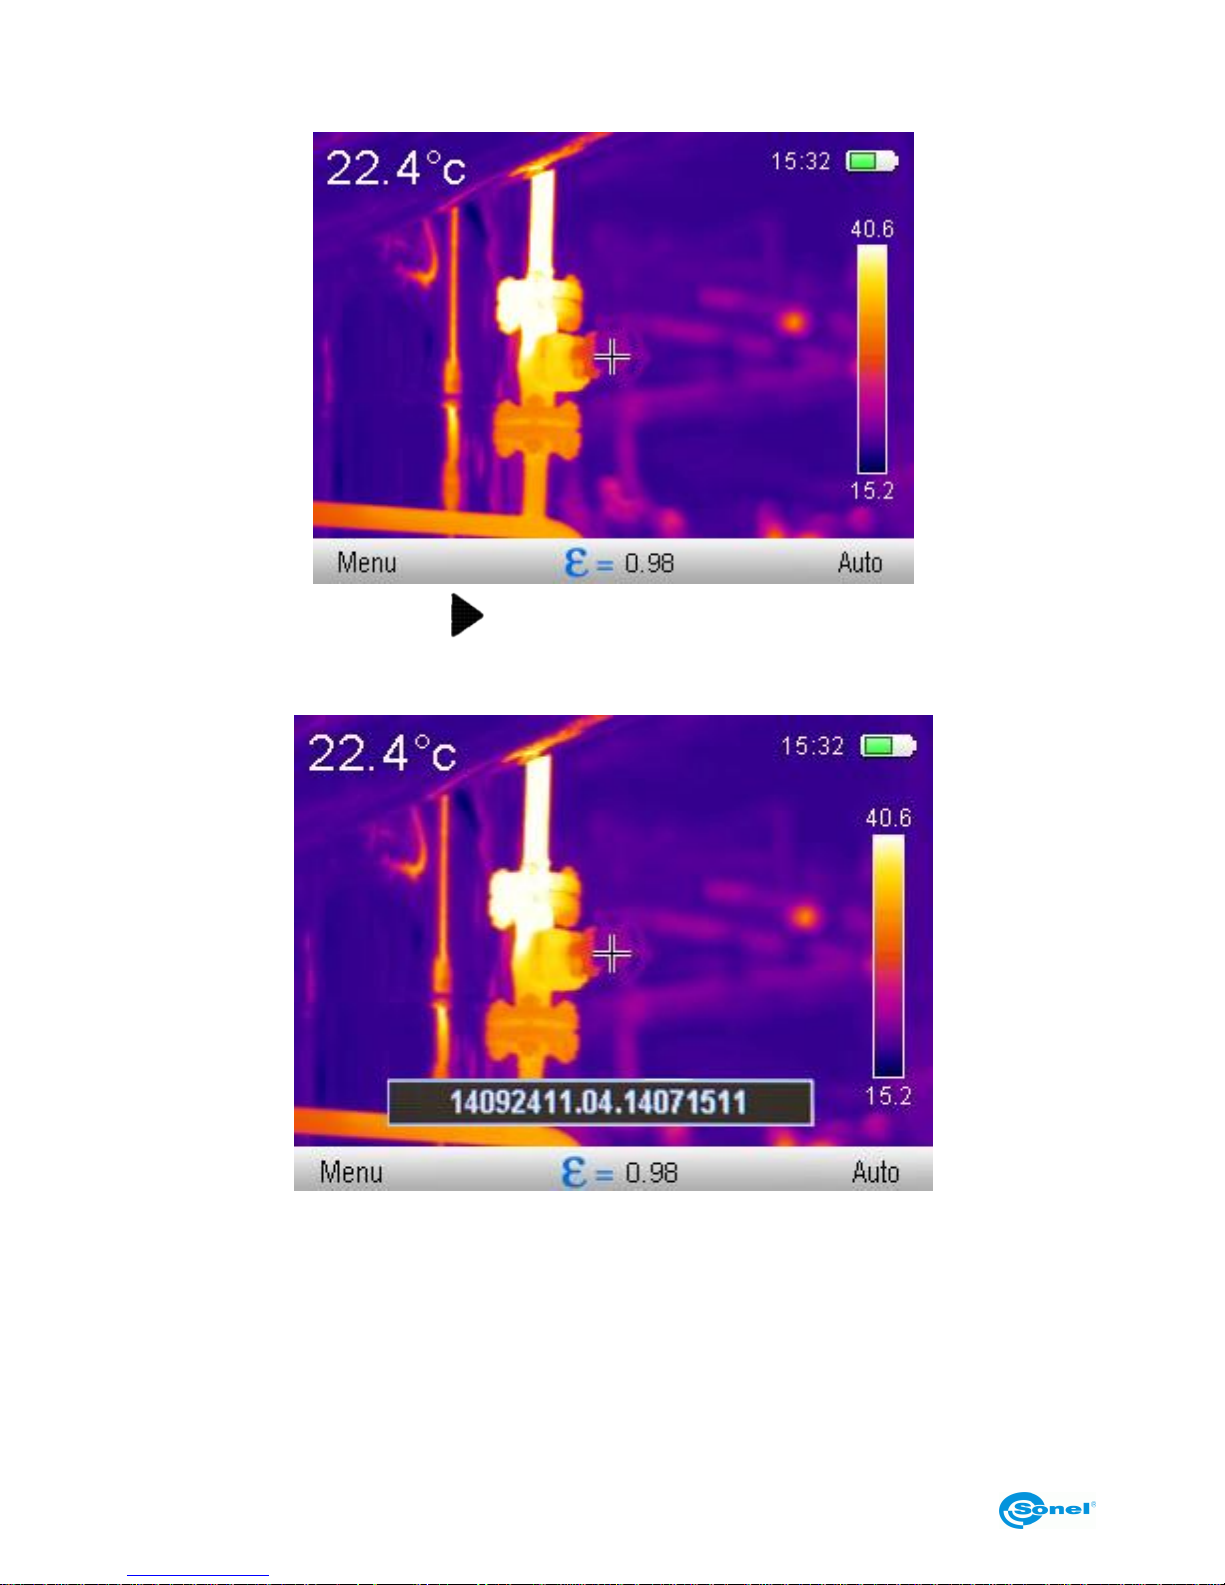
The camera displays image in continuous manner. In order to capture the image at a given moment, press the trigger button (3) to freeze the image and display the menu on the
screen:
followed by the file name, under which the screen has been saved and stored:
After the image has been saved, the camera automatically goes back into real time infrared mode.
Page 18
THERMAL IMAGER SONEL KT-80 and KT-145
16
4.6 Menu, settings, features
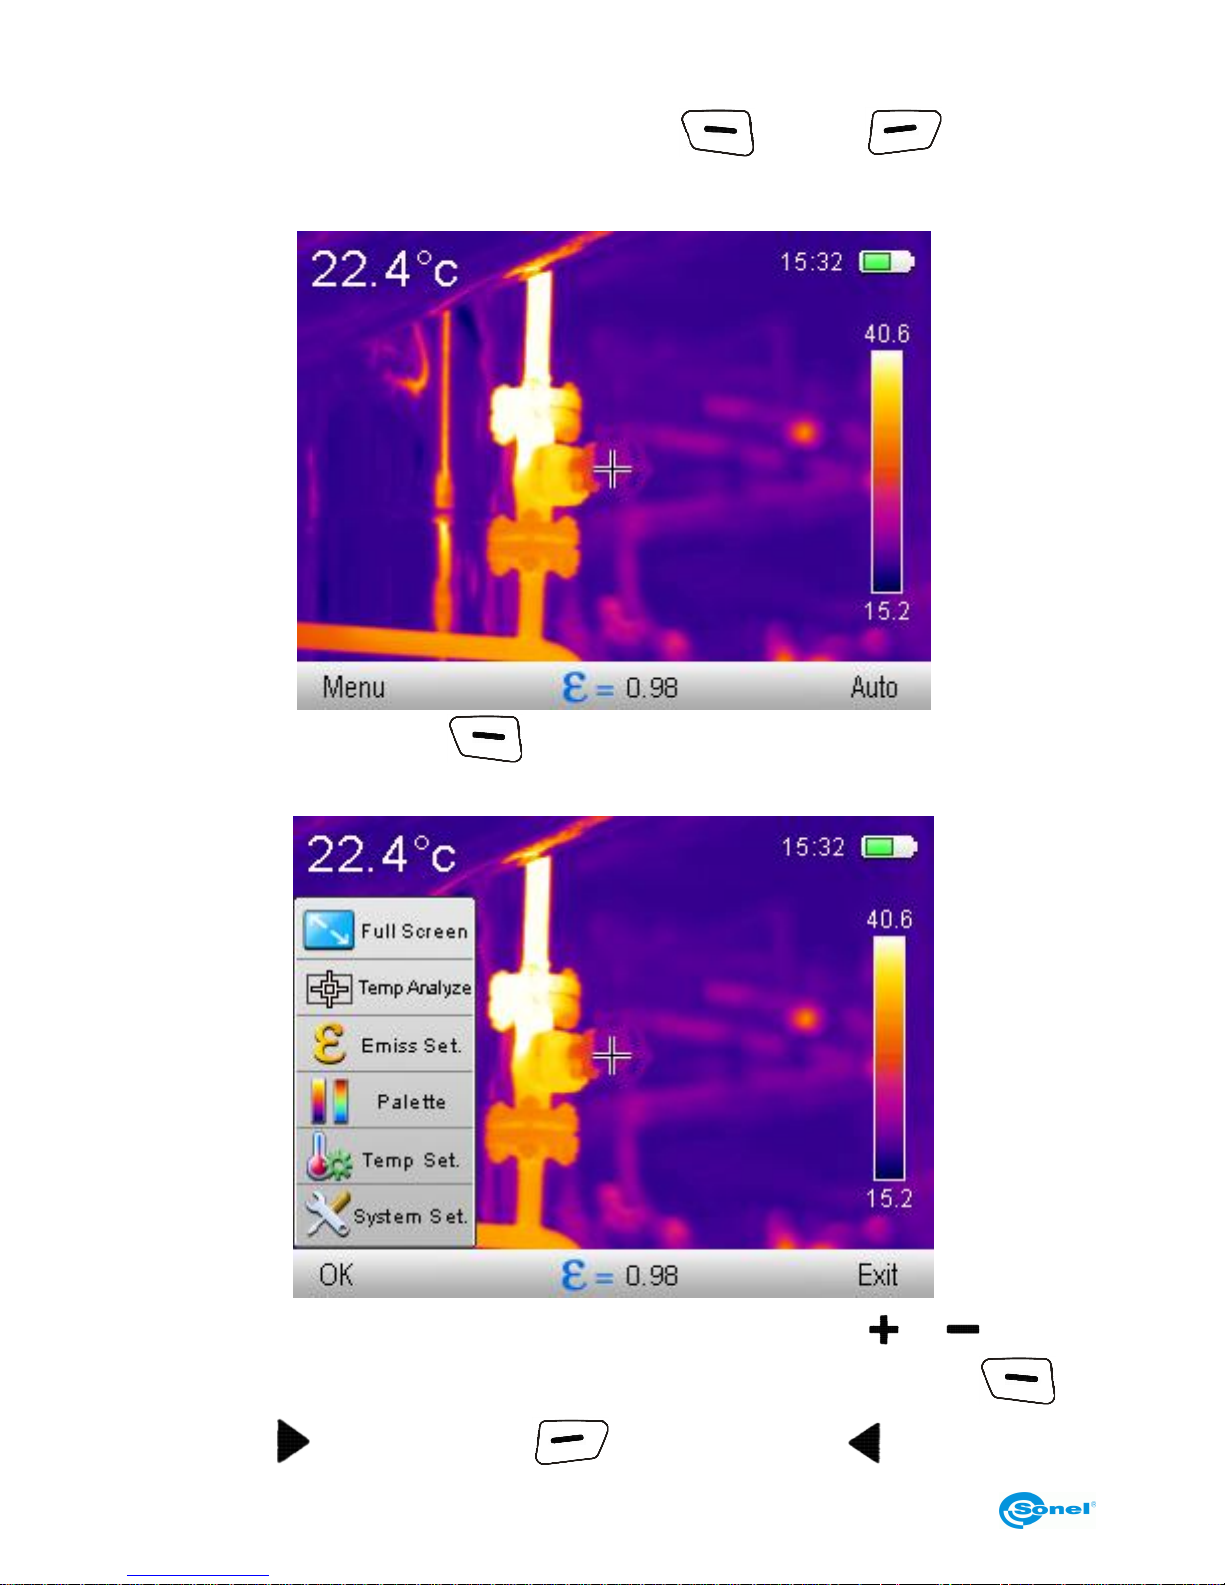
When no menu is displayed on the screen, press buton or buton to bring
bottom menu bar into screen:
Select „Menu” (by pressing button) to open up the main menu, that allows to
change settings of the camera:
Parameters can be selected with the use of 'up' and 'down' cursors ( or buttons ).
Select chosen parameter and confirm the selection by pressing 'OK' buton ( ) or
‘right’ buton ( ). Press ‘Exit’ buton ( ) or ‘left’ buton to exit ( ).
Page 19
USER MANUAL
17
4.6.1 Full screen
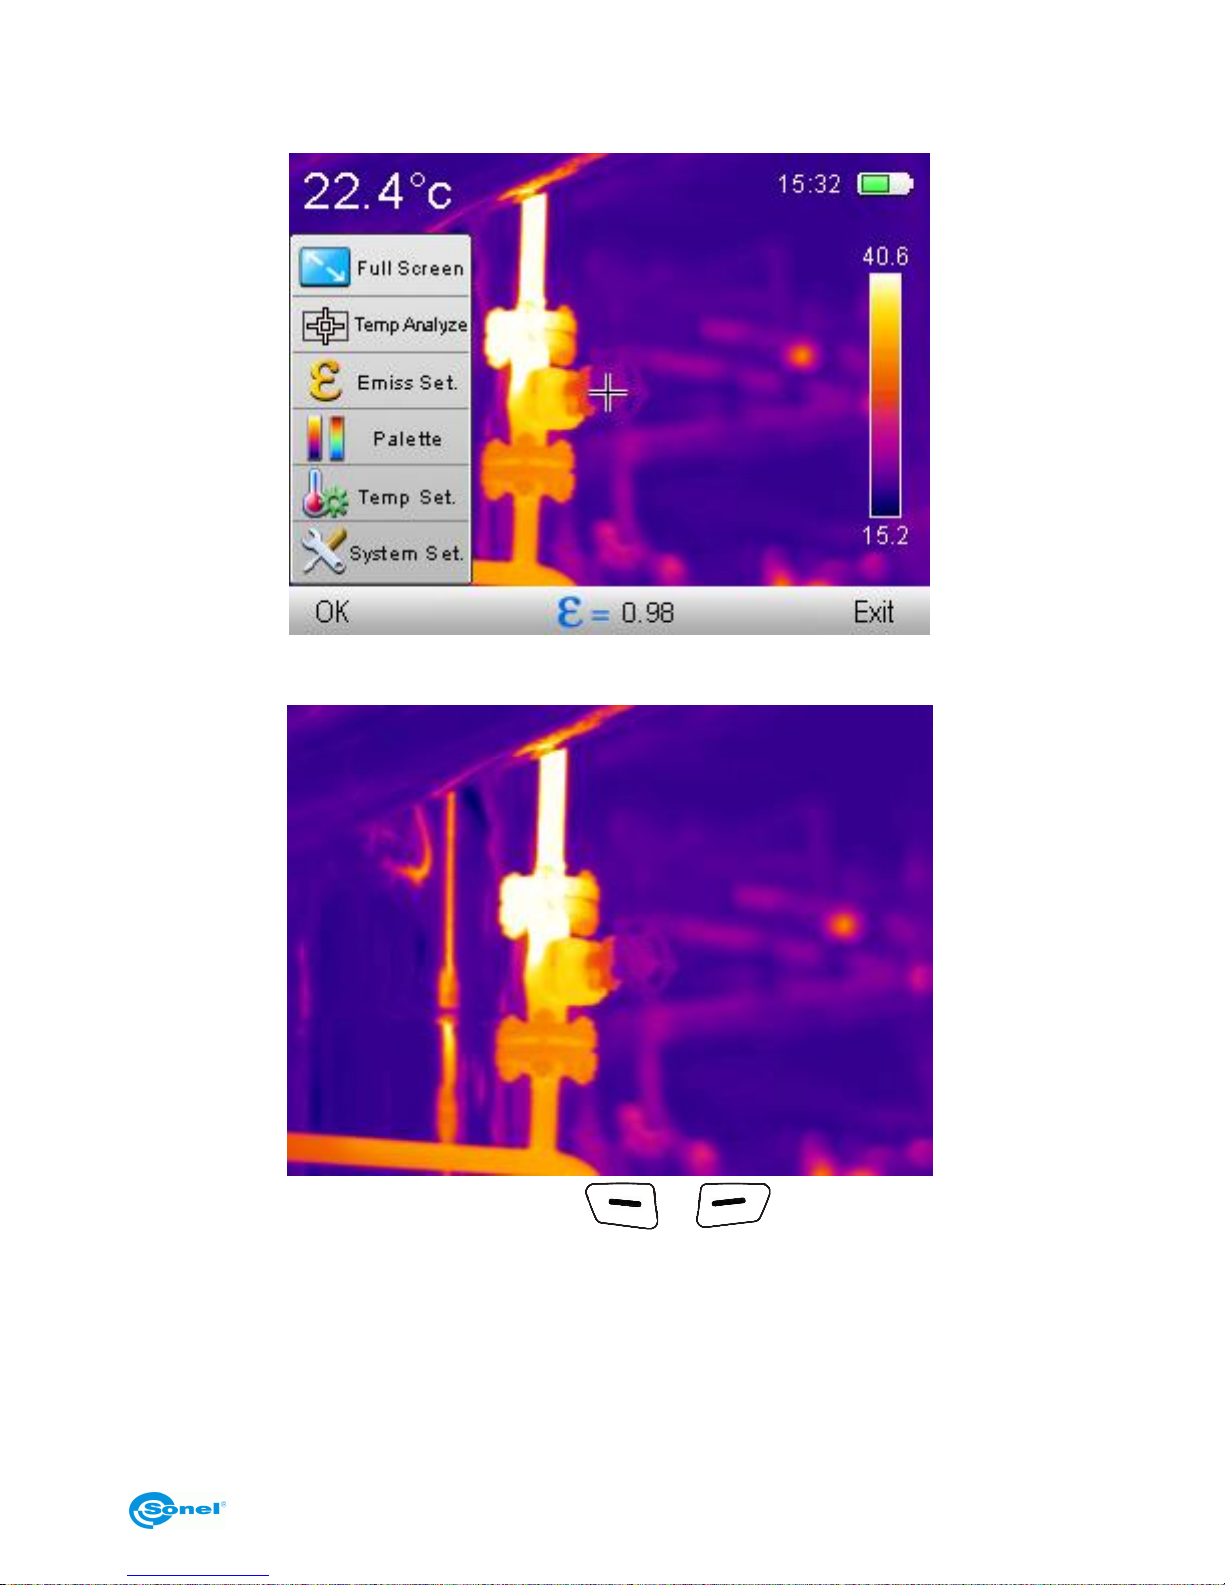
The main mode is displayed on the screen.
Select Full Screen mode and press OK to confirm, to switch the camera into full screen
mode:
Restore normal mode by pressing buttons or .
Page 20
THERMAL IMAGER SONEL KT-80 and KT-145
18
4.6.2 Temperature Analysis
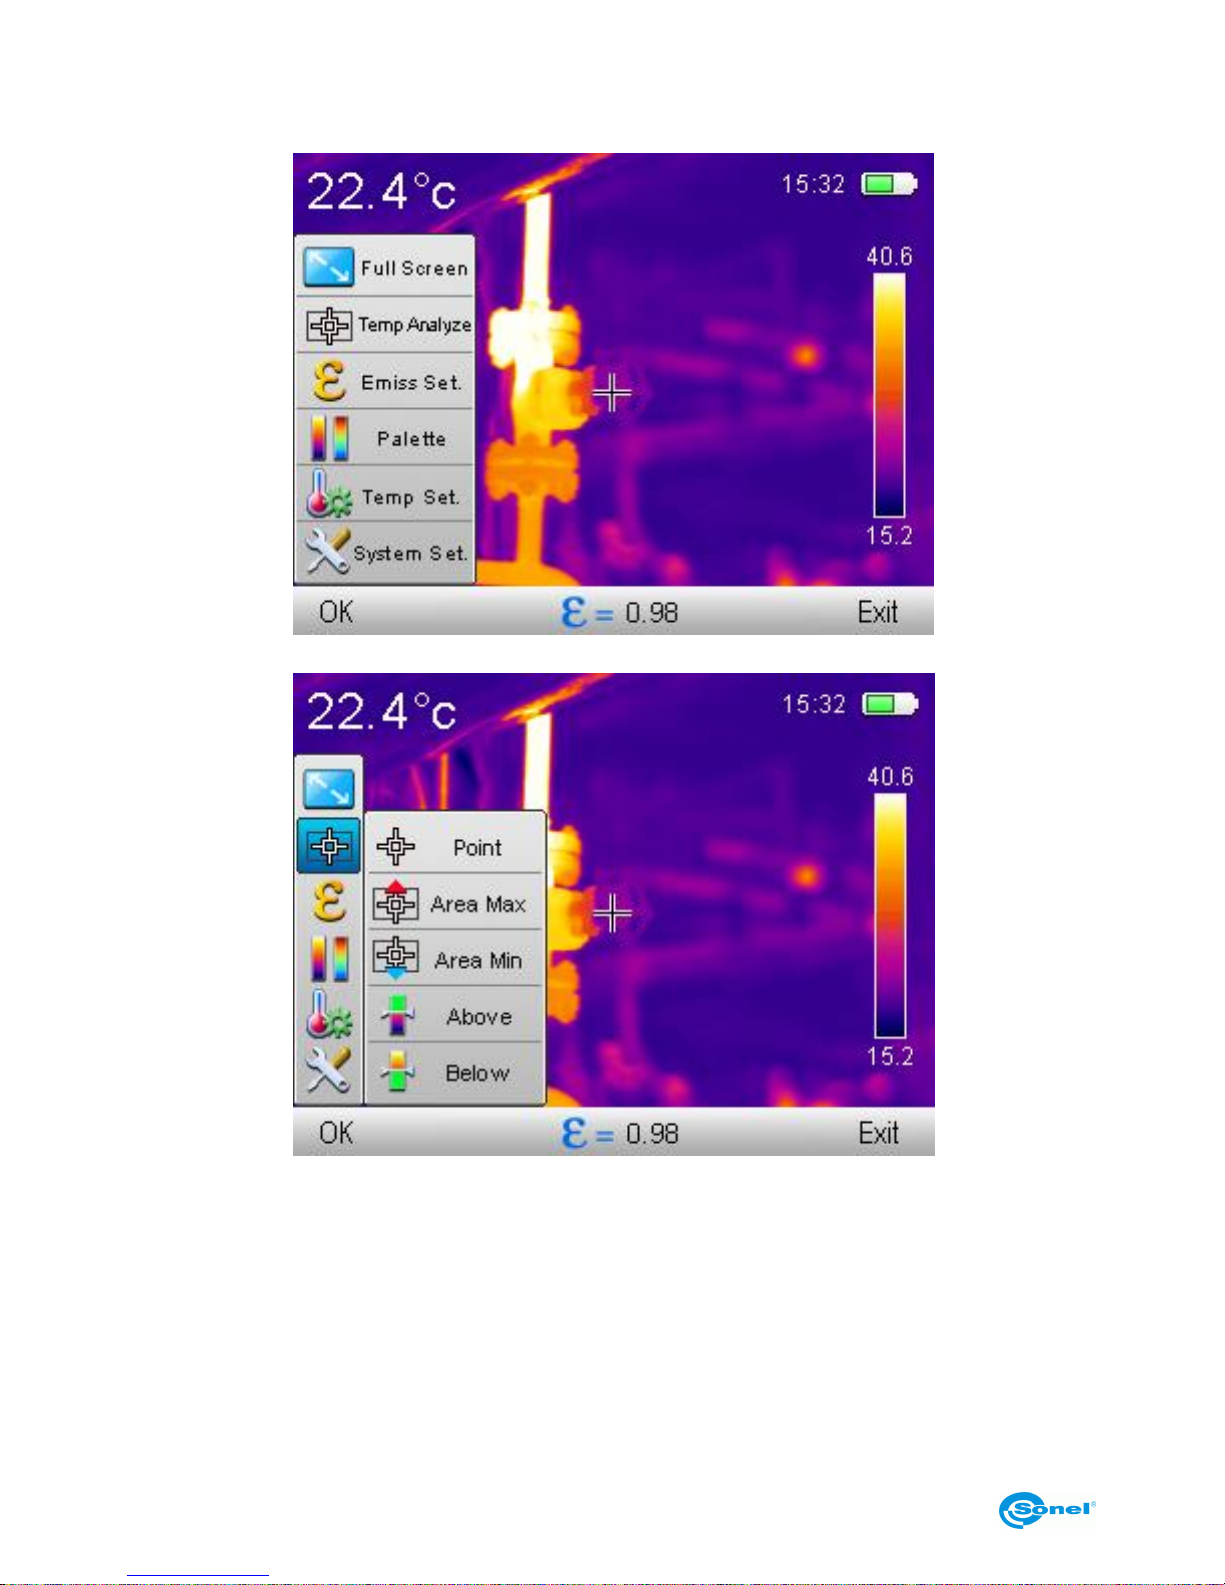
The main mode is displayed on the screen.
Select ‘Temp Analyze’ to unfold drop down sub menu with analysis tools:
Several options are available in this mode.
Page 21
USER MANUAL
19
4.6.2.1 Point
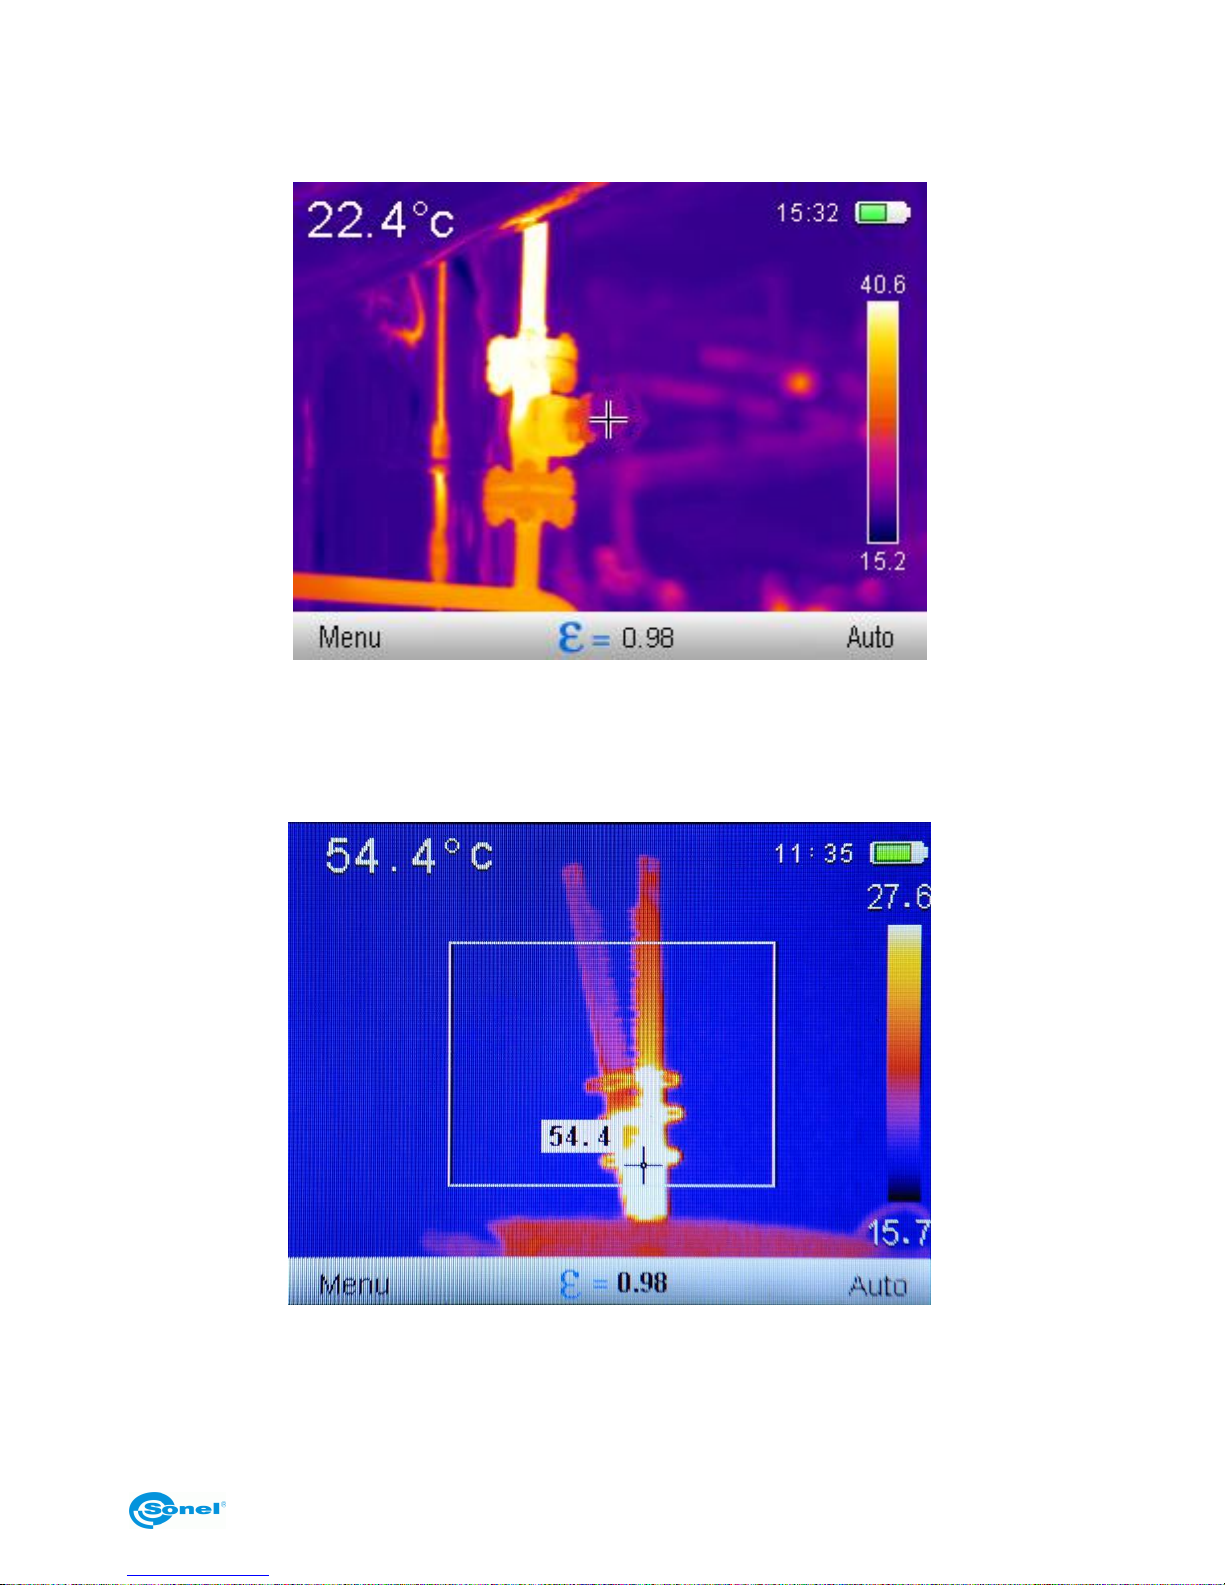
Select ‘Point’ to activate the camera in normal mode, with point cursor in the center of the
screen:
4.6.2.2 Area Max
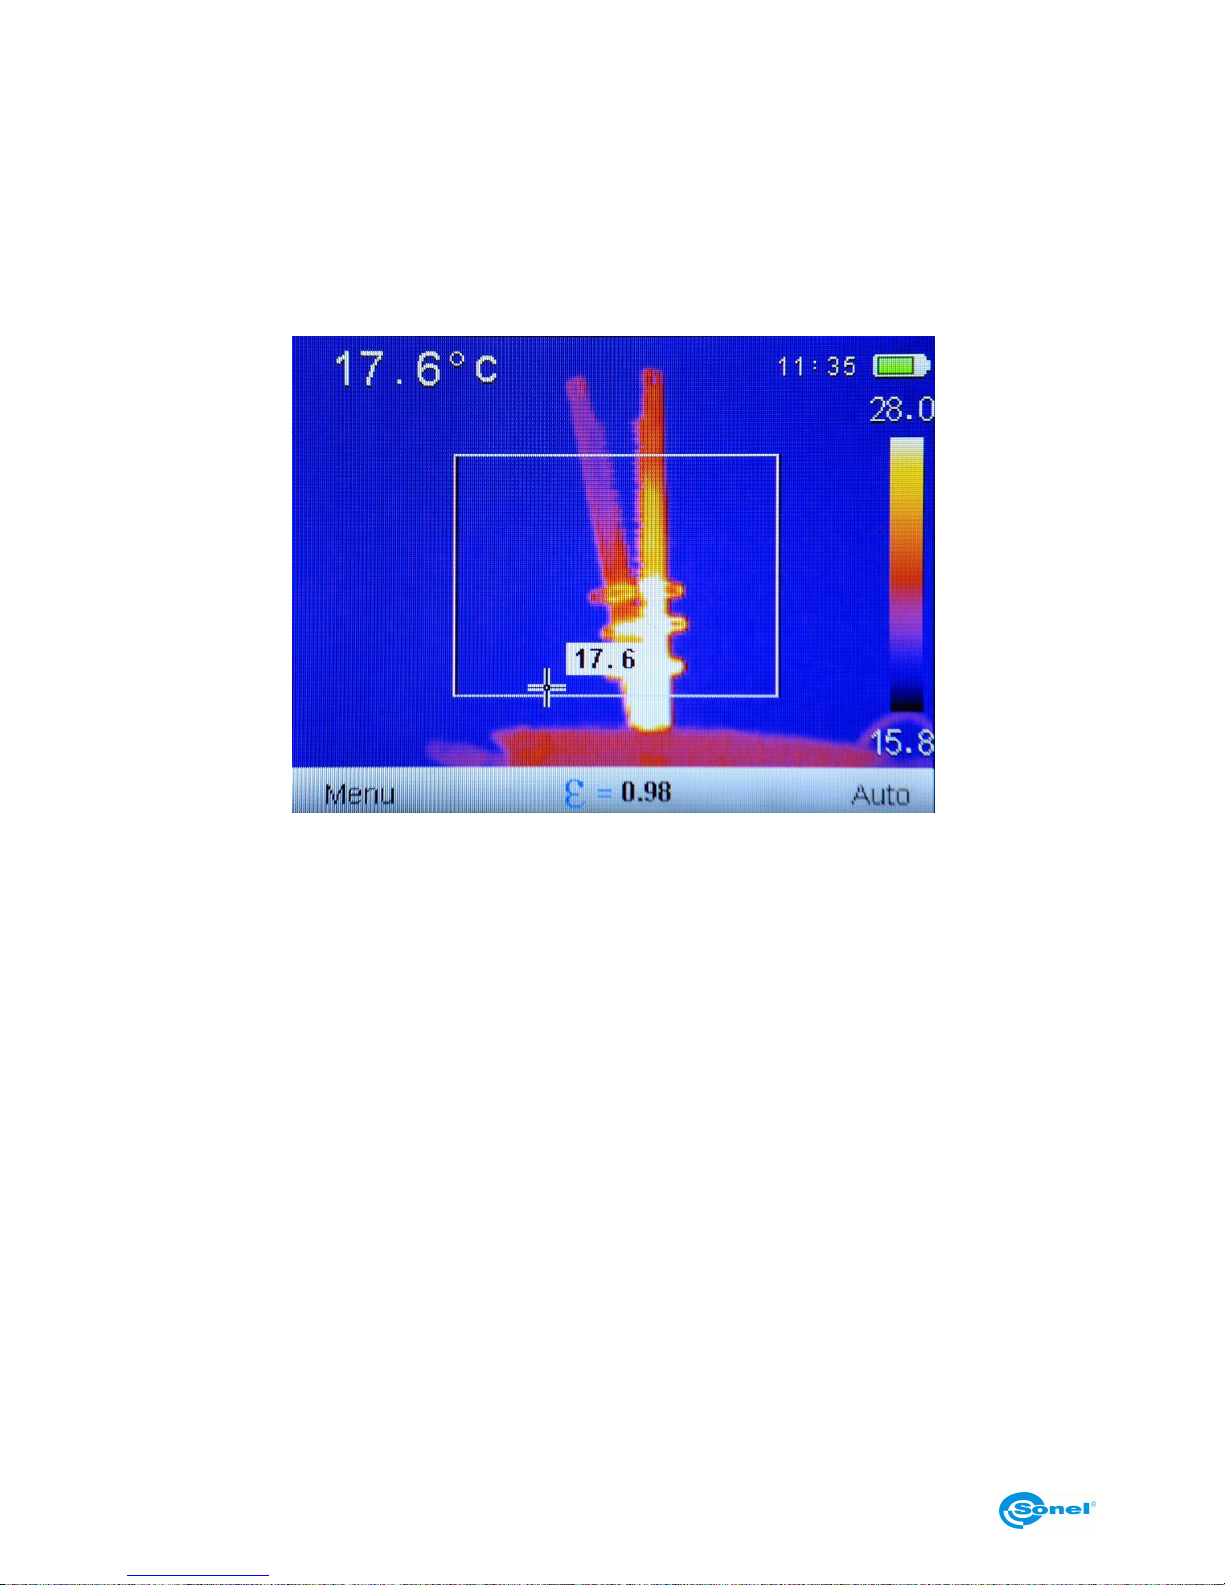
Select ‘Area Max’ to activate the mode that allows to monitor the temperature in a way
that shows the point of maximum temperature within selected area:
Area that is being monitored for the highest temperature is created. Cursor inside the area
is changing its position whenever new point of the highest temperature is detected. Additionaly, only in KT-145: Cursor temperature indication in repeated on screen by the cursor
itself, and when the Max Temperature alarm mode is on, the max temperature indicator by
the cursor will be changing its color whenever the threshold temperature level is crossed
Page 22
THERMAL IMAGER SONEL KT-80 and KT-145
20
(the background color of the temperature indicator will change its color repeatedly: yellow
to black to yellow. The color of the digits showing temperature value will be alternating in
the same manner).
4.6.2.3 Area Min.
Select ‘Area Min’ to activate the mode that allows to monitor the temperature in a way that
shows the point of minimum temperature within selected area:
Area that is being monitored for the lowest temperature is created. Cursor inside the area
is changing its position whenever new point of the lowest temperature is detected. Additionaly, only in KT-145: Cursor temperature indication in repeated by the cursor itself, and
when the MinTemperature alarm mode is on, the mintemperature indicator by the cursor
will be changing its color whenever the threshold temperature level is crossed (the background color of the temperature indicator will change its color repeatedly: blue to black to
blue. The color of the digits showing temperature value will be alternating in the same
manner).
4.6.2.4 Above (Isotherm analysis)
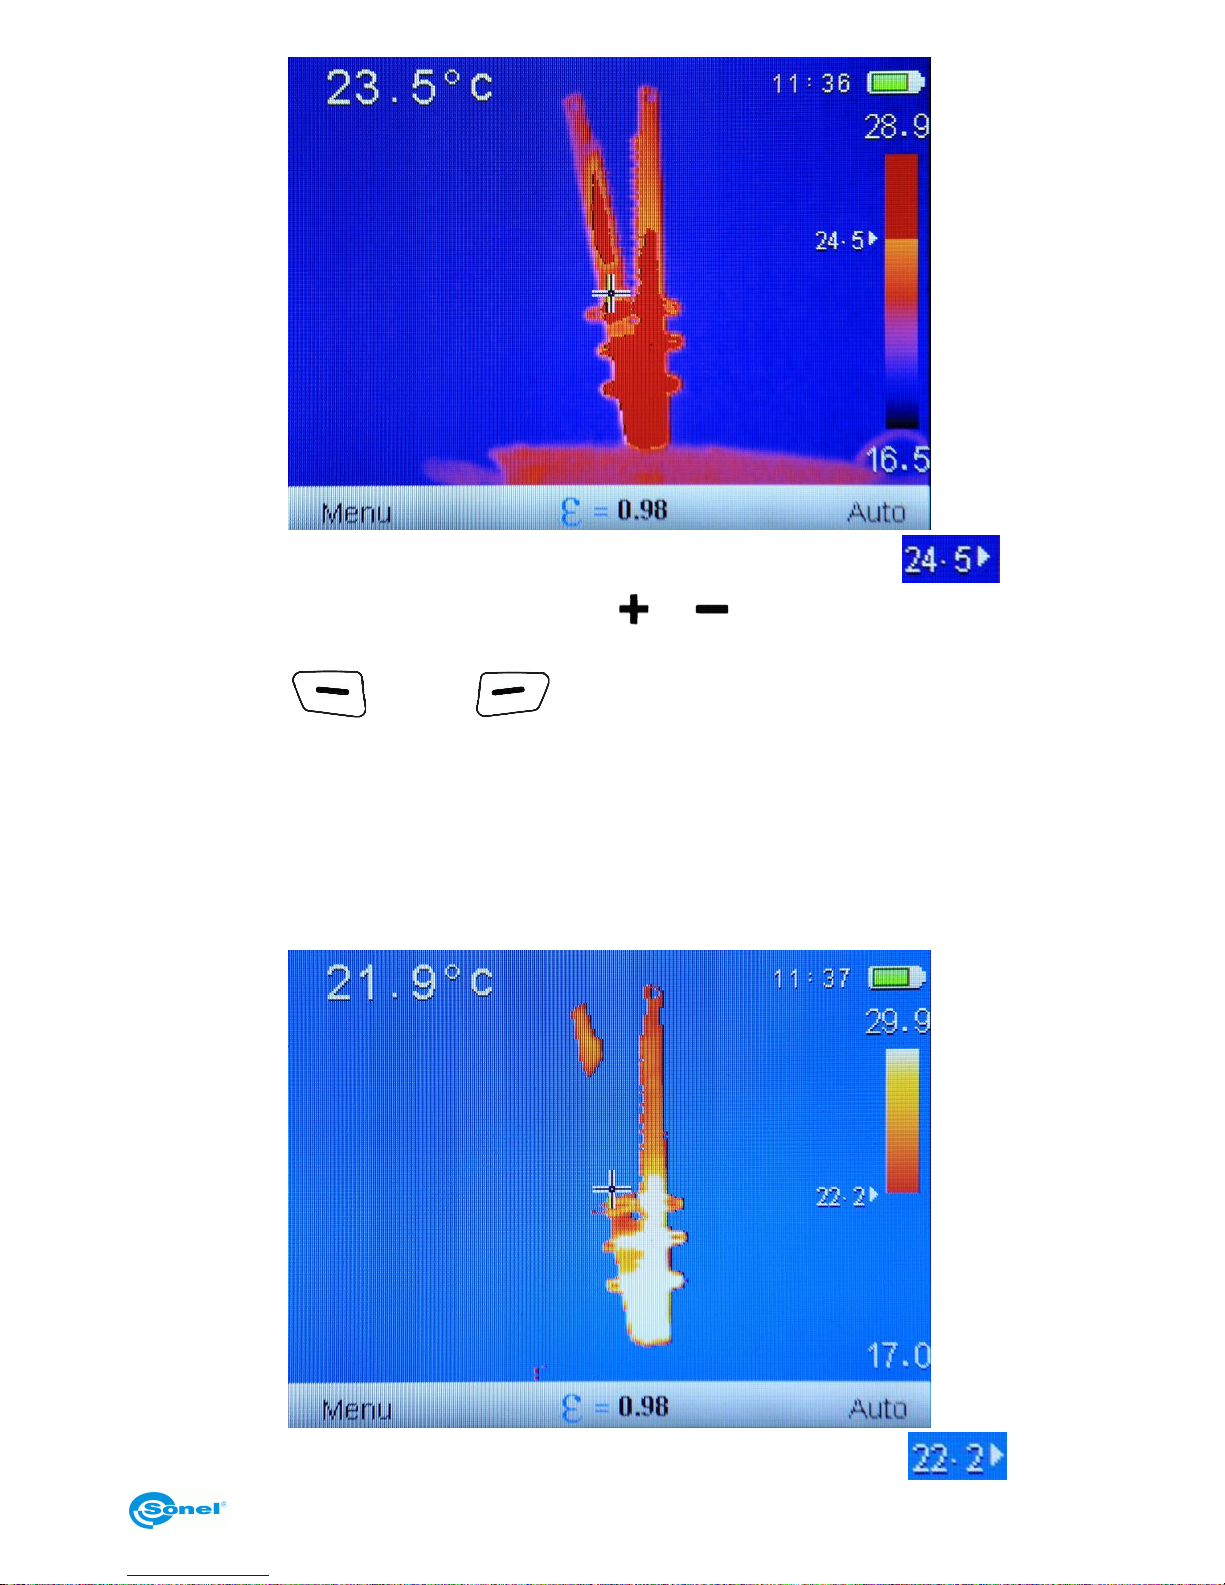
Selecting 'Above' starts isotherm analysis mode, effecting in the areas, of the temperatures higher than the preset reference temperature (threshold), being displayed in red colour:
Page 23
USER MANUAL
21
Isotherm threshold temperature in displayed next to the palette indicator , and it
can be increased and decreased by pressing or buttons.
Press „MENU” or „Auto” to exit this mode. In isotherm analysis mode image
saving is unavailable.
4.6.2.5 Below (Isotherm analysis)
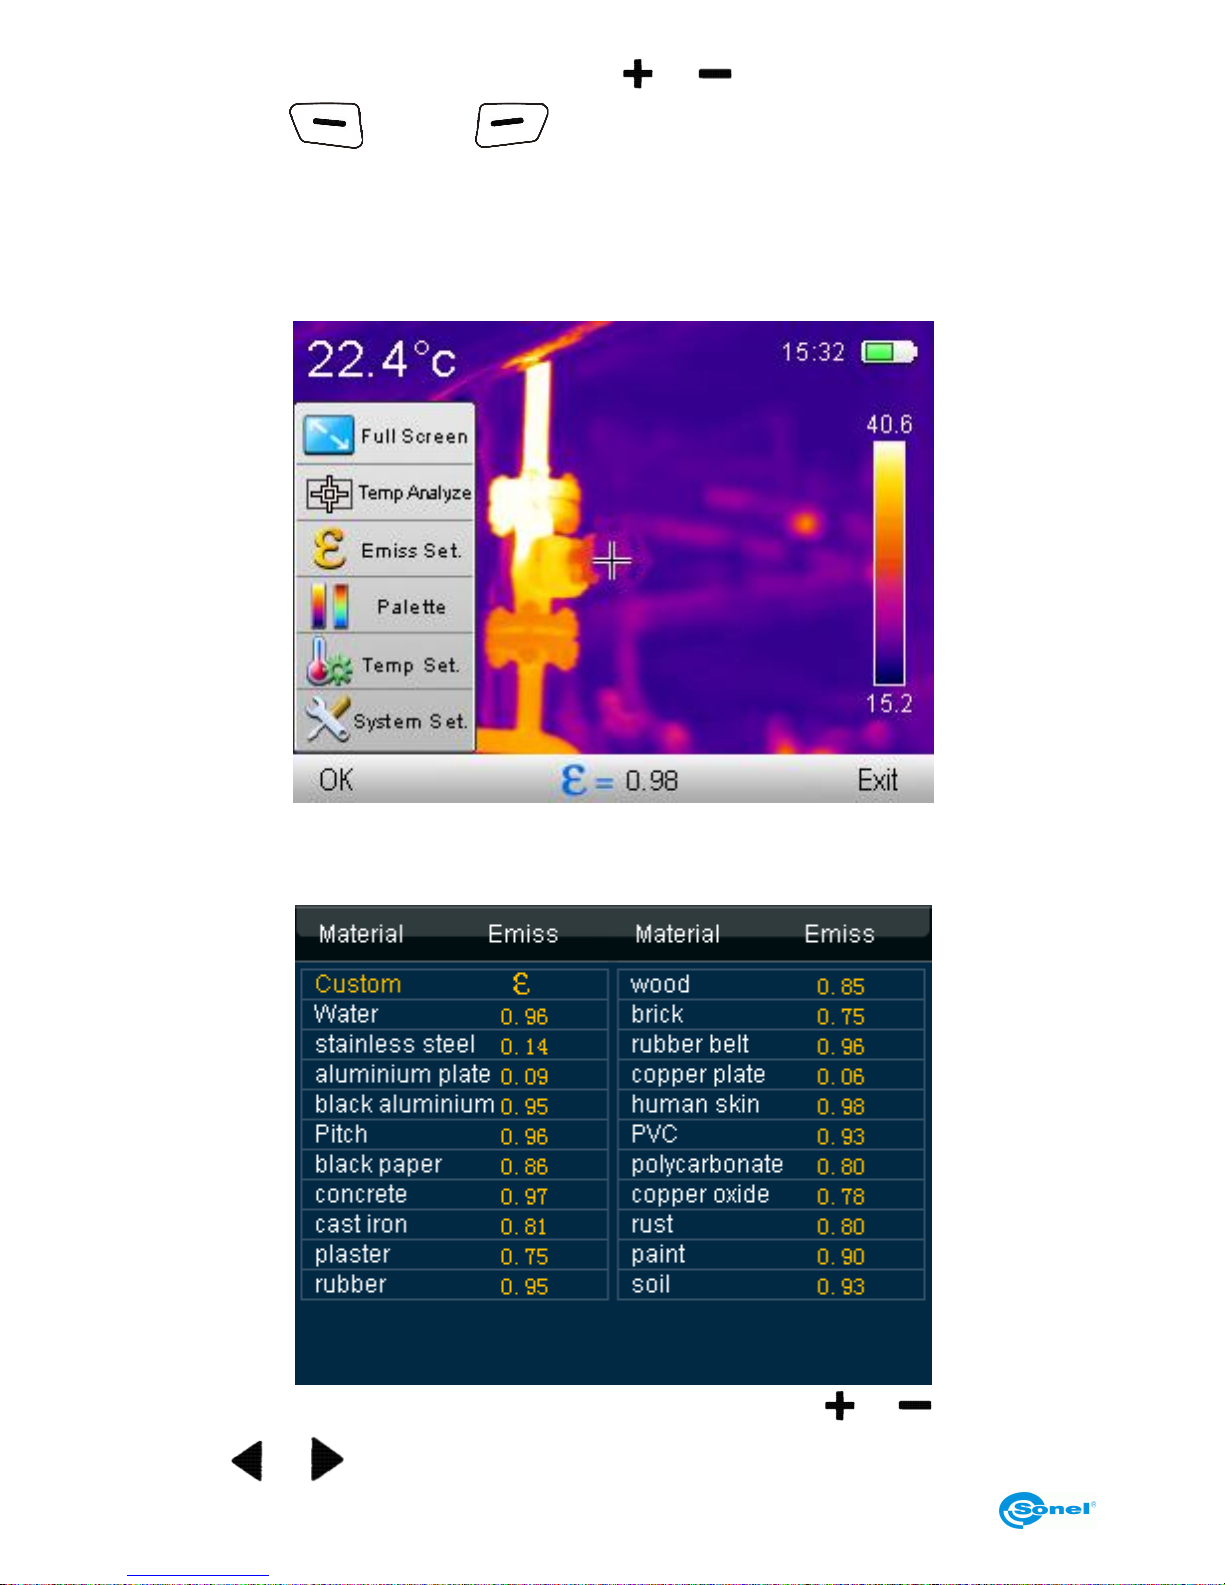
Selecting 'Below' starts isotherm analysis mode, effecting in the areas, of the temperatures lower than the preset reference temperature (threshold), being displayed in blue
colour:
Isotherm threshold temperature in displayed next to the palette indicator , and it
Page 24
THERMAL IMAGER SONEL KT-80 and KT-145
22
can be increased and decreased by pressing or buttons.
Press „MENU” or „Auto” to exit this mode. In isotherm analysis mode image
saving is unavailable.
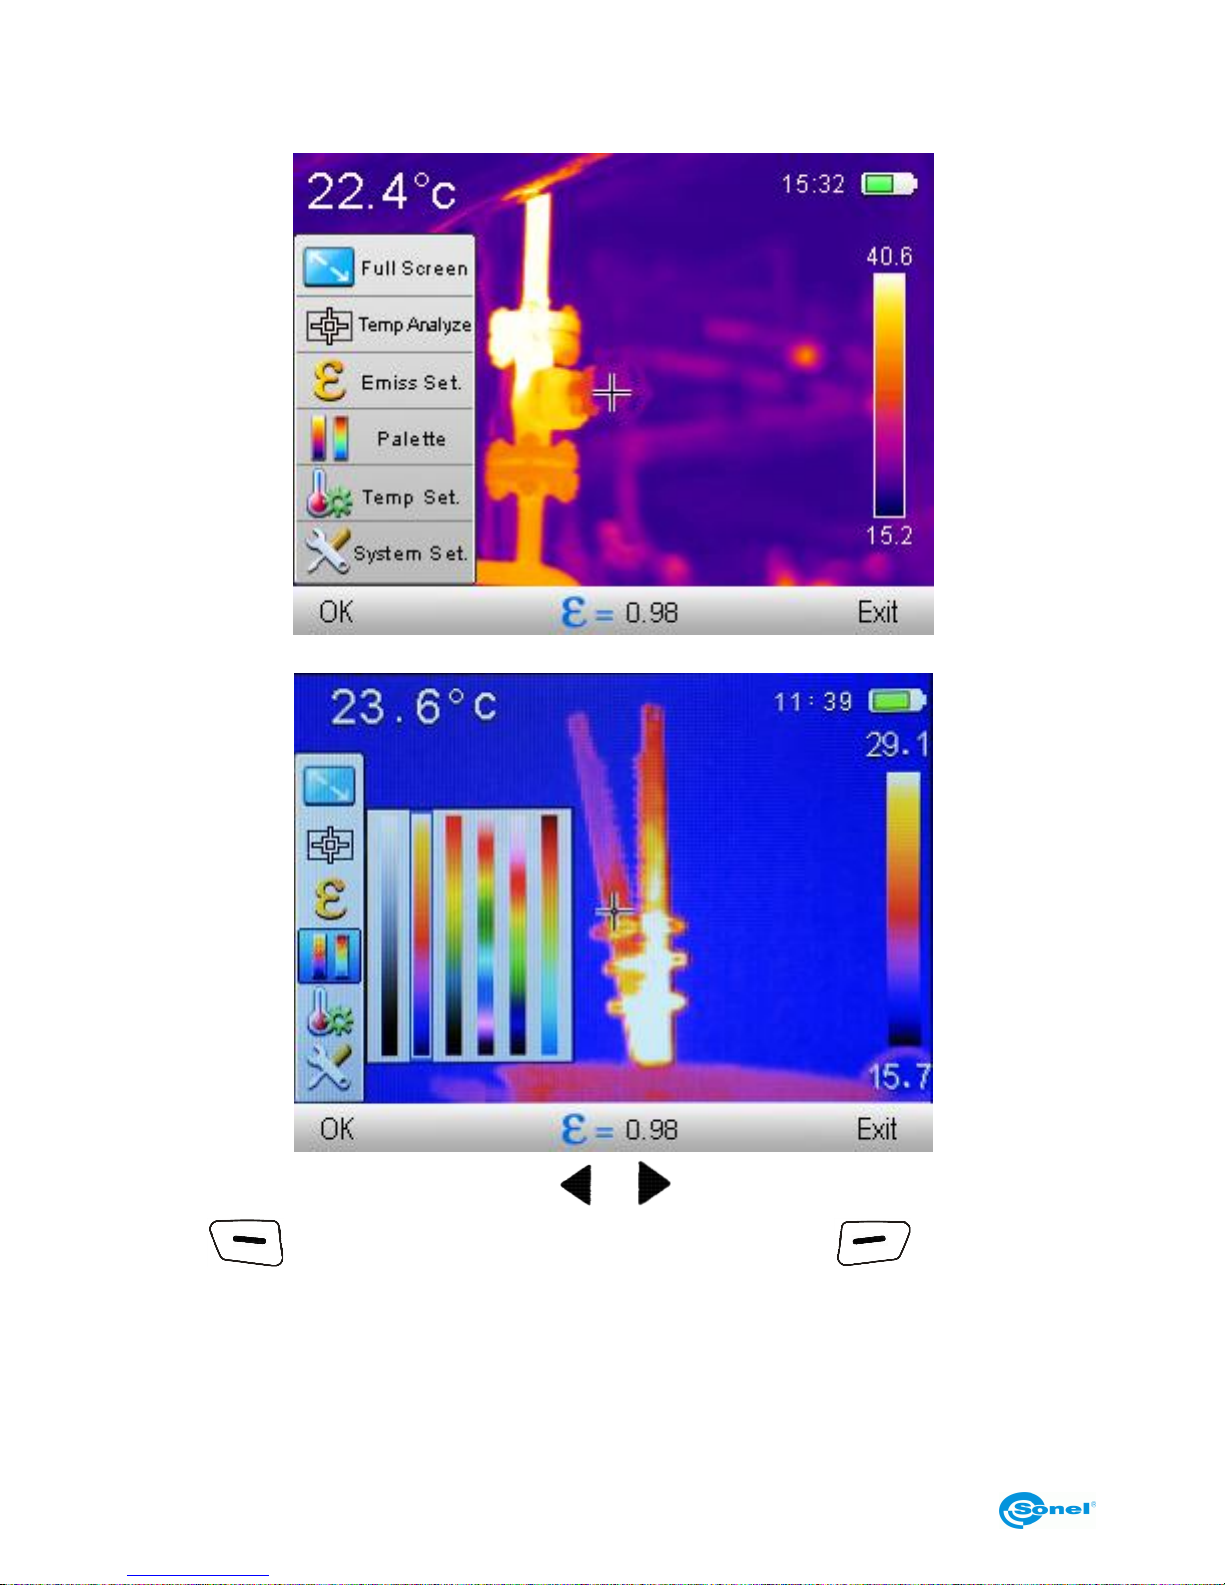
4.6.3 Emissivity
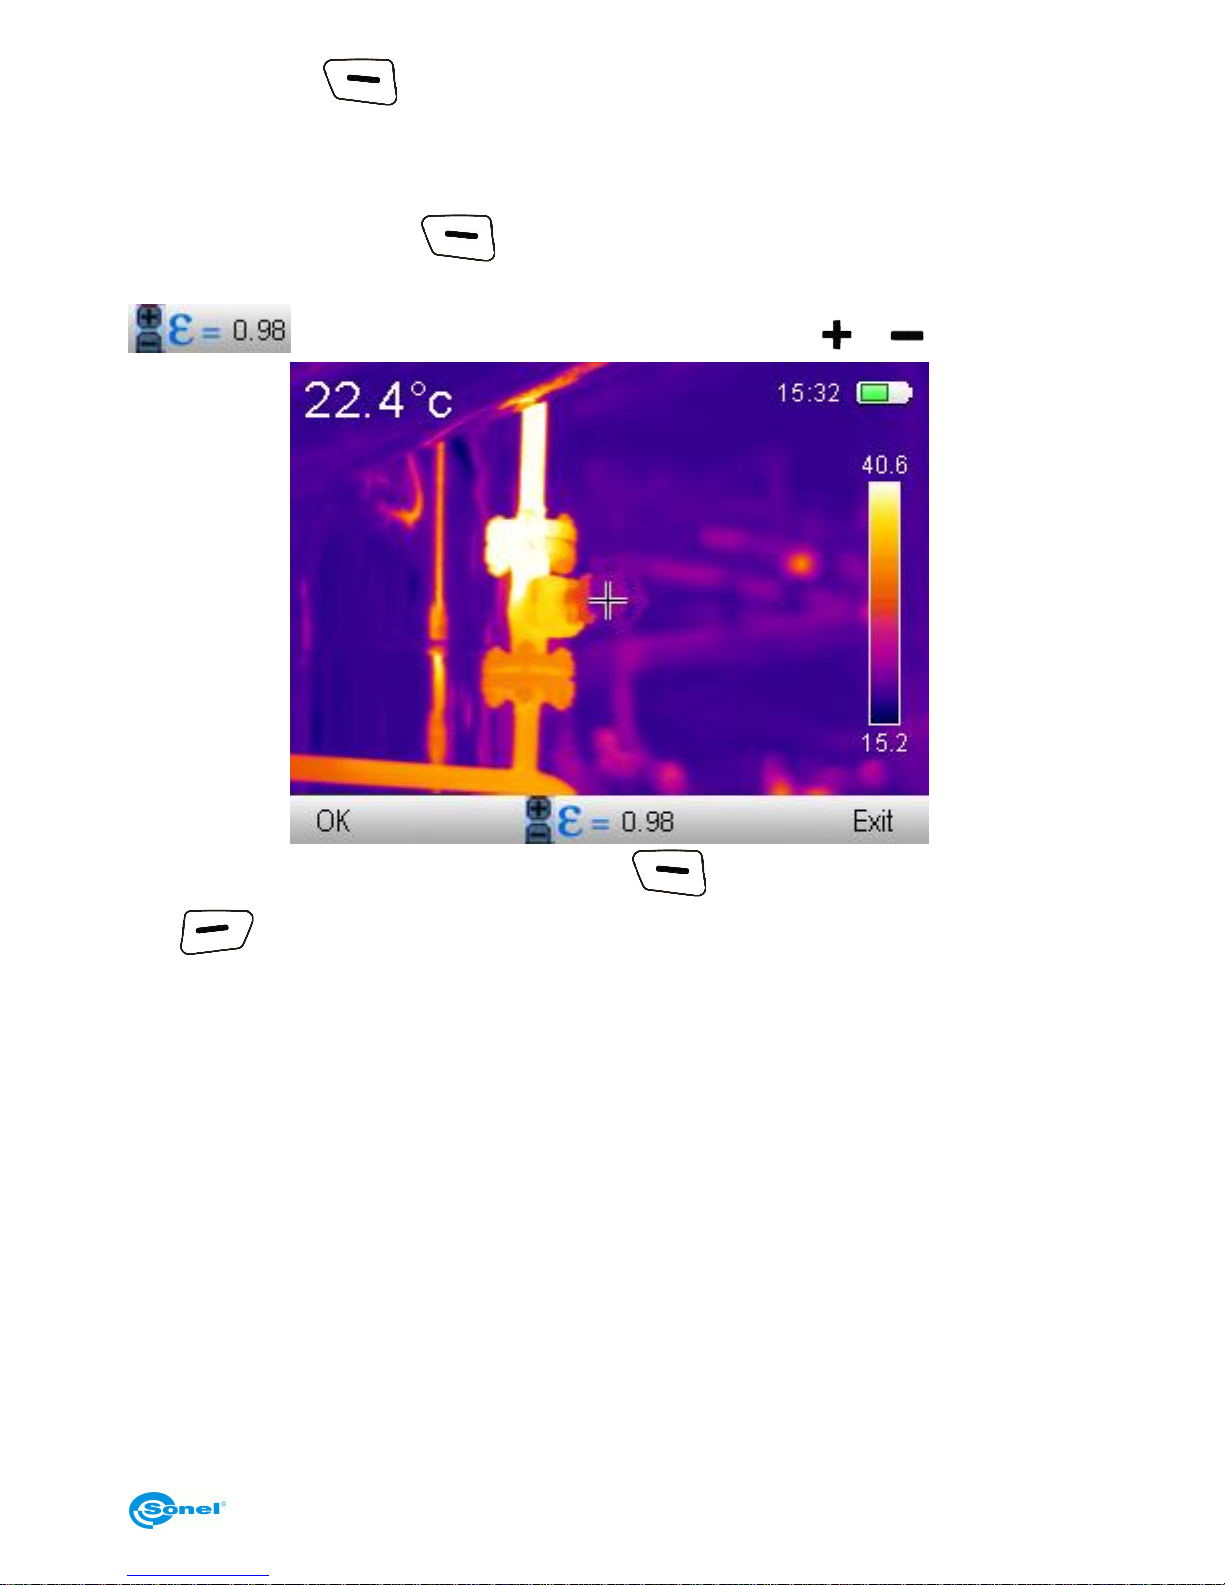
The main mode is displayed on the screen,
select ‘Emiss Set.’ To pop up the window with emissivity coefficient value selection, with a
list of the most common materials along with their emissivity coefficient values, also
known as reference emissivity values:
Move up and down and across the list with ‘up/down’ buttons ( or ) and ‘left/right’
buttons ( or ), select the material of your interest and confirm your se-
Page 25
USER MANUAL
23
lection with „OK” buton. Doing so will bring back the temperature measurement
mode onto the screen.
Emissivity can also be set manually by selecting ‘Custom’ on the list and confirming the
selection by pressing ‘OK’ . The table screen will be closed, and the possibility of
changing the emissivity value on screen, in measurement mode, will be added
press ‘up/down’ buttons to set the proper value ( or ).
Confirm the selection by pressing ‘OK’ buton ( ), or cancel it by pressing ‘Exit’ but-
ton ( ).
Page 26
THERMAL IMAGER SONEL KT-80 and KT-145
24
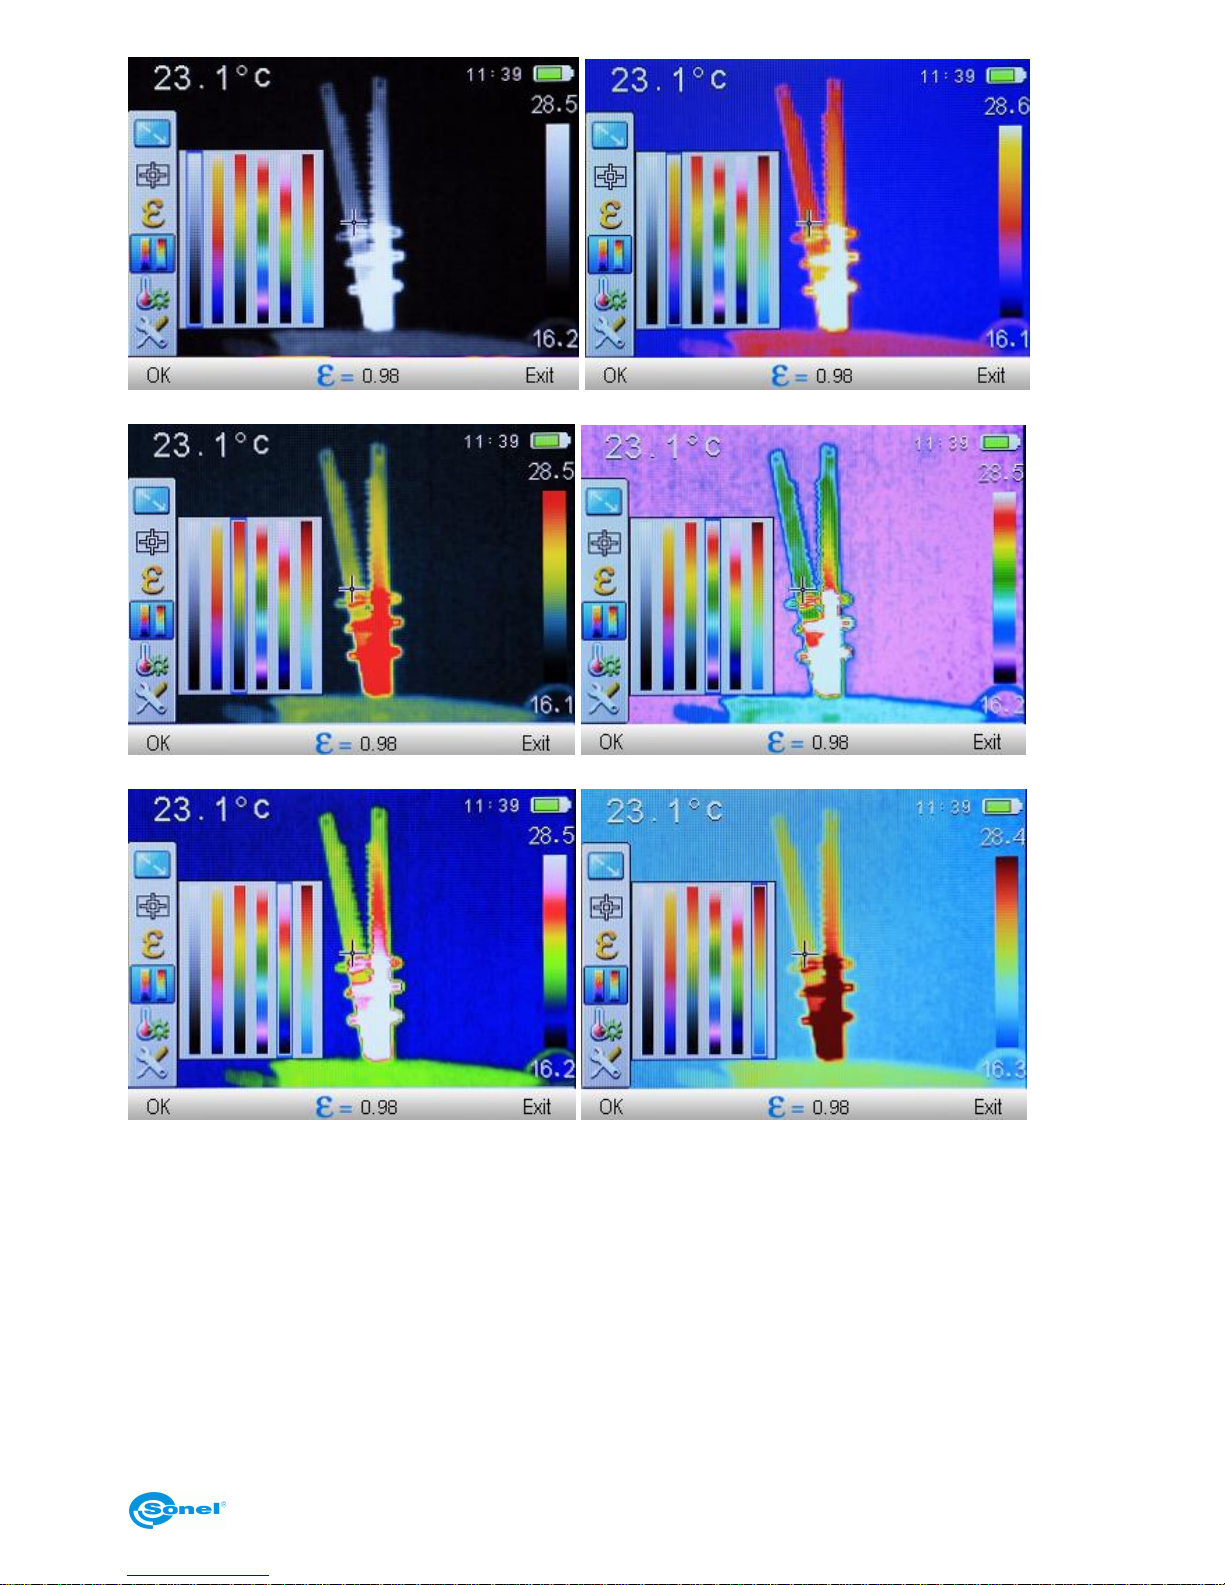
4.6.4 Palette
The main mode is displayed on the screen,
Select ‘Palette’ to pop up the window that allows to select one of the available palettes.
Selection is done by ‘left/right’ buttons ( or ), confirmation is done by pressing ‘OK’
buton ( ), and cancelation is done by pressing ‘Exit’ button ( ).
There are four palettes available in T-80, while KT-145 provides six different palettes:
Page 27
USER MANUAL
25
(KT-80 and KT-145) (KT-80 and KT-145)
(KT-80 and KT-145) (KT-80 and KT-145)
(only KT-145) (only KT-145)
Page 28
THERMAL IMAGER SONEL KT-80 and KT-145
26
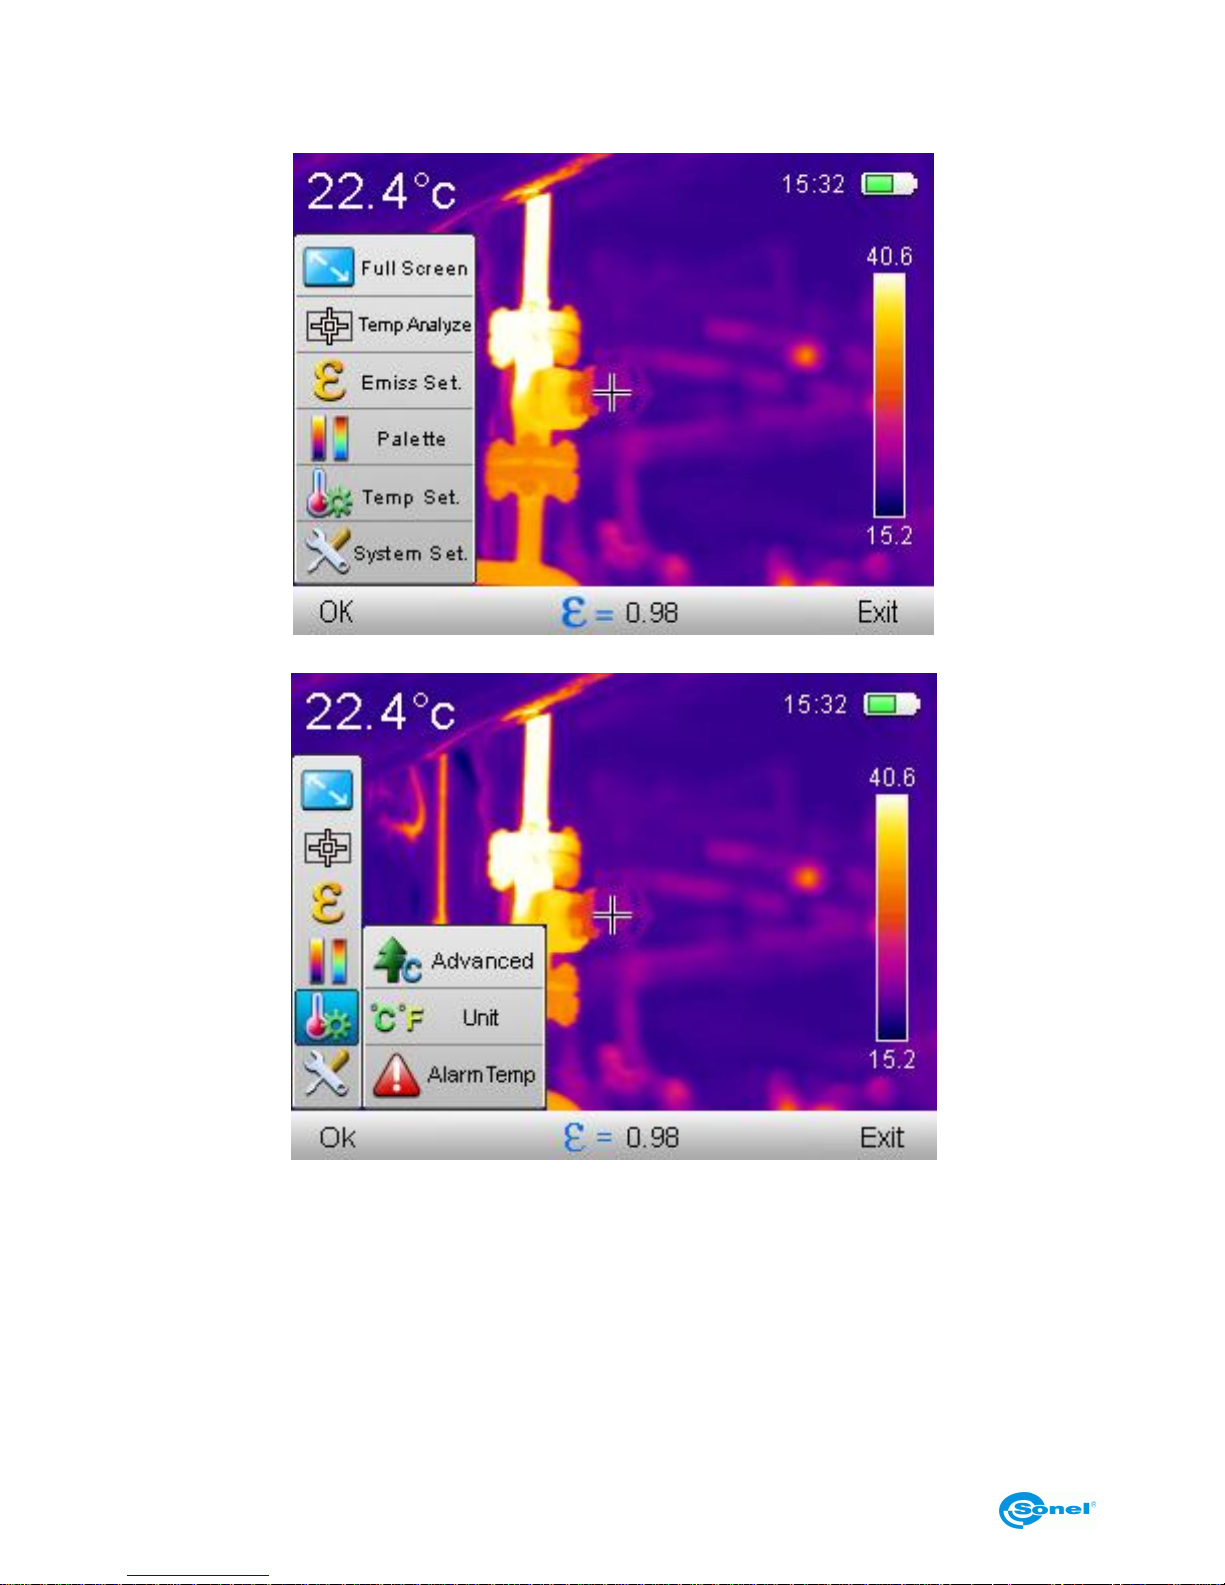
4.6.5 Temperature settings (temperature measurement settings)
The main mode is displayed on the screen,
Select ‘Temp Set.’ To open up submenu.
Three options are available here.
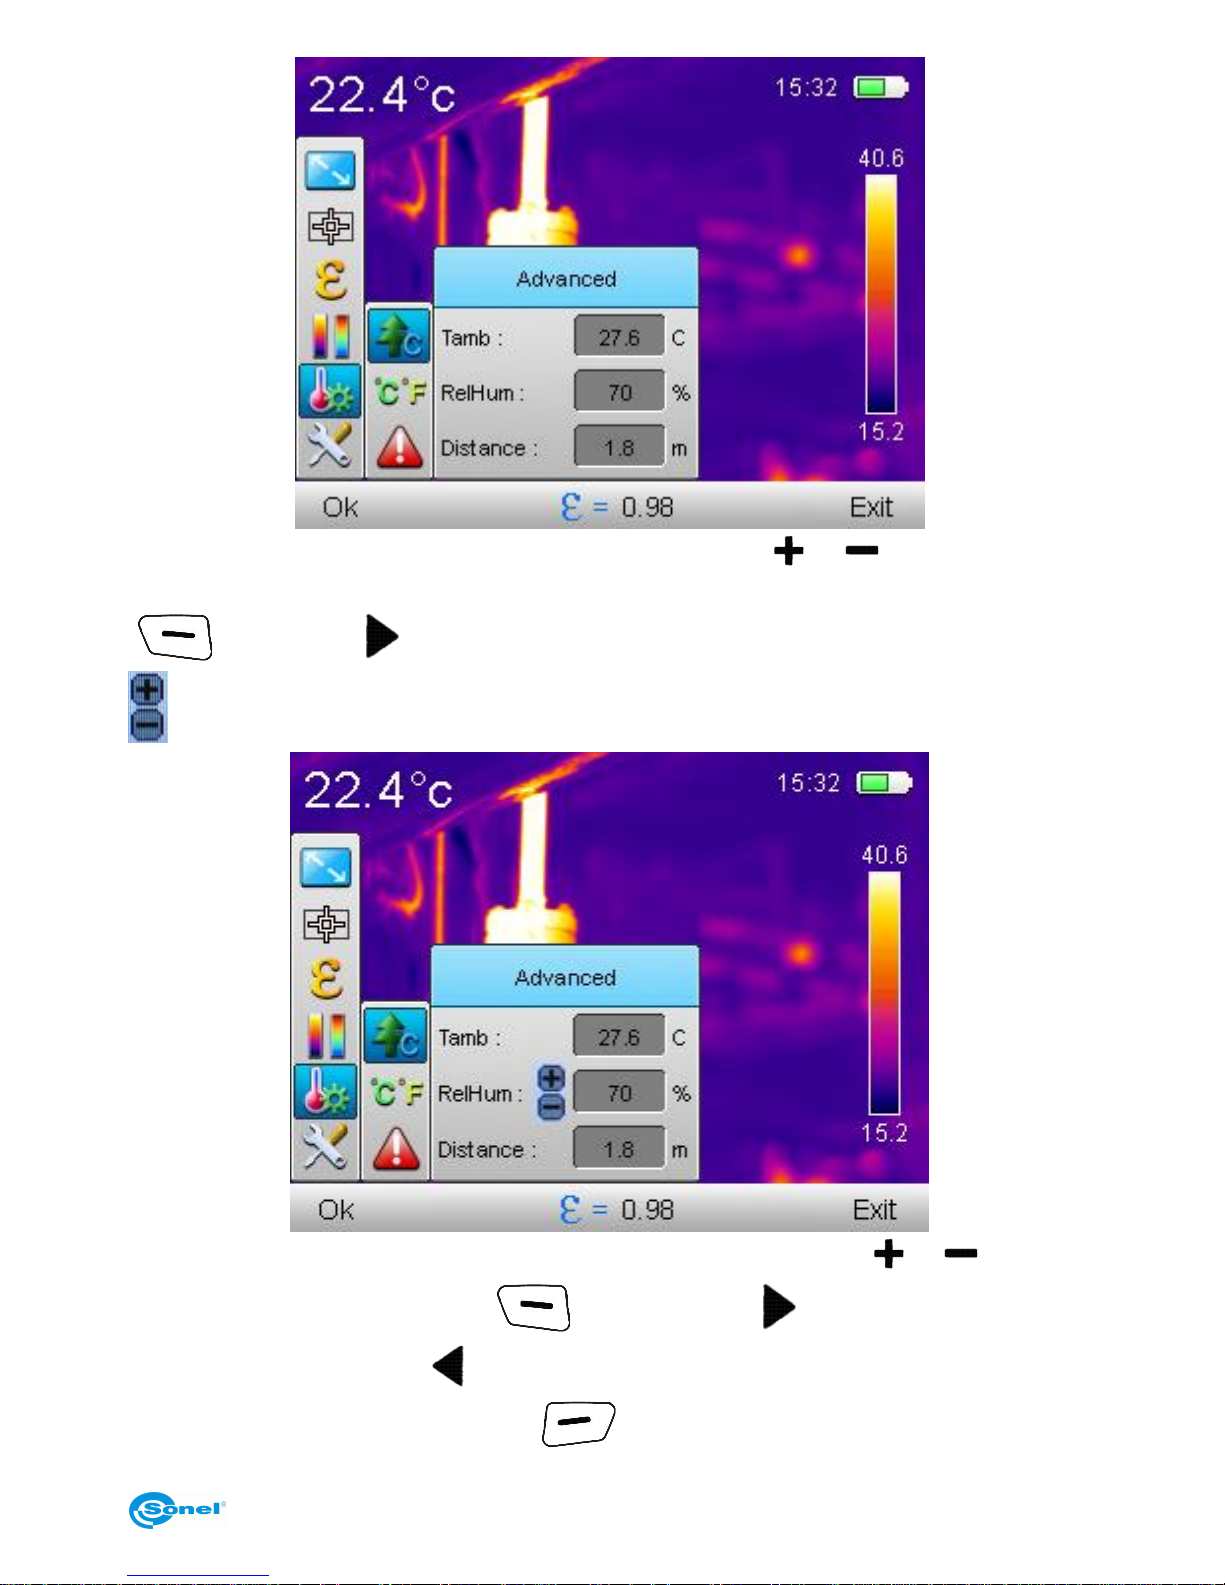
4.6.5.1 Advanced (only in KT-145)
Select 'Advanced' to pop up the window with measurement environmental conditions settings, including ambient temperature, relative humidity and distance from the measured
object.
Page 29
USER MANUAL
27
switching between the fields in done by 'up/down' buttons ( or ), editing the values
is by selecting (highlighting) field that user wants to edit and by pressing 'OK' button
( ) or the ‘right’ button. Next to the value that is being edited, a marker is placed
,
Press ‘up/down’ to increase or decrease the value of the parameterł ( or ). Confirm
changes by pressing 'OK' button ( ) or ‘right’ buton ( ),exit without saving changes by pressing 'left' button ( ). Go back to temperature measurement mode, after sav-
ing changes, by pressing 'Exit' button ( ).
Page 30
THERMAL IMAGER SONEL KT-80 and KT-145
28
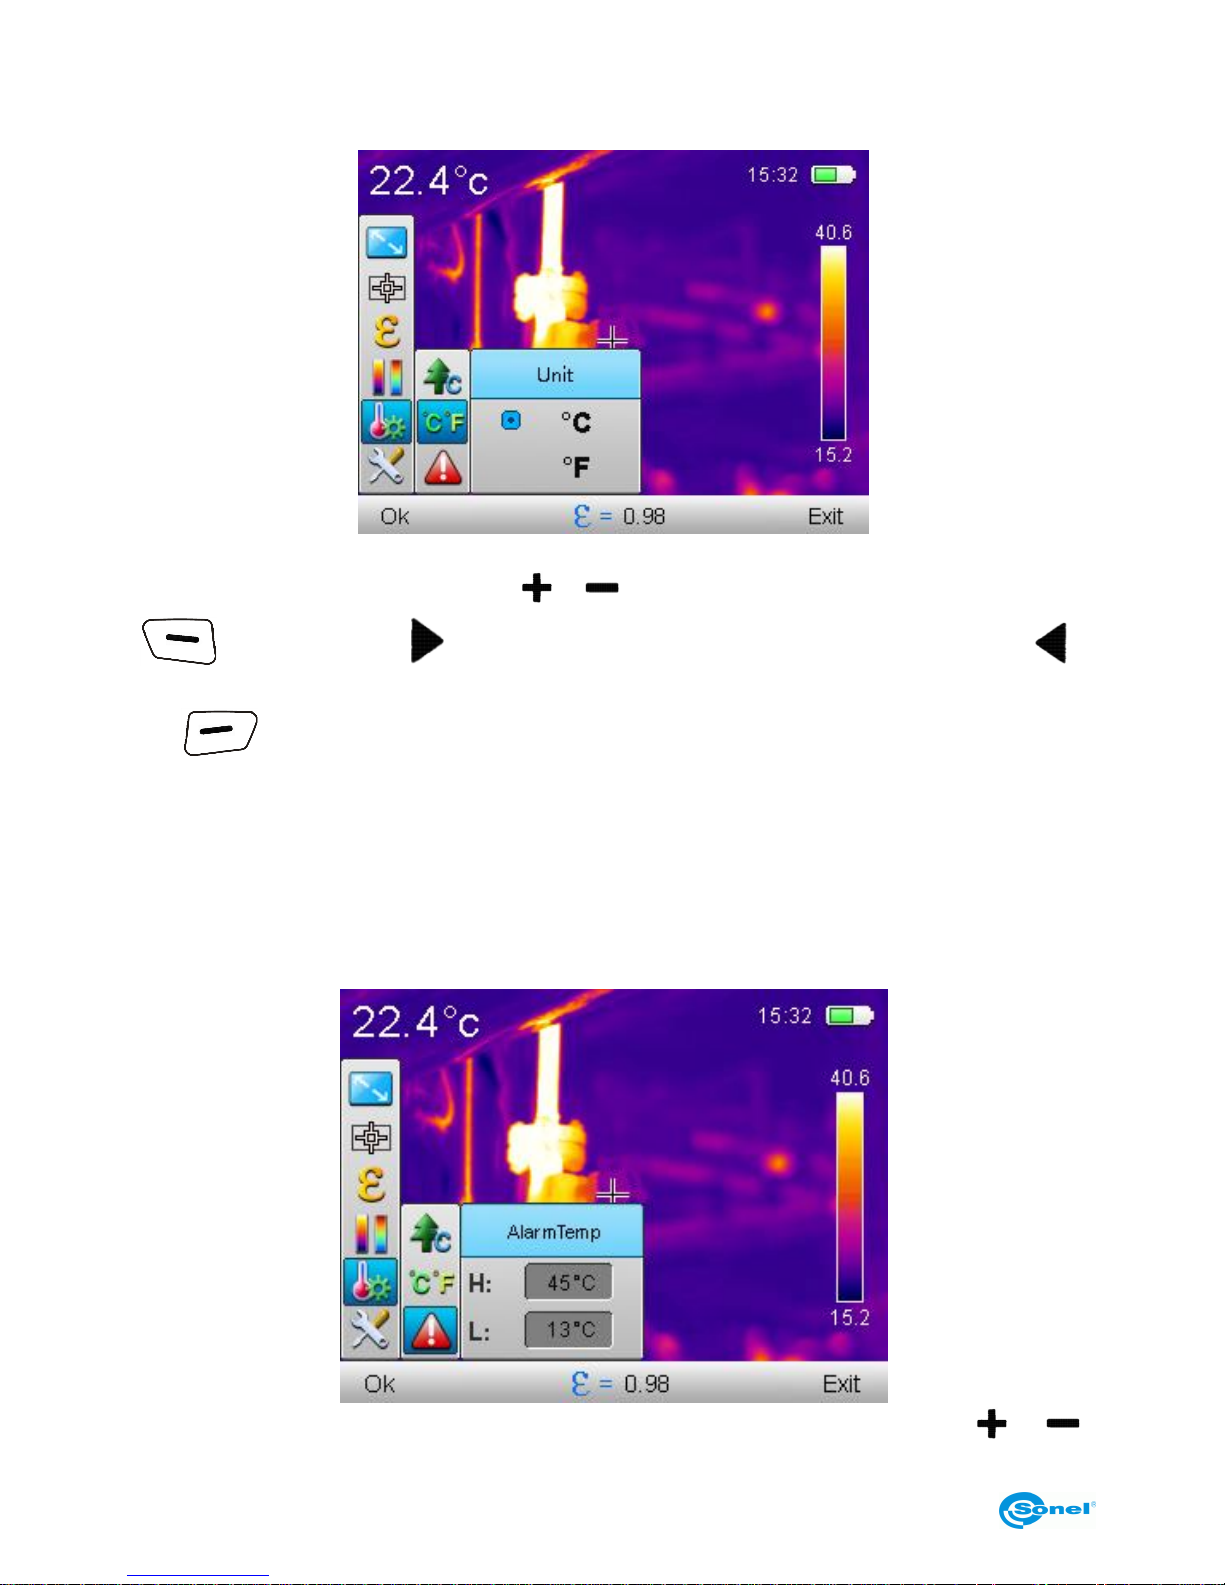
4.6.5.2 °C, °F, Temperature unit selection
Select ‘°C, °F, Unit’ to open up a window with temperature measurement unit selection.
Available options are: ‘°C’ – Celcius degrees or ‘°F’ – Fahrenheita degrees. Make selec-
tion by pressing 'up/down' buttons ( or ). Confirm selection by pressing ‘OK’ buton
( ) or ‘right’ buton ( ),exit without saving changes by pressing 'left' button ( ) .
Go back to temperature measurement mode, after saving changes, by pressing 'Exit' but-
ton ( ) .
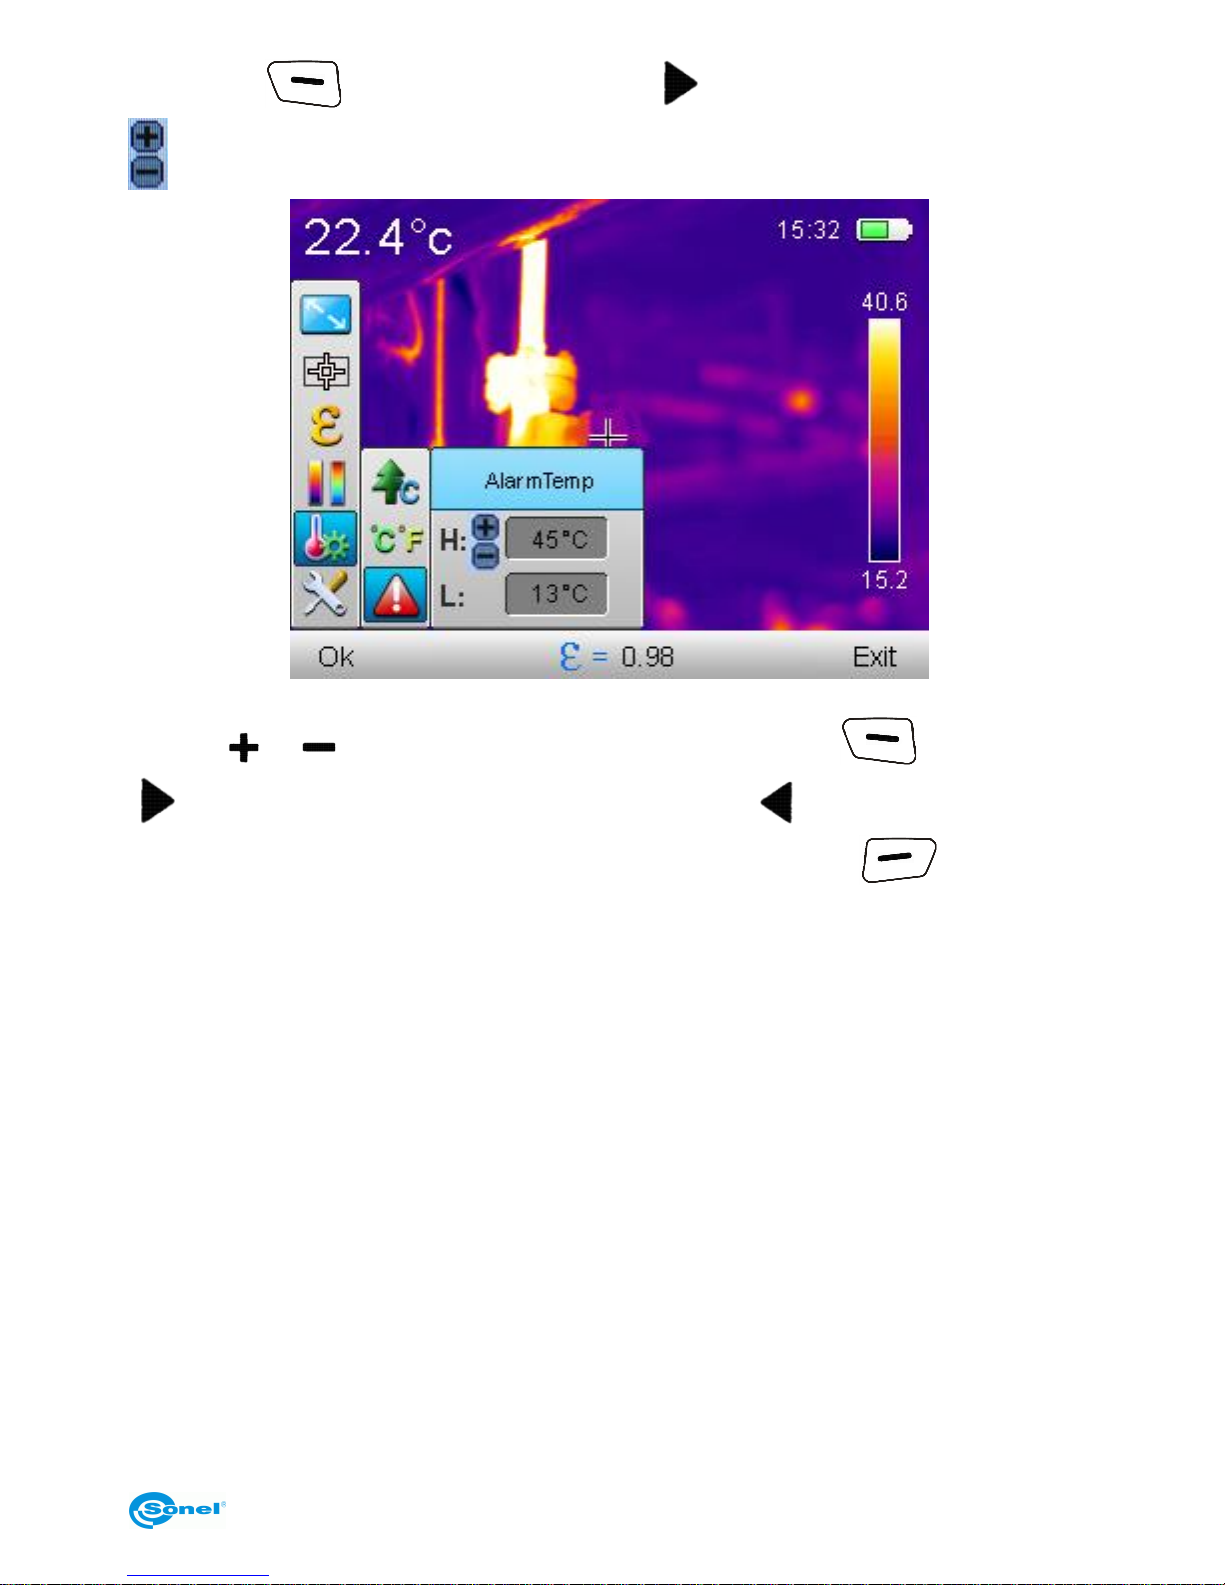
4.6.5.3 Temperature Alarm (only in KT-145)
Select 'AlarmTemp' to open up a window where the threshold values for minimum and
maximum temperature can be set. Set High, to activate the alarm when the temperature is
higher than selected value. Set Low to activate the alarm for temperatures below the selected value.:
Switching between High and Low fields is done by pressing 'up/down' buttons ( or ),
while editing those values is done by selecting (highlighting) field for editing and pressing
Page 31
USER MANUAL
29
'OK' button ( ) or by pressinf ‘right’ buton ( ).When edit mode is on, the symbol
is displayed next to the value set for editing.,
increasing or decreasing the value of the edited parameter is done by pressing 'up/down'
buttons ( or ). Confirm selection by pressing ‘OK’ buton ( ) or ‘right’ buton
( ),exit without saving changes by pressing 'left' button ( ) . Go back to temperature
measurement mode, after saving changes, by pressing 'Exit' button ( ) .
Depending on the selected alarm type, moving cursor in the area analysis mode will be
marking point of the highest, or the lowest temperature, changing its colors as described
in 4.7.2.2 and 4.7.2.3.
Page 32
THERMAL IMAGER SONEL KT-80 and KT-145
30
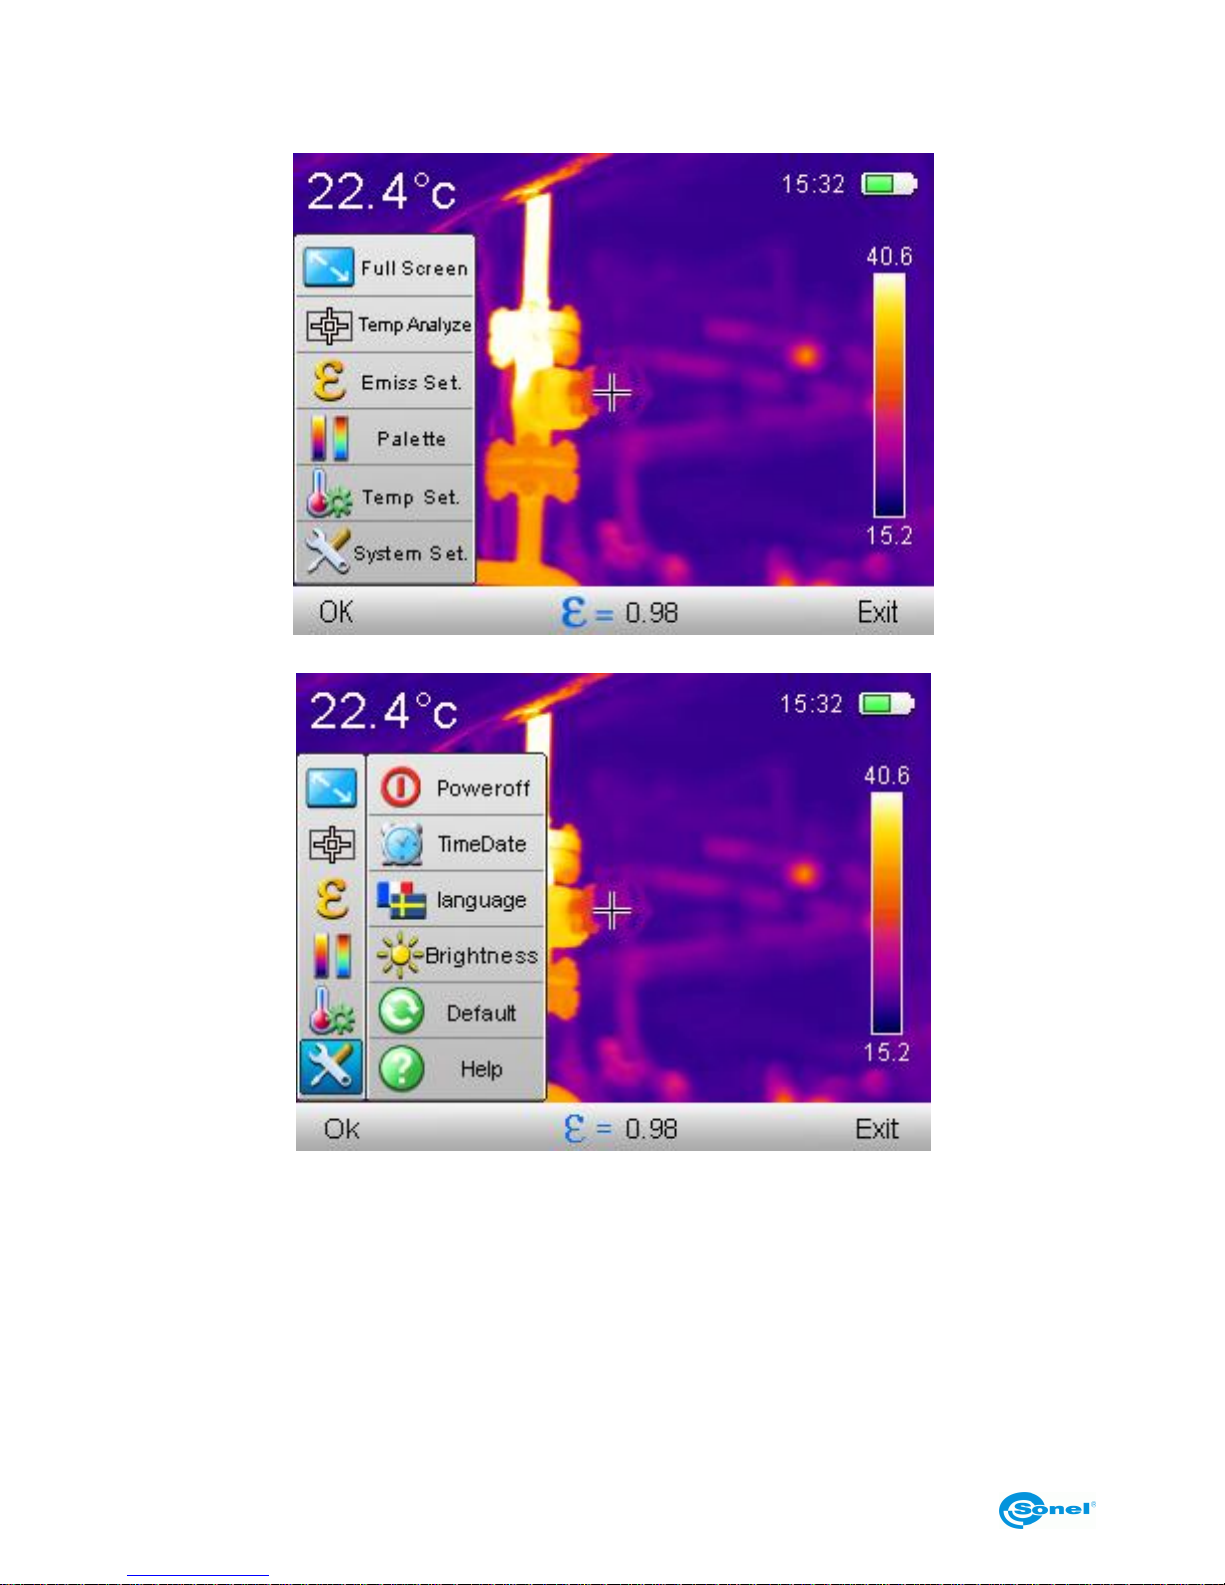
4.6.6 System Settings
The main mode is displayed on the screen,
Select ‘System set.’ to expand drop-down configuration menu:
Several options are available for adjusting here.
Page 33
USER MANUAL
31
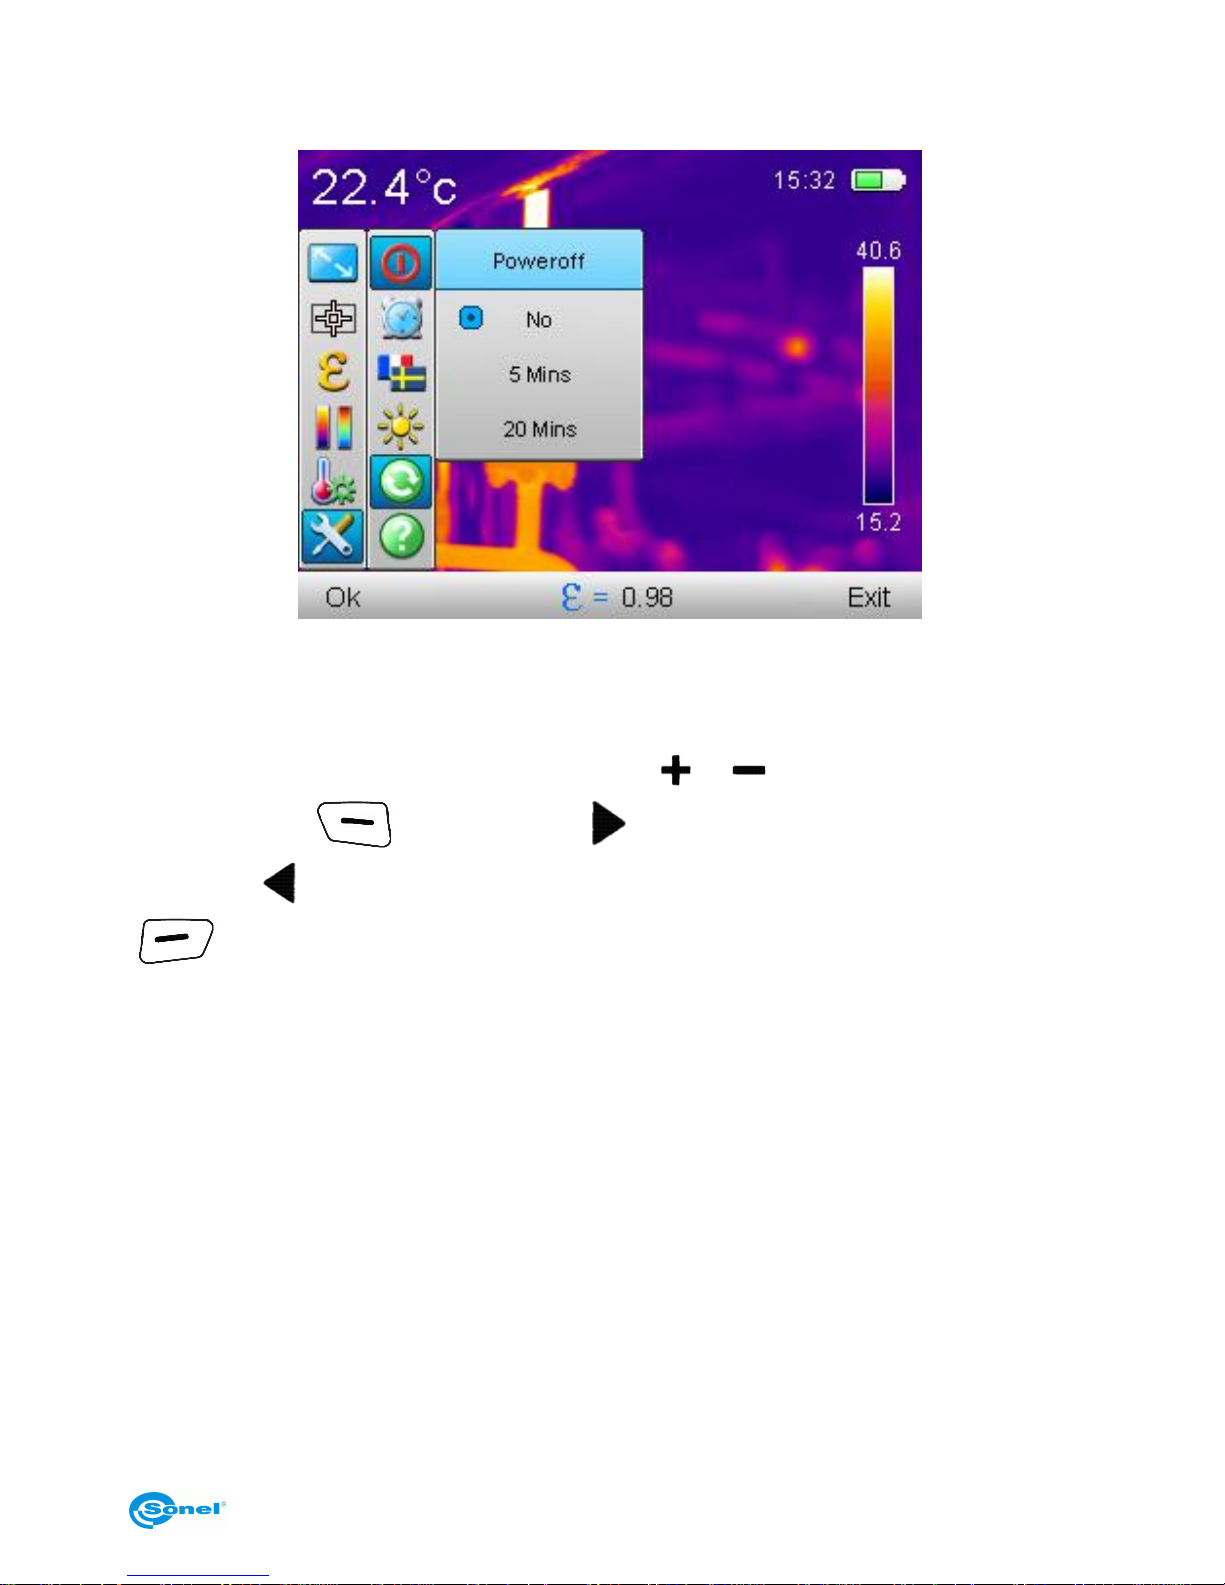
4.6.6.1 Power-off
Select 'Poweroff' to open up the setting window for automatic camera switch off.
Three settings for power off mode are available:
- ‘No’ – auto power off mode is deactivated,
- ‘5 min’– the camera will switch off automatically after being idle for 5 mins,
- ‘20min’– the camera will switch off automatically after being idle for 20 mins.
Selection is done by pressing 'up/down' buttons ( or ). Confirm selection by press-
ing ‘OK’ buton ( ) or ‘right’ buton ( ), exit without saving changes by pressing
'left' button ( ) . Go back to temperature measurement mode, by pressing 'Exit' button
( ).
Page 34
THERMAL IMAGER SONEL KT-80 and KT-145
32
4.6.6.2 Time / Date
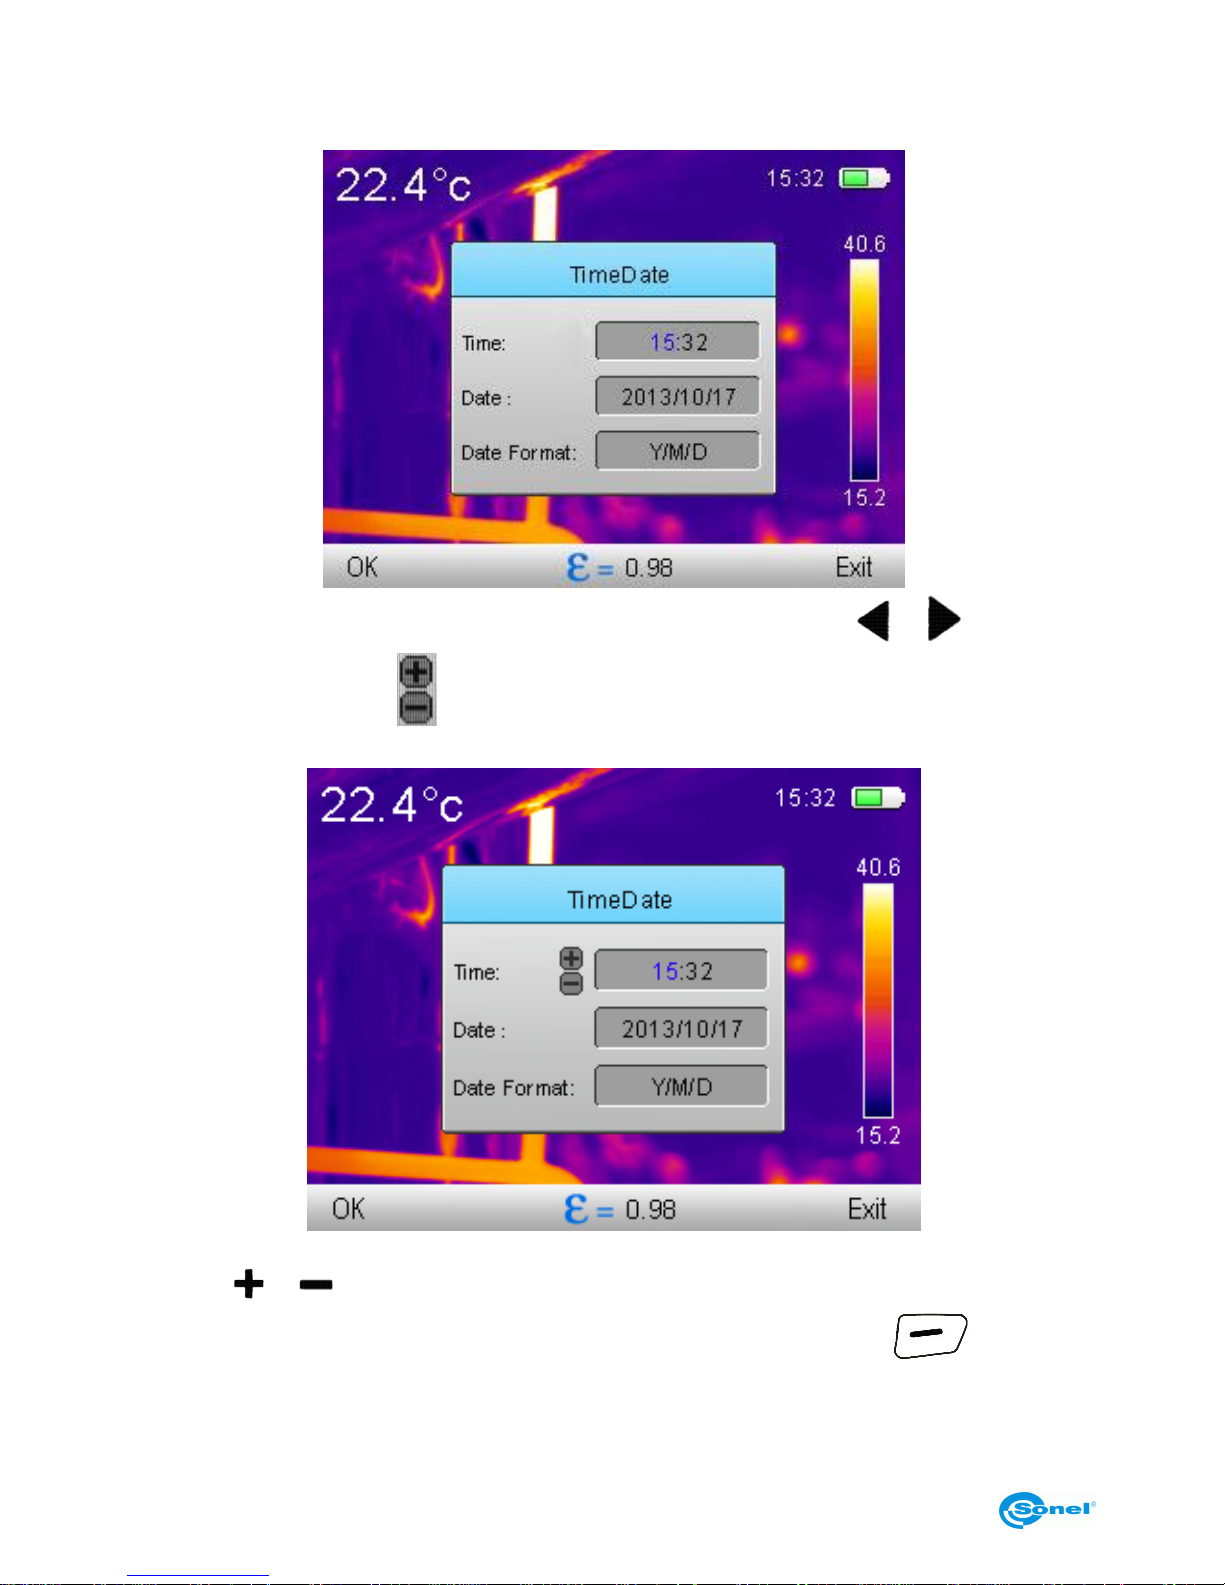
Select ‘TimeDate’ to open up a window with time, date and date format settings:
Switching between the fields is done by pressing 'left/right' button’ ( or ). When edit
mode is on, the symbol is displayed next to the value set for editing. Edited value is
highlighted in blue.
increasing or decreasing the value of the edited parameter is done by pressing 'up/down'
buttons ( or ). Confirm changes by pressing ‘OK’ buton. Go back to temperature
measurement mode, without saving changes, by pressing 'Exit' button ( ).
Three date formats are available:
Page 35
USER MANUAL
33
M/D/Y – month/day/year
Y/M/D – year/month/day
D/M/Y – day/month/year
4.6.6.3 Language
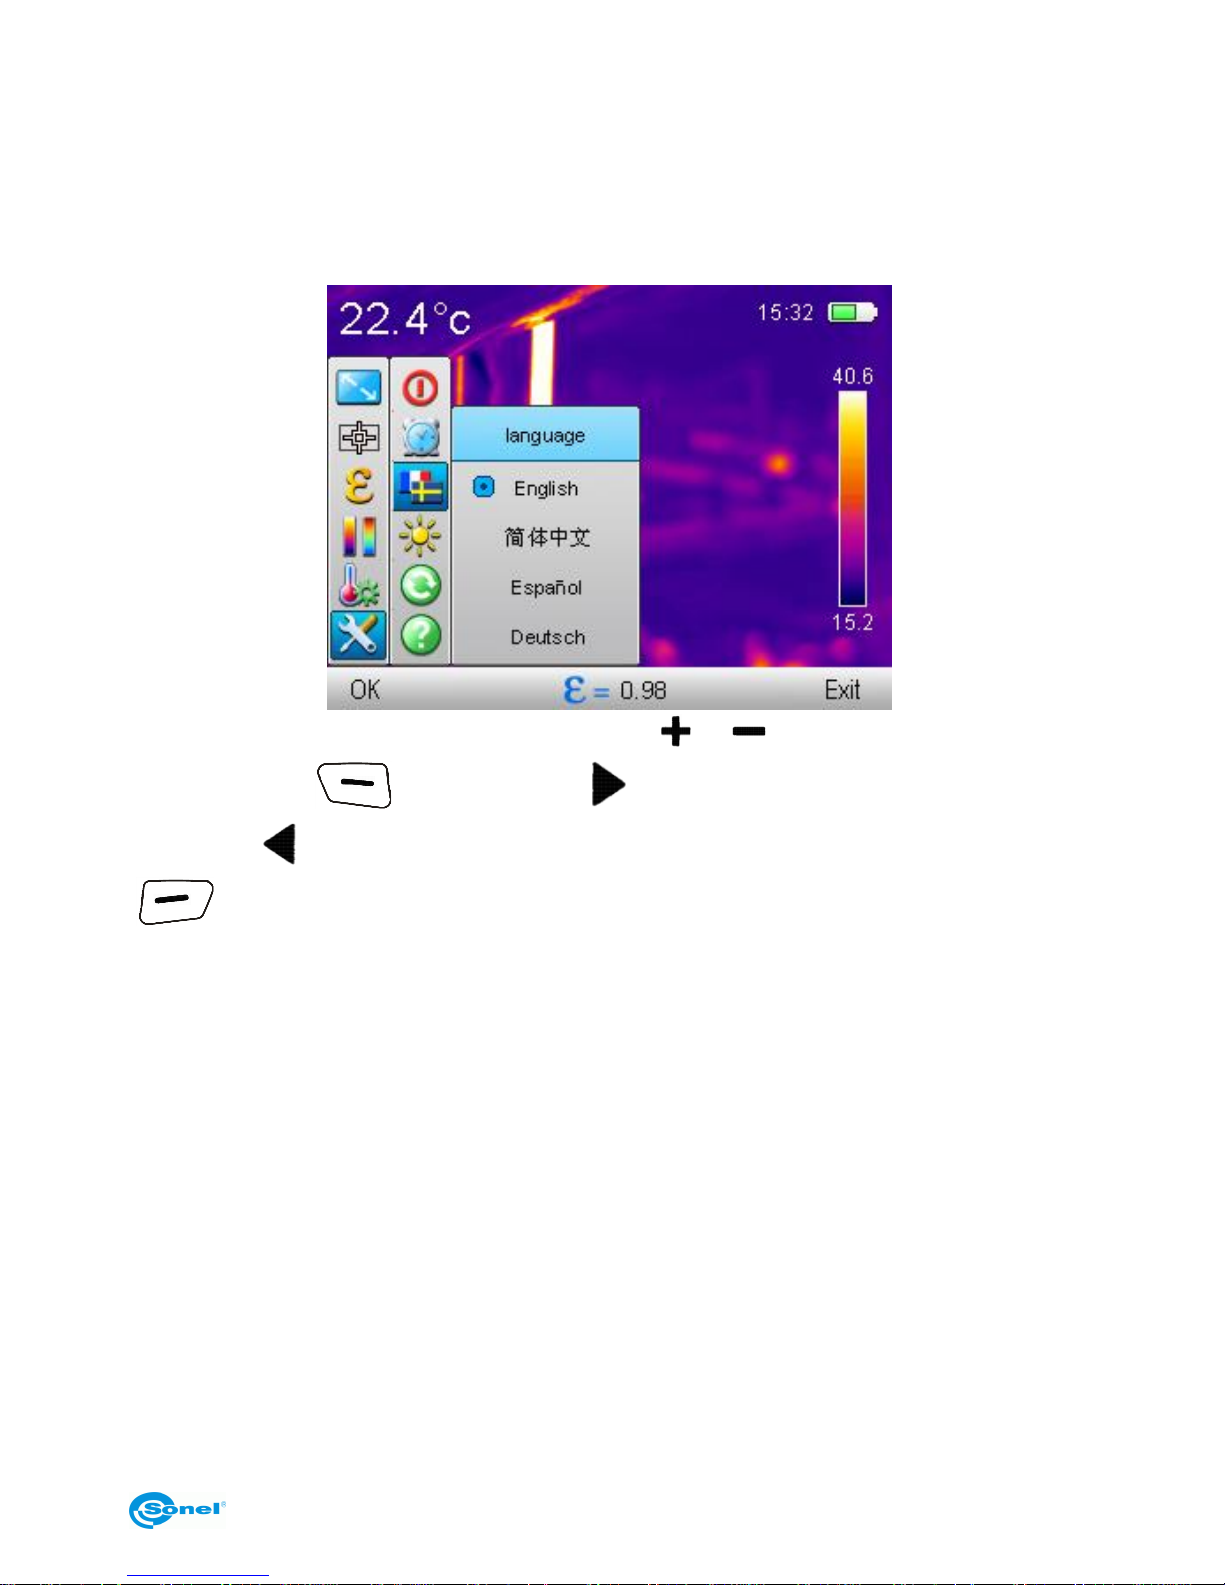
Select ‘language’ to open up a window with the language selection.
Selection is done by pressing 'up/down' buttons ( or ). Confirm selection by press-
ing ‘OK’ buton ( ) or ‘right’ buton ( ), exit without saving changes by pressing
'left' button ( ) . Go back to temperature measurement mode, by pressing 'Exit' button
( ).
The list of available languages may be different in your camera.
Page 36
THERMAL IMAGER SONEL KT-80 and KT-145
34
4.6.6.4 Brightness
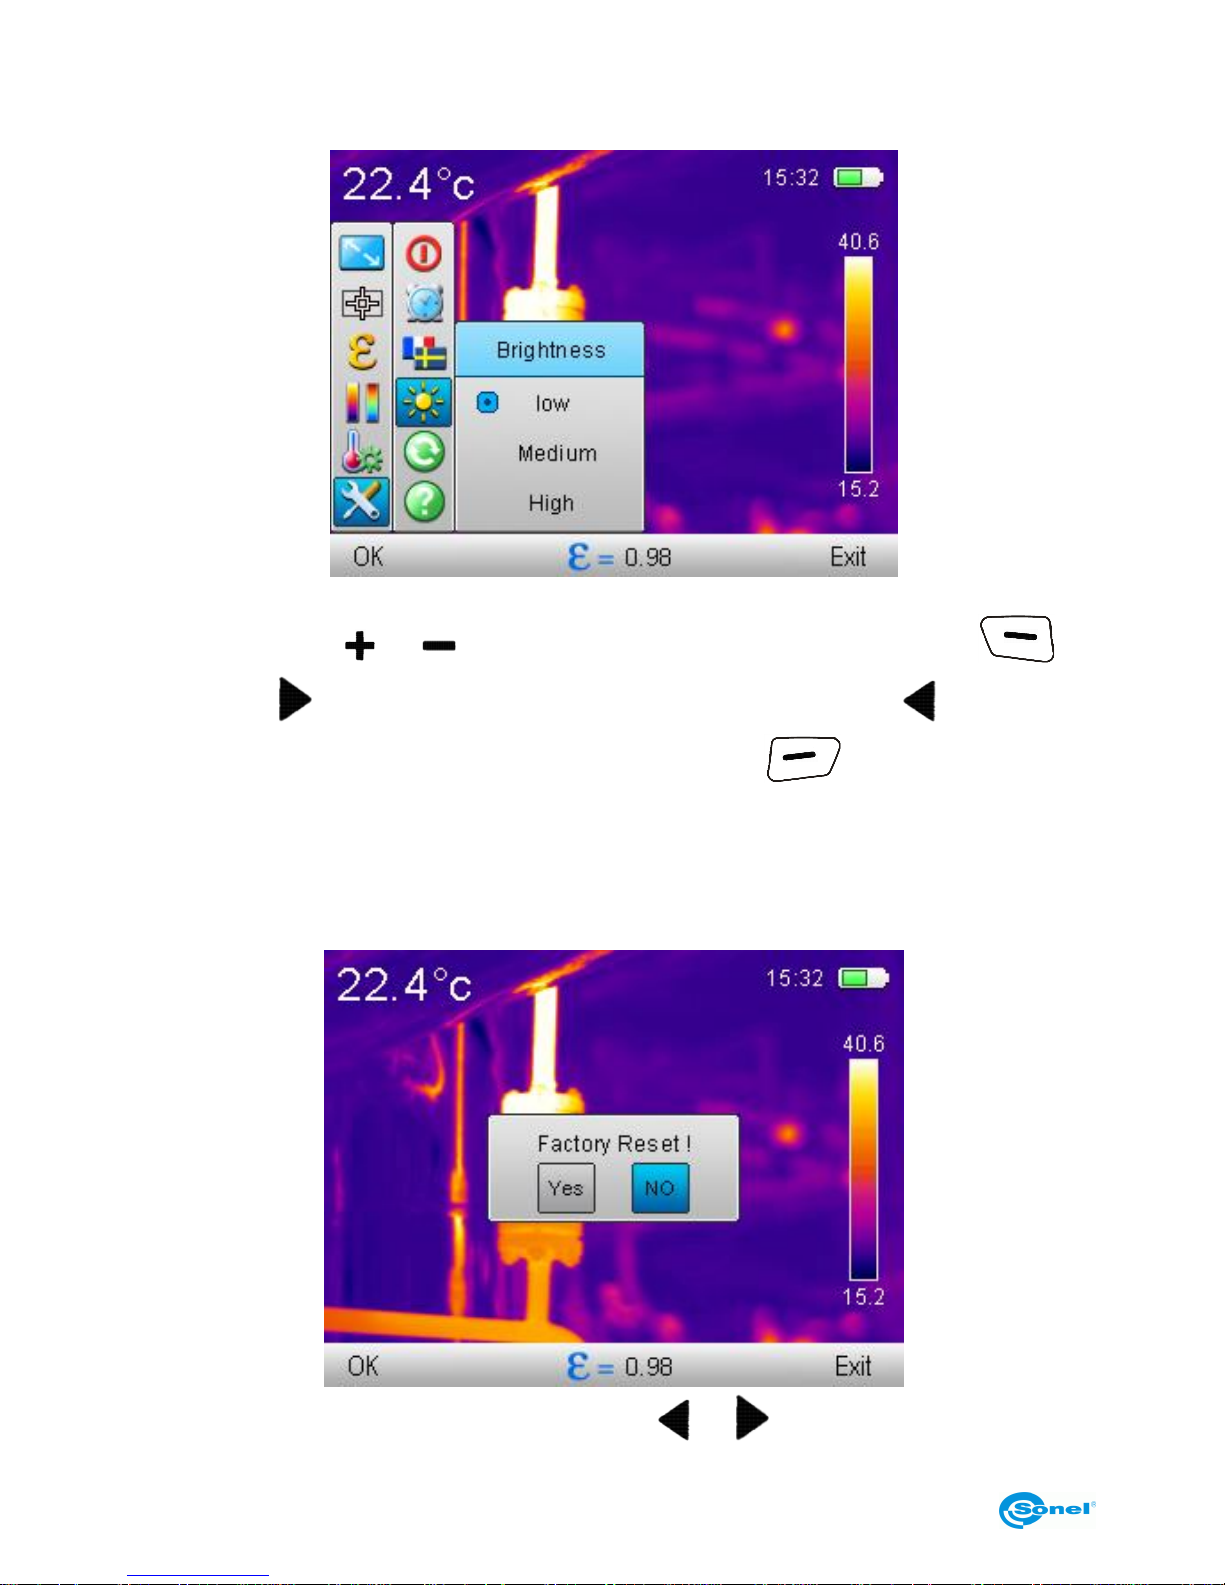
Select ‘Brightness’ to open up a window with LCD brightness adjustment selection.
There are three modes for LCD brightness adjustment. Selection is done by pressing
'up/down' buttons ( or ). Confirm selection by pressing ‘OK’ buton ( ) or
‘right’ buton ( ), exit without saving changes by pressing 'left' button ( ) . Go back to
temperature measurement mode, by pressing 'Exit' button ( ).
.
4.6.6.5 Default
Select ‘Default’ to undergo Factory Reset that will restore default settings of the camera.
Selection is done by pressing 'left/right' buttons ( or ). Confirm selection by press-
Page 37
USER MANUAL
35
ing ‘OK’ buton ( ). Chosing ‘OK’ will restore factory settings. Select ‘Exit’ to go
back to the menu without restoring factory settings, Go back to temperature measurement
mode, by pressing 'Exit' button ( ).
After selecting default settings, following parameters are switching their values into below
levels:
- emissivity: 0,98;
- distance to object: 1,8m (only in KT-145),
- ambient temperature (only in KT-145),
- palette: 2;
- relative humidity: 70% (only in KT-145),
- Temperature alarm: W: 100°C (212°F), N: 0,0°C (32°F),
- Power off: deactivated,
- temperature unit: °C,
- brightness LCD: average.
4.6.6.6 Help
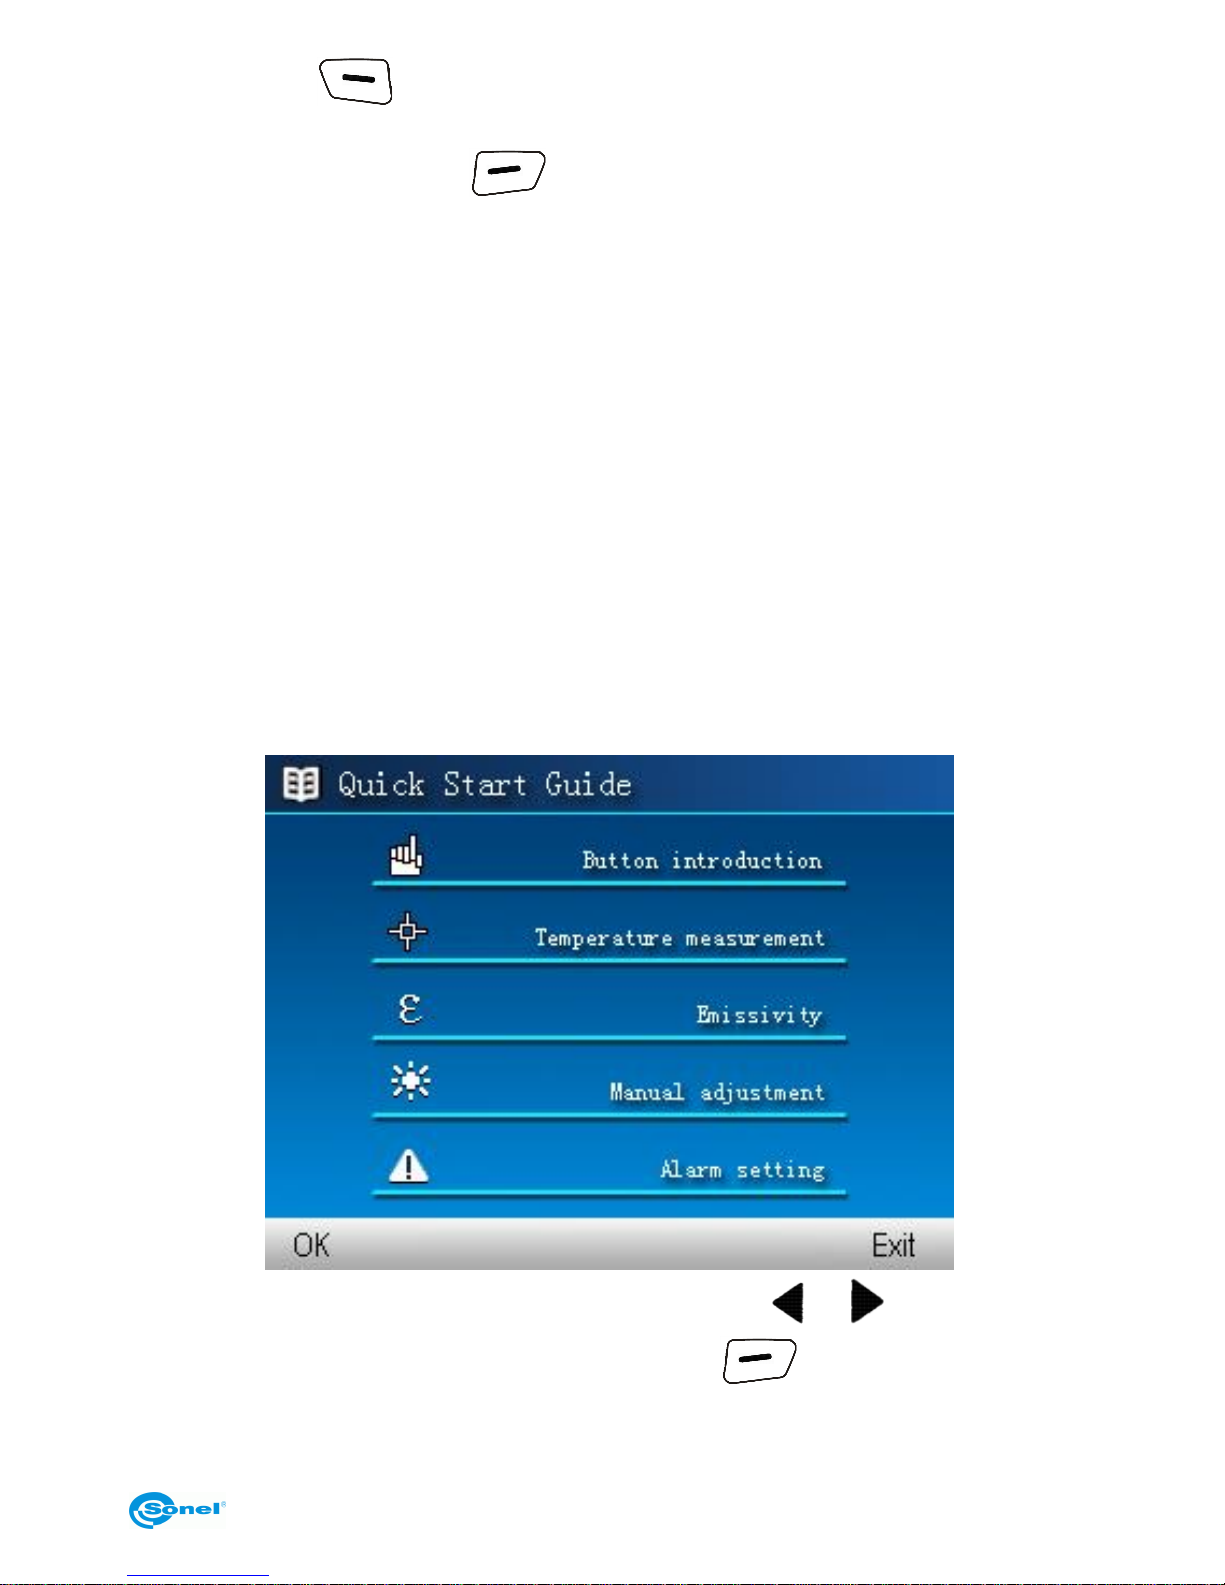
Select ‘Help’ to open up on-screen help, that describes basic parameters and features of
the camera.
This Guide can be browsed by pressing ‘left/right’ buttons ( or ). Go back to tem-
perature measurement mode, by pressing 'Exit' button ( ).
Page 38
THERMAL IMAGER SONEL KT-80 and KT-145
36
4.7 Files – browsing and deleting
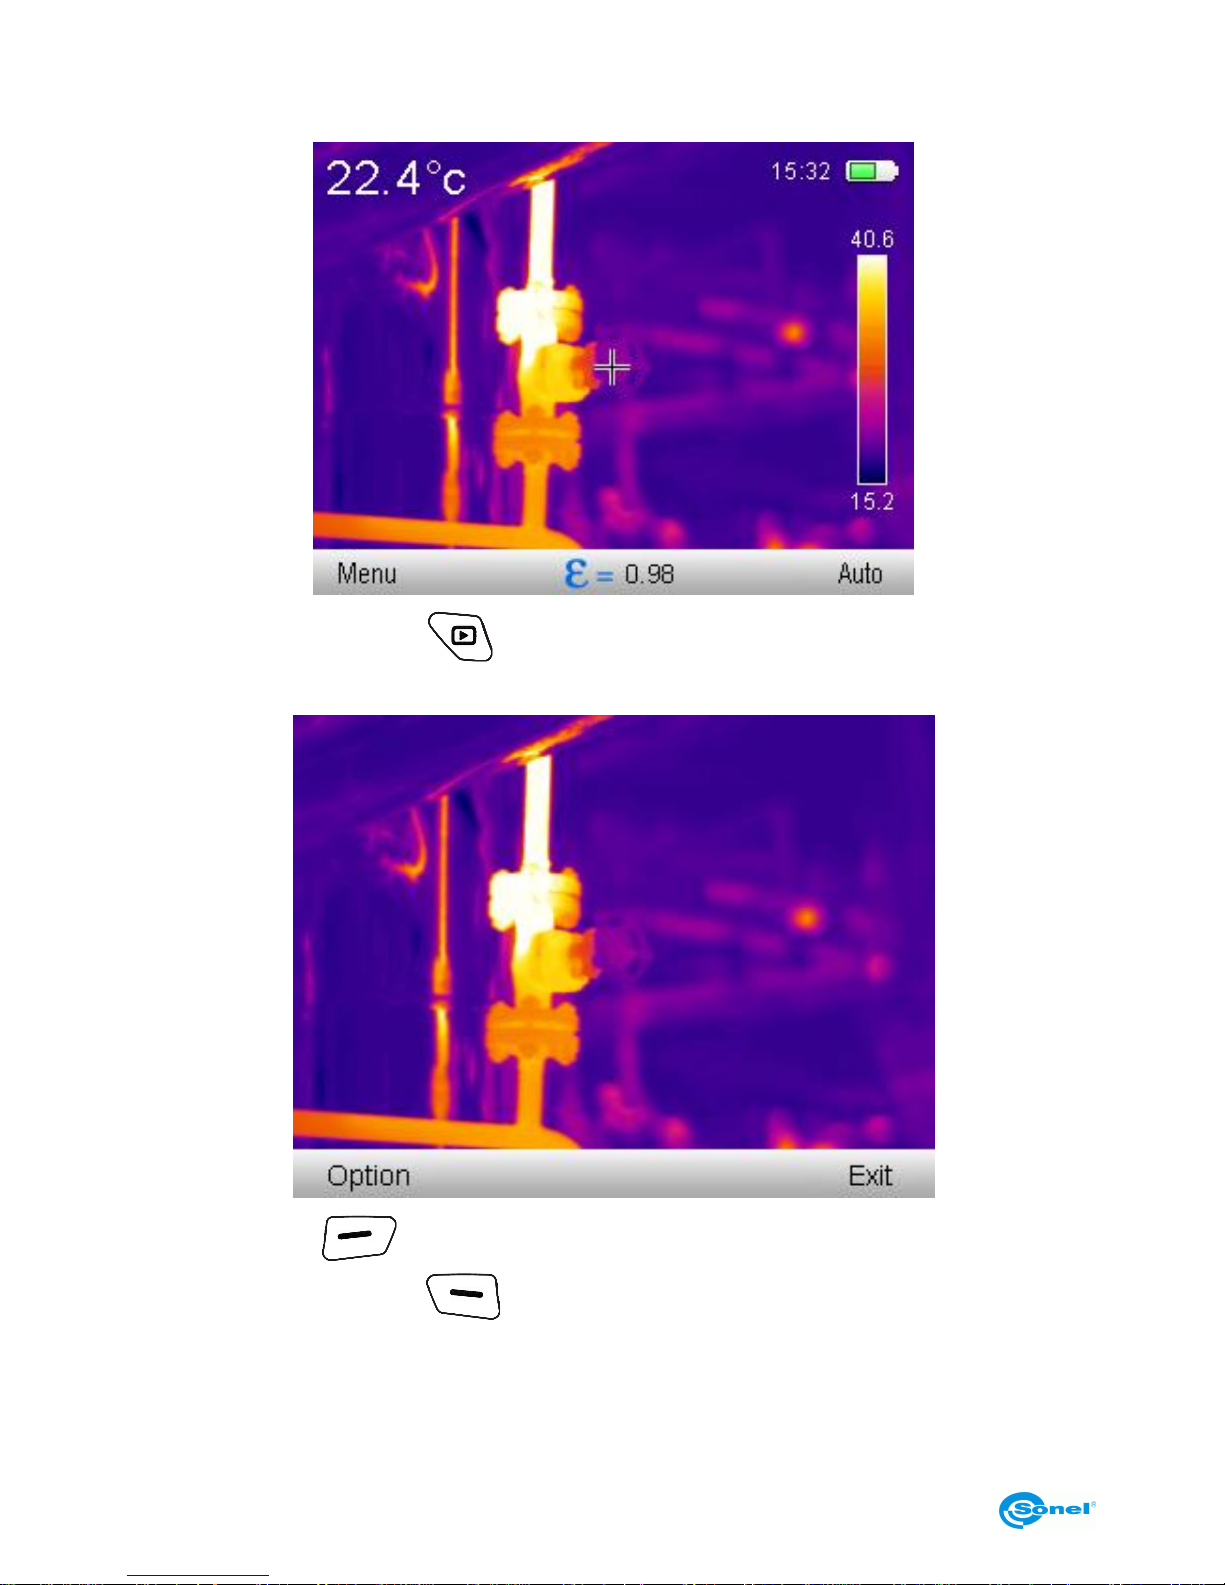
With the below menu on the bottom of the screen:
Press ‘view again’ button ( ) to open up a window with the image that was saved
previously:
‘Exit’ by pressing to go back to temperature measurement mode.
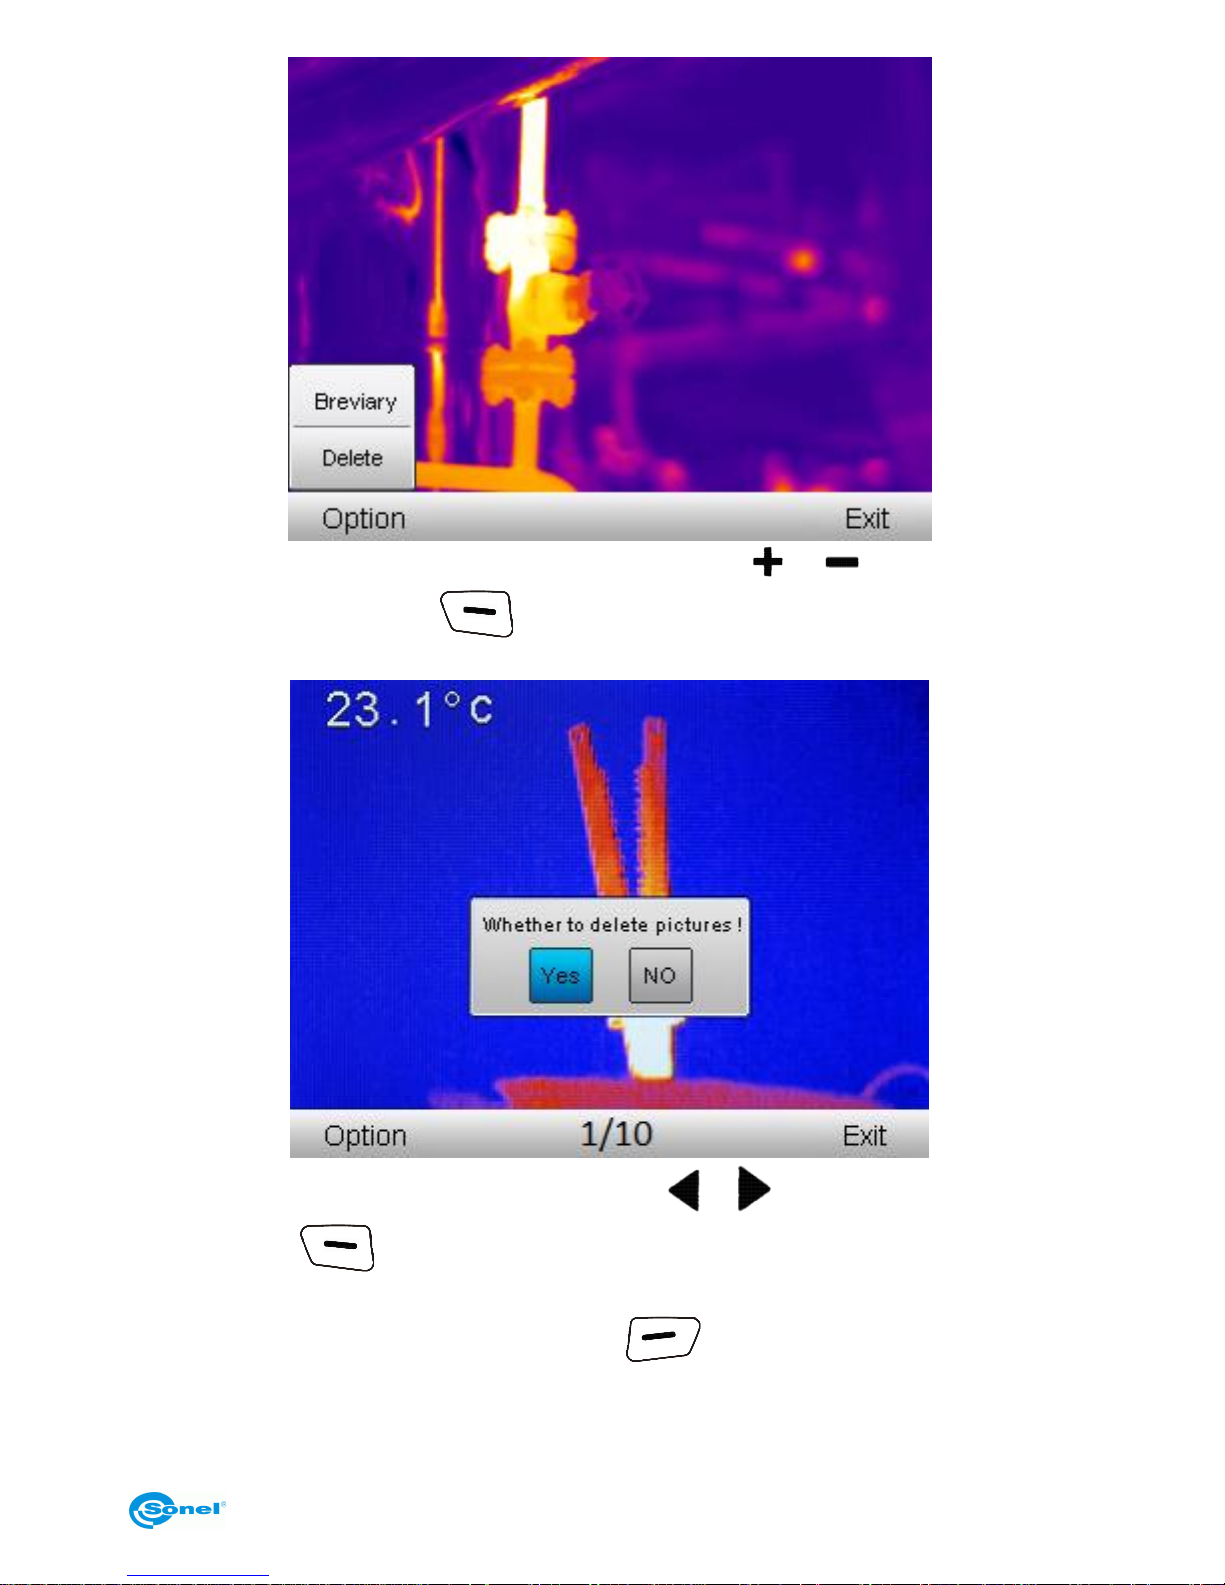
Select ‘Option’ by pressing button, to open up option menu:
Page 39
USER MANUAL
37
Further selection is done by pressing ‘up/down’ buttons ( or ). Confirm the selection by pressing ‘OK’ buton ( ). Press ‘Delete’ to open up window asking to confirm
deletion:
Changes are done by pressing ‘left/right’ buttons ( or ). Confirm changes by pressing ‘OK’ buton ( ). Choose ‘Yes’ to remove selected image. Select ‘No’ to return to
image viewing without making changes in the camera’s memory. Go back to temperature
measurement mode, by pressing 'Exit' button ( ).
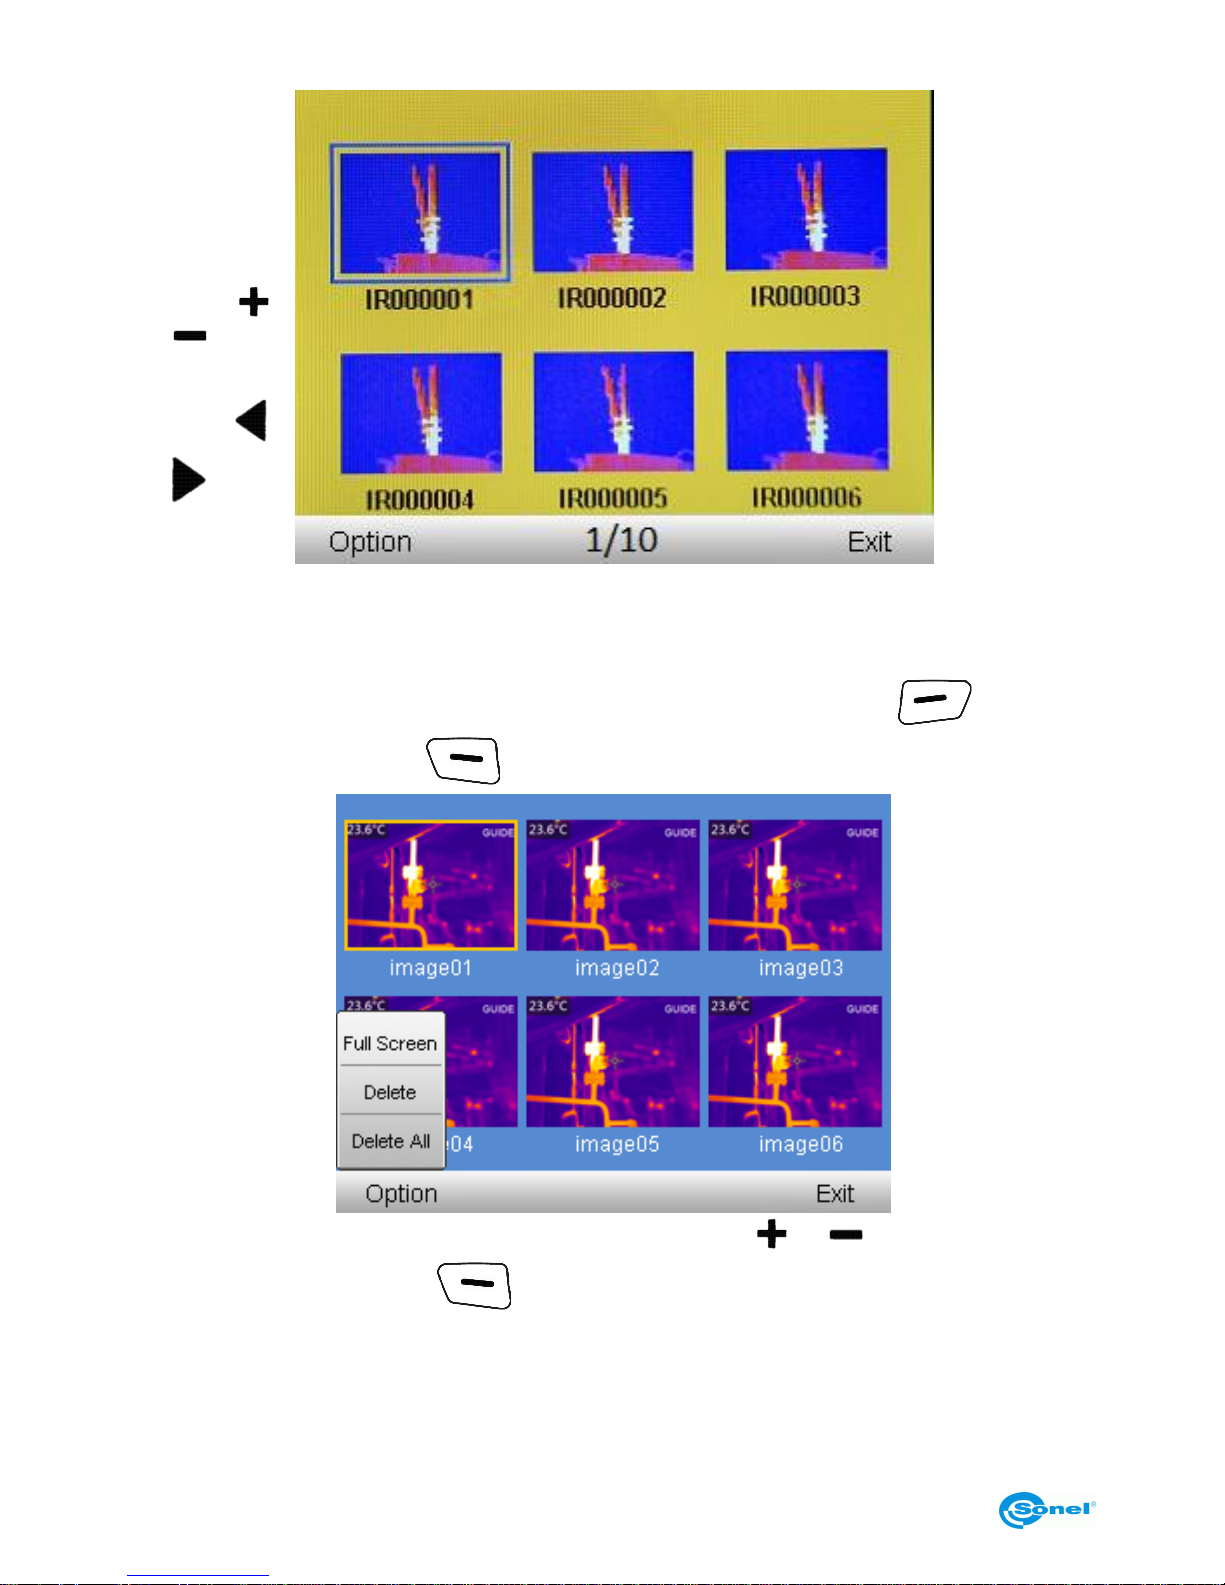
Select ‘Thumbnails’ to see the preview versions of the registered and saved images:
Page 40
THERMAL IMAGER SONEL KT-80 and KT-145
38
Navigate
through thr
list by pressing
‘up/down’
buttons (
or ) and
‘left/right’
buttons (
or ), Select the picture of your
interest, and on the bottom bar information on the number of the selected picture, and the
total number of saved pictures, will be displayed.
„Go back to temperature measurement mode, by pressing 'Exit' button ( ).
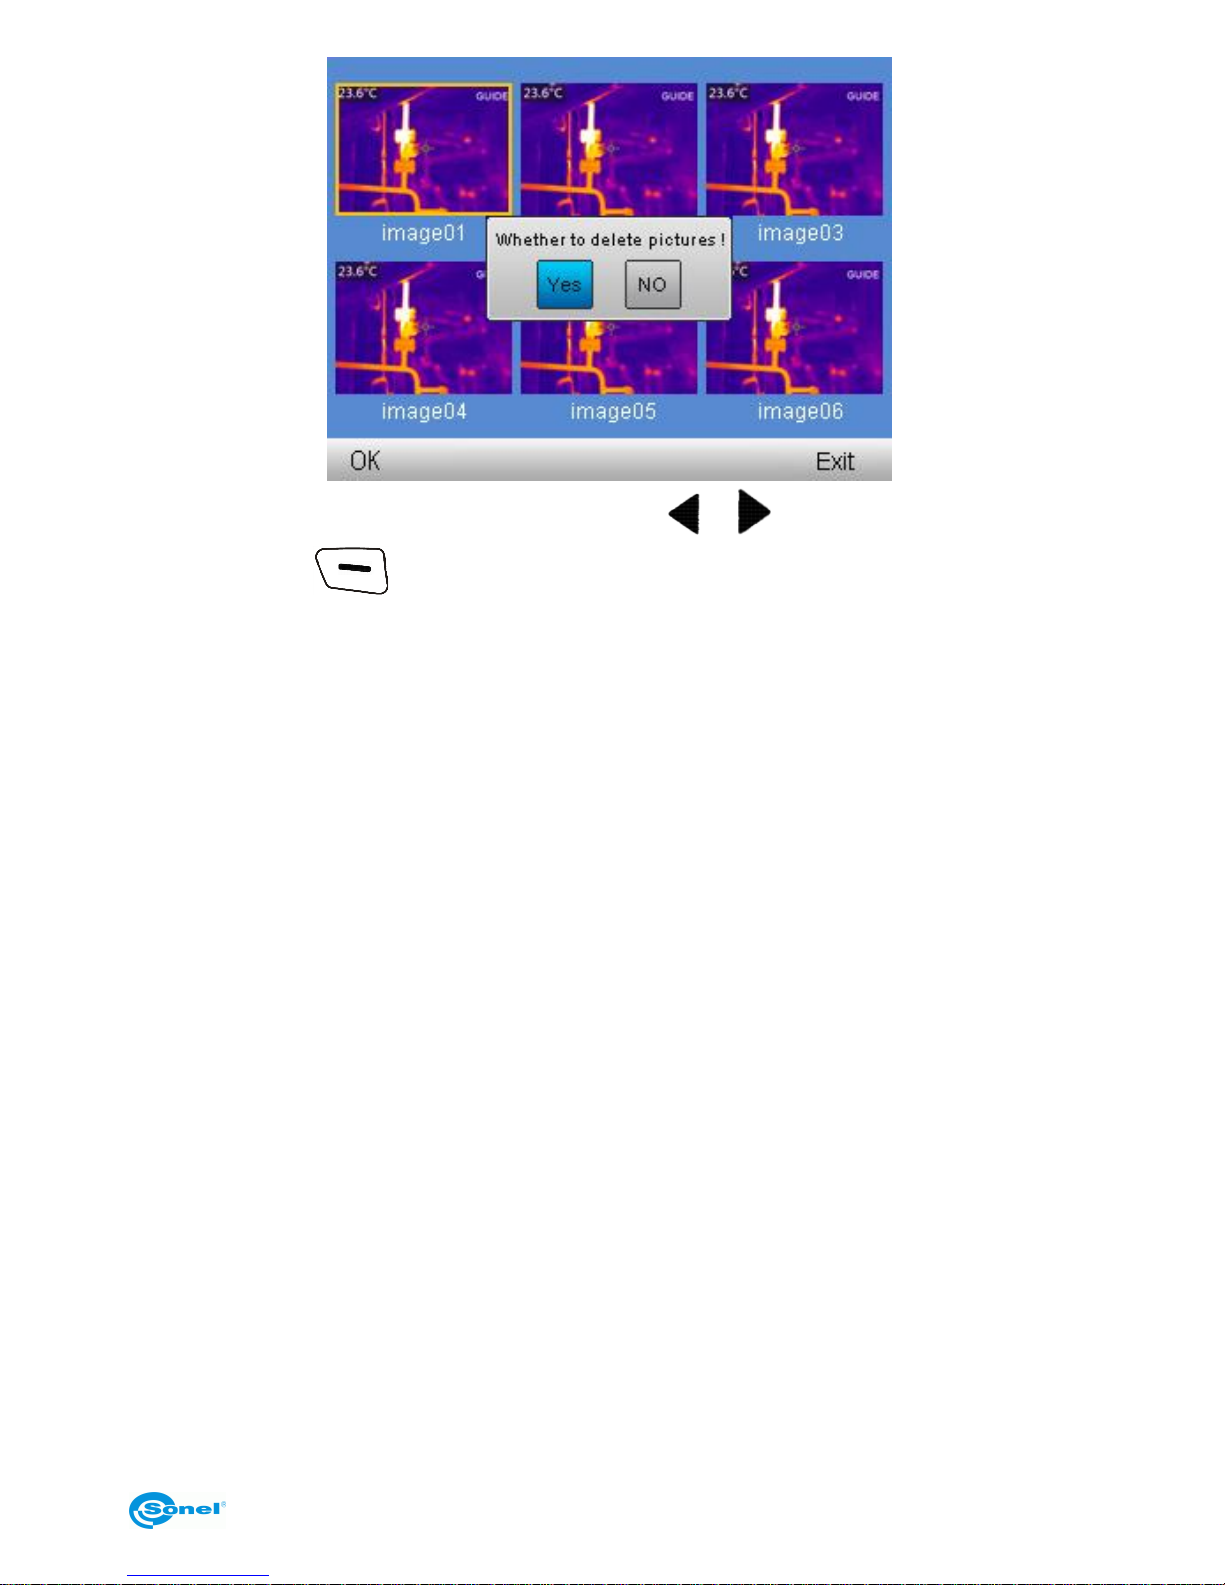
Select ‘Option’ by pressing buton, to open up the menu options:
Further selection is done by pressing ‘up/down’ buttons ( or ). Confirm the selection by pressing ‘OK’ buton ( ).
Select ‘Full Screen’ to get the preview of the selected picture in full screen mode.
Select ‘Delete” to open up a window which allows to delete single image. Select delete all
to open up similar window, that allows to delete all images stored in the memory.
Page 41
USER MANUAL
39
Changes are done by pressing ‘left/right’ buttons ( or ). Confirm changes by pressing ‘OK’ buton ( ). IMPORTANT: selecting 'Yes' will delete all images
stored on the SD card. Select 'No' to go back to image viewing without doing any
changes on memory card.
Select ‘Full Screen’ to get the preview on the selected image in full screen mode.
Page 42
THERMAL IMAGER SONEL KT-80 and KT-145
40
4.8 Information on hardware and firmware version
With the below menu on the bottom of the screen:
Press and hold ‘right’ buton ( ) for about 4 seconds, to make the bar with the firmware
and hardware version appear in the down middle of the screen.
Release the buton to make the bar disappear.
Page 43
USER MANUAL
41
4.9 SD card
Thermal images are stored on removable SD card (max. 32GB). The card must be formatted in FAT32 file format. SD card used for storing thermal images must not be used for
any other purpose. Failing to obey this rule may result in the loss of the stored thermal data.
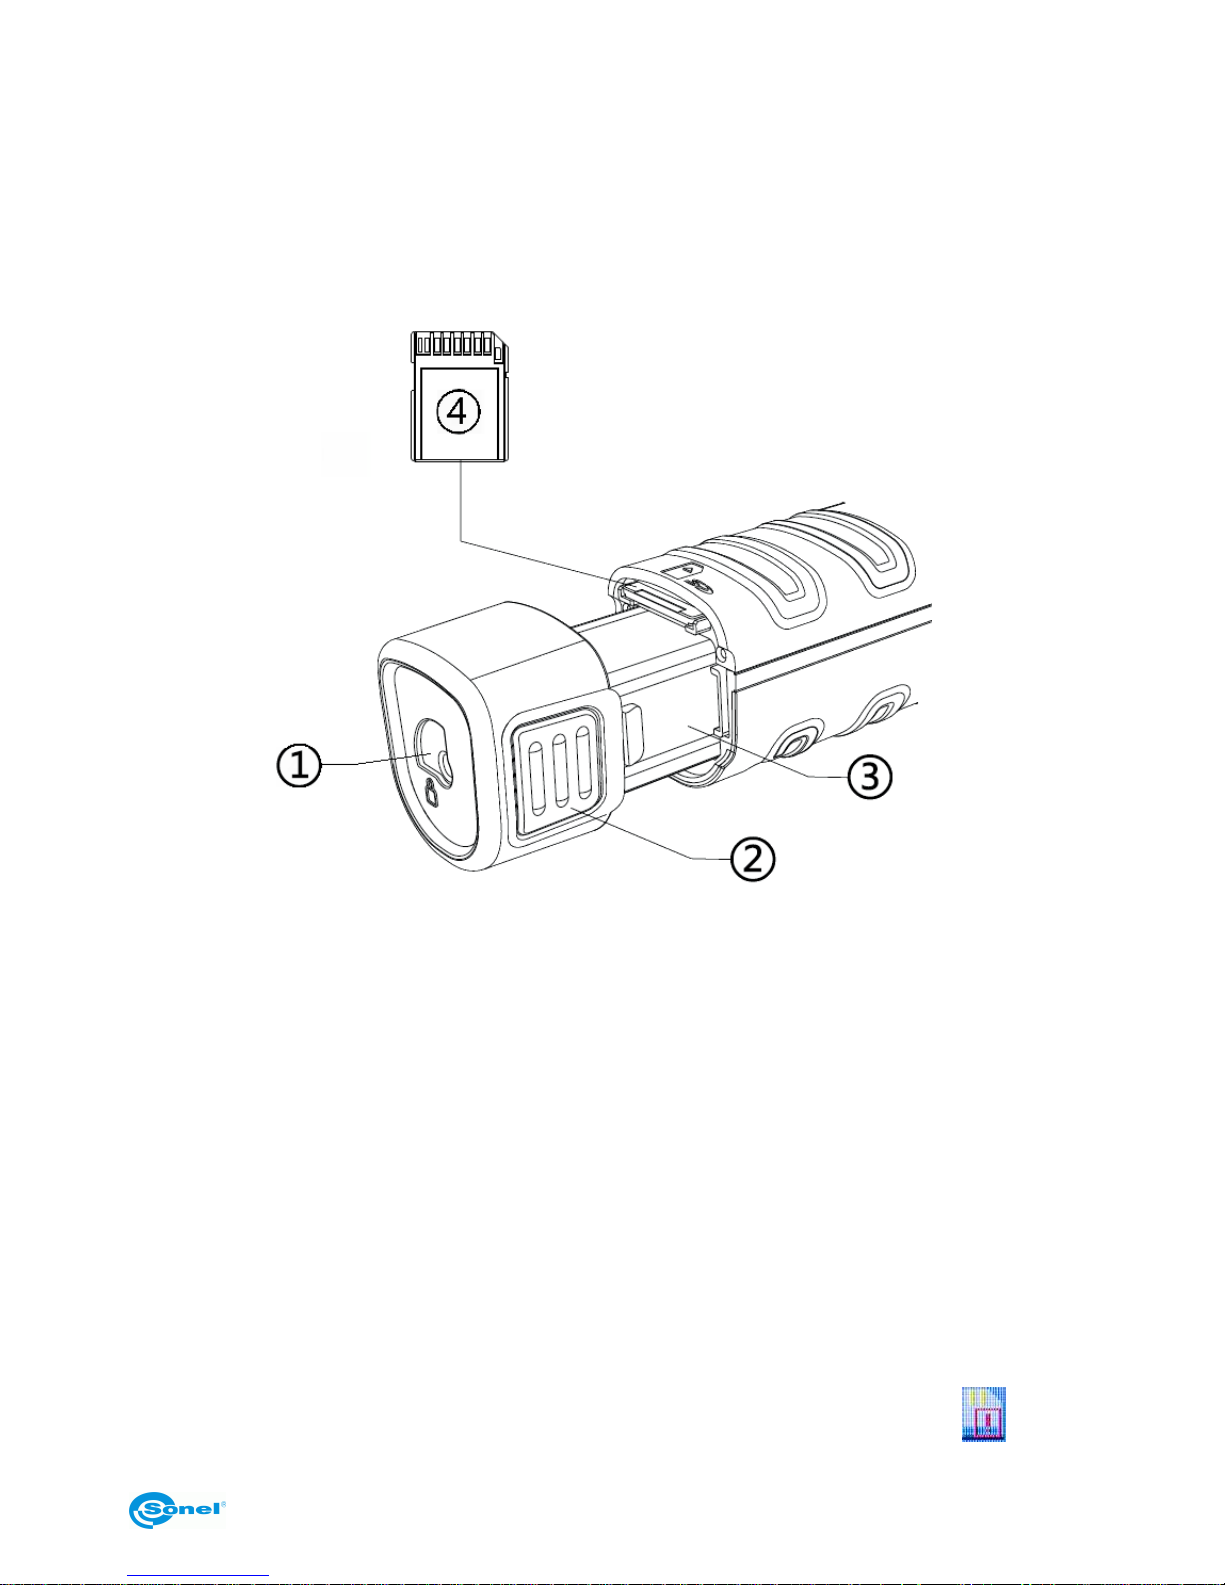
SD card slot is locaded in the camera’s handgrip, next to the battery.
In order to mount/unmount SD card all the following steps must be done with switched on
camera:
- Slide the hooks securing the battery (1) into unlocked position,
- Clutch the battery holders (2) evenly on both sides and extend the battery until the battery body (3) is outside the camera,
- When inserting the SD card make sure it's positioned properly. Insert the card into SD
card slot until 'click' sound is heard. Card removal: press the available part of the card
gently into the card slot until hearing 'click' sound. The card can be removed now,
- Slide the battery back until holders' 'click' sound is heard. ,
- set the hooks securing the battery into BLOCKED position (towards closed padlock).
At certain times of camera usage (for example – after SD card replacement, connection/disconnection of USB cable) a note saying 'SD card initiation' may appear on the
screen. This happens when the camera is installing SD card, and it will disappear automatically upon completing the procedure.
When there is no SD card inserted, the camera will indicate it by displaying symbol
on the screen.
Page 44
THERMAL IMAGER SONEL KT-80 and KT-145
42
4.10 Power supply, charging batteries
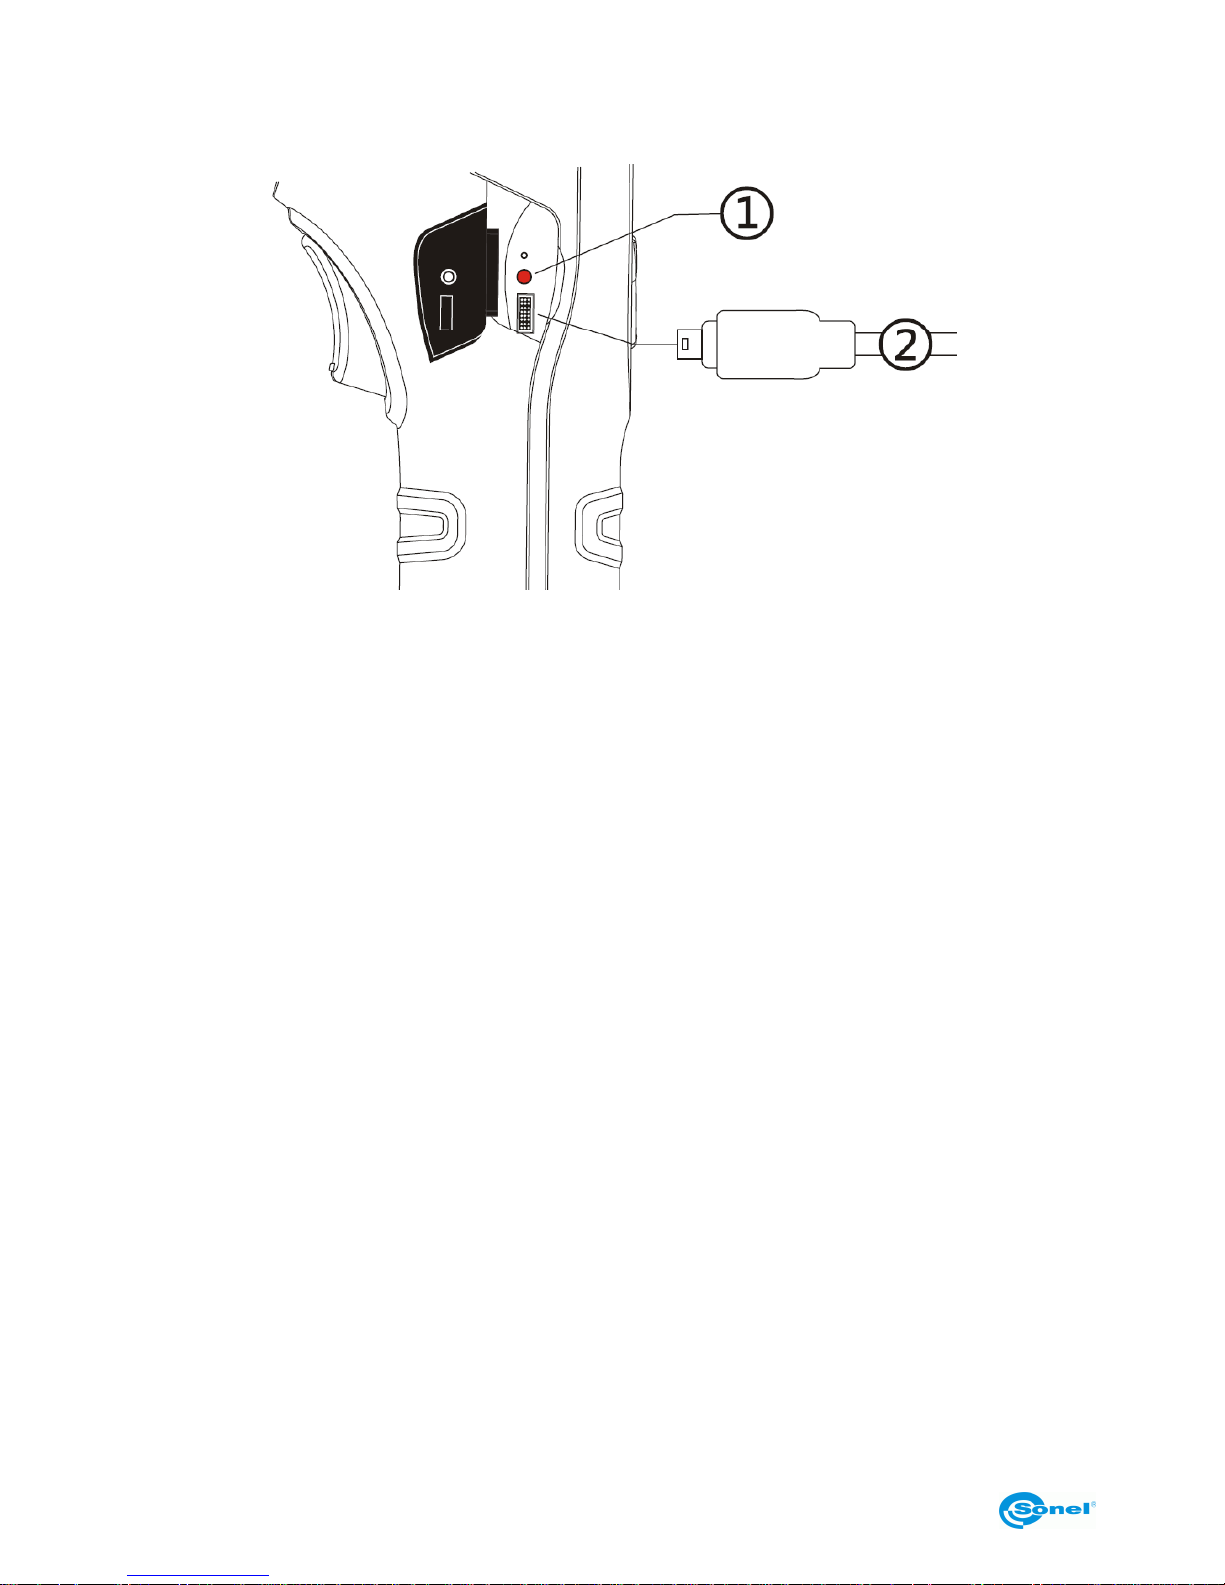
The camera is powered by 3,7V 4200mAh buttery. It can also be powered from mains
through AC adapter.
1 – LED charging indicator (also for USB charging).
2 – micro USB port for USB power adaptor connection.
The batteries in KT series can be charged while being inside of the camera - through AC
adapter connected into micro USB port while the camera is off.
Charging can be performed only when the camera is not being used.
If the camera is not to be used for several weeks, it’s advised to recharge its batteries
eavery couple of weeks. If the device is unused for an extended period, remove the battery and store it separately.
During camera operation, current power supply source indicator is displayed in the upper
right corner of the screen.
Page 45
USER MANUAL
43
4.10.1 Battery installation/removal
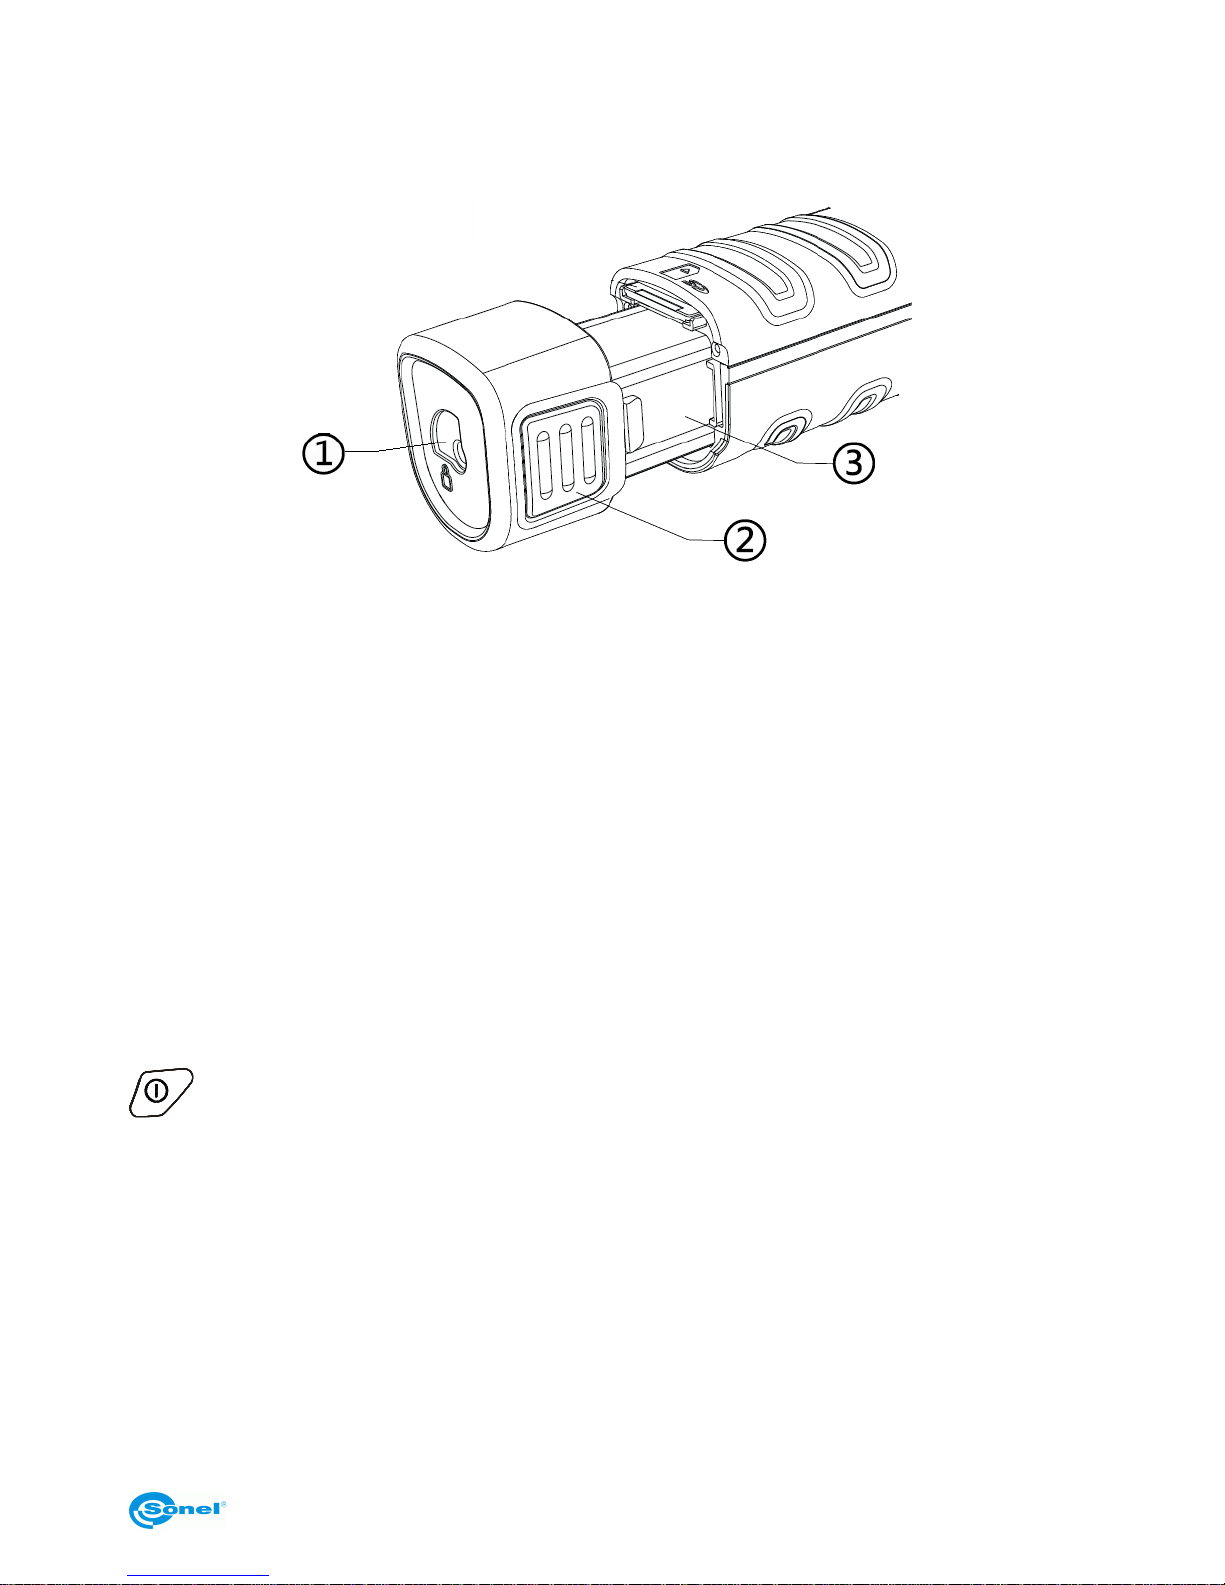
The battery is located inside the camera’s handgrip. No tool is needed to install/remove
the battery.
In order to install/remove battery all the following steps must be done with switched on
camera):
- Slide the hooks securing the battery (1) into unlocked position,
- Clutch the battery holders (2) evenly on both sides and extend the battery until the battery body (3) is outside the camera.
In order to install the battery repeat above process in reversed order. Always make sure
that hooks securing the battery are locked in BLOCKED position (towards closed padlock).
4.10.2 Using AC adapter
The adapter must be connected to mains socket, and then connected with the camera via
USB cable supplied with the camera.
Connecting AC adapter is signalled by LED indicator. When the camera is turned off, the
indicator shows battery charging status. After switching on the camera (press and hold
buton for 3 seconds) the indicator will show that camera is powered by AC adapter
)batteries are not being charged). Switching off the camere again (provided the AC adapter has not been disconnected), will result in the indicator showing that battery charging is
on.
AC adapter, when not used, should be disconnected from the camera and from the mains.
Page 46
THERMAL IMAGER SONEL KT-80 and KT-145
44
4.10.3 Battery power supply
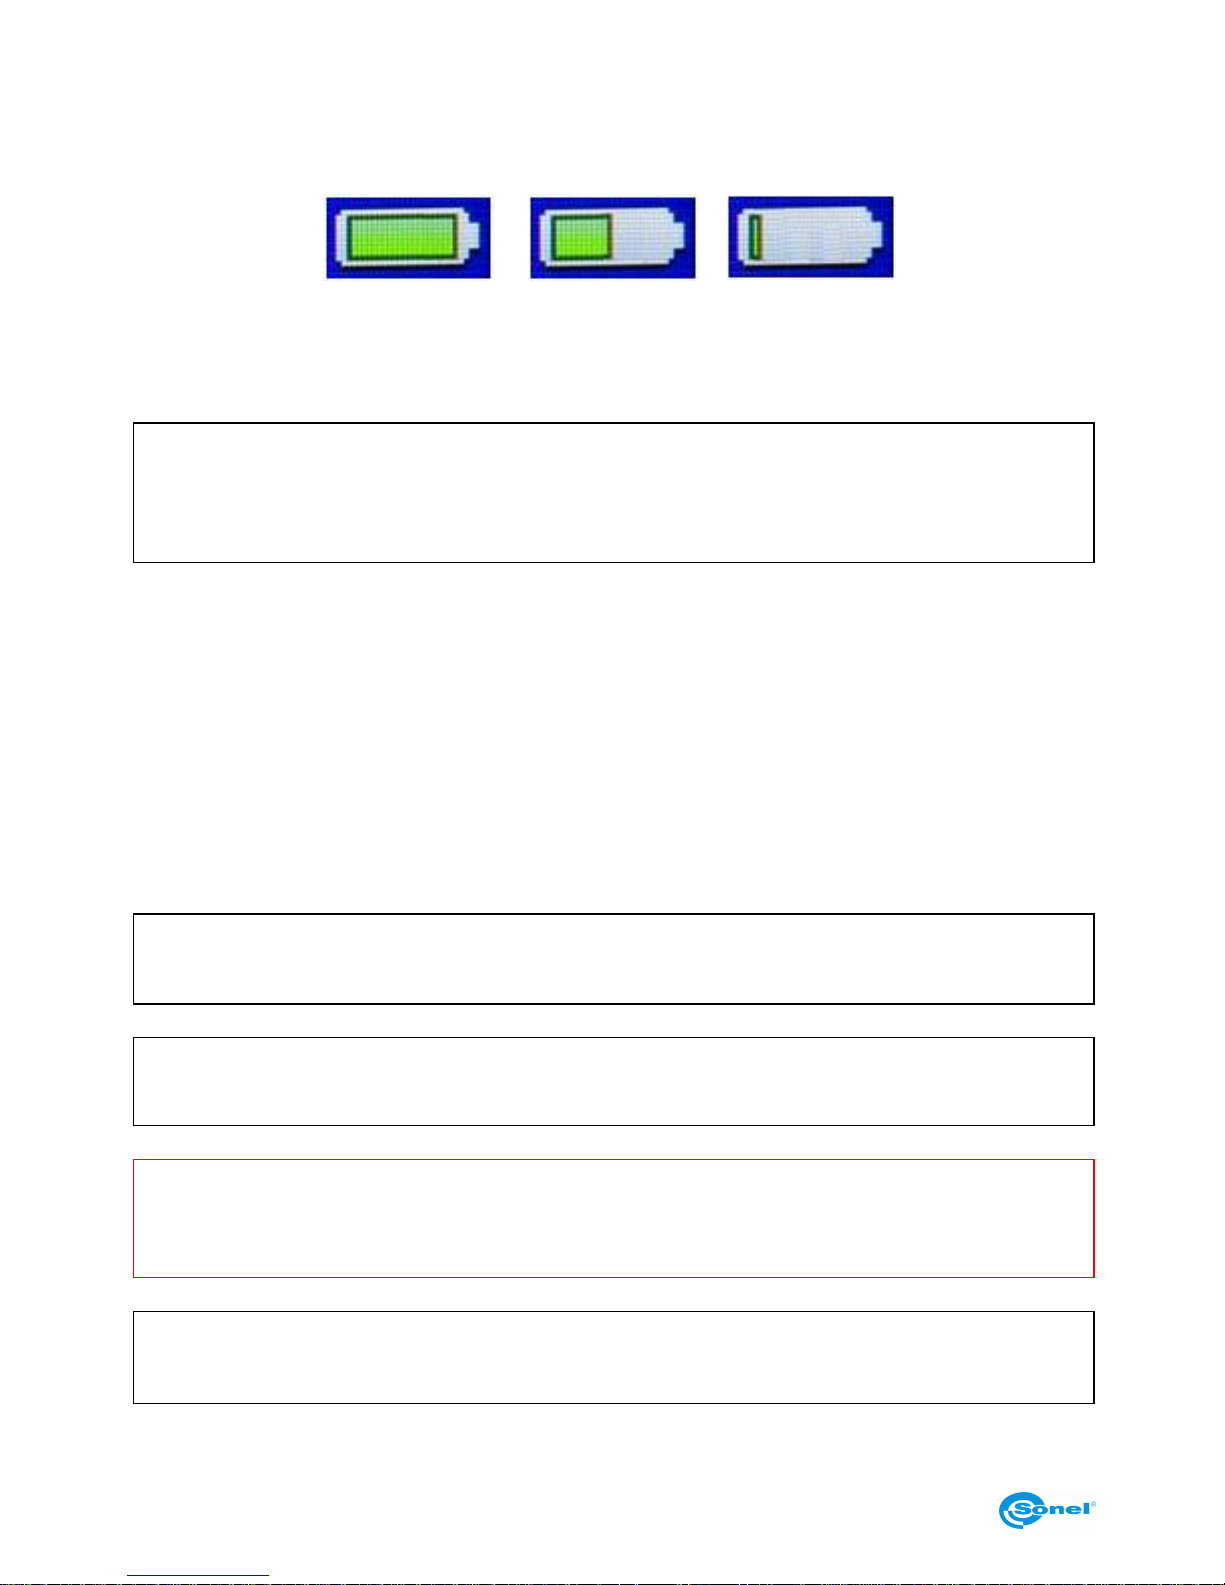
After turning on battery powered camera, battery charge level indicator is displayed in the
upper left corner of the screen.
During camera operation the battery charge level is being shown in real time:
Max.
min.
4.10.4 Charging batteries
NOTE!
When using for the first time the battery should be charged with the use of USB
charger, that is supplied with each camera, for at least 4 hours. The camera
should be switched off when charging.
When the camera is turned off, and the battery is inside, connecting the AC adapter and
starting the charging procedure is signalled by the LED charging indicator next to micro
USB port. When fully charged, LED indicator is turning off.
Rapid LED indicator's flashing during charging process indicates malfunction occurance
(i.e. broken batteries). In this situation, the charging procedure has to be stopped, and the
reason for malfunction must be identified.
In case the charging malfuncion was caused by the overheated bateries, the charging has
to be stopped until the batteries cool down.
NOTE!
Use only the AC adapter supplied with the camera.
NOTE!
Do not remove the battery from the camera while it’s being charged.
NOTE!
Use only the batteries supplied by the manufacturer with the camera.
NOTE!
Battery charging should be performed in 0...40°C temperature range.
Page 47

USER MANUAL
45
NOTE!
In order to maintain the proper parameters of the batteries, charging of unused
batteries should be repeated every 3 months.
4.10.5 General rules of using Lithium (Li-On) batteries.
If the device is unused for an extended period, remove the battery and store it separately.
The battery stored in state of deep discharge can get permanently damaged.
The battery should be stored in dry, cool and well-ventilated place and it should be protected from exposure to direct sunlight. If the battery is stored for an extended period at a
location with high temperature in it, then the chemical processes occuring within it may
shorten its expected life span.
Do not charge and use Li-On batteries in extreme temperatures (don’t overheat and dont
expose the batteries to very low temperatures). Extreme temperatures decrease battery
life. Avoid placing devices powered with rechargeable batteries in very warm/hot places.
Their nominal working temperature must be strictly observed.
Li-Ion batteries are vulnerable to mechanical damages. Such damages can contribute to
permanent damage of those type of batteries, and thus the ignition. Any interference in
the structure of the battery may lead to its damage. Shorting poles (+ and -) of the battery
may cause permanent damage and auto-ignition of the battery.
Do not immerse the Li-Ion batteries in liquids, do not store them in conditions of high humidity.
In case the electrolyte, that is filling the inside of the Li-Ion battery, makes direct contact
with eyes or skin, rinse them with a large amount of water and contact your doctor immediately. The battery should be used in a way, that makes it beyond access for random
people. Keep it away from children.
Whenever any changes in Li-Ion battery is observed (different color, swelling, excessive
temperature), it must cease to be used. Mechanically damaged, overcharged or deeply
discharged batteries are not suitable for use.
4.11 Installing camera driver
4.11.1 Hardware requirements
Operating system: Microsoft® Windows XP or higher (recommended Win7 or higher)
Processor: Pentium 4 2.4GHz or higher
RAM: at least 512M
Page 48

THERMAL IMAGER SONEL KT-80 and KT-145
46
4.11.2 Installation
It is advised to install Sonel ThermoAnalyze 2 programme before connecting the camera
to the PC (camera's drivers install themselves automatically with Sonel ThermoAnalyze
2).
After inserting the CD containing the software (supplied with your camera) into CD-ROM
drive, installation dialog box will appear. If the installation box doesn’t appear automatical-
ly, double-click “autorun.exe” file in the CD’s main folder.
After selecting language, a window is opened, where 'Thermal Imagers' should be selected, and then Sonel ThermoAnalyze 2 must be installed. The installer will start. All neces-
sary system modules (by Microsoft®) will be installed in the first place, followed by Sonel
ThermoAnalyze 2. Follow on-screen instructions.
When the installation is completed the camera can be connected to USB port on your PC.
In order to transfer images stored on SD card to PC's hard drive, follow description in
4.12. In order to transfer thermal image, follow description in 4.13.
In case the original CD, supplied with the camera, is missing, the installation procedure
can be completed with the installation files downloaded from www.sonel.pl/en.
4.12 Reading data from external memory (SD card)
The content stored on SD card can be read by connecting the camera to PC using USB
cable, or by removing the card from the camera, and using external SD card reader.
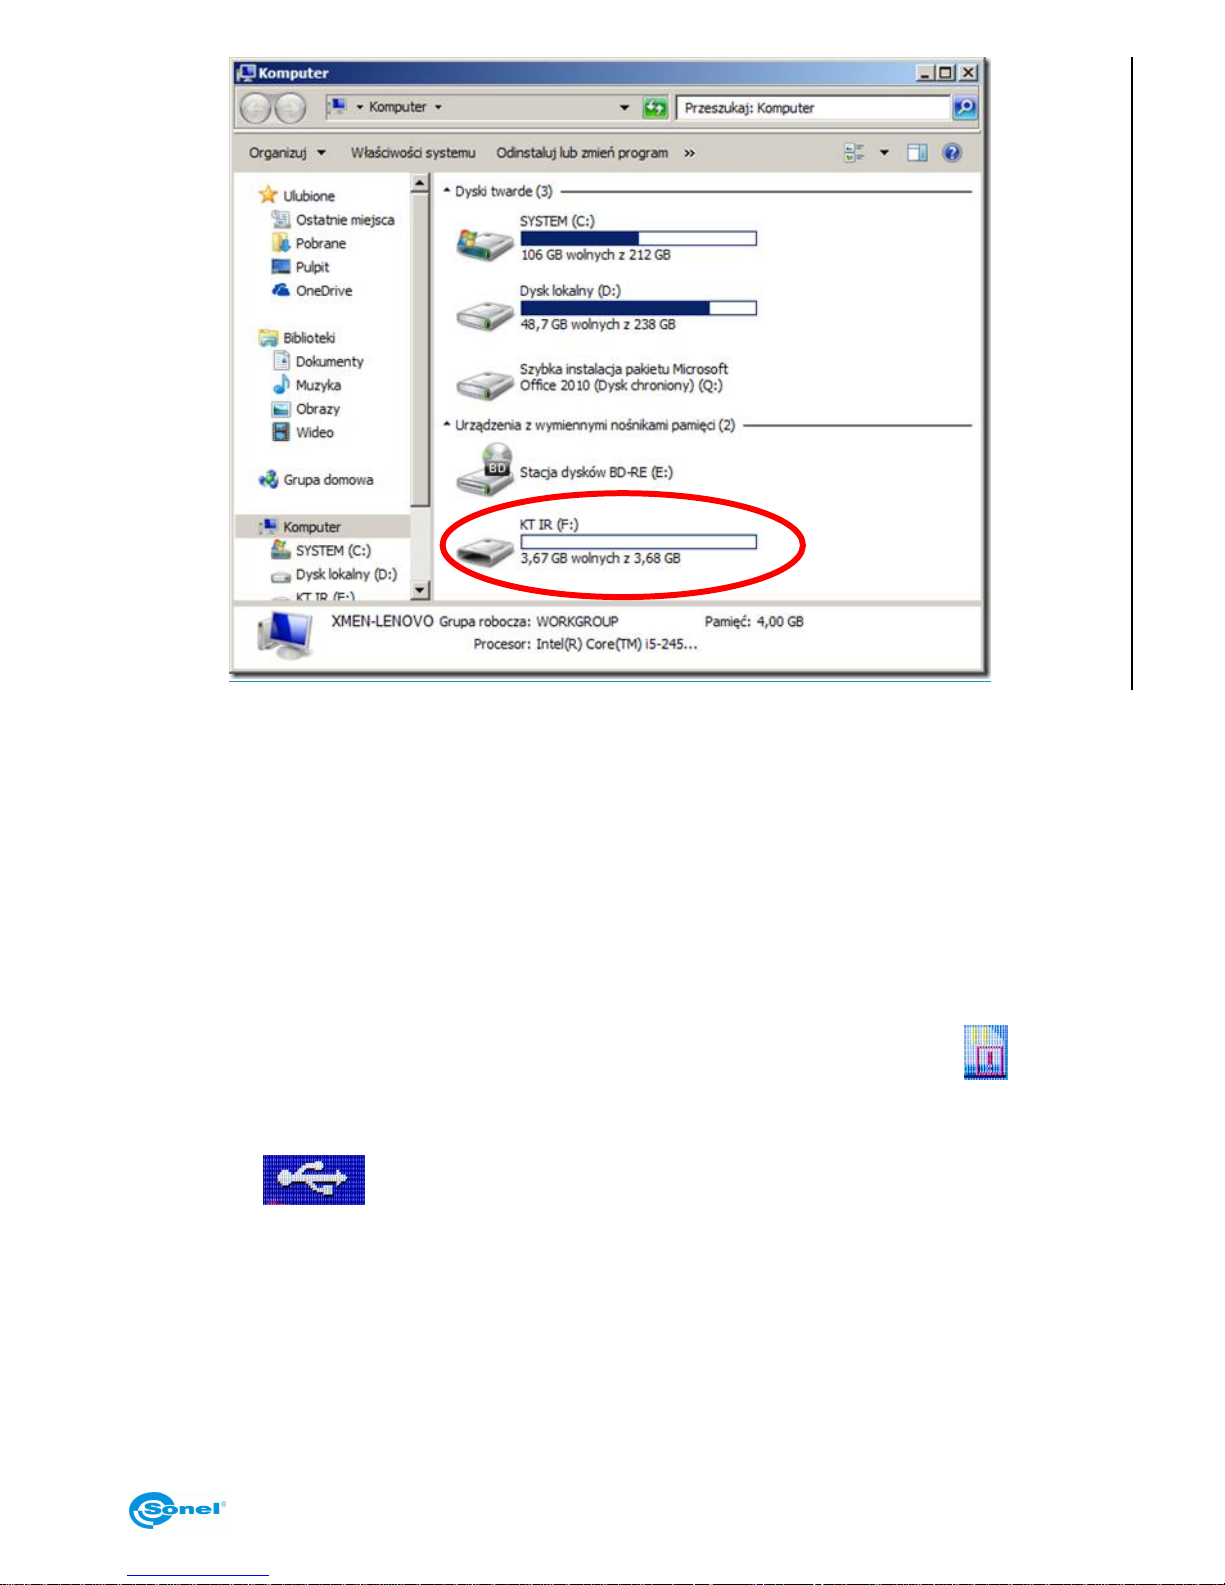
USB port symbol will apprear on the screen upon connecting the camera to
PC via USB port. The SD card will install itself automatically on the system, and after the
installation is completed it will be recognied as one another hard drive installed on the
computer. It's name will be the same as the original name of the card.
Page 49
USER MANUAL
47
Files containing thermograms are located in the following directory: (hard drive letter):\DCIM\PICTURE\.
Selected or all files should be copied into computer’s hard drive.
It is advised to copy files into ‘All files’ directory in Sonel ThermoAnalyze2 folder. Standard
location: C:\Program Files\Sonel\Sonel ThermoAnalyze2\All Files\
4.13 Transfering thermal image via USB (only in KT-145)
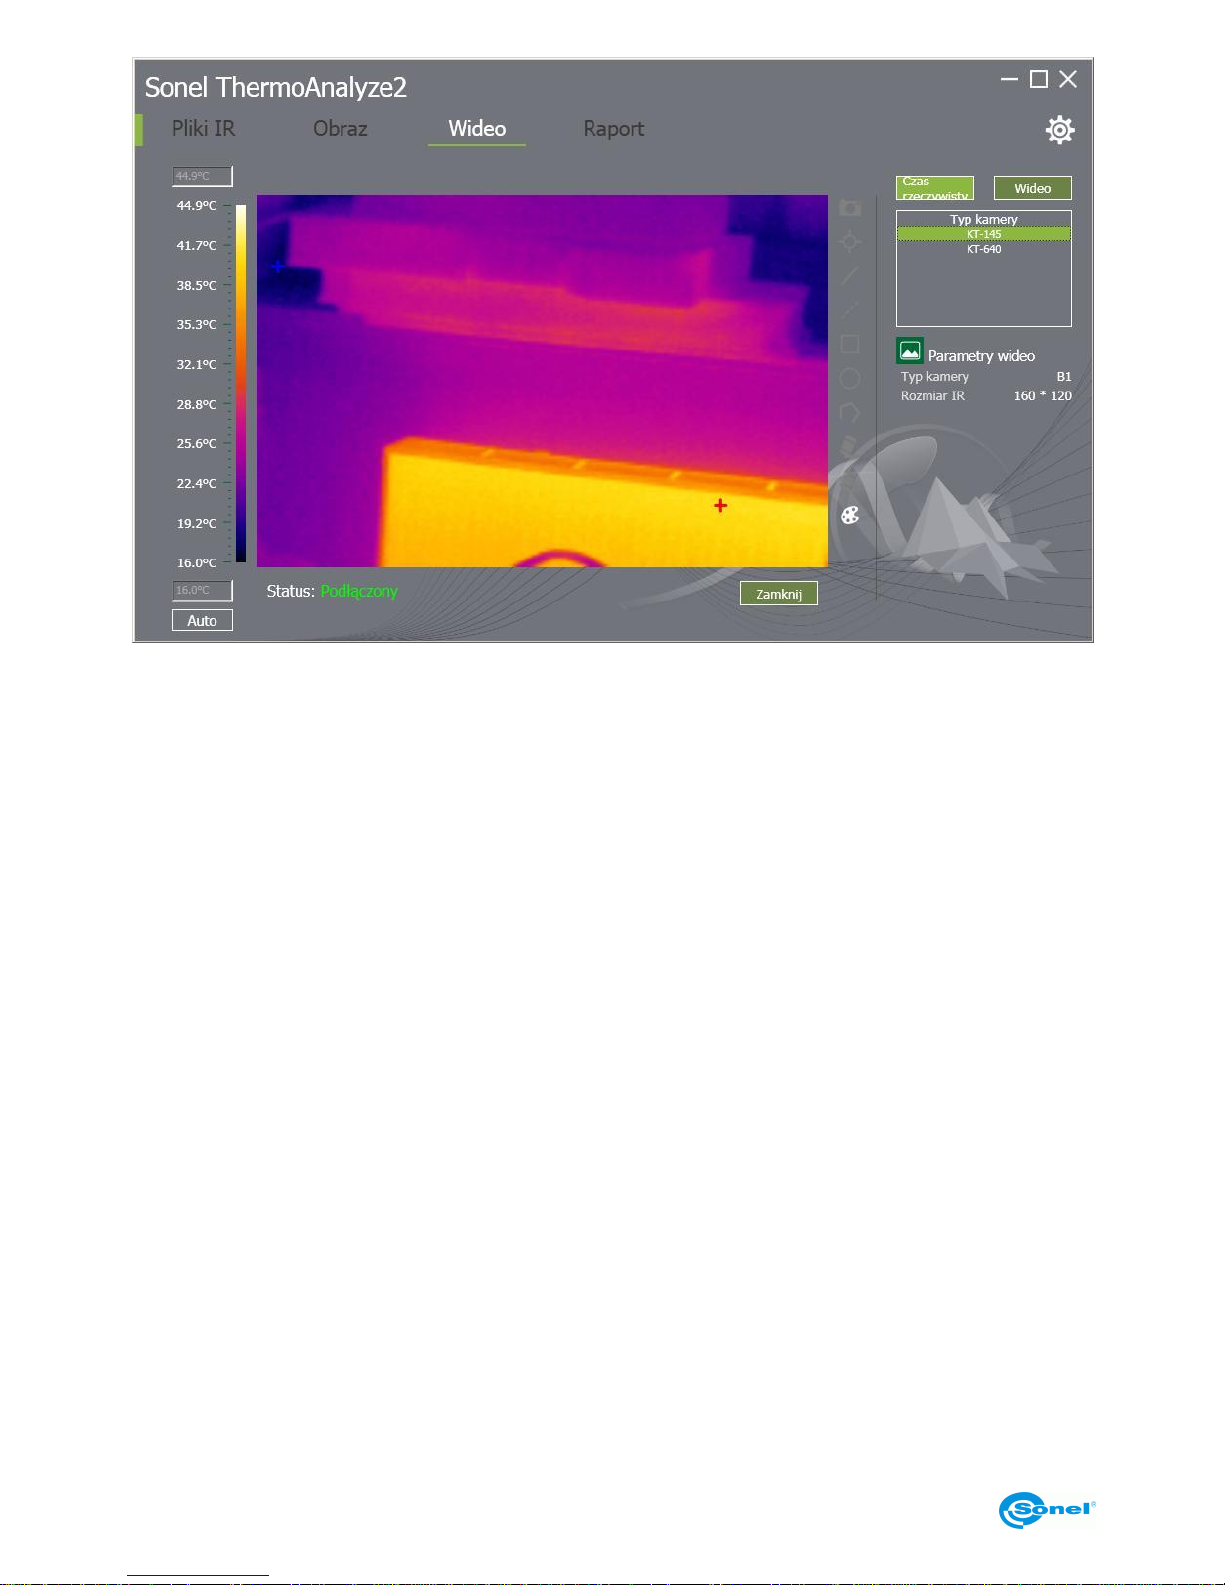
In order to be able to transfer real time infrared footage, SD card must be removed from
the camera. Then the camera must be switched on. Missing SD card symbol will appear on screen. Connect the camera to USB port on your computer and run Sonel ThermoAnalyze2 programme.
USB symbol will appear on the camera’s screen. In Sonel ThermoAnalyze2 select ‘Video’, and then ‘camera type’: KT-145.
Page 50
THERMAL IMAGER SONEL KT-80 and KT-145
48
Further instructions are described in Sonel ThermoAnalyze2 user manual.
4.14 Data analysis
A PC software, 'Sonel ThermoAnalyze 2', that is supplied with the camera, allows to perform detailed analysis of the recorded thermal images, followed by generating thermal inspection report. Detailed description of the software's features is included in a separate
'Sonel ThermoAnalyze' user manual.
Page 51
USER MANUAL
49
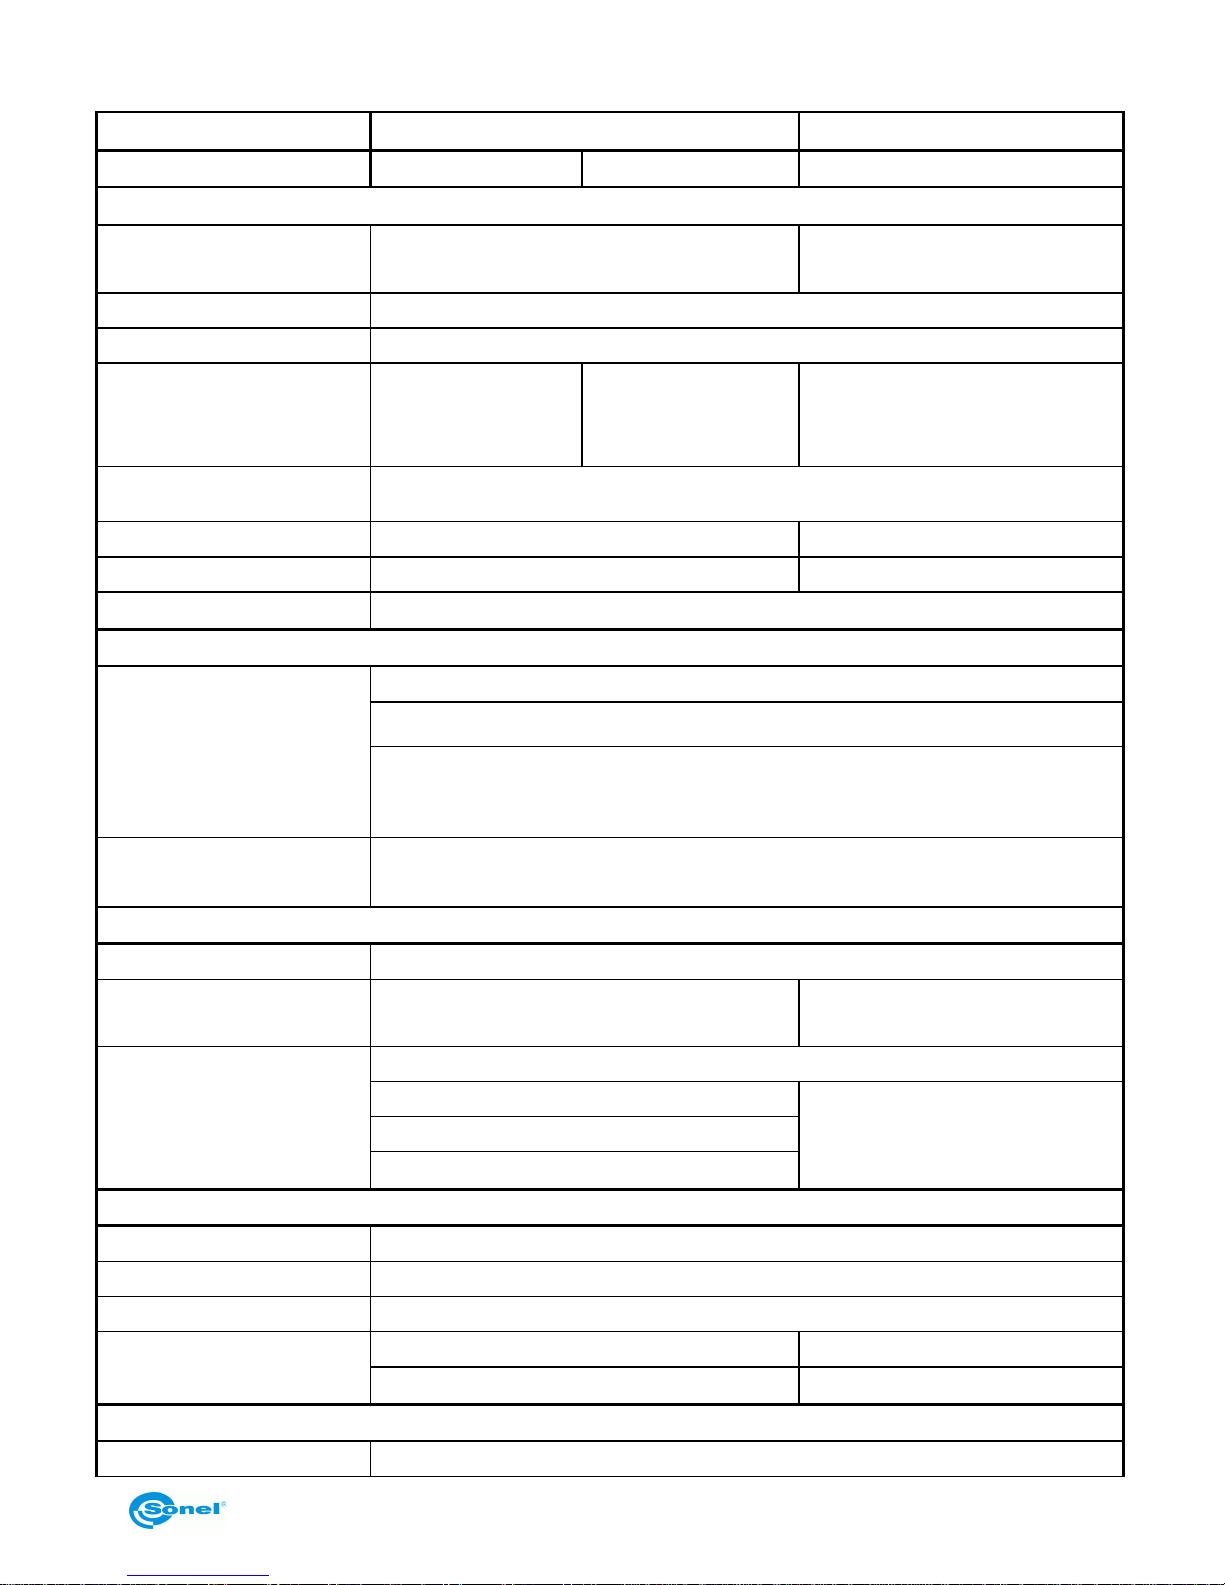
5 Specifications
Model (version)
KT-145v11
KT-145v30
KT-80
Lens
11mm
30mm
8mm
Thermal
Detector resolution
160 × 120 pixels
80 × 80 pixels
Spectral range
8~14цm
Focus
Manual
Focal lenght / Field of
View
11mm / 15.5°X
20.6°
30mm / 5.7°X 7.6°
8mm / 18.5°X 18.5°
Thermal Sensivity
≤0.08°C @30°C
Zoom
X2
-
Palettes
6
4
Interface
Mikro-USB
Image Presentation
Display
LCD
3.5’’ LCD(320X240 pixels)
Three step LCD backlit
Frequency
50 Hz
Measurement
Accuracy
±2°C or ±2%
Temperature Range
-20°C …+350°C
0°C …+250°C
Measurement conditions correction
Emissivity (0.01-1.00)
Ambient temperature
Distance
Relative humidity
Measurement Features
Point
Central
Max
Max temp. point
Min
Min temp. point
Alarm
Alarm for min. temperature
-
Alarm for max. temperature
-
Thermal pictures
File format
JPG
Page 52
THERMAL IMAGER SONEL KT-80 and KT-145
50
Storage
removable SD card
Power Supply
Battery type
3,7V 4200mAh Li-Ion
Charging
Built-in (in camera) or external charger
External power supply
AC 110/230 VAC, 50/60Hz
Battery Operating Time
over 4 hours
Physical Characteristics / Environmental Specifications
Encapsulation
IP43
Size
103mm x 98mm x 258mm
Weight
755g
Operating Temperature
-10°C ... 50°C
Storage Temperature
-20°C ... 60°C
Humidity
10% to 95%, without condensation
Shock
25G, IEC 68-2-29
Vibration
2G, IEC 68-2-6
Page 53

USER MANUAL
51
6 Examplary Emissivity Coefficient Values
aluminum ................................................. 0.05
aluminum Rough ...................................... 0,07
Aluminum oxidized ................................... 0,25
asphalt ..................................................... 0,90
asbestos board ................................ ....... 0,96
asbestos (fiber) ........................................ 0,78
akelite ..................................................... 0,93
bronze: dull ……………………………….. 0,22
bronze: polished………………………….. 0,10
bronze: rough …………………………….. 0,55
brick: glass., rough……………………….. 0,85
brick: fireproof, rough…………………….. 0,94
cement…………………………………….. 0,54
cement (concrete)………………………… 0,90
chrome……………………………………...0,15
chrome polished………………………….. 0,10
tin……………………………………………0,09
zinc………………………………………….0,05
brick red………………………………….…0,93
paint: oil…………………………………….0,94
clay: fired……………………………..…….0,91
clay………………………………………….0,40
graphite……………………………………. 0,85
ground: frozen…………………………….. 0,93
rubber……………………………………….0,93
cobalt………………………………………. 0,18
quartz………………………………….…….0,93
lacquer white..…………………………….. 0,87
lacquer polished black…………………… 0,87
lacquer dull black…………………………. 0,97
lacquer silver……………………………… 0,31
ice………………………………………….. 0,97
magnesium………………………………...0,12
copper: oxidized………………………….. 0,65
copper: oxidized black…………………… 0,88
copper: polished………………….………. 0,07
copper: polished annealed………..0,01.. 0,02
brass………………………………………. 0,10
brass: oxidized……………………………. 0,61
nickel : polished………………………….. 0,05
lead: polished…………………………….. 0,08
lead: grey…………………………………. 0,28
lead: oxidized………………………………0,63
paper white……………………………….. 0,90
paper black glossy……………………….. 0,90
paper black dull…………………………… 0,94
paper: tarred………………………………. 0,92
plastic: black………………………………. 0,95
platinum……………………….…………… 0,10
porcelain: glazed…………...…………….. 0,92
mercury………………………………….… 0,10
lampblack……………………………...….. 0,96
silver……………………………………….. 0,03
steel: galvanized………………………….. 0,28
steel: oxidized…………………………….. 0,88
steel: rolled freshly……………………….. 0,24
steel: rolled………………...……………… 0,56
steel: rough……………..………………… 0,96
steel: rusty red……………………………. 0,69
steel nickeled……………………...……… 0,11
glaze……………………………………….. 0,90
glass……………………………………….. 0,92
glass dull…..……………………………… 0,96
snow……………………………………….. 0,80
tape insulation…………………………….. 0,95
fabric……………………………………….. 0,85
titanium………...………………………….. 0,30
carbon……………………………………… 0,90
charcoal powder………………………….. 0,96
tungsten…………………………………… 0,13
tungsten: oxidized………………………… 0,11
gold………………………………………… 0,02
iron: glossy…………...…………………… 0,16
iron: heat rolled…………………………… 0,77
iron: oxidized……………………………… 0,74
iron: polished……………………………… 0,23
iron and steel: oxidized…...……………… 0,85
cast: raw casting…………………………. 0,81
cast: polished………………..…………… 0,21
Values given above can vary depending on the conditions in which measurements were
taken.
Page 54

THERMAL IMAGER SONEL KT-80 and KT-145
52
7 Cleaning and maintenance
NOTE!
Use the below specified methods of maintenance only.
Camera enclosure - all surfaces, except for optical elements of the camera, can be
cleaned with a soft and moist cloth with generally available mild detergents. Do not use
any solvents or cleaning agents that could scratch the enclosure (powder, paste, etc.).
During cleaning, the camera must be turned off.
Due to the applied anti-reflective coating, optical lens are the most sensitive and at the
same time the most expensive part of the camera (the lens is of key importance to radiometric capabilities of the infrared system). Therefore it is important to close the protective
lens cover after each use of the camera. Optical surfaces should be cleaned only, when
they are visibly fouled. Do not touch exposed surfaces of optical lens with fingers, because fouling left with fingerprints can be harmful to coatings and glass of the lens.
Chemical agents must not be used for cleaning the optical viewfinder, and particularly optics and accessories of the camera. Use a clean, dry and soft cloth for cleaning the body
of the viewfinder; for cleaning the lens, use only the supplied lens cleaning cloth.
8 Calibration
In order to ensure the accuracy and reliability of the thermal imaging camera it is recommended to calibrate the instrument once every 12 months.
For detailed information related to laboratory services call +48 74 85 83 879 or send an
inquiry to [email protected]
NOTE:
KT-145 and KT-80 thermal imaging cameras don't comprise any parts serviceable by the
user. Do not attempt to dismantle or modify the camera on your own. Opening the instrument voids the warranty.
9 Storage
When storing the instrument, observe the following guidelines:
make sure the camera and its accessories are dry,
when storing the camera for a prolonged time, remove the batteries,
allowed are storage temperatures specified in technical specifications,
in order to avoid complete discharging of rechargeable batteries during pro-
longed storage, charge them once in a while..
Page 55

USER MANUAL
53
10 Equipment
10.1 KT-80 standard accessories
Standard bundle supplied by the manufacturer includes:
KT-80 Thermal Imager
SD card
Power Adapter 100~240V (with adapters for different sockets)
USB-micro USB cable
CD with Sonel ThermoAnalyze2® PC software
User Manual
Sonel ThermoAnalyze2 User Manual
Hand srtip.
10.2 KT-145 standard accessories
Standard bundle supplied by the manufacturer includes:
KT-145 Thermal Imager
SD card
Power Adapter 100~240V (with adapters for different sockets)
USB-micro USB cable
CD with Sonel ThermoAnalyze2® PC software
User Manual
Sonel ThermoAnalyze2 User Manual
Hand srtip.
Carrying case (WAFUTM7).
Page 56
THERMAL IMAGER SONEL KT-80 and KT-145
54
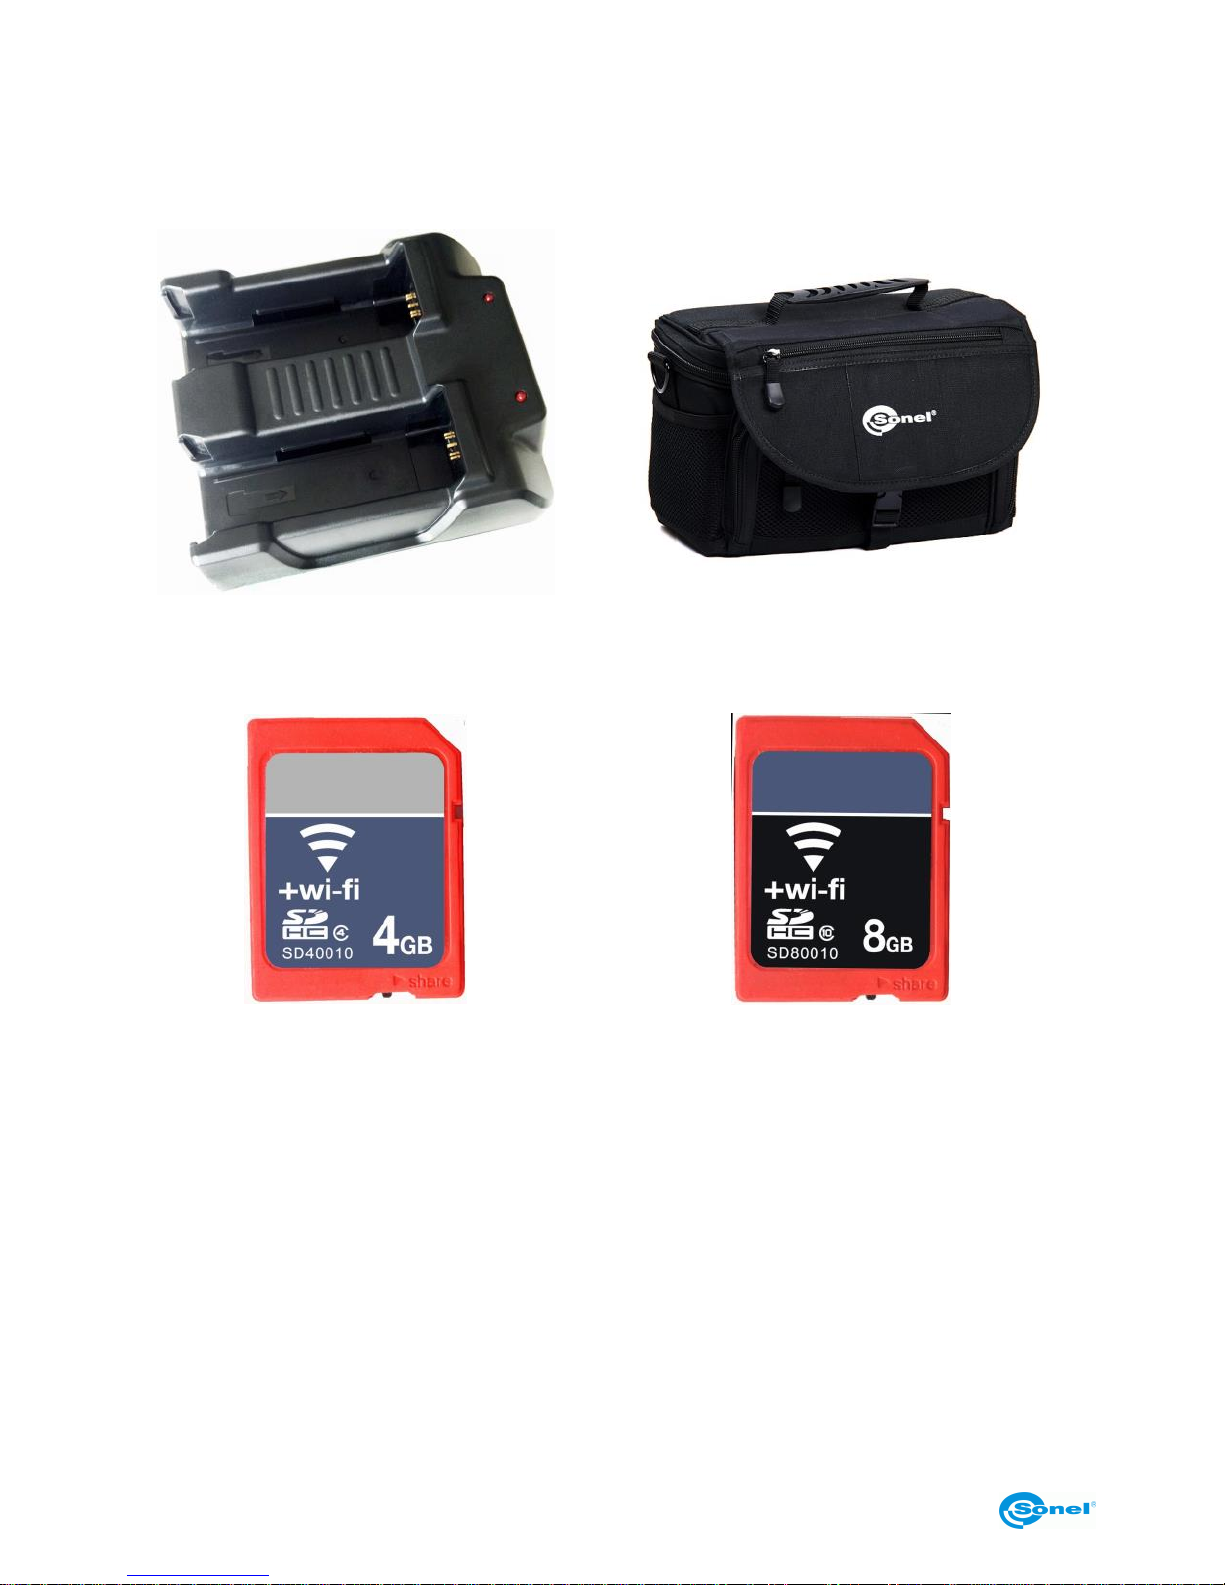
10.3 Additional Equipment
Optional addtional accessrories:
External battery charger.
Carrying case.
(WAFUTM7)
Wi-Fi SD card 4GB.
(….)
Wi-Fi SD card 4GB.
(…..)
* exemplary images - actual apperance of the supplied items may be different from those shown
above.
Page 57
USER MANUAL
55
11 Dismantling and disposal
Used-up electrical or electronic equipment must be collected selectively, i.e. must not be
mixed with waste of other types.
Used-up electronic equipment must be delivered to an appropriate collection centre in accordance with regulations related to used-up electrical or electronic equipment.
Before delivering the equipment to the collection centre do not attempt to dismantle any of
its parts.
NOTE:
Follow local regulations related to disposing of packaging,
used-up batteries and rechargeable batteries.
12 Manufacturer
The manufacturer and provider of warranty and post-warranty services for the instrument
is:
SONEL S.A.
ul. Wokulskiego 11
58-100 Świdnica
Poland
tel. +48 74 858 38 60
fax +48 74 858 38 09
E-mail: [email protected]
Web page: www.sonel.pl
NOTE:
Only the manufacturer is authorized
to provide repair service.
Manufactured in PRC.
Page 58

THERMAL IMAGER SONEL KT-80 and KT-145
56
NOTES
Page 59

Testing and Calibration Laboratory
Research and Calibration Laboratory of SONEL SA offers calibration of the following instruments
used for electrical/non-electrical measurements:
- meters for electrical protective measurements: insulation resistance, impedance and resistance of
short-circuit loops, earthing resistances and earth resistivity, RCD parameters and multi-functional
meters that perform the above functions,
- electrical safety meters,
- multimeters,
- power quality analysers,
- meters for measuring low resistance values,
- infra-red cameras,
- pyrometers,
- luxmeters.
In addition, the Laboratory performs voltage, current and resistance calibration.
A calibration certificate is a document confirming compliance of parameters declared by the
manufacturer of tested device with national standards, specifying the measurement uncertainty.
Pursuant to standard EN ISO 10012:2003 "Measurement management systems — Requirements
for measurement processes and measuring equipment", SONEL S.A. recommends for its instruments
to be periodically tested, observing the interval of 13 months.
For new devices with calibration certificates, the next metrological inspection (calibration) is
recommended within 13 months from the date of purchase, but not later than 19 months from the
date of manufacture.
Note:
In case of instruments used for tests related to the protection against electric shock, the
person performing measurements should have complete confidence in the efficiency of
operated apparatus. Measurements carried out with malfunctioning meter may cause wrong
assessment of tested equipment in terms of its protection features
Page 60
SONEL S.A.
ul. S. Wokulskiego 11
58-100 Świdnica
tel. 74 85 83 878
fax 74 85 83 809
e-mail: [email protected]
www.en.sonel.pl
 Loading...