

Sonance VIRTUOSO V831SSDR, VIRTUOSO V833SSDR, VIRTUOSO VRS2, VIRTUOSO SSDR Instruction Manual
Page 1

INTRODUCTION
Thank you for purchasing Sonance Virtuoso® SSDR/VRS2-series speakers.
When properly installed, these speakers will give you many years of entertainment pleasure. To get the most out of your new speakers, please read this
manual thoroughly before you begin installation.
This manual covers the Virtuoso V833
SSDR, V831SSDR and VRS2 models:
To achieve the best performance,Sonance recommends that these speakers be
installed by a Sonance Authorized Dealer/Installer.
SAFETY WARNING:
These speakers have FastMount® tabs that prevent the speaker from falling
out of the mounting hole during the installation process.
The edges of FastMount tabs are very sharp. Use caution
when handling the speaker.
See Installation (page 4) for complete information about the FastMount tabs.
PARTS LIST
Your Sonance Virtuoso SSDR speaker includes the following:
• (1) Sonance Virtuoso SSDR Speaker
• (1) Paintable Grille
• (1) Plastic paint plug to protect speaker during painting
• (1) Mounting cutout template (in packaging)
Your Sonance Virtuoso VRS2 speakers include the following:
• (2) Sonance Virtuoso VRS2 Speakers
• (2) Paintable Grilles
• (2) Plastic paint plugs to protect speakers during painting
• (1) Mounting cutout template (in packaging)
OPTIONAL ACCESSORIES
VirtuosoDRMetal Grille (part# 92290): Metal replacement for included grilles.
Virtuoso
DR
Cloth Grille (part# 92285): Cloth-covered replacement for included grilles.
Virtuoso
DR
FlexBracket (part# 92247): Plastic template to reserve a mounting
hole for the speaker in new construction. Designed to be used with the
RotoLock® mounting system.
VirtuosoDRCoverplate (part# 92245): Covers the hole made by the FlexBracket
during construction until the speaker is installed.
Virtuoso
DR
Acoustic Enclosure (part# 91900): ½” MDF enclosure that
provides ideal acoustic performance and maximum reduction of
sound transmission into adjacent spaces. Designed for use only in new
construction.
Virtuoso
DR
Retrofit Enclosure (part# 92243): Molded enclosure that reduces
sound transmission into adjacent rooms and spaces. Can be used in both new
construction and retrofit installations.
VirtuosoDRFire-Rated Back Can (part# 91908): Meets ASTM E 119 and
UL2043 criteria for commercial installations.
Sonafill
®
In-Ceiling System (part# 91928): Retrofittable acoustical
treatment consisting of two pillows and four tiles that virtually eliminates
noises produced by resonating drywall. Dramatically improves midbass
sound quality and reduces sound transmission into adjacent rooms.
SPEAKER PLACEMENT
V833SSDR
and V831SSDR
Virtuoso Single Stereo Technology® SSDR speakers are ideal for use in hallways, bathrooms, closets, or in any location where listeners will be moving
around and a pair of stereo speakers would be impractical.
The location of the speaker should be determined by considering the primary
listening location as well as aesthetic values. Because a single Virtuoso SSDR
reproduces both stereo channels from a single location, they will deliver
outstanding performance from an extremely wide variety of mounting locations.
For optimum results contact your Authorized Sonance Dealer for advice.
Distributed Audio Placement
Sonance Virtuoso speakers have very smooth and predictable off-axis
response, increasing placement options while providing excellent coverage in
distributed audio systems. The chart below shows how far apart the speakers
can be placed while still providing good coverage. The distances are based on
ear heights of 62” for standing listeners and 40” for seated listeners.
VRS2: 5.1-Channel Home Theater System
(see
Illustration 1
)
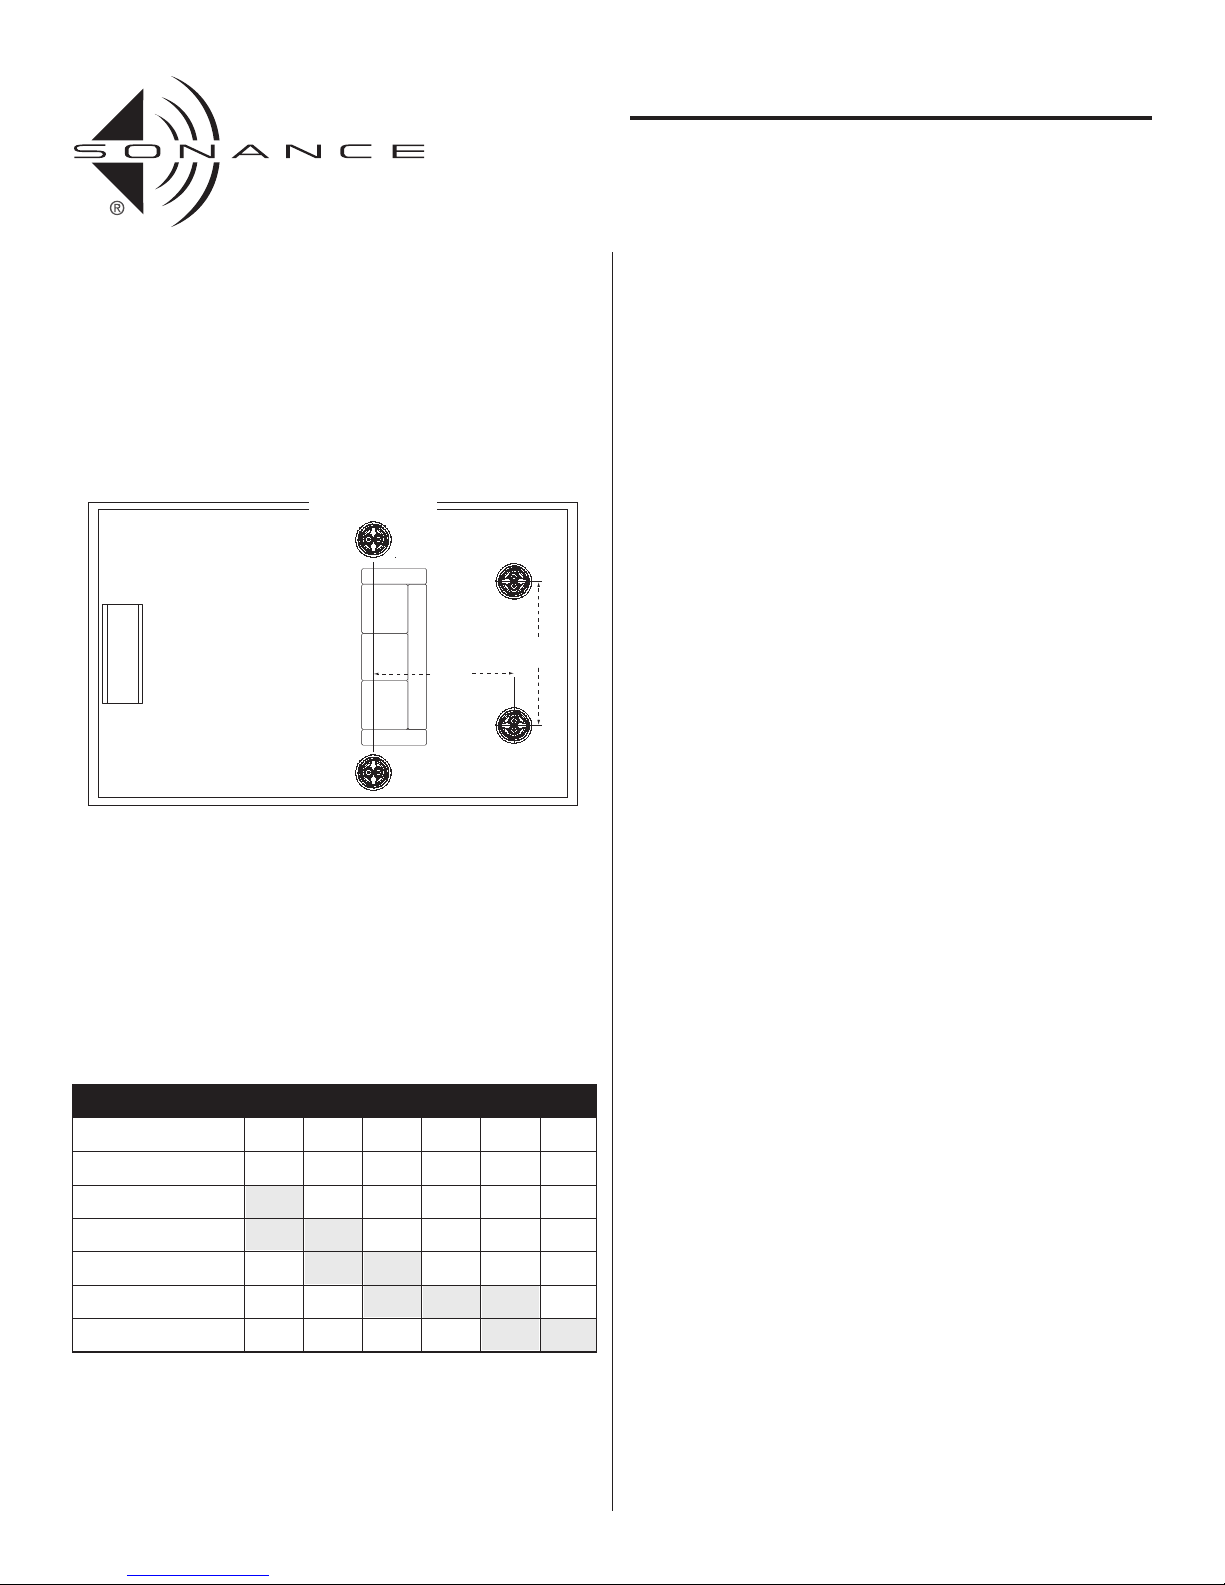
Locate the left and right VRS2 surround speakers on the ceiling between 2 feet
and 4 feet behind the listening position. The speakers should be between 8 feet
and 12 feet apart.
Orient the speakers so the dual midrange/tweeter assemblies face the front
and rear walls of the room.
1
INSTRUCTION MANUAL
SONANCE VIRTUOSO®SERIES
SSDR & VRS2 SPEAKERS
TV
8' – 12'
apart
2' – 4'
Left & Right
Surround Speakers
Illustration 1: VRS2 Placement in a 5.1-Channel Home Theater
Speaker spacing in feet for a distributed audio system
Standing Lis tener Seated Listen er
10-foot ceiling
12-foot ceiling
14-foot ceiling
8-foot ceiling
9.5'
13.5'
17.5'
21.5'
5.7'
9.7'
13.7'
17.7'
Page 2
2
VRS2: 7.1-Channel Home Theater System (see
Illustration 2
)
• Left & Right Surround Speakers: Place the left and right surround speakers
anywhere from directly to the sides of the listening position to 2 – 3 feet in
front of it, and between 8 feet and 12 feet apart. Orient the speakers so the
dual midrange/tweeter assemblies face the front and rear walls of the room.
• Surround Back Speakers: Place the surround back speakers 4 – 8 feet behind
the listening position. The surround back speakers should be closer together
than the left and right surround speakers: 6 – 10 feet apart. Orient the
speakers so the dual midrange/tweeter assemblies face the left & right side
walls of the room.
WIRE GAUGE
Extra resistance in the speaker wire can make speakers sound less dynamic
and reduce definition of the bass frequencies. In extreme cases, it can even
attenuate high frequencies. Also, amplifier power is wasted in wire with extra
resistance, reducing your system’s maximum output level.
To prevent degrading sound quality, the total wire resistance should be less
than 10% of the speaker’s impedance. This means that for an 8-ohm speaker,
the total resistance of the wire should be less than 0.8 ohms.
Refer to the following table when selecting the proper wire gauge for your system:
PREPARING THE INSTALLATION LOCATION
All Sonance speakers are designed to be relatively insensitive to
variations in enclosure volume. To achieve the ultimate performance from
your speakers, a section of the ceiling bay can be sectioned-off to form a back
box. Building such an enclosure will create a dramatic improvement in your
speakers’ bass performance and power handling.
Ideal back box volume requirements:
Virtuoso V833
SSDR: 2.2 ft
3
Virtuoso V831ss
DR 2.0 ft
3
Virtuoso VRS2 2.2 ft
3
Insulating the Ceiling Cavity
You can reduce sound transmission to adjacent rooms and further improve
speaker performance by inserting a sheet of unfaced fiberglass insulation over
the back of the speaker. To reduce noise produced by unsupported drywall,
install fiberglass insulation in the ceiling bays adjacent to the speaker location.
Optional VirtuosoDRRetrofit Enclosures
For installations where it isn’t possible to section-off the ceiling bay to form a
back box (such as when you’re retrofitting the speakers into an existing
ceiling), you can effectively reduce sound transmission into adjacent rooms by
fitting the speakers with optional Virtuoso Retrofit Enclosures (part# 92243).
This enclosure is designed specifically to be used with Virtuoso DR, SSDR and
VRS2 speakers, and will noticeably reduce sound “spillover” from the rears of
the speakers into adjacent rooms and spaces.
INSTALLING THE SPEAKERS
For more information about flangeless installation contact your Authorized
Sonance Dealer or visit www.sonance.com.
Before Installation: New Construction
For installations in new construction, Sonance recommends using
a Virtuoso FlexBracket (part# 92247) to reserve a location for the speaker.
The FlexBracket is nailed or screwed to the studs and serves as a guide for the
drywaller so that the speaker hole will be in the desired location once the
drywall is installed.
Virtuoso FlexBrackets are compatible with the RotoLock™ mounting system.
Before Installation: Retrofit
1. Determine the location for the speaker (see Speaker Placement on page 1).
2. Perform an obstruction survey to be certain that there are no studs, conduit,
pipes, heating ducts or air returns that will interfere with the speaker.
3. The cutout for Virtuoso SSDR and VRS2 speakers is 10
1
/8”(257mm). There
also must be at least 6” (152mm) depth within the ceiling cavity for the
speaker.
4. Position the included cutout template where the speaker is to be located and
pencil an outline on the ceiling.
• If you are unsure about obstructions, drill a small hole in the center of the
outline and insert a coat hanger wire into the hole to feel-around for
possible obstructions.
5. Cut the hole using a drywall saw, and run the speaker wires.
Installation
Sonance Virtuoso SSDR and VRS2 speakers feature exclusive FastMount™
tabs and an integral RotoLock® mounting system for quick mounting directly
into existing ceilings and walls.
WARNING: The edges of FastMount tabs are very sharp. Use caution
when handling the speaker.
Wire resistance in Ohms vs. length of cable run
Distance in Feet 50' 100' 150' 200' 250' 300'
1.04
.65
.41
.26
.16
.10
18 gauge
16 gauge
14 gauge
12 gauge
10 gauge
20 gauge
2.07
1.30
.82
.52
.32
.20
3.11
1.96
1.22
.77
.49
.31
4.14
2.61
1.63
1.03
.65
.41
5.18
3.26
2.04
1.29
.81
.51
6.22
3.91
2.45
1.55
.97
.61
INSTRUCTION MANUAL
SONANCE VIRTUOSO®SERIES
SSDR & VRS2 SPEAKERS
TV
6' – 10'
apart
4' – 8'
Surround
Back
Speakers
Left & Right
Surround Speakers
Illustration 2: VRS2 Placement in a 7.1-Channel Home Theater
Page 3
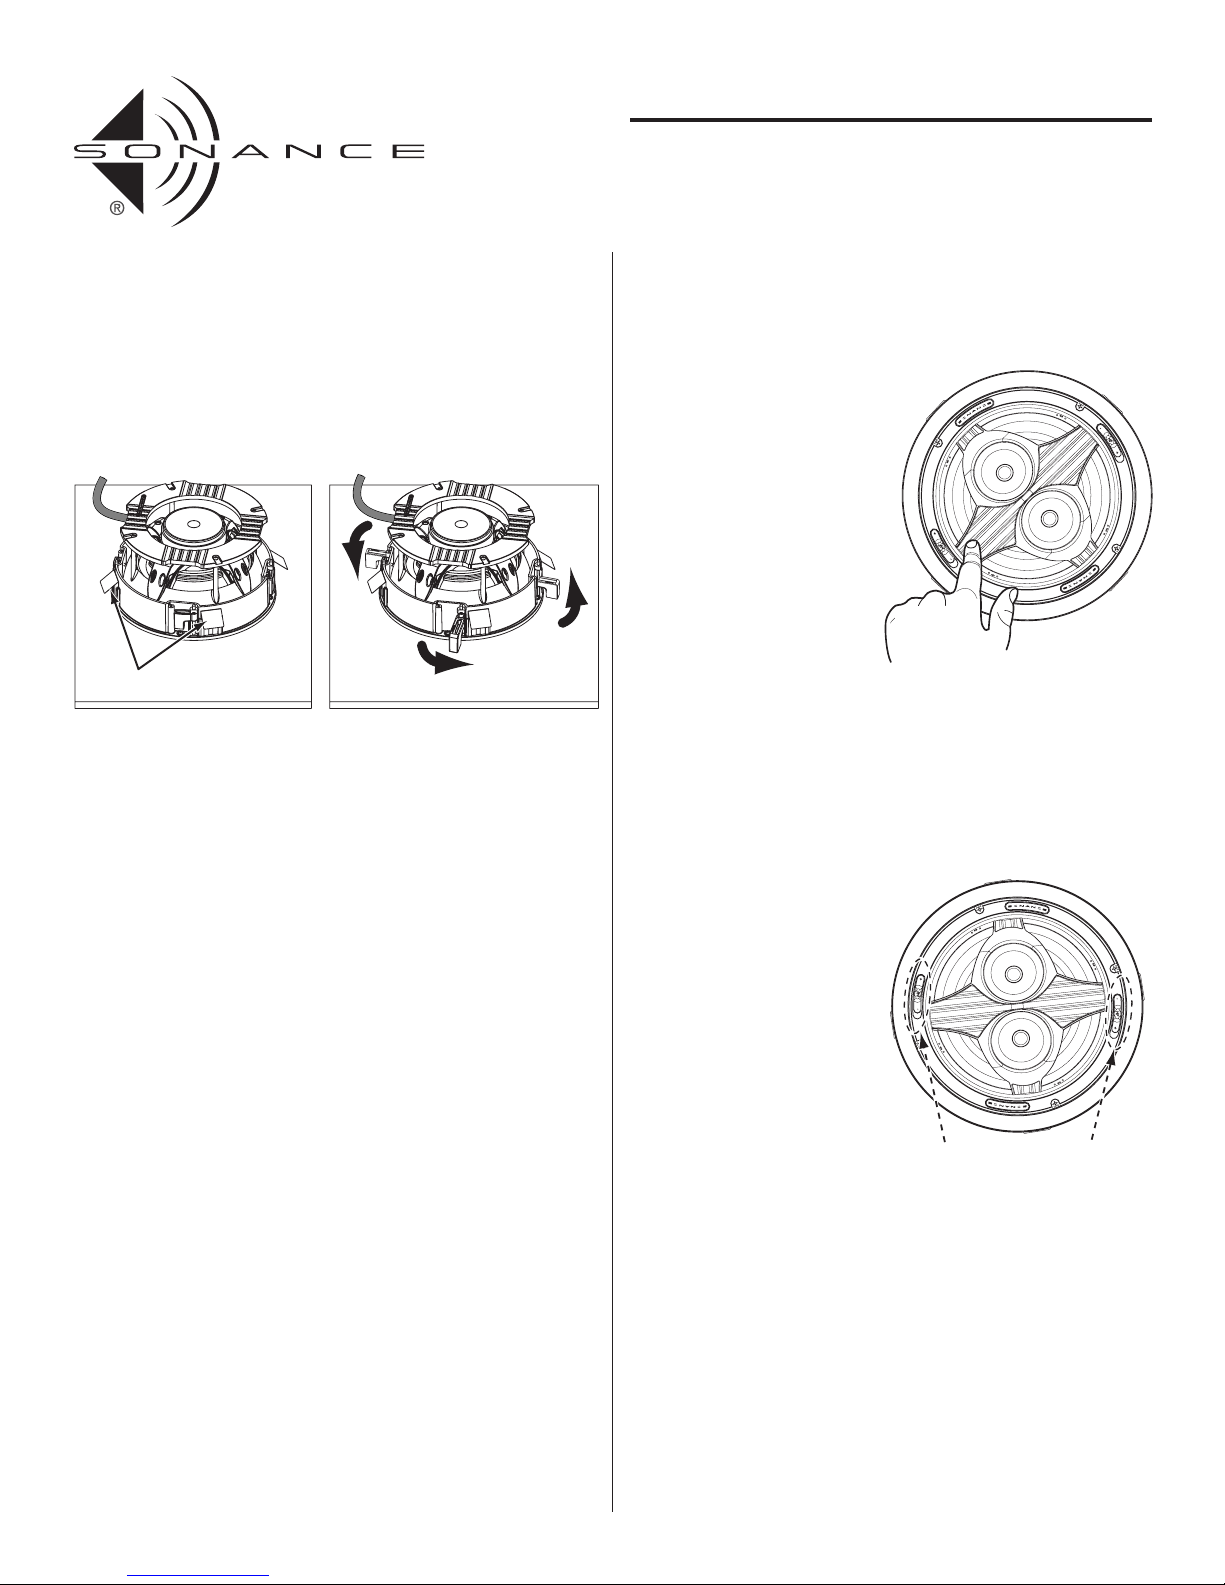
1. Remove the paint plug from the speaker. Connect the speaker wire to the
terminals on the speaker. Double-check that you connected amplifier + to
speaker + and amplifier – to speaker –.
2. Make sure all the RotoLock clamps are in the full clockwise position so that
they are tucked within the mounting hole’s border. Insert the speaker into
the hole in the ceiling. The RotoLock system can accommodate a maximum ceiling material thickness of 1¼”.
• The FastMount tabs will prevent the speaker from falling out of the
mounting hole, allowing the installer to let go of the speaker to pick-up
tools or other items (see Illustration 4).
Note: The FastMount tabs are designed for one-time use only. If the
speaker is removed from the mounting hole the FastMount tabs will
disconnect and remain inside the wall.
3. Tighten the four screws on the front of the speaker baffle. The RotoLock
clamps will automatically rotate into position and begin clamping the
speaker (see Illustration 4).
• When you notice resistance on the screws the speaker has been clamped
successfully.
Note: The speaker flange is designed to flex and conform to any
small imperfections in the ceiling surface. Do not tighten the screws
so much so that the flange bows-out.
Important: Always use low-torque settings; NEVER over-tighten.
4. Attach the grille after the speaker has been installed.Insert about half of the
grille into the groove at the edge of the speaker.Gently fit the remaining half
of the grille by working around the speaker,fitting the grille into the groove
as you go.
Note: You can adjust the torque applied to the RotoLock screws to
achieve a proper grille fit.
PAINTING THE SPEAKERS AND GRILLES
You can paint the speakers and grilles before installing them, which will
eliminate the “paint scar” if the speaker ever needs to be removed for service.
You can also paint the speakers after installation, but before the grilles are
attached. Virtuoso SSDR and VRS2 speakers come from the factory fitted with
a plastic ‘paint plug’. Use the paint plug to protect the speaker drivers while the
flange is being painted along with the wall.
Sonance always suggests painting the grille separately from the speaker.
Before painting, carefully remove the under-grille cloth. It is held in place with
a light tacking glue that makes it easy to remove.
Spray the grilles with thinned paint (5 parts thinner to 1 part paint), being
careful not to plug the holes. Too heavy a coat of paint on the grille will
adversely affect the sound of the speaker.
Once the grilles and flange are painted and dry, replace the under-grille cloth,
remove the paint plug from the speaker flange and install the grille.
ADJUSTING THE SPEAKERS
Pivoting Woofer
Virtuoso SSDR and VRS2
speakers have a pivoting woofer
assembly. These pivoting drivers
allow you to direct sound toward
or away from the listening area,
depending on therequirements
of the installation.
For VRS2 speakers being used as
surround channel speakers in a
home theater, you can create a
more diffuse, spacious surround
effect by pivoting the woofers
towards a wall or window, away
from the listeners.
To pivot the woofer:
Apply pressure on the outer edge of the Sonic Eye support bracket, as shown
in Illustration 5. Do not touch or apply pressure to the woofer cone.
Tweeter & Midrange Level Controls (V833
SSDR & VRS2 only)
The V833ssDR and VRS2 have tweeter and midrange level control switches
that let you boost or cut the tweeter and midrange levels by 3dB.
(See Illustration 6.)
Once you have installed the speakers, listen to a variety of music that
you are familiar with. If the music
all tends to sound too bright or
dull, use the Tweeter Control to
compensate. If the music all tends
to have too much or too little presence, use the Midrange Control to
compensate. If some recordings
sound dull or lack presence and
some sound bright and have too
much presence, the speaker is accurately reproducing differences in
the recordings, and you should
leave the control in the middle
(0dB) position.
3
INSTRUCTION MANUAL
SONANCE VIRTUOSO®SERIES
SSDR & VRS2 SPEAKERS
FastMount
Tab s
Illustration 4: Virtuoso SSDR/VRS2 Installation
Midrange Control Tweeter Control
Illustration 6: Tweeter and Midrange
Level Controls
Illustration 5: Pivoting the Woofer
Page 4

4
SPECIFICATIONS
V833ssDR
Tweeter: Two ¾" (19mm) Silk domes, Ferrofluid cooled
Midrange: Two 3" (76mm) Carbon Fiber cones, rubber
surrounds
Woofer: 8" (203mm) Carbon Fiber cone, dual voice
coil, rubber surround, pivoting
Frequency Response: 32Hz – 20kHz ±3dB
Impedance: 6 Ohms nominal; 4 Ohms minimum
Power Handling: 5 Watts minimum; 150 Watts maximum
SPL: 91dB SPL (2.83V 1 meter)
Grille Material: Perforated Aluminum
Adjustments: Tweeter and midrange level (±3dB)
Dimensions (Dia. x D): 11¼" x 6" (286mm x 152mm)
Cutout Diameter: 10
1
/8" (257mm)
Shipping Weight: 10 lbs. (4.5kg) Each
V831ss
DR
Tweeter: Two ¾" (19mm) Silk domes, Ferrofluid cooled
Midrange: Two 3" (76mm) Polypropylene cones, rubber
surrounds
Woofer: 8" (203mm) Polypropylene cone, dual voice
coil, rubber surround, pivoting
Frequency Response: 45Hz – 20kHz ±3dB
Impedance: 8 ohms nominal; 6 ohms minimum
Power Handling: 5 Watts minimum; 100 Watts maximum
Sensitivity: 89dB SPL (2.83V 1 meter)
Grille Material: Perforated Aluminum
Adjustments: None
Dimensions (Dia. x D): 11¼" x 6" (286mm x 152mm)
Cutout Diameter: 101/8" (257mm)
Shipping Weight: 8 lbs. (3.6kg) Each
VRS2
Tweeter: Two ¾" (19mm) Silk domes, Ferrofluid cooled
Midrange: Two 3" (76mm) Carbon Fiber cones, rubber
surrounds
Woofer: 8" (203mm) Carbon Fiber cone, rubber
surround, pivoting
Frequency Response: 32Hz – 20kHz ±3dB
Impedance: 6 Ohms nominal; 4 Ohms minimum
Power Handling: 5 Watts minimum; 150 Watts maximum
SPL: 91dB SPL (2.83V 1 meter)
Grille Material: Perforated Aluminum
Adjustments: Tweeter and midrange level (±3dB)
Dimensions (Dia. x D): 11¼" x 6" (286mm x 152mm)
Cutout Diameter: 101/8" (257mm)
Shipping Weight: 20 lbs. (9.0kg) Pair
TECHNICAL ASSISTANCE AND SERVICE
If you any have questions about the operation or installation of
this product, please call our Technical Assistance Department on any
business day at (800) 582-0772 or (949) 492-7777; from 7 a.m. to
5 p.m., PST.
If your speakers should need repair or service, contact your Sonance
Authorized Dealer for help, or use the following procedure:
1. Prior to calling, note the product’s model number, serial number,
purchase date, and the name and address of the dealer where you
purchased the product.
2. Contact our Technical Assistance Department at the above number(s)
and describe the problem the unit is experiencing. If applicable, they
will issue a Return Authorization Number.
IMPORTANT: YOU MUST HAVE PRIOR AUTHORIZATION TO
RETURN YOUR SPEAKER TO SONANCE!
3. If you’re directed to return the unit to Sonance for repair, pack the unit
in its original shipping carton. If needed, you can obtain replacement
packaging from us for a small charge. Note: it is best if you place the
box into an additional outer “overcarton”before shipment to minimize
a chance of theft in shipment. Please include a copy of the original bill
of sale inside the package.
4. Contact a package delivery service such as United Parcel Service or
Federal Express to arrange prepaid (not collect) shipping. Do not use
the U.S. Postal Service.
IMPORTANT: Freight collect shipments will be refused.
55.. WWrriittee tthhee RReettuurrnn AAuutthhoorriizzaattiioonn NNuummbbeerr oonn tthhee oouuttssiiddee ooff tthhee
sshhiippppiinngg ccaarrttoonn..
6. Ship the packaged unit to:
Quality Assurance Department
Sonance
212 Avenida Fabricante
San Clemente, CA 92672-7531
INSTRUCTION MANUAL
SONANCE VIRTUOSO®SERIES
SSDR & VRS2 SPEAKERS
Page 5

5
LIMITED LIFETIME WARRANTY COVERAGE (U.S. ONLY)
Sonance warrants to the original retail purchaser only that this
Sonance product will be free from defects in materials and workmanship, provided the speaker was purchased from a Sonance Authorized
Dealer.
Defective products must be shipped,together with proof of purchase, prepaid
insured to the Authorized Sonance Dealer from whom they were purchased,
or to the Sonance factory at the address listed on this instruction manual.
Freight collect shipments will be refused. It is preferable to ship this product
in the original shipping container to lessen the chance of transit damage. In
any case, the risk or loss or damage in transit is to be borne by the purchaser.
If upon examination at the factory or Authorized Sonance Dealer it is
determined that the unit was defective in materials or workmanship at any
time during this warranty period, Sonance or the Authorized Sonance Dealer
will, at its option, repair or replace this product at no additional charge, except
as set forth below. If this model is no longer available and can not be repaired
effectively, Sonance, at is sole option, may replace the unit with a current
model of equal or grater value. In some cases where a new model is
substituted, a modification to the mounting surface may be required. If
mounting surface modification is required, Sonance assumes no
responsibility or liability for such modification. All replaced parts and
product become the property of Sonance. Products replaced or repaired
under this warranty will be returned to the original retail purchaser, within a
reasonable time, freight prepaid.
This Warranty does not include service or parts to repair damage caused by
accident, disaster, misuse, abuse, negligence, inadequate packing or shipping
procedures, commercial use, voltage inputs in excess of the rated maximum
of the unit, or service, repair or modification of the product which has not
been authorized or approved by Sonance.This Warranty also excludes normal
cosmetic deterioration caused by environmental conditions. This Warranty
will be void if the Serial Number on the product has been removed,tamperedwith or defaced. This Warranty is in lieu of all other expressed warranties. If
the product is defective in materials or workmanship as warranted above, the
purchaser’s sole remedy shall be repair or replacement as provided above. In
no event will Sonance be liable for any incidental or consequential damages
arising out of the use or inability to use the product, even if Sonance or an
Authorized Sonance Dealer has been advised of the possibility of such
damages, or for any claim by any other party.
Some states do not allow the exclusion or limitation of consequential damages, so the above limitation and exclusion may not apply. All implied warranties on the product are limited to the duration of this expressed Warranty.
Some states do not allow limitation on the length of an implied warranty. If
the original retail purchaser resides in such a state, this limitation does not
apply.
EXCLUSIONS AND LIMITATIONS
The warranty set forth above is in lieu of all other warranties, express or
implied, of merchantability,fitness for a particular purpose, or otherwise. The
warranty is limited to Sonance products registered herein and
specifically excludes any damage to loudspeakers and other allied or
associated equipment which may result for any reason from use with this
product. Sonance shall, in no event, be liable for incidental or
consequential damages arising from any breach of this warranty or
otherwise. This warranty gives you specific legal rights, and you may have
other rights which vary from state to state.
INSTRUCTION MANUAL
SONANCE VIRTUOSO®SERIES
SSDR & VRS2 SPEAKERS
Page 6

Sonance • 212 Avenida Fabricante • San Clemente, CA 92672-7531,USA • (800) 582-7777 or (949) 492-7777 • FAX: (949) 361-5151 • Technical Support: (800) 582-0772
www.sonance.com
33-4074 04/06
©2006 Sonance. All rights reserved.
Sonance, Sonance Virtuoso, Single Stereo Technology, RotoLock, Sonic Eye, Sonafill and FastMount are trademarks or registered trademarks of Dana Innovations.
Due to continuous product improvement, all specifications are subject to change without notice. For the latest Sonance product specification information visit our website:
www.sonance.com
 Loading...