

Page 1
INSTALLATION INSTRUCTIONS
MODEL: ST2432D Series
SUPPLIED ACCESSORIES: Tegular Brackets
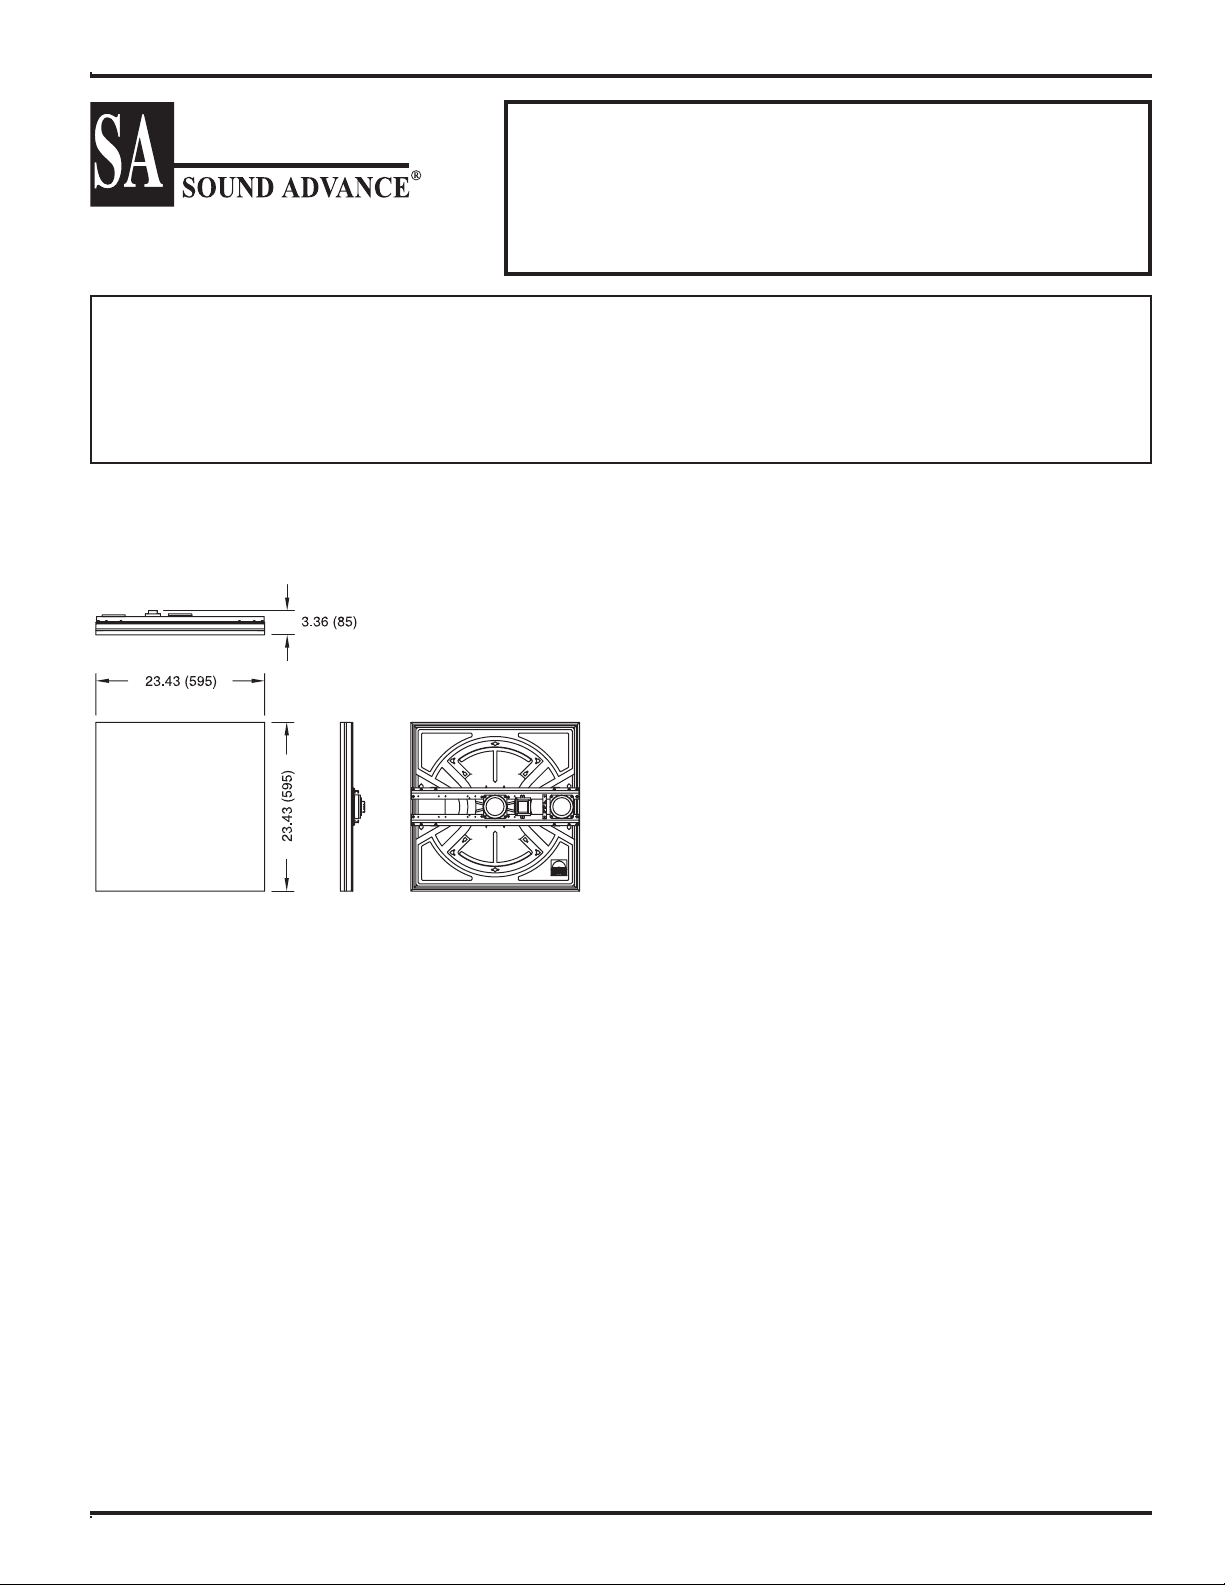
DIMENSIONS
All dimensions are in inches (mm)
ST2432D Series SpeakerTile
and Accessories
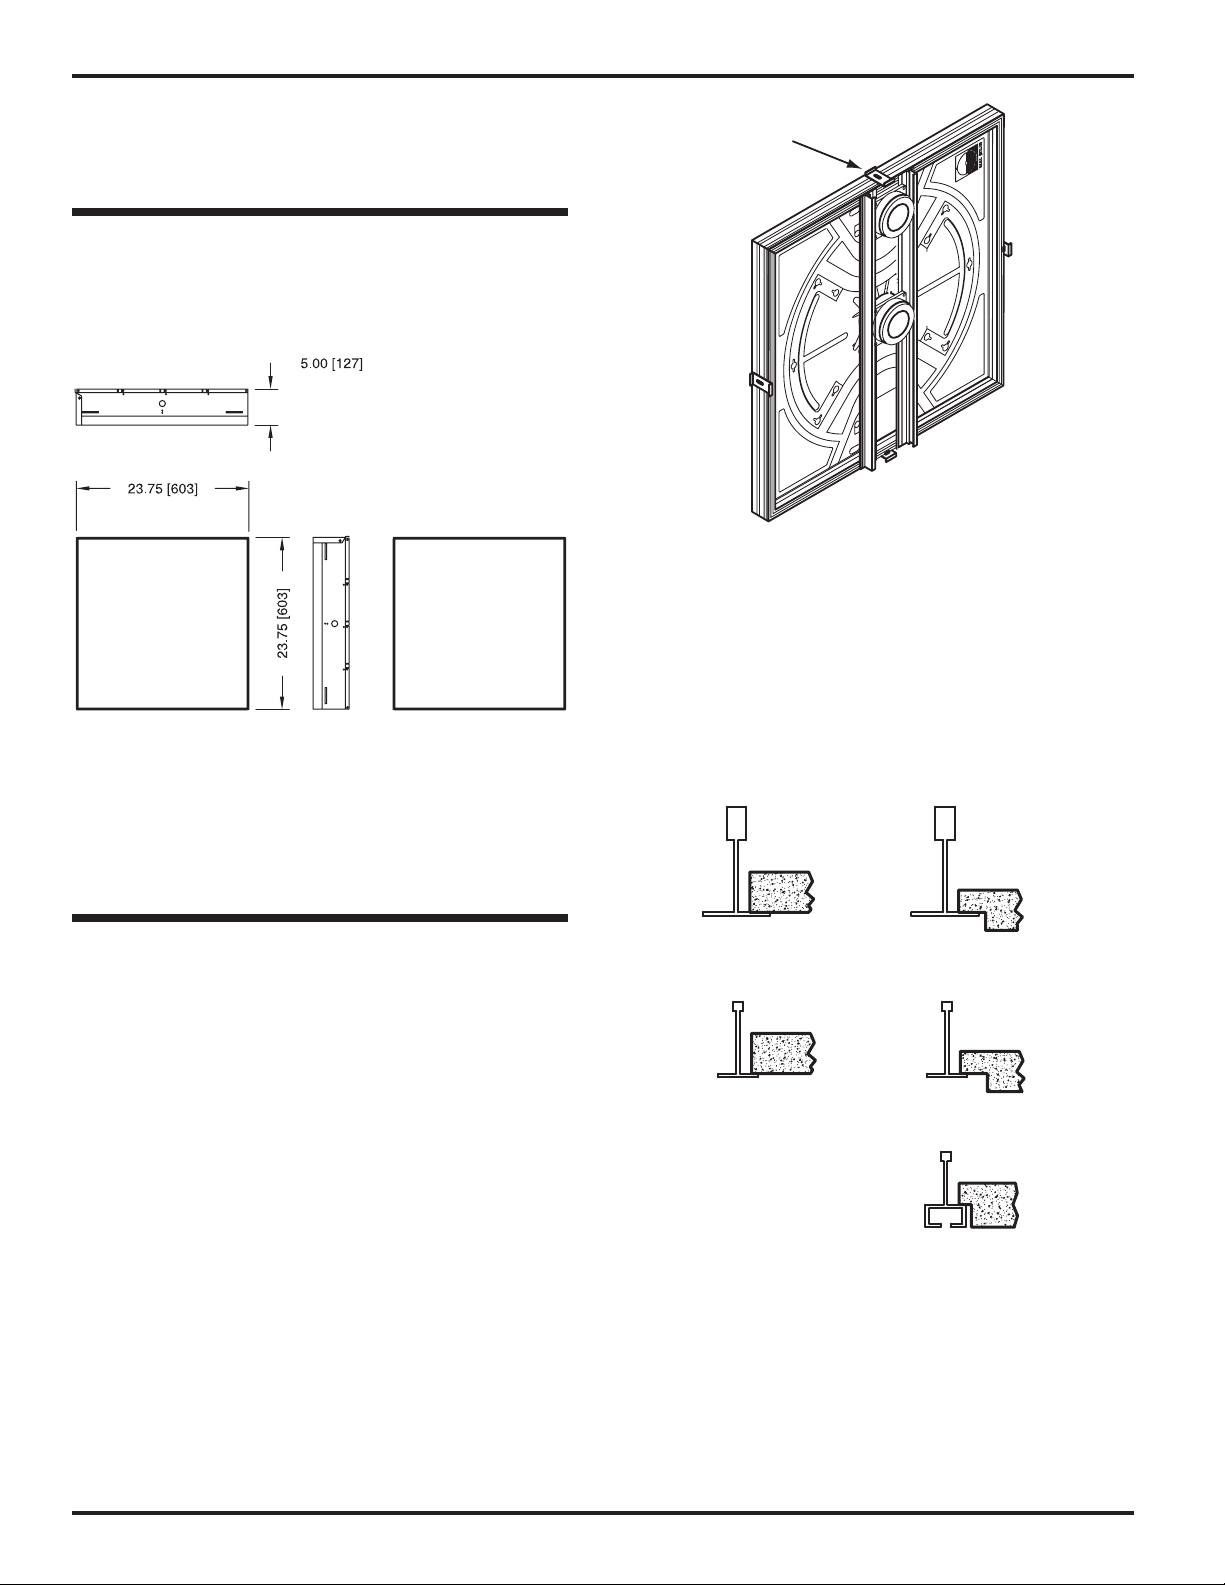
RECOMMENDED PBB2.0 Backbox
ACCESSORIES: Safety Strap
ECS2432D Enclosure
Compensation Module
for 9/16” and 15/16” ceiling grids, fl ush (lay-in)
or non-flush (tegular) mounting. However, if
the loudspeaker is to be installed on a tegular
(non-fl ush) mounting 15/16” ceiling grid, in order
to drop below the ceiling grid the front surface of
the diaphragm must be factory-routed.
Sound Advance will make every effort to match
the SpeakerTile to the customer’s ceiling tiles.
However, our standard tegular routing is a 90
251.004-1
B.E.S.T.
SANTA ANA
USA
CA
degree angle cut. We may not be able to match
beveled, chamfered or angled tegular tiles.
®
B.E.S.T. #272.133
PRODUCT WEIGHT
ST2432D Series: 9.8 lbs. (4.45 kg.)
RECOMMENDED MOUNTING LOCATIONS
Sound Advance products provide outstanding
performance and economic advantages when installed
in environments with an ambient noise level at or below
75dBA, where the speakers can be placed between 8 and
18 feet above the fl oor, and which are large enough to
accommodate at least 4 or more conventional loudspeakers. When system design requirements indicate speaker to
speaker distances of greater than 40.0 ft., please contact
the factory for additional technical information on such
applications.
Sound Advance recommends mounting the ST2432D in
9/16” and 15/16” T-Bar Suspended Ceiling Systems
IMPORTANT NOTE: The ST2432D-series
SpeakerTile is designed to be installed in standard
2’ x 2’ suspended ceiling systems. It is suitable
FACTORY-PROVIDED FINISH
The Sound Advance ST2432D-Series SpeakerTiles are
designed to be easily mounted into T-Bar suspended
ceiling systems, completely replacing a standard 2’ x 2’
ceiling tile.
A variety of 3-dimensional and textured patterns are
available, providing a match to most suspended ceiling
tile patterns.
The ST2432D can optionally be covered with any watersoluble fi nish, such as latex paint, or be covered with light
wallpaper, fabrics and selected texture coats*, further
enhancing the SpeakerTile’s ability to blend invisibly with
almost any interior design choice.
[* Please contact the factory before applying any
textured coating, light wallpaper or fabrics to Sound
Advance products]
AVAILABLE MODELS
ST2432D: 70.7V/8-ohm, Dual-Driver SpeakerTile
ST2432D#: Same as ST2432D, with factory-applied
3-dimensional or textured pattern
Page 1 ST2432D Series960.066 Rev # 1
Page 2
RECOMMENDED ENVIRONMENTS
Indoor or Weather Protected Outdoor
ACCESSORIES DATA
SOUND ADVANCE offers a backbox to allow code
installation requirements to be met:
PBB2.0 — 2.0 cu. ft. backbox
Dimensions: See below. All dimensions are in inches (mm).
Tegular
Brackets
Figure 1
1. If not previously done, run speaker wires or conduit
(as per local Building Code requirements) into the selected mounting location. Fasten and seal as required.
Connect the speaker wires to the correct (+) and (–)
SpeakerTile terminals and select the appropriate power
tap. Insure that all connections and wiring runs are in
compliance with required codes and regulations.
Weight: 4.8 lbs. (2.17 kg)
NOTE: The use of backboxes may be required by
local or national building codes.
INSTALLATION
UNPACKING AND INSPECTION
Carefully open the shipping cartons and remove all
contents. Inspect the SpeakerTile and accessories for damage. Report damage or shortages to Sound Advance.
Figure 1
the PBB2.0 backbox is NOT being used. See
details on the backbox.
CAUTION: SOUND ADVANCE loudspeakers utilize
a fl at polystyrene material as the sound radiating
surface. Although it is resistant to mechanical
damage and is unaffected by environmental extremes,
care should be observed during handling, to avoid
punctures or other damage.
INSTALLATION PREPARATION
Determine the type of ceiling grid system (9/16” or 15/16”)
and mounting application (fl ush or Tegular). See
9/16” AND 15/16” CEILING GRIDS: FLUSH-MOUNT
INSTALLATION WITHOUT BACKBOX
indicates all items required for installation if
Figure 8
for
Figure 2.
Flush Tegular
15
/16” Grid
9
/16” Grid
Figure 2
IMPORTANT: To avoid any noise or damage to the
system when in operation be sure speaker wires or
other objects are not in contact with the back of the
SpeakerTile surface. To avoid damage to the front
surface during mounting do not remove the
protective cardboard cover from the Speaker Tile until it has
been fully positioned into the ceiling.
15
/16” Grid
9
/16” Grid
Page 2ST2432D Series 960.066 Rev # 1
Page 3
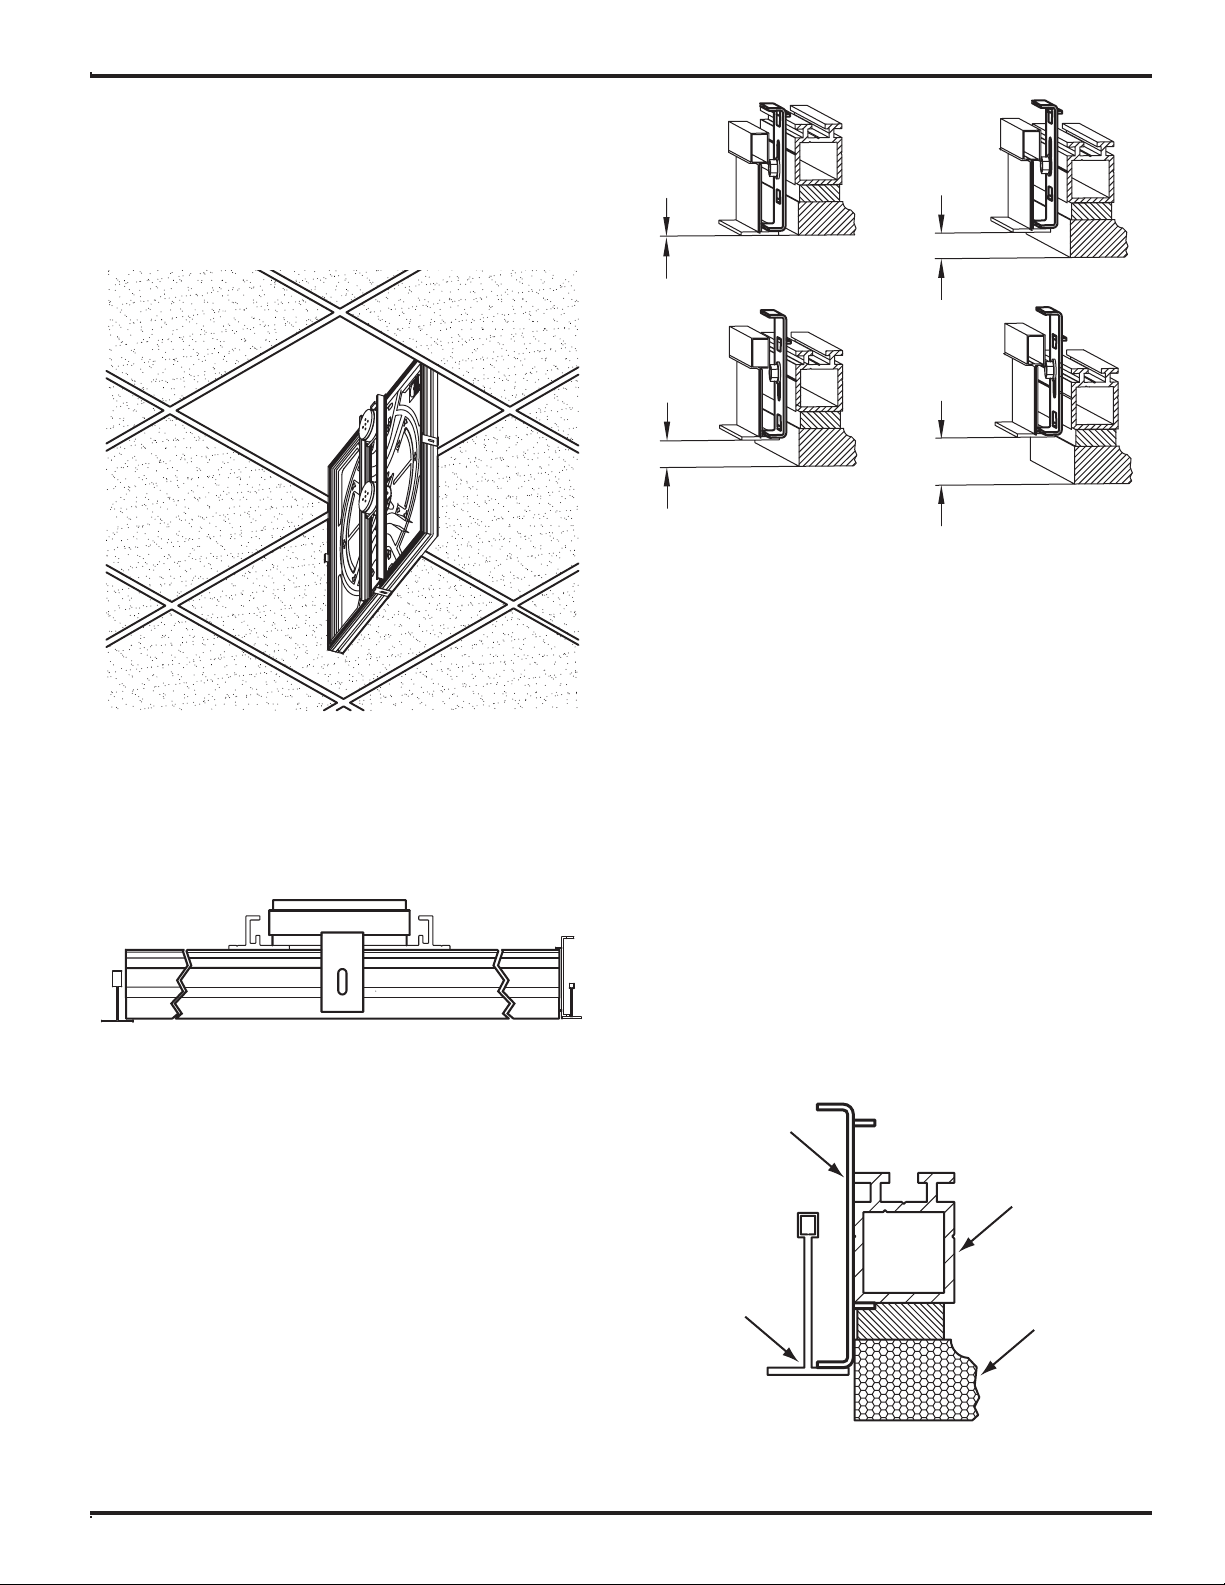
2. If the ceiling grid is a 15/16” T-Bar, remove the Tegular
0 [0] Factory
5
/32” [4.0]
5
/16” [8.0] 180° Rotated
1
/8” [3.0] 180° Rotated
Tegular
Bracket
Speaker
Frame
9
/16”
Grid
Speaker
Diaphragm
Brackets from the SpeakerTile (see
Figure 1
).
3. Hold the SpeakerTile with the fl at/front surface facing
down and insert it obliquely through the ceiling grid
until it passes entirely through. Remove protective
cardboard. See
Figure 3
Figure 3
.
4. Maneuver the SpeakerTile until it is aligned and
centered to the grid. The SpeakerTile will rest by the
four Tegular Brackets (attached to the frame sides) on
a 9/16” ceiling grid and will rest by the Diaphragm on a
15/16” ceiling grid. See
Figure 4
.
Figure 5
Connect the speaker wires to the correct (+) and (–)
SpeakerTile terminals and select the required power
tap.
IMPORTANT: To avoid any noise or damage to the
system when in operation be sure speaker wires or
other objects are not in contact with the back of the
SpeakerTile surface. To avoid damage to the front
surface during mounting do not remove the
protective cardboard cover from the Speaker Tile until it has
been fully positioned into the ceiling.
3. Hold the SpeakerTile with the front surface (fl at) facing
down and insert it obliquely through the ceiling grid
until is passes entirely through. Remove protective
cardboard. See
Figure 3
.
15
/16” Grid
Figure 4
9
/16” Grid
9/16” CEILING GRID: TEGULAR MOUNT
INSTALLATION WITHOUT BACKBOX
1. Adjust the four tegular brackets (attached to the
SpeakerTile frame, see
by loosening the screws and moving them up or down,
or by rotating the brackets 180 degrees and then
moving up or down, depending on the height required.
See
Figure 5
.
2. Once the tegular brackets have been adjusted,
make sure they are straight (perpendicular) and then
fasten them properly to avoid further movement. If not
previously done, run speaker wires or conduit (as per local
Building Code requirements) into the selected mounting
location. Fasten and seal as required.
Figure 1
) to the desired height
4. Maneuver the SpeakerTile until it is aligned and
centered to the grid. When properly installed, the tegular
brackets (attached to the frame of the SpeakerTile) will
rest on the ceiling grid system. See
Figure 6
Figure 6
.
Page 3 ST2432D Series960.066 Rev # 1
Page 4

15/16” CEILING GRID: TEGULAR MOUNT
Box Panel (4)
Long
Screw (8)
Short
Screw (1)
Latch (1)
Rivet (1)
Spacer (4)
Hinge (1)
Spring-Loaded
Hinge (1)
INSTALLATION WITHOUT BACKBOX
PLEASE NOTE: This mounting method requires
the diaphragm front surface to be factory-routed in
order to drop below the ceiling grid. If the supplied
SpeakerTiles have not been routed, this installation
method cannot be used.
1. Remove the four tegular brackets attached to the sides
of the SpeakerTile frame. See
2. If not previously done, run speaker wires or conduit (as
per local Building Code requirements) into the selected
mounting location. Fasten and seal as required. Connect
the speaker wires to the correct (+) and (– ) SpeakerTile
terminals and select the required power tap. Insure that
all connections and wiring runs are in compliance with
required codes and regulations.
IMPORTANT: To avoid any noise or damage to the
system when in operation be sure speaker wires or
other objects are not in contact with the back of the
SpeakerTile surface. To avoid damage to the front
surface during mounting do not remove the
protective cardboard cover from the Speaker Tile until it has
been fully positioned into the ceiling.
3. Hold the SpeakerTile with the front surface (fl at) facing
down and insert it obliquely through the ceiling grid
until is passes entirely through. Remove protective
cardboard. See
Figure 3
4. Maneuver the SpeakerTile until it is aligned and
centered to the ceiling grid. The SpeakerTile diaphragm
will rest on the ceiling grid system. See
.
Figure 1
Speaker
Frame
on page 2
Figure 7
.
.
UNPACKING AND INSPECTION
Carefully open the shipping cartons and remove all
contents. Inspect for damage. Report damage or
shortages to Sound Advance.
Figure 8
indicates all items required for assembly of the
PBB2.0 backbox.
Figure 8
ASSEMBLING THE BACKBOX
1. Lay the four panels down on your work surface with the
bends facing up. Peel the covers from the adhesive
squares on each panel.
2. Set up the four corners as shown in
the straight end of one with the bent end of the other
panel at a 45o angle. Open the panels to form a 90
angle and insure that the adhesive tape bonds the ends
of the panels together.
Figure 9
by aligning
o
Speaker
Diaphragm
15
/16” Grid
Figure 7
9/16” AND 15/16” CEILING GRIDS: FLUSH
OR TEGULAR MOUNT INSTALLATION WITH
BACKBOX
NOTE: Before attempting to install the SpeakerTile
you must fi rst assemble the backbox according to the
following instructions:
Figure 9
3. Fasten the two panels together using one of the long
sheet metal screws on the upper part of the panel as
Page 4ST2432D Series 960.066 Rev # 1
Page 5

shown in
sides.
4. Determine the type of ceiling grid system (9/16” or
15/16”) and mounting application (fl ush or Tegular).
See
Figure 10
Figure 11
.
. Repeat
Figure 10
Steps 1 – 3
for all four
Flush Tegular
For Flush
For Tegular
Figure 12
6. Bend two of the tabs located on the back edge of the
backbox inward on opposite sides. These will properly support the ceiling tile, which will be used as the
back panel of the backbox.
7. Remove the ceiling tile from the T-Bar grid where the
backbox and SpeakerTile are to be installed.
15
/16” Grid
9
/16” Grid
Figure 11
5. IMPORTANT: This step is only necessary for 9/16”
ceiling grid systems (both flush and Tegular
mounting). If your ceiling is a 15/16” grid, skip to
Step 6.
If a TEGULAR mount is required insert the short sheet
metal screw into the
of the panel, as shown in
insert the screw on the
lower
15
/16” Grid
9
/16” Grid
hole located on the center
Figure 12
upper
. For FLUSH mount
hole.
8. Insert the backbox through the T-Bar grid as shown in
Figure 13
9. Lay the backbox (felt side down) in the grid, being sure
that all 4 sides rest on the grid system, as shown in
Figure 14
NOTE: If additional support is required, hanger
attachment points are located at all four corners of
the backbox. It is recommended that you use these
as a matter of practice. It insures a secure installation
and is a good safety practice. Insure that the chosen
.
Figure 13
on page 6.
Page 5 ST2432D Series960.066 Rev # 1
Page 6

attachment points are to a non-moveable, secure,
portion of the ceiling structure.
Figure 14
be attached to a non-moveable, secure, portion of the
ceiling structure to function properly.
1. Place the SpeakerTile on a clean work area with the fl at
surface facing down. Remove all four Tegular Brackets
located on the center of each side of the frame (see
Figure 1
on page 2).
2. Locate the pre drilled holes inside the speaker frame
groove for mounting the two hinges (see
Figure 8
), and
position the SpeakerTile so that the holes are on the
upper side.
3. Using the provided long sheet metal screws, secure
the spring-loaded hinge to the holes on the right side
of the speaker frame, as shown in
Figure 16
. Be sure that
the screws are properly tightened.
Long Screws
10. If not previously done, run speaker wires or conduit (as
per local Building Code requirements) into the selected
mounting location. Fasten and seal as required.
11. IMPORTANT: Step 11 is only for 9/16” T-Bar grid
systems (both fl ush and Tegular mounting). If your
ceiling is a 15/16” grid, skip to page 8.
Complete the backbox installation by diagonally
inserting the removed ceiling tile back into the ceiling
through the open backbox. Lay the ceiling tile on the
ledge and tabs at the rear of the backbox. Accessing from
adjoining openings, secure the tile with bailing wire or
#6d nails, as shown in
Figure 15
.
Use spacers only with
Tegular mounting
SpeakerTile
Frame
Figure 16
SpringLoaded
Hinge
IMPORTANT NOTE: if a tegular mount is required,
install the provided spacers under both spring loaded
and fi xed hinges, as shown in
Figure 16
.
4. Using the provided long sheet metal screws, secure
the non spring-loaded hinge on the left side of the
SpeakerTile frame opposite to the spring-loaded hinge.
Be sure that the screws are properly tightened.
Figure 15
9/16” CEILING GRID SYSTEM: FLUSH OR
TEGULAR MOUNT INSTALLATION WITH
BACKBOX
CAUTION: Use of a safety strap to secure ST2432D
SpeakerTile systems to backboxes or appropriate
ceiling structure elements which are sufficiently
strong and well-attached during installation is
strongly recommended. It prevents the SpeakerTile
from falling should a problem occur. The strap must
5. Locate the latch and expanding rivet (supplied). Insert
the rivet in the Latch and then into the center hole
located on the SpeakerTile frame, as shown in
Figure 17
Secure by tapping the center pin to set the rivet.
IMPORTANT NOTE: The latch must be opposite to
the hinges mounted in the previous steps for the
SpeakerTile to mount properly. Do not set the
rivet until you confi rm that the hinges and latch are
installed properly.
6. Being sure that the latch faces the screw previously
mounted on the backbox in
Step 5
on page 5, install
the SpeakerTile into the backbox by FIRST inserting
Page 6ST2432D Series 960.066 Rev # 1
.
Page 7

Figure 17
the fi xed hinge into the slot provided on the side of the
backbox as shown in
Figure 18
, and THEN inserting the
spring-loaded hinge in the opposite slot on the backbox,
as shown in
Figure 19
.
Figure 19
8. Remove the protective cardboard from the front of the
SpeakerTile. Move the latch to the open position, swing
the SpeakerTile into the backbox and close the latch,
making sure the SpeakerTile is secured. See
Figure 20
.
Figure 18
NOTE: Once both hinges are inserted, the SpeakerTile
will swing like a trap door.
7. If not previously done, run speaker wires or conduit (as
per local Building Code requirements) into the selected
mounting location. Fasten and seal as required. Connect
the speaker wires to the correct (+) and (–) SpeakerTile
terminals and select the required power tap. Insure that
all connections and wiring runs are in compliance with
15/16” CEILING GRID: FLUSH OR TEGULAR
MOUNT INSTALLATION WITH BACKBOX
NOTE: The 15/16” tegular mount arrangement requires
the diaphragm front surface to be factory-routed in
order to drop below the ceiling grid.
1. Place the ST2432D SpeakerTile on a clean work area
with the fl at surface facing down. Remove all four Tegular Brackets (see
required codes and regulations.
2. If not previously done, run speaker wires or conduit
IMPORTANT: To avoid any noise or damage to the
system when in operation, be sure speaker wires or
other objects are not in contact with the back of the
SpeakerTile surface.
(as per local Building Code requirements) into the selected mounting location. Fasten and seal as required.
Connect the speaker wires to the correct (+) and (–)
SpeakerTile terminals and select the required power
tap. Insure that all connections and wiring runs are in
compliance with required codes and regulations.
Page 7 ST2432D Series960.066 Rev # 1
Figure 20
Figure 1
on page 2).
Page 8

IMPORTANT: To avoid any noise or damage to the
system when in operation, be sure speaker wires or
other objects are not in contact with the back of the
SpeakerTile surface.
3. Remove the protective cardboard from the front of the
SpeakerTile.
4. Hold the SpeakerTile with the fl at front surface facing
down and carefully insert it obliquely through the ceiling
grid until is passes entirely through, as shown in
Figure 21.
Figure 23
If a situation should arise which cannot be resolved
through the information contained in these installation
instructions, please contact Sound Advance, Customer
Support Services at (800) 592-4644, Monday-Friday,
8 AM to 5 PM Pacifi c Time.
Figure 21
5. Maneuver the SpeakerTile until it is aligned and
centered to the grid. As shown in
Figure 22
, the SpeakerTile
will rest on the ceiling grid by its diaphragm.
Figure 22
6. Complete the Backbox installation by diagonally
inserting the removed ceiling tile back into the ceiling
through an adjacent opening. Lay the ceiling tile on the
ledge and tabs at the rear of the backbox. Accessing from
adjoining openings, secure the tile with bailing wire or
#6d nails, as shown in
Figure 23
.
Sound Advance
212 Avenida Fabricante, San Clemente, CA 92672-6353 USA
(800) 592-4644 FAX (800) 538-5151
www.soundadvance.com
Page 8ST2432D Series 960.066 Rev # 1
 Loading...