

Introduction
Thank you for purchasing the Sonance Sonamp®A800 subwoofer
amplifier. When properly installed, this amplifier will give you
many years of entertainment pleasure. To get the most out of your
new amplifier, please read this manual thoroughly before you
begin installation. To achieve the best performance, Sonance
recommends that this amplifier be installed by a Sonance
Authorized Dealer/Installer.
Important Safety Instructions
Basic safety precautions should always be followed when using
your A800 amplifier, to reduce risk of fire, electric shock, and
injury to persons:
1. Read and understand all instructions.
2. Retain these instructions for future reference.
3. Follow all warnings and instructions in this manual and
marked on the product.
4. Any service or repair required must be performed by
qualified factory-authorized personnel.
5. Do not use the amplifier in a high-humidity environment or
near water — for example in a wet basement, or near a wet
bar or swimming pool.
6. Always provide adequate ventilation for the amplifier. Allow a
minimum of one (1) inch above and three (3)
inches behind the amplifier. Do not block the cooling vents on
the amplifier case.
7. The amplifier should be situated away from heat sources such
as heat registers, radiators, stoves, or other appliances that
produce heat.
8. The amplifier should only be connected to a power supply of
the type marked on its back panel. The power supply cord
should be routed to avoid damage from contact with sharp
objects or being stepped on.
9. Unplug the amplifier during thunderstorms or when it will be
unused for extended periods of time.
10. Exercise care to avoid spilling liquids on or in the amplifier.
11. Do not place the amplifier on an unstable table, stand, or
cart. Improper placement of the
amplifier may cause it to fall on an
adult or child causing serious injury,
as well as damage to the amplifier.
12. Do not expose the amplifier to drip-
ping or splashing. Do not place
objects filled with liquids, such as
vases, on the amplifier.
13. Cleaning: To clean the amplifier, wipe it with a soft cloth. Do
not use solvents, as they may damage the amplifier.
14. Non-Use Periods: Unplug the amplifier’s power cord from the
electrical outlet when the woofer will be unused for a long
period of time.
15. Damage Requiring Service: The amplifier should be
serviced by qualified service personnel when:
A. The power cord or plug has been damaged
B. Objects have fallen, or liquids have been spilled into the
amplifier
C. The amplifier has been exposed to rain.
D. The amplifier does not appear to be operating properly or
exhibits a marked change in performance.
E. The amplifier has been dropped or appears to have been
damaged.
16. Servicing: The user should not attempt to service the amplifier beyond that described in these instructions. All other
servicing should be referred to qualified service personnel.
17. Storms: To prevent damage to components, unplug all
electronic equipment during thunderstorms.
Box Contents
Your Sonance A800 Amplifier box should contain the
following items:
(1) Sonance A800 Amplifier
(1) IEC Power Cord (120V version only)
1
INSTRUCTION MANUAL
SONAMP
®
A800
SUBWOOFER AMPLIFIER
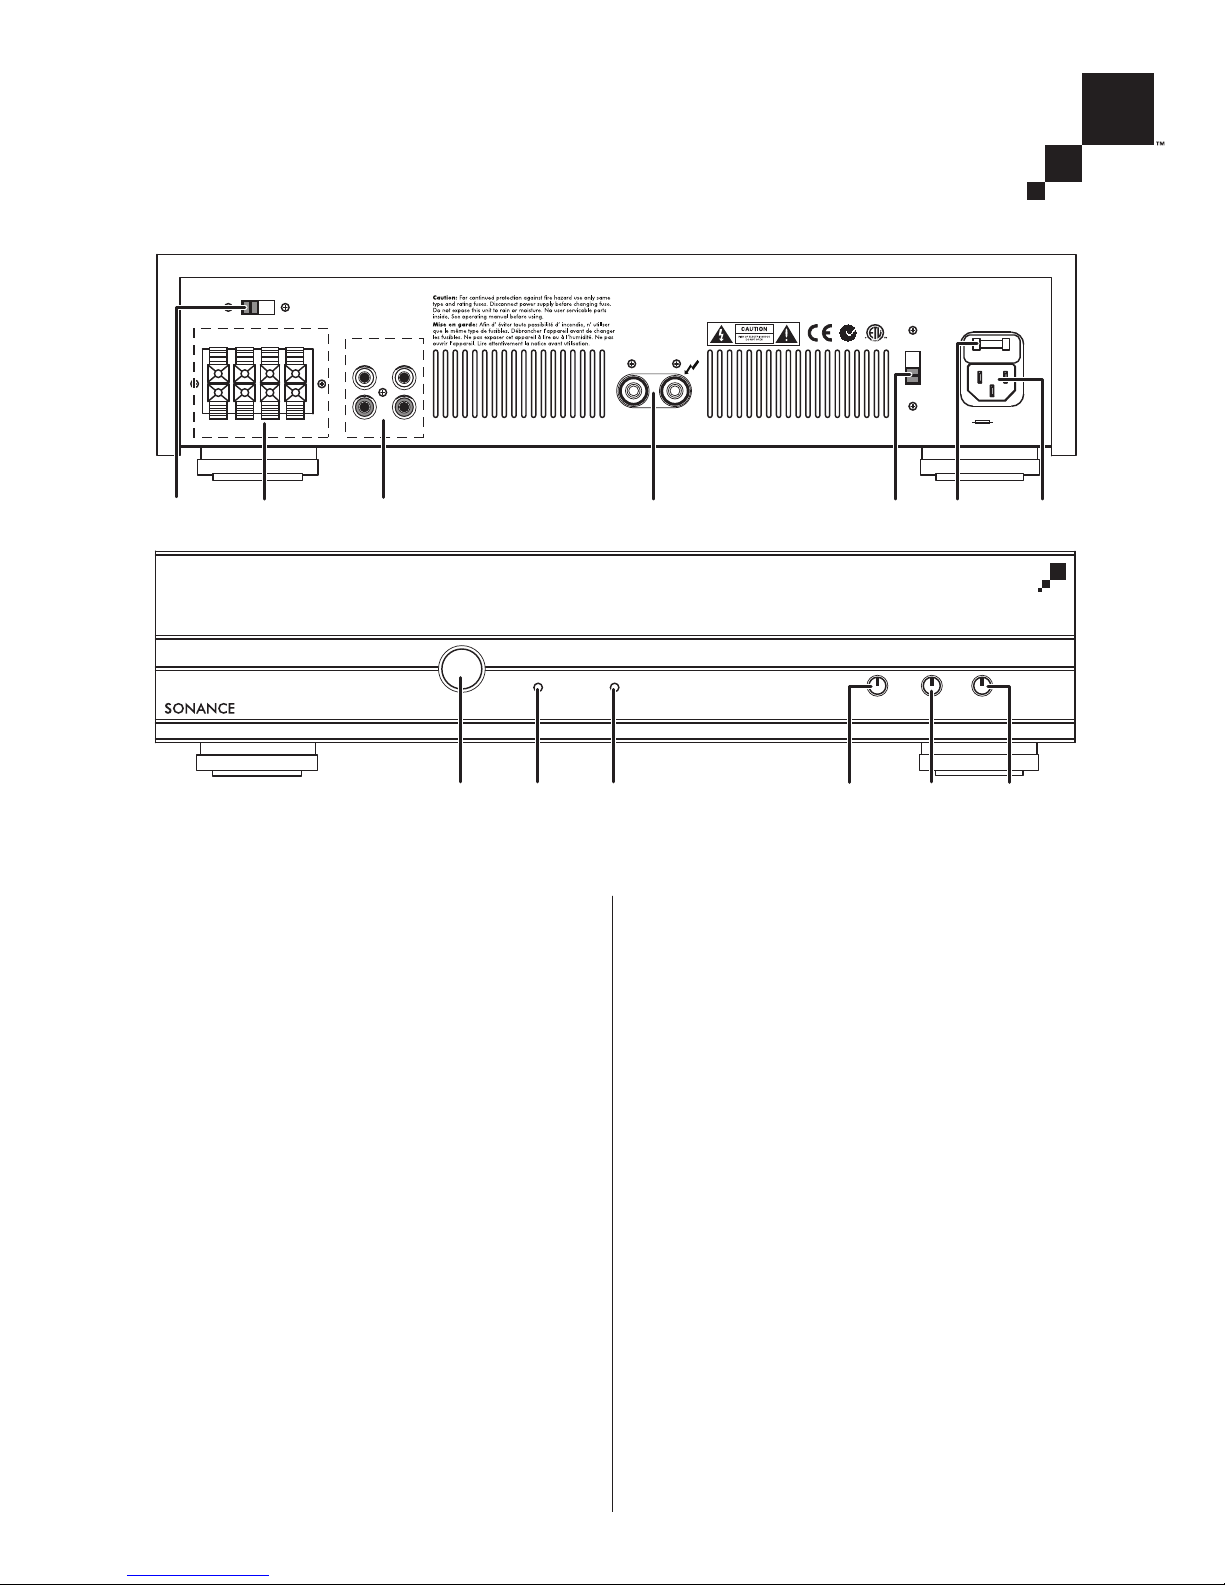
Rear Panel Features
Power Cord Connection
The A800 features a removable IEC power connector. (A power
cord is included only with the 120V version of the amplifier.)
Plug the female end of the power cord into the Power Cord
Connector on the amplifier rear panel and plug the male end into
a grounded wall socket. Do NOT plug the amplifier’s power cord
into a convenience outlet on any other audio or video
component.
IMPORTANT: DO NOT PLUG THE POWER CORD INTO THE
WALL OUTLET UNTIL ALL SYSTEM CONNECTIONS HAVE BEEN
MADE AND VERIFIED.
N
OTE: IF YOU NEED TO USE AN EXTENSION CORD, USE ONLY A
HEAVY
-DUTY (14-GAUGE OR LARGER) EXTENSION CORD TO AVOID
STARVING THE AMPLIFIER OF ALL THE CURRENT NECESSARY FOR
FULL
-POWER OPERATION.
A.C. Fuse Holder
120V versions of the A800 amplifier is shipped with a 4 amp AC
fuse installed. 230V versions have a 2 amp AC fuse installed.
To replace the fuse, unplug the power cord from the Power Cord
Connector and use a screwdriver to remove the fuse holder.
CAUTION: FOR CONTINUED PROTECTION
AGAINST FIRE, REPLACE THE FUSE WITH ONLY
THE SAME TYPE AND RATING.
Voltage Selector
The A800 can operate from either 120V/60Hz or 230V/50Hz
current. The Voltage Selector is factory-set to the proper voltage
for the region the A800 is shipped to.
Changing the Voltage
If you want to use the A800 in a different region than it was
originally shipped, you can change its operating voltage.
IMPORTANT: Remove the power cord from the amplifier
and the wall outlet before changing the voltage
1. Remove the power cord from the wall outlet and from the
amplifier’s Power Cord Connection.
2. Insert a flat-blade screwdriver or similar tool into the empty
power cord socket and gently pry the fuse holder out of its
socket.
3. Install the proper fuse for the region where the amplifier will be
operated:
120V current = 4A, 250V (T4AL/250V) fuse
230V current = 2A, 250V (T2AL/250V) fuse
4. Replace the fuse holder back into its socket above the power cord
connection.
5. Use a flat-blade screwdriver or similar tool to change the
Voltage Switch to the proper setting for the region where the
amplifier is being used.
2
SN:
HI LEVEL
AUTO ON
OFF ON
L
LINEINLINE
OUT
R
+
–
+
–
RL LR
IN OUT
SUBWOOFER OUT
3.2
Ω
MIN
CLASS 2 WIRING
MODEL NO: A800 AMPLIFIER : SONANCE.COM
SONANCE, SAN CLEMENTE, CA 92672-7531
115
120V/230V~60/50Hz 130W
~FUSE
USE ONLY WITH 250V FUSE
SONANCE
A800 AMPLIFIER
CONFORMS TO UL STD.6500
CERTIFIED TO CAN/CSA STD.E60065
CAUTION: TO REDUCE THE RISK OF
ELECTRIC SHOCK USE ONLY INDOORS
AVIS: RISQUE DE CHOC ELECTRIQUE-NE PAS OUVRIR
N136 2003553
120V T4AL/250V
230V T2AL/250V
POWER ACTIVE A.C. ON
50
0° 180°
250
FREQUENCYPHASE
MIN MAX
LEVEL
A800
Hi Level
Inputs and Outputs
P
OWER
Button
A
CTIVE
LED
A.C. ON
LED
Level
Control
P
HASE
Control
F
REQUENCY
Control
A
uto On
Switch
Line Inputs
and Outputs
Subwoofer
Output
A.C. Fuse
Holder
Power Cord
Connection
Voltage
Selector
A800 SUBWOOFER AMPLIFIER F RONT AND REAR PANELS
SONAMP®A800 SUBWOOFER AMPLIFIER

3
6. Replace the power cord with one that is correct for the region
where the amplifier is being used.
Line Inputs and Outputs
The A800 amplifier has L
INE INPUTS and LINE OUTPUTS. Use these
connections if your receiver or preamp has a line-level subwoofer output. If the subwoofer output is mono you can connect
it to either the A800’s Left or Right L
INE INPUT.
If your system has a separate preamp and power amplifier you
can use the A800’s L
INE INPUT and LINE OUTPUT jacks to connect
the amplifier between the preamp and power amp.
IMPORTANT: IF YOU ARE USING THE A800’S HI L EVEL
INPUTS (SEE PAGE 3), DO NOT MAKE ANY CONNECTIONS
TO THE LINE L EVEL INPUTS.
HI LEVEL Inputs and Outputs
CAUTION: DO NOT CONNECT THE A800’S HI LEVEL
INPUTS TO AN AMPLIFIER WITH A FLOATING GROUND OR A
BRIDGED OUTPUT. BEFORE USING THE HI LEVEL INPUTS,
CHECK THE OTHER AMPLIFIER’S DOCUMENTATION.
If your system’s electronics do not have preamp outputs or
subwoofer outputs you can connect its left and right speaker
outputs to the A800’s H
I LEVEL Inputs. Then connect the A800’s
H
I LEVEL Outputs to your left and right speakers. Always make
sure to connect the A800’s “+” terminals to the electronics’ and
speakers’ “+” terminals, and its “–” terminals to the electronics’
and speakers’ “–” terminals.
I
MPORTANT
: IF YOU ARE USING THE A800’S LINE LEVEL
I
NPUTS ( SEE ABOVE
), DO NOT MAKE ANY CONNECTIONS
TO THE
HI
LEVEL I NPUTS.
AUTO ON Switch
When this switch is in the
ON
position the A800 will
automatically turn ON
when it senses a signal on either of its
inputs. The amplifier will remain on for approximately 5
minutes after the signal has ceased. If you want to manually turn
the amplifier ON
and OFF, set the AUTO ON switch to the
OFF
position. This allows the amplifier to be switched ON and OFF by
the front-panel P
OWER button.
Subwoofer Output
The A800 amplifier features a binding post speaker connector
that can accept bare wire and wire terminated in pins or
single banana connectors. The amplifier can drive a single
Virtuoso in-wall or in-ceiling woofer, or two Virtuoso woofers
connected in parallel.
N
OTE: IF USING SINGLE BANANA CONNECTORS, BE SURE THE
SUBWOOFER OUTPUT TERMINALS ARE CLOSED ( ROTATED FULLY
CLOCKWISE
) BEFORE INSERTING THE CONNECTOR.
If you use bare wire, make sure you strip only enough wire (½")
to fit into the hole in the terminal. Before inserting the wire, twist
all strands tightly to prevent strays that could cause a short
circuit between the “+” and “–” terminals. To make a secure
connection, insert the wire in the direction of terminal rotation
(clockwise) to force the wire around the terminal post.
Front Panel Features
POWER Button
When the rear-panel AUTO ON switch is in the
OFF
position, the
P
OWER button turns the A800 ON and OFF. If the A
UTO ON switch
is in the
ON
position the POWER button will have no effect.
ACTIVE LED
The ACTIVE LED illuminates whenever the A800 is operating.
A.C. ON
LED
The POWER LED indicates that the A800 is connected to an active
power outlet.
LEVEL
Control
The LEVEL control sets the subwoofer’s volume. When setting the
A800’s L
EVEL control by ear, try to find a volume setting where the
bass sounds balanced on both music and films. Listen to several
different music recordings and film soundtracks that contain
strong bass passages and try to find a setting for the L
EVEL con-
trol that doesn’t over-emphasize the bass or make it sound weak.
The most accurate way to set the L
EVEL control is with
calibrated test noise or test tones and a sound-pressure level
(SPL) meter or real-time analyzer. There are several CDs and
DVDs that contain subwoofer test signals. If you use an SPL
meter, set the A800’s L
EVEL control so that the subwoofer plays at
the same volume as the system’s other speakers.
P
HASE Control
The PHASE control can be adjusted from 0° to 180°. At the 0°
setting, a positive input voltage will cause the subwoofer’s
speaker cone to move
out
(towards the room). When the PHASE
control is at the 180° setting a positive input voltage will cause
the subwoofer cone to move
in
(away from the room). This allows
you to better match the timing of the woofer with the timing of
your left and right speakers so that their signals all reach your
ears properly aligned (in phase) with each other.
There is no absolute correct setting for the P
HASE control. When
the woofer is properly in phase with the left and right speakers
the sound will be clearer and have maximum impact in the
midbass range. This will make percussive sounds like drums,
piano and plucked strings sound more life-like.
The best way to adjust the P
HASE Control is to listen to music that
you are familiar with and adjust the control so that drums and
other percussive sounds have maximum impact.
FREQUENCY Control
The FREQUENCY control adjusts the amplifier’s internal crossover
between 50Hz and 250Hz. The crossover’s slope is 12dB/octave.
The higher you set the F
REQUENCY control the higher in frequency
the connected subwoofer will operate.
SONAMP®A800 SUBWOOFER AMPLIFIER
 Loading...