

Page 1
SONAMP 2120T HIGH CURRENT AMPLIFIER
Congratulations on your purchase of this precision audio
component and thank you for your selection of Sonance
®
.Your
Sonamp has been designed with the latest technology to
become the heart of the finest home theater and music
systems. Its high power output is matched by enormous
current capacity to drive multiple pairs of high quality
speakers. A robust toroid transformer provides reserve power.
An ultra-fast discrete AB output stage assures flawless
reproduction. You have made an excellent choice.
The Sonamp 2120T is UL Listed.
Please take a few moments now to read these instructions
thoroughly so you may fully understand the sophisticated
capabilities of your new power amplifier.
IMPORTANT SAFETY INSTRUCTIONS
1. Read instructions - All the safety and operating
instructions should be read before the appliance is operated.
2. Retain instructions - The safety and operating instructions
should be retained for future reference.
3. Heed Warnings - Adhere to all warnings and precautions
listed on the appliance and in the operating instructions.
4. Follow instructions - Follow all operating instructions .
5. Water and Moisture - The appliance should never be used
next to water - for example,near a bathtub,kitchen sink,
laundry tub, in a wet basement, or near a swimming
pool, etc.
6. Carts and Stands - The appliance should be used only with
a cart or stand that is recommended by the manufacturer.
7. An appliance and cart combination should be moved with
care.Quick stops, excessive force, and uneven surfaces may
cause the appliance and cart combination to overturn.
8. Caution: To prevent electric shock, do not use the Sonamp
(polarized) plug with an extension cord,receptacle or
other outlets unless the blades can be fully inserted to
prevent blade exposure.
9. Ventilation - the appliance should be situated so that its
location does not interfere with its proper ventilation.For
example,the appliance should not be situated on a bed,
sofa, rug, or similar surface that may impede the flow of
air through the ventilation openings.
10. Heat - The appliance should be situated away from heat
sources such as radiators,heat registers,stoves,or other
appliances (including amplifiers) that produce heat.
11. Power sources - The appliance should be connected to a
power supply only of the type described in the operating
instructions or as marked on the appliance.
12. Grounding or Polarization - Grounding or polarization are
the precautions that should be taken so that these
attributes of an appliance are not defeated.
13. Power-Cord Protection - Power supply cords should be
routed so that they are not likely to be walked on or
pinched by items placed upon or against them, paying
particular attention to cords at plugs, convenience
receptacles,and the point where they exit from the
appliance.
14. Cleaning - The appliance should be cleaned only as
recommended by the manufacturer.
15. Non-Use Periods- The power cord of the appliance should
be unplugged from the outlet when left unused for a long
period of time.
16. Object and Liquid Entry - Care should be taken so that
objects do not fall and liquids are not spilled through the
opening of the enclosure.
17. Damage Requiring Service - The appliance should be
serviced by a qualified service personnel when:
A. The power-supply cord or the plug has been damaged
B. Objects have fallen,or liquid has been spilled into
the appliance
C. The appliance has been exposed to rain
D. The appliance does not appear to operate normally or
exhibits a marked change in performance
E. The appliance has been dropped,or the
enclosure damaged
18. Servicing - The user should not attempt to service the
appliance beyond that described in the operating
instructions.All other servicing should be referred to
qualified service personnel.
INSTALLATION INSTRUCTIONS
SONAMP®2120T OWNER'S MANUAL
HIGH CURRENT POWER AMPLIFIER
PN.33-0434 1.99
1
CAUTION
RISK OF ELECTRIC SHOCK
DO NOT OPEN
CAUTION: TO REDUCE THE RISK OF ELECTRIC SHOCK,
DO NOT REMOVE COVER (OR BACK)
NO USER SERVICEABLE PARTS INSIDE
REFER SERVICING TO AUTHORIZED
SERVICE PERSONNEL.
The lighting flash with arrowhead symbol, within an
equilateral triangle, is intended to alert the user to the
presence of uninsulated dangerous voltage within the
product's enclosure that may be of sufficient magnitude
to constitute a risk of electric shock to persons.
The exclamation point within an equilateral triangle is
intended to alert the user to the presence of important
operating and maintenance (servicing) instructions in the
literature accompanying the appliance.
WARNING: TO PREVENT FIRE OR SHOCK HAZARD,
DO NOT EXPOSE THIS APPLIANCE TO
RAIN OR MOISTURE.
WARNING
MOVE WITH CARE
Page 2
UNPACKING:
Save your carton and the styrofoam inserts for future safe
transport, in case you move or the unit ever requires shipping
for repair. It is best if you place it into an additional outer
“over-carton” before shipment to minimize a chance of theft
in shipment.
Before you proceed, find the serial number which is located on
the rear panel of the unit and note it here for future reference or
in case of theft in shipment.
PLACEMENT:
Keep your Sonamp out of direct sunlight and away from
windows where rain may enter. It should be placed away from
heat sources such as hot air ducts or radiators; do not place the
unit directly on a pile carpet that could interfere with air flow
into its bottom vent opening. If you stack your components, it
is better to place the Sonamp above or alongside your other
components; when driven hard, the unit itself may create a
little heat and disturb components stacked on top of it. If it is
inside a cabinet, allow ample ventilation. Very sensitive low
level sources might pick up some hum radiating from its
enormous power supply.
MAKING CONNECTIONS:
Before making any signal or speaker connection, make sure
your power amplifier is turned off and unplugged. When
making connections,make sure there is no strain or tension on
input leads or speaker wires that could cause them to pull loose
in the future.
Input Connections:
Use the RCA jacks for the R and L channels.Make sure these are
consistent with R and L outputs from your preamplifier.
Looping Jacks
Your Sonamp provides a pair of RCA output jacks which
duplicate the input signal. These facilitate connection of
additional power amplifiers from a single source component.
With only a single input connector pair you can link or “loop”
amplifiers without messy Y-cord adapters.
Speaker Connections
You may use either bare wire or banana plugs with the Sonamp
“5-way” terminals. If you use bare wire without spade lugs or
plugs, make sure you strip only enough wire (1/2") to fit into
the slot in the terminal. Before inserting the wire, twist all its
strands tightly to prevent strays that could cause a short circuit
between + and - terminals! Insert wire in the direction of
terminal rotation (clockwise) to force wire around terminal
post for secure connection.
Sonance • 961 Calle Negocio • San Clemente, CA 92673-6202, USA • (800) 582-7777 or (949) 492-7777 • FAX: (949) 361-5151 • Technical Support: (800) 582-0772
AUTO ON
OFF ON
LINE
LINE
OUTIN
L
R
WARNING:
HAZARDOUS ENERGY, MAKE PROPER SPEAKER
CONNECTIONS; SEE OWNERS MANUAL BEFORE USING
DISCONNECT SUPPLY CORD BEFORE CHANGING FUSE
ATTENTION:
DEBRANCHER AVANT DE REMPLACER LE FUSIBLE
ATTENTION:
VOIR LE CAHIER D' INSTRUCTION
ATTENTION:
UTILISER UN FUSIBLE DE RECHANGE DE MEME TYPE
CAUTION:FOR CONTINUED PROTECTION AGAINST FIRE
HAZARD USE ONLY SAME TYPE AND RATING FUSE.
47K
CAUTION
RISK OF ELECTRIC SHOCK
DO NOT OPEN
AVIS:
RISQUE DE CHOC ELECTRIQUE-NE PAS OUVRIR
SONANCE
S/N
A DIVISION OF DANA INNOVATIONS
SAN CLEMENTE, CA 92672
+
+
--
L
R
SONAMP 2120T
AC FUSE
3AG 8A
120VAC/60Hz
750 VA
USE 8
Ω SPEAKERS
SPEAKER
4
12
3
5
6
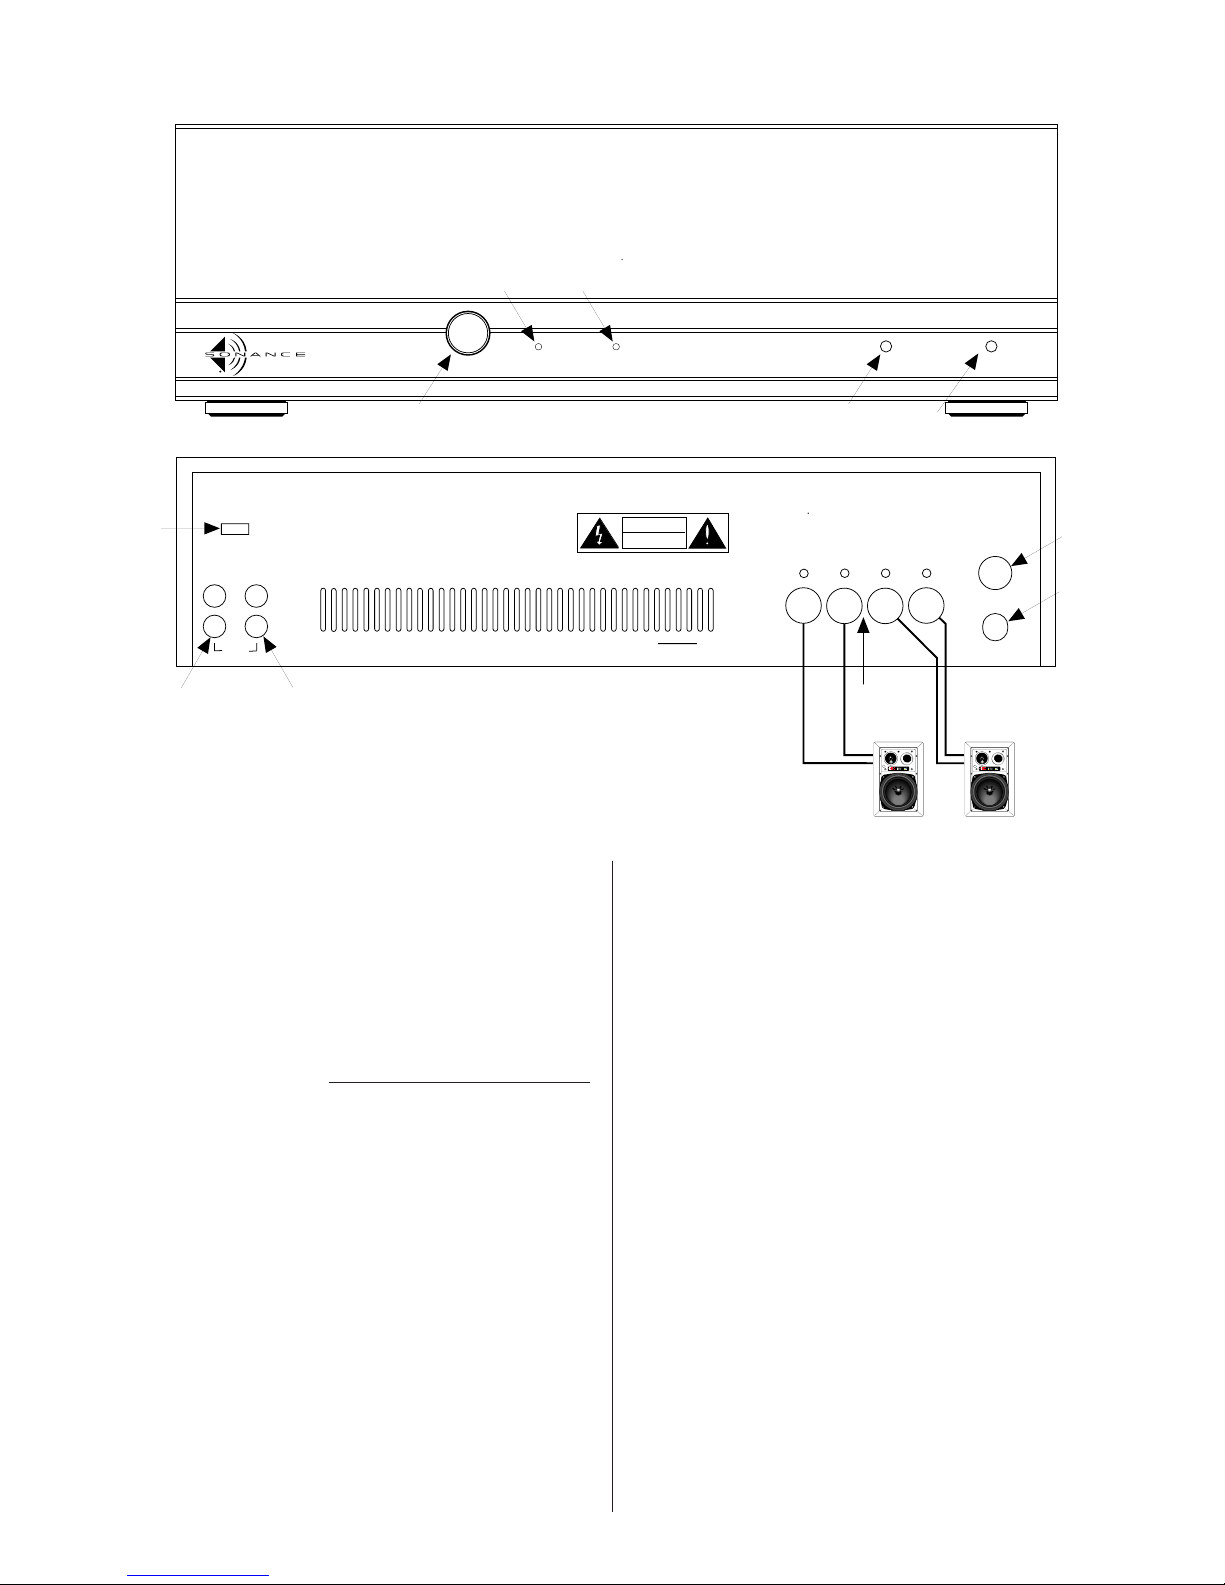
A. FRONT PANEL
1. POWER SWITCH
2. ACTIVE L.E.D.
3. POWER L.E.D.
4. INPUT LEVEL CONTROLS
B. REAR PANEL
1. RCA INPUT JACKS
2. RCA OUTPUT JACKS
3. SPEAKER TERMINALS
4. AUTO ON DEFEAT SWITCH
5. AC POWER CORD
6. FUSE
B
A
POWER LRA.C. ONACTIVE
4
4
1
2 3
IR
PN.33-0807
T4000
FLAT
BASS
MID
TREBLE
BASS
MID
TREBLE
HI IMP8ΩLIVE
ROOM
DEAD
ROOM
IR
PN.33-0807
T4000
FLAT
BASS
MID
TREBLE
BASS
MID
TREBLE
HI IMP8ΩLIVE
ROOM
DEAD
ROOM
SONAMP 2120T
Page 3

Polarity
It is important to observe correct polarity when using in stereo
mode. One side of the speaker lead will have some sort of mark,
either printing, a raised ridge on the insulation or different
color of conductor. This permits you to know which wire you
had connected to the + and which to the - speaker terminals so
you can repeat these connections at the power
amplifier terminals.
Multiple Speaker Hookup
The Sonamp®2120T is stable into low impedances. If you are in
doubt about your specific impedance load,consult your dealer or
Sonance Technical Service.
To connect more than one pair of speakers to the Sonamp 2120T,
you will need to connect the speaker wires from each speaker in
parallel. The safest and most efficient way to do this is to use
dual-banana plug connectors which are plugged into each other,
end-to-end. If you are connecting bare wires from each pair of
speakers together, we recommend you make this junction at a
point that is not immediately at the speaker terminals. This is
because each joined bundle of wires will be too thick to fit into its
speaker terminals and you run a risk of a short circuit between +
and - terminals. You may use a Sonance SS6 or SS4
speaker selector.
Use good wire
For best results, and minimum power loss, you should never
use thin gauge speaker wire - it will constrict the sound and
deteriorate bass response. We recommend use of premium
Sonance speaker cable. You may also wish to experiment with
audiophile-grade speaker wire and interconnects, but be sure
to check local codes governing wire that may be installed in
walls or ceilings. Each brand of wire will have a different
characteristic sound and some may be more compatible with
the sonic "signature" of your various components. Your
Sonamp is stable with any reputable brand of wire.
AC Line cord
You can plug this into a wall socket or an AC outlet on your
preamplifier.Make sure your preamp outlet rating is equal to or
greater than the Sonamp's power consumption rating.If you do
not plan to use the automatic turn on/off feature, you will
probably want to use a switched AC outlet that is turned on and
off by your preamp's power button. If you choose to use the
Auto Turn on/off feature, you must leave the Sonamp plugged
into an unswitched AC outlet that is always “live” even when the
preamp is turned off.
If you are installing the Sonamp in a remote zone,you may plug
it into the closest AC wall socket that is always “live”.
Caution: To prevent electric shock, match wide blade of plug to
wide slot,fully insert.
Attention: Pour evitar les chocs electriques, introduire la lame
la plus large de la fiche dans la borne correspondante de la prise
et pousser jusqu'au fond.
Use only a heavy-duty extension cord, if required, to avoid
starving the amplifier of all current necessary for full
power operation.
OPERATING THE SONAMP 2120T
The Sonamp 2120T has an ingenious and very sophisticated
Auto On turn on/off circuit. Please read these instructions
carefully to facilitate correct operating procedures.
Power Switch
Press the power switch once to the “in” position to turn on.
Press again to the "out" position to turn it off. Leave the button
in its inner position when using the Auto On turn on/off
feature. The amplifier will switch its power on automatically
when there is a musical signal present at its input jacks.
Auto-On
Any audio signal arriving at the Sonamp's left input jack will
trigger automatic turn on circuitry to activate the unit for
operation. A green LED on the front panel marked “Ac tive”
indicates that the amplifier is operational.
The amplifier will remain on after the audio signal has ceased
for approximately 3 minutes. This provides ample time to
prevent erratic operation from pauses between musical
passages or while changing sources. With this feature there is
no limit to where you can place the Sonamp. Here are a few
installation possibilities:
• Local room system coupled with a multi-CD changer
• Surround sound front,side, or rear channels
• Multi-room,multi-source control systems
Auto-On Defeat (located on rear panel)
If the Auto-On turn on/off feature is not required, it can be
defeated by moving the rear panel switch to its “off ” position.
Use a small flat-bladed screwdriver to move the recessed
switch. Do not apply excessive force. Now the Sonamp power
switch will function conventionally and the Sonamp will turn
on and off from a switched AC outlet on your preamp or other
source component.
Level Controls
Front panel level controls are recessed for adjustment by
screwdriver only. This prevents accidental tampering with
levels.Use level controls to adjust the left-right channel balance
to match the listening area to speaker placement in the zone
powered by the Sonamp. You may also adjust levels to limit
maximum safe gain to protect the speaker or to optimize the
signal to noise ratios between the source components and
amplifier. Many volume controls, on source components, are
overly sensitive near their minimum positions;by reducing the
Sonamp input level control settings, you “compel” the source
component volume control to operate up higher, in its more
uniform adjustment range.
The Sonamp level controls can also determine the maximum
level in a speaker volume control system (such as the VC60's
and 30's) to prevent transformer saturation, distortion
or burn-out.
If using the Sonamp 2120T with THX
®
calibrated 5.1
processors, set the level controls to maximum clockwise
rotation in order to to take full advantage of correct SPL setting
of the processor.
Sonance • 961 Calle Negocio • San Clemente, CA 92673-6202, USA • (800) 582-7777 or (949) 492-7777 • FAX: (949) 361-5151 • Technical Support:(800) 582-0772
Page 4

Power LED (red)
This LED indicates that the AC power line cord is plugged into
a live AC outlet. If the main AC line fuse ever opens, this LED
will go out. To use the Auto-On feature, this LED must remain
on at all times (i.e., with an unswitched outlet). The power
switch has no effect on this LED.
Active LED (green)
The primary function of the LED is to show amplifier
operational activity.In the Auto-On mode, this LED turns on at
the presence of an audio signal to the input jacks.The first time
AC power is applied to the Sonamp
®
, the Active LED will light
for about 3 minutes and then extinguish. This is a normal
reaction of the Auto-On circuitry the very first time it receives
power. Thereafter, the Sonamp is ready for automatic
operation. In normal Auto-On operation the amplifier will
respond “on” within 1.5 seconds it will turn “off ” about 3
minutes after the signal ceases.
Whenever AC power to the Sonamp 2120T has been
interrupted, the Active LED will light up for about 3 minutes
when power is first restored. The active LED functions as a normal on/off power indicator when the Auto-On feature is defeated.
Protection Circuits
The Sonamp has numerous protection circuits. If any are
triggered, the green Active LED will flash and you may hear the
sound of the protection relay clicking to protect the amplifier.
After the fault has been corrected, the unit will automatically
reset itself for normal operation.But it is advised that you turn
off the power switch while you are trouble-shooting for
shorted connections of faults with source components.
MAINTAINING YOUR SONAMP 2120T
The Sonamp 2120T requires no periodic maintenance and has
no user serviceable parts inside. Do not remove the top cover.
Doing so will increase your risk of electric shock. To keep clean
use only a soft cloth and never use any solvents or abrasives.
Fingerprints may be removed with a soft cloth moistened only
with a few drops of water.
SPECIFICATIONS
Both Channels Driven
Output Power,Stereo mode, RMS: 120 Watts per channel @ 8Ω
160 Watts per channel @ 4Ω
IHF: Dynamic Power 163 Watts per channel @ 8Ω
242 Watts per channel @ 4Ω
Dynamic Headroom: +1.33dB @ 8Ω
+1.79dB @ 4Ω
Total Harmonic Distortion: 0.05% 20Hz-20kHz @ 8Ω (120 WRMS)
0.10% 20Hz-20kHz @ 4Ω (160 WRMS)
THD @ 1kHz less than 0.01% with 8Ω (120
WRMS)
THD @ 1kHz less than 0.02% with 4Ω (160
WRMS)
I.M. Distortion (SMPTE 4:1) @ 8Ω: 0.02% @ 1 Watt
0.02% @ 60 Watts
Signal to Noise Ratio: -100dB below rated output (A-weighted)
Input Sensitivity: 1.1 Volt for 120 watts RMS @ 8Ω
Theater Sensitivity: 1.0 Volt for 100 watts RMS @ 8Ω
Input Impedance: 47k Ω
Power Consumption 750 Watts, maximum 4Ω full power
10 Watts,idle no signal
Dimensions: 16-3/4" x 5-3/8" x 12-5/8"
(425.45mm x 136.53mm x 321mm)
TECHNICAL ASSISTANCE
If you any have questions about the operation or installation of your Sonamp 2120T,please call
our Technical Assistance Department on any business day at:
• (800) 582-0772 or (949) 492-7777; from 9 a.m. to 5 p.m., PST.
OBTAINING SERVICE
If your product should need repair or service, contact your authorized Sonance dealer for help or
use the following procedure:
1. Prior to calling,note the product’s model number,purchase date, and original dealer’s name
and address.
2. Contact our Technical Assistance Department at the above number(s) and describe the problem
the unit is experiencing. If applicable, they will issue a Return Authorization Number.
IMPORTANT: Do not return the unit to Sonance without first obtaining a Return Authorization Number.
3. If you’re directed to return the unit to Sonance for repair, pack the unit in its original shipping
carton. If needed,you can obtain replacement packaging from us for a small charge.
4. Contact United Parcel Service, Federal Express,or RPS to arrange prepaid (not collect)
shipping.Do not use the U.S.Mail Service.
IMPORTANT:Freight collect shipments will be refused.
5. Write the Return Authorization Number on the outside of the shipping carton.For warranty
work, please include a copy of the original bill of sale inside the package.
6. Ship the packaged unit to: Technical Assistance Department • Sonance • 961 Calle Negocio
San Clemente, CA 92673-6202
WARRANTY COVERAGE (USA ONLY)
If, within one (1) year from the date shown on the bill of sale, the unit fails,due to a defect
in workmanship or material, Sonance will, at its option and at no charge,repair or replace the
components of such unit which prove to be defective.
For this warranty to be effective,the bill of sale must show that the unit was purchased from an
“Authorized Sonance Dealer” and must list the price paid.This warranty shall apply exclusively to
the original purchaser and shall not apply to units purchased for industrial or commercial use.
Furthermore,this warranty shall not apply if:
1. Damage to the unit was caused by accident, abuse,or misuse;
2. The unit was opened, modified,or repaired by unauthorized personnel; or
3. The unit was not used as outlined in the operating instructions.
Exclusions and Limitations
The warranty set forth above is in lieu of all other warranties,express or implied, of merchantability,
fitness for a particular purpose, or otherwise. The warranty is limited to Sonance products registered
herein and specifically excludes any damage to loudspeakers and other allied or associated equipment
which may result for any reason from use with this product.
Sonance shall, in no event, be liable for incidental or consequential damages arising from any
breach of this warranty or otherwise. This warranty gives you specific legal rights,and you may
have other rights which vary from state to state.
Sonance • 961 Calle Negocio • San Clemente, CA 92673-6202, USA • (800) 582-7777 or (949) 492-7777 • FAX: (949) 361-5151 • Technical Support:(800) 582-0772
 Loading...