

For Mounting Option 2: Table Top or Mounting Option 3: Key Hole Wall Mount (not attached to display)
and slim display application, see detailed installation sheet at: www.sonance.com/soundbar
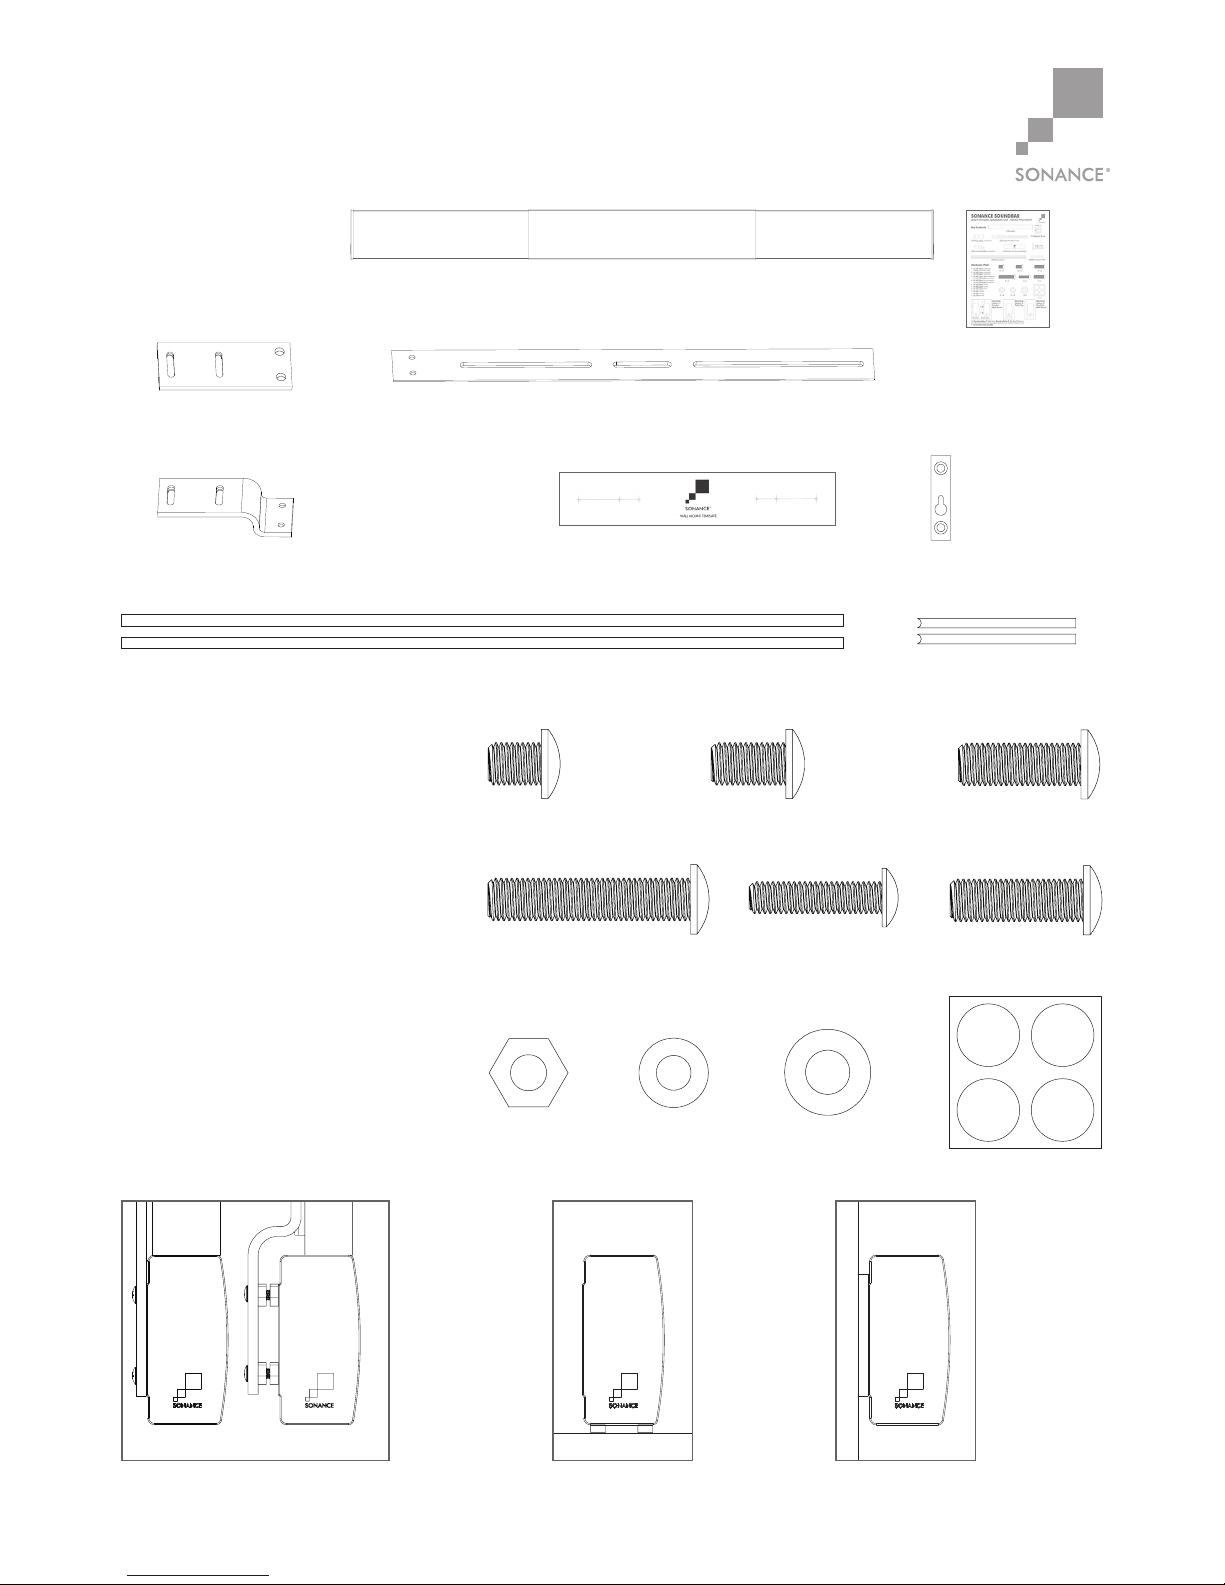
(1) Soundbar
(1) Quickstart Guide
(2) Display attachment rails(2) Flat Soundbar connectors
(2) Recessed Soundbar connectors (1) Key hole wall mount template
(2) Key hole
wall mounts
(2) Display spacers
(2) Black opaque strips
Box Contents
Mounting
Option 1:
Bracket
Wall Mount
Flat Connector Recessed Connector
Mounting
Option 2:
Table Top
Mounting
Option 3:
Key Hole
Wall Mount
Hardware Pack
A. (4) M8 10mm screws for
display attachment rails
B. (4) M8 14mm screws for
flat Soundbar connector
C. (4) M8 23mm short screws for
recessed Soundbar connector
D. (4) M8 38mm long screws for
recessed Soundbar connector
E. (4) M6 25mm screws
F. (4) M8 25mm screws
G. (8) M8 6.5mm nuts
H. (8) M6 washers
I. (8) M8 washers
J. (4) Rubber feet
A. x 4
D. x 4
G. x 8
B. x 4
E. x 4
H. x 8 I. x 8
J. x 4
C. x 4
F. x 4
SB46 M AND SB46 L QUICKSTART GUIDE - BRACKET WALL MOUNT
SONANCE SOUNDBAR
P. 1

Verify wall mount will
support combined weight
of display and Soundbar.
SB46 M (24 lbs. installed)
Suitable for displays 50”- 65”
(1270mm to 1651mm)
SB46 L (29 lbs. installed)
Suitable for displays 70”- 80”
(1778mm to 2032mm)
For Mounting Option 2: Table Top
or Mounting Option 3: Key Hole
Wall Mount (not attached to display)
and slim display application, see
detailed installation sheet at:
www.sonance.com/soundbar
Finished view.
11
SB46 M AND SB46 L QUICKSTART GUIDE - BRACKET WALL MOUNT
SONANCE SOUNDBAR
Install display wall bracket using
spacers & screws supplied with
display mount or (E)/(F) screws &
(H)/(I) washers. Hardware will vary.
It is recommended to keep spacers
provided with display.
Carefully mount display & Soundbar
to wall bracket. NOTE: When lifting,
be careful not to place too much
pressure on, or twist, the Soundbar.
This could bend the bracket.
Cover open area with black opaque
strip & cut to size. This will prevent
any light from passing through grille.
Complete wiring to Soundbar &
display. If possible, leave enough
wire out of the wall to allow for
connection prior to mounting to
wall bracket.
Soundbar installation is now
complete & ready for audio
system calibration.
Slide grille to edge of display &
tighten screw. No tool required.
Loosen screw to allow for
adjustment of Soundbar grille.
No tool required.
Position Soundbar as close
to display as possible. Firmly
fasten (B) screws & (I) washers
to connect Soundbar to the
Soundbar connectors.
Install display mount to wall per
manufacturer’s instructions.
Choose & attach the correct
Soundbar connector with (A)
screws. The flat Soundbar
connector will align with 2 5/8”
(65mm) deep displays.
The recessed Soundbar connector
will align with displays from
1 7/32” - 2 3/32” (31.74mm 53mm) deep. Use (C) or (D)
screws and (G) nuts.
Alignment options for Soundbar:
A) Top edge of Soundbar aligned
with front of display. B) Front radius
of Soundbar aligned with front
of display.
Option A: Use included 8mm display
spacers. This creates the offset needed
for bottom of display to align with top
of Soundbar. Carefully place display
on top of spacers. Be careful not to
scratch front of display. Skip step 4B.
Option B: Lay display & Soundbar
on same surface (without display
spacers). Be careful to not scratch
front of display.
2 5/8” Deep Display
Place attachment rails on display
& Soundbar making sure that
holes and rails are aligned.
For detailed installation sheet
scan the QR code above or visit
www.sonance.com/soundbar
2B
Option A Option B
Display mount arms not
provided by Sonance
B
I
Opaque Strip
1 7/32” - 2 3/32” Deep Display
P. 3
P. 2
A
A
E/F
H/I
6
10
13
1
12
2A
8
14
7
9
3 4A
4B
5
 Loading...