

Page 1
INSTRUCTION MANUAL
SONANCE® LANDSCAPE SERIES
CROWN® AMPLIFIER
Introduction
Thank you for purchasing Sonance Landscape Series Crown
amplification. The Landscape series Crown amplifier has been
preloaded with custom equalization to achieve maximum
performance from the Landscape series satellites and subwoofers.
When properly installed, this amplifier will provide you with years
of outdoor entertainment pleasure. To get the most out of your
new system, please read this manual thoroughly before you begin
installation.
Amplifier Power Planning
The maximum number of satellites and subwoofers that can be
used in a system will depend on the quantity of amplifier’s available
power.
Before beginning an installation use the chart below to calculate
the amplifier power your installation will require. Multiple amplifiers
may be required in large installations.
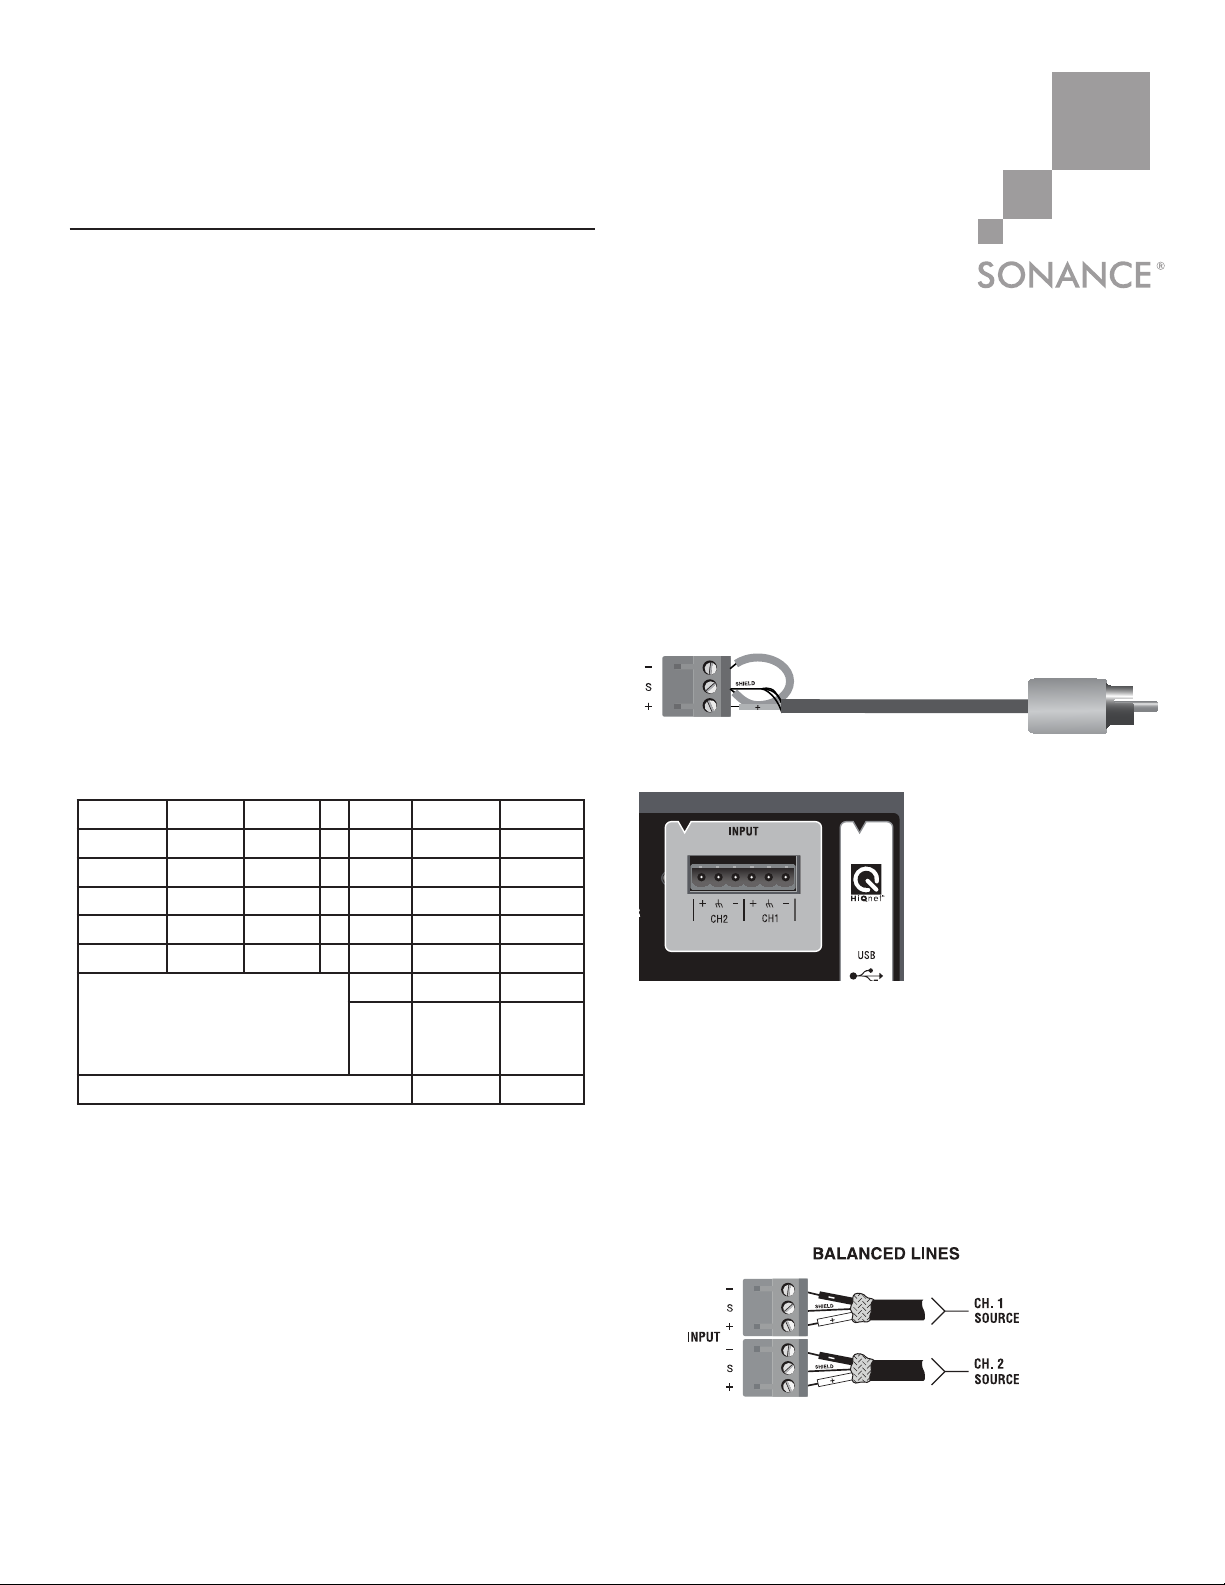
Wattage Calculator
Model qty. ch1 qty. ch2 x watts total ch1 total ch2
LS47SAT x 25
LS67SAT x 25
LS10SUB x 100
Input connections
Unbalanced (Most Common)
To connect your audio source to the Crown amplifier you will need
cables with RCA connectors on the source end and bare wire on
the Landscape amplifier end. The Crown amplifier channels are
labeled CH1 and CH2. Both channels are identical so you can
choose which to use for right and left depending on your personal
preference.
Attach the bare wires from your cable to the Phoenix style
connector provided in the amplifier box. Note the location of the
positive and ground wires on the Phoenix connector. You must run
a jumper wire from the ground terminal to the negative terminal;
see Figure 1.
Figure 1. RCA to PHOENIX connector
total
20%
head
room
TOTAL MINIMUM WATTAGE
Balanced
When using the Landscape series in a commercial installation
it might be necessary to connect the amplifier using balanced
wiring.
Connect the wires from your source equipment to the Phoenix
connector. Be sure to observe proper polarity when connecting
the wires to the Phoenix connector. If your source equipment
uses XLR connectors please confirm the polarity or pin out of your
source equipment before terminating the Phoenix connector. see
figure 2
Figure 2. Balanced Lines to the Phoenix connectors
NOTE: WHEN USING BALANCED INPUTS PLEASE CONSULT THE
CROWN® AMPLIFIER MANUAL FOR GREATER DETAIL.
1
Page 2
Output Connections
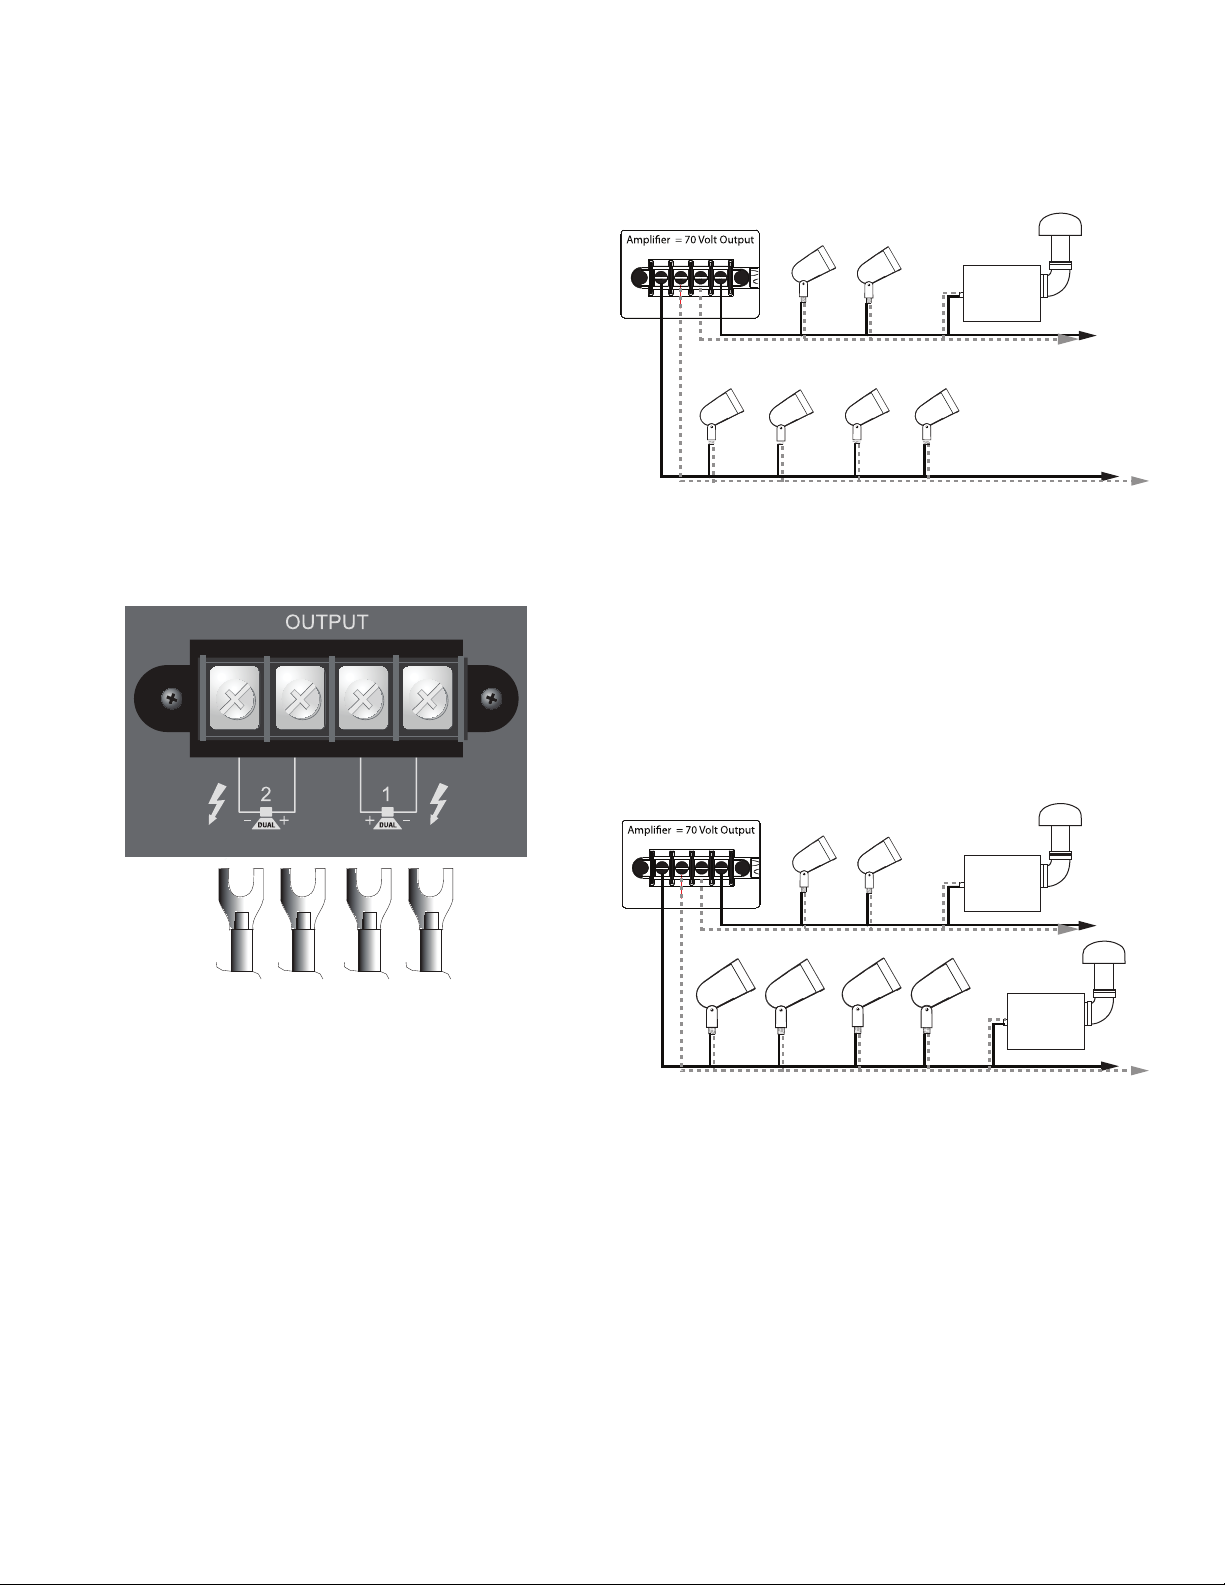
70 volt audio systems allow for speakers to be daisy chained together.
In a typical system with one zone of audio you simply run a wire
from the amplifier to the closest speaker then wire from there to next
speaker and so on.
Note: Sonance strongly recommends the use of 14 gauge or larger
direct burial grade wire.
Terminating the wire
Attach the supplied spade connectors to the ends of your speaker
cables. Once the connectors are installed then connect the spades
to the output connectors on the amplifier. Once your connections
are finished place the supplied plastic cover over the connectors to
prevent a short circuit or shock hazard.
Caution: The amplifier should not be connected to AC power until all
connections are completed. High power 70 volt amplifiers present a
serious shock hazard. Do not connect speaker wires to the amplifier
until all other connections are completed.
Systems with only one size satellite
If your system will be comprised of only LS47SAT or LS67SAT satellites
you can connect the satellites and subwoofers to either channel of
the amplifier.
CH2
CH1
+
+
- -
LS47SAT LS47SAT
LS47SAT LS47SAT
LS47SAT LS47SAT
CH1
LS10SUB
Expandable
CH2
Expandable
Systems with LS47SAT and LS67SAT
satellites
If your system will be comprised of LS47SAT and LS67SAT satellites you
must connect the LS47SAT satellites to CH1 on the amplifier and the
LS67SAT satellites to CH2 of the amplifier. This connection scheme is
critical so that the proper EQ can be applied to each satellite model.
The subwoofers can be connected on either channel.
CH2
CH1
- -
+
+
LS67SAT LS67SAT
LS47SAT
LS47SAT
LS10SUB
CH1
LS67SAT LS67SAT
Expandable
LS10SUB
CH2
Expandable
2
Page 3
DSP Preset Selection
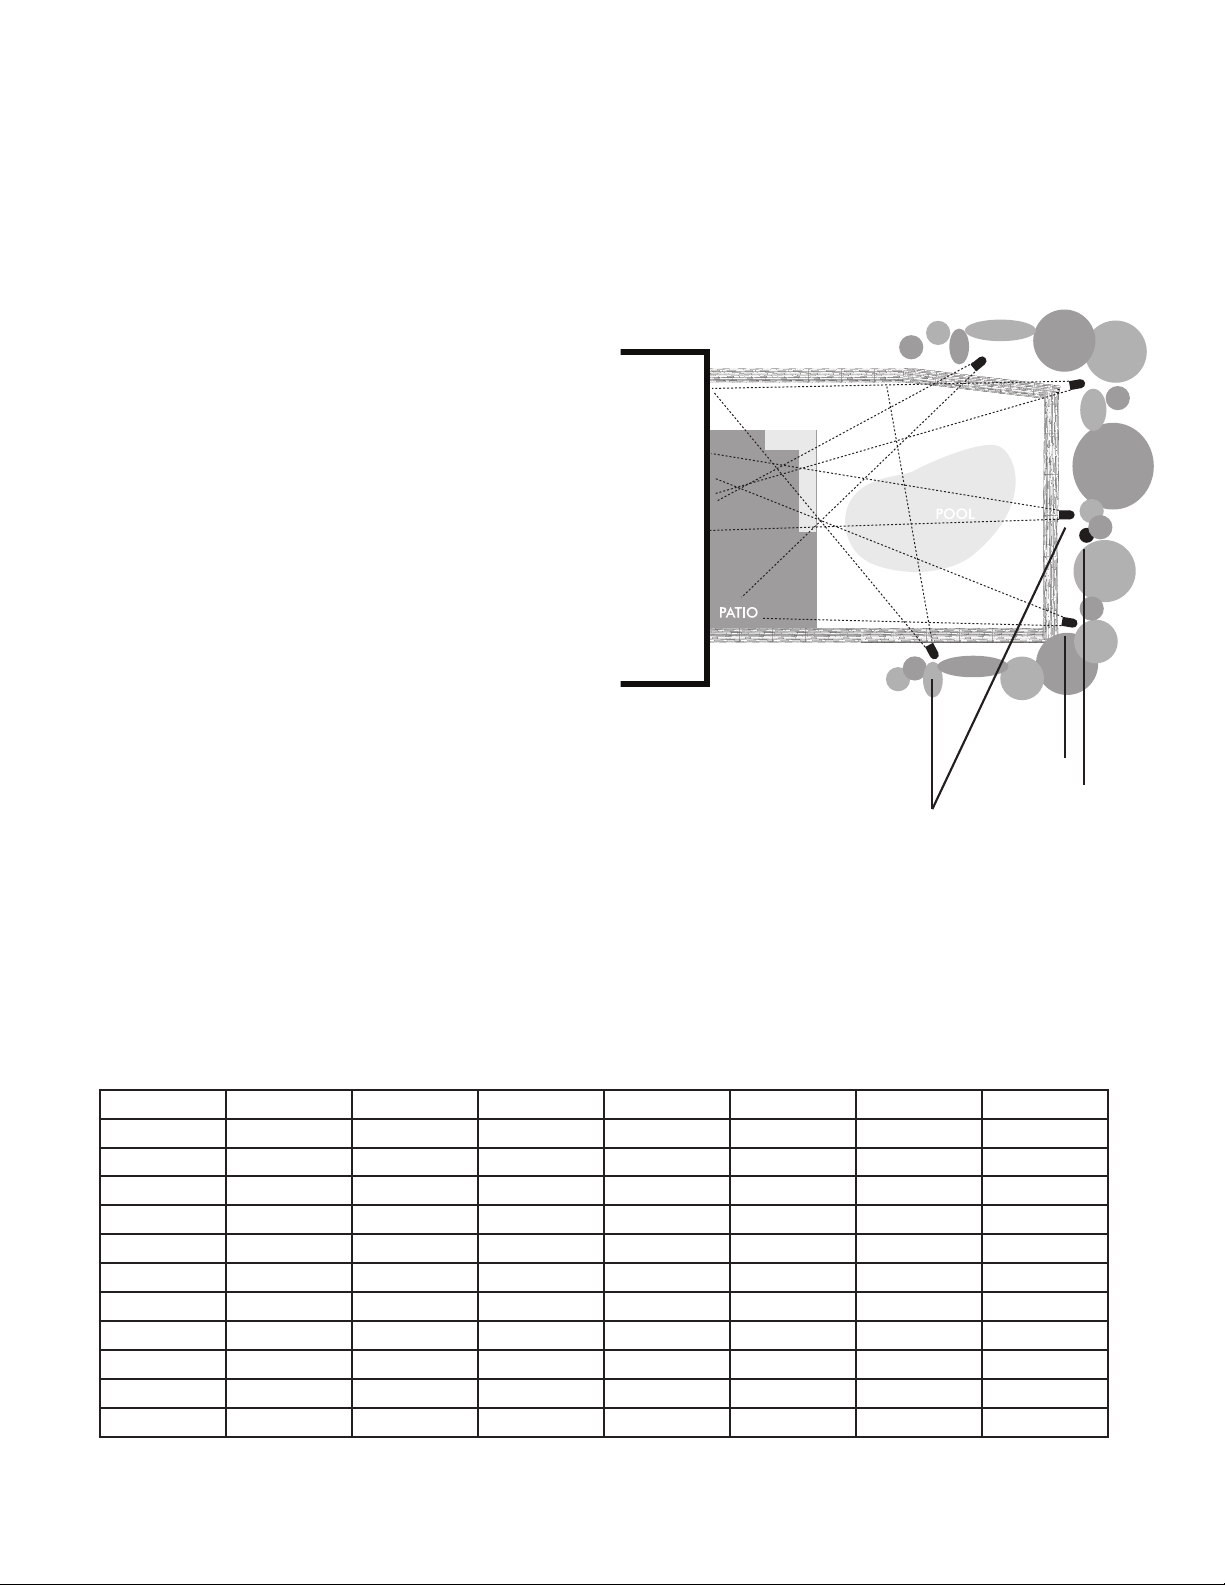
The Crown CDi series amplifier you purchase from Sonance is
preloaded with 12t EQ presets. These presets allow you to tailor the
sound to your customer’s preference.
Also included in the preloaded software is equalization for each
of the Landscape series products to provide the flattest frequency
response possible in an outdoor system. To achieve this flat response
measurements were taken of typical systems measured in outdoor
environments. A compensation curve is applied in the software to
correct for any response anomalies.
NOTE: When choosing the preset it is critical to select the preset based
on the satellite and subwoofer model you are using in your system.
How to Select
1. Press the Select / Enter button on the front of the amplifier.
2. Press the Next / Down button until the word PRESET appears
on the display.
3. Press the Select / Enter button
4. Press the Next / Down or Prev / Up buttons until the preset you
desire is displayed
5. Press the Select / Enter button
6. Your chosen preset should now be displayed
Volume Control
In most systems the volume control knobs should be turned fully
clockwise to achieve proper level.
Included in the amplifier carton are volume control security covers
that replace the existing level-control knobs so the amplifier output
level cannot be changed. The knobs snap into the front panel.
Typical Landscape Set-up
LS67SAT
SONANCE Landscape Series EQ Presets
Preset CH1 CH2 SUB
Model
SAT model SAT model EQ Range 0= Flat EQ Range 0=Flat
4= LS47SAT 4= LS47SAT 1=10” 20-80Hz 3= +3dB 6k-20kHz 3= +3dB
6= LS67SAT 6= LS67SAT 6= +6dB
A 4 4 1 B 0 T 0
B 4 4 1 B 3 T 0
C 4 4 1 B 3 T 3
D 4 4 1 B 6 T 0
E 6 6 1 B 0 T 0
F 6 6 1 B 3 T 0
G 6 6 1 B 3 T 3
H 6 6 1 B 6 T 0
I 4 6 1 B 0 T 0
J 4 6 1 B 3 T 0
K 4 6 1 B 3 T 3
L 4 6 1 B 6 T 0
Bass Bass
Level
Treble Treble
LS47SAT
LS10SUB
Level
3
Page 4

LIMITED THREE (3) YEAR WARRANTY
Sonance warrants to the first end-user purchaser that this Sonance-brand product (“Product”), when purchased from an authorized Sonance
Dealer/Distributor, will be free from defective workmanship and materials for the period stated below. Sonance will at its option and expense
during the warranty period, either repair the defect or replace the Product with a new or remanufactured Product or a reasonable equivalent.
EXCLUSIONS
TO THE EXTENT PERMITTED BY LAW, THE WARRANTY SET FORTH ABOVE IS IN LIEU OF, AND EXCLUSIVE OF, ALL OTHER WARRANTIES, EXPRESS OR IMPLIED, AND IS THE SOLE AND EXCLUSIVE WARRANTY PROVIDED BY SONANCE. ALL OTHER EXPRESS AND IMPLIED WARRANTIES, INCLUDING THE IMPLIED WARRANTIES OF MERCHANTABILITY, IMPLIED WARRANTY OF FITNESS FOR USE, AND IMPLIED WARRANTY
OF FITNESS FOR A PARTICULAR PURPOSE ARE SPECIFICALLY EXCLUDED.
No one is authorized to make or modify any warranties on behalf of Sonance. The warranty stated above is the sole and exclusive remedy
and Sonance’s performance shall constitute full and final satisfaction of all obligations, liabilities and claims with respect to the Product.
IN ANY EVENT, SONANCE SHALL NOT BE LIABLE FOR CONSEQUENTIAL, INCIDENTAL, ECONOMIC, PROPERTY, BODILY INJURY, OR PERSONAL INJURY DAMAGES ARISING FROM THE PRODUCT, ANY BREACH OF THIS WARRANTY OR OTHERWISE.
This warranty statement gives you specific legal rights, and you may have other rights which vary from state to state. Some states do not
allow the exclusion of implied warranties or limitations of remedies, so the above exclusions and limitations may not apply. If your state does
not allow disclaimer of implied warranties, the duration of such implied warranties is limited to period of Sonance’s express warranty.
Your Product Model and Description: Landscape Series Crown® Amplifier.
Warranty Period for this Product: Three (3) years from the date on the original sales receipt or invoice or other satisfactory proof of purchase.
Additional Limitations and Exclusions from Warranty Coverage: The warranty described above is non-transferable, applies only to the initial
installation of the Product, does not include installation of any repaired or replaced Product, does not include damage to allied or associated
equipment which may result for any reason from use with this Product, and does not include labor or parts caused by accident, disaster,
negligence, improper installation, misuse (e.g. overdriving the amplifier or speaker, excessive heat or cold or humidity, outdoor installation),
or from service or repair which has not been authorized by Sonance. Obtaining Authorized Service: To qualify for the warranty, you must
contact your authorized Sonance Dealer/Installer or call Sonance Customer Service at (800) 582-0772 within the warranty period, must
obtain a return merchandise number (RMA), and must deliver the Product to Sonance shipping prepaid during the warranty period, together
with the original sales receipt, or invoice or other satisfactory proof of purchase.
For Technical Support, please contact Sonance: (800) 582-0772
©2010 Sonance. All rights reserved. Sonance is a registered trademarks of Dana Innovations.
Due to continuous product improvement, all features and specifications are subject to change without notice.
For the latest Sonance product specification information visit our website: www.sonance.com
SONANCE • 212 Avenida Fabricante • San Clemente, CA 92672-7531 USA
(800) 582-7777 or (949) 492-7777 • FAX: (949) 361-5151 • Technical Support: (800) 582-0772
www.sonance.com
4
33-5514 112310
 Loading...