

Page 1
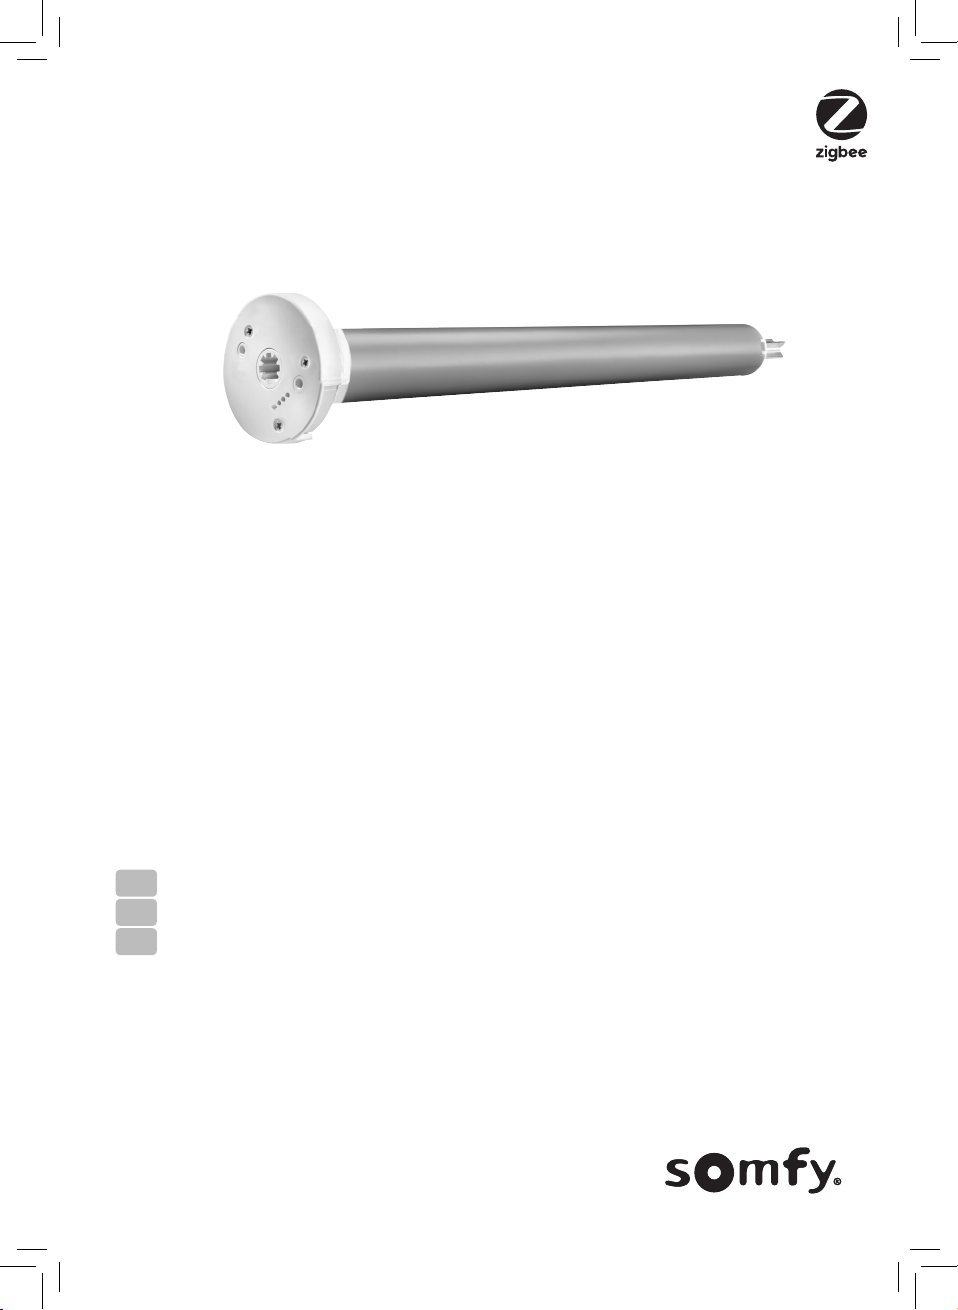
Sonesse 30 Zigbee
Li-ion
Instructions
EN
Manual
ES
Notice
FR
Page 2
EN
Sonesse 30 WF Zigbee Li-Ion
Copyright© 2017 - 2019 SOMFY ACTIVITES SA, Société Anonyme. All rights reserved.
These instructions apply to all Sonesse 30 WF Zigbee Li-ion drives, the different versions of which are
available in the current catalogue
ORIGINAL INSTRUCTIONS
CONTENTS
1. Prior information 2
1.1. Sphere of application 2
1.2. Liability 2
2. installation 3
2.1. Assembly 3
2.2. Wiring 3
2.3. Commissioning 4
2.4. Tips and advice on installation 5
3. Use and maintenance 8
3.1. Use from the appliction 8
3.2. Controlling up, down, my 8
3.3. Tips and advice on operation 10
3.4. Battery replacement 11
4. Technical data 12
GENERAL INFORMATION
Safety intructions
Danger
Indicates a danger which may result in immediate death or serious injury.
Warning
Indicates a danger which may result in death or serious injury.
Precaution
Indicates a danger which may result in minor or moderate injury.
Attention
Indicates a danger which may result in damage to or destruction of the product.
1. PRIOR INFORMATION
1.1. SPHERE OF APPLICATION
Sonesse 30 drives are designed to drive all types of interior blinds except pantographs.
The installer, a home motorisation or home automation professional, must ensure that once the
motorised product is installed, it respects the current standards in the country of installation, notably
standard EN 13120 relative to interior blinds.
1.2. LIABILITY
Before installing and using the drive, please read these instructions carefully. In addition to the instructions provided in this guide, please also comply with the instructions set out in the enclosed
Safety instructions document.
The drive must be installed by a home motorisation and automation professional, in accordance with
Somfy’s instructions and the applicable regulations in the country of installation.
Any operation of the drive outside the sphere of application described above is prohibited. Such operation shall exclude Somfy from all liability and invalidate the Somfy warranty, as will any failure to
comply with the instructions given herein and in the enclosed Safety instructions document.
Aer installing the drive, the installer must inform his customers of the operating and maintenance
conditions for the drive and must pass the operating and maintenance instructions on to them, as
well as the enclosed Safety instructions document. Any Aer-Sales Service operation on the drive
requires intervention by a home motorisation and automation professional.
Should any doubt arise during installation of the drive or for additional information, consult a Somfy
contact or visit www.somfy.com.
2
Page 3
Sonesse 30 WF Zigbee Li-Ion
EN
Copyright© 2017 - 2019 SOMFY ACTIVITES SA, Société Anonyme. All rights reserved.
2. INSTALLATION
Attention
• These instructions are mandatory for the home motorisation and automation professional
installing the drive.
• Never drop, knock or puncture the drive or immerse it in liquid.
• Install an individual control point for each drive.
Make sure that LED, programming button and input connection remain visible and easily accessible
after installation.
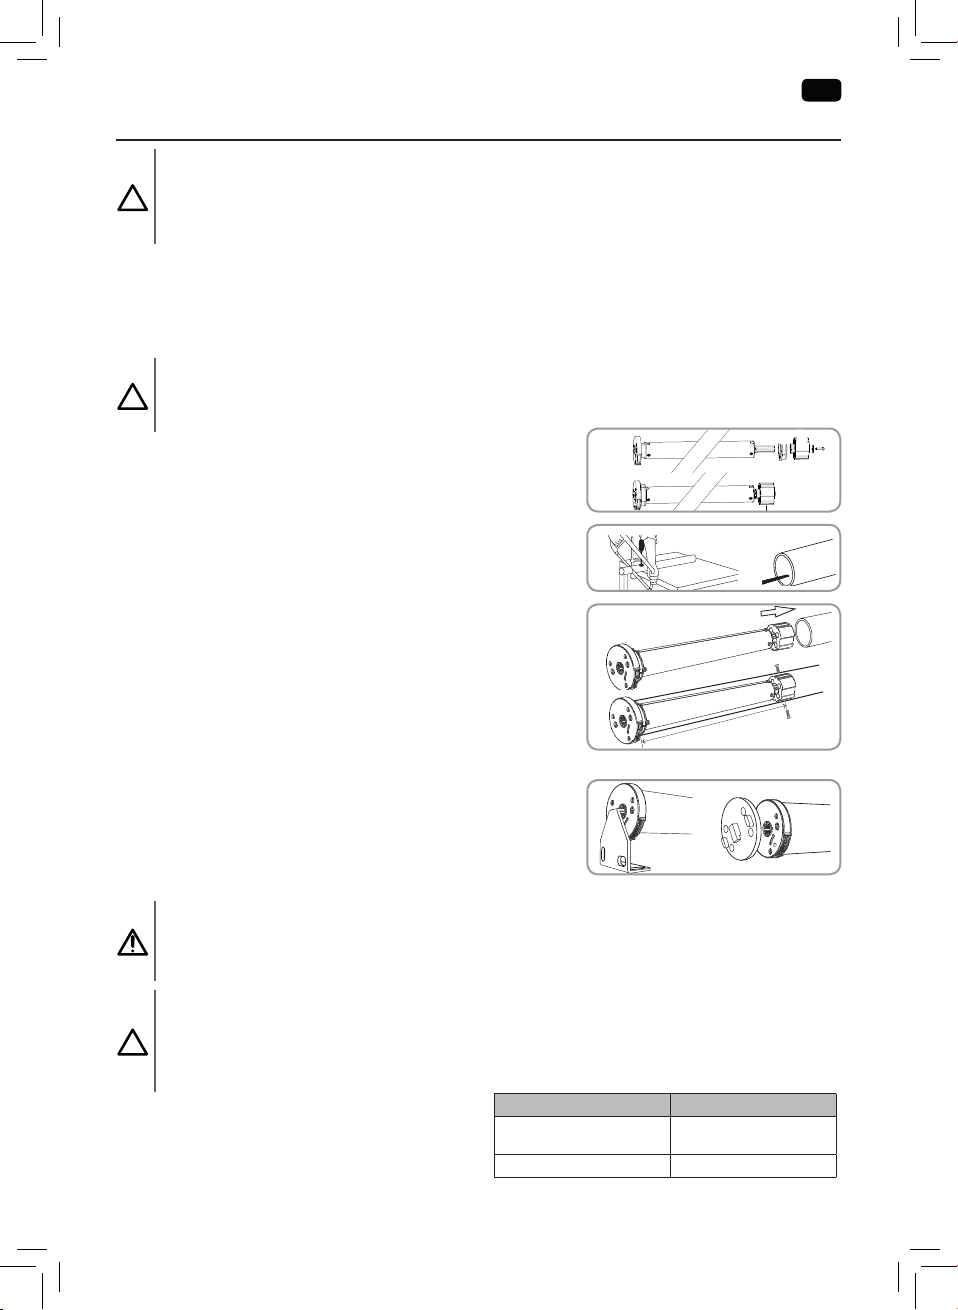
2.1. ASSEMBLY
2.1.1. Drive preparation
Attention
• Sonesse 30 Zigbee: interior diameter of the tube has to be Ø27.7 mm or greater.
1) Fit the crown (a) and drive wheel (b) to the motor.
2) Measure the length (L) between the end of the drive wheel
and the head end.
1
2
a b
2.1.2. Tube preparation
1) Cut the tube to the required length.
2) Deburr the tube and remove the debris.
1
2
2.1.3. Drive/tube assembly
1) Slide the drive into the tube. Insert the wheel by aligning
the wheel to the tube profile. Insert the drive half way and
then slide the crown down the drive and insert it in the tube.
Finally, push the motor inside the tube.
2) Not required, but if needed, fix the tube to the drive with
self-tapping screws or steel pop rivets depending on the
dimension (L).
1
2
L
2.1.4. Mounting the tube-drive assembly on the brackets
a) Standard bracket.
b) Drive plate for specific bracket.
a b
For optimal radio reception, the motor antenna should be kept
straight and should be positioned outside of headrail (if used).
2.2. WIRING
Precaution
• To ensure electrical safety, this Class III motor must be powered by a «SELV» voltage source
(Safety Extra Low Voltage).
• The battery level must be below 30% before shipping by air.
Attention
• Use power charger (recommended by Somfy) to charge the drive battery.
• Ensure battery is fully charged prior to installation on site.
1) Connect the charger to the drive.
2) When charging is complete, disconnect and
store charger for later use.
LED illuminates Behaviour
Green LED blinks
Solid Green. Charging is complete.
Charging is near
completion.
3
Page 4
EN
Sonesse 30 WF Zigbee Li-Ion
Copyright© 2017 - 2019 SOMFY ACTIVITES SA, Société Anonyme. All rights reserved.
2.3. COMMISSIONING
2.3.1. Start-up
To set the drive, you need to access and use Set&Go Connect Application,
You must have a compatible phone or mobile device and access to the internet.
The App is downloadable for free from Apple Store platforms and Google Play Store on the following
mobile devices:
• Apple iPhone® mobile phone or mobile device with iOS operating system
running iOS 11 and later.
• Mobile phone or mobile device with operating system Android™ OS 6.0
and later.
The soware version of the Set&Go Connect Application may be updated
from time to time to add new features and services.
2.3.2. Drive settings
• Once the Set&Go Connect Application is downloaded, open the app and follow the
instructions to set the drive.
• Once the drive is set, check the settings by pressing the button on the motor head:
- To start the motorised product movement, briefly press the button on the motor head.
- To stop the motorised product movement, briefly press the button on the motor head.
- To move the motorised product in the opposite direction of the previous movement, briefly
press the button on the motor head again.
- To stop the motorised product movement, briefly press the button on the motor head, and
so on.
2.3.3. Network management
Network status when the motor wakes up: if the product makes 1back and forth movement, it is
linked to a network.If the product makes 3 back and forth movements, it is not linked to any network.
To join a network :
• Follow the instructions on the Set&Go Connect application,
• Press and hold the motor head programming button until the product makes 2
back and forth movements (the first feedback aer 2 seconds and the second aer 7 seconds).
4
Page 5
Sonesse 30 WF Zigbee Li-Ion
EN
Copyright© 2017 - 2019 SOMFY ACTIVITES SA, Société Anonyme. All rights reserved.
2.4. TIPS AND ADVICE ON INSTALLATION
2.4.1. Questions about the drive?
Observations Possible causes Solutions
The driven product
does not operate.
The driven product
stops too soon.
The red LED of the
remote control
lights up.
Drive battery is low and requires
charge. Red LED blinks 3 times
when any button of a paired
control point is pressed.
The control point battery is low. Check the battery and replace it as
The control point is not compatible
or not programmed.
Drive position is out of the end
limits.
The motor is not linked to a
network.
The thermal protection has
activated.
The end limits are incorrectly set Reset the end limits.
The driven product has exceeded
recommended weight limit.
Battery is low. Red LED blinks 3
times when any button of a paired
control point is pressed.
There is a setting error. Go to chapter Drive settings
Plug in the charger.
required.
Check the compatibility and replace
the remote control if necessary.
Proceed to section «Setting the end
limits»
Go to chapter Network management
Wait for the drive to cool down.
Replace driven product.
Charge the battery.
2.4.2. Erasing the memory of the motor (factory default)
This reset deletes all remote control, all the settings, the network, and resets the motor’s favorite
position .
Press and hold the motor head programming button (≈12s) until the product makes 3 back and forth
movements (the first feedback after 2s, the second after 7s and the third after 12s).
3. USE AND MAINTENANCE
3.1. USE FROM THE APPLICATION
The motor control and tilting control are possible from the application: follow the instructions on
the Somfy Smart Setting application.
3.2. CONTROLLING UP, DOWN, MY
1) To move the driven product from a limit to the other limit, briefly press the UP or DOWN button.
2) To stop the driven product, briefly press the MY button.
3) If a my position is recorded) To move the driven product to the my position, briefly press the MY
button.
CONTROLLING UP, DOWN, MY: IN ROLLER MODE
5
Page 6
EN
Copyright© 2017 - 2019 SOMFY ACTIVITES SA, Société Anonyme. All rights reserved.
3.3. TIPS AND ADVICE ON OPERATION
Observations Possible causes Solutions
The control point battery is
low.
Drive battery is low and
The driven product does
not operate.
requires charge. Red LED
blinks 3 times when any
button of a paired control point
is pressed.
Thermal protection of the drive
is on .
Battery is low. Red LED blinks
The driven products
stops before its end limit
3 times when any button
of a paired control point is
pressed.
3.4. BATTERY REPLACEMENT
Contact Somfy for battery model's recommendation.
Precaution
Replacement of the battery by an identical model only, must be carried out by a professional of
the motorization and the automation of the habitat.
Attention
• Do not use tools that could damage the drive when replacing the battery.
• Do not cut or damage the antenna cable.
1) If the drive is fixed to the tube, disassemble the driven product
to access the self-tapping screws or steel pop rivets (motor
drive wheel side) and remove them.
2) Grab the motor head and pull out the drive by sliding it out of
the driven product tube.
3) If necessary, offset the ring gear on the actuator tube to access
the two T6 torx screws or cruciform screws and unscrew the
motor head.
4) Remove carefully the motor head from the drive tube taking
care not to damage the wires and disconnect the battery.
5) Grab and remove the used battery by sliding it out of the drive
tube taking care not to damage the wires.
Sonesse 30 WF Zigbee Li-Ion
Check the battery and replace it as
required.
Plug in the charger.
Wait for the motor to cool down.
Charge the battery.
1
2
3
4
5
6
Page 7
Sonesse 30 WF Zigbee Li-Ion
EN
Copyright© 2017 - 2019 SOMFY ACTIVITES SA, Société Anonyme. All rights reserved.
6) Insert and slide the new battery into the drive tube, leaving the battery connector accessible from
the outside of the tube.
7) Connect the new battery.
8) Insert the motor head using the keying notches on the drive
tube taking care not to cut off the wires.
9) Screw the motor head using the two T6 torx screws or
6
cruciform screws to the drive tube.
10) Restart the installation in chapter 2.1.3. Drive/tube assembly.
7
8
9
10
2.1.3. Drive/tube assembly.
4. TECHNICAL DATA
Power supply 12 Vdc SELV
Radio frequency 2.4 GHz
Frequency bands and maximum power used 2.4 GHz - 2.4835 GHz e.r.p < 10mW
Torque 2 Nm
Electrical insulation III
Operating temperature 0°C à + 60°C
Protection rating IP 20 (For indoor use only)
Charging temperature 0 / +45°C
For additional information on the technical data for this drive contact your Somfy representative.
Please separate storage cells and batteries from other types of waste and recycle them via the
local collection facility.
We care about our environment. Do not dispose of the appliance with usual household waste.
Give it to an approved collection point for recycling.
SOMFY ACTIVITES SA, F-74300 CLUSES as manufacturer hereby declares that the drive
covered by these instructions and used as intended according to these instructions is in
compliance with the essential requirements of the applicable European Directives and in
particular of the Machinery Directive 2006/42/EC, and the Radio Directive 2014/53/EU.
The full text of the EU declaration of conformity is available at www.somfy.com/ce.
Antoine Crézé, Approval manager, acting on behalf of Activity director, Cluses, 07/2018.
7
Page 8
EN
Sonesse 30 WF Zigbee Li-Ion
Copyright© 2017 - 2019 SOMFY ACTIVITES SA, Société Anonyme. All rights reserved.
The Bluetooth® word mark and logos are registered trademarks owned by the Bluetooth
SIG, Inc. and any use of such marks by SOMFY ACTIVITIES SA is under license. Other
trademarks and trade names are those of their respective owners.
FCC warning statement:
- This device complies with Part 15 of the FCC Rules.
Operation is subject to the following two conditions:
(1) This device may not cause harmful interference, and (2) This device must accept any interference
received, including interference that may cause undesired operation.
- This equipment complies with FCC radiation exposure limits set forth for an uncontrolled
environment. End users must follow the specific operating instructions for satisfying RF exposure
compliance. This transmitter must not be co-located or operating in conjunction with any other
antenna or transmitter.
- Changes or modifications not expressly approved by the party responsible for compliance could
void the user’s authority to operate the equipment.
Apple and Apple logos are trademarks of Apple, Inc., registered in the U.S. and other countries.
iPad® and iPhone® are registered trademarks of Apple, Inc. App Store is a service mark of Apple Inc.
Android is a trademark of Google LLC.
https://developer.android.com/distribute/marketing-tools/brand-guidelines
8
Page 9

IC statements:
‐ This device complies with Industry Canada licence‐exempt RSS standard(s). Operation is
Subject to the following two conditions: (1) this device may not cause interference, and (2)
this device must accept any interference, including interference that may cause undesired
Operation of the device.
‐ Le présent appareil est conforme aux CNR d'Industrie Canada applicables aux appareils radio
exempts de licence. L'exploitation est autorisée aux deux conditions suivantes : (1) l'appareil ne
doit pas produire de brouillage, et (2) l'utilisateur de l'appareil doit accepter tout brouillage
radioélectrique subi,même si le brouillage est susceptible d'en compromettre le fonctionnement.
RF Exposure Warning Statement:
For mobile or fixed location transmitters, the minimum separation distance between the antenna
& radiating structures of the device and nearby persons is 20 cm, even if calculations indicate
that the MPE distance would be less.
Page 10

Sonesse 30 WF Zigbee Li-Ion
ES
Copyright© 2017 - 2019 SOMFY ACTIVITES SA, Société Anonyme. All rights reserved.
MANUAL TRADUCIDO
Estas instrucciones se aplican a todos los motores Sonesse 30 Zigbee Li-ion. Las diferentes versiones
están disponibles en el presente catálogo
ÍNDICE
1. Información previa 9
1.1. Ámbito de aplicación 9
1.2. Responsabilidad 9
2. Montaje 10
2.1. Ensamble 10
2.2. Cableado 10
2.3. Puesta en marcha 11
2.4. Sugerencias y consejos de instalación 12
3. Uso y mantenimiento 12
3.1. Uso desde la aplicación 12
3.2. Control de subida, bajada y MY 12
3.3. Sugerencias y consejos de utilización 13
3.4. Sustitución de la batería 13
4. Características técnicas 14
ASPECTOS GENERALES
Instrucciones de seguridad
Peligro
Señala un peligro que provoca inmediatamente la muerte o lesiones graves.
Advertencia
Señala un peligro susceptible de provocar la muerte o lesiones graves.
Precaución
Señala un peligro susceptible de provocar lesiones leves o moderadamente graves.
Atención
Señala un peligro susceptible de dañar o destruir el producto.
1. INFORMACIÓN PREVIA
1.1. ÁMBITO DE APLICACIÓN
Las motorizaciones Sonesse 30 están diseñadas para accionar todo tipo de cortinas enrollables de interior
excepto mallorquinas.
El instalador, un profesional de la motorización doméstica o la domótica, deberá asegurarse de que el
producto automatizado, una vez instalado, cumpla la normativa local vigente, en especial la norma EN 13120
relativa a persianas interiores.
1.2. RESPONSABILIDAD
Antes de instalar y utilizar el motor, lea detenidamente esta guía. Además de las instrucciones que figuran en
esta guía, siga también las instrucciones detalladas en el documento adjunto Instrucciones de seguridad.
El motor debe ser instalado por un profesional de la motorización y automatización residencial de acuerdo
con las instrucciones de Somfy y la normativa vigente aplicable en el país de instalación.
Queda prohibido utilizar el motor fuera de cualquier campo aplicación arriba descrito. Cualquier uso fuera del
campo de aplicación mencionado en esta guía y el documento adjunto Instrucciones de seguridad, anulará
cualquier responsabilidad y garantía de Somfy.
Tras la instalación del motor, el instalador deberá informar a sus clientes de las condiciones de uso y
mantenimiento y hacerles entrega de las instrucciones de uso y mantenimiento, así como del documento
adjunto Instrucciones de seguridad. Cualquier operación de Servicio Posventa en el motor requerirá la
intervención de un profesional de la motorización y la automatización residencial.
En caso de duda durante la instalación del motor o para obtener información adicional, consulte con un
representante de Somfy o visite el sitio web www.somfy.com.
9
Page 11

ES
Sonesse 30 WF Zigbee Li-Ion
Copyright© 2017 - 2019 SOMFY ACTIVITES SA, Société Anonyme. All rights reserved.
2. MONTAJE
Atención
• Las siguientes instrucciones deben ser cumplidas de carácter obligatorio por el profesional de motorización y automatización residencial durante la instalación del motor.
• No deje caer, golpee, perfore ni sumerja nunca el motor.
• Instale un punto de mando individual para cada motorización.
Asegúrese de que el LED, el botón de programación y la conexión de entrada sean visibles y
fácilmente accesibles después de la instalación.
2.1. ENSAMBLE
2.1.1. Preparación del motor
Atención
• Sonesse 30 Zigbee: el diámetro interior del tubo debe ser Ø 27,7 mm o mayor.
1) Introduzca la corona (a) y la rueda motriz (b) en el motor.
2) Mida la longitud (L) entre el extremo de la rueda motriz y
la parte delantera.
1
2
2.1.2. Preparación del tubo
1) Corte el tubo a la longitud deseada.
2) Elimine las rebabas del tubo y retire los fragmentos.
1
2.1.3. Ensamblaje de la motorización-tubo
1) Deslice la motorización dentro del tubo. Inserte la rueda
alineándola con el perfil del tubo. Inserte la motorización
hasta la mitad y, a continuación, deslice la corona hacia
abajo en la motorización e insértela en el tubo. Por último,
introduzca el resto del motor en el interior del tubo.
2) No es obligatorio, pero si fuera necesario, fije el tubo al
motor por medio de tornillos autorroscantes o remaches de
acero en función de la medida (L).
1
2
2.1.4. Montaje del conjunto tubo-motorización en los soportes
a) Soporte estándar.
b) Placa de la motorización para soporte específico.
a b
Para una recepción óptima de la radio, la antena del motor
debe estar recta y situada fuera del cabezal (si se utiliza).
2.2. CABLEADO
Precaución
• Para garantizar la seguridad eléctrica, este motor de claseIII debe accionarse mediante una
fuente de tensión «SELV» (tensión extrabaja de seguridad).
• El nivel de la batería debe ser inferior al 30% para enviarla por correo aéreo.
Atención
• Use un cargador (recomendado por Somfy) para cargar la batería de la motorización.
• Asegúrese de que la batería esté totalmente cargada antes de su instalación.
a b
2
L
1) Conecte el cargador al motor.
2) Cuando se haya completado la carga,
desconecte y guarde el cargador para usarlo en
el futuro.
10
Iluminación LED Comportamiento
La luz verde parpadea
Verde fijo. Carga finalizada.
La carga está a punto
de finalizar.
Page 12

Sonesse 30 WF Zigbee Li-Ion
ES
Copyright© 2017 - 2019 SOMFY ACTIVITES SA, Société Anonyme. All rights reserved.
2.3. PUESTA EN MARCHA
2.3.1. Arranque
Para configurar la motorización, debe acceder y utilizar la aplicación Set&Go Connect.
Debe disponer de un teléfono o dispositivo móvil compatible y conectarse a Internet.
Puede descargar la aplicación de forma gratuita desde las plataformas Apple Store y Google Play
Store en los siguientes dispositivos móviles:
• Teléfono móvil Apple Iphone® o dispositivo móvil con sistema operativo iOS
con la versión iOS 11 o posterior.
• Teléfono móvil o dispositivo móvil con sistema operativo Android™ OS 6.0
o posterior.
La versión de soware de la aplicación Set&Go Connect se puede actualizar
en cualquier momento para añadir nuevas funciones y servicios.
2.3.2. Ajustes de la motorización
• Una vez que se haya descargado la aplicación Set&Go Connect, ábrala y siga las
instrucciones para configurar la motorización.
• Después de configurarla, compruebe los ajustes pulsando el botón del cabezal del motor:
- Para iniciar el movimiento del producto automatizado, pulse brevemente el botón del cabezal
del motor.
- Para detener el movimiento del producto automatizado, pulse brevemente el botón del
cabezal del motor.
- Para mover el producto automatizado en dirección contraria al movimiento anterior, pulse
brevemente el botón del cabezal del motor de nuevo.
- Para detener el movimiento del producto automatizado, pulse brevemente el botón del
cabezal del motor, etc.
2.3.3. Gestión de redes
Estado de la red cuando se activa el motor: si el producto se mueve una vez hacia atrás y hacia
delante, es que está conectado a una red. Si el producto se mueve tres veces hacia atrás y hacia
delante, es que no está conectado a ninguna red.
Para unirse a una red:
• Siga las instrucciones de la aplicación Set&Go Connect;
• Mantenga pulsado el botón de programación del cabezal del motor hasta que el producto se mueva
dos veces hacia atrás y hacia adelante (el primer feedback al cabo de 2 segundos, y el segundo,
después de 7 segundos).
11
Page 13

ES
Copyright© 2017 - 2019 SOMFY ACTIVITES SA, Société Anonyme. All rights reserved.
2.4. SUGERENCIAS Y CONSEJOS DE INSTALACIÓN
2.4.1. ¿Alguna pregunta sobre la motorización?
Observaciones Posibles causas Soluciones
El producto
motorizado no
funciona.
El producto
motorizado se
detiene demasiado
pronto.
Se ha encendido la
luz roja del mando a
distancia.
El nivel de batería del motor es bajo,
por lo que se necesita carga. El LED
rojo parpadea 3 veces cuando se pulsa
cualquier botón de un punto de mando
emparejado.
La pila del punto de mando está
agotada.
El punto de mando no es compatible o
no está programado.
La posición de la motorización está
fuera de los finales de carrera.
El motor no está conectado a una red. Vaya al capítulo Gestión de redes
Se ha activado la protección térmica. Espere a que se enfríe la motorización.
Los finales de carrera están mal
ajustados
El producto motorizado ha excedido el
límite de peso recomendado.
Batería baja. El LED rojo parpadea 3
veces cuando se pulsa cualquier botón
de un punto de mando emparejado.
Existe un error de configuración. Vaya al capítulo Ajustes de la
Conecte el cargador.
Compruebe si el nivel de carga de la pila
es bajo y sustitúyala en caso necesario.
Compruebe la compatibilidad y sustituya
el mando a distancia en caso necesario.
Pase a la sección «Ajuste de los finales
de carrera»
Vuelva a ajustar los finales de carrera.
Sustituya el producto motorizado.
Cargar la batería.
motorización
Sonesse 30 WF Zigbee Li-Ion
2.4.2. Borrado de la memoria del motor (predeterminado de fábrica)
Esta puesta a cero borra todo el mando a distancia, todos los ajustes, la red y reinicia la posición
favorita del motor .
Mantenga pulsado el botón de programación del cabezal del motor (≈12s) hasta que el producto se
mueva tres veces hacia atrás y hacia adelante (el primer feedback al cabo de 2s, el segundo después
de 7s y el tercero transcurridos 12s).
3. USO Y MANTENIMIENTO
3.1. USO DESDE LA APLICACIÓN
El motor y la inclinación pueden controlarse desde la aplicación: siga las instrucciones de la
aplicación Somfy Smart Setting.
ENROLLAMIENTO
3.2. CONTROL DE SUBIDA, BAJADA Y MY
1) Para mover el producto motorizado de un límite a otro, pulse brevemente el botón de subida o
de bajada.
2) Para detener el producto motorizado, pulse brevemente el botón MY.
3) (Si se ha registrado una posición MY) Para mover el producto motorizado hasta dicha posición
MY, pulse brevemente el botón MY.
12
CONTROL DE SUBIDA, BAJADA Y MY: EN MODO
Page 14

Sonesse 30 WF Zigbee Li-Ion
ES
Copyright© 2017 - 2019 SOMFY ACTIVITES SA, Société Anonyme. All rights reserved.
3.3. SUGERENCIAS Y CONSEJOS DE UTILIZACIÓN
Observaciones Posibles causas Soluciones
La pila del punto de mando
está agotada.
El nivel de batería del motor
Compruebe si el nivel de carga de la pila
es bajo y sustitúyala en caso necesario.
Conecte el cargador.
es bajo, por lo que se necesita
El producto motorizado
no funciona.
carga. El LED rojo parpadea
3 veces cuando se pulsa
cualquier botón de un punto de
mando emparejado.
El modo de protección térmica
Espere a que se enfríe la motorización.
de la motorización está
activado.
Los productos
motorizados se paran
antes del final de carrera
Batería baja. El LED rojo
parpadea 3 veces cuando se
pulsa cualquier botón de un
punto de mando emparejado.
Cargar la batería.
3.4. SUSTITUCIÓN DE LA BATERÍA
Póngase en contacto con Somfy para que le recomendemos el modelo de batería.
Precaución
La batería solo debe sustituirse por otra del mismo modelo exactamente y debe realizarse por
parte de un profesional de motorización y automatización del hogar.
Atención
• Al sustituir la batería, no utilice herramientas que puedan dañar el motor.
• No corte ni dañe el cable de la antena.
1) Si el motor está fijado al tubo, desmonte los productos
motorizados para acceder a los tornillos autorroscantes
o remaches de acero (lado de la rueda motriz del motor) y
retírelos.
2) Agarre el cabezal del motor y sáquelo deslizándolo del tubo
del producto motorizado.
3) En caso necesario, desplace la corona dentada del tubo de
accionamiento para acceder a los dos tornillos Torx T6 o
tornillos cruciformes y desatornille el cabezal del motor.
4) Saque el cabezal del motor con cuidado del tubo de
motorización, prestando atención para no dañar los cables, y
desconecte la batería.
5) Agarre y saque la batería usada deslizándola del tubo de
motorización, prestando atención para no dañar los cables.
1
2
3
4
5
13
Page 15

ES
Sonesse 30 WF Zigbee Li-Ion
Copyright© 2017 - 2019 SOMFY ACTIVITES SA, Société Anonyme. All rights reserved.
6) Inserte y deslice la nueva batería en el tubo de motorización, dejando el conector de la batería
accesible desde fuera del tubo.
7) Conecte la nueva batería.
8) Inserte el cabezal del motor usando las muescas en el tubo de
motorización, prestando atención para no cortar los cables.
9) Atornille el cabezal del motor al tubo de motorización con los
6
dos tornillos Torx T6 o tornillos cruciformes.
10) Retome la instalación en el capítulo 2.1.3. Ensamblaje de la
motorización-tubo.
7
8
9
10
2.1.3. Ensamblaje de
la motorización-tubo.
4. CARACTERÍSTICAS TÉCNICAS
Suministro eléctrico 12V CC SELV
Frecuencia de radio 2,4GHz
Bandas de frecuencia y potencia máxima utilizadas 2,4GHz - 2,4835GHz e.r.p < 10mW
Par 2Nm
Aislamiento eléctrico III
Temperatura de funcionamiento De 0°C a + 60°C
Índice de protección IP 20 (solo para uso en interiores)
Temperatura de carga 0 / +45°C
Para obtener más información sobre las características técnicas de la motorización, consulte con su
agente de Somfy.
Recuerde separar las baterías y las pilas del resto de desechos y reciclarlas en el centro de
recogida de residuos de su localidad.
Nos preocupa el medioambiente. No tire el aparato junto con los desechos domésticos
habituales. Llévelo a un punto de recogida aprobado para su reciclaje.
14
Page 16

Sonesse 30 WF Zigbee Li-Ion
ES
Copyright© 2017 - 2019 SOMFY ACTIVITES SA, Société Anonyme. All rights reserved.
En virtud del presente documento, SOMFY ACTIVITES SA, F-74300 CLUSES declara, en
calidad de fabricante de la motorización objeto de las presentes instrucciones, utilizada
tal y como se indica en las mismas, que cumple las exigencias básicas de las directivas
europeas aplicables y, en particular, la Directiva sobre máquinas 2006/42/CE y la
Directiva de radio 2014/53/UE.
Encontrará el texto completo de la declaración de conformidad con la UE en www.somfy.
com/ce.
Antoine Crézé, jefe de homologaciones, en representación del director de actividades,
Cluses (Francia), 07/2018.
La marca con la palabra y los logotipos de Bluetooth® son marcas comerciales
registradas propiedad de Bluetooth SIG, Inc. y cualquier uso de las mismas por parte de
SOMFY ACTIVITIES SA se realiza bajo licencia. Las demás marcas y denominaciones
comerciales pertenecen a sus respectivos propietarios.
Advertencia de la FCC:
- Este dispositivo cumple la Parte 15 de las normas de la FCC.
El funcionamiento está sujeto a estas dos condiciones:
(1) El dispositivo no puede provocar interferencias dañinas; y (2) debe aceptar cualquier interferencia
recibida, incluidas las que puedan provocar un funcionamiento no deseado.
- Este equipo cumple los límites de exposición a la radiación de la FCC para entornos no controlados.
Los usuarios finales deben seguir las instrucciones de uso específicas para cumplir la normativa de
exposición a radiofrecuencias. Este transmisor no debe instalarse ni funcionar junto con ninguna otra
antena o transmisor.
- Los cambios o modificaciones que no hayan sido expresamente aprobados por la parte responsable
del cumplimiento podrían anular la autorización del usuario para utilizar el equipo.
Apple y los logotipos de Apple son marcas de Apple Inc., registradas en EE.UU. y otros países.
iPad® and iPhone® son marcas registradas de Apple, Inc. App Store es una marca de servicio de
Apple Inc.
Android es una marca de Google LLC.
https://developer.android.com/distribute/marketing-tools/brand-guidelines
15
Page 17

FR
Sonesse 30 WF Zigbee Li-ion
Copyright© 2017 - 2019 SOMFY ACTIVITES SA, Société Anonyme. All rights reserved.
Cette notice s’applique à toutes les motorisations Sonesse 30 WF Zigbee Li-ion et dont les
déclinaisons sont disponibles au catalogue en vigueur.
NOTICE TRADUITE
SOMMAIRE
1. Informations préalables 16
1.1. Domaine d’application 16
1.2. Responsabilité 16
2. installation 17
2.1. Montage 17
2.2. Câblage 17
2.3. Mise en service 18
2.4. Astuces et conseils d’installation 19
3. Utilisation et maintenance 19
3.1. Usage depuis l'application 19
3.2. Montée, descente, MY 19
3.3. Astuces et conseils d’utilisation 20
3.4. Remplacement de la batterie 20
4. Données techniques 21
GÉNÉRALITÉS
Consignes de sécurité
Danger
Signale un danger entraînant immédiatement la mort ou des blessures graves.
Avertissement
Signale un danger susceptible d’entraîner la mort ou des blessures graves.
Précaution
Signale un danger susceptible d’entraîner des blessures légères ou moyennement graves.
Attention
Signale un danger susceptible d’endommager ou de détruire le produit.
1. INFORMATIONS PRÉALABLES
1.1. DOMAINE D’APPLICATION
Les motorisations Sonesse 30 sont conçues pour motoriser tous types de stores d’intérieur à l’exception
des pantographes.
L’installateur, professionnel de la motorisation ou de l’automatisation de l’habitat, doit s’assurer que le
produit motorisé, une fois installé, respecte les normes en vigueur dans le pays d’utilisation, notamment la
norme EN13120 relative aux stores d’intérieur.
1.2. RESPONSABILITÉ
Avant d’installer et d’utiliser la motorisation, lire attentivement cette notice. Outre les instructions décrites
dans cette notice, respecter également les consignes détaillées dans le document joint Consignes de
sécurité.
La motorisation doit être installée par un professionnel de la motorisation et de l’automatisation de l’habitat,
conformément aux instructions de Somfy et à la réglementation applicable dans le pays de mise en service.
Toute utilisation de la motorisation hors du domaine d’application décrit ci-dessus est interdite. Elle exclurait,
comme tout irrespect des instructions figurant dans cette notice et dans le document joint Consignes de
sécurité, toute responsabilité et garantie de Somfy.
L’installateur doit informer ses clients des conditions d’utilisation et de maintenance de la motorisation et doit
leur transmettre les instructions d’utilisation et de maintenance, ainsi que le document joint Consignes de
sécurité, après l’installation de la motorisation. Toute opération de Service Après-Vente sur la motorisation
nécessite l’intervention d’un professionnel de la motorisation et de l’automatisation de l’habitat.
Si un doute apparaît lors de l’installation de la motorisation ou pour obtenir des informations
complémentaires, consulter un interlocuteur Somfy ou aller sur le site www.somfy.com.
16
Page 18

Sonesse 30 WF Zigbee Li-ion
FR
Copyright© 2017 - 2019 SOMFY ACTIVITES SA, Société Anonyme. All rights reserved.
L
2. INSTALLATION
Attention
• Consignes à suivre impérativement par le professionnel de la motorisation et de l’automatisation de l’habitat réalisant l’installation de la motorisation.
• Ne jamais laisser tomber, choquer, percer ou immerger la motorisation.
• Installer un point de commande individuel pour chaque motorisation.
S'assurer que la DEL, le bouton de programmation et l'entrée du câble du chargeur restent visibles
et facilement accessibles après l'installation.
2.1. MONTAGE
2.1.1. Préparation de la motorisation
Attention
• Sonesse 30 Zigbee: le diamètre intérieur du tube doit être de Ø27,7mm ou plus.
1) Monter la couronne (a) et la roue (b) sur la motorisation.
2) Mesurer la longueur (L) entre l'extrémité de la roue et
l'extrémité de la tête.
1
2
a b
2.1.2. Préparation du tube
1) Couper le tube à la longueur désirée.
2) Ébavurer le tube et éliminer les copeaux.
1
2
2.1.3. Assemblage motorisation - tube
1) Glisser la motorisation dans le tube. Insérer la roue en l’alignant
sur le profilé du tube. Insérer à moitié la motorisation, puis faire
glisser vers le bas la couronne, jusqu’à la motorisation, puis
l’insérer dans le tube. Enfin, pousser la motorisation à l’intérieur
du tube.
2) Ce n’est pas indispensable, mais si nécessaire, fixer le tube à la
motorisation avec des vis parker ou des rivets pop en acier, selon
la cote (L).
1
2
2.1.4. Montage de l’ensemble tube - motorisation sur les supports
a) Support standard.
b) Platine motorisée pour support spécifique.
a b
Pour que la réception radio soit optimale, l'antenne de
la motorisation doit être tenue rectiligne et doit être placée à
l'extérieur du caisson (si utilisée).
2.2. CÂBLAGE
Précaution
• Pour garantir la sécurité électrique, cette motorisation de classe III doit obligatoirement être
alimentée par une source de tension «TBTS» (Très Basse Tension de Sécurité).
• Le niveau de la batterie doit être inférieur à 30% avant l'expédition par voie aérienne.
Attention
• Utiliser le chargeur secteur (recommandé par Somfy) pour recharger la batterie de la
motorisation.
• S’assurer que la batterie est entièrement rechargée avant l’installation sur site.
1) Brancher le chargeur à la motorisation.
2) Une fois la recharge terminée, débrancher
et ranger le chargeur.
État de la DEL Comportement
La DEL verte clignote
DEL verte allumée. Charge terminée.
Charge proche de la
fin.
17
Page 19

FR
Sonesse 30 WF Zigbee Li-ion
Copyright© 2017 - 2019 SOMFY ACTIVITES SA, Société Anonyme. All rights reserved.
2.3. MISE EN SERVICE
2.3.1. Démarrage
Pour mettre la motorisation en service, utiliser l’application Set&Go Connect.
Disposer d’un téléphone ou d’un appareil mobile compatible et accéder à Internet.
L’application est téléchargeable gratuitement depuis l'Apple Store et le Google Play Store» sur les
appareils mobiles suivants:
Téléphone mobile Iphone® Apple® ou appareil mobile avec système d’exploitation iOS
exécutant iOS 11 ou une version supérieure.
Téléphone mobile ou appareil mobile avec système d’exploitation Android® OS 6.0
ou une version supérieure.
La version logicielle de l’application Set&Go Connect Application peut être mise à jour
de temps en temps pour ajouter de nouvelles fonctionnalités et de nouveaux services.
2.3.2. Réglages de motorisation
• Une fois l'application Set&Go Connect téléchargée, l'ouvrir et suivre les
instructions pour régler la motorisation.
• Une fois la motorisation réglée, vérifier les réglages en appuyant sur le bouton de la tête du
moteur:
- pour démarrer le mouvement du produit motorisé, appuyer brièvement sur le bouton de la
tête du moteur,
- pour arrêter le mouvement du produit motorisé, appuyer brièvement sur le bouton de la tête
du moteur,
- pour déplacer le produit motorisé dans le sens inverse du mouvement précédent, appuyer à
nouveau brièvement sur le bouton de la tête du moteur,
- pour arrêter le mouvement du produit motorisé, appuyer brièvement sur le bouton de la tête
du moteur, etc.
2.3.3. Gestion de réseau
État du réseau lorsque la motorisation est sollicitée: si le produit motorisé réalise un mouvement de
va-et-vient, il est connecté à un réseau; si le produit motorisé réalise 3mouvements de va-et-vient,
il n'est relié à aucun réseau.
Pour se connecter à un réseau:
• Suivre les instructions de l'application Set&Go Connect.
• Appuyer et maintenir enfoncé le bouton programmation de la tête du moteur jusqu'à ce que le
produit effectue 2
mouvements de va-et-vient (le premier après 2s et le deuxième après 7s).
18
Page 20

Sonesse 30 WF Zigbee Li-ion
FR
Copyright© 2017 - 2019 SOMFY ACTIVITES SA, Société Anonyme. All rights reserved.
2.4. ASTUCES ET CONSEILS D’INSTALLATION
2.4.1. Questions sur la motorisation?
Constats Causes possibles Solutions
Le produit
motorisé ne
fonctionne pas.
Le produit
motorisé
s’arrête trop tôt.
La DEL
rouge de la
télécommande
s'allume.
La batterie de motorisation est faible
et nécessite une recharge. La DEL
rouge clignote 3fois sur pression de
toute touche d'un point de commande
appairé.
La batterie du point de commande est
faible.
Le point de commande n’est pas
compatible ou n’est pas programmé.
La motorisation est en dehors des fins
de course.
Le moteur n’est pas relié à un réseau. Passer au chapitre Gestion de réseau
La protection thermique s’est
déclenchée.
Les fins de courses sont mal réglées. Réajuster les fins de course.
Le produit motorisé a dépassé la limite
de poids recommandée.
La batterie est faible. La DEL rouge
clignote 3fois sur pression de toute
touche d'un point de commande appairé.
Il y a une erreur de réglage. Passer au chapitre Réglages de
Brancher le chargeur.
Contrôler si la batterie est faible et la
remplacer si besoin.
Contrôler la compatibilité et remplacer
la télécommande si besoin.
Passer au chapitre «Réglage des fins
de course».
Attendre que la motorisation
refroidisse.
Remplacer le produit motorisé.
Recharger la batterie.
motorisation
2.4.2. Effacement de la mémoire de la motorisation (valeurs par défaut d'usine)
Cette remise à zéro supprime tous les points de commande, tous les capteurs, tous les réglages ainsi
que le réseau et réinitialise la position favorite de la motorisation.
Appuyer et maintenir enfoncé le bouton programmation de la tête du moteur (≈12s) jusqu’à ce que
le produit effectue trois mouvements de va-et-vient (le premier après 2s, le deuxième après 7s et
le troisième après 12s).
3. UTILISATION ET MAINTENANCE
3.1. USAGE DEPUIS L'APPLICATION
La commande du moteur et d'orientation des lames est possible depuis l’application: suivre les
instructions sur l’application Somfy Smart Setting.
ENROULEMENT
3.2. MONTÉE, DESCENTE, MY
1) Pour manœuvrer le produit motorisé depuis l’une de ses fins de course jusqu’à l’autre, faire un
appui bref sur la touche MONTÉE ou DESCENTE.
2) Pour arrêter le produit motorisé, faire un appui bref sur la touche MY.
3) Si une position MY est enregistrée: pour manœuvrer le produit motorisé jusqu’à la position MY,
faire un appui bref sur la touche MY.
MONTÉE, DESCENTE, MY: EN MODE
19
Page 21

FR
Copyright© 2017 - 2019 SOMFY ACTIVITES SA, Société Anonyme. All rights reserved.
3.3. ASTUCES ET CONSEILS D’UTILISATION
Constats Causes possibles Solutions
La batterie du point de
commande est faible.
La batterie de motorisation
est faible et nécessite une
Le produit motorisé ne
fonctionne pas.
recharge. La DEL rouge
clignote 3fois sur pression
de toute touche d'un point de
commande appairé.
La protection thermique de la
motorisation est active.
Le produit motorisé
s'arrête avant sa fin de
course
La batterie est faible. La DEL
rouge clignote 3fois sur
pression de toute touche d'un
point de commande appairé.
3.4. REMPLACEMENT DE LA BATTERIE
Consulter Somfy pour connaître le modèle de batterie recommandé.
Précaution
Le remplacement de la batterie, par un modèle identique uniquement, doit être effectué par un
professionnel de la motorisation et de l'automatisation de l'habitat.
Attention
• Ne pas utiliser d'outil susceptible d'endommager la motorisation lors du remplacement de
la batterie.
• Ne pas couper ou endommager le câble de l'antenne.
1) Si la motorisation est fixée au tube, démonter le produit
motorisé pour accéder aux vis auto-taraudeuses ou aux rivets
pop en acier (côté roue d’entraînement moteur) et les retirer.
2) Saisir la tête moteur et extraire la motorisation en la faisant
glisser hors du tube du produit motorisé.
3) Si nécessaire, décaler la couronne du tube de l'actionneur
pour accéder aux deux vis torx T6 ou cruciformes et dévisser
la tête moteur.
4) Retirer doucement la tête moteur du tube de la motorisation
en prenant soin de ne pas détériorer les câbles, puis
déconnecter la batterie.
5) Saisir et déposer la batterie usagée en la faisant glisser
hors du tube de la motorisation en faisant attention à ne pas
endommager les câbles.
Sonesse 30 WF Zigbee Li-ion
Contrôler si la batterie est faible et la
remplacer si besoin.
Brancher le chargeur.
Attendre que le moteur refroidisse.
Recharger la batterie.
1
2
3
4
5
20
Page 22

Sonesse 30 WF Zigbee Li-ion
FR
Copyright© 2017 - 2019 SOMFY ACTIVITES SA, Société Anonyme. All rights reserved.
6) Insérer et faire glisser la batterie neuve dans le tube de la motorisation, en laissant le connecteur
de la batterie accessible depuis l'extérieur du tube.
7) Connecter la batterie neuve.
8) À l'aide des encoches de détrompage, enchâsser la tête
moteur sur le tube de la motorisation en prenant soin de ne
pas détériorer les câbles.
6
9) Visser la tête moteur au tube de la motorisation en utilisant
les deux vis torx T6 ou cruciformes.
10) Reprendre l'installation au chapitre 2.1.3. Assemblage
motorisation - tube.
7
8
9
10
2.1.3. Assemblage
motorisation - tube.
4. DONNÉES TECHNIQUES
Alimentation 12 Vcc TBTS
Fréquence radio 2.4 GHz
Bandes de fréquence et puissance maximale utilisées
Couple 2 Nm
Isolation électrique III
Température d’utilisation 0°C à +60°C
Indice de protection IP 20 (pour usage en intérieur exclusivement)
Température de charge 0 / +45°C
2,4GHz - 2,4835GHz p.a.r < 10mW
Pour tout complément d'information sur les caractéristiques techniques de cette motorisation,
consulter votre interlocuteur Somfy.
Veiller à séparer les piles et batteries des autres types de déchets et à les recycler via votre
système local de collecte.
Nous nous soucions de notre environnement. Ne jetez pas votre appareil avec les déchets
ménagers habituels. Déposez-le dans un point de collecte agréé pour son recyclage.
21
Page 23

FR
Sonesse 30 WF Zigbee Li-ion
Copyright© 2017 - 2019 SOMFY ACTIVITES SA, Société Anonyme. All rights reserved.
SOMFY ACTIVITES SA, F-74300 CLUSES déclare par la présente, en tant que fabricant,
que la motorisation couverte par ces instructions et utilisée comme indiqué dans ces
instructions, est conforme aux exigences essentielles des Directives Européennes
applicables et en particulier de la Directive Machine 2006/42/CE, et de la Directive Radio
2014/53/UE.
Le texte complet de la déclaration UE de conformité est disponible sur www.somfy.com/
ce.
Antoine Crézé, responsable des homologations, agissant au nom du directeur de
l’Activité, Cluses, 07/2018.
La marque et les logos Bluetooth® sont des marques déposées appartenant à Bluetooth
SIG, Inc. et toute utilisation de ces marques par SOMFY ACTIVITES SA se fait sous
licence. Les autres marques et noms commerciaux sont la propriété de leurs détenteurs
respectifs.
Déclaration de la FCC:
- Cet appareil est conforme à la partie 15 des règles de la FCC.
Son fonctionnement est soumis aux deux conditions suivantes:
(1) cet appareil ne doit pas causer d’interférences nuisibles; et (2) cet appareil doit accepter toute
interférence reçue, y compris les interférences pouvant entraîner un fonctionnement indésirable.
- Cet équipement est conforme aux limitations prévues par la FCC pour l’exposition aux radiations
dans le cadre d’un environnement d’accès libre. Les utilisateurs finaux doivent suivre les instructions
d’utilisation spécifiques pour garantir la conformité aux limites d’exposition RF. Cet émetteur ne doit
pas être situé au même endroit ou utilisé conjointement avec une autre antenne ou un autre émetteur.
- Les changements ou modifications non expressément approuvés par la partie responsable de
la conformité pourraient annuler l’autorité de l’utilisateur à utiliser l’équipement.
Apple et les logos Apple sont des marques déposées appartenant à Apple, Inc., société inscrite au
répertoire des entreprises aux États-Unis et dans d'autres pays.
iPad® et iPhone® sont des marques déposées d'Apple, Inc. App Store est une marque d'Apple Inc.
Android est une marque déposée de Google LLC.
https://developer.android.com/distribute/marketing-tools/brand-guidelines
22
Page 24

Sonesse 30 WF Zigbee Li-ion
FR
Copyright© 2017 - 2019 SOMFY ACTIVITES SA, Société Anonyme. All rights reserved.
23
Page 25

SOMFY ACTIVITES SA
50 avenue du Nouveau Monde
F-74300 Cluses
www.somfy.com
SOMFY ACTIVITES SA, Société Anonyme, capital 35.000.000 Euros, RCS Annecy, 303.970.230 - 05/2019 Images not contractually binding
5041037A
 Loading...