

Page 1
www.somfy.com
5050583D
Eolis 3D
Wirefree™ RTS
For Awnings
FR
Notice Installateur
DE
Installationsanleitung
EN
Installer Manual
Ref.5050583D
Notice Installateur
FR
Cette notice décrit l’installation, la
mise en service et le mode d’utilisation de
ce produit.
1. Introduction
L’Eolis 3D WireFree™ RTS est un capteur
de mouvement en trois dimensions
l et autonome
automatique du store lorsque celui-ci
est soumis à des secousses provoquées
par le vent. La détection des secousses
correspond à un seuil de sensibilité.
Si le store est aussi associé à un capteur
soleil, les jours venteux et ensoleillés,
l’Eolis 3D WireFree™ RTS détecte les
mouvements intempestifs et bloque
l’ouverture du store pour le protéger.
L’Eolis 3D WireFree™ RTS est conçu
uniquement pour les stores terrasse à
bras de type banne, coffre ou cassette.
L’Eolis 3D Wirefree RTS est compatible
avec la gamme actuelle de moteurs
RTS, télécommandes RTS et capteurs
RTS Somfy.
. Il permet la remontée
sans
2. Sécurité
2.1. Sécurité et responsabilité
Avant d’installer et d’utiliser ce produit, lire
attentivement cette notice.
Ce produit doit être installé par un
professionnel de la motorisation et de
l’automatisation de l’habitat auquel cette
notice est destinée.
L’installateur doit par ailleurs, se conformer
aux normes et à la législation en vigueur
dans le pays d’installation, et informer ses
clients des conditions d’utilisation et de
maintenance du produit.Toute utilisation
hors du domaine d’application déni par
Somfy est interdite. Elle entraînerait,
comme tout irrespect des instructions
gurant dans cette notice, l’exclusion de
la responsabilité et de la garantie Somfy.
Avant toute installation, vérier la
compatibilité de ce produit avec les
équipements et accessoires associés.
2.2. Consignes spéciques de
sécurité
Ne jamais laisser tomber, choquer,
percer, immerger le capteur.
Ne pas utiliser de produits abrasifs
ni de solvants pour nettoyer le
capteur.
Ne pas le nettoyer au jet d’eau, ni
sous haute pression.
S’assurer que le capteur est
toujours propre et vérier son bon
fonctionnement régulièrement.
Ce capteur ne protège pas votre
store en cas de forte rafale de vent.
En cas de risques météorologiques
de ce type, s’assurer que le store
reste fermé.
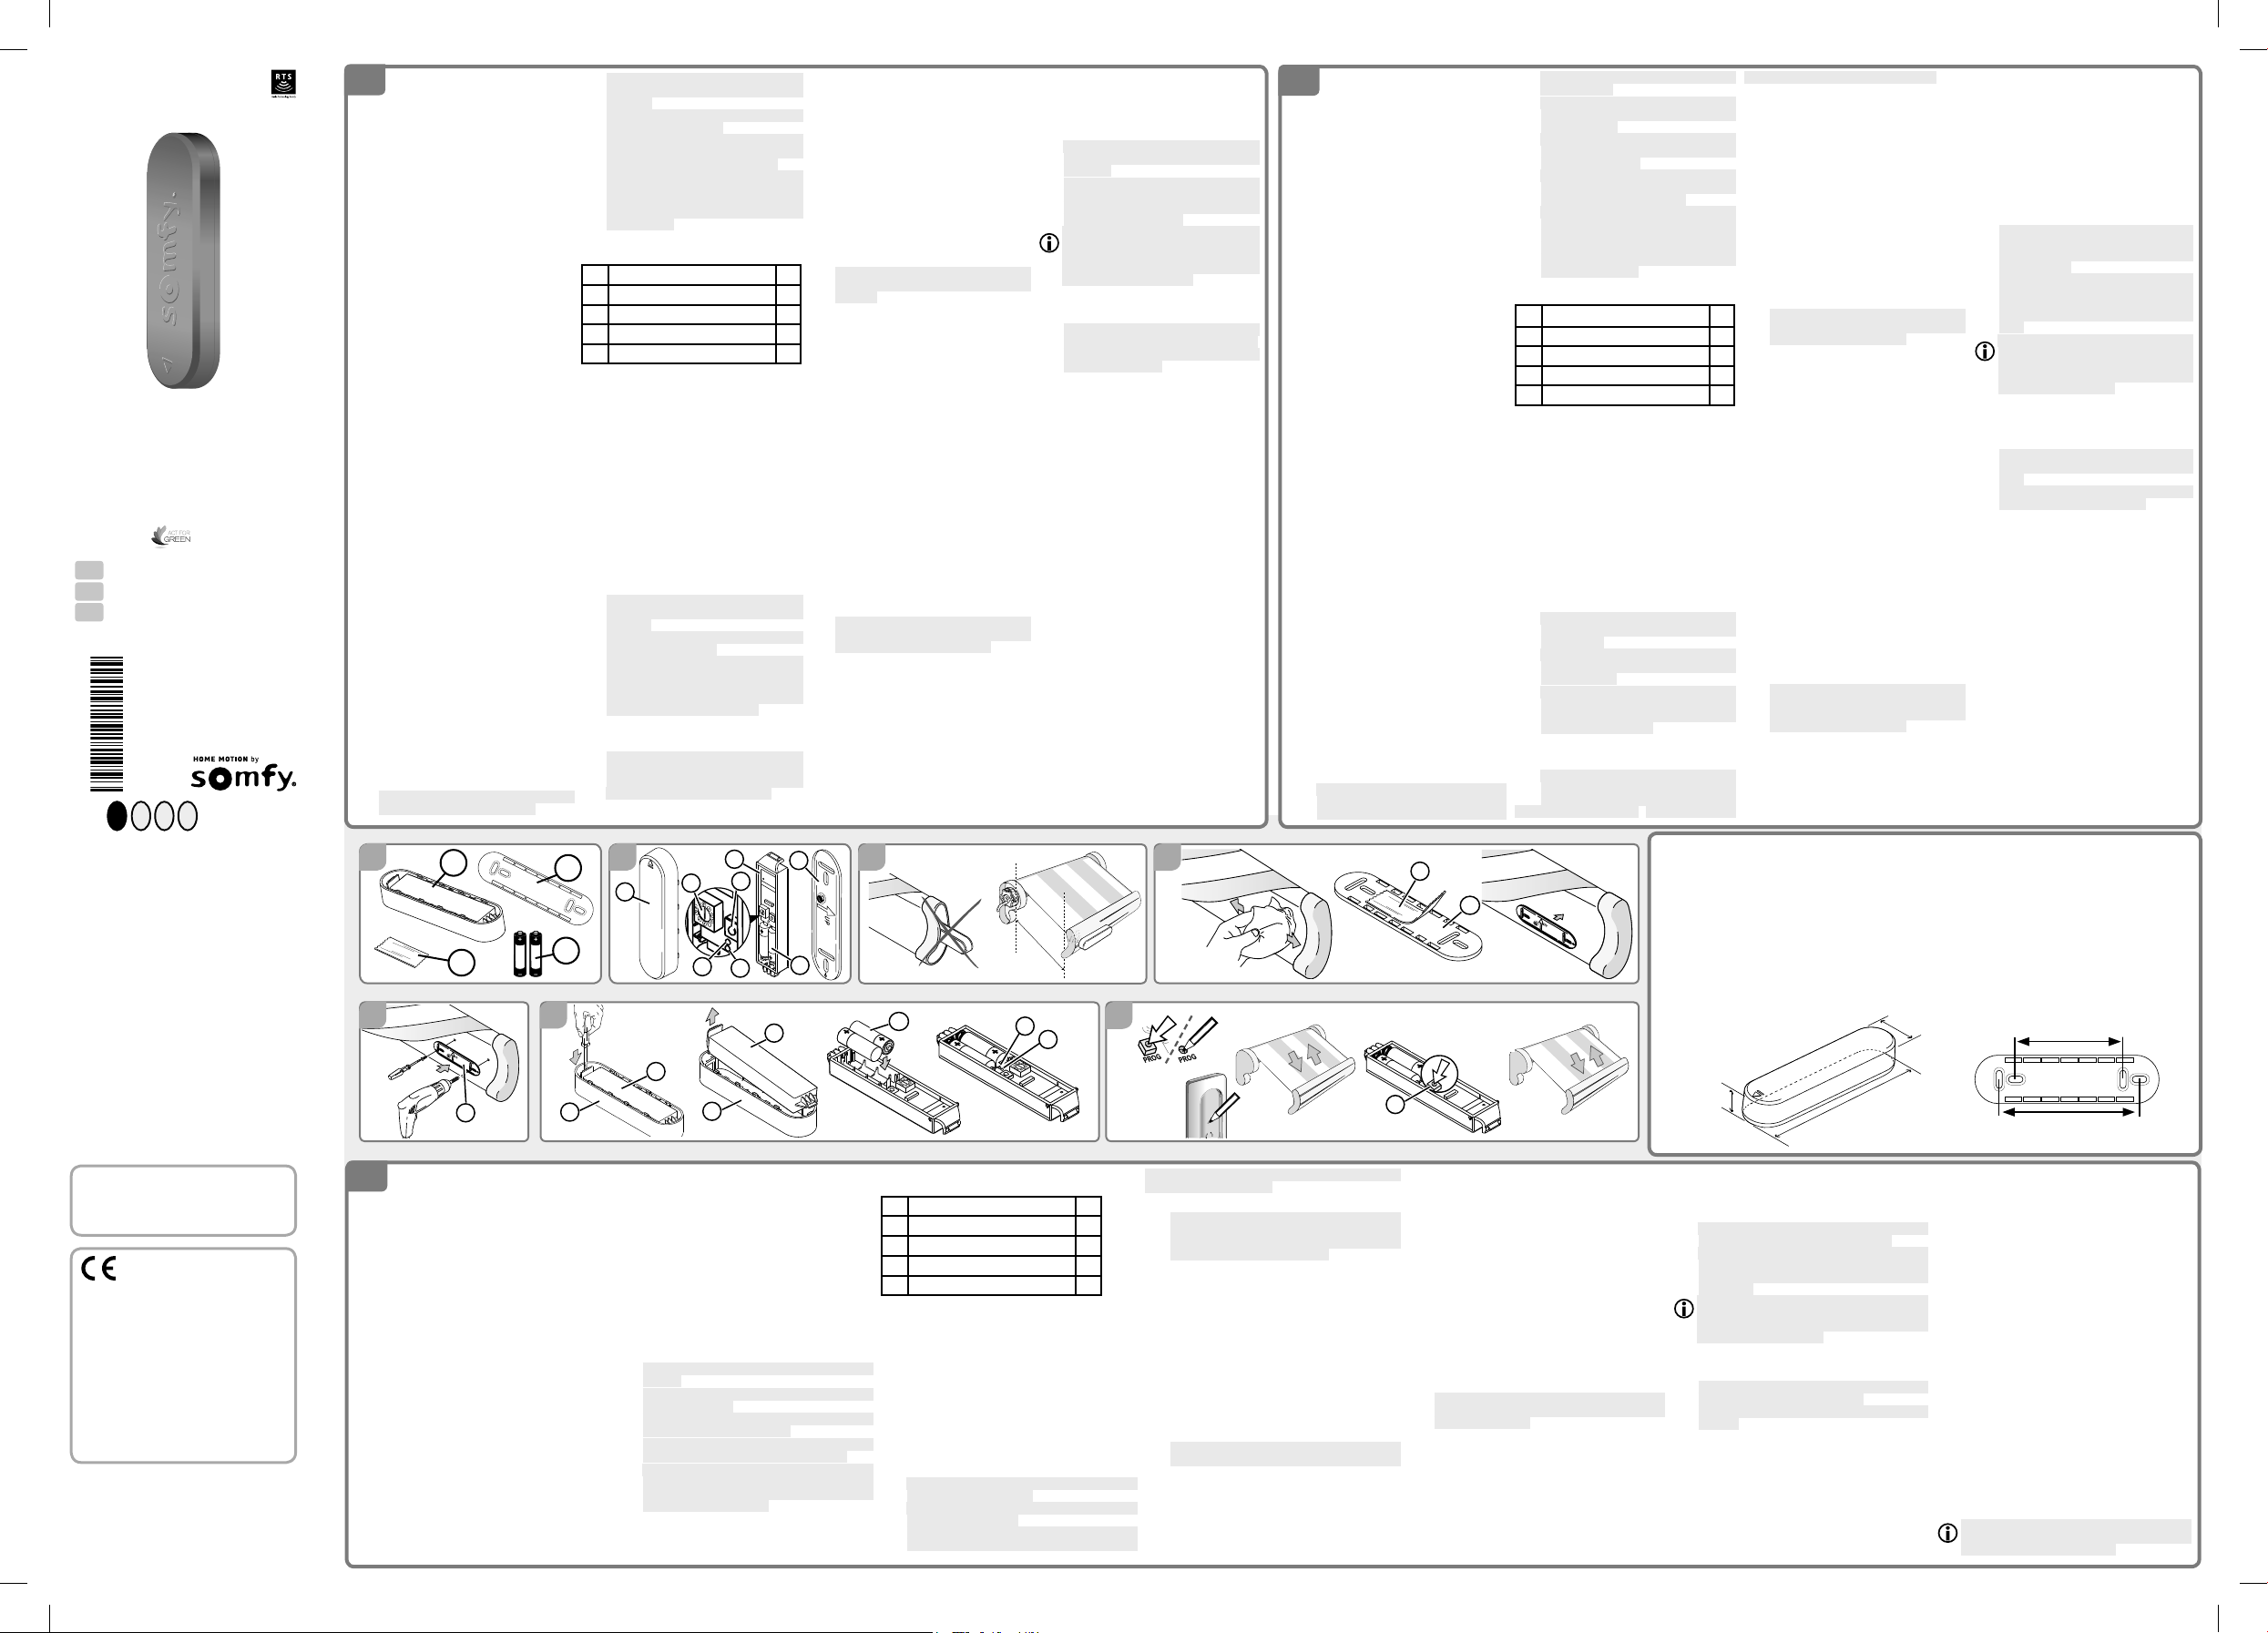
3. Contenu (Figure A)
Désignation Q.
Eolis 3D WireFree™ RTS 1
a
Support 1
g
Adhésif double face 1
c
Piles 1,5 V, type AAA (LR03) 2
d
4. Eolis 3D RTS en détails
(
Figure B)
e. Couvercle f. Capteur
g. Support h. Potentiomètre
i. Voyant rouge j. Voyant vert
k. Logement des piles
l. Bouton de programmation (PROG.)
5. Installation
5.1. Préconisations (Figure C)
L’Eolis 3D WireFree™ RTS se xe
sur la barre de charge au niveau des
extrémités ou au milieu. La détection des
secousses est plus sensible au niveau
des extrémités.
L’Eolis 3D WireFree™ RTS ne doit
jamais être enfermé dans la barre de
charge !
Le capteur ne doit pas être à plus
de 20 m du moteur
Certains équipements à forte puissance radio (par exemple des
casques hi sans ls) avec une
fréquence de transmission identique
peuvent affecter sa fonction.
5.2. Fixation avec l’adhésif
(
Figure D)
L’adhésif fourni est à usage
unique ! Toujours utiliser l’adhésif
fourni par Somfy. L’utilisation de
tout autre adhésif est interdit !
- Choisir un emplacement sur la face
.
interne ou externe de la barre de
charge. La surface doit être plane et
adaptée au collage du support.
- Si le positionnement est sur la face
interne de la barre de charge:
- contrôler que l’
support (g) n’empêche pas la fermeture
du store et ne se détériore pas.
- Nettoyer la barre de charge.
- Coller l’adhésif (c) sur l’arrière du
support (g).
- Fixer l’ensemble adhésif-support sur la
barre de charge :
la èche gravée sur le support avec
«UP» doit être orientée pointe vers
le haut.
Eolis 3D monté sur
son
5.3. Autres moyens de xation
du support (
Le support (g) se xe sans rondelle à
l’aide de:
- 2 vis cylindriques bombées ø 4 mm,
- ou 2 vis à tête fraisée ø 4 mm,
- ou 2 rivets Pop ø 4 mm,
- ou 2 accessoires de xation Somfy
(moyen de xation non fourni).
- Choisir un emplacement sur la face
interne ou externe de la barre de charge.
- Si le positionnement est sur la face
interne de la barre de charge:
- contrôler que l’
support (g) n’empêche pas la fermeture
du store et ne se détériore pas.
- En fonction du moyen de xation choisi,
percer deux trous dans la barre de
charge selon l’entraxe du support (voir
« Données techniques »).
Fixer le support : la èche gravée
sur le support avec «UP» doit être
orientée pointe vers le haut.
Figure E)
Eolis 3D monté sur
son
5.4. Mise en place des piles
(
Figure F)
- Sortir le capteur (f) du couvercle (e) à
l’aide d’un tournevis plat.
- Insérer les piles fournies (d) dans
le capteur en respectant la polarité
indiquée :
- Le voyant vert (j) s’allume pendant
1s si le niveau des piles est sufsant.
- Le voyant rouge (i) clignote si le
niveau des piles est insufsant.
- Laisser le capteur ouvert pour continuer
la mise en service.
6. Mise en service (Figure B)
Après la mise en service, s’assurer
que le seuil réglé permet la remontée
du store.
L’Eolis 3D WireFree™ RTS ne
fonctionne que lorsque l’ensemble
(e) + (f) est xé au support (g) et que
les réglages sont nis.
En conguration d’origine la sensi-
bilité est réglé sur une valeur de
seuil de 2.
sante pour assurer la sécurité de la
plupart des applications.
6.1. Enregistrement de l’Eolis 3D
à un moteur (Figure G)
Le moteur doit être déjà réglé et
enregistré à un point de commande.
Ne pas enregistrer un Eolis 3D à
plusieurs moteurs.
- Prendre une télécommande enregis-
trée dans le moteur.
- Appuyer sur le bouton PROG. de la
télécommande, jusqu’à ce que le store
effectue un va-et-vient.
- Faire un appui bref sur le bouton
PROG. (l) du capteur : l
effectue un va-et-vient, l’Eolis 3D est
enregistré dans le moteur.
6.2. Seuil pré-déni
Ce réglage correspond à une détection
des secousses du store à partir de
valeurs pré-réglées.
Cette sensibilité est sufsante pour
assurer la sécurité de la plupart des
applications.
Réglage du «Seuil pré-déni»
(Figure H)
- Mettre le potentiomètre (h) sur le seuil
voulu à l’aide d’un tournevis plat :
- Seuil 1 : des secousses de faible
intensité provoquent la remontée du
store.
- Vers le seuil 9 : des secousses de
plus forte intensité provoquent la
remontée du store.
- Insérer le capteur (f) dans le couvercle (e).
- Glisser le capteur sur le
support (g) jusqu’en butée :
Cette sensibilité est suf-
e moteur
Installationsanleitung
DE
Diese Anleitung beschreibt die
Installation, die Inbetriebnahme und die
Bedienung dieses Produkts.
1. Einleitung
Der Eolis 3D WireFree™ RTS ist
ein
kabelloser, autonomer
dreidimensionaler Bewegungssensor. Er
sorgt das automatische Einfahren einer
Markise, wenn heftiger Wind an ihr rüttelt.
Die Erkennung des Rüttelns ist abhängig
von einem Grenzwert für die Empndlichkeit.
Wenn die Markise zusätzlich mit einem
Sonnensensor kombiniert ist, erkennt
der Eolis 3D WireFree™ RTS heftige
Bewegungen und verhindert das Ausfahren
der Markise, um diese zu schützen.
Der Eolis 3D WireFree™ RTS wurde
ausschließlich für den Einsatz in Verbindung
mit Gelenkarm-Terrassenmarkisen mit
Kasten oder Kassette entwickelt. Der Eolis
3D WireFree RTS ist mit allen aktuellen
RTS-Antrieben, RTS-Funksendern und
den RTS-Sensoren von Somfy kompatibel.
und
2. Sicherheitshinweise
2.1. Sicherheit und Gewährleistung
Lesen Sie bitte vor der Montage und
Verwendung dieses Produktes diese
Installationsanleitung sorgfältig durch.
Dieses Produkt darf nur von qualizierten
Gebäudetechnikern installiert werden, an
welche sich diese Anleitung daher wendet.
Der Installateur muss sich außerdem
an die Normen und Vorschriften des
Installationslandes halten und die Kunden
darüber informieren, was bei der Benutzung
und Wartung des Produkts zu beachten ist.
Jede Verwendung zu anderen als den von
Somfy vorgegebenen Zwecken gilt als nicht
bestimmungsgemäß. Sie führt, wie jede
Nichtbeachtung der Anweisungen in dieser
Anleitung, zum Ausschluss der Haftung und
der Garantie durch Somfy.
Vor der Montage muss die Kompatibilität
dieses Produkts mit den dazugehörigen
Ausrüstungs- und Zubehörteilen geprüft
werden.
2.2. Spezische Sicherheitshinweise
Lassen Sie den Sensor niemals
fallen, bewahren Sie ihn vor
Erschütterungen, bohren Sie ihn
nicht an und tauchen Sie ihn nicht in
Flüssigkeiten.
Verwenden Sie zur Reinigung des
Sensors keine Schleif- oder
Lösungsmittel.
Reinigen Sie das Gerät nicht mit
einem Wasserstrahl oder
Hochdruckreiniger.
Stellen Sie sicher, dass der Sensor stets
sauber ist, und prüfen Sie regelmäßig,
ob er einwandfrei funktioniert.
Ihre Markise kann durch diesen
Sensor nicht vor plötzlichen
Windböen geschützt werden. Stellen
Sie im Falle einer meteorologischen
Gefahr sicher, dass die Markise
eingefahren bleibt.
3. Lieferumfang (Abbildung A)
Bezeichnung S.
Eolis 3D WireFree™ RTS 1
a
Halterung 1
g
Doppelseitiger Klebestreifen 1
c
Batterien 1,5 V, Typ AAA (LR03) 2
d
4. Details des Eolis 3D RTS
(
Abbildung B)
e. Deckel f. Sensor
g. Halterung h. Potentiometer
i. Rote Kontrollleuchte j. Grüne Kontrollleuchte
k. Batteriefach
l. Programmiertaste (PROG.)
5. Montage
5.1. Vorgaben (Abbildung C)
Der Eolis 3D WireFree™ RTS wird an
einem der Enden oder in der Mitte des
Ausfallprols installiert. Das Rütteln wird an
den Enden besser erkannt.
Der Eolis 3D WireFree™ RTS darf
keinesfalls im Ausfallprol eingeschlos
sen werden!
Die Entfernung zwischen Sensor und
Antrieb darf 20 m nicht
überschreiten
Geräte mit hoher Funkleistung (zum
Beispiel drahtlose Kopfhörer), die
dieselbe Frequenz nutzen, können
seine Funktion stören.
5.2. Befestigung mit
Klebeband (Abbildung D)
Das mitgelieferte Klebeband ist nur für
eine einmalige Verwendung bestimmt!
Immer das von Somfy mitgeliefert
Klebeband verwenden. Die Verwendung
.
anderer Klebemittel ist nicht zulässig!
- Wählen Sie einen Montageort an der
Außen- oder Innenseite des Ausfallprols.
Die Fläche muss eben und für das
Ankleben der Halterung geeignet sein.
- Bei einer Befestigung auf der Innenseite
des Ausfallprols:
- Vergewissern Sie sich, dass der auf der
Halterung (g) montierte
Schließen der Markise nicht behindert
und er dabei auch nicht beschädigt wird.
- Reinigen Sie das Ausfallprol.
- Kleben Sie das Klebeband (c) auf die
Rückseite der Halterung (g).
- Befestigen Sie die Halterung mit dem
Klebeband am Ausfallprol:
Der in der Halterung eingravierte Pfeil
mit dem Hinweis „UP“ muss mit der
Spitze nach oben weisen.
E
olis 3D das
5.3. Andere Befestigungsmittel für
die Halterung (
Die Halterung (g) kann ohne Unterlegscheiben
mit folgenden Verbindungsmitteln befestigt
werden:
- 2 Flachkopf-Zylinderschrauben ø 4 mm,
- oder 2 Inbusschrauben ø 4 mm,
- oder 2 Pop-Nieten ø 4 mm,
- oder 2 Somfy-Befestigungsmittel (nicht
im Lieferumfang).
- Wählen Sie einen Anbringungsort an der
Außen- oder Innenseite des Ausfallprols.
- Bei einer Befestigung auf der Innenseite
des Ausfallprols:
- Vergewissern Sie sich, dass der auf der
Halterung (g) montierte
Schließen der Markise nicht behindert
und er dabei auch nicht beschädigt wird
-
- Bohren Sie entsprechend dem gewählten
Befestigungsmittel im angegebenen
Abstand (siehe „Technische Daten“) zwei
Löcher in das Ausfallprol.
Befestigen Sie die Halterung: Der in
der Halterung eingravierte Pfeil mit
dem Hinweis „UP“ muss mit der
Spitze nach oben weisen.
Abbildung E)
Eolis 3D das
5.4. Einsetzen der Batterien
(Abbildung F)
- Lösen Sie den Sensor (f) mit einem
Schlitzschraubendreher aus dem Gehäuse (e).
- Setzen Sie die mitgelieferten Batterien(d)
in den Sensor ein und beachten Sie dabei
die angegebene Polarität:
- Die grüne Kontrollleuchte (j) leuchtet
1 s lang auf, wenn die Batterien
ausreichend geladen sind.
- Wenn die Batterieladung nicht ausreicht,
blinkt die rote Kontrollleuchte (i).
- Lassen Sie den Sensor für die
Fortsetzung der Inbetriebnahme geöffnet.
6. Inbetriebnahme (Abbildung B)
Vergewissern Sie sich nach der
Inbetriebnahme, dass der eingestellte
Grenzwert für das Einfahren der
Markise sorgt.
Der Eolis 3D WireFree™ RTS
funktioniert erst, wenn die Sätze von
(e) + (f) an der Halterung (g) befestigt
und die Einstellungen abgeschlossen
sind.
In der Werkseinstellung ist die
Empndlichkeit auf den Wert 2 einge-
Diese Empndlichkeit gewähr-
stellt.
leistet bei den meisten Anwendungen
einen sicheren Betrieb.
6.1. Einlernen des Eolis 3D
WireFree™ RTS an einem Antrieb
Abbildung G)
(
Der Antrieb muss bereits eingestellt
und mit einem Funksender verknüpft
sein.
Ein Eolis 3D darf nicht an mehreren
Antrieben eingelernt werden.
Nehmen Sie einen im Antrieb eingelernten
Funksender.
- Drücken Sie die PROG -Taste des
Funksenders, bis die Markise mit
einer kurzen Vor-/Zurück-Bewegung
bestätigt.
- Drücken Sie kurz auf die PROG-Taste
.
(l) des Sensors: D
kurze Vor-/Zurück-Bewegung aus, der
Eolis 3D ist im Antrieb eingelernt.
6.2. Voreingestellter Grenzwert
In dieser Einstellung wird das Rütteln an
der Markise anhand voreingestellter Werte
erkannt.
Diese Empndlichkeit gewährleistet bei
den meisten Anwendungen einen sicheren
Betrieb.
Änderung des „voreingestellten
Grenzwerts“
- Drehen Sie das Potentiometer (h) mit
er Antrieb führt eine
(Abbildung H)
Somfy SAS
50 avenue du Nouveau Monde
F-74300 CLUSES
www.somfy.com
FR - Par la présente Somfy déclare que le
produit est conforme aux exigences de la
Directive 2014/53/UE. Le texte complet de
déclaration de conformité est mis à disposition
à l’adresse internet www.somfy.com/ce.
DE - SOMFY erklärt hiermit, dass sich dieses
Produkt die Anforderungen der Richtlinie
2014/53/EU erfüllt. Der vollständige Text
der Konformitätserklärung ist unter der
Internetadresse www.somfy.com/ce verfügbar.
EN - Somfy hereby declares that this product
is in compliance with the requirements of
Directive 2014/53/EU. The full text of the
Declaration of Conformity is available at www.
somfy.com/ce.
Copyright © 2015 Somfy SAS. All rights reserved.
Somfy SAS, capital 20.000.000 Euros,
RCS Annecy 303.970.230 - 10/2015
A
a
c
g
d
E F
g
Installer Instructions
EN
These instructions describes how to install,
set up and operate this product.
e
1. Introduction
The Eolis 3D WireFree™ RTS is a
autonomous
automatically retracts the awning when vibration
is detected due to wind. The motion detection is
congured according to a predetermined sensitivity
threshold. If the awning is also connected to a sun
sensor, on windy and sunny days, the Eolis 3D
WireFree™ RTS will detect motion and prevent
the awning from extending to protect it.
The Eolis 3D WireFree™ RTS is designed only
for roller, encased or cassette type folding arm
patio awnings.
compatible with the current range of RTS motors,
RTS remote controls and RTS Somfy sensors.
three-dimensional motion sensor. It
The Eolis 3D WireFree RTS is
wireless and
2. Safety
2.1. Safety and responsibility
Before installing and using this product, please
read these instructions carefully.
This product must be installed by a professional
motorisation and home automation installer, for
whom these instructions are intended.
B C
e
f
Moreover, the installer must comply with current
standards and legislation in the country in which
the product is being installed, and inform his
customers of the operating and maintenance
conditions for the product. Any use outside the eld
of application specied by Somfy is forbidden. This
invalidates the warranty and discharges Somfy of
all liability, as does any failure to comply with the
instructions given herein.
Never begin installing without rst checking the
compatibility of this product with the associated
equipment and accessories.
f
l
h
i
j
e
g
k
f
2.2. Specic safety advice
Never drop, knock, drill or submerge the
sensor.
Do not use abrasive products or solvents to
clean the sensor.
Do not clean it using a water spray or high
pressure cleaning methods.
Ensure that the sensor is kept clean and
regularly check it is operating correctly.
This sensor will not protect your awning from
heavy gusts of wind. If weather conditions
present this sort of risk, ensure that the
awning remains closed.
L≤ 20m
d
j
i
G
PROG. 2 s
3. Contents (Figure A)
Description Q.
Eolis 3D WireFree™ RTS 1
a
Bracket 1
g
Double-sided adhesive 1
c
AAA (LR03) 1.5 V batteries 2
d
4. Eolis 3D RTS in detail (Figure B)
e. Casing f. Sensor
g. Bracket h. Potentiometer
i. Red indicator light j. Green indicator light
k. Battery housing
l. Programming button (PROG.)
5. Installation
5.1. Recommendations (Figure C)
The Eolis 3D WireFree™ RTS is xed to the
front bar at either end or in the middle. Vibration
detection is more effective at either end.
The Eolis 3D WireFree™ RTS must never be
enclosed in the front bar!
The sensor must not be more than
20 m from the motor
Operation can be affected by devices with
high power radio functions (such as wire
.
D
less headphones) that operate on the same
transmission frequency.
5.2. Fixing with adhesive (Figure D)
The adhesive supplied is only to be used
for this operation. Always use the adhe-
sive provided by Somfy. The use of any
other adhesive is prohibited.
- Choose a location on the inner or outer face
of the front bar. The surface must be at and
suitable for the bracket to be attaches.
- If the position is on the inner face of the front
bar:
- check that the
bracket (g), does not obstruct the closure of the
awning and is not damaged during this operation.
- Clean the front bar.
- Apply the adhesive (c) to the rear of the
bracket (g).
- Fix the adhesive-bracket assembly to the front bar:
the arrow engraved on the bracket with
«UP» must be positioned to point upwards.
Eolis 3D, when mounted on
5.3. Other methods for xing the
bracket (Figure E)
The bracket (g) is mounted without washers
using:
-
- 2 x ø 4 mm pan head screws,
c
g
PROG. 0.5 s
l
- or 2 x ø 4 mm countersunk screws,
- or 2 x ø 4 mm pop rivets,
- or 2 Somfy mounting accessories (xings
not supplied).
- Choose a location on the inner or outer face
of the front bar.
- If the position is on the inner face of the front
bar:
- check that the
its bracket (g), does not obstruct the closure
of the awning and is not damaged during this
operation.
its
- Depending on the xing method chosen, drill
two holes in the front bar according to the centre
distance of the bracket (see “Technical data”).
Mount the bracket: the arrow engraved on
the bracket with «UP» must be positioned
to point upwards.
Eolis 3D, when mounted on
5.4. Fitting the batteries (Figure F)
- Remove the sensor (f) from the cover (e)
using a at blade screwdriver.
- Insert the batteries supplied (d) in the sensor,
taking care to observe the polarity indicated:
The green indicator light (j) will come on for 1
second if the battery level is sufcient.
- The red indicator light (i) will ash if the
Données techniques
Bandes de fréquence et
Puissance maximale utilisée
433,050 MHz - 434,790 MHz
e.r.p. <10 mW
Indice de protection : IP 44
Température d’utilisation :
-20°C à +60°C
Alimentation :
2 piles type AAA (LR03), 1,5 V.
25 mm
battery level is insufcient.
- Leave the sensor open to continue the set up.
Technische Daten
Frequenzband und maximale
leistung
:
:
433.050 MHz - 434.790 MHz
e.r.p. <10 mW
Schutzart: IP 44
Temperaturbereich:
-20 °C bis +60 °C
Spannungsversorgung:
2 Batterien Typ AAA (LR03), 1,5 V.
153 mm
6. Set up (Figure B)
After set up, make sure that the threshold
set enables the awning to be raised.
The Eolis 3D WireFree™ RTS will only
function when the assembly (e) + (f) is
xed to the bracket (g) and all settings are
complete.
In the default conguration, the sensitivity
threshold value is set to 2.
is sufcient to provide protection for the
majority of applications.
6.1. Programming the Eolis 3D to a
motor (Figure G)
The motor must have already been set and
programmed to a control point.
Do not program an Eolis 3D to several
motors.
- Take a remote control that is already
programmed in the memory of the motor.
- Press the PROG. button of the remote
control, until the awning jogs.
- Briey press the PROG. button (l) on the
he motor will jog and the Eolis 3D
sensor: T
is programmed to the motor.
6.2. Pre-dened threshold
This sensitivity
Technical data
Frequency range and max
power used
433.050 MHz - 434.790 MHz
e.r.p. <10 mW
Index protection rating: IP 44
38 mm
This setting corresponds to vibration detection
of the awning according to pre-set values.
This sensitivity is sufcient to provide protection
for the majority of applications.
Setting the “Pre-dened threshold”
Operating temperature:
-20°C to +60°C
Power supply:
2 x AAA (LR03) 1.5 V batteries.
93.5 mm
120.5 mm
(Figure H)
- Set the potentiometer (h) to the required
threshold using a at blade screwdriver:
- Threshold 1: light vibration will trigger the
retraction of the awning.
- Towards threshold 9: stronger vibration will
trigger the retraction of the awning.
- Insert the sensor (f) in the cover (e).
- Slide the sensor onto the bracket (g) until it
hits the stop. Move the awning to simulate the
vibration in order to check the setting.
6.3. Personalised threshold
- This setting corresponds to vibration detection
based on a sensitivity threshold that has
been set by the installer. The awning is
manually shaken until automatic retraction is
triggered: the strength of the vibration caused
is recorded by the sensor.
If the awning is not shaken before the
automatic retraction, the sensor will return
to the original conguration.
:
5050583D Eolis-3D-RTS-FR-DE-EN.indd 1 15/01/2016 09:04
Page 2
Exercer un mouvement sur le store an de contrôler le
FR
réglage et le modier si la sensibilité aux secousses est
incorrecte.
6.3. Seuil personnalisé
- Ce réglage correspond à une détection de secousses
à partir d’un seuil de sensibilité réglé par action
de l’installateur. Le store est secoué manuelle
ment jusqu’à la remontée automatique : l’intensité
des secousses provoquées est enregistrée par le capteur.
Si aucune secousse n’est émise avant la remontée auto-
matique, le capteur se retrouve en conguration
d’origine.
Après le réglage du seuil, le capteur passe en mode
démonstration lors des deux premiers cycles. Ce mode permet
de modier facilement le réglage sélectionné. Un simple appui
sur la touche STOP/My arrête la remontée du store et permet
de modier le seuil de sensibilité en renouvelant les secousses
manuellement.
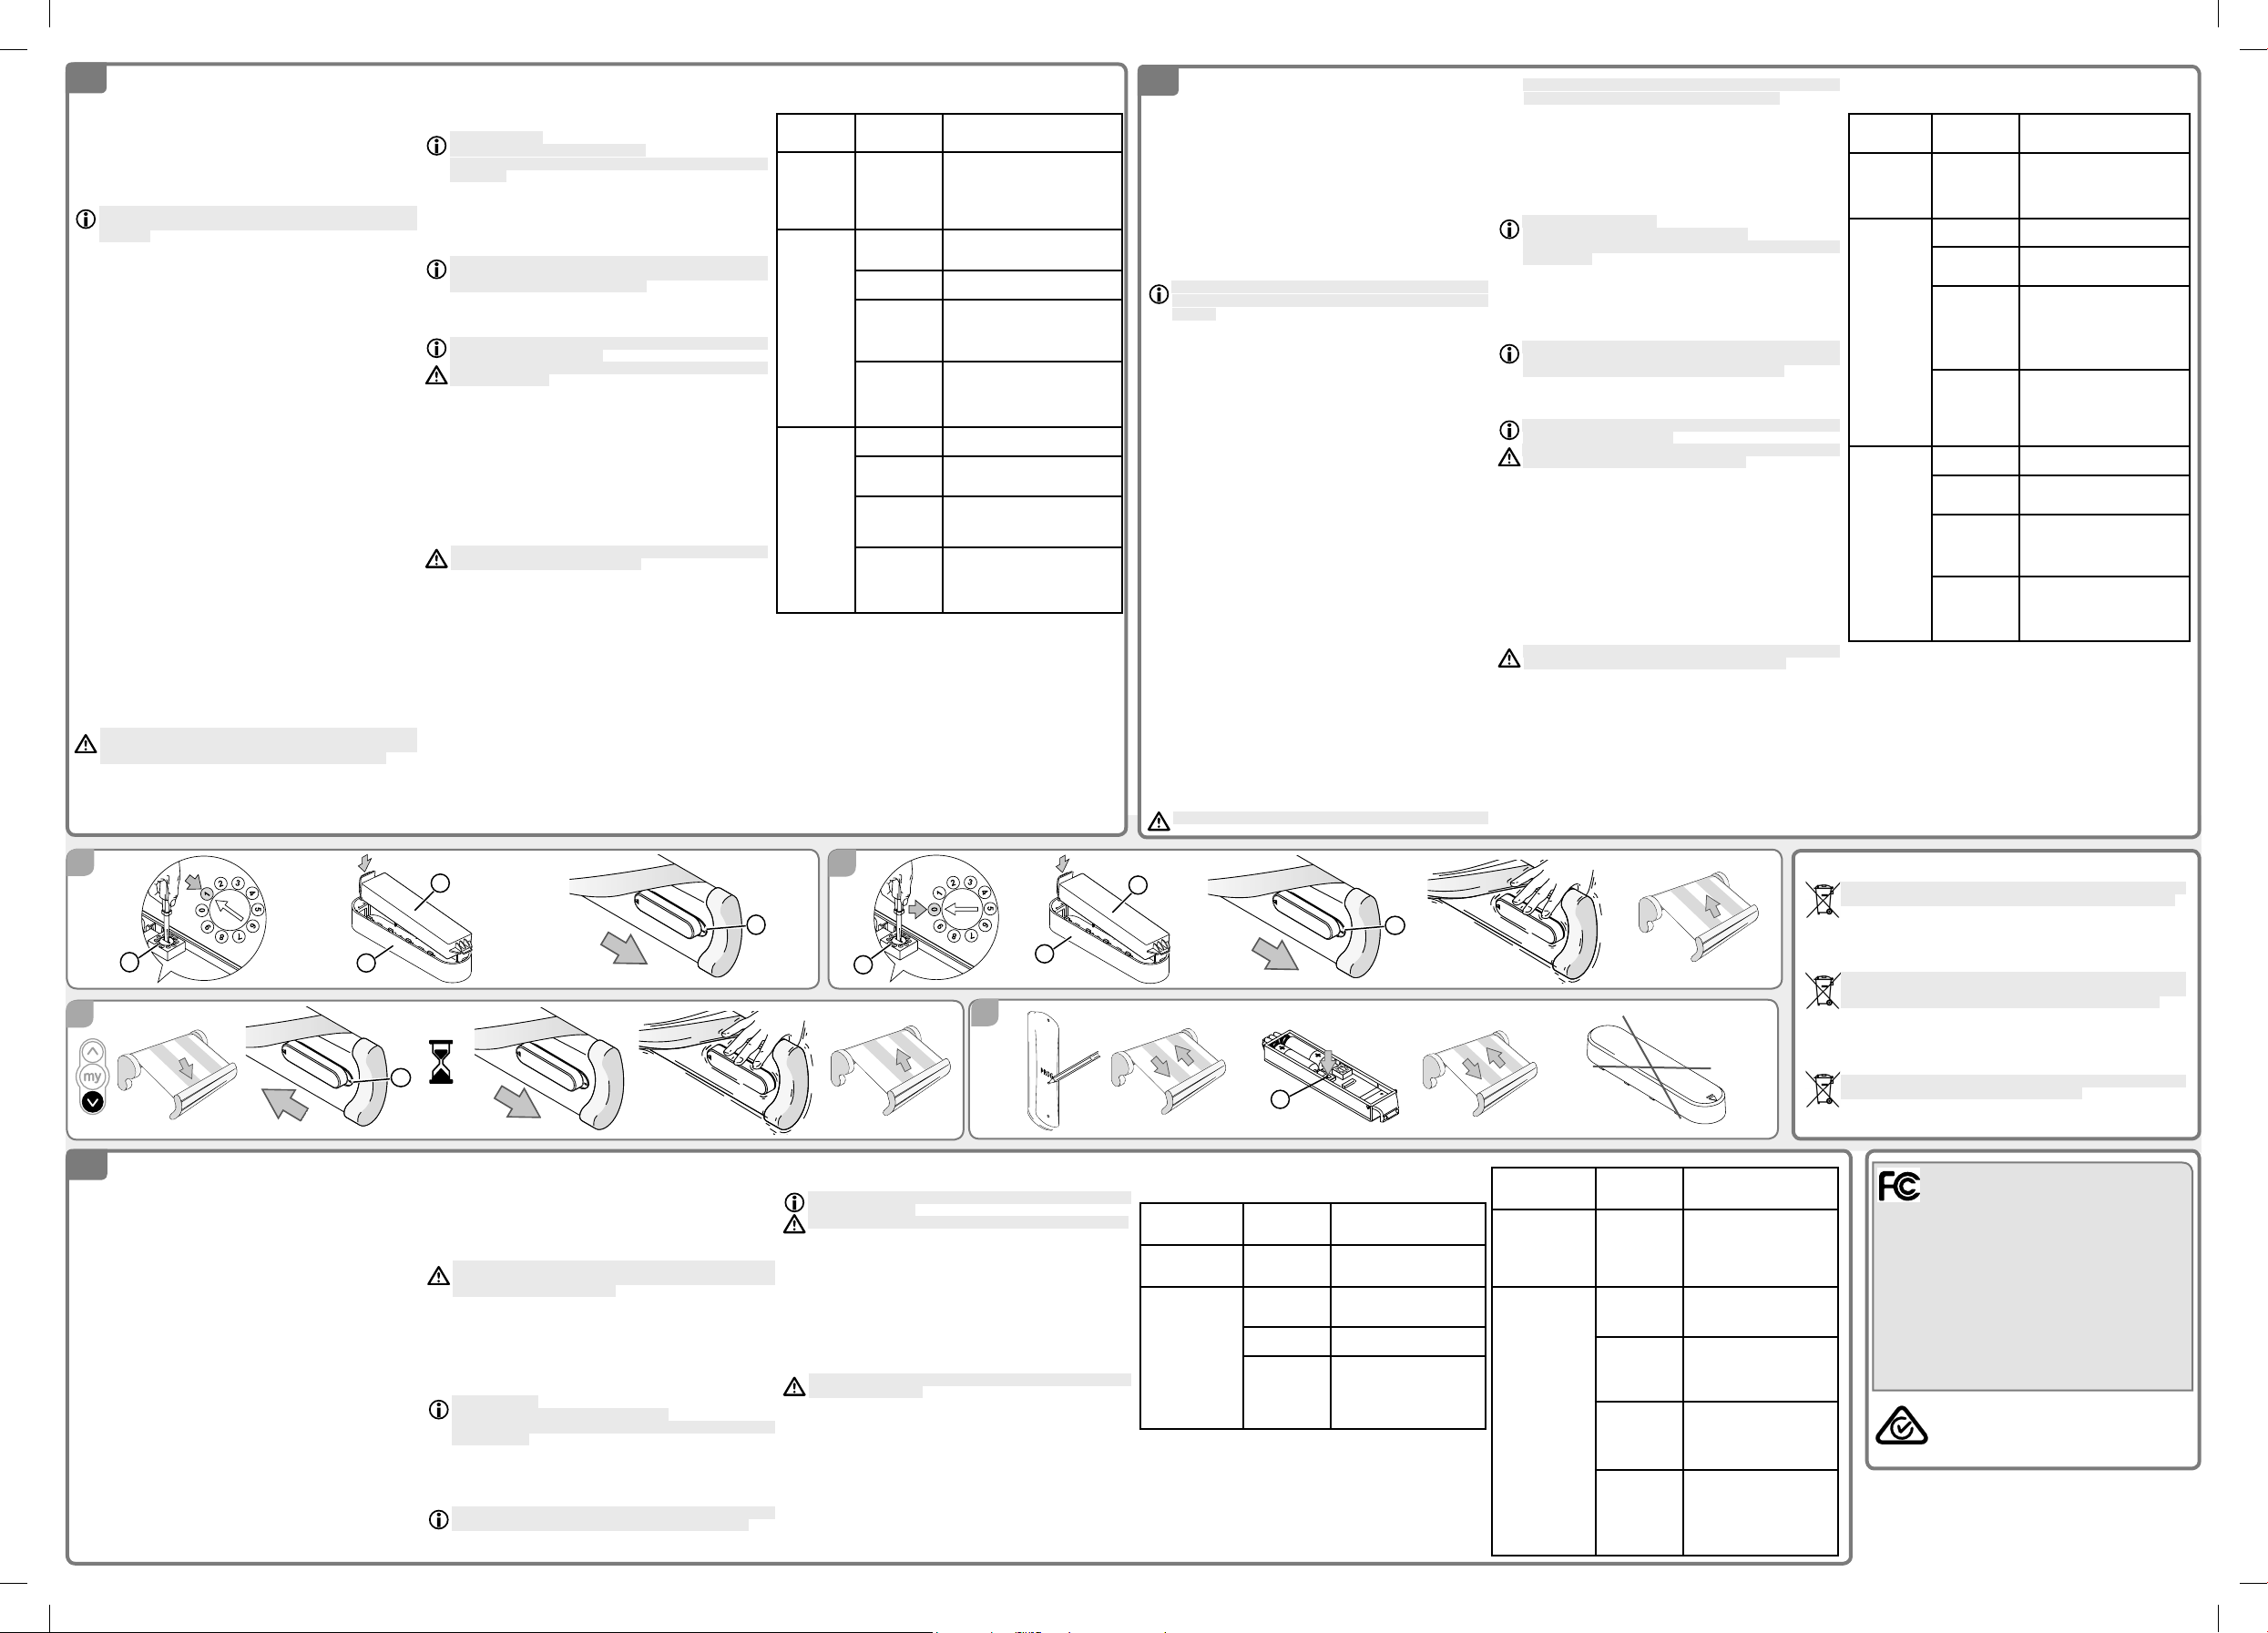
6.3.1. Réglage du «Seuil personnalisé» (Figure I)
- Mettre le potentiomètre (h) sur 0 avec un tournevis plat.
- Insérer le capteur (f) dans le couvercle (e).
- Glisser l’ensemble sur le support (g) jusqu’en butée :
le capteur est en mode « Seuil personnalisé ».
- Exercer un mouvement sur le store pour simuler le seuil
maximal de vibration autorisée et ce jusqu’à la remontée
automatique du store : le capteur est réglé et passe en mode
Démonstration.
Contrôle du réglage :
- Descendre le store puis exercer des mouvements de vibration
sur le store pour simuler le vent et provoquer la remontée du
store :
- Si le store réagit de façon satisfaisante, le capteur est réglé
correctement,
- Si le store ne réagit pas de façon satisfaisante, arrêter la
remontée du store en appuyant sur la touche STOP/My
et passer à l’étape « Modication du réglage du seuil
personnalisé».
6.3.2. Modication du réglage du «Seuil personnalisé»
(Figure J)
- Descendre le store.
- Désengager l’ensemble couvercle-capteur du support (g)
et attendre 2 s.
- Enclencher l’ensemble couvercle-capteur sur le support :
le capteur est en mode « Seuil personnalisé ».
Si l’ensemble couvercle-capteur est désengagé du
support pendant plus de 4 s, enclencher alors à nouveau
l’ensemble et répéter les deux étapes précédentes.
- Exercer un mouvement sur le store pour simuler le
seuil maximal de vibration autorisée et ce jusqu’à la remontée
automatique du store : le capteur est réglé.
7.
Mode de fonctionnement
- L’apparition du vent engendre la vibration du store. Si la
vibration est supérieure au seuil réglé, le store remonte
automatiquement.
Il est impossible:
- d’empêcher la remontée du store.
- de descendre le store pendant les 30 s qui suivent la
remontée.
- Lorsque le capteur ne détecte plus aucune vibration pendant
30s : il est alors possible de piloter l’application en mode
Si l’Eolis 3D est associé à un capteur soleil et que
manuel.
le soleil apparaît, alors le store descend automatiquement
au bout de 12 min.
Lors de forte bourrasque de vent et de journée ensoleilllée, Somfy conseille de désactiver la fonction « Soleil »
pour protéger au mieux votre store.
8. Réglages supplémentaires
8.1. Remplacement des piles (Figure F)
Pendant le remplacement des piles, les réglages du
capteur restent mémorisés.
Ne jamais utiliser de piles rechargeables pour alimenter le
capteur Eolis 3D !
- Retirer l’ensemble capteur (f) / couvercle (e) du support (g) et
suivre la procédure du chapitre 5.4. «Mise en place des piles».
- Remettre le capteur (f) dans son couvercle (e) puis glisser
l’ensemble sur le support (g) jusqu’en buté.
8.2. Suppression l’Eolis 3D d’un moteur (
La procédure à suivre pour la suppression de l’Eolis 3D
WireFree™ RTS d’un moteur est identique à celle de
l’enregistrement : voir le chapitre 6.1. «Enregistrement de l’Eolis 3D
WireFree™ RTS à un moteur».
8.3 Suppression de tous les capteurs
La remise à zéro supprime tous les capteurs (soleil, vent,
etc) associés au moteur du store !
- Prendre une télécommande enregistrée dans le moteur.
- Appuyer sur le bouton PROG. de la télécommande, jusqu’à
ce que le store effectue un va-et-vient.
- Faire un appui long (7 s) sur la touche PROG d’un capteur
associé ou non au moteur du store : le store effectue deux
va-et-vient. Tous les capteurs sont supprimés de la mémoire
du moteur.
Figure K)
9. Astuces et conseils
9.1. Questions sur l’Eolis 3D?
Constats
Aucune
des LEDs
s’allume
après la mise
en place des
piles.
Le store ne
remonte pas
automatiquement à
l’apparition
du vent.
Le store
remonte
régulièrement
alors qu’il
n’y a pas de
vent.
Causes
possibles
Les piles sont
mal mises en
place.
Le capteur
n’est pas
enregistré
Le seuil est mal
réglé.
Le capteur ou
le moteur est
en panne.
La réception
radio est
altérée par des
équipements
radio externes
Les piles sont
faibles.
Le capteur est
mal inséré dans
le support.
Le capteur est
en panne.
La connexion
radio entre
le capteur et
le moteur ne
marche pas.
Vérier le sens de montage des
piles dans le capteur.
Enregistrer le capteur au moteur,
voir chapitre 6.1.
Modier le seuil, voir chapitre 6.2.
ou 6.3.
Secouer le store pour le faire
remonter. S’il ne remonte pas,
remplacer les piles voir chapitre 8.1.
S’il ne remonte toujours pas,
contrôler le capteur et le moteur.
Arrêter les équipements radio au
alentours.
Remplacer les piles du capteur,
voir chapitre 8.1.
Enclencher le capteur dans le
support jusqu’en butée.
Remplacer les piles du capteur,
voir chapitre 8.1.
Si le store remonte toujours,
remplacer le capteur.
Remplacer les piles voir chapitre
8.1.
S’il ne remonte toujours pas,
contrôler le capteur.
Solutions
Schlitzschraubendreher auf den gewünschten Grenzwert:
DE
- Grenzwert 1 : Schon schwaches Rütteln veranlasst die
Markise zum Einfahren.
- In Richtung Grenzwert 9: Immer stärkeres Rütteln ist
erforderlich, um die Markise zum Einfahren zu veranlassen.
- Setzen Sie den Sensor (f) in das Gehäuse (e) ein.
- Schieben Sie den Sensor bis zum Anschlag auf die Halterung (g).
Bewegen Sie die Markise um Überprüfen Sie die Einstellungen,
wenn die Empndlichkeit auf Rütteln korrekt ist.
6.3. Individueller Grenzwert
- Der Installateur kann den Empndlichkeitsgrenzwert für das
Erkennen von Rütteln einstellen. Dabei wird an der Markise wird
manuell gerüttelt, bis sie automatisch einfährt: Die Intensität des
Rüttelns wird vom Sensor gespeichert.
Wenn vor dem automatischen Einfahren nicht gerüttelt wird,
werden die Werkseinstellungen des Sensors wieder
aktiviert.
Nach der Einstellung des Grenzwerts geht der Sensor bei den
ersten beiden Zyklen in einen Demo-Modus. In diesem Modus kann
die gewählte Einstellung einfach geändert werden. Ein einmaliger
Druck auf die STOP/My-Taste hält das Einfahren der Markise an
und ermöglicht es, die Empndlichkeitsgrenze durch erneutes
manuelles Rütteln zu ändern.
6.3.1. Einstellung des „Individuellen Grenzwerts“
(Abbildung I)
- Drehen Sie das Potentiometer (h) mit einem
Schlitzschraubenzieher auf 0.
- Setzen Sie den Sensor (f) in das Gehäuse (e) ein.
- Schieben Sie die Baugruppe bis zum Anschlag auf die Halterung (g):
Der Sensor ist jetzt im Modus „Individueller Grenzwert“.
- Bewegen Sie die Markise, um die Obergrenze für die
Schwingungen zu simulieren, und zwar solange, bis die Markise
automatisch einfährt: Der Sensor ist eingestellt und geht in den
Demo-Modus.
Überprüfung der Einstellung:
- Fahren Sie die Markise aus und simulieren Sie durch Rütteln an
der Markise solange Wind, bis die Markise einfährt:
- Wenn die Markise wie erwartet reagiert, ist der Sensor korrekt
eingestellt.
- Wenn die Markise nicht wie erwartet reagiert, können Sie das
Einfahren durch Druck auf die STOP/My-Taste anhalten und
mit den Schritt Änderung der Einstellung des „individuellen
Grenzwerts“ fortfahren.
6.3.2. Änderung der Einstellung des „individuellen
Grenzwerts“
- Fahren Sie die Markise aus.
- Entfernen Sie Gehäuse und Sensor zusammen von der Halterung
(g) und warten Sie 2 s.
- Schieben Sie Gehäuse und Sensor wieder auf die Halterung:
Der Sensor ist jetzt im Modus „Individueller Grenzwert“.
(Abbildung J)
Wenn Gehäuse und Sensor länger als 4 s von der Halterung
getrennt bleiben, schieben Sie die Baugruppe wieder auf
und wiederholen Sie die beiden vorigen Schritte.
- Bewegen Sie die Markise, um die Obergrenze für die Vibrationen
zu simulieren, und zwar solange, bis die Markise automatisch
einfährt: Der Sensor ist eingestellt.
7.
Funktionsweise
- Aufkommender Wind versetzt die Markise in Schwingungen.
Wenn die Schwingungen den eingestellten Grenzwert
überschreiten, fährt die Markise automatisch ein.
Es ist dann nicht möglich:
- das Einfahren der Markise zu verhindern.
- die Markise innerhalb von 30 s nach dem Einfahren wieder
auszufahren.
- Wenn der Sensor 30 s lang keine Schwingungen mehr feststellt:
kann die Anwendung manuell gesteuert werden.
- Wenn der Eolis 3D mit einem Sonnensensor verknüpft ist
und die Sonne erscheint, fährt die Markise nach 12 Minuten
automatisch aus.
Wenn es an einem sonnigen Tag zu heftigen Windböen
kommt, empehlt Somfy, die „Sonnen“-Funktion zu deaktivieren, um Ihre Markise bestmöglich zu schützen.
8. Zusätzliche Einstellmöglichkeiten
8.1. Austausch der Batterien (Abbildung F)
Die Sensoreinstellungen bleiben während des
Batterietauschs gespeichert.
Verwenden Sie für die Versorgung des Sensors Eolis
3D keinesfalls wiederauadbare Batterien!
- Nehmen Sie die Baugruppe Sensor(f) / Gehäuse (e) von der
Halterung (g) und folgen Sie den Anweisungen in Abschnitt 5.4.
„Einsetzen der Batterien“.
- Setzen Sie den Sensor (f) wieder in das Gehäuse(e) und schieben
Sie beide zusammen bis zum Anschlag auf die Halterung (g).
8.2. Löschen des Eolis 3D aus einem Antrieb
(
Abbildung K)
Die Vorgehensweise für das Löschen des Eolis 3D WireFree™ RTS
aus einem Antrieb ist identisch mit dem Einlernen: Siehe Abschnitt
6.1. „Einlernen des Eolis 3D WireFree™ RTS an einem Antrieb“.
8.3 Löschen aller Sensoren
Eine Rücksetzung auf Null löscht alle verknüpften Sensoren
(Sonne, Wind usw.) aus dem Antrieb der Markise!
- Nehmen Sie einen im Antrieb eingelernten Funksender.
- Drücken Sie die PROG -Taste des Funksenders, bis die Markise
mit einer kurzen Vor-/Zurück-Bewegung bestätigt.
- An einem Sensor, der mit dem Antrieb der Markise verknüpft
ist oder nicht, lange (7 s) auf die Taste PROG drücken: Die
Markise führt zwei kurze Vor-/Zurück-Bewegung aus. Alle
Sensoren sind aus dem Speicher des Antriebs gelöscht.
9. Tipps und Hinweise
9.1. Fragen zum Eolis 3D?
Fehler
Nach dem
Einsetzen
der Batterien
leuchtet keine
der LEDs.
Die Markise
fährt bei
aufkommendem
Wind nicht
automatisch
ein.
Die Markise
fährt
regelmäßig ein,
obwohl kein
Wind herrscht.
Mögliche
Ursachen
Die Batterien
sind falsch
eingesetzt.
Der Sensor ist
nicht eingelernt
Der Grenzwert
ist schlecht
eingestellt.
Der Sensor oder
der Antrieb ist
defekt.
Der
Funkempfang
wird durch
externe
Funkgeräte
gestört.
Die Batterien
sind schwach.
Der Sensor sitzt
nicht richtig in
seiner Halterung.
Der Sensor ist
defekt.
Die
Funkverbindung
zwischen Sensor
und Antrieb
funktioniert nicht.
Lösungen
Überprüfen Sie die Richtung, in der
die Batterien im Sensor eingesetzt
sind.
Lernen Sie den Sensor am Antrieb
ein, siehe Abschnitt 6.1.
Ändern Sie den Grenzwert, siehe
Abschnitt 6.2. oder 6.3.
Rütteln Sie an der Markise,
damit sie einfährt. Wenn sie nicht
einfährt, sollten Sie die Batterien
austauschen, siehe Abschnitt 8.1.
Wenn sie immer noch nicht einfährt,
müssen Sie den Sensor und den
Antrieb überprüfen.
Schalten Sie die Funkgeräte in der
Umgebung aus.
Tauschen Sie die Batterien des
Sensors aus, siehe Abschnitt 8.1.
Schieben Sie den Sensor bis zum
Anschlag auf die Halterung.
Tauschen Sie die Batterien des
Sensors aus, siehe Abschnitt 8.1.
Wenn die Markise immer noch
einfährt, muss der Sensor ersetzt
werden.
Tauschen Sie die Batterien aus,
siehe Abschnitt 8.1.
Wenn sie immer noch nicht einfährt,
müssen Sie den Sensor überprüfen.
H
h
e
J
g
After the threshold is set, the sensor will switch to
EN
demonstration mode for the rst two cycles. This mode
enables users to easily modify the selected setting.
Pressing the STOP/My button once will stop the awning retracting
and allow the user to modify the sensitivity threshold by manually
shaking the awning.
6.3.1. Setting the “Personalised threshold” (Figure I)
- Turn the potentiometer (h) to 0 with a at blade screwdriver.
- Insert the sensor (f) in the cover (e).
- Slide the assembly onto the bracket (g) until it hits the stop:
the sensor is in “Personalised threshold” mode.
- Move the awning to simulate the threshold for the maximum
vibration permitted, and continue until the awning automatically
retracts: the sensor is set and will switch to Demonstration
mode.
Checking the setting:
- Extend the awning, then shake it to simulate vibration by the
wind to cause the awning to retract:
- If the awning reacts as required, the sensor has been
correctly set,
- If the awning does not react as required, stop the
retraction of the awning by pressing the STOP/My button
and go to the step entitled “Modifying the personalised
threshold setting”.
f
2 s.
6.3.2. Modifying the “Personalised threshold” setting
(Figure J)
- Extend the awning.
- Detach the cover-sensor assembly from the bracket (g) and
wait for 2 seconds.
- Fit the cover-sensor assembly onto the bracket: the sensor is in
“Personalised threshold” mode.
If the cover-sensor assembly is detached from the bracket
for more than 4 seconds, tre-engage the assembly and
repeat the two previous steps.
- Move the awning to simulate the threshold for the maximum
vibration permitted, and continue until the awning automatically
retracts: the sensor has been set.
7.
Method of operation
- Wind will cause the awning to vibrate. If the vibration is greater
than the set threshold, the awning will automatically retract.
It is impossible:
- to prevent the awning from retracting.
- to extend the awning wait for 30 seconds after the awning
has retracted.
- When the sensor stops detecting any vibration for 30 seconds: the
application can be controlled in manual mode.
- If the Eolis 3D is connected to a sun sensor and the sun
comes out, then the awning will extend after 12 mins.
On gusty, sunny days, Somfy recommends that the «Sun»
function be deactivated to better protect your awning.
I
g
e
h
e
K
8. Additional settings
8.1. Battery replacement (Figure F)
When the batteries are replaced, the sensor settings will
remain memorised.
Never use rechargeable batteries for the Eolis 3D sensor!
Remove the sensor (f) / cover assembly (e) from the bracket
(g) and follow the procedure in section 5.4. “Fitting the batteries”.
- Ret the sensor (f) in the cover (e) and slide the assembly onto
the bracket (g) until it reaches the stop.
8.2. Deleting an Eolis 3D from a motor (
The procedure for deleting the Eolis 3D WireFree™ RTS from a
motor is identical to the programming procedure: see section 6.1.
“Programming the Eolis 3D WireFree™ RTS to a motor”.
8.3 Deleting all sensors
Resetting deletes all sensors (sun, wind, etc.) connected
to the awning motor!
- Take a remote control that is already programmed in the
memory of the motor.
- Press the PROG. button of the remote control, until the awning
jogs.
- Press and hold (7 seconds) the sensor PROG button (the
sensor does not have to be linked to the awning motor): the
awning will jog twice. All the sensors have been deleted from
the motor’s memory.
Figure K)
f
l
9. Tips and recommendations
9.1. Questions on the Eolis 3D?
Observations
None of the LEDs
come on after the
batteries are tted.
The awning does
not automatically
retract when the
wind increases.
Possible
causes
The batteries
are incorrectly
tted.
The sensor
is not
programmed
The threshold is
incorrectly set.
The sensor or
the motor is out
of order.
Check the direction in which
the batteries are inserted into
the sensor.
Program the sensor to the
motor, see section 6.1.
Modify the threshold, see
section 6.2. or 6.3.
Shake the awning to make it
retract. If it does not retract,
replace the batteries (see
section 8.1).
If it still does not retract, check
the sensor and the motor.
g
Solutions
Observations
The awning does
not automatically
retract when the
wind increases.
The awning
frequently retracts
when there is no
wind.
Possible
causes
External radio
equipment
is interfering
with the radio
reception
The batteries
are low.
The sensor
is incorrectly
inserted in the
bracket.
The sensor is
not operating.
The radio
connection
between the
sensor and the
motor is not
working.
Solutions
Turn off all radio equipment
nearby.
Replace the sensor batteries,
see section 8.1.
Engage the sensor in the
bracket until it reaches the
stop.
Replace the sensor batteries,
see section 8.1.
If the awning still retracts,
replace the sensor.
Replace the batteries
(see section 8.1).
If it still does not retract,
check the sensor.
Veiller à séparer les piles et batteries des autres types de
déchets et à les recycler via votre système local de collecte.
Die Batterien und Akkus von den restlichen Haushaltsabfällen
trennen und entsprechend den geltenden Vorschriften im
Handel oder den kommunalen Sammelstellen entsorgen.
Ensure batteries are separated from other types of waste and
are recycled via your local recycling centre.
This device complies with Part 15 of the FCC
Rules.
Operation is subject to the following two
conditions:
- this device may not cause harmful interference, and
- this device must accept any interference received, including interference that may cause undesired operation.
Warning !
Changes or modications not expressly approved by the
manufacturer could void the user’s authority to operate
the equipment.
5050583D Eolis-3D-RTS-FR-DE-EN.indd 2 15/01/2016 09:04
 Loading...