

Page 1
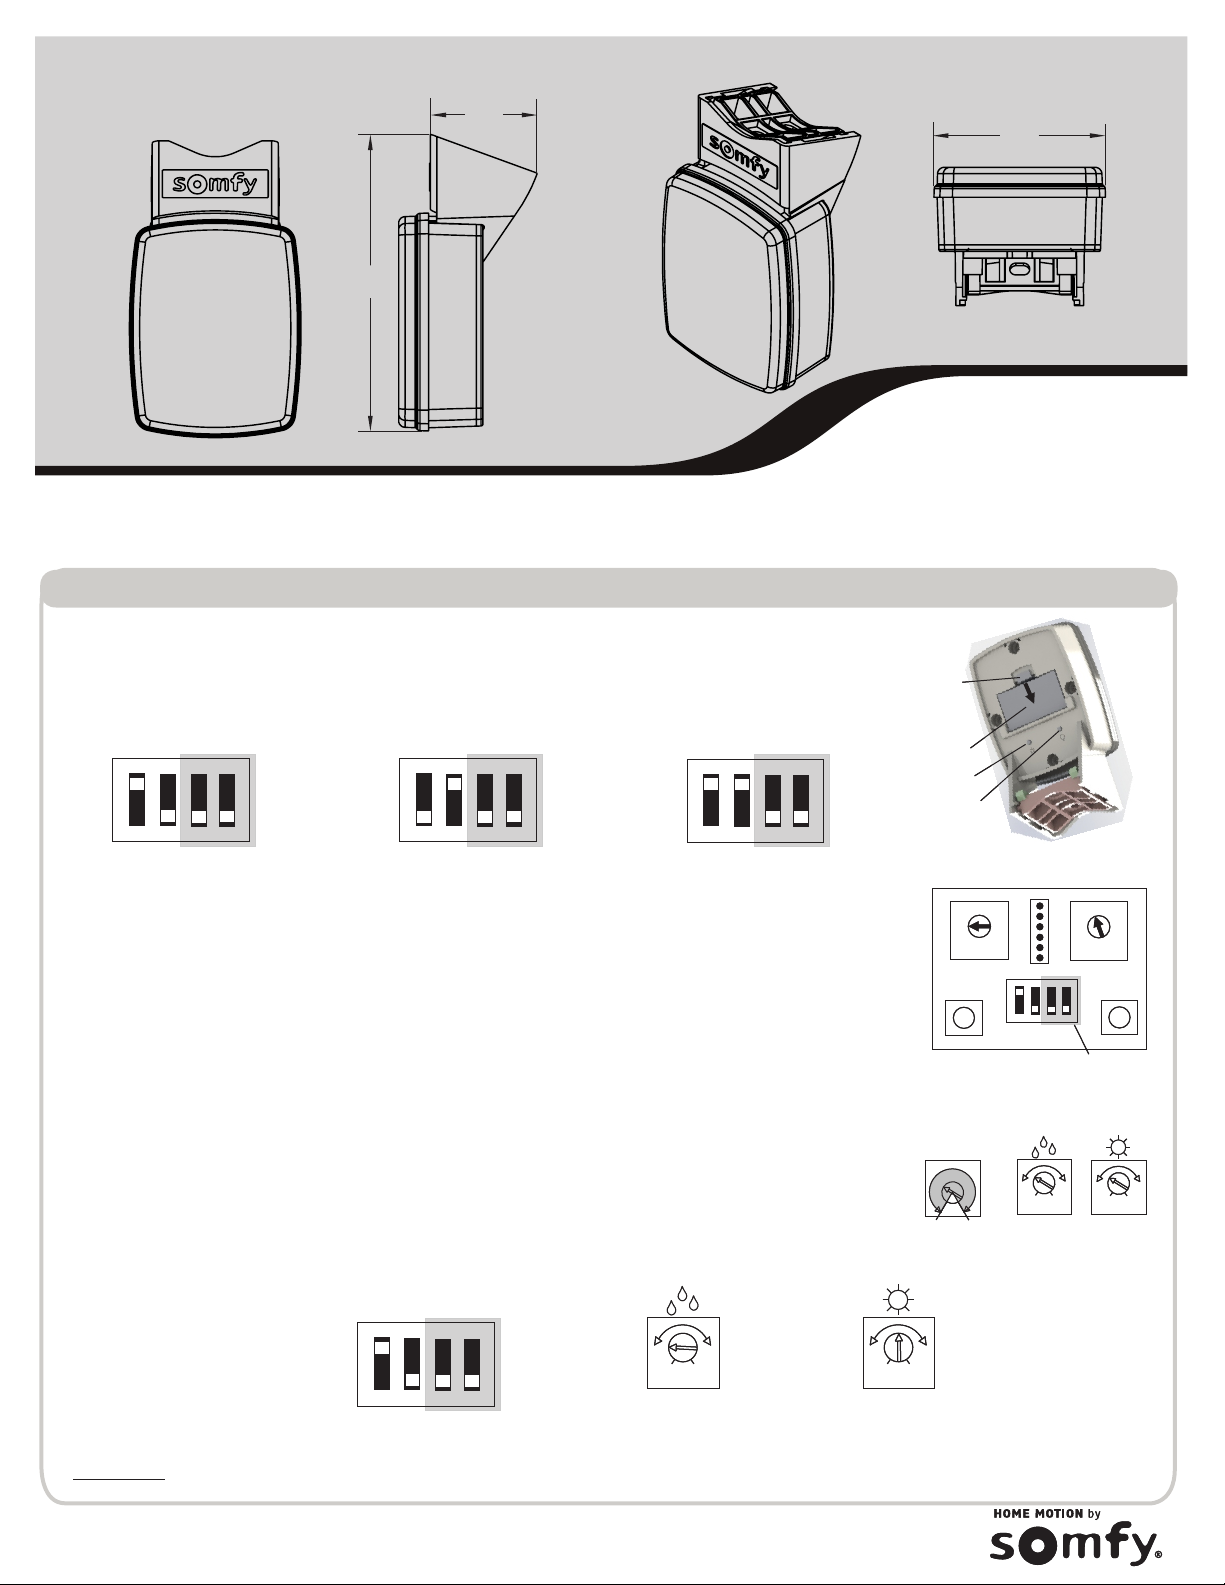
Instructions Somfy Solar Rain Sensor (SRS) - RTS
2.088”
[53.04]
4.479”
[113.77]
IMPORTANT - Read the entire instructions and ensure the unit is charged before starting installation (see installation section)
This device complies with Part 15 of the FCC Rules. Operation is subject to the following conditions
- This device may not cause harmful interference and
- This device must accept any interference received, including interference that may cause undesired operation
Warning! Changes or modifications not expressly approved by the manufacturer could void the users authority to operate the equipment.
Mode and Threshold Selection - Awning
1 - Open the hatch by pressing the latch toward the hatch and pulling outward (Fig 1)
2 - Inside the hatch you will see the Rain and Sun threshold adjustment pots, the DEMO and
Program Buttons and the Mode Dip Switches (Fig 2).
Latch
3 - Do not remove the sticker over dip switches 3 and 4. Only Dip switches 1 and 2 will be
Latch
used to select the Mode for normal Awning use.
4 - Select the desired mode using dip switches 1 and 2. Dips 3 and 4 should remain off.
ON
ON
ON
A CB
A CB
2
2
3
1
1
Awning Rain
Awning Rain
3
4
4
ON
2
2
3
1
1
3
Awning Sun
Awning Sun
ON
ON
2
4
4
2
3
1
1
Awning Rain & Sun
3
4
4
Hatch
Hatch
Sun LED
Sun LED
Rain LED
Rain LED
5 - In Awning Rain mode (A), the SRS will run the awning in when the rain rate exceeds
the set rain threshold.
6 - In Awning Sun mode* (B), the SRS will run the awning in after about 15-30 min with the
sun below the set sun threshold and out after about 2 min with the sun above the threshold.
7 - In Awning Rain & Sun mode* (C), the rain and sun functions are both active but a rain
event will override the sun function until the rain rate falls below the set threshold for 5 min.
8 - The Sun and Rain threshold adjustment pots can be turned 280 deg from the minimum
setting to the maximum. (Fig 3)
9 - The Rain threshold (Fig 4) can be set from:
Min (fully CCW) = Very Light Rain/Heavy Mist/Heavy Condensation
Max (fully CW) = Very Heavy Rain.
10 - The Sun threshold (Fig 5) can be set from
Min (fully CCW) = approx 0.5klux - Facing sun with heavy cloud cover
POT
POT
Adj
Adj
Range
Range
Max (Fully CW) = approx 55klux - Facing direct summer sun with no cloud cover
11- LED indicators, The rain and sun LEDs will blink when conditions are above the
-
threshold, continuously in DEMO mode and every 5 sec in normal mode.
Note; In order for the SRS to activate a motor in response to sun, the sun function of the motor
must be enabled. To enable this feature, a Soliris Transmitter must be used and therefore
programmed to the motor.
-
Min
Min
280 deg
280 deg
Fig 3
Fig 3
DEMO
DEMO
Max
Max
RAIN
RAIN
+
+
2.590”
[65.79]
Fig 1
Fig 1
SUN
ON
ON
1
1
Fig 2
Fig 2
-
-
Min
Min
SUN
2
2
3
3
4
4
Sticker
Sticker
-
-
+
+
Max
Max
Min
RAIN
RAIN
Fig 4 Fig 5
Fig 4 Fig 5
Min
PROG
PROG
SUN
SUN
Max
Max
+
+
Factory Default settings:
A
A
ON
ON
2
2
3
1
1
Awning Rain
Awning Rain
3
-
-
-
+
+
Min
Min
Max
Max
4
4
RAIN
RAIN
Approx 9:00
Approx 9:00
Light Rain
Light Rain
Approx 12:00
Approx 12:00
Facing Sun, Light Cloud Cover
Facing Sun, Light Cloud Cover
-
Min
Min
SUN
SUN
Max
Max
+
+
Important: If the RTS Rain and Sun sensor is removed from a job site it must be deleted from the motor memory.
(see next section)
Page 2
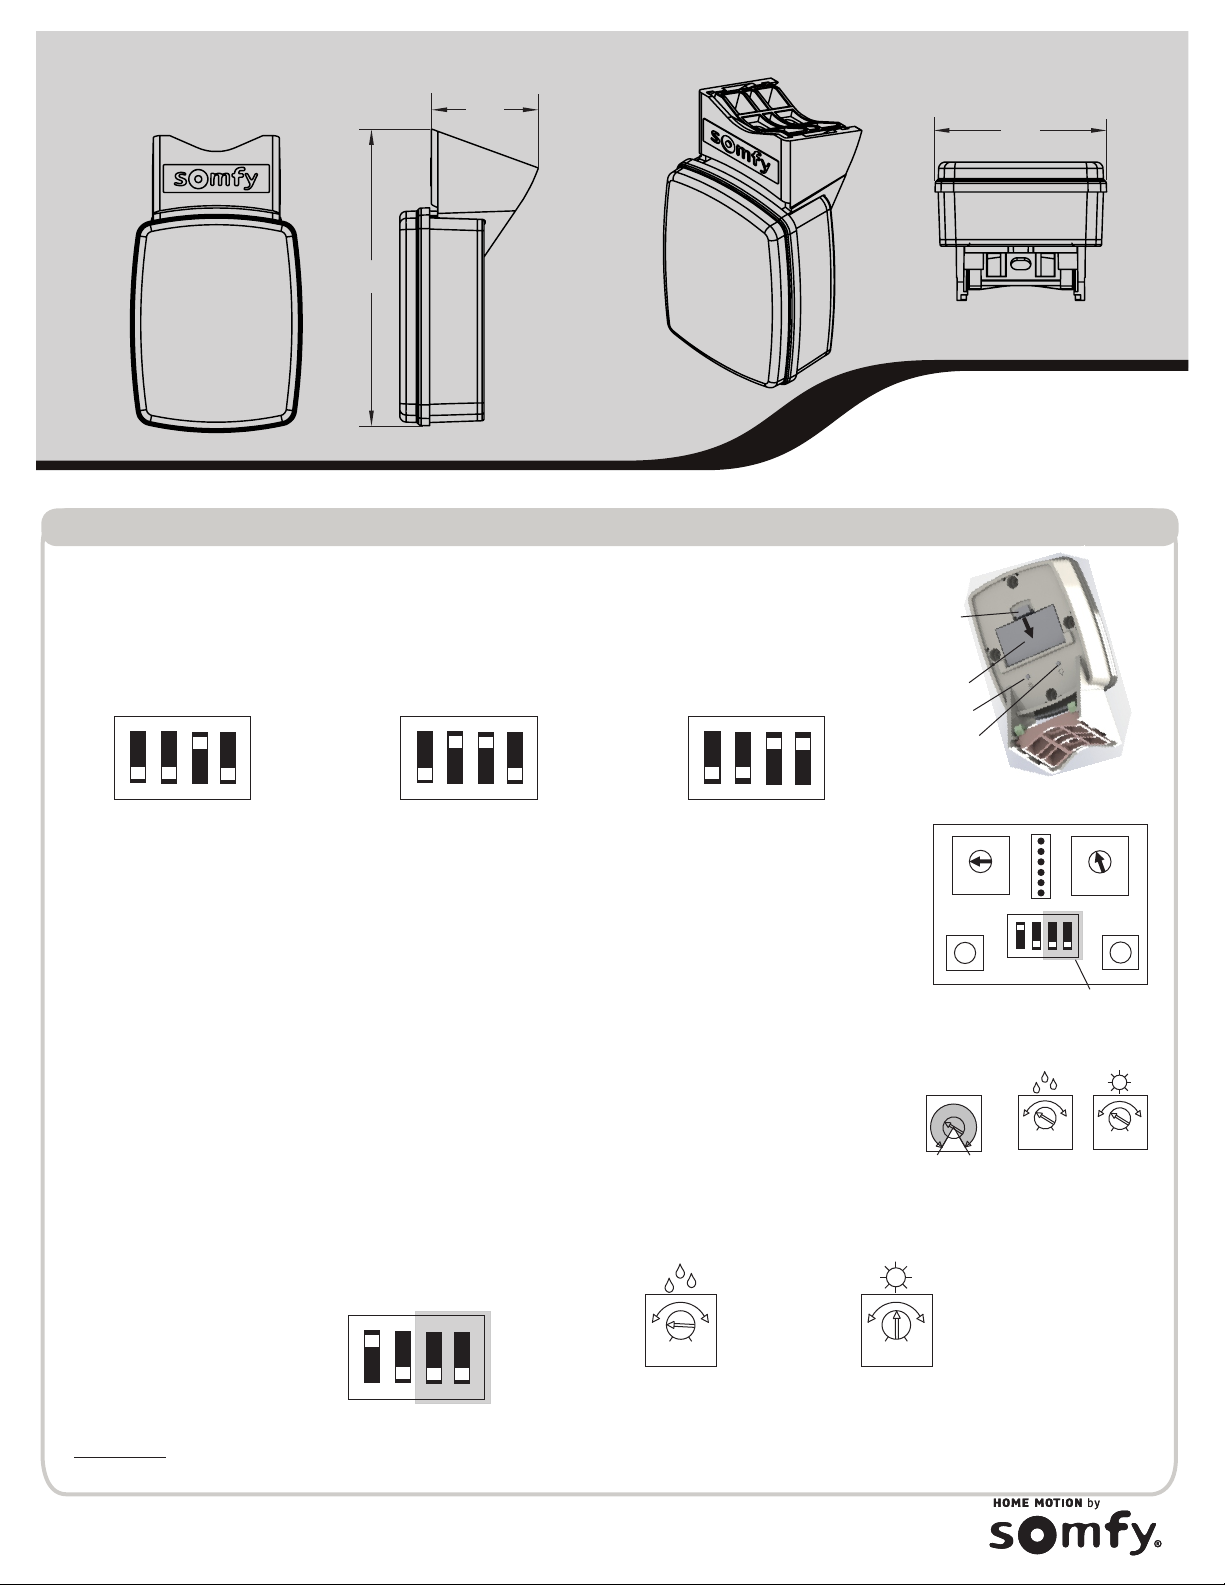
Instructions Somfy Solar Rain Sensor (SRS) - RTS
2.088”
4.479”
[113.77]
[53.04]
2.590”
[65.79]
IMPORTANT - Read the entire instructions and ensure the unit is charged before starting installation (see installation section)
Mode and Threshold Selection - Shutter/Screen (S/S)
1 - Open the hatch by pressing the latch toward the hatch and pulling outward (Fig 1)
2 - Inside the hatch you will see the Rain and Sun threshold adjustment pots, the DEMO and
Program Buttons and the Mode Dip Switches (Fig 2).
Latch
3 - Remove the sticker over dip switches 3 and 4.
4 - Select the desired mode using dip switches 2, 3 and 4. Dip switch 1 should remain off.
ON
ON
ON
Hatch
Sun LED
Rain LED
E GF
RAIN
+
Fig 1
2
RAIN
3
Max
4
Sticker
+
SUN
PROG
-
Min
SUN
ON
1
Fig 2
-
Min
Fig 4 Fig 5
+
Max
2
1
Shutter/Screen Rain
3
4
2
1
3
4
2
1
S/S Rain & AutoS/S Rain & Sun
3
4
5 - In S/S Rain mode (E), the SRS will send a down command when the rain rate exceeds
the set rain threshold and will not send another rain command until the rain falls below the
rain threshold for 5 min and then goes above the threshold again..
6 - In S/S Rain & Sun mode (F), Rain functions as per Mode E. A rain event will lock out the
sun function until it falls below the threshold for 5 min. Sun light detected over the sun
threshold for 2 min will cause a down (out) command. Sunlight under the threshold for 15min
will cause an up (in) command
7 - In S/S Rain & Auto mode (G), Rain functions as per Mode E. When the rain falls below
the rain threshold for 5 min continuous, the sensor will send an automatic up command.
8 - The Sun and Rain threshold adjustment pots can be turned 280 deg from the minimum
setting to the maximum. (Fig 3)
9 - The Rain threshold (Fig 4) can be set from:
Min (fully CCW) = Very Light Rain/Heavy Mist/Heavy Condensation
Max (fully CW) = Very Heavy Rain.
10 - The Sun threshold (Fig 5) can be set from
Min (fully CCW) = approx 0.5klux - Facing sun with heavy cloud cover
Max (Fully CW) = approx 55klux - Facing direct summer sun with no cloud cover
11- LED indicators, The rain and sun LEDs will blink when conditions are above the
threshold, continuously in DEMO mode and every 5 sec in normal mode.
DEMO
POT
Adj
Range
-
Max
Min
280 deg
Fig 3
Factory Default settings:
A
ON
2
1
Awning Rain
3
-
+
Min
Max
4
RAIN
Approx 9:00
Light Rain
Approx 12:00
Facing Sun, Light Cloud Cover
-
Min
+
Max
SUN
Important: If the RTS Rain and Sun sensor is removed from a job site it must be deleted from the motor memory.
(see next section)
Page 3
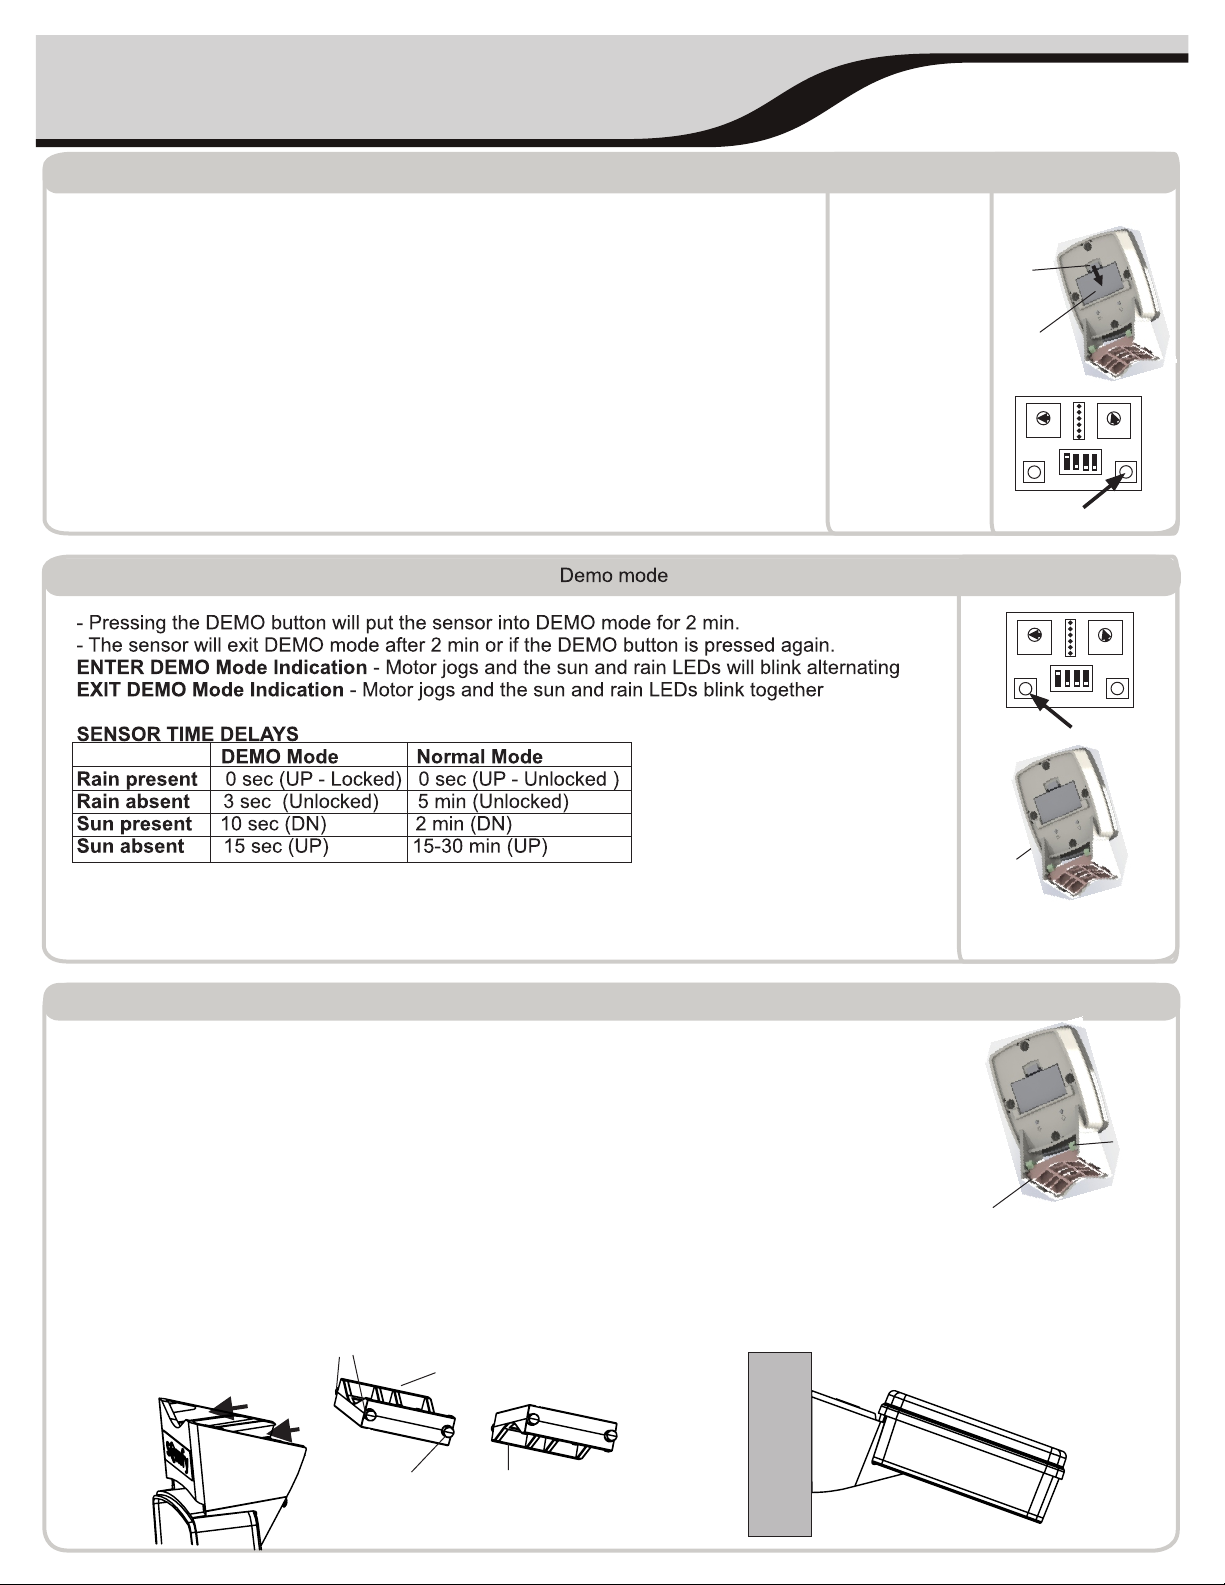
Programming
*Before programming ensure the sensor is set to the desired mode (Mode
selection - Step 4 on page 1) and ensure the unit is charged (see below)
Step 2
Latch
Adding the sensor
1- Put the motor into learning mode by pressing the programming button on
an already programmed transmitter until the motor jogs.
2- Open the hatch on the sensor and press the programming button. The
motor will jog.
Deleting the sensor
Repeat steps 1 and 2 above.
-When the rain or sun condition passes a set threshold for the delay time listed above the
command (XX) is given. Rain present locks out sun functions and normal transmitters.
- In DEMO mode the LEDs will blink when conditions are above the threshold. In normal
mode the LEDs will blink every 5 sec if conditions are above the threshold.
Hatch
DEMO
Programming
Button
DEMO
Sun LED
RAIN
RAIN
SUN
ON
2
3
1
4
SUN
ON
PROG
2
3
1
4
DEMO Button
PROG
Rain LED
Installation
- Initial Charge - The Somfy Solar Rain Sensor (SRS) RTS is solar powered. Before installation
ensure the unit has an initial charge by placing the unit with the solar cell facing direct sun light.
The initial charge will take about 10 min in direct outdoor sun light.
- Mounting Bracket - The mounting is released by pushing the bracket clips gently towards
the main body of the control. The bracket can be used to mount the SRS to a vertical wall using
screws or to a 2 inch mast pole using zip ties. For a vertical wall the bracket is placed flat face
towards the wall. For a mast pole mount the curved face is mounted to the pole.
- Mounting Location - The Sensor should be mounted in a clear unobstructed location with the
sensor facing the sun in the same facing as the awning.
The sensor must be mounted with clear exposure to the rain in the same facing as the awning.
The sensor must be mounted with the clear cover facing upward as shown (correct mount), with
the sensor face at an angle. This allows excess moisture to run off and clear debris from the face.
NOTE - If the sensor is removed from a job site, it must be deleted from the motor’s memory.
Front tabs into top slot 1
Mast pole orientation
Correct mount
1
2
Back tabs into
lower slot 2
Vertical wall orientation
Vertical Wall
Mounting
Bracket
Bracket
Clip
Page 4

Mode Function Description
DIP Switch settings: 1 - Awning Rain 2 - Sun 3 - Shutter/Screen Rain 4 - Auto Up
ON
Power Off - Unit can still charge from the solar panel but the unit functions are turned off to save power.
Note - Mode will have to be selected (see below) before the sensor can be programmed to the motor.
2
3
1
Off - Power Saving
4
Awning functional setting - In these settings the rain sensor programs and functions as a sensor.
*Note - The Somfy Rain Sensor must be removed from motor memory if it is removed from operation. Failure to remove
the sensor from motor memory will cause the awning to retract at regular periods.
ON
A
2
1
Awning Rain
ON
B
2
1
Awning Sun
ON
C
2
1
Awning Rain & Sun
ON
D
2
1
Awning Sensor Test
3
3
3
3
Awning Rain - Rain detect over threshold sends an up command and locks the motor up until 5 min after last
rain detected over threshold.
4
Awning Sun - Sun light detected over the threshold for 2 min will cause a down (out) command. Sunlight
under the threshold for 15-30 min will cause an up (in) command.
4
Awning Rain & Sun - Both Rain and Sun functions will work as described above for Modes A & B. However
the rain function will have priority and will lock out sun functions and user commands
until 5 min past the last rain detected over the rain threshold.
4
Awning Sensor Test - Allows a test of the sensor programmed to the motor. In this Mode pressing the Demo
button will send a Demo high sun command that will extend the awning. This allows
the installer to confirm with the out movement the unit is programmed correctly. This
4
Mode is for testing only. Do not leave the unit in this mode for normal operation.
Shutter/Screen functional setting - In these settings the rain sensor programs and functions as a transmitter.
ON
E
2
1
Shutter/Screen Rain
ON
F
2
1
S/S Rain & Sun
ON
G
2
1
S/S Rain & Auto Up
ON
H
2
1
S/S Transmitter Test
Shutter/Screen Rain - Rain detect over threshold sends a down command. The unit must detect 5 min with
rain below the threshold before it will clear and send another command at rain over the
threshold. Rain does not lock the motor. It will respond to new transmitter commands.
3
4
S/S Rain & Sun - Rain functions as per Mode E. A rain event will lock out the sun function until it falls below the
threshold for 5 min. Sun light detected over the sun threshold for 2 min will cause a down
(out) command. Sunlight under the threshold for 15min will cause an up (in) command.
3
4
S/S Rain & Auto Up - Rain functions as per Mode E. When the rain falls below the rain threshold for 5 min
continuous, the sensor will send an automatic up command.
3
4
S/S Transmitter Test - Allows a test of the sensor programmed to the motor. In this Mode pressing the Demo
button will send a down transmitter command. This allows the installer to confirm
with the down movement, the unit is programmed correctly. This Mode is for testing only.
3
4
Do not leave the unit in this mode for normal operation.
Important - The rain sensor if programmed to a motor must be deleted from the motors memory before it is changed
between Awning or Shutter/Screen mode.
Do not change between Awning and Shutter/Screen modes without deleting the sensor from the motors
memory first.
Below are non-functional Dip Switch setting. Do not use the Dip Switch configurations below
ON
2
3
1
4
ON
2
3
1
4
ON
2
3
1
4
ON
2
3
1
4
ON
2
3
1
4
ON
2
3
1
4
ON
2
3
1
4
 Loading...