

Page 1
Sonesse® 40 Zigbee
FR
Notice
EN
Instructions
ES
Instrucciones
Page 2
FR
Sonesse® 40 Zigbee
Copyright© 2018 SOMFY ACTIVITES SA, Société Anonyme All rights reserved.
NOTICE TRADUITE
SOMMAIRE
1. Informations préalables 2
1.1. Domaine d’application 2
1.2. Responsabilité 2
2. Installation 3
2.1. Montage 3
2.2. Câblage 4
2.3. Mise en service 4
2.4. Astuces et conseils 5
3. Utilisation et maintenance 6
3.1. Utilisation depuis l’application tél. 6
3.2. Retour en configuration d'origine 6
4. Données techniques 6
GÉNÉRALITÉS
Consignes de sécurité
Danger
Signale un danger entraînant immédiatement la mort ou des blessures graves.
Avertissement
Signale un danger susceptible d’entraîner la mort ou des blessures graves.
Précaution
Signale un danger susceptible d’entraîner des blessures légères ou moyennement graves.
Attention
Signale un danger susceptible d’endommager ou de détruire le produit.
1. INFORMATIONS PRÉALABLES
1.1. DOMAINE D’APPLICATION
Les motorisations Sonesse 40 sont conçues pour motoriser tous types de stores d’intérieur à
l’exception des pantographes.
L’installateur, professionnel de la motorisation et de l’automatisation de l’habitat, doit s’assurer que
l’installation du produit motorisé respecte les normes en vigueur dans le pays de mise en service,
notamment la norme sur les stores d’intérieur EN 13120.
1.2. RESPONSABILITÉ
Avant d’installer et d’utiliser la motorisation, lire attentivement cette notice. Outre les instructions
décrites dans cette notice, respecter également les consignes détaillées dans le document joint
Consignes de sécurité.
La motorisation doit être installée par un professionnel de la motorisation et de l’automatisation de
l’habitat, conformément aux instructions de Somfy et à la réglementation applicable dans le pays de
mise en service.
Toute utilisation de la motorisation hors du domaine d’application décrit ci-dessus est interdite. Elle
exclurait, comme tout irrespect des instructions figurant dans cette notice et dans le document joint
Consignes de sécurité, toute responsabilité et garantie de Somfy.
L’installateur doit informer ses clients des conditions d’utilisation et de maintenance de la motorisation
et doit leur transmettre les instructions d’utilisation et de maintenance, ainsi que le document joint
Consignes de sécurité, après l’installation de la motorisation. Toute opération de Service AprèsVente sur la motorisation nécessite l’intervention d’un professionnel de la motorisation et de
l’automatisation de l’habitat.
Si un doute apparaît lors de l’installation de la motorisation ou pour obtenir des informations
complémentaires, consulter un interlocuteur Somfy ou aller sur le site www.somfy.com.
2
Page 3
FR
Sonesse® 40 Zigbee
Copyright© 2018 SOMFY ACTIVITES SA, Société Anonyme All rights reserved.
b
a
L
L = …
L
L
L = …
Ø > 37
l
L
2. INSTALLATION
Avertissement
• Consignes à suivre impérativement par le professionnel de la motorisation et de
l’automatisation de l’habitat réalisant l’installation de la motorisation.
• Se conformer aux normes et à la législation en vigueur dans le pays d’installation.
Attention
• Ne jamais laisser tomber, choquer, percer ou immerger la motorisation.
• Installer un point de commande individuel pour chaque motorisation.
• Pour optimiser le fonctionnement silencieux, les jeux entre la motorisation, les accessoires,
le tube et l’embout du tube doivent être minimisés.
2.1. MONTAGE
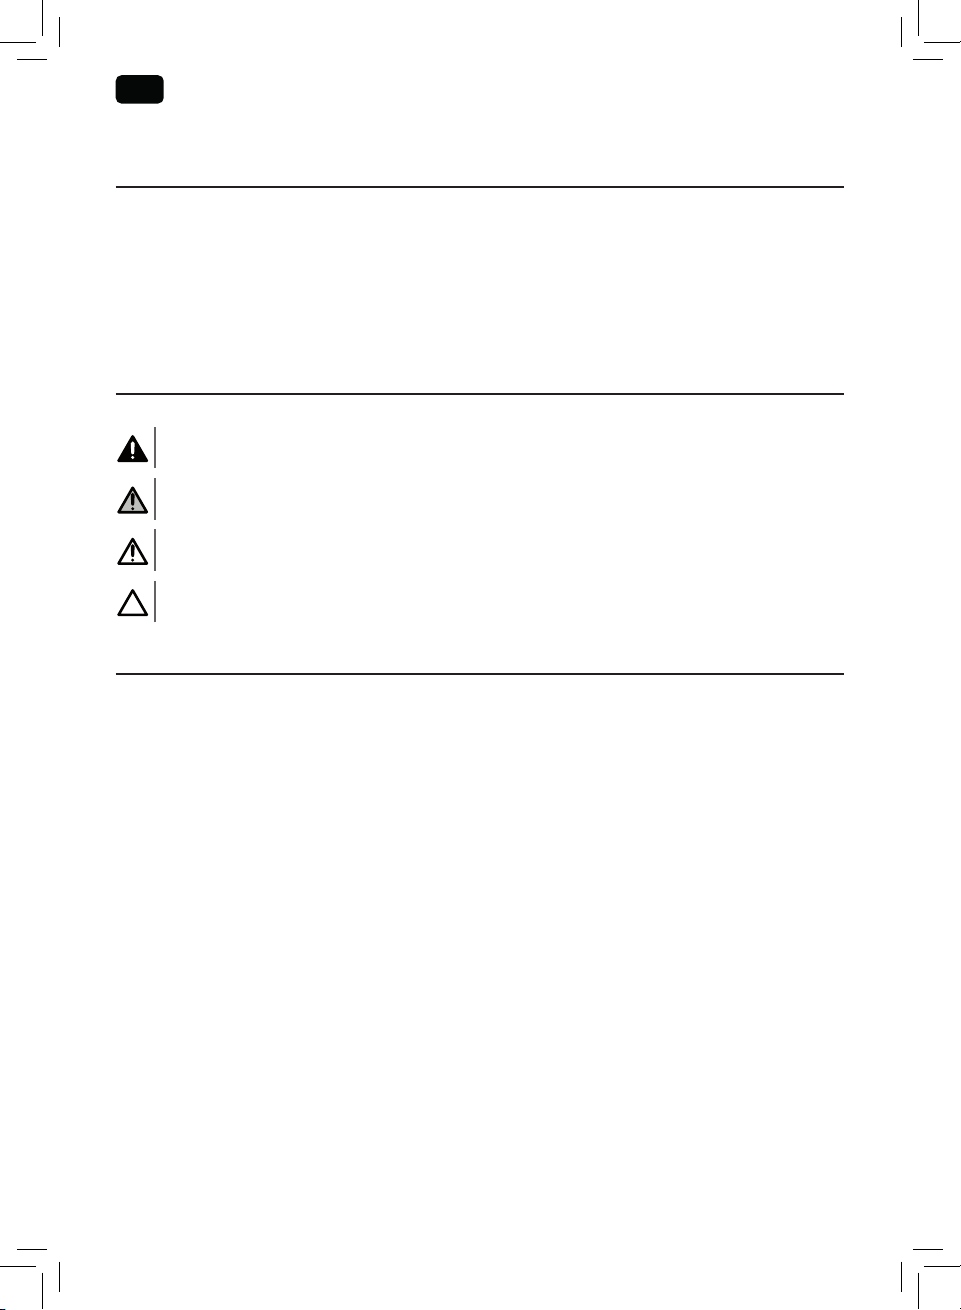
2.1.1. Préparation de la motorisation
S’assurer que le diamètre intérieur du tube du produit motorisé est
supérieur à 37mm.
1) Monter les accessoires nécessaires à l’intégration de la
motorisation dans le tube d’enroulement:
• Monter la roue a sur la motorisation.
• Monter la couronne b et la roue a sur la motorisation.
2) Mesurer la longueur (L) entre le bord intérieur de la tête de la
motorisation et l’extrémité de la roue.
2.1.2. Préparation du tube
1) Couper le tube d’enroulement à la longueur désirée en fonction
du produit motorisé.
2) Ébavurer le tube d’enroulement et éliminer les copeaux.
3) Pour les tubes d’enroulement lisses à l’intérieur, découper une
encoche selon les cotes suivantes: l=7mm, L=10mm.
1
b
2
1 2
3
L = …
a
L
Ø > 37
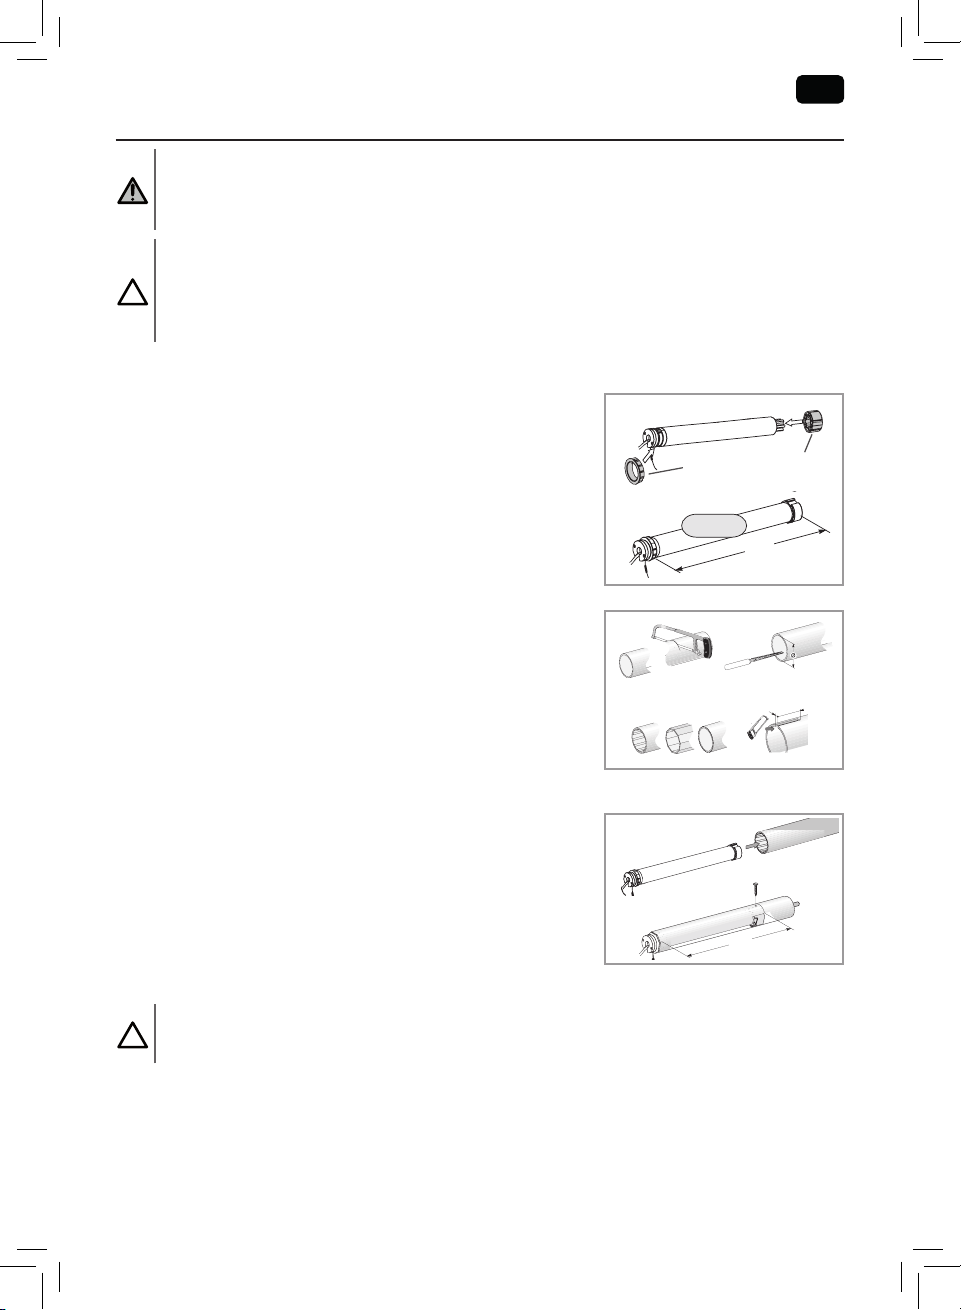
2.1.3. Assemblage motorisation – tube
1) Glisser la motorisation dans le tube d’enroulement.
Pour les tubes d’enroulement lisses à l’intérieur, positionner
l’encoche découpée sur la couronne.
2) La roue doit être vissée en place pour éviter tout mouvement
dans le tube d’enroulement: cela peut être réalisé en fixant le
tube d’enroulement sur la roue à l’aide de 4 vis Parker Ø5mm
ou 4 rivets pop acier Ø4,8mm placés entre 5mm et 15mm
de l’extrémité extérieure de la roue, quel que soit le tube
d’enroulement.
Attention
Les vis ou les rivets pop ne doivent pas être fixés sur la motorisation mais uniquement sur la
roue.
1
2
L
3
Page 4
FR
Sonesse® 40 Zigbee
Copyright© 2018 SOMFY ACTIVITES SA, Société Anonyme All rights reserved.
2.1.4. Montage de l’ensemble tube / motorisation
L
f
g
Attention
Les vis ou les rivets pop ne doivent pas être fixés sur la
motorisation mais uniquement sur la roue.
Si nécessaire, visser l’adaptateur du support sur la tête de la
motorisation. Monter et fixer l’ensemble tube-motorisation sur le
support embout g et sur le support motorisation f.
Attention
S’assurer que l’ensemble tube-motorisation est verrouillé sur le support embout. Cette opération
permet d’éviter à l’ensemble tube-motorisation de sortir de la fixation du support embout.
Attention
Pour que la réception radio soit optimale, l’antenne de la motorisation doit être tenue rectiligne
et doit être placée à l’extérieur du caisson (si utilisée).
2.2. CÂBLAGE
Précaution
• Respecter la Norme NF C 15-100 pour les installations électriques.
• Les câbles traversant une paroi métallique doivent être protégés et isolés par un manchon ou
un fourreau.
• Attacher les câbles pour éviter tout contact avec une partie en mouvement.
• Le câble de la motorisation n’est pas démontable. S’il est endommagé, retourner la
motorisation au SAV.
Attention
Laisser le câble d’alimentation de la motorisation accessible : il doit pouvoir être remplacé
facilement
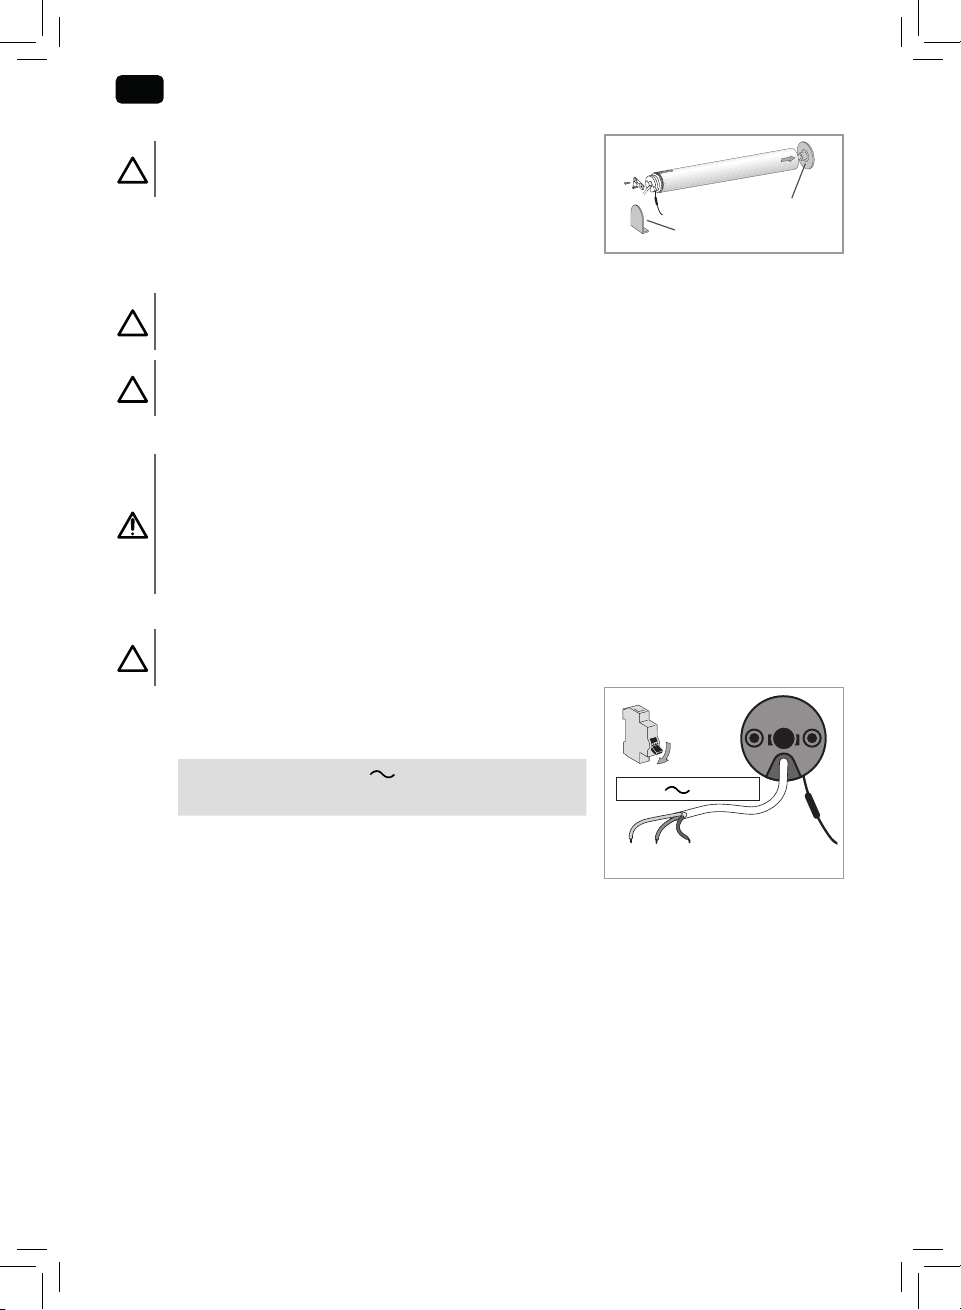
- Couper l’alimentation secteur.
- Connecter la motorisation selon les informations du
tableau ci-dessous :
120 V 60 Hz
Neutre (N) Phase (L1) Terre/masse
Blanc Noir Vert
f
OFF
120 V 60 Hz
N L1 Terre/masse
g
2.3. MISE EN SERVICE
2.3.1. Mise en service/programmation
Pour mettre la motorisation en service, utiliser l’application Set&GoConnect. Il faut disposer d’un
téléphone ou d’un appareil mobile compatible et accéder à Internet.
L’application est téléchargeable gratuitement depuis Apple Store et «Google Play Store» sur les
appareils mobiles suivants:
• Téléphone mobile Iphone® d'Apple ou appareil mobile avec système d’exploitation iOS
exécutant iOS11 et supérieur.
• Téléphone mobile ou appareil mobile avec système d’exploitation Android™ OS 6.0 et supérieur.
La version logicielle de l’application Set&GoConnect peut être mise à jour de temps en temps pour
ajouter de nouvelles fonctionnalités et de nouveaux services.
4
Page 5
FR
Sonesse® 40 Zigbee
Copyright© 2018 SOMFY ACTIVITES SA, Société Anonyme All rights reserved.
2.3.2. Réglages de motorisation
0,5sec
a
b
=
=
a
b
=
=
7sec
• Lorsque l’application Set&Go Connect est téléchargée,
ouvrir l’application et suivre les instructions pour régler la
motorisation.
• Une fois la motorisation réglée, vérifier les réglages en
appuyant sur le bouton de la tête du moteur:
- pour démarrer le mouvement du produit motorisé,
appuyer brièvement sur le bouton de la tête du moteur,
- pour arrêter le mouvement du produit motorisé, appuyer
brièvement sur le bouton de la tête du moteur,
- pour déplacer le produit motorisé dans le sens inverse du mouvement précédent, appuyer à
nouveau brièvement sur le bouton de la tête du moteur,
- pour arrêter le mouvement du produit motorisé, appuyer brièvement sur le bouton de la tête
du moteur, etc.
2.3.3. Gestion de réseau
Pour rejoindre un réseau:
• Suivre les instructions sur l’application Set&GoConnect,
• Appuyer et maintenir enfoncé le bouton programmation de
la tête du moteur (≈7secondes) jusqu’à ce que le produit
effectue deux mouvements de va-et-vient (le premier après
2 secondes et le deuxième après 7 secondes).
2.4. ASTUCES ET CONSEILS
0,5sec
7sec
2.4.1. Questions sur la motorisation ?
Constats Causes possibles Solutions
La motorisation est éteinte. Allumer la motorisation.
La batterie de la télécommande
est faible.
La télécommande n’est pas
Le produit motorisé ne
fonctionne pas.
Le produit motorisé s’arrête
trop tôt.
Le voyant rouge de la
télécommande s’allume.
compatible ou n’est pas
programmée.
La protection thermique est
activée.
Le moteur n’est pas relié à un
réseau.
Les fins de course sont mal
réglées.
Le produit motorisé a
dépassé la limite de poids
recommandée.
Il y a une erreur de réglage.
Contrôler la batterie et la
remplacer si besoin.
Contrôler la compatibilité et
remplacer la télécommande si
besoin.
Attendre que le moteur
refroidisse.
Consulter le chapitre 2.3.3.
Gestion de réseau
Réinitialiser les fins de course.
Remplacer le produit.
Consulter le chapitre 2.3.2.
Réglages de motorisation
5
Page 6
FR
Sonesse® 40 Zigbee
Copyright© 2018 SOMFY ACTIVITES SA, Société Anonyme All rights reserved.
3. UTILISATION ET MAINTENANCE
a
b
=
=
a
b
=
=
a
b
=
=
12 sec
Cette motorisation ne nécessite pas d’opération de maintenance
3.1. UTILISATION DEPUIS L’APPLICATION TÉL.
La commande du moteur et d'orientation des lames sont possibles
depuis l’application : suivre les instructions sur l’application
Set&GoConnect.
3.2. RETOUR EN CONFIGURATION D'ORIGINE
Cette remise à zéro supprime tous les points de commande, tous les capteurs, tous les réglages ainsi
que le réseau, et réinitialise la position favorite de la motorisation.
Appuyer et maintenir enfoncé le bouton programmation de la
tête du moteur (≈ 12 s) jusqu’à ce que le produit effectue trois
mouvements de va-et-vient (le premier après 2 s, le deuxième
après 7s et le troisième après 12s).
12 sec
4. DONNÉES TECHNIQUES
Alimentation secteur 120 VCA 60 Hz
Bandes de fréquence et puissance
maximale utilisées
Version Zigbee 3.0
Version Bluetooth® 4.2
Niveau de sécurité I
Température de fonctionnement 0°C à + 60°C
Indice de protection IP 30 (pour usage en intérieur exclusivement)
2,4 GHz - 2,4835 GHz
e.r.p. <63 mW
Nous nous soucions de notre environnement. Ne jetez pas votre appareil avec les
déchets ménagers habituels. Déposez-le dans un point de collecte agréé pour son
recyclage.
La marque et les logos Bluetooth® sont des marques déposées appartenant à
Bluetooth SIG, Inc. et toute utilisation de ces marques par SOMFY ACTIVITES SA se
fait sous licence. Les autres marques et noms commerciaux sont la propriété de
leurs détenteurs respectifs.
6
Page 7

FR
Sonesse® 40 Zigbee
Copyright© 2018 SOMFY ACTIVITES SA, Société Anonyme All rights reserved.
Cet appareil est conforme aux normes d’exemption de licence RSS d’Industry Canada. Son
fonctionnement est soumis aux deux conditions suivantes:
(1) Cet appareil ne doit pas causer d’interférence; et (2) cet appareil doit accepter toute interférence,
y compris les interférences pouvant entraîner un fonctionnement indésirable de celui-ci.
Déclaration de la FCC:
- Cet appareil est conforme à la partie 15 des règles de la FCC.
Son fonctionnement est soumis aux deux conditions suivantes:
(1) cet appareil ne doit pas causer d’interférences nuisibles; et (2) cet appareil doit accepter toute
interférence reçue, y compris les interférences pouvant entraîner un fonctionnement indésirable.
- Cet équipement est conforme aux limitations prévues par la FCC pour l’exposition aux radiations
dans le cadre d’un environnement d’accès libre. Les utilisateurs finaux doivent suivre les instructions
d’utilisation spécifiques pour garantir la conformité aux limites d’exposition RF. Cet émetteur ne doit
pas être situé au même endroit ou utilisé conjointement avec une autre antenne ou un autre émetteur.
- Les changements ou modifications non expressément approuvés par la partie responsable de la
conformité pourraient annuler l’autorité de l’utilisateur à utiliser l’équipement.
Pour les émetteurs mobiles ou fixes, la distance de séparation minimale entre l'antenne, les
structures rayonnantes de l'appareil et les personnes proches est de 20 cm, même si les calculs
indiquent que la distance MPE serait inférieure.
Apple, le logo d'Apple sont des marques de commerce d’Apple Inc., déposées aux États-Unis et dans
d’autres pays.
iPad® et iPhone® sont des marques déposées d'Apple Inc. App Store est une marque de service
d'Apple Inc.
Android est une marque commerciale de Google LLC.
https://developer.android.com/distribute/marketing-tools/brand-guidelines
7
Page 8

EN
Sonesse® 40 Zigbee
Copyright© 2018 SOMFY ACTIVITES SA, Société Anonyme All rights reserved.
ORIGINAL INSTRUCTIONS
CONTENTS
1. Prior information 8
1.1. Sphere of application 8
1.2. Liability 8
2. Installation 9
2.1. Assembly 9
2.2. Wiring 10
2.3. Commissioning 10
2.4. Tips and recommendations 11
GENERAL INFORMATION
Safety instructions
Danger
Indicates a danger which may result in immediate death or serious injury.
Warning
Indicates a danger which may result in death or serious injury.
Precaution
Indicates a danger which may result in minor or moderate injury.
Attention
Indicates a danger which may result in damage to or destruction of the product.
1. PRIOR INFORMATION
3. Use and maintenance 12
3.1. Use from the application 12
3.2. Factory mode 12
4. Technical data 12
1.1. SPHERE OF APPLICATION
Sonesse 40 drives are designed to drive all types of interior blinds except pantographs.
The professional drive and home automation installer must ensure that, once installed, the
installation of the motorised product complies with the standards in force in the country in which it is
commissioned, in particular such as standard EN 13120 relating to interior blinds.
1.2. LIABILITY
Before installing and using the drive, please read these instructions carefully. In addition to the
instructions provided in this guide, please also comply with the instructions set out in the enclosed
Safety instructions document.
The drive must be installed by a home motorisation and automation professional, in accordance with
Somfy’s instructions and the applicable regulations in the country of installation.
Any operation of the drive outside the sphere of application described above is prohibited. Such
operation shall exclude Somfy from all liability and invalidate the Somfy warranty, as will any failure
to comply with the instructions given herein and in the enclosed Safety instructions document.
After installing the drive, the installer must inform his customers of the operating and maintenance
conditions for the drive and must pass the operating and maintenance instructions on to them, as
well as the enclosed Safety instructions document. Any After-Sales Service operation on the drive
requires intervention by a home motorisation and automation professional.
Should any doubt arise during installation of the drive or for additional information, consult a Somfy
contact or visit www.somfy.com.
8
Page 9

EN
Sonesse® 40 Zigbee
Copyright© 2018 SOMFY ACTIVITES SA, Société Anonyme All rights reserved.
b
a
L
L = …
L
L
L = …
Ø > 37
l
L
2. INSTALLATION
Warning
• These instructions are mandatory for the drive and home automation professional installing
the drive.
• Comply with current standards and legislation in the country of installation.
Attention
• Never drop, knock or puncture the drive or immerse it in liquid.
• Install an individual control point for each drive.
• To ensure optimized silent operation, the gaps between the drive, the accessories, the tube
and the tube end piece must be minimized.
2.1. ASSEMBLY
2.1.1. Preparing the drive
Check that the inner diameter of the motorized product’s tube is
greater than 37 mm.
1) Fit the accessories required to integrate the drive into the
winding tube:
• Either fit the drive wheel a on the drive.
• Or fit the crown b and the drive wheel a on the drive.
2) Measure the length (L) between the inner edge of the drive
head and the rim of the drive wheel.
1
b
2
L = …
a
L
2.1.2. Preparing the tube
1) Cut the winding tube to the required length, depending on the
motorised product.
2) Deburr the winding tube and remove the swarf.
3) For winding tubes which are smooth inside, cut a notch with
the following measurements: l = 7mm, L = 10 mm.
2.1.3. Drive/tube assembly
1) Slide the drive into the winding tube.
For winding tubes with a smooth interior, position the cut
notch on the crown.
2) The drive wheel must be locked in place to prevent any
movement in the winding tube: This can be achieved by
fastening the winding tube to the drive wheel using 4 selftapping screws, Ø 5 mm, or 4 steel pop rivets, Ø 4.8 mm,
placed between 5 mm and 15 mm from the outer edge of the
drive wheel, regardless of the winding tube.
Attention
The screws or pop rivets must only be fastened onto the drive wheel and not on the drive.
1 2
Ø > 37
3
1
2
L
9
Page 10

EN
Sonesse® 40 Zigbee
Copyright© 2018 SOMFY ACTIVITES SA, Société Anonyme All rights reserved.
2.1.4. Assembling the tube / drive assembly
L
f
g
Attention
The screws or pop rivets must only be fastened onto the
drive wheel and not on the drive.
If necessary, screw the bracket adapter to the drive head.
Assemble and fix the drive/tube assembly onto the end bracket g
and onto the drive bracket f.
Attention
Ensure that the drive/tube assembly is secured onto the end bracket. This operation prevents
the drive/tube assembly from coming out of the end bracket mounting.
Attention
For optimal radio reception, the motor antenna should be kept straight and should be
positioned outside of headrail (if used).
2.2. WIRING
Precaution
• Cables which pass through a metal wall must be protected and isolated using a sheath or
sleeve.
• Attach cables to prevent any contact with moving parts.
• The drive cable cannot be removed. If it is damaged, return the drive to the After-Sales
department.
Attention
Leave the drive power supply cable accessible: it must be possible to replace it easily.
- Switch off the power supply.
- Connect the drive according to the information in the
table below:
120 V 60 Hz
Neutral (N) Live (L1) Live (L2)
White Black Red
f
OFF
120 V 60 Hz
N L1 L2
g
2.3. COMMISSIONING
2.3.1. Start-up
To set the drive, you need to access and use Set&GoConnect Application, You must have a compatible
phone or mobile device and access to the internet.
The App is downloadable for free from Apple Store platforms and Google Play Store on the following
mobile devices:
• Apple iPhone® mobile phone or mobile device with iOS operating system running iOS 11 and later.
• Mobile phone or mobile device with operating system Android™ OS 6.0 and later.
The software version of the Set&GoConnect Application may be updated from time to time to add
new features and services.
10
Page 11

EN
Sonesse® 40 Zigbee
Copyright© 2018 SOMFY ACTIVITES SA, Société Anonyme All rights reserved.
2.3.2. Drive settings
0.5 sec
a
b
=
=
a
b
=
=
7 sec
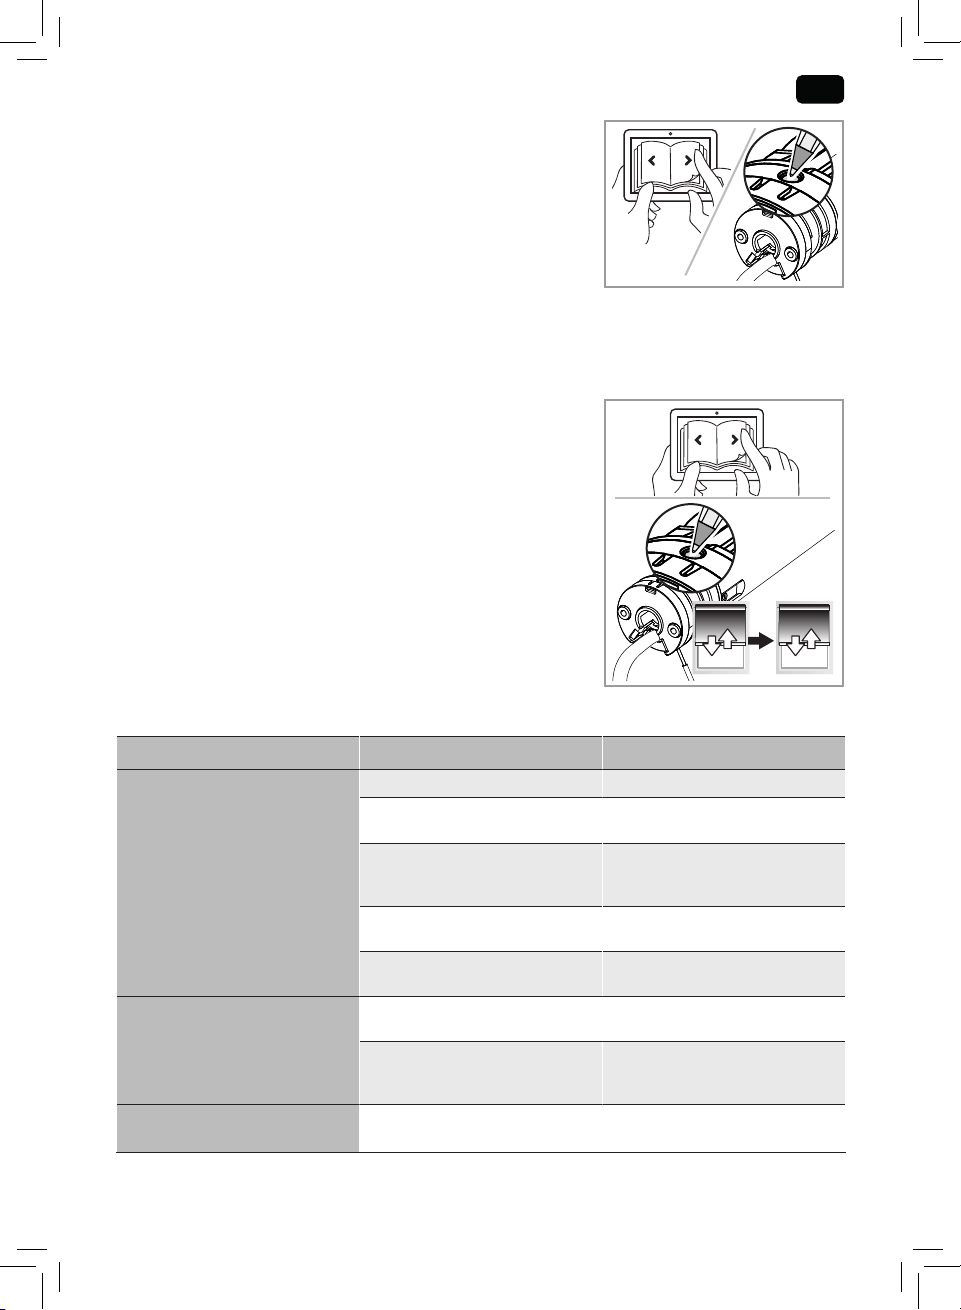
• Once the Set&GoConnect Application is downloaded, open
the app and follow the instructions to set the drive.
• Once the drive is set, check the settings by pressing the
button on the motor head:
- To start the motorised product movement, briefly press
the button on the motor head.
- To stop the motorised product movement, briefly press
the button on the motor head.
- To move the motorised product in the opposite direction of the previous movement, briefly
press the button on the motor head again.
- To stop the motorised product movement, briefly press the button on the motor head, and
so on.
2.3.3. Network management
To join a network :
• Follow the instructions on the Set&GoConnect application,
• Press and hold the motor head programming button (≈ 7
seconds) until the product makes 2 back and forth movements
(the first feedback after 2 seconds and the second after 7
seconds).
2.4. TIPS AND RECOMMENDATIONS
0.5 sec
7 sec
2.4.1. Questions about the drive ?
Observations Possible causes Solutions
The drive is powered off. Turn on the drive.
The remote control battery is
low.
The motorised product does
not operate.
The motorised product stops
too soon.
The red light of the remote
control lights up.
The remote control is not
compatible or not programmed.
The thermal protection is
activated.
The motor is not linked to a
network.
The end limits are incorrectly
adjusted.
The motorised product has
exceeded recommended weight
limit.
There is a setting error.
Check the battery and replace it
if necessary.
Check the compatibility and
replace the remote control if
necessary.
Wait for the motor to cool
down.
Go to chapter 2.3.3. Network
management
Reset the end limits.
Replace the product.
Go to chapter 2.3.2. Drive
settings
11
Page 12

EN
Sonesse® 40 Zigbee
Copyright© 2018 SOMFY ACTIVITES SA, Société Anonyme All rights reserved.
3. USE AND MAINTENANCE
a
b
=
=
a
b
=
=
a
b
=
=
12 sec
This drive is maintenance-free
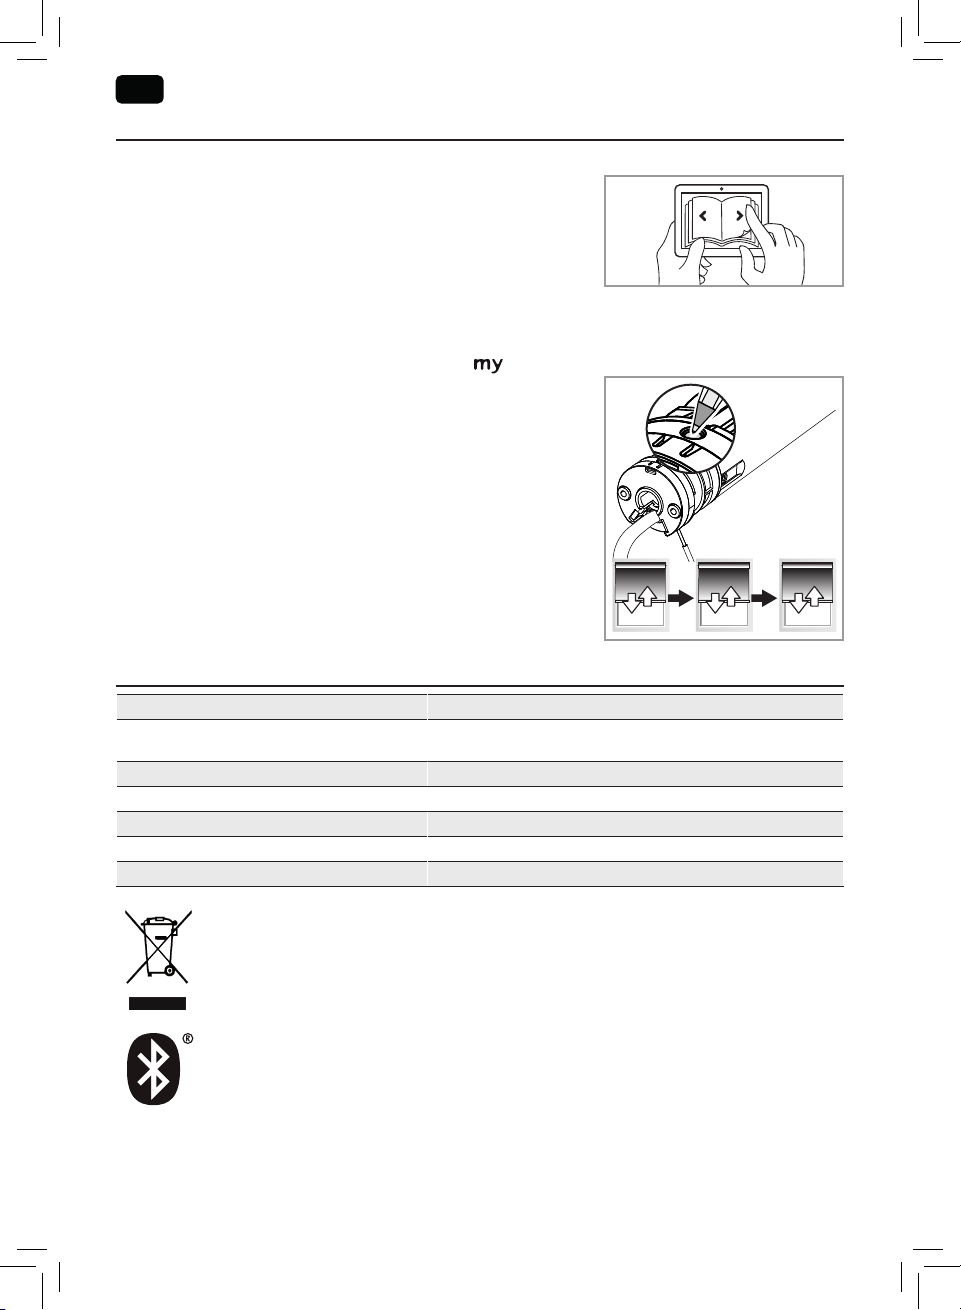
3.1. USE FROM THE APPLICATION
The motor control and tilting control are possible from the
application: follow the instructions on the Set&Go Connect
application.
3.2. FACTORY MODE
This reset deletes all remote control, all the settings, the network, and resets the motor’s favorite
position .
Press and hold the motor head programming button (≈12seconds)
until the product makes 3 back and forth movements (the first
feedback after 2seconds, the second after 7seconds and the third
after 12seconds).
12 sec
4. TECHNICAL DATA
Power supply 120 VAC 60 Hz
Frequency bands and maximum power used 2.4 GHz - 2.4835 GHz
Version Zigbee 3.0
Version Bluetooth® 4.2
Safety level I
Operating temperature 0°C to + 60°C
Protection rating IP 30 (For indoor use only)
e.r.p. <63 mW
We care about our environment. Do not dispose of the appliance with usual household
waste. Give it to an approved collection point for recycling.
The Bluetooth® word mark and logos are registered trademarks owned by the
Bluetooth SIG, Inc. and any use of such marks by SOMFY ACTIVITIES SA is under
license. Other trademarks and trade names are those of their respective owners.
12
Page 13

EN
Sonesse® 40 Zigbee
Copyright© 2018 SOMFY ACTIVITES SA, Société Anonyme All rights reserved.
This device complies with Industry Canada’s licence-exempt RSSs. Operation is subject to the
following two conditions:
(1) This device may not cause interference; and (2) This device must accept any interference, including
interference that may cause undesired operation of the device.
FCC warning statement:
- This device complies with Part 15 of the FCC Rules.
Operation is subject to the following two conditions:
(1) This device may not cause harmful interference, and (2) This device must accept any interference
received, including interference that may cause undesired operation.
- This equipment complies with FCC radiation exposure limits set forth for an uncontrolled
environment. End users must follow the specific operating instructions for satisfying RF exposure
compliance. This transmitter must not be co-located or operating in conjunction with any other
antenna or transmitter.
- Changes or modifications not expressly approved by the party responsible for compliance could void
the user’s authority to operate the equipment.
For mobile or fixed location transmitters, the minimum separation distance between the antenna &
radiating structures of the device and nearby persons is 20 cm, even if calculations indicate that the
MPE distance would be less.
Apple and Apple logos are trademarks of Apple, Inc., registered in the U.S. and other countries.
iPad® and iPhone® are registered trademarks of Apple, Inc. App Store is a service mark of Apple Inc.
Android is a trademark of Google LLC.
https://developer.android.com/distribute/marketing-tools/brand-guidelines
13
Page 14

ES
Sonesse® 40 Zigbee
Copyright© 2018 SOMFY ACTIVITES SA, Société Anonyme All rights reserved.
ÍNDICE
MANUAL TRADUCIDO
1. Información previa 14
1.1. Ámbito de aplicación 14
1.2. Responsabilidad 14
2. Instalación 15
2.1. Montaje 15
2.2. Cableado 16
2.3. Puesta en marcha 16
2.4. Trucos y consejos 17
3. Uso y mantenimiento 18
3.1. Uso desde la aplicación para el teléfono 18
3.2. Modo de fábrica 18
4. Datos técnicos 18
ASPECTOS GENERALES
Instrucciones de seguridad
Peligro
Señala un peligro que provoca inmediatamente la muerte o lesiones graves.
Advertencia
Señala un peligro susceptible de provocar la muerte o lesiones graves.
Precaución
Señala un peligro susceptible de provocar lesiones leves o moderadamente graves.
Atención
Señala un peligro susceptible de dañar o destruir el producto.
1. INFORMACIÓN PREVIA
1.1. ÁMBITO DE APLICACIÓN
Las motorizaciones Sonesse 40 están diseñadas para accionar todo tipo de cortinas enrollables de
interior excepto mallorquinas.
El instalador, profesional de la motorización y de la automatización de la vivienda, debe asegurarse
de que la instalación del producto automatizado, una vez instalado, respete las normas vigentes en el
país donde vaya a utilizarse, en particular, la norma sobre persianas interiores EN 13120.
1.2. RESPONSABILIDAD
Antes de instalar y utilizar el motor, lea detenidamente esta guía. Además de las instrucciones que
figuran en esta guía, siga también las instrucciones detalladas en el documento adjunto Instrucciones
de seguridad.
El motor debe ser instalado por un profesional de la motorización y automatización residencial de
acuerdo con las instrucciones de Somfy y la normativa vigente aplicable en el país de instalación.
Queda prohibido utilizar el motor fuera de cualquier campo aplicación arriba descrito. Cualquier uso
fuera del campo de aplicación mencionado en esta guía y el documento adjunto Instrucciones de
seguridad, anulará cualquier responsabilidad y garantía de Somfy.
Tras la instalación del motor, el instalador deberá informar a sus clientes de las condiciones de uso
y mantenimiento y hacerles entrega de las instrucciones de uso y mantenimiento, así como del
documento adjunto Instrucciones de seguridad. Cualquier operación de Servicio Posventa en el
motor requerirá la intervención de un profesional de la motorización y la automatización residencial.
En caso de duda durante la instalación del motor o para obtener información adicional, consulte con
un representante de Somfy o visite el sitio web www.somfy.com.
14
Page 15

ES
Sonesse® 40 Zigbee
Copyright© 2018 SOMFY ACTIVITES SA, Société Anonyme All rights reserved.
b
a
L
L = …
L
L
L = …
Ø > 37
l
L
2. INSTALACIÓN
Advertencia
• Instrucciones que debe seguir obligatoriamente el profesional de la motorización y la auto-
matización de la vivienda que efectúe la instalación de la motorización.
• Se deben seguir las normas y la legislación vigentes en el país de instalación.
Atención
• No deje caer, golpee, perfore ni sumerja nunca el motor.
• Instale un punto de mando individual para cada motorización.
• Para garantizar un funcionamiento silencioso optimizado, debe reducirse al mínimo la sepa-
ración entre el motor, los accesorios, el tubo y la pieza del extremo del tubo.
2.1. MONTAJE
2.1.1. Preparación del motor
Compruebe que el diámetro interior del tubo del producto
automatizado sea superior a 37 mm.
1) Monte los accesorios necesarios para la integración de la
motorización en el tubo de enrollamiento:
• Monte la rueda a en el motor.
• Monte la corona b y la rueda a en el motor.
2) Mida la longitud (L) entre el borde interior del cabezal del
motor y el extremo de la rueda.
2.1.2. Preparación del tubo
1) Corte el tubo de enrollamiento a la longitud deseada en función
del producto que quiera automatizar.
2) Lime el tubo de enrollamiento y elimine las virutas.
3) En caso de que el tubo de enrollamiento sea liso en el interior,
realice una muesca según las siguientes dimensiones:
l=7mm, L=10mm.
1
b
2
1 2
3
L = …
a
L
Ø > 37
2.1.3. Ensamblaje del motor-tubo
1) Introduzca la motorización en el tubo de enrollamiento.
En los tubos de enrollamiento de interior liso, coloque la
muesca sobre la corona.
2) La rueda motriz debe quedar bloqueada para evitar su movimiento
dentro del tubo de enrollamiento: Esto puede conseguirse
fijando el tubo de enrollamiento a la rueda con cuatrotornillos
Parker de 5mm de Ø o cuatro remaches de acero de 4,8mm
de Ø colocados entre 5 mm y 15 mm del extremo exterior
de la rueda, independientemente del tubo de enrollamiento
utilizado.
Atención
Los tornillos o los remaches no deben fijarse a la motorización, sino únicamente a la rueda.
1
2
L
15
Page 16

ES
Sonesse® 40 Zigbee
Copyright© 2018 SOMFY ACTIVITES SA, Société Anonyme All rights reserved.
2.1.4. Montaje del conjunto tubo-motor
L
f
g
Atención
Los tornillos o los remaches no deben fijarse a la motorización,
sino únicamente a la rueda.
Si es necesario, atornille el adaptador del soporte al cabezal del
motor. Monte y fije el conjunto tubo-motor al soporte del extremo g
y al soporte del motor f.
Atención
Asegúrese de que el conjunto tubo-motor quede bloqueado en el soporte del extremo. Con
esta operación se evitará que el conjunto tubo-motor se salga de la fijación del soporte del
extremo.
Atención
Para una recepción óptima de la radio, la antena del motor debe estar recta y situada fuera del
cabezal (si se utiliza).
2.2. CABLEADO
Precaución
• Si los cables deben atravesar una pared metálica, deben protegerse y aislarse con un manguito o una vaina.
• Fije los cables para evitar cualquier contacto con un componente en movimiento.
• El cable de la motorización no es desmontable. Si está dañado, debe devolverse el motor al
Servicio Posventa (SPV).
Atención
Deje accesible el cable de alimentación del motor se debe poder sustituir fácilmente.
- Corte la alimentación eléctrica.
- Conecte la motorización siguiendo la información
facilitada en la siguiente tabla:
120V 60Hz
Neutro (N) Fase (L1) Tierra
Blanco Negro Verde
f
OFF
120 V 60 Hz
N L1 Tierra
g
2.3. PUESTA EN MARCHA
2.3.1. Configuración/programación
Para configurar la motorización, debe acceder y utilizar la aplicación Set&GoConnect. Debe disponer
de un teléfono o dispositivo móvil compatible y conectarse a Internet.
Puede descargar la aplicación de forma gratuita desde Apple Store y Google Play Store en los
siguientes dispositivos móviles:
• teléfono móvil Iphone® de Apple o dispositivo móvil con sistema operativo iOS con la versión
iOS 11 o posterior;
• teléfono móvil o dispositivo móvil con sistema operativo Android™ OS 6.0 o posterior.
La versión de soware de la aplicación Set&GoConnect puede actualizarse en cualquier momento
para añadir nuevas funciones y servicios.
16
Page 17

ES
Sonesse® 40 Zigbee
Copyright© 2018 SOMFY ACTIVITES SA, Société Anonyme All rights reserved.
2.3.2. Ajustes de la motorización
0,5 s
a
b
=
=
a
b
=
=
7 s
• Una vez que se haya descargado la aplicación
Set&Go Connect, ábrala y siga las instrucciones para
configurar la motorización.
• Después de configurarla, compruebe los ajustes pulsando el
botón del cabezal del motor:
- Para iniciar el movimiento del producto automatizado, pulse
brevemente el botón del cabezal del motor;
- Para detener el movimiento del producto automatizado, pulse
brevemente el botón del cabezal del motor;
- Para mover el producto automatizado en dirección contraria al movimiento anterior, pulse
brevemente el botón del cabezal del motor de nuevo;
- Para detener el movimiento del producto automatizado, pulse brevemente el botón del cabezal del
motor, etc.
2.3.3. Gestión de redes
Para unirse a una red:
• Siga las instrucciones de la aplicación Set&GoConnect;
• Mantenga pulsado el botón de programación del cabezal
del motor (≈ 7 segundos) hasta que el producto se mueva
dos veces hacia atrás y hacia adelante (el primer feedback al
cabo de 2 segundos y el segundo después de 7 transcurridos
segundos).
2.4. TRUCOS Y CONSEJOS
0,5 s
7 s
2.4.1. ¿Alguna pregunta sobre la motorización?
Observaciones Posibles causas Soluciones
El motor está apagado. Encienda el motor.
La carga de la pila del mando a
distancia está baja.
El mando a distancia no
El producto automatizado no
funciona.
El producto automatizado se
detiene demasiado pronto.
Se ha encendido la luz roja del
mando a distancia.
es compatible o no está
programado.
Se ha activado la protección
térmica.
El motor no está conectado a
una red.
Los finales de carrera están mal
ajustados.
El producto automatizado
ha excedido el límite de peso
recomendado.
Existe un error de
configuración.
Compruebe la pila y sustitúyala
en caso necesario.
Compruebe la compatibilidad y
sustituya el mando a distancia
en caso necesario.
Espere a que se enfríe la
motorización.
Consulte el capítulo 2.3.3.
Gestión de redes
Vuelva a ajustar los finales de
carrera.
Sustituya el producto.
Consulte el capítulo 2.3.2.
Ajustes de la motorización
17
Page 18

ES
Sonesse® 40 Zigbee
Copyright© 2018 SOMFY ACTIVITES SA, Société Anonyme All rights reserved.
3. USO Y MANTENIMIENTO
a
b
=
=
a
b
=
=
a
b
=
=
12 s
Esta motorización no precisa ninguna operación de mantenimiento
3.1. USO DESDE LA APLICACIÓN PARA EL TELÉFONO
El motor y la inclinación pueden controlarse desde la aplicación: siga las
instrucciones de la aplicación Set&GoConnect.
3.2. MODO DE FÁBRICA
Esta puesta a cero borra todo el mando a distancia, todos los ajustes, la red y reinicia la posición favorita
del motor .
Mantenga pulsado el botón de programación del cabezal del motor
(≈12s) hasta que el producto se mueva tres veces hacia atrás y hacia
adelante (el primer feedback al cabo de 2s, el segundo después de 7s y
el tercero transcurridos 12s).
12 s
4. DATOS TÉCNICOS
Alimentación 120V CA 60Hz
Bandas de frecuencia y potencia máxima utilizadas 2,4 GHz - 2,4835 GHz
Versión Zigbee 3.0
Versión Bluetooth® 4.2
Nivel de seguridad I
Temperatura de funcionamiento de 0°C a + 60°C
Índice de protección IP 30 (solo para uso en interiores)
e.r.p. <63 mW
Nos preocupa el medioambiente. No tire el aparato junto con los desechos
domésticos habituales. Llévelo a un punto de recogida aprobado para su reciclaje.
La marca con la palabra y los logotipos de Bluetooth® son marcas comerciales
registradas propiedad de Bluetooth SIG, Inc. y cualquier uso de las mismas por parte
de SOMFY ACTIVITIES SA se realiza bajo licencia. Las demás marcas y denominaciones
comerciales pertenecen a sus respectivos propietarios.
18
Page 19

ES
Sonesse® 40 Zigbee
Copyright© 2018 SOMFY ACTIVITES SA, Société Anonyme All rights reserved.
Este dispositivo cumple las RSS exentas de licencia de Industry Canada. El funcionamiento está
sujeto a estas dos condiciones:
(1) El dispositivo no puede provocar interferencias; y (2) debe aceptar cualquier interferencia, incluidas
las que puedan provocar un funcionamiento no deseado del mismo.
Advertencia de la FCC:
- Este dispositivo cumple la Parte 15 de las normas de la FCC.
El funcionamiento está sujeto a estas dos condiciones:
(1) El dispositivo no puede provocar interferencias dañinas; y (2) debe aceptar cualquier interferencia
recibida, incluidas las que puedan provocar un funcionamiento no deseado.
- Este equipo cumple los límites de exposición a la radiación de la FCC para entornos no controlados.
Los usuarios finales deben seguir las instrucciones de uso específicas para cumplir la normativa de
exposición a radiofrecuencias. Este transmisor no debe instalarse ni funcionar junto con ninguna otra
antena o transmisor.
- Los cambios o modificaciones que no hayan sido expresamente aprobados por la parte responsable
del cumplimiento podrían anular la autorización del usuario para utilizar el equipo.
Apple, el logotipo de Apple son marcas comerciales de Apple Inc., registradas en EE.UU. y otros países.
iPad® y iPhone® son marcas registradas de Apple Inc. App Store es una marca de servicios de Apple Inc.
Android es una marca registrada de Google LLC.
https://developer.android.com/distribute/marketing-tools/brand-guidelines
19
Page 20

SOMFY ACTIVITES SA
50 avenue du Nouveau Monde
F-74300 Cluses
www.somfy.com
SOMFY ACTIVITES SA, Société Anonyme, capital 35.000.000 Euros, RCS Annecy, 303.970.230 - 11/2019 Images not contractually binding
5145518A
 Loading...