

Page 1

TM
RTS Tilt WireFree Programming & Operation Instructions
New & Improved w/RTS
WireFree Tilt now joins the Somfy RTS motor offering.
TM
Before you begin
Motors are shipped without limit switch settings and transmitter ID’s
Steps (1-6) must be completed to ensure proper shade programming and functionality.
Power should ONLY be connected to current shade being programmed. All other
shades should be disconnected from their respective power while programming is in progress.
While programming (step 4), shade should not be inactive for longer than 2 minutes
or motor will exit programming mode.
Programming Instructions are for use with Telis 1&4, Decora 1&4, Modulis or Chronis Timer
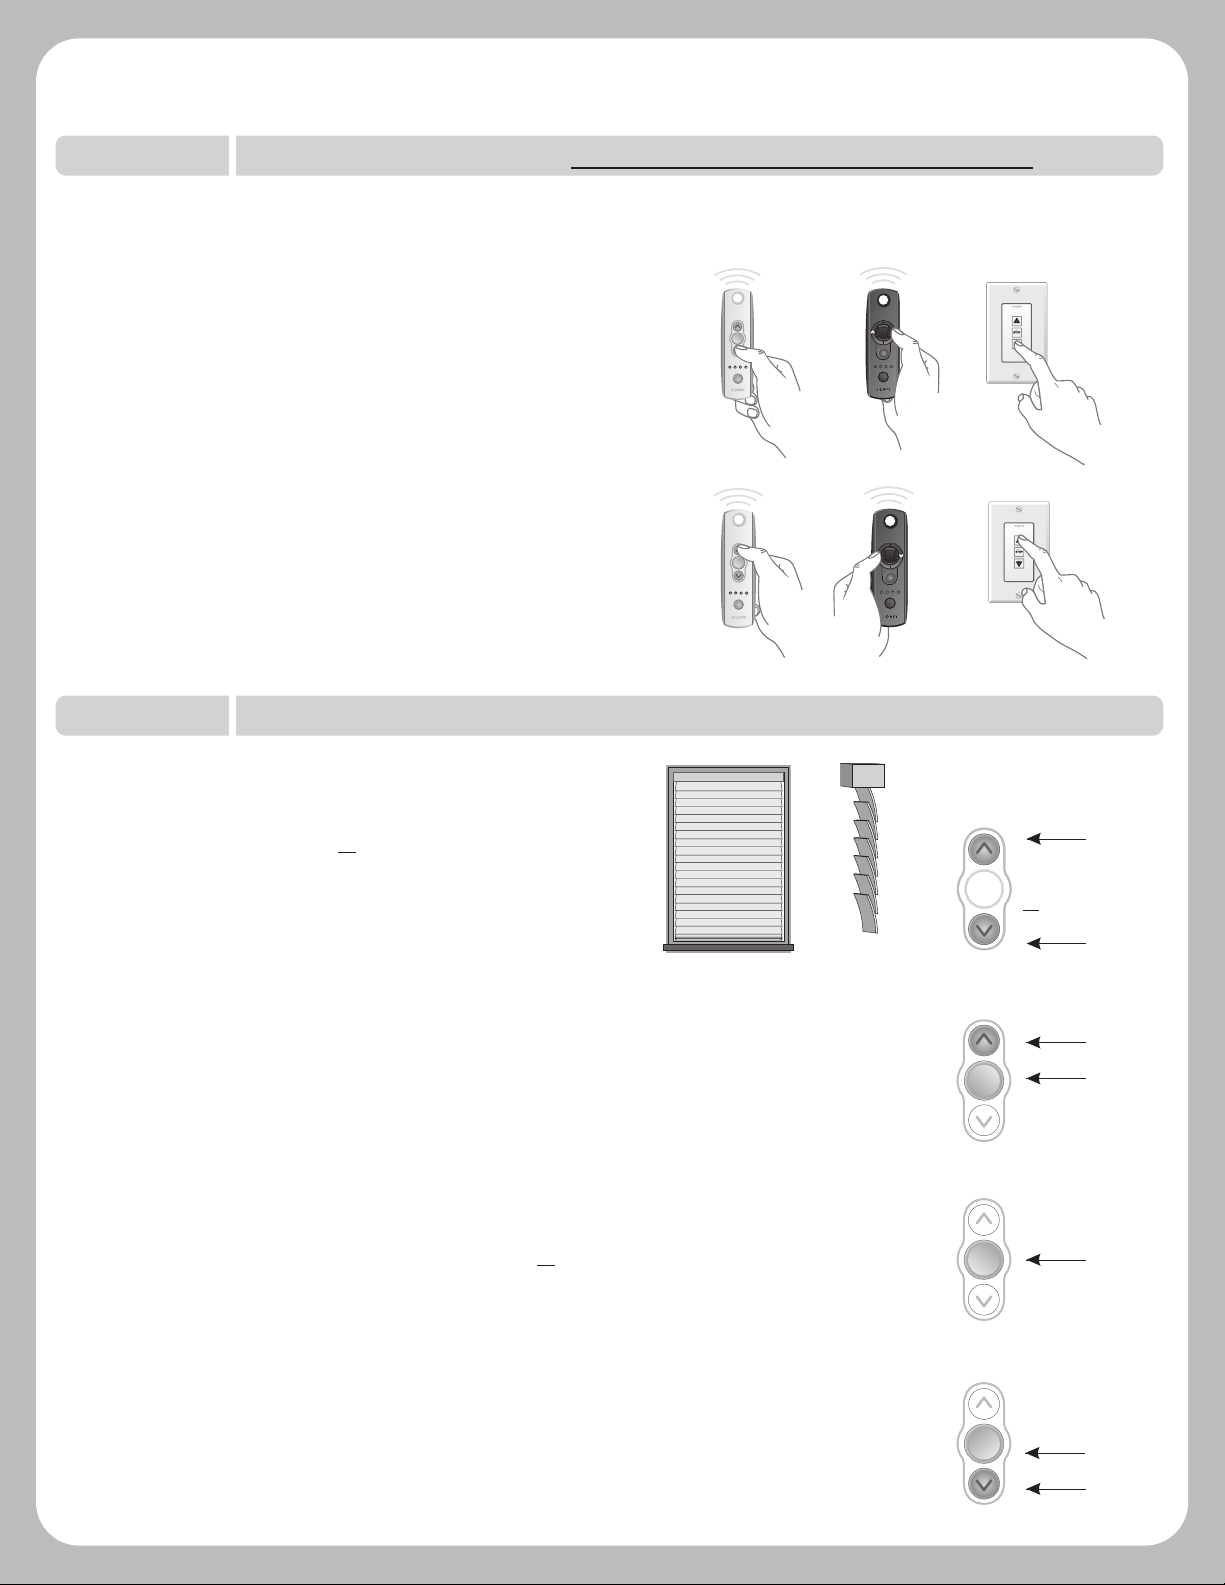
The following illustrations and instructions represent the Telis hand-held remote, and
may also be applied to the Decora wireless wall switch and Chronis Timer.
UP
STOP
DOWN
LED
Channel
Indicator
CHANNEL
SELECTOR
UP
my
Telis Modulis Five Channel
(with tilt wheel)
DOWN
STOP
LED
Channel
Indicator
CHANNEL
SELECTOR
my
Telis RTS Single Channel
(Standard)
UP
STOP
DOWN
LED
Channel
Indicator
my
Telis RTS Five Channel
(Standard)
UP
STOP
DOWN
Decora WireFree Wall Switch
(Standard)
STEP ONE
Connect Power to Motor
1) Connect 12V battery wand or transformer to the motor
Motor should already be installed in blind.
STEP TWO
Initiate Programming – (for use with Telis 1 & 4, Decora 1 & 4, Modulis or Chronis Timer)
For Single Channel Transmitters (Telis 1, Decora 1, Modulis or Chronis Timer)
1) On the transmitter, press and hold the UP and DOWN buttons
simultaneously until the blind jogs (blind slats have a short
up and down tilt movement).
For Multi-Channel Transmitters (Telis 4, Decora 4)
1) Using the channel selector, select the desired channel.
2) On the transmitter, press and hold the UP and DOWN buttons
simultaneously until the blind jogs.
NOTE: This step cannot be performed if the transmitter has
already been programmed (memorized) to blind.
my
my
TI N
BY
C
SOMFY SYSTEMS, INC. 9/08 REV.2A
Page 2
Tilt WireFree RTS Programming & Operation Instructions
TM
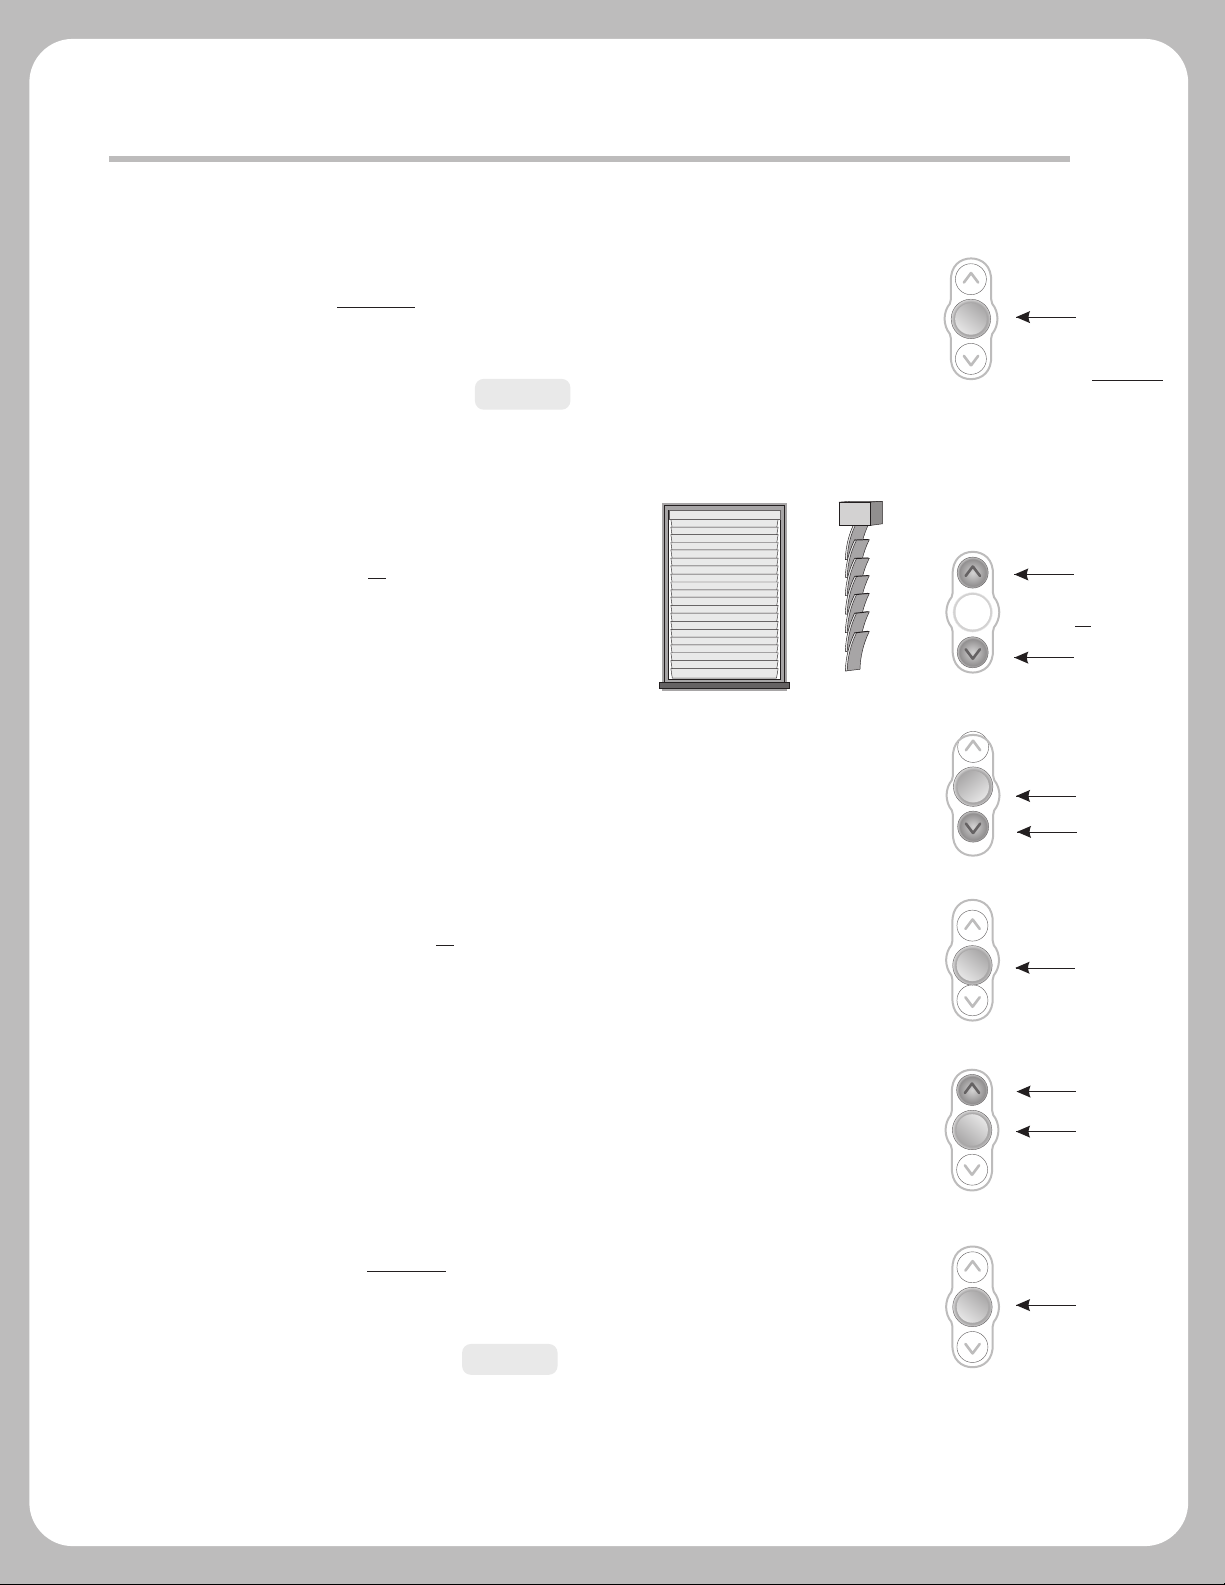
STEP THREE
Check Polarity (blind direction) MUST BE DETERMINED BEFORE SETTING BLIND LIMITS
Press and hold the DOWN button and confirm the blind tilts down.
Press and hold the UP button and confirm the blind tilts up.
·If blind direction is correct, continue to Step 4.
·If blind direction is not correct (in reverse), press and hold
the MY (Stop) button on the transmitter for 2 seconds.
Blind will jog. Blind direction is now corrected. Blind
movement should now correspond to the direction button
on the transmitter.
STEP FOUR
Setting Limits (Slat Positions)
Telis Modulis Decora
my
my
my
my
Starting with slats in down (closed) position.
1) Press and hold the UP or DOWN button on the transmitter
to reach the desired lower limit (slat position).
2 ) Once the desired lower limit (slat position) is reached, press and hold
the MY (Stop) and UP buttons simultaneously until the
blind begins to tilt upward, then release.
3) Press the MY (Stop) button when the blind reaches the desired
upper limit (slat position). If necessary, adjust the desired
slat position with a brief press of either the UP or DOWN button.
2.
1.
3.
my
my
my
my
Press &
hold UP
or DOWN
Button
Press MY (stop)
and UP Button
Press MY (stop)
Button
4) Once desired upper limit (slat position) is reached, press and
hold the MY (Stop) and DOWN buttons simultaneously until the
blind begins to tilt downward, then release.
2
4.
Press MY (stop)
and DOWN Button
my
Page 3
Tilt WireFree RTS Programming & Operation Instructions
TM
5) Once blind stops at previously set lower limit (slat position), press the
MY (stop) button for 2 seconds until the slats jog. This confirms both
limits (slat positions).
To complete programming, proceed to STEP FIVE
Starting with slats in up (closed) position
1) Press and hold the DOWN or UP button on the transmitter
to reach the desired upper limit (slat position).
2) Once the desired upper limit (slat position) is reached, press and hold
the MY (Stop) and DOWN buttons simultaneously until the
blind begins to tilt downward, then release.
5.
1.
2.
my
Press MY (stop)
Button for 2 seconds
Press and
my
hold UP or
DOWN Button
Press MY (stop)
and DOWN Button
my
3) Press the MY (Stop) button when the blind reaches the desired lower
limit (slat position). If necessary, adjust the desired slat position
with a brief press of either the UP or DOWN button.
4) Once desired lower limit (slat position) is reached, press and hold
MY (Stop) and UP buttons simultaneously until the blind begins to
tilt upward, then release.
5) Once blind stops at previously set upper limit (slat position), press
the MY (stop) button for 2 seconds until the slats jog. This confirms
both limits (slat positions).
To complete programming proceed to STEP FIVE
3.
Press MY (stop)
Button
my
4.
my
Press MY (stop)
and UP Button
5.
my
Press MY (stop)
Button
3
Page 4

Tilt WireFree RTS Programming & Operation Instructions
TM
STEP FIVE
Completing & Exiting Programming Mode
Using a paperclip or pen, press and hold the PROGRAM button
on the back of the transmitter until the blind jogs. TRANSMITTER
IS NOW MEMORIZED AND PROGRAMMING IS COMPLETE.
Note: If power is disconnected from blind before Step 5 is
completed, TRANSMITTER WILL NOT BE MEMORIZED to the
programmed blind however limits (slat positions) will
remain programmed. If this occurs, go back and repeat
step 2 (Initiate Programming). Then omit step 4 (Setting Limits)
and resume with step 5.
STEP SIX
Adding Additional Transmitters or Assigning Channels
Adding Additional Transmitters (Single Channel)
Telis Transmitter
(back view)
Program
Button
Program
Button
Chronis RTS Timer
with cover removed
Previous
transmitter
Program
Button
Decora Wireless
Wall Switch, (side view)
1) Using a paperclip or pen, press and hold the PROGRAM button on the
previously addressed transmitter until the blind jogs.
2) Using a paperclip or pen, press and hold the PROGRAM button on the Additional
(new) transmitter until the blind jogs. Additional (new) transmitter is now added
to shade memory and can be used to operate blind.
Assigning Specific Channels to Blind (Multi-channel transmitters only)
1) Using a paperclip or pen, press and hold the PROGRAM button on the
previously addressed transmitter until the blind jogs.
2) Select the desired channel (1-4 or all) by momentarily pressing the Channel
Selector Button on the multi-channel transmitter.
3) Press and hold the PROGRAM button on the multi-channel transmitter until
the blind jogs. Additional (new) channel is now added to blinds memory and
can be used to operate blind.
Note: To prevent unwanted Channel/Transmitter assignments, ALL PREVIOUSLY
PROGRAMMED BLINDS should be UNPLUGGED until Programming is complete.
New
transmitter
Previous
transmitter
Program
Button
New
transmitter
Program
Button
my
Channel
Selector
4
Page 5

Tilt WireFree RTS Programming & Operation Instructions
TM
Deleting Specific Channels/Transmitters
1) Using a paperclip or pen, press and hold the PROGRAM button on the
previously addressed transmitter until the blind jogs.
2) Select the desired channel (1-4 or all) or transmitter (single channel)
to be deleted.
3) Press and hold the PROGRAM button on the transmitter until the
blind jogs. Channel or transmitter is now deleted from the blind memory
and will not operate blind.
Previous
transmitter
Program
Button
my
Channel
Selector
STEP SEVEN
1)
To delete all previous settings: Using a paperclip, press and hold
Resetting Motor (Erasing all Previously Programmed Limit Settings and Channels)
the PROGRAM Button, located on the top of the motor casing, until
the blind jogs (3) times (approx. 12 seconds).
All transmitters and limits will be erased from the motor memory.
(Motor is now reset to factory mode). Motor limits (slat positions) will
need to be reestablished.
OPTION ONE
Setting an Intermediate Position (IP)
1) Press the UP or DOWN directional button on the previously addressed
transmitter until the blind slats reach a desired intermediate position, then
press the MY (Stop) button to stop. If necessary adjust the desired slat
position by pressing and holding either the UP or DOWN button.
1.
my
Press and
hold UP or
DOWN Button
5
Page 6

Tilt WireFree RTS Programming & Operation Instructions
TM
2) Press and hold the MY (Stop) button on the transmitter until the blind jogs.
2.
Intermediate slat position is now added to memory
3) Activate the blind intermediate position by pressing the MY (Stop) button
3.
from ANY slat position.
Note: Blind should be stationary prior to activating intermediate position function. If slats
are actively moving (in-motion) the MY (Stop) button should be pressed twice.
To Delete: Activate blind to (IP) position, then press and hold the MY (Stop) button for 5 seconds.
OPTION TWO
1) Press the UP directional button on the transmitter. Blind will tilt to
Re-adjusting Upper Limit (UP Slat Position)
1.
the pre-set UP limit.
my
Press MY (stop)
Button for 2 seconds
my
Press MY (stop)
Button
mymy
Press and
hold UP
Button
2) Once blind stops at pre-set up limit, press and hold the UP and DOWN
buttons simultaneously on the transmitter until the blind jogs.
3) Press and hold either the UP or DOWN button on the transmitter to adjust
slats to new position.
4) Press and hold the MY (Stop) button until the blind jogs.
2.
3.
4.
my
my
my
my
Press &
hold UP
& DOWN
Button
Press &
hold Either
UP or DOWN
Button
New Upper Limit (Up Stop Position) is now added to memory.
my
Press and hold
My (stop) Button
6
Page 7

Tilt WireFree RTS Programming & Operation Instructions
TM
OPTION THREE
Re-adjusting Lower Limit (DOWN Slat Position)
1) Press the DOWN directional button on the transmitter. Blind will tilt
to the pre-set DOWN limit.
2) Once blind stops at pre-set down limit, press and hold the UP and
DOWN buttons simultaneously on the transmitter until the blind jogs.
3) Press and hold either the UP or DOWN button on the transmitter to adjust
slats to new position.
1.
2.
3.
my
my
my
my
my
my
Press and
hold DOWN
Button
Press &
hold UP
& DOWN
Button
Press &
hold Either
UP or DOWN
Button
4) Press and hold the MY (Stop) button until blind jogs.
New lower limit (Down Stop Position) is now added to memory
Operating Instructions are for use with Telis 1&4, Decora 1&4 or Modulis Chronis Timer
USER MODE: Operating the Blind (tilting the slats)
Telis Modulis Decora
Telis & Decora Switch Only
1. Press and hold the (UP) button to open the blind slats.
Release the button when the desired position is reached.
Blind slats will operate at ½ speed or press momentarily
my
on the UP button, blind slats will move to the programmed
limit (slat position) at full speed.
Telis & Decora Switch Only
2. Press and hold the (DOWN) button to close the slats.
Release the button when the desired position is reached.
Blind slats will operate at ½ speed or press momentarily
on the DOWN button, blind slats will move to the
programmed limit (slat position) at full speed.
4.
Press hold
MY (stop) Button
my
my
7
Page 8

Tilt WireFree RTS Programming & Operation Instructions
TM
Modulis Only
Press momentarily on the (UP) button to open the blind
slats. Press the (UP) button again to stop the movement
of the slats. (If the stop command is not desired, slats will
continue to move to the preprogrammed limit (slat position)
Modulis Only
Press momentarily on the (DOWN) button to close the slats.
Press the (DOWN) button again to stop the movement of
the slats.
(If the stop command is not desired, slats will
continue to move to the preprogrammed limit (slat position)
Using the Scroll Wheel
Modulis Only
3. Scroll the wheel of the Modulis transmitter to move the blind
slats up or down. The slats will move in relation
to the motion of the wheel on the transmitter.
my
my
my
Activate the Preferred Position
my
Telis, Modulis & Decora Switch
4. Press momentarily on the MY (stop) button. The slats will
start moving and stop at the pre-programmed “preferred”
my
my
slat position.
my
my
TI N
BY
8
C
SOMFY SYSTEMS, INC. 9/08 REV.2A
 Loading...