

SOMFY Tilt & Lift 25 RTS Central Instructions Manual
Tilt & Lift 25 RTS Central
Instructions
EN
Notice
FR
Manuale
IT
Manual
ES
Instruções
PT
Οδηγίες
EL
Ref. 5113053B


TRANSLATED INSTRUCTIONS
CONTENTS
1. Prerequisite information 3
1.1. Fields of application 3
1.2. Liability 4
2. Installation 4
2.1. Installation 5
2.2. Wiring 6
2.3. Commissioning 6
2.4. Tips and recommendations for
installation 8
3. Use and maintenance 10
3.1. Mode selection: Roller or
Tilting mode 10
3.2. Up, Down, My: In roller mode 11
3.3. Up, Down, My: In tilting mode 11
3.4. Additional settings 12
3.5.
Tips and recommendations for use
4. Technical data 14
13
1. PREREQUISITE INFORMATION
1.1 FIELDS OF APPLICATION
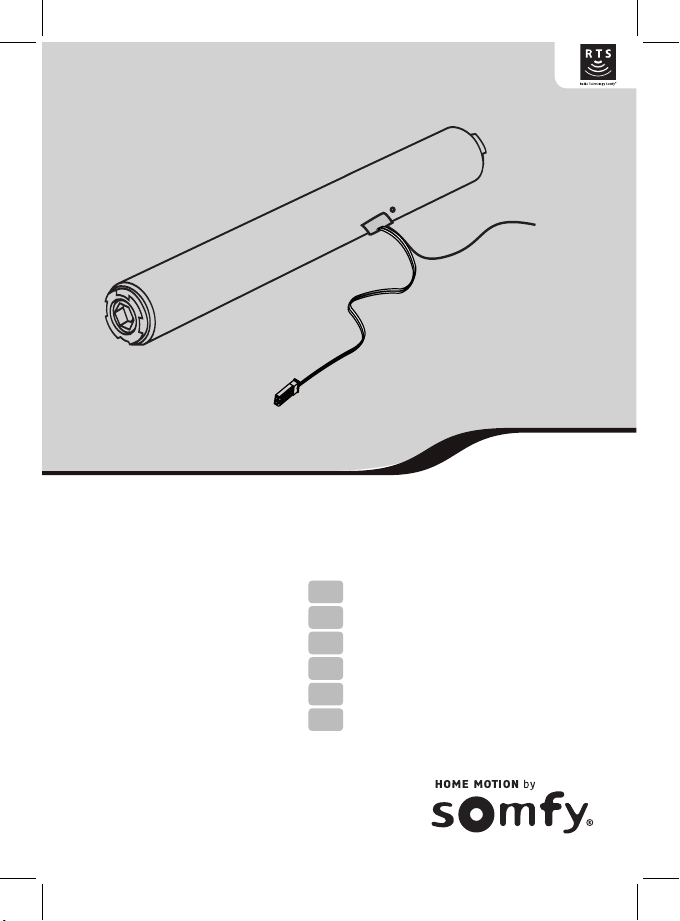
The Tilt & Lift 25 RTS Central is a motor specially dedicated to interior applications.
The Tilt & Lift 25 RTS Central can motorize roman, pleated, venetian and cellular
blinds.
The Tilt & Lift 25 RTS Central is a battery operated motor, powered with lithium primary
batteries or NiMH batteries with solar pack. The motor can also be powered by a
power supply.
Use only the below Somfy references with this motor :
Ref. 9018685 : 12V RELOADABLE TUBE (8 AA LITHIUM) + Ref. 9014834 : 8 AA
LITHIUM BATTERY PACK
Ref. 9018608 : 12V RELOADABLE TUBE (10 AA NIMH) + Ref. 9018621 : 10AA NIMH
BATTERIES
Ref. 9019034 : SOLAR PACK
Ref. 1822445 : 12V AC/DC Power Supply
Caution : Batteries must be installed as shown on the battery tube.
Do not mix type, brand or used batteries with new.
Warning : The Tilt & Lift 25 RTS Central is compatible only with the «Sunis Indoor WireFreeTM RTS» sensor.
Warning : The Tilt & Lift 25 RTS Central cannot be used with sealed double glazing.
Please separate storage cells and batteries from other types of waste and recycle them via your local collection facility.
3Copyright © 2013 Somfy SAS. All rights reserved - V1 - 02/2013

1.2 LIABILITY
Before installing and using the motor, please read operating and installation guide
carefully. In addition to following the instructions given in this guide, the instructions
detailed in the attached Safety instructions document must also be observed.
The motor must be installed by a motor and home automation professional,
according to instructions from Somfy and the regulations applicable in the country in which it is commissioned.
It is prohibited to use the motor outside the elds of application described above.
Such use, and any failure to comply with the instructions given in this guide and in the
attached Safety instructions document, absolves Somfy of any liability and invalidates
the warranty.
The installer must inform its customers of the operating and maintenance conditions for
the motor and must provide them with the instructions for use and maintenance, and
the attached Safety instructions document, after installing the motor. Any After-Sales
Service operation on the motor must be performed by a motor and home automation
professional.
If in doubt when installing the motor, or to obtain additional information, contact a Somfy
adviser or go to the website www.somfy.com
Safety warning!
Caution!
Information
2. INSTALLATION
Instructions which must be followed by the motor and home automation professional installing the Tilt & Lift 25 RTS central motor.
Never drop, knock, drill or submerge the motor.
Install a separate control point for each motor.
4 Copyright © 2013 Somfy SAS. All rights reserved - V1 - 02/2013

2.1. INSTALLATION
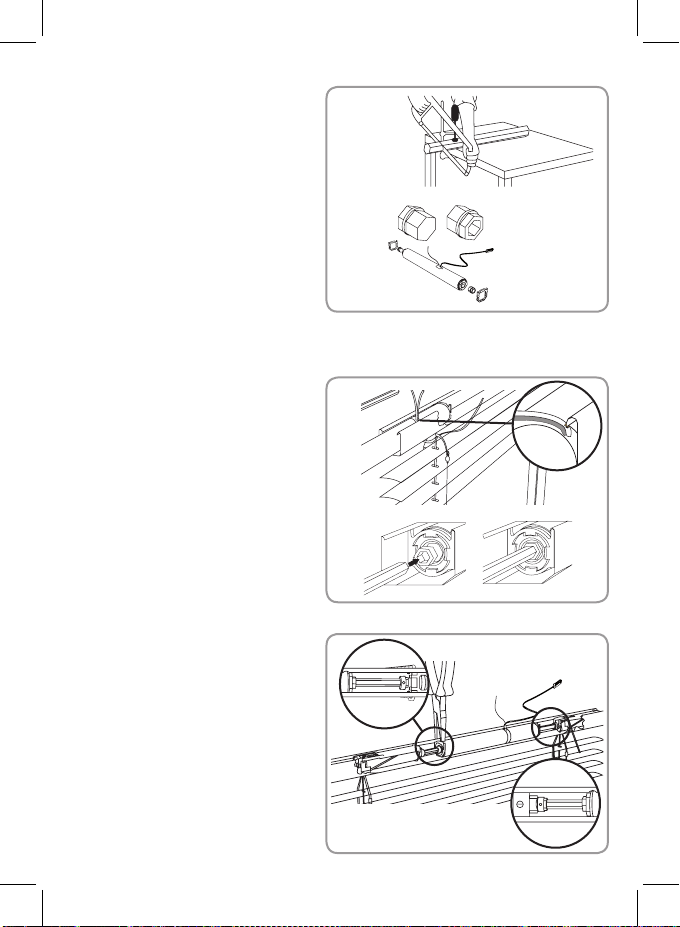
2.1.1. Motor preparation
1) Cut the shaft to the length required.
2) Position the headrail and shaft
adapters on the motor.
2
2.1.2. Motor integration inside the headrail
1) Insert the motor in the headrail.
Take care not to cut the power
supply wires on the edges of the
headrail when introducing the
motor.
2) Let the shaft abut against the motor
shaft adapters.
For optimal radio reception, the
antenna should be kept straight
and outside the headrail.
2.1.3. Motor and shaft locking
Using the relevant tool, pinch headrail
edges to block motor translation.
To lock the shaft, place stop rings
against the CTS , and screw them.
1
2
1
5Copyright © 2013 Somfy SAS. All rights reserved - V1 - 02/2013
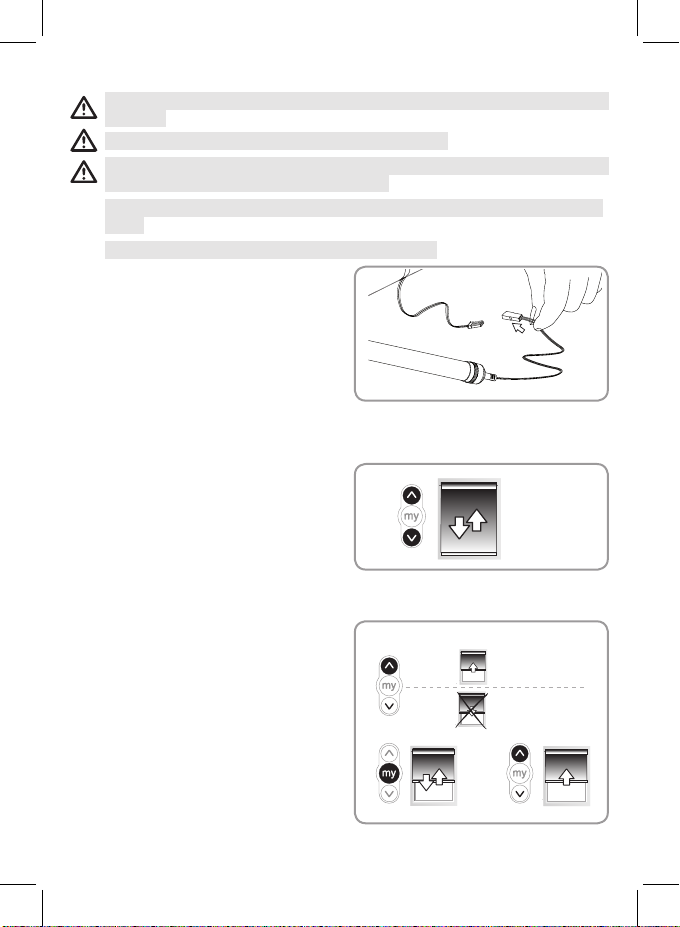
2.2. WIRING
Cables which pass through a metal wall must be protected and isolated using a sheath
or sleeve.
Attach cables to prevent any contact with moving parts.
The cable for the Tilt & Lift 25 RTS Central cannot be removed. If it is damaged,
return the drive to the After-Sales department.
Leave the motor power supply cable accessible: it must be possible to replace it
easily.
Do not unplug the battery when the motor is working.
Plug the battery or the power supply with the
motor supply cable :
Do not unplug the battery or the power
supply when the motor is working.
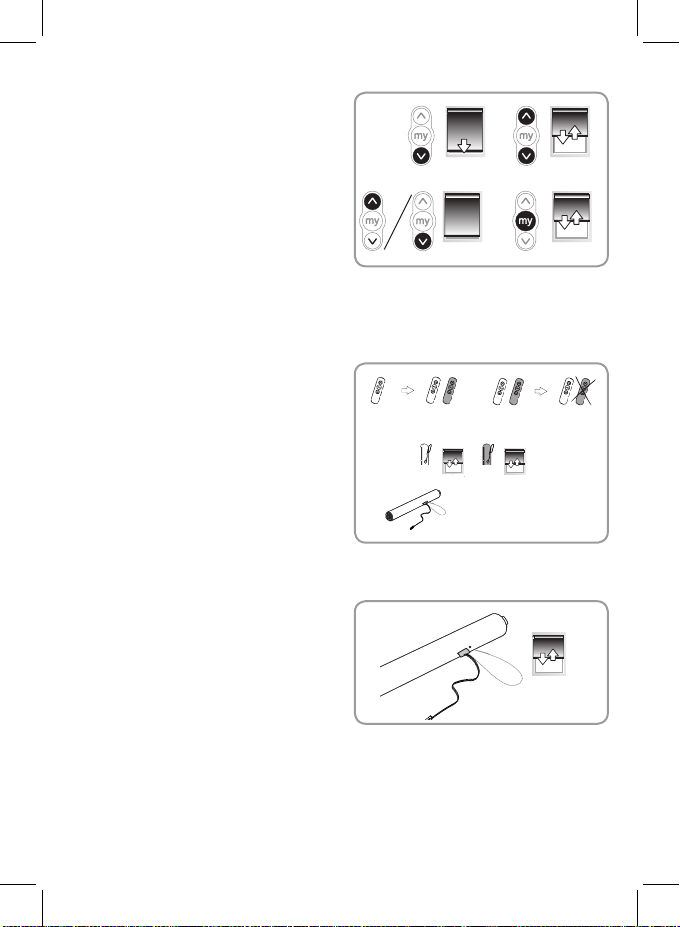
2.3. COMMISSIONING
2.3.1. Programming the RTS control point
Press the Up and Down buttons
simultaneously on the RTS control point:
the motorised product moves up and down
and the control point is preprogrammed in the
motor
2.3.2. Checking the direction of rotation
Press the Up button on the RTS control point:
a) If the motorised product rises (a), the
direction of rotation is correct: Move onto the
section 5.3 entitled “Setting the end limits”.
b) If the motorised product lowers (b), the
direction of rotation is incorrect: Move onto the
next step.
b1) Press the my button on the RTS control
point until the motorised product moves
up and down: The direction of rotation has
been modied.
b2) Press the Up button on the RTS control
point to check the direction of rotation.
6 Copyright © 2013 Somfy SAS. All rights reserved - V1 - 02/2013
a
=
b
=
b2b1
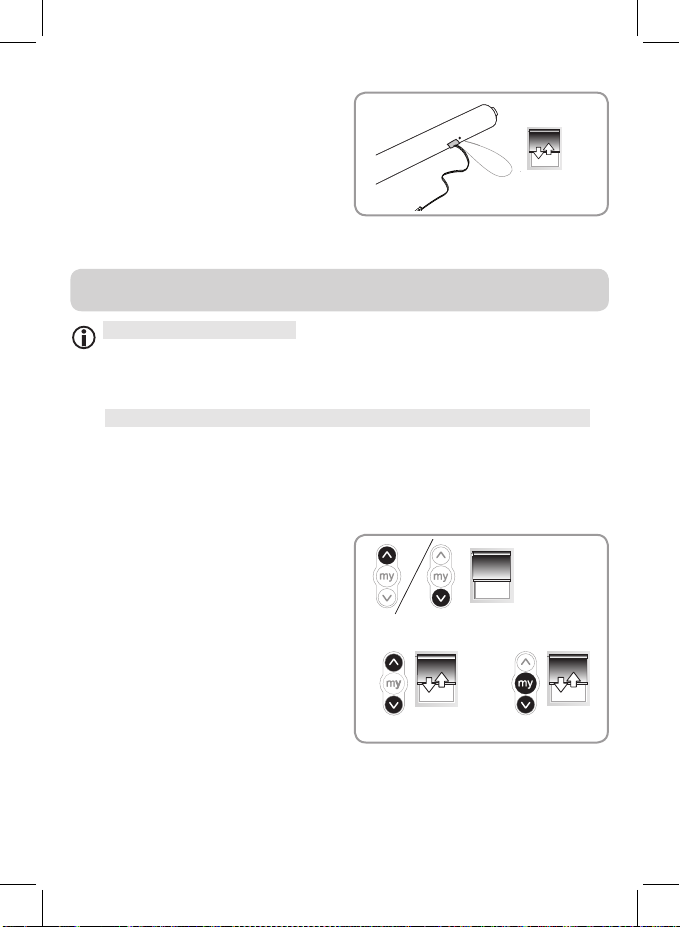
2.3.3. Setting the end limits
The end limits can be set in any order.
Do not set the upper end limit in a position in which the fabric or slats are fully
pressed against the headrail, as this could damage the motorised product and/or
the motor in the long term.
1) Raise the motorised product to the desired
position by pressing the Up button.
2) Press the my and Down buttons at the
same time until the motorised product moves.
The upper end limit is memorised.
3) Press the my button when the motorised
product reaches the desired lowered position.
If necessary, adjust the position of the
motorised product using the Up and Down
buttons.
4) Press the my and Up buttons at the same
time until the motorised product moves.
The lower end limit is memorised. The
motorised product rises and stops in the
raised position.
5) To conrm the end limits, press the my
button until the motorised product moves up
and down.
The end limits are programmed.
2.3.4. Recording the RTS control point
The motorisation is in programming mode:
Quickly press the PROG button on the RTS
control point to be programmed:
The motorised product moves up and down:
this RTS control point is programmed in the
motorisation.
1 2
3 4
5
PROG.
If the motorisation is no longer in programming mode, repeat Step 2.3.1 then
perform Step 2.3.4.
7Copyright © 2013 Somfy SAS. All rights reserved - V1 - 02/2013
2.4. TIPS AND RECOMMENDATIONS FOR INSTALLATION
2.4.1. Questions about the Tilt & Lift 25 RTS Central?
Observations Possible causes Solutions
There may be some radio
The motorised
product does not
operate.
To press on the motor PROG button, it’s best to use the motor antenna. The
use of other tools could damage the PROG button.
2.4.2. Re-setting the end limits
Readjusting the upper end limit
1) Press the Up button to bring the
motorised product to the end limit to be
readjusted.
2) Press the Up and Down buttons at the
same time until the motorised product moves
up and down.
3) Press the Up or Down button to move
the motorised product to the new desired
position.
4) To conrm the new end limit, press the
my button until the motorised product moves up and down.
interferences.
One or more batteries have been
mounted backwards.
One or more batteries leak in the
battery tube.
Batteries (inside battery tube) are
weak.
The control point battery is weak.
The control point is not
compatible.
The control point used has not
been programmed into the motor.
Unplug the motor supply cable
and reconnect the battery tube to
the motor.
Verify that batteries are all
mounted in the correct manner.
Replace the batteries
Check whether the batteries are
weak and replace if necessary.
Check whether the battery is
weak and replace it if necessary.
Check for compatibility and
replace the control point if
necessary.
Use a programmed control point
or program this control point.
1 2
3
4
8 Copyright © 2013 Somfy SAS. All rights reserved - V1 - 02/2013
Readjusting the lower end limit
1) Press the Down button to bring the
motorised product to the end limit to be
1 2
readjusted.
2) Press the Up and Down buttons at the
same time until the motorised product moves
up and down.
3
3) Press the Up or Down button to move
the motorised product to the new desired
position.
4) To conrm the new end limit, press the
my button until the motorised product moves up and down.
2.4.3. Adding or deleting a RTS control point
Find an RTS control point (A) programmed
in the motor.
Press and hold the RTS programmed control
A
A
B
point (A) PROG button or the motor PROG
button until the motorised product moves
up and down: the motor is in programming
mode.
Quickly press the RTS control point(B)
PROG.
A
PROG button to add or delete: the motorised
product moves up and down and the RTS
control point is programmed or deleted from
the motor.
2.4.4. Erasing the control point from the memory of the motor
To delete all the programmed control points,
press and hold the motor PROG button until
the motorised product moves up and down
twice.
All the control points are deleted.
PROG.
4
A
B
A
B
B
x2
9Copyright © 2013 Somfy SAS. All rights reserved - V1 - 02/2013
x2
2.4.5. Erasing the memory of the motor
To reset the motor, press and hold the PROG
button on the motor head until the motorised
product moves up and down 3 times.
All the settings are erased.
x3
3. USE AND MAINTENANCE
This motor is maintenance-free
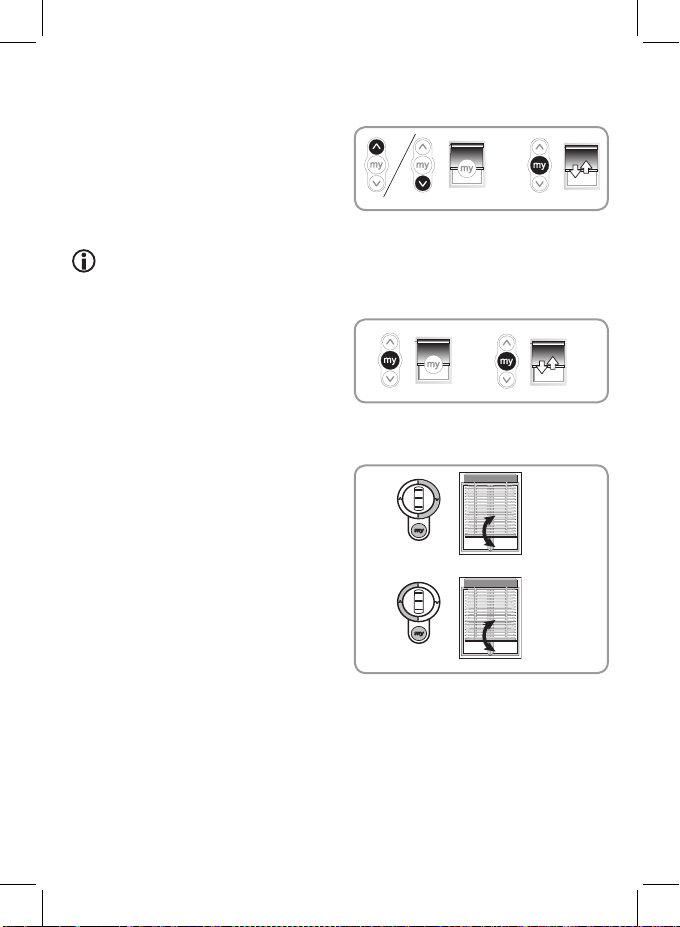
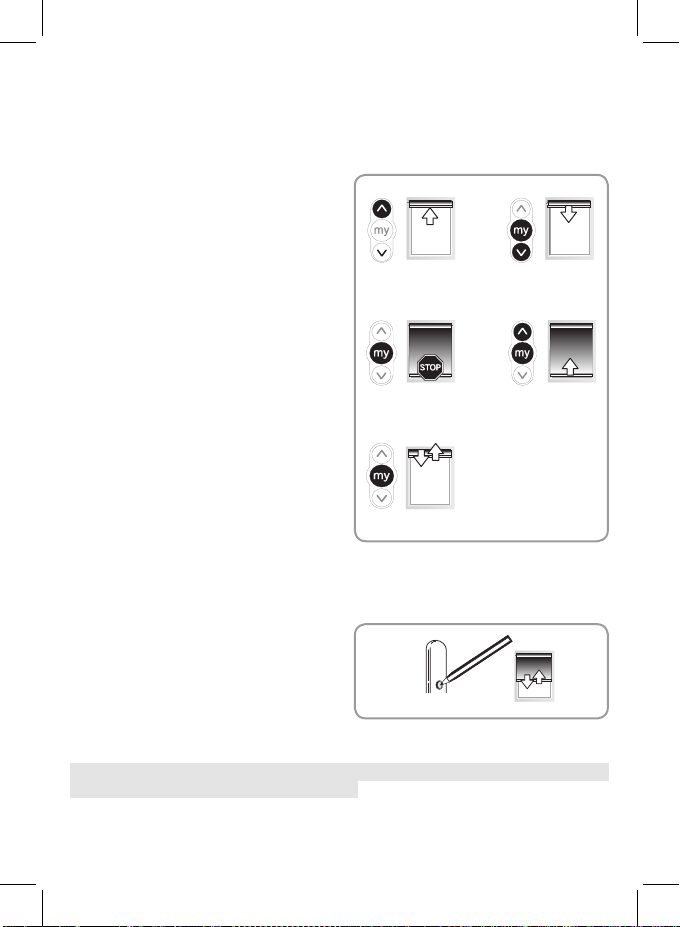
3.1. MODE SELECTION: ROLLER OR TILTING MODE
The mode selection is only possible if step 2.3.4. has already been completed.
The Tilt & Lift 25 RTS Central is designed to work with 2 modes: Tilting mode or Roller
mode. This feature allows the Tilt & Lift 25 RTS to be set according to the type of blind
you are working with. The Tilt & Lift 25 RTS is set by default to work in Tilting mode.
1) Move the motorised product away from
the end limits.
2)Simultaneously press the Up and Down
buttons until the motorised product moves
up and down.
3) Press and hold the my and Down buttons
simultaneously until the motorised product
moves up and down to change from Roller
mode to Tilting mode.
To return to previous mode, repeat step 1.
10 Copyright © 2013 Somfy SAS. All rights reserved - V1 - 02/2013
1
2
3

3.2. UP, DOWN, MY: IN ROLLER MODE
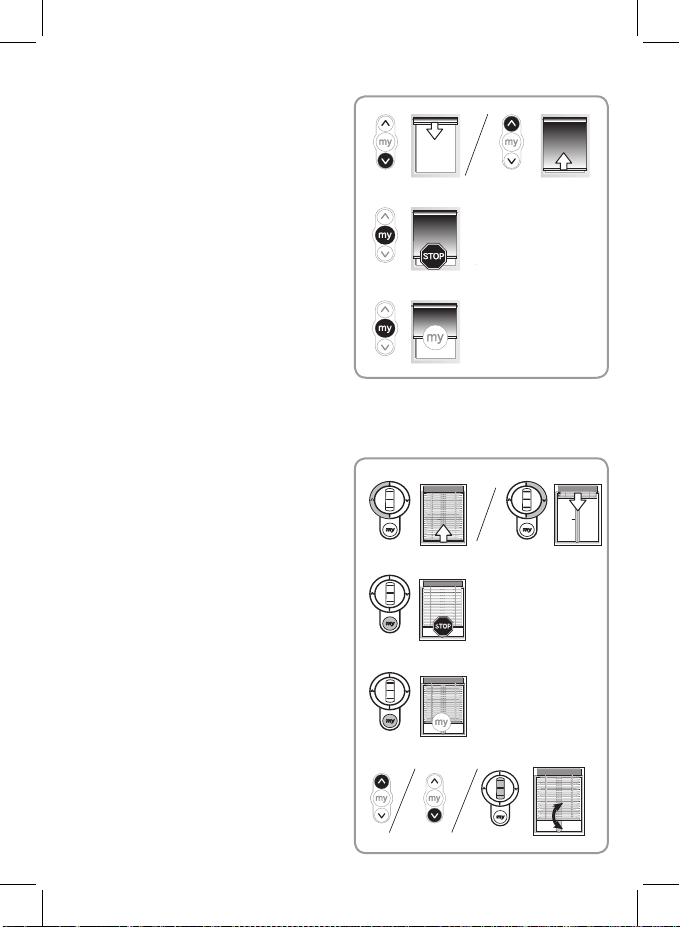
1) to move the motorised product from a li-
mit to the other limit, press briey the Up or
Down button
1
2) To stop the motorised product, press the
my button.
3) If a my position is recorded,To move the
motorised product to this my position, press
briey the my button.
2
3
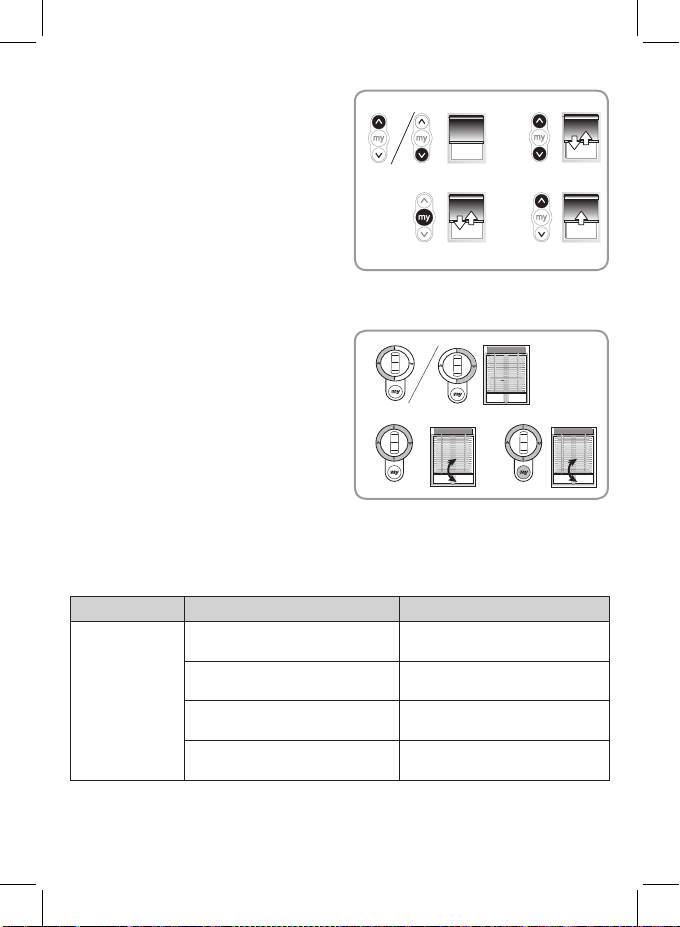
3.3. UP, DOWN, MY: IN TILTING MODE
1) To move the motorised product from a limit
to the other limit, briey press (less than 0,5s)
the Up or Down button.
2) To stop the motorised product, press the
my button.
3) If a my position is recorded,To move the
motorised product to this my position, press
briey the my button.
The motorised product rst goes to the down
end limit, then to the my position.
4) To tilt the slats, press and hold the Up or
Down button or use the scroll of the remote
control, until the slats reach the desired position.
1
2
3
4
11Copyright © 2013 Somfy SAS. All rights reserved - V1 - 02/2013
3.4. ADDITIONAL SETTINGS
3.4.1. Record or Modify the favourite position (my)
1) Place the motorised product in the desired
favourite position (my).
2) Press my until the motorised
product moves up and down: the
desired favourite position (my) has been
programmed.
In tilting mode (the default mode), if you want to save a favorite slat position, turn
the motorised product necessarily in the down end limit, then set the desired position by pressing the Up button.
3.4.2. Deleting the favourite position (my)
To delete the my position, press the my
button to move to this position and press the
my button until the motorised product moves
up and down.
3.4.3. Adjusting the tilting speed
1) To decrease the tilting speed, press and
hold the my and Down buttons simultaneously until the motorised product moves up
and down. Repeat as needed. If the motorised product does not moves up and down,
then the minimum setting has been reached.
2) To increase the tilting speed, press and
hold the my and Up buttons simultaneously
until the motorised product moves up and
down. Repeat as needed. If the If the motorised product does not moves up and down,
then the maximum setting has been reached.
1
2
1
2
12 Copyright © 2013 Somfy SAS. All rights reserved - V1 - 02/2013
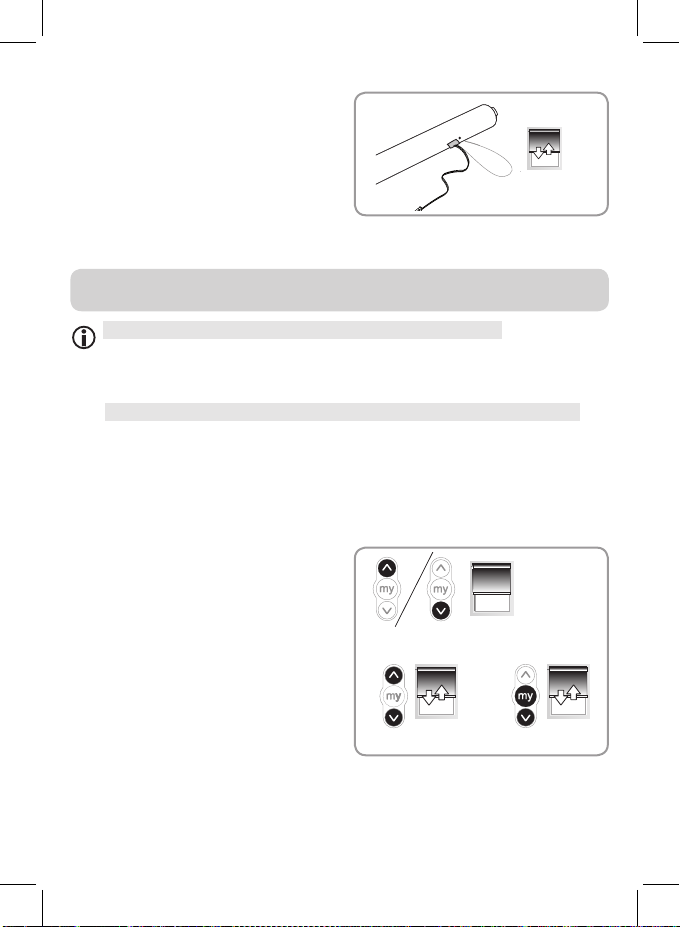
3.4.4. Modifying the motor rotation direction
1) Move the motorised product away from the
end limits.
2) Press the Up and Down buttons simulta-
neously until the motorised product moves up
and down.
3) Press the my button until the motorised
product moves up and down to reverse the
rotation direction.
4) Press the Up button to check the new rota-
tion direction.
The motor rotation direction is reversed.
3.4.5. Modifying the wheel rotation direction
1) Move the motorised product away from
the end limits.
2) Press the Up and Down buttons simulta-
neously, until the motorised product makes
an Up and Down movement.
3) Press the Up, my and Down buttons
simultaneously, until the motorised product
moves up and down, to reverse the wheel
rotation direction.
1 2
3
1
2 3
3.5. TIPS AND RECOMMENDATIONS FOR USE
Questions about the Tilt & Lift 25 RTS Central?
Observations Possible causes Solutions
The motorised
product does not
operate.
One or more batteries have been
mounted backwards.
One or more batteries leak in the
battery tube.
Batteries (inside battery tube) are
weak.
The control point battery is weak.
Verify that batteries are all
mounted in the correct manner.
Replace the batteries
Check whether the batteries are
weak and replace if necessary.
Check whether the battery is
weak and replace it if necessary.
4
If the motorised product still does not work, contact a motorisation and home automation
professional.
13Copyright © 2013 Somfy SAS. All rights reserved - V1 - 02/2013

4. TECHNICAL DATA
Power supply 12 Vdc SELV
Radio frequency 433,42 MHz
Torque 0,8 Nm
Up speed 30 rpm
Down speed 45 rpm
Electrical insulation III
Minimum distance between two end-limit 1 turn
Maximum distance between two end-limit 110 turns
Maximum running time 6 min
Operating temperature 0°C to + 60°C
Protection rating IP 20 (For indoor use only)
Maximum number of associated control 12
Somfy hereby declares that the drive covered by these instructions and
used as intended according to these instructions, is in compliance with the
A declaration of conformity detailing the standards and specications used and stating
all particulars for identication of the drive, name and address of the person(s) authorised to compile the technical le and empowered to draw up the declaration including
place and date of issue is available at www.somfy.com/ce.
14 Copyright © 2013 Somfy SAS. All rights reserved - V1 - 02/2013
essential requirements of Directives 2006/42/EC, and 2014/53/EU.

SOMMAIRE
NOTICE ORIGINALE
1. Informations préalables 15
1.1. Domaine d’application 15
1.2. Responsabilité 16
2. Installation 16
2.1. Montage 17
2.2. Câblage 18
2.3. Mise en service 18
2.4. Astuces et conseils d’installation 20
3. Utilisation et maintenance 22
3.1. Choix du type de mode: Mode
enroulable ou vénitien 22
3.2. Montée, Descente et My : En mode
enroulable 23
3.3. Montée, Descente et My : En mode
vénitien 23
3.4. Réglages supplémentaires 24
3.5. Astuces et conseils d’utilisation 25
4. Données techniques 26
1. INFORMATIONS PRÉALABLES
1.1 DOMAINE D’APPLICATION
Le Tilt & Lift 25 RTS Central est un moteur spécialement dédié aux applications intérieures.
Le Tilt & Lift 25 RTS Central peut motoriser tous types de stores d’intérieur bateaux, plissés,
vénitiens, et cellulaire.
Le Tilt & Lift 25 RTS Central est un moteur fonctionnant sur batterie, alimenté par des batteries
au lithium ou des batteries NiMH avec le « Solar pack ». Le moteur peut également être alimenté
par un bloc d’alimentation.
Utiliser uniquement les références ci-dessous avec ce moteur:
Ref. 9018685 : 12V RELOADABLE TUBE (8 AA LITHIUM) + Ref. 9014834 : 8 AA LITHIUM
BATTERY PACK
Ref. 9018608 : 12V RELOADABLE TUBE (10 AA NIMH) + Ref. 9018621 : 10AA NIMH BATTERIES
Ref. 9019034 : SOLAR PACK
Ref. 1822445 : 12V AC/DC Power Supply
Attention : Les batteries doivent être installées comme indiqué sur le tube batterie.
Ne pas mélanger le type, la marque ou des batteries usagées avec des neuves.
Attention: Le Tilt & Lift 25 RTS Central est uniquement compatible avec le capteur «Sunis Indoor
WireFreeTM RTS ».
Attention: Le Tilt & Lift 25 RTS Central ne peut pas être utilisé avec des doubles vitrages scellés.
Veiller à séparer les piles et batteries des autres types de déchets et à les recycler via
votre systeme local de collecte.
15Copyright © 2013 Somfy SAS. All rights reserved - V1 - 02/2013

1.2 RESPONSABILITÉ
Avant d’installer et d’utiliser la motorisation, lire attentivement cette notice. Outre les
instructions décrites dans cette notice, respecter également les consignes détaillées
dans le document joint Consignes de sécurité.
La motorisation doit être installée par un professionnel de la motorisation et de
l’automatisation de l’habitat, conformément aux instructions de Somfy et à la
réglementation applicable dans le pays de mise en service.
Toute utilisation de la motorisation hors du domaine d’application décrit ci-dessus est
interdite. Elle exclurait, comme tout irrespect des instructions gurant dans cette notice
et dans le document joint Consignes de sécurité, toute responsabilité et garantie de
Somfy.
L’installateur doit informer ses clients des conditions d’utilisation et de maintenance de
la motorisation et doit leur transmettre les instructions d’utilisation et de maintenance,
ainsi que le document joint Consignes de sécurité, après l’installation de la motorisation. Toute opération de Service Après-Vente sur la motorisation nécessite l’intervention
d’un professionnel de la motorisation et de l’automatisation de l’habitat.
Si un doute apparaît lors de l’installation de la motorisation ou pour obtenir des informations complémentaires, consulter un interlocuteur Somfy ou aller sur le site www.somfy.
com.
Avertissement
Sécurité!
Attention!
Information
2. INSTALLATION
Consignes à suivre impérativement par le professionnel de la motorisation et de
l’automatisation de l’habitat réalisant l’installation de la motorisation Tilt & Lift 25
RTS Central.
Ne jamais laisser tomber, choquer, percer, immerger la motorisation.
Installer un point de commande individuel pour chaque motorisation.
16 Copyright © 2013 Somfy SAS. All rights reserved - V1 - 02/2013
2.1. MONTAGE
2.1.1. Assemblage du moteur
1) Couper l’axe du caisson à la longueur
désirée.
2) Placer les adaptateurs de caisson et
d’axe sur le moteur.
1
2
2.1.2. Intégration du moteur dans le caisson
1) Glisser le moteur dans le caisson.
Attention à ne pas couper les fils
d’alimentation avec le bord du
caisson.
2) Faire glisser les axes en butée sur les
adaptateurs d’axe du moteur.
Pour une portée radio optimale,
l’antenne du motor doit être mainte-
nue droite, et en dehors du caisson.
2.1.3. Verrouillage du moteur et de l’axe
A l’aide d’un outil adapté, pincer les
bords du caisson pour bloquer le moteur
en translation.
Pour bloquer l’axe, placer les bagues
d’arrêt contre le CTS, et vissez les.
1
2
17Copyright © 2013 Somfy SAS. All rights reserved - V1 - 02/2013

2.2 CÂBLAGE
Les câbles traversant une paroi métallique doivent être protégés et isolés par un
manchon ou un fourreau.
Attacher les câbles pour éviter tout contact avec une partie en mouvement.
Le câble du Tilt & Lift 25 RTS Central n’est pas démontable. S’il est endommagé,
retourner la motorisation au SAV.
Laisser le câble d’alimentation de la motorisation accessible: il doit pouvoir être
remplacé facilement.
Ne pas débrancher la batterie quand le moteur fonctionne.
Brancher la batterie ou l’alimentation secteur
sur le câble d’alimentaion du moteur.
Ne pas débrancher la batterie ou
l’alimentation quand le moteur fonctionne.
2.3. MISE EN SERVICE
2.3.1. Pre-enregistrement du point de commande RTS
Appuyer simultanément sur les touches
Montée et Descente du point de commande
RTS : Le produit motorisé se déplace pendant
quelques secondes et le point de commande
est pré-enregistré dans le moteur.
2.3.2. Contrôle du sens de rotation
Appuyer sur la touche Montée du point de commande:
a) Si le produit motorisé monte (a), le sens de rotation est correct : Passer au para-
graphe 5.3 «Réglage des ns de course».
b) Si le produit motorisé descend (b), le sens
de rotation est incorrect : Passer à l’étape suivante.
b1) Appuyer sur la touche my du point de
commande RTS jusqu’au va-et-vient du
produit motorisé: Le sens de rotation est
modié.
b2) Appuyer sur la touche Montée du point
de commande RTS pour contrôler le sens
de rotation.
a
=
b
=
b2b1
18 Copyright © 2013 Somfy SAS. All rights reserved - V1 - 02/2013
2.3.3. Réglagedesnsdecourse
Les ns de course peuvent être réglées dans n’importe quel ordre.
Ne réglez pas la n de course haute dans une position où le tablier est comprimé
contre le caisson car cela pourrait endommager le produit motorisé et/ou le
moteur à long terme.
1) Placer le produit motorisé en position
haute souhaitée en appuyant sur la touche
Montée. Si besoin, ajuster la position haute
du produit motorisé avec les touches Montée
et Descente.
2) Appuyer simultanément sur les touches
my et Descente jusqu’au mouvement du
produit motorisé. La n de course haute est
mémorisée.
3) Appuyer sur la touche my quand le
produit motorisé atteint la position basse
souhaitée. Si besoin, ajuster la position
basse du produit motorisé avec les touches
Montée et Descente.
4) Appuyer simultanément sur les touches
my et Montée jusqu’au mouvement du
produit motorisé.
La n de course basse est mémorisée.
Le produit motorisé monte et s’arrête en
position haute.
5) Pour conrmer les ns de courses,
Appuyer sur la touche my jusqu’au va-etvient du produit motorisé.
Les ns de courses sont enregistrées.
2.3.4. Enregistrement du point de commande RTS
La motorisation est en mode programmation:
Faire un appui bref sur le bouton PROG du
point de commande RTS à enregistrer.
Le produit motorisé effectue un va-et-vient :
ce point de commande RTS est enregistré
dans la motorisation.
1 2
3 4
5
PROG.
Si la motorisation n’est plus en mode programmation, effectuer de nouveau
l’Étape 2.3.1, avant de réaliser l’Étape 2.3.4.
19Copyright © 2013 Somfy SAS. All rights reserved - V1 - 02/2013
2.4. ASTUCES ET CONSEILS D’INSTALLATION
2.4.1. Questions sur le Tilt & Lift 25 RTS Central?
Constats Causes possibles Solutions
Il y a peut être des interférences
Le produit
motorisé ne
fonctionne pas.
Pour l’appui sur le bouton PROG du moteur, il est préférable d’utiliser l’antenne du moteur. L’utilisation de tout autre outil pourrait endommager le
bouton PROG .
2.4.2. Re-réglagedesnsdecourse
Réajustementdelandecoursehaute
1) Appuyer sur le bouton Montée pour
amener le produit motorisé jusqu’à la n de
course à réajuster.
2) Appuyer en même temps sur les touches
Montée et Descente jusqu’au va-et-vient du
produit motorisé.
3) Appuyer sur la touche Montée ou
Descente pour déplacer le produit motorisé
vers la nouvelle position souhaitée.
4) Pour conrmer la nouvelle n de course
appuyer sur la touche my jusqu’au va-et-vient du produit motorisé.
radio.
Une ou plusieurs batteries sont
montées dans le mauvais sens.
Une ou plusieurs batteries fuient
dans le tube.
Les batteries (dans le tube
batterie) sont faibles.
La pile du point de commande
est faible.
Le point de commande n’est pas
compatible.
Le point de commande utilisé
n’est pas enregistré dans la
motorisation.
Débranchez et rebranchez le
câble d’alimentation du moteur.
Contrôler que les batteries soient
montées correctement.
Remplacer l’ensemble des
batteries.
Contrôler le niveau des batteries
et les remplacer si besoin.
Contrôler si la pile est faible et la
remplacer si besoin.
Contrôler la compatibilité et
remplacer le point de commande
si besoin.
Utiliser un point de commande
enregistré ou enregistrer ce point
de commande.
1 2
3
4
20 Copyright © 2013 Somfy SAS. All rights reserved - V1 - 02/2013

Réajustementdelandecoursebasse
1) Appuyer sur le bouton Descente pour
amener le produit motorisé jusqu’à la n de
1 2
course à réajuster.
2) Appuyer en même temps sur les touches
Montée et Descente jusqu’au va-et-vient du
produit motorisé.
3
4
3) Appuyer sur la touche Montée ou
Descente pour déplacer le produit motorisé
vers la nouvelle position souhaitée.
4) Pour conrmer la nouvelle n de course
appuyer sur la touche my jusqu’au va-et-vient du produit motorisé.
2.4.3. Ajout / Suppression d’un point de commande RTS
Prendre un point de commande RTS (A)
enregistré dans le moteur.
Appuyer sur le bouton PROG du point de
A
A
B
A
B
commande RTS (A) ou du moteur jusqu’au
va-et-vient du produit motorisé: Le moteur
est en mode programmation.
Appuyer brièvement sur le bouton PROG du
PROG.
PROG.
A
B
point de commande RTS (B) à ajouter ou
supprimer. Le produit motorisé effectue un
va-et-vient. Le point de commande RTS est
enregistré ou supprimé du moteur.
2.4.4. Effacement des points de commandes de la mémoire du moteur
Pour effacer tous les points de commande
appuyer sur le bouton PROG du moteur
jusqu’au double va-et-vient du produit motorisé.
Tous les points de commandes sont effacés.
x2
A
B
21Copyright © 2013 Somfy SAS. All rights reserved - V1 - 02/2013
x2
2.4.5.Effacement de la mémoire du moteur.
Pour effacer la mémoire du moteur, appuyer
sur le bouton prog du moteur jusqu’au triple
va-et-vient du produit motorisé.
Tous les réglages sont supprimés.
x3
3. UTILISATION ET MAINTENANCE
Cette motorisation ne nécessite pas d’opération de maintenance
3.1. CHOIX DU TYPE DE MODE:
MODE ENROULABLE OU VÉNITIEN
Le choix du type de mode n’est possible que si l’étape 2.3.4. a été effectuée.
Le Tilt & Lift 25 RTS Central est concu pour fonctionner sous 2 modes: mode vénitien ou
mode enroulable.Cette fonction permet de régler le Tilt & Lift 25 RTS Central selon le type
de produit motorisé dans lequel il est installé.
Le Tilt & Lift 25 RTS Central est réglé par défault en mode vénitien.
1) Déplacer le produit motorisé vers une
position autre que les ns de courses.
2) Appuyer simultanément sur les touches
Montée et Descente jusqu’au va et- vient
du produit motorisé.
3) Appuyer simultanément sur les touches
my et Descente jusqu’au va et- vient du
produit motorisé pour passer du mode
enroulable au mode vénitien.
Pour revenir au mode précédent, recommencer à l’étape 1.
22 Copyright © 2013 Somfy SAS. All rights reserved - V1 - 02/2013
1
2
3
3.2. MONTÉE, DESCENTE ET MY : EN MODE ENROULABLE
1) Pour déplacer le produit motorisé d’une n
de course à l’autre, appuyer sur les touches
Montée ou Descente.
1
2) Pour stopper le produit motorisé, appuyer
sur la touche my.
3) Si une position my est enregistrée, pour
déplacer le produit motorisé en position my,
appuyer sur la touche my.
2
3
3.3. MONTÉE, DESCENTE ET MY : EN MODE VÉNITIEN
1) Pour déplacer le produit motorisé d’une n
de course à l’autre, appuyer (moins de 0,5s)
sur la touche Montée ou Descente.
2) Pour stopper le produit motorisé, appuyer
sur la touche my.
3) Si une position my est enregistrée, pour
déplacer le produit motorisé en position my,
appuyer sur la touche my. Le produit motorisé va en premier au n de course bas et
ensuite en position my.
4) Pour orienter les lames, appuyer sur la
touche Montée ou Descente, ou utiliser la
molette du point de commande jusqu’à ce
que les lames atteignent la position souhaitée.
1
2
3
4
23Copyright © 2013 Somfy SAS. All rights reserved - V1 - 02/2013
 Loading...