

SOMFY Sunea Screen 40 io Instructions Manual
Ref. 5125920A
FR
NOTICE
DE
ANLEITUNG
EN
INSTRUCTIONS
IT
ISTRUZIONI
NL
HANDLEIDING
ES
MANUAL
DA
BRUGSVEJLEDNING
SV
BRUKSANVISNING
NO
BRUKSANVISNING
FI
KÄYTTÖOHJE
Sunea Screen 40 io
www.somfy.com


3
FR
Copyright © 2016 Somfy SAS. All rights reserved.
Images non contractuelles
SOMMAIRE
1. Informations préalables 3
1.1 Domaine d’application 3
1.2 Responsabilité 4
2. Installation 4
2.1. Montage 4
2.2. Câblage 5
2.3. Mise en service 6
2.4. Astuces et conseils d’installation 9
3. Utilisation et maintenance 10
3.1. Touches Montée et Descente 10
3.2. Fonction STOP 10
3.3. Position favorite (my) 10
3.4. Fonctionnement avec un capteur Somfy 10
3.5. Réglages supplémentaires 10
3.6. Astuces et conseils d’utilisation 11
4. Données techniques 11
NOTICE ORIGINALE
1. INFORMATIONS PRÉALABLES
1.1 DOMAINE D’APPLICATION
Les motorisations Sunea Screen 40 io sont conçues pour motoriser tous types de stores verticaux d’extérieurs (sans verrous), de lambrequin et de stores à bras verticaux.
L’installateur, professionnel de la motorisation et de l’automatisation de l’habitat doit s’assurer que l’installation du produit motorisé une
fois installé respecte les normes en vigueur dans le pays de mise en service comme notamment la norme sur les stores d’extérieur EN
13561.
Cette notice s’applique à toutes les motorisations Sunea Screen screen 40 io dont les déclinaisons sont disponibles au catalogue en vigueur.
4
FR
Copyright © 2016 Somfy SAS. All rights reserved.Images non contractuelles
1.2 RESPONSABILITÉ
Avant d’installer et d’utiliser la motorisation, lire attentivement cette notice. Outre les instructions décrites dans cette notice, respecter
également les consignes détaillées dans le document joint Consignes de sécurité.
La motorisation doit être installée par un professionnel de la motorisation et de l’automatisation de l’habitat, conformément aux instructions de Somfy et à la réglementation applicable dans le pays de mise en service.
Toute utilisation de la motorisation hors du domaine d’application décrit ci-dessus est interdite. Elle exclurait, comme tout irrespect des
instructions figurant dans cette notice et dans le document joint Consignes de sécurité, toute responsabilité et garantie de Somfy.
L’installateur doit informer ses clients des conditions d’utilisation et de maintenance de la motorisation et doit leur transmettre les
instructions d’utilisation et de maintenance, ainsi que le document joint Consignes de sécurité, après l’installation de la motorisation.
Toute opération de Service Après-Vente sur la motorisation nécessite l’intervention d’un professionnel de la motorisation et de l’automatisation de l’habitat.
Si un doute apparaît lors de l’installation de la motorisation ou pour obtenir des informations complémentaires, consulter un interlocuteur
Somfy ou aller sur le site www.somfy.com.
2. INSTALLATION
Consignes à suivre impérativement par le professionnel de la motorisation et de l’automatisation de l’habitat réalisant l’installation de la motorisation.
Ne jamais laisser tomber, choquer, percer, immerger la motorisation.
Installer un point de commande individuel pour chaque motorisation.
2.1. MONTAGE
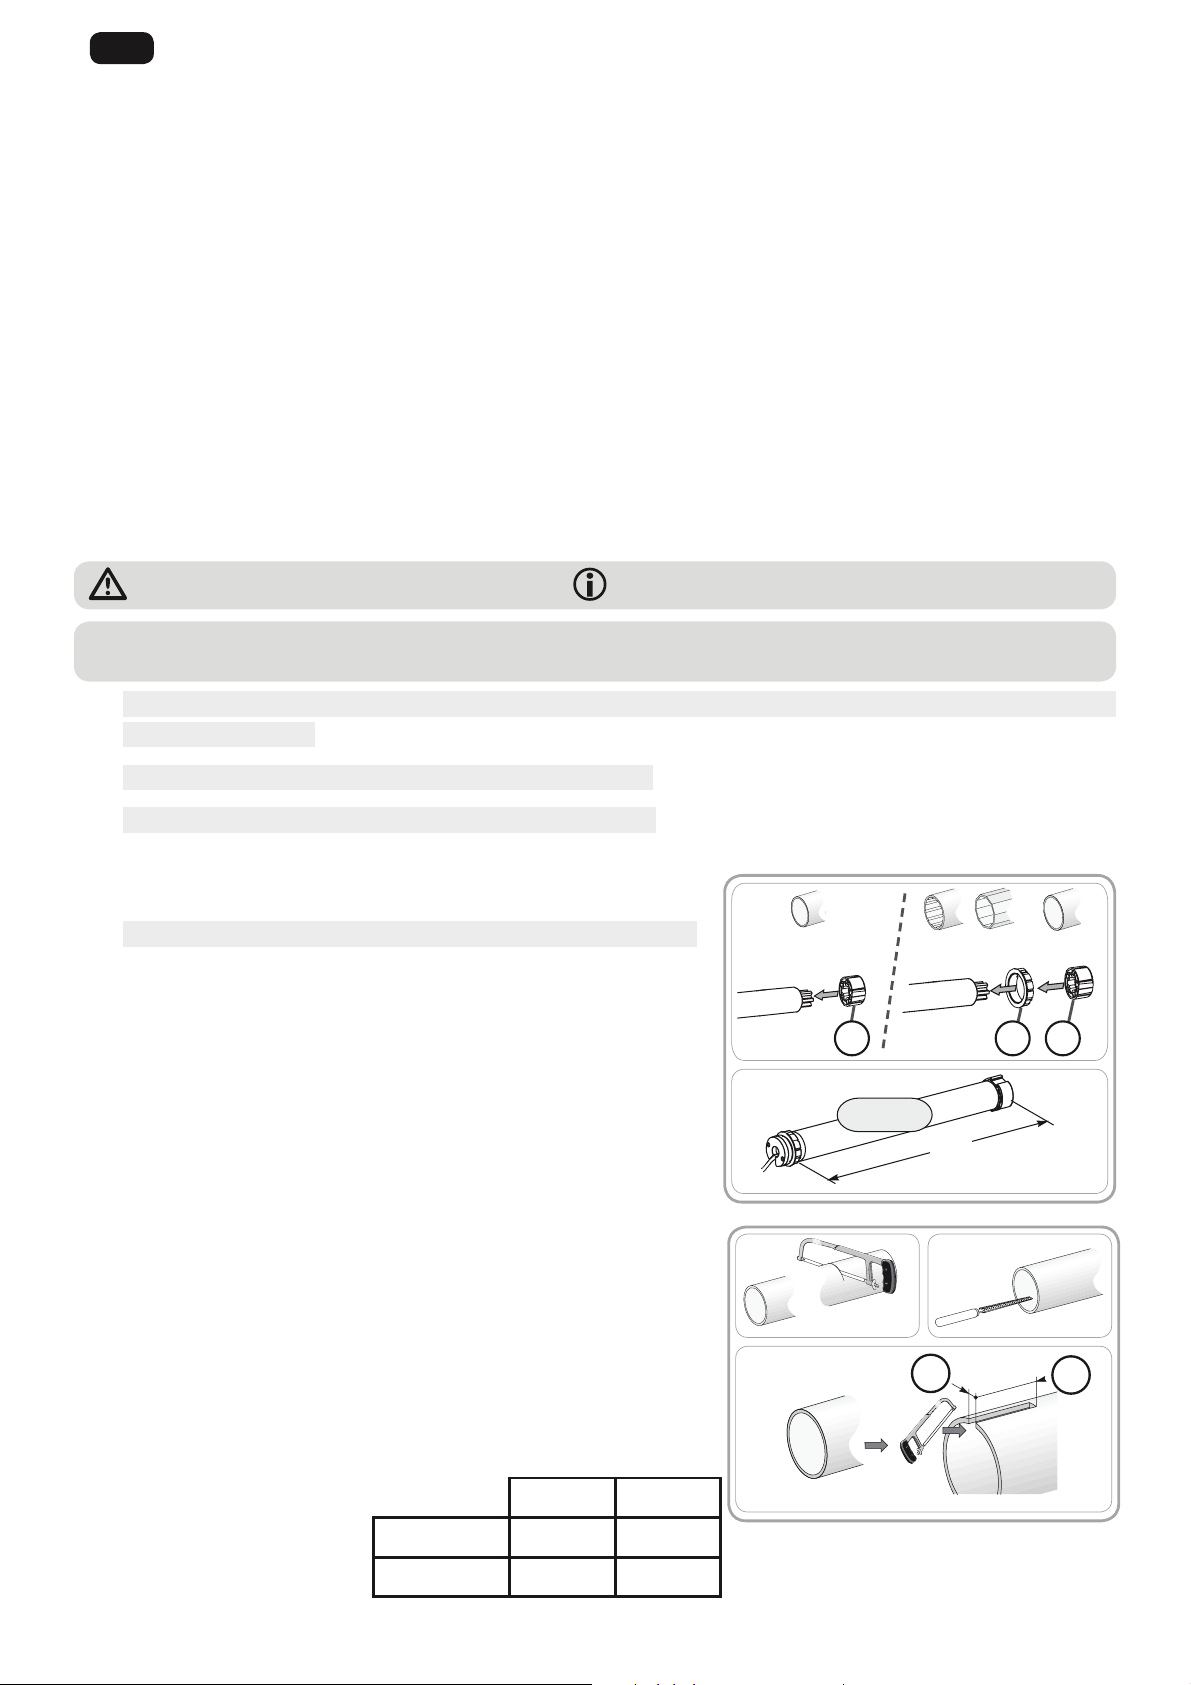
2.1.1. Préparation de la motorisation
S’assurer que le diamètre intérieur du tube est supérieur ou égal à 37 mm.
1) Monter les accessoires nécessaires à l’intégration de la motorisation dans le tube
d’enroulement :
• Soit uniquement la roue a sur la motorisation.
• Soit la couronne b et la roue c sur la motorisation.
2) Mesurer la longueur (L1) entre le bord intérieur de la tête de la motorisation et
l’extrémité de la roue.
2.1.2. Préparation du tube
1) Couper le tube d’enroulement à la longueur désirée en fonction du produit motorisé.
2) Ébavurer le tube d’enroulement et éliminer les copeaux.
3) Pour les tubes d’enroulement lisses à l’intérieur, découper une encoche selon les
cotes suivantes :
3)
1) 2)
d
e
1
1
1
Avertissement Sécurité! Attention! Information Λ Montée V Descente
1
1)
L1
L1 = …
2)
Ø > 37 mm
cb
Ø = 37 mm
a
d e
Ø 40 x 1 6 mm 8.5 mm
Ø 40 x 1.5 7 mm 8.5 mm
1
5
FR
Copyright © 2016 Somfy SAS. All rights reserved.
Images non contractuelles
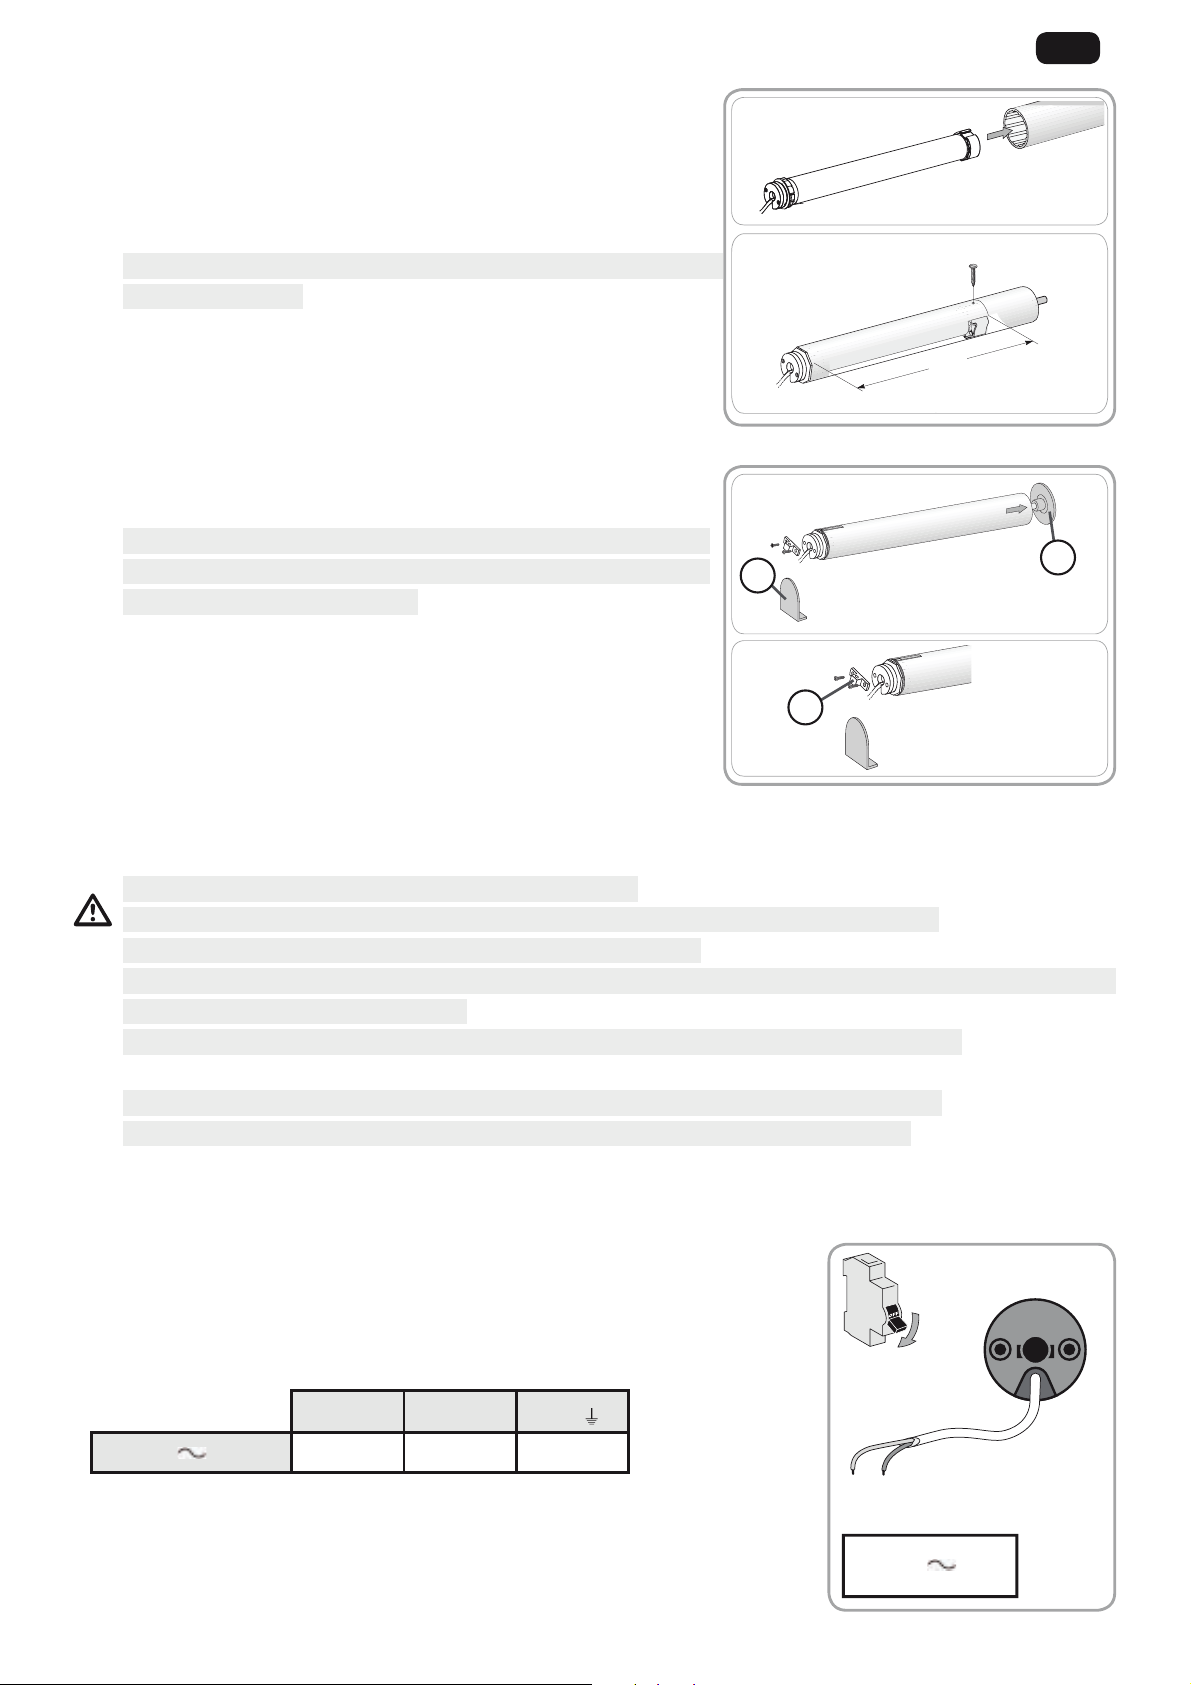
2.1.3. Assemblage motorisation - tube
1) Glisser la motorisation dans le tube d’enroulement.
Pour les tubes d’enroulement lisses à l’intérieur, positionner l’encoche découpée sur
l’ergot de la couronne.
2) Fixer le tube d’enroulement sur la roue avec des vis ou des rivets pop suivant la
longueur (L1).
Les vis ou les rivets pop ne doivent pas être fi xés sur la motorisation mais
uniquement sur la roue.
2.1.4. Montage de l’ensemble tube - motorisation
1) Monter et fi xer l’ensemble tube-motorisation sur le support embout (f) et sur le
support motorisation (g) :
S’assurer que l’ensemble tube-motorisation est verrouillé sur le support
embout. Cette opération permet d’éviter à l’ensemble tube-motorisation de
sortir de la fi xation du support embout.
2) Suivant le type de support, visser l’adaptateur sur la tête moteur.
L1
1)
2)
1
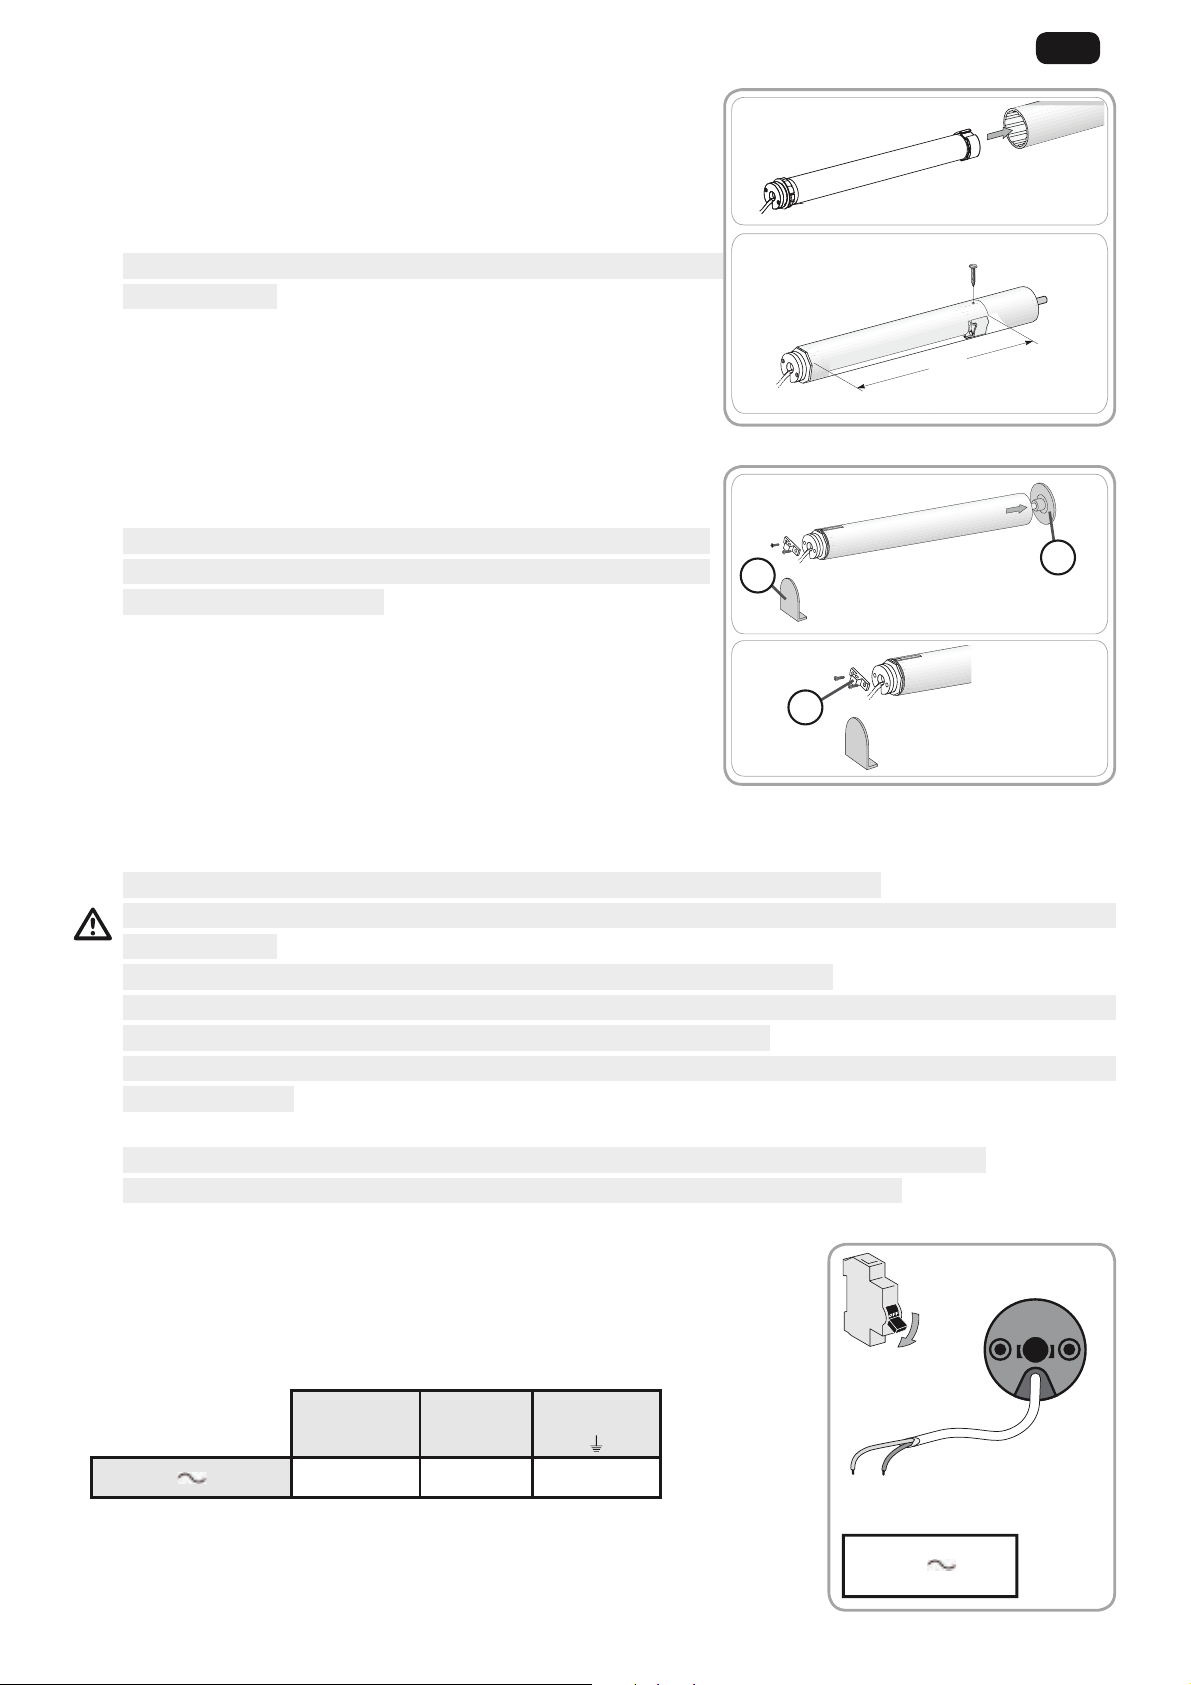
2.2. CÂBLAGE
Respecter la Norme NF C 15-100 pour les installations électriques.
Les câbles traversant une paroi métallique doivent être protégés et isolés par un manchon ou un fourreau.
Attacher les câbles pour éviter tout contact avec une partie en mouvement.
Si la motorisation est utilisée en extérieur, et si le câble d’alimentation est de type H05 VVF alors installer le câble dans un conduit
résistant aux UV, par exemple sous goulotte.
Le câble du Sunea Screen 40 io n’est pas démontable. S’il est endommagé, retourner la motorisation au SAV.
Toujours faire une boucle sur le câble d’alimentation pour éviter la pénétration d’eau dans la motorisation !
Laisser le câble d’alimentation de la motorisation accessible : il doit pouvoir être remplacé facilement.
- Couper l’alimentation secteur.
- Connecter la motorisation selon les informations du tableau ci-dessous :
1
1
Neutre (N) Phase (L) Terre( )
230 V
50 Hz
Bleu Marron -
1)
2)
g
f
h
230 V 50 Hz
N
OFF
L

6
FR
Copyright © 2016 Somfy SAS. All rights reserved.Images non contractuelles
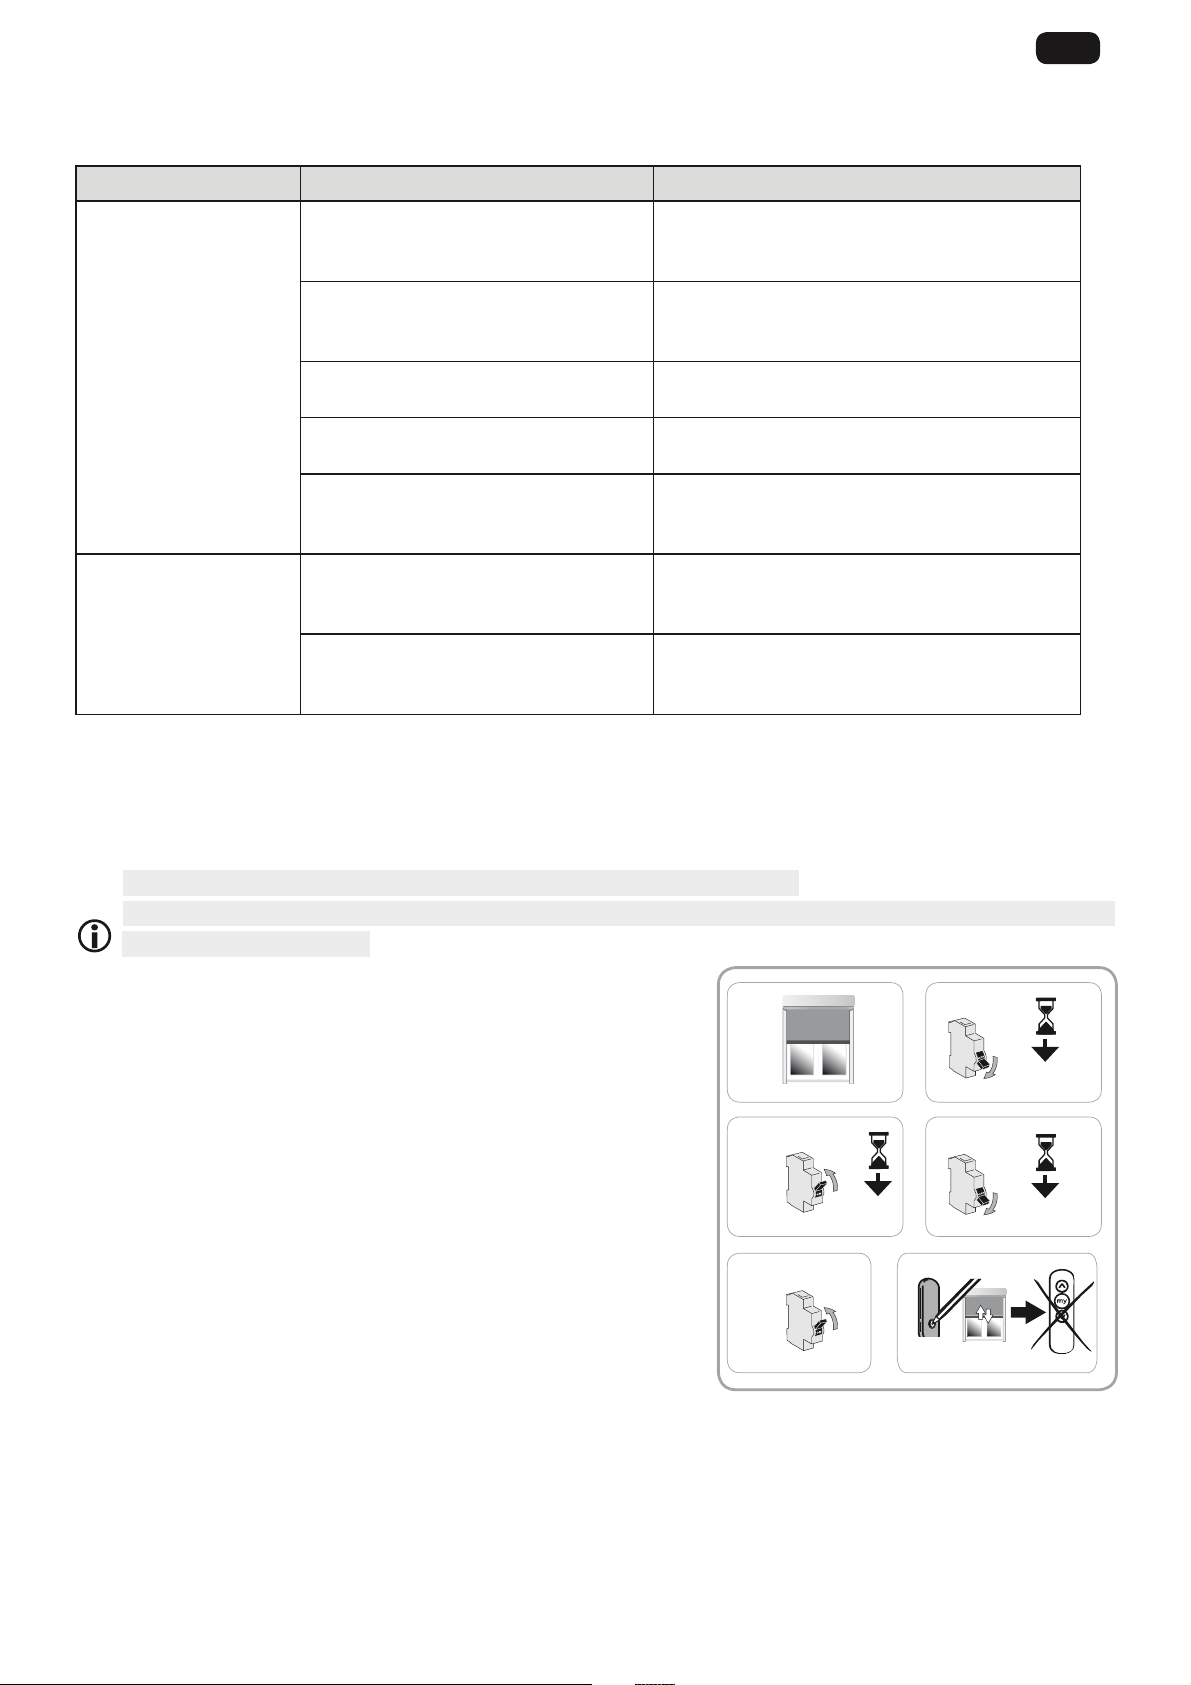
2.3. MISE EN SERVICE
2.3.1. Pré-enregistrement du point de commande
1) Mettre sous tension.
2) Appuyer en même temps sur les touches Λ / V du point de commande: Le produit
motorisé fait un va-et-vient (rapide montée et descente), le point de commande est
pré-enregistré dans le moteur.
La motorisation est en mode programmation pendant ≈ 10 min.
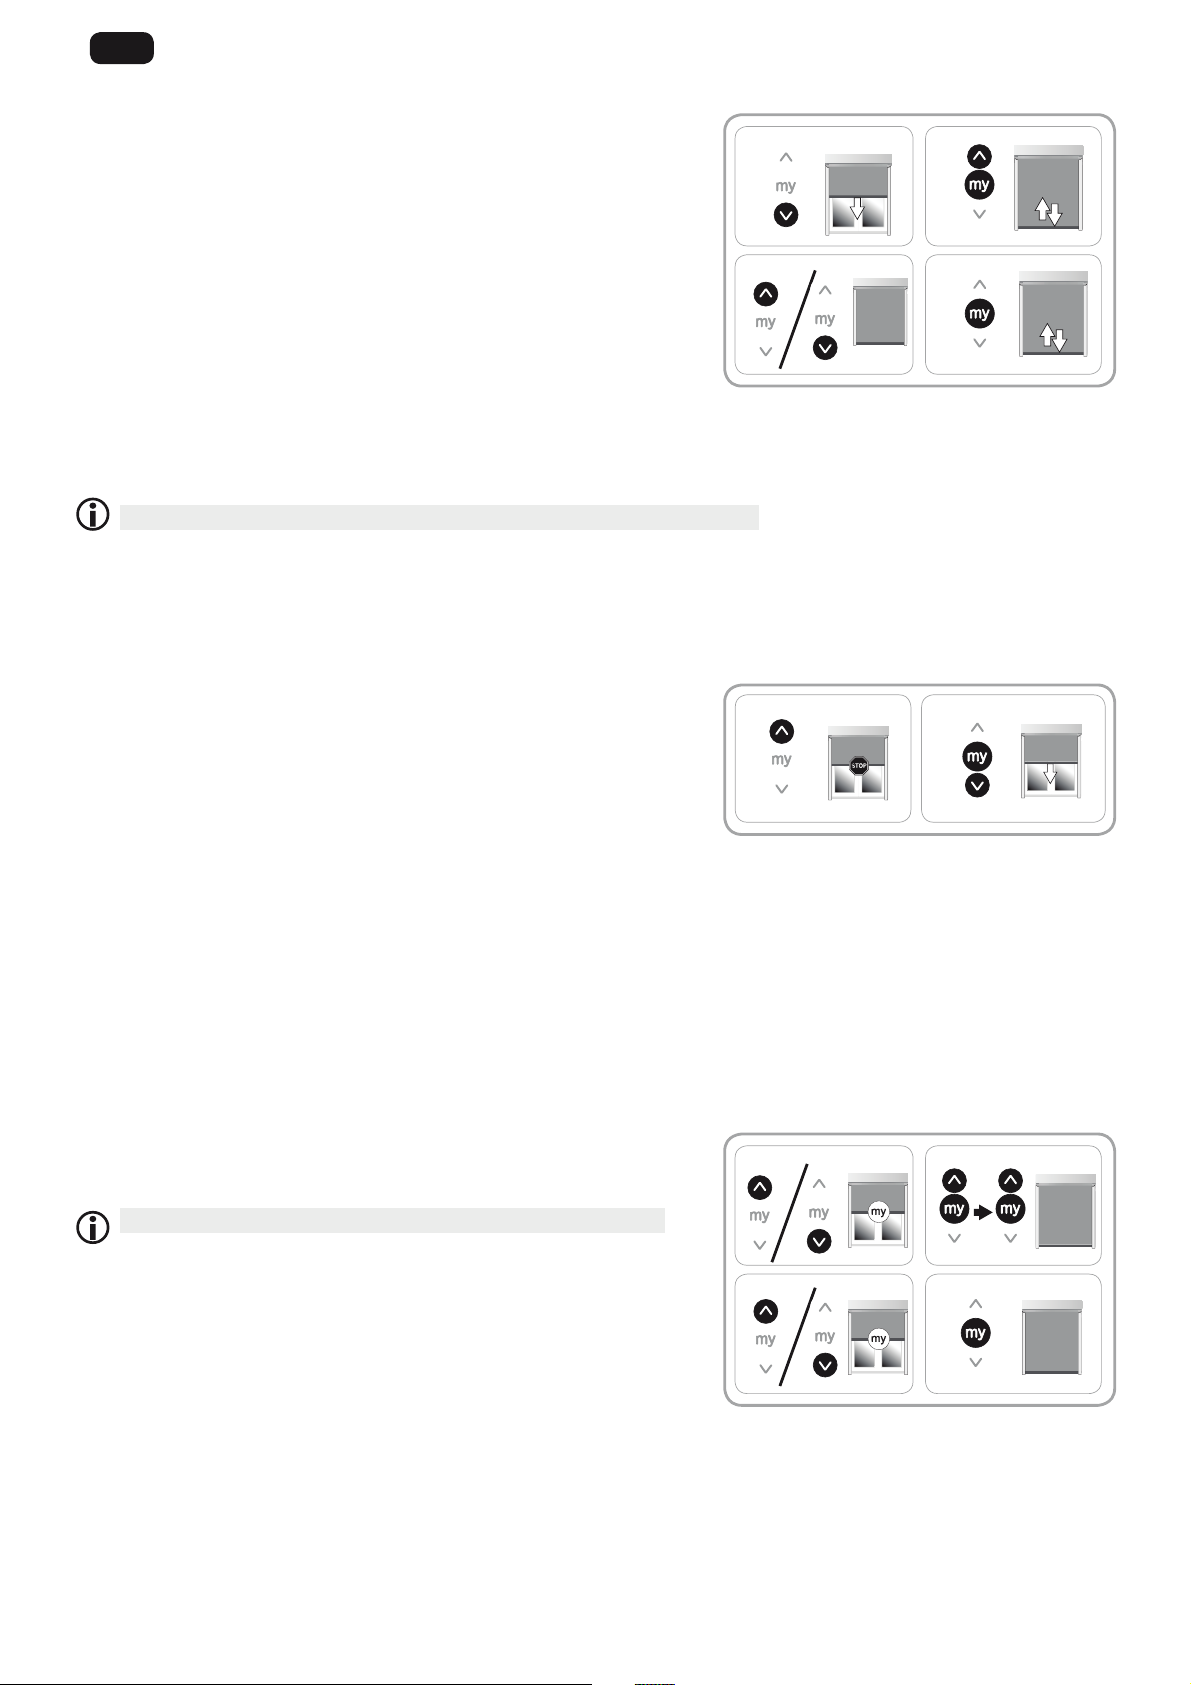
2.3.2. Contrôle du sens de rotation
1) Appuyer sur la touche Λ du point de commande:
a) Si le produit motorisé monte (a), le sens de rotation est correct : Passer au
paragraphe «Réglage des fins de course».
b) Si le produit motorisé descend (b), le sens de rotation est incorrect : Passer
à l’étape suivante.
2) Appuyer sur la touche my du point de commande jusqu’au va-et-vient du produit
motorisé : Le sens de rotation est modifié.
3) Appuyer sur la touche Λ du point de commande pour contrôler le sens de rotation.
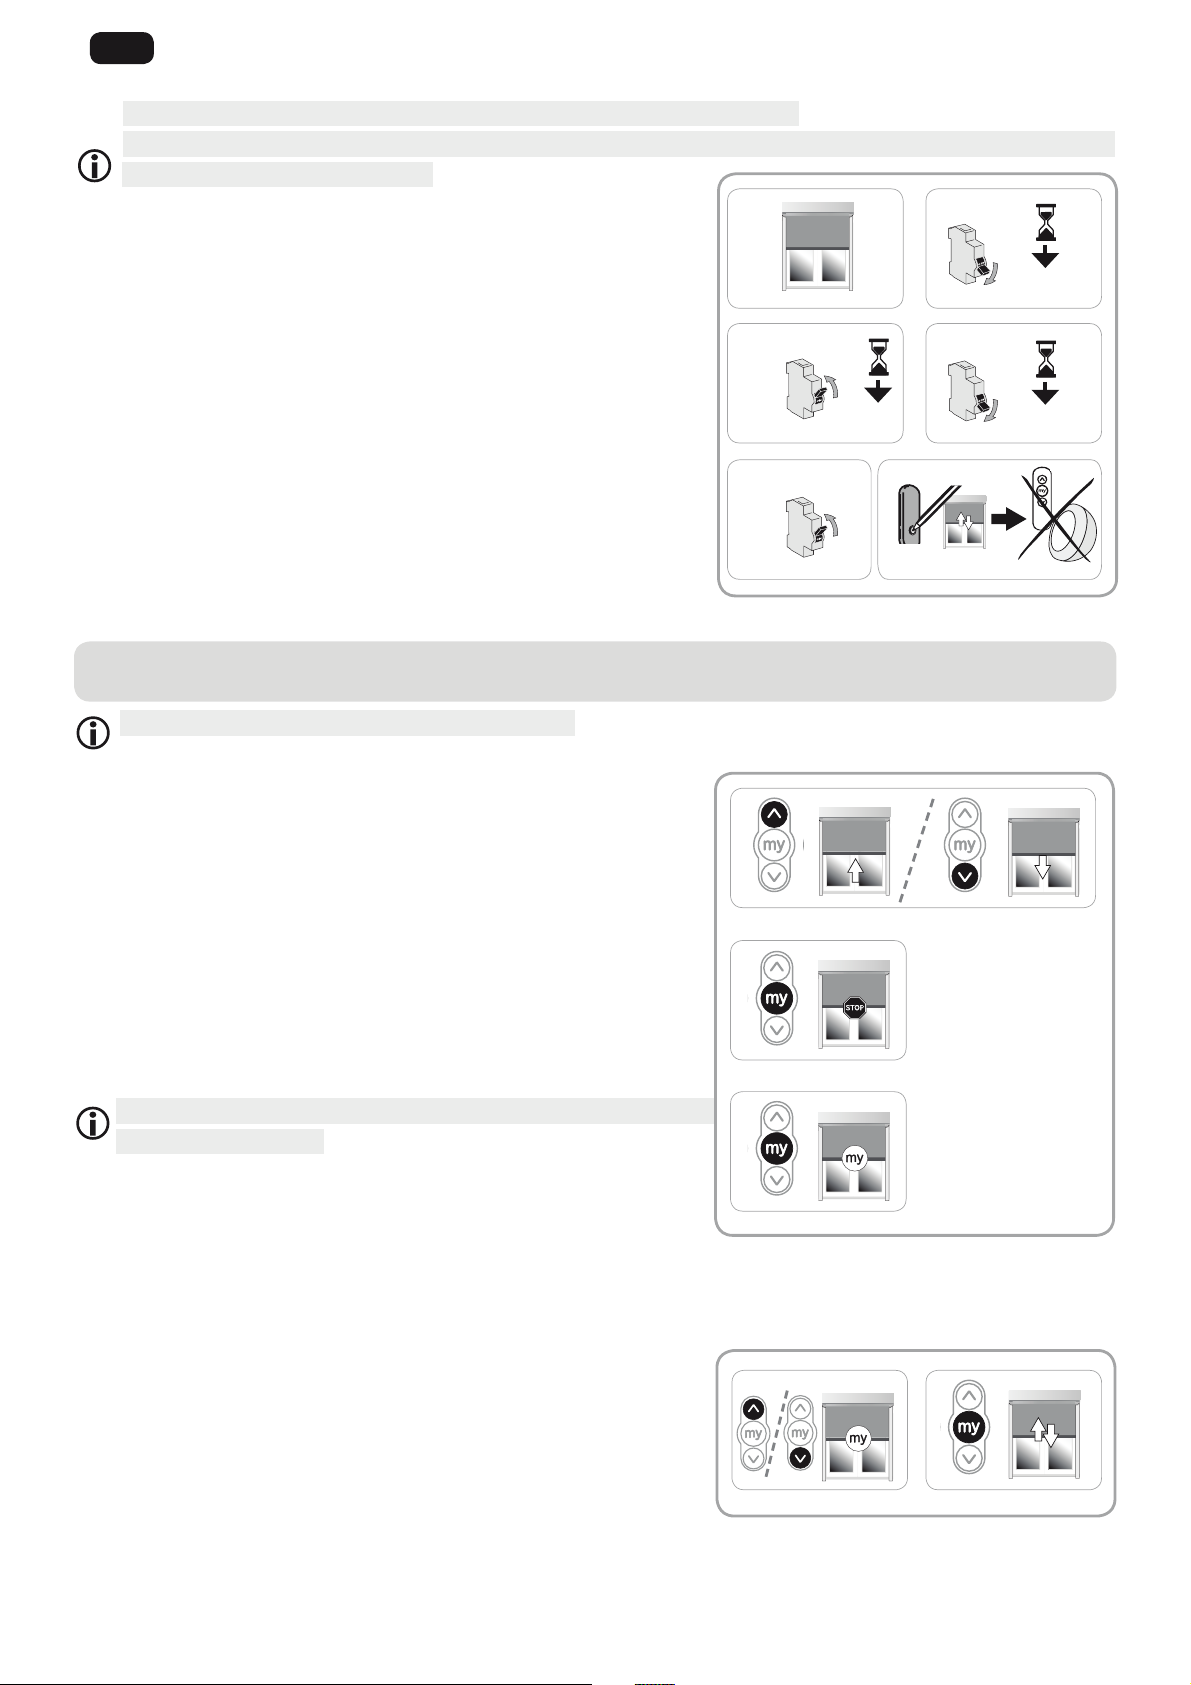
2.3.3. Réglage des fins de course
Réglage des fins de course en mode manuel
Pour les stores verticaux sans butée haute ou les stores à bras latéraux sans caisson, les fins de course haute et basse doivent être
réglées.
Les fins de course peuvent être réglées dans n’importe quel ordre.
1) Monter le produit motorisé en position haute souhaitée en appuyant sur la touche
Λ.
2) Appuyer simultanément sur les touches my et V jusqu’au mouvement du produit
motorisé.
La fin de course haute est mémorisé.
3) Appuyer sur la touche my quand le produit motorisé atteint la position basse
souhaitée. Si besoin, ajuster la position du produit motorisé avec les touches Λ et V.
4) Appuyer simultanément sur les touches my et Λ jusqu’au mouvement du produit
motorisé.
La fin de course basse est mémorisé. Le produit motorisé monte et s’arrête en
position haute.
5) Pour confirmer les fins de courses, Appuyer sur la touche my jusqu’au va et- vient
du produit motorisé.
Les fins de courses sont enregistrées.
1 2
ON
1 2
3
4
5
1
2 3
a
b
Passer
à l’étape suivante
Réglage des fins
de course

7
FR
Copyright © 2016 Somfy SAS. All rights reserved.
Images non contractuelles
Réglage des fins de course en mode semi-automatique
Pour les stores avec butée haute (arrêt de la barre de charge sous le caisson), la fin de course haute se règle automatiquement alors
que la fin de course basse doit être réglée.
Réglage fins de course haut automatique, bas manuel.
1) Descendre le produit motorisé en position basse souhaitée en appuyant sur la
touche V.
2) Appuyer simultanément sur les touches my et Λ jusqu’au mouvement de montée
du produit motorisé, le fin de course bas est réglé.
3) Appuyer sur la touche my pour stopper le produit motorisé.
4) Pour confirmer les fins de courses, Appuyer sur la touche my jusqu’au va etvient du produit motorisé.
2.3.4. Enregistrement du point de commande
La motorisation est en mode programmation :
Faire un appui bref sur le bouton PROG du point de commande à enregistrer :
Le produit motorisé effectue un va-et-vient : ce point de commande est enregistré
dans la motorisation.
Si la motorisation n’est plus en mode programmation, effectuer de
nouveau l’Étape 2.3.1, avant de réaliser l’Étape 2.3.4.
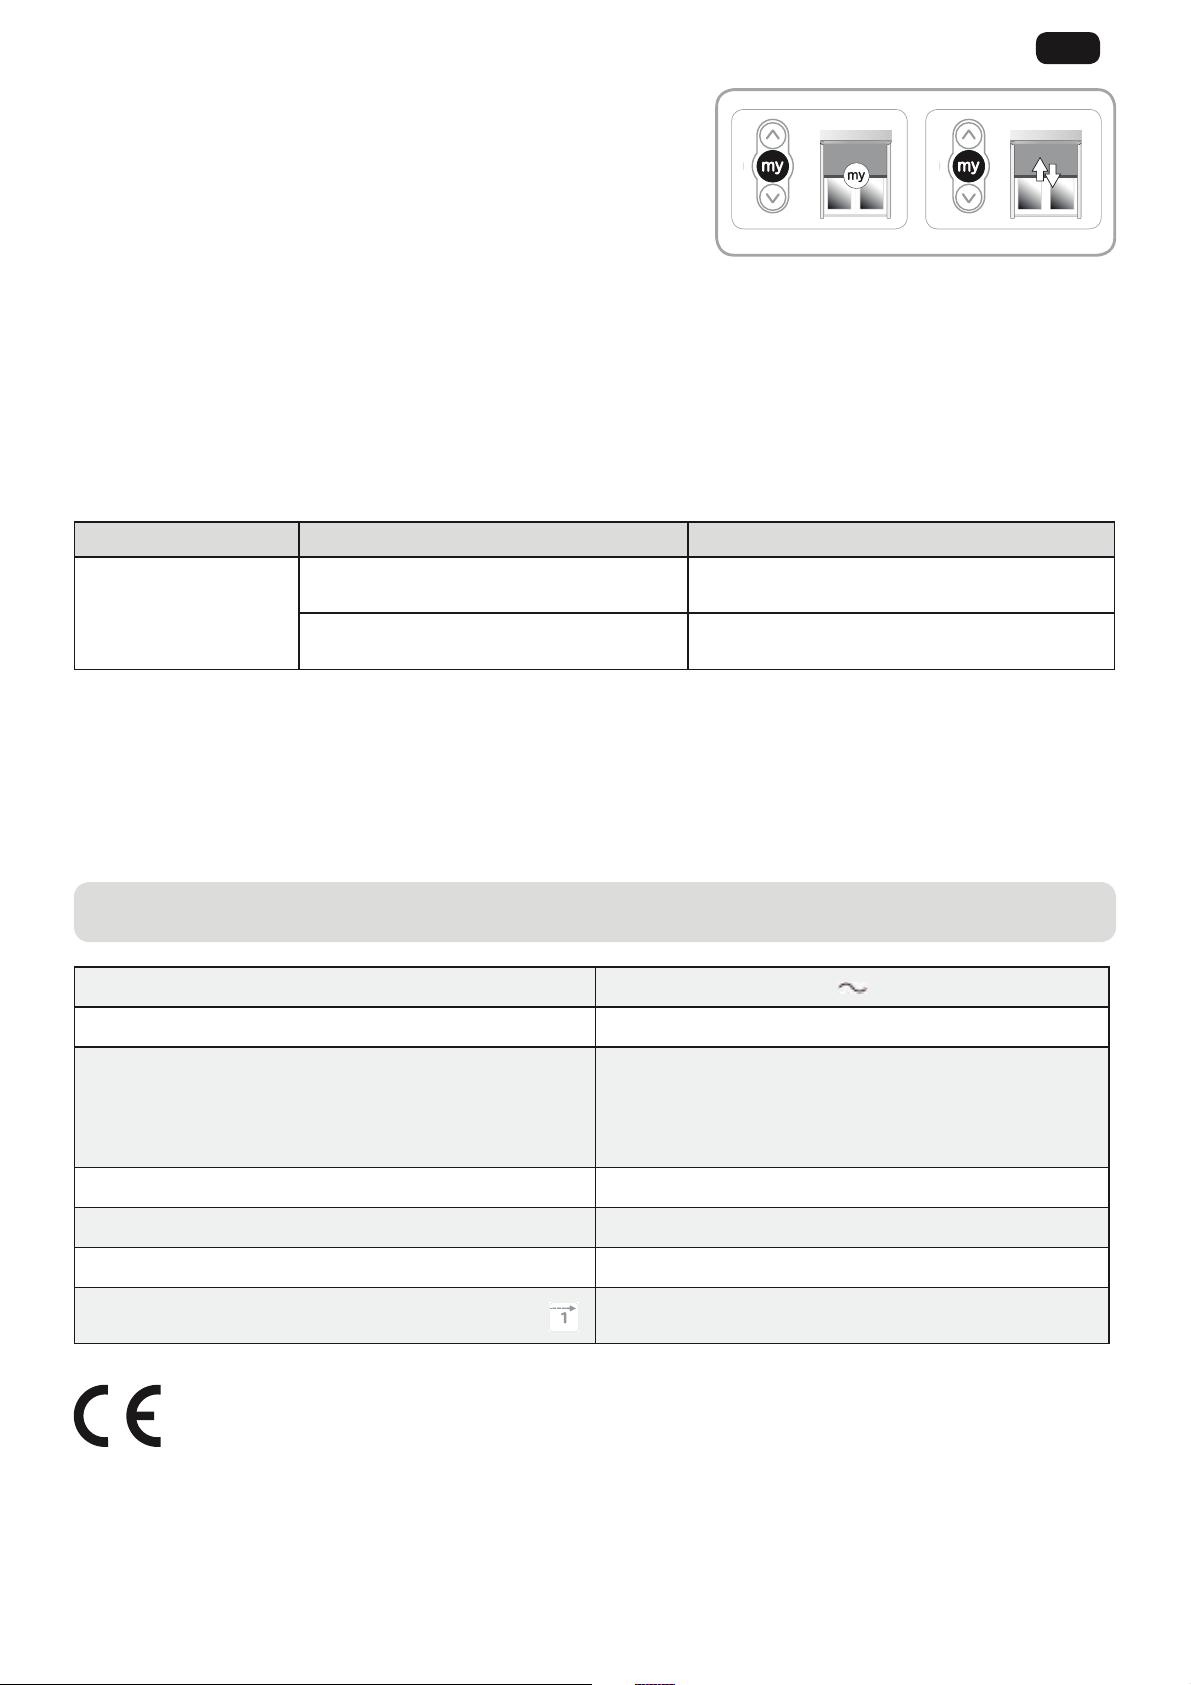
2.3.5. Re-réglage des fins de course (pour les fins de course réglé en manuel)
Réajustement de la fin de course haute
1) Appuyer sur la touche Λ pour amener le produit motorisé jusqu’a la fin de course
à réajuster.
2) Appuyer en même temps sur les touches Λ et V jusqu’au va-et-vient du produit
motorisé.
3) Appuyer sur la touche Λ ou V pour déplacer le produit motorisé vers la nouvelle
position souhaitée.
4) Pour confirmer la nouvelle fin de course appuyer sur la touche my jusqu’au
va-et-vient du produit motorisé.
Réajustement de la fin de course basse
1) Appuyer sur la touche V pour amener le produit motorisé jusqu’a la fin de course
à réajuster.
2) Appuyer en même temps sur les touches Λ et V jusqu’au va-et-vient du produit
motorisé.
3) Appuyer sur la touche Λ ou V pour déplacer le produit motorisé vers la nouvelle
position souhaitée.
4) Pour confirmer la nouvelle fin de course appuyer sur la touche my jusqu’au
va-et-vient du produit motorisé.
1 2
3
4
1 2
3
4
1 2
3
4
PROG.
8
FR
Copyright © 2016 Somfy SAS. All rights reserved.Images non contractuelles
2.3.6. Fonction «Back impulse»
Cette fonction permet de tendre la toile après chaque mouvement de descente du
store. Il est possible de l’ajuster jusqu’à ½ tour de tube d’enroulement.
Pour mettre en œuvre cette fonction:
1) Placer le produit motorisé en fin de course basse.
2) Appuyer en même temps sur my et Λ jusqu’au va-et-vient du produit motorisé : la
motorisation est en mode programmation.
3) Ajuster la tension de la toile avec Λ et V (½ tour de tube maxi.).
4) Appuyer sur my jusqu’au va-et-vient du produit motorisé : la tension de toile est
enregistrée.
2.3.7. Fonction «Back release»
Cette fonction permet de relâcher la tension sur la toile après la fermeture du store avec butée haute (arrêt de la barre de charge sous
le caisson).
La procédure à suivre pour activer ou désactiver le « Back release » est identique.
Par sécurité, cette fonction peut être activée ou désactivée par le point de commande io-homecontrol® Somfy dans 3 cas seulement :
• Après le stop de 2 s de validation des réglages et avant l’enregistrement du premier point de commande io-homecontrol® Somfy.
• Après l’enregistrement du premier point de commande io-homecontrol® Somfy et durant les 4 cycles suivants.
• Après une simple coupure d’alimentation et durant les 4 cycles suivants.
Pour mettre en œuvre cette fonction :
1) Placer le produit motorisé en position de fin de course haute.
2) Appuyer en même temps sur my et V jusqu’au va-et-vient du produit motorisé.
Si la fonction « Back release » était inactive, elle est activée.
Si la fonction « Back release » était active, elle est désactivée.
2.3.8. Fonction «Effort de fermeture»
Cette fonction permet d’augmenter ou de diminuer l’effort de de la barre de charge sous le caisson, sur 3 seuils (fort-moyen-faible).
Par défaut, la motorisation est positionnée en sortie d’usine sur le niveau faible.
Par sécurité, cette fonction est atteignable par le point de commande io-homecontrol® Somfy dans 3 cas seulement :
• Après le stop de 2 s de validation des réglages et avant l’enregistrement du premier point de commande io-homecontrol
®
Somfy.
• Après l’enregistrement du premier point de commande io-homecontrol® Somfy et durant les 4 cycles suivants.
• Après une simple coupure d’alimentation et durant les 4 cycles suivants.
Pour mettre en œuvre cette fonction :
1) Placer le produit motorisé en position médiane.
2) Faire un appui bref et simultané sur my et Λ, suivi immédiatement d’un appui
maintenu et simultané sur my et Λ jusqu’au va-et-vient du produit motorisé.
La motorisation est en mode programmation pendant 10 s uniquement.
3) Ajuster l’effort de fermeture avec Λ et V.
Pour augmenter l’effort de fermeture, appuyer sur Λ jusqu’au mouvement lent
du produit motorisé : l’effort de fermeture du store cassette est passé au seuil
supérieur.
Pour diminuer l’effort de fermeture, appuyer sur V jusqu’au mouvement lent du
produit motorisé : l’effort de fermeture du store cassette est passé au seuil inférieur.
4) Appuyer sur la touche my jusqu’au mouvement du produit motorisé : le nouvel effort de fermeture est enregistré.
1)
2)
1)
3)
2)
4)
0.5 s 5 s
1)
3)
2)
4)
9
FR
Copyright © 2016 Somfy SAS. All rights reserved.
Images non contractuelles
2.4. ASTUCES ET CONSEILS D’INSTALLATION
2.4.1. Questions sur le Sunea Screen ?
Constats Causes possibles Solutions
Le produit motorisé ne
fonctionne pas.
Le câblage est incorrect. Contrôler le câblage et le modifier si besoin.
La motorisation est en protection thermique. Attendre que le moteur refroidisse.
La pile du point de commande est faible. Contrôler si la pile est faible et la remplacer si besoin.
Le point de commande n’est pas compatible.
Contrôler la compatibilité et remplacer le point de
commande si besoin.
Le point de commande utilisé n’est pas
enregistré dans la motorisation.
Utiliser un point de commande enregistré ou enregistrer
ce point de commande.
Le produit motorisé s’arrête
trop tôt.
La couronne est mal mise en place. Fixer la couronne correctement.
Les fins de course sont mal réglées. Réajuster les fins de course.
2.4.2. Remplacement d’un point de commande Somfy perdu ou cassé
Ne réaliser la double coupure de courant qu’au niveau de l’application à remettre à zéro.
Cette remise à zéro supprime tous les points de commande locaux cependant les capteurs, les réglages de fin de course et la
position favorite sont conservés.
1) Positionner le produit motorisé à mi-hauteur.
2) Couper l’alimentation secteur pendant 2s.
3) Remettre l’alimentation secteur entre 5s et 15s.
4) Couper l’alimentation secteur pendant 2s.
5) Remettre l’alimentation secteur : le produit motorisé se met en mouvement
quelques secondes. (Si l’application est en fin de course haute ou basse elle effectuera un bref va-et-vient).
6) Appuyer sur le bouton PROG du nouveau point de commande jusqu’au va-et-vient
du produit motorisé: le nouveau point de commande est enregistré et tous les
autres points de commande sont effacés.
1
4
2 sec.
OFF
5
ON
2
2 sec.
OFF
3
10 sec.
ON
PROG.
6
1
10
FR
Copyright © 2016 Somfy SAS. All rights reserved.Images non contractuelles
3. UTILISATION ET MAINTENANCE
Cette motorisation ne nécessite pas d’opération de maintenance
3.1. TOUCHES MONTÉE ET DESCENTE
Un appui bref sur la touche Λ ou V provoque une montée ou descente complète du
produit motorisé.
3.2. FONCTION STOP
Le produit motorisé est en cours de mouvement.
Faire un appui bref sur my: le produit motorisé s’arrête automatiquement.
3.3. POSITION FAVORITE (my)
Pour utiliser la position favorite (my) : Faire un appui bref sur my: le produit motorisé se met en mouvement et s’arrête en position favorite (my).
Pour enregistrer, modifier ou supprimer la position favorite(my), voir chapitre
Réglages supplémentaires.
3.4. FONCTIONNEMENT AVEC UN CAPTEUR SOMFY
Se référer à la notice correspondante.
3.5. RÉGLAGES SUPPLÉMENTAIRES
3.5.1. Enregistrement ou modification de la position favorite (my)
1) Placer le produit motorisé dans la position favorite (my) souhaitée.
2) Appuyer sur my, pendant ≈5 s, jusqu’au va-et-vient du produit motorisé: la
position favorite (my) souhaitée est enregistrée.
1
2
3
1
2
2.4.3. Retour en configuration d’origine
Ne réaliser la double coupure de courant qu’au niveau de l’application à remettre à zéro.
Cette remise à zéro supprime tous les points de commande, tous les capteurs, tous les réglages de fin de course et réinitialise la
position favorite(my) de la motorisation.
1) Positionner le produit motorisé à mi-hauteur.
2) Couper l’alimentation secteur pendant 2s.
3) Remettre l’alimentation secteur entre 5s et 15s.
4) Couper l’alimentation secteur pendant 2s.
5) Remettre l’alimentation secteur : le produit motorisé se met en mouvement
quelques secondes.(Si l’application est en fin de course haute ou basse elle effectuera un bref va-et-vient).
6) Appuyer sur le bouton PROG du point de commande local Somfy pendant ≈7
s, jusqu’aux deux va-et-vient du produit motorisé:
La motorisation est réinitialisée en configuration d’origine.
Reprendre la mise en service (voir chapitre Mise en service).
X2
my
4
2 sec.
OFF
5
ON
2
2 sec.
OFF
3
10 sec.
ON
PROG.
6
1
1
11
FR
Copyright © 2016 Somfy SAS. All rights reserved.
Images non contractuelles
3.5.2. Suppression de la position favorite (my)
1) Appuyer sur my : le produit motorisé se met en mouvement et s’arrête en position
favorite (my).
2) Appuyer de nouveau sur my jusqu’au mouvement du produit motorisé : la position
favorite (my) est supprimée.
3.5.3. Ajout/Suppression de points de commande et capteurs Somfy
Se référer à la notice correspondante.
4. DONNÉES TECHNIQUES
Alimentation 230 V 50 Hz
Fréquence radio 868-870 MHz io homecontrol® bidirectionnel Tri-bandes
Bandes de fréquence et Puissance maximale utilisées
868,000 MHz - 868,600 MHz e.r.p. <25 mW
868,700 MHz - 869,200 MHz e.r.p. <25 mW
869,700 MHz - 870,000 MHz e.r.p. <25 mW
Température d’utilisation - 20°C à + 60°C
Indice de protection IP 44
Niveau de sécurité Classe II
Nombre maximal de points de commandes et de capteurs associés 9
Par la présente, Somfy SAS, F-74300 CLUSES déclare en tant que fabricant que la motorisation couverte par ces instructions,
marquée pour être alimentée en 230V~50Hz et utilisée comme indiqué dans ces instructions, est conforme aux exigences
essentielles des Directives Européennes applicables et en particulier de la Directive Machine 2006/42/EC et de la Directive Radio
2014/53/EU.
Le texte complet de la déclaration de conformité à l’UE est disponible sur www.somfy.com/ce.
Christian Rey, responsable des homologations, agissant au nom du Directeur de l’Activité, Cluses, 03/2016.
3.6. ASTUCES ET CONSEILS D’UTILISATION
3.6.1. Questions sur le Sunea Screen ?
Si le produit motorisé ne fonctionne toujours pas, contacter un professionnel de la motorisation et de l’automatisation de l’habitat.
3.6.4. Remplacement d’un point de commande Somfy perdu ou cassé
Pour le remplacement d’un point de commande perdu ou cassé, contacter un professionnel de la motorisation et de l’automatisation de
l’habitat.
Constats Causes possibles Solutions
Le produit motorisé ne
fonctionne pas.
La pile du point de commande est faible. Contrôler si la pile est faible et la remplacer si besoin.
La motorisation est en protection thermique. Attendre que la motorisation refroidisse.
1
2

12
FR
Copyright © 2016 Somfy SAS. All rights reserved.Images non contractuelles

13
DE
Copyright © 2016 Somfy SAS. All rights reserved
Abbildungen nicht bindend.
INHALTSVERZEICHNIS
ÜBERSETZTE ANLEITUNG
1. VORBEMERKUNGEN
1.1 ANWENDUNGSBEREICH
Der Antrieb Sunea screen wurde für den Antrieb aller Arten von vertikalen Außenmarkisen (ohne Verriegelungen), von Volants und von
vertikalen Fallarm-Außenmarkisen.
Der Installateur, eine Elektrofachkra[ nach DIN VDE 1000-10 für Antriebe und Automatisierungen im Haustechnikbereich, muss sicherstellen, dass der Antrieb nach der Installation die gültigen Normen des Landes, in dem er betrieben wird, insbesondere die Norm EN 13561
für Markisen, die im Außenbereich montiert werden, einhält.
Die vorliegende Anleitung ist für alle Sunea Screen 40 io -Antriebe gültig, die im derzeit gültigen Produktkatalog aufgeführt sind.
1. Vorbemerkungen 13
1.1 Anwendungsbereich 13
1.2 Ha[ung 14
2. Installation 14
2.1. Montage 14
2.2. Verkabelung 15
2.3. Inbetriebnahme 16
2.4. Tipps und Empfehlungen für
die Installation 19
3. Anwendung und Wartung 20
3.1. AUF- und AB-Tasten 20
3.2. STOPP-Funktion 20
3.3. Lieblingsposition (my-Position) 20
3.4. Betrieb mit einem Somfy-Sonnensensor 20
3.5. Weitere Einstellungen 20
3.6. Tipps und Empfehlungen für
die Anwendung 21
4. Technische Daten 21

14
DE
Copyright © 2016 Somfy SAS. All rights reservedAbbildungen nicht bindend.
1.2 HAFTUNG
Lesen Sie diese Anleitung aufmerksam durch, bevor Sie den Antrieb installieren und einsetzen. Beachten Sie außer den Anweisungen in
dieser Anleitung auch die detaillierten Hinweise im beiliegenden Dokument Sicherheitshinweise.
Die Installation des Antriebs muss von einem Fachmann für Gebäudeautomation unter Einhaltung der Anweisungen von
Somfy und der am Ort der Inbetriebnahme geltenden Vorschrien vorgenommen werden.
Jede Nutzung des Antriebs zu Zwecken, die über den im vorliegenden Dokument beschriebenen Anwendungsbereich hinausgehen, ist
untersagt. Jede Missachtung dieser sowie aller anderen in dieser Anleitung und im beiliegenden Dokument Sicherheitshinweise
enthaltenen Anweisungen führt zum Ausschluss jeglicher Ha[ung und Gewährleistungsansprüche durch Somfy.
Der Installateur hat seine Kunden auf die Nutzungs- und Wartungsbedingungen des Antriebs hinzuweisen und ihnen diese sowie das beiliegende Dokument Sicherheitshinweise nach Abschluss der Installation des Antriebs auszuhändigen. Wartungs- und Reparaturarbeiten
für den Antrieb dürfen ausschließlich von Fachleuten für Gebäudeautomation ausgeführt werden.
Für Fragen zur Installation des Antriebs und weiterführenden Informationen wenden Sie sich bitte an Ihren Somfy-Ansprechpartner, oder
besuchen Sie unsere Website www.somfy.com.
2. INSTALLATION
Diese Anweisungen sind von der Fachkra[ für Antriebe und Automatisierungen im Haustechnikbereich, die den Antrieb installiert,
unbedingt einzuhalten.
Den Antrieb nicht fallen lassen, keinen Stößen aussetzen, nicht anbohren, nicht in Wasser tauchen.
Installieren Sie für jeden Antrieb eine eigene Bedieneinheit.
2.1. MONTAGE
2.1.1. Vorbereitung des Antriebs
Darauf achten, dass der Innendurchmesser der Welle mindestens 37 mm
beträgt.
1) Bringen Sie die erforderlichen Zubehörteile zur Integration des Antriebs an der
Welle an:
• Entweder nur den Mitnehmer a am Antrieb.
• Oder den Adapter b und den Mitnehmer c am Antrieb.
2) Messen Sie die Länge (L1) zwischen dem Innenrand des Antriebskopfes und dem
äußersten Ende des Mitnehmers.
2.1.2. Vorbereitung der Welle
1) Schneiden Sie die Welle auf die gewünschte Länge zu.
2) Entgraten Sie die Welle und entfernen Sie die Späne.
3) Versehen Sie Wellen, die auf der Innenseite glatt sind, mit einer Ausklinkung mit
folgenden Maße
n:
3)
1) 2)
d
e
1
1
1
Sicherheitshinweis Achtung! Information Λ AUF-Taste V AB-Taste
1
1)
L1
L1 = …
2)
Ø > 37 mm
cb
Ø = 37 mm
a
d e
Ø 40 x 1 6 mm 8.5 mm
Ø 40 x 1.5 7 mm 8.5 mm
1
15
DE
Copyright © 2016 Somfy SAS. All rights reserved
Abbildungen nicht bindend.
2.1.3. Zusammenbau von Antrieb und Welle
1) Führen Sie den Antrieb in die Welle ein.
Positionieren Sie bei auf der Innenseite glatten Wellen die Ausklinkung am
Führungszapfen des Adapters.
2) Stellen Sie mit selbstschneidenden Schrauben oder Pop Nieten (abhängig von der
Länge (L1)) eine feste Verbindung zwischen Welle und Antrieb her.
Schrauben bzw. Blindnieten dürfen nur am Mitnehmer angebracht werden,
niemals am Antrieb.
2.1.4. Einbau der Einheit Antrieb-Welle
1) Bringen Sie die Wellen-Antriebs-Einheit am Gegenlager (f) und am Antriebslager
(g) an:
Vergewissern Sie sich, dass die Wellen-Antriebs-Einheit am Gegenlager
verriegelt ist. Damit wird verhindert, dass sich die Befestigung der Welle mit
dem Antrieb vom Gegenlager löst.
2) Bringen Sie, je nach Art des Lagers, den Federring (h) an.
L1
1)
2)
1
2.2. Verkabelung
Dieses Produkt darf nur von einer Elektrofachkra[ nach DIN VDE 1000-10 angeschlossen werden!.
Alle Kabel, die in Kontakt mit einer metallischen Wandung geraten könnten, müssen mit einer Hülse oder Ummantelung geschützt
und isoliert werden.
Bringen Sie die Kabel so an, dass sie nicht in Kontakt zu beweglichen Teilen geraten können.
Wenn der Antrieb im Freien eingesetzt wird und wenn ein Versorgungskabel des Typs H05-VVF verwendet wird, muss dieses in
einem UV-beständigen Kabelrohr, zum Beispiel in einem Kabelkanal verlegt werden.
Das Kabel des Sunea Screen 40 io kann nicht demontiert werden. Wenn es beschädigt ist, müssen Sie den Antrieb zum
Kundendienst bringen.
Achten Sie darauf, dass das Netzkabel des Antriebs zugänglich bleibt: Es muss sich einfach austauschen lassen.
Sehen Sie eine Schleife im Netzkabel vor, um das Eindringen von Wasser in den Antrieb zu vermeiden!
- Unterbrechen Sie die Spannungsversorgung.
- Schließen Sie den Antrieb gemäß den Angaben in unten stehender Tabelle an:
1
1
Neutralleiter
(N)
Phase
(L)
Schutzleiter
(
)
230 V
50 Hz Blau Braun
-
1)
2)
g
f
h
230 V 50 Hz
N
OFF
L

16
DE
Copyright © 2016 Somfy SAS. All rights reservedAbbildungen nicht bindend.
2.3. INBETRIEBNAHME
2.3.1. Vorabspeicherung des Funksenders
1) Schalten Sie die Spannungsversorgung ein.
2) Drücken Sie gleichzeitig auf die beiden Tasten Λ und V des RTS-Funksenders: Der
Behang führt eine kurze Auf- und Abbewegung aus und der RTS-Funksender wird
im Antrieb vorabgespeichert.
Der Antrieb verbleibt über einen Zeitraum von ≈ 10 min im Programmiermodus.
2.3.2. Prüfen der Drehrichtung
1) Drücken Sie am Funksender die Taste Λ:
a) Wenn der Behang nach oben fährt (a), ist die Drehrichtung korrekt: Fahren
Sie mit dem Kapitel „Einstellung der Endlagen“ fort.
b) Wenn der Behang nach unten fährt (b), ist die Drehrichtung vertauscht:
Nehmen Sie folgende Schritte vor.
2) Drücken Sie die my-Taste des Funksenders, bis der Antrieb mit einer kurzen Aufund Abbewegung bestätigt: Die Drehrichtung ist geändert.
3) Drücken Sie am Funksender die Taste Λ, um die Drehrichtung zu überprüfen.
2.3.3. Einstellung der Endlagen
Manuelle Einstellung der Endlagen
Bei Außenjalousien ohne Anschlag in der oberen Endlage und bei Fallarm-Außenmarkisen müssen sowohl die obere als auch die untere
Endlage eingestellt werden.
Die Endlagen können in beliebiger Reihenfolge bestimmt werden.
1) Drücken Sie die Taste Λ, um den Behang in die gewünschte obere Endlage zu
fahren.
2) Drücken Sie gleichzeitig die beiden Tasten my und V, bis der Behang sich zu
bewegen beginnt.
Die obere Endlage ist damit eingestellt.
3) Drücken Sie die Taste my, wenn der Behang die gewünschte untere Endlage
erreicht hat. Führen Sie gegebenenfalls mit den beiden Tasten Λ und V eine
Feinabstimmung der Endlage durch.
4) Drücken Sie gleichzeitig die beiden Tasten my und Λ, bis der Behang sich zu
bewegen beginnt.
Die untere Endlage ist damit eingestellt. Der Behang wird jetzt hochgefahren und
verbleibt dann in der oberen Endlage.
5) Um die beiden Endlagen zu bestätigen, drücken Sie die my-Taste, bis der Antrieb
mit einer kurzen Auf- und Abbewegung bestätigt:
Die beiden Endlagen sind gespeichert.
1 2
ON
1 2
3
4
5
1
2 3
a
b
Nehmen Sie folgende
Schritte vor
Einstellung der Endlagen

17
DE
Copyright © 2016 Somfy SAS. All rights reserved
Abbildungen nicht bindend.
Halbautomatische Einstellung der Endlagen
Bei Außenjalousien mit Anschlag in der oberen Endlage (Stopp des Ausfallprofils unterhalb des Kastens) wird die obere Endlage automatisch eingestellt. Die untere Endlage muss jedoch manuell eingestellt werden
Automatische Einstellung der oberen Endlage und manuelle Einstellung der unteren Endlage.
1) Drücken Sie die Taste V, um den Rollladen in die gewünschte untere Endlage zu
fahren.
2) Drücken Sie gleichzeitig die Tasten “my” und Λ und halten Sie diese gedrückt,
bis der Rollladen nach oben zu fahren beginnt. Die untere Endlage ist jetzt
eingestellt.
3) Drücken Sie auf die Taste “my”, um den Rollladen anzuhalten.
4) Um die beiden Endlagen zu bestätigen, drücken Sie die my-Taste, bis der Antrieb
mit einer kurzen Auf- und Abbewegung bestätigt.
2.3.4. Speichern des Funksenders
Der Antrieb ist im Programmiermodus:
Drücken Sie kurz auf die PROG-Taste des einzulernenden Funksenders:
Der Behang führt eine kurze Auf- und Abbewegung aus: Der Funksender ist jetzt
am Antrieb eingelernt.
Wenn der Antrieb nicht mehr im Programmiermodus ist, wiederholen Sie bitte den Schritt 2.3.1 vor der Ausführung des Schrittes 2.3.4.
2.3.5. Korrektur der Endlagen (bei manuell eingestellten Endlagen)
Nachstellen der oberen Endlage
1) Drücken Sie die Taste Λ, um den Behang in die zu korrigierende Endlage zu
bringen.
2) Drücken Sie gleichzeitig die beiden Tasten Λ und V, bis der Behang eine kurze
Auf- und Abbewegung ausführt.
3) Drücken Sie eine der Tasten Λ oder V, um den Behang in die gewünschte neue
Endlage zu bringen.
4) Um die neue Endlagen zu bestätigen, drücken Sie die my-Taste, bis der Antrieb
mit einer kurzen Auf- und Abbewegung reagiert.
Nachstellen der unteren Endlage
1) Drücken Sie die Taste V, um den Behang in die zu korrigierende Endlage zu
bringen.
2) Drücken Sie gleichzeitig die beiden Tasten Λ und V, bis der Behang eine kurze
Auf- und Abbewegung ausführt.
3) Drücken Sie eine der Tasten Λ oder V, um den Behang in die gewünschte neue
Endlage zu bringen.
4) Um die neue Endlage zu bestätigen, drücken Sie die my-Taste, bis der Antrieb
mit einer kurzen Auf- und Abbewegung reagiert.
1 2
3
4
1 2
3
4
1 2
3
4
PROG.
18
DE
Copyright © 2016 Somfy SAS. All rights reservedAbbildungen nicht bindend.
2.3.6. Back-impulse-Funktion
Mit dieser Funktion wird das Markisentuch nach jeder Abwärtsbewegung der Markise
gespannt. Eine Justierung um bis zu einer halben Wellendrehung ist möglich.
Für die Benutzung dieser Funktion:
1) Fahren Sie die Markise in ihre untere Endlage.
2) Drücken Sie gleichzeitig die beiden Tasten my und Λ, bis die Markise eine kurze
Auf- und Abbewegung ausführt: Der Antrieb ist jetzt im Programmiermodus.
3) Justieren Sie die Tuchspannung mithilfe der Tasten Λ und V (maximal ½
Wellenumdrehung).
4) Drücken Sie auf my, bis das angetriebene Produkt sich kurz auf und ab bewegt:
Die Tuchspannung ist jetzt gespeichert.
2.3.7. Back-Release-Funktion nur für Außenjalousien mit Anschlag in der oberen Endlage
Diese Funktion erlaubt es, die Tuchspannung nach dem Schließen der Außenjalousie mit Anschlag in der oberen Endlage (Stopp des
Ausfallprofils unterhalb des Kastens) zu lockern.
Die Vorgehensweise für das Aktivieren und Deaktivieren des „Back Release“ ist identisch.
Aus Sicherheitsgründen kann diese Funktion nur in drei Fällen durch den Somfy-io-homecontrol® -Funksender aktiviert oder deaktiviert
werden:
• Nach einer 2 Sekunden andauernden Unterbrechung der Bestätigung der Einstellungen und vor dem Speichern des ersten
Somfy-io-homecontrol®-Funksenders.
• Während der ersten vier Zyklen nach dem Speichern des ersten Somfy-io-homecontrol®-Funksenders;
• Nach einer einfachen Spannungsunterbrechung und in den folgenden 4 Zyklen.
Für die Benutzung dieser Funktion:
1) Fahren Sie die Markise in ihre obere Endlage.
2) Drücken Sie gleichzeitig die beiden Tasten my und V, bis die Markise eine kurze
Auf- und Abbewegung ausführt.
Wenn die Funktion „Back Release“ vorher deaktiviert war, ist sie jetzt aktiviert.
Wenn die Funktion „Back Release“ vorher aktiviert war, ist sie jetzt deaktiviert.
2.3.8. ÄSchließkra-Funktion nur für Außenjalousien mit Anschlag in der oberen Endlage
Diese Funktion erlaubt eine Erhöhung oder Verringerung der Schließkra[ unterhalb des Ausfallprofils in 3 Stufen (hoch-mittel-niedrig).
Werksseitig ist der Antrieb auf die niedrigen Stufe eingestellt.
Aus Sicherheitsgründen kann diese Funktion nur in drei Fällen durch den Somfy-io-homecontrol® -Funksender ausgelöst werden:
• Nach einer 2 Sekunden andauernden Unterbrechung der Bestätigung der Einstellungen und vor dem Speichern des ersten
Somfy-io-homecontrol®-Funksenders.
• Während der ersten vier Zyklen nach dem Speichern des ersten Somfy-io-homecontrol®-Funksenders;
• Nach einer einfachen Spannungsunterbrechung und in den folgenden 4 Zyklen.
Für die Benutzung dieser Funktion:
1) Fahren Sie das angetriebene Produkt in eine mittlere Position.
2) Drücken Sie gleichzeitig kurz auf die Tasten my und Λ und anschließend gleich-
zeitig anhaltend auf die Tasten my und Λ, bis die Markise eine kurze Auf- und
Abbewegung ausführt.
Der Antrieb ist jetzt für nur 10 Sekunden im Programmiermodus.
3) Korrigieren Sie die Schließkra[ mithilfe der Tasten Λ und V.
Zur Steigerung der Schließkra[ halten Sie die Taste Λ gedrückt, bis die Markise eine
langsame Bewegung ausführt: Für die Schließkra[ der Markise mit Kasten ist jetzt
die höhere Schwelle eingestellt.
Zur Verringerung der Schließkra[ halten Sie die Taste V gedrückt, bis die Markise
eine langsame Bewegung ausführt: Für die Schließkra[ der Markise mit Kasten ist jetzt die untere Schwelle eingestellt.
4) Halten Sie die Taste my gedrückt, bis die Markise eine kurze Auf- und Abbewegung ausführt: Die neue Schließkra[ ist jetzt gespeichert.
1)
2)
1)
3)
2)
4)
1)
3)
2)
4)
0.5 s 5 s

19
DE
Copyright © 2016 Somfy SAS. All rights reserved
Abbildungen nicht bindend.
2.4. TIPPS UND EMPFEHLUNGEN FÜR DIE INSTALLATION
2.4.1. Fragen zum Sunea Screen ?
Fehler Mögliche Ursachen Lösungen
Der angetriebene
Behang funktioniert
nicht.
Die Verkabelung ist fehlerha[. Die Verkabelung überprüfen und ggf. ändern.
Der Überhitzungsschutz des Antriebs wurde
ausgelöst.
Warten, bis der Antrieb abgekühlt ist.
Die Batterie des Funksenders ist schwach.
Überprüfen Sie die Batteriespannung und tauschen
Sie ggf. die Batterie aus.
Die Bedieneinheit ist nicht kompatibel.
Überprüfen Sie die Kompatibilität und tauschen Sie
ggf. die Bedieneinheit aus.
Der verwendete Funksender ist im Antrieb
nicht eingelernt.
UVerwenden Sie eine eingelernte Bedieneinheit oder
lernen Sie die Bedieneinheit ein.
Die Markise wird zu früh
angehalten
Der Adapter wurde nicht richtig angebracht. Den Adapter richtig anbringen.
Die Endlagen sind falsch eingestellt. Endlagen nachjustieren.
2.4.2. Austausch eines verlorenen oder beschädigten Somfy-Funksenders
Führen Sie die doppelte Spannungsunterbrechung nur an dem Antrieb durch, der zurückgesetzt werden soll.
Durch diese Rücksetzung werden alle lokalen Funksender gelöscht. Die Sensoren sowie die Einstellung der Endlagen und der
Lieblingspositionen bleiben dagegen gespeichert.
1) Fahren Sie den Behang auf halbe Höhe.
2) Unterbrechen Sie die Spannungsversorgung für 2Sekunden.
3) Schalten Sie die Spannungsversorgung für 5 bis 15 Sekunden wieder ein.
4) Unterbrechen Sie die Spannungsversorgung für 2Sekunden.
5) Schalten Sie die Spannungsversorgung wieder ein: Der Behang bewegt sich
einige Sekunden lang. (Wenn er sich in seiner oberen oder unteren Endlage befindet,
führt er eine kurze Auf- und Abbewegung aus).
6) Drücken Sie die PROG-Taste des neuen Funksenders, bis der Behang mit einer
kurzen Auf- und Abbewegung bestätigt: Der neue Funksender ist jetzt eingelernt
und alle anderen Funksender wurden gelöscht.
1
4
2 sec.
OFF
5
ON
2
2 sec.
OFF
3
10 sec.
ON
PROG.
6
1

20
DE
Copyright © 2016 Somfy SAS. All rights reservedAbbildungen nicht bindend.
3. ANWENDUNG UND WARTUNG
Für diesen Antrieb sind keine Wartungsarbeiten erforderlich.
3.1. AUF UND ABTASTEN
Ein einfacher Druck auf eine der Tasten Λ oder V löst eine vollständige Öffnung oder
Schließung des Behangs aus..
3.2. STOPP-FUNKTION
Der Behang ist gerade in Bewegung.
Drücken Sie kurz auf die Taste my: Der Behang wird automatisch angehalten.
3.3. LIEBLINGSPOSITION (my-Position)
Anfahren der Lieblingsposition (my-Position):
Drücken Sie kurz auf die Taste my: Das angetriebene Produkt bewegt sich und hält
an der voreingestellten Lieblingsposition (my) an.
Zur Speicherung, Änderung oder Löschung der Lieblingsposition (my), siehe
Abschnitt Weitere Einstellungen.
3.4. BETRIEB MIT EINEM SOMFYSENSOR
Wir verweisen auf die Gebrauchsanleitung des betreffenden Geräts.
3.5. WEITERE EINSTELLUNGEN
3.5.1. Einlernen oder Ändern der Lieblingsposition („my“)
1) Fahren Sie den Behang in die gewünschte Lieblingsposition (my-Position).
2) Halten Sie die my-Taste für etwa 5 Sekunden gedrückt, bis der Behangeine
kurze Auf- und Abbewegung ausführt: Die gewünschte neue Lieblingsposition
(my-Position) ist jetzt gespeichert.
1
2
3
1
2
2.4.3. Rücksetzung auf Werkseinstellung
Führen Sie die doppelte Spannungsunterbrechung nur an dem Antrieb durch, der zurückgesetzt werden soll.
Bei dieser Rücksetzung werden alle Funksender, alle Sensoren und alle Endlageneinstellungen gelöscht und die Lieblingsposition
(my-Position) zurückgesetzt.
1) Fahren Sie den Behang auf halbe Höhe.
2) Unterbrechen Sie die Spannungsversorgung für 2Sekunden.
3) Schalten Sie die Spannungsversorgung für 5 bis 15 Sekunden wieder ein.
4) Unterbrechen Sie die Spannungsversorgung für 2Sekunden.
5) Schalten Sie die Spannungsversorgung wieder ein: Der Behang bewegt sich
einige Sekunden lang. (Wenn er sich in seiner oberen oder unteren Endlage befindet,
führt er eine kurze Auf- und Abbewegung aus).
6) Halten Sie die PROG-Taste des Somfy-Funksenders für ca. 7 Sekunden
gedrückt, bis der Behangzwei Auf- und Abbewegungen ausführt:
Der Antrieb wurde jetzt in seine Werkseinstellung zurückgesetzt.
Wiederholen Sie alle Schritte der Inbetriebnahme (siehe Kapitel Inbetriebnahme).
X2
my
4
2 sec.
OFF
5
ON
2
2 sec.
OFF
3
10 sec.
ON
PROG.
6
1
1
21
DE
Copyright © 2016 Somfy SAS. All rights reserved
Abbildungen nicht bindend.
3.5.2. Löschen der Lieblingsposition (my-Position)
1) Drücken Sie auf die Taste my: Der Behang bewegt sich und hält an der
voreingestellten Lieblingsposition (my) an.
2) Drücken Sie die my-Taste erneut und halten Sie sie gedrückt, bis sich der Behang
in Bewegung setzt: Die Lieblingsposition (my-Position) wurde jetzt gelöscht..
3.5.3. Hinzufügen/Löschen von Somfy-Funksendern und Somfy-Sensoren
Wir verweisen auf die Gebrauchsanleitung des betreff enden Geräts.
4. TECHNISCHE DATEN
Betriebsspannung 230 V 50 Hz
Funkfrequenz 868-870 MHz io-homecontrol
®
bidirektional Triband
Frequenzband und maximale Leistung
868,000 MHz - 868.600 MHz e.r.p. <25 mW
868,700 MHz - 869.200 MHz e.r.p. <25 mW
869,700 MHz - 870.000 MHz e.r.p. <25 mW
Temperaturbereich - 20 °C bis + 60 °C
Schutzart IP 44
Schutzklasse Klasse II
Max. Anzahl Bedieneinheiten
mit den entsprechenden Sensoren
9
Somfy SAS, F-74300 CLUSES (Frankreich), erklärt hiermit als Hersteller, dass der in dieser Anleitung beschriebene Antrieb bei
bestimmungsgemäßem Einsatz und angeschlossen gemäß Kennzeichnung an eine 230 V / 50 Hz-Stromversorgung die
grundlegenden Anforderungen der geltenden europäischen Richtlinien und insbesondere der Maschinenrichtlinie 2006/42/EG sowie
der Funkanlagenrichtlinie 2014/53/EU erfüllt.
Der vollständige Text der EU-Konformitätserklärung ist unter der Internetadresse www.somfy.com/ce verfügbar.
Christian Rey, Bevollmächtiger für Zulassungen, in Vertretung des Directeur de l’Activité, Cluses, Frankreich, 03/2016.
3.6. TIPPS UND EMPFEHLUNGEN FÜR DIE ANWENDUNG
3.6.1. Fragen zum Sunea Screen ?
Wenn das Produkt weiterhin nicht funktioniert, wenden Sie sich bitte an einen Fachmann für Gebäudeautomation.
3.6.4. Austausch eines verlorenen oder beschädigten Somfy-Funksenders
Für den Austausch von verlorenen oder defekten Funksendern wenden Sie sich bitte an einen Fachmann für Gebäudeautomation.
1
2
Fehler Mögliche Ursachen Lösungen
Der angetriebene Behang
funktioniert nicht.
Die Batterie des Funksenders ist schwach.
Überprüfen Sie die Batteriespannung und tauschen Sie ggf. die
Batterie aus.
Der Überhitzungsschutz des Antriebs
wurde ausgelöst.
Warten Sie ab, bis der Antrieb abgekühlt ist.

22
DE
Copyright © 2016 Somfy SAS. All rights reservedAbbildungen nicht bindend.

23
EN
Copyright © 2016 Somfy SAS. All rights reserved.
Images not contractually binding
CONTENTS
1. Prerequisite information 23
1.1 Field of application 23
1.2 Liability 24
2. Installation 24
2.1. Assembly 24
2.2. Wiring 25
2.3. Commissioning 26
2.4. Tips and recommendations for installation 29
3. Use and maintenance 30
3.1. Up and Down buttons 30
3.2. STOP function 30
3.3. Favourite position (my) 30
3.4. Operating with a Somfy sensor 30
3.5. Additional settings 30
3.6. Tips and recommendations for use 31
4. Technical data 31
ORIGINAL INSTRUCTIONS
1. PREREQUISITE INFORMATION
1.1 FIELD OF APPLICATION
The io Sunea Screen 40 drives are designed to motorise all types of vertical external awnings (without locks), valances and vertical arm
awnings.
The professional drive and home automation installer must ensure that, once installed, the installation of the motorised product complies
with the standards in force in the country in which it is commissioned, in particular such as standard EN 13561 relating to external
awnings.
These instructions apply to all io Sunea Screen screen 40 drives, the versions of which are available in the current catalogue.
24
EN
Copyright © 2016 Somfy SAS. All rights reserved.Images not contractually binding
1.2 LIABILITY
Please read these instructions carefully before installing and using the drive. In addition to following the instructions given in this guide,
the instructions detailed in the attached Safety instructions must also be observed.
The drive must be installed by a drive and home automation professional, according to Somfy instructions and the
regulations applicable in the country in which it is commissioned.
It is prohibited to use the drive outside the field of application described above. Such use, and any failure to comply with the instructions
given in this guide and in the attached Safety instructions document, absolves Somfy of any liability and invalidates the warranty.
The installer must inform his customers of the operating and maintenance conditions for the drive and must provide them with the
instructions for use and maintenance, as well as the attached Safety instructions document, a[er installing the drive. Any A[er-Sales
Service operation on the drive must be performed by a drive and home automation professional.
If in doubt when installing the drive, or to obtain additional information, contact a Somfy adviser or go to the website www.somfy.com.
2. INSTALLATION
These instructions are mandatory for the drive and home automation professional installing the drive.
Never drop, knock, drill or submerge the drive.
Install a separate control point for each drive.
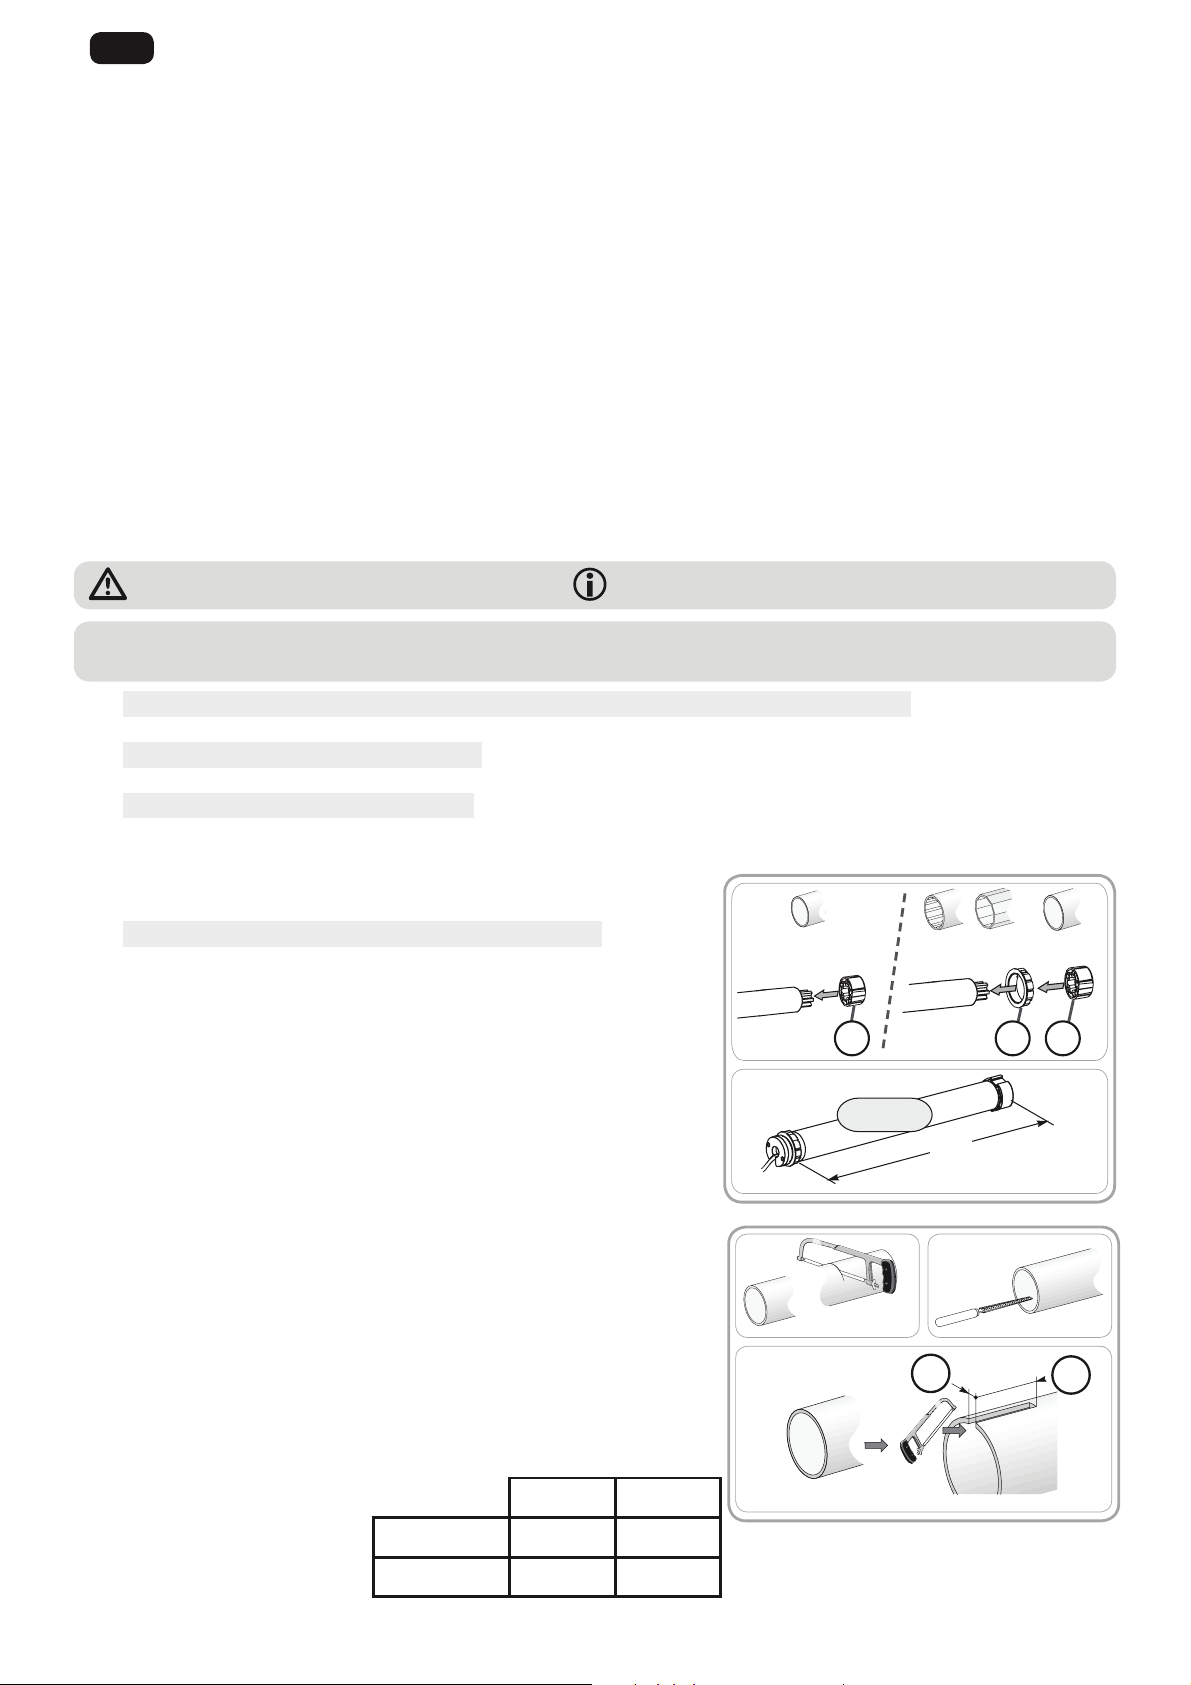
2.1. ASSEMBLY
2.1.1. Preparing the drive
Check that the inner diameter of the tube is 37 mm or greater.
1) Fit the accessories required to integrate the drive into the roller tube:
• Either fit the drive wheel a on the drive.
• Or fit the crown b and the drive wheel c on the drive.
2) Measure the length (L1) between the inner edge of the drive head and the rim of
the drive wheel.
2.1.2. Tube preparation
1) Cut the roller tube to the required length, depending on the motorised product.
2) Deburr the roller tube and remove the swarf.
3) For roller tubes which are smooth inside, cut a notch with the following
measurements:
3)
1) 2)
d
e
1
1
1
Safety warning! Caution! Information Λ Up V Down
1
1)
L1
L1 = …
2)
Ø > 37 mm
cb
Ø = 37 mm
a
d e
Ø 40 x 1 6 mm 8.5 mm
Ø 40 x 1.5 7 mm 8.5 mm
1

25
EN
Copyright © 2016 Somfy SAS. All rights reserved.
Images not contractually binding
2.1.3. Drive/tube assembly
1) Slide the drive into the roller tube.
For roller tubes which are smooth inside, position the notch previously cut on the boss
on the crown.
2) Fix the roller tube on the drive wheel using the screws or pop rivets depending on
the length (L1).
The screws or pop rivets must only be fastened onto the wheel and not on the
drive.
2.1.4. Installing the drive/tube assembly
1) Fit and attach the tube/drive assembly to the end support (f) and the drive support (g):
Ensure that the drive/tube assembly is secured onto the end bracket. This
operation prevents the tube/drive assembly from coming out of the end
bracket attachment.
2) Depending on the type of bracket, screw the adapter onto the motor head.
L1
1)
2)
1
2.2. WIRING
Standard NF C 15-100 for electrical installations must be adhered to.
Cables which pass through a metal wall must be protected and insulated using a sheath or sleeve.
Attach cables to prevent any contact with moving parts.
If the drive is used outdoors and if the power supply cable is of the H05-VVF type, route the cable in a UV-resistant duct, e.g.
trunking.
The io Sunea Screen 40 cable cannot be removed. If it is damaged, return the drive to the A[ er-Sales department.
Always make a loop in the power supply cable to prevent water entering the drive!
Leave the drive power supply cable accessible: it must be easily replaceable.
- Switch off the power supply.
- Connect the drive according to the information in the table below:
1
1
Neutral (N) Live (L) Earth ( )
230 V
50 Hz
Blue Brown -
1)
2)
g
f
h
230 V 50 Hz
N
OFF
L
26
EN
Copyright © 2016 Somfy SAS. All rights reserved.Images not contractually binding
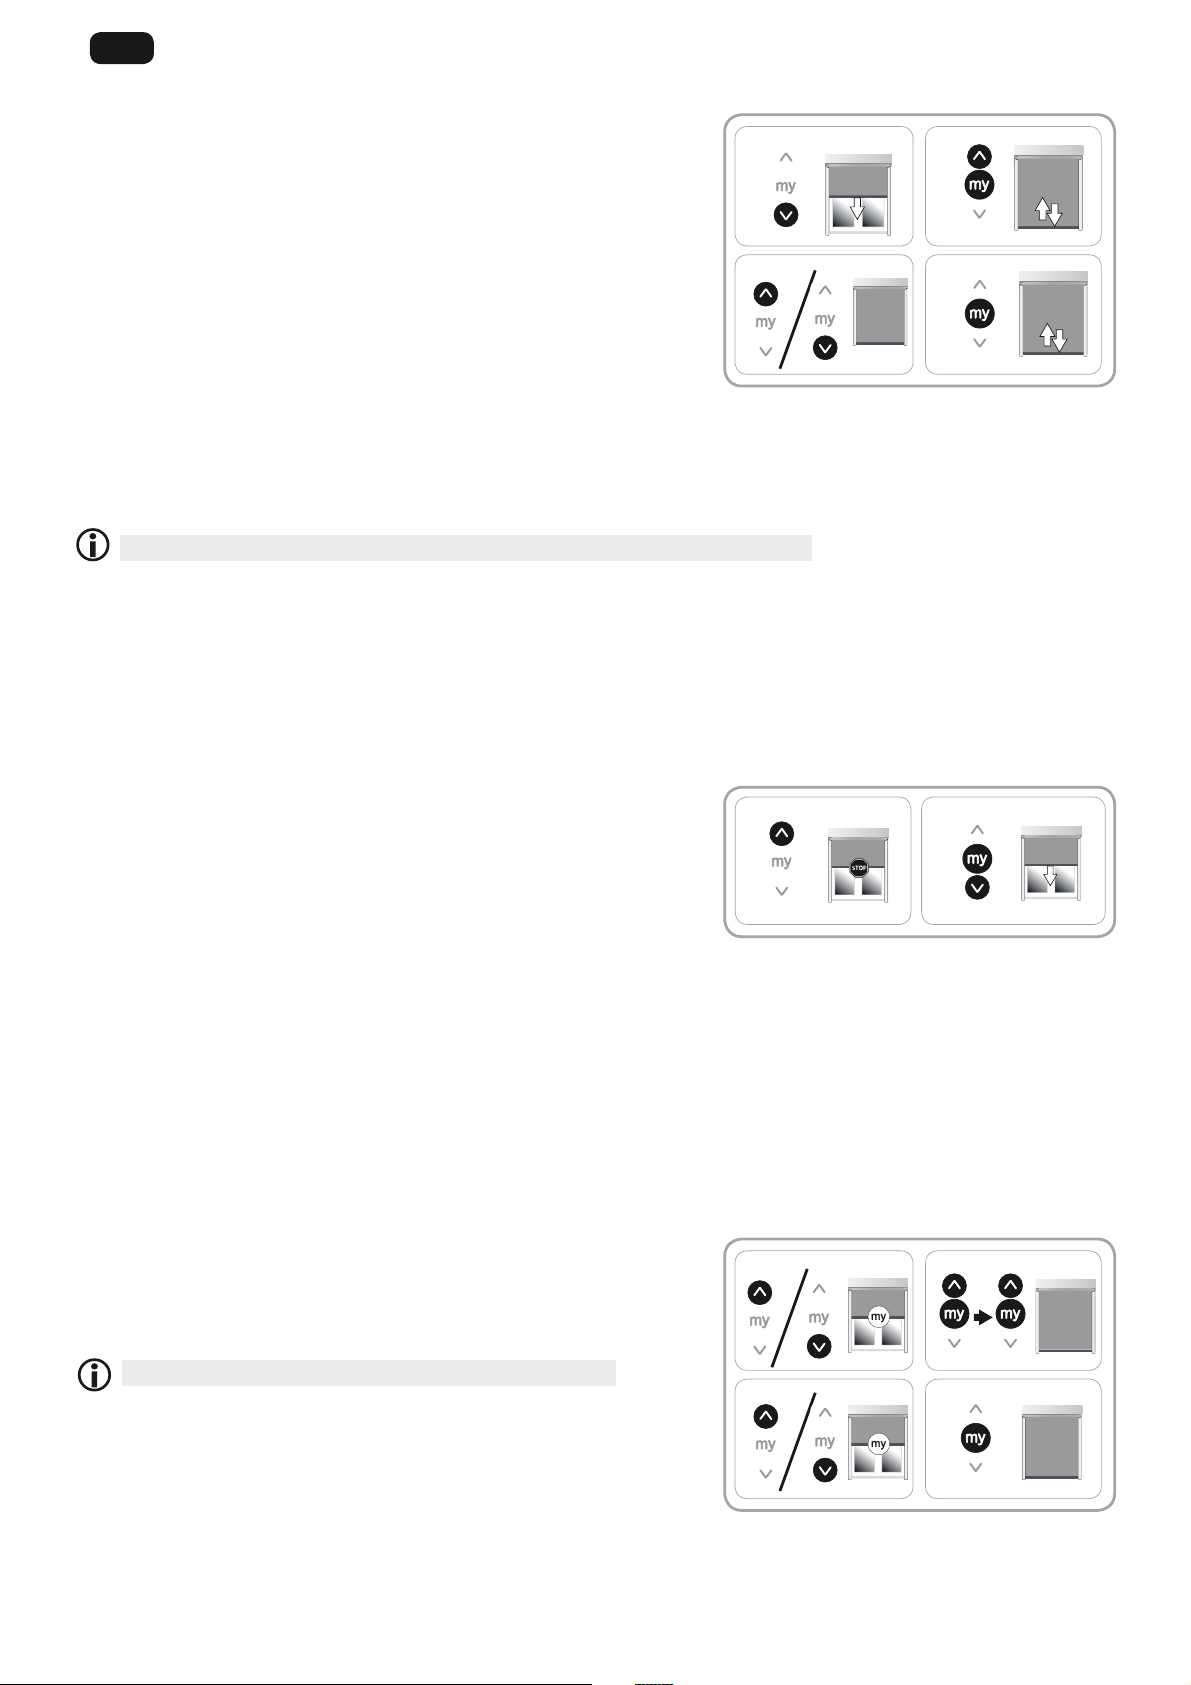
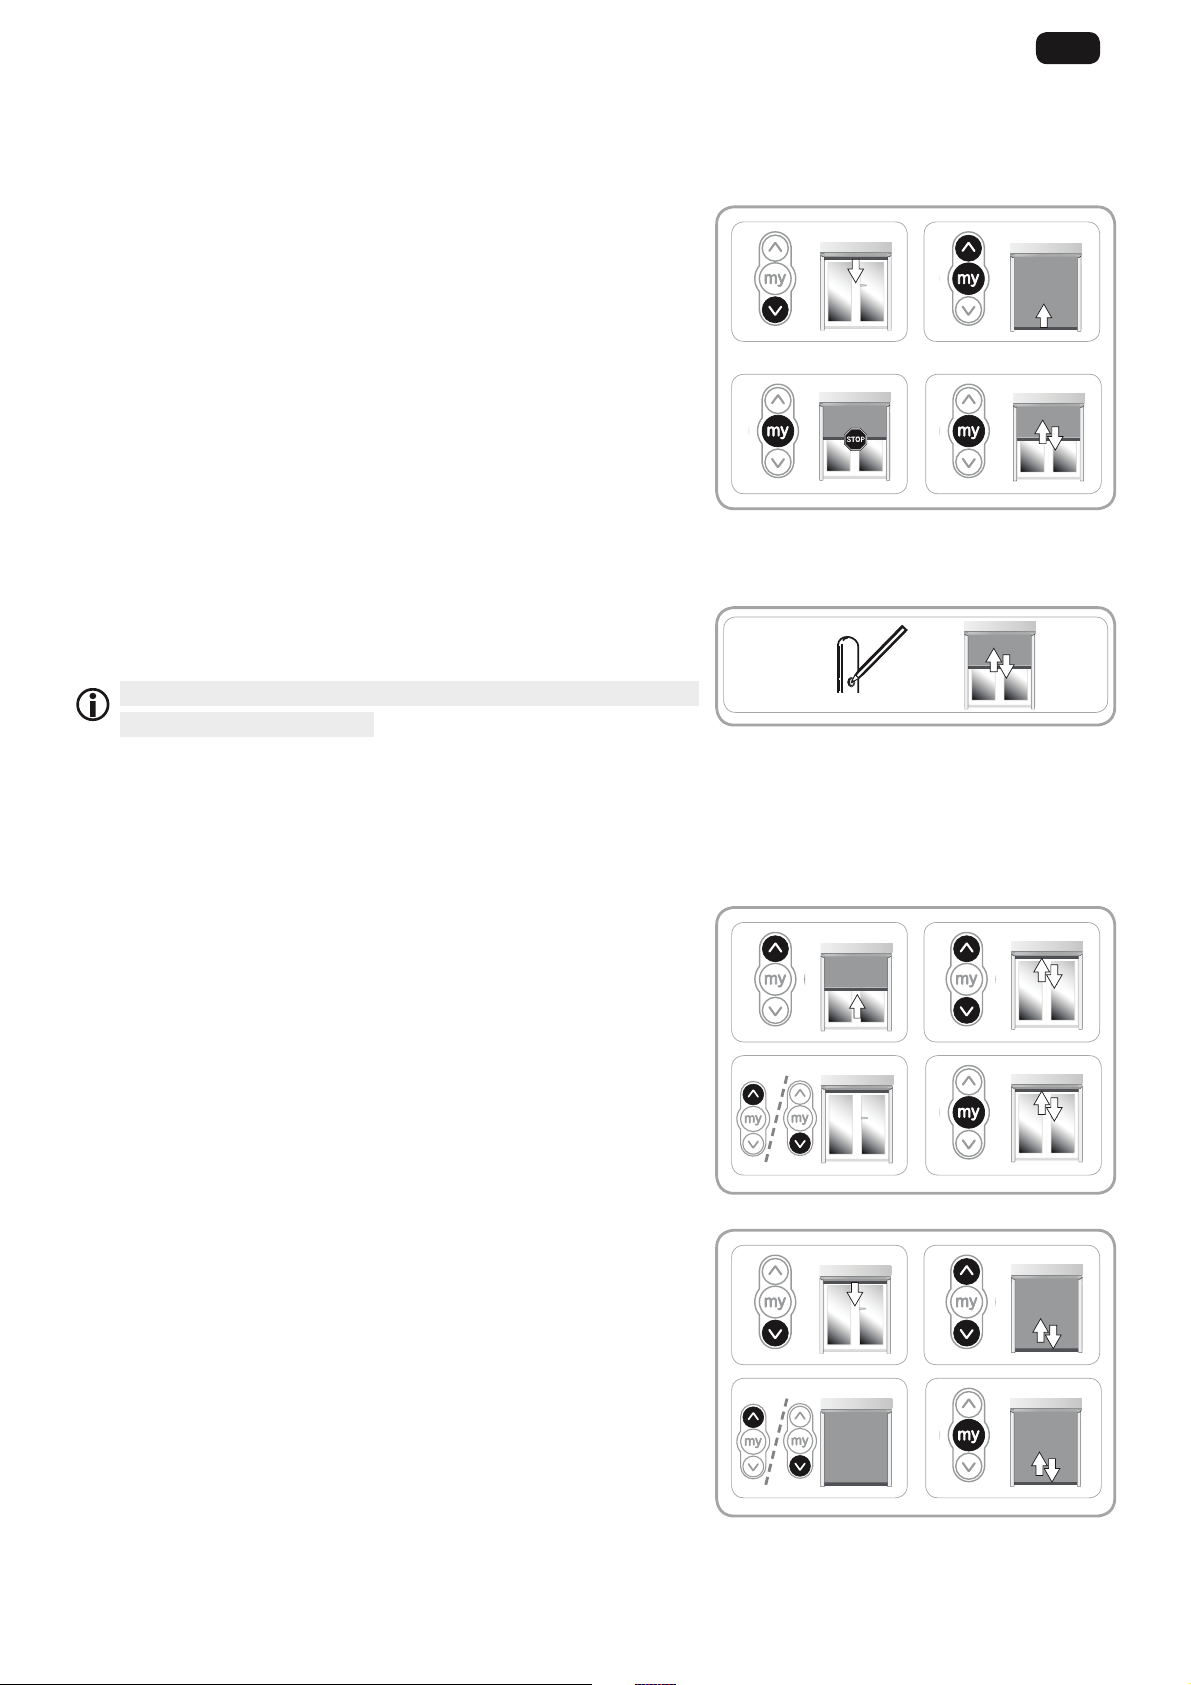
2.3. COMMISSIONING
2.3.1. Preprogramming the control point
1) Switch on the power supply.
2) Press the Λ / V buttons on the control point at the same time: The motorised
product makes up and down movements (rapidly raising and lowering), and the
control point is pre-programmed in the motor.
The drive is in programming mode for ≈ 10 min.
2.3.2. Checking the direction of rotation
1) Press the Λ button on the control point:
a) If the motorised product rises (a), the direction of rotation is correct: Move
onto the section entitled “Setting the end limits”.
b) If the motorised product lowers (b), the direction of rotation is incorrect:
Move onto the next step.
2) Press the my button on the control point until the motorised product moves up and
down: the rotational direction has been modified.
3) Press the Λ button on the control point to check the direction of rotation.
2.3.3. Setting the end limits
Limit position setting in manual mode
For vertical awnings without upper stop, or lateral arm-mounted awnings without head rail, both end limits may be modified.
The end limits can be set in any order.
1) Raise the motorised product to the desired position by pressing the Λ button.
2) Press the my and V buttons at the same time until the motorised product moves.
The upper end limit is memorised.
3) Press the my button when the motorised product reaches the desired lowered
position. If necessary, adjust the position of the motorised product using the Λ and
V buttons.
4) Press the my and Λ buttons at the same time until the motorised product moves.
The lower end limit is memorised. The motorised product rises and stops in the
raised position.
5) To confirm the end limits, press the my button until the motorised product moves
up and down.
The end limits are programmed.
1 2
ON
1 2
3
4
5
1
2 3
a
b
Move
onto the next step
Setting the end
limits
27
EN
Copyright © 2016 Somfy SAS. All rights reserved.
Images not contractually binding
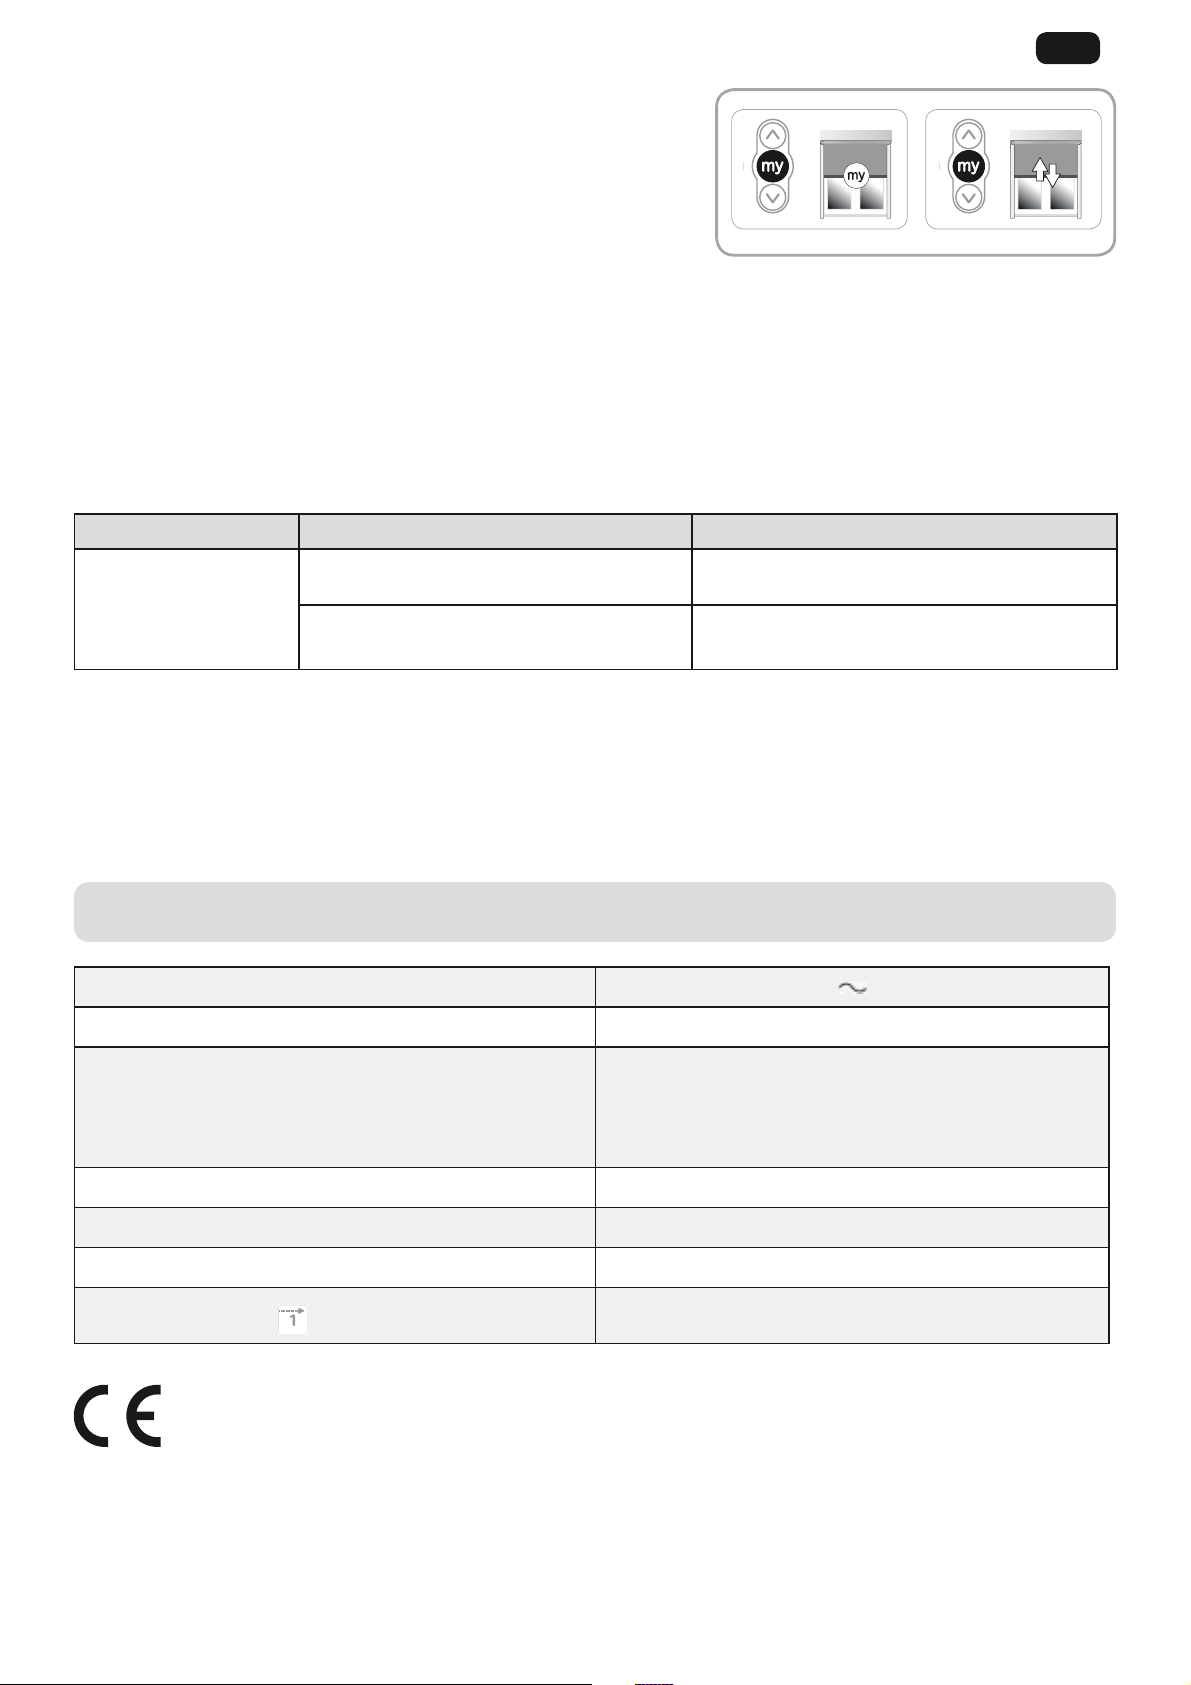
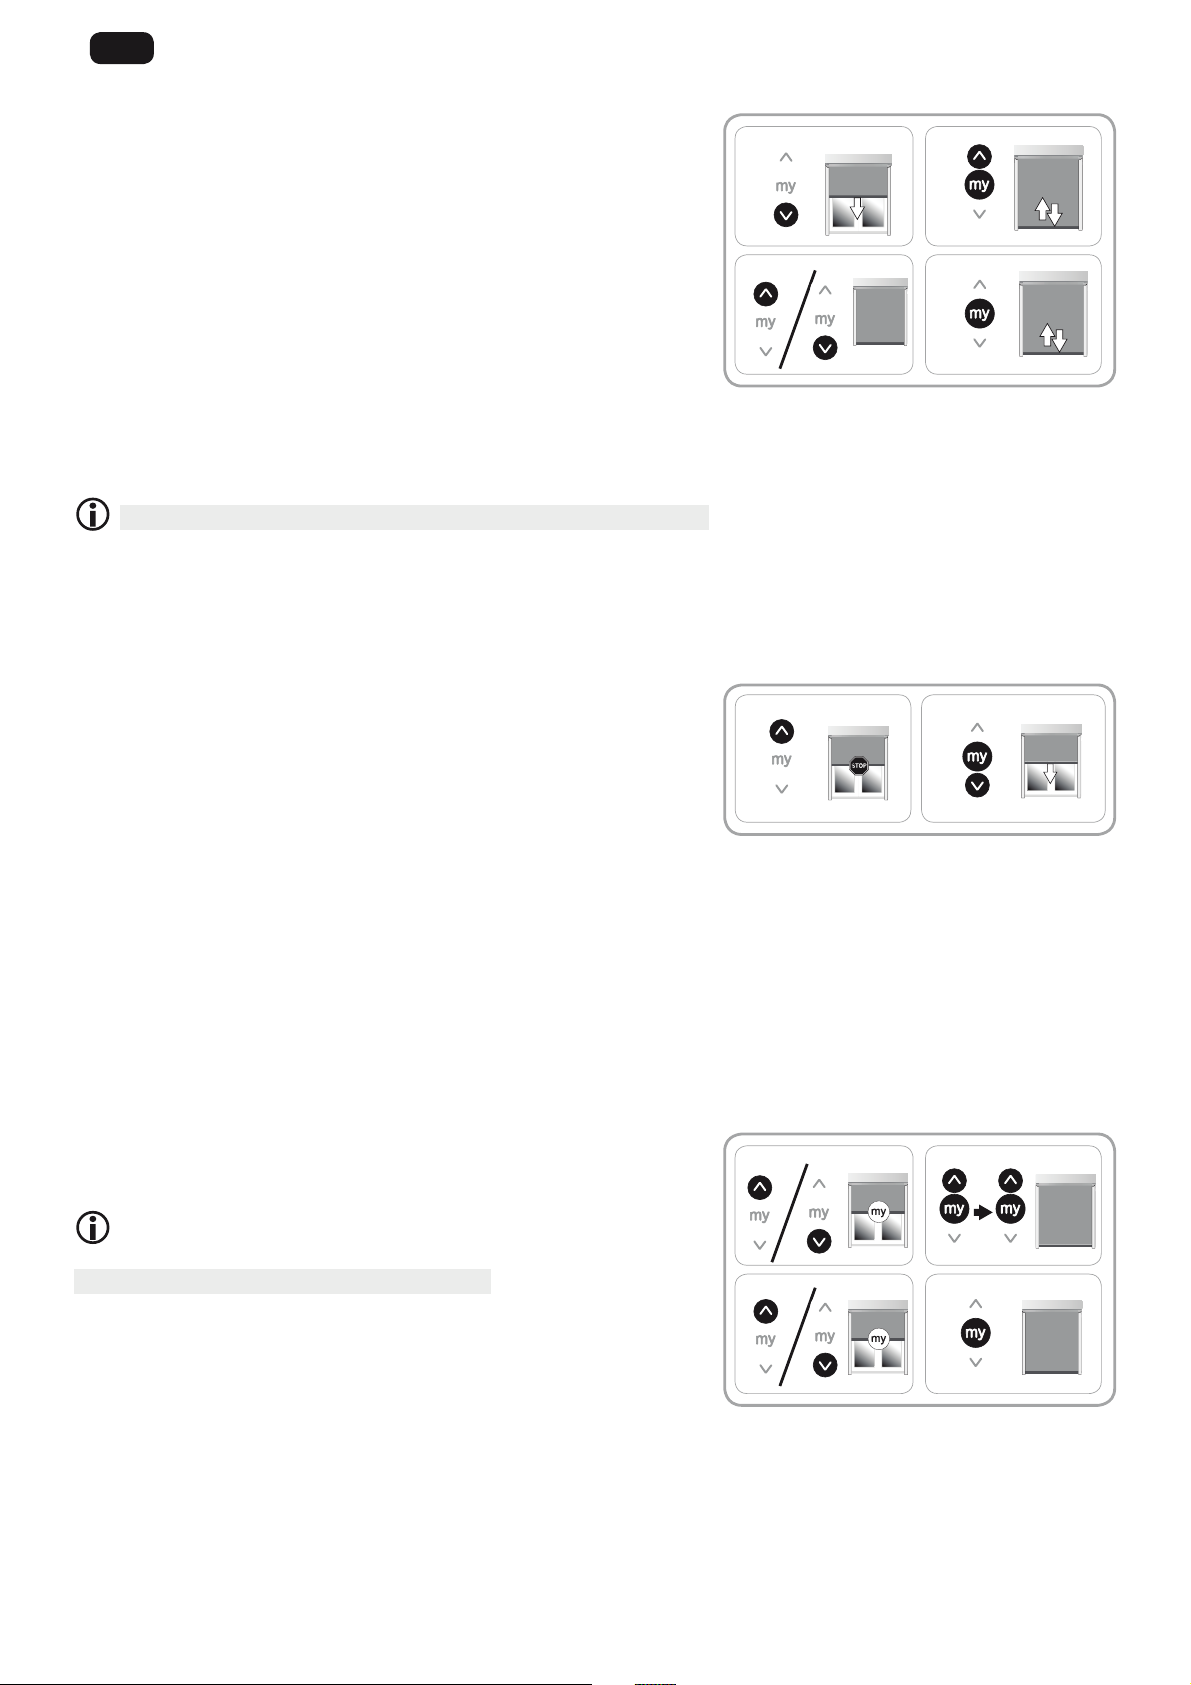
Limit position setting in semi-automatic mode
For awnings with upper stop (load bar stopped under the head rail), the upper end limit is adjusted automatically, while the lower end
limit must be adjusted manually.
Setting the upper automatic and lower manual end limits.
1) Lower the motorised product to the desired position by pressing the V button.
2) Press the my and Λ buttons simultaneously until the motorised product rises;
the lower end limit has been set.
3) Press the "my" button to stop the motorised product.
4) To confirm the end limits, press the my button until the motorised product
moves up and down.
2.3.4. Programming the control point
The drive is in programming mode:
Quickly press the PROG button on the control point to be programmed:
The motorised product moves up and down: this control point is programmed in
the drive.
If the drive is no longer in programming mode, repeat Step 2.3.1
before performing Step 2.3.4.
2.3.5. Re-setting the end limits (for end limits set manually)
Readjusting the upper end limit
1) Press the Λ button to bring the motorised product to the end limit to be
readjusted.
2) Press the Λ and V buttons at the same time until the motorised product moves
up and down.
3) Press the Λ or V button to move the motorised product to the new desired
position.
4) To confirm the new end limit, press the my button until the motorised product
moves up and down.
Readjusting the lower end limit
1) Press the V button to bring the motorised product to the end limit to be
readjusted.
2) Press the Λ and V buttons at the same time until the motorised product moves
up and down.
3) Press the Λ or V button to move the motorised product to the new desired
position.
4) To confirm the new end limit, press the my button until the motorised product
moves up and down.
1 2
3
4
1 2
3
4
1 2
3
4
PROG.
28
EN
Copyright © 2016 Somfy SAS. All rights reserved.Images not contractually binding
2.3.6. "Back impulse"function
This function is used to tension the fabric each time a[er the awning has been
lowered. It can be adjusted up to ½ turn of the roller tube.
To activate this function:
1) Position the motorised product at the lower end limit.
2) Press my and Λ at the same time until the motorised product moves up and down:
the drive is in programming mode.
3) Adjust the tension of the fabric using the Λ and V buttons (max. ½ turn of the
tube.).
4) Press my until the motorised product moves up and down: the fabric tension has
been programmed.
2.3.7. "Back release" function
This function releases the fabric tension a[er closing an awning with upper stop (load bar stopped under the head rail).
The procedure to follow to activate or deactivate "Back release" is identical.
For safety reasons, this function can only be activated or deactivated via the Somfy io-homecontrol® control point in 3 scenarios:
• A[er the 2-second settings validation stop and before programming the first Somfy io-homecontrol® control point.
• A[er programming the first Somfy io-homecontrol® control point and for the next 4 cycles.
• A[er a single power cut, and for the next 4 cycles.
To activate this function:
1) Position the motorised product at the upper end limit.
2) Press my and V at the same time until the motorised product moves up and
down.
If the "Back release" function was inactive, it is activated.
If the "Back release" function was active, it is deactivated.
2.3.8. "Closing force" function
This function can be used to increase or decrease the load bar's force under the head rail, with 3 thresholds (high-medium-low).
The drive is factory set at the low level.
For safety reasons, this function can only be accessed via the Somfy io-homecontrol
®
control point in 3 scenarios:
• A[er the 2-second settings validation stop and before programming the first Somfy io-homecontrol® control point.
• A[er programming the first Somfy io-homecontrol® control point and for the next 4 cycles.
• A[er a single power cut, and for the next 4 cycles.
To activate this function:
1) Put the motorised product in the middle position.
2) Briefly press the my and Λ buttons at the same time, then immediately press
and hold the my and Λ buttons at the same time until the motorised product
moves up and down.
The drive is in programming mode for just 10 seconds.
3) Adjust the closing force using the Λ and V buttons.
To increase the closing force, press the Λ until the motorised product slowly
moves: the cassette awning closing force is increased to the upper threshold.
To reduce the closing force, press the V until the motorised product slowly moves: the cassette awning closing force is decreased to
the lower threshold.
4) Press my until the motorised product moves up and down: the new closing force has been programmed.
1)
2)
1)
3)
2)
4)
0.5 s 5 s
1)
3)
2)
4)

29
EN
Copyright © 2016 Somfy SAS. All rights reserved.
Images not contractually binding
2.4. TIPS AND RECOMMENDATIONS FOR INSTALLATION
2.4.1. Questions about the Sunea Screen?
Observations Possible causes Solutions
The motorised product does
not operate.
The wiring is incorrect. Check the wiring and modify it if necessary.
The overheating protection on the drive has
been activated.
Wait until the motor cools down.
The control point battery is low.
Check whether the battery is low and replace it if
necessary.
The control point is not compatible.
Check for compatibility and replace the control point if
necessary.
The control point used has not been
programmed into the motor.
Use a programmed control point or program this control
point.
The motorised product
stops too soon.
The crown is incorrectly positioned. Fit the crown correctly.
The end limits have been incorrectly set. Readjust the end limits.
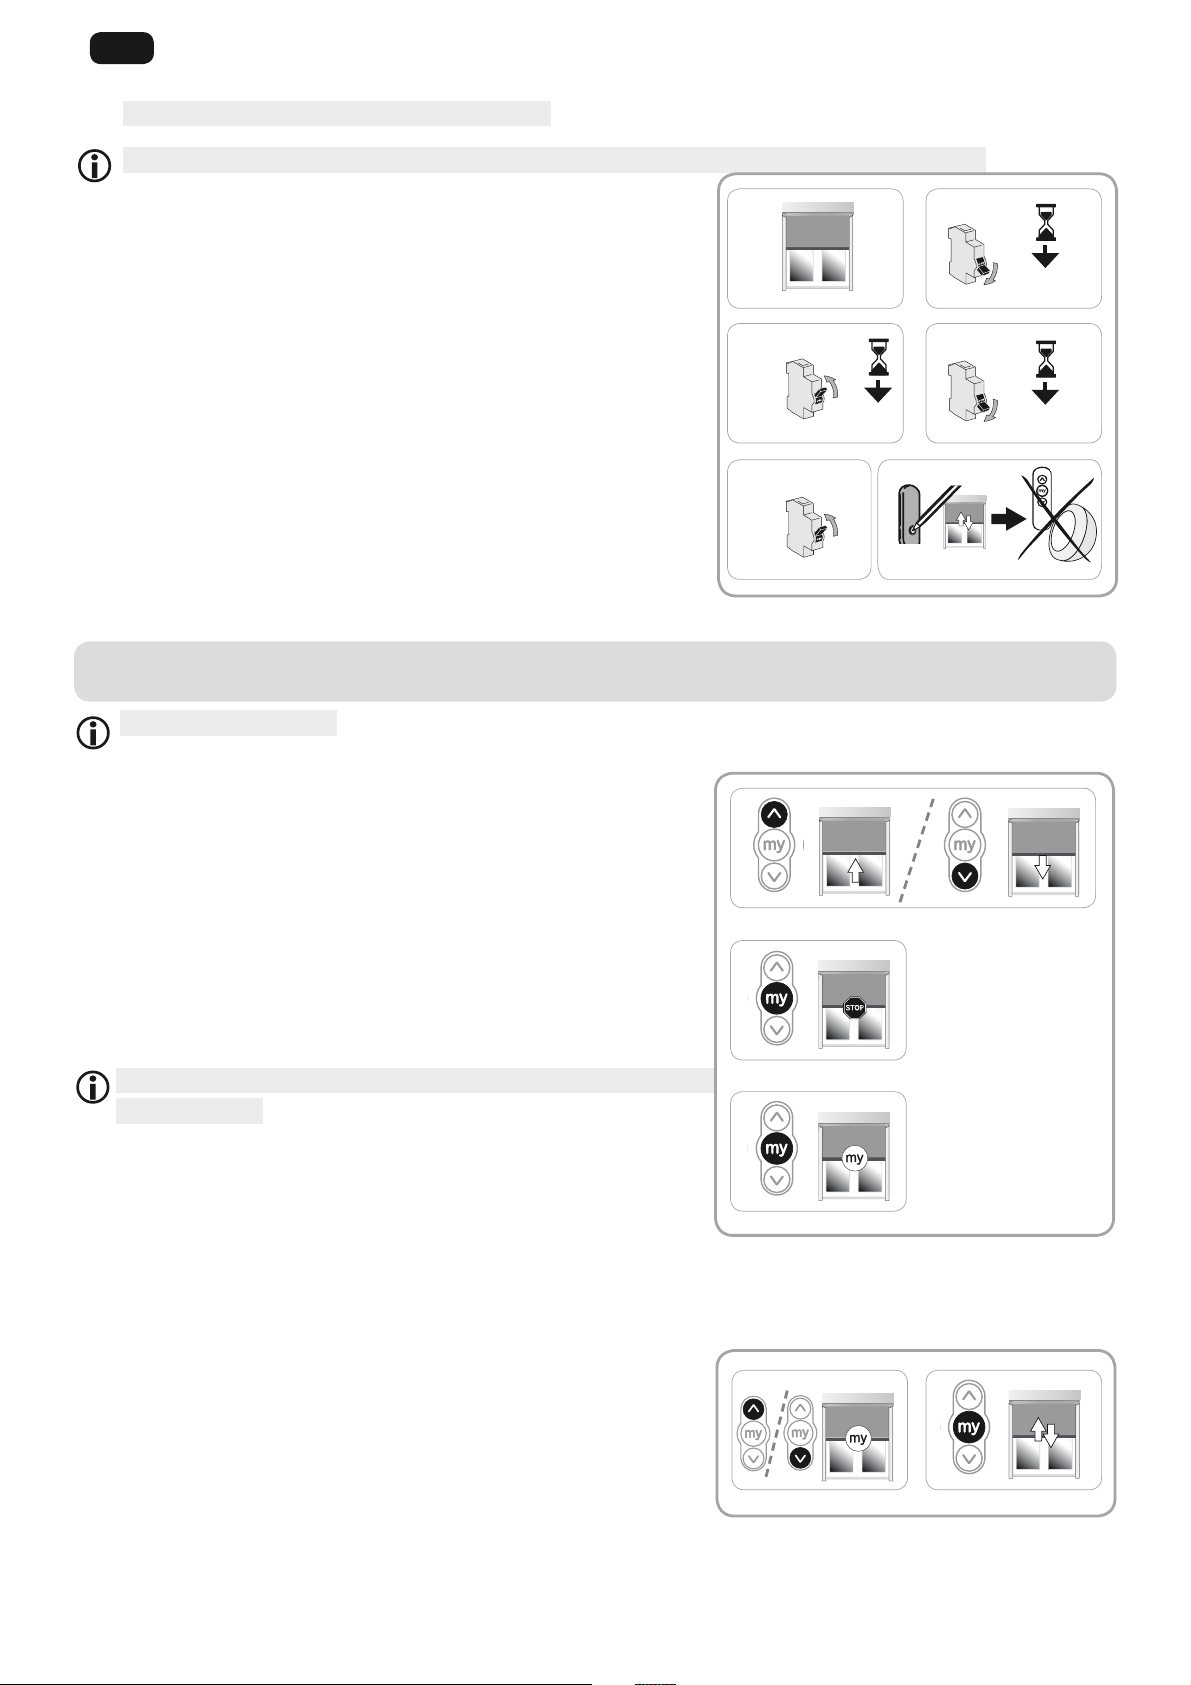
2.4.2. Replacing a lost or broken Somfy control point
Only switch off the power to the application to be reset.
This reset deletes all the local control points, however the sensors, end limit settings and favourite position are retained.
1) Position the motorised product at the mid-height position.
2) Cut the power supply for 2seconds.
3) Switch the power supply back on for 5 to 15 seconds.
4) Cut the power supply for 2seconds.
5) Switch the power supply back on: the motorised product moves for a few
seconds. (If the application is in the upper or lower limit position, it will make a
brief up and down movement).
6) Press the PROG button on the new control point until the motorised product
moves up and down: the new control point is programmed and all the other control
points are deleted.
1
4
2 sec.
OFF
5
ON
2
2 sec.
OFF
3
10 sec.
ON
PROG.
6
1
30
EN
Copyright © 2016 Somfy SAS. All rights reserved.Images not contractually binding
3. USE AND MAINTENANCE
This drive is maintenance-free
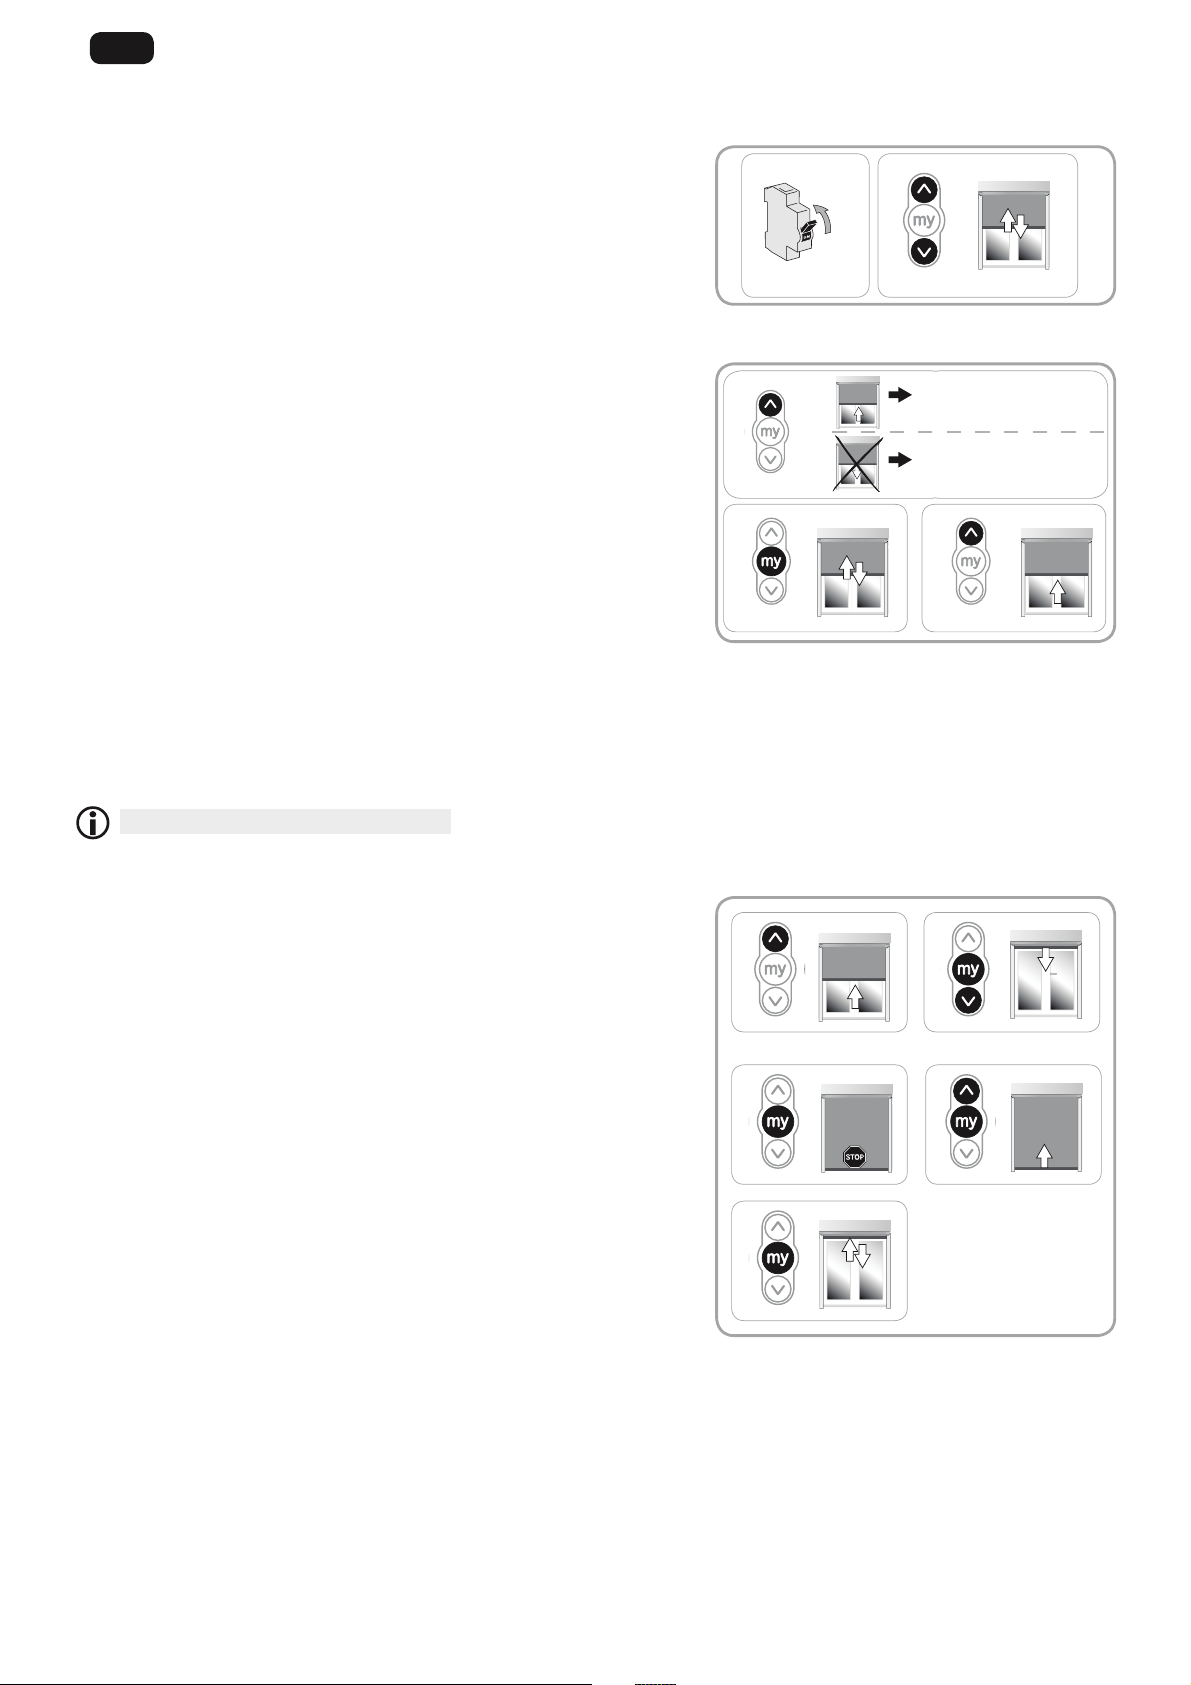
3.1. UP AND DOWN BUTTONS
Pressing the Λ or V button fully raises or lowers the motorised product.
3.2. STOP FUNCTION
The motorised product is moving.
Briefly press my: the motorised product stops automatically.
3.3. FAVOURITE POSITION (my)
To use thefavourite position (my): Briefly press my: the motorised product starts to
move, and stops in the favourite position (my).
To program, modify or delete the favourite (my) position, see the section on
Additional settings.
3.4. OPERATING WITH A SOMFY SENSOR
Refer to the corresponding instructions.
3.5. ADDITIONAL SETTINGS
3.5.1. Programming or modifying the favourite position (my)
1) Place the motorised product in the desired favourite position (my).
2) Press my for ≈5 seconds until the motorised productmoves up and down: the
desired favourite position (my) has been programmed.
1
2
3
1
2
2.4.3. Restoring the original configuration
Only switch off the power to the application to be reset.
This reset deletes all control points, sensors and end limit settings and resets the drive’s favourite position (my).
1) Position the motorised product at the mid-height position.
2) Cut the power supply for 2seconds.
3) Switch the power supply back on for 5 to 15 seconds.
4) Cut the power supply for 2seconds.
5) Switch the power supply back on: the motorised product moves for a few
seconds. (If the application is at the upper or lower end limit, it will make a brief
up and down movement).
6) Press the PROG button on the Somfy local control point for ≈7 seconds, until
the motorised productmoves up and down twice:
The drive is reset to the original configuration.
Repeat the commissioning procedure (see the Commissioning section).
X2
my
4
2 sec.
OFF
5
ON
2
2 sec.
OFF
3
10 sec.
ON
PROG.
6
1
1
 Loading...