

SOMFY AXORN 65, AXORN 85 User Instructions

Garage Door Drive
User Instructions
AXORN 65 1 215 007
AXORN 85 1 215 008

Contents
SOMFY-Garage Door-Drive AXORN 65/85
2
Review of Parts 3
Preparation Prior to Installation 4
Important for your safety 4
Check contents of package 5
Which drive for which door 5
External emergency release 6
Mechanical end-stop 6
Door locking 6
Installation conditions, example 7
Installation Instructions 8
Important advice for safe installation 8
Pre-assembly of drive unit 8
Installation 10
Adjustment Instructions 13
Commissioning 13
Adjusting upper and lower end stops 14
Carrying out a test run 14
Registering hand transmitter 15
Test recognition of obstacle 15
Connections 16
Accessories 16
Internal, Code and key button 16
Light beam, access door, safety contact strip 17
Operating Instructions 18
Opening, closing or stopping garage door 18
Internal emergency release 18
Additional Information 19
Correcting Faults 20
Self remedy 20
Guarantee 21
After sales service 21
Miscellaneous 22
Technical Information 22
Accessories 22
In order that you may optimally use the advantages of the garage door drive we
request that you read through these user instructions carefully.
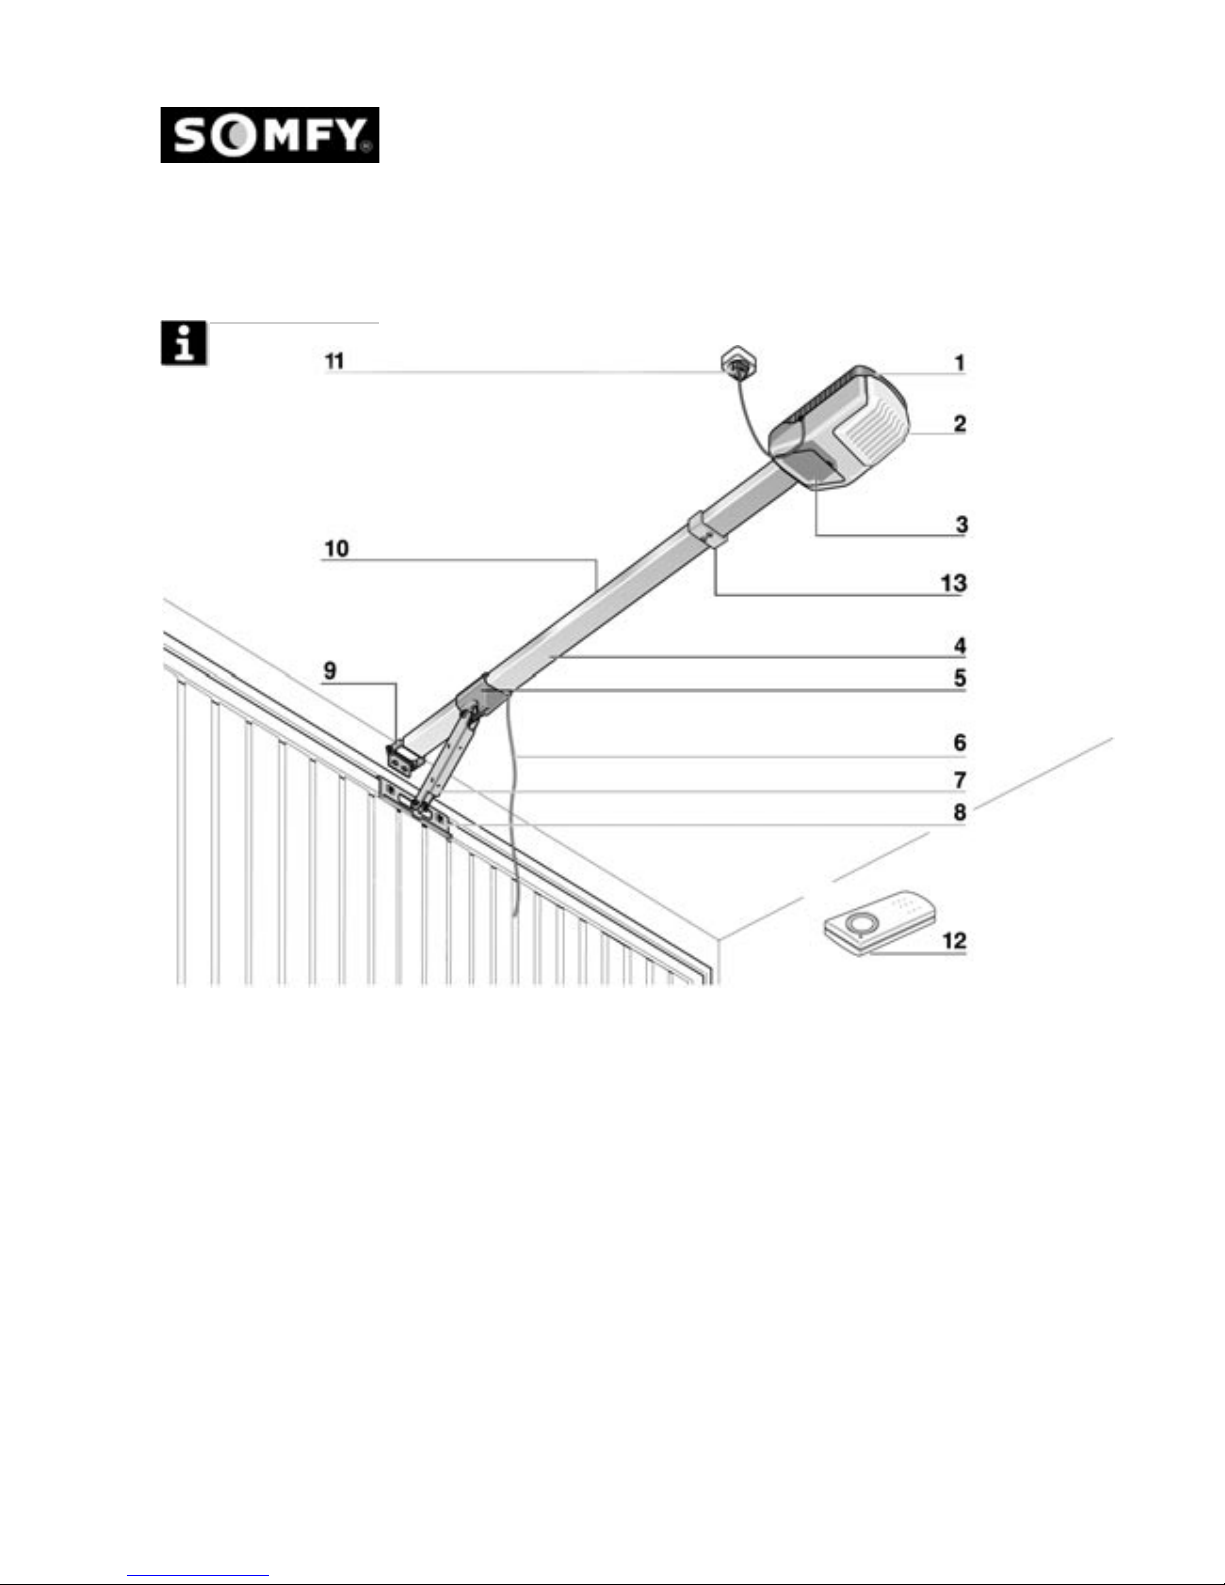
1. Drive housing
2. Drive lighting
3. Electronics connection
4. Running rail
5. Carriage
6. Internal emergency release
7. Guide arm
8. Securing angle for door plate
9. Securing angle / support ceiling
10. Chain with return pulley (covered)
11. Power supply
12. Hand transmitter
13. Mechanical end -stop.
3
Review of Parts
Your new SOMFY Garage Door Drive AXORN 65/85

Use the garage door exclusively for:
- automatic opening and closure of door
- in private areas
- in accordance with the specification and safety instructions given in this
operating instruction
Important Safety Advice
Take care - For the safety of persons it is essential to follow all
the following instructions:
■ Retain these instructions and pass them on to the next owner. Read the introduction
completely before assembly and make particular note of the safety instructions.
■ Carry out the work in the recommended sequence and familiarise yourself with the
operation
■ After commissioning instruct all users on the function and operation of the door drive.
■ Open and close the door only when you can see the area covering the entire range of
movement of the door and when there are no persons or objects inside this area.
■ Only use authorised or recommended fixing elements, original spare parts and
accessories.
■ Replace damaged cables immediately (only by a qualified electrician).
■ Keep the radio transmitter in a safe place so that it cannot be inadvertently used, e.g.
by children etc)
■ Only install a door drive on a correctly installed and balanced door. Incorrectly
installed door can cause injury.
■ Before working on the door always disconnect the power supply
■ Never get hold of a moving door
Advice for persons wearing a pace maker
The power of the transmitter is within the permitted standards and is almost negligible.
To eliminate even the slightest risk we recommend that you do not operate the
transmitter close to your body. For your own safety point the handset to the garage
door with an outstretched arm before operating.
Safety Devices
Safety devices protect against injury and physical damage.
Never ignore or deliberately by-pass safety devices.
Automatic sensing of obstacles
If the door hits an obstacle on opening it will stop moving. As the door closes the
obstacle is cleared the door runs back up to the upper mechanical stop (reference point)
and then up to the programmed upper end stop
■ Check the function at least once per month (see chapter on "Commissioning". We
also recommend the installation of various safety devices (see "Accessories).
Preparations Prior to Installation
SOMFY Garage Door Drive AXORN 65/85
4
Important for
your safety
5
Preparation prior to Installation
SOMFY Garage Door Drive AXORN 65/85
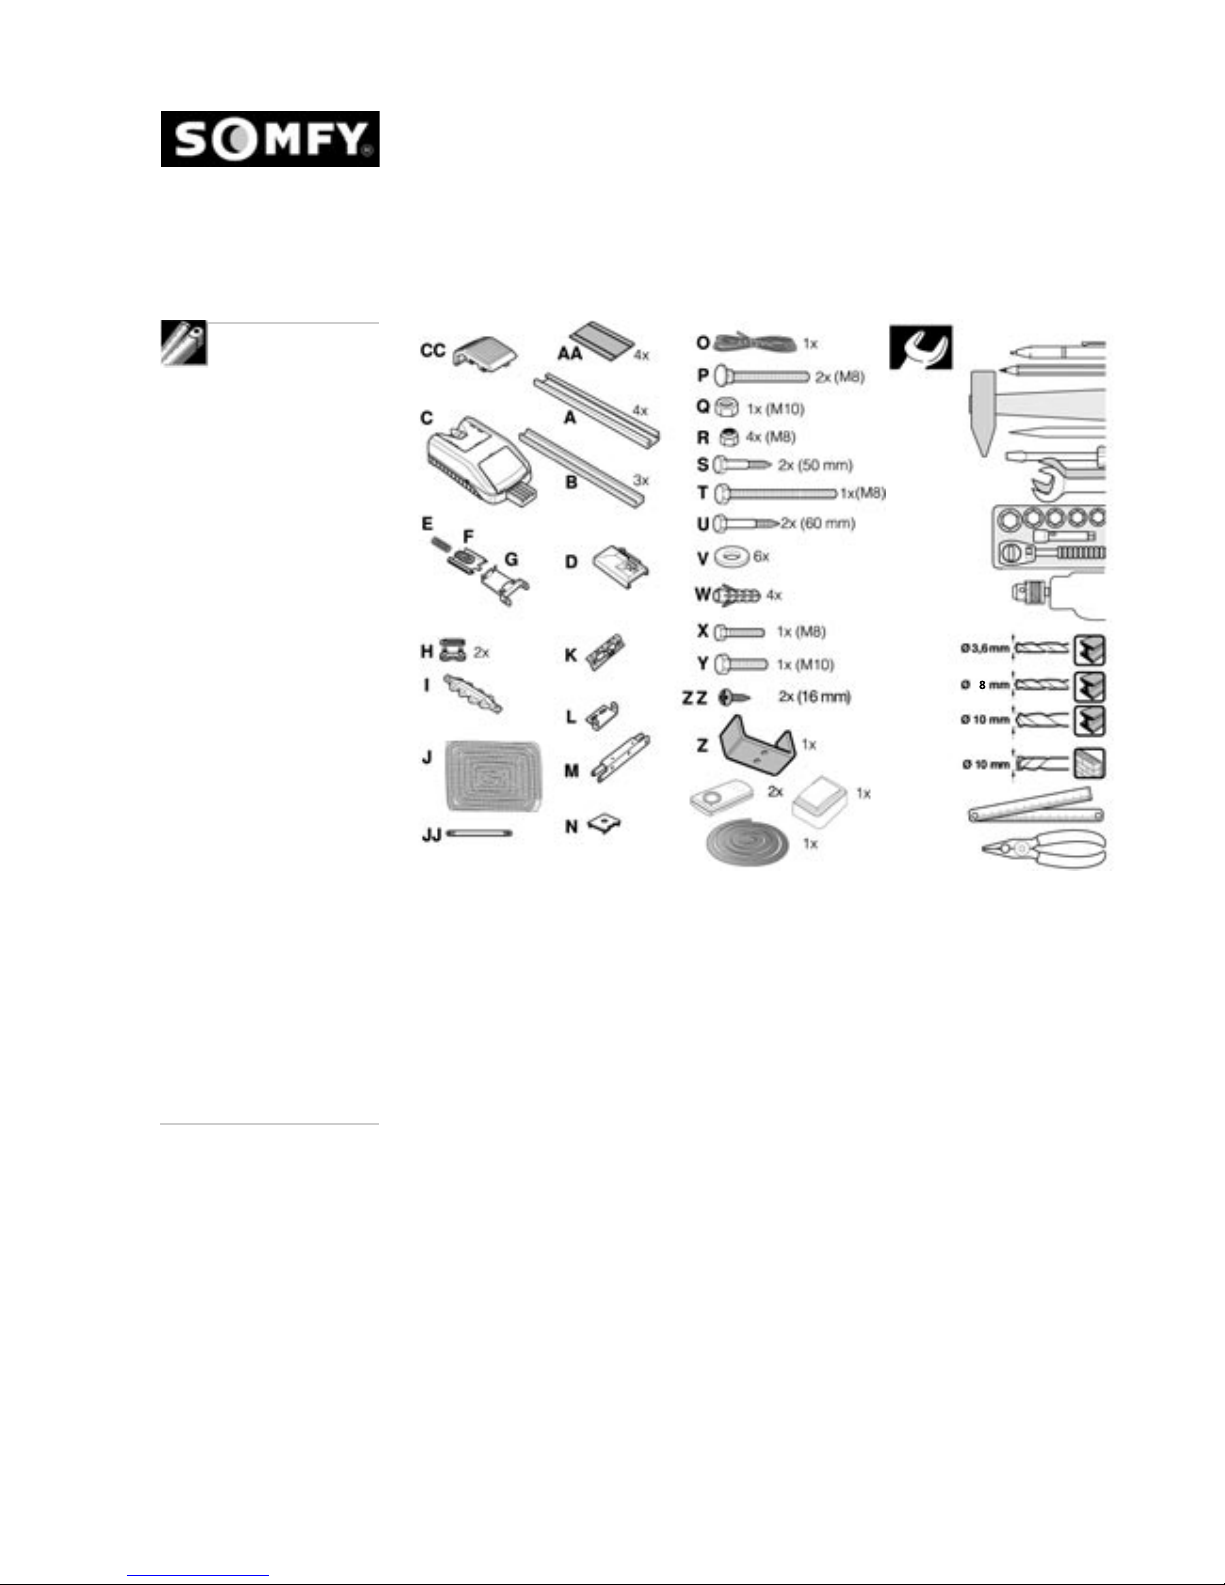
To avoid interruption during assembly check contents of
package and have necessary tools ready
Note: Foam parts AA are used to muffle the sound of the chain.
Power Supply
Is there a 230 volt supply on hand?
■ Length of power cable 1 m.
If not, supply must be installed by a qualified electrician
AXORN 65/85:
Swing Door
Ceiling sectional door (sectional door fitting available)
Wing Door (Wing Door accessory kit available)
■ Also running direction of the drive must be changed. Information about this can be
obtained from your specialist dealer for SOMFY Garage Door Drives or the nearest
authorised service agent. (also see User instructions for the winged door).
Check contents of
package
Which drive for
which Garage
Door?

Preparations prior to
Installation
SOMFY Garage Door Drive AXORN 65/85
6
AXORN 85:
Canopy Door (lifting arm required see accessories)
Side Sectioned Door.
Maximum Door Size
AXORN 65 AXORN 85
Light doors e.g. steel up to 7.5 m_ up to 12.0 m_
Heavy doors e.g. wood up to 6.0 m_ up to 7.5 m_
Heights
■ Up to 2.3 m for ceiling -sectionalised doors
■ Up to 2.5 m for remaining garage doors
■ Over 2.5 to 3.2 m with rail extension set, see "Accessories"
Support and Ceiling Stability
Minimum loading of support and ceiling:
700N for AXORN 65 or 900N for AXORN 85
Beware of ceiling thickness when drilling (concrete ceiling for pre-fabricated garages)!
Required minimum ceiling thickness for dowels and screws: 50 mm. Standard dowels
are delivered with the package. Where required use special dowels which are suitable
for foundations.
Door Mechanics
Can the door be easily opened and closed by
hand? If not then have the door adjusted by
skilled mechanics.
If there is no second means of entry into the garage an external
release mechanism must be fitted (see Accessories). In this way the door
can be opened manually in the event of a power failure or fault.
A secure mechanical end stop is necessary to serve as a reference point for
adjusting the upper stop (e.g. re-setting after an obstacle has been sensed).
The garage door drive is self-locking and holds the door closed. Existing
locking systems can be automated (see "Accessories"), or removed.
External Emergency
Release
Mechanical End
Stop
Door Locking
7
Preparation prior to
Installation
SOMFY Garage Door Drive AXORN 65/85
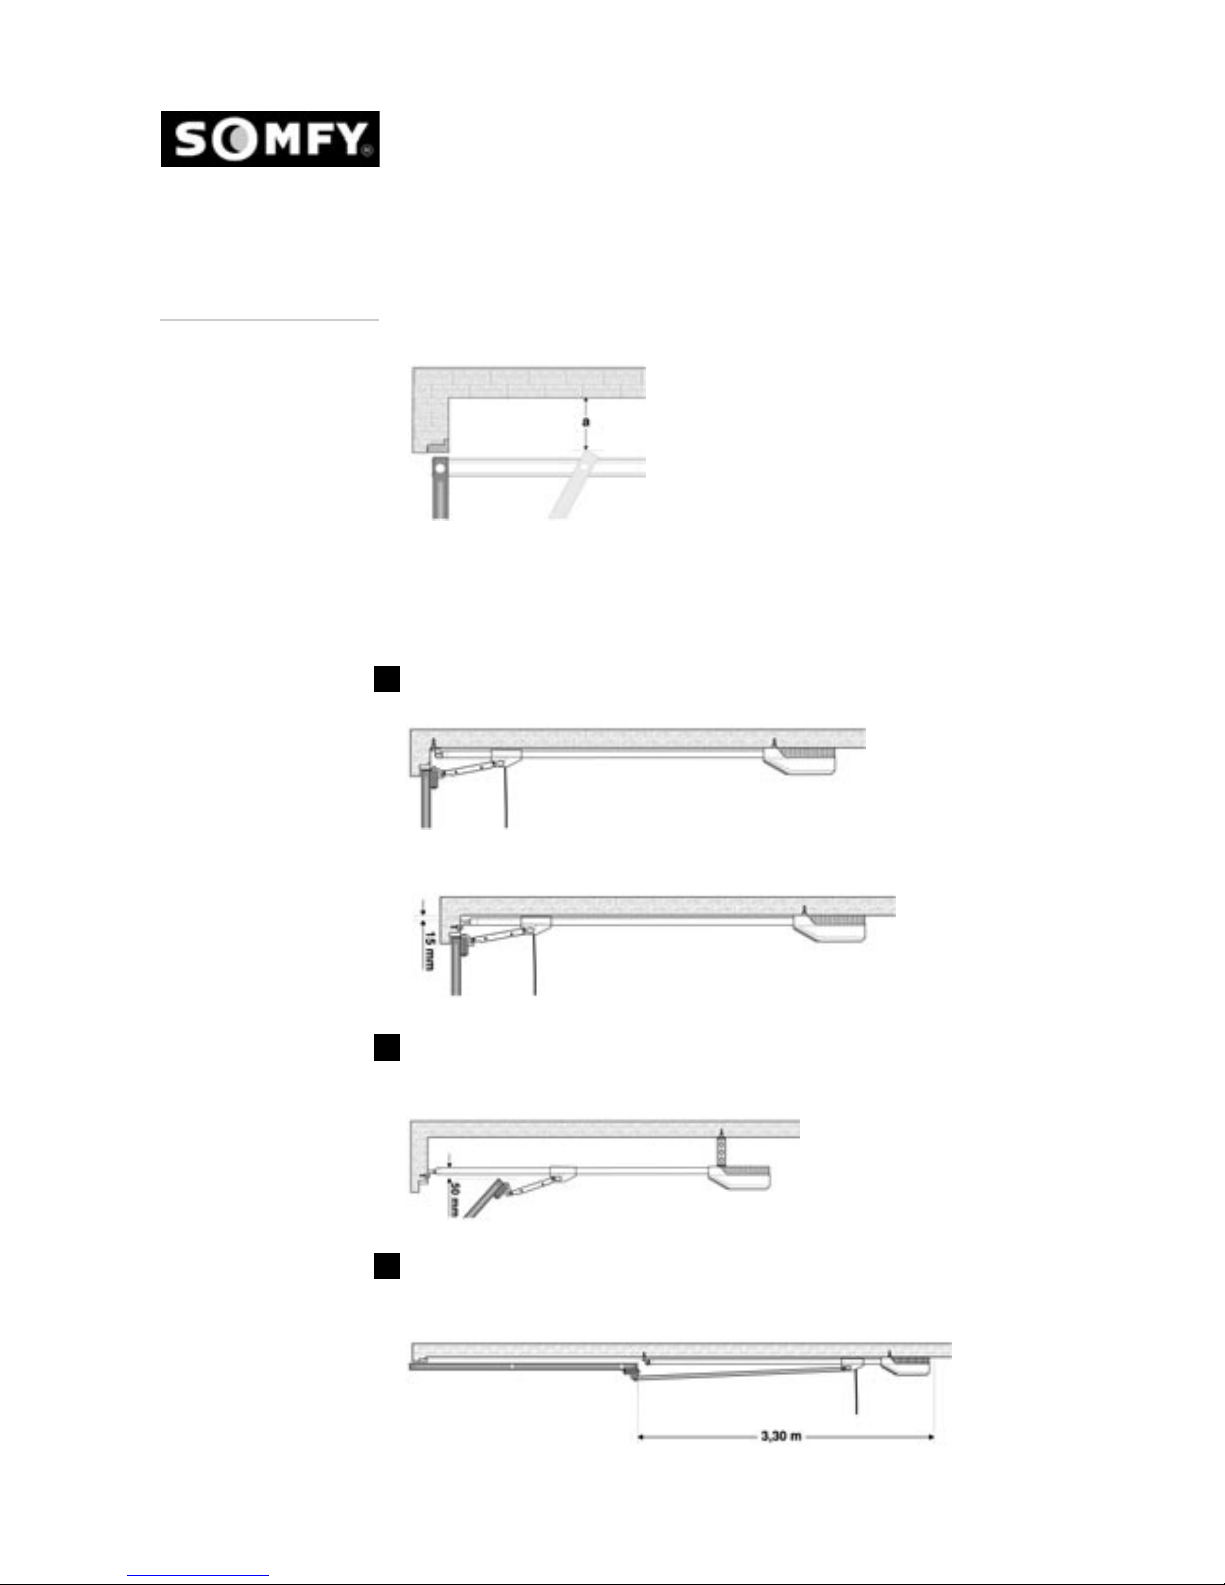
Where to fit the retaining angle for support /ceiling and the drive head?
(Example of retractable door)
Establish the highest point of door travel "a" (minimum gap from door face to garage
ceiling. Depending on the size there are various possibilities for installation. For
optimum power transmission the drive should be positioned as close as possible above
the highest travel point of the door.
1. Size "a" of 38 mm to 140 mm. Garage door drive to be secured to ceiling. Assembly
angled support, ceiling to be fixed to support or ceiling (preferably to support)
2. Size "a" greater than 140 mm Assembly angle support / ceiling to be mounted to the
support with a 50 mm gap. Garage door drive to be hung from the ceiling (perforated rail
required) see "Accessories".
3. Size "a" less than 38 mm. Install assembly angle support /
ceiling and garage door drive behind the open garage door to the ceiling .See
"Accessories"). Bear in mind the overall length.
Installation
Conditions
Example
1
2
3
For lintel assembly maintain a gap of 15 mm
Note: Incorrect assembly can lead to serious injury Please
follow all assembly instructions!
Assembly will be easier with the help of an assistant
Beware!
■ When drilling overhead wear protective glasses.
To keep out dust cover drive unit before drilling
Installation Instructions
SOMFY Garage Door Drive AXORN 65/85
8
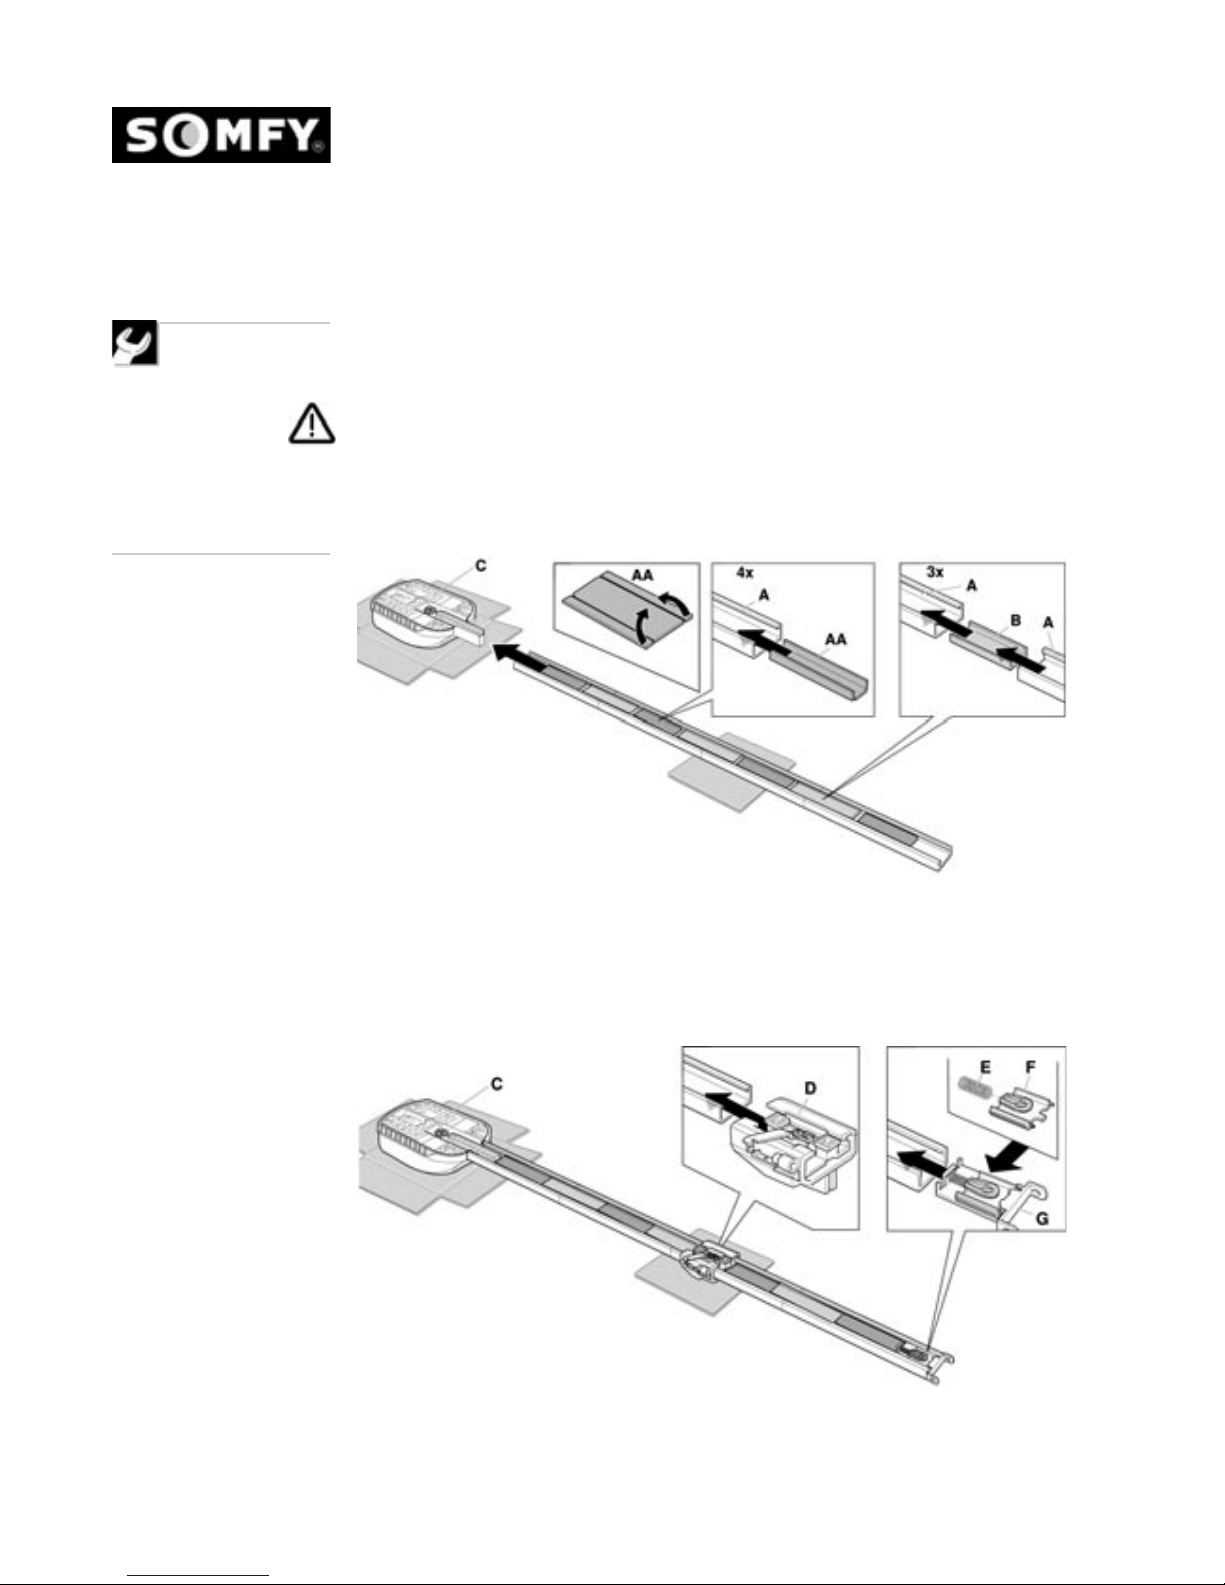
■ Insert rail connectors "B" up to the end stop in the guide rail "A" and assemble
guide rail parts
■ Bend the white foam insert "AA" at fold to dampen noise.
■ Position damper in the middle of the 4 guide rails "A"
■ Insert pre assembled guide rail in the drive head "C"
■ Push carriage "D" on the running rail with the sloped part towards the motor head
■ Assemble leading chain deflectors "E", "F" and "G" and insert on running rail.
Important advice
for safe
installation
Pre assembly of
drive unit
 Loading...