

Page 1

1
Instruction Manual
English
Insert Fires – Panoramic Line
Trevi 850 | Trevi 1100
Mod.168 – E
Page 2

2
Thank you for purchasing a SOLZAIMA unit.
Please read this manual carefully and keep it for future reference.
* All our products fulfil the requirements of the European Regulation (Reg UE
305/2011) and have been certified with the CE conformity trademark;
* SOLZAIMA disclaims responsibility for damages to the unit if it is installed by
non-qualified personnel;
* SOLZAIMA disclaims responsibility for damages to the unit if the rules for
installation and use described in this manual are not followed;
* All local regulations, including those referring to national and European
standards, should be complied with when installing the unit;
* Our Panoramic Line Insert Fires have been tested according to standards
EN 13229:2001 + EN 13229:2001/AC:2003 + EN 13229:2001/A1:2003 + EN
13229:2001/A2:2004 + EN 13229:2001/AC:2006 + EN
13229:2001/A2:2004/AC:2006;
* Technical support is normally provided by SOLZAIMA, except in exceptional
cases to be determined by the installer or support technician;
* Whenever you need assistance, you should contact your unit’s supplier or
installer. You should provide its serial number, which is on the identification plate
located on the ash pan holder.
Page 3

3
Contents:
Solzaima .................................................................................. 4
Technical Specifications ........................................................... 5
Your Stove................................................................................ 7
Components ............................................................................. 9
Installation .............................................................................. 10
Instructions for Use ................................................................. 16
Troubleshooting ...................................................................... 25
End of Life .............................................................................. 26
Sustainability .......................................................................... 26
Glossary ................................................................................. 27
Warranty ................................................................................. 29
Page 4

4
Solzaima
Solzaima's vision has always been to provide a clean, renewable and more costeffective energy. This is why we've been dedicating ourselves for more than 35
years to the manufacturing of biomass heating equipment and solutions.
As a result of the persistence and unconditional support from our partner
network, Solzaima is today a leading player in the production of biomass heating
solutions, best illustrated by our backboiler fires for central heating.
We provide annually approximately 20000 homes with biomass heating
solutions. This market has been growing at an annual rate of 20% - a sign that
consumers are becoming increasingly aware of ecological and more costeffective heating solutions.
Solzaima is the only manufacturer in Portugal with ISO 9001 quality certification
and ISO14001 environmental certification – we believe we are a role model in
this respect.
Page 5

5
Technical Specifications
Panoramic Line Insert Fires are designed to heat their surroundings. They are
the perfect solution for those who want a designer fireplace for their living room
while getting a high efficiency rate and considerable firewood savings – such is
the case of the new designer devices with a guillotine door - TREVI 850 and
TREVI 1100.
* Technical specifications across this range:
* CE certified
* Frequency: 50 Hz
* Power: 66 W With optional ventilation
* Voltage: 230 V
* Maximum fuel load: 11pounds (6,7 Kg)
* Average reloading time: 45 minutes
* Type of equipment: intermittent use
* Fuel: Dry firewood
Page 6

6
Table 1 – Technical Specifications for each Stove
1
Power output is calculated by taking into account a variation of 30% in relation to the rated output.
2
Consumption of firewood, taking into account the range of power outputs.
Trevi
850
Trevi
1100
Dimensions
Width
Height
Width
Height
Front (inches/mm)
34.4/875
17.3/440
44.2/1125
17.3/440
Casing (inches/mm)
40.1/1020
41.5/1055
50/1270
41.5/1055
Total Depth (inches/mm)
21.2/540
21.2/540
Flue Ø (inches/mm)
Ø 7.8/200 int.
Ø 9.8/250 int.
Rated output (kW)
21,7
21,7
Efficiency (%)
77
77
CO Emissions (13%O2) (%)
0,88
0,88
CO2 Emissions (%)
12,3
12,3
Average combustion temperature (ºF/ºC)
351
351
Combustion flow (g/s)
14
14
Power output1 (kW)
15,2 – 28,2
15,2 – 28,2
Firewood consumption2 (pounds/kg / h)
10.3/4,7 – 19.1/8,7
10.3/4,7 – 19.1/8,7
Weight (pounds/kg)
540.1/245
637.1/289
Maximum heated volume (m3)
640
640
Energy efficiency rating
1
1
Length firewood ( inches/mm)
1543/700
1543/700
Trevi
850
Trevi
1100
Dimensions
Width
Height
Width
Height
Front (inches/mm)
34.2/870
16.7/425
43.3/1100
16.7/425
Page 7

7
Your Stove
*Trevi 850
*Trevi 1100
Fig. 1 – Trevi 850 and Trevi 1100 with and without frame
Casing (inches/mm)
39.3/1000
41.3/1050
49.2/1250
41.3/1050
Total Depth (inches/mm)
19.6/500
19.6/500
Flue Ø (inches/mm)
Ø 7.8/200 int.
Ø 9.8/250 int.
Weight (pounds/kg)
661.3/300
272.5/330
TREVI 850
TREVI 850 with frame (optional)
TREVI 1100
TREVI 1100 with frame (optional)
Page 8

8
Fig. 2 – Main components of the Trevi panoramic line unit.
Smoke outlet
Hot air outlets
Air intakes
Ash pan
Counterweight blocking
screws
Combustion air intake
regulation damper
Adjustable legs
Door lock (for
cleaning)
Vermiculite
panels
Latch for opening the
door
Combustion air intake openings
Page 9

9
Components
* This unit’s casing is made of top-quality carbon steel plate, with a thickness of
0.1 inches (5mm). Other parts of the unit use plates with thicknesses of 0.07,
0.09 and 0.11 inches (2mm, 2.5mm and 3mm). The other shell is made of 0.03
inches (1mm) thick galvanised plate and the ash grate of 0.47 inches (12mm)
thick plate;
* The combustion chamber is coated with a heat-resistant material. The
insulation on the back wall, combustion bed and baffle plate is made of
vermiculite, a hydrosilicate that can withstand temperatures in the order of
2012°F (1100°C). Its insulating properties allow the unit to take better advantage
of the heat, increasing the temperature inside the chamber and enabling cleaner
combustion (lower CO content), as well as providing greater protection for the
steel plate forming the combustion chamber walls and thus prolonging the life of
the equipment;
* The specially-shaped door is made of carbon steel, making it extremely hardwearing;
* Heat-resistant ceramic glass. Can withstand temperatures of up to 1382°F
(750°C) in continuous use;
* Heat-resistant paint for temperature peaks up to 1652°F (900°C) and operating
temperatures in the order of 1112°F (600°C);
Page 10

10
Installation
Attention: all regulations and standards must be complied with when installing
this unit.
Check that the product is complete and in good condition immediately upon
receipt. Any defects should be notes before the unit is installed.
* Before starting the installation, do the following:
a) Before assembly, remove the counterweight blocking screws that ensure the stove can
be transported safely (Fig. 3);
b) Open the hot air outlets, located on the top of the unit (Fig. 4);
Fig. 3 Fig. 4
c) Check that all parts are functioning correctly before installation;
d) Raise and lower the door, using the key provided (Figs. 5 and 6);
Fig. 5 Fig. 6
e) Open the door to the front in cleaning mode, using the key provided (Figs. 7 and 8);
Fig. 7 Fig. 8
f) Move the air regulation damper (Fig. 9);
Fig. 9
Page 11

11
Check the ventilator is working, if applicable, as well as the installation of the adjustable
legs. Remove the label from the glass and retain the instruction manual for future
reference.
1. Combustion air and gas circulation
* This type of unit should be installed in a well-ventilated area. Any air intake
grilles should be placed in locations that are not liable to become blocked;
* The combustion air enters the stove through a set of easily visible openings,
located on the front of the fire. This flow should be kept clear at all times;
* Additional air inlets may be needed if the stove is used in simultaneous with
other devices that require an air supply. The installer should evaluate the
situation according to the overall air flow requirements;
* Under normal operating conditions, the combustion gas flow should create a
draught of 12 Pa one metre above the throat of the flue. For proper installation,
at least 78.7 inches (2 metres) of metal flue tube with the same diameter as the
unit's smoke outlet should be fitted vertically above the unit. After this section,
sections of tubing with a maximum angle of 45° may be used; Figures 10 and 11
illustrate correct and incorrect angles for installing a bend;
Page 12

12
45º45º
Fig. 10 – Correct angle for bends Fig.11 – Incorrect angle for bends
* A single-walled tube installed on the outside of a building results in the
condensation of water vapour in the combustion gases. We therefore
recommend the use of a double – walled insulated pipe;
* The flue outlet should allow for good air circulation and be placed at least 23.6
inches (60cm) above the top of any obstacle located within a distance of 9.8 feet
(3m);
* Brick chimneys should not be too wide, as the smoke will cool as it disperses,
reducing the draft. In case of draft problems, a revolving chimney cowl can be
installed;
* The same flue should not be used for more than one unit or open fireplace;
* With shared chimneys, each flue should reach its outlet independently and
these should be at the same level to ensure that the air circulation expels the
gases;
45º45º45º
Page 13

13
2. Installation location requirements
* The stove should stand on a masonry hearth made of refractory bricks or
another type of non-combustible material;
* It is recommended for these units to be insulated with insulating material with a
thickness of 1.57 inches (40mm) and a density of 154 pounds (70kg)/m3;
* It is recommended for all stoves should be installed at least 15.7 inches
(400mm) from combustible materials;
* Combustible materials should not be installed close to the walls of the stoves,
in the installation area or in the air convection area;
* Materials/objects placed in front of the stoves should be able to withstand the
heat radiated from the glass of the door, so should not be combustible;
* The floor on which the unit will stand must be able to support a permanent load
of 2.2 pounds (1kg)/cm². If the load capacity of the floor is insufficient, a solid
plate can be used to distribute the load over an area larger than the stove’s
base;
* Refractory cement or other refractory material should be applied on the
chimney walls;
* The building’s air intake grilles should not be obstructed;
Page 14

14
* Ensure that the opening in the wall is of an appropriate size to house the stove;
* There should be a gap of around 0.19 inches (5mm) between the stove and
ornamental stones (or any other type of finishing), to allow room for the metal to
expand. The housing, whether it is stone, plasterboard or any other material,
should also allow the stove to be removed without causing damage, if the need
arises;
* The use of wood finishing may increase the risk of fire. Therefore, we
recommend the use of adequate insulation or that wood not be used at all.
Page 15
15
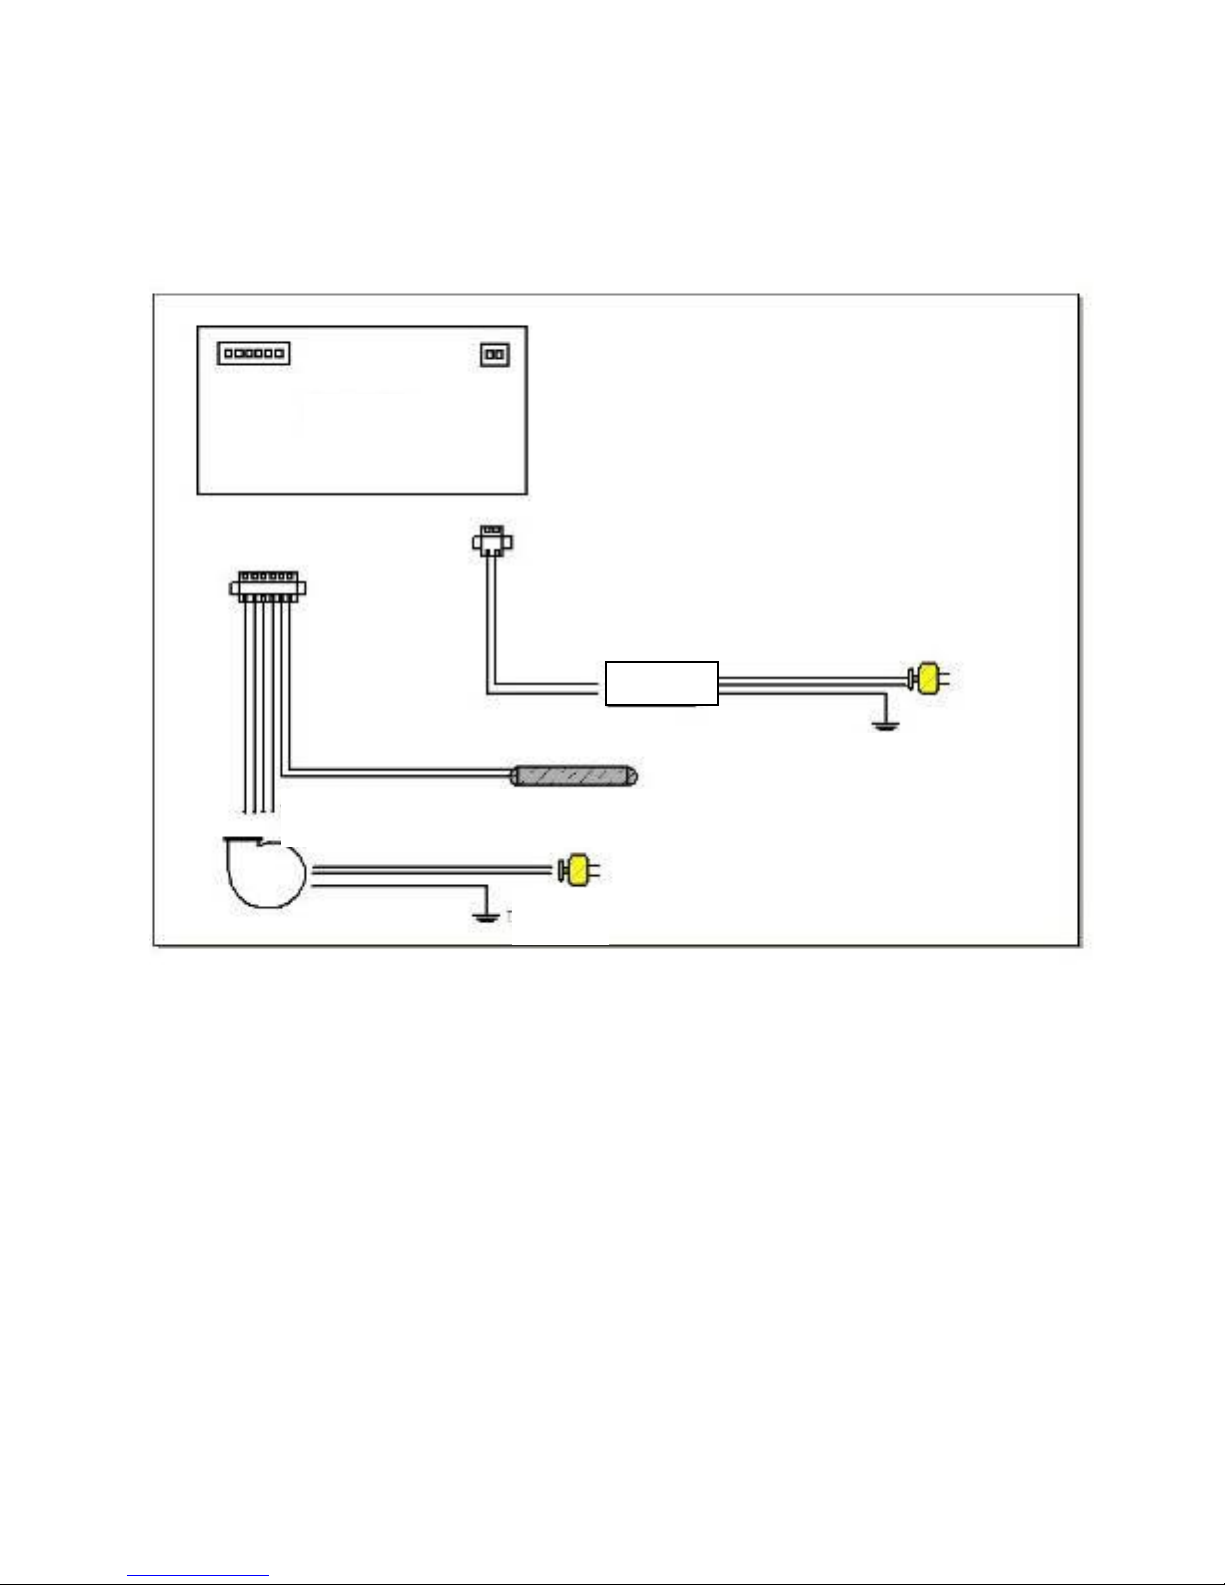
3. Forced Ventilation (optional)
* Units equipped with forced ventilation include one 66W ventilator and a circuit
board that enables you to control its functioning.
Fig.12 – Circuit diagram
Attention: all three wires in the power feed cable – earth, neutral and live – should be
connected. We take no responsibility for any damage resulting from non-compliance with
this warning.
* The electrical components should always be connected to the power supply;
* The cable used for the electrical connection should be silicon-coated and heatresistant to 356°F (180°C). If the power feed cable is damaged, it should only be
replaced by a qualified technician;
14
Controller
Converter
Earth
Temperature probe
Ventilator
Earth
Page 16

16
* You should take care to not lay the cable where it may be crushed;
* The electrical installation should incorporate means to switch the stove off, with
a minimum separation of 0.118 inches (3mm) between the contacts, pursuant to
the applicable legislation in force.3
Instructions for Use
Attention: all regulations and standards must be complied with when installing
this unit.
4. Fuel
* Only firewood should be used in this type of unit. It may not be used as an
incinerator, nor should other materials such as coal, painted wood, varnishes,
thinners, liquid fuels, glues or plastics be used. Also avoid burning common
combustible materials such as cardboard and straw.
* The firewood should have a low water content (less than 20%) in order to
ensure efficient combustion and avoid creosote build-up in the smoke duct and
on the glass;
* See Table 2 (on the next page), which lists some of the types of wood that can
be used in these units;
3
We recommend the use of a 30 mA differential switch and a 0.5 A circuit breaker for the unit’s electrical
installation.
Page 17

17
Table 2 – List of types of firewood that may be used in SOLZAIMA fires, their geographical
distribution and calorific value/reactions.
(+): most availability from firewood sellers
Common
Name
Scientific
name
Distribution
(total: 18 districts)
Characteristics
Smoke
Heat
Lighting
Combustion
Speed
Hardness
Pine
Pinus
Europe, except
Finland; Northern
Sweden and
Norway.
Little
High
Easy
Fast
Soft
Cork Oak
(+)
Quercus
suber
Southern Europe
Little
Very
High
Easy
Regular
Hard
Eucalyptus
Eucalyptu
s
Mediterranean
Region
Lot
Regu
lar
Difficult
Slow
Hard
Holm Oak
(+)
Quercus
ilex
Southern Europe
Little
Very
High
Difficult
Slow
Hard
Olive tree
Olea
Mediterranean
Region
Little
Very
High
Difficult
Slow
Hard
Oak
Quercus
Across Europe
Little
High
Difficult
Slow
Hard
Ash
Fraxinus
Across Europe
Regula
r
High
Difficult
Slow
Hard
Birch
Betula
Across Europe
Little
Very
High
Easy
Fast
Soft
Beech
Fagus
Europe, except
Iberian Peninsula
and Northern
Europe, including
United Kingdom.
Little
High
Difficult
Slow
Hard
Elm
Ulmus
Across Europe
Regula
r
High
Difficult
Slow
Hard
Maple
Acer
Across Europe
Little
Regu
lar
Regular
Slow
Soft
Poplar
Populus
Across Europe
Little
High
Easy
Fast
Soft
Chestnut
Castanea
Across Europe
Regula
r
High
Difficult
Slow
Hard
Page 18

18
1.1. Power
The power of your unit indicates its heating capacity, i.e. the energy your stove
transfers from the firewood to your home (usually measured in kW) and is
directly related to the amount of firewood that you place in it.
The rated output is the measure of a standard load of firewood when tested in
laboratories during a certain amount of time.
The power output is a manufacturer's recommendation from tests to the
equipment with firewood loads within a reasonable operation range. This power
output range will present different firewood consumptions per hour.
1.2. Energy Efficiency and Performance Ratings
Implementing solutions that seek to achieve greater energy efficiency allows for
substantial reductions in energy needs, and thus reduces our current
dependence on fossil fuels and other non-renewable sources of energy.
Energy efficiency enables you to make large savings from both an economic
and an environmental point of view.
As a result of Solzaima's commitment towards the equipment's efficiency, most
of our products are classified as efficiency class 1, i.e., with an efficiency rate
equal to or greater than 70%.
Page 19

19
A 70% efficiency rate means that 70% of the energy contained in the firewood is
used to warm your home or, in other words, you are able to produce the same
amount of energy with much less firewood.
*in accordance with EC classification standards for insert fires.
A Solzaima 5kW unit with an efficiency rate of 75%, i.e. efficiency class 1, will
consume approximately 3.5 pounds (1.6kg) of firewood per hour to warm a 389
sq ft room (35m2).
Typically, a traditional fireplace has an efficiency rate of approximately 10%,
which means it will consume about 26.5 pounds (12kg) of firewood to produce
the same 5kw necessary to warm the same 389 sq ft room (35m2).
EFFICIENCY RATING*
EFFICIENCY RATE*
(fire door closed)
70 %
60% < 70 %
50% < 60 %
30% < 50 %
EFFICIENCY RATING*
EFFICIENCY RATE*
(fire door closed)
70 %
60% < 70 %
50% < 60 %
30% < 50 %
1
2
3
4
1
2
3
4
Page 20

20
FIREWOOD CONSUMED IN ONE HOUR TO WARM
APPROXIMATELY 389 SQ FT (35 M2) WITH A 5kW UNIT
A traditional fireplace with an
efficiency rate of 10%
consumes 26.5 pounds (12kg)
of firewood
A fireplace equipped with a
simple fire (class 4) and
providing an efficiency rate of
30% consumes 8.8 pounds
(4kg) of firewood
A fire with an efficiency rate of
50% (class 3) consumes 5.3
pounds (2.4kg) of firewood
A Solzaima fire with an
efficiency rate of 75% (class 1)
consumes only 3.5 pounds
(1.6kg) of firewood
2. First Use
* Ask the installer to light the unit to ensure that all is functioning correctly;
* The stove’s paint is cured by the heat when it is first used, which may give rise
to additional smoke. If this happens, you should air the room by opening
external windows and doors.
Page 21

21
3. Normal Use
* Lighting:
a) Place firewood of the correct size (mentioned above) in the unit, piled
horizontally;
b) Place some pine cones (preferably) on the ash grate;
c) If required to make lighting easier, open the air regulator completely
to allow the inflow of combustion air and then regulate the burn intensity;
d) The lighting period is over when the body of the stove has reached a
constant temperature.
* You should check that there is sufficient ventilation in the room where the unit
is installed, otherwise it will not work properly. For this reason, you should check
if there are any other heating devices which consume air during operation (e.g.
gas-fired equipment, braziers, etc). We recommend against using these devices
all at once;
* The air for combustion is drawn from the surrounding room, consuming
oxygen. You should check that ventilation grilles and other devices for allowing
air to enter from outside remain unobstructed;
* You should only open the door during reloading. Normal conditions of use
require the door to remain closed;
Page 22

22
* When reloading with firewood, open the door slightly and wait a little while to
allow a good draught, and only then open the door completely. Reload before
the previous load has burnt completely, in order to make it easier for the
combustion to continue.
* Use of the unit is not recommended when weather conditions are so bad that
the draft is seriously affected (particularly when there are very strong winds).
4. Optional Accessories
* The unit can be supplied with a full 3.9in (10cm) frame and accompanying
components to attach it to the wall. It also comes with adjustable legs, so you
can install your unit at the height you desire.
5. Hot air outlets
* There are 4 hot air outlets on the stove's top panel. Each measures 5.1 inches
(130mm) in diameter and should be used to channel the hot air into the room
where the stove is installed, or to other rooms;
* If the warm air duct always runs upwards, there is no need for a forced system.
If it is for distributing the heat, you should install an aspirator to force the air to
circulate. In this case, it should be installed as plumb over the unit as possible,
so the thermostat can detect the rising heat immediately;
* An air outlet grille should be placed in each room and all the ducts should be
well insulated;
* If you are interested in this form of heating, we recommend you contact a
specialised installer.
Page 23

23
6. Safety
* The electrical installation, where applicable, should incorporate means to
switch the unit off, with a minimum separation of 0.11 inches (3mm) between the
contacts, pursuant to the applicable legislation in force;
* The exposed metal parts reach high temperatures – around 302ºF (150°C) on
the door. The door handle does not reach temperatures above 113ºF (45°C).
Do not touch the hotter areas;
* You should use a glove or other protection if you have to touch the unit when it
is in operation;
* The electrical components should always be connected to the power supply,
where applicable;
* In case of fire in the flue, immediately close the door of the unit and the
air intake regulator;
* If there is a power cut, resulting in the ventilators cutting out when the unit is in
operation, if applicable, close the combustion air intake and do not load the unit
with any more firewood.
Page 24

24
7. Cleaning and Maintenance
* You should remove ash from the pan on a regular basis (after the unit is
switched off), so that the combustion air is not prevented from entering through
the ash grate;
* The baffle plate (removable plate in the ceiling of the combustion chamber)
should be removed and cleaned on a regular basis, according to use, as it
gathers ash and may impede the draught;
* To clean the glass, you need to place the key in the lock located in the centre
of the top edge of the door. Rotate the lock to the left, which will then allow you
to tilt the door forwards (see Fig. 9);
* The glass should only be cleaned when completely cold;
* The glass should be cleaned with a suitable product,4 by following the
instructions for use and not allowing the product to come into contact with the
sealing string and painted metal parts, which could initiate oxidation. The sealing
string is glued, so should not be moistened with water or cleaning products. If it
becomes detached, it can be reattached with contact glue after cleaning the
groove with fine sandpaper;
* Do not clean the plate iron parts with detergent, but rather with just a dry cloth
to remove the dust;
* We advise you to clean the flue and flue throat (at the exit of the unit) at least
once a year, removing the baffle plate to do so;
* If you do not use the unit for a prolonged period, check to make sure that the
flue pipes are clear before lighting it.
4
Seek advice from your supplier/installer.
Page 25

25
Troubleshooting
Problem
Solution
Glass gets dirty
. Check moisture of firewood
. Increase burn intensity by opening the
combustion air intake regulator slightly
Excessive draft
. Close the combustion air intake regulator
. Contact the installer
Weak draft, causing smoke
to be expelled into the room
. Check that the flue is clear of obstructions
. Clean the flue
. There may be exceptional weather conditions
Weak fire
. Check moisture of firewood and opening of the
combustion air intake regulator
. Check entry of air into the room
Ventilation stopped working
. Check possible obstruction of ventilator
. Check and/or reconnect power supply
. The stovemay not be hot enough to make the
ventilator switch on
Ventilation working but flow
is weak
. Clean all dust, ash or other residue that may
have accumulated in the ventilator grilles
Problems associated with
the weather
. Contact the installer
Page 26

26
End of Life
* Around 90% of the materials used in the manufacture of these units are
recyclable, thus helping to reduce environmental impact and contributing to the
sustainable development of the planet;
* End-of-life units should be taken to licensed waste operators. We advise you to
contact your local council for collection.
Sustainability
* Solzaima designs solutions and equipment "moved" by biomass as their
primary energy source. This is our contribution for the sustainability of our planet
– an economically viable and environmentally-friendly alternative, following
environmental best management practices to ensure an efficient carbon cycle
management.
* Solzaima cares about being up to date with and assessing the existing forest
area while efficiently responding to energetic demands, with a constant watch on
biodiversity and natural wealth, critical aspects to the quality of life in our planet.
Page 27

27
Glossary
* Ampere (A): SI unit of measurement of electric current
* bar: unit of pressure equal to exactly 100,000 Pa. This pressure is very close to
standard atmospheric pressure.
* cal (calorie): equal to the amount of heat required to increase the temperature of one
gram of water by one degree centigrade.
* Groove: housing for the sealing ring.
* cm (centimetres): unit of measurement.
* CO (carbon monoxide): Lightly flammable, colourless, odourless and very dangerous
gas, due to its toxicity.
* CO2 (carbon dioxide): Gas needed by plants on the one hand for photosynthesis, and
emitted into the atmosphere on the other, contributing to the greenhouse effect.
* Combustion: a process that releases energy. Combustion is basically a chemical
reaction that requires three things in order to take place: fuel, oxidant and ignition
temperature.
* Oxidant: chemical substance that feeds combustion (essentially oxygen) and is
essential for it to take place.
* Fuel: anything that can undergo combustion, in this case wood.
* Creosote: chemical compound created by combustion. This compound is sometimes
deposited on the glass and flue of an insert fire.
* Circuit breaker: Electromechanical device that protects a given electrical appliance.
* Energy Efficiency: capacity to generate large quantities of heat with the least amount
of energy possible, causing the least environmental impact and reducing the energy
budget.
* CO Emissions: emission of carbon monoxide gas into the atmosphere.
* CO Emissions (13% O2): carbon monoxide content corrected for 13% of O2.
* Differential Switch: protects people and property against earthing failures, preventing
electric shocks and fires.
Page 28

28
* kcal (Kilocalorie): multiple unit of measurement of calories. Equivalent to 1,000 calories.
* kW (Kilowatt): Unit of measurement equal to 1,000 watts.
* mm (millimetres): unit of measurement.
* mA (milliampere): unit of measurement of electric current.
* Pa (Pascal): standard SI unit of pressure and tension. This unit is named after Blaise
Pascal, eminent French mathematician, physicist and philosopher.
* Calorific Value: also known as specific combustion heat. Represents the quantity of
heat released when a certain quantity of fuel is completely burned. Calorific value is
expressed in calories (or kilocalories) per unit of weight of fuel.
* Rated output: Electric power consumed by an energy source. Measured in watts.
* Nominal heat output: heating capacity, i.e. the heat energy the unit transfers from
energy present in the firewood – measured for a standard load of firewood over a given
period of time.
* Power output: a manufacturer's recommendation from tests on the equipment with
firewood loads within a reasonable operating range. This power output range will present
different firewood consumptions per hour.
* Plumb: vertically above the installation.
* Efficiency: expressed as a percentage of “useful energy” that can be extracted from a
given system, taking into account the “total energy” of the fuel used.
* Ignition temperature: temperature above which the fuel can enter into combustion.
* Heat-resistant: resistant to high temperatures and thermal shock.
* Ceramic glass: Highly resistant ceramic material produced through controlled
crystallisation of vitreous materials. Used widely in industrial applications.
* W (Watt): SI unit of power.
Page 29

29
Warranty
* All SOLZAIMA units have a 2 (two) year warranty from the date the invoice was
issued. In order for your warranty to be valid, you must keep the invoice or receipt of
purchase throughout the warranty period.
* The warranty applies only to defects in materials or manufacture;
* The unit's components – ventilators, thermostats, terminals, electric cables, etc.
have a 2 (two) year warranty;
* SOLZAIMA is happy to replace defective elements free of charge, following
analysis and verification by a qualified agent/installer.
* Exclusions:
* Fracture of the glass due to misuse of the unit does not fall within the scope of this
warranty; the chances of natural fracture of the glass are minimal, as this would only
be possible due to overheating. The glass can withstand temperatures of 1382°F
(750°C) in constant operation, as well as temperature peaks of 1562°F (850°C) –
temperatures which are never reached during normal operation;
* The type of fuel used and how the unit is handled are not within SOLZAIMA’s
control, so the parts in direct contact with the flame – the ash grate, comb and baffle
plate – are not covered by this warranty;
* The vermiculite and sealing ring are not included in the warranty;
* The installer bears full responsibility for all problems and/or defects resulting from
the installation process;
* Costs associate with moving, transport, labour, packaging, disassembly and
immobilisation of the unit incurred during warranty operations shall be borne by the
purchaser;
* Any malfunctioning caused by mechanical or electrical parts not supplied by
SOLZAIMA and which are prohibited under the instructions governing heating
appliances are not covered by this warranty;
* SOLZAIMA bears no responsibility for damage caused by the use of any fuel other
than firewood.
Page 30

30
Please read this Instruction Manual carefully and keep it for future
reference.
All Solzaima products come with a 2-year warranty.
APPROVED PRODUCT
 Loading...