

Page 1
User Manual
User Manual
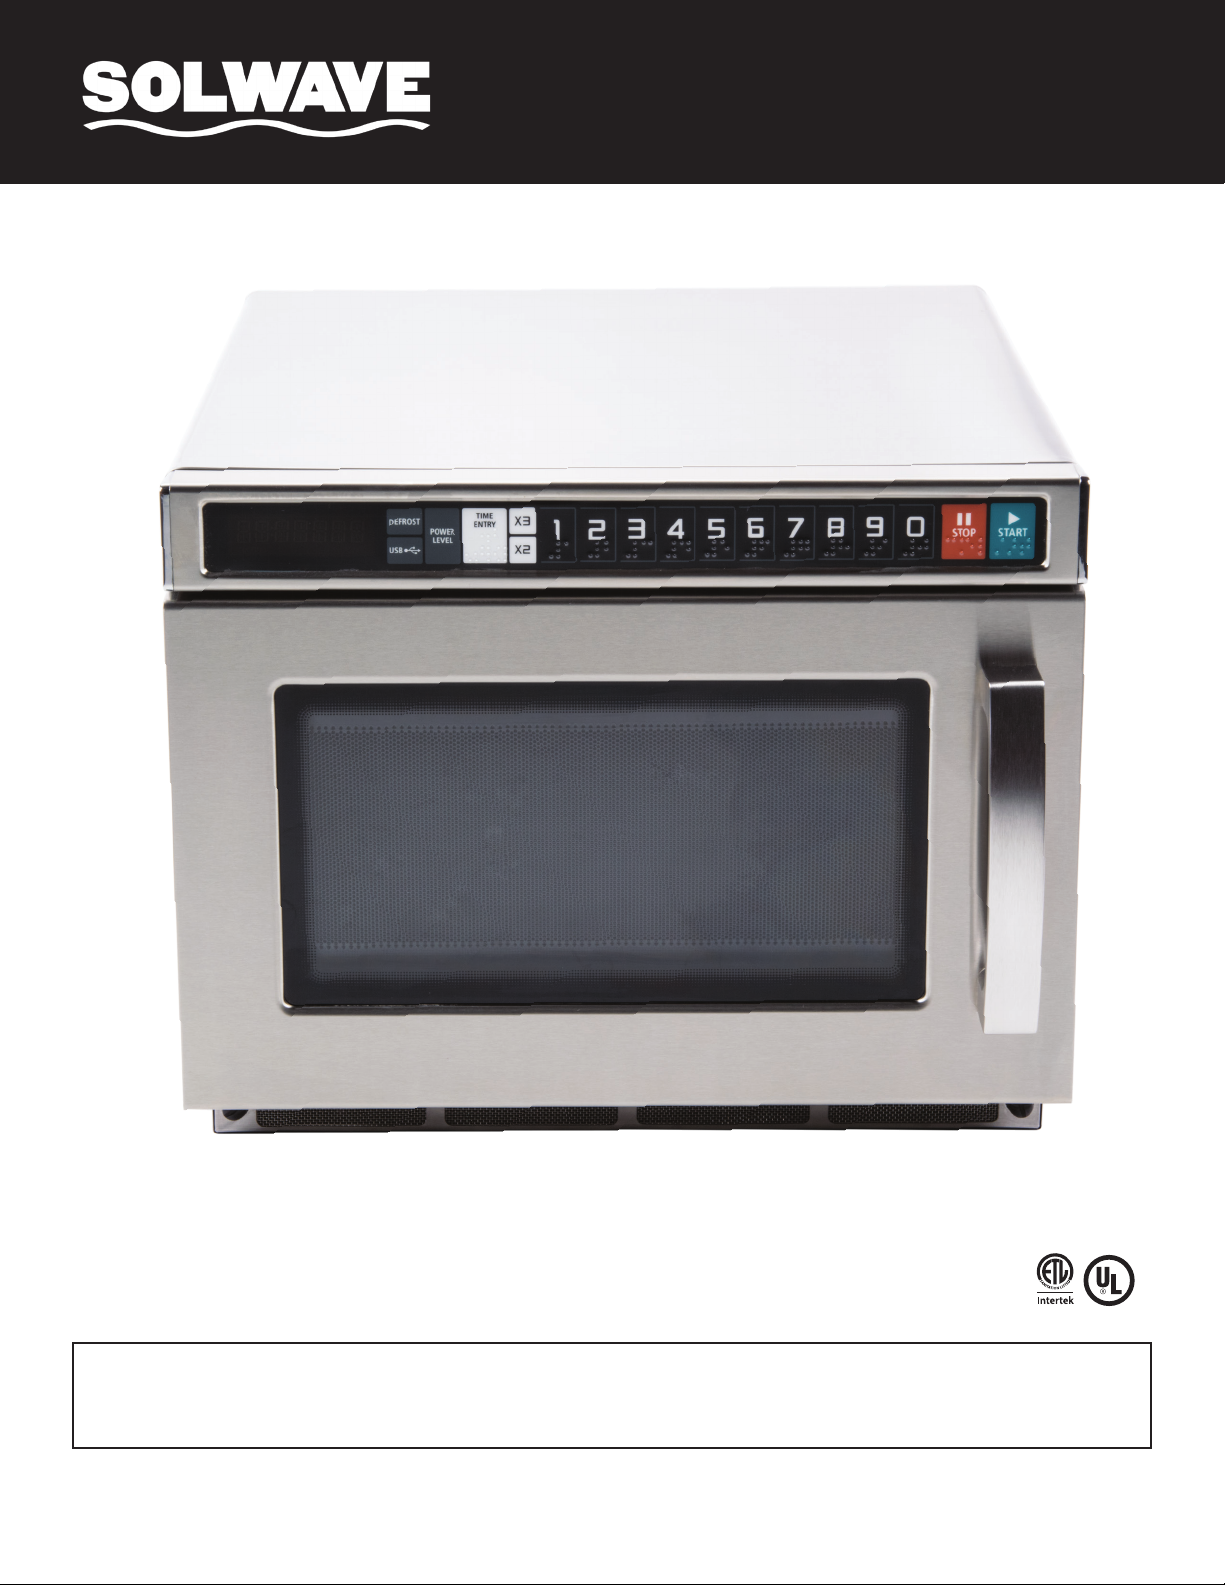
Commercial Microwaves
Model: 180MWHD12, 180MWHD18, 180MWHD21
04/2020
Please read and keep these instructions. Indoor use only.
Page 2

User Manual
Specifications
Model Voltage Power Dimensions (LxWxH) Net Wt. Shipping Wt. Pl ug Typ e
180 MW12H D
180 MW18HD
180MW21HD
120V
208V/240V
208V/240V
IMPORTANT SAFETY INSTRUCTIONS
120 0W
180 0W
2100W
16.5" x 22.25" x 13.5"
16.5" x 22.25" x 13.5"
16.5" x 22.25" x 13.5"
NEMA 5-20P
NEMA 6-20P
NEMA 6-20P
1. Do not attempt to operate this microwave oven with
the door open. This can result in harmful exposure to
microwave energy.
2. Do not operate the oven if it is damaged. Always
ensure there is no damage to the door, hinges,
latches, door seals, cord or plug.
3. Do not modify or tamper with safety locks.
4. Do not place any object between the front of the
microwave oven and the door. It is also necessary
to prevent food splatter and cleaning residue from
accumulating on the sealing surfaces around
the door.
5. As with other cooking appliances, observation is
necessary to reduce the risk of fire in the oven cavity.
6. To reduce the risk of fire inside oven cavity:
a. Do not overcook food.
b. Pay close attention when placing paper, plastic,
or other combustible materials inside the oven to
facilitate cooking.
c. Remove wire twist-ties and metal handles from
paper or plastic containers/bags.
d. If materials inside the oven ignite, keep door
closed and unplug appliance.
e. Do not use oven cavity for storage purposes.
Do not leave paper products or cooking utensils
in the cavity when not in use.
7. This appliance must be grounded. Connect only to a
properly grounded outlet. For more information, see
"GROUNDING INSTRUCTIONS" on page (3).
8. Install or position this oven only in accordance with
the installation instructions provided.
9. Use this appliance only for its intended purpose as
described in this manual.
10. Do not use corrosive chemicals or vapors in this
appliance.
11. Supervision is necessary when used by children.
12. Do not cover or block any openings on the oven.
13. Do not store or use this appliance outdoors.
14. Do not use this oven near water – for example, near
a kitchen sink, in a wet basement, near a swimming
pool, or other similar location.
15. Do not immerse cord or plug in water.
16. Keep cord away from heated surfaces.
17. Do not let cord hang over the edge of a table or
counter.
18. When cleaning, use only mild, nonabrasive soaps or
detergents and a sponge or soft cloth.
19. Liquids such as water, coffee, or tea may be heated
beyond their boiling point without the appearance of
boiling. Visible bubbling or boiling when the container
is removed from the microwave oven is not always
present. THIS COULD RESULT IN VERY HOT LIQUID
SUDDENLY BOILING OVER WHEN THE CONTAINER
IS DISTURBED OR A UTENSIL IS INSERTED INTO
THE LIQUID.
20. To reduce the risk of injury:
a. Do not overheat the liquid.
b. Stir the liquid both before and halfway through
heating it.
c. Do not use straight-sided containers with
narrow necks.
d. After heating, allow the container to stand in the
microwave oven for a short time before removing
the container.
e. Use extreme care when inserting a spoon or
other utensil into the container.
SAVE THESE INSTRUCTIONS
2
Page 3
User Manual
Grounding Instuctions
This appliance must be used with a grounded outlet. In the event of an electrical short circuit, grounding reduces the risk
of electrical shock by providing an alternate pathway for the electrical current. This appliance is equipped with a cord and
grounding plug. The appliance must be plugged into an outlet that is properly installed and grounded.
Attempting to bypass the grounding prong on the power cable can result in a risk of
electric shock.
Touching some of the internal components of this appliance can cause serious personal
injury or death. Do not disassemble this appliance.
Consult a qualified electrician or serviceman if the grounding instructions are not completely understood or if doubt
exists as to whether or not the appliance is properly grounded.
If it is necessary to use an extension cord, use only a 3-wire extension cord that has a 3-blade grounded plug, and 3-slot
receptacle that will accept the plug on the appliance. The marked rating of the extension cord shall be equal to or greater
than the electrical rating of the appliance. The cord should not drape over a countertop or tabletop where it can be pulled
on by children or tripped over.
Radio Interference
Operation of the microwave oven may cause interference to your radio, TV, or similar equipment. When there is
interference, it may be reduced or eliminated with the following measures:
1. Clean door and sealing surface of the oven.
2. Reorient the receiving antenna of radio or television.
3. Move the microwave oven to a different location or plug it into a different outlet so that the oven and receiver are
on different branch circuits.
3
Page 4
User Manual
Materials and Utensils in Microwave Oven
Tightly-closed containers could explode. Closed containers should be opened and plastic pouches pierced before
cooking. There may be certain non-metallic utensils that are not safe to use for microwaving. If in doubt, test utensil in
question with the following procedure:
1. Fill a microwave-safe container with 1 cup (250mL) of cold water along with utensil in question.
2. Cook on maximum power for 1 minute. Do not exceed 1 minute.
3. Carefully feel the utensil. If it is warm, do not use for microwave cooking.
For list of materials to use with microwave oven, please see below for proper handling:
Utensil Notes
Aluminum Foil For shielding only. Small, smooth pieces can be used to cover thin parts of meat or poultry to prevent
overcooking. Arcing can occur if foil is too close to oven walls. The foil should be at least 1 inch (2.5 cm)
away from oven walls.
Browning Dish Follow manufacturer's instructions. Bottom of browning dish must be placed on ceramic board.
Incorrect usage may cause the ceramic board to break.
Dinnerware Only if labeled "microwave-safe." Do not use cracked or chipped dishes.
Glass Jars Always remove lid, and use only to heat food until warm. Most glass jars are not heat-resistant and
may break.
Glassware Only if heat-resistant. Do not use cracked or chipped dishes, and make sure there is no metallic trim.
Oven Cooking Bags Do not close with metal tie. Make slits to allow steam to escape.
Paper Plates and Cups Use for short-term cooking/warming only. Do not leave unattended while cooking.
Paper Towels Use only to cover food for reheating and absorbing fat. Do not leave unattended while cooking.
Parchment Paper Use only as a cover to prevent splattering or wrap for steaming.
Plastic Only if labeled "microwave-safe." Some plastic containers soften as food inside gets hot. "Boiling bags"
and tightly closed plastic bags should be slit, pierced, or vented as directed by package.
Plastic Wrap Only in labeled "microwave-safe." Use to to cover food during cooking to retain moisture. Do not allow
plastic wrap to touch food.
Thermometers Only for use with meat and candy thermometers, and if labeled "microwave-safe."
Wax Paper Use as a cover to prevent splattering and retain moisture.
For list of materials to avoid with microwave oven, please see below:
Utensil Notes
Aluminum Tray May cause arcing. Transfer food into microwave-safe dish.
Food Carton with Metal
Handle
Metal or Metal-Trimmed
Utensils
Metal Twist Ties May cause arcing or start fire.
Paper Bags May start fire.
Plastic Foam May melt or contaminate the liquid inside when exposed to a high temperature.
Wood Will dry out and split or crack.
4
May cause arcing. Transfer food into microwave-safe dish.
Metal shields the food from microwave energy. Metal trim may cause arcing.
Page 5
User Manual
A
B
C
D
E
F
G
Setting Up Your Oven
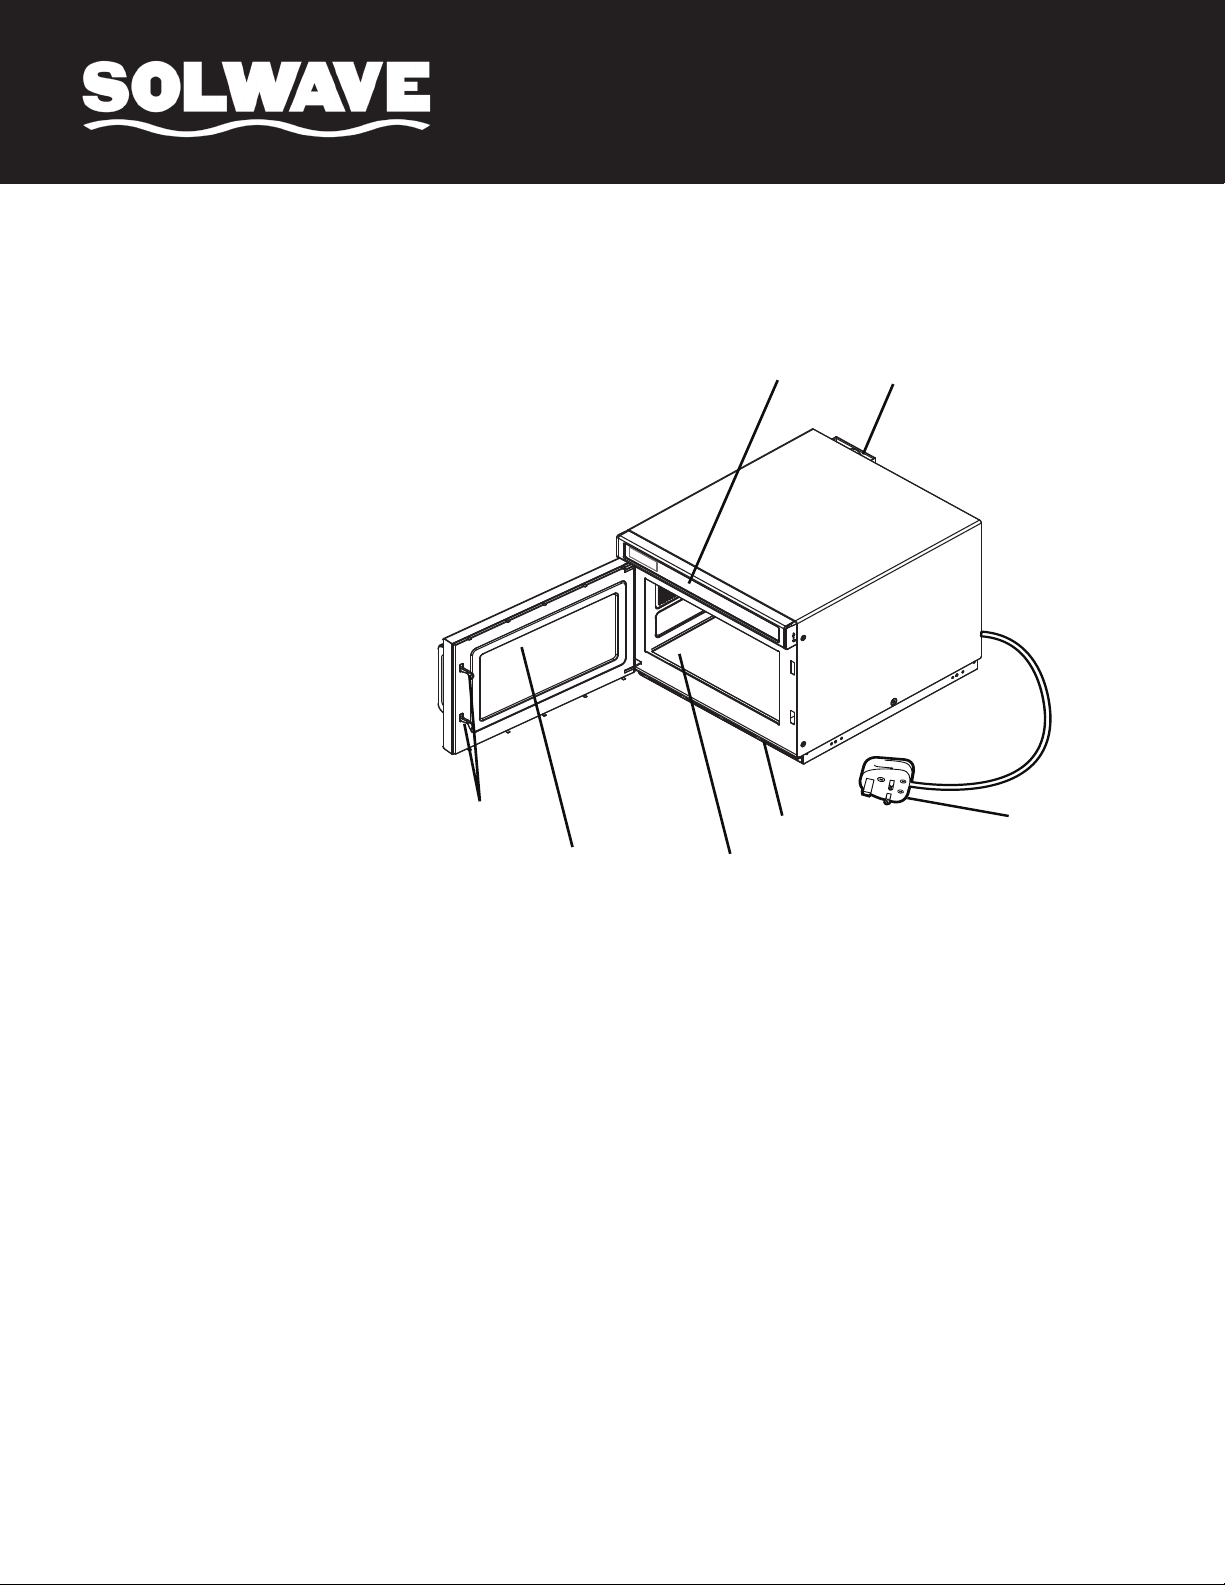
Names of Oven Parts & Accessories
Remove the oven and all materials from the carton and oven cavity.
Your oven comes with the following accessories:
Instruction Manual
A) Control Panel
B) Observation Window
C) Safety Interlock System
D) Ceramic Board
E) Filter
F) Plug
G) Ventilation
Note:
1) Don't press the ceramic board forcibly.
2) When using the microwave, carefully place
items onto the ceramic board in order to
avoid damage to the surface.
3) After using, don’t touch the ceramic board
with your hands in order to avoid high temperature burns.
5
Page 6
User Manual
Installation
Remove all packing material and accessories.
Examine the oven for any damage such as
dents or broken door. Do not install if oven is
damaged.
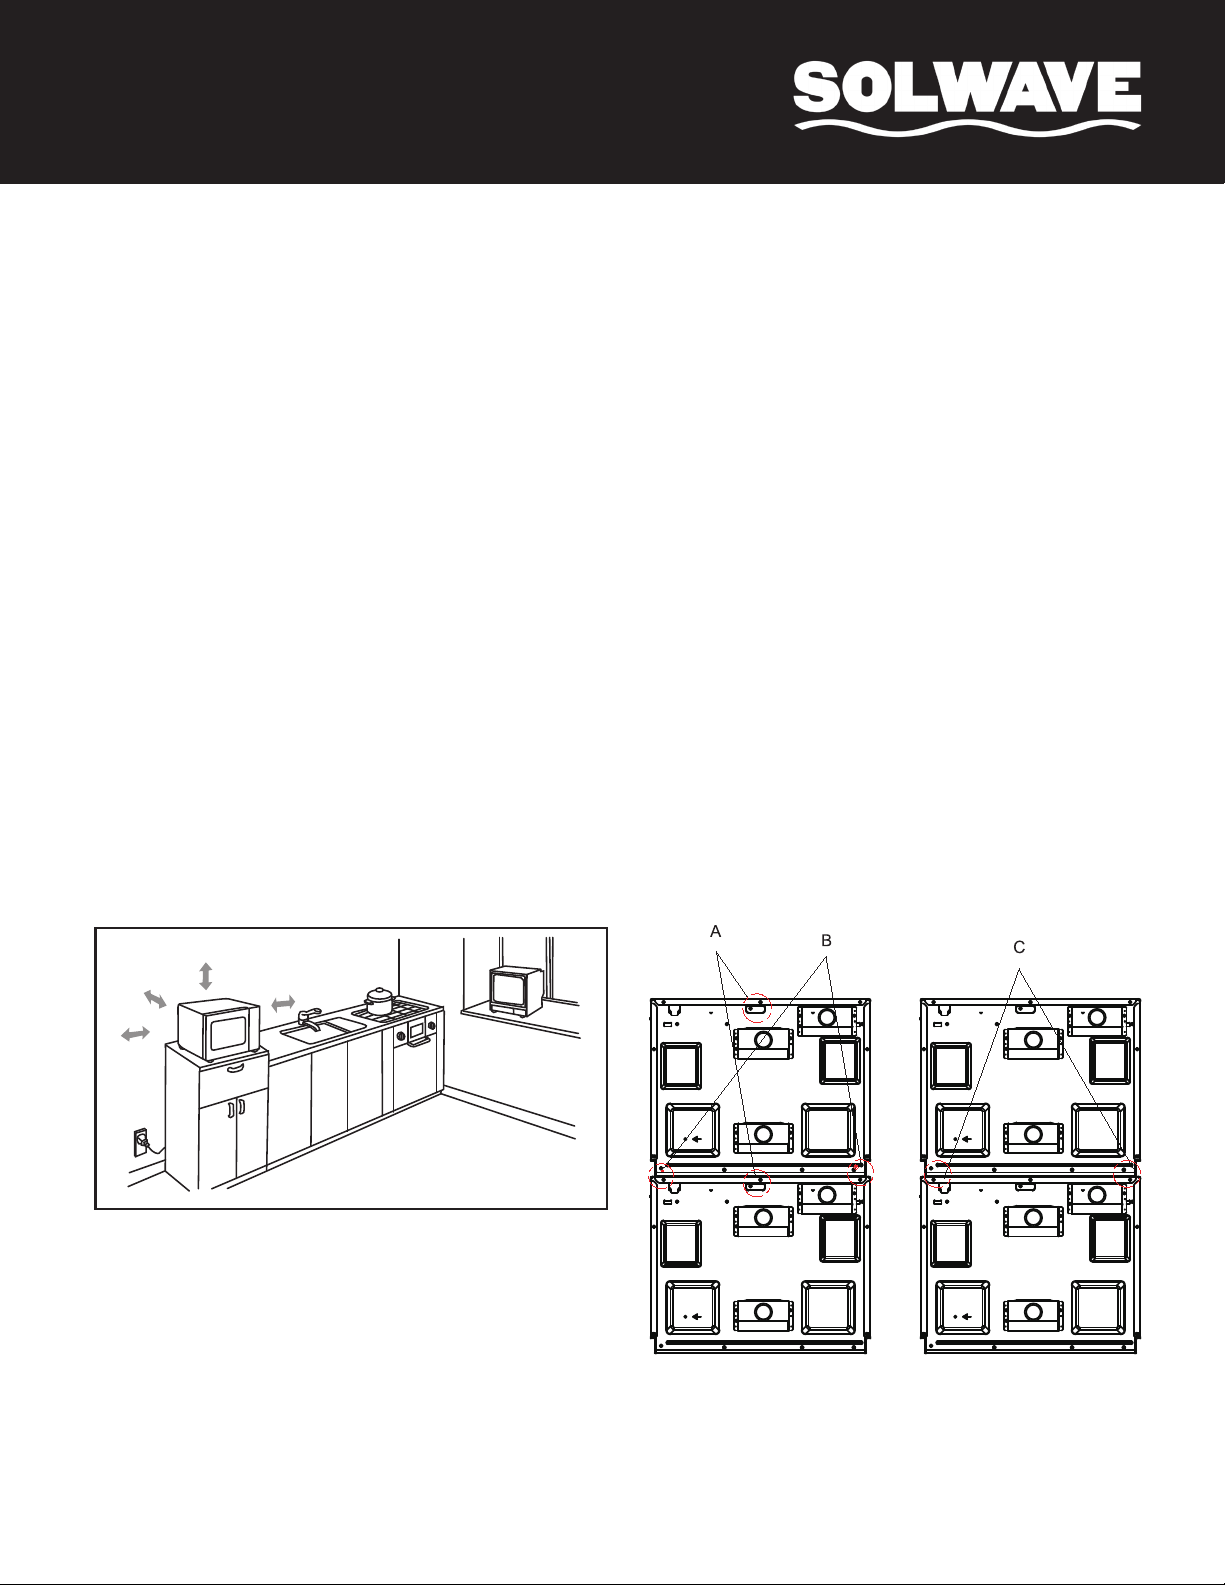
Countertop Installation
Cabinet: Remove any protective film found
on the microwave oven cabinet surface.
1. Select a level surface that provide
enough open space for the intake
and/or outlet vents .
( )Fig 1ure
2. Stacking and installation of the microwave oven.
The maximum height of stacking shall be two
layers. Specific stacking installation is as follows
(A) Unscrew and remove the mounting plate, and then
tighten the screws.
(B) Remove the four screws as shown in Figure.
(C) Mount the mounting plate to the lower position and
fix the screws that are just loosened.
Countertop Installation
Remove all packing material and accessories. Examine the oven for any damage such as dents or broken door. Do not
install if oven is damaged.
Cabinet: Remove any protective film found on the microwave cabinet surface.
1) Select a level surface that provides enough open space for the intake and/or….Never remove the appliance’s feet or
block the air intake and exhaust opening. The left side must be left exposed.
A) Blocking the intake and/or outlet openings can damage the oven.
B) Place the oven as far away from radios and TV as possible. Operation of microwave oven may cause
interference to your radio or TV reception.
C) Plug your oven into a standard household outlet. Be sure the voltage and the frequency is the same as the
voltage and the frequency on the rating label.
WARNING: The plug socket, electric appliances, or items which may be effected by heat and moisture should
be kept away from any vents on the oven.
2) Stacking and installation of the microwave oven. Do not stack more than two microwave ovens together. Specific
stacking instructions are as follows:
A) Unscrew and remove the mounting plate, and then tighten the screws.
B) Remove the four screws as shown in Figure 2.
C) Secure the mounting plate to the lower microwave oven and tighten the screws.
Fig 1
4.0 inch(10cm)
OPEN
30cm
12 inch( )
4.0 inch(10cm)
6
Page 7
User Manual
Cleaning Instructions
Always keep the oven clean. For cleaning instructions on particular pieces of the appliance, see below.
Glass Viewing Window, Inner Door Panel, and Oven Front:
1. For best performance and to maintain a high degree of safety, inner door panel should be free of food and grease
build-up.
2. Wipe parts with mild detergent, rinse, and wipe dry.
3. Never use abrasive powders or pads.
Control Panel and Plastic Parts:
1. Do not apply a detergent or alkaline liquid spray, as it may cause damage.
2. Use a dry cloth, not a soaked cloth.
Scrub your glass to a sparkling shine while leaving absolutely
no residue or streaks with this Noble Chemical Reflect glass
cleaner! Reflect boasts a ready to use formula that quickly
Oven Interior:
1. Be sure to clean up spilled liquids, splattered oil, and food debris as quickly as possible. If oven is used when dirty,
efficiency drops and dirt that gets stuck may cause odors.
2. Use cloth soaked in lukewarm water with a mild detergent that has been dissolved, then rinse soap off with damp cloth.
Do not wipe plastic and painted sections of the oven with bleach, thinners, or other
cleaning agents. This may cause parts to dissolve.
Clean oil blockage and filter regularly. Otherwise, stain on oil blockage will drop on food
and appliance will overheat.
penetrates dust, grease, soil and smoke on all glass surfaces.
Easily attack and eliminate 99.99% of harmful bacteria with this
Noble Chemical QuikSan sanitizer and disinfectant. Its powerful
solution is perfect for sanitizing virtually all hard, nonporous
food contact surfaces quickly and efficiently.
7
Page 8
User Manual
(7)
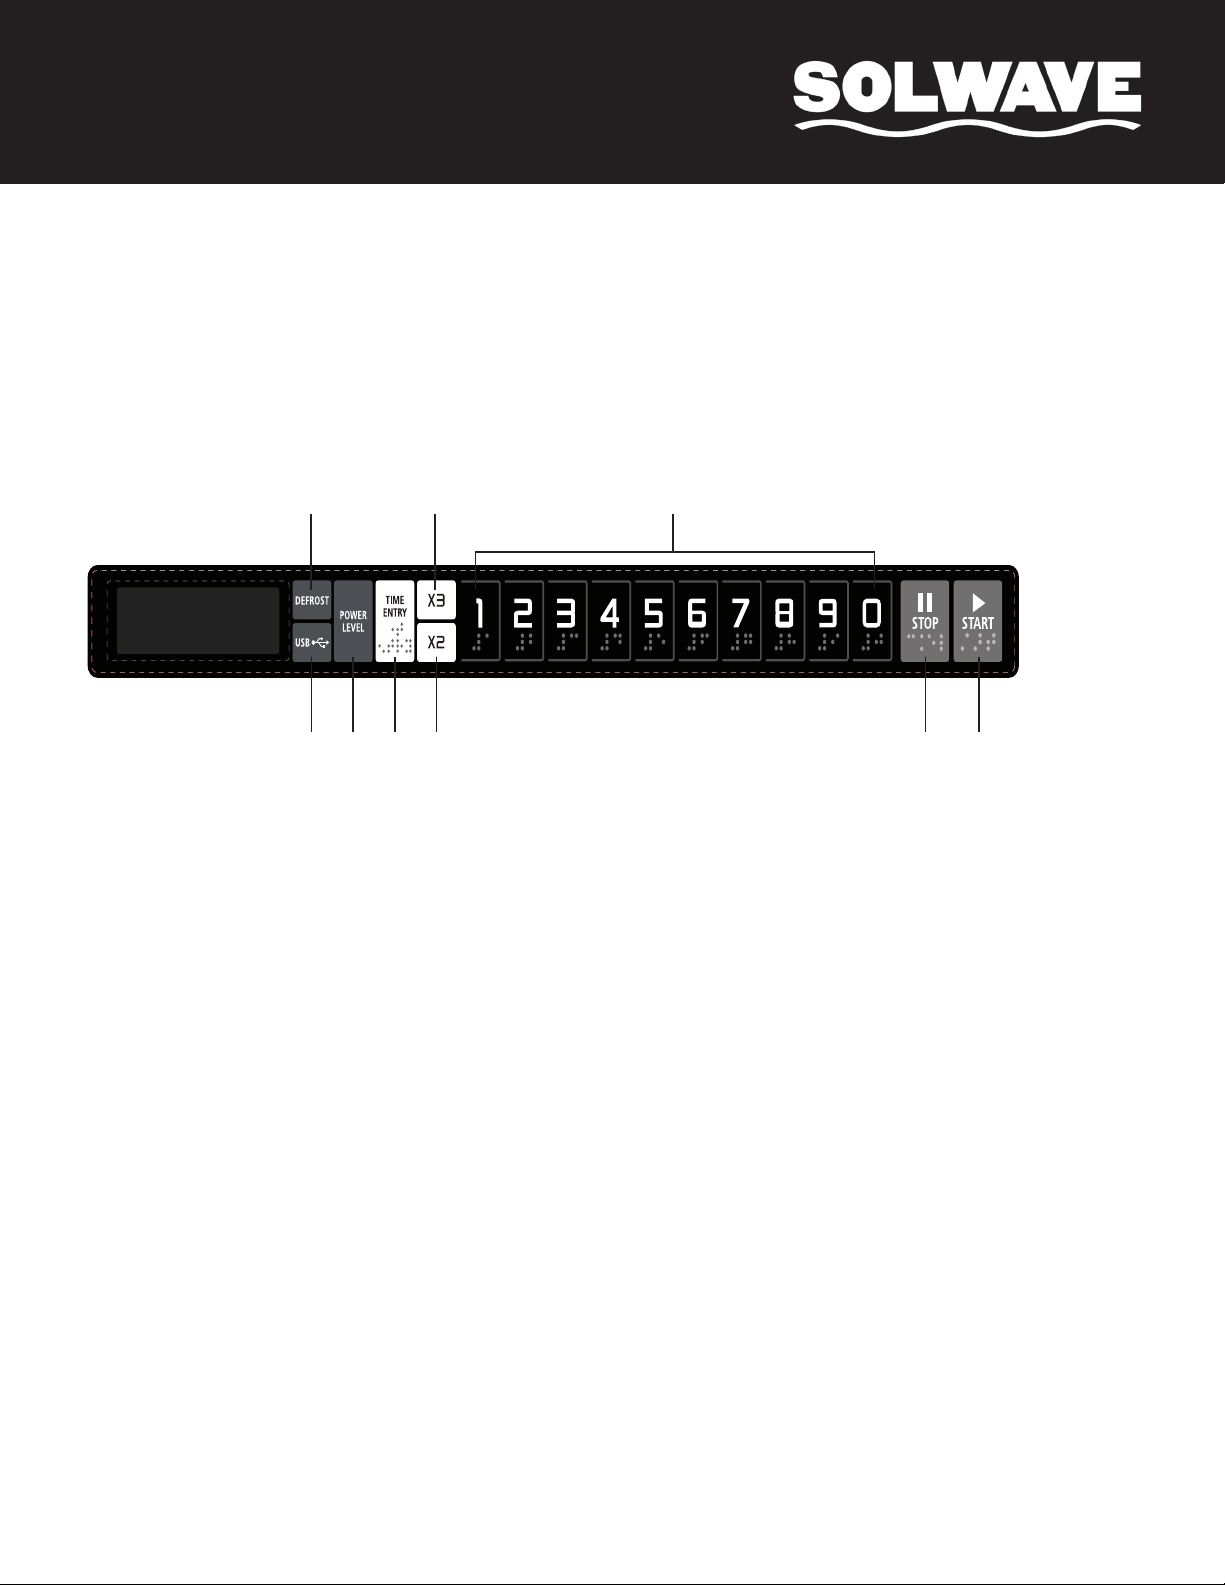
(1) Defrost Button
(3) Power Level Button
(6) Triple Quantity Button
(8)
(9)
(2)
(3) (4) (5)
(1) (6)
OPERATION
Control Panel(with braille) and Features
(2) USB Buttons
(4) Time Entry Button
(5) Double Quantity Button
(7) Number Buttons
(8) Stop/Reset Button
(9) Start Button
8
Page 9
OPERATION INSTRUCTION
0
OPP::2222
OPP::3311
OPP::4422
OPP::5511
0
OPP::7700
OPP::8811
0
3 sseeccoonnddss bbeeeepp
Meeddiiuumm
Keeyybbeeeepp OOnn
600 sseeccoonnddss
Onn--tthhee--FFllyy EEnnaabblleedd
d
600 MMiinnuuttee MMaaxxiimmuumm CCooookk TTiimmee
Maannuuaall PPrrooggrraammmmiinngg EEnnaabblleedd
s
OPP::0022
Moonntthhllyy--DDiissppllaayy eevveerryy 3300 ddaayyss
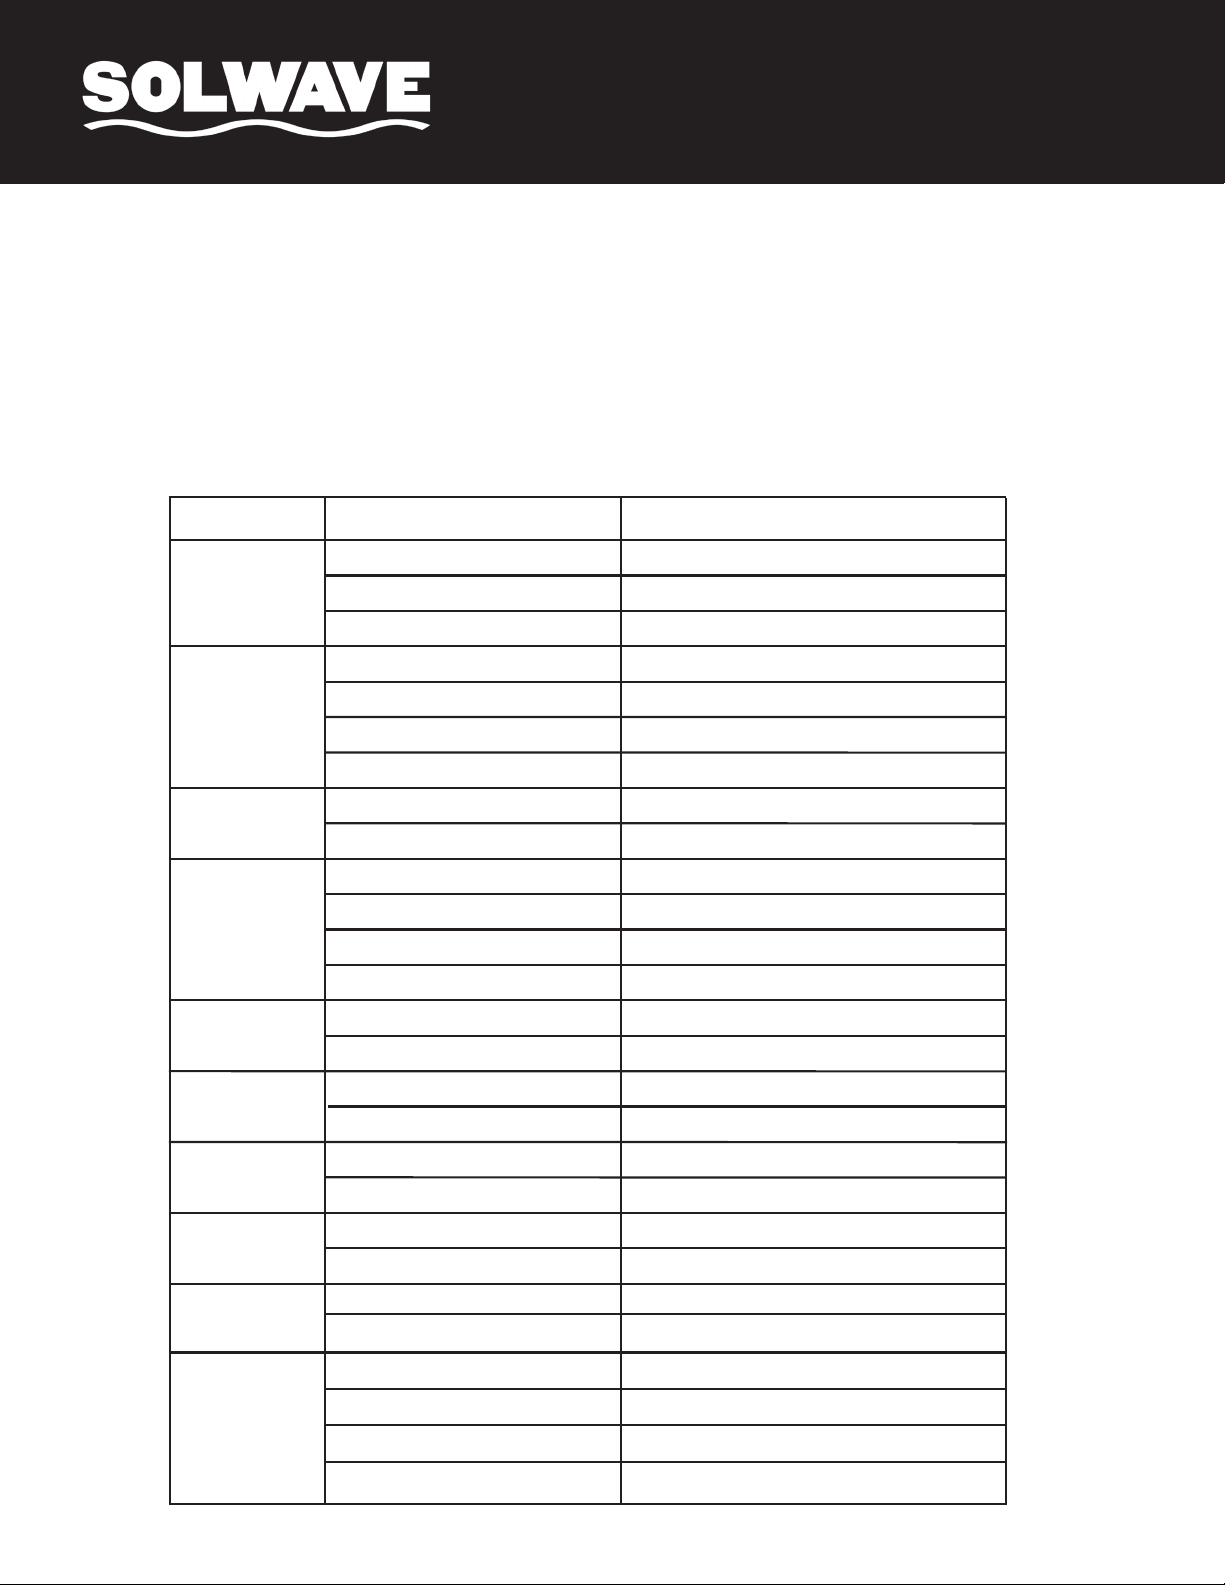
Appendix. A User Options
Items bolded below are the default values.
User Manual
Option
1
EOC Tone
2
Beeper
Volume
3
Beeper
On/Off
4
Keyboard
Window
5
On the Fly
6 Door Reset
7 Max time
8 Manual
Programming
9
Double Digit
0
Clean
filter
Setting
OOPP::110
OP:11
OP:12
OP:20
OP:21
O
OP:23
OP:30
O
OP:40
OP:41
O
OP:43
OP:50
O
OOPP::660
OP:61
O
OP:71
OP:80
O
OOPP::990
OP:91
OP:00
OP:01
O
Discription
3
Continuous beep
5 quick beeps,Repeating
Beeper Off
Low
M
High
Keybeep Off
K
15 seconds
30 seconds
6
120 seconds
On-the-Fly Disabled
O
DDoooorr rreesseett DDiissaabblleed
Door Reset Enabled
6
10 Minute Maximum Cook Time
Manual Programming Disabled
M
SSiinnggllee DDiiggiitt MMooddee--1100 pprrooggrraamms
Doule Digit Mode-100 programs
Off-Never Display Clean filter
Weekly-Display every 7 days
M
OP:03
Quarterly-Display every 90 days
9
Page 10
User Manual
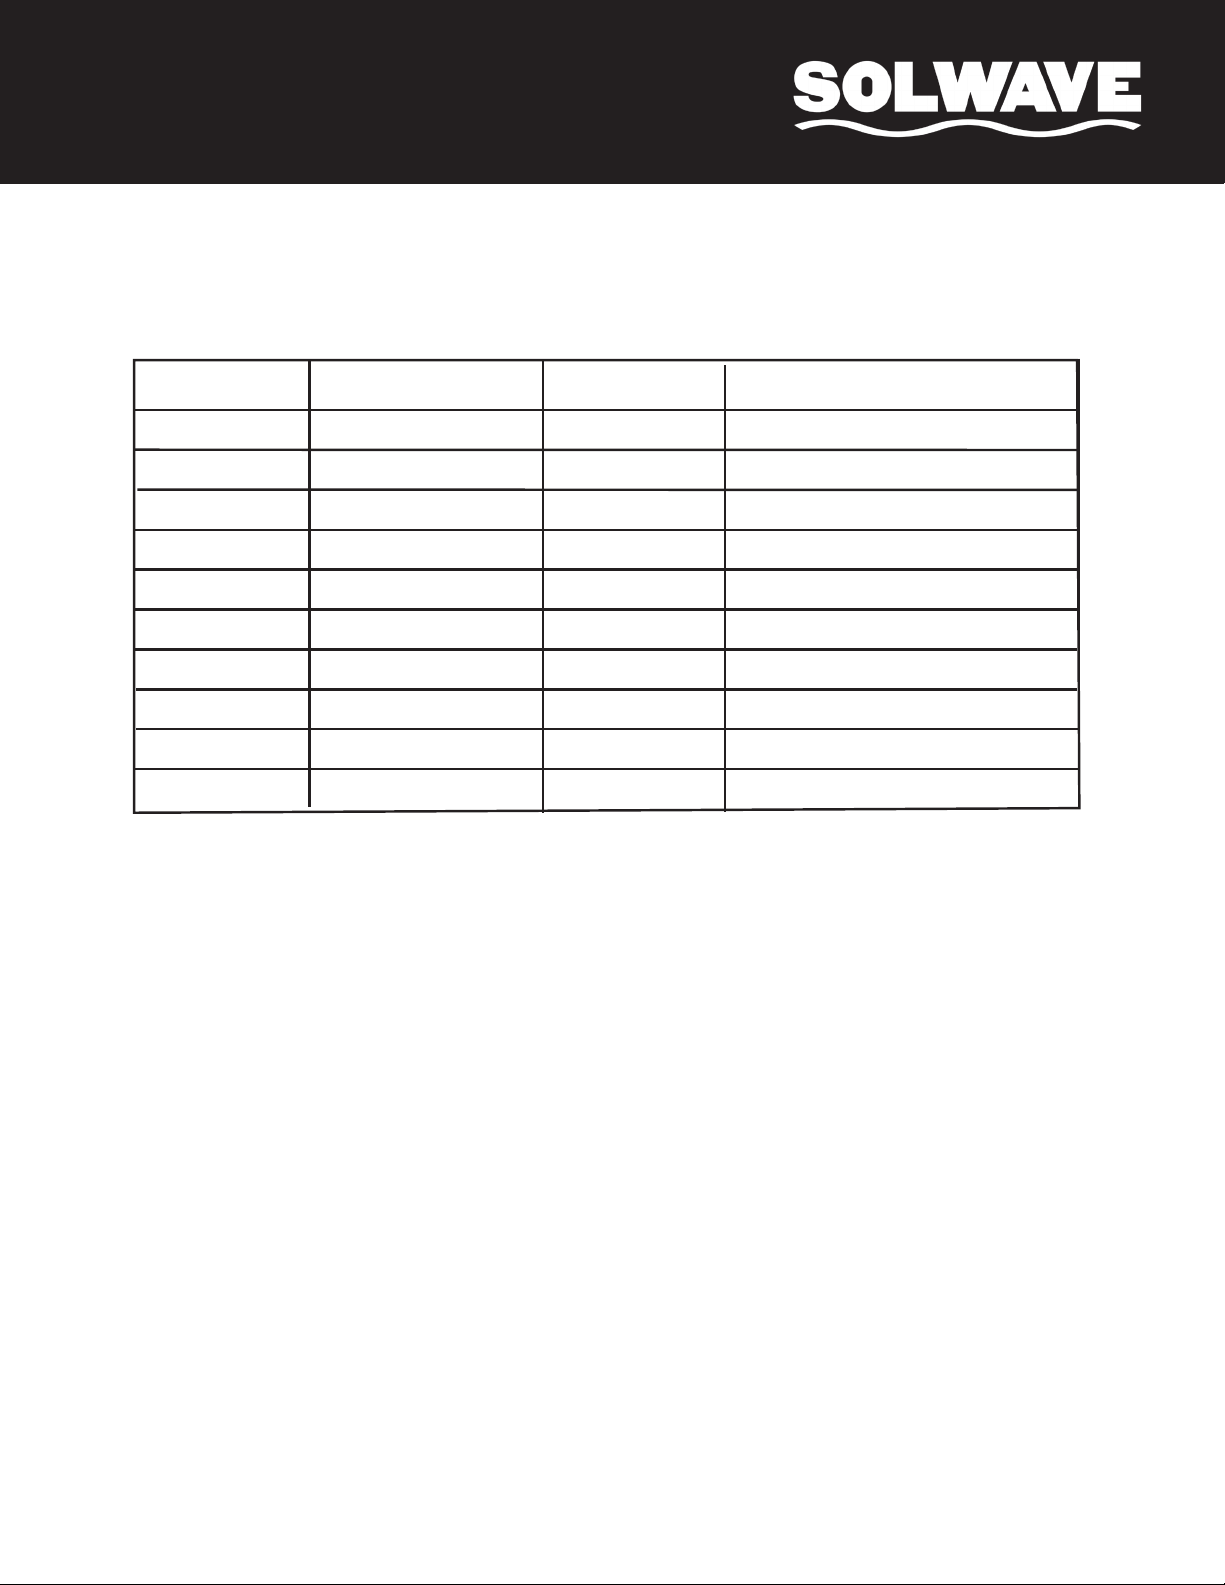
Appendix. B Default Cook Times
The oven shall ship with the following Preset Cook Times unless otherwise noted in the
product Specification.
Button
1
2
3
4
5
6
7
8
9
0
Display (Time)
0:10
0:20
0:30
0:45
1:00
1:30
2:00
2:30
3:00
3 3
: 0
Power
100%
100%
100%
100%
100%
100%
100%
100%
100%
100%
Cook Factors
80%
80%
80%
80%
80%
80%
80%
80%
80%
80%
10
Page 11

User Manual
pressed, the oven will change
to idle
pressed, the oven will change
to idle
1. Power Up
When the oven is electrified for the first time, the voltage will display for 3 times and
then " ------- " will display. If "
Note: In idle mode, any buttons pressed will produce no response.
" button pressed, the oven will change to idle mode.
2. Idle Mode
A) The microwave oven will enter Idle Mode after several seconds have passed in Ready
Mode without any key being pressed or the door opened and closed. You can control this
time using the settings for Timeout Window, set on User Option 4.
B) During Idle Mode, the screen is blank and the oven will not operate.
C) Opening and closing the door will cycle the oven out of Idle Mode and into Ready Mode.
Note: Under Idle Mode, any button pressed will produce no response. If "
buzzer will ring once but the oven will not operate.
" button pressed, the
3. Ready Mode
A) In this mode, the oven is ready to either begin a manual or preset cook cycle.
B) Opening and closing the door while the oven is in Idle Mode will put the oven into Ready
Mode.
C) During Ready Mode, "READY" displays.
D) From the Ready Mode, the oven can go to almost all of the other modes.
4. Door Open Mode
A) The microwave oven enters Door Open Mode when the door of the oven is open.
B) In Door Open Mode the screen is blank. If the microwave oven was cooking before the
door was opened, "DOOR" and "OPEN" will display in order on the screen. Then the screen
will display the remaining cook time while the fan and light remain on.
C) When the door is closed, the oven will cycle into Ready Mode.
Note: When the door is open, if User Option OP:60 is selected and the oven was running a manual
or preset cook cycle, the oven will go into Pause Mode. In all other cases, the oven will enter
Door Open Mode with User Option OP:61 set. Opening and closing the door will clear any
information from the manual or preset program that was running.
11
Page 12

User Manual
pressed, the oven will change
to idle
pressed, the oven will change
to idle
" button,
" button,
pressed, the oven will change
to idle
" button,
the screen
number buttons will cause
the oven to run the
the screen
number buttons will cause
the oven to run the
5. Pause Mode
A) This mode allows a user to temporarily stop the cooking cycle to inspect or stir food.
B) The oven will enter Pause Mode if the door is opened and then closed or if the "
" pad is
pressed.
C) While paused, the screen will display the remaining cooking time.
D) Pause Mode will cycle into Idle Mode in the same way as Ready Mode and the time
settings can be configured in User Option 4. Additionally, if the "
will immediately enter Ready Mode. Or if the "
" is pressed, the oven will go into working
" is pressed, the oven
mode.
6. Manual Cook Entry Mode
A) The user may manuallly enter a cook time and power level while in this mode.
B) While the oven is in the Ready Mode, pressing the "Time Entry" pad on the keyboard will
put the oven into Manual Cook Entry Mode.
C) When "00:00" displays in this mode, you can input the time you need.
D) Press "Power Level" button, "%POWER" displays. Press number buttons to select power
level you want, and the corresponding power will light. If you want to choose full power
level, press "1" and "0" successively. Then the screen will display "%POWER". If no power is
chosen, 100% power is default.
E) During setting process, press "
Mode.
" to enter Manual Cook Mode. Press "
" to enter Ready
7. Manual Cook Mode
A) This mode allows you to set the cook time for food items manually. While in Manual Cook
Entry Mode, pressing the "
" pad will cause the oven to begin Manual Cook Mode.
B) In this mode the remaining cooking time shows on the display. The fan and oven light will
also run.
C) When the cooking program finishes, the oven will enter End of Cook Cycle Mode. If you
press "
" button under this mode, the oven will enter Pause Mode.
8. End of Cook Cycle Mode
B) During this mode, "DONE" displays.
C) If either User Option OP:11 or OP:12 is selected, the oven shall continue to sound until
A) After the time has expired in a Manual Cook Mode, or a Preset Program Cook Mode, the
oven shall go into The End of Cook Cycle Mode.
the user acknowledges this by either opening and closing the door or pressing the "
" pad. If User Option OP:10 is selected, after the 3 second beep, the oven shall display
"DONE". After the beep, "READY" will display and the oven will enter Idle Mode without any
operation for a period of time.
12
Page 13

User Manual
the screen
number buttons will cause
the oven to run the
" button,
the screen
number buttons will cause
the oven to run the
" button,
9. Preset Program Cook Mode
A) This mode allows cooking of food items through a one pad touch operation. While in
Ready Mode, pressing number buttons will cause the oven to run the Preset Program
associated with that number button.
B) During this mode, the screen displays the remaining cooking time. When using multi-stage
cooking, the total remaning cooking time displays not a particular stage cooking time.
C) When the cooking program finishes, the oven will enter End of Cook Cycle Mode. If you
press "
10. On The Fly Cooking
A) To change programs while the oven is running, select User Option OP:51, and then press
the number button that represents the preset program of your choice. The preset cooking
program will start automatically.
B) The screen displays the remaining cooking time.
C) When the cooking program finishes, the oven will enter End of Cook Cycle Mode.
" button under this mode, the oven will enter Pause Mode.
11. Time Defrost Function
A) In Ready Mode, press "DEFROST" button. The screen will display "00.00".
B) Press number buttons to input defrosting time. The maximum time is 99 minutes and
99 seconds.
C) Press "
D) The remaining cooking time will be displayed. When the cooking program finishes, the
oven will enter End of Cook Cycle Mode. If you press "
oven will enter Pause Mode.
" to start defrosting. The default power is power level 20%.
" button under this mode, the
12. Programming Mode
This mode allows the user to assign cook times and power levels to the once touch button.
A) Open the door and press "1" pad for 5 seconds, the buzzer will sound once and enter to
Programming Mode.
B) "PROGRAM" displays.
C) Setting Program: Press number button to set the program. 2 seconds later, the screen will
display the time associated with that number button.
D) Press "POWER LEVEL" button, "%POWER" displays. Press number buttons to select power
level you want and the existing power setting will display. You can then enter a new power
setting. If you want to choose full power level, press "1" and "0" successively. The the
screen will display "%POWER". If no power is chosen, 100% power is default.
Note: Set the time first, then choose the power.
E) After setting the time and power, press "
program saved, "PROGRAM" displays.
", the cooking program will be saved. When the
13
Page 14

User Manual
the screen
number buttons will cause
the oven to run the
" button,
the screen
number buttons will cause
the oven to run the
9. Preset Program Cook Mode
A) This mode allows cooking of food items through a one pad touch operation. While in
Ready Mode, pressing number buttons will cause the oven to run the Preset Program
associated with that number button.
B) During this mode, the screen displays the remaining cooking time. When using multi-stage
cooking, the total remaning cooking time displays not a particular stage cooking time.
C) When the cooking program finishes, the oven will enter End of Cook Cycle Mode. If you
press "
10. On The Fly Cooking
A) To change programs while the oven is running, select User Option OP:51, and then press
the number button that represents the preset program of your choice. The preset cooking
program will start automatically.
B) The screen displays the remaining cooking time.
C) When the cooking program finishes, the oven will enter End of Cook Cycle Mode.
" button under this mode, the oven will enter Pause Mode.
11. Time Defrost Function
A) In Ready Mode, press "DEFROST" button. The screen will display "00.00".
B) Press number buttons to input defrosting time. The maximum time is 99 minutes and
99 seconds.
C) Press "
D) The remaining cooking time will be displayed. When the cooking program finishes, the
oven will enter End of Cook Cycle Mode. If you press "
oven will enter Pause Mode.
" to start defrosting. The default power is power level 20%.
" button under this mode, the
12. Programming Mode
This mode allows the user to assign cook times and power levels to the once touch button.
A) Open the door and press "1" pad for 5 seconds, the buzzer will sound once and enter to
Programming Mode.
B) "PROGRAM" displays.
C) Setting Program: Press number button to set the program. 2 seconds later, the screen will
display the time associated with that number button.
D) Press "POWER LEVEL" button, "%POWER" displays. Press number buttons to select power
level you want and the existing power setting will display. You can then enter a new power
setting. If you want to choose full power level, press "1" and "0" successively. The the
screen will display "%POWER". If no power is chosen, 100% power is default.
14
Note: Set the time first, then choose the power.
Page 15

User Manual
" button,
" button,
" button,
E) After setting the time and power, press "
program saved, "PROGRAM" displays.
F) Change this whole section to: If your programmed cooking time exceeds the max cook
time allowed, when you press the "
times briefly to alert you that the program has not saved. The screen will then return to
displaying "PROGRAM" to prompt another attempt.
G) Close the door and the oven will return to Ready Mode. If you press the "
the setting process, the oven will return to Door Open Mode. You unsaved program will be
lost. If there is a program saved, you can select the preset number and the program will
run. If there is no program saved, the buzzer will sound to signal an error.
For example: set the program as memory cooking. Power level 70% and cooking time is
1 minute and 25 seconds.
Step1: Open the door, press number button "1" for 5 seconds, "PROGRAM" displays.
Step 2: Press number button "3", the screen will display "P:03", after two seconds.
Step 3: Press number buttons "1", "2" and "5" to input the cooking time.
Step 4: Press "7" button, "1:25 70" displays. Setting finished.
Step 5: Press "
related program will start.
" to save. When you use the program next time, just press "3", the
", the cooking program will be saved. When the
" to save the program, the microwave will beep three
" button during
Note:
1) If the electricity is cut off, the saved program will not be lost.
2) If the program need to reset , just repeat the above steps.
3) If you press "
not be saved.
" at the last step, it will return to Ready Mode and your setting will
13. Double/Triple Quantity Cooking
A) If the "X2" or X3" button is pressed in Ready Mode, followed by the starting of a Preset
Program, or if the "X2" or X3" button is pressed in 5 seconds of starting a Preset Program,
the oven will start cooking with the quantity preset cooking time.
B) Press "X2", "DOUBLE" displays. Press "X3", "TRIPLE" displays. When you press number
buttons, the screen will display the quantity preset time.
For example: number button "5" and its preset time is 1 minute. Then press "X2", then time
will change to 1:00*2=2 (2 minutes).
C) When the cooking program finishes, the oven will enter End of Cook Cycle Mode.
15
Page 16

User Manual
" button,
" button,
14. Stage Cooking Programming
This mode allows the user to cook food items at manual cook mode and programming mode.
A) Three stages can be set at most under cooking mode or programming mode. After setting
the power and time for the first stage, press " Time Entry " to set the second stage. And the
same step to set the third stage.
B) When setting the second or third stage, press “Time Entry”, "STAGE 2","STAGE 3" displays.
C) Press "
Example: In programming mode, press number buttons "3" to set two stages of
cooking. The first stage is PL7 and time is 1 minute, 25 seconds. The second stage is
PL5 and 5 minutes, 40 seconds. The steps are as follows:
1) Open the door. Press number button "1" for 5 seconds. "PROGRAM" displays.
2) Press number button "3", the screen will display "P:03". After two seconds, the screen
3) Press "1","2","5" to input the cooking time. "1:25" displays.
4) Press "Med-Hi 70%", "1:25 70" displays.
5) Press "Time Entry", "STAGE 2" displays.
6) Press "5", "4", "0" button, "5:40" displays.
7) Press "Medium 50% ", "5:40 50" displays.
8) Press "
9) The total time counts down.
" button to start cooking.
will display the related time ":30".
The first stage is finished.
The second stage is finished.
" button to start cooking.
16
15. Filter Cleaning Function
A) If User Option OP:51 is selected and the setting time arrives, the oven will remind the user
to cleaning the filter.
Note: The oven must be electrified.
B) The screen will display "CLEAN FILTER". At this time, pressing "
door will put the oven into Ready Mode.
C) If you do not need to clean the filter, press "
the reminder information. Otherwise, the oven will remind you all the time during Idle Mode.
" button and hold for 3 seconds to clear out
" button or opening the
Page 17

User Manual
" button,
" button,
" button,
" button,
" button,
" button,
" button,
16. USB Function
A) During Ready Mode, insert the U disk which saved the "Utable" file.
B) Press "USB" button to update the data of computer board. "LOADING" displays.
C) If the update is successful, the screen will display "SUCCESS". Otherwise, "Fail" will display.
D) Press "
" or open the door to finish it.
17. Use Option Mode
This mode allows the user to cook food items at manual cook mode and programming mode.
A) Open the oven door and press "2" pad for 5 seconds. The buzzer sounds once and enter
this mode.
B) The screen displays "OP: - -".
C) Press any number button to enter related mode setting.
For example: to set the voice of the buzzer to medium. Press " 2 ", "OP:22" displays.
If you want to change, keep pressing "2", the screen displays "OP:20", "OP:21","OP:22",
"OP:23", "OP:20" .....in cycle.
D) Press "
E) During setting process, press "
Ready Mode.
F) If "
previous way.
" to save the current setting. After saved, "OP: - -" display again.
" to enter Door Open Mode. Close the door will enter
" button not pressed at the last step, the program cannot be saved but stay at
18. Factory Default Setting
In the Ready Mode, pressing "
A) Press "
If the microwave is in the factory-default setting, the screen will display “11” after three
seconds. Then the oven will cycle to the Ready Mode. Press "
and go back a step on the display.
If the microwave oven is not in the factory-default setting, the screen will display “00”.
Press "
buzzer sounds once after a self-test and the screen will then display “11” or “00”.
B) If do not press "
Note: Be careful in the operation as it will restore all configurations to factory-default settings.
" and “0”. The buzzer will sound once and the screen will display “CHECK”.
" to enter factory-default settings and the screen will display ‘CLEAR”. The
" when the display " 00 ", the setting will cancel.
" will restore factory-default settings.
" to cancel the display
17
Page 18
User Manual
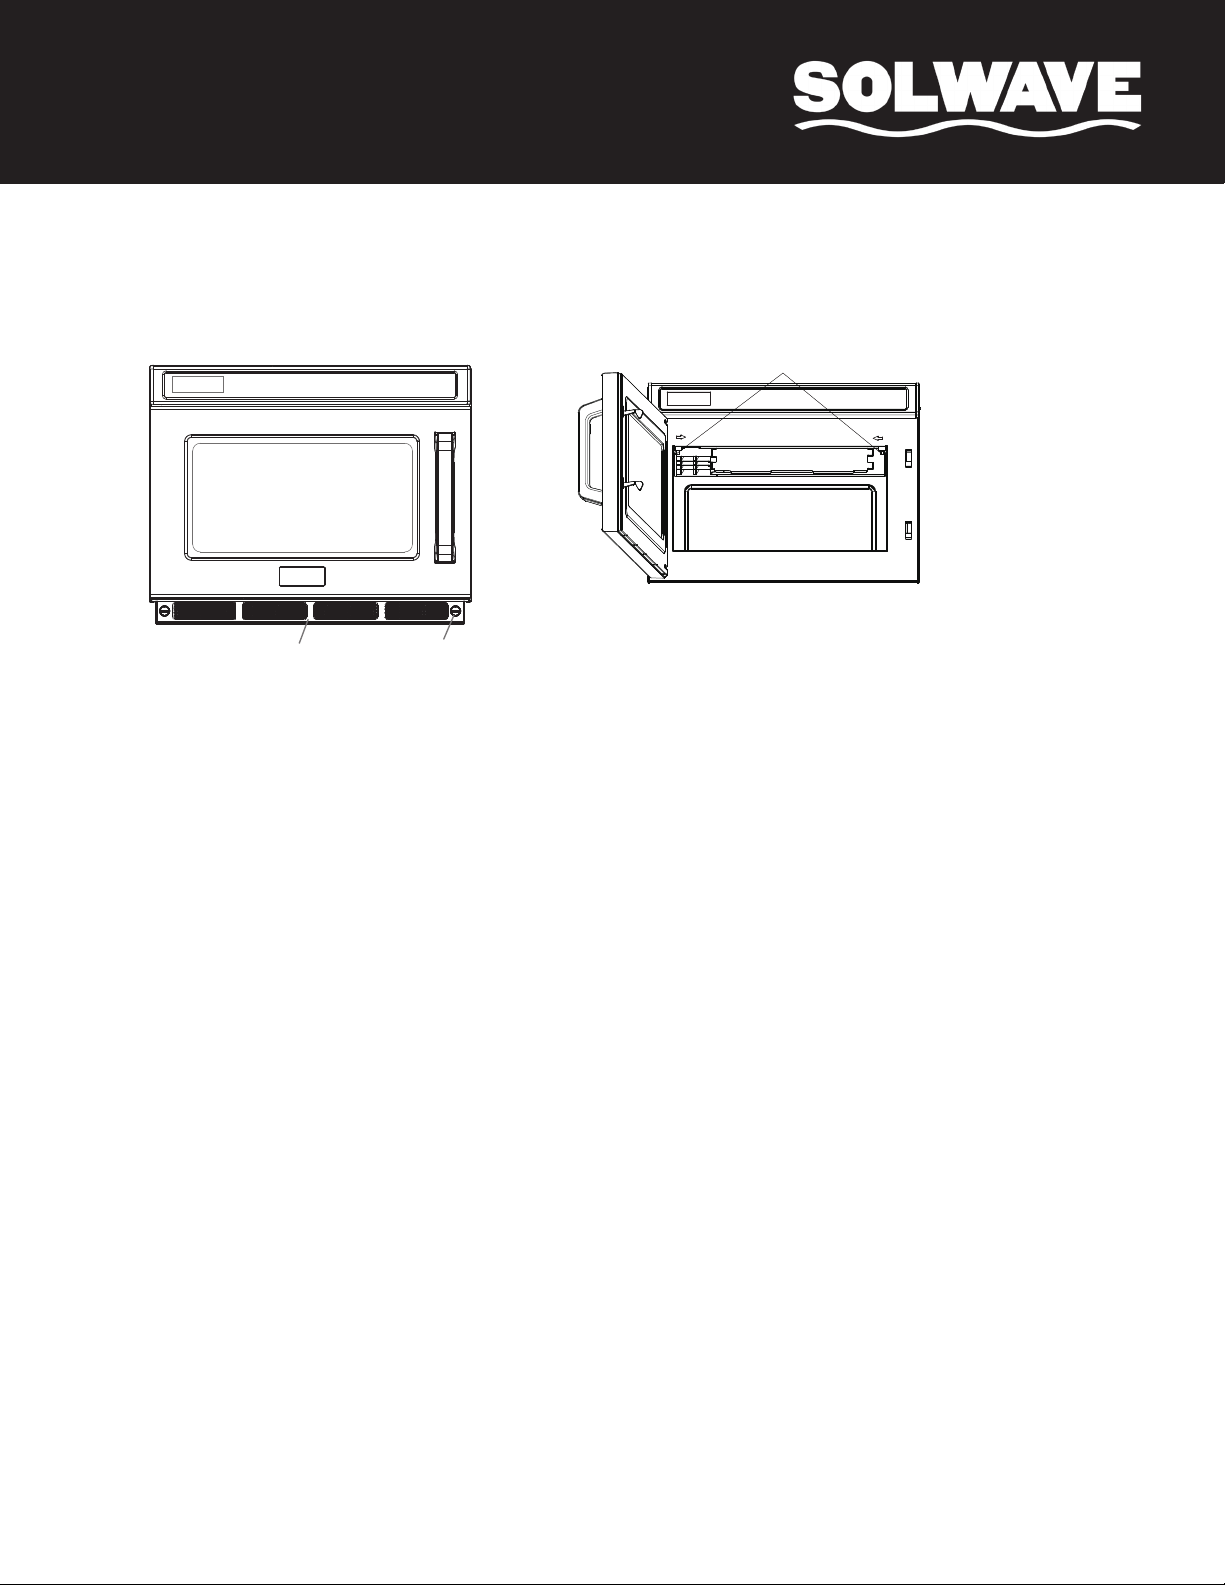
Filter cleaning
Filter Filter screws
The front filter serves as the air inlet; the filter should be cleaned on time
to keep the chamber clean.
1) Turn counterclockwise to unscrew and take down the filter; and wash it
with warm water.
2) To install the filter screen, tighten the screws clockwise.
3) Make sure the filter is installed before use of the microwave oven.
4) The factory setting has the function to remind the user of washing the
filter every 30 days.
Splash shield cleaning
1) Detaching: Hold the two buckle positions in front of the splash shield
with your (as shown by the arrows). Exert your strength following the
direction of the arrows and pull downwards after you have pulled out
the buckle.
Caution! Make sure the splash shield is installed
correctly before use of the microwave oven!
18
2) Wash the splash shield.
3) Installation: Pick up the splash shield and place it into the chamber
so that the first pin is aligned with the hole on the rear plate of the
chamber. Then push the other side to insert all positioning pins into
their respective holes.
Page 19

User Manual
Limited Warranty
Solwave Models: 180MWHD12, 180MWHD18, 180MWHD21
All new Solwave models used for commercial purpose are warranted against defects in materials and workmanship
under normal use and maintenance. The Warranty runs for one year on parts and labor and three years on the
magnetrons from the date of original installation and is for the benefit of the original purchaser only. All other warranties,
expressed or implied, statutory or otherwise, including without limitation any implied warranty of merchantability for
fitness for purposes are excluded. The seller shall in no event be liable for direct, indirect or consequential damages in
connection with Solwave commercial products.
Exclusions
The following conditions are not covered by warranty:
• Equipment damage or equipment failure occurs because of accident, carelessness, lack of proper set-up,
supervision when required, or if the equipment is installed or operated in any manner contrary to the installation and
operating instructions.
• Equipment damage or equipment failure due to improper installation, improper utility connection or supply, and
problems due to ventilation.
• Equipment that has not been used appropriately, or has been subject to misuse, neglect, abuse, accident, alteration,
negligence, damage during transit, delivery or installation, fire, flood, or act of God. • Equipment that has the model
number or serial number removed or altered.
• Equipment that has been changed, altered, or modified or repaired by other than an Authorized Service Agency.
Solwave shall not be held liable for any damages to any person or property which may result from the use of the
equipment thereafter.
This warranty does not apply to, and Solwave is not responsible for any warranty claims on products sold or used
outside of the contiguous United States.
This equipment is intended for commercial use only. Warranty is void if equipment is installed in other than commercial
applications.
19
 Loading...