

Page 1

TestView
TCP/UDP/COM Test Program
User Manual
Ver 2.1
Feb. 19, 2010
Page 2

Revision History
Revision Date Doc Version Pages Description
10/17/2007 1.0 All Written by khheo
11/25/2008 2.0 Partial File Transfer Added by hjnoh
2/19/2010 2.1 Partial Added by ghpark
Copyright 2007-2008 SystemBase Co., Ltd. All rights reserved.
Website http://www.sysbas.com/
Tel 82-2-855-0501
FAX 82-2-855-0580
16F Daerung Post Tower-1, Guro-dong, Seoul, Korea
For any inquiries or comments, contact to tech@sysbas.com
Page 3

TestView
Contents
Contents
Chapter 1. Overview.....................................................................................1-1
1.1 Features.................................................................................................................... 1-1
1.2 Software.................................................................................................................... 1-1
1.3 Hardware................................................................................................................... 1-1
1.4 Environment.............................................................................................................. 1-2
1.5 Protocols................................................................................................................... 1-2
Chapter 2. Installation..................................................................................2-1
2.1 How to Install............................................................................................................. 2-1
2.2 Running(2000/XP/2003)............................................................................................ 2-3
2.3 Running(Vista/2008/7)............................................................................................... 2-4
Chapter 3. Menu ...........................................................................................3-1
3.1 Menu Description...................................................................................................... 3-1
Chapter 4. Port Menu ...................................................................................4-1
4.1 Com Port................................................................................................................... 4-1
4.1.1 Features ........................................................................................................................ 4-1
4.1.2 Opening Com Ports....................................................................................................... 4-1
4.1.3 Open Com Port Configurations..................................................................................... 4-2
4.1.4 Com Ports Window Main Menu..................................................................................... 4-3
4.1.5 Com Ports Window Description .................................................................................... 4-3
4.1.6 Connect / Disconnect Button......................................................................................... 4-4
4.1.7 Setup Button.................................................................................................................. 4-4
4.1.8 Clear Button .................................................................................................................. 4-5
4.1.9 Send Data/Stop Data..................................................................................................... 4-5
4.1.10 Start Thro ughput/Stop Throughput................................................................................ 4-6
4.1.11 Terminal......................................................................................................................... 4-6
4.1.12 Add Port ........................................................................................................................ 4-6
4.2 TCP/UDP Port........................................................................................................... 4-7
4.2.1 Opening Ports ............................................................................................................... 4-7
4.2.2 Open TCP/UDP Port Configuration............................................................................... 4-7
4.2.3 TCP Client Configuration............................................................................................... 4-8
4.2.4 TCP Server Configuration............................................................................................. 4-9
4.3 Open ........................................................................................................................4-11
4.4 Save.........................................................................................................................4-11
4.5 Exit...........................................................................................................................4-11
Chapter 5. File Transfer Menu.....................................................................5-1
5.1 Summary................................................................................................................... 5-1
5.2 Menu......................................................................................................................... 5-1
5.2.1 COM Port ...................................................................................................................... 5-2
5.2.2 Transfer Option.............................................................................................................. 5-2
5.2.3 Transfer Status.............................................................................................................. 5-3
5.3 Transferring Files...................................................................................................... 5-4
5.3.1 Sending File .................................................................................................................. 5-4
5.3.2 Receiving File................................................................................................................ 5-5
I
Page 4

TestView
Contents
Chapter 6. Settings Menu ............................................................................6-1
6.1 Overview................................................................................................................... 6-1
6.2 Macro........................................................................................................................ 6-1
6.3 Font........................................................................................................................... 6-1
Chapter 7. Windows Menu...........................................................................7-1
7.1 Tile ............................................................................................................................ 7-1
7.2 Cascade.................................................................................................................... 7-2
Chapter 8. Uninstalling TestView................................................................8-1
II
Page 5

TestView
Chapter 1. Overview
TestView is a serial / socket communication test application running on Windows. It allows exact and
smooth test environment for serial Multiports, embedded modules, and device servers manufactured
and distributed by SystemBase Co., Ltd.
1.1 Features
This application can be used to test ports for almost all Multiport and device server products
manufactured and distributed by SystemBase Co., Ltd.
z Performance test provides numeric measures.
z Received data can be displayed in the window.
z Various protocols are supported.(COM, UDP, TCP)
z File transfer test through COM ports.
Chapter 1. Overview
1.2 Software
It is a Windows application, composed of a single installer file
TestView-setup.exe
1.3 Hardware
z TCP/UDP Port
y Portbase 3010+/ 3020+/ 3040/ 3080/ 3160/ 3161
y Eddy Modules
z COM Port
y Redirector Com
y Multi-2,4,8,16,32 PCI Multiport
y Multi-1,2,4,8 USB Multiport
1-1
Page 6

TestView
1.4 Environment
y As the number of test ports increases, more CPU power and higher memory is required.
y CPU : Pentium 1Ghz or better
y Memory : 512Mb or higher
y O/S : Windows 2000/XP/2003/Vista/2008/7
y CD-ROM : 4X or faster
y Network : 10M Ethernet or faster
1.5 Protocols
y COM Serial
y TCP Server/Client
y UDP Server/Client
Chapter 1. Overview
1-2
Page 7
TestView
Chapter 2. Installation
Installation process is simple and intuitive. Follow install steps provided below.
2.1 How to Install
1. You can install TestView with the installation CD or the executable file.
2. Insert the installation CD into the CD-ROM drive to see an auto-run menu screen.
Select TestView from the menu to start installation. When running with the executable
file, simply run TestView_Setup.exe.
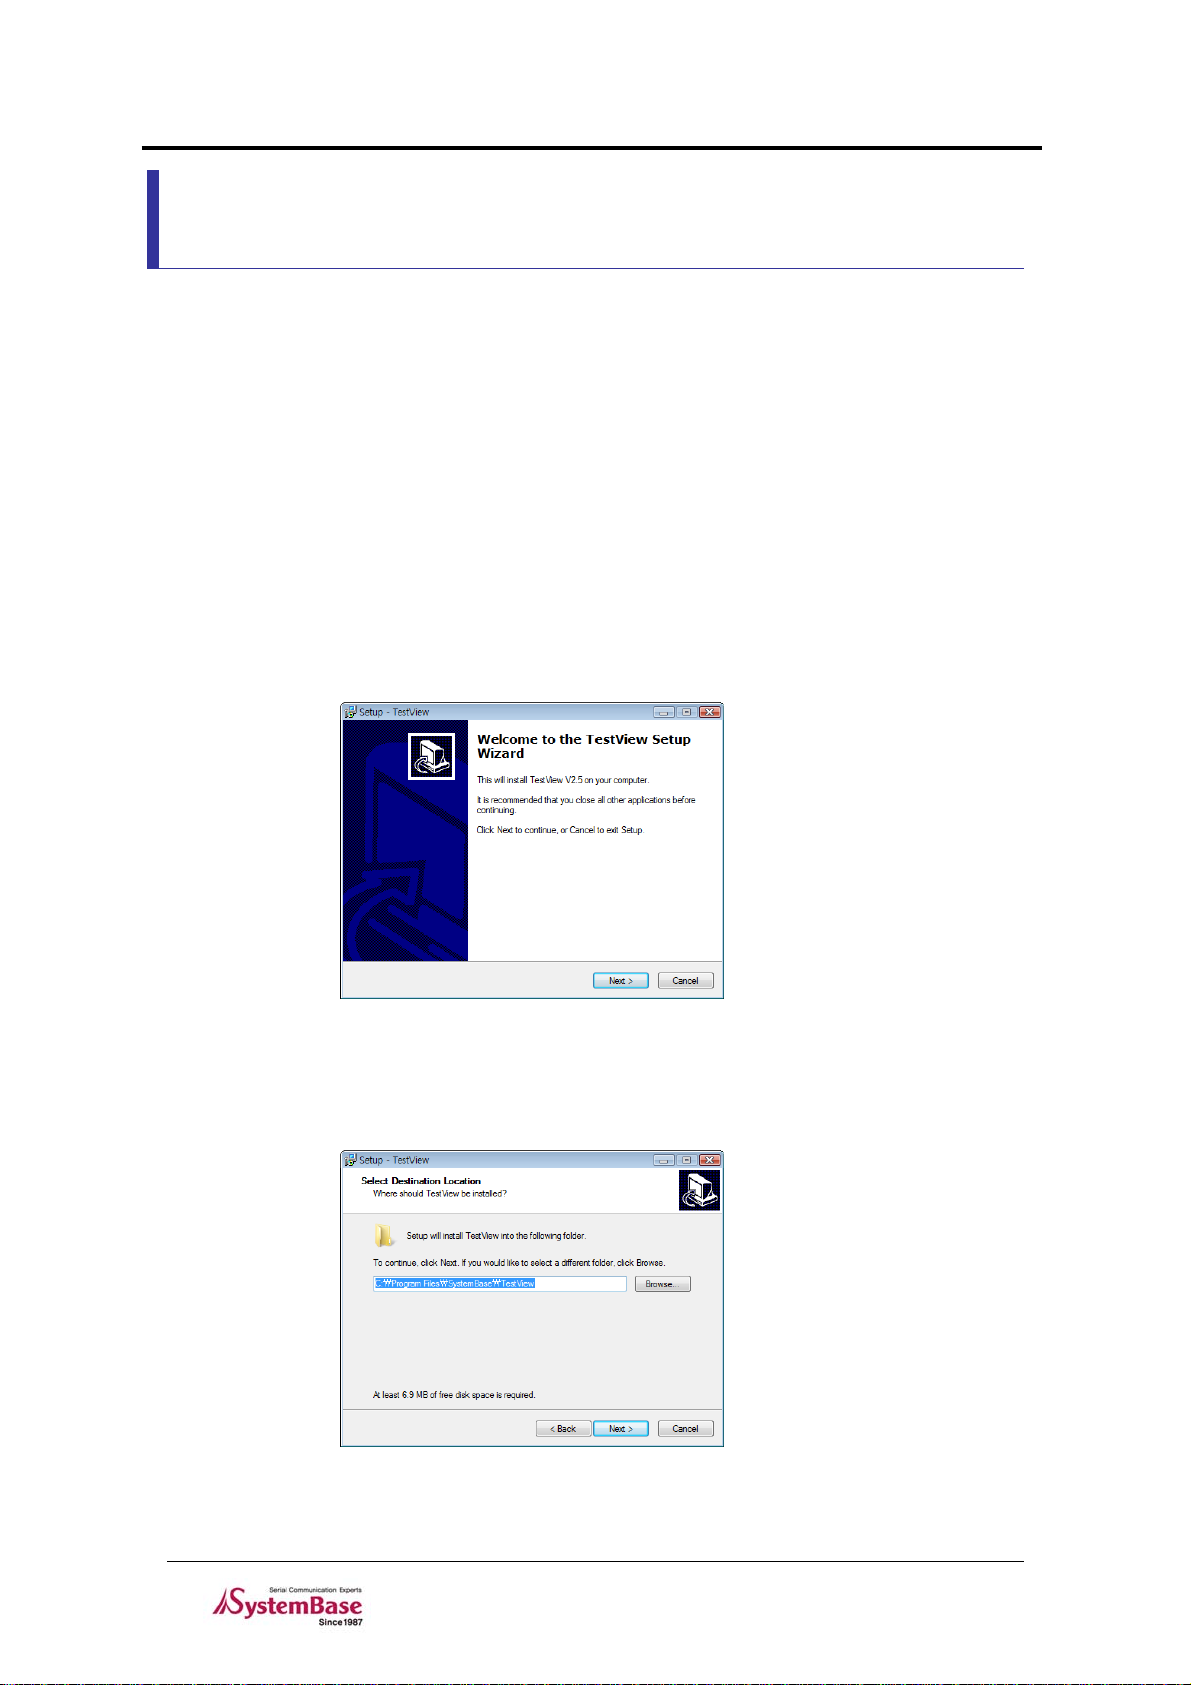
3. If successful, you will see the bottom-left window. Click “Next”.
Chapter 2. Installation
4. You can change the destination installation directory by clicking “Browse…” button.
It is recommended, however, that you keep the default location. from the bottom-right
corner. Click “Next” after choosing the target directory.
2-1
Page 8
TestView
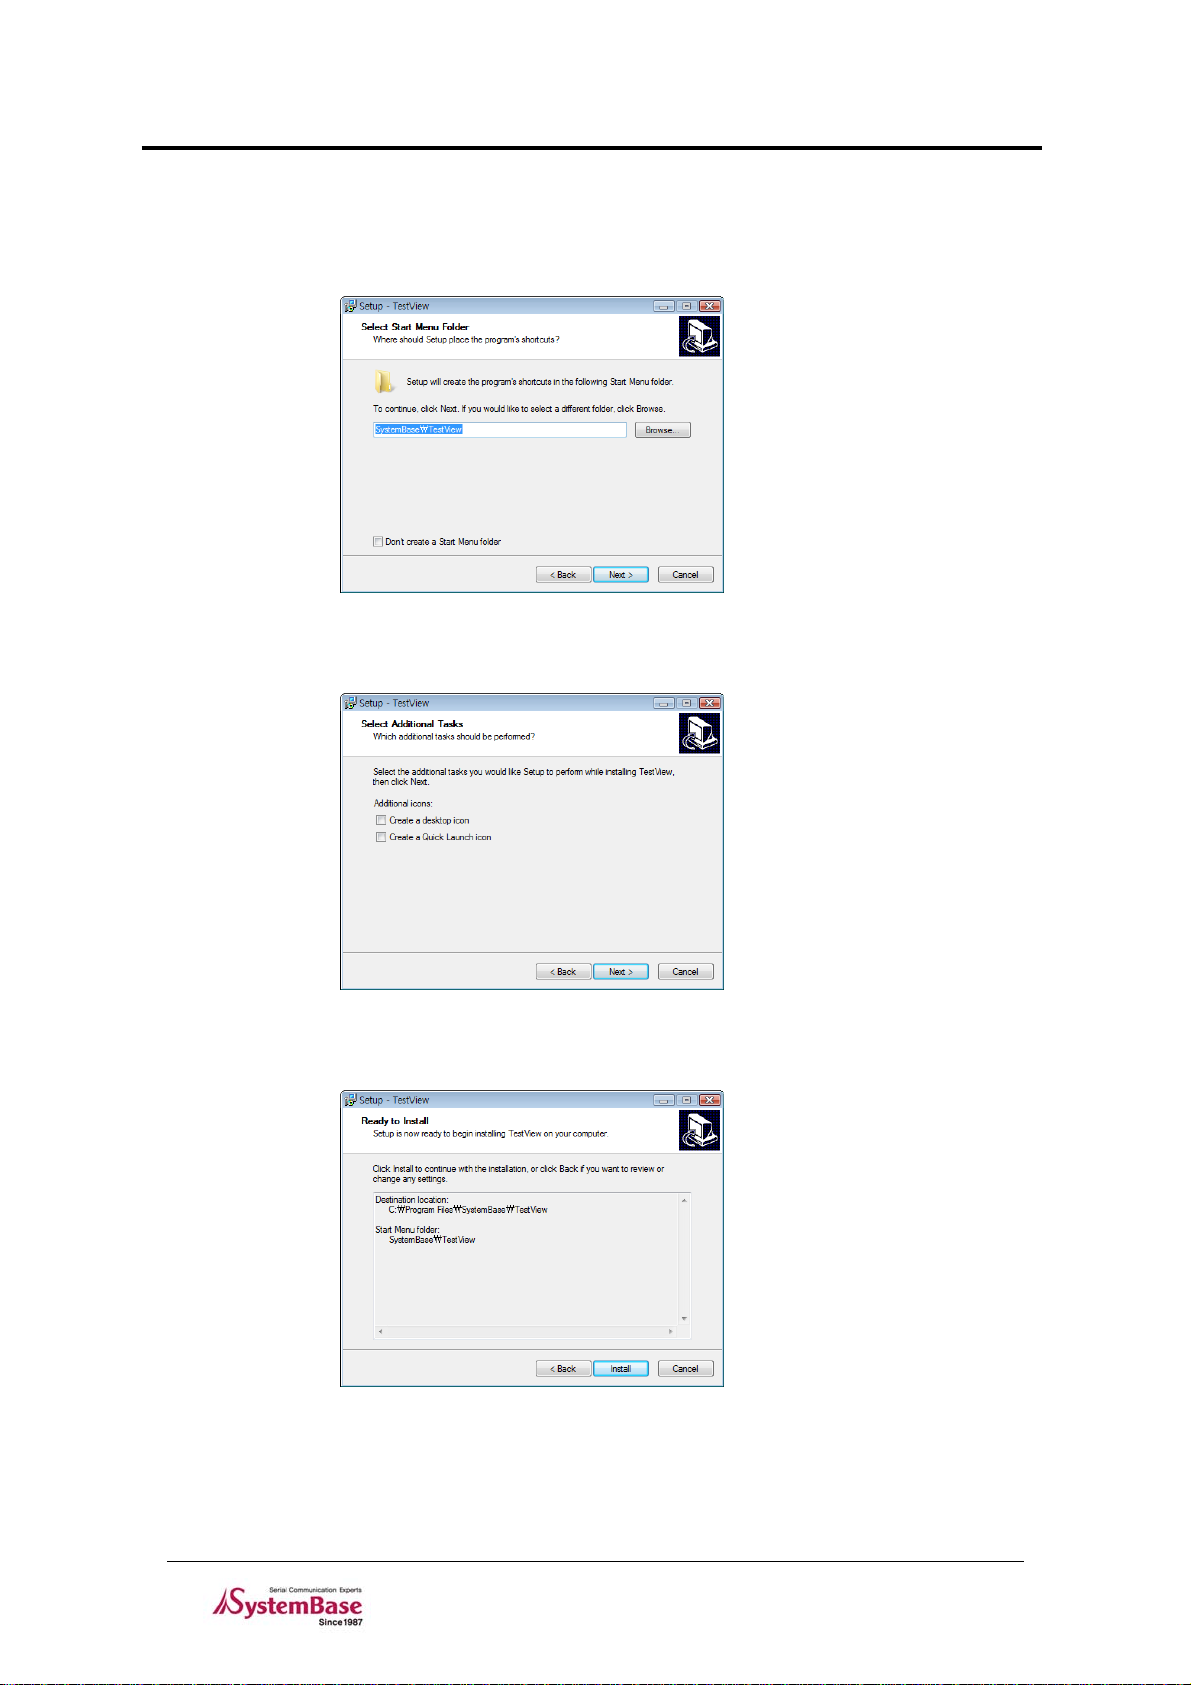
5. Select start menu folder. You can choose not to create start menu folder.
6. Choose to create a desktop icon and a Quick Launch icon. Click “Next”.
Chapter 2. Installation
7. Click ”Install”.
2-2
Page 9
TestView
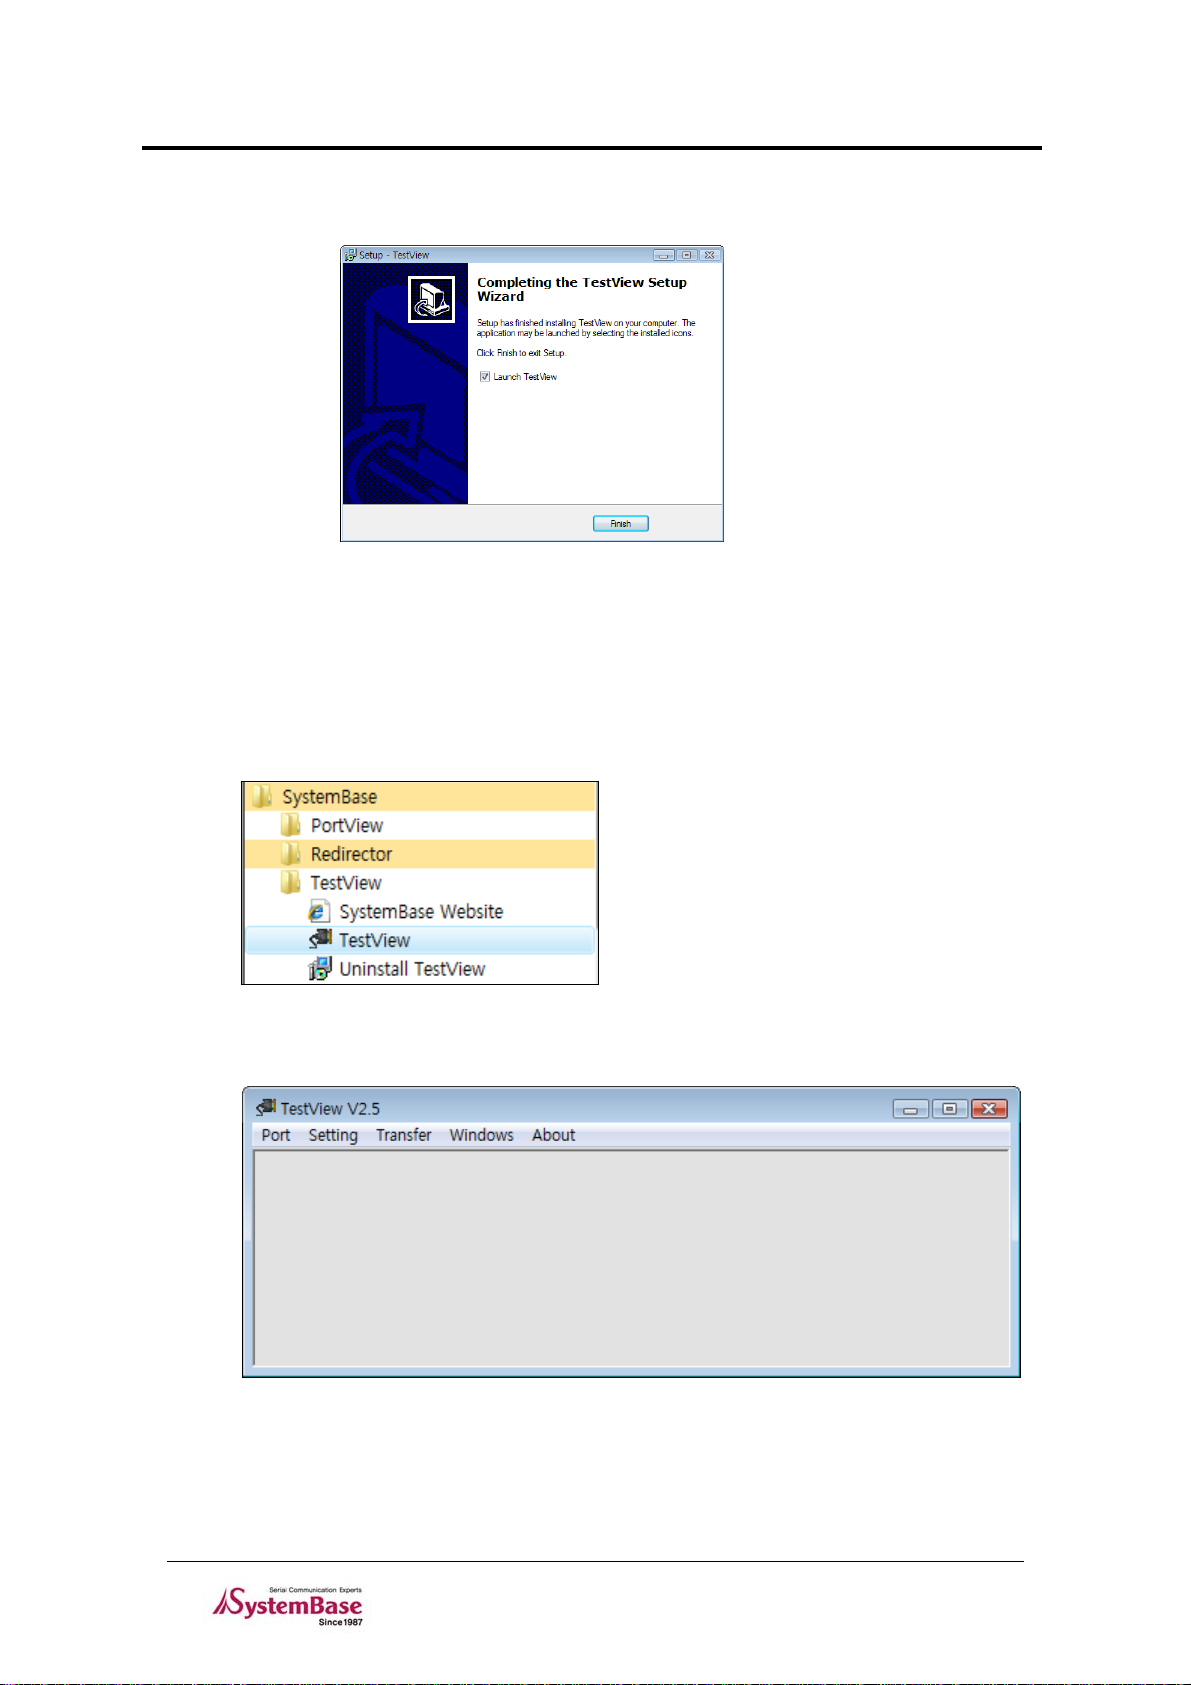
8. Click “Finish” to complete TestView installation.
2.2 Running(2000/XP/2003)
Chapter 2. Installation
1. If you have a desktop icon for TestView, double-click the icon to run the application.
2. Otherwise, Select “Start Æ All Programs Æ SystemBase Æ TestView Æ T estView”.
3. If successful, you will see the main window of TestView similar to the one shown
below.
2-3
Page 10
TestView
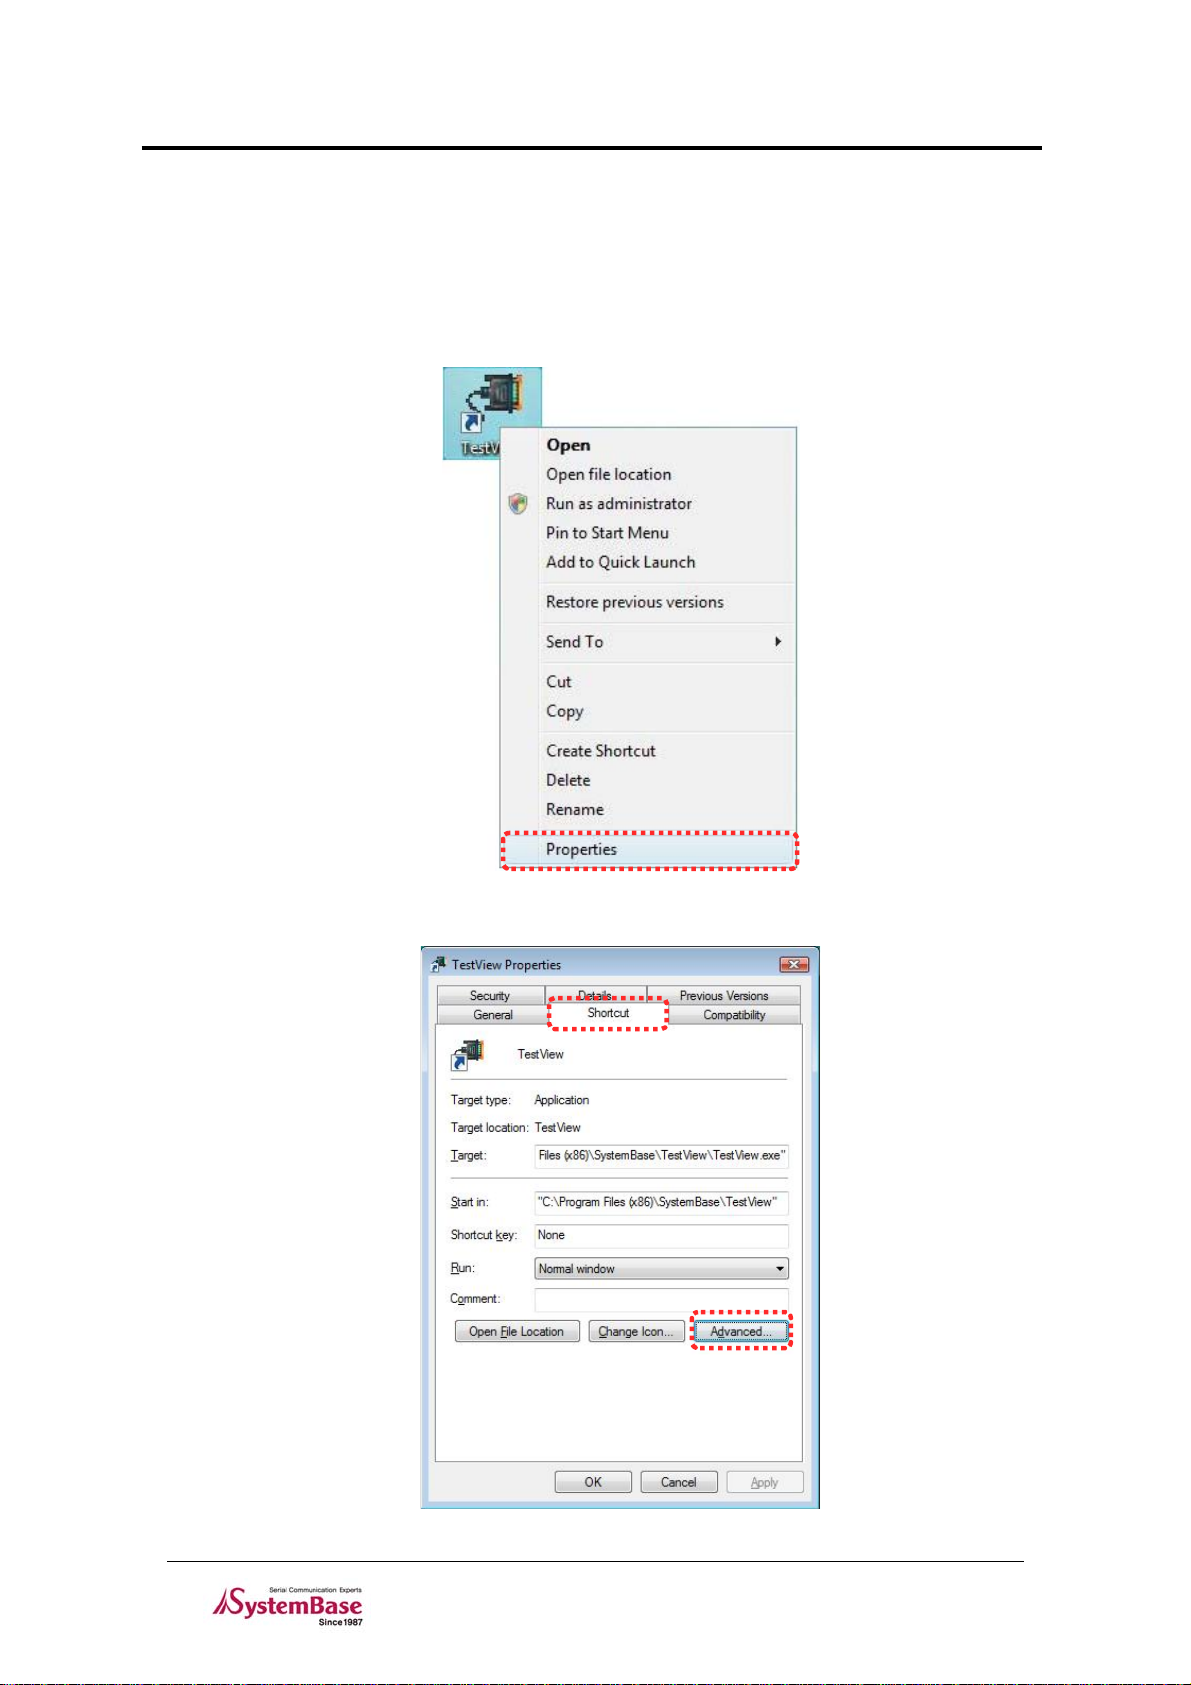
2.3 Running(Vista/2008/7)
1. It is necessary to setting following methods because of enhanced securities in
windows vista/2008/7.
2. Right click “TestView” icon on the desktop, then select “Properties”
Chapter 2. Installation
3. Select “Shortcut” tab, then click “Advanced”.
2-4
Page 11

TestView
4. Check “Run as administrator” in “Advanced Properties” window, then click “OK”
button.
Chapter 2. Installation
2-5
Page 12

TestView
Chapter 3. Menu
Since TestView has complex menu system, detailed menu description will be provided in the following
chapters. This chapter is a brief outline for menu system. From TestView version 2.5, Burning menu is
removed and Transfer menu is added. In this manual, previous screenshots from version 2.0, which
shows Burning menu instead of Transfer menu, is still used for pages that are not related with those two
menus. But from TestView 2.5, only Transfer menu exists so please don’t be confused.
3.1 Menu Description
Main Menu Sub Menu Description
Com Port Open and test serial ports.
TCP/UDP Port Open and test TCP/UDP port s.
Port
Settings
Transfer
Windows
About
Open Read information stored in files.
Save Save information as files.
Exit Exit the program.
Macro Assign macro data to transfer. (F1~F12)
Font for Terminal Change fonts.
Serial Thread Priority Sets serial operation thread priority
TCP/UDP Thread Priority Sets TCP/UDP operatio n thread priority
File Send Send file through COM port.
File Receive Receive file through COM port.
Tile Open windows in tile style.
Cascade Open windows in cascade style.
Close Terminal Close all terminal windows
Close All Close all child windows
Help Open help.
About Open program information.
Chapter 3. Menu
3-1
Page 13

TestView
Chapter 4. Port Menu
This chapter describes port menu in the main menu.
4.1 Com Port
Open and test Com Ports. TCP/UCP ports are described in the following section.
4.1.1 Features
z New windows are available to monitor incoming data to Com Ports.
z Throughput is displayed.
z Test data can be transferred via COM ports.
Chapter 4. Port Menu
4.1.2 Opening Com Ports
z Select Port Æ Com Port.
4-1
Page 14

TestView
4.1.3 Open Com Port Configurations
Select a beginning port number and assign quantity. Also available are baud rate, data bits, parity bits,
and stop bits. (When you assign 64 ports, the system automatically detects COM port s and opens them.)
Click “OK” when finished with the configuration.
z “Open Com Port” Menu Description
y Com Region: 4 ranges can be defined. Each range can support up to 64 ports; 256
ports can be assigned in total.
y Com Options: Communication options.
Baudrate: Transmission speed
Data Bits: Data Bits
Parity Bits: Parity Bit
y Send Flow Control: Select send flow control method.
y Receive Flow Control: Select receive flow control method.
y Connect On Open: Open COM Ports immediately.
Chapter 4. Port Menu
4-2
Page 15

TestView
4.1.4 Com Ports Window Main Menu
“COM Ports” menu is presented when you open ports. The following example shows that 8 ports are
opened from COM7 to COM14. Buttons affect all port s shown in this window.
z Menu description
y Connect : Open all or selected ports.
y Disconnect : Close all or selected ports.
y Setup : Change default communication options for individual ports.
y Clear : Initialize all counts for all or selected ports.
y Send Data : Send character data (A~Z) to all or selected ports.
y Start Throughput : Start calculating throughput for all or selected ports.
y Stop Throughput : Stop calculating throughput for all or selected ports.
y Terminal : Run port emulator for all or selected ports
y Add Port: Add Additional Ports
Tip
When you drag your mouse for more than 1 ports and right-click, pull-down menu is
displayed. You can control port operations with this menu.
Chapter 4. Port Menu
4.1.5 Com Ports Window Description
Port information is described in a number of parameters.
z Columns
y Port: Com Port number
y Status: connection status. Connect: connected, Close: disconnected.
y Option: Baudrate/parity/data bit/stop bit/Flow control type displayed.
y Signals: RTS/DTR/CTS/DSR/DCD/RI signal displayed.
y Send Bytes: Tx Byte count
y Receive Bytes: Rx Byte count
y Parity: Parity bit error count
y Overrun Error: Overrun Error count
y Transmit throughput/Receive throughput: Tx/Rx data per second
y Running: Time elapsed from the opening of the port. Cleared when ‘Clear’ is selected.
4-3
Page 16

TestView
4.1.6 Connect / Disconnect Button
Connect option opens selected ports. All menu optio ns are activated aft er the port is opened.
z Use buttons to connect or disconnect all ports displayed in the window.
z When you want to connect or disconnect only selected ports, refer to the screenshot below. Ports
are connected in this example.
Chapter 4. Port Menu
4.1.7 Setup Button
The options are identical to what is available in “Open COM Port” menu. This option is handy when you
need to change speed or other options when testing port s.
z When you press “Setup” button, “COM Setting” window is displayed.
z Baudrate/Data Bits/Parity bit/Stop Bits/Flow Control options can be changed. It is recommended,
however, that you use default settings ex cept the baudrate.
4-4
Page 17

TestView
z Option description in “Com Setting” window
y Com Options: Communication options.
Baudrate: Transmission speed
Data Bits: Data Bits setting
Parity Bits: Parity Bit setting
Stop Bits: Stop bit setting
y Flow Control: Select flow control method.
y
4.1.8 Clear Button
“Clear” button clears all information recorded so far .
z Before selecting “Clear”
Chapter 4. Port Menu
z After selecting “Clear”
4.1.9 Send Data/Stop Data
Send pattern data.
4-5
Page 18

TestView
4.1.10 Start Throughput/Stop Throughput
Select “Start Throughput” to see Transmit/Receive throughput. Average data per second is calculated
from the time start button is pressed. Select “S top Throu ghput” to stop calculating.
4.1.11 Te rm in al
Monitor incoming COM port data. The b ackground color for COM port terminals i s black.
Chapter 4. Port Menu
4.1.12 Add Port
Add additional ports. Refer to 4.1.3 Open Com Port Configuration for more details.
4-6
Page 19

TestView
4.2 TCP/UDP Port
This option allows testing TCP Server/Client and UDP protocol s.
4.2.1 Opening Ports
Select Port Æ TCP/UDP Port from the menu.
4.2.2 Open TCP/UDP Port Configuration
Chapter 4. Port Menu
Set connection type, protocols, IP Address, S t art port, and Quantity.
z “Open TCP/UDP Port” Options
y There are four Connection Type options available.
TCP Client : Connect to the remote TCP server . Set se rver’s IP address and the port.
TCP Server : Run the TCP server with the PC. PC’s IP address is used by the server.
UDP Client : Connect to the remote UDP server. Set server’s IP address and the port.
UDP Server : Run the UDP server with the PC. PC’s IP address is u sed by the server .
y IP Address: IP Address
y Start Port: The beginning port number.
y Quantity: The number of ports to test.
y
Note
UDP Server/Client test details are identical to TCP Server/Client settings.
All other options are identical to COM Ports except the “Setup”menu, so refer to “Com Ports
more information.
“for
4-7
Page 20

TestView
4.2.3 TCP Client Configuration
z Test tips
y From the TCP client, “Connect” and “Send Data” to the server to send pattern data.
Select “Start Throughput” to calculate average throughput.
y Click “Terminal” to monitor incoming data.
y Click “Clear” when you want to reset all information recorded so far.
y Select “Data Stop” and “Disconnect” if you want to quit the connection.
z Set the remote server IP address and the port number.
Chapter 4. Port Menu
z Transmit test pattern data after making the connection to the remote server.
4-8
Page 21

TestView
z Click “Terminal” button to monitor test pattern data displayed in the window.
Chapter 4. Port Menu
4.2.4 TCP Server Configuration
z When you select TCP Server, the current IP address of the PC is automatically assigned. Enter
the beginning port number in the ‘Start Port’ field. Up to 64 ports can be assigned to maximum 4
servers.
4-9
Page 22

TestView
z When you select ‘Connect’ in the TCP Server mode, the status changes to ‘Waiting..’.
z When you connect to the server from remote sites, destination IP address and data are displayed
in the terminal window. Click ‘Send Data’ to send pattern data. Incoming data is displayed in the
terminal window, just as in COM port mode. The difference is in background color of the
terminal; it is blue in TCP mode.
Chapter 4. Port Menu
4-10
Page 23

TestView
4.3 Open
This option is used when restoring previous configurations to another setting. When you need to
configure same settings to multiple devices, this option can be handy.
z This menu opens INI configuration files.
Chapter 4. Port Menu
4.4 Save
This option is used when saving current configurations to a file. When you need to configure same
settings to multiple devices, this option can be handy.
z This menu saves settings in INI configuration file format.
4.5 Exit
Terminate the program.
4-11
Page 24

TestView
Chapter 5. File Transfer Menu
5.1 Summary
Chapter 5. File Transfer Menu
You can transfer file through serial COM Ports in File Transfer Menu. Go to Menu Æ Transfer Æ File
Send to open File Send window or File Receive to open File Receive window.
5.2 Menu
File Transfer window looks as follows. It is divided into three categories, COM Port, Transfer Option and
Transfer Status. Notice that only COM Port category is activated. The other two categories will be
activated once you connect the COM Port.
y COM Port: Select COM Port settings
y Transfer Option: Select transfer options
y Transfer Status: Displays transfer status
5-1
Page 25

TestView
5.2.1 COM Port
Y ou can configure COM Port settings in COM Port category.
y Port Number: Select port number
y Baud Rate: Select baud rate
y Parity: Select parity bits
y Data Bits: Select Data bits.
y Stop Bits: Select stop bits
y Flow Control: Select flow control option.
Chapter 5. File Transfer Menu
5.2.2 Tr ansf er Opt ion
You can configure transfer options in Transfer Option category. Options are different between File Send
and File Receive.
z File Send
y File Path: Select the path of the file that will be transferred
y Protocol: Select file transfer protocol
z File Receive
y Destination: Select the destination where the transferred file will be saved
y Protocol: Select file transfer protocol
5-2
Page 26

TestView
5.2.3 Transfer Status
Transfer Status Category displays file transfer status.
y Status: Shows file transfer status.
y Elapsed Time: Shows elapsed time.
y Remaining Time: Shows estimated remaining time.
y Total Bytes: Shows total size of the file being transferred.
y Sent (Received) Bytes: Shows total sent (received) bytes.
y Remaining Bytes: Shows total bytes left to be transferred.
y Transfer Rate: Shows the transferred bytes rate in percentage.
y Transfer Speed (bps): Shows instantaneous transfer speed in bps.
y Transfer Speed (cps): Shows instantaneous transfer speed in cps.
y Avg. Speed (bps): Shows average transfer speed in bps.
y Avg. Speed (cps): Shows average transfer speed in cps.
Chapter 5. File Transfer Menu
5-3
Page 27

TestView
5.3 Transferring Files
In order to transfer file through file transfer menu, you need two COM ports, one for file send and the
other for file receive. Keep in mind that COM port settings and file transfer protocol should be the same
for both COM ports.
5.3.1 Sending File
1. Go to Menu Æ Transfer Æ File Send and open File Send window. Configure COM Port
settings and click “Connect”.
Chapter 5. File Transfer Menu
2. Specify the transfer protocol and the file to be sent. You can either ty pe in manually or click
“Search” to find the file to be sent.
5-4
Page 28

TestView
3. Click “Send” and the file sending will start. You can see that “Status” has changed to “Waiting
to send…”.
5.3.2 Receiving File
1. Go to Menu Æ Transfer Æ File Receive and open File Receive window. Configure COM Port
settings and click “Connect”
Chapter 5. File Transfer Menu
2. Specify the transfer protocol and the directory where the received file will be saved. You can
either type manually or use “Search” button to specify the destination directory.
5-5
Page 29

TestView
3. Click “Receive” and the file receiving will start. You can see that “Status” has changed to
“Waiting to receive…”
4. Once file sending and receiving is done correctly, file transfer will begin.
Chapter 5. File Transfer Menu
5. You can use the “Cancel” button on Transfer Status to cancel transfer.
5-6
Page 30

TestView
Chapter 6. Settings Menu
6.1 Overview
General options used in TestView can be set up with this menu. Macro is used to simply transmit
predefined pattern data with a simpl e function key. Font can be changed with the Font menu.
6.2 Macro
Assign pattern data to be transmitted when you press F1 to F12 keys.
Chapter 6. Settings Menu
6.3 Font
Change fonts displayed in the terminal window.
6-1
Page 31

TestView
Chapter 7. Windows Menu
7.1 Tile
Chapter 7. Windows Menu
7-1
Page 32

TestView
7.2 Cascade
Chapter 7. Windows Menu
7-2
Page 33

TestView
Chapter 8. Uninstalling TestView
Chapter 8. Uninstalling TestView
z Start -> All Programs -> SystemBase -> TestView -> Uninstall TestView
z Select ‘Ye s’ from the confirmation dialog box.
z Uninstall status is shown in the progress bar.
z After uninstall is complete, the success message is displayed.
8-1
 Loading...