

Page 1

Serial/IP® Redirector
User Manual
Version 1.0
March 21, 2014
Page 2

Serial/IP® Redirector User Manual
Modified Date
Version
Pages
Description
Mar. 21. 2014
1.0
All
Written by W. Lee
Copyright (C) SystemBase Co., Ltd. All Rights Reserved.
Website http://www.sysbas.com/
Phone +82-2-855-0501
Fax +82-2-855-0580
16F Daerung Post Tower-1, 228, Digital-ro, Guro-gu, Seoul, Republic of Korea
For any inquiries, please visit our technical support website at http://www.solvline.com/
History
Page 3

Serial/IP® Redirector User Manual Contents
Index
Chapter 1. Serial/IP® Redirector .................................................................... 2
1.1 Introduction ................................................................................................................ 2
1.2 Configuration .............................................................................................................. 2
1.3 Control Panel .............................................................................................................. 3
1.4 Adding or Removing Virtual COM Ports ...................................................................... 4
1.5 Activity ........................................................................................................................ 5
1.6 Trace .......................................................................................................................... 6
1.7 Advanced Settings...................................................................................................... 7
1.8 Proxy Server............................................................................................................... 9
1.9 Configuration on SerialGate ..................................................................................... 10
Chapter 2. Installation ................................................................................... 11
2.1 Install Guide ..............................................................................................................11
2.2 Uninstall Guide ......................................................................................................... 15
Page 4
Serial/IP® Redirector User Manual Chapter 1. Serial/IP® Redirector
Chapter 1. Serial/IP® Redirector
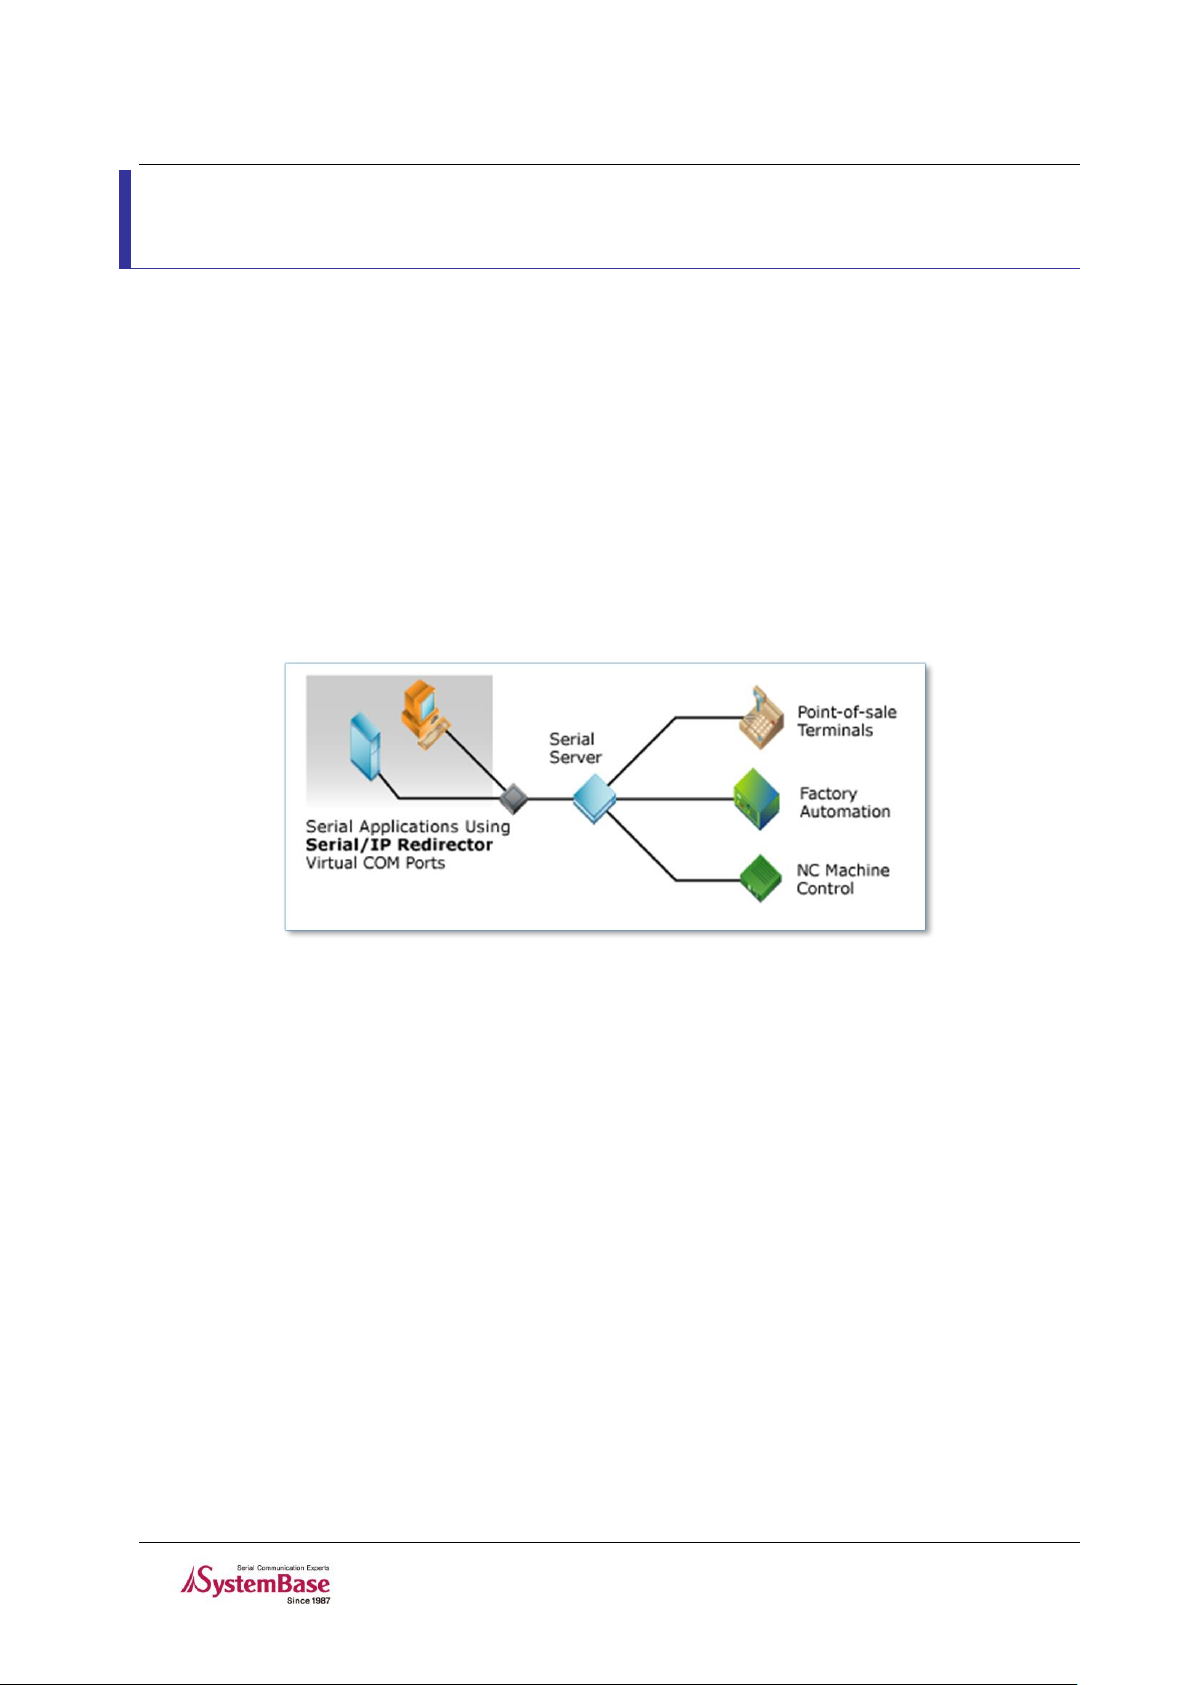
1.1 Introduction
The device servers by SystemBase includes Serial/IP® Redirector by Tactical Software. The
Serial/IP allows the users to add virtual COM ports in a PC, communicating SerialGate with
TCP/IP using the RFC-2217 telnet protocol. In order to use with the SerialGate, Serial/IP must
be set to client mode while telnet (RFC-2217) mode in the SerialGate.
The virtual COM ports created by Serial/IP can be set to the speed from 300 to 460800 bps.
1.2 Configuration
Connect the user PC with the SerialGate by Ethernet.
Install Serial/IP in the PC and add virtual COM ports.
Open the virtual COM port from the software that uses serial ports.
The virtual COM port opened by software will communication with the SerialGate using
the telnet (RFC-2217) protocol.
When the serial device sends the data to the SerialGate, it will be converted to telnet
(RFC-2217) protocol data, then sent to the virtual COM port added by the Serial/IP to
communicate with the software in the PC.
2
Page 5
Serial/IP® Redirector User Manual Chapter 1. Serial/IP® Redirector
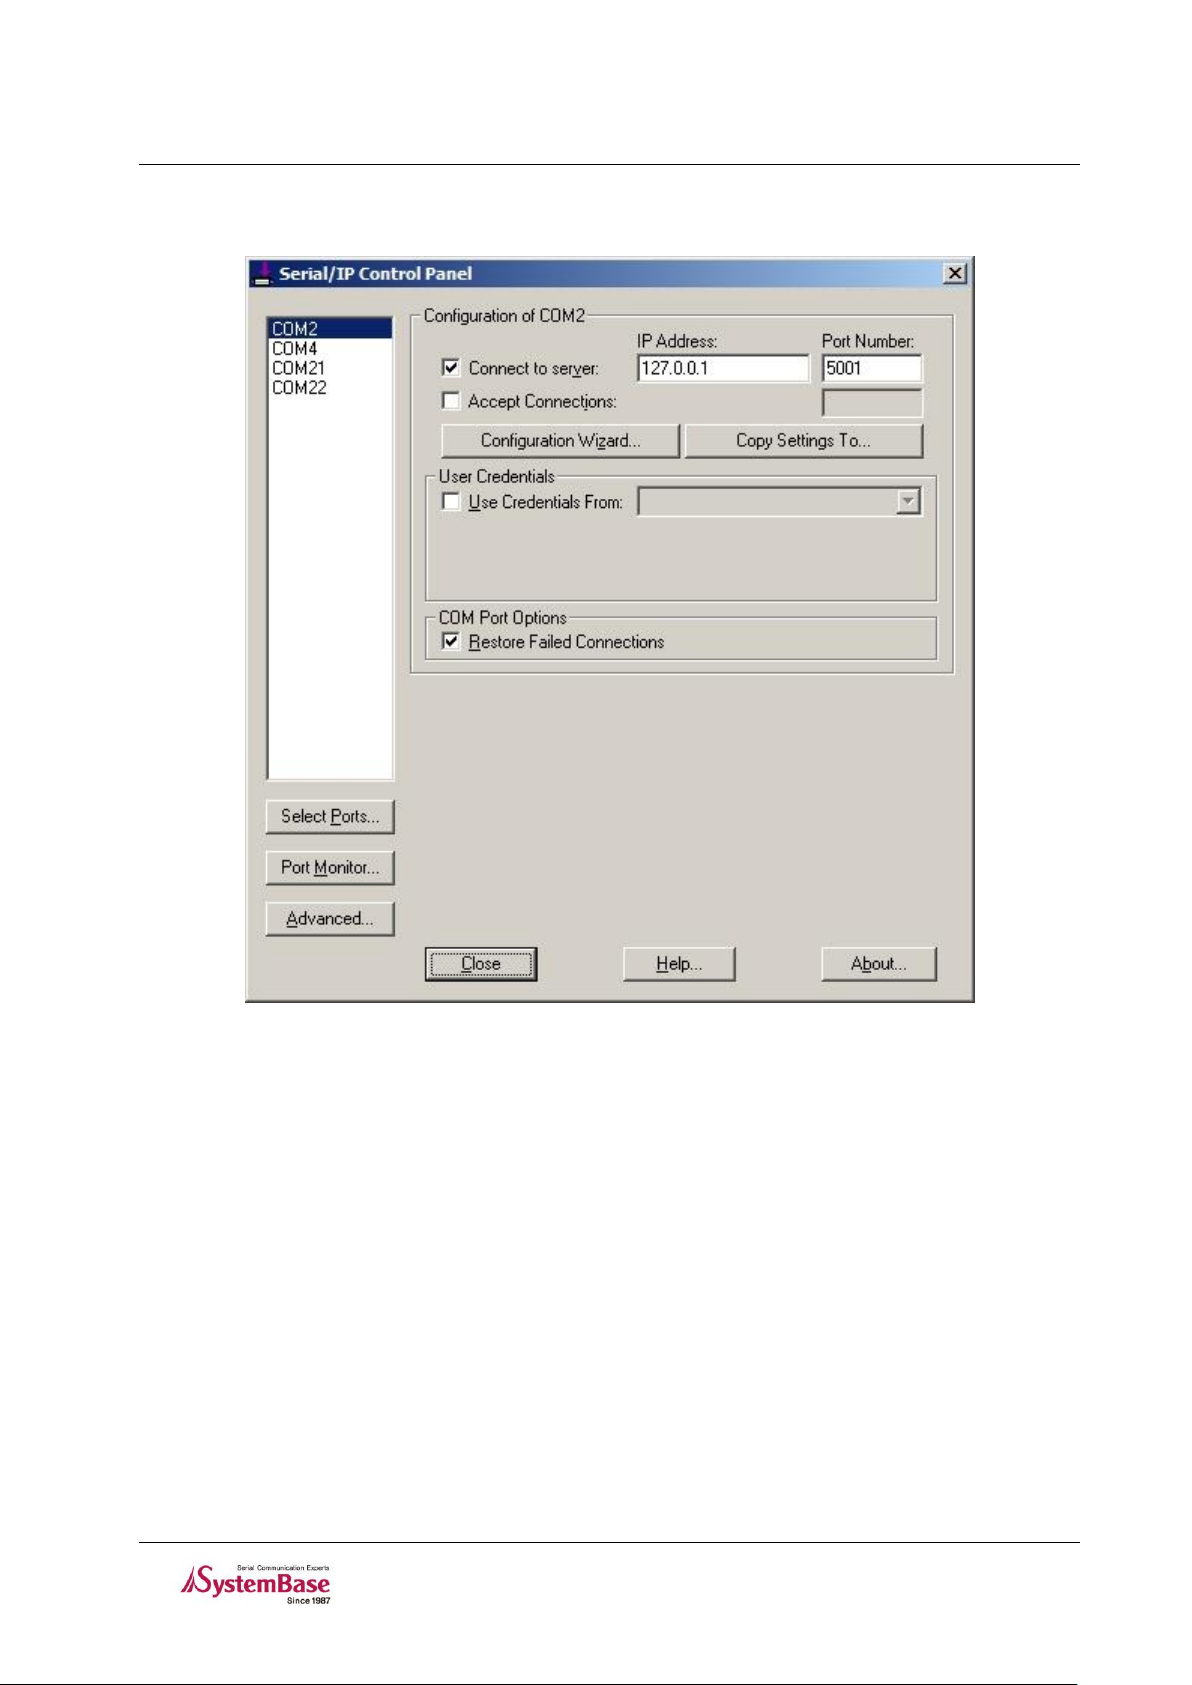
1.3 Control Panel
Configuration of COM00 (00 may be replaced with associated port number) : IP address
and TCP port number of SerialGate device server that should be connected by Serial/IP.
COM Port Options : COM port option for retrying connection when connection is failed or
closed
Select Ports : Manage to install and remove virtual COM ports
Port Monitor : Monitoring data flow and status of COM ports
Advanced : Advanced option
3
Page 6
Serial/IP® Redirector User Manual Chapter 1. Serial/IP® Redirector
1.4 Adding or Removing Virtual COM Ports
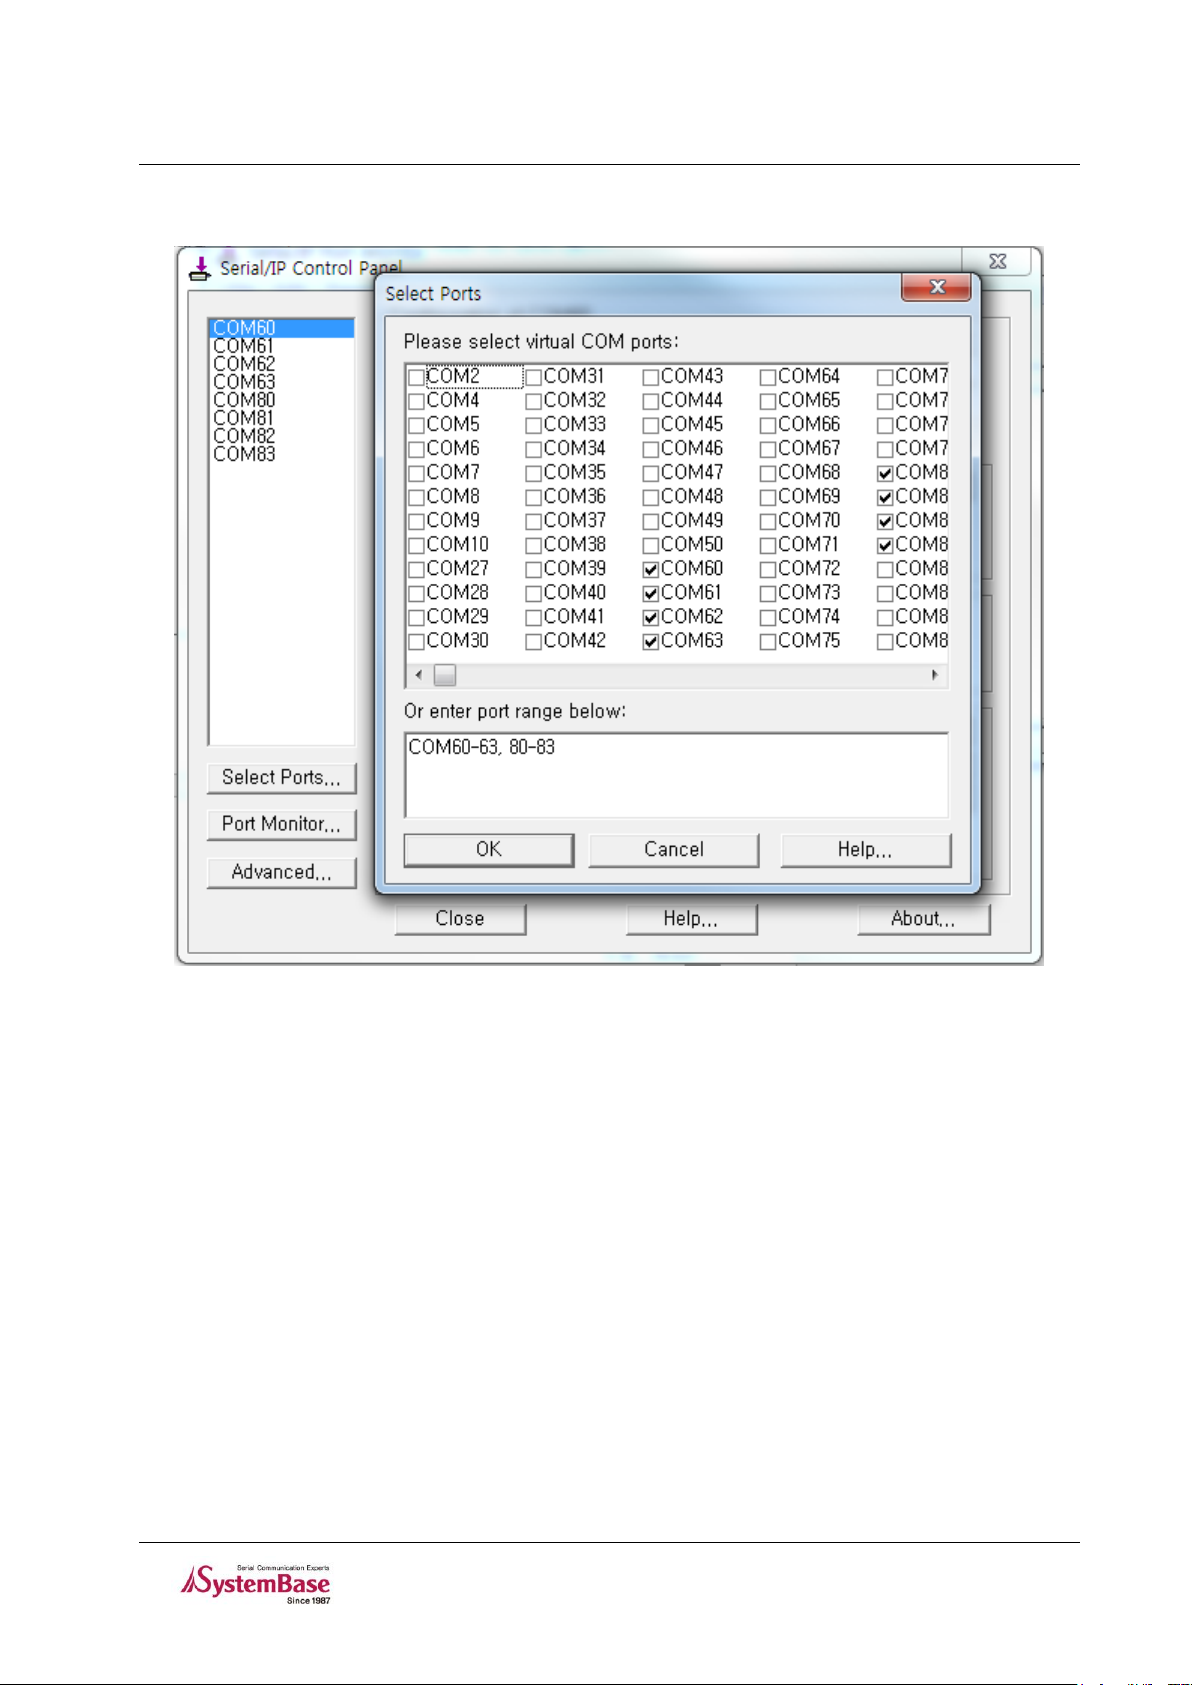
Adding or removing virtual COM ports are very simple. Click ‘Select Ports’ button on Serial/IP
Control Panel, this will show the ‘Select Ports’ window. From this window, if you mark any check
boxes that you wish to use to virtual COM ports, it will be added as virtual COM ports. If you
unmark check boxes which is already marked, it will be removed from virtual COM ports.
4
Page 7

Serial/IP® Redirector User Manual Chapter 1. Serial/IP® Redirector
1.5 Activity
To check the status of each virtual COM ports, double click the Serial/IP icon from the tray icon.
TD/RD: When data transmit/receive the corresponding icons will blink.
TR/DR/CD: ON/OFF signal line status can be checked.
Status: Status with the devices can be checked.
IP Address: Displays currently set IP address
5
Page 8

Serial/IP® Redirector User Manual Chapter 1. Serial/IP® Redirector
1.6 Trace
Trace of the data is enabled after “Enable Trace” is checked.
Enable Trace: starts tracing data.
Hex Display: Shows in hexadecimal value.
Auto Scroll: Automatically scrolls.
Always On Top: Displays this windows on top of other windows.
6
Page 9

Serial/IP® Redirector User Manual Chapter 1. Serial/IP® Redirector
1.7 Advanced Settings
Displays advanced settings for the Serial/IP Redirector.
Extend Server Connection by xx ms: This option causes the redirector to extend its
connection to the server (and access to the device) for a designated interval that
begins when the virtual COM port is closed by the application.
Attempt Server Connection for xx ms: If this setting is used, the redirector terminates
pending connection attempts if they do not succeed in the specified time.
Synchronize with Server Upon COM Port Open: Some applications require that the
COM port open operation should "synchronize" with the server by waiting until the
server provides the serial device and returning a failure from the COM port open
function otherwise.
Update Routing Table Upon COM Port Open: The Serial/IP Redirector can
automatically maintain its IP route to a server on a different subnet by modifying the
IP routing table.
Enable Nagle Algorithm: The Nagle algorithm is a method employed by the Windows
TCP/IP stack to coalesce small TCP/IP packets. This can affect the packetization
and arrival time of data between the redirector and the server.
Always Limit Data Rate to COM Port Baud Rate: The Serial/IP Redirector can be
configured to limit the data rate to the baud rate that is in effect for the virtual COM
port.
Include Domain in Windows Credentials: Some servers that require user login may
need the username to start with the Windows domain name.
COM Port Control Keep-Alive Interval: If the server supports the COM Port
7
Page 10

Serial/IP® Redirector User Manual Chapter 1. Serial/IP® Redirector
Control protocol, the redirector can use a keep-alive message method to detect
a failed connection to the server. This option controls the interval at which the
redirector will issue the keep-alive message, if no activity has occurred on the
connection.
Maximum Connection Recovery: This option controls the maximum time
between the redirector's attempts to reconnect to the server if Restore Failed
Connection is enabled for a virtual COM port.
8
Page 11

Serial/IP® Redirector User Manual Chapter 1. Serial/IP® Redirector
1.8 Proxy Server
Configure proxy server settings.
The Serial/IP Redirector supports TCP network connections made through a proxy server,
which may be controlling access to external networks (such as the Internet) from a private
network that lacks transparent IP-based routing, such as NAT. Proxy server support is
built into the Serial/IP Redirector because it is a driver that runs in kernel mode.
Conventional proxy server support for Windows applications is provided in user mode
and is unavailable to drivers.
The Serial/IP Redirector supports the following proxy protocols:
SOCKS v5
SOCKS v4
HTTPS
The Serial/IP Redirector is compatible with the following proxy servers:
Microsoft ISA (for the SOCKS protocol only)
Apache on Linux and Windows
Squid
9
Page 12

Serial/IP® Redirector User Manual Chapter 1. Serial/IP® Redirector
1.9 Configuration on SerialGate
To use the SerialGate with the Serial IP, the operation mode of serial settings on SerialGate
should be set to Telnet (RFC-2217).
10
Page 13

Serial/IP® Redirector User Manual Chapter 2. Installation
Chapter 2. Installation
2.1 Install Guide
Insert the installation CD into the CD-ROM drive
Run “SystembaseNNN.exe” if it does not start automatically. (Replace NNN with the numbers
which represents the version number of the software.)
Serial/IP installer starts and provides installation details. Click “Next” to continue.
11
Page 14

Serial/IP® Redirector User Manual Chapter 2. Installation
Next, in license confirmation window, after reading the End User License Agreement, if you agree,
click ‘I accept the license agreement’ and click “Next” button.
Click “Next” button.
12
Page 15

Serial/IP® Redirector User Manual Chapter 2. Installation
Click “Next” button.
Click “Next” to start the installation.
13
Page 16

Serial/IP® Redirector User Manual Chapter 2. Installation
Click “Finish” to complete the installation.
14
Page 17

Serial/IP® Redirector User Manual Chapter 2. Installation
2.2 Uninstall Guide
Insert the installation CD into the CD-ROM drive
Run “SystembaseNNN.exe” if it does not start automatically. (Replace NNN with the numbers
which represents the version number of the software.)
In the window below, select “Remove” and click “Next” to remove Serial/IP.
15
Page 18

Serial/IP® Redirector User Manual Chapter 2. Installation
Click “Next” button.
Click “Finish” to complete uninstallation process.
16
 Loading...