

Page 1

PortView
User Manual
Version 2.3
January 14, 2014
Page 2

PortView History
Revision Date
Doc Version
Pages
Description
10/17/2007
1.0
All
Written by KH Heo
05/10/2012
1.1
Partial
Added by KH Lee
06/28/2012
2.1
All
Rewritten by KH Lee
03/05/2013
2.1a
Partial
Modified by W. Lee
01/14/2014
2.3
All
Rewritten by JH Moon
Revision History
Copyright 2014 SystemBase Co., Ltd. All rights reserved.
Websites http://www.sysbas.com/
Phone +82-2-855-0501
FAX +82-2-855-0580
16F Daerung Post Tower-1, 288, Digital-ro, Guro-gu, Seoul, Republic of Korea
For any inquiries or comments, contact us at http://www.solvline.com/
Page 3

PortView History
Index
Chapter 1. Introduction .............................................................. 1
1.1 Features ...................................................................................... 1
1.2 Software ...................................................................................... 1
1.3 System Requirement ........................................................................ 1
1.4 Supported Hardware ......................................................................... 1
Chapter 2. Installation and Execution .............................................. 2
2.1 How to install ................................................................................. 2
2.2 Execution ..................................................................................... 4
Chapter 3. PortView ................................................................. 5
3.1 SGConfig ..................................................................................... 5
3.2 PortView ...................................................................................... 5
3.3 Searching Range of PortView / SGConfig ................................................. 6
3.3.1 Area that can be detected by the Search feature ............................................. 6
3.3.2 Area that can be detected by the PortView .................................................... 6
3.4 Structure ...................................................................................... 7
3.4.1 Main Window ...................................................................................... 7
3.4.2 Group Window ..................................................................................... 8
3.4.3 Device Window .................................................................................... 8
Chapter 4. Main Bar ................................................................. 9
4.1 SGConfig Feature ............................................................................ 9
4.1.1 SGConfig Menu ................................................................................... 9
4.1.2 Search ............................................................................................ 10
4.1.3 Search IP ......................................................................................... 10
4.1.4 Configure ......................................................................................... 10
4.1.5 Import ............................................................................................ 11
4.1.6 Telnet ............................................................................................ 11
4.1.7 Web ............................................................................................ 12
4.1.8 Upgrade Firmware .............................................................................. 12
Page 4

PortView History
4.1.9 Apply 12
4.1.10 Configure IP address of the PortView ........................................................ 13
4.2 Other Features .............................................................................. 15
4.2.1 Config Menu ..................................................................................... 15
4.2.2 Help ............................................................................................ 15
4.2.3 About ............................................................................................ 16
4.2.4 Cascade Windows .............................................................................. 16
4.2.5 Tile Windows .................................................................................... 17
4.3 Close All ..................................................................................... 17
Chapter 5. Group Window ......................................................... 18
5.1 Terminology ................................................................................. 18
5.1.1 Group ............................................................................................ 18
5.1.2 ‘Sub-group’ vs. ‘Device List’ ................................................................... 19
5.2 Create or Delete Group ..................................................................... 19
5.2.1 Initial Screen ..................................................................................... 19
5.2.2 Add Group ....................................................................................... 20
5.2.3 Delete Group .................................................................................... 22
Chapter 6. Device Window ......................................................... 23
6.1 Sub Group Window ......................................................................... 24
6.1.1 Configuration .................................................................................... 25
6.1.2 Remote Connection ............................................................................. 25
6.2 Statistics ..................................................................................... 26
6.3 Scope ........................................................................................ 27
6.3.1 Scope Menu: ..................................................................................... 27
6.3.2 Start / Stop ....................................................................................... 27
6.3.3 Hex / ASCII ...................................................................................... 28
6.3.4 Capture Start / Stop ............................................................................. 28
6.3.5 Screen ............................................................................................ 29
6.3.6 Open ............................................................................................ 29
Chapter 7. Uninstall PortView ..................................................... 30
Page 5

PortView Chapter 1. Introduction
Chapter 1. Introduction
PortView is a real-time monitoring Windows application utility supporting remote configuration of the device
servers by SystemBase.
1.1 Features
PortView supports following features from local and remote sites.
Search and Configuration device servers in the network
Real-time data monitoring
Real-time device status
Group configuration and management
Connect the selected device server with web browser and/or telnet.
1.2 Software
Run following executable file to install.
PortView_setup_v2.3.exe
1.3 System Requirement
CPU : Pentium 1GHz or greater
Memory : 512MB or greater
Operating System : Windows 2000/XP/2003/Vista/7
Network : 100Mbps Ethernet Connection
1.4 Supported Hardware
SerialGate series
Eddy CPU Modules
1
Page 6
PortView Chapter 2. Installation and Execution
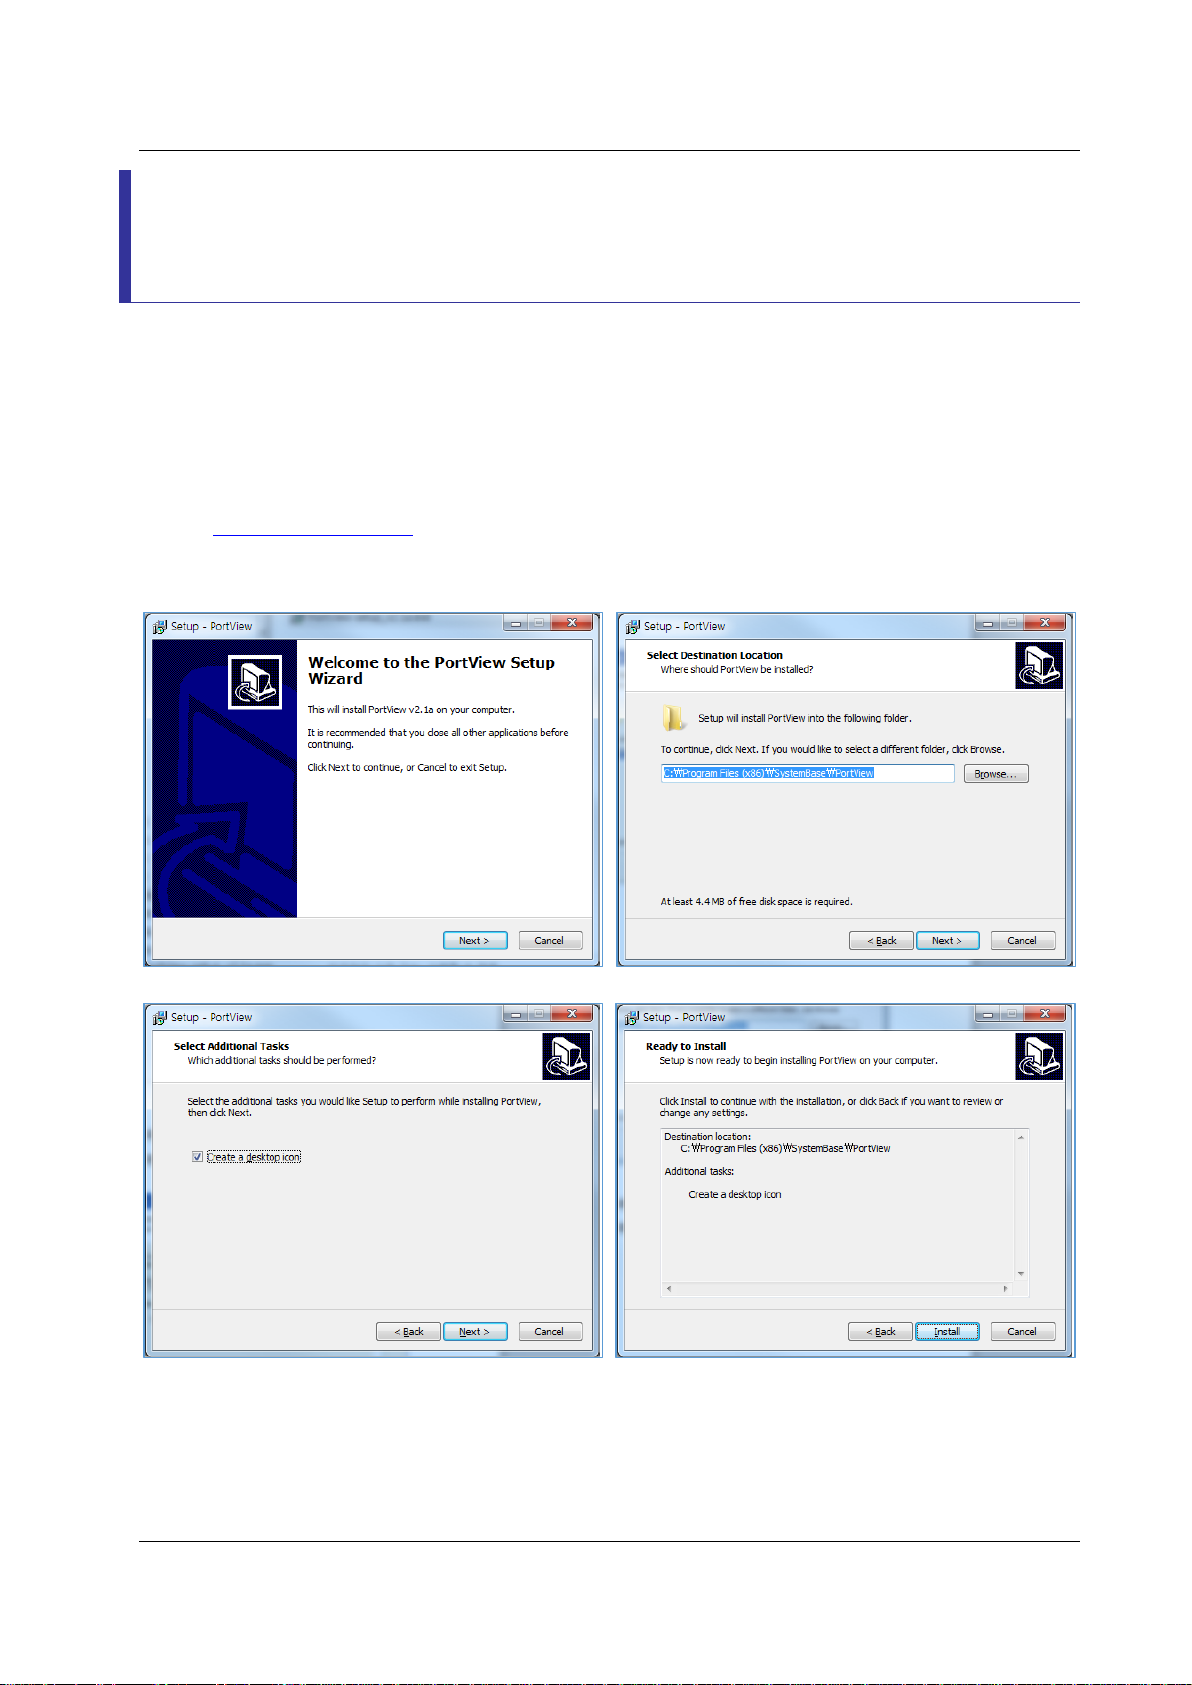
Chapter 2. Installation and Execution
2.1 How to install
If you have a CD included in the SerialGate unit, insert the CD into the CD-ROM drive.
If you do not have a CD, please visit our technical support website to download the installation file at
http://www.solvline.com/
Run PortView installation file.
2
Page 7

PortView Chapter 2. Installation and Execution
After installing PortView, run PortView and click ‘Login’ to continue.
3
Page 8
PortView Chapter 2. Installation and Execution
2.2 Execution
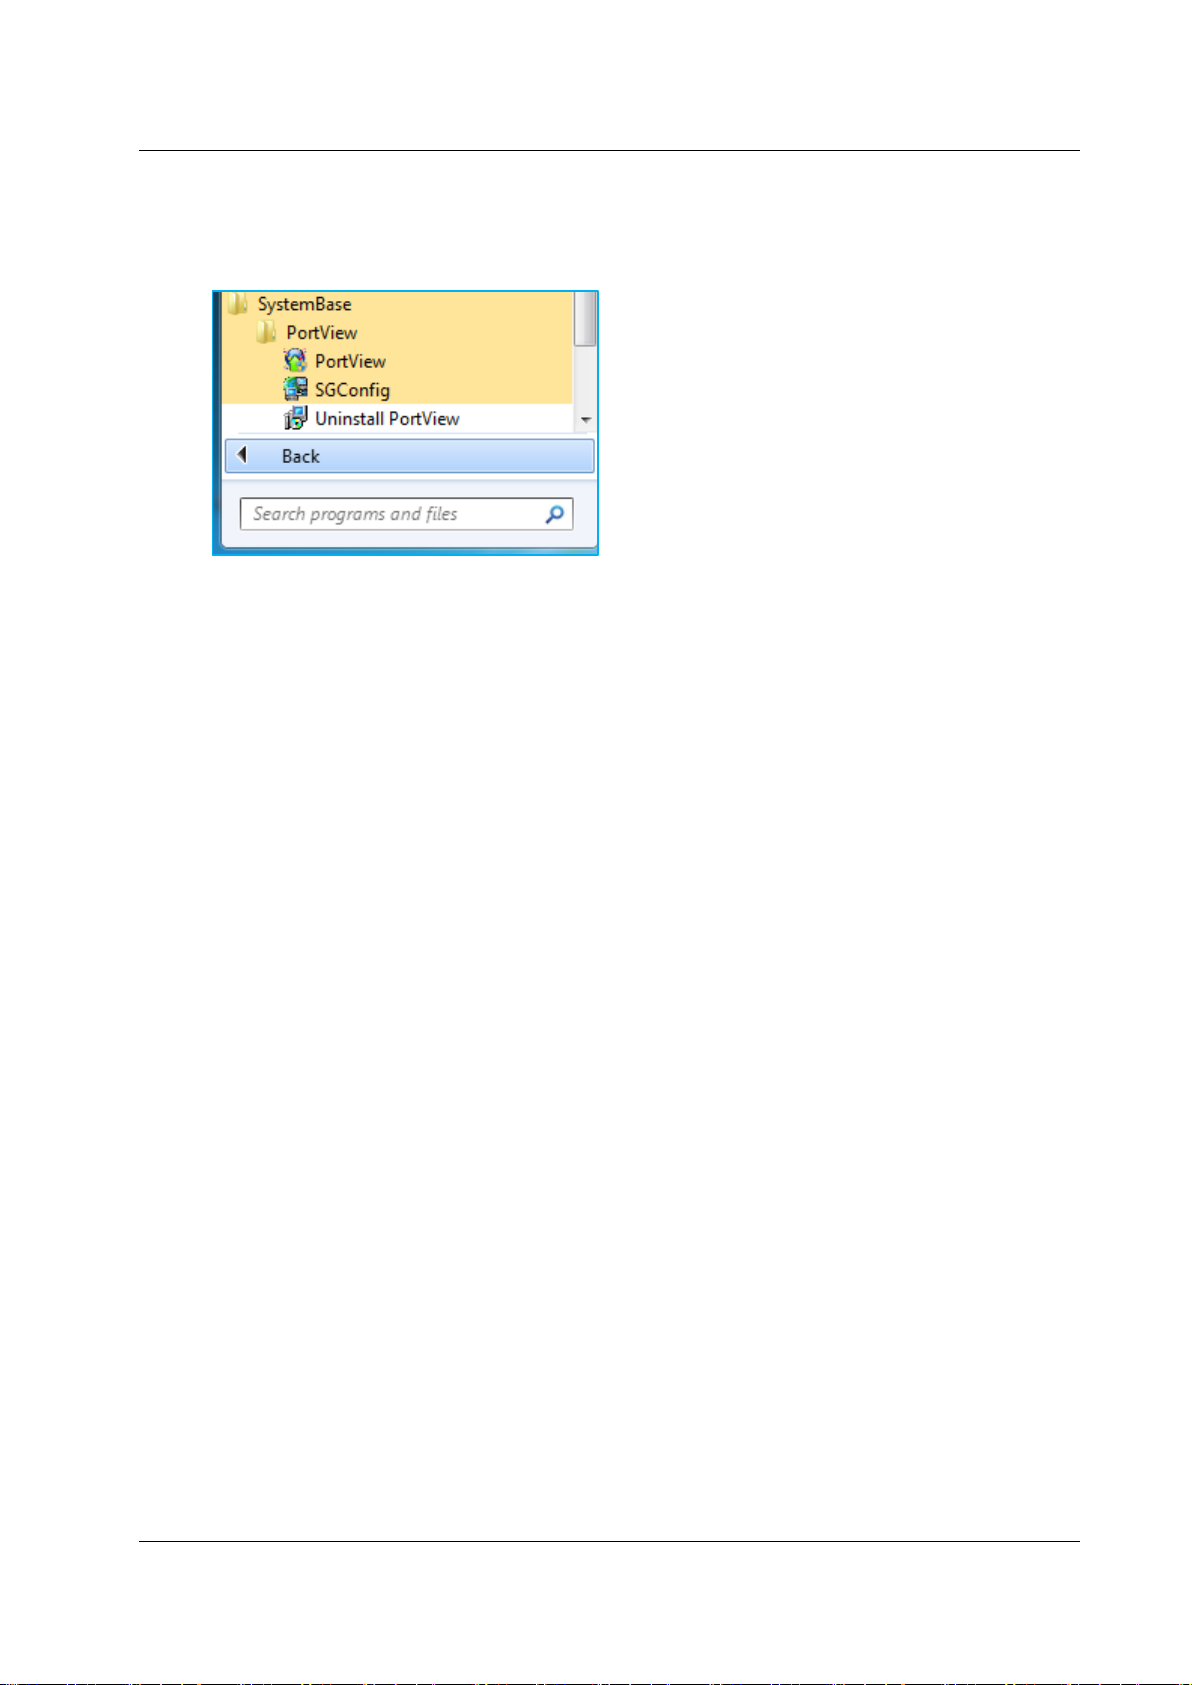
Click All Programs SystemBase PortView then run PortView.
If you have an icon in your desktop area, you can double click the icon to run it.
4
Page 9

PortView Chapter 3. PortView
Chapter 3. PortView
3.1 SGConfig
The SGConfig is included in PortView. The users can use search feature to locate SerialGate
devices in the local network or with the configure feature, following settings can be modified:
Network, Operation Mode, and Serial Option. If there are any devices servers connected to the
router, the PortView can access them to let the user manage them.
3.2 PortView
The PortView provides numbers of features: SGConfig feature, real-time data monitoring, realtime device status, grouping and renaming devices, remote connection with web browser or telnet.
5
Page 10
PortView Chapter 3. PortView
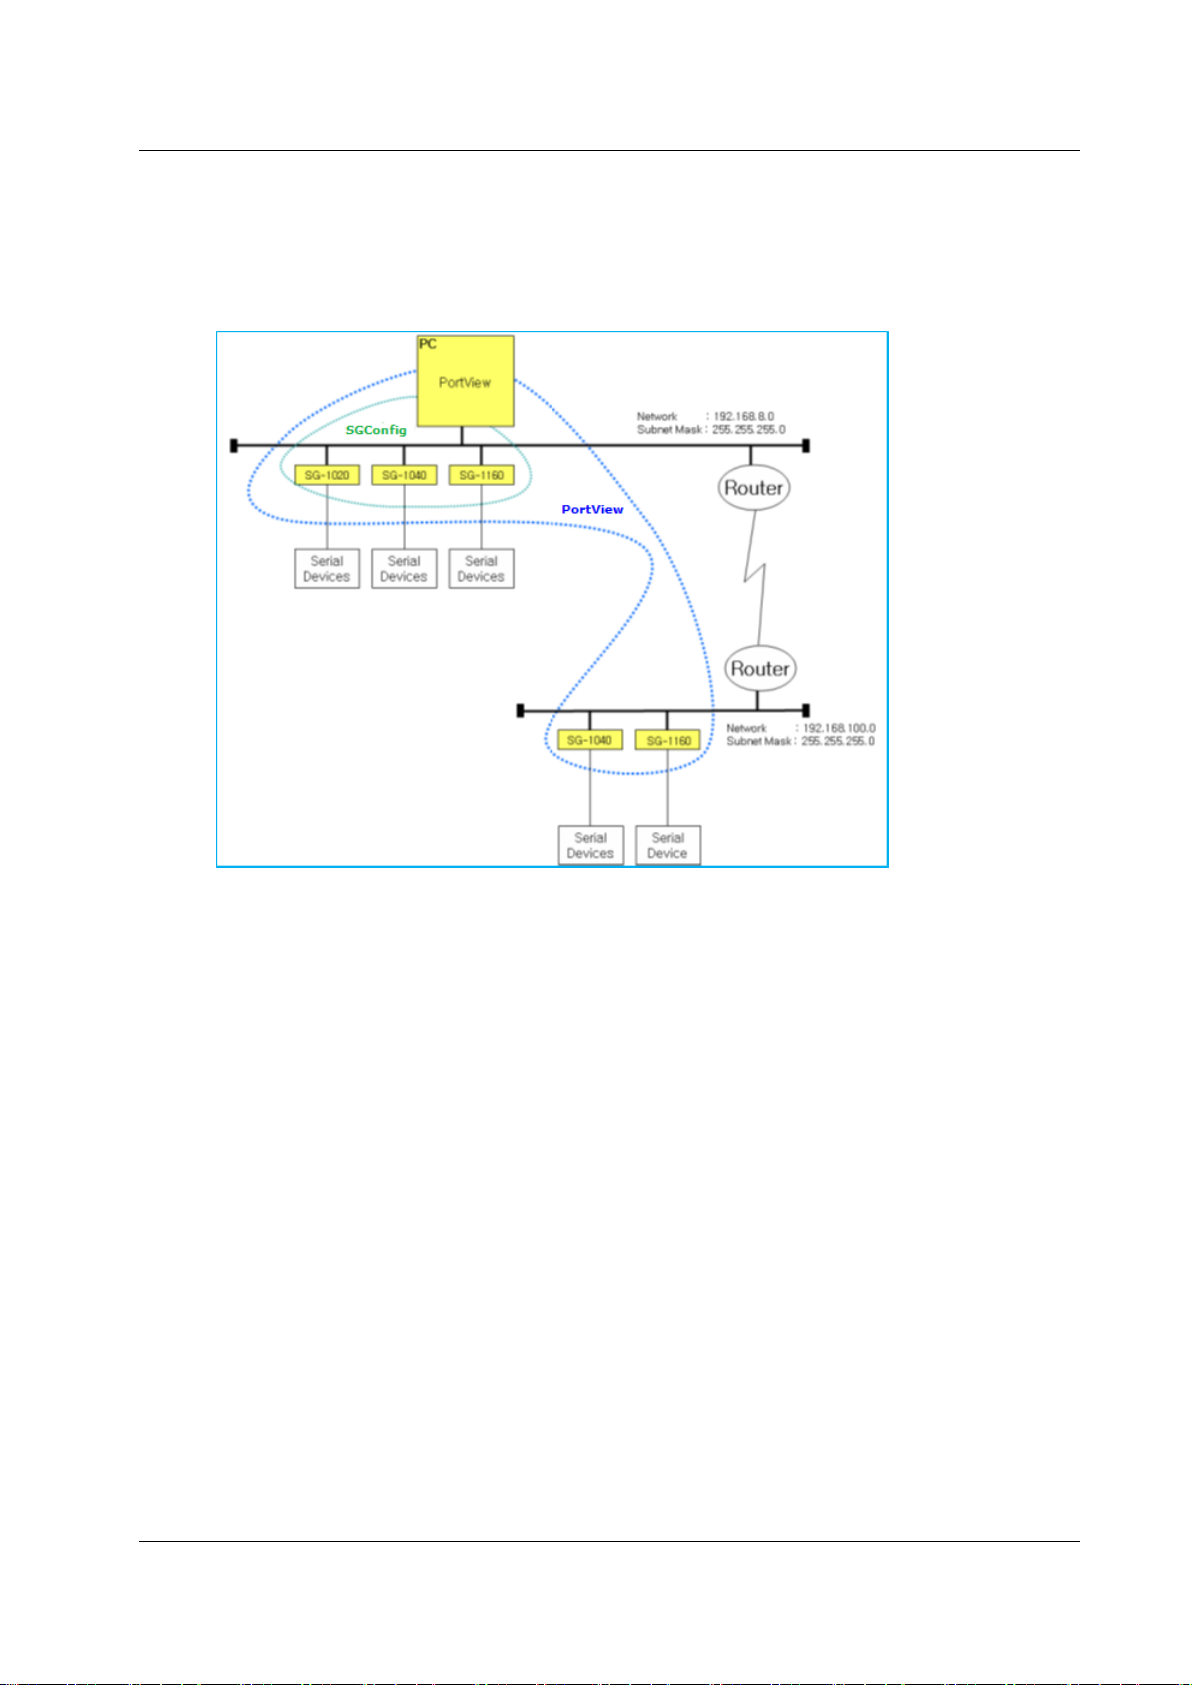
3.3 Searching Range of PortView / SGConfig
The following figure shows the operating range of the PortView and SGConfig.
However, depending on the network status, some network settings may require changes.
3.3.1 Area that can be detected by the Search feature
The green dotted line shown above is the area that the Search feature can detect the devices in the local
network.
3.3.2 Area that can be detected by the PortView
The blue dotted line shown above is the area that the PortView can detect the devices in the local
network. If the network class is different, separate configuration may be required.
6
Page 11
PortView Chapter 3. PortView
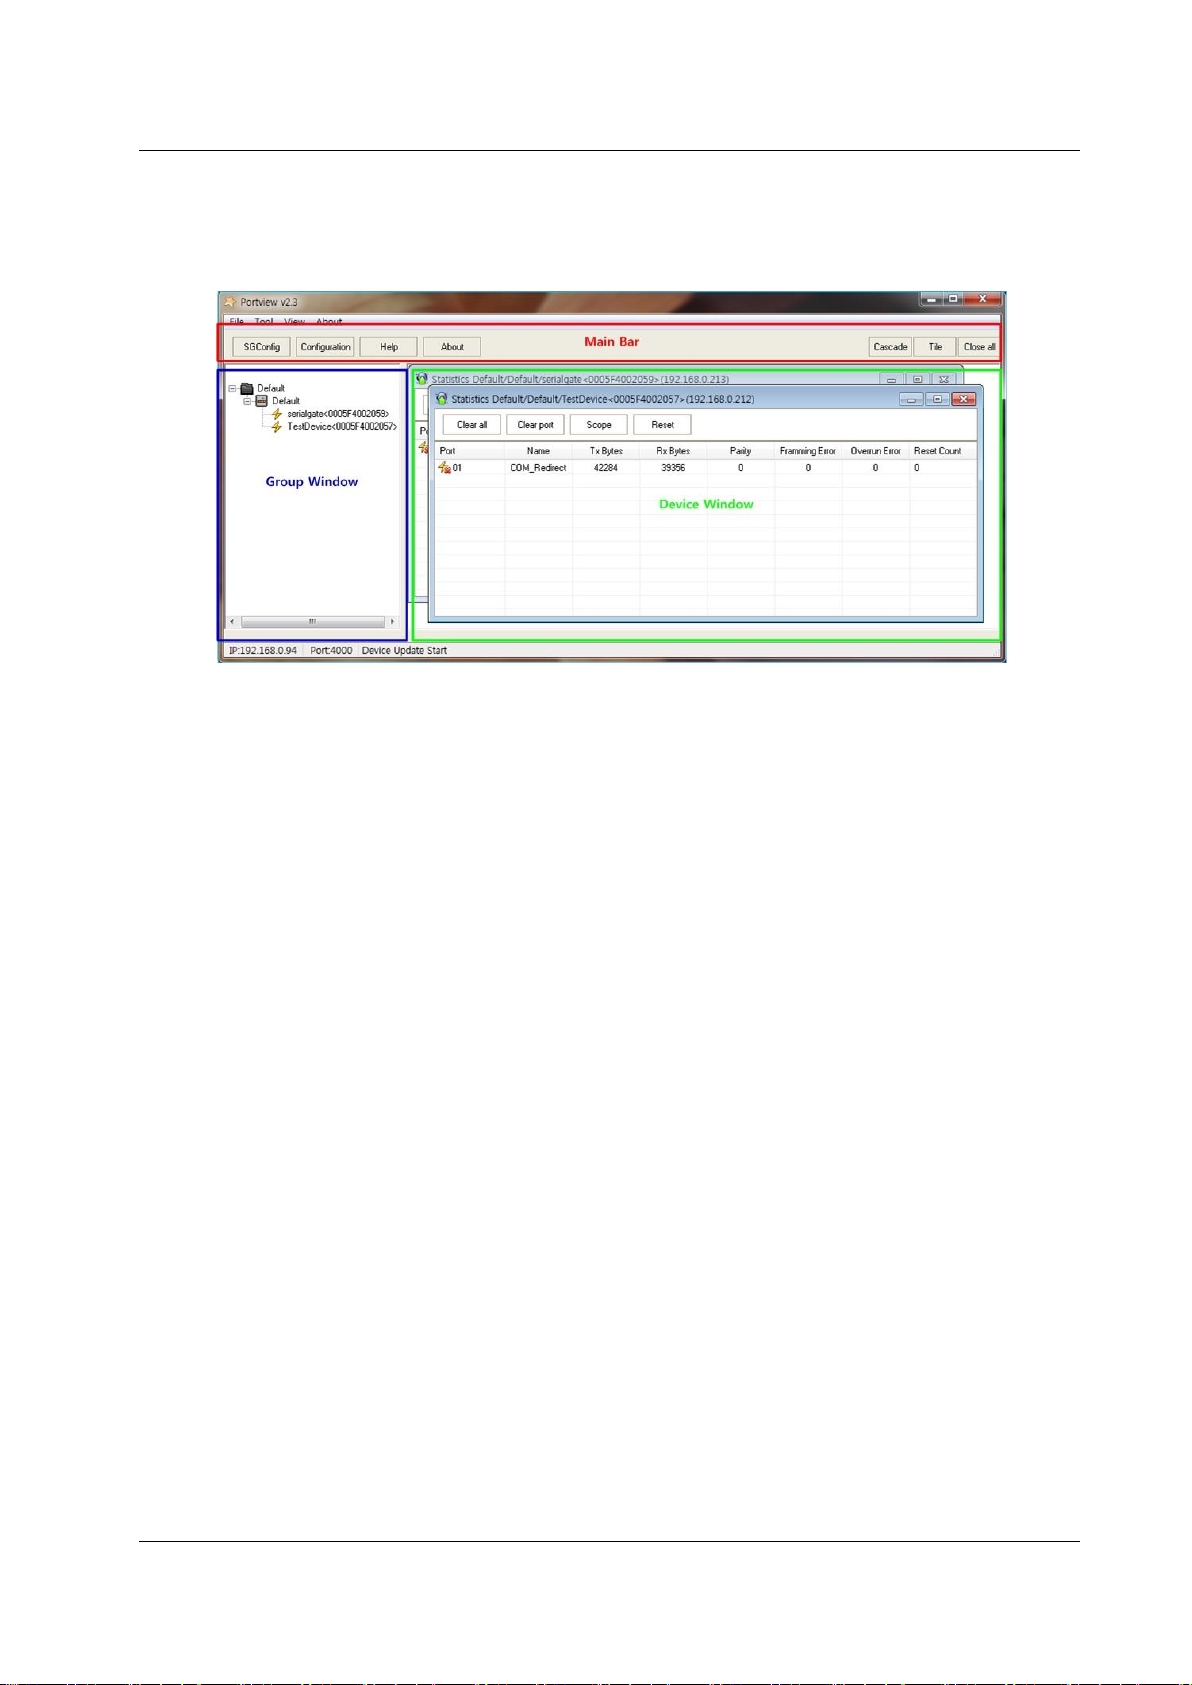
3.4 Structure
The PortView is divided into 3 main areas.
3.4.1 Main Window
The red squared area shown above is the ‘Main Bar’.
The blue squared area is the ‘Group Window’.
The green squared area is the ‘Device Window’.
SGConfig: Can search and configure the devices in the local network.
Configuration: Can set the alarm, log, service socket, and password.
Help: Open the folder where the PortView manual is located.
About: Displays the version of the utility.
Cascade: Cascade all windows.
Tile: Tile all windows
Close All: Close all windows in the utility.
7
Page 12

PortView Chapter 3. PortView
3.4.2 Group Window
The blue square box shows the ‘Group Window’. The users can see the group, sub-group, device server,
or undefined.
Group: Indicates the top of the folder structure. The users can add or delete groups.
Ex) ‘default’: If the SerialGate is not defined in a group it will be added in this group.
Sub-group: Can be created in the group. When clicked, devices in the group will be displayed in the
sub-group window.
Default: Displayed in default sub-group. Can be moved to other sub-group with the mouse. Hold
the left mouse button and drag.
Device: Added to a sub-group. Newly added devices will be shown in the default sub-group and
can be moved to other sub-groups by drag & drop.
3.4.3 Device Window
The green square box shows the ‘Device Window’. Sub-group windows and statistics windows will be shown
here. The windows can be shown in tile or cascade with the buttons in the ‘Menu bar’.
8
Page 13

PortView Chapter 4. Main Bar
Chapter 4. Main Bar
4.1 SGConfig Feature
Can manage devices in the same local network.
4.1.1 SGConfig Menu
Search: search devices in the local network.
Search IP: Use this if the device is not shown with ‘Search’ feature or not in the same local
network.
Configuration: Change settings of the device.
Import: Save the configuration of the device to the current PC.
Telnet: Connect the device using telnet.
Web: Connect the device using the web browser.
Upgrade Firmware: Update the firmware of the device.
Apply: Change values from the device name, IP address, subnet mask, gateway, PortView IP
shown in the list.
9
Page 14

PortView Chapter 4. Main Bar
4.1.2 Search
Display device server in the local area network.
4.1.3 Search IP
If the ‘Search’ feature does not work, use this to find it directly.
4.1.4 Configure
Change settings and apply.
10
Page 15

PortView Chapter 4. Main Bar
1: Can set: network, operation mode, and serial option
2: When ‘Export’ button is clicked, current SerialGate settings can be saved.
3: When ‘Apply’ is clicked, current values shown in the settings will be applied to the device.
4.1.5 Import
Load saved settings in a file from the PC.
4.1.6 Telnet
Use telnet to connect to the selected IP address.
11
Page 16

PortView Chapter 4. Main Bar
(If there are two devices with the same IP address, they can be accessed one at a time but not at
the same time.)
4.1.7 Web
Use the web browser to connect to the selected IP address.
(If there are two devices with the same IP address, they can be accessed one at a time but not at
the same time.)
4.1.8 Upgrade Firmware
Update the firmware of the selected device.
4.1.9 Apply
Change values from the device name, IP address, subnet mask, gateway, PortView IP shown in the list.
When network status is changed, use the ‘Search’ button to refresh the list.
12
Page 17

PortView Chapter 4. Main Bar
4.1.10 Configure IP address of the PortView
In the searched device list, change the IP address of the PC which the users wish to use the PortView.
After typing it, click apply button to change the settings in the device.
After above process is complete, the device name and the MAC address will be shown in the PC where the
PortView is installed.
13
Page 18

PortView Chapter 4. Main Bar
The IP address of the PortView can be modified with the web browser. Login to the SerialGate and go to
Network Settings PortView Server IP / Port. (The default login ID and password is: serialgate /
99999999)
Click ‘Apply’ button after any changes are made.
14
Page 19

PortView Chapter 4. Main Bar
4.2 Other Features
Provides features for configuration, help, about, sub-group, statistics, and how windows are arranged.
4.2.1 Config Menu
Alarm: Set when the alarm will be triggered. The alarm sound can be set also.
Log: Save log file if the message meets the condition.
Alive Check time: Send a signal by given period to check if the device is still alive.
Service Socket No: Select the port number to be used. The default value is 4000.
Change Password: When executed, a window will pop-up. Change the password from this
window.
Origin Password: When not set by the user, there will not be any password. If the password
need to be changed, type the current password.
New Password: Type in the new password, if it needs to be changed.
4.2.2 Help
Can check the help. May come with a separate manual. Same as About > Help from the top menu.
15
Page 20

PortView Chapter 4. Main Bar
4.2.3 About
Displays the information of the PortView as shown below. Similar to About > About from the top menu.
4.2.4 Cascade Windows
Cascade all available windows.
16
Page 21

PortView Chapter 4. Main Bar
4.2.5 Tile Windows
Tile all available windows.
4.3 Close All
Close all windows at once. Similar to View > Close All from the top menu.
17
Page 22

PortView Chapter 5. Group Window
Chapter 5. Group Window
In Group Window, the users can manage group, sub-group by arranging devices or renaming them.
5.1 Terminology
5.1.1 Group
There are default and user defined groups. Only the sub-groups can have devices displaying under them.
Legend
Default group: SerialGate not defined by the users are managed here.
User defined group: Defined by the users. SerialGate can be moved to here from the default group.
18
Page 23

PortView Chapter 5. Group Window
5.1.2 ‘Sub-group’ vs. ‘Device List’
Sub-group: A group under the group where the devices can be located.
Device List: Devices in a sub-group. If a sub-group is double clicked, a manage window will
appear.
5.2 Create or Delete Group
Follow the examples below to add group/sub-group and add a device under it.
5.2.1 Initial Screen
There are two devices in a default group.
Group: Default
Sub-group: Default
Device List: SerialGate
19
Page 24

PortView Chapter 5. Group Window
5.2.2 Add Group
Use the right mouse button on the screen to add a group.
Type the name of the group then click OK.
Create a sub-group under the newly added group.
\
Type the name of the sub-group then click OK.
20
Page 25

PortView Chapter 5. Group Window
The users can drag the sub-group to different location.
Sub-group is moved.
Renaming group. Click ‘Rename’ after clicking right mouse button on the name of the group.
Type the new name. This is only displayed from the PortView.
21
Page 26

PortView Chapter 5. Group Window
5.2.3 Delete Group
Click the right mouse button from the group name to delete a group. Deleted devices will show up
in the default group in a moment.
22
Page 27

PortView Chapter 6. Device Window
Chapter 6. Device Window
The ‘Device Window’ is the area in the red square below. The users can manage device lists or monitor
the device servers as well as checking device status, information, and scoping I/O data.
Sub-group Window: The users can group the devices in a sub-group to manage them.
When double clicked, the current status of the device will be shown.
Statistics Window: There will be names of ‘Statistics Group’/Sub-group/Device’. Displays
the monitoring feature of the device server, Tx/Rx bandwidth and scope feature.
23
Page 28

PortView Chapter 6. Device Window
6.1 Sub Group Window
Sub-group is used to manage the devices in the sub-group. Double click the sub-group from the group
window in the left to see the device list in the right screen.
Sub-Group Menu
Statistic: Display statistics of the devices in the sub-group.
Configuration: Display the configuration of the selected device.
Connect Web: Run the default web browser and connect to the selected device.
Connect Telnet: Run telnet and connect to selected device.
Reboot: Reset selected the device.
Status: Since it is general information that does not need an explanation, it will not be explained.
24
Page 29

PortView Chapter 6. Device Window
6.1.1 Configuration
Display the configuration of the selected device.
The red square box above shows the related information of the device while the blue square box
shows the configuration of the each ports.
Refresh: Refresh the information.
6.1.2 Remote Connection
For Connect Web/Connect Telnet/Reboot, please refer to explanation shown above.
Chapter 6.2 deals with more information about the ‘Statistic’.
25
Page 30

PortView Chapter 6. Device Window
6.2 Statistics
The ‘Statistic’ window will show when the ‘Statistic’ button is clicked from the sub-group. The users can
monitor each device servers and reset them from this feature.
Statistic Menu:
Clear All: Reset counts from Rx/Tx Byte, parity, and errors for all ports.
Clear Port: Reset counts for individual port.
Scope: It can be run per one PortView. The scope feature for I/O data will be executed
individually.
Reset: Reset each ports.
Entries in the list:
Port: Number of ports in the device server.
Name: The name of the device.
Tx/Rx Byte: Transfer/Receive Bytes
Parity: Number of occurred parity errors
Framing Error: Number of occurred framing errors
Overrun Error: Number of occurred overrun errors
Reset Count: Reset Count
26
Page 31

PortView Chapter 6. Device Window
6.3 Scope
The users can monitor the I/O data with the ‘Scope’ feature. The values will be displayed
in Hex or ASCII character. Select the port to scope the data and click the ‘Scope’ button.
6.3.1 Scope Menu:
Start/Stop: Starts or Stops scoping the data.
Hex/ASCII: Toggles the data type. Hex displays hexadecimal value while ASCII shows the data in
ASCII format.
Clear: Delete all values shown in the window.
Capture: Capture and save currently displayed data into a file.
Screen: Displayed colors for background or character can be modified here.
Open: Open capture data file.
6.3.2 Start / Stop
The following screen shows the scope window in hexadecimal mode. Since the scope is active the ‘Stop’
button is displayed. The users can click the stop button to stop scoping.
27
Page 32

PortView Chapter 6. Device Window
6.3.3 Hex / ASCII
The following scope window shows the hex value of the data, but later, it shows the ASCII value.
The ASCII value was shown after the mode was changed from Hex to ASCII.
6.3.4 Capture Start / Stop
If the users start capturing the data and click the button again to stop it, following window will show
to save the data into a file.
28
Page 33

PortView Chapter 6. Device Window
6.3.5 Screen
The colors in the ‘Screen’ window can be modified here. After changing the font and/or background
color, click the ‘Save’ button and close it to apply the changed settings.
6.3.6 Open
Open captured file.
29
Page 34

PortView Chapter 7. Uninstall PortView
Chapter 7. Uninstall PortView
Click ‘Uninstall PortView’ under PortView from the SystemBase group.
Click ‘Yes’ when following message is displayed.
If the following message is displayed, uninstall process was successful. Click ‘OK’ to close the
windows.
30
 Loading...