

Page 1

TM
LemonIDE
User Guide
Ver 1.0e
2010. 07. 02
Page 2

LemonIDE
Revision History
2007. 8. 31 1.0 All jhkim
2007. 11. 29 1.0a All shlee
2008. 4. 10 1.0b All LemonIDE for Windows appended
TM
Date Version Pages Description
2008.5.10 1.0c 6.4 Nonstop Debugging Appanded
2009.2.3 1.0d All Eddy CPU 2.1 Environment Appanded
2010.7.2 1.0e 2 Open Linux Version
Page 3

LemonIDE
TM
Table of Contents
Table of Contents
Chapter 1. Introduction....................................................................... 1-1
1.1 About this manual................................................................................1-1
1.2 Who should read this manual? .................................................................1-1
1.3 Contents...........................................................................................1-1
1.4 LemonIDE Documents............................................................................1-2
1.5 Technical Support ................................................................................1-2
Chapter 2. Getting Started ................................................................... 2-1
2.1 Overview...........................................................................................2-1
2.2 Structure ..........................................................................................2-2
2.3 Features ...........................................................................................2-3
Chapter 3. Installing LemonIDE Windows.................................................. 3-4
3.1 Install Environment ..............................................................................3-4
3.1.1 Windows Host System..............................................................................3-4
3.1.2 Target System .......................................................................................3-4
3.2 Installation ........................................................................................3-5
3.2.1 JDK installation .....................................................................................3-5
3.2.2 Configuring Windows En vironment Variables...................................................3-6
3.2.3 Installing LemonIDE ................................................................................3-6
3.3 Creating Project Space..........................................................................3-7
3.3.1 Creating Workspace ................................................................................3-8
3.3.2 Creating Projects ...................................................................................3-8
3.3.3 Configuring Path .................................................................................. 3-10
Chapter 4. Installing LemonIDE Linux...................................................... 4-1
4.1 Install Environment ..............................................................................4-1
4.1.1 Linux Host System ..................................................................................4-1
4.1.2 Target System .......................................................................................4-1
4.2 Installation ........................................................................................4-2
4.2.1 Toolchain & Package Installation.................................................................4-2
4.2.2 JDK installation .....................................................................................4-2
4.3 4.3 Configuration.................................................................................4-4
4.4 LemonIDE..........................................................................................4-4
4.5 Creating Workspace..............................................................................4-4
4.6 Creating Projects.................................................................................4-5
4.6.1 Creating LemonIDE C/C++ Project ...............................................................4-5
Chapter 5. Using IDE ........................................................................... 5-1
5.1 LemonIDE Views..................................................................................5-1
5.2 Creating & Editing Source Codes ..............................................................5-2
5.3 Compile Environment Settings & Build .......................................................5-3
5.3.1 Creating & Updating Makefile ....................................................................5-4
5.3.2 Adding to Make Target .............................................................................5-5
5.3.3 Source Compile .....................................................................................5-6
5.4 Registering Run Method.........................................................................5-6
Page 4

LemonIDE
TM
Table of Contents
5.4.1 Registering M ethod name and binary file.......................................................5-7
5.4.2 Configuring Arguments.............................................................................5-7
5.4.3 Configuring Target Agent ..........................................................................5-7
5.4.4 Configuring Debugger..............................................................................5-8
5.4.5 Configuring Common...............................................................................5-9
5.4.6 Method register result .............................................................................5-9
5.5 Executing Run Method...........................................................................5-9
5.5.1 Configuring Eddy’s Target Agent................................................................ 5-10
5.5.2 Executing Run Method (with results to Serial Port) ......................................... 5-10
5.5.3 Executing Run Method (with result to Telnet)................................................ 5-11
5.6 Creating a Firmware Image................................................................... 5-13
5.6.1 Changing Makefile ................................................................................ 5-13
5.6.2 Adding to Make Target ........................................................................... 5-15
5.6.3 Creating Firmware Image........................................................................ 5-15
5.6.4 Updating Firmware............................................................................... 5-15
Chapter 6. LemonIDE Debugger ............................................................6-16
6.1 Debugging Preparation ........................................................................ 6-16
6.1.1 Execute Target Agent ............................................................................ 6-16
6.1.2 Cautions when setting compile options ....................................................... 6-16
6.2 Executing Debugger............................................................................ 6-17
6.3 Breakpoint Debugging ......................................................................... 6-18
6.3.1 Modifying compiling environment & Executing debugging....................................... 6-19
6.3.2 Settings Breakpoint............................................................................... 6-19
6.3.3 Program Run Control ............................................................................. 6-19
6.4 Non-Breaking Debugging ........................................................................6-20
6.4.1 Modifying compiling environment & Executing debugging....................................... 6-20
6.4.2 Setting Tracepoints & Actions ..................................................................... 6-21
6.4.3 Program Trace Control............................................................................. 6-23
Chapter 7. Monitoring Tool ................................................................... 7-1
7.1 Target Browser....................................................................................7-1
7.1.1 Target Browser User Interface....................................................................7-1
7.1.2 Adding a Target to the Target Browser ..........................................................7-3
7.2 Target Status Monitor............................................................................7-5
7.3 Terminal ...........................................................................................7-6
7.4 CPU Memory View................................................................................7-7
7.5 Registers...........................................................................................7-8
7.6 Changing Workspace.............................................................................7-8
Page 5

LemonIDE
TM
User’s Guide
Chapter 1. Introduction
This chapter is an introduction to SystemBase’s Integrated Devel opment Envi ronment, Lem onIDE.
1.1 About this manual
This manual includes procedures, functions, and usages of LemonIDE, an IDE developed by SystemBase so that
programmers can easily write applications and execute them on the tar get board.
1.2 Who should read this manual?
This manual is designed for developers who wish to write applications using LemonIDE. It is strongly
recommended that anyone trying to apply or configure LemonIDE read this document. This manual includes
various functions, developm ent process , and i mpo rtant note s on using LemonIDE. It is a great starting point for any
programmer who wants to execut e custom appli cations on conn ected devices.
1.3 Contents
Chapter 1. Introduction is a preface with general information and introductory notices.
Chapter 2. Getting Started explains about features and structure of LemonIDE.
Chapter 3. Installing LemonIDE Windows provides information on first-time installation of LemonIDE
Windows and host configuration.
Chapter 4. Installing LemonIDE Linux provides information on first-time installation of LemonIDE Linux
and host configuration.
Chapter 5. Using IDE describes each menu and its f unction.
Chapter 6. LemonIDE Debugger explains how to debug remote applications running on the target using
LemonIDE debugger.
Chapter 7. Monitoring Tool explains how to monitor the target status in real-time with LemonIDE.
1-1
Page 6

LemonIDE
TM
User’s Guide
1.4 LemonIDE Documents
The following table summarizes documents included in the Eddy document set.
Table 1-1. LemonIDE Documents
Document Description
User Guide LemonIDE configuration and management
LemonIDE Spec Sheet Technical specifications of LemonIDE
T o access m ore information on Lem onIDE, pl ease refer t o the SystemBase website at
developer community
Through these websites, technical documents or latest updates are available for download.
Note
All documents are updated promptly, so check for the recent document updates. The
contents in these documents are subject to change without a prior notice.
http://www.embeddedmodule.com
http://www.sysbas.com or
1.5 Technical Support
You can reach our tech support with the following methods;
1. Visit the developer’s community at
LemonIDE with developers all around the world.
2. Visit us at
and submitted.
3. E-mail our technical support team to
welcomed.
4. Call us at our customer center at 82-2-855-0501 for immediate support.
http://www.sysbas.com/ and go to ‘Technical Support’menu. FAQ and questions can be reviewed
http://www.embeddedmodule.com and share information and tips on
tech@sysbas.com. Any kind of inquiries, requests, and comments are
1-2
Page 7

LemonIDE
TM
User’s Guide
Chapter 2. Getting Started
This chapter includes general i nformati on, main featu res, and appli cations of Le monIDE.
2.1 Overview
LemonIDE is an integrated dev elom e nt envir onm ent (I DE) for em bedde d so ftware de velo pment , based on a world famous open source project Eclipse. It includes GUI (Graphical User Interface) environment which helps writing
applications or firmware running on a Embedded Linux. It also eliminates inconvenience from TUI (Text User
Interface) with integrated structure linking GNU C/C++ compiler , source code editor , and debugge r to one interface.
This means programmers do not need to learn compiler or debugger commands. With an unified GUI, all
development process can be handled by mouse clicks. In addition, Mak efile auto-creation, source auto-co mpletion,
remote debugging, plugin support, and target system monitoring features are provided.
2-1
Page 8
LemonIDE
TM
User’s Guide
2.2 Structure
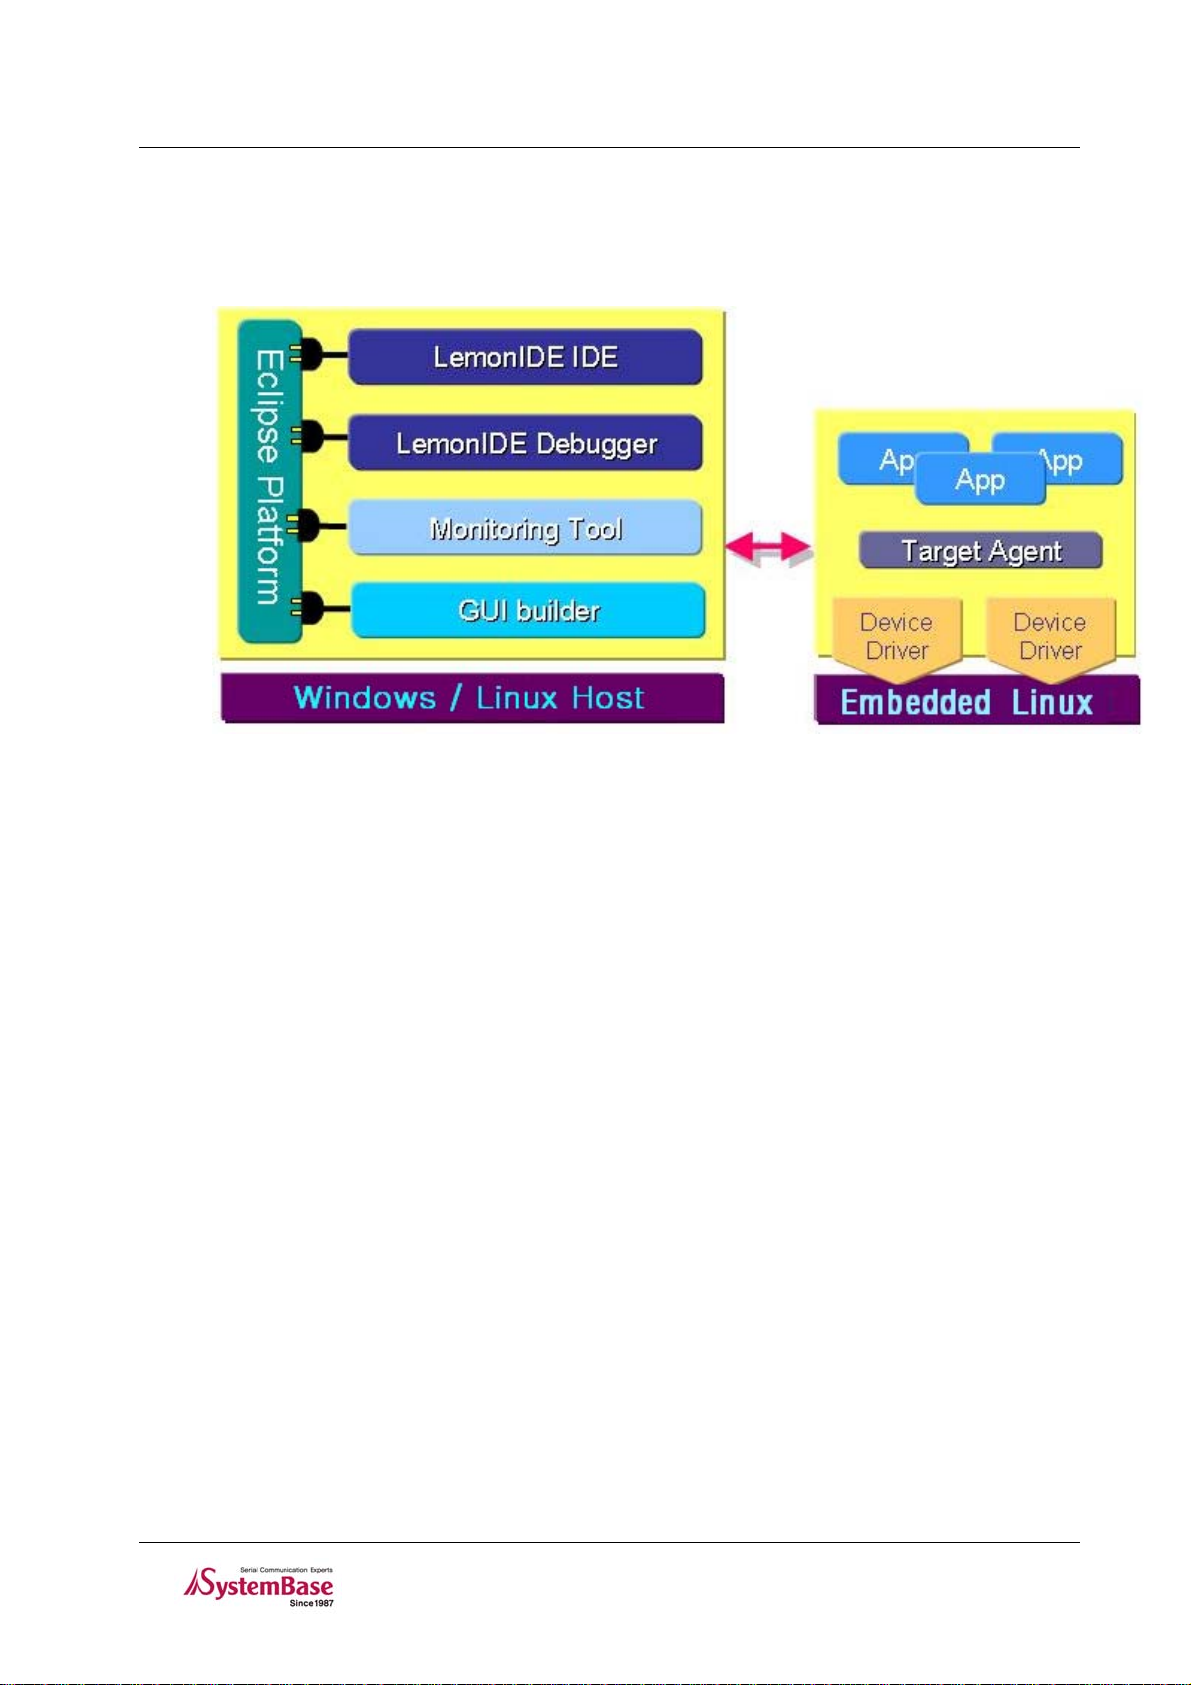
Image 2-1 LemonIDE Structure
Users can develop embedded software running on the target system based on Eddy platform in a more convenient
and accelerated manner. Tools included in LemonIDE are as follows:
LemonIDE IDE : Project-based management with C/C++ source program editing, cross-compile,
remote execution, and GUI builder integration
LemonIDE Debugger : A built-in debugger in LemonIDE supporting both breakpoint and tracepoint
debugging
Monitoring Tool : Memory, process, resource, and battery usage of the target system displayed
visually
Target Agent : Running on the target, the agent is connected to the host to transfer file and accept
remote execution command.
2-2
Page 9

LemonIDE
TM
User’s Guide
2.3 Features
Main features of LemonIDE are as follows:
Eclipse
Eclipse SDK 3.2.2
CDT core 3.1.2
CVS core 3.2.2
Compiler
GNU C/C++ 3.4.3
arm-linux cross compile r
Editor
C/C++ source code editor
C/C++ code auto-completion
Syntax highlighting
Makefile auto-creation
Source browser
Multiple file editing with tab interface
File search and advanced search
External editor link for various file types
Detailed information on error syntax
Auto Build
Remote execution
Debugger
GNU gdb 6.3.90
Visual source code debugger
Breakpoint and tracepoint-based debugging
Remote debugging
Multi-thread debugging
Target Monitor Tool
T ar getview Pl ug-in 1.0. 0
Monitor Plug-in 1.3.4
2-3
Page 10

LemonIDE
TM
User’s Guide
Chapter 3. Installing LemonIDE Windows
This chapter describes how to install LemonIDE on the Windows host system.
Refer to “Eddy_DK_Program mer_Guide ”for installing instructions on Cy win, Toolchain and DK Sources.
3.1 Install Environment
3.1.1 Windows Host System
LemonIDE Windows requires a W indows host system. It has been tested on the following W indows versions.
Windows XP SP2
Windows 2000
Windows 2003
Note
Instructions in this manual are based on LemonIDE Windows installed on Windows XP.
3.1.2 Target System
In order to download and execute the application created from LemonIDE, a target system is required. SystemBase
embedded modules applicable as target systems are as follows:
Eddy Series (Ver 2.xx, Ver 2.1.x.x)
Eddy-DK (Ver 2.xx, Ver 2.1.x.x)
Refer to Eddy-DK Programm er’s G uide for hos t-target co nnections and operation tests.
3-4
Page 11
LemonIDE
TM
User’s Guide
3.2 Installation
This chapter describes how to install LemonIDE on the Windows host system.
Cywin and Toolchain must be installed i n order to inst all LemonI DE Windows.
Refer to “Eddy_DK_Program mer_Guide ”for installing instructions on Cy win, Toolchain and DK Sources.
3.2.1 JDK installation
LemonIDE requires a Java Runti me Environm ent runnin g on the W ind ows host s ystem.
Java 5 JRE (Java Runtime Enviro nment) or hi gher is requi red.
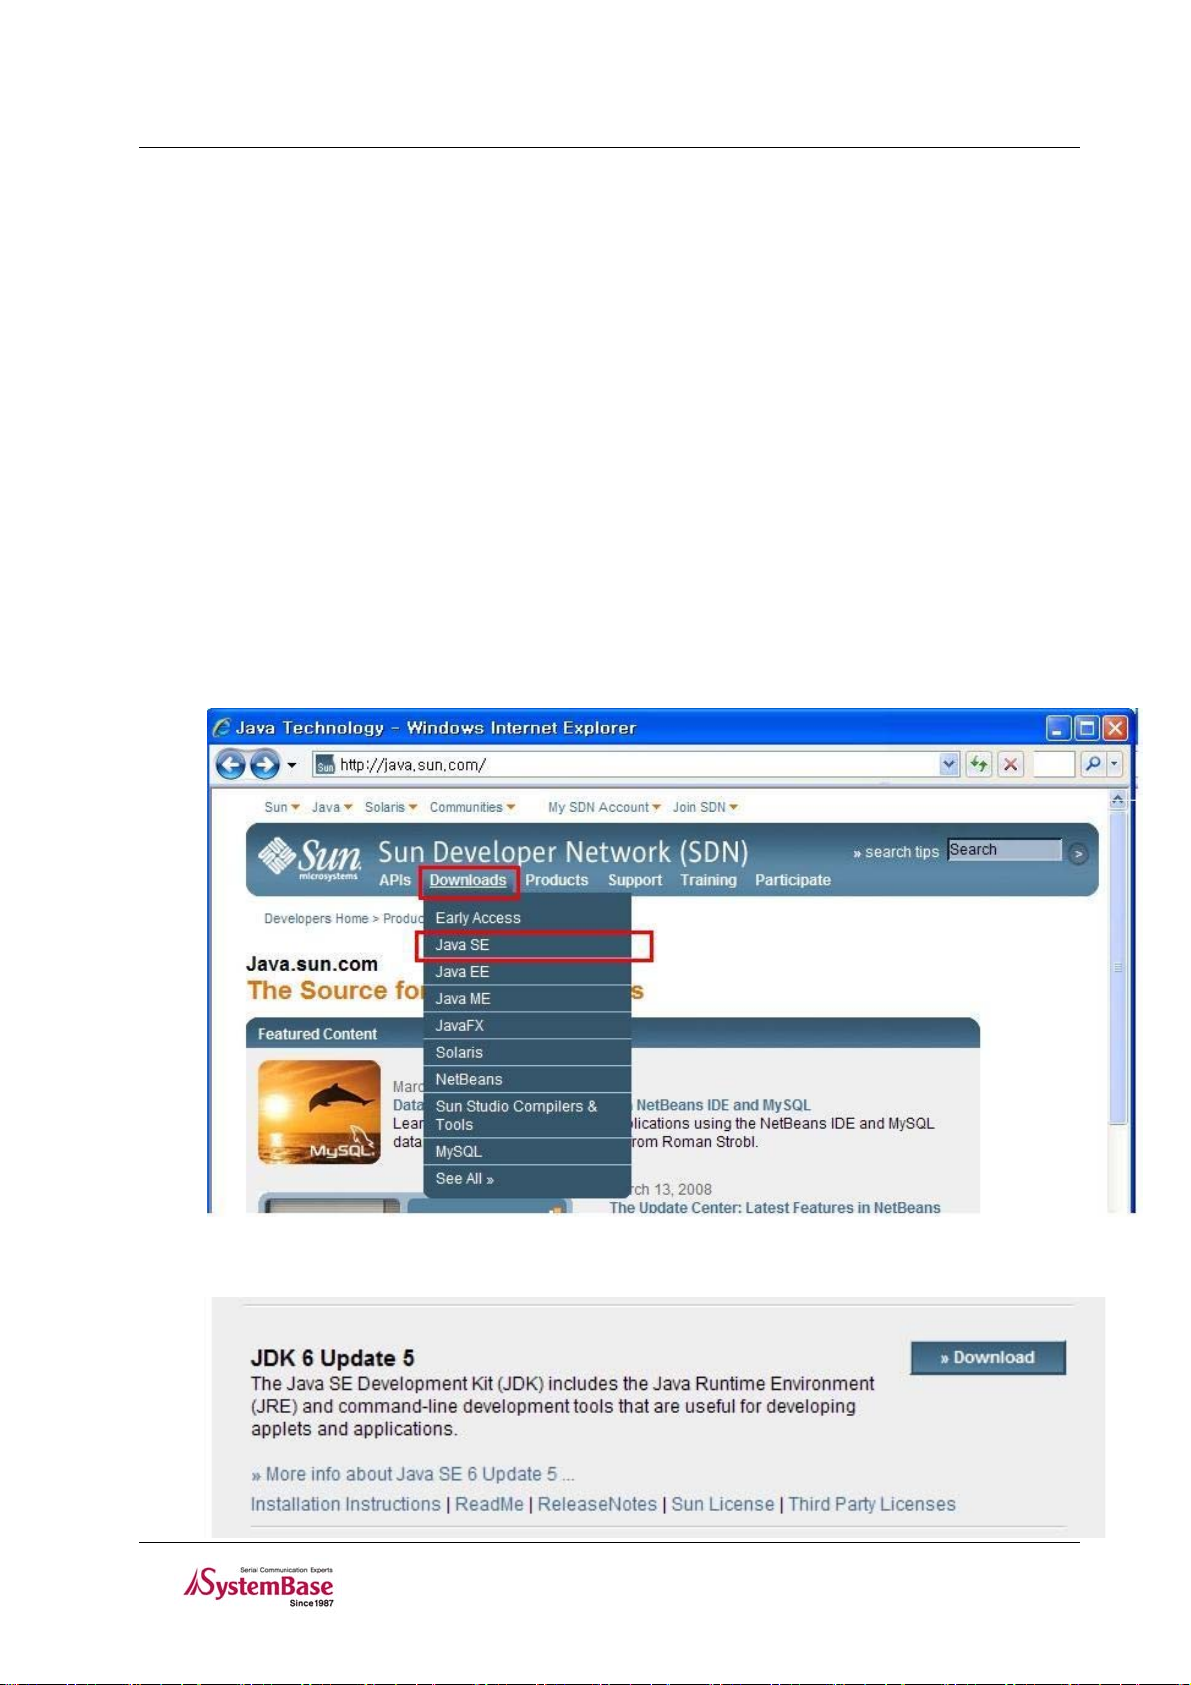
User must download and install JDK as its License policy forbids public distribution. The following describes
downloading and install ing of J DK 6.0.
Access
http://java.sun.com/.
Select ‘Download’ and then ‘Java SE’ as shown above to move to JDK 6 download area.
3-5
Page 12
LemonIDE
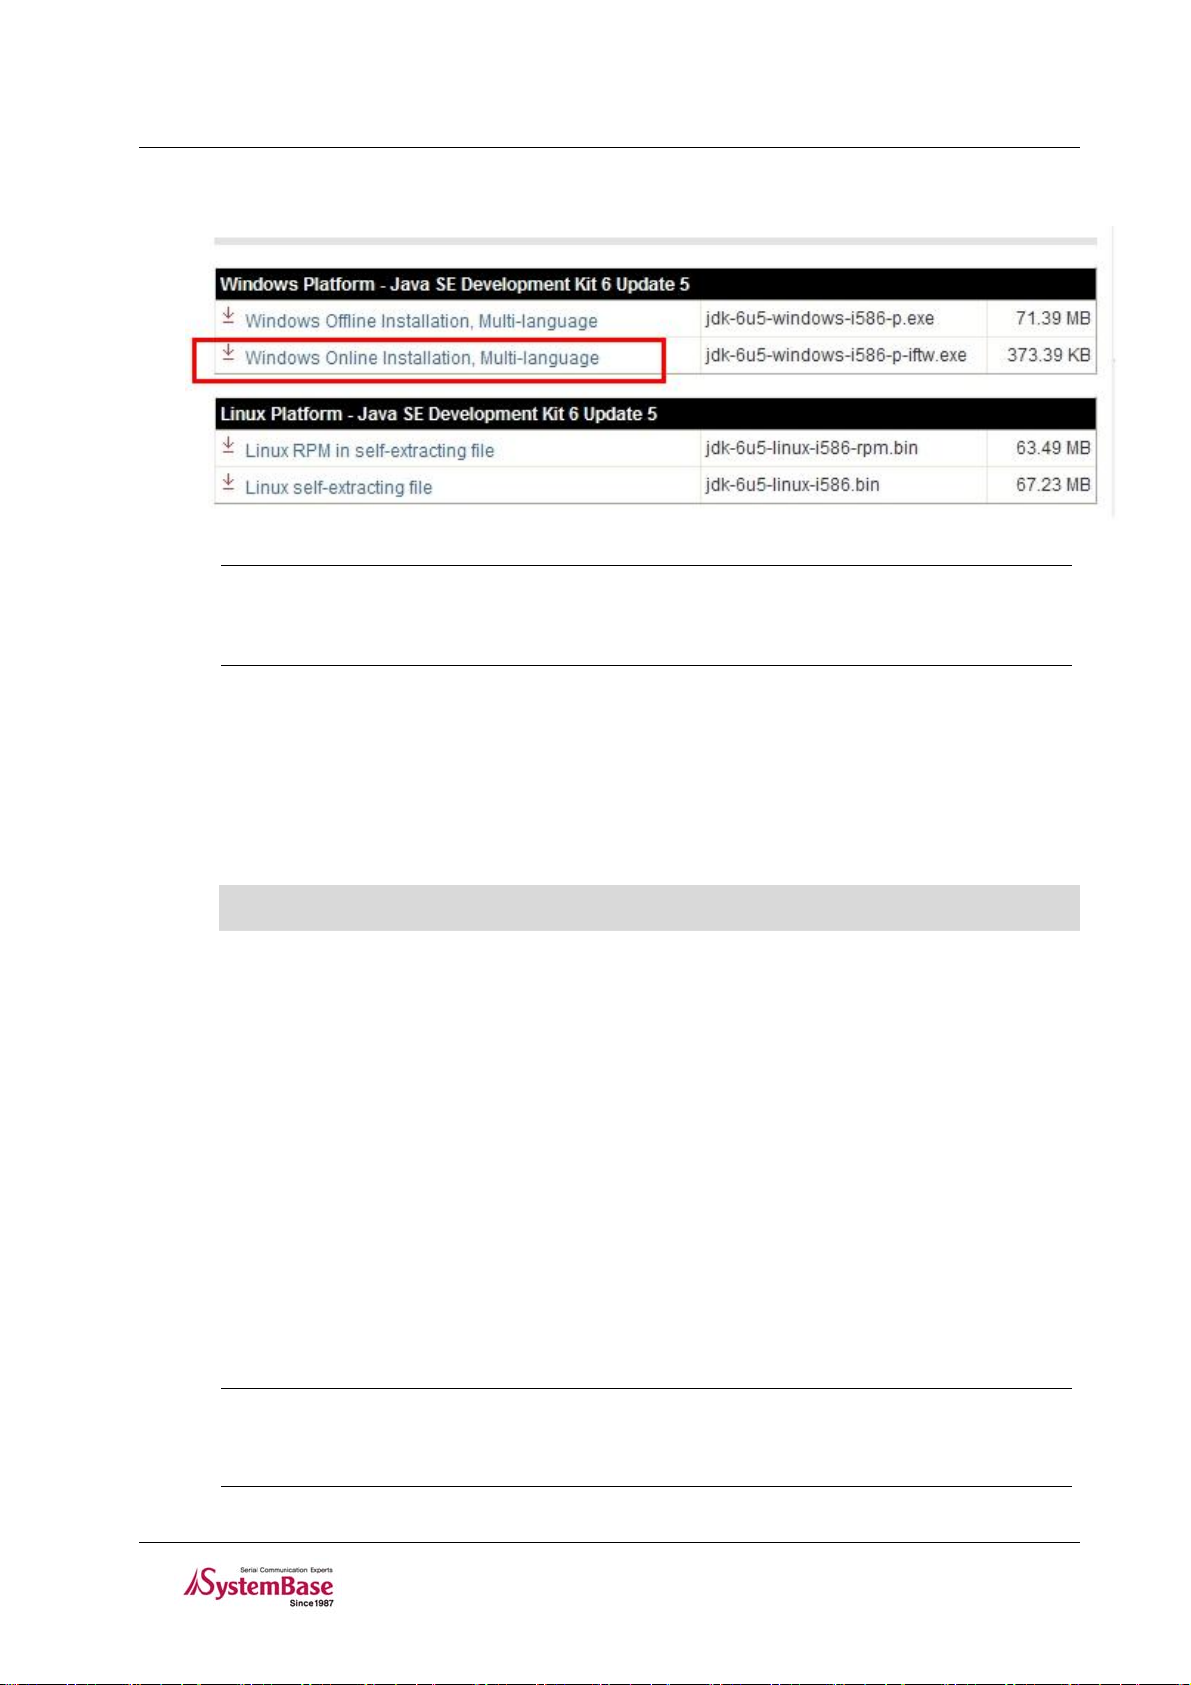
Download the latest JDK 6 version by clicking the download button on the right.
Note
It is recommended that JDK be installed under “ C:\”.
Install Wizard will be automatically executed and guide you through install process once
download is complete. Downloading time may vary depending on your network environment.
TM
User’s Guide
3.2.2 Configuring Windows Environment Variables
Path must be set for LemonIDE to reference Ja va Libraries.
On ‘Window Desktop’ Æ Right click ‘My Computer’ Æ ‘Properties’ Æ ‘Advanced’ Æ ‘Environment Variables’,
select ‘Path’ from System Variables. Click ‘Edit’ and add the following line.
;c:\jdk1.<Version>\bin
Version reflects the installed JDK version.
If JDK6 was installed under C:\, installed directory would resemble c:\jdk1.6.0_05, where “6.0_05” reflects the
installed JDK version.
In the Path file, add “;c:\jdk1.6.0_05\bin”
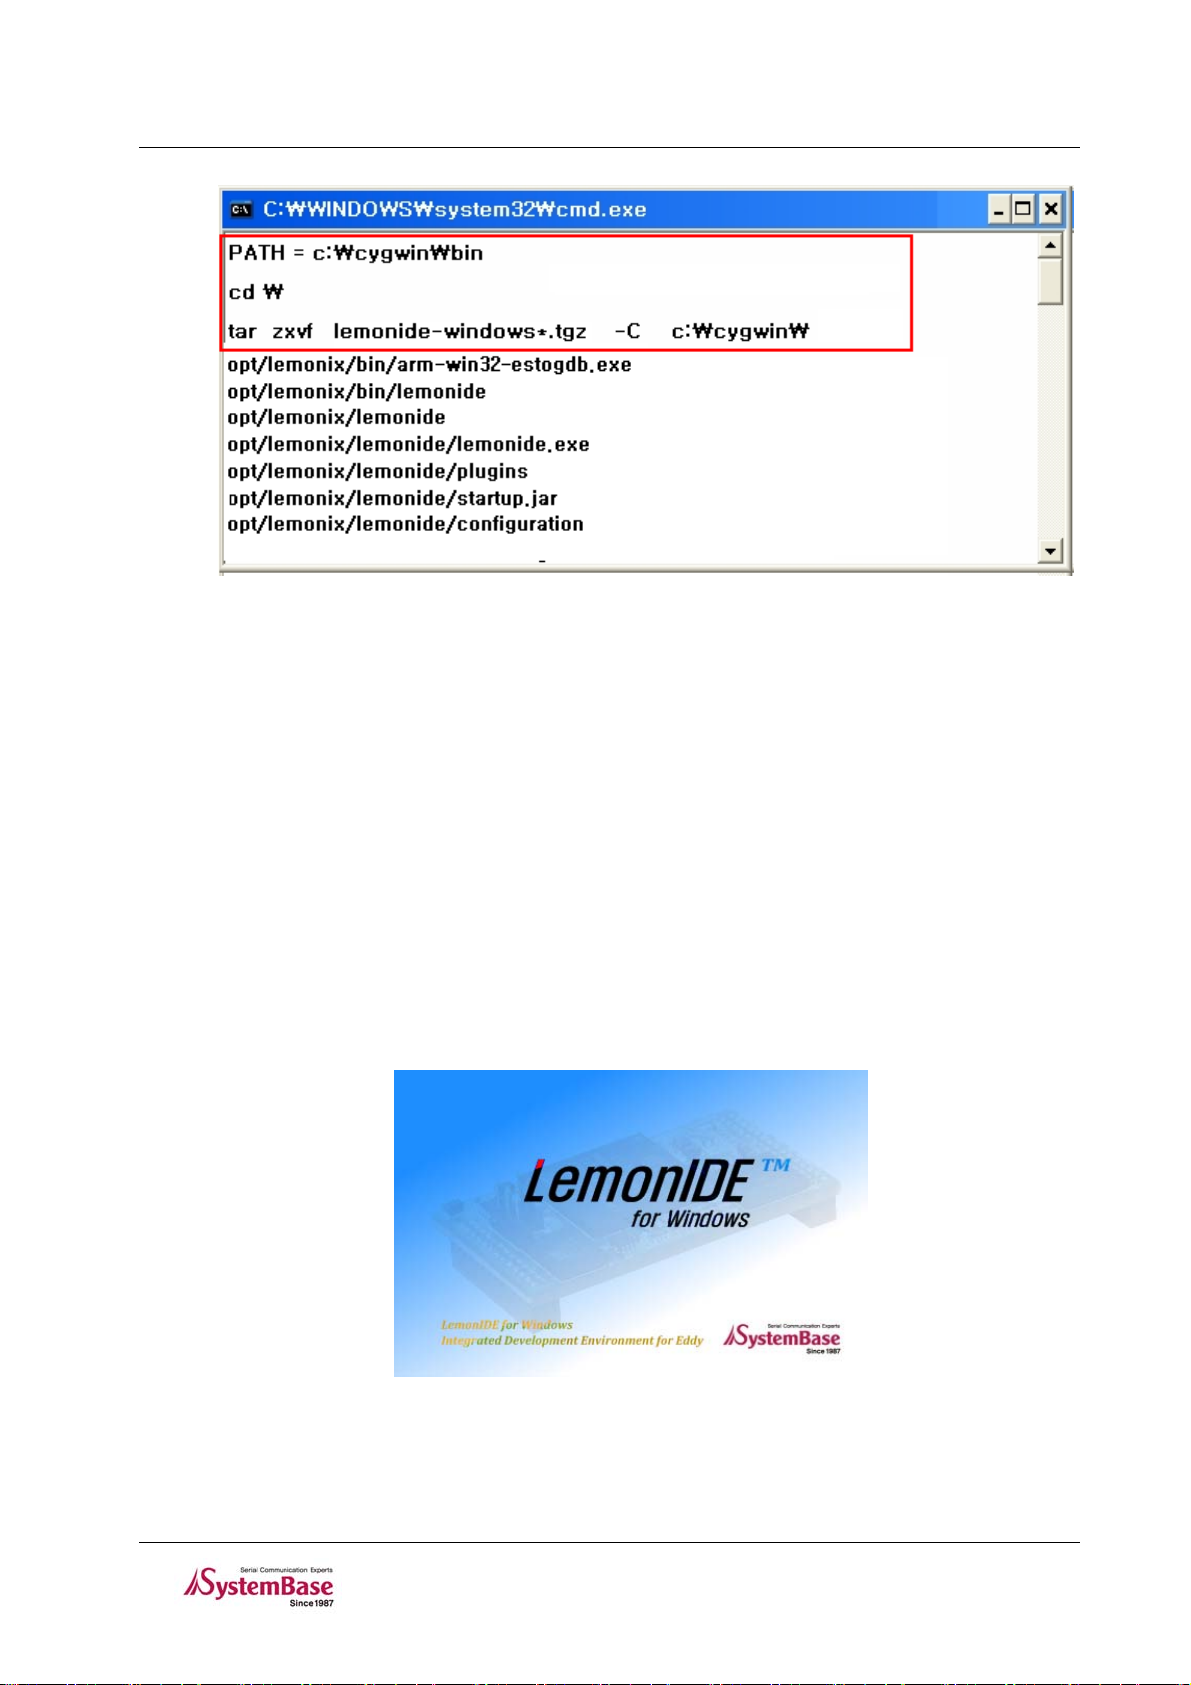
3.2.3 Installing LemonIDE
Install LemonIDE package. LemonIDE package can be found in Eddy DK CD under SDK/W indows. “Lemonidewindows-1xx.tgz” file is the LemonIDE package. Copy this file to “C:” drives root directory. Execute Windows
command prompt program “CM D” and unzip t he LemonIDE packa ge as shown bel ow.
(Directory path is case sensitive)
The default directory for LemonIDE installation is set to “c:\cygwin\opt\lemonix\lemonide ”
Note
Instructions on this manual are based on LemonIDE installation under C:\. Should LemonIDE
be installed in different hard drive or directory, environmental variables must be set
accordingly. It is recommended that LemonIDE be installed under C:\.
3-6
Page 13
LemonIDE
TM
User’s Guide
3.3 Creating Project Space
If installation process is completed move to LemonIDE installed directory, /cygwin/opt/lemonix/lemonade, and
execute “lemonide.exe”.
LemonIDE execution program is located in “c:\cygwin\opt\lemoix\lemonide\lemonide.exe”.
You may create shortcut icons for your co nvenience.
LemonIDE logo will first appear, and after loading is completed LemonIDE will automatically display its initial
screen.
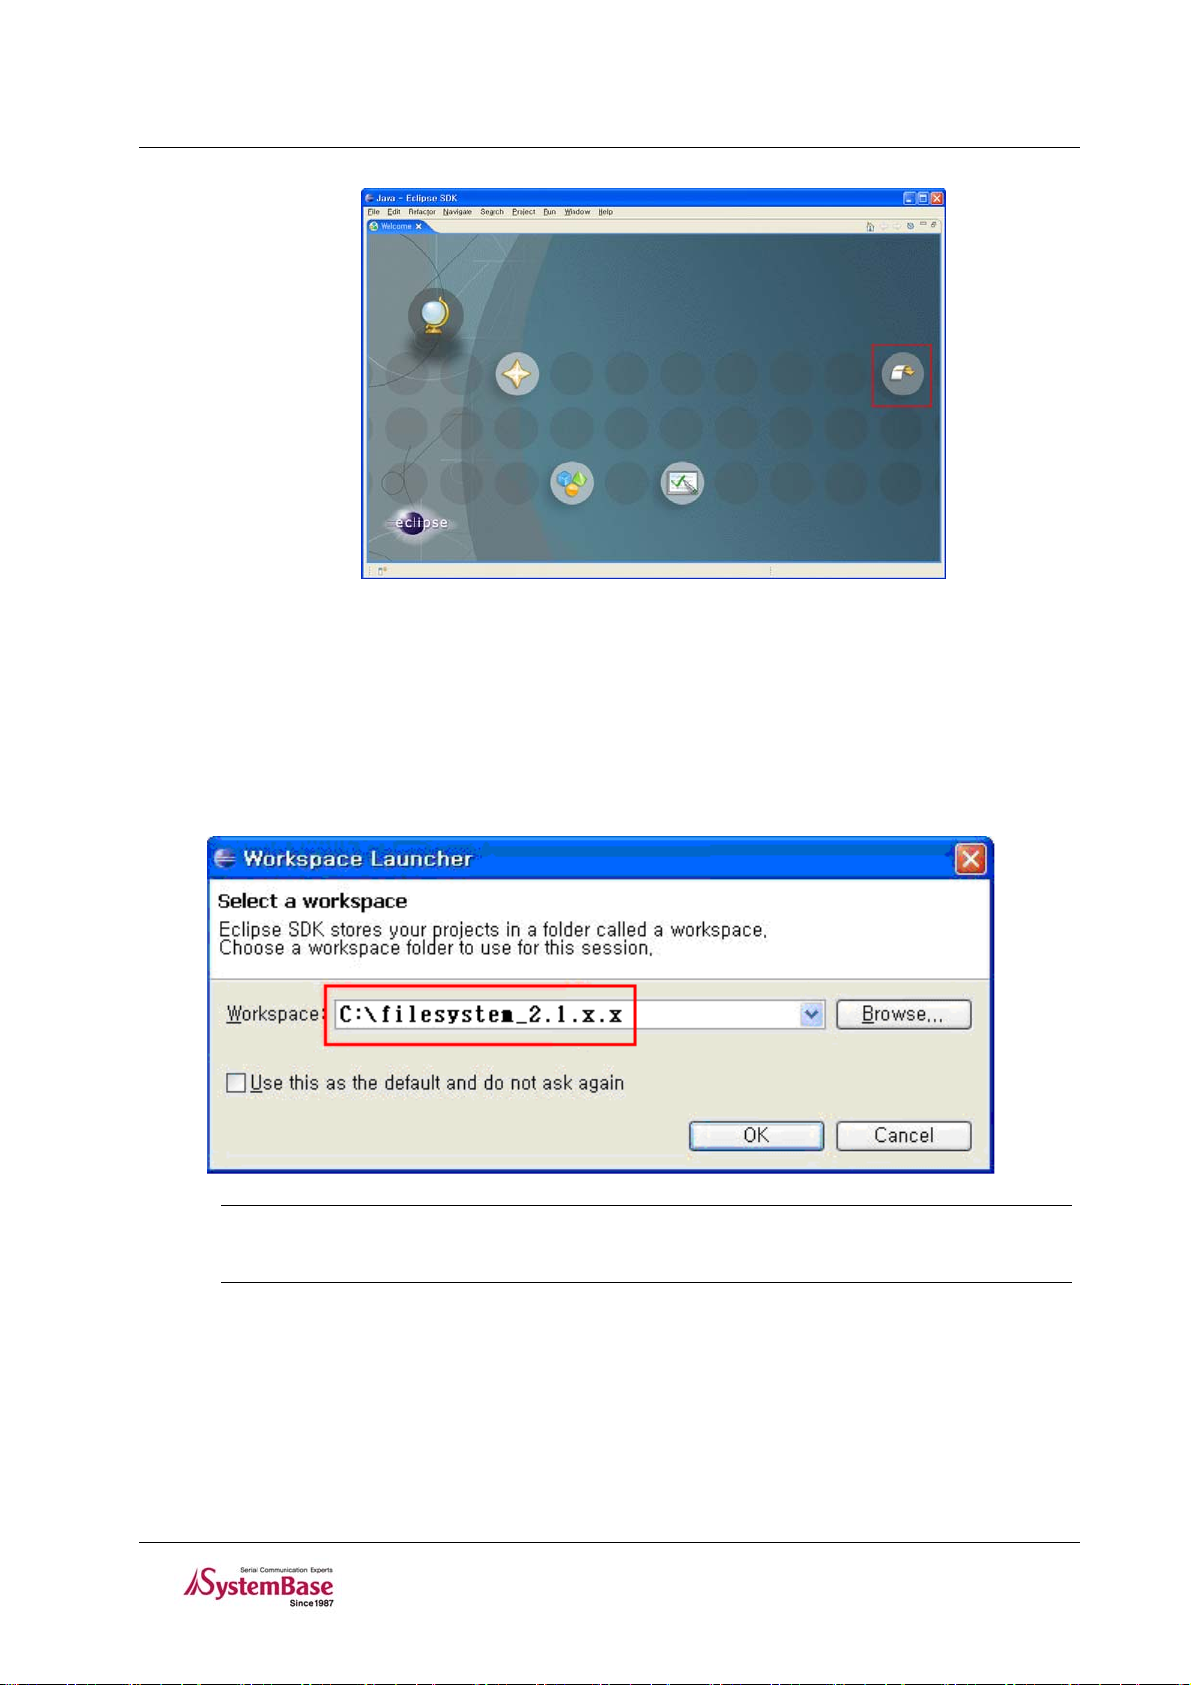
Picture below is the first screen that will appear when LemonIDE is successfully executed. Click “WorkBench” icon
on the right.
3-7
Page 14
LemonIDE
TM
User’s Guide
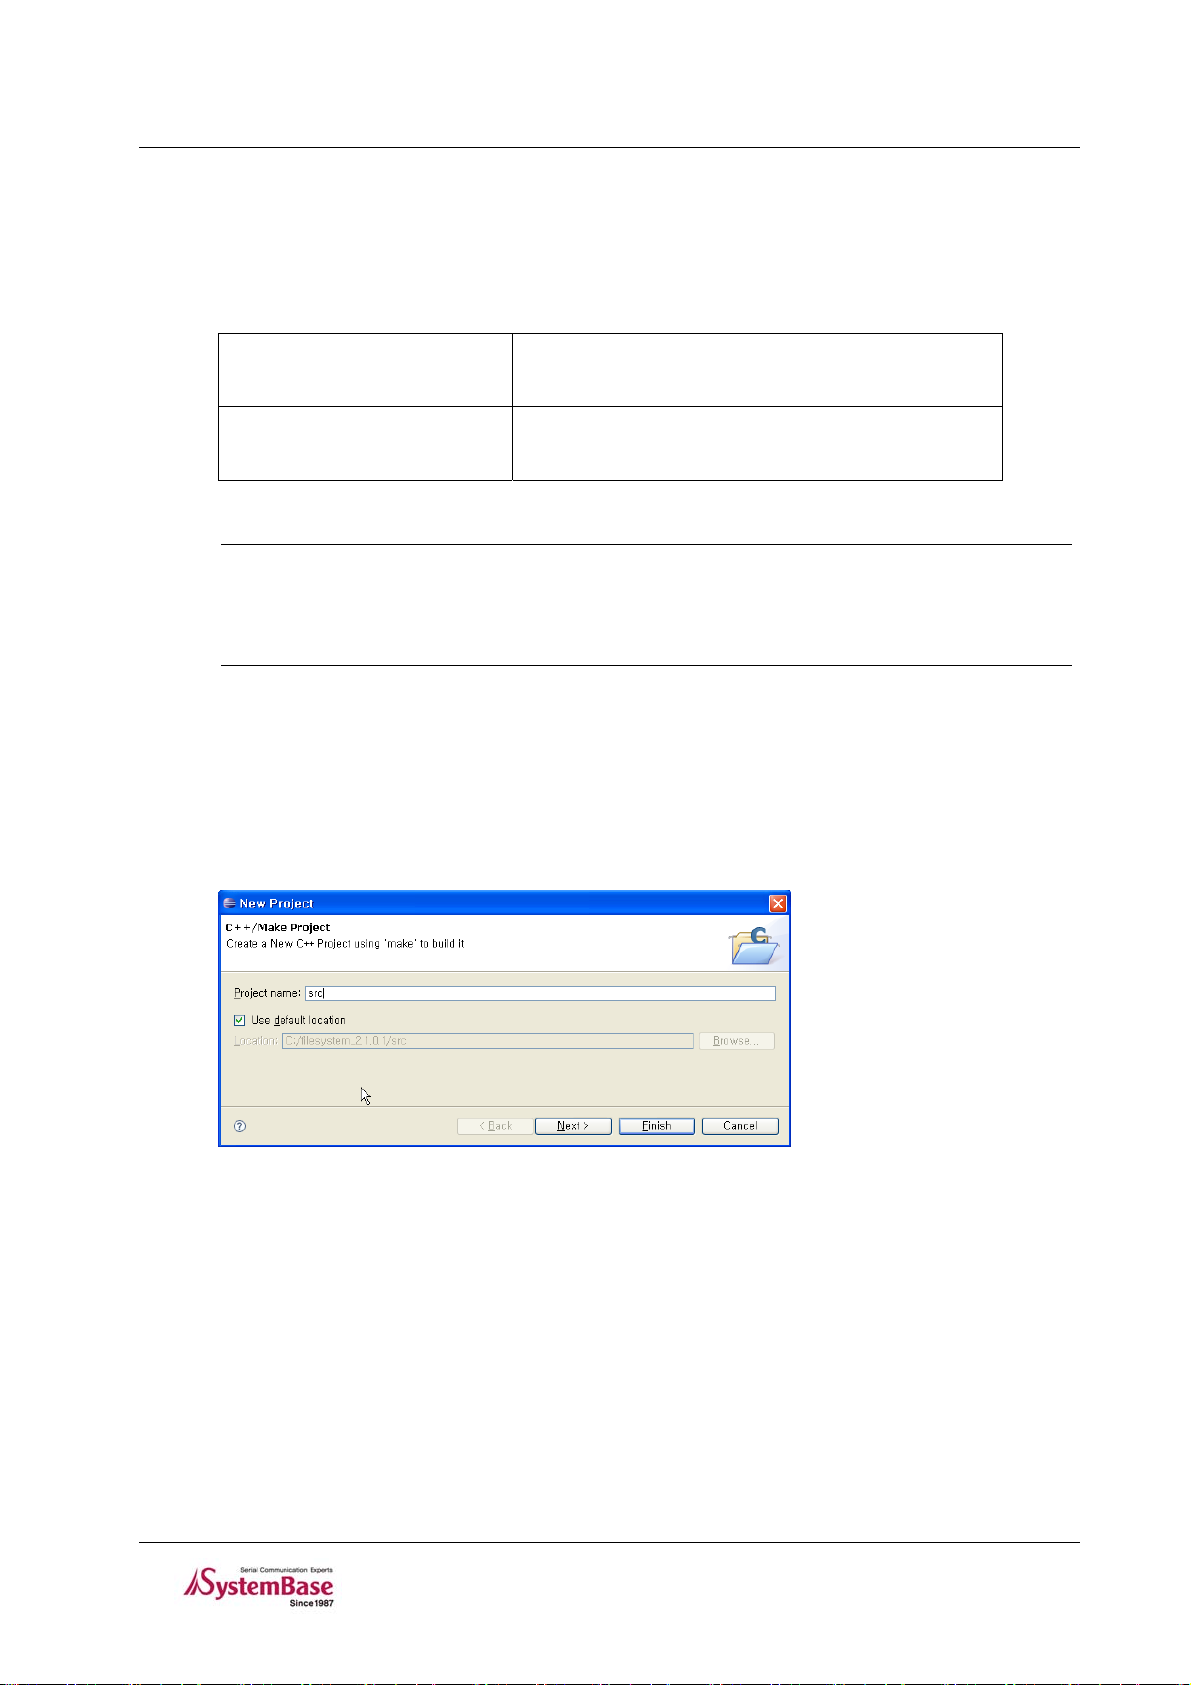
3.3.1 Creating Workspace
Create a Workspace folder.
As Workspace DK Source has been installed in previous section of this manual, select the directory where DK
Source has been installed. Refer to “7.6 Changing Workspace” to change workspace.
Note
Blank space is not allowed when creating Workspace.
(e.g.) “ C:\documents and settings” (not allowed)
3.3.2 Creating Projects
Create a new project on a Workspace.
A project is a set of required resource needed in developing a program, and includes source code and build
information.
3-8
Page 15
LemonIDE
As this manual’s instructions are based on Eddy DK Source, add application & firmware image space under DK
Source directory(W orkspace) a s projects.
LemonIDE project can be classified into one of the following four categories depending whether makefile is created
and whether C or C++ program is used.
TM
User’s Guide
Standard Make C Project
Project based on C or C++ where existin g makefile is used
Standard Make C ++ Project
LemonIDE Make C Project
LemonIDE Make C++ Project
Project based on C or C++ where makefile is automatically
created
Note
Links to libraries are common in ordinary developing environment, and most Open Sources
provide makefile. Hence use of Standard type project is recommended. Provided DK Source
also includes makefile definitions. Explanation on this manual will be based on Standard
typed project.
To create a “Standard Make C++ Project” or “Standard C Project”, select “File” Æ “New” Æ “Project”
“LemonIDE Application” Æ “Standard Make C++ Project” or “Standard C Project” or “File” Æ
Æ
“New” Æ “Standard C++Project”/“Standard C Project” from LemonIDE title menu.
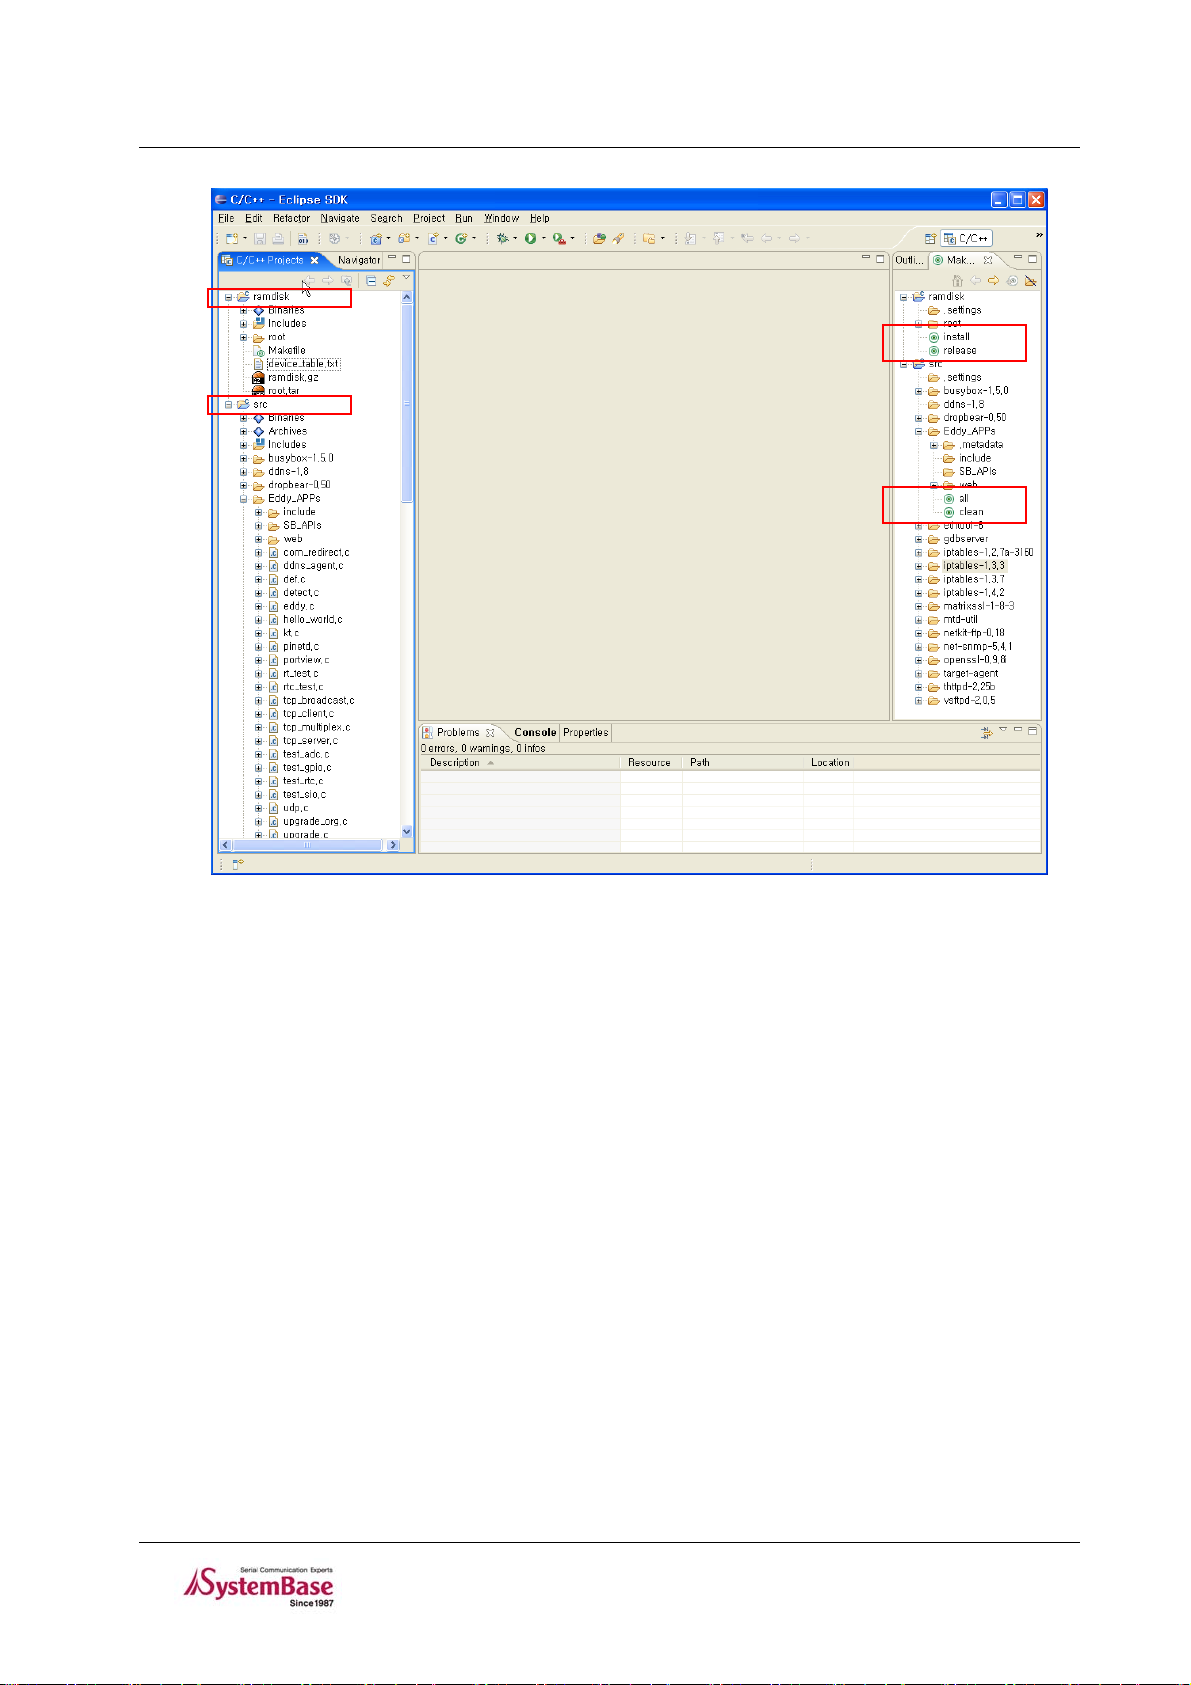
T ype in “src” for Project Nam e and click “Finish” to enlist an Eddy application project.
“src” is an application directory enlisted as a filesystem_2.1.x.x Workspace.
T ype in “ram disk” for Project Name and click “Finish” to enlist a project to be used as File System Image Works in
the same manner.
If all procedures were carried out correctly, Workspace “filesystem_2.1.x.x” should display two projects, “src” and
“ramdisk” as shown in the image below.
3-9
Page 16
LemonIDE
TM
User’s Guide
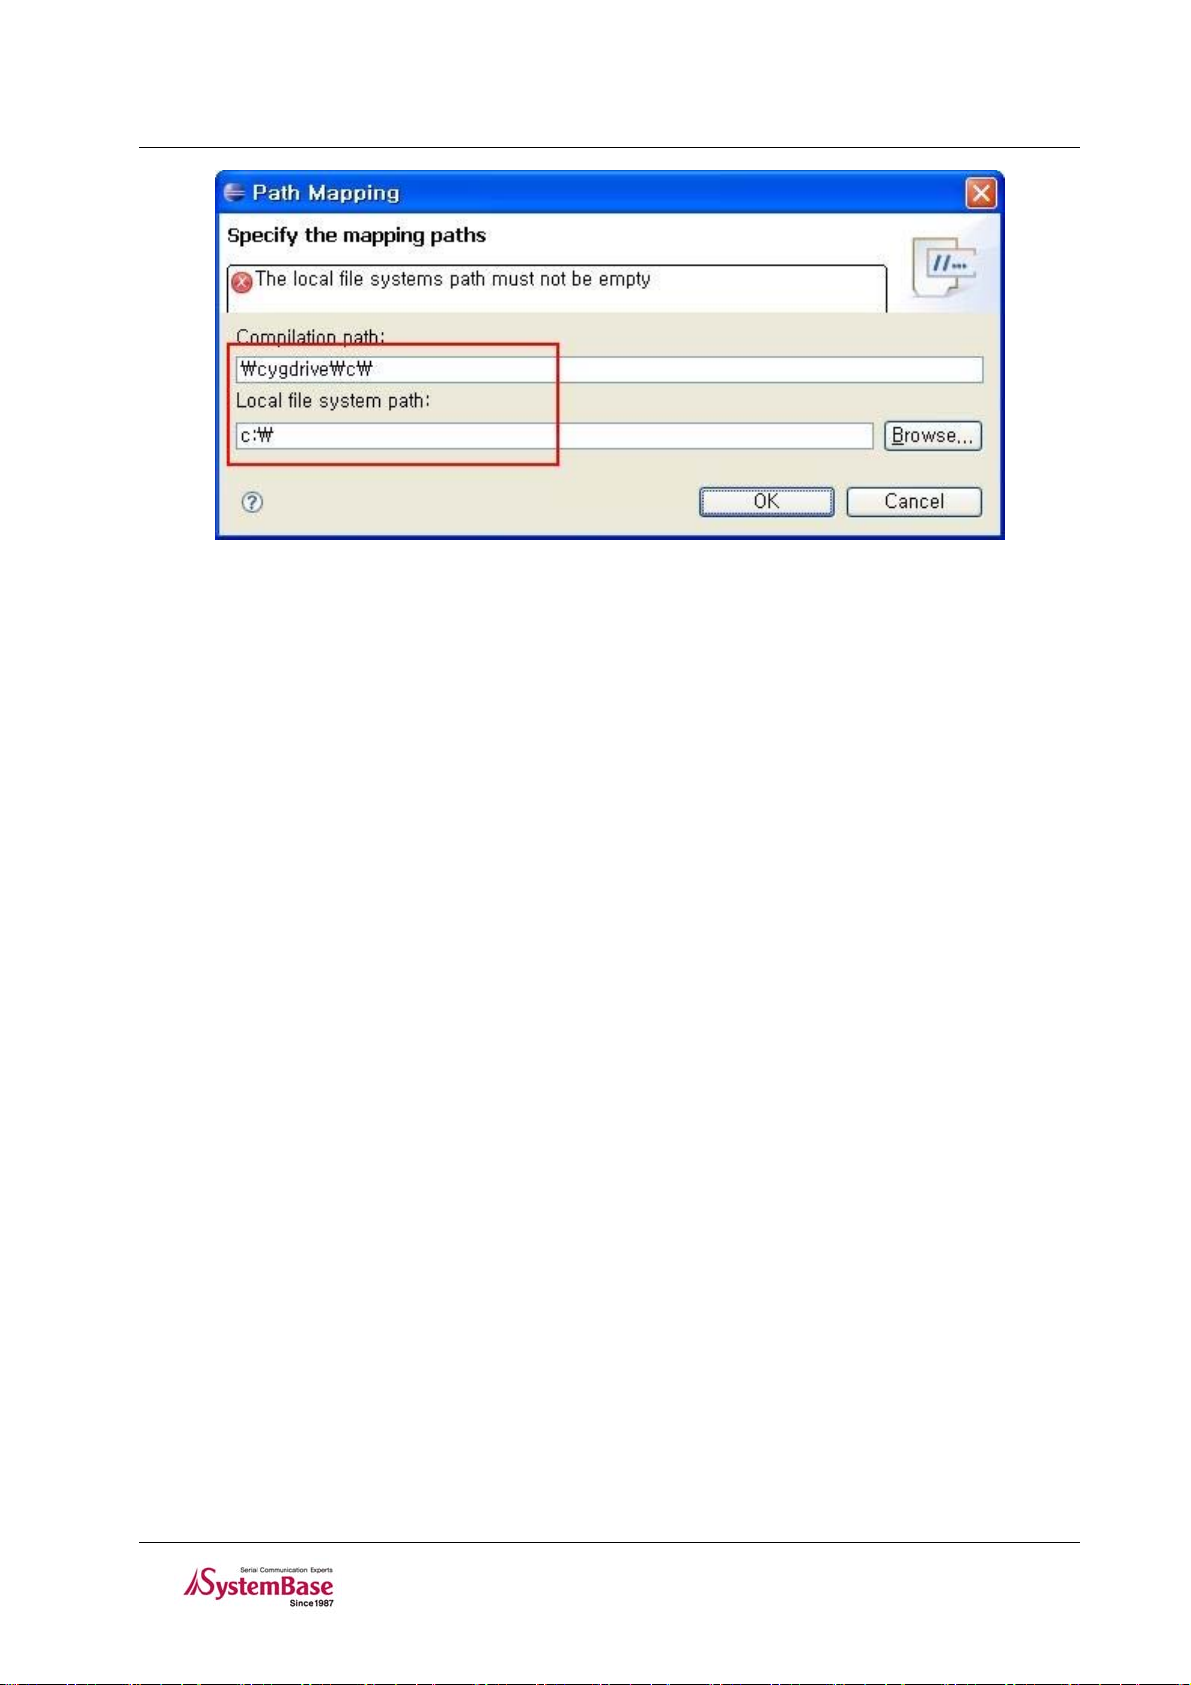
3.3.3 Configuring Path
Some libraries provided by Cygwin are used in LemonIDE.
For this reason, “/” used in Cygwin’s Path has to be converted to c:\cygwin\, and it also has to comply with
Windows default Path C:\.
Click “Windows Æ Preferences… Æ C/C++ Æ Debug Æ Common Source Lookup Path Æ Add Æ Path
Mapping” from LemonIDE menu and “Path Mapping : New Mapping” will be created.
On the newly created Path Mapping : New Mapping, click Edit Æ Add, and Path Mapping window will appear as
shown below. Add the following.
\cygdrive\c\ Æ c:\
3-10
Page 17
LemonIDE
TM
User’s Guide
3-11
Page 18

LemonIDE
TM
User’s Guide
Chapter 4. Installing LemonIDE Linux
This chapter describes how to install LemonIDE on the linux host system and configure cross-compile environment
to connect it to LemonIDE.
Refer to “Eddy_DK_Program mer_Guide ”for installing instructions on Toolchain and DK Sources.
4.1 Install Environment
4.1.1 Linux Host System
LemonIDE requires a Linux host system. It has been tested o n the followi ng Linux dist ributions.
Red Hat 9.0
Red Hat Enterprise Linux 3.0
Fedora Core 4, 5, 6
SUSE Linux Enterprise Server 10.2
Ubuntu Linux 6.x, 7.x
Debian Linuv 4.0
CentOS 4.5
Asianux 3.0
Note
Images in this manual have been captured from LemonIDE running on Linux Fedora core 5.
Other Linux distributions will bear similar images.
4.1.2 Target System
In order to download and execute the application created from LemonIDE, a target system is required. SystemBase
embedded modules applicable as target systems are as follows:
Eddy Series (Ver 2.xx, Ver 2.1.x.x)
Eddy-DK (Ver 2.xx, Ver 2.1.x.x)
Refer to Eddy-DK Programmer Gui de for host-tar get connection s and operation tests.
4-1
Page 19

LemonIDE
TM
User’s Guide
4.2 Installation
LemonIDE, Integrated development Environment based on Eclipse platform will be installed on Linux host.
4.2.1 Toolchain & Package Installation
LemonIDE is provided in tar.gz format. When the package file is extracted under the ‘/’ directory, LemonIDE is
installed under /opt/lemonide. LemonIDE need not be installed again, if already installed while installing Toolchain
with instruction provided in “Eddy_DK_Programmer_Guide”.
Note
Carry out all installation procedures under super user privileges.
Example below assumes CDROM be mounted on /mnt/cdrom.
# cd /
# tar -zxvf /mnt/cdrom/SDK/linux/lemonide*.tar.gz -C /
4.2.2 JDK installation
LemonIDE requires a Java Runti me Environm ent running on the Linux h ost system.
Java 5 JRE (Java Runtim e Environm ent) or hig her is require d, and Java 5 JRE is rec omm ended. Som e feature s m ay
not display normal perform ance under Java 6 JRE.
User must download and install JDK as its License policy forbids public distribution. The following describes
downloading and install ing of J DK 5.0.
Access
http://java.sun.com/.
4-2
Page 20

LemonIDE
T o access download site, click the red box in pi cture above. All versions of JDKs can be downloaded at this site.
LemonIDE JDK Ver. 5.0(J2SE 5.0). The latest release (of current date) is JDK 6. Move to Previous Release to
download older versions. Image captures below outlines this procedure.
Note
Procedures and methods of downloading JDK on this site are subject to change without
notice, and procedures described in this manual may not reflect recent changes in such
events.
TM
User’s Guide
When download is completed, copy and install the downloaded file to Linux host as shown below.
4-3
Page 21

LemonIDE
TM
User’s Guide
JDK installation is now complete.
# chmod +x jdk-1_5_0_<version>-linux-i586.bin
#./jdk-1_5_0_<version>-linux-i586.bin
# sudo cp –rf jdk1.5.0_<version> /opt/lemonix/jdk
4.3 4.3 Configuration
Add a path to the .bashrc file in the home directory.
export PATH=/opt/lemonix/bi n: $P AT H
With the source command, reflect changes into the system.
source .bashrc
4.4 LemonIDE
After installation and configuration is complete, move to ‘/opt/lemonide/bin’ directory and run lemonide.
cd /opt/lemonix/bin
./lemonide
With the LemonIDE splash logo image, you will see an initial screen of IDE after loading.
4.5 Creating Workspace
Select a Workspace folder, and click <OK>. You will be able to see LemonIDE’s initial screen. (The following
example will differ according to user’s folder directory .)
A popup window to select a Workspace will appear as below.
4-4
Page 22

LemonIDE
TM
User’s Guide
4.6 Creating Projects
Create a project on a Workspace.
A project is a set of required resource needed in developing a program, and includes source code and build
information. LemonIDE manages program modules to be executed in the target as a project. Project build
environment is executed as a form of make command.
A makefile is required to run make commands. LemonIDE projects can either create makefile automatically or
manually. When a makefile is created automatically, users can easily modify build information through UI(User
Interface). When created manually, users need to modify the makefile itself in order to change any build information.
When an existing makefile-based project is imported to LemonIDE, it is recommended that makefile be created
manually. Converting existing makefile build information through UI might require more ef fort.
LemonIDE project can be classified into one of the following four categories depending whether makefile is created
and whether C or C++ program is used.
Standard Make C Project
Standard Make C ++ Project
LemonIDE Make C Project
LemonIDE Make C++ Project
Note
Links to libraries are common in ordinary developing environment, and most Open Sources
provide makefile. Hence use of Standard type project is recommended. Provided DK Source
also includes makefile definitions. Explanation on this manual will be based on Standard
typed project.
Project based on C or C++ where existin g makefile is used
Project based on C or C++ where makefile is automatically
created
4.6.1 Creating LemonIDE C/C++ Project
LemonIDE Make C/C++ Projects are useful when creating a new C/C++ program as makefile is automatically
generated, but as makefile is provided in D K Source use o f St andard type pro ject is recomm ended.
Select “File” Æ “New” Æ “Project”from LemonIDE’s menu. Select LemonIDE Application Æ
Standard Make C++ Project as shown below.
4-5
Page 23

LemonIDE
TM
User’s Guide
T ype in “src” for Project Nam e and click “Finish” to enlist an Eddy application project.
Enlisting “src” means, src folder existing under DK Source will be registered as a project, as the folder that DK
Source is installed is enlisted as a Workspace.
T ype in “ram disk” for Project Name and click “Finish” to enlist a project to be used as File System Image Works in
the same manner.
If all procedures were carried out correctly, Workspace “filesystem_2.1.x.x” should display two projects, “src” and
“ramdisk” as shown in the image below.
4-6
Page 24

LemonIDE
TM
User’s Guide
4-7
Page 25

LemonIDE
TM
User’s Guide
Chapter 5. Using IDE
IDE features of LemonIDE will be explained in this chapter.
W e will create, build and execute a source file named hello.c on Eddy. Procedures for making a firmware image will
be outlined.
5.1 LemonIDE Views
LemonIDE IDE(Integrated Development Environment) is based on Eclipse and supports C/C++ source editing,
cross compile, remote execution, and GUI builder integration. LemonIDE is a plugin of Eclipse and uses of Eclipse
UI (workbench) as a basic layout. Th is chapter fo cuses pr imarily on LemonIDE-specific characteristics rather than
general Eclipse UI context.
LemonIDE consists of following views.
5-1
Page 26

LemonIDE
Project V iew Displays project lists included in Workspace.
Make V iew Displays headers, functions, structures and classes of editing source code
Edit V iew Used for source code editing. Composed of multiple tabs for multiple source code edit.
Message V iew Display messages during project buid and LemonIDE supported Target Browers
TM
User’s Guide
5.2 Creating & Editing Source Codes
Create a new source file or open an existing source file.
There are two cases in adding source files to a project: creating new files or importing existing files.
When editing an existing file, double click on the file to edit on Project View and the file will be opened in Edit
View.
To create a new source file, select “File” Æ “New” Æ “Source File” and assign proper saving location
and name for the new file. The created new file can be seen in the Project View and will be opened in Edit View for
editing.
Image below shows procedures on creating “hello.c” in “src” project, under “Eddy_APPs”folder.
5-2
Page 27

LemonIDE
TM
User’s Guide
Sample program “hello.c” is shown below to provide a better understanding on use of LemonIDE.
#include <stdio.h>
void sub (int value);
int main (int argc, char *argv[])
{
sub (1000);
return 0;
}
void sub (int value)
{
int sum=0, i;
for (i=1; i<=value; i++) {
sum += i;
}
printf ("SUM (1 ~ %4d) = %7d\n", value, sum);
return;
}
5.3 Compile Environment Settings & Build
Compile refers to process of com piling and li nking source files and m aking binary image execut able for Eddy.
LemonIDE projects are usually compiled based on makefile. This chapter outlines process of compiling source files
using makefile provided in D K Source.
5-3
Page 28

LemonIDE
TM
User’s Guide
5.3.1 Creating & Updating Makefile
If new source file is created or an existing source file in Project View has been altered, a makefile to compile source
file must be created. Makefile pr ovide in DK Source can be re ference to c reate a new m akefile.
Below displays an example of creating a compile environment for m akefile for source file, “hello.c” in “src” project,
under “Eddy_APPs”folder.
CROSS = /opt/lemonix/cdt/bin/arm-linuxLDFLAGS += -L/opt/lemonix/cdt/lib -L/opt/lemonix/cdt/bin
IFLAGS += -I/opt/lemonix/cdt/include -I./include
.
.
.
TARGET = eddy pinetd def ddns_agent \
Upgrade portview upgradetftp detect \
udp rt_test test_rtc test_sio \
test_adc test_gpio hello
LIBS = -lrt SB_APIs/SB_APIs.a
all : $(TARGET)
hello : hello.o
rm -f $@
$(CC) $(CFLAGS) $(LDFLAGS) $(IFLAGS) -o $@ $@.o
$(STRIP) $@
udp : udp.o
rm -f $@
$(CC) $(CFLAGS) $(LDFLAGS) $(IFLAGS) -o $@ $@.o $(LIBS)
$(STRIP) $@
.
.
5-4
Page 29

LemonIDE
TM
User’s Guide
5.3.2 Adding to Make Target
, If source file and makefile are created, next step is to add makefile to
As new source file “Hello.c”was created on “5.2 Creating & Editing Source Codes”and compile environment
Make Target. Make Target pane can be found in Make View. Select
folder where source file and makefile exists, right click and select “Add
Make T arget”.
on “Hello.c “ was made on “5. 3.1 Creatin g & Updating Makefile ”, add compile environment as sh own below.
Right image displays Hello added to Make T ar get.
T argeTarget Name : An alias for to be compiled target source file
Make T arget : Arguments to be used in make(compile environ ment variable s configure d in makefil e)
5-5
Page 30

LemonIDE
TM
User’s Guide
5.3.3 Source Compile
Source file is compiled to Eddy executable binary file.
Compile is carried out by clicking Make Target created in “5.3.2 Addi ng to Make Target ”.
(Double click “Hello” on “MakeView” )
Compiling process can be observed in “Console” of “Message View”.
Make Targets provided in DK Source are “All” and “Clean”. “All” Make Target compiles all application sources
associated to makefile, and “Clean” Make T arget initia lizes all compiled applications. (Refer to “Makefile”)
5.4 Registering Run Method
Steps on creating Run/Debug Method will be discussed in this section.
Run/Debug Method is necessary to upload and execute or debug executable binary file on Eddy.
Select “Run” Æ “Run … “ from the main menu, and Method creation window will appear.
Double click“C/C++ Remote” and Method which execution environment variable can be configured will be
created.
5-6
Page 31

LemonIDE
TM
User’s Guide
5.4.1 Registering Method name and binary file
Select “Main” tab and add name & path f or executable binary fi le.
Name : Method’s alias
Project : The name of the project which binary file is located
C/C++ Application : Binary file to be executed
As shown in the image above, folder under the project directory may be added with
executable binary file name (“Eddy_Apps/hello”), or “Browse” may be used to add its
absolute path (“C:\filesystem_2.1.x.x\src\Eddy_APPs\hello”).
5.4.2 Configuring Arguments
Select “Arguments” tab and enlist necessary ar gument s when executi ng binary fi le.
5.4.3 Configuring Target Agent
Select “T arget Agent” tab and input IP address a nd port number for tar get device, Eddy.
Port number is fixed to 2004 on Eddy modules, so do not alter the port number.
5-7
Page 32

LemonIDE
TM
User’s Guide
5.4.4 Configuring Debugger
Select “Debugger” tab and add debugge r to be use d.
Debugger : Select debugger type.
Select “Esto GDB Serve r”for LemonIDE Wi ndows an d
“LemonIDE GDB Server”for LemonIDE Linux.
GDB Debugger : Assign path of the selected debugger execution file.
Select “c:\cygwin\opt\lemoix\lib\arm-linux-estogdb.exe” with LemonIDE in Windows
environment and “/opt/lemonix/arm-linux- lemonidegdb” in Linux environment
T ype : Select communication method to e xchange debuggin g data between Lem onIDE and
target system, Eddy.
Current version LemonIDE supports onl y “TCP” and “Serial” is not yet supported.
Select any port number except for “2004” port reserved for Eddy .
Prefix of absolute shared library path : In order to use a debugger, Target system’ s root file system must also be
installed in Host system. Root file system’s /lib and /usr/lib libraries must be present in
order to perform debugging ope ration. Target system’s libraries m ust be present under Host
system’ s /lib directory in order to perform Target system debugging. Library path for
shared library is “c:\cygwin\opt\lemonix\cdt\arm-linux-gnueabi”for LemonIDE
Windows and “/opt/lemonix/cdt/arm-linux-gnueabi” for LemonIDE Linux.
5-8
Page 33

LemonIDE
TM
User’s Guide
5.4.5 Configuring Common
Select “Common” tab and check Debug and Run checkboxes to display Debug and Run result information.
Normally both Debug and Run optio ns are checked for full di splay of i nformation .
After configuring all options on “Hello” method, click “Close” to finish registor.
5.4.6 Method register result
After registering the binary file to be executed through above process, registered methods can be checked by
selecting the icon pointing downwards next to the debugger icon and execute icon on top of the screen.
.
If “Hello” method is not registered as shown below, select “Run” Æ “External Tools” Æ
“Organize Favoites” Æ “Add” and the method will be shown.
5.5 Executing Run Method
Procedures for uploading executable(built) binary files and its executing on Eddy will be introduced in this section.
There are two ways to upl oad & execute bi nary file on Eddy.
5-9
Page 34

LemonIDE
TM
User’s Guide
One is through LemonIDE’s GDB Server where upload, execution and debug processes can all be carried out
automatically. Another way would be to upload the binary file using FTP and manually executing and debugging
the binary file through Telnet. Procedures for this process is outlined in “Eddy_DK_Programmer_Guide”. This
manual will focus on uploading & executing binary file using LemonIDE.
If Run Method for Hello.c’s execution environment was created in previous section, Run Method can be executed
by clicking Run icon under LemonIDE’s title menu bar .
5.5.1 Configuring Eddy’s Target Agent
LemonIDE’s Target System is Eddy. Eddy requires a server program to be running to respond to LemonIDE’s Run
or Debug requests. This program is called Target Agent and can be set by enabling “LemonIDE Target Agent” in
Eddy’s e nvironm ent settings.
Picture below displays Eddy’s Target Agent being set by accessing Eddy using a Web browser. “LemonIDE Target
Agent” must be set to “enable”. Config uration m ust be saved and reset t o take ef fect.
Note
Eddy’s default console port is serial port. Therefore, all results executed by LemonIDE are
printed to Eddy DK’s console port. If target board is not Eddy DK board, results can not be
verified through serial port as console port is not existent.
In such cases, Telnet must be used as a console and setting for “LemonIDE Target Agent”
must be set to “disable”. Target Agent must be manually executed by after accessing Eddy
through Telnet.
5.5.2 Executing Run Method (with results to Serial Port)
By default, Eddy’s Target Agent prints out its results through Eddy’s serial console port. Therefore, in order to verify
the results printed out to Eddy’s serial console port, a serial communication emulator program is required. Steps on
“5.5.1 Configuring Eddy ’ s Target Agent” must b e followed first for thi s met hod.
Eddy’s consol e port is ma rked as ‘ DEBUG PORT” on Eddy DK board, and its communication specs are 115200 bps,
5-10
Page 35

LemonIDE
None Parity, 8 Data Bits with 1 Stop Bit . On Windows environment, connect Eddy’s console port and serial port of
Windows run PC with a serial cross cable (Only 3 lines of Tx, Rx, GND is required). Executed HyperTerminal and
set communication environment to 115200 bps, None Parity , 8 Data Bits, 1 stop bit.
In order to use LemonIDE’ s serial comm unication emulator , pl ease refer to “ 7.3 Terminal”.
If all settings are finished, click Run Method to upload the binary file to the target system, Eddy and check its
execution result.
The image below shows the result of executing hello.c (of 5.2 Creating & Editing Source Codes) from
HyperTerminal.
TM
User’s Guide
Click on the icon left to execute last executed Run Method.
Clicking on the arrow would allow you to select a Run Method of your listing.
5.5.3 Executing Run Method (with result to Telnet)
If Eddy DK board is not used, verifying result through serial port is not possible as serial console port i s not e xi ste nt.
In such cases, Telnet can be set to be used as a console port.
T o use Telnet as a console port, procedure “ 5.5.1 Configuri ng Eddy’s Target Agent” m ust not be carrie d out.
To change the console port from serial port to Telnet, login to Eddy using a terminal program and execute Eddy
Target Agent, “tae”, manually as a background process as shown below. Execution results of uploads from
LemonIDE can now be checked through Telnet. Refer to “7.3 Terminal” for instructions on Telnet terminal
connections.
If all settings are finished, click Run Method to upload the binary file to the target system, Eddy and check its
execution result.
Click on the icon left to execute last executed Run Method.
The image below shows the result of executing hello.c (of 5.2 Creating & Editing Source Codes) from
Telnet.
Clicking on the arrow would allow you to select a Run Method of your listing.
5-11
Page 36

LemonIDE
TM
User’s Guide
5-12
Page 37

LemonIDE
TM
User’s Guide
5.6 Creating a Firmware Image
Application program which has been compiled and executed on the target (with the instructions of previous
chapters) will now be made into a firmware image to be loaded to the target. This chapter will outline the
process of creating a firmware image and loading it to its target.
5.6.1 Changing Makefile
Changes to Makefile will be made to make a firmware image.
Makefile resides under “Ramdisk”( / DK Source / Ramdisk) w hich is regi stered as a pr oject.
Version information, amount of Ramdisk to be used, application information to be copied can be configured in
Makefile.
Example below shows a newly created “hello” binary file which is included in Makefile (under “Ramdisk” project
under “ramdisk” directory) bei ng added t o firmware image file.
Note
DK Source is distributed in Linux compatible format.
Thus some commands in Makefile may not be recognized in Windows environment. In such
cases, add .exe to unrecognized utilities in Makefile as shown below.
../tool/genext2fs Æ ../tool/genext2fs.exe
../tool/mkimage Æ ../tool/mkimage.exe
IMAGE=ramdisk
FW_NAME = eddy-fs-2.1.x.x.bin Æ Firmware image name and Version info
FIRMWARE_DIR = ../firmware
## Check environments
#include ../Make.check
install:
#@echo "Making ramdisk image..."
#$(TOOL) -b 8192 -d root -D device_table.txt ramdisk
#../tool/genext2fs -U -b 5110 -d root -D device_table.txt ramdisk
#../tool/genext2fs -U -b 7158 -d root -D device_table.txt ramdisk
#../tool/mkcramfs -q -D device_table.txt root ramdisk
../tool/genext2fs.exe -U -b 10240 -d – N 1024 root -D device_table.txt ramdisk
of Ramdisk to 10,240 K and register the device of Eddy/dev as indicated on Devide_table.txt.
gzip -vf9 ramdisk
test -f ramdisk.gz
Æ Directory to store created firmware
Æ Make size
5-13
Page 38

LemonIDE
release:
TM
User’s Guide
../tool/mkimage.exe -A arm -O linux -T ramdisk -C gzip -a 0 -e 0 -n $(FW_NAME) -d ./ramdisk.gz
$(FW_NAME)
test -f $(FW_NAME)
mv $(FW_NAME) $(FIRMWARE_DIR)/
Æ Register the desired application to the directory for copying to Eddy
cp -f ../src/Eddy_Apps/hello root/sbin
cp -f ../src/busybox-1.5.0/busybox root/bin
cp -f ../src/dropbear-0.50/dropbear root/usr/local/sbin
cp -f ../src/dropbear-0.50/dropbearkey root/usr/local/sbin
cp -f ../src/ethtool-6/ethtool root/usr/local/sbin
cp -f ../src/thttpd-2.25b/thttpd root/usr/local/sbin
cp -f ../src/ucd-snmp-3.6.2/agent/snmpd root/usr/local/sbin
cp -f ../src/ucd-snmp-3.6.2/agent/snmpd.conf root/etc
cp -f ../src/netkit-ftp-0.18/ftp/ftp root/usr/local/bin
.
.
5-14
Page 39

LemonIDE
TM
User’s Guide
5.6.2 Adding to Make Target
After creating/changing Makefile for firmware image, it must be added to Make Target.
Make Target can be found in Make View pane on right side of LemonIDE. Select Ramdisk project and right click
and select “Add Make T ar get”.
cfg, release and install in DK source is already added to Make Target and need not be added again. Refer to “5.3.2
Adding to Make Target” for details on adding procedures to Make Target.
install ; creates Filesystem image file to be used in Eddy
release ; copies Makefile release binary file to Eddy
ramdisk directory
5.6.3 Creating Firmware Image
To copy binary files to Eddy Ramdisk(Linux file system) , the directory which will be made in to firmware image,
double click “Release” in Ramdisk project and all binary files in Makefile will be copied to Eddy Ramdisk. If all
binary files were already copied to “Ramdisk/root/sbin”, “Release” does not have to be e xecuted.
If Eddy Ramdisk is ready to be made into a firmware image, double click “install” in “Make View” of Ramdisk
project and Ramdisk directory will be created into a firmware image.
Created firmware image can be found in ramdisk/firmware directory.
5.6.4 Updating Firmware
Upload created firmware file to Eddy and save i t in Flash Mem ory.
Firmware upgrade can be carried out by 1) through a FTP, 2) through a Web browser and 3) through a bootload.
Upgrading firmware procedures through a Web browser is described in “Eddy-Serial-User_Guide”. And
upgrading firmware procedures through a FTP and bootload is described in “5.2 Firmware update using FTP server”
and “9.1 System Recovery” of “Eddy_DK_Programmer_Guide.
5-15
Page 40

LemonIDE
TM
User’s Guide
Chapter 6. LemonIDE Debugger
LemonIDE supports breakpoi nt & tracepoint debuggi ng method s.
This chapter will demonstrate procedures of breakpoint debugging with the hello.c project introduced in section “5.2
Creating & Editing Source Codes”
Adding a breakpoint
Remote debugging confi guration
Starting remote debuggi ng
Program run control
Moving into a function
Confirm and modify the values of variables, registers, a nd equations .
Leaving a function
6.1 Debugging Preparation
Unlike debugging on a host, remot e target deb ugging re quires som e configurat ions to be set.
6.1.1 Execute Target Agent
Execute T arget Agent on the T ar get System, Eddy.
Refer to “5.5.2 Executing Run Method(with result to Serial Port)” or “5.5.3 Ex ecuting Run Method(with result to
T elnet)” for deta iled procedures .
6.1.2 Cautions when setting compile options
The following debugging options must be set with care.
Makefile in “5.3.1. Creating & Updating Makefile” is set with optimization compile option and breakpoint
debugging and tracepoint debugging is not possible.
Optimization option to minimize the size or the speed of
-O, -O1, -O2, -O3
Optimization option
Debugging not possible
strip
binary file. Debugging is not possible when binary file is
compiled with this option.
Zip program used to minimize size in compilations.
Debugging information is stripped out when com piled with
this option and debugging is not po ssible.
6-16
Page 41

LemonIDE
TM
User’s Guide
Breakpoint debugging
-g1
-g
option
-g3
Tracepoint debugging
-gstabs+ Nonstop Debug Level tracepoi nt debuggi ng option
option
Minimal Debug Level break point deb ugging op tion
Default Debug Level breakpoi nt debuggi ng option
Maximum Debug Level breakpoi nt debuggi ng option
As shown in table above, Makefile’s CFLAGS option must be altered in order to perform debugging operations.
The following is a corrected exam ple of Ma kefil e introduce d in “5. 3.1. C reating & Updati ng M akefile”. –O 2 opti on
and $(STRIP) $@ have been removed. –g option has to be replaced with -gstabs+ in case of Tracepoint debugging.
.
.
CFLAGS = -g -Wall -Wno-nonnull
.
.
hello : hello.o
rm -f $@
$(CC) $(CFLAGS) $(LDFLAGS) $(IFLAGS) -o $@ $@.o
.
.
6.2 Executing Debugger
hello.c introduced in “5.2 Creating & Editing Source Codes” will be used to demonstrated the use of debugger.
Debug Icon (Breakpoint & T racepoint)
Click on the icon left to execute last executed Debug Method.
Clicking on the arrow would allow you to select a Debug Method of your listing.
When in debugging mode, source editor display will transform to debugger display as shown below.
The following is the debugger display.
6-17
Page 42

LemonIDE
.
TM
User’s Guide
Stack V i ew Displays in formation on Threads and S tacks during debu gging.
Module View
Source Tracer view
Source Info View Displays functions a nd reverse a ssembly codes r elated to source file.
Message V iew Displays target’s status.
Debug Execution V i ew
Displays information on variables, breakpoint, equations and modules during
debugging.
Displays breakpoint locations in source codes.
Controls debugging start, stop and breakpoints.
6.3 Breakpoint Debugging
This chapter will introduce breakpoint debugging.
After debugging, it is recommended that the completed program be restored with original CFLAGS option
and STRIP values to optimize execution module.
6-18
Page 43

LemonIDE
)
TM
User’s Guide
6.3.1 Modifying compiling environment & Executing debugging
As mentioned in “6.1.2 Cautions when setting compile options”, MakeFile must be modified for
debugging. In the image below optimization option is removed, options are modified to use breakpoint
debugging, STRIP is removed so that execution module will not be compressed..
CFLAGS = -g -Wall -Wno-nonnull
hello : hello.o
rm -f $@
# $(STRIP) $@
$(CC) $(CFLAGS) $(LDFLAGS) $(IFLAGS) -o $@ $@.o
After modifying and saving Makefile, recompile hello.c so that it can be debugged,
6.3.2 Settings Breakpoint
Breakpoints can be added in C/C++ perspective or debug
6.3.3 Program Run Control
perspective. From the source line that you would like to add
a breakpoint, select the left margin in the edit view to add a
breakpoint. Double-click to remove the breakpoint. You can
also add a breakpoint from the popup menu by rightclicking on the source code line.
Added breakpoint is added to “BreakPoints” of “Module
View”.
Various debugging information can be checked on “Windows”
“Show View” Æ “Other..” Æ “Debug”.
Æ
“Debug Execution View”provides commands to control program execution during debugging.
Resume (continue)
Suspend
Terminate Step into
Step return (finish
Step over (next)
6-19
Page 44

LemonIDE
TM
User’s Guide
Main commands used to control program execution are as follows:
Resume: Continue until the next breakpoint.
Suspend: Pause the program.
Terminate: Terminate the debugging session completely.
Step into: Continue to the next line, and move into a function when there is one.
Step over: Continue to the next line, but do not enter a function.
Step return: Execute until the end of a function
6.4 Non-Breaking Debugging
This chapter will introduce Non-Breaking Debugging.
While Breakpoint Debugging debugs by lines appointed by the breakpoints, Non-Breaking
Debuggings stores the results at specific points appointed by Tracepoints and brings back execution
status using the stored information after the debugging is finished.
6.4.1 Modifying compiling environment & Executing debugging
As mentioned in “6.1.2 Cautions when setting compile options”, MakeFile must be modified for
debugging. In the image below optimization option is removed, options are modified to use breakpoint
debugging, STRIP is removed so that execution module will not be compressed..
After modifying and saving Makefile, recompile hello.c so that it
can be debugged,
CFLAGS = -gstabs+ -Wall -Wno-nonnull
hello : hello.o
rm -f $@
# $(STRIP) $@
$(CC) $(CFLAGS) $(LDFLAGS) $(IFLAGS) -o $@ $@.o
6-20
Page 45

LemonIDE
TM
User’s Guide
6.4.2 Setting Tracepoints & Actions
Register a new Tracepoint.
Left click on the source code to be registered as a
Tracepoint and click “Toggle Tracepoint”. A properties
window where actions for the tracepoint can be set will
appear.
Pass count, registers, local variables, arguments can be selected
as desired in “Tracepoint Properties”
Click “OK” and a green trace point will appear.
Pass Count Non-Breaking Debugging will stop when the line is executed this number of times.
6-21
Page 46

LemonIDE
All General registers Checks register information.
All local Variable Checks all variable values in the execution module.
All arguments Checks all argument values passed on to the execution module.
TM
User’s Guide
Non-Breaking Debugging must designated with a end point in order to check the
status after tracing is over.
When Pass Count is 0, tracing will continue. When it is bigger than 0, debugging will
stop after executing this number of times.
In actual debugging, debugging area is divided into many steps. So lines in the
middle is appointed with 0, and the finish line with a number bigger than 0.
Variable name
f
Register a variable name to check value of a specific variable in the execution
module.
Select “Windows” Æ “Show View” Æ
“TracePoint” to check the list of tracepoints added
in the workspace.
In this picture, lines 8 and 17 are set as tracepoints..
Pass Count in line 17 is set to 0 and is set is a start point.
Pass Count in line 8 is set to 1, meaning that trace will
finish when line 8 is executed once, making the line to
be an end poi
nt.
6-22
Page 47

LemonIDE
TM
User’s Guide
6.4.3 Program Trace Control
Buttons used for tracing and replaying in Non-Breaking Debugging are as follows.
Load Tracepoint
Start/Stop Tracing
Stop Replay
Save Tracepoint
Stop Replay
Start Tracing
Stop Replay
Stop Traci ng
Stop Replay
Start Replay
Stop Replay
Jump to
Trace Frame
To Previous
Trace Frame
To Next
Trace Frame
Click Start Tracing (
screen to see if tracing is over (“Trade Finished” will be printed on the target’s screen (Serial port or telnet) when
tracing is over). Click Stop Tracing (
When tracing is properly over, Start Replay( ) will be activated and debug view, variable view, register view
will show information on endpoints.
), hello program in the target will be executed and tracing will start. Check target’s
) when tracing is over.
Click Start Replay(
on the first trace point as shown.
Click To Next(
To Previous(
Check Variables view and Registers View on
each trace points.
Local variables that are not traced are also
shown in Variables View. Users should be
careful since traced variables and untraced
variables are not classified.
Trace level can be checked on TraceDump view
) and the screen will stop
) to move to next frame or
) to move to previous frame.
in each tracepoint or Console window on
bottom of LemonIDE.
6-23
Page 48

LemonIDE
Click Resume (
Various Debugging information can be checked on “Windows” Æ “Show View” Æ “Other..” Æ “Debug”
TM
User’s Guide
) to run through whole step or Terminate ( ) to quit debugging session.
6-24
Page 49

LemonIDE
TM
User’s Guide
Chapter 7. Monitoring Tool
This chapter focuses on the target browser and the monitoring tool used to monitor target system information from
LemonIDE.
Select “W indows” Æ “Show View” from LemonIDE title menu to select a monitoring tool supported in
LemonIDE.
7.1 Target Browser
T arget browser’ s user interface & its usage will be discussed in this section.
7.1.1 Target Browser User Interface
T arget browser user interface is shown below .
Connect
Status
T arget browser may contain multiple target nodes. Each tar get node includes the following information.
Monitoring Status
Add target Remove target
Target node
Connection status between the host and the target
Remote monitoring status
Target name
IP address
Port
7-1
Page 50

LemonIDE
T arget architecture
Connection status icon differs in color, depending on the current connection status.
Red: Target is not connected or doe s not exist.( No ping res ponse)
Orange: Target is alive and is connected to the network, but target agent is not connected.
Green: T ar get Agent is connected, so that remote monitoring is possible.
When remote monitoring is in operation, the target monitoring status icon becomes a Play shape, and turns to a
Pause shape when not in operation.
Each target can have multiple run configurations. Run configuration is an object with project run and debugging
information, and can be created / removed / modified form the Run / Debug Configuration window in LemonIDE
interface. Each run configuration contains following information:
Project name
Run Configuration Name: There can be multiple run configurations for one project.
TM
User’s Guide
Hide CPU/Memory Information: When not checked, CPU and memory information is displayed on the first subnode in the target node. Values are in effect when remote monitoring is activated. This option cannot be set for each
target node; this option only works universally.
Check Target Connection Automatically: Check to au tomatically check the target-host connection status registered
in the target browser and display this information.
Add Current Project: A project selected in C/C++ project view is the “Current Project”. Create a run configuration
for this project under the target node. Run configuration is not added, however, when something other than the
project is selected in C/C++ Project view.
7-2
Page 51

LemonIDE
TM
User’s Guide
Activate Monitor Views: Activate target status monitor views. CPU/Memory view and process list view starts
periodical monitoring.
Pause Monitoring: Pause the remote monitoring to that target. CPU/Memory view and process list view stops
periodical monitoring.
Show Monitor Perspectives: Open LemonIDE Monitor perspective
7.1.2 Adding a Target to the Target Browser
Select “Windows” Æ “Show View” Æ “Other…”from LemonIDE title menu and then select “Show View”Æ
“LemonIDE Monitor”Æ Target Browser. Target Browser will appear on Message View in the lower part of
LemonIDE.
Select “LemonIDE Monitor” category from the “Show View” window. Then you will see a “Tar get Browser” at the
bottom. Select “Target Browser” and click OK to open t he tar get browser.
7-3
Page 52

LemonIDE
A recommended location of the target browser is the bottom-left side as shown in the image on the left.
TM
User’s Guide
Add a target
When the target does not appear in the target browser, you need to add a target. Click + mark to open ‘Input New
T arget’ window. Enter hostname, IP address, and target agent port number.
Then, a new target node is created in the target browser.
Now add a run configuration for the target node in the tar get browse r. Drag and drop the face project to hybus target
node in the target browser, as an example.
7-4
Page 53

LemonIDE
TM
User’s Guide
As you drop the project to the node, a debugger select window will appear. By default, it is set to “gdb”. Select a
correct debugger according to your target type. When a debugger is selected, default “Absolute Shared Library
Path” information is set.
When you need to change “Absolute Shared Library Path” to paths other than defaults, click Browse button.
“arm-linux-LemonIDEgdb” Æ “/opt/LemonIDE/cdt/arm-linux”
Click OK button from the Debugger Selection window when done with debugger configuration. Th en you will see
a run configuration created for the face project, under hybus target node.
7.2 Target Status Monitor
Select “Show Monitor Perspectives” menu from the target node in the target browser. Then, LemonIDE Monitor
perspective will open, as shown below. No real data is shown yet, since remote monitoring has not been started.
Select “Activate Monitor V iews” from eddy_1 Target node’s shortc ut me nu.
Remote monitoring will start as shown above and CPU/memory view will display graphs. Process list view will be
refreshed in every 10 seconds.
Select “Pause Monitoring” from eddy_1 Target node’s shortcut menu.. Confirm that monitoring is stopped. Select
“Activate Montior Views” again to resume monitoring.
Now we will terminate a process from the process list view. Run any program from the target, such as “tae –p
10000”. Then you will see “tae –p 10000” from the process list view. From the popup menu of this process, select
7-5
Page 54

LemonIDE
TM
User’s Guide
“kill” to finish the process. Make sure the process is killed.
Please note that the process list view refreshes every 10 seconds, so it may take a while for the finished process to
disappear from the list.
It might be the case that the process does not exist when you try to kill the process. If this is the case, you will be
prompted with the following message.
Select “Windows – Show View”menu to monitor views in LemonI DE Monitor.
7.3 Terminal
Remote execution and remote debugging on target system requires a terminal program.
A terminal program refers to a serial emulator and a telnet emulator in this case and LemonIDE supports both
emulators enabling remote execution & debugging of target system all in LemonIDE’s IDE.
Select “Windows” Æ “Show View” Æ “Other…” Æ “Terminal” Æ “Terminal”from LemonIDE’s title menu to
enable a terminal. T erm inal will be created in “Message View” located on the lower part of LemonIDE.
New Te rminal : Create a new terminal.
Connect : Connect to preregistered Target.
Disconnect : Terminate a connection.
Settings : Set Target connection information
In order to execute a termi nal as an inde pende nt windo w outsi de of Me ssage View, right click on termi nal window’s
title menu bar and select ‘Detached”.
In “Message View”, on lower part of LemonIDE, select the newly created terminal, and click
connection environment.
to set
View Title : Set terminal’s name
Connection T ype : Select terminal to use (Serial, T elnet)
Image below shows configuration of a Telnet terminal(left) and a Serial terminal(right).
7-6
Page 55

LemonIDE
Note
Followings must be set in orderto utilize Serial terminal.
Copy jar & dll files to system according to LemonIDE installed OS’s environment. Refer to
install file in /opt/lemonix/install_files directory for this operation.
LemonIDE Windows requires 2 dll files under Windows/i386-mingw32 to be copied to
Windows/system32. RXTXcomm.jar file is to be copied to jre/lib/ext (directory where JDK
was installed in “3.2.1 Installing JDK”) and restart LemonIDE.
TM
User’s Guide
Telnet Terminal
Host : Target’s IP to connect
Port : Target’s port to connect (Select Telnet)
Timeout : Timeout duration( Time till connection termination after connection with no activity)
Serial Terminal
Port : Serial port number of LemonIDE installed PC (and Target connected PC)
Baud Rate : Communication speed between Target (Set to 115200 bps)
Data Bits : Number of data bits
7.4 CPU Memory View
LemonIDE target system’s CPU Traffic & Me mory usage can be viewed.
Select “Windows” Æ “Show View” Æ “Other…” Æ “Esto Monitor” Æ “CPU Memory View” from
LemonIDE’s title menu. CPU View can be found in “Message V iew” in lower part of LemonIDE.
7-7
Page 56

LemonIDE
TM
User’s Guide
starts CPU & Memory’s status chec k , and stops the process.
In order to execute “CPU Me mory View” as an independent window outside of Message View , right cli ck on “CPU
Memory V iew” window’ s title menu bar and select ‘Detached”.
7.5 Registers
LemonIDE target system ’s register status can be viewed.
Select “Windows” Æ “Show View” Æ “Registers”from LemonIDE’s title menu to activate Registers view
window . This wind ow can be f ound in Ma ke View on right side of LemonIDE.
In order to execute “Registers View” as an independent window outside of Message View, right click on “Registers
View” window’s title menu bar and select ‘Detached”.
7.6 Changing Workspace
Workspace is top directory intended for creating firmware to be used in target systems and includes numerous
projects. A project can be defined as a directory for application to be executed in target systems. To change
W orkspace, select “file” Æ “Switch Workspace”from LemonIDE title menu.
7-8
 Loading...