


161 -0002 4, Rev. 0 1_18_ EN
SOLTARO All-In-One ESS
USER MANUAL
ST OR AG E SO LU TI ON S FO R TH E FU TU RE

To secure the full 10-year product warranty, be sure to install the
Soltaro All-In-One ESS by qualied installers.
Warning: Read this entire document before installing or using
Sinlion All-ine-one ESS. Failure to do so or to follow any of the
instructions or warnings in this document can result in electrical
shock, serious injury, or death, or can damage Soltaro LFP ESS,
potentially rendering it inoperable.
PRODUCT SPECIFICATIONS
All specifications and descriptions contained in this document are verified to be accurate
at the time of printing. However, because continuous improvement is a goal at Soltaro, we
reserve the right to make product modifications at any time.
The images provided in this document are for demonstration purposes only. Depending
on product version and market region, details may appear slightly different.
ERRORS OR OMISSIONS
To communicate any inaccuracies or omissions in this manual, please send an email to:
service@soltaro.com.cn
ELECTRONIC DEVICE: DO NOT THROW AWAY
Proper disposal of batteries is required. Refer to your local codes for
disposal requirements.
C 2018 Wuxi Soltaro Energy Technology Ltd. All rights reserved.
All other trademarks contained in this document are the property of their respective owners and
their use herein does not imply sponsorship or endorsement of their products or services. The
unauthorized use of any trademark displayed in this document or on the product is strictly prohibited.
All information in this document is subject to copyright and other intellectual property rights of
Wuxi Soltaro Energy Technology Co., Ltd. and its licensors. This material may not be modified,
reproduced or copied, in whole or in part, without the prior written permission of Wuxi Soltaro Energy
Technology Ltd. and its licensors. Additional information is available upon request. The following
are trademarks or registered trademarks of Wuxi Soltaro Energy Technology Ltd. in Australia, UK and
other countries:
Soltaro
Soltaro Battery Soltaro ESS
STO RAGE SO LUTIO NS FOR TH E FUTUR E

Important Safety Instructions
SAVE THESE IMPORTANT SAFETY INSTRUCTIONS. Soltaro All-in-one ESS installation and
repair instructions assume knowledge of high voltage electricity and should only be
performed by Soltaro Certified Installers. Soltaro assumes no liability for injury or property
damage due to repairs attempted by unqualified individuals or a failure to properly follow
these instructions. These warnings and cautions must be followed when using Soltaro ESS.
SYMBOLS IN THIS DOCUMENT
This manual uses the following symbols to highlight important information:
Warning:
WARNING indicates a hazardous situation which, if not
avoided, could result in injury or death.
CAUTION indicates a hazardous situation which, if not
avoided, could result in damage to the equipment.
NOTE indicates an important step or tip that leads to best
results, but is not safety or damage related.
Caution:
Note:
!
!
GENERAL INFORMATION
Warning: Read this entire document before installing or using Soltaro All-in-one ESS.
Failure to do so or to follow any of the instructions or warnings in this document can
result in electrical shock, serious injury, or death, or can damage Soltaro LFP Battery,
potentially rendering it inoperable.
Warning: A battery can present a risk of electrical shock, fire, or explosion from vented
gases. Observe proper precautions.
Warning: Soltaro LFP Battery installation must be carried out only by Soltaro Certified
Installers, who have been trained in dealing with high voltage electricity.
Warning: Soltaro is heavy and challenging to lift.
Warning: Use Soltaro LFP Battery only as directed.
Warning: Do not use Soltaro LFP Battery if it is defective, appears cracked, broken, or
otherwise damaged, or fails to operate.
Warning: Before beginning the wiring portion of the installation, first power off the
inverter and then open the AC and DC disconnect switches (if applicable for the
installation).
Warning: Do not attempt to open, disassemble, repair, tamper with, or modify Soltaro
LFP Battery. Soltaro LFP Battery is not user serviceable. LFP Cells in Soltaro Battery
are not replaceable. Contact the Soltaro Authorized Reseller who sold the Soltaro LFP
Battery for any repairs.
2
!
!
!
!
!
!
!
!
Sin lion LF P Batte ry User Man ual

Warning: Do not connect Soltaro LFP Battery to alternating current carrying
conductors. Soltaro LFP Battery must be wired to either an inverter or a DC combiner
panel that is then wired to an inverter. No other wiring configuration may be used.
Warning: Soltaro LFP Battery contains components, such as switches and relays,
that can produce arcs or sparks.
Warning: To protect Soltaro LFP Battery and its components from damage when
transporting, handle with care. Do not impact, pull, drag, or step on Soltaro LFP
Battery. Do not subject Soltaro LFP Battery to any strong force. To help prevent
damage, leave Soltaro LFP Battery in its shipping packaging until it is ready to be
installed.
Warning: Do not insert foreign objects into any part of Soltaro LFP Battery.
Warning: Do not expose Soltaro LFP Battery or its components to direct flame.
Warning: Do not install Soltaro LFP Battery near heating equipment.
Warning: Do not immerse Soltaro LFP Battery or its components in water or other
fluids.
Caution: Do not use cleaning solvents to clean Soltaro LFP Battery, or expose Soltaro
LFP Battery to flammable or harsh chemicals or vapors.
Caution: Do not use fluids, parts, or accessories other than those specified in this
manual, including use of non-genuine Soltaro parts or accessories, or parts or
accessories not purchased directly from Soltaro or a Soltaro-certified party.
Caution: Do not place Soltaro LFP Battery in a storage condition for more than one
(1) month, or permit the electrical feed on the Soltaro LFP Battery to be severed for
more than one (1) month, without placing Soltaro LFP Battery into a storage condition
in accordance with Soltaro’s storage specifications.
Caution: Do not paint any part of Soltaro LFP Battery, including any internal or external
components such as the exterior shell or casing.
Caution: Do not connect Soltaro LFP Battery directly to photovoltaic (PV) solar wiring.
Caution: When installing Soltaro LFP Battery in a garage or near vehicles, keep it out
of the driving path. If possible, install the Soltaro LFP Battery on a side wall and/or
above the height of vehicle bumpers.
Important Safety Instructions
ENVIRONMENTAL CONDITIONS
Warning: Install Soltaro LFP Battery at a height that prevents damage from flooding.
Warning: Operating or storing Soltaro LFP Battery in temperatures outside its specified
range might cause damage to Soltaro LFP Battery.
3
!
!
!
!
!
!
!
!
!
!
!
!
!
!
!
Sol taro LF P Batte ry User M anu al

Warning: Do not expose the Soltaro LFP Battery to ambient temperatures above 60°C
(140°F) or below -30°C (-22°F).
Caution: Ensure that no water sources are above or near Soltaro LFP Battery, including
downspouts, sprinklers, or faucets.
Important Safety Instructions
3
!
!
Sol taro LF P Batte ry User M anu al

What is Soltaro All-in-one ESS?
THE FUTURE OF SUSTAINABLE ENERGY
Soltaro All-in-one ESS is a lithium-ion(LiFePO4) battery system that turns solar panels into
an all-day resource while offering backup power in the event of a grid outage. Soltaro All-inone ESS enables storage of renewable energy, allowing optimized home energy control and
an increasing amount of total electricity production to come from renewable sources.
Reliable renewable energy improves the resiliency of the grid, reduces energy costs, and
increases the impact of electric vehicle ownership.
POWER WHEN NEEDED
Soltaro All-in-one ESS enables the storage of energy from solar panels during the day, or
from the grid when energy rates are low; discharges energy for backup or use at night; and
automatically optimizes home energy. Soltaro All-in-one ESS thereby maximizes solar
consumption and reduces energy spending.
A FLEXIBLE SOLUTION
Soltaro All-in-one ESS can be charged from solar or grid power and can provide backup
power.
If greater amounts of energy are needed, multiple Soltaro All-in-one ESS can be installed
together to work as a larger system.
4 Sol taro LF P Batte ry User M anu al
Specifications
5 Sin lion LF P Batte ry User Man ual

Standard Packing List
6 Sin lion LF P Batte ry User Man ual
Hybrid/AC Coupled Inverter4.5KWH LFP Battery
Inverter Backsheet Battery Backsheet
Inverter Holder
Battery<-->Inverter
Power Cables 25mm2
Battery<-->Inverter Rj45
Communication Cable
M6 Expansion Screws M5/M4/M8 Hexagon
Socket Head Cap Screw
Inverter Positioner

Main Applications Target
7 Sin lion LF P Batte ry User Man ual
PV GE NERATOR
STR ING INV ERTER
APP LIANC E
PV GE NERATO R
APP LIANC E
LOAD S
L1 L2 L3
Mas ter Sla ve1 Sla ve2
SOLTARO RETRO CLU STER
PV GE NERATOR PV GE NERATOR WIN D GENER ATOR
SOLTARO MPPT BOX
SOLTARO AC
COU PLED ES S
DIE SEL GEN ERATOR
STR ING INV ERTER
WIN D
INV ERTER
LOAD
DC
AC
COM MUNIC ATION
SOLTARO WIFI SOCKETS
APP LIANC E
SO LTARO A C COU PL ED
AL L-I N- ONE E SS -IP 6 5
ROU TER
INT ERNET
SOLTARO PORTA L
SOLTARO ENERGY METER
UTI LITY ME TER FOR B ILL PUR POSES
UTI LITY GR ID
SOLTARO WIFI SOCKETS
APP LIANC E
ROU TER
INT ERNET
SOLTARO PORTA L
SOLTARO ENERGY METER
UTI LITY ME TER FOR B ILL PUR POSES
UTI LITY GR ID
SOLTARO HYBR ID
ALL -IN-O NE ESS- IP 65
SOLTAR O AC COUP LED ALL -IN-O NE ESS
Ret rofit ex isted o n-gri d solar s ystem t o hybri d;
Max imum PV G enera tion se lf-co nsump tion;
Aut omati c Emerg ency Power Backu p(<10 ms UPS le vel);
Pea k shavi ng(ti mer set ting for charg e&dis charg e);
Bui lding A C BUS for m icro- grid sy stem;
SOLTAR O HYBRI D ALL -IN -ONE ESS
New b uildi ng sola r hybri d syste m;
Max imum PV G enera tion se lf-co nsump tion;
Aut omati c Emerg ency Power Backu p(<10 ms UPS le vel);
Pea k shavi ng(ti mer set ting charge& disch arge) ;
Bui lding A C BUS for m icro- grid sy stem;
3. AS YMMET RIC LOA D ON THE THREE-P HASE G RID IS NO
PRO BLEM FO R SOLTARO AC C OUPLE D ALL IN ON E ESS
2. WI ND/SO LAR/D IESEL /STOR AGE MIC RO-GR ID SYST EM
BAS ED ON SOLTAR O AC COUP LED ALL I N ONE ESS
1. RE GULAR R ETROF IT SOLA R SYSTE M
TY PI CAL I NS TAL LAT IO N

Mechanical Installation
9 Sin lion LF P Batte ry User Man ual
Step-1, Confirm the exact mounting position of battery backsheet-
434.58mm
180mm
Minimum 434.58mm
above ground.
Please use M6
expansion screws
to fix the battery
back sheet on the
wall according to
the fixed position.
Step-2, Hanging on the battery module to the mounted battery backsheet-
Step-3, Select the right Inverter back-positioner to the inverter holder(only one shall be chosed) -
Distance to wall with
two options-
21.20mm
61.20mm
21. 20mm
61. 20mm
Use 4pcs M4
hexagon socket
head cap screw
to fix the right
inverter backpositioner

1
2
3
4
5
6
7
8
Mechanical Installation
10 Sin lion LF P Batte ry User Man ual
Step-4, Install the inverter holder-
Take out these
two hexagonM8
socket head cap
screws from battery
Put on the inverter
holder and screw
back the two M8
he x a go n s o ck e t
head cap screws
Please use two hexagon socket M5
head cap screws to screw together
the inverter holder with battery
backsheet.
Please use 2pcs M6
expansion screws
to fix the inverter
holder on the wall
through the hole
of inverter backpositioner .
1 2
3 4
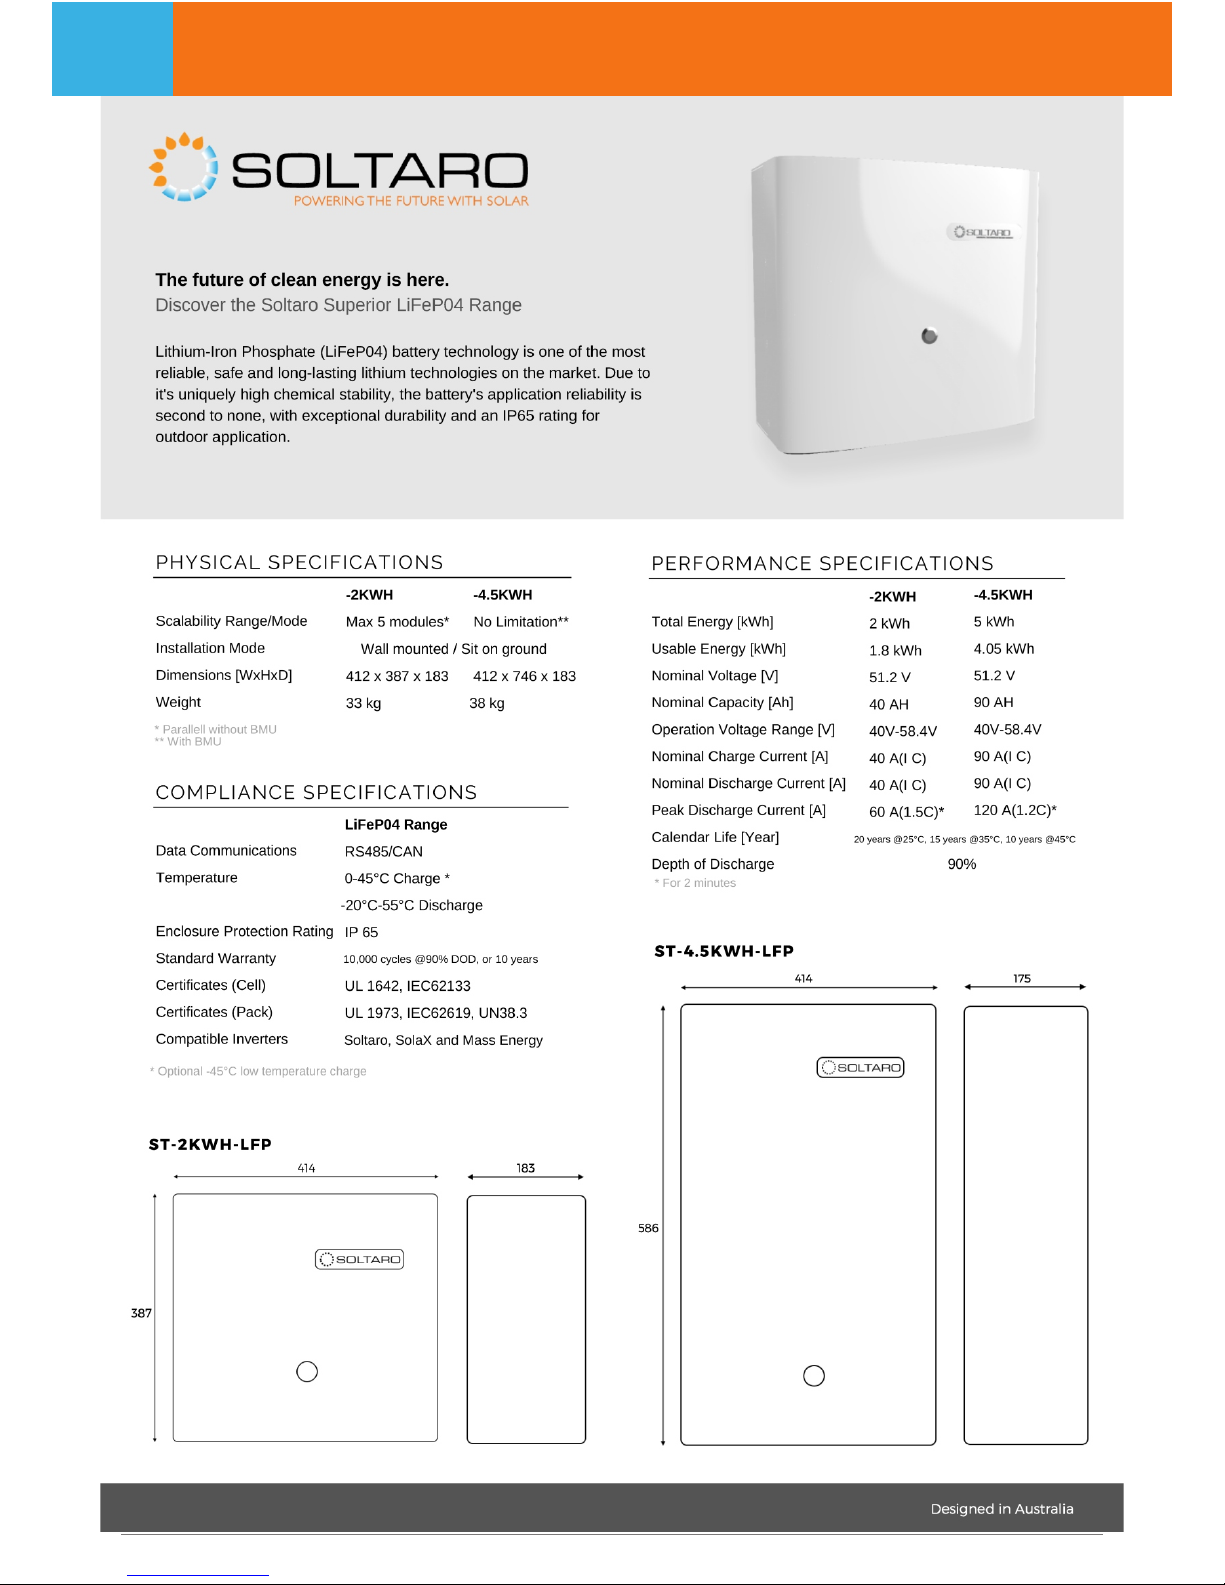
Step-5, Install battery power cable and communication cable
B+B-
POW ER
DC IS OLATOR
125A
DOW N U P
Warning: Read the e ntire usermanual
before installing or using Soltaro LF P
Battery. Failure to do so or not to follow
any of the instructions or warnings in
this document can result in electrical
shock, serious injury, or death, or can
damage Soltaro Battery.
COM
DO WN UP
Warning: Read the entire usermanual
before installing or using Soltaro LF P
Battery. Failure to do so or not to follow
any of the instructions or warnings in
this document can result in elec trical
shock, serious injur y, or death, or can
damage Soltaro Battery.
COM
B- B+
Cables Cover with
waterproof terminals
Connection terminals
inside battery module
Loosen the waterproof terminals, then put through the Positive
/Negative/Communication cables according to each position,
then using cold compression pincer to connect the power cables
(+/-) with connectors, then use Philips Screwdriver to OT-25-6
screw the power cables to battery power inter face accordingly.
Please take out the communication cable from inverter box,
cut battery Rj45 end, put the cable through in cables cover, then
Use Rj45 cable clamp to crimping the communication cable with
Rj45 connector and plug-in the battery COM interface-if one
battery connected, either Up or Down is ok, if for multi batteries
parallel connection, please refer to following page.
1
2
3
4
5
6
7
8
CAN -H
CAN -L
485 A
NUL L
485 B
GND
RX+
TX+
1
2
3
4
5
6
7
8
CAN -H
CAN -L
485 A
NUL L
485 B
GND
RX+
TX+
Sol taro Ba ttery Sol taro In verte r
Mechanical Installation
11 Sin lion LF P Batte ry User Man ual
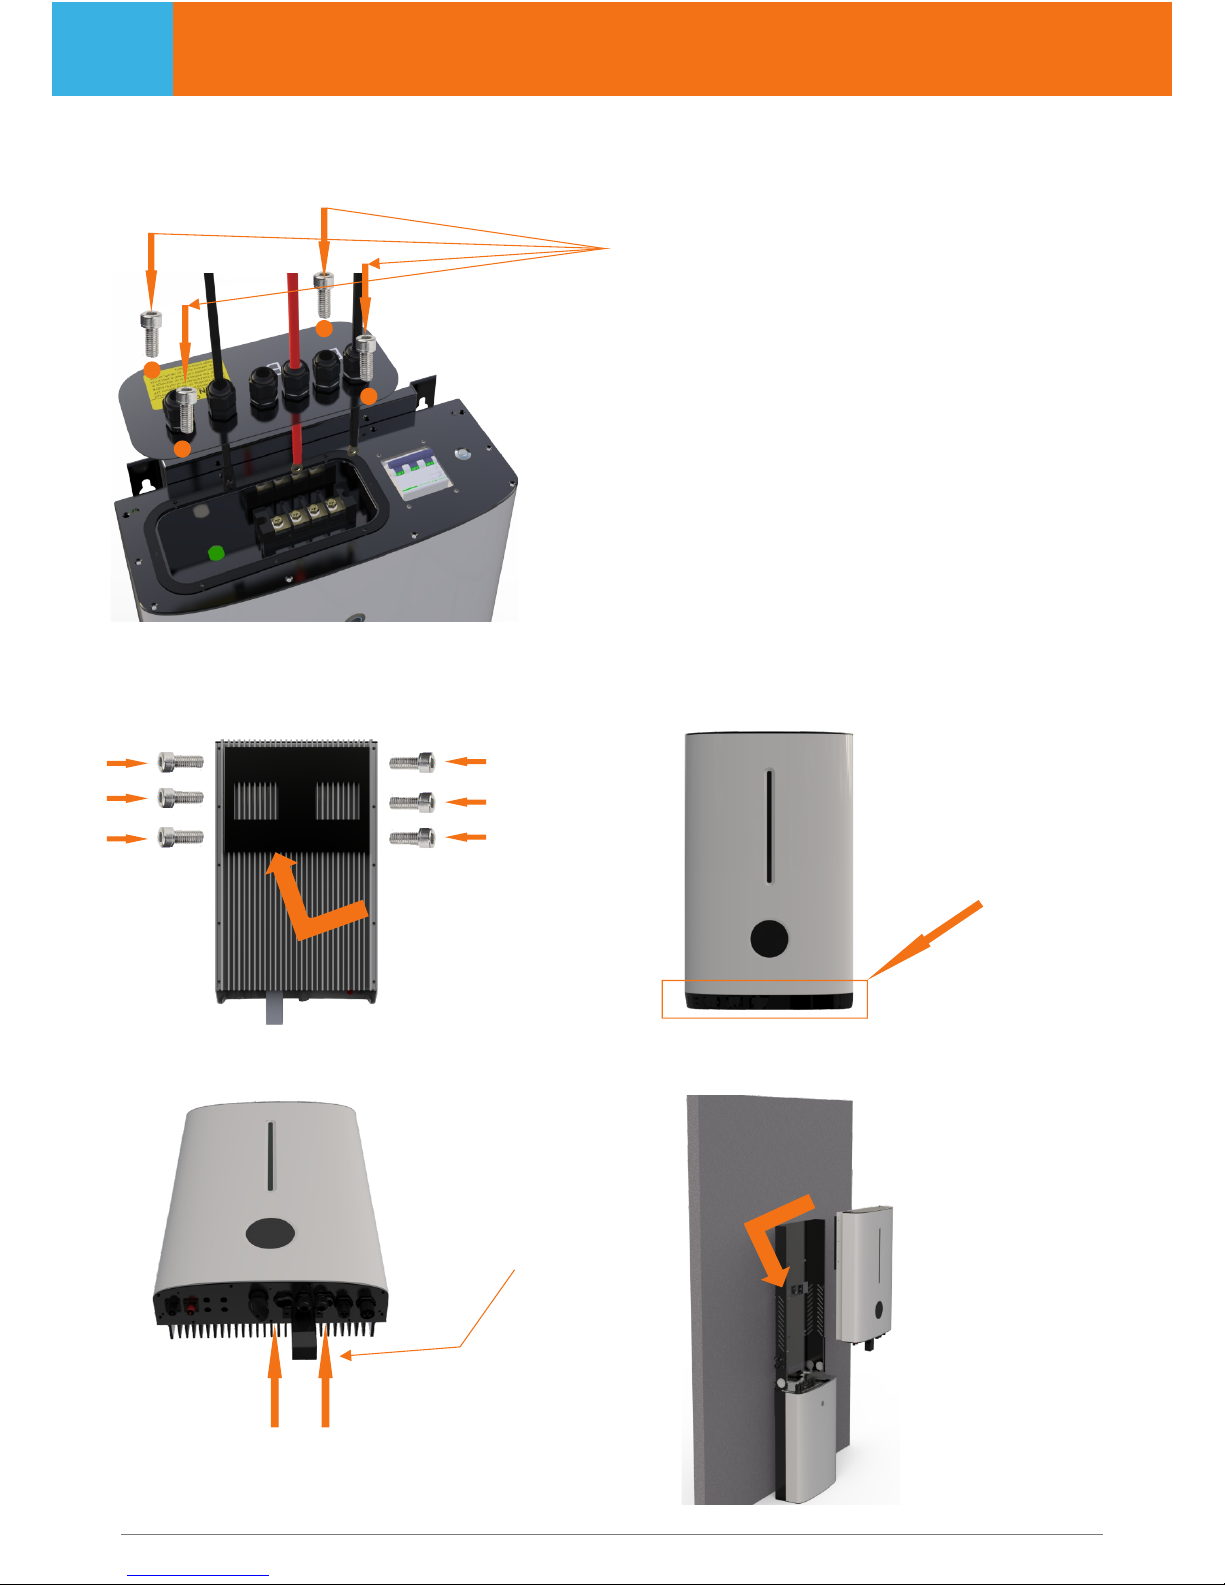
Step-6, Fix the cables cover onto battery
Screw back the 4PCS M hexagon socket
head cap screws(from battery accessories)
to fix the cables cover back onto battery
module, please guarantee the tightness in
case installing the ESS outside house.
Step-7, Mounting the inverter
Screw hexagon 6PCS M5
socket head cap screws
(from All-in-one Kits) to
fix the inverter backsheet
onto inverter, if inverter
c o m e s w i t h a n o t h e r
backsheet, please remove
it.
Pl e a se r em ov e t h e b la ck
protection plate from inverter
if it comes from invert er to
make it ready for all-in-one
installation.
Use to fix the 2PCS M4
Wi fi stic k to inverter
from bottom
Hanging the inverter
onto battery holder
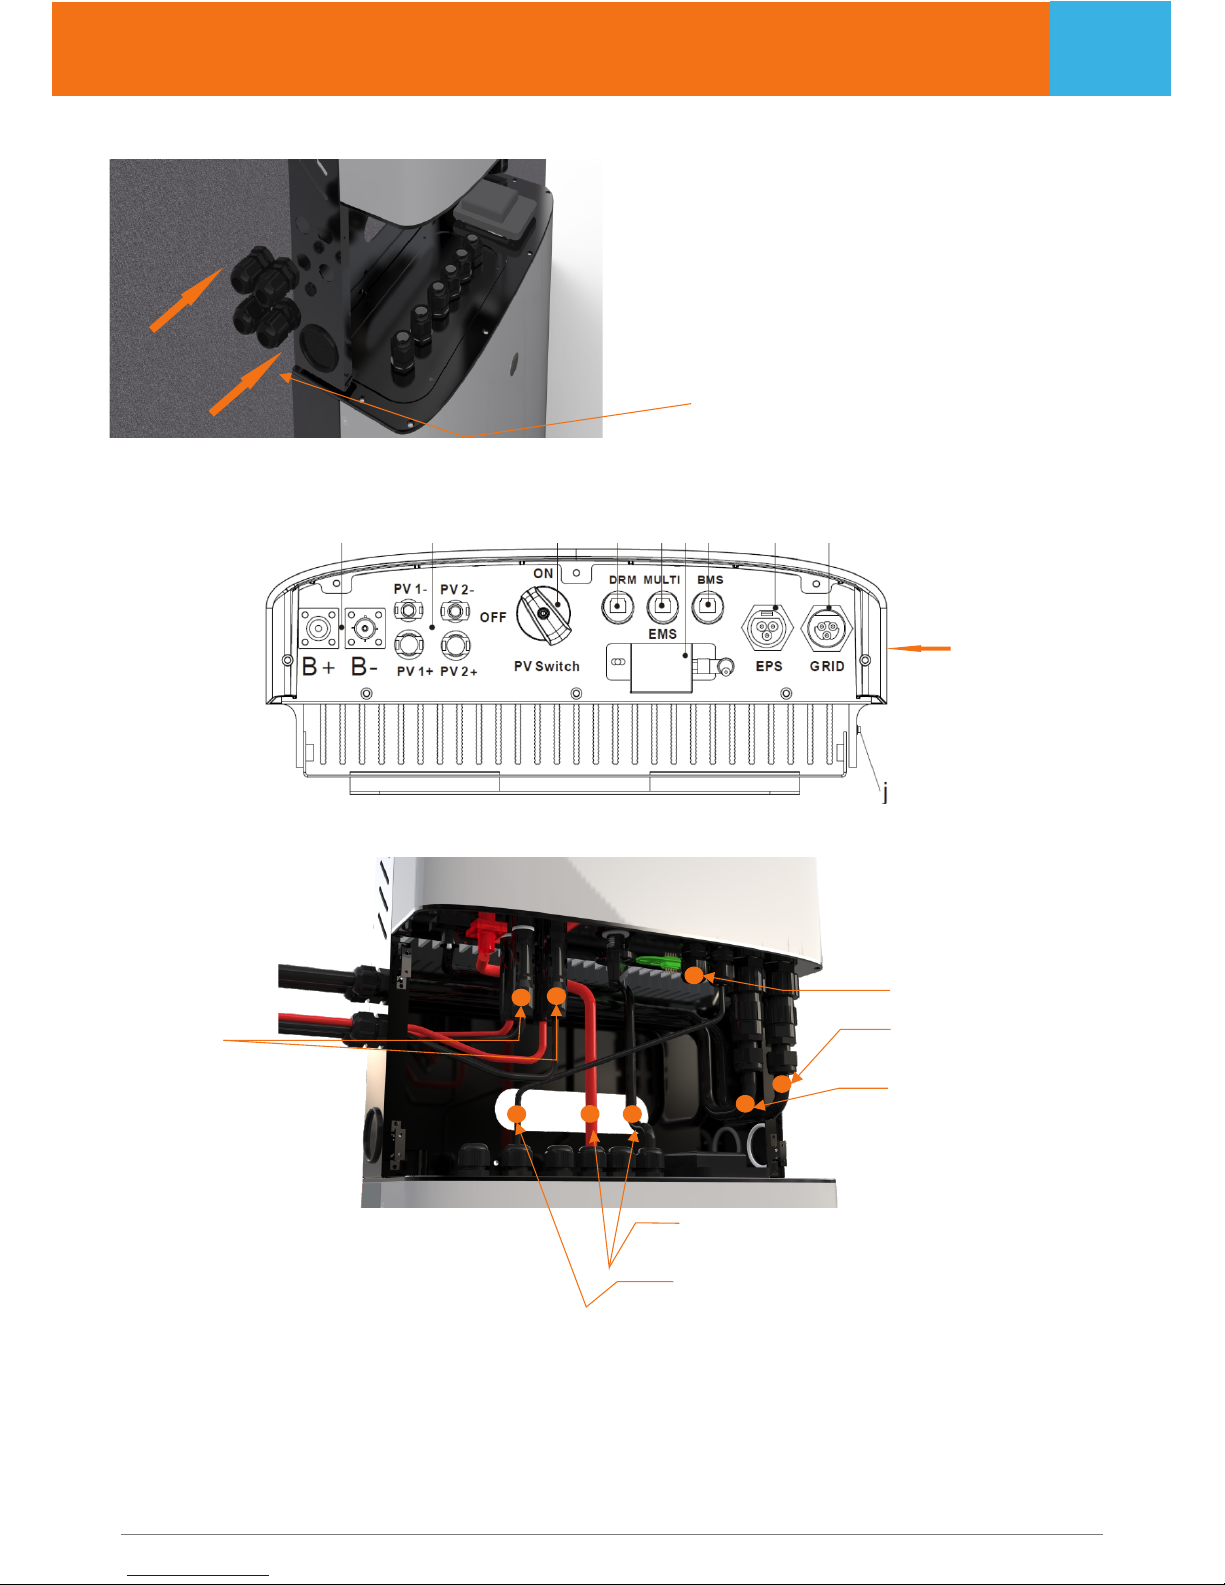
Electric Connection
12 Sin lion LF P Batte ry User Man ual
Step-8, Screw the waterproof terminals onto inverter holder
Please screw the water proof terminals
onto inverter holder, to make it ready for
all-in-one ESS cables in/out.
Step-9, Cables connection inside Soltaro All-in-one ESS
Battery<-->Inverter Power Cables
Battery<-->Inverter Communication Cable
Grid AC Cable
EPS AC Cable
Smart Meter Terminal
PV Cables
Hybrid Inverter Interface
Note:
For detailed Hybrid&AC Coupled Inverter diagram, please refer to
Hybrid Inverter- document “ ”Manual Soltaro Hyper-LV-1P-EU1.04
AC Coupled Inverter-document “ ” Manual Soltaro Retro-LV-1P-EU1.04

System Setting
11 Sin lion LF P Batte ry User Man ual
Step-10, Battery&Inverter Setting
Please refer to following manuals-
Hybrid Inverter- document “ ”Manual Soltaro Hyper-LV-1P-EU1.04
AC Coupled Inverter-document “ ” Manual Soltaro Retro-LV-1P-EU1.04
Step-11, How to start the system?
Please refer to following manuals-
Hybrid Inverter- document “ ”-Page 27Manual Soltaro Hyper-LV-1P-EU1.04
AC Coupled Inverter-document “ ”-Page 25 Manual Soltaro Retro-LV-1P-EU1.04
When power on battery, please refer to following steps-
ON
OFF
Step-1, please pull on the DC
Isolator
Step-2, please press on the
Power Button
Step-12, Put in the Cables Cover
Push inside the
c ab le s c o v e r
(from all-in-one
Kits Accessory)
Battery Reset Button
Blue
Yellow
Red
None
Normal, 30%<SOC<100%
Normal, 0%<SOC<30%
Red, Alarm or Protection
Power Off or Sleep

START THE BATTERY ARRAY
During normal operation, if Soltaro All-in-one ESS are installed correctly, the inverter
and battery will start communication immediately, then begin to process power commands.
See the inverter manual for further configuration instructions.
Warning: Do not operate Soltaro All-in-one ESS unless all covers are in place.
Warning: Do not disconnect anything from or add anything to Soltaro All-in-one ESS.
Caution: Do not try to communicate with Soltaro LFP Battery using third party tools or diagnostics
between Soltaro LFP Battery and the inverter.
Caution: Do not lean on, stack anything on top of, or hang anything from Soltaro LFP Battery or the
conduit.
SOLTARO ALL-IN-ONE ESS CARE
Keep the top edge of Soltaro All-in-one ESS clear of articles to maintain optimal
airflow.
To clean Soltaro All-in-one ESS, use a soft, lint-free cloth. The cloth can be dampened
with only water if needed. It should not be dripping.
Caution: Do not use cleaning solvents to clean Soltaro All-in-one ESS.
NORMAL OPERATION
Sin lion LF P Batte ry User Man ual13
!
!
!
!
!
 Loading...