

Solo 425, 425-PAF, 425-HD, 475-B, 425-L Operator's Manual
...
US9425739 (03-14)
Operator’s Manual & Parts List
425, 425-HD, 425-L, 425-PAF, 475-B, 475-PAF, 435, 478-SSH, 485, 473-P,
473-D, 473-ECS, 425-Deluxe, and 475-B Deluxe
STOP!
WARRANTY:
Solo backpack sprayers are covered by Solo’s 1-YEAR LIMITED WARRANTY. Solo manufactured parts which fail due to defective
material or workmanship will be repaired or replaced without charge. See page 5 for full details and complete warranty information.
MAINTENANCE TIP: The cap gasket (#4061345) is prelubricated for
improved sealing. Occasional lubrication with Solo Superior Grease (#9850-P) or
petroleum jelly is recommended.
SAFETY PRECAUTIONS:
1. Before using sprayer with chemicals, fill sprayer with fresh water to assure
that you have it properly assembled; pressurize and practice spraying.
Also, check for any leaks at this time. When thoroughly familiar with the
sprayer operation, follow normal operating procedures.
2. Ensure all pressure in the sprayer is relieved by locking the shut-off
valve in the open position.
3. Avoid contact with chemicals.
4. Always wear rubber gloves, safety goggles and appropriate
protective clothing.
5. Work in a well ventilated area.
6. Individuals should be trained in the proper use of this sprayer, chemical handling procedures, and first aid/emergency
care. Where training is not available, individuals should study and follow the procedures detailed in this manual.
If you are missing parts, instructions or have questions, DO NOT take this unit back to the store. Call
1-800-SOLO-INC (1-800-765-6462). Solo will send the missing parts/information to you promptly.
Piston Diaphragm
WARNING:
Chemicals can be harmful to individuals and the environment if improperly used. In addition, some chemicals are caustic, corrosive or
poisonous and should be avoided. Read warnings and chemical manufacturers’ instructions. Solo high density polyethylene sprayers are
fitted with chemical resistant seals which are compatible to a wide variety of agricultural and household chemicals; however, care should be
exercised to ensure that sprayer components are clean, functioning properly, and in a good state of repair before and during use.
If in doubt about a particular chemical, check with the manufacturer. If you suspect or observe indications that the material may be
unsafe in a Solo sprayer...STOP. DO NOT USE OR APPLY CHEMICAL. ALWAYS WEAR RUBBER GLOVES, GOGGLES, AND
APPROPRIATE PROTECTIVE CLOTHING!
Read and follow operating instructions.
•
Do not fill with, use, or spray flammable materials.
•
Do not modify sprayer.
•
Never spray in the direction of humans, animals or property which might be injured or damaged by spray formula.
•
Do not use disinfectants, solvents or impregnating agents unless first tested to ensure they are not harmful to the
•
environment or sprayer.
Do not use liquids with a temperature above 110°F (43°C).
•
Wear appropriate protective clothing to prevent contact with chemical agents.
•
Rinse and clean sprayer thoroughly after using. Disposal of contaminated rinse should be in accordance with applicable
•
ordinances. Observe the precautionary instructions of the chemical manufacturer.
Do not use any acid (including citrus) or caustic chemicals. For bleach solutions, try our Solo 475-B or
•
475-B Deluxe sprayers.
Remember that a sprayer with liquid is a significant amount of weight (8 lbs. per gallon). Do not climb when wearing
•
the sprayer. Use caution when bending, leaning or walking. Bend at the knees rather than the waist.
During sprayer operation, the pressure cylinder (#4400240) contains compressed air and liquid. Compressed air
•
and liquid under pressure are inherently dangerous. Before making adjustments on sprayers fitted with a pressure
regulating valve assembly (#4800182) located on the pressure cylinder or any other repair or inspection of any
sprayer, be sure to relieve pressure through the shut-off valve and wand.
CUSTOMER SERVICE COMMITMENT FROM SOLO’S SERVICE DEPARTMENT
In the event the sprayer you have purchased has missing or damaged parts, please call 1-800-765-6462, 9:00 AM - 5:00 PM EST.
In order to assist your service representative, please have the following information available: sprayer model number,
part description and part number. A parts list is included in your operator’s manual.
Solo is committed to your satisfaction and is continuing its efforts to earn your future business.
Troubleshooting and parts ordering available on-line.
Visit us on the web at www.solousa.com
REMOVING PLASTIC ADJUSTABLE NOZZLE
Unscrew the nozzle cap (1) from the nozzle body (3). This is best
accomplished while the retaining nut (2) is fastened tightly to the
elbow (5). Next, unscrew the retaining nut (2). Push the nozzle
body (3) out of the retaining nut (2). The filter with gasket (4) will
come out with the body. To reinstall the nozzle, reverse the above
instructions.
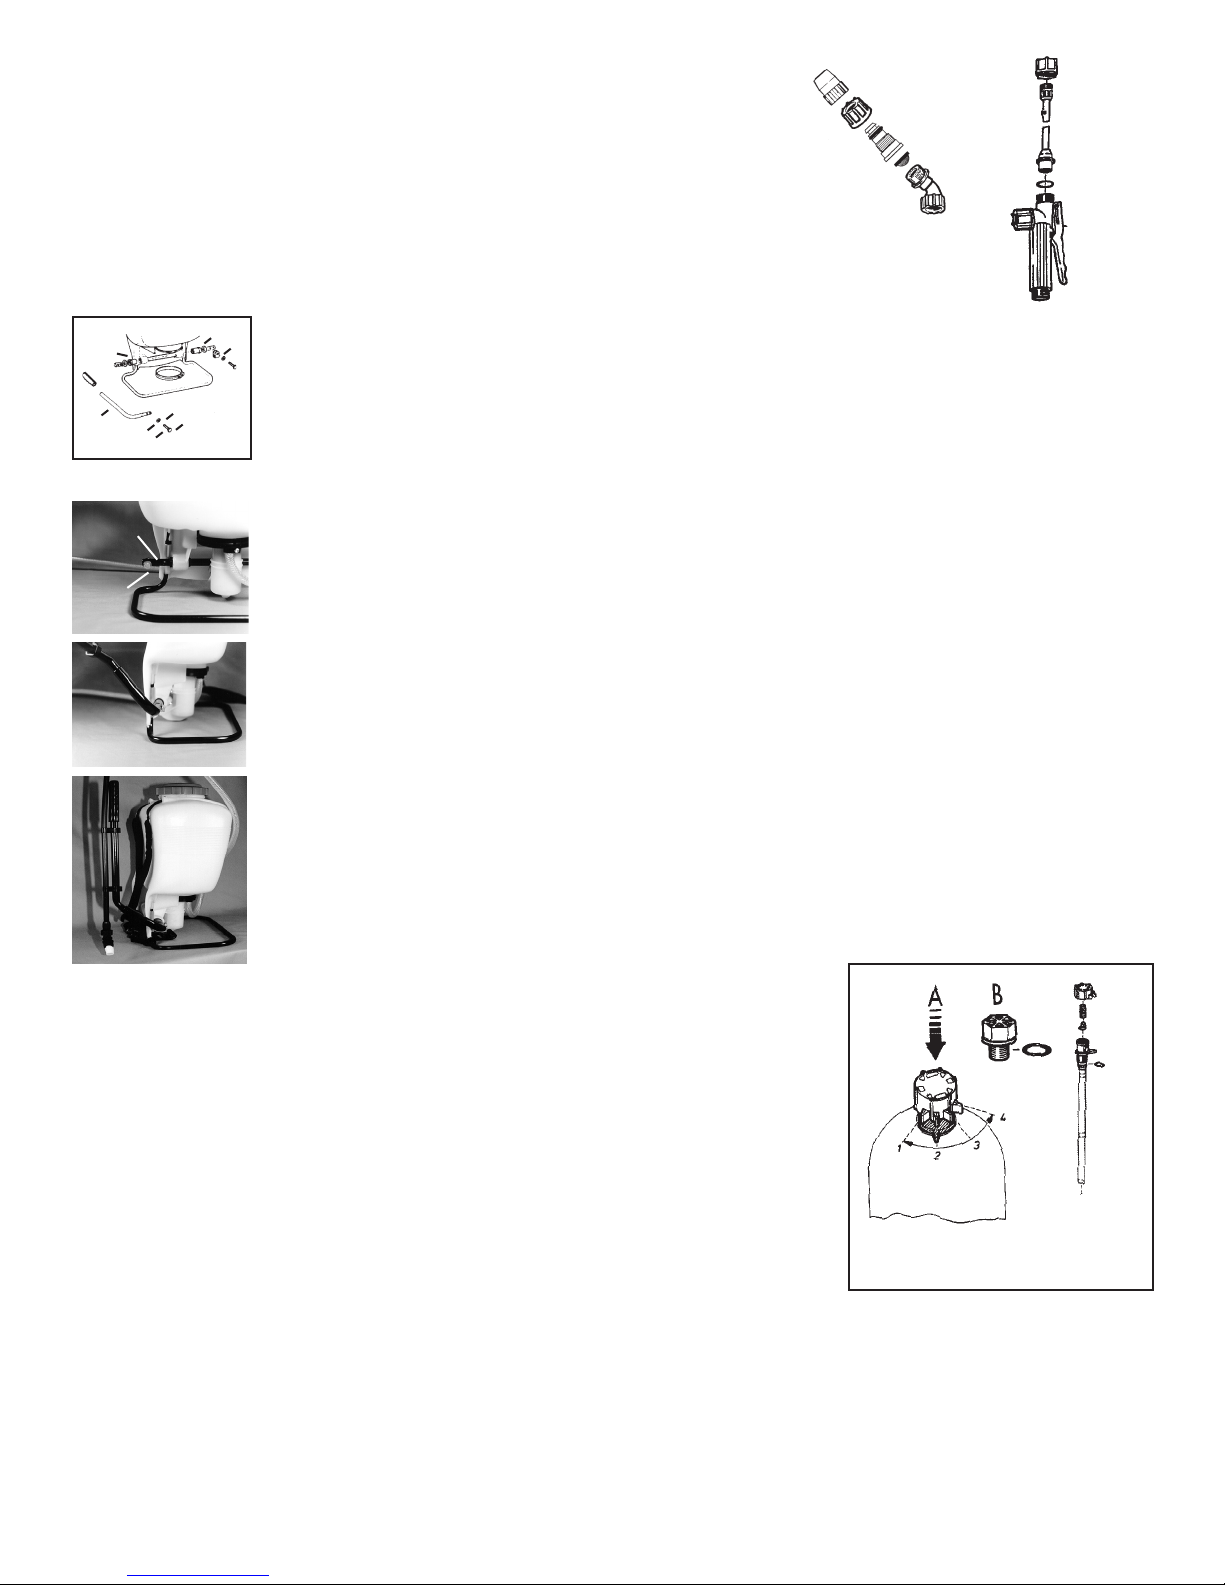
ASSEMBLY INSTRUCTIONS FOR WAND
1. Insert wand into shut-off valve as shown.
2. Tighten the screw cap clockwise onto the shut-off valve.
1. Nozzle
2. Retaining Nut
4. Filter with Gasket
5. Elbow
3. Nozzle Body
O-Ring
Gauge Mount
Shut-Off
Screw Cap
➔
➔
Wand
➔
➔
Install Wand
➔
➔
A
B
PUMP LEVER INSTALLATION: All hardware necessary for pump lever installation is
D
included with the sprayer. The pump lever (C) should be installed as follows: place lever
handle (C) onto the shaft (A). Align bolt holes and install the two bolts (E) and washers (F); then tighten.
To install pump lever on the opposite side on a Diaphragm Pump sprayer, remove the stop plate (D)
C
F
E
F
E
and washer, install the pump lever as above. The stop plate (D) should be mounted on the inner
bolt hole with the closed end of the stop plate pointing downward on the opposite side of the pump
shaft.
FOLD-AWAY PUMP HANDLE INSTALLATION (FOR SELECT MODELS ONLY):
Remove bolt and nut from pump handle.
B
A
1.
Slide handle assembly over the pump rod and align the holes so that the rear (elbow) portion
2.
of the handle points up and slightly forward (approximately 45 degrees) and away from the
Solo logo. Reinstall bolt and locknut. Pump handle can be installed on the opposite side of
the sprayer for right hand pumping. (For Diaphragm Pump Sprayer, stop plate will need to be
relocated to the left side.)
The handle can be rotated to either down (pumping) or up (storage) positions. Note: The handle
3.
swings away from the sprayer, then up or down as desired. The spray wand attaches to the
clamps on the handle assembly for storage (does not apply to the brass or stainless steel
wands).
SHOULDER STRAP INSTALLATION:
The top of the shoulder straps are pre-attached to the sprayer by means of a buckle or pin. The
lower end of the straps are attached by fastening the strap hooks to the metal frame between where
frame exits the plastic tank and where the frame makes a bend.
REGULATING THE PRESSURE: (FOR DELUXE MODELS ONLY)
The Solo backpack sprayer is equipped with a built-in regulator to control output pressure. This
regulator is operator adjustable. Make adjustments prior to filling tank. To adjust the regulator,
remove the tank cap and the filter basket. Look inside the
spray tank; you will see the top of the regulator. There are 4 fingers on the regulator
knob. The finger farthest to the left is #1; to the right is #4. They are numbered 1, 2,
3, 4. 1 = 15 psi, 2 = 30 psi, 3 = 45 psi, 4 = 60 psi. The higher the pressure, the more
chemical applied from the sprayer in a given amount of time, but the droplets will be
smaller with more drift. If the spray pressure must be changed, excess pressure in
the pressure cylinder must be released back into the tank through the spray tube.
To adjust, push down on the knob and rotate to align the desired number with the
alignment pin. To operate the 425-DELUXE and 435 at higher than 60 psi, first release
the excess pressure and then replace the pressure control valve with the optional
plug (#4200215).
FILLING:
Mix the spray formula and the proper volume of water in a separate container. Pour
the mix through the filter basket in the tank opening. This keeps debris from entering
the sprayer. Pump the sprayer handle to prime the pump and pressurize the pressure cylinder. The volume of liquid in the
sprayer tank will appear to decrease as the pressure cylinder is pressurized. Remember that it’s not necessary to completely
fill the sprayer tank each time. Mix only the amount needed to get the job done. Chemicals should not be stored in the
sprayer.
Setting #1 15 psi
#2 30 psi
#3 45 psi
#4 60 psi
Always read and carefully follow the manufacturer’s instructions printed on the product label. This can save money and help
prevent injury and crop and environmental damage.
2
OPERATING FEATURES:
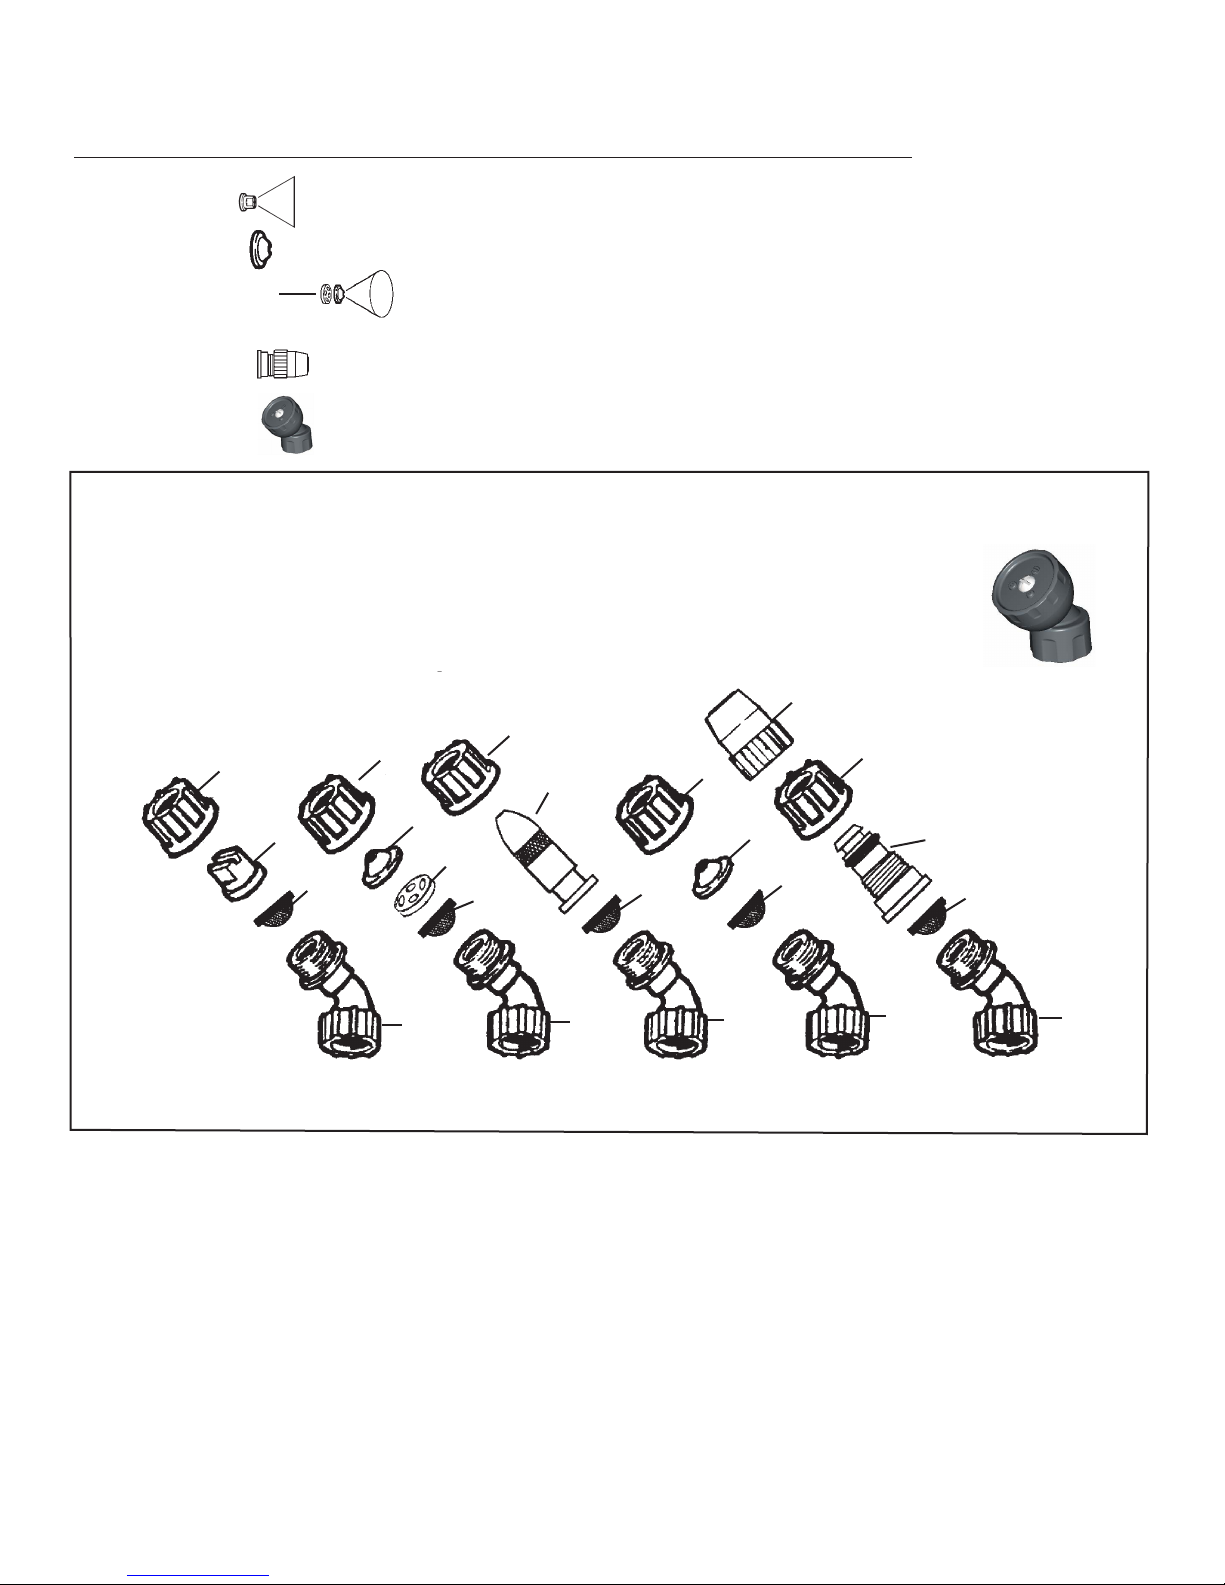
Nozzles - Your Solo sprayer can provide a variety of spray patterns with the standard and optional nozzle arrangements.
Item Application Part #
Flat spray nozzle Row treatment 4074263
Jet stream nozzle Spot & longer range 4074755
Jet stream nozzle and Shrubs and bushes 4074755
Swirl plate = hollow cone 4074756
Plastic adjustable Spot, shrubs & bushes 4900527
nozzle
Speed Tip Nozzle Row, spot, shrubs & bushes 4074666
SPRAY TIP ASSEMBLY
1. Flat spray nozzle
2. Filter NEW Solo Speed Tip Nozzle*
3. Jet cap (attaches directly to the wand)
4. Swirl plate
5. Nozzle cap
6. Nozzle body
7. Brass adj. nozzle*
8. Nozzle retaining nut
9. Elbow
8
1
8
8
7*
3
4
2
2
8
2
5
8
3
2
6
2
9
Flat spray
nozzle
*Brass adjustable nozzle and Speed Tip nozzle are not standard items on all Solo sprayers but each may be purchased as an accessory. Spray tips should be assembled as above for desired spray pattern.
WARNING: Handling the brass parts of this product will expose you to lead, a chemical known by the State of
California to cause birth defects and other reproductive harm and/or cancer. Wash hands after handling.
SPRAYING:
Prime the pump with rapid pump strokes. When you feel very firm resistance, the pressure chamber is filling with
liquid. With repeated piston strokes, the air in the pressure chamber is slowly compressed. In a safe area, point
the wand upward and press the shut-off valve lever spraying for 10 seconds or until no air and only liquid is coming out. This will bleed all of the air out of the hose and wand. By pressing the hand lever, the valve opens, and
liquid is forced through the nozzle. The shut-off valve has a retaining clip which keeps the valve in the “OPEN” position for continuous operation. Pump using the end of the pump handle, as it is less fatiguing. The volume of liquid
delivered varies with the working pressure which should be as high as needed to ensure an adequate spray pattern for
each individual application.
NOTE: Should the pressure drop very quickly, drain the tank completely and pump without liquid. By this procedure, the air
chamber is refilled with the required volume of air. It is advisable to pump the tank completely empty from time to time.
Hollow
cone spray
nozzle
9 9
Brass
adjustable
nozzle*
3
Jet stream
nozzle
9
9
Plastic
adjustable
nozzle

WETTABLE POWDERS:
Avoid use in piston pump sprayers models 425, 425Deluxe, 425-HD, 425-L, 435, 425-PAF, 473-P! The Solo
models 475-B, 475-Deluxe, 475-B Deluxe, 475-PAF, 473D, 473-ECS, 478 and 485 sprayers with a diaphragm
pump are generally resistant to abrasive materials and are
recommended for this purpose. Note: If you use a wettable
powder in your 425, 435 or 473-P sprayer, be sure that it
is thoroughly mixed in the formula solution. Immediately
after use, be sure to remove the piston and clean and
lubricate the Viton® collar with Solo Superior Grease*
or petroleum jelly. Thorough flushing of the sprayer will
extend the life of its working parts. If you use wettable
powders in the piston pump sprayer, be sure to inspect
regularly for seepage around the piston and repair
accordingly.
CLEANING:
• After spraying, clean the tank thoroughly. If some spray
liquid is left inside, drain tank completely.
• Pumping causes air to be taken in and the remaining
liquid to be discharged. Pump until liquid and air are
coming out through the nozzle.
• Refill tank with a few quarts of clean, soapy water and
pump the water out as explained above (if necessary,
repeat this procedure several times).
• If the shut-off valve is removed, the pump can be
flushed quickly. Improper spray distribution is the result of
a clogged nozzle, which is easily removed and cleaned.
• Soap and water may also be used to clean tank.
• Do not use aggressive cleaning agents or abrasives.
• Follow the recommendations of the chemical
manufacturer for disposal of waste water and
chemicals.
• Activated charcoal in liquid or other form may be used to
absorb chemicals in tanks or spills.
MAINTENANCE AND STORAGE TIPS:
3
1
2
1. Pressure Cylinder
2. Cylinder Support Clamp
3. Pressure Control Valve (Deluxe Models Only)
• After operation, the sprayer should be stored away from
direct sunlight to prevent UV damage.
• After removing the pump or when mounting a new Viton®
collar, treat both the collar and the piston with waterresistant grease.*
• Before winter, drain all liquid in tank, lines and air
chamber. (See “Cleaning.”) Leave shut-off valve
locked in the “open” position to prevent freezing.
• For service, visit our website to locate your nearest Solo
dealer. Always insist on original Solo spare parts.
• Regularly inspect hose, wand, pump, tank and shut-off
valve for wear, damage or leaks. Repair promptly.
• Occasionally lubricate cap gasket.*
NOTE: When cleaning the sprayer after working with
hormone weedkillers, follow the instructions of the
herbicide producers. Neutralize with activated charcoal.
(Example: add 0.35 oz./1 g. of activated charcoal to 1.7
pint/1 liter of water and leave this detergent in the tank and
the lines approximately for 24 hours.) This is very important
if other chemicals will be sprayed as the residues of the
herbicide may damage susceptible plants. Cleaning after
application of products containing carbolineum, if they
are not water soluble, should be done with a 5% soda lye
having a temperature of 104°F (40°C). Rinse with plenty of
clean water.
Avoid excessive wear by:
1) Regular lubrication of Viton® collar, cylinder and piston
with water-resistant grease.*
2) Prompt and thorough cleaning and flushing of sprayer.
Soap and water work well.
*Use Solo Superior Grease (#9850-P). Petroleum jelly may also be used.
4
 Loading...