

Page 1
9 424 101 12/2017
en
fr
es
424 NOVA
Original instructions
Notice originale
Manual original
Attention!
Read this instruction manual
carefully before first operation and
strictly observe the safety regulations!
Attention !
Lire attentivement le présent manuel avant
la première mise en service et observer
impérativement les consignes de sécurité !
Atención!
¡Lea atentamente este manual de empleo antes de
la primera puesta en funcionamiento y respete
imprescindiblemente las prescripciones de
seguridad!
Backpack sprayer
Pulvérisateur à dos
Pulverizador de
mochila
Page 2

Page 3

ENGLISH 1
Original instructions
Changes to the scope of supply in form, technology
and equipment are reserved. No claims can be
derived from any information and figures in these
original instructions.
The original packaging and, at the end of its
service life, the sprayer must be properly disposed
of according to the local environmental regulations.
The machine can be subject to national rulings for
regular review by designated offices, as specified
in directive 2009/128/EC.
1 EC declaration of conformity
SOLO Kleinmotoren GmbH,
Stuttgarter Straße 41, D-71069 Sindelfingen,
Germany declares that the back spraying unit type
NOVA 424 from production date 11/2017 onwards
- corresponds to the relevant provisions of directive
2006/42/EC of the European parliament and the
council from 17 May 2006 about machinery and
directive 2009/127/EC.
Sindelfingen, 01 November 2017
Wolfgang Emmerich, SOLO Kleinmotoren GmbH,
Stuttgarter Straße 41, D-71069 Sindelfingen
(managing director and documentation officer)
2 Scope of delivery
• Basic unit with hand valve and pressure hose
• Spray tube
• Pre-installed nozzle assembly incl. nozzle
• Assembly parts cap but, O-ring
• Carrying belt and attachment pin
• Pump lever
3 Wear parts
The following wear parts are not subject to the
manufacturer's guarantee:
* All rubber parts that come into contact with
spraying liquid, * nozzles, * filters, * seals,
* diaphragms, * sleeves
4 Warranty
Please observe that specific warranty conditions
are valid in some countries. In doubt, ask your
vendor.
No guarantee can be granted for any damage
caused by:
• Non-observation of the original instructions.
• Omission of necessary maintenance and
cleaning work.
• Wear and tear from regular use
• Use of unapproved working tools.
• Use of force, improper treatment, abuse or
accident.
• Manipulations by non-qualified persons or from
improper repair attempts.
• Unauthorized modifications to the device.
• Use of unsuitable spare parts or non-genuine
spare parts.
• Use of unapproved chemicals or dilutions.
• Damage caused by use in the rental business.
Any warranty work must be performed by one of
our authorised specialist vendors. Cleaning, care
and standard adjustments are not accepted as
warranty services.
For Australia only: Supplementary warranty notes
specifically for Australia
To make a claim, contact Clayton Engineering, 26
French Ave, Brendale, Q, 4500 on phone 1300 798
022 or email [email protected].
You will be asked to provide proof of purchase and
then will be instructed on the procedure for
repairing or replacement of the product under
warranty. All costs incurred for repair or replace,
and additional claims can be discussed at this
stage.
This warranty is provided in addition to other rights
and remedies you have under law: Our goods
come with guarantees that cannot be excluded
under the Australian Consumer Law. You are
entitled to a replacement or refund for a major
failure and for compensation for any other
reasonably foreseeable loss or damage. You are
also entitled to have the goods repaired or
replaced if the goods fail to be of acceptable quality
and the failure does not amount to a major failure.
5 Symbols
Read the original instructions thoroughly.
DANGER! Non-observation of the original
instructions may potentially cause fatal
injury.
Wear the prescribed protective clothing.
Wear protective gloves.
Wear facial protection (e.g. goggles).
Wear breathing protection.
No smoking.
No open fire.
Minimum distance from other
persons: 15 m [approx. 16 yards]
Page 4

ENGLISH 2
6 Safety provisions
6.1 Intended use / applications
• Use the sprayer only for the application of liquid
herbicides, pesticides and weed killers as well
as liquid fertilisers that are available from the
authorised specialist trade and approved by
local/national authorities for use with portable
spraying devices and for the application of clean
water.
• Strictly observe the guide lines provided by the
chemical manufacturer.
• Application areas are in farming, tree nurseries,
forest operations, orchards, vineyards, market
gardens, as well as glasshouse cultures with
sufficient ventilation and venting.
• The backpack sprayer must not be used for any
other purpose or for the application of liquids not
mentioned above. In particular, no aggressive,
acid- or solvent-containing liquids, disinfectants
and waterproofing agents must be applied.
• Never use any liquids with temperatures above
40 °C [104 °F].
• We will disclose the materials used for the
sprayer on request.
6.2 General safety notes
Read the original instructions before first use and
keep it in a safe place.
Non-observation of information provided in these
original instructions may potentially be fatal; the
user is liable for any damage, direct or
consequential, caused by this.
The original instructions must be kept on hand at
the site of use of the sprayer at all times.
It must be read by all who are charged with any
work with and on the device (including for
maintenance, care and repair).
• Have safe use shown and explained to you by a
SOLO specialist vendor.
• Persons under the age of 18 must only work
under supervision with this sprayer.
• Keep persons and animals away from the
working area. Never spray in the direction of any
persons, animals or objects that could be hurt or
damaged.
• This sprayer must only be passed on to persons
who are familiar with this model, its operation
and the original instructions.
• If you work with this sprayer, you should be
physically fit, rested and healthy.
• Do not use the sprayer while under the influence
of alcohol, drugs or medication.
• Never make any changes to existing safety
provisions and operating parts.
• Only use the sprayer when it is operationally
safe to do so. Check the sprayer before every
use according to chap. 10.1.
• Replace damaged parts without delay. Only use
SOLO genuine spare parts.
• Only use factory approved accessories and
attachments for this sprayer.
• Empty and clean the sprayer according to the
information in chap. 10.4 for this. Prevent
unauthorised access to the machine.
6.3 Safe handling of spraying liquids
• Follow suitable procedures and use collection
containers to prevent any contamination of the
environment, the public waterways and/or storm
water systems from chemical agents and
cleaners. This can happen while mixing, filling,
using, emptying, cleaning or during transport.
• Always collect chemical spray liquids and
cleaners (including residues) in suitable
containers and return them to collection points
specified by the municipal administration.
• In case of skin or eye contact, rinse or flush the
affected body parts with plenty of clean water.
Seek medical advice without delay.
• Contaminated clothing should be changed at
once.
• Never eat or drink while handling spray liquids
• If you feel nauseous during work, or if you are
excessively fatigued, stop working at once. If the
condition persists, seek medical advice without
delay.
• Never permit children or persons work with or
handle spraying liquids if they are not familiar
with these substances.
• Never fill different spray solutions into the spray
tank.
• The description of the kind of spray solution
used must be attached to the device and must
be updated with every change of the spraying
solution.
• When changing the spray solution, clean the
spray tank and all parts that come in contact with
the spray solution. Operate the sprayer with
clear water first before filling the spray tank with
the different spray solution.
• At the end of work, empty and clean the sprayer
according to chap. 10.4, clean your face and
hands thoroughly, take off work clothing and
wash it regularly.
6.4 When transporting the sprayer
• The device must be securely strapped down
when transported on vehicles.
• Prevent leakages of spraying agents. The liquid
tank of the sprayer and all liquid carrying hoses
must be inspected regularly for leaks.
Page 5

ENGLISH 3
6.5 Work clothing /personal protection
equipment (PPE)
Suitable and approved protective clothing
that protects all body parts from contact with
the spray solution must be worn.
• Wear firm shoes with good gripping soles.
• Wear protective gloves with a slip-proof
palm.
• Use facial protection (e.g. protective
goggles).
• Always wear a breathing mask. when
working in dense, tall plants, greenhouses,
troughs or trenches and when using
dangerous spraying agents.
6.6 Before and during work
• Before starting work, always check the entire
device for operational safety according to
chap. 10.1.
• The sprayer must only be operated by one
person. There must be no other person within a
radius of 15m [approx. 16 yards].
• Always ensure sufficient air exchange in dense
plant growth, in greenhouses, troughs or
trenches.
• Always stay within calling distance from other
persons that may provide help in emergency.
• Take regular working breaks to prevent fatigue.
• Do not smoke at the workplace.
6.7 Maintenance, repair and storage
Only perform maintenance and repair work yourself
that is described in these original instructions. All
other work must be carried out by an authorised
specialist workshop.
• Do not service, repair or store the sprayer near
open fire.
• Before any maintenance and repair work,
release the pressure in the pressure chamber
inside the tank. To do this, hold the spray wand
in the liquid tank or in a suitable container until
the liquid flow stops.
• The pressure hose, hand valve, spray wand and
nozzle assembly must only be unscrewed when
the sprayer is depressurised.
Page 6
ENGLISH 4
7 Work preparation
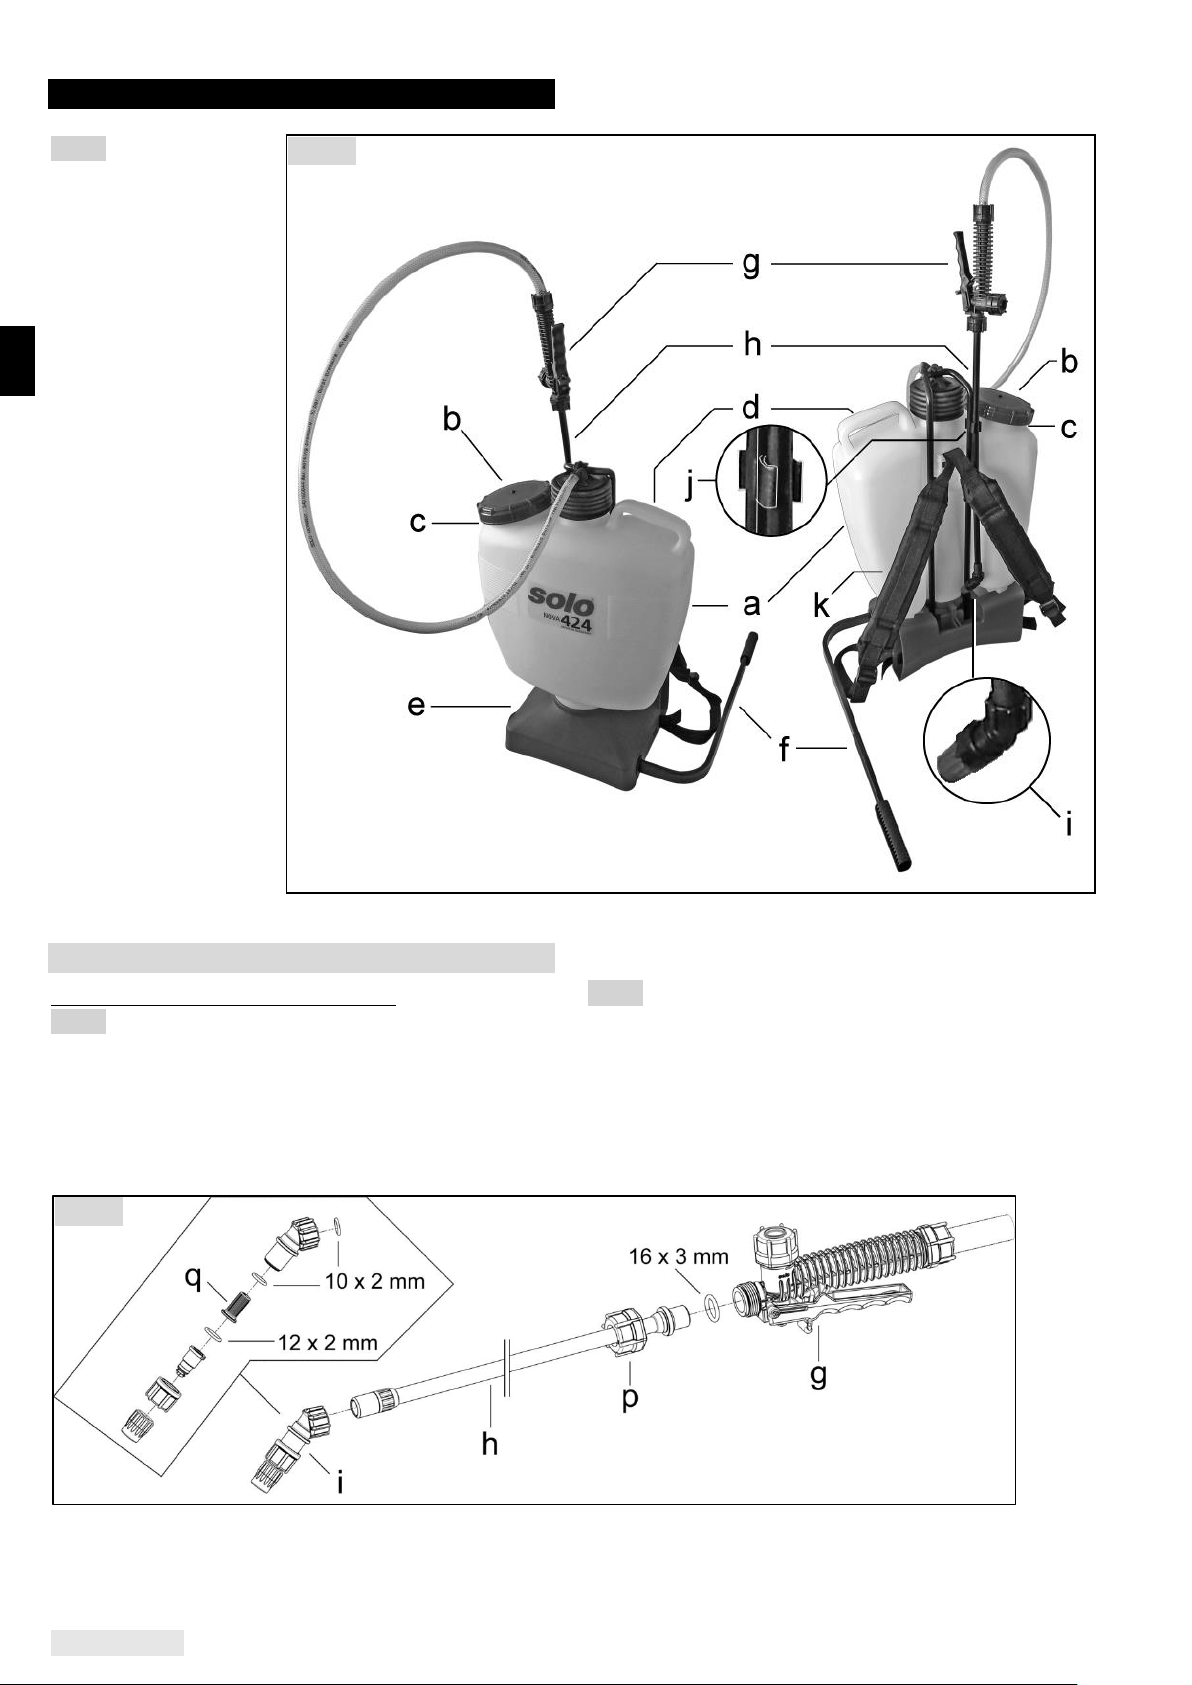
Fig. 1:
a. Spray tank)
b. Tank lid
screwed to the
filling socket (c)
d. Carry handle
e. Standing foot
f. Pump lever
g. Hand valve
h. Spray wand
i. Nozzle attachment
j. Spray tube holder
k. Carrying belt
7.1 Assembly
Assembly of the spraying wand (h):
Fig. 2
• Start the cap nut (p) evenly and screw the spray
tube with the O-ring (16x3 mm) onto the hand
valve (g) hand-tight without tools.
• Screw the nozzle attachment (i) onto the spray
tube hand-tight without tools.
Fig. 1:
• Outside of work, the spraying wand (h) is
attached to the spraying wand holder (j).
Fig. 1
Fig. 2
Page 7
ENGLISH 5
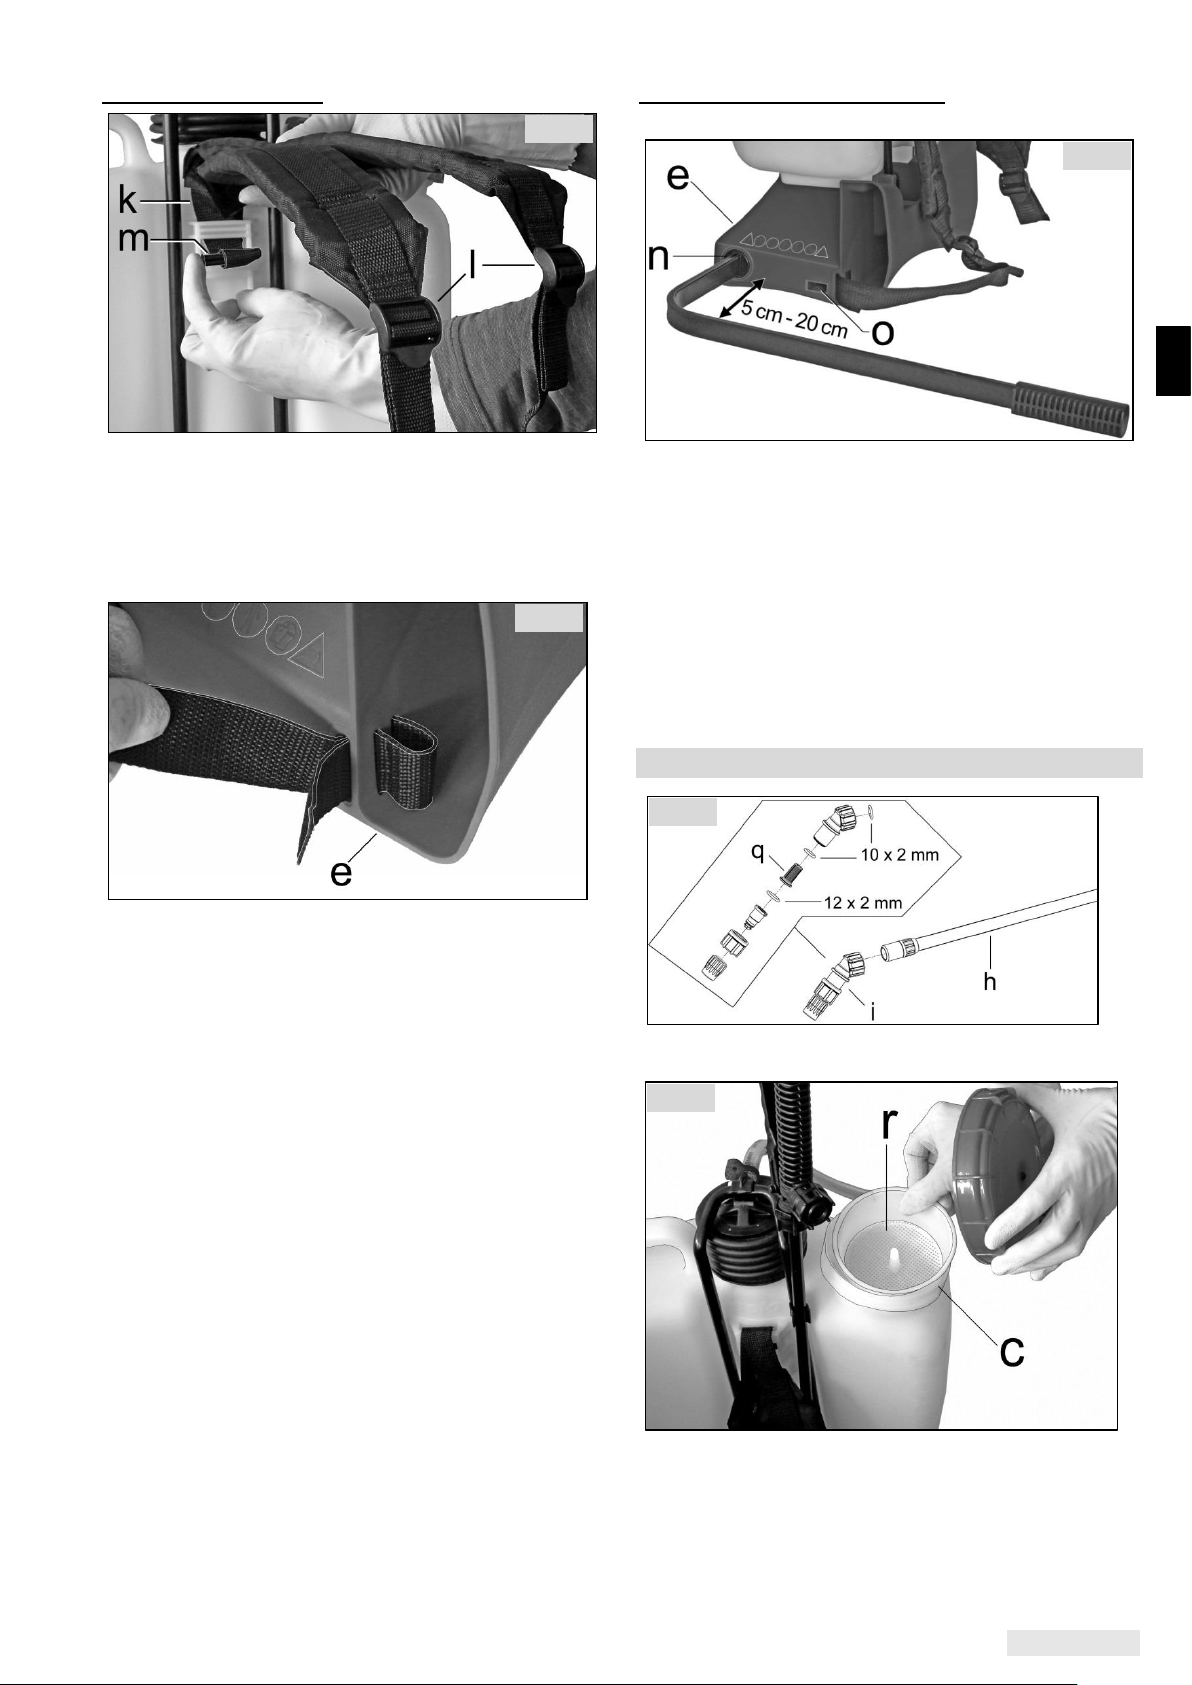
Assembly carrying belt
• Thread the upper loop of the carrying belt (k),
through one of the three attachment ribs from
above depending on body size, so that the two
clamping sliders (l) are on the outside.
• Secure the loop with the attachment pin (m)
from below.
• Thread the ends of each carrying belt through
the specified slits in the standing base (e).
• Tighten the belt.
Assembly of the pump lever (f):
The pump lever can be attached to the left or right.
• Push the pump lever into the guide (n) at the
standing base (e) from the desired side, so that
the pump handle points backwards (next to the
user when the device is carried on the back).
For ergonomic adjustment, the pump lever can
be pushed into the device base to different
degrees so that the distance from the standing
base is between 5 cm and max. 20 cm.
• When not working, the pump lever can be
pushed into the rear opening (o) at the standing
base for space-saving storage.
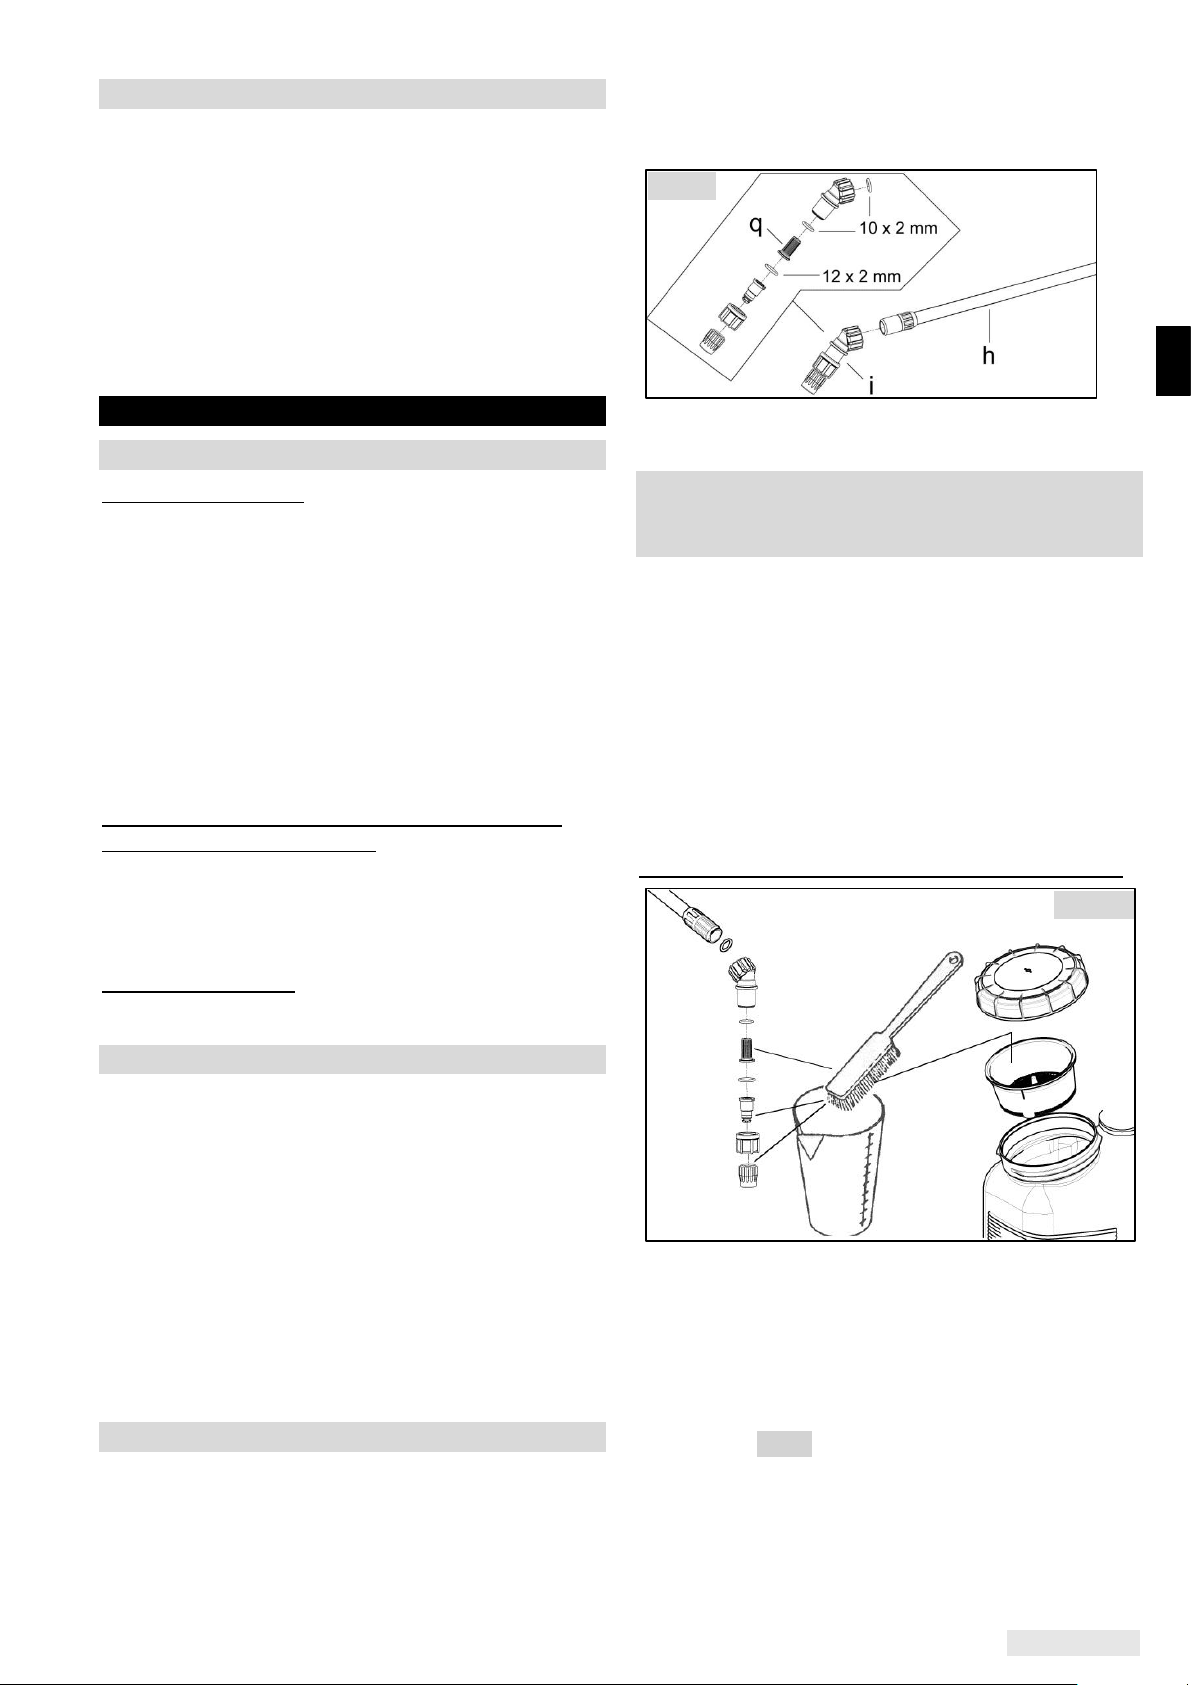
7.2 Filter and filling screen
The nozzle assembly (i) includes a filter (q) insert
in front of the nozzle.
The basket in the filling neck (c) of the liquid tank
contains a filter screen(r).
The nozzle filter and the inlet filler screen must
always be used when working with the backpack
sprayer.
Fig. 3
Fig. 4
Fig. 5
Fig. 6
Fig. 2
Page 8
ENGLISH 6
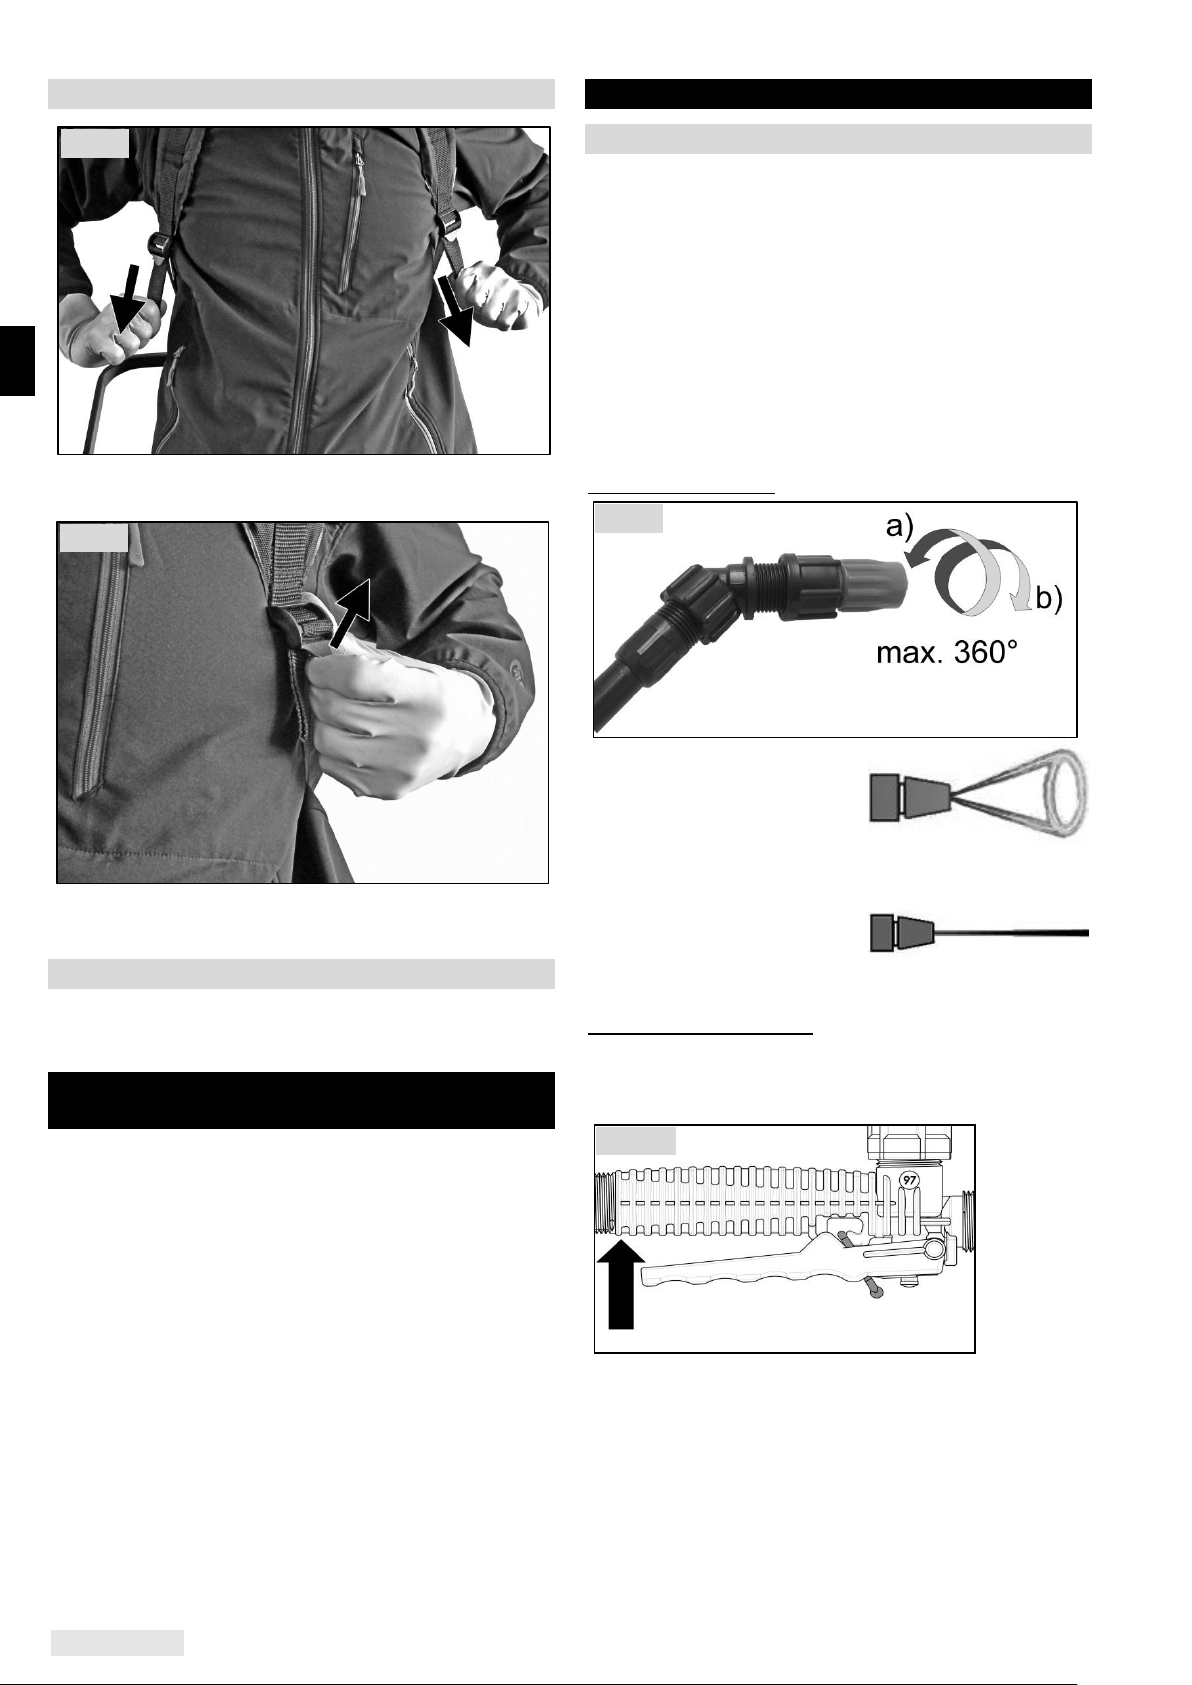
7.3 Length adjustment of the carrying straps
Pulling down the two strap ends will tighten the
carrying straps.
Pulling the two belt ends upwards will loosen the
carrying strap.
7.4 Test run
Before its initial use, the sprayer should be tested
according to chapter 10.2.
8 Preparing the spray liquid and filling the
spray tank
Prepare the spray liquid according to the
instructions of the chemical manufacturer.
Always prepare the spray liquid outdoors, never in
living quarters, stables or storage rooms for food
and animal feed.
When filling the spray tank, always use the filler
basket with the integrated filter screen (r).
Fill the tank no further than to the upper-most mark
on the side of the spray tank.
Overfilling the tank or spills can contaminate public
waterways, rain- and storm water channel and
must be avoided.
Wipe off spilled spray liquid without delay.
9 Use of the backpack sprayer
9.1 Spraying
• Do not use the sprayer in wind or rain.
• Check the direction of the air movement before
starting work and spray with the air movement,
not against it.
• Do not spray towards persons, animals, open
doors and windows, cars or other objects that
may be hurt or damaged by the spray.
• Ensure that only the actual spray target will be
wetted. Always aim to obtain even and
homogenous distribution of the spray on the
treated surfaces.
Nozzle adjustment:
a) Nozzle closed
hollow cone
Delivery rate at 2 bar:
0.55 l/min [0.145 USgal/min]
b) Nozzle open
(1/2 turn 180° until
max. 1 turn, 360°)
coarse and narrow jet
Delivery rate at 2 bar: 1.45 l/min [0.383 USgal/min]
Pumping and spraying:
Draw in and pressurize the liquid in the pump with
quick pump lever strokes.
Hold the spray wand with the hand valve.
To spray, depress the hand lever on the valve.
Release the hand valve lever to stop spraying.
To spray the underside of leaves, lightly loosen the
spray wand cap nut and turn the wand hand tighten
again.
An uneven spray picture or reduced spray output
from the nozzle may require cleaning of the nozzle
filter insert and nozzle (chap.10.4) or the
replacement of these parts (chap. 10.3).
Fig. 7
Fig. 8
Fig. 9
Fig. 10
Page 9
ENGLISH 7
9.2 Disposal of residual spray volume
Residual spray volumes of less than 100 ml
[6.8 oz] are no longer pumped effectively. Either
add more spray formula and continue spraying or,
when finishing off, dilute the residual volume with
2 litres [68 oz] of clean water and apply to the
already treated area.
At the end of the work, empty and clean the
sprayer according to chap. 10.4, wash face and
hands thoroughly and take off the work clothing.
Work clothing requires regular washing.
10 Maintenance, cleaning and storage
10.1 Maintenance plan
Before starting work:
• Check the entire sprayer is operationally safe by:
o Visual inspection of the sprayer
o Checking the tightness of all parts (at
maximum admissible pressure with the hand
valve opened and closed).
o Checking the working of all functional parts
(pump lever, hand valve).
o Checking the hoses and their screw
connections.
o Visual inspection of the filter screen in the
filler basket.
After the end of work, when changing the spray
formula, whenever required:
• Cleaning the spray tank chap. 10.4
• Cleaning the nozzles and filters chap. 10.4
• Cleaning the filter screen in the filler basket
chap. 10.4
Whenever required:
• Greasing the tank lid seal chap. 10.5
10.2 Test run
When the spraying season starts and then every
month, the following items must be checked in a
test run with clean water:
• Tightness of all sprayer parts at maximum
admissible pressure with the hand valve opened
and closed
• Function of all working parts (hand valve, pump
lever)
• Dosage and distribution accuracy
In case of irregularities, damage, leaks or limited
function, do not use the sprayer but have it
checked in a specialist workshop without delay.
10.3 Replace the spray nozzle and/or filter
• Flush the nozzle assembly with clean water.
• Unscrew the nozzle assembly.
• Clean the O-rings, filter insert and spray nozzle
with clean water and soft brush. Do not blow out
the spray nozzle by mouth! Do not clean nozzles
with any hard objects!
• Replace the nozzle with a new nozzle and/or
new filter insert.
• Screw the parts of the nozzle assembly back
together.
10.4 Empty the spray tank and clean all the
parts in the spray delivery system to the
nozzle
Empty the spray tank, flush with clean water all
parts in the delivery system to the nozzle and the
filter screen in the filler basket.
Give special attention to the wear parts such as
nozzles, filters and seals.
Observe the cleaning notes in the original user
manual for the chemical.
Never use any aggressive, acid- or solventcontaining cleaning agents (e.g. petrol).
After cleaning, let the spray tank dry in the open
air.
Clean the spraying nozzle, filter and filling screen:
• Flush the nozzle assembly with clean water.
• Unscrew the nozzle assembly.
• Clean the O-rings, filter insert, spray nozzle and
filling screen with clean water and a soft brush.
Never blow out the spray nozzle with the mouth!
Never clean nozzles with hard objects!
• Screw the parts of the nozzle assembly back
together (Fig. 2).
Fig. 2
Fig. 11
Page 10
ENGLISH 8
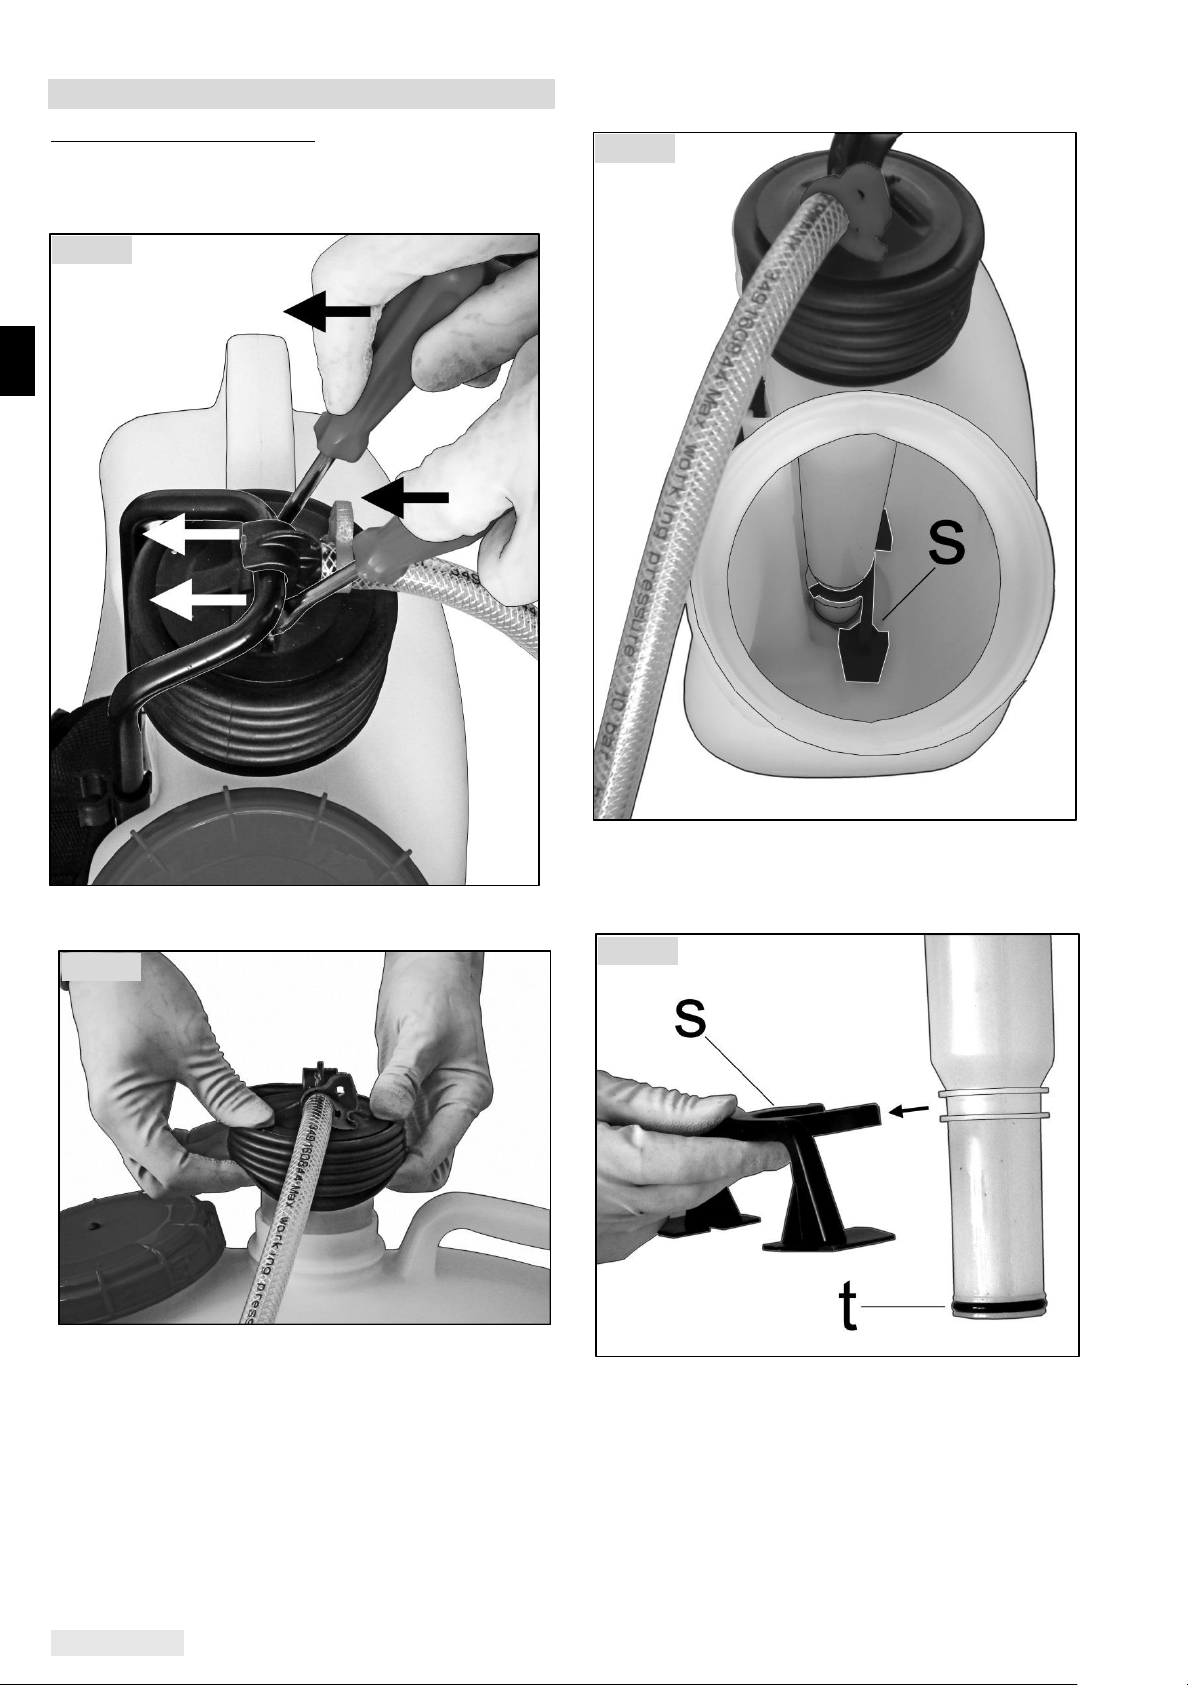
10.5 Greasing the piston seal
With the pump going stiffly:
Only perform maintenance work when
depressurised and with the spraying agent tank
empty.
• Lever the lifting rods out of the clamp with two
screwdrivers.
• Push the fold tube up.
• Unscrew the tank lid.
• Take out the filling screen.
• Reach into the spraying agent tank with one
hand and remove the stirrer (s) from the piston.
• Lift the piston out of the spraying agent tank
upwards.
• Wet the piston seal (t) with silicone grease.
Reassemble the back sprayer in the reverse order.
Fig. 12
Fig. 13
Fig. 15
Fig. 14
Page 11
ENGLISH 9
10.6 Down periods and storage
Empty and clean the sprayer according to chap. 10.4.
Keep the sprayer protected from sunlight in a dry, frost-free and secure location at a temperature of max.
35 °C [95 °F].
No open fireplaces or similar must be nearby.
Prevent unauthorised use – especially by children.
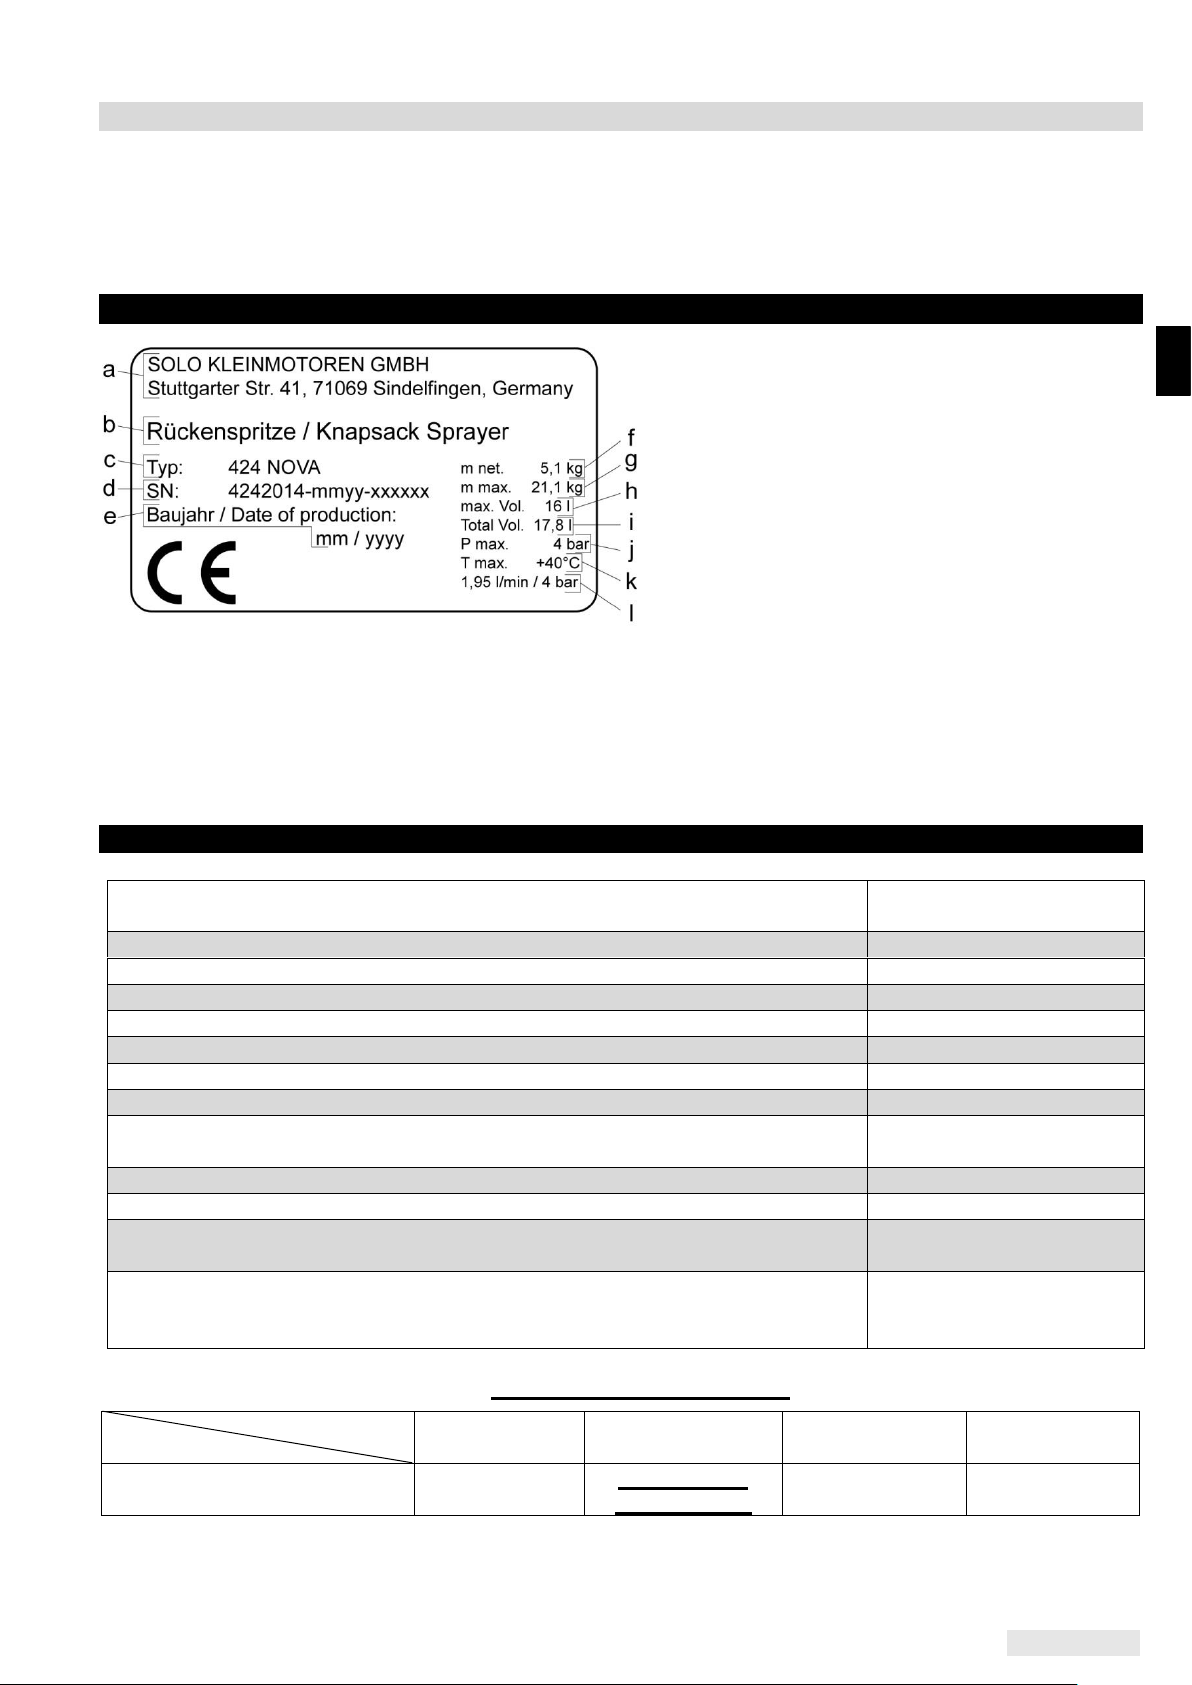
11 Type plate
a: Name and address of the manufacturer
b: Product description
c: Type designation
d: Serial number
e: Manufacturing month/year
f: Weight (ready for operation, empty)
g: Weight (ready for operation, with max. fill
level)
h: Maximum fill level of the spraying agent tank
i: Volume of the spray tank
j: Maximum permitted operating pressure
k: Maximum permitted operating temperature
l: Maximum application volume (with standard
spraying nozzle at max. operating pressure)
12 Technical data
Spray tank: Total volume
Max. fill volume
17.8 l [4.7 gal]
16.0 l [4.2 gal]
Residual volume, (remaining liquid in tank that cannot be used)
< 100 ml [3.4 oz]
Pump system
Piston pump
Maximum permitted operating pressure
4.0 bar [58 psi]
Pressure chamber capacity
1.1 l [37.2 oz]
Stroke volume
86,7 cm3 [5.29 cu.in]
Permissible operating temperature
0–40 °C [32–104 °F]
Pressure hose: Length
1,300 mm [51.2"]
Maximum application volume (with standard spraying nozzle at 4 bar [58 psi])
1,95 l/min
[0.515 USgal/min]
Filter insert: Mesh gauge
0.8 mm [0.031"]
Filling screen: Mesh gauge
2.0 mm [0.079"]
Weight: Ready for operation, empty
Ready for operation, with max. filling volume
5.1 kg [11.2 lbs]
21,1 kg [46.5 lbs]
Dimensions (without spray wand, height
Pump lever and pressure hose): Width
Depth
610 mm [24.0"]
390 mm [15.4"]
245 mm [9.6"]
Application volumes (l/min [USgal/min])/* optimal operating pressure by using the corresponding nozzle:
Spray pressure
Nozzle
1 bar [15 psi]
2 bar [29 psi]
3 bar [44 psi]
4 bar [58 psi]
High reach jet, adjustable
0.44 -1.10
[0.116–0.291]
* 0.55 – 1.45
[0.145–0.383]
0.66 – 1.75
[0.174–0.462]
0.75 – 1.95
[0.198–0.515]
 Loading...