

Page 1

9 113 103 english 01/2008
113/114
Instruction manual
Important!
Read this instruction manual carefully
before first operation and strictly observe
all safety regulations!
Electric trimmer
05
Page 2
ENGLISH 2
Introduction
Dear Customer,
Congratulations for choosing this SOLO quality
product.
SOLO's equipment design incorporates the Iatest
technology to provide trouble free, extended service
life. The utilization of high-grade materials and
modern, state of the art manufacturing equipment
assures consistently high quality.
Prior to operating the unit, please read the
owner’s manual carefully, and most importantly,
observe all safety rules.
Your dealer will be glad to assist you with any
questions.
CE Declaration of Conformity
SOLO Kleinmotoren GmbH, Stuttgarter Strasse 41,D-71069
Sindelfingen, certifies that the following product in the
version as supplied
Description of product: Electric trimmer
Model/type description: 113, 114
complies with the following EU guide lines:
98/37/EC, 2000/14/EC, 2004/108/EC and 2006/95/EC
Applied standards:
EN 786, EN 60335-1, DIN EN 60335-2-91,
EN 55014-1, EN 55014-2, EN 61000, EN 50366
Conformity assessment procedures (2000/14/EC):
Appendix VI
Name
and address of the Notified Body:
CESMA
Via Gorizia, 49
42100 Reggio Emilia – ITALY
Registration number: 1232
Sound power level 113 114
guaranteed 96 96 dB(A)
measured 95,40 95,48 dB(A)
Year of the firsttime CE marking: 2005
Serial number, Build year Î Type plate on the machine
This Declaration of Conformity will become invalid if the
product is modified, changed or altered without prior
approval.
Sindelfingen, 1st January 2008
SOLO Kleinmotoren GmbH Wolfgang Emmerich
Managing Director
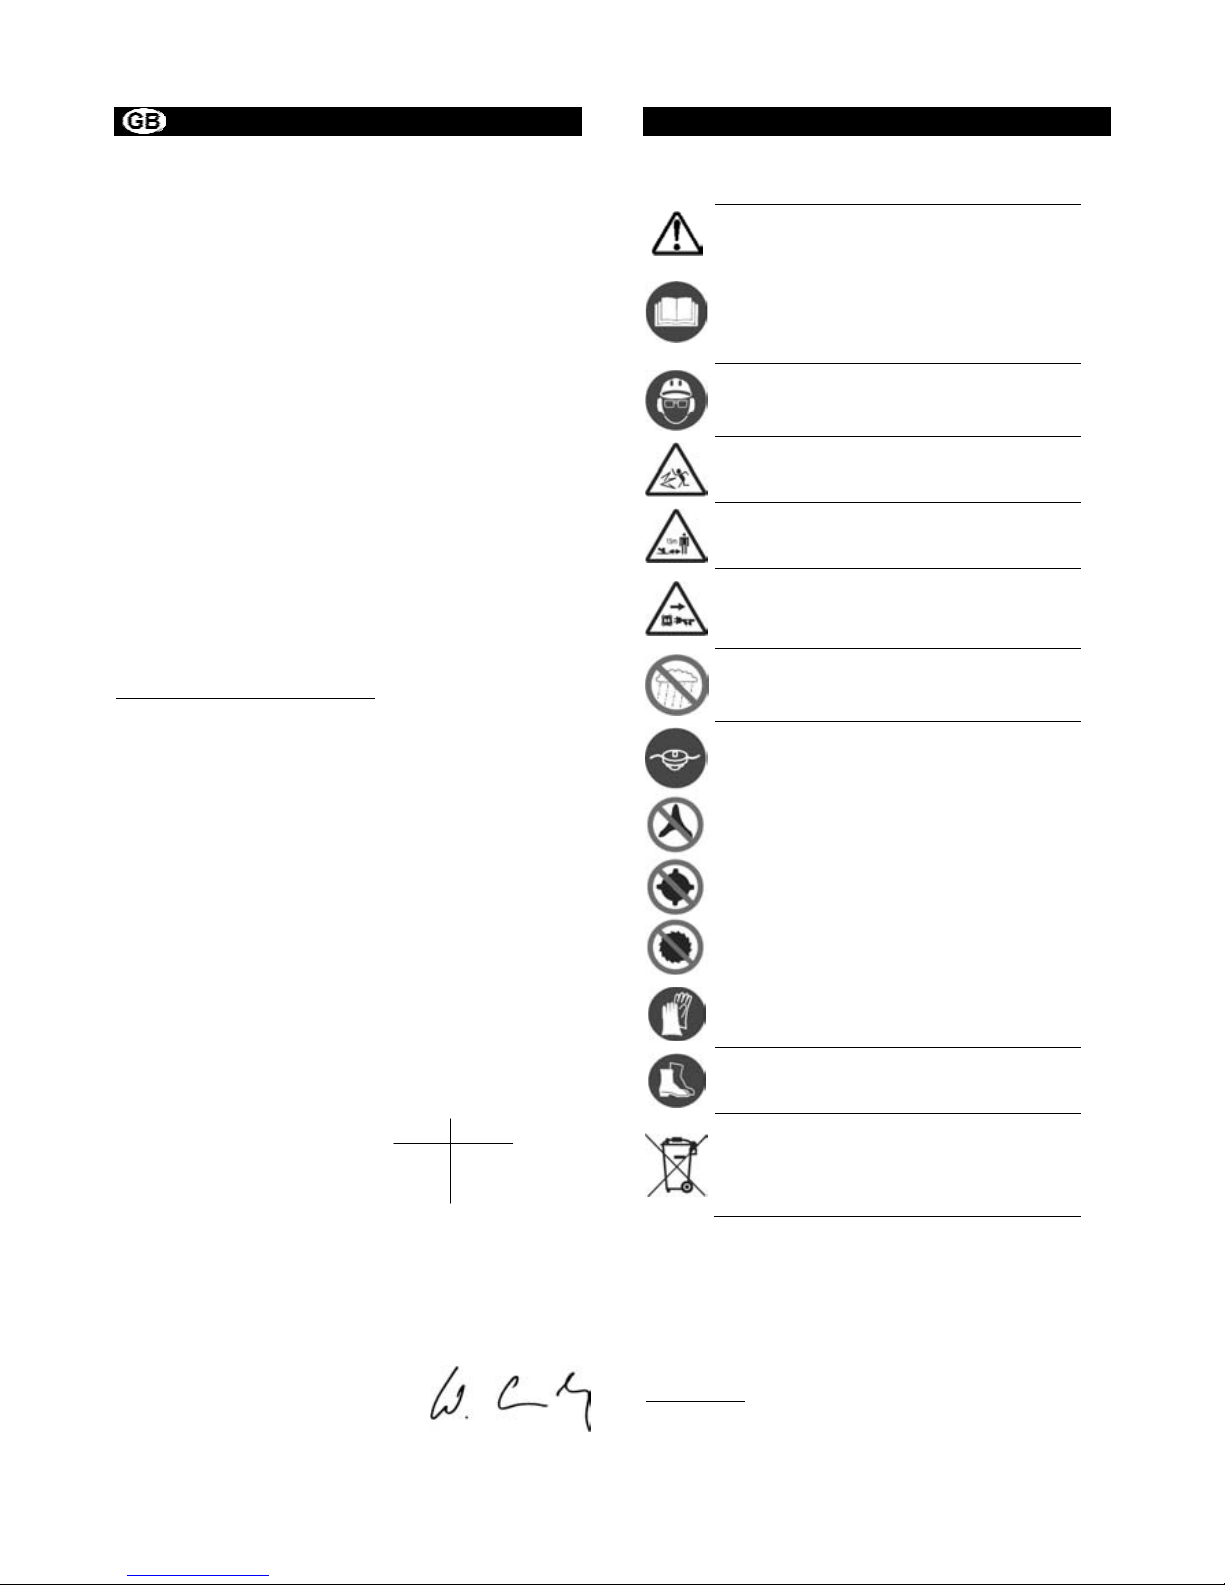
Symbols
The following symbols are used in this manual and
on the product:
Always handle this power tool with
particular care
Read these operating instructions
carefully before undertaking any
maintenance, installation and cleaning
steps
Wear ear defenders and a face shield
before starting the motor.
Please note: objects may be thrown out
and high
Maintain a minimum distance of 15
metres bystanders
Immediately pull the mains plug from
its socket if the supply cable or
extension cable are damaged
Never use this power tool in the rain
No use of metal cutting blades allowed.
Use only permitted string head cutting
tools for work process.
Wear protective gloves when handling
and working with the equipment
Wear solid shoes, preferably safety
shoes with a good profile
Electrical equipment is unsuitable for
domestic waste. Have the equipment,
accessories and packaging recycled in
an environmentally responsible way.
Packaging
The packing materials used to protect the unit
against damage during transportation are cartons
made from pulp, which can be re-used or recycled.
Page 3

ENGLISH 3
Index
Page
1. Safety regulations ..................................................................................................................... 4
1.1 Correct use / General safety instructions 4
1.2 Working clothes 4
1.3 When transporting the equipment 4
1.4 Mains supply and extension cable 5
1.5 Before connection to the mains supply 5
1.6 Working with the machine 5
1.7 Maintenance, cleaning and repairs 5
2. Standard delivery ...................................................................................................................... 6
3. Control and function elements ................................................................................................6
4. Preparing the equipment for use............................................................................................. 7
4.1 Loop handle assembly 7
4.2 Fitting the nylon head 7
4.3 Shield installation 7
4.4 Connection to the mains supply 8
5. Using your brushcutter ............................................................................................................. 8
5.1 Scope of Application 8
5.2 Correct brushcutter operation 8
5.3 Adjusting the cutting line 8
5.4 Troubleshooting 9
6. Specification .............................................................................................................................. 9
7. Operating and maintenance instructions.............................................................................. 10
7.1 General operating and maintenance instructions 10
7.2 Cleaning 10
7.3 Shutdown and storage 10
8. Guarantee................................................................................................................................. 11
9. Parts subject to wear and tear ............................................................................................... 11
Page 4

Safety regulations
ENGLISH 4
1. Safety regulations
1.1 Correct use / General safety instructions
The electric trimmer must only be used to cut grass, reeds, weeds and wild growth at ground level. The brushcutter must not
be used for any other purposes (see chapter 5.1 "Scope of Application").
Read the operating instructions carefully before taking this equipment into service and keep them in a safe
place. Use this power tool with particular caution.
Non-observance of safety instructions can lead to a risk to life. Also observe any regulations from your professional body.
These operating instructions must always be available at the place of work. All individuals instructed to work with the
equipment (including maintenance, care and repair), should read these instructions.
• You should request and receive instructions from the vendor on the safe operation if you are using this type of product
for the first time.
• Never expose this power tool to rain. Never use this equipment in moist or wet conditions.
• Children and young persons under the age of 18 years may not work with this power tool, with the exception of young
people over the age of 16 years who are being trained under supervision.
• Keep bystanders and animals away from the working area. Maintain a minimum distance of 15 m. When working near
thickets, be aware that children and animals may be hidden there. Immediately stop the machine and the cutter if any
person or animal comes close to the working area. The operator is responsible for any accidents or damage caused to
individuals or property.
• This machine may only be passed on or lent to third parties if they are familiar with the safe use of this product and with
these instructions. Always supply the manual with the machine.
• Ensure you are rested and in good health when using this machine.
• Persons under the influence of alcohol or drugs, including prescription drugs, are not allowed to use this machine, as their
ability to quickly react to potential danger may be impaired.
• Never alter, change or modify any safety equipment or functional assemblies on this machine.
• Only use this machine if it is in good, safe condition. Always check the machine prior to use. Risk of accident!
• Only use those accessories and attachments that have been supplied by the manufacturer and that are expressly approved
for attachment.
When using a nylon head, never replace a plastic line with a steel line. Always use the appropriate guard
with each cutter.
• Before replacing the cutting blades, always first stop the motor and pull the mains plug from its socket to prevent an
accidental starting of the motor.
• The reliability and safe operation of your machine depend on the quality of parts used with the machine. Only use
original spare parts. Original spare parts are identical with genuine production parts and guarantee best quality in
material, dimensions, function and safety. Original parts and accessories are available from your specialist dealer. Your
dealer has been supplied with appropriate documentation to determine the correct parts. Your dealer is frequently
supplied with updates about improvements to the equipment. Please note that the use of non-original parts will void your
warranty.
• Always store the machine in a safe place and in such a way that it will not pose any danger. Stop the motor when the
machine is not used.
Persons who disregard safety instructions, operating or maintenance instructions may be liable for any damage or
consequential losses.
1.2 Working clothes
To prevent injuries, always wear suitable clothing and safety equipment when working with this power tool. This clothing
should be practically oriented to the application (for example a tight fitting work suit), but should not be confining.
Never wear scarves, ties, jewellery or other items of clothing, which might get caught in the equipment, in brush or on
branches. Safely tie back long hair (use a cap, helmet or similar).
Wear sturdy shoes with a good profile - ideally safety shoes.
Wear protective gloves with non-slip palms.
Use ear defenders and/or a visor for protection against flying objects or objects caught up in the
turbulence (protective goggles for example).
1.3 When transporting the equipment
• Always turn off the motor when transporting the machine.
• Never carry or transport the brushcutter with the motor running.
• Always cover the cutters with blade protectors, when transporting the equipment over longer distances.
Page 5

Safety regulations
ENGLISH 5
1.4 Mains supply and extension cable
• Only extension cables approved for outdoor use with a minimum
cross-section as shown here are permissible as mains extension
cable.
- DIN 57282/H07 RN-F
- The cable connectors must be made from rubber or must
be covered in rubber.
- When using a cable reel, fully unreel all cable.
• Check whether the mains supply voltage matches the details on the type plate of the power tool.
• The mains socket must be protected at least by a 16 A fuse.
• For your personal safety, we recommend the use of a 30 mA RCD.
1.5 Before connection to the mains supply
Before taking the power tool into use, check it fully for perfect condition.
• The ON/OFF switch must be able to move freely and must automatically return into the stop position.
• The cutters and guard must be tightly secured and in perfect condition.
• The mains cable, which is part of the equipment, and the extension cable must be in perfect condition.
Should the check reveal any irregularities or recognisable damage (also to the frame) or reduced efficiency of the machine, do
not commence work. Take the power tool to a specialised workshop and have it checked.
1.6 Working with the machine
• Only use this power tool when it is complete and in a safe condition.
• Work conscientiously, thoughtfully and calmly, and do not endanger third parties.
- Pay attention to good visibility and lighting conditions.
- Always remain within earshot of other people who can provide help in case of emergency.
- Plan for timely work breaks.
- Pay attention to possible hazards and take appropriate precautions. Be aware that wearing ear defenders reduces the
ability to perceive noise. This includes sounds alerting to danger such as signals, shouts, etc. that can go unnoticed.
- Exercise caution when the ground is wet or covered in ice and snow, on overhangs, or uneven terrain. There is an
increased risk of slipping!
- Pay attention to the risk of stumbling and obstacles, such as tree roots and stumps, edges, etc. Pay particular attention
to safety when working on slopes.
- Before commencing work, check the working area for stones, broken glass, nails, wire or other solid objects and remove
such debris to prevent them being picked up and thrown out by the cutting tool.
- Ensure that, when you start the machine, it contacts neither objects nor the ground.
- Always hold this power tool firmly in both hands, and ensure your safe and firm foothold.
- Always hold the cutters below hip level. Never lift a rotating cutter off the ground.
- Keep all parts of the body away from the rotating cutting tool.
- Always keep the mains supply or extension cable away from the cutting tool.
- Use a correct operating mode (see Chapter 5.2 "Correct brushcutter operation").
- Please note that noise also impacts on the environment. Observe the quiet times that can vary from place to place.
• Stop the motor if you notice a difference in the operating characteristics of the brushcutter.
• The cutter continues to rotate for a short time after releasing the ON/OFF switch. Ensure that the cutter has come to a
complete standstill before parking the machine.
• Before any contact with the cutter – even when clearing a blockage or jamming of the cutter – switch OFF the motor, wait
until the cutter has come to a complete standstill and pull the mains plug from its socket.
1.7 Maintenance, cleaning and repairs
Only carry out those maintenance jobs and repairs, which are described in this manual. A specialised service centre will carry
our all other jobs.
• Before cleaning, maintenance or repairs, always switch OFF the motor and pull the mains supply plug from its socket.
• For any repairs only use original parts from the manufacturer.
• Never hose down the power tool – not even for cleaning.
Cable length up
to
Minimum cable cross-
section
7 m 1,2 mm
2
15 m 1,6 mm2
30 m 2,0 mm2
Page 6

Standard delivery ; Control and function elements
ENGLISH 6
2. Standard delivery
• Electric brushcutter partially assembled; the following components are supplied separately and require
assembly
• Handle and all parts required to complete the assembly
• Guard, Guard bar, line trimmer and all parts required to assemble the shield
• Nylon head cutter with all assembly parts required for fitting the nylon head
• Retaining pin (allen wrench)(for fitting the cutter)
• Instruction manual
3. Control and function elements
1. Locking button
2. ON/OFF switch
3. Handle on the motor casing
(r.h.)
4. Loop handle (l.h.)
5. Safety stop
6. Guard
7. Nylon head
8. Nylon line
9. Mains cable
Type plate:
a: Type designation
b: Serial number
c: Build year
d: Double-insulated
Fig. 1
Page 7

Preparing the equipment for use
ENGLISH 7
4. Preparing the equipment for use
For shipping purposes, the brushcutter is partly
disassembled and has to be reassembled prior to
use.
Only use the brushcutter after it has been fully
assembled.
4.1 Loop handle assembly
• Install the safety stop (5) pointing to the left
(viewed from the operator position).
• Initially tighten the screws only lightly.
• Push the handle, in accordance with your body
size, into its optimum position.
• Then tighten the screws.
4.2 Fitting the nylon head
Lock the drive shaft with the locking pin (allen
wrench). Wind the line head clockwise onto the
drive shaft.
Note: When adjusting the cord length (see
"Adjusting the cutting line", chapter 5.3), the cord
trimming
blade in the contact protector
automatically cuts the cord end to the correct
length, as soon as the tool is started.
Please note: Never start the brush cutter without
fitted line trimming blade.
To replace the line head, unwind it, with the drive
shaft blocked, by rotating it anti-clockwise.
4.3 Shield installation
Guide the contact protector from the top over the
shaft tube into the correct position. In the correct
working position, the protector must point towards
the user.
Also guide the fixing part over the shaft tube into
its correct position, so that the open part of the ring
points towards the user.
Secure the contact protector and fixing part with
the four screws (14), washers (15) and spring washer
(16).
Fig. 2
Fig. 4
Fig. 5
Fig. 6
Fig. 3
Page 8

Preparing the equipment for use ; Using your brushcutter
ENGLISH 8
4.4 Connection to the mains supply
Always secure the extension cable on the cable
retainer (23) on the motor housing.
To isolate the equipment, always pull the mains
plug from its socket, i.e. never pull on the cable to
remove the plug.
5. Using your brushcutter
5.1 Scope of Application
Only use brushcutters equipped with a nylon head
for cutting grass – particularly suitable around
obstacles - and for trimming light weeds and wild
growth near ground level. The nylon head is
particularly suitable for a soft cut, e.g. for clean
trimming around trees and posts.
5.2 Correct brushcutter operation
Observe the relevant safety instructions when using
the brushcutter.
Carry the power tool on your r.h. side.
Approach the area to be cleared with the motor
switched OFF; then start the motor before dipping
the cutter into the working area.
With your thumb, initially press the locking button
(1) and then additionally the ON/OFF switch (2) with
your index finger. Then release the locking button
again. Release the ON/OFF switch to switch the
motor OFF again.
Dip the cutter 2/3 into the growth and use the
equipment like a scythe by stepping forward in
small steps and cutting from side to side.
Immediately switch OFF the motor, if you notice any
unusual vibrations or cuttings have wrapped
themselves around the cutting tool or have jammed
near the guard. Reduce the cutting tool speed by
pushing the cutter down onto the ground, until it
has come to a complete standstill. Pull the mains
plug from its socket and clear the cutting tool of
grass, brush etc. Check the entire power tool for
perfect condition.
When using the line head, only work with an
approved line length. If the contact protection
shield is properly fitted, cutting lines will always be
trimmed to the permissible length (trimming blade
integrated into the contact protection shield).
There is a high risk of injury, and the motor is
subjected to excessive loads leading to a risk of
damage, if nylon lines are left too long.
5.3 Adjusting the cutting line
When using a semi-automatic nylon head:
(schematic diagram)
Fig. 8
Fig. 10
Fig. 7
Fig. 9
Page 9

Using your brushcutter ; Specification
ENGLISH 9
Several times, tip down the equipment with
rotating nylon head onto covered ground. This
dispenses nylon line in steps. Per release, approx. 30
mm line length will be dispensed. Excess line
lengths will be trimmed to size by the line trimming
blade.
5.4 Troubleshooting
Fault Possible cause Remedy
Motor will not start
1. No power supply
2. Cutting tool
jammed/blocked
1a.Check the mains supply and the extension cable.
1b. Check the mains socket (e. g. different
equipment plugged in).
2. Pull the mains plug and clear the cutting tool.
The cutter does not rotate,
even though the motor is
running.
1. Flexible shaft broken
2. Flexible shaft incorrectly
assembled
1. Contact your local specialist.
2. Contact your local specialist.
Cutting line will not unreel 1. Line spent
2. Line reel jammed, line
twisted
1. Pull the mains plug and load a new cutting line.
2. Pull the mains plug, open the nylon head,
rewind the line, clean the reel and re-assemble
correctly.
6. Specification
Electric brushcutter 113 114
Motor type / Motor power W Electric motor / 700 Electric motor / 850
Mains voltage / frequency V / Hz 230 AC / 50
Protection class II (double-insulated)
Extension cable (accessory) DIN 57282/H07 RN-F
Rated speed of the cutter 1/
min
7000-8000 7000-8000
Drive shaft – property / diameter mm Flexible / 6,2
Shaft tube – material / diameter Ø mm
Steel / 25 Aluminium / 25
Standard cutting tool 2-line nylon head; semi-automatic;
square section and twisted line Ø 2.0 mm
Cutting diameter Ø mm 370
Dimensions - Height / Width / Length cm 149 / 49 / 35
Weight w/o guard and cutting tool kg 4,6 4,6
Weighted effective acceleration (EN 786 Appendix D)
Handle r.h. side / handle l.h. side m/s
2
6,16 / 4,32
6,07 / 6,18
Sound pressure level LPeg (EN 786 Appendix E) dB(A) 75,8 76,6
Sound power level L
Weg
(EN 786 Appendix E)
actual / guaranteed 95% dB(A)
95,40 / 96
95,48 / 96
/
Page 10

Operating and maintenance instructions
ENGLISH 10
7. Operating and maintenance
instructions
7.1 General operating and maintenance
instructions
The maintenance and the repair of modern
machines as well as their safety-relevant assemblies
require qualified specialised training and a
workshop equipped with special tools and test
equipment. Consequently the manufacturer
recommends that all tasks not described in these
operating instructions be carried out by a specialised
workshop. That specialist has the required training,
experience, and equipment at his disposal, to
provide you with the most cost-effective solution for
such work. He will provide additional help in word
and deed.
After a running-in time of app. 5 hours, check all
accessible screws and nuts for tightness and
retighten them, if required.
Inspect the cutting tool regularly (short intervals)
and when you notice unusual vibrations or the
cutting area or guard has become jammed/blocked.
For this switch OFF the motor, and the cutting tool
must be at a complete standstill. Pull the mains plug
and remove grass cuttings, brush etc. from the tool
base.
7.2 Cleaning
Before cleaning always switch OFF the motor and
pull the mains supply plug from its socket.
Never hose down this power tool.
• Clean cuttings from the cutting area with a hand-
held brush.
• Only use a dry or slightly damp cloth to clean the
entire machine. Never use solvents or abrasive
cleaning agents. Before connecting the
equipment to the mains supply, the motor casing
and its interior must not be damp.
7.3 Shutdown and storage
Store the equipment in a dry secure location. Open
flames and similar should not be nearby. Prevent
unauthorised access – particularly by children.
Page 11

Guarantee ; Parts subject to wear and tear
ENGLISH 11
8. Guarantee
The manufacturer guarantees trouble-free quality
and will cover the cost of replacing parts which are
found to be faulty in material or workmanship
within the prescribed guarantee period after the
date of purchase. Please note that specific
guarantee conditions may vary from country to
country. If in doubt, ask your equipment vendor. He
is responsible for guarantee matters.
We hope you will understand that we cannot be
liable for damage resulting from the following
causes:
• Non-compliance with the operating
instructions.
• Neglecting essential maintenance and repair
work.
• Wear in normal use.
• Obvious overload by continuously exceeding
the maximum performance limit of the
product.
• Using non-authorised tools.
• Use of force, incorrect treatment, misuse and
accidents.
• Damage from excessive heat due to dirt build-
up around the cooling fan housing.
• Attempted adjustments and repairs by
unqualified persons.
• Use of unsuitable spare parts or third party
parts, if these are the cause of the defect.
• Damage caused by using the product in the
hire or rental industry.
Normal cleaning, adjustments or maintenance work
fall outside the guarantee provisions.
A service centre authorised by the manufacturer
must carry out all guarantee work.
9. Parts subject to wear and tear
Various parts are subject to application-specific or
normal wear and must be replaced in good time,
when required. The following parts are subject to
normal wear and are not covered by the
manufacturer's guarantee:
• Cutting tools
• Lubricants
• Nylon line
In the best interest of continued technological
progress we reserve the right to change the design
and configuration of any product without prior
notice.
For that reason, no claims can be accepted with
reference to text and illustrations in this manual.
Page 12

SOLO
Postfach 60 01 52
D 71050 Sindelfingen
Tel. 07031-301-0
Fax 07031-301-130
info@solo-germany.com
SOLO
P.O.Box 60 01 52
D 71050 Sindelfingen
Germany
Phone+49-7031-301-0
Fax +49-7031-301-149
export@solo-germany.com
 Loading...