


R
GEOTAGGER
Pro2-EOSPro2-EOS
User Manual (V1.0)
Solmeta Technology Co., Ltd
Copyright ©2014 Solmeta Technology Co., Ltd. All Rights Reserved


1
2
3
3
4
5-6
7-10
11
13-14
15-17
18
19
20
21
22
Safety I n f o rmation............................ . . . . . . ................................... . . . . . .. ........
Introdu c t i o n . ............. .................................... . . . . . . .....................................
....... . . . . . .................................... . . . . . ..............................
LC D d i s p l ay introduction
Custom se t t i n g i n structions
Contents
R
Pro2-EOS
....... . . . . . .................................... . . . . . ....................
Turn the receiver on and off
Parts of the Pro2-EOS
Recording GPS data (geotagging)
... ....... . . . . . .................................... . . . . . ....................
.. ........ . . . . . .................................... . . . . . .................
....... . . . . . .................................... . . . . . .............
Logging t h e Route Traveled
Using the c o m p a s s
Warranty
Magneti c d e c l i n ation adjustment
Specifi c a t i o n
Mountin g i l l u s t ration
Contact / S e r v i c e
Compass c a l i b ration
....... . . . . . .................................... . . . . . ...............................
....... . . . . . .................................... . . . . . .............................
....... . . . . . .................................... . . . . . .............
....... . . . . . ............ ........... . ....... . . . . . .................................... . . . . . .....
....... . . . . ............ .................... . . . . . .................................
....... . . . . . ..... ............ .............. . . . . . .................................... . . .


To prevent damage to this GPS unit or injury to you or others, please read the following safety instructions before
using.
Do not disassemble
Touching the product’s internal parts could result in injury. In the event of malfunction, the products should be
repaired only by a qualified technician. Any unauthorized disassembly or modification may void the unit’s
warranty.
Keep the GPS unit dry
Do not immerse in or expose to water or handle with wet hands. Exposing the GPS unit to water could result fire or
electric shock.
Do not subject to high temperatures
The GPS unit can be damaged by exposure to fire or high temperatures. Do not leave the unit in areas subject to
extreme heat. Failure to observe this precaution could result in damage to the casing or internal circuitry, and
could potentially cause a fire.
Keep out of reach of children
This product contains small or potentially dangerous parts that could prove hazardous to children. Failure to
observe this precaution could result in injury.
Safety Information
R
1
Pro2-EOS

Introduction
2
R
Th ank you for your purchase of a Solmeta Pro2- Eos. T he Pr o2-E os GPS Receive r is a ne wly de vel oped u nit
sp ecia lly designed fo r phot ographe rs who use Ca nnon EOS System and en joy g eota ggin g photos. In
ad diti on, it can ea sily be use d inde pend entl y as a GP S track lo gger t o pro vide r eal time ge ographi c
co ordi nate s logging.
Be sure to read this manua l thor ough ly be fore u se.
Features:
·LC D with ba c kligh t d ispla ys all ma j or GPS in forma t ion in re a l time.
·Record l o catio n i nform ation (l atitu d e, long i tude, a ltitud e, and sh o oting t i me (UTC)) dir e ctly to y our
ph o to file 's meta d ata.
·3- axis el e ctron i c compa ss prov i des acc urat e s hooti n g direc tion. No t only th e d irect i on data c an be
vi e wed in LC D, bu t i t also be a dded in th e image f i le.
·Us e i ntern al recha rgeab l e Li-io n b atter y as its po w er sour c e.
·A Lo c k funct ion can be e nable d , allow i ng the re ceive r to reus e t he last k n own pos ition fo r subse q uent
im a ges if th e GPS sig n al is los t .
·Lo g ging Routes t rave led wit h t he rece iver.
Ca n u sed as a GP S logge r. A la rge 2GB c apacit y memor y can reco rd up to 4, 9 00,00 0 positi ons. Lo g f iles
ca n b e direc tly rea d o n a PC comp u ter or Ma c OSX sys t em, lik e a USB fla s h drive r. No softw are is ne eded.
Packin g l ist
Co n firm th at the pac kage co n tains t h e follo wing ite ms:
·Pr o 2-Eos G P S recei ver
·Co n necti n g cable
·US B c able
·Ma n ual
·St o rage b ag
·Ca m era st rap ad a pter
Pro2-EOS

R
3
Parts of the Pro2-EOS
① Power switch
② ENTER b u t ton
③ MENU button
④ LC D
⑤ USB te r m inal
⑥ Mountin g f o o t
Ch a rging
1. U se the su pplied U SB cabl e t o conne c t the dev ice to a co m puter, ca r charge r or AC ada p tor wit h a USB
po r t. The re ceive r c an be cha rged us i ng any U S B port th a t prov i des the s tandar d 5 volts .
2. T he devi ce shoul d be full y c harge d i n about t wo and a ha l f hours . T he indi cator on t he LCD sc reen wi l l
sh o w the int ernal ba ttery ’s cur rent level of cha rge.
·In t h e custo m settin g, the cu r rent vo ltage o f b atter y can be ch e cked a nytime .
·Wh e n the int ernal ba ttery i s c lose to b e ing exh auste d , the bat t ery ind icator w ill fla s h.
Turn the receiver on and off
Pr e ss the po wer swit ch for 2 se c onds to t u rn the re ceive r on.
Pr e ss the po wer swit ch for 3 se c onds an d c onfir m with th e bu t ton to tu rn the rec eiver o ff. [E N TER]
Bu t ton Def initio n
[M E NU] but t on -> Cha nge & Sel e ct func t ion
[E N TER] bu t ton -> Co nfirm se lect & en t er the cu rrent se tting o p tion
Pro2-EOS

4
R
LCD display introduction
Ma i n Displ ay
1. Turn on t h e recei ver. The LC D shows t he firm ware ve rsion f i rst, th en the lon gitud e .
2. T here ar e 9 displa y optio ns which w ill be di s playe d on the LC D. Th i s is the fi rst lev el of opti ons. Pr e ss
th e [ MENU] b u tton to a ccess a n d scrol l t hroug h the LCD d isplay s elect ions.
3. T he numb er displ ayed i n t he top le ft corne r indic a tes sig n al cond itions , 03 mean s t hat the u nit
ac q uires t w o satel lites, 0 9 means t h at the un it acqu i res thr e e satel lites.
LO N > : Long itude , “ W”= -w e st, “E” = - east<
<L A T >: La t itude , “ S”= -so uth, “N” = -nort h
<A L T >: Al t itude ( t he unit o f “meter” or “f eet “is availa b le via se tting.
M- mete r, FT- feet )
<D I R >: Di r ectio n ( M a gneti c north or t rue nor t h is ava ilabl e v ia sett ing.
MN - M a gneti c n orth, T N- True no rth)
<T I M >: Ti m e ( U TC or lo cal time i s avai lable v i a setti n g. U-UTC , Llo c al time )
<D A T >: Da t e (time z one=U TC, dat e format c an be set )
<S P E >: Mo ve spee d (the uni t of “kM”, “MIL” or “N ” i s ava i lable v i a
se t ting. K M - K ilome ter, MIL - m ile, N- naut ical mil e)
<G R A >: El e ctron i c leve l . The num b er at lef t is the un i t ’s c u rrent p i tch (el evat i on)
da t a. The nu mber at ri ght is th e r oll (ti l t) data . ( T he leve l zero ca n b e
co r recte d v ia sett ing)
<S E T Custo m setti n g. In thi s d ispla y, pres s bu tton and
th e c ustom s etting i s entere d. The Pr o 2-EOS o f fers fo llowin g16 cus t om
se t ting op t ions.
? : [E N TER]>
Pro2-EOS

R
Custom setting instructions
Ti p s
·Wh e n the uni t is in cust om sett i ng menu , p ress sw i tch can r eturn to t he disp l ay menu。[P O WER]
Th e r eceiv er offe r s 13 seco nd leve l custom s ettin g s optio n s acces sible fr om the it e m Ma i n Displ ay
<S E T ? > [E N TER] [M E NU] Pr e ss to acces s the cus t om sett i ngs, th en repe atedly t o view ea c h of the
fo l lowin g o ption s.
1
(b a cklig h t setti ng, ON, OF F or DELAY. Dela y: 1, 2, 3, 4 o r 5 minute s. The de f ault
is 1 m inute . )
< >LE D
3
( M= m eter or F T =feet, m eter is t h e defau lt )< >Un i t of alti t ude
4
.T h e UTC ti me is rec e ived f r om the GP S s ignal a nd canno t be
ad juste d . The loc al time ca n be adju s ted to me e t the use r ’s lo c al time b y chang i ng
th e time zo ne. (U=U TC or L= Local ti me. UTC i s the def ault).
< >UTC Time or L ocal ti m e
5
( YY Y Y.MM.DD,DD.MM.Y Y YY or MM. DD.Y YYY, < >Da t e forma t YY Y Y.MM.DD i s the defa ult.)
6
(K M =kilo m eter, MIL = mile, o r N=naut ical mi l e. KM is th e d efaul t )< >Un i t of spee d
7
2
< >LO CK (Aut o matic ally use t he last k n own pos i tion or n ot use, LOCK-use or U NLOCK-d o
no t u se, LO C K is the de fault )
Pro2-EOS
5
< >Lo g ging in t erva l set
[E N TER] bu tton to s et the i nterval time . The in t erva l time c a n be set a s 1, 5, 10 , 15,
30 se c on ds, 1, 2, 5, 10 , 2 0 o r 3 0 m i nu tes . 1 0 s e c. i s t h e d e f aul t .
To d isabl e t h e f uncti on press the [ME NU] butt o n u ntil DIS ABLE is sh o wn on the LCD.
Pr e ss [ENT E R] to con firm yo ur selec tion.
. Th e n umber d isplayed sho w s the av ailab le memor y. Pres s the

R
6
Custom setting instructions
8
<C o mpass f u nctio n on>. Se t t he comp a ss func tion on or o ff.
<C o mpass c a libration > ( refer t o p age15 )
9
10
<D i recti o n prefe rence >
op t ions. “ M N”=Ma gnetic N orth (d e fault ) , “TN”= True No rth. Ma g netic d e clina tion can
al s o be adju sted.
. Ma g netic n orth sta ndard o r True No r th stan dard are avai l able
11
<L e vel ze r o corre ction >
12
<B e ep on>. S et the aud ible be e p on or off.
13
<C u rrent b a ttery v oltag e>
Pro2-EOS

Recording GPS data (geotagging)
R
7
1.Co n n e ct t h e rec e i v e r to a co m p a t ib l e Camera
1. Turn the camera.off
2. The receiver is equipped with a mount that fits the camera accessory shoe. Slide the receiver onto the
camera accessory shoe. Then connect it to your camera’s accessory port via the connecting cable.
Turn on the Pro2-EOS receiver and the camera. If the receiver is properly connected to the camera, GPS signal
status is also shown on the camera LCD panel or LCD monitor. The GPS icon is only displayed when the
receiver is communication with the camera.
Blinking GPS: Signal not acquired
Constant GPS: Signal acquired
2. A c q u ir e G PS s i g na l s
To acquire GPS signals, take the receiver and camera outdoors where the sky is unobstructed and hold it up.
At first, you will see a flashing GPS symbol in the top left of the receiver’s LCD, indicating that the receiver is
searching for satellite signals. After a few moments, the GPS symbol will be steady, indicating acquired GPS
signals.
Pro2-EOS
Canon EOS 650D main screen

Recording GPS data (geotagging)
R
8
3. V i e w in g G PS i n f or m a t i on
Check GPS information as follows when the receiver is connected to a camera that displays
settings] in the menu.
[GPS device
Select [GPS device settings]
On the EOS-1D X and other models that display the following screen, set [GPS device] to [Enable] , and then select
[GPS device settings].
Pro2-EOS
Canon EOS-1D x back LCD screen

9
R
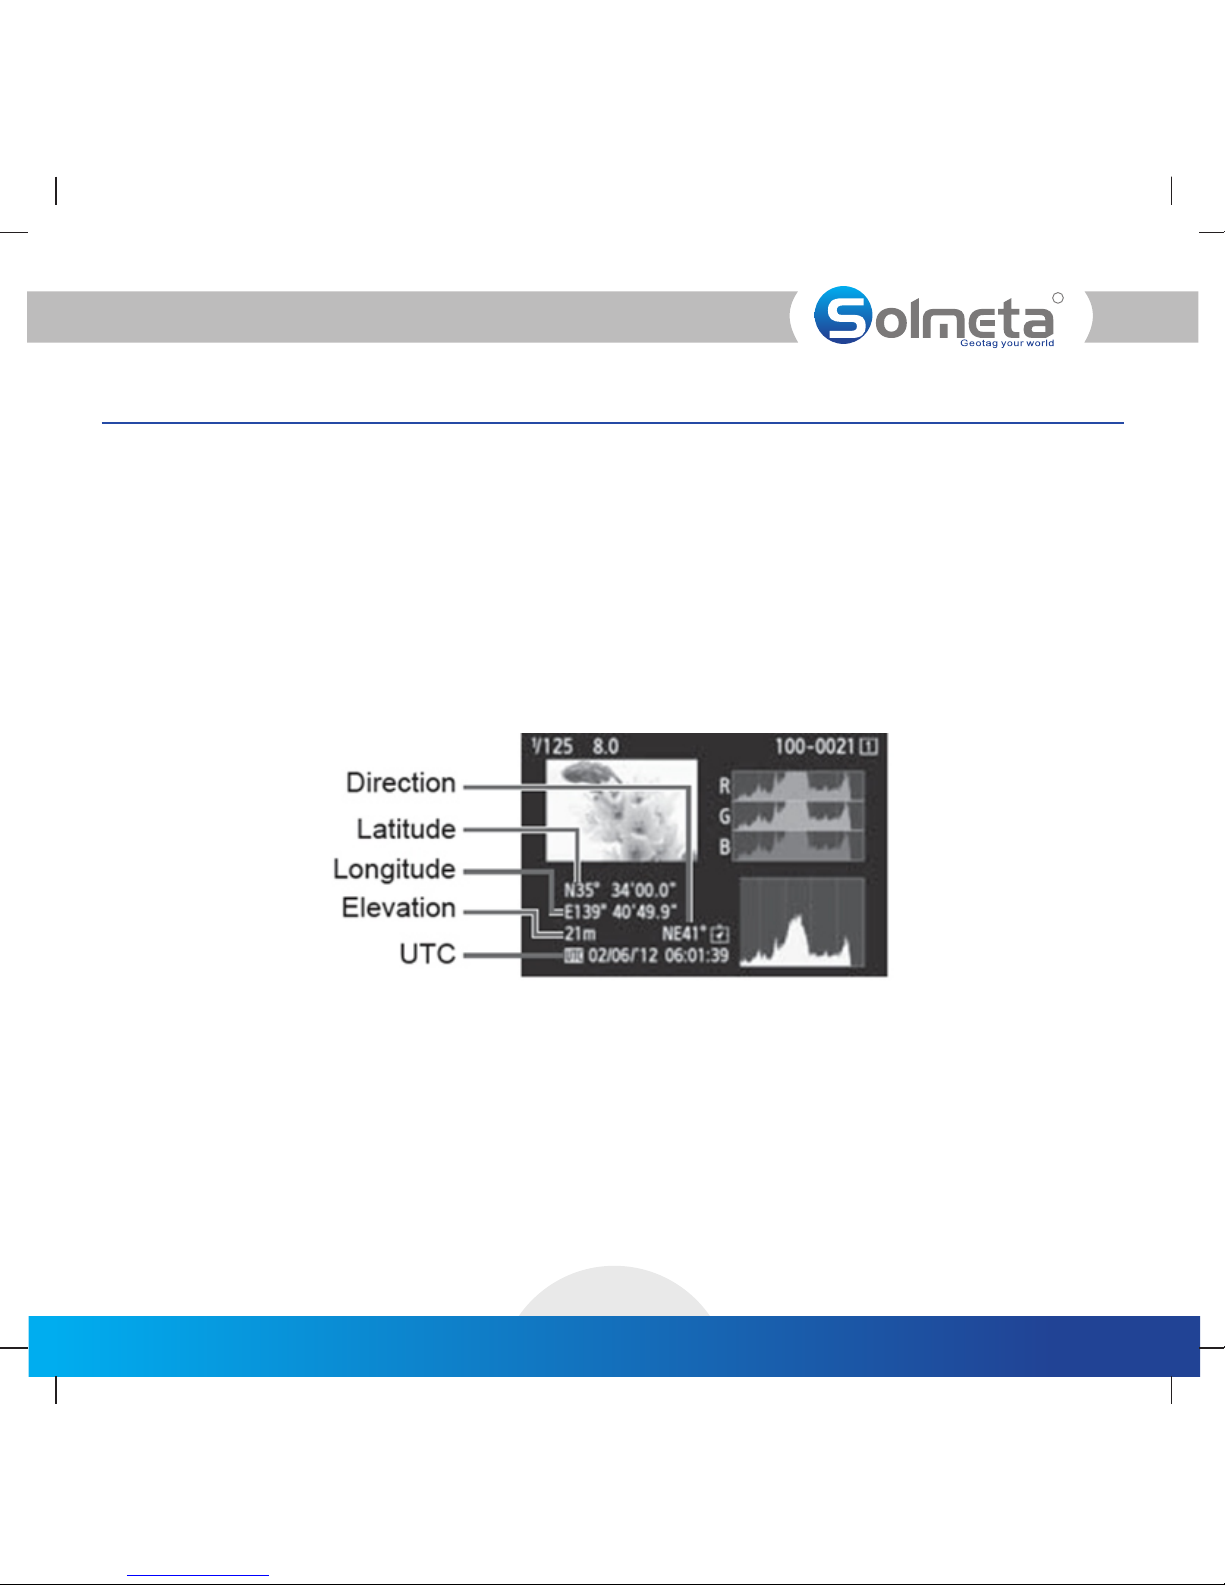
In t h is samp le scree nshot , in d icate s t hat the c amera was fac i ng 45 nor theast .[D i recti o n NE 45°]
[U TC] (Co ordina ted Uni versa l T ime) is e s senti ally the s ame as Gr e enwic h Mean Ti m e.
Th e i con ind icate s s ignal c o nditi o ns. Whe n is d i splayed, ele vati o n can als o be reco r ded.
Ho w ever,
<3 D >
el e vati on cann o t be reco r ded whe n is d i splay ed.<2 D >
Se l ect , de t ailed G P S infor matio n i s displ ayed. [G P S infor mation d isplay ]
Pro2-EOS
Recording GPS data (geotagging)
4. Taki n g phot o s and g e o t ag g i n g th e imag e s
Take photos as you would normally. The GPS data is recorded directly onto the photo's metadata EXIF. as you
shoot.
Since the receiver has a built-in electronic compass, the images can also be tagged with the shooting direction.
*EOS 7D does not support tagging of the shooting direction.
*If the heading data is not accurate, it will be necessary to perform a compass calibration. Please refer to the
calibration instructions.
R
10
5. G e o t ag g i n g inf o r m ati o n
Tips
·If a photo is taken when the receiver is off or it has not yet obtained a GPS lock, the image will be recorded
normally but without any GPS data.
·If you take photos in situations where the GPS signal is lost after it was already acquired, such as indoors,
under tree coverage or near tall buildings, the lock function, which is enabled by default, will reuse the last
known position for subsequent images.
Only when the receiver is kept on, the Pro2-EOS able to provide the last known GPS information. If you turn
off the receiver, the stored GPS data becomes invalid. The LOC symbol is displayed on the LCD to indicate
that the current GPS position is the recorded Lock data.
Pro2-EOS
Recording GPS data (geotagging)

Logging the route traveled
R
11
Th e r eceiv er can be u sed as a dat a logge r, wh ich rec ords the G PS posi t ion at re g ular in terva ls in its
in t ernal m emory.
Th e l og func tion is de fault . A s long as t h e recei ver’s GPS sig n al has be en acqui red, th e d aily lo g s are
au t omati c ally re corded i n the log f i le, eve n if the re ceive r i s not con necte d t o the cam e ra.
In t erva l time se t ting
Lo c ation i n forma tion is re corde d a t regul ar inter vals a l ong the r oute tr avel ed with th e recei ver. Dail y
lo g s are saved in th e f lash me m ory. Th e inter val ti m e can be se t via the cu stom se t tings a s d escri bed
be l ow:
1) Turn on th e r eceiv er and pr ess the but t on to acc ess the c u stom se t tings . The LCD w ill show [M E NU]
<S E T ? > flash i ng on the L CD scre en.
th e i con <SE T ? > i s flash ing in th e LCD
2) P r ess the but ton to go i n to the cu s tom set tings. T hen con t inue pr essing t he bu t ton [E N TER] [M E NU]
un t il the LC D displ ay is sho w n as:
Th e n umber i n the LCD s hows the a vai l able me m ory.
Wh e n the av ailab le memo r y is disp l ayed , press th e bu tton to a c cess th e inter val tim e settin gs. [E N TER]
Co n tinue t o p ress th e butto n to reac h t he desi r ed inte rval t i me, the n press th e butt on to [M E NU] [E N TER]
co n firm th e select ion. Th e i nterval time c an be set a t 1 , 5, 10, 15 , and 30 se c onds; 1 , 2, 5, minu tes or
DI SABLE . 1 0 secon ds is the de fault .
No t e: Disa bling th e log fun c tion is a l so ava ilabl e in the in t erva l time set ting.
Th e p ositi o ning in terva l can als o be set via t he conn e cting c a mera .
Se l ect <GP S device s ettin g s>
On e t he EOS- 1D X and oth er mode l s that di splay t h e follo wing scr een, se t < GPS dev i ce> to <E nable>
an d t hen sel ect GPS de vice se t tings .
,
Pro2-EOS

Logging the route traveled
R
12
Se l ect <Positi o n updat e timing >
Se l ect the t ime
Pro2-EOS

R
13
Using the compass
Th e bu i lt in an el ectron ic comp a ss. The d i recti on is reco rded in t h e EXIF me t adata w hen you
sh o ot. The d irecti on is als o l ogged i n t he dail y log file .
Pr o 2-EOS
Th e d irect i on can be v iewed i n t he LCD a s b elow.
In t h is samp le LCD, it indi c ates th at the re c eiver was faci ng 230. 5 ° south west. “ M N” show n
on t h e LCD in d icate s that dir ectio n i s of Magn e tic Nor th stand ard.
If y ou don’ t nee d t he dire ction da ta, you c ould tu r n off the d irecti on via Pr o 2-EOS c u stom se tting (r efer to
th e c ustom s etting 8 ) or conn e cting c a mera a s below.
Se l ect <GP S d evice s ettin g s>
On e t he EOS- 1D X and oth er mode l s that di splay t h e follo wing scr een, se t
<G P S devic e >to <En able>, and t h en sele ct GPS dev ice set t ings> .
En a ble the d i gital c ompas s
Se l ect <Di g ital co mpass> a nd pres s
Pro2-EOS
SET
< >

R
14
Using the compass
Se l ect an d p ress<E n able>
Pro2-EOS
SET
< >

R
15
Compass calibration
IM P ORTAN T:
ti m e you mo ve the de vice and c amera m ore tha n 100 mil e s or are us ing diff erent c a mera s. Also,
ca l ibra te the com pass if t h e direc tion sho wn as you s hoot se e ms inco r rect.
Th e c ompas s calibratio n c an be per formed v ia Pro2 – EOS rec e iver c u stom se tting or v ia came ra sett ing.
Be f ore usi ng the rec eiver, you must ca libra te the co mpass. Repea t this pr o cedur e e ach
3) P r ess the [ bu t ton rep eatedl y to acce s s the .ME N U] Cu s tom Set tings <C AL>
2. Perf o rm the ca libra ting as d e scrib e d below
1)H o ld the ca mera a n d the Pro 2 -EOS re ceive r
in y our han d , rotat e b oth dev ices sl o wly aro u nd the X-ax i s, Y-axi s, and Z-axi s . Do the ro t ation t wice
in e a ch axis .
Try to do the r o tatio n as a cons t ant spe e d. Each r otatio n takes a bout 5- 1 0 secon d s.
2)A f ter doi ng the rot ation i n e ach of th e three-axis, p ress th e bu t ton aga in to fini sh the
ca l ibra tion.
[E N TER]
Ca l ibra ting the c ompas s v ia Pro2 - EOS rec eiver c ustom se tting
1. E nable t h e compa ss cali b rati o n
ME N U] Ma i n Displ ay
1) W i th the da ta cable c onnec t ed, mou n t the rec eiver o n the cam e ra’s hot sh o e, then t urn the re ceive r
an d t he came ra on.
2) P r ess the [ bu t ton to ac cess the s ettin g < SET?> fla s hing on t he LCD
4) P ress th e butt o n again u ntil the LCD show s the fol l owing s c reen: [E N TER]
Pro2-EOS

R
16
Compass calibration
Ca l ibra ting the c ompas s v ia came ra set t ing
2. S et [Dig ital com pass] t o [ Enabl e ]
1. S e lect [G PS devic e setti n gs]
On e t he EOS- 1D X and oth er mode l s that di s play t h e follo wing scr een, se t [ to [ E nable ] ,
an d t hen sel ect [GPS d evice s e tting s ].
GP S d evice ]
3. S elect [ C alibrate di g ital co m pass] .
pr e ss to pre pare fo r c alibration .
Mo ve the ca mera a s s hown on t he next pa ge.
Pro2-EOS
SET
< >

R
17
Compass calibration
IM P ORTAN T: When y ou fini sh perfo rming t h e steps u pon, yo u must pre ss the [E N TER] bu t ton on th e Pro2-E OS
re c eive r. On ce you p r ess the [ E NTER] b utton, t he came ra disp lays th e follow ing scr e en whic h i ndica t es the
ca l ibra tion com plete d .
Pro2-EOS

R
18
Magnetic declination adjustment
Pr e ss the button t wice to s h ow the th e LCD dir e ction s etting .[E N TER]
If n e cessa ry, the d i recti on can al s o be magn e tic dec linati on adju s ted. Th i s adjus tment is s ometi m es
re q uired t o compen sate fo r t he diff e rence b etwee n m agnet i c north a nd true n o rth, wh i ch can vary
de p endin g o n one's g eogra phic po sition .
At t his tim e , point t h e recei ver to True Nort h (you sh ould fi n d True N o rth fro m your lo c ation w ith the
he l p of a map or a n accur ate mag netic co mpass ) . Press t h e [ENTE R] butto n again a n d turn th e receiv er
un t il the LC D shows t h e follo wing:
“0 0 00” mea ns that th e magne t ic decl i natio n is adju s ted.
Do i ng the ma gnetic d eclin a tion ad j ustme nt
Pr e ss the [M ENU] but ton rep e atedl y t o acces s the Cust om Sett i ng #10 <D IR>. “TN ” shown o n t he LCD
in d icate s t hat the d irect i on is of True Nort h s tanda rd.
Pro2-EOS

R
Specification
19
EOS 1DX, 5DMarkIII,7D, 70D,700D,650D, 100D
please refer to our website to learn the latest compatible camera models.
Reacqu i sitio n < 1sect .
Position
Without aid: 3.0M 2D-RMS
DGPS (WAAS,EGNOS,MSAS,RTCM): 2.5M
1Hz
80
NMEA 0813
High accuracy time
Shown on LCD as 0.1s. The time is from GPS. Accuracy< 100ns
Internal flash memory
size, file system
2G B, FAT 16
Op e rati ng tempe ratu r e
-1 0 °C-50°C ( -2°F ~ 12 2°F)
Ba t tery
60 0 mAh Li- ion
Op e rati on Curre nt < 60mA
Ch a rging C u rrent 3 00mA
Di m ension s (L x W x H)
Ap p rox. 5 6 x 3 6x 19mm
Ap p rox. 5 0 g (1.8 oz .)
MTK MT3329
66 parallel searching, 22 tracking channels.
Tracking sensitivity: -165dBm
Pro2-EOS

·So l meta Techno l ogy Co. L imite d g uara ntees t h is prod uct to be fr ee from m a nufac turing d efect s a nd
wo r kmans hip for a pe riod of t w o-ye ars fro m the dat e o f origi n al purc hase. Du ring th e t wo-y ear
wa rran ty peri o d, Solm e ta Tec hnolo g y will re pair or re place t h e produ c t free of c harge i f d efect ive.
Pl e ase ke e p your o r igina l i nvoi ce as pro o f of purc hase.
·Cu s tomer s are requ ired to c o ntact S o lmeta Techn o logy by e -mail ( i nfo@s o lmeta .com) fo r troub l e
sh o oting i ssues be fore re t urnin g t he prod uct.
·Cu s tomer s are resp onsib l e for shi p ping an d insurance ch a rges fo r retur n ing the p r oduct t o Solmet a
Techno l ogy.
·Ch a rges wi l l be impo sed for r e pairi n g the pro duct if it i s out of th e warra nty co vera ge perio d or if the
wa rran ty is invalid .
·Th e g uara ntee is n o t vali d if there i s evide n ce of dam age caus ed by inc o rrect u se, poo r m ainte n ance
or i f p erson s not aut h orize d by Solm e ta Tec hnolo g y have c arried o ut alte ratio ns or repa irs.
·For the de v ice to be u sed corr ectly, the user s hould s t rictl y a dhere t o all ins t ructi o ns incl u ded in th e
us e r guide a nd absta in from a ny acti o ns or use s that are warned a gains t i n the use r guide.
20
R
Warranty
In f ormat ion in thi s docum e nt is sub j ect to ch ange wit hout no t ice. So l meta Techno l ogy res erves t he
ri g ht to cha nge or imp rove t h eir pro d ucts an d to make c hange s i n the con t ent wit hout obl igati o n to
no t ify any person o r organ i zatio n o f such ch anges or i mprov ement s.
Do n o t drop: T he produ ct may ma lfunc t ion if su b jecte d to stron g shock s o r vibration.
Keep dry : This pr o duct is n o t wate r proof a nd may ma lfunct ion if im m ersed i n o r is expo sed to wa ter.
Avoid su dden ch a nges in t e mperature : S udden c h anges i n tempe ratur e, such as w hen ent e ring or
le aving a h e ated bu i lding o n a cold day, can ca u se cond ensati on to for m i nside t h e devic e. To pr event
co n densa t ion, pl ace the d e vice in a c a rryin g case or p l astic b a g befor e exposi ng it to su d den cha n ges
in t e mperature.
Keep aw ay from s trong m a gneti c f ields : Do not use o r store t h is devi c e in the vi cinit y o f equip ment
th a t generates s t rong el e ctrom agneti c radi a tion or m agneti c field s . Stron g s tatic c harges o r the
ma g netic f ields pr oduce d b y equip m ent suc h as rad i o tran smitt e rs coul d a ffect t he produ ct’s i ntern a l
ci r cuitr y. In ext r emely rare in s tance s , a stron g exter n al stat i c charg e may cau s e the dev ice to st o p
fu n ction i ng. If th is occu r s, turn t h e camera off an d d iscon nect and r econn e ct the Ge o tagge r Pro-Eo s.
In t h e even t o f a conti nued mal funct i on, con t act yo u r retai ler or Sol meta- autho r ized se rvice
re p resen tative .
Pr e cauti o ns for us e
Pro2-EOS

Mounting illustration
21
R
Pro2-EOS

If you have any questions or need help with our products please do not hesitate to get in
touch with our Technical Service. You can reach our service people by phone under the telephone
number indicated below from Monday through Friday from 9:00 am to 5:00 pm. Independently
of these service times you can also get in touch by e-mail;
Contact/Service
22
Solmeta Technology
Tel:+86 755 26969187
E-mail: info@solmeta.com, pol@solmeta.com
www.solmeta.com
R
Pro2-EOS


Shenzhen Solmeta Technology Company
Add : Room 327, Buil d i ng 5, Zhong Xing Ind u s trial Tow n ,
Chu a ng Ye Road, Nan Sh a n d istrict, Shenzh e n,
51 8 0 54,China
Tel: +86-755-2 6 969187 Fax: +86-755-2 6 9 69187
E-Ma i l: info@solmeta . c om
Web: www.solmeta.co m
R
Pr int i n C hin a
 Loading...