

Page 1
- 0 -
Sollae Systems Co., Ltd.
http://www.ezTCP.com
16 ports Console Server
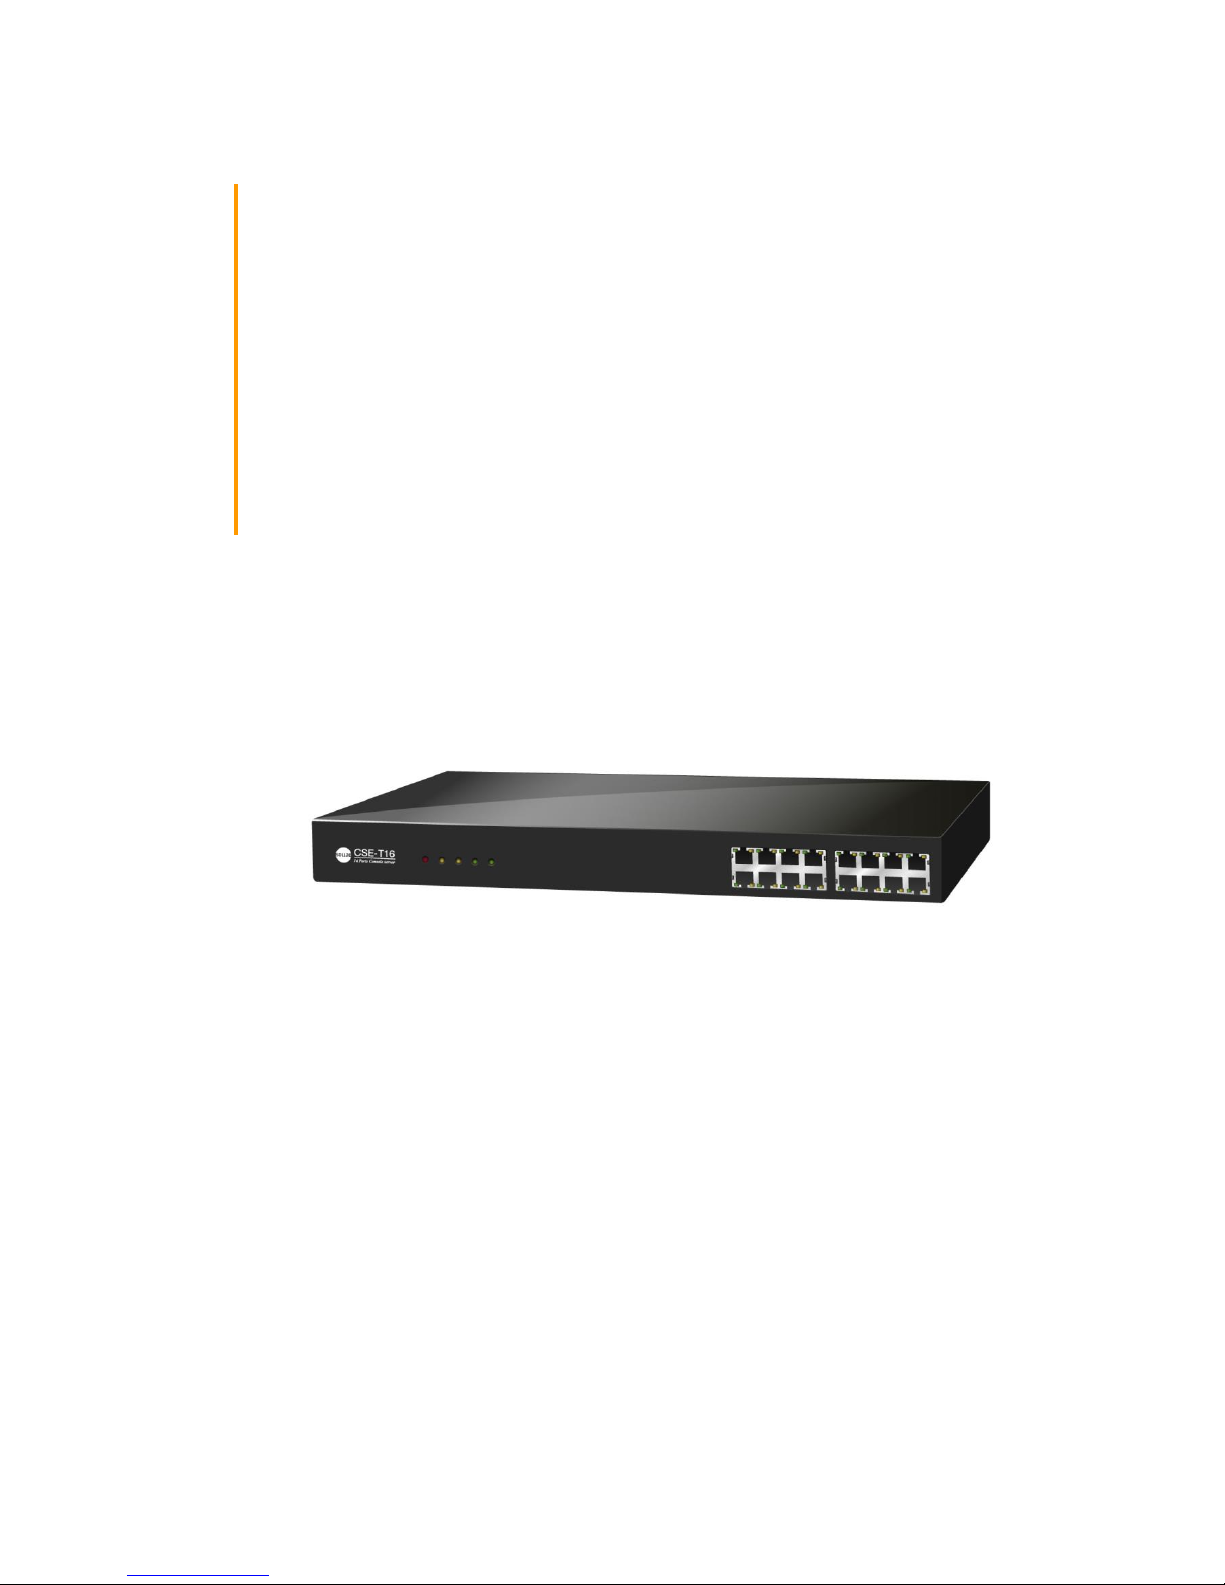
CSE-T16 User Manual
Version 1.2
Page 2
CSE-T16 User Manual Ver. 1.2
- 1 -
http://www.ezTCP.com
This symbol, found on your product or on its packaging, indicates that this
product should not be treated as household waste when you wish to dispose
of it. Instead, it should be handed over to an applicable collection point for the
recycling of electrical and electronic equipment. By ensuring this product is
disposed of correctly, you will help prevent potential negative consequences to the
environment and human health, which could otherwise be caused by inappropriate disposal
of this product. The recycling of materials will help to conserve natural resources. For more
detailed information about the recycling of this product, please contact your local city
office, household waste disposal service or the retail store where you purchased this
product.
※ This equipment obtained certification by using 1.5M serial cable.
Page 3

CSE-T16 User Manual Ver. 1.2
- 2 -
http://www.ezTCP.com
Contents
1 Overview .................................................................................................................................. - 5 -
1.1 Overview ................................................................................................................................................................. - 5 -
1.2 Features .................................................................................................................................................................. - 5 -
1.3 Application Examples ....................................................................................................................................... - 6 -
1.4 Components ......................................................................................................................................................... - 7 -
1.5 Specification.......................................................................................................................................................... - 7 -
1.5.1 Hardware ....................................................................................................................................................... - 7 -
1.5.2 Software......................................................................................................................................................... - 7 -
1.6 Dimensions ............................................................................................................................................................ - 8 -
1.7 Interface .................................................................................................................................................................. - 9 -
1.7.1 Panel Layout ................................................................................................................................................ - 9 -
1.7.2 Serial Interface ......................................................................................................................................... - 10 -
1.7.3 Ethernet Interface .................................................................................................................................. - 11 -
1.7.4 Power ........................................................................................................................................................... - 11 -
1.8 ETC ......................................................................................................................................................................... - 12 -
1.8.1 System LED indicators ......................................................................................................................... - 12 -
2 Installation and Test ............................................................................................................ - 13 -
2.1 Installation .......................................................................................................................................................... - 13 -
2.1.1 Setting Network Area .......................................................................................................................... - 14 -
2.2 Simple Test ......................................................................................................................................................... - 17 -
2.2.1 Simple Test ................................................................................................................................................ - 17 -
3 Configuration ........................................................................................................................ - 20 -
3.1 Configuration with ezManager ................................................................................................................. - 20 -
3.1.1 Configuration ........................................................................................................................................... - 20 -
4 Communication mode ......................................................................................................... - 23 -
4.1 Normal Communication Mode ................................................................................................................. - 23 -
4.2 TCP Server .......................................................................................................................................................... - 24 -
4.2.1 Key parameters ....................................................................................................................................... - 24 -
4.2.2 Examples .................................................................................................................................................... - 25 -
4.3 TCP Client ............................................................................................................................................................ - 27 -
4.3.1 Key parameters ....................................................................................................................................... - 27 -
4.3.2 Examples .................................................................................................................................................... - 28 -
4.4 UDP ........................................................................................................................................................................ - 30 -
Page 4

CSE-T16 User Manual Ver. 1.2
- 3 -
http://www.ezTCP.com
4.4.1 Key parameters ....................................................................................................................................... - 30 -
4.4.2 Examples .................................................................................................................................................... - 31 -
5 System Management ........................................................................................................... - 33 -
5.1 Upgrading Firmware ...................................................................................................................................... - 33 -
5.1.1 Firmware ..................................................................................................................................................... - 33 -
5.1.2 Process ........................................................................................................................................................ - 33 -
5.2 Status Monitoring through Shell command ....................................................................................... - 35 -
5.2.1 How to connect ...................................................................................................................................... - 35 -
5.2.2 Shell command ....................................................................................................................................... - 38 -
5.3 Status Window of ezManager ................................................................................................................... - 40 -
5.3.1 Status ........................................................................................................................................................... - 40 -
5.4 Factory Reset ..................................................................................................................................................... - 42 -
5.4.1 How to reset ............................................................................................................................................ - 42 -
5.4.2 Sequence of LED operation .............................................................................................................. - 42 -
6 Security functions ................................................................................................................ - 43 -
6.1 SSL .......................................................................................................................................................................... - 43 -
6.1.1 SSL(Secure Socket Layer) .................................................................................................................... - 43 -
6.1.2 How to set SSL ........................................................................................................................................ - 43 -
6.1.3 Restriction .................................................................................................................................................. - 46 -
6.2 Setting password ............................................................................................................................................. - 46 -
7 Additional Functions ............................................................................................................ - 47 -
7.1 CSE-T16 Tab Functions ................................................................................................................................. - 47 -
7.1.1 TCP+TENLET - ① ................................................................................................................................... - 47 -
7.1.2 Separator - ② .......................................................................................................................................... - 48 -
7.1.3 Checking an option .............................................................................................................................. - 49 -
7.2 Option tab functions ..................................................................................................................................... - 50 -
7.2.1 Notify Ipv4 Change ............................................................................................................................... - 50 -
8 Related Materials.................................................................................................................. - 51 -
8.1 Documents ......................................................................................................................................................... - 51 -
8.2 Applications for a Smart Phone ............................................................................................................... - 51 -
9 Technical Support and Warranty ....................................................................................... - 52 -
9.1 Technical Support ............................................................................................................................................ - 52 -
9.2 Warranty .............................................................................................................................................................. - 52 -
9.2.1 Refund ......................................................................................................................................................... - 52 -
9.2.2 Free Repair Services .............................................................................................................................. - 52 -
Page 5

CSE-T16 User Manual Ver. 1.2
- 4 -
http://www.ezTCP.com
9.2.3 Charged Repair Services ..................................................................................................................... - 52 -
10 Precaution and Exemption from Liability ........................................................................ - 53 -
10.1 Precaution ........................................................................................................................................................... - 53 -
10.2 Exemption from Liability .............................................................................................................................. - 54 -
10.2.1 English version ........................................................................................................................................ - 54 -
10.2.2 French version ......................................................................................................................................... - 55 -
11 Revision History ................................................................................................................... - 57 -
Page 6

CSE-T16 User Manual Ver. 1.2
- 5 -
http://www.ezTCP.com
1 Overview
1.1 Overview
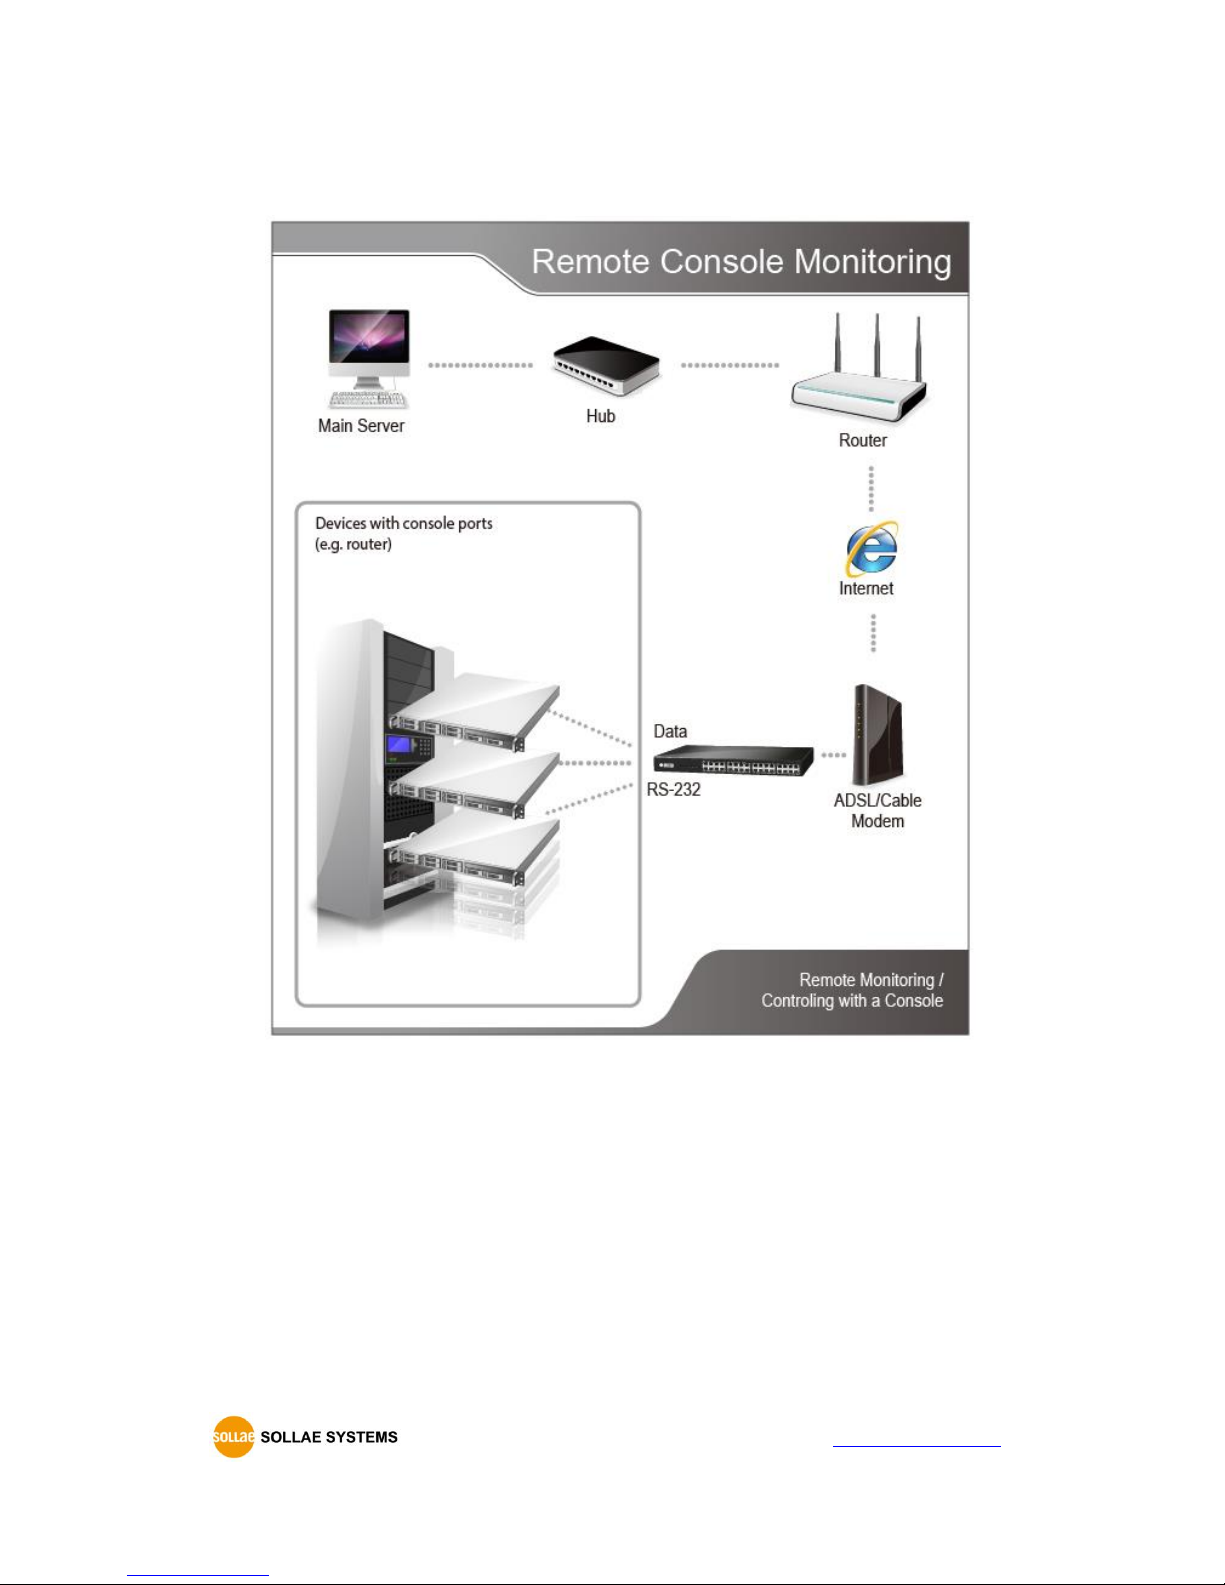
CSE-T16 is a 16-port console server allowing devices with console ports to be embedded with
networking capabilities. With CSE-T16, therefore, you can easily monitor status of console ports
over the network from anywhere in the world. It also helps you save your time and energy by
improving efficiency of integrated management and control of many devices in diverse applications.
This RS232 console server is an ideal solution for Remote Console Monitoring as it supports
useful features such as 16 ports of RS232, a security protocol(SSL) to protect data transmission,
sharing serial ports through the network(Telnet with RFC2217), etc.
1.2 Features
16 x RS232 (RJ45, up to 115,200bps)
Security Functions (SSL 3.0 / TLS 1.0, Password)
3 Communication modes (TCP Server, TCP Client and UDP)
Support of DHCP for DSL and cable network
A variety of ways to monitor communication status (ezManager, TELNET)
Powerful management software for Windows OS (ezManager)
Firmware upgrade through Network
Page 7
CSE-T16 User Manual Ver. 1.2
- 6 -
http://www.ezTCP.com
1.3 Application Examples
Figure 1-1 CSE-T16 Application
Page 8
CSE-T16 User Manual Ver. 1.2
- 7 -
http://www.ezTCP.com
1.4 Components
CSE-T16 Body
1.5 Specification
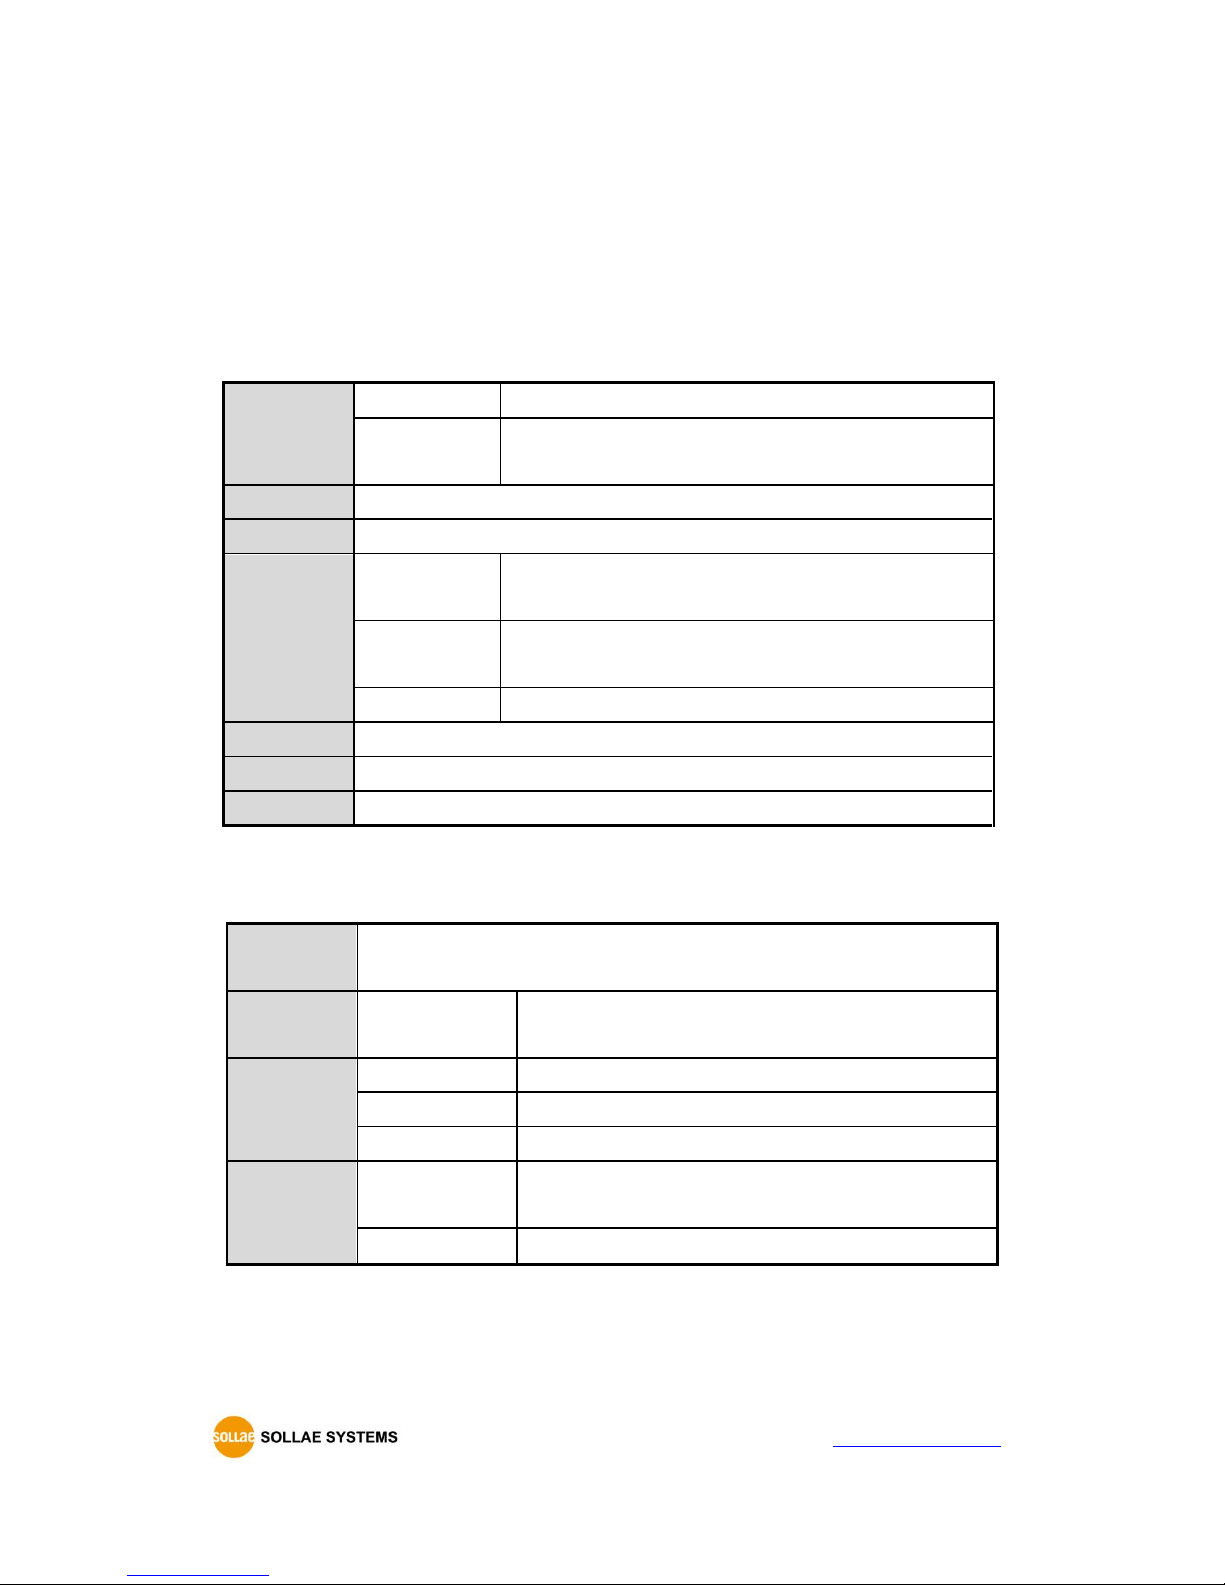
1.5.1 Hardware
Power
Input Voltage
AC 85V~264V
Power
Consumption
7W
Dimension
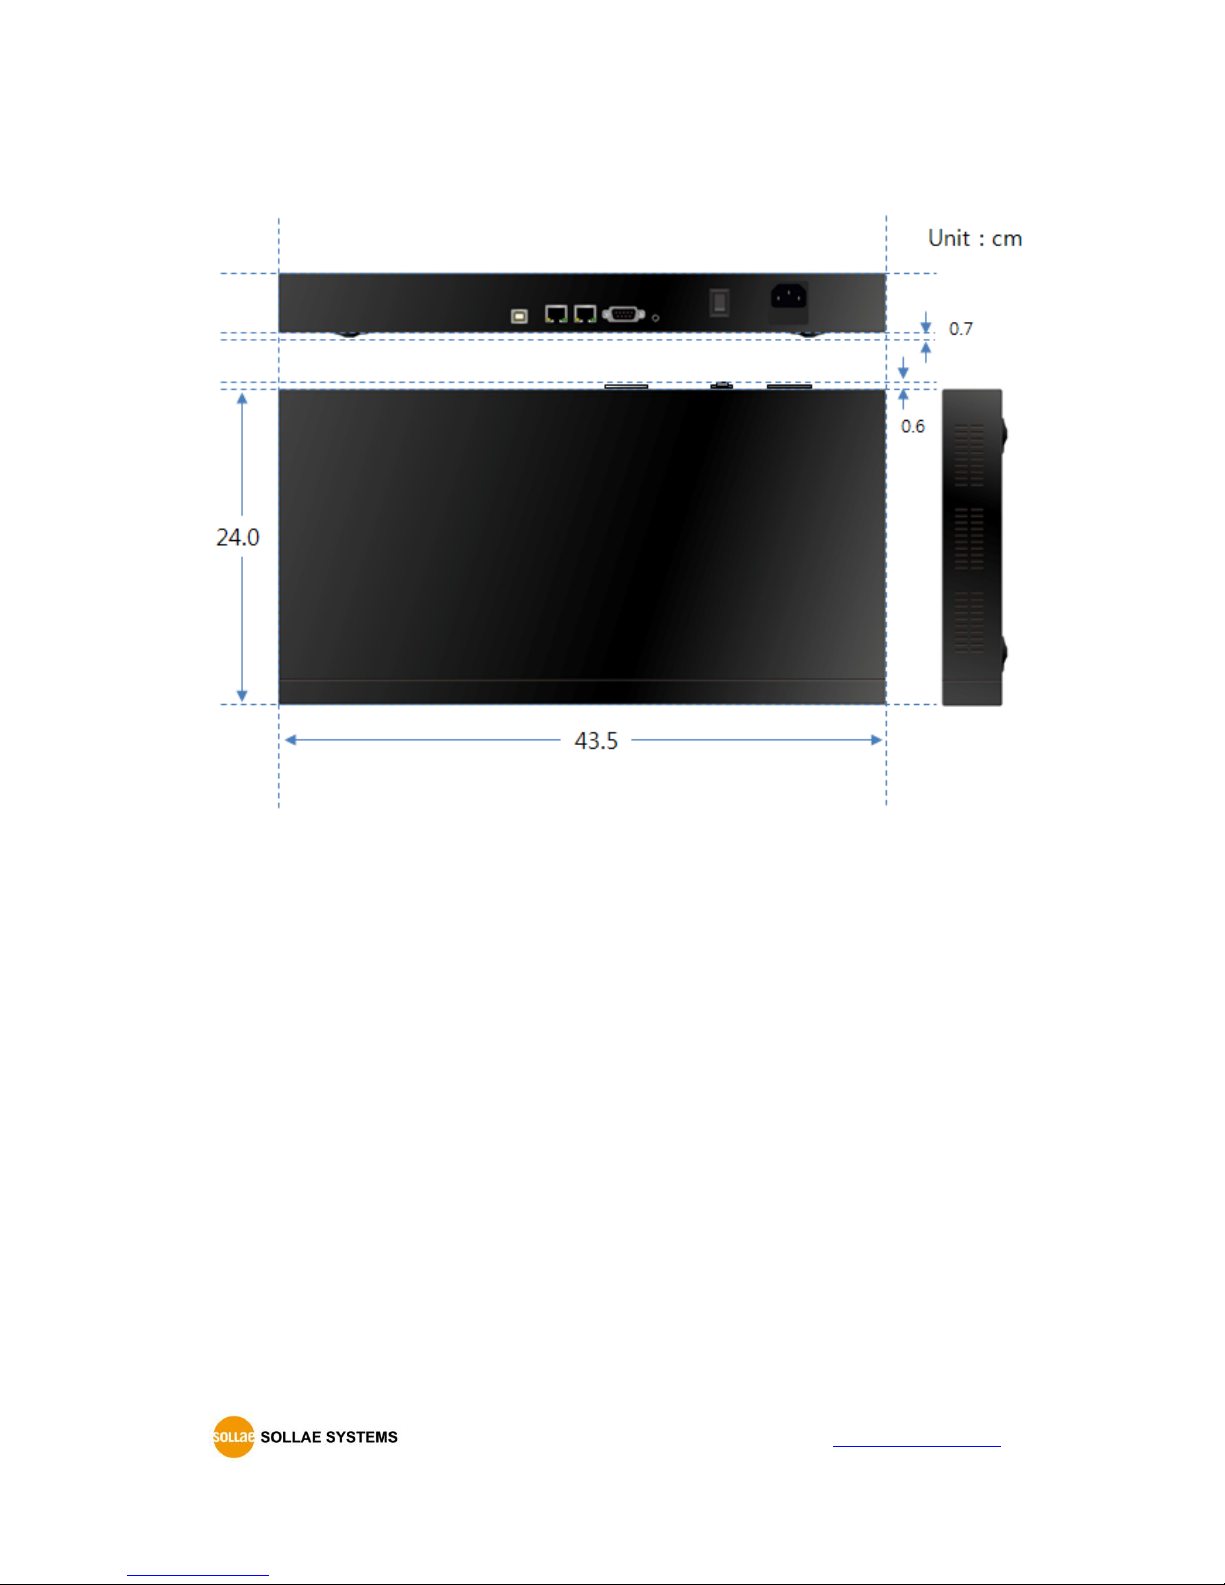
435mm X 240mm X 45mm
Weight
About 2.7Kg
Interface
Serial
16 × RS232 – RTS/CTS Flow control
(Baud Rate: 300bps ~ 115,200bps)
Network
Ethernet 10Base-T or 100Base-TX (Auto-Sensing)
Auto MDI/MDIX
Console
1 x D-sub port (Male type)
Temperature
Operating: -20 ~ 70℃ / Storage: 0 ~ 60℃
Approval
-
RoHS
RoHS Compliant
Table 1-1 hardware specification
1.5.2 Software
Protocol
TCP, UDP, IP, ICMP, ARP, DHCP, DNS lookup,
DDNS(Dynamic DNS), Telnet, SSL
Operation
mode
Normal
For Normal Data Communication
Communi-
cation mode
TCP Server
TCP Passive Connection
TCP Client
TCP Active Connection
UDP
UDP
Major
Utilities
ezManager
Configuration Utility for MS Windows
(Firmware download)
ezVSP
Serial to TCP/IP Virtual driver for MS Windows
Table 1-2 software specification
Page 9
CSE-T16 User Manual Ver. 1.2
- 8 -
http://www.ezTCP.com
1.6 Dimensions
Figure 1-2 dimensions
Page 10
CSE-T16 User Manual Ver. 1.2
- 9 -
http://www.ezTCP.com
1.7 Interface
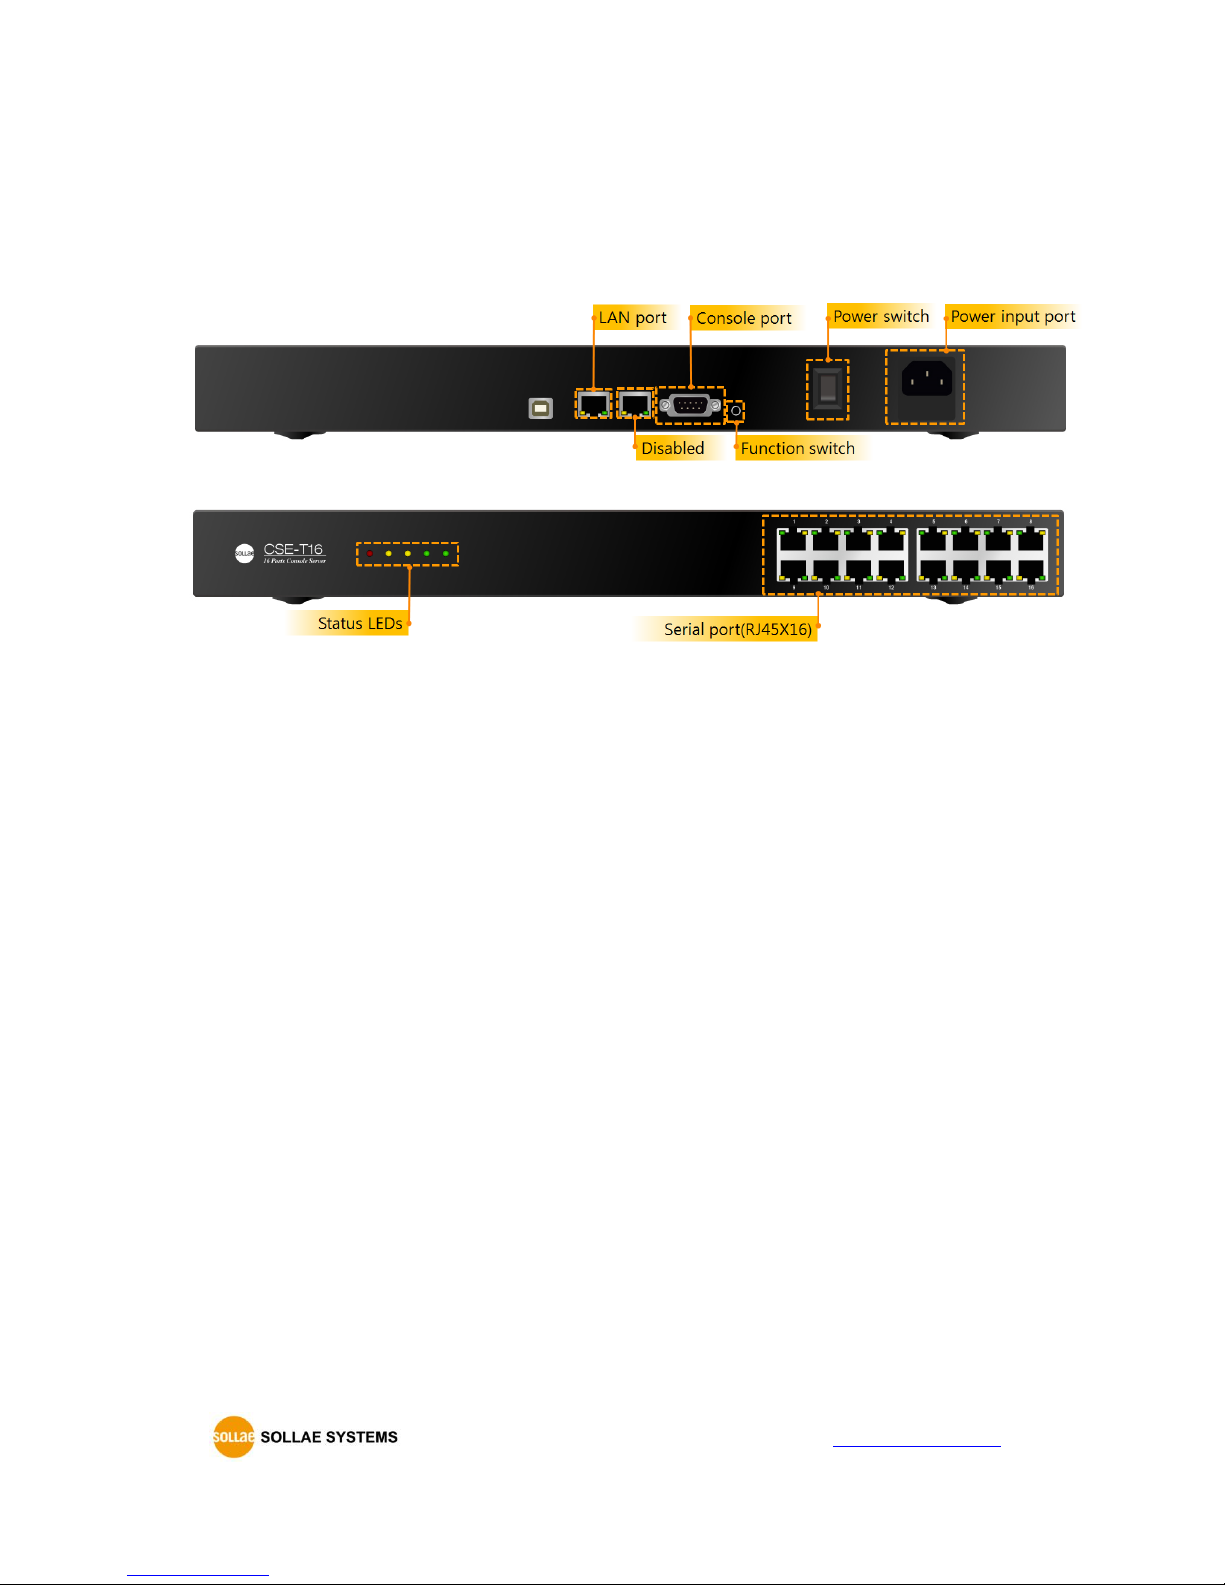
1.7.1 Panel Layout
Figure 1-3 panel layout
Page 11
CSE-T16 User Manual Ver. 1.2
- 10 -
http://www.ezTCP.com
1.7.2 Serial Interface
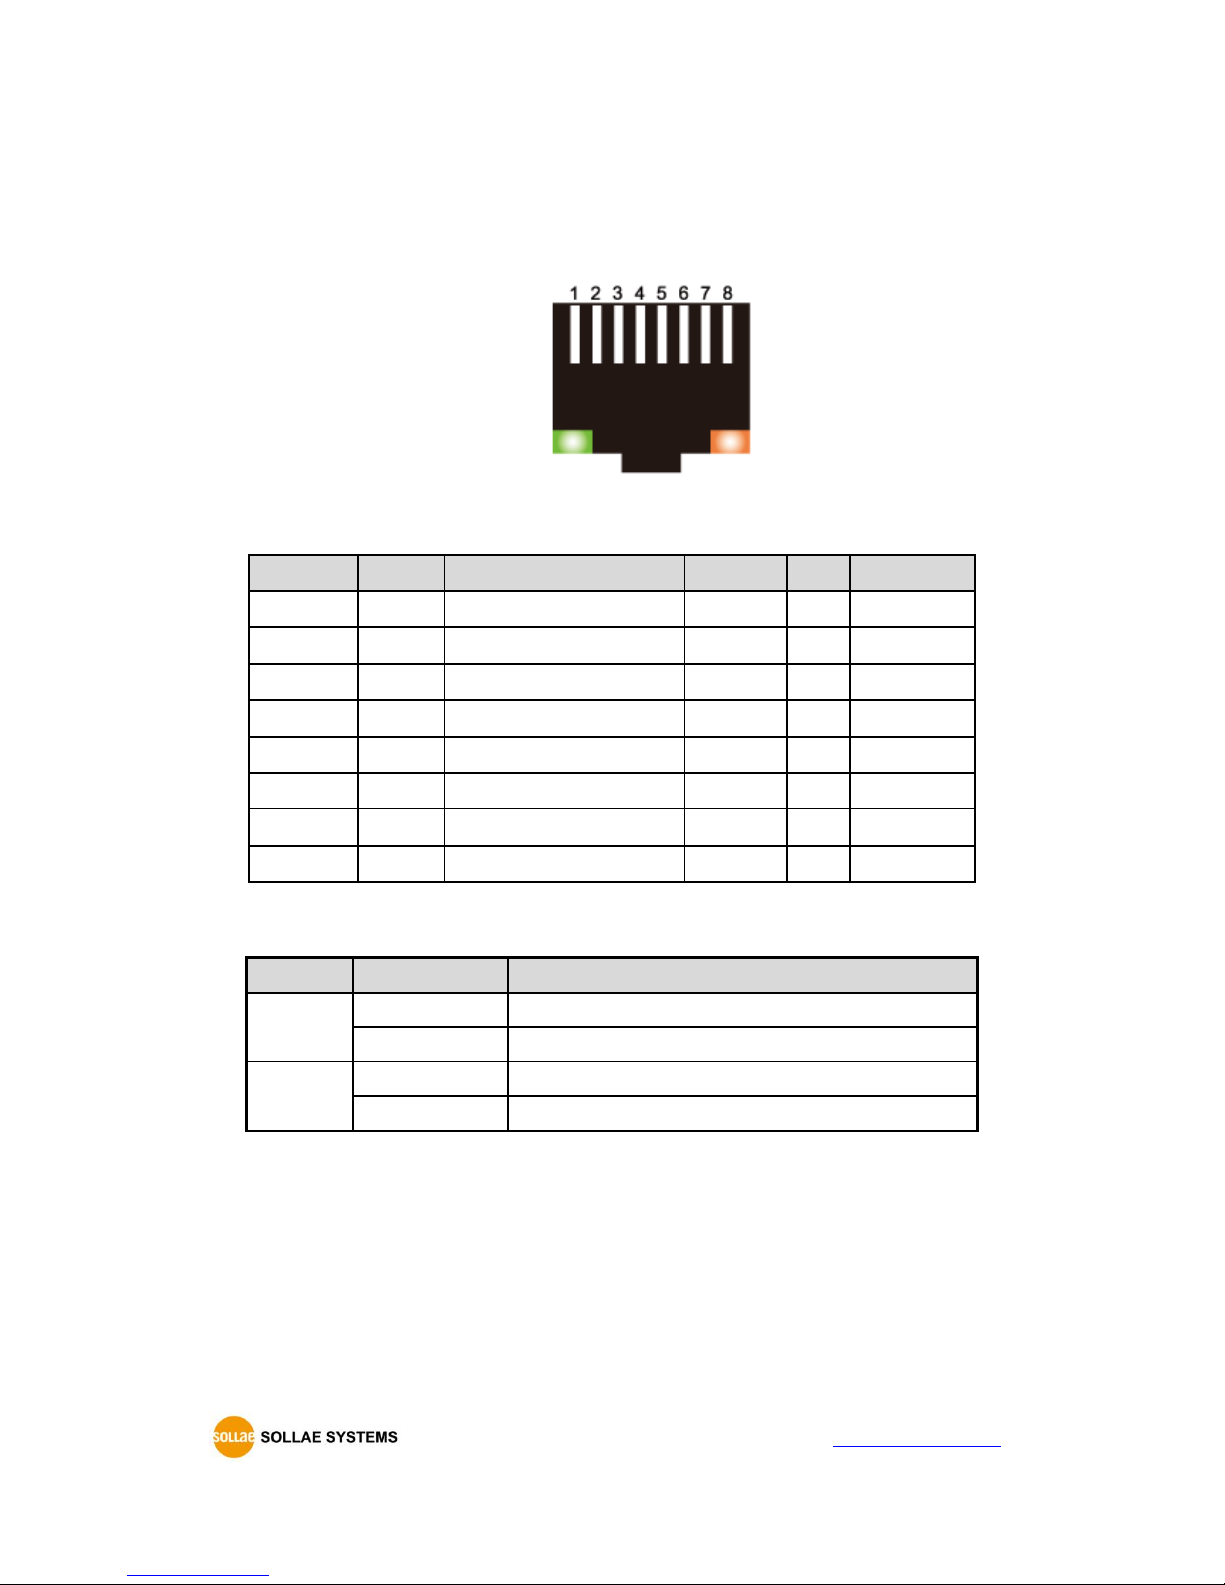
CSE-T16 has 16 of RJ45-typed connectors for RS232 and it can be communicated with 300bps ~
115,200bps.
Figure 1-4 RJ45 connector for serial port
Serial port(RJ45)
Number
Name
Description
Level
I/O
Wiring
1
RTS
Request To Send
RS232
Out
Optional
2
DTR
Data Terminal Ready
RS232
Out
Optional
3
TXD
Transmit Data
RS232
Out
Required
4
GND
Ground
Ground
-
Required
5
GND
Ground
Ground
-
Required
6
RXD
Receive Data
RS232
In
Required
7
DSR
Data Set Ready
RS232
In
Optional
8
CTS
Clear To Send
RS232
In
Optional
Table 1-3 serial port (RJ45)
LEDs of serial port
Color
LED Status
Operation
Yellow
On
DSR (COM port is ready to communicate)
Blinking
CSE-T16 is sending data to the serial device
Green
On
DTR (TCP connection is being established)
Blinking
CSE-T16 is getting data from the serial device
Table 1-4 LEDs of serial port
Flow control
CSE-T16 supports RTS/CTS Hardware Flow Control.
Page 12
CSE-T16 User Manual Ver. 1.2
- 11 -
http://www.ezTCP.com
1.7.3 Ethernet Interface
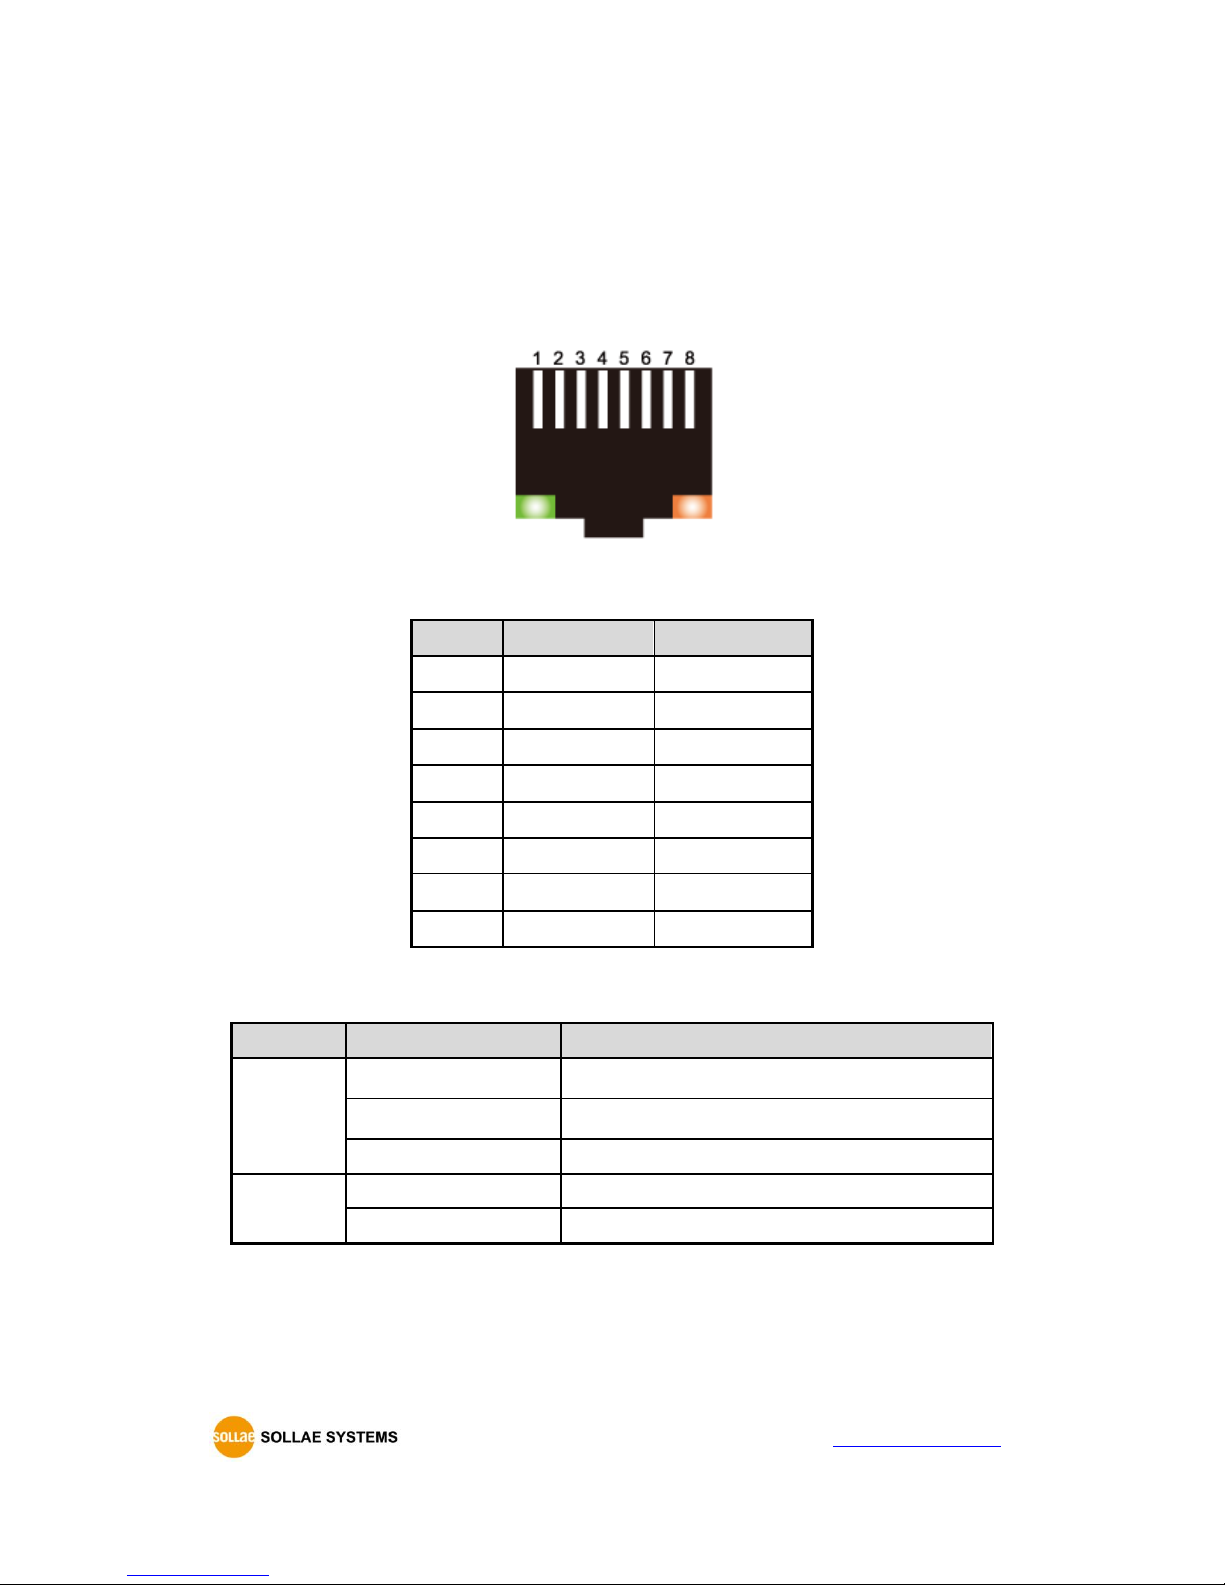
Network part of CSE-T16 is configured with Ethernet. So, what you have to do is only to connect
UTP cable. The Ethernet part detects 10Mbit or 100Mbit Ethernet automatically, to connect the
corresponding cable. It also provides auto MDI/MDIX function to detect 1:1 cable or cross-over
cable automatically.
Figure 1-5 RJ45 connector for Ethernet port
Ethernet port interface (RJ45)
Number
Name
Type
1
TX+
OUT
2
TX-
OUT
3
RX+
INPUT
4 - -
5 - - 6 RX-
INPUT
7 - -
8 - -
Table 1-5 RJ45 the Ethernet port interface
LED indicator of RJ45
Color
LED status
Description
Green
On
Connected to network
Off
Not connected to network
Blinking
Receiving or transmitting network data
Yellow
On
Connected to 100M Ethernet
Off
Connected to 10M Ethernet
Table 1-6 LED indicator of RJ45
1.7.4 Power
AC85V ~ AC264V is used for the power.
Page 13
CSE-T16 User Manual Ver. 1.2
- 12 -
http://www.ezTCP.com
1.8 ETC
1.8.1 System LED indicators
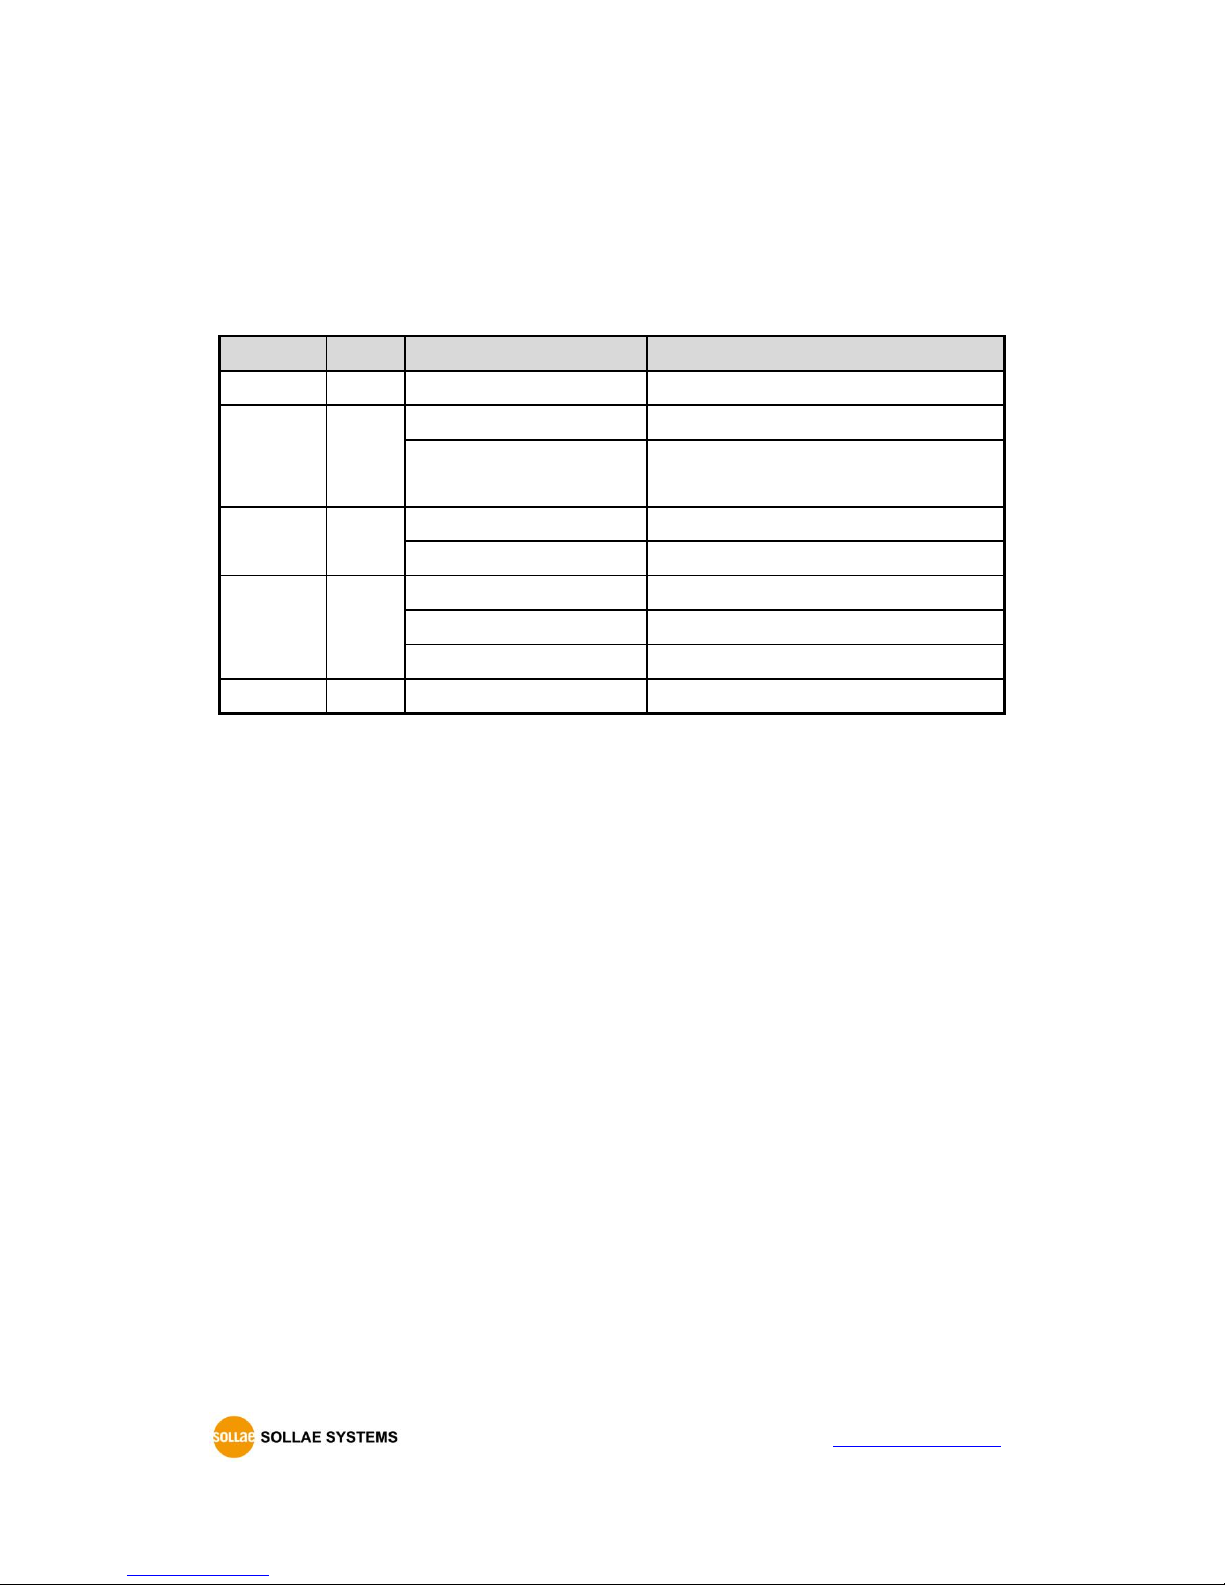
There are 5 system LED indicators operating as follows:
Name
Color
Status
Description
PWR
Red
On
Power is supplied
STS1
Yellow
Blinking in every second
Obtaining an IP address
Blinking 4 times at once
Without obtaining an IP address by
DHCP
STS2
Yellow
Blinking quickly
Initializing the serial port
On
Serial port initializing complete
LAN1
Green
On
Connected to the network
Off
Not connected to the network
Blinking
Data exchanging in the network
LAN2 - -
Disable
Table 1-7 System LED indicators
Page 14
CSE-T16 User Manual Ver. 1.2
- 13 -
http://www.ezTCP.com
2 Installation and Test
2.1 Installation
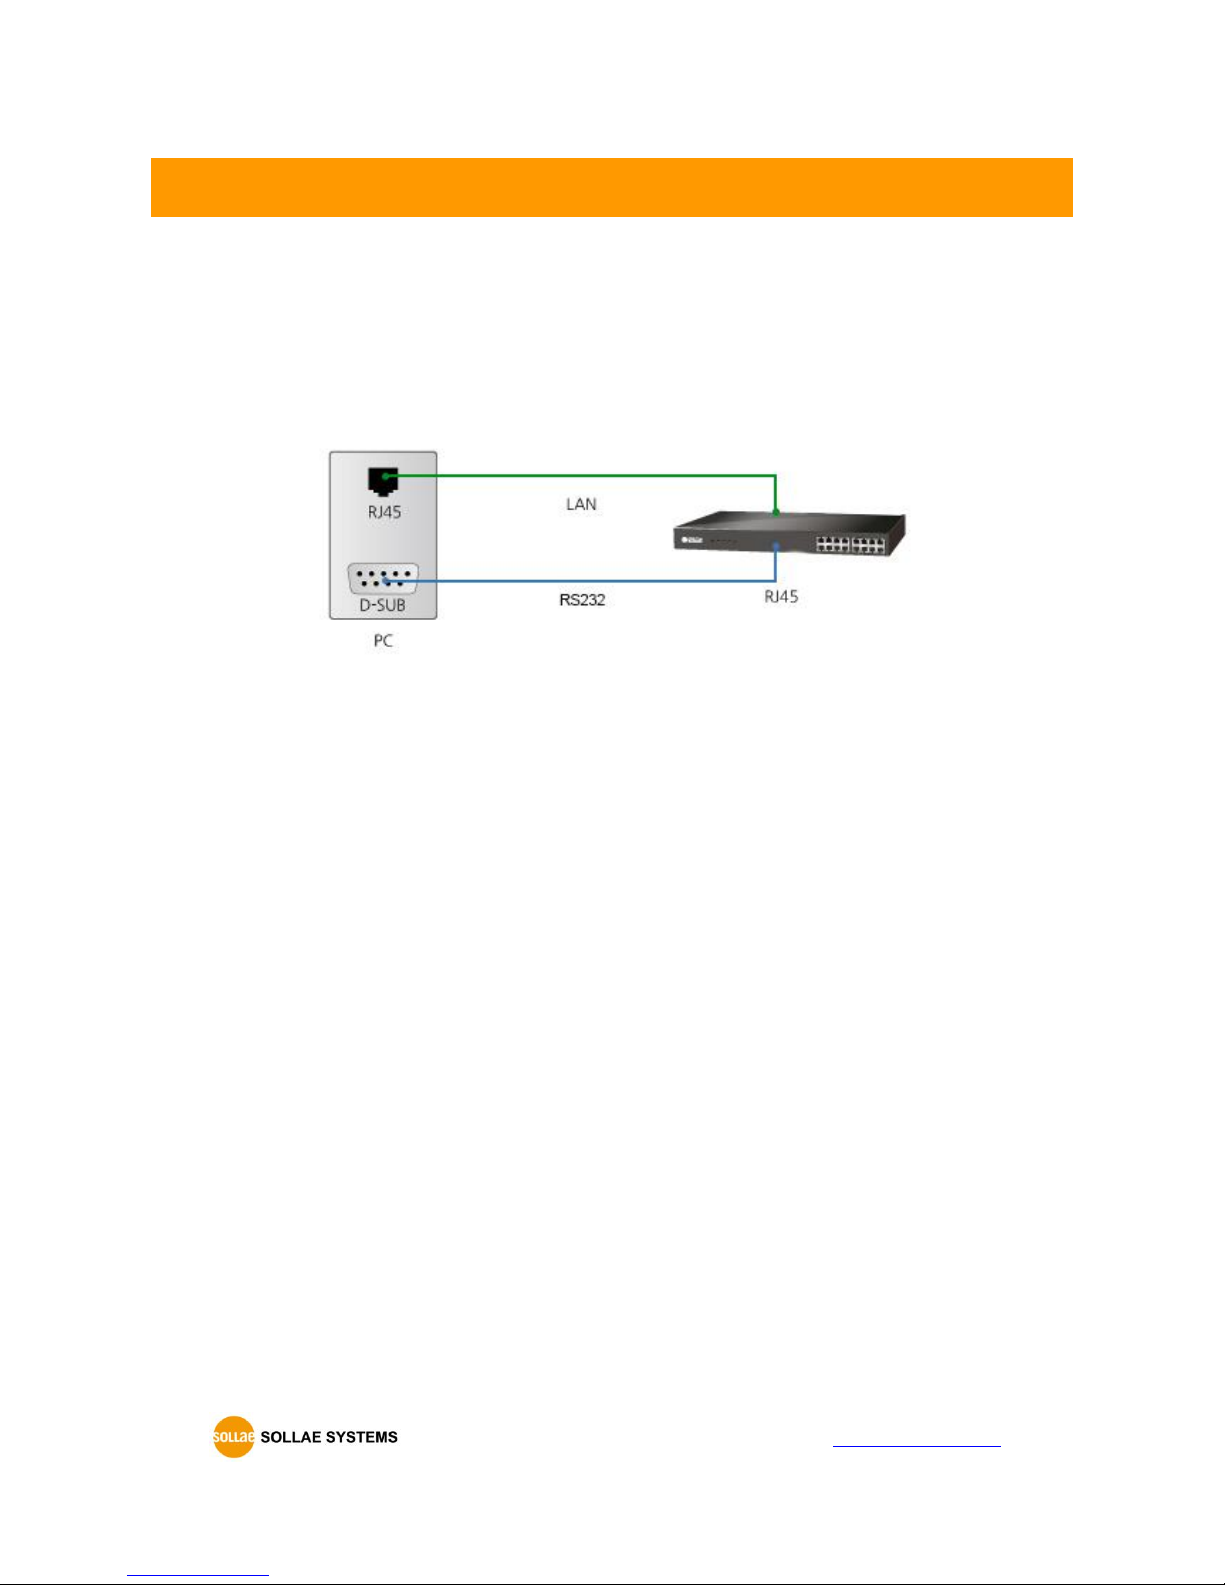
Before testing CSE-T16, users should connect CSE-T16’s Ethernet port to PC. It will be no
problem that the Ethernet connection includes network hubs. It also need to connect one of 16
serial ports to PC via a serial cable.
Figure 2-1 Connection between CSE-T16 and a PC
In case if your PC doesn’t have a RS232 port, use a USB to RS232 cable.
Page 15
CSE-T16 User Manual Ver. 1.2
- 14 -
http://www.ezTCP.com
2.1.1 Setting Network Area
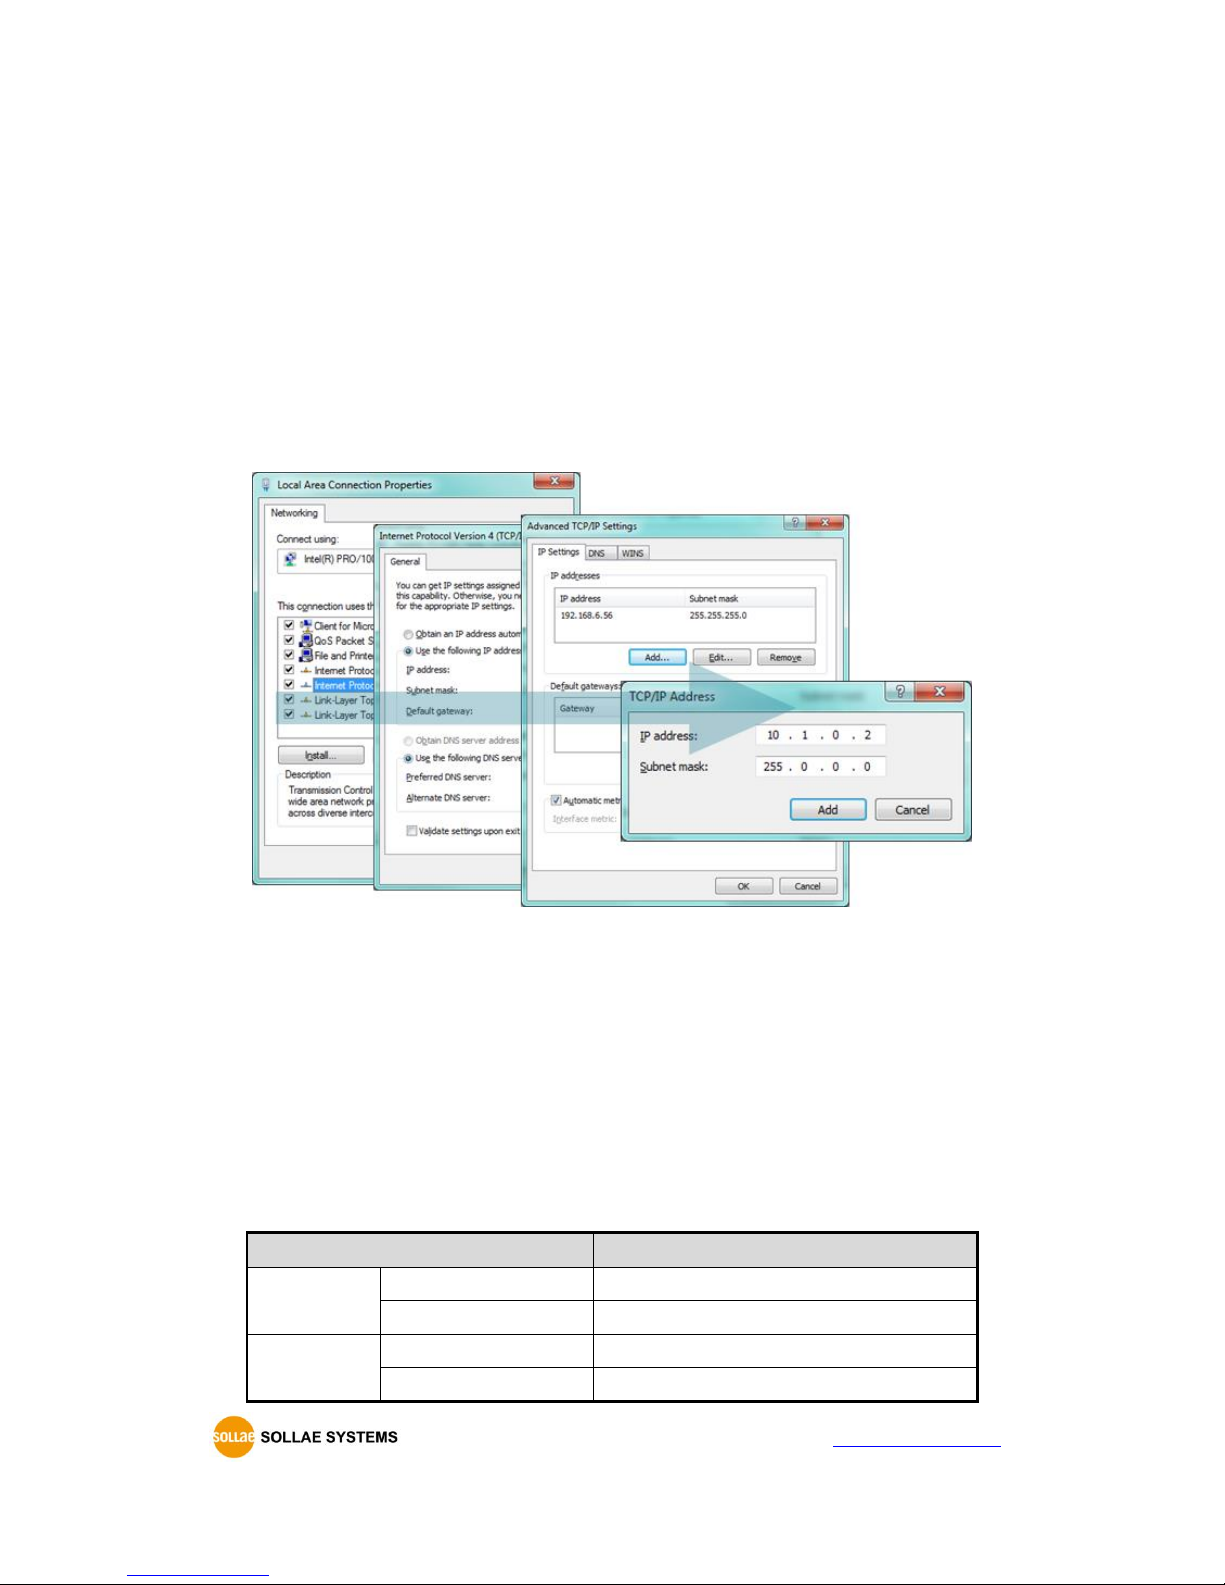
This procedure should be followed to make CSE-T16 and your PC located on the same network
for a TCP connection.
IP address of PC setting
Add or change the IP address of the network adapter on your PC like following.
Click [Windows Control Panel] >> [Network Connections] and [Properties of the Network
Adapter]. Then, you can see the properties of [Internet Protocol (TCP/IP)]. Press the [Advanced]
button and add an IP Address like the figure below.
Figure 2-2 setting PC
CSE-T16 settings
ezManager comes with CSE-T16 as a configuration tool. This MS Windows-based software is
easy to use and does not need installation.
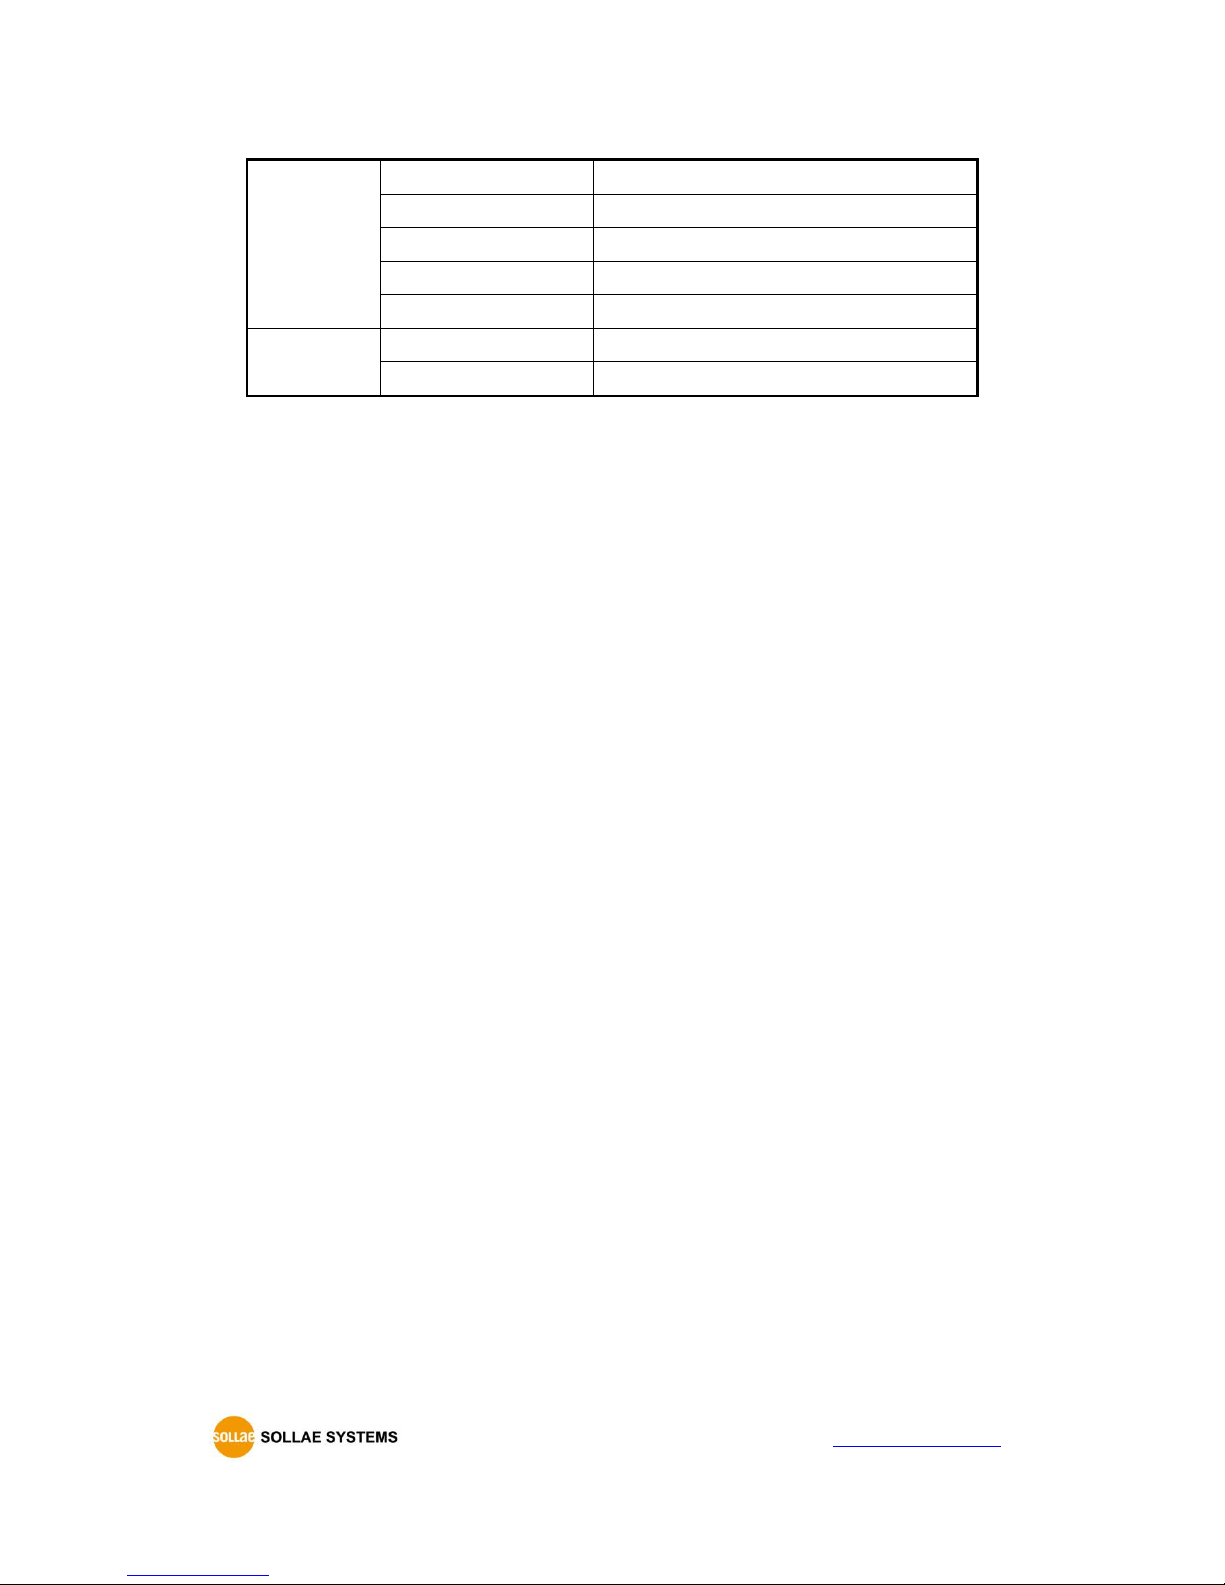
For simple test, we recommend that the variables keep default values as shown in the below
table.
Name
Default values
Network
Local IP Address
10.1.0.1
Subnet Mask
255.0.0.0
Serial Port
(COM1~16)
Baud Rate
19,200bps
Parity
NONE
Page 16
CSE-T16 User Manual Ver. 1.2
- 15 -
http://www.ezTCP.com
Data Bits
8
Stop Bit
1
Flow control
NONE
Communication Mode
TCP Server – T2S
Local Port
14701~14716
Option
Telnet
Enabled
IPv4 Address Search
Enabled
Table 2-1 default values of major parameters
Page 17
CSE-T16 User Manual Ver. 1.2
- 16 -
http://www.ezTCP.com
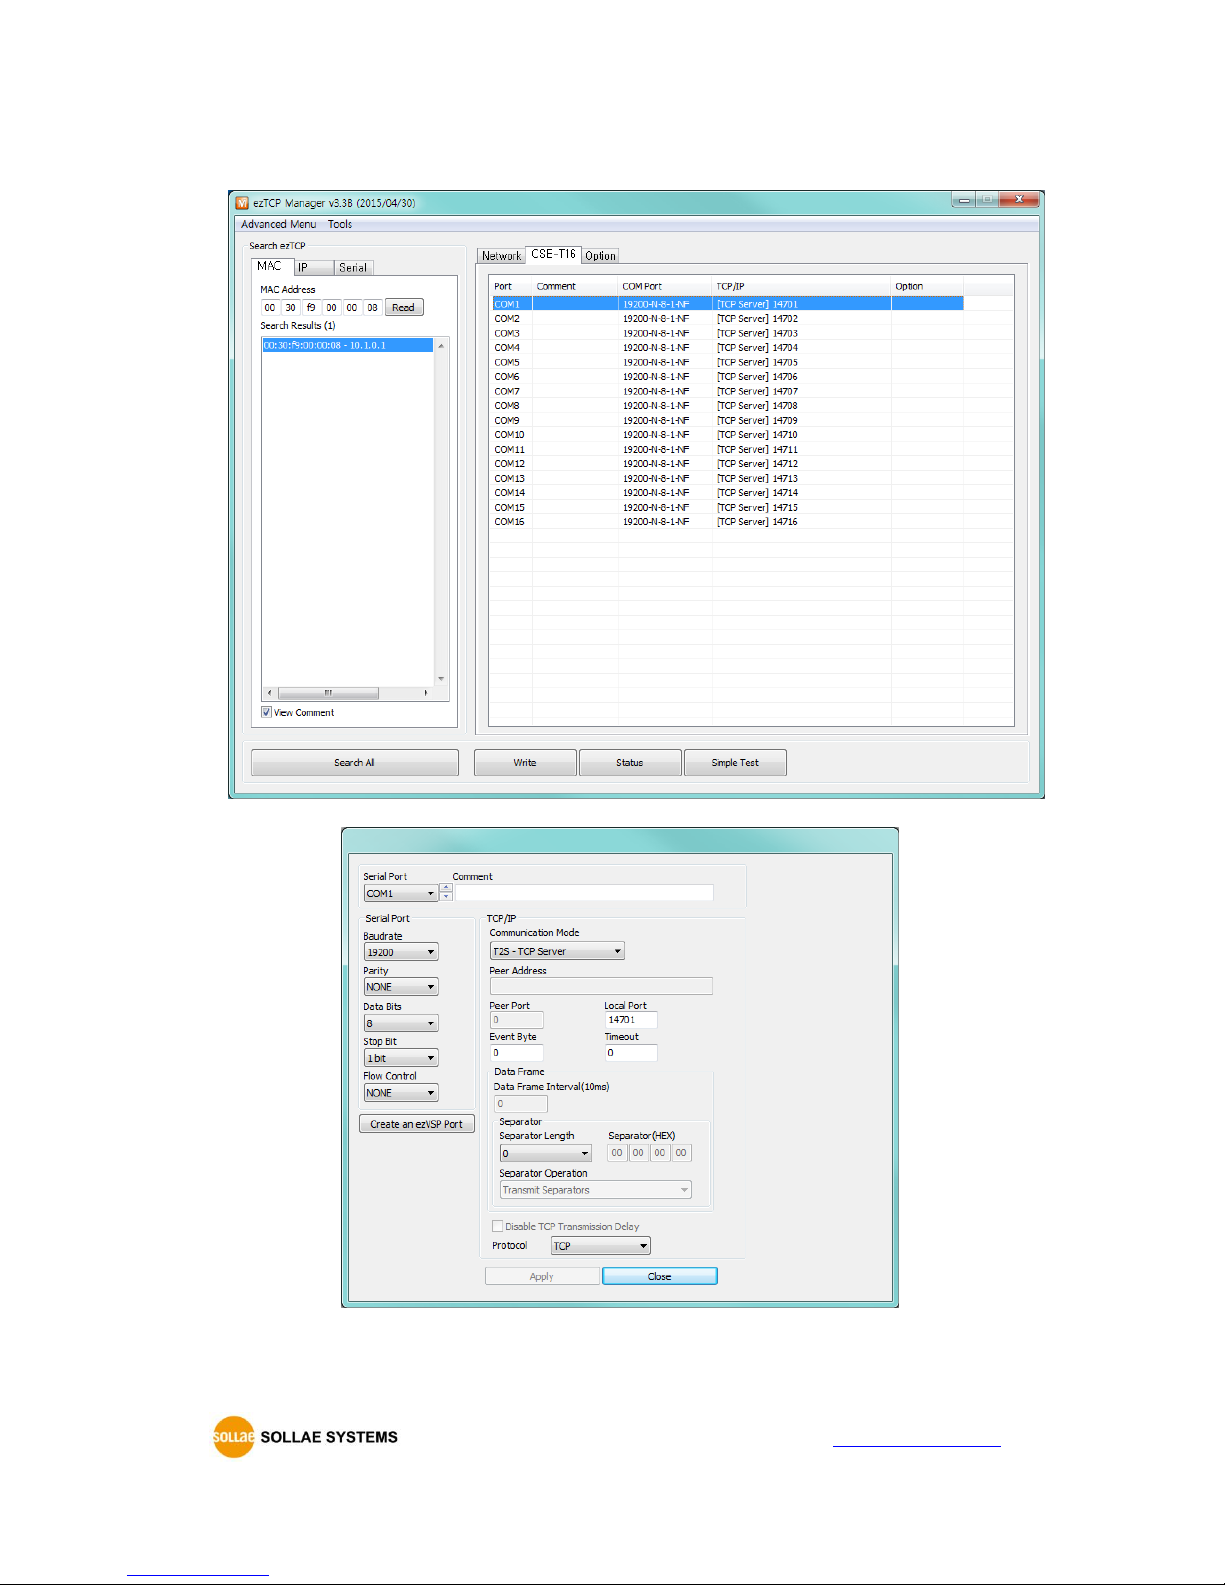
The following images show the configuration of serial ports on ezManager.
Figure 2-3 ezManager settings
Figure 2-4 Basic settings of environmental variables
Page 18
CSE-T16 User Manual Ver. 1.2
- 17 -
http://www.ezTCP.com
2.2 Simple Test
2.2.1 Simple Test
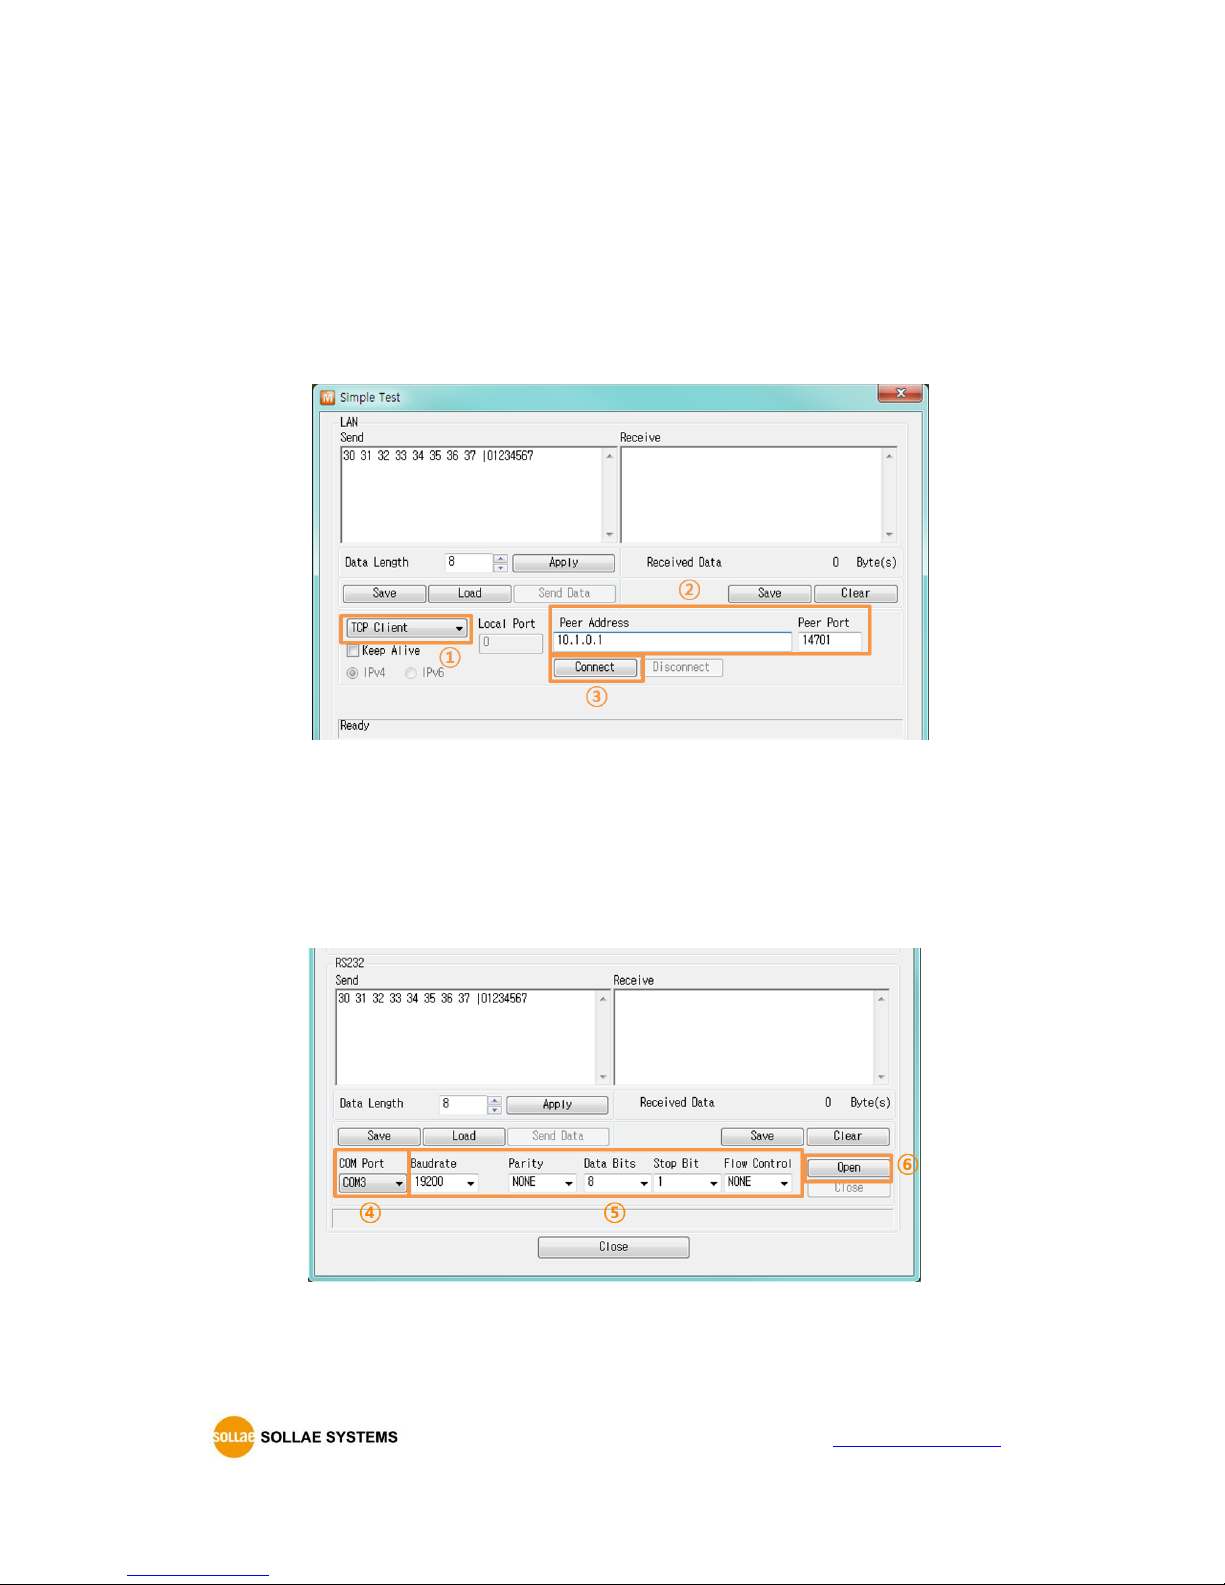
After CSE-T16 is connected to the network by checking green LED on LAN1, you may press
[Simple Test] button on ezManager to see a test program as in the following Figure 2-4.
Connecting to the CSE-T16 via LAN
Figure 2-5 settings for TCP connection
① Select [TCP Client].
② Input correct IP address and port number of CSE-T16 corresponding with the serial port,
which are connected to PC
③ Click [Connect] button. (In the case of TCP server, it will be the [Listen] button).
Opening RS232 port
Figure 2-6 opening COM port
④ Select COM port of your PC where CSE-T16 is being connected.
⑤ Make sure that all the parameters are the same with CSE-T16.
⑥ Press the [Open] button.
Page 19
CSE-T16 User Manual Ver. 1.2
- 18 -
http://www.ezTCP.com
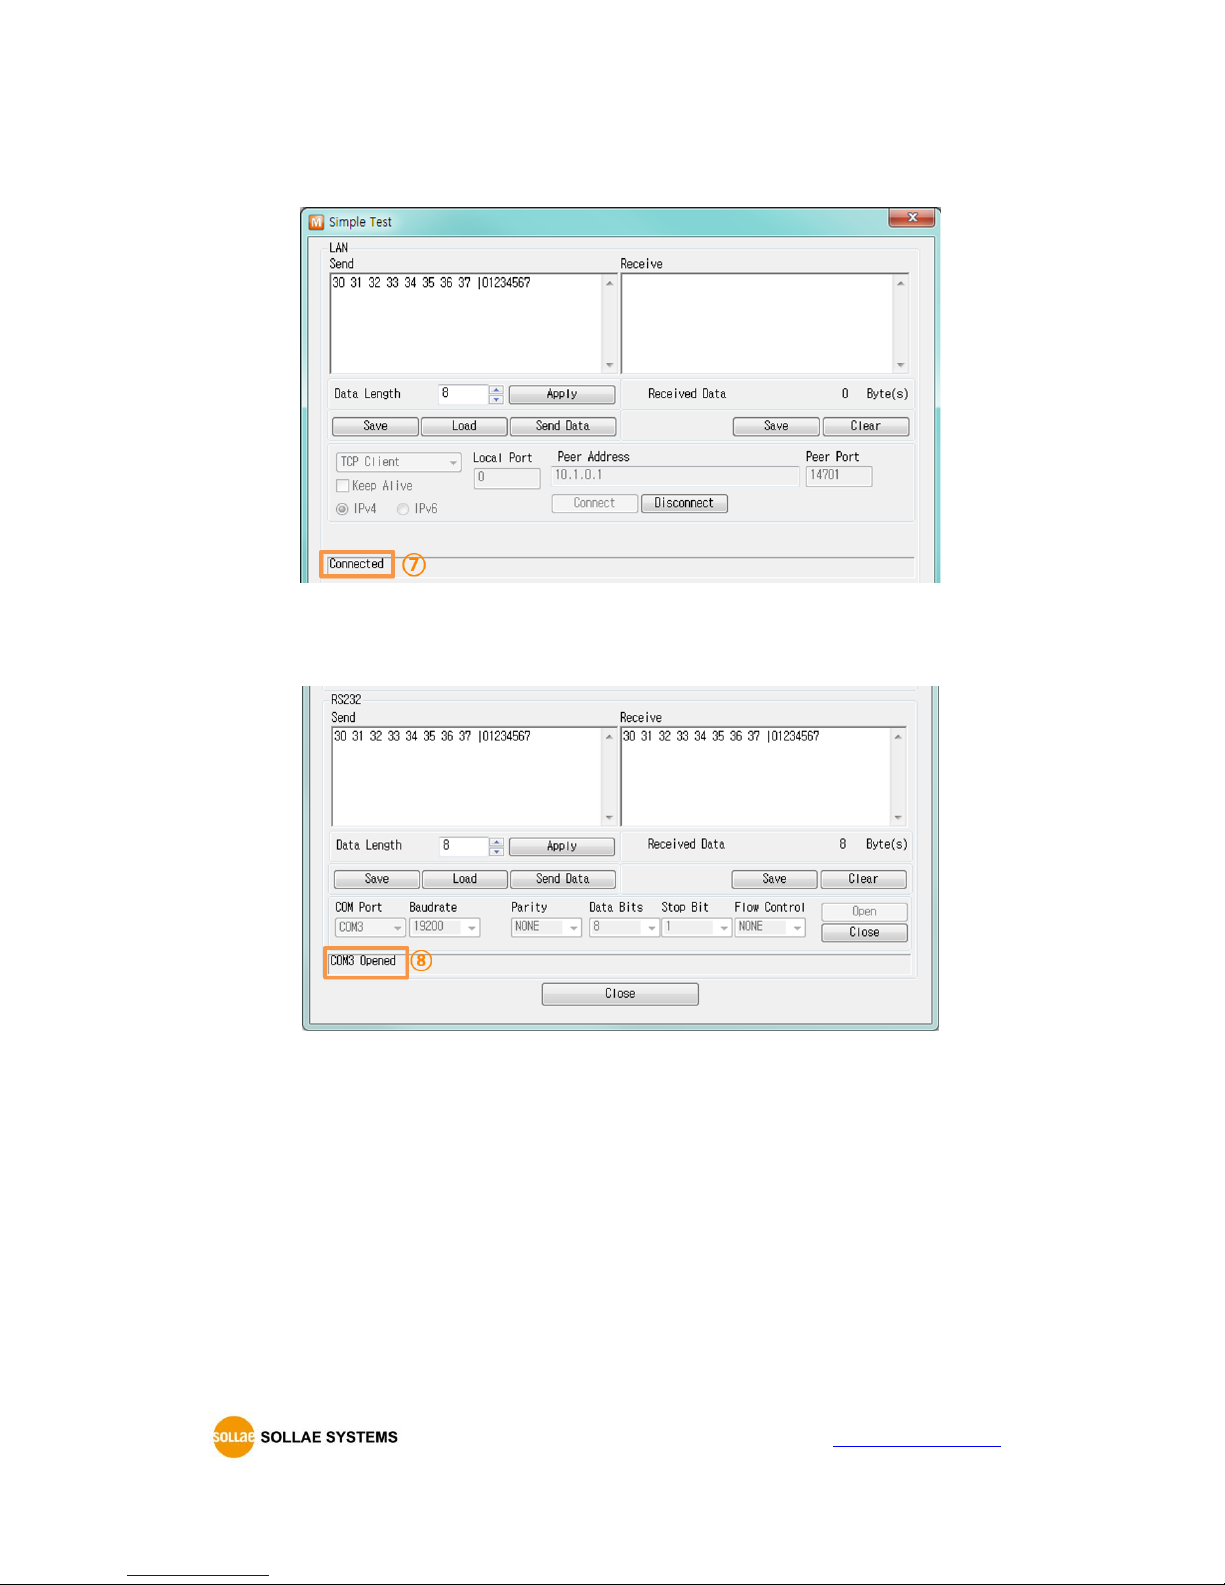
Confirm the TCP Connection and COM port status
Figure 2-7 TCP connection message
⑦ Check the message if the TCP connection has been established well.
Figure 2-8 COM port open message
⑧ Check the message if the COM port has been opened.
Page 20
CSE-T16 User Manual Ver. 1.2
- 19 -
http://www.ezTCP.com
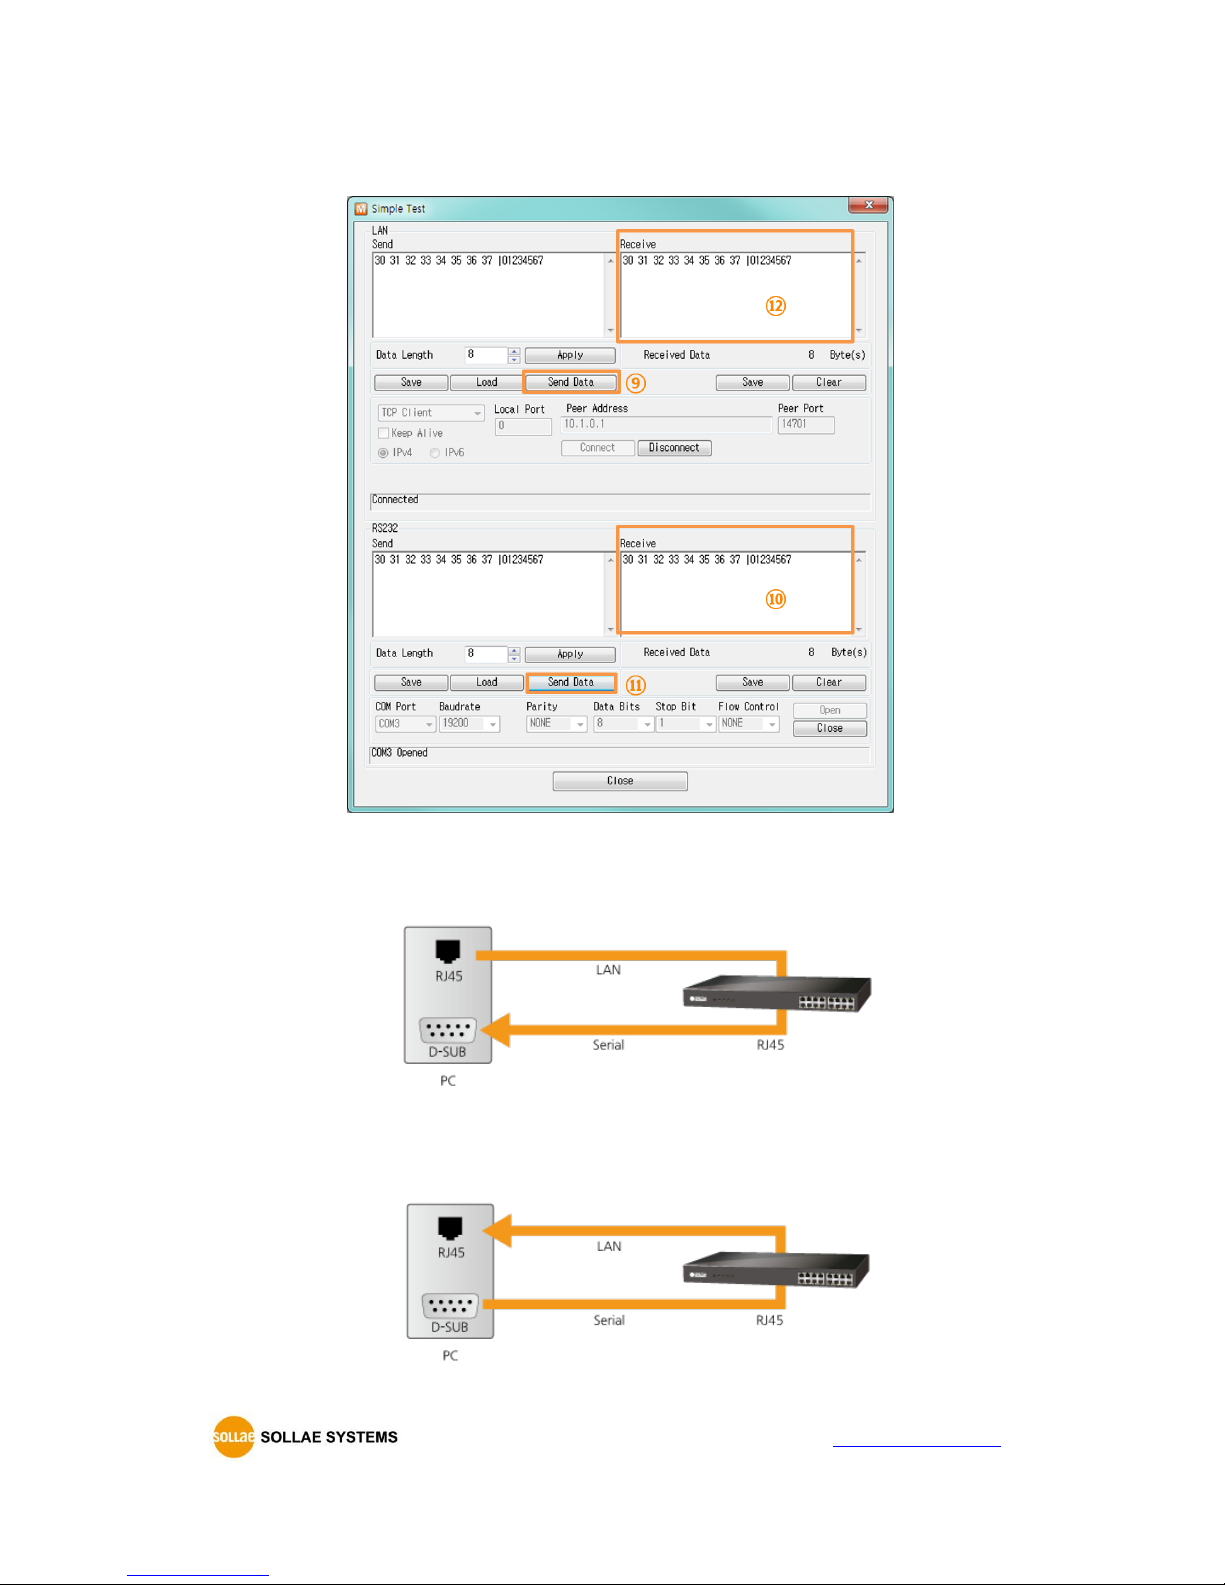
Data transmission test
Figure 2-9 successful data transmission
⑨ Click [Send data] on the LAN side.
⑩ Check the data from ⑨ has been shown.
Figure 2-10 LAN → RS232
⑪ Press [Send data] on the RS232 side.
⑫ Check the data from ⑪ has been received.
Figure 2-11 RS232 → LAN
Page 21
CSE-T16 User Manual Ver. 1.2
- 20 -
http://www.ezTCP.com
3 Configuration
3.1 Configuration with ezManager
3.1.1 Configuration
Requirements
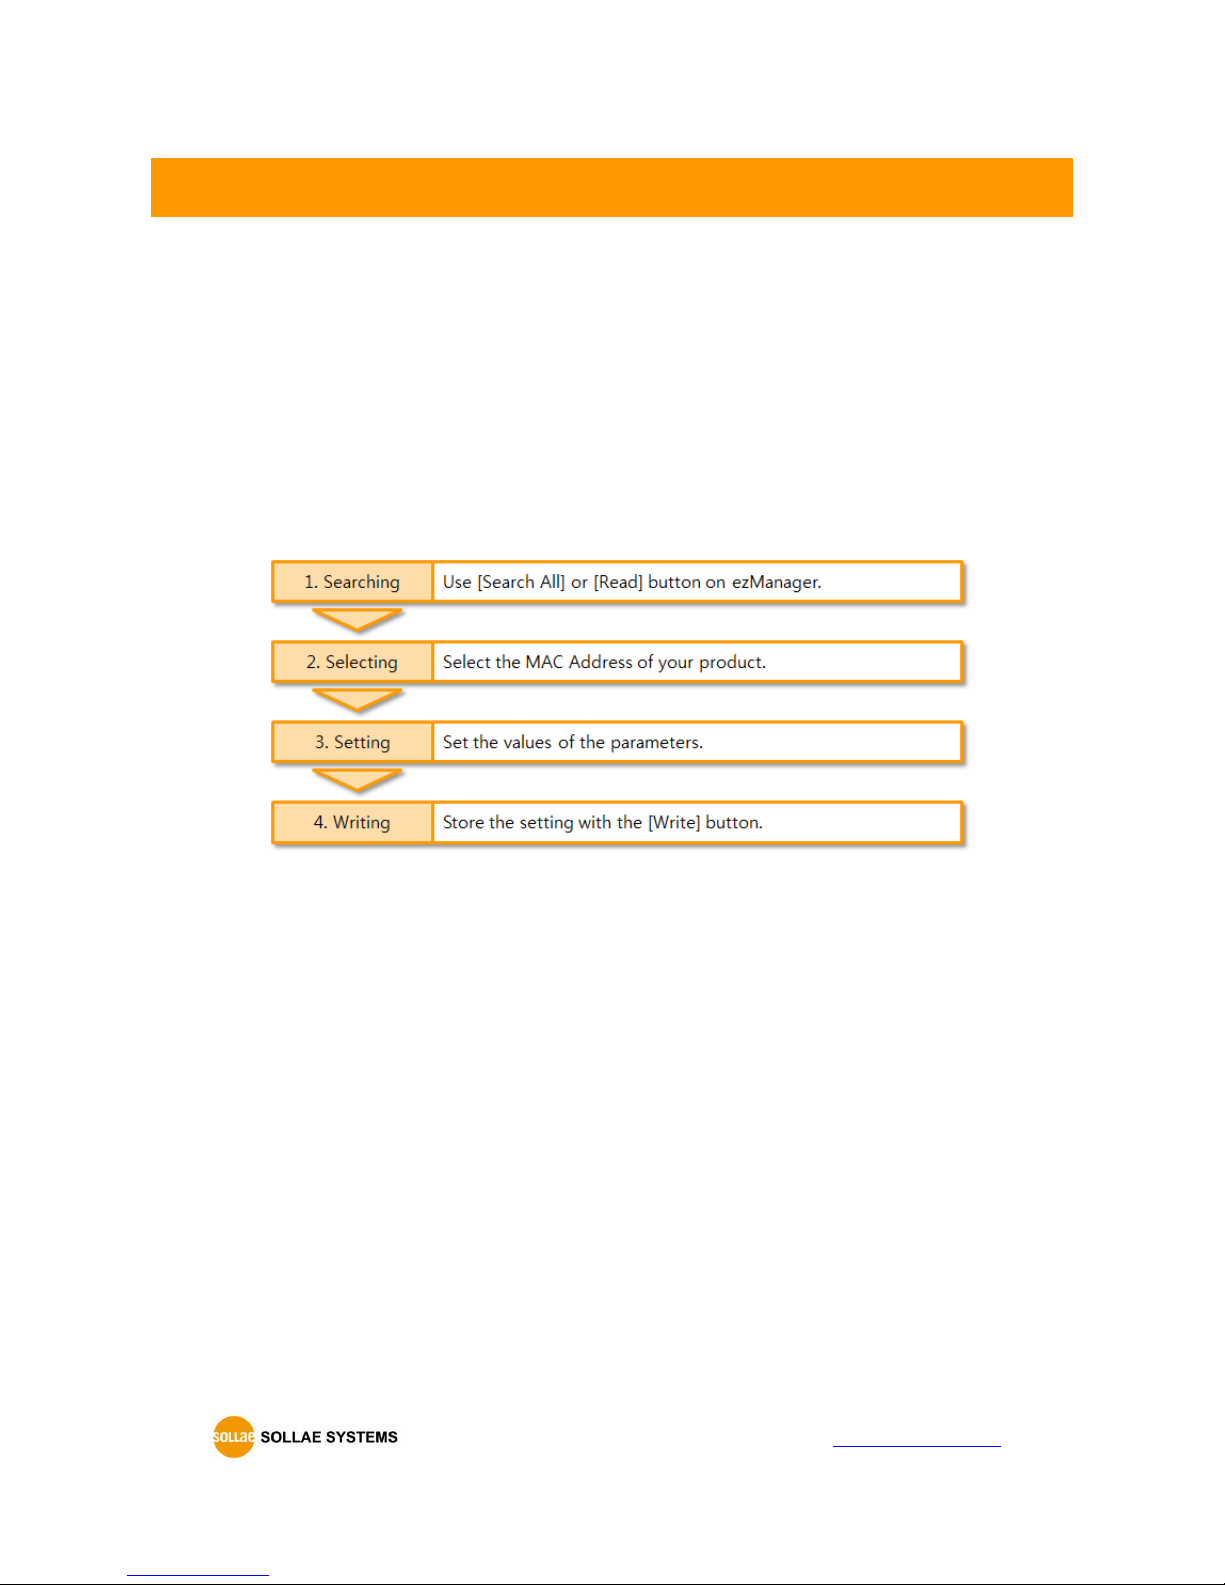
Make sure of the connection between your PC and CSE-T16 via Ethernet. If they are in the
same LAN network, [MAC Address search] button can be used. Otherwise, only [IP Address
search] is allowed to use.
Procedure
Figure 3-1 procedures for configuration via LAN
If a situation to read CSE-T16 via [IP] tab in ezManager, UDP 50005, the initial port
number must be changed to 50007.
Page 22
CSE-T16 User Manual Ver. 1.2
- 21 -
http://www.ezTCP.com
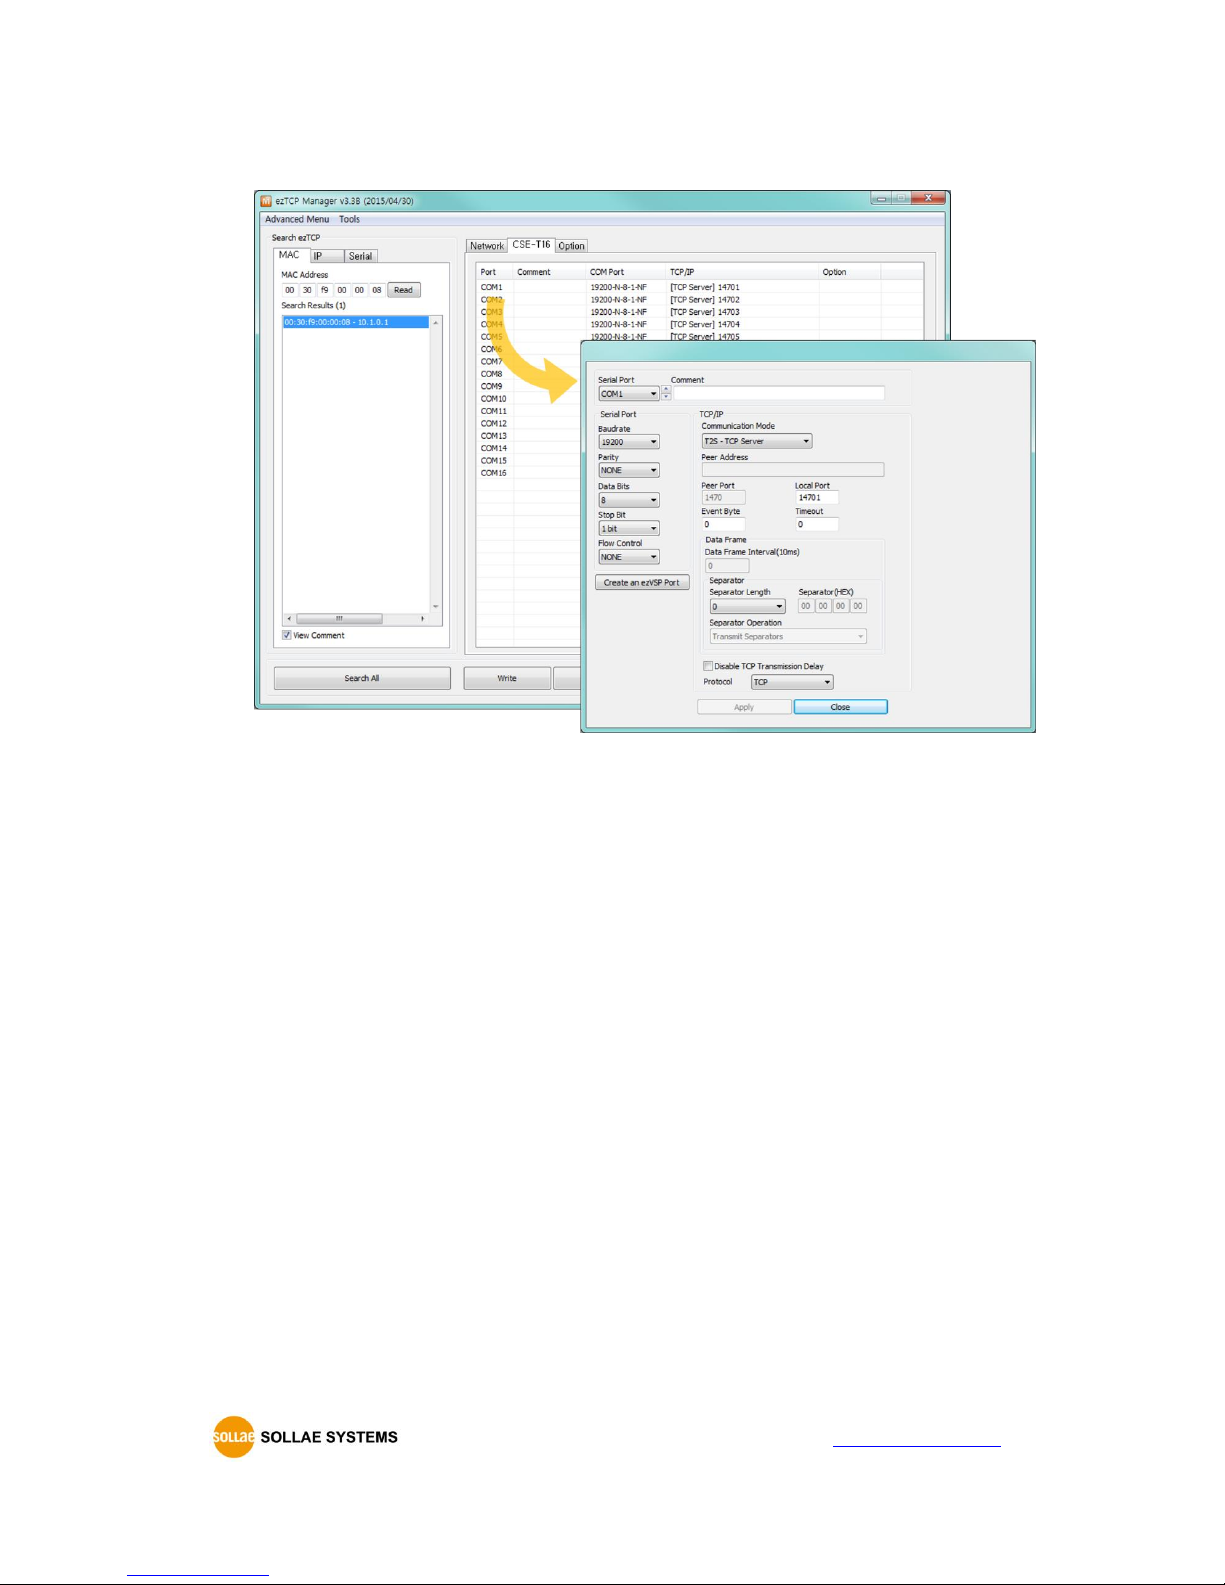
Ports settings
Figure 3-2 ports settings
Page 23
CSE-T16 User Manual Ver. 1.2
- 22 -
http://www.ezTCP.com
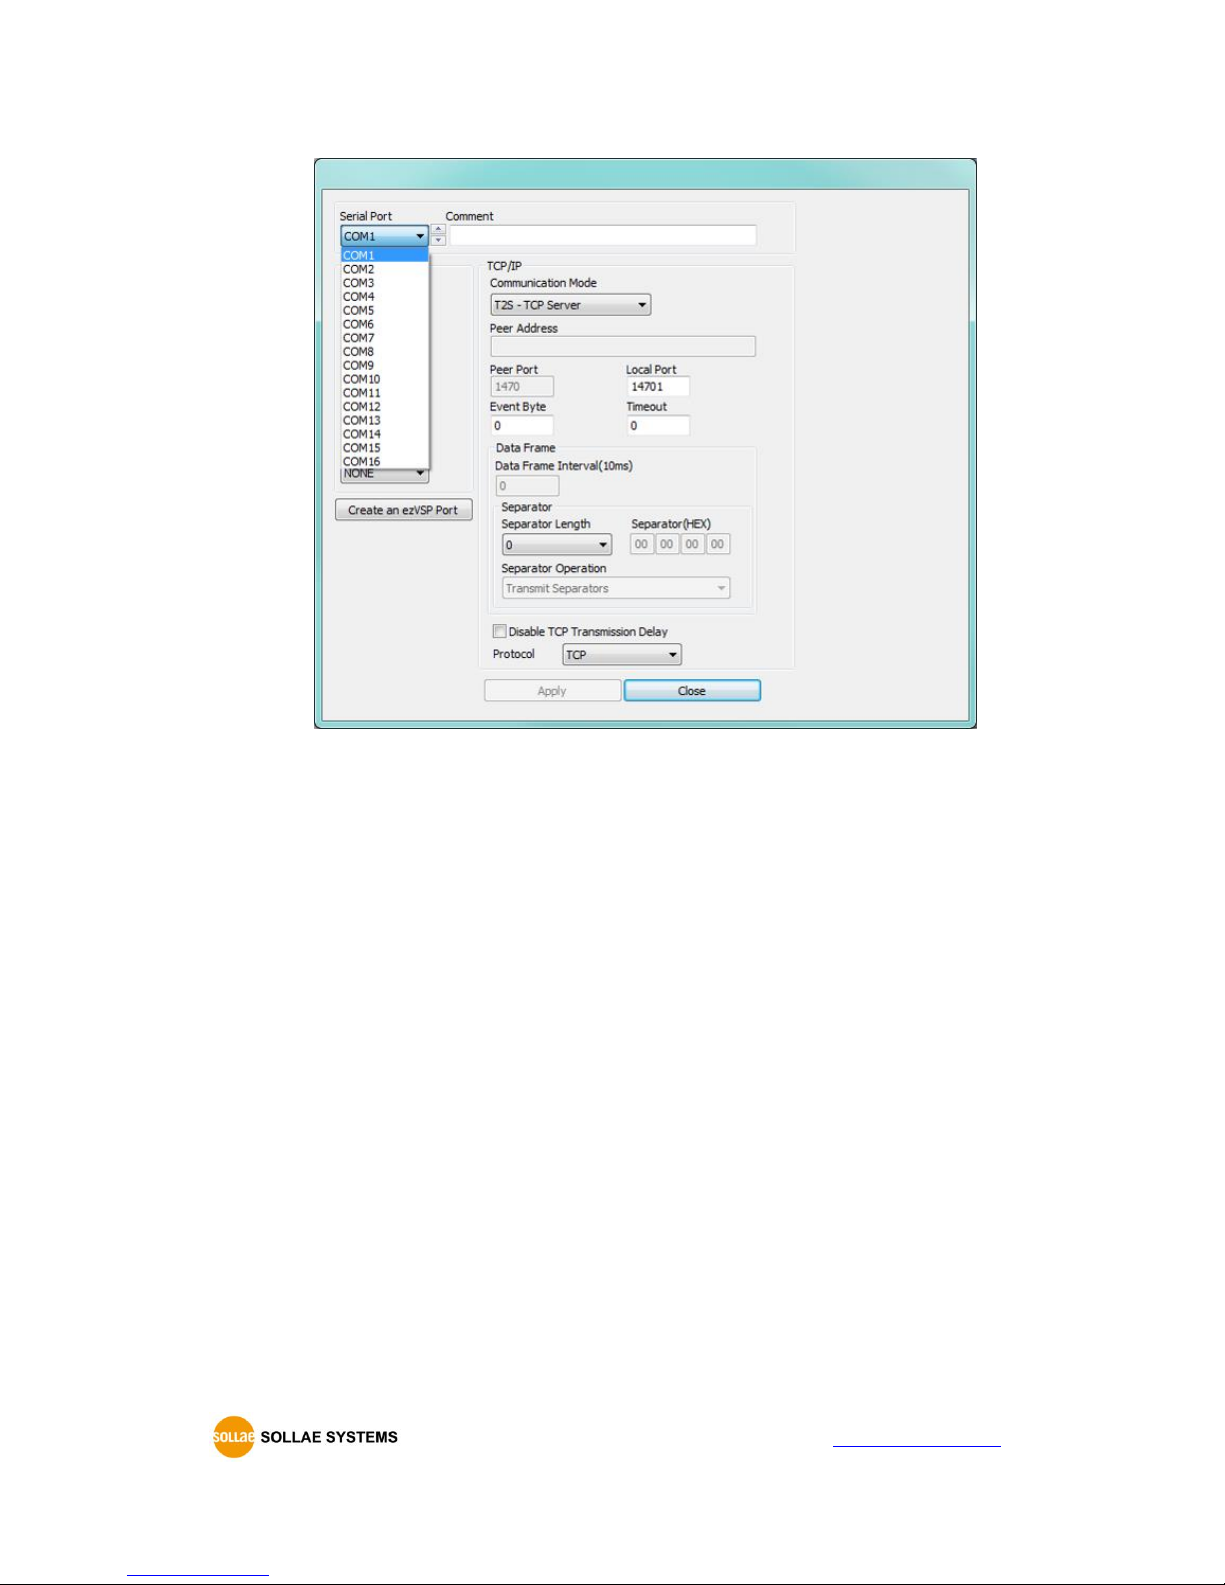
Figure 3-3 A port settings
You can set each port when you double-click a COM port in CSE-T16 tab.
Individual port setting is also available by opening a serial port list like in the Figure 3-3.
When you click [Write] button, all the modified settings is saved, and the product
reboots, whereas [Apply] button in the individual port setting page will only save the
settings without rebooting the product. (TCP Communication that was previously made
will be disconnected.)
Page 24
CSE-T16 User Manual Ver. 1.2
- 23 -
http://www.ezTCP.com
4 Communication mode
4.1 Normal Communication Mode
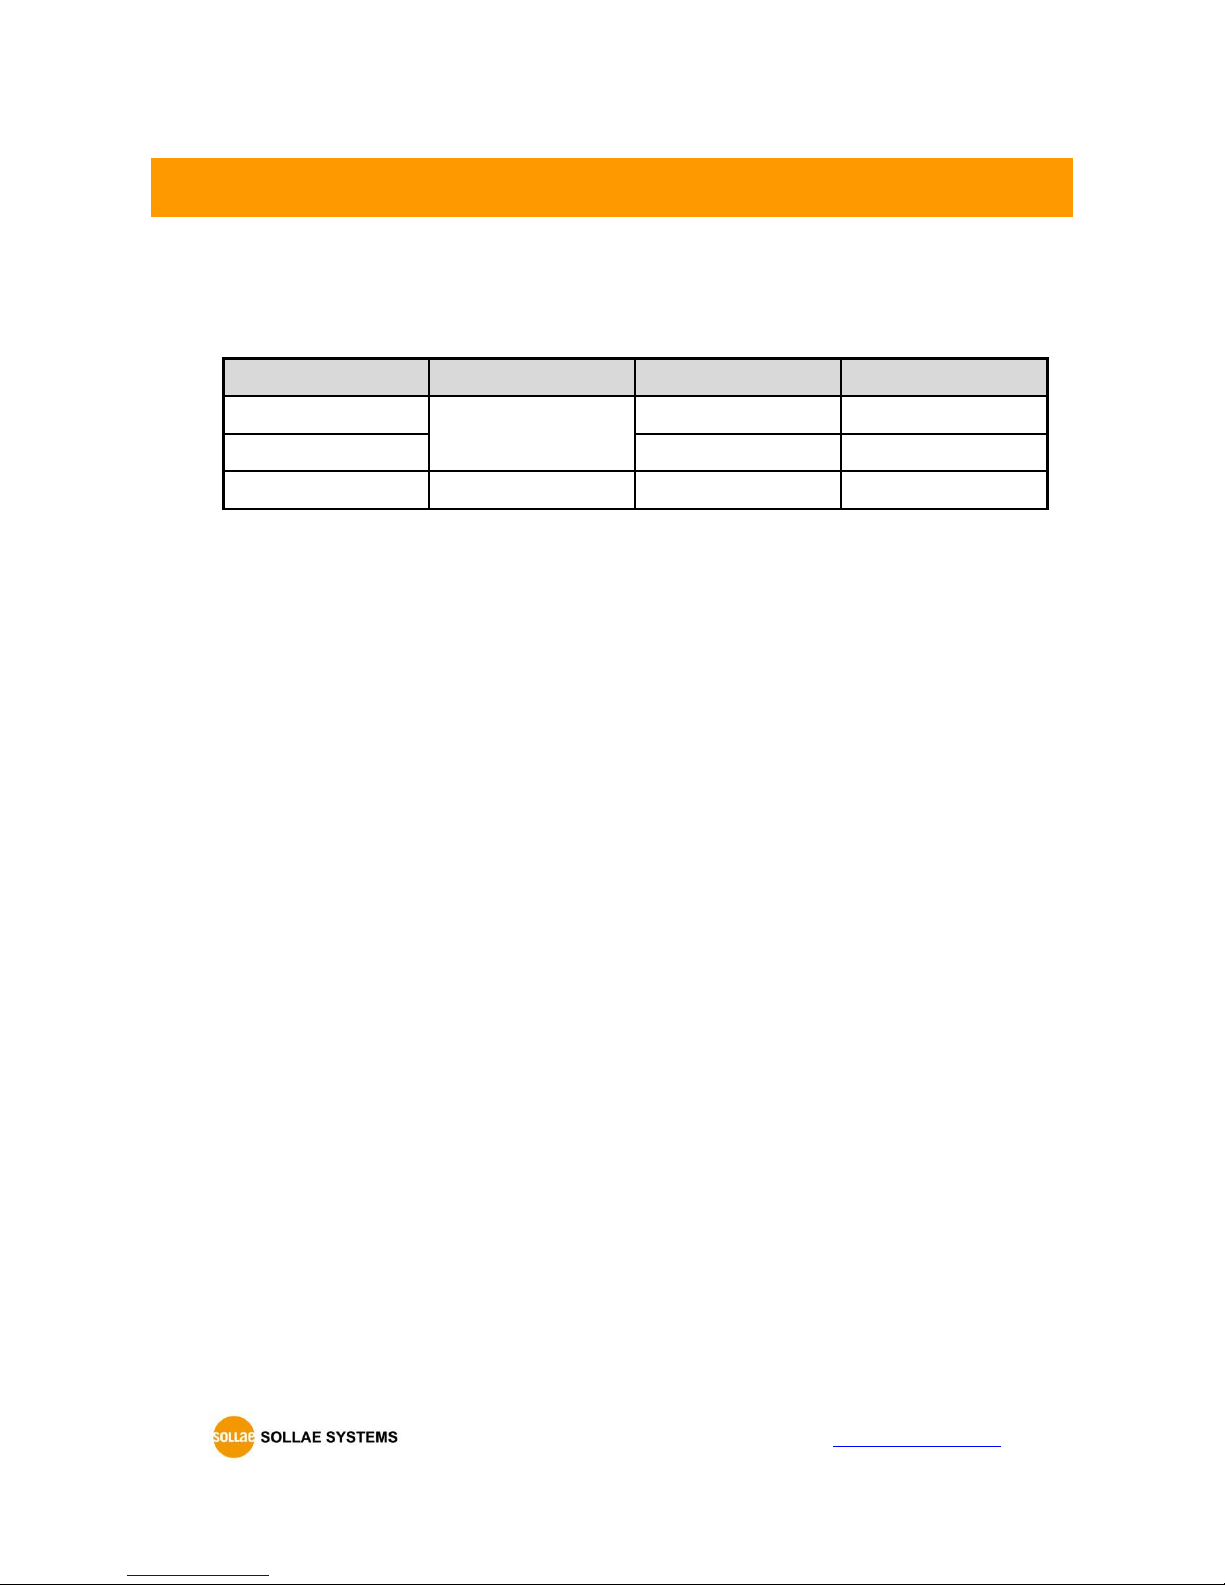
There are 3 types of connection to communicate with a remote host.
Mode
Protocol
Connection
Topology
TCP Server
TCP
Passive
1:1
TCP Client
Active
1:1
UDP
UDP
-
N:M
Tabl-4-1 comparison of communication mode
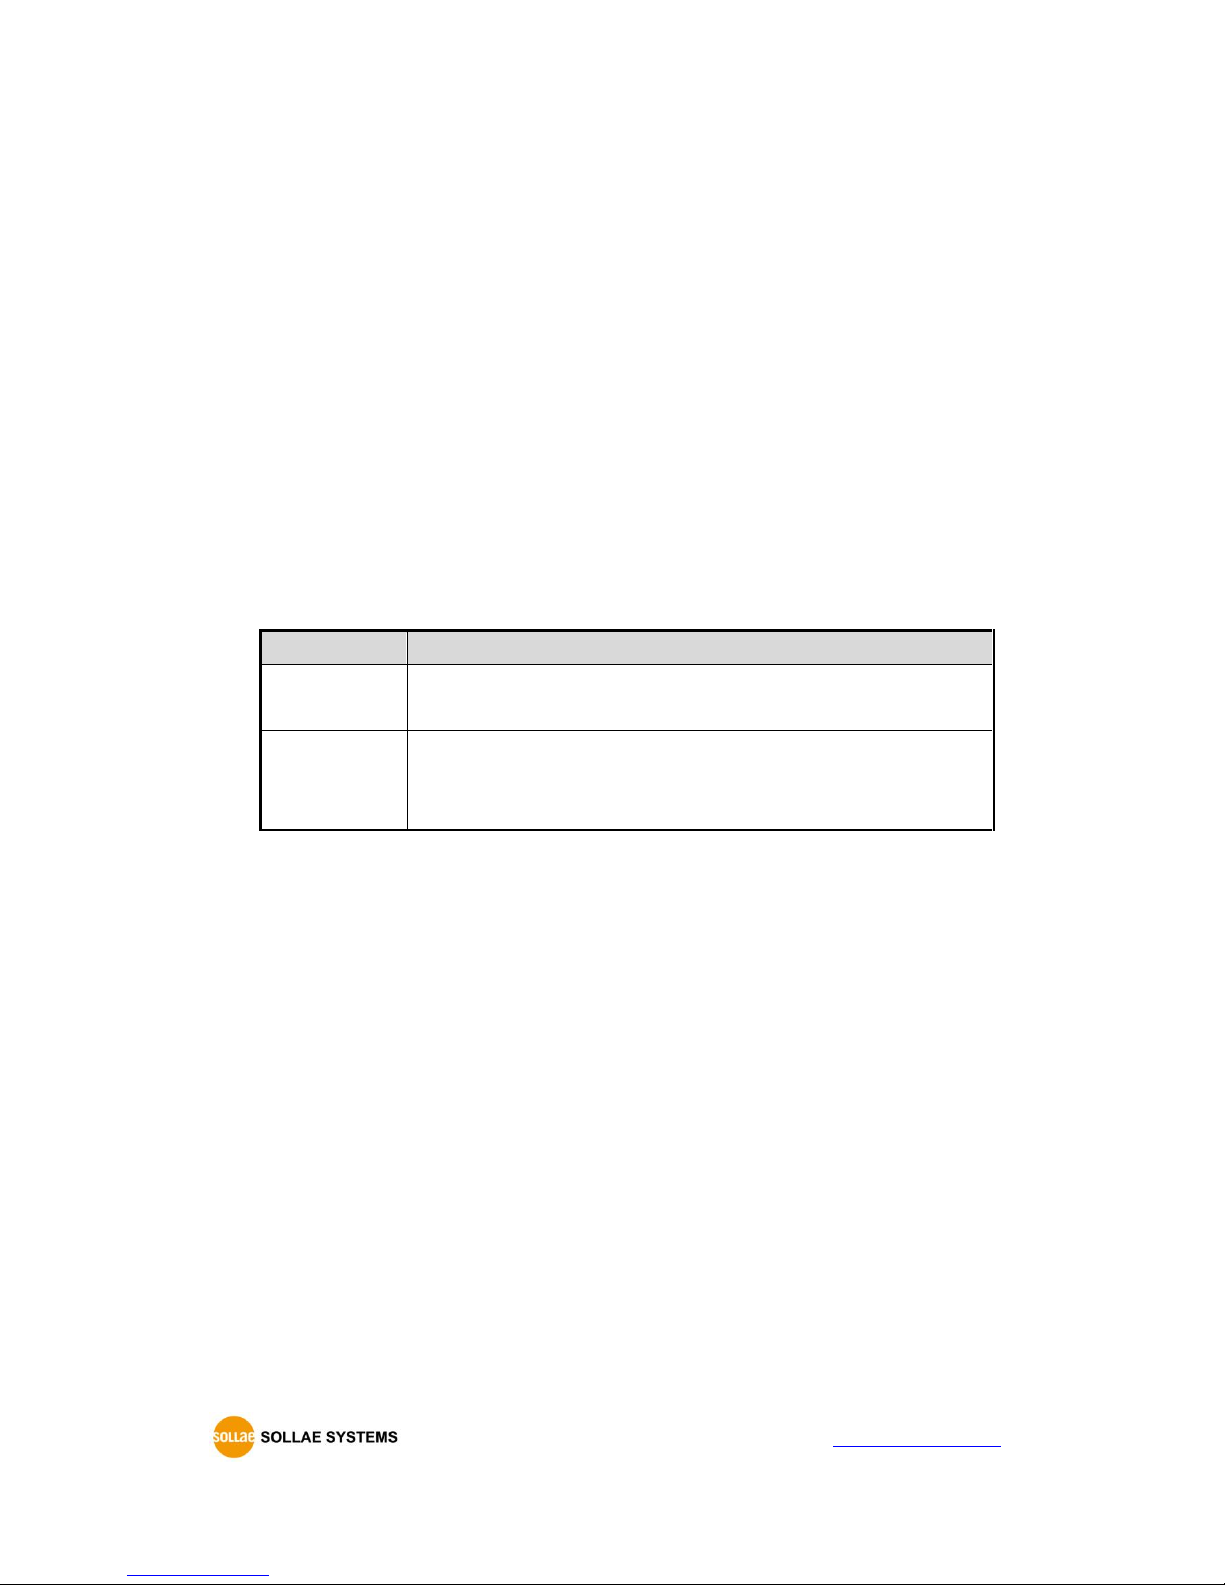
TCP protocol requires connection process. The connection is always established as 1:1 connection.
At this time, the host waiting for connection (passive connection) is called a server and the one
attempting to connect (active connection) is called a client.
On the other hand, UDP communicates by block unit without connection process. As UDP does
not require connection, numbers of hosts can communicate at the same time.
Page 25
CSE-T16 User Manual Ver. 1.2
- 24 -
http://www.ezTCP.com
4.2 TCP Server
In this mode, CSE-T16 listens to a TCP connection request from remote hosts. Once a host tries
connecting to CSE-T16, it accepts a connection. After the connection is established, CSE-T16
converts the raw data from the serial port to TCP/IP data and sends it to the network and vice
versa.
4.2.1 Key parameters
Local Port
This is a server’s port number which is used in the TCP connection.
Event Byte
With setting event bytes, you can handle the serial data of the serial buffer before a TCP
connection is established.
Value
Description
0
CSE-T16 does not send the data received before a TCP
connection is established
Otherwise
(512 or under)
CSE-T16 sends the data, which is received before a TCP
connection is established, right after a connection is established.
512 or under bytes are strongly recommended.
Table 4-2 Event Byte
Timeout
If there is no transmission data for amount of the time (in seconds) CSE-T16 actively close
the connection. If this value is set to zero, the connection would not be terminated unless
other side actively closes or there is an error on TCP connection.
Page 26
CSE-T16 User Manual Ver. 1.2
- 25 -
http://www.ezTCP.com
4.2.2 Examples
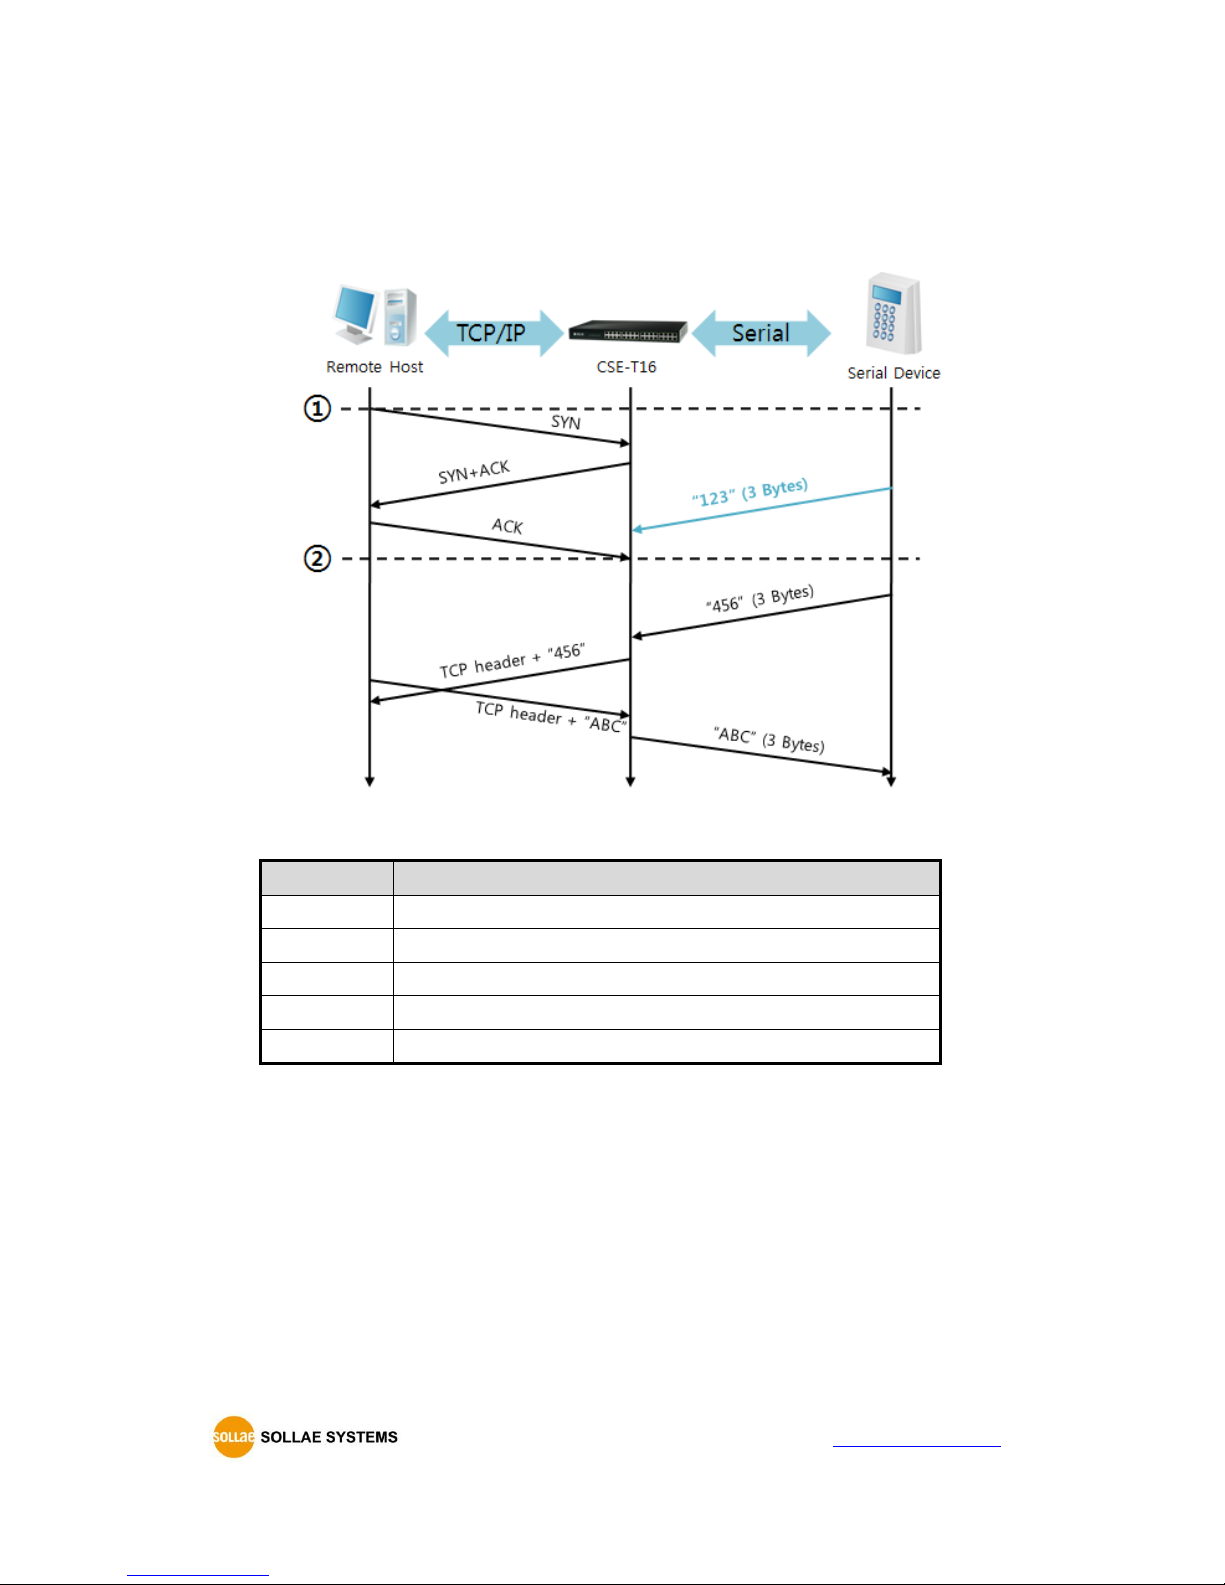
A situation that [Event Byte] is set to 0.
Figure 4-1 time chart
Time
States
~
CSE-T16 listens to connection requests
①
Remote host sends a connection request (SYN) segment
~
Processes of the connection
②
The connection is established
~
Data communication is implemented on both sides
Table 4-3 states of each point
Look at the blue arrow. The data “123” from the serial port has been received before establishing
a connection. In this case, the data would not be sent because of the [Event Byte] is set to 0.
Page 27
CSE-T16 User Manual Ver. 1.2
- 26 -
http://www.ezTCP.com
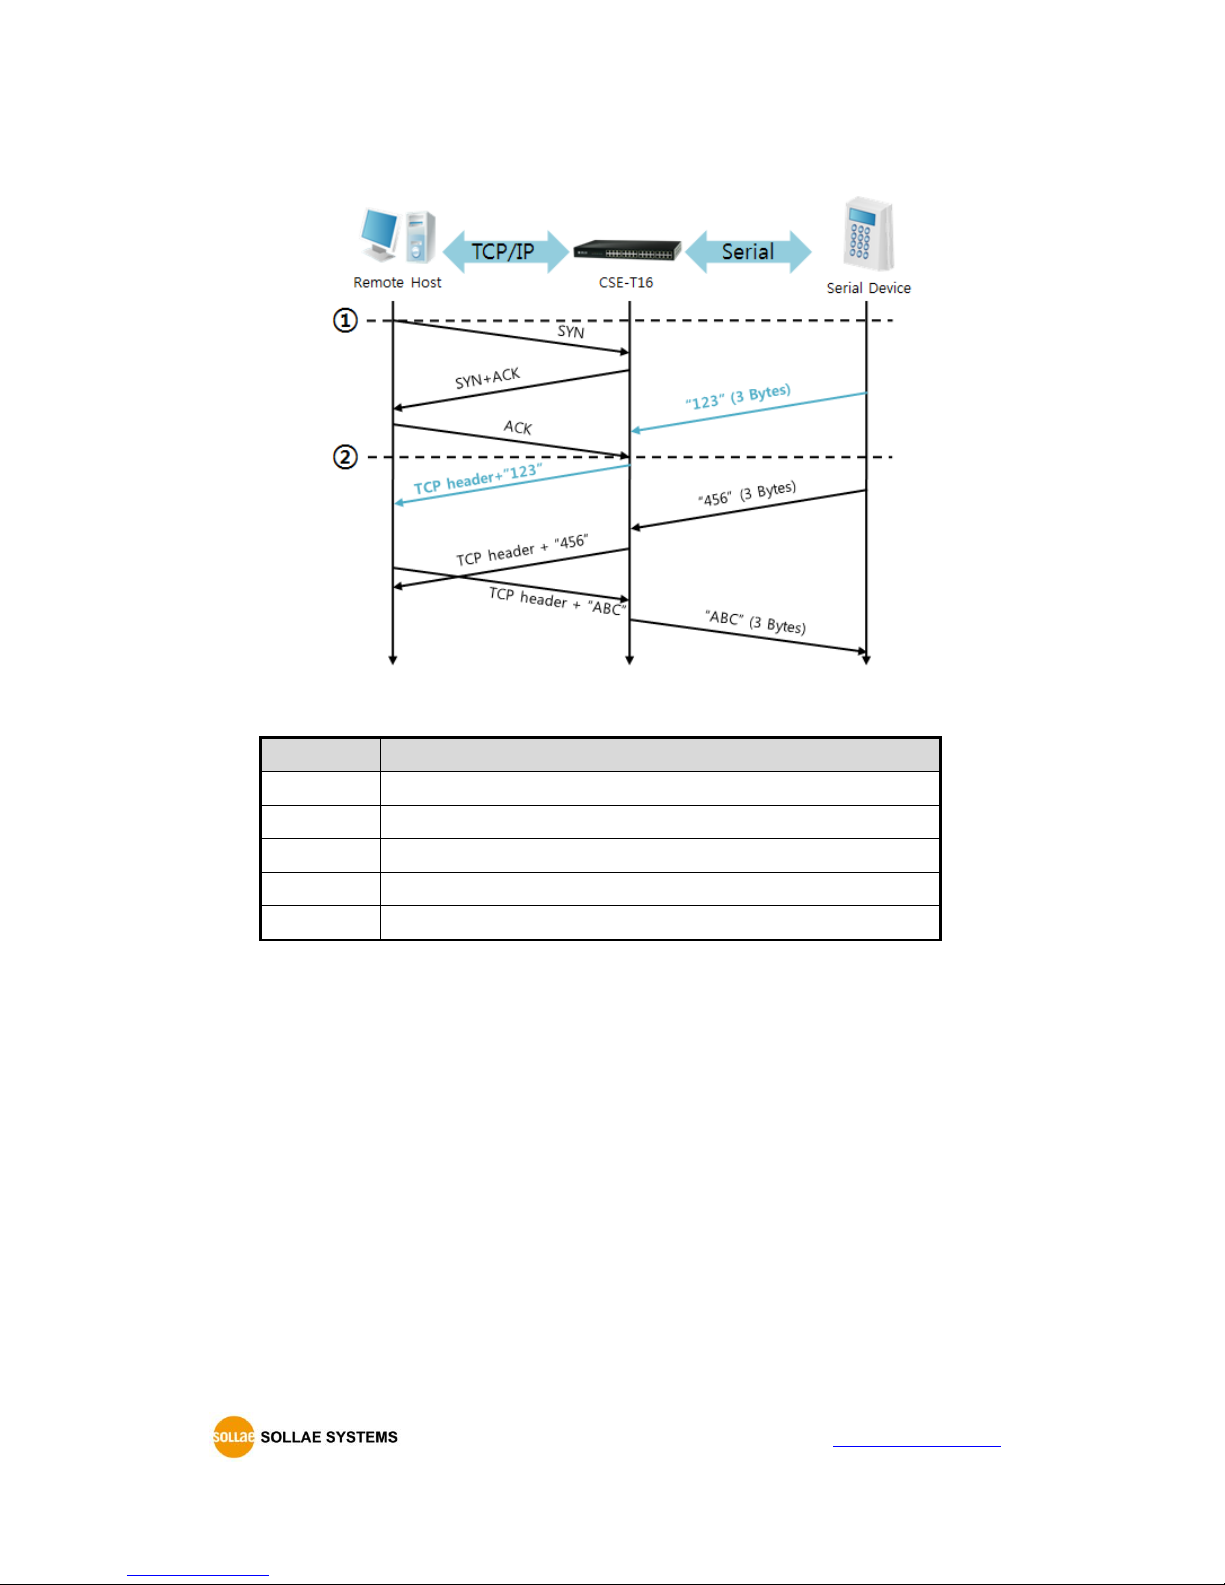
A situation that [Event Byte] is set to 1.
Figure 4-2 time chart
Time
States
~
CSE-T16 listens connection requests
①
Remote host sends connection request (SYN) segment
~
Processes of the connection
②
The connection is established
~
Data communication is implemented on both sides
Table 4-4 states of each point
As you can see, even though the data “123” arrives CSE-T16 before connection is established, it
is sent to remote host right after establishing a connection because the value of [Event Byte] had
been set to 1.
Page 28
CSE-T16 User Manual Ver. 1.2
- 27 -
http://www.ezTCP.com
4.3 TCP Client
In this mode, CSE-T16 sends request segments to a TCP server with information of [Peer Address]
and [Peer Port]. Once a host is listening, the connection will be established. After then, CSE-T16
converts the raw data from the serial port to TCP/IP data and sends them to the network and vice
versa.
4.3.1 Key parameters
Peer Address
This part is to put an IP address or a host name of TCP server.
Peer Port
[Peer Port] is a port number of TCP server.
Event Byte
In TCP Client mode, this parameter has two functions.
Firstly, this item can decide the point of time to send the connection request parameter.
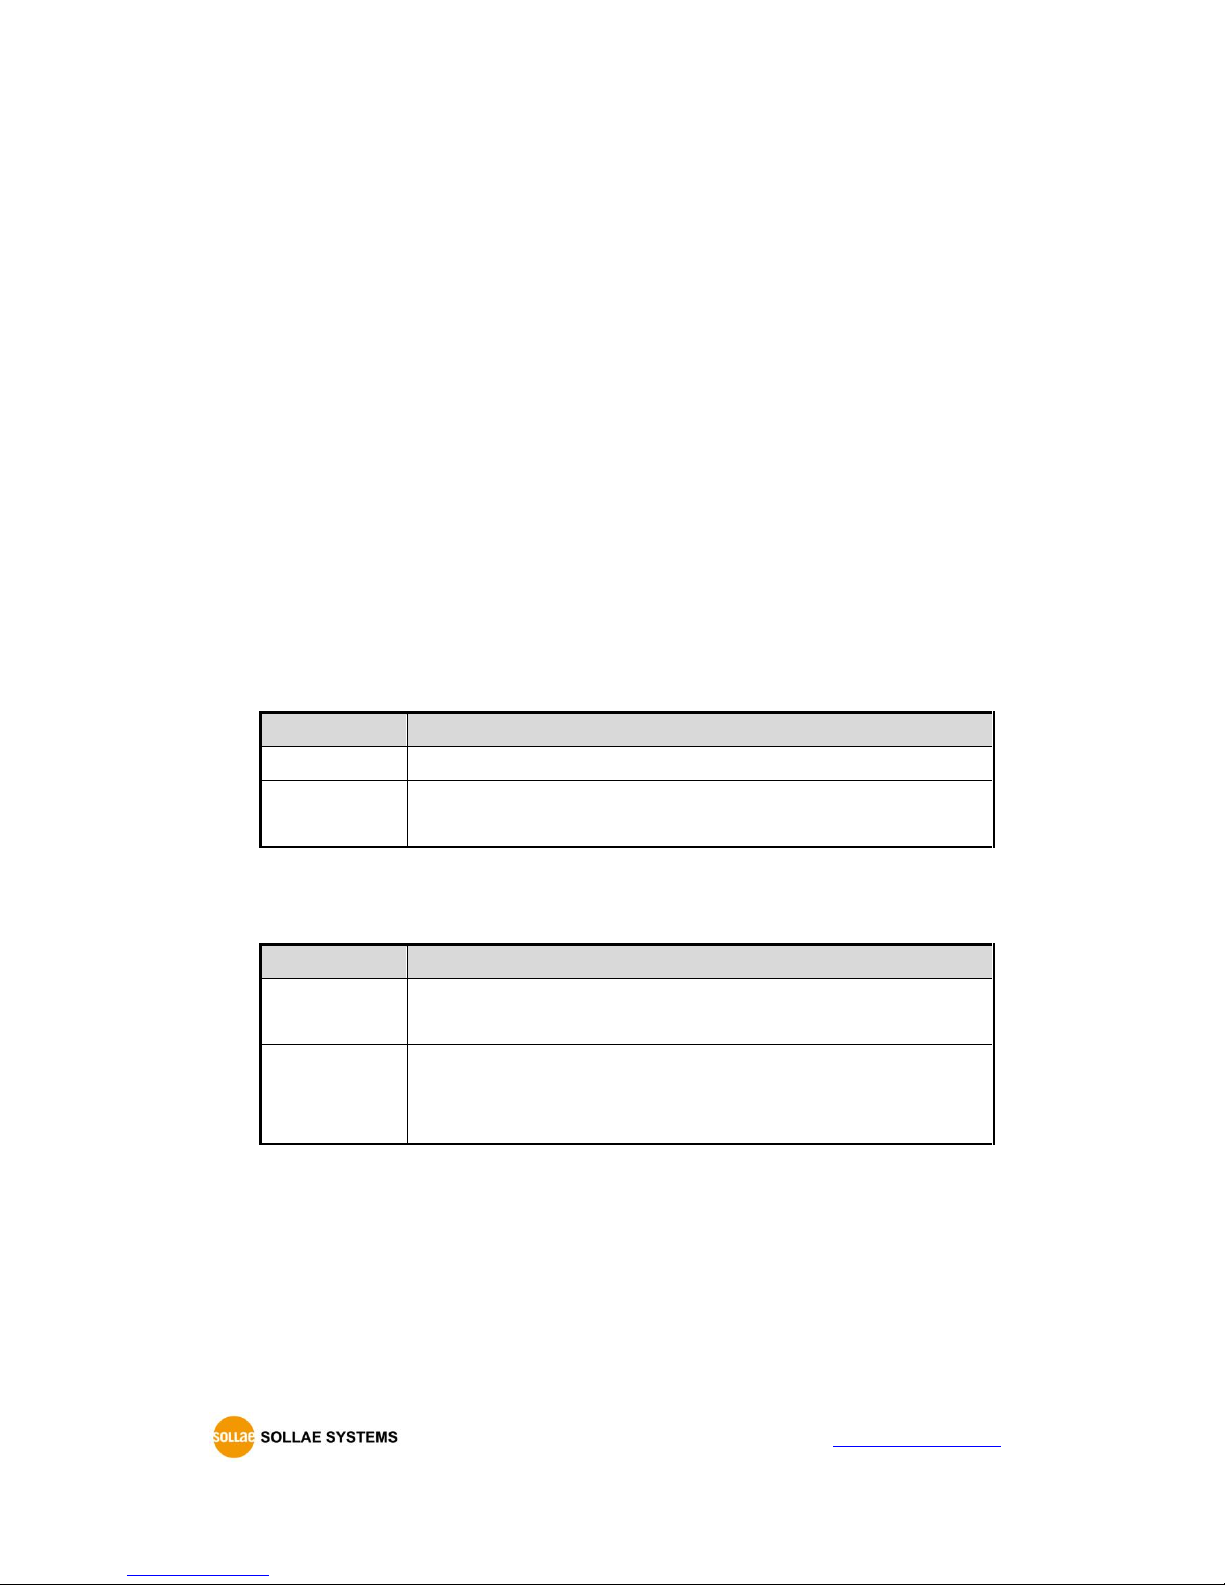
Value
The point of time to send SYN request segment
0
Right after CSE-T16 boots up
Otherwise, N
(N <= 512 )
Right after CSE-T16 received N bytes from the serial port.
Setting to less than 512 bytes is strongly recommended.
Table 4-5 the operation of Event Byte 1
Secondly, you can handle the serial data before a TCP connection is established with this
parameter.
Value
Description
0
CSE-T16 does not send the data received before a TCP
connection is established.
Otherwise
(512 or under)
CSE-T16 sends the data, which is received before a TCP
connection is established, right after a connection is established.
Setting to less than 512 bytes is strongly recommended.
Table 4-6 the operation of Event Byte 2
Timeout
If there is no transmission data for amount of the time (in seconds) CSET16 actively close the
connection. If this value is set to zero, the connection would not be terminated unless other
side actively closes or there is an error on TCP connection.
Page 29
CSE-T16 User Manual Ver. 1.2
- 28 -
http://www.ezTCP.com
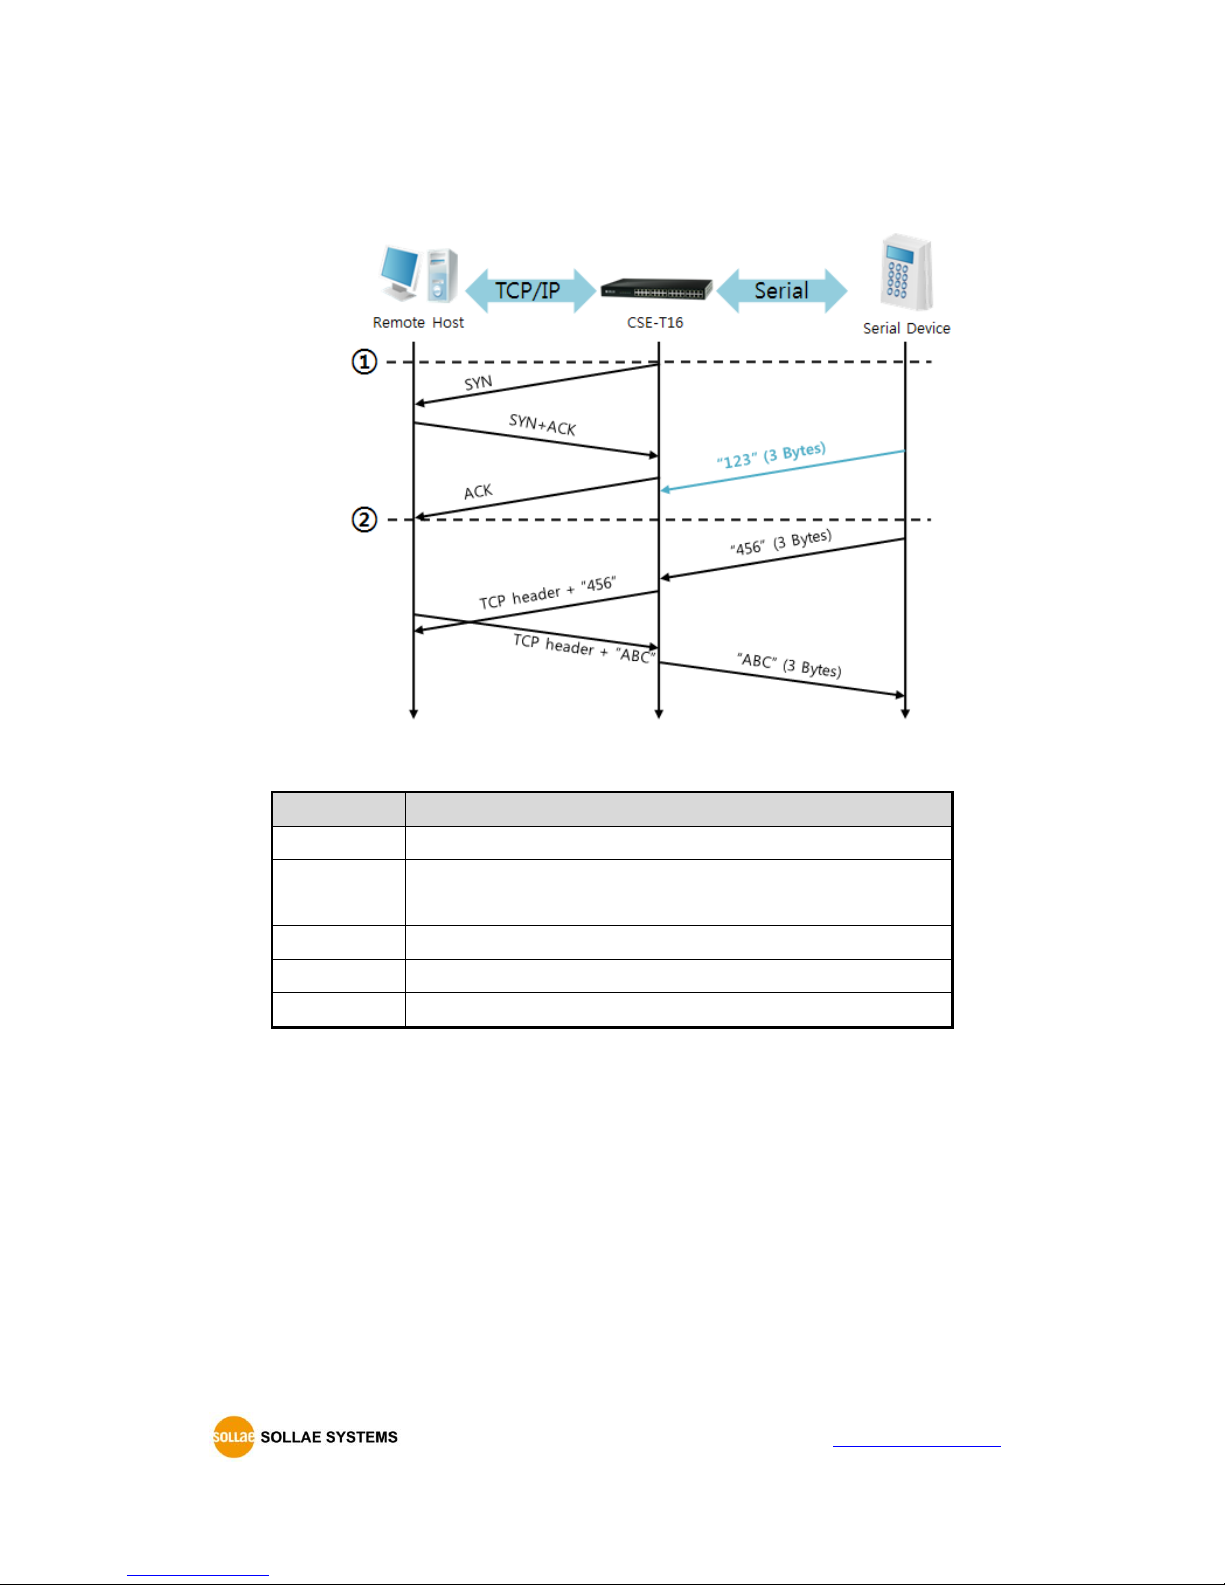
4.3.2 Examples
A situation that [Event Byte] is set to 0
Figure 4-3 time chart
Time
States
~
Power is not supplied yet.
①
CSE-T16 sends a connection request segment right after it
boots up.
~
processes of TCP connection
②
The connection is established.
~
data communication on both sides
Table 4-7 states of each point
Look at the blue arrow. The data “123” from the serial port was received from serial port before
establishing a connection. In this case, the data would not be sent because the [Event Byte] is set
to 0.
Page 30
CSE-T16 User Manual Ver. 1.2
- 29 -
http://www.ezTCP.com
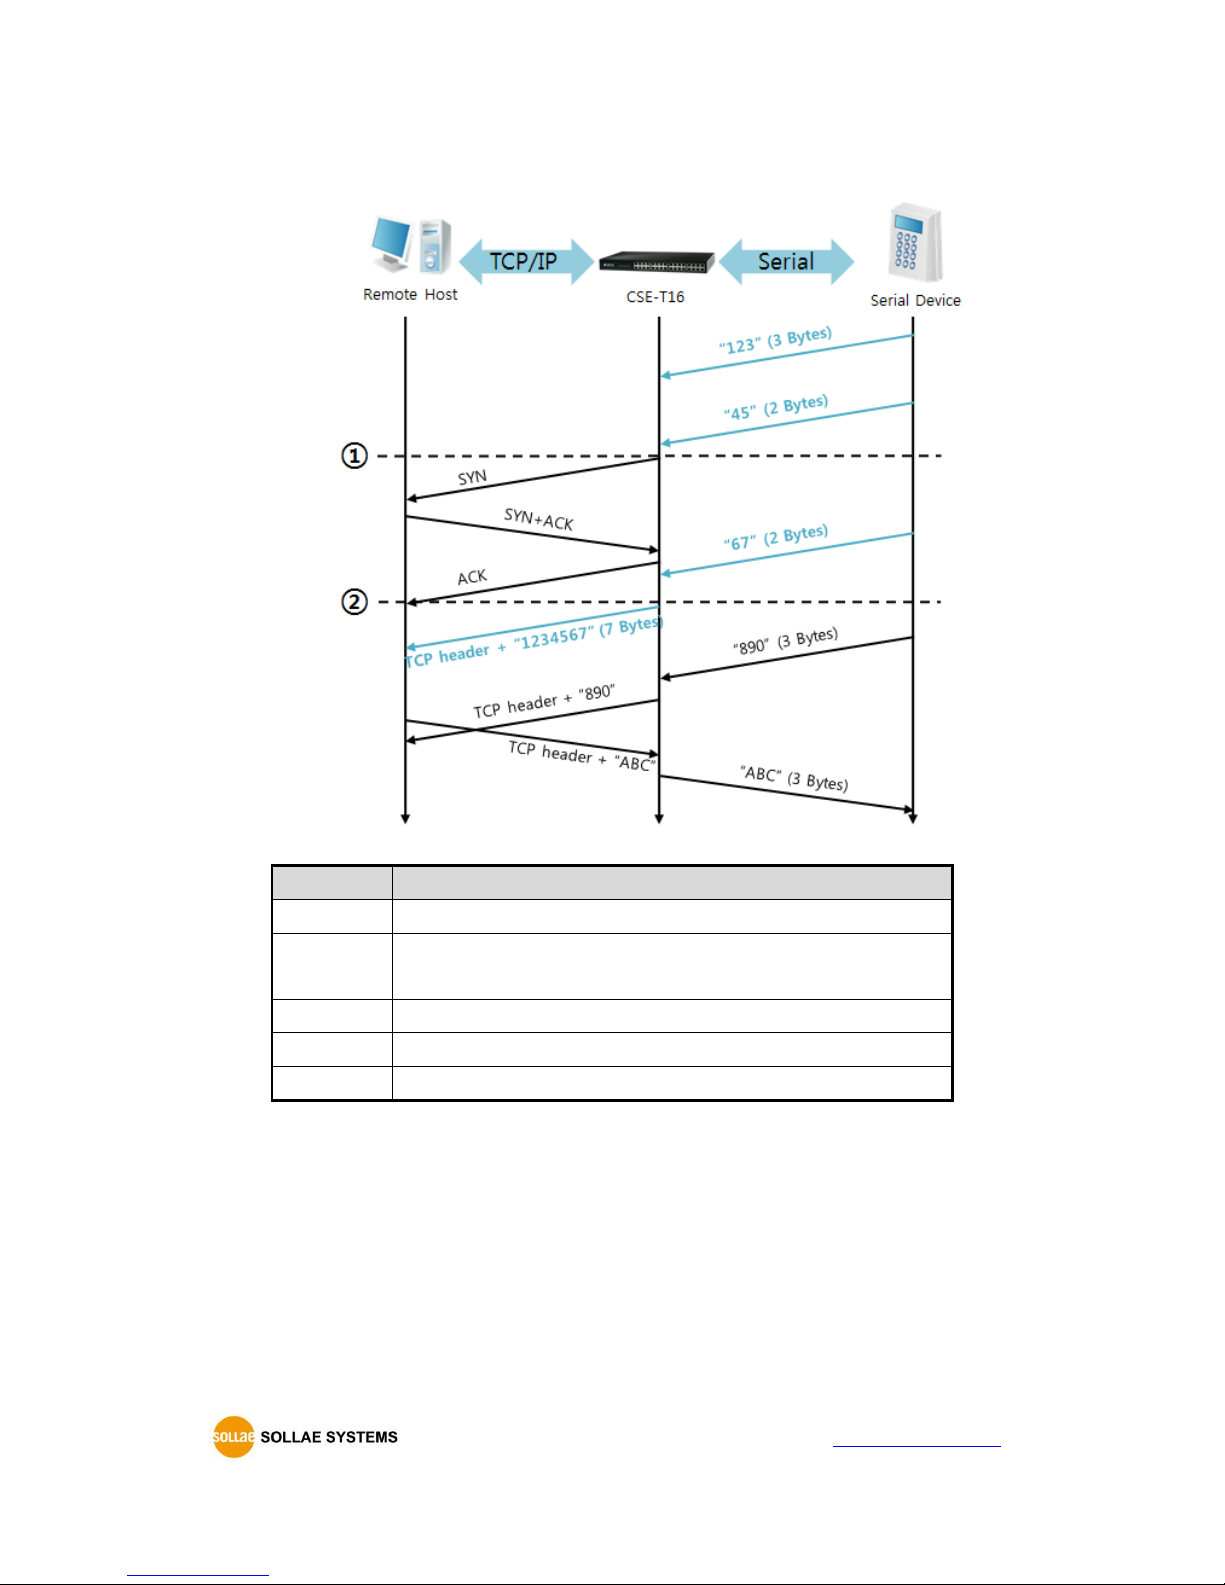
A situation that [Event Byte] is set to 5
Figure 4-4 time chart
Time
States
~
CSE-T16 receives data from its serial port
①
CSE-T16 sends a connection request segment right after
receiving 5 bytes
~
Processes of the TCP connection
②
The connection is established
~
The data “1234567” is transmitted to the remote host
Table 4-8 states of each point
As you can see, CSE-T16 has sent a request segment right after the size of the serial data has
been 5 bytes. Even though they arrived before the connection, the data “123”, “45” and “67” was
transmitted to the remote host because the [Event Byte] is set to 5.
Page 31

CSE-T16 User Manual Ver. 1.2
- 30 -
http://www.ezTCP.com
4.4 UDP
UDP has no connection processes. In this mode, data is sent in block units. Therefore, data that
comes through CSE-T16’s serial port is collected in block units to send it elsewhere.
4.4.1 Key parameters
Block Size
[Block Size] is to set how many bytes of data need to in one block. If the number of byes
arrives come into the serial port reaches the block size value, CSE-T16 will send them as one
block to the network. The maximum value could be 1460 bytes.
Dynamic update of Peer host
If you set the value of [Peer Address] and [Peer Port] to 0, [dynamic update of peer host]
function is activated. By using this function, CSE-T16 can automatically change the host,
allowing to communicate with multiple hosts without additional setting.
Page 32
CSE-T16 User Manual Ver. 1.2
- 31 -
http://www.ezTCP.com
4.4.2 Examples
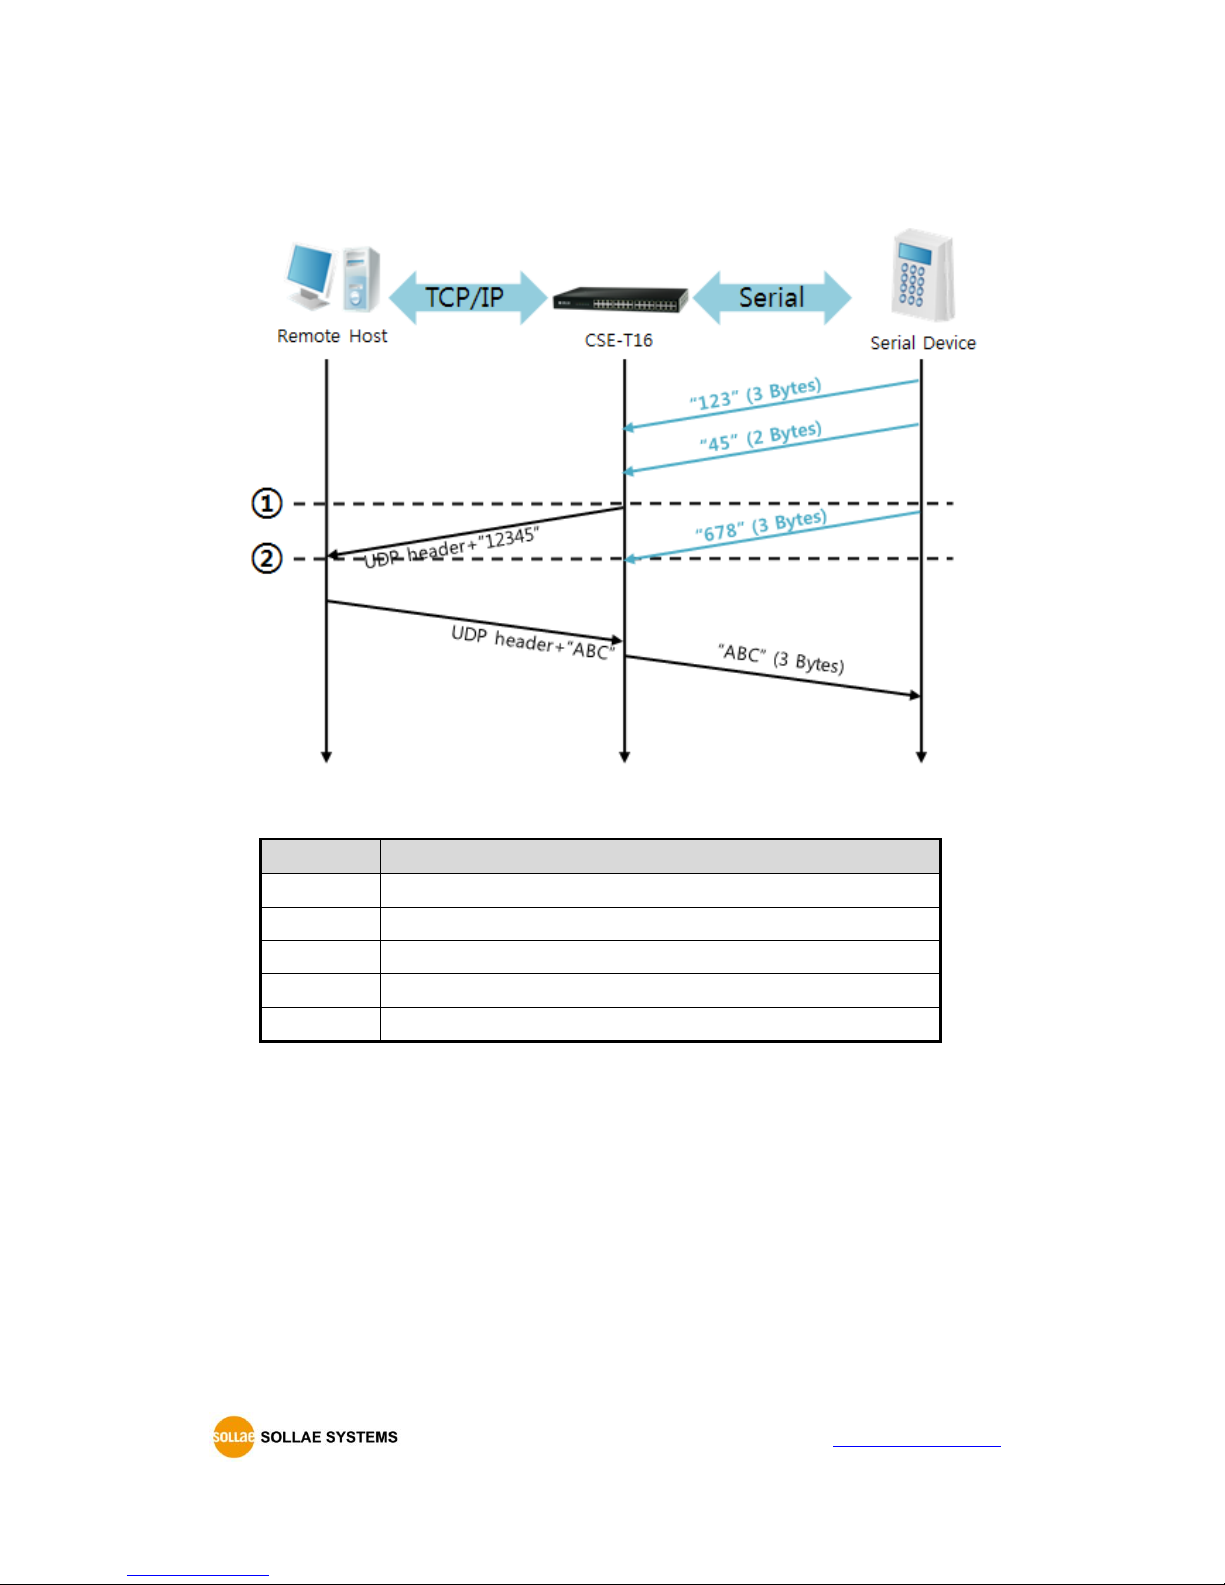
Block size: 5 Bytes
Figure 4-5 time chart
Time
States
~
CSE-T16 receives data from the serial port
①
CSE-T16 sends 5 bytes as one block based on the [Block Size]
~
Serial device sends the data “678”
②
The data “678” arrives.
~
Waiting data from the serial port to be 5 byte.
Table 4-9 states of each point
Although CSE-T16 received data “678” from serial port it does not immediately send this data
because it has not gather enough block size of data. It keeps this data and waits for enough 5
bytes.
Page 33
CSE-T16 User Manual Ver. 1.2
- 32 -
http://www.ezTCP.com
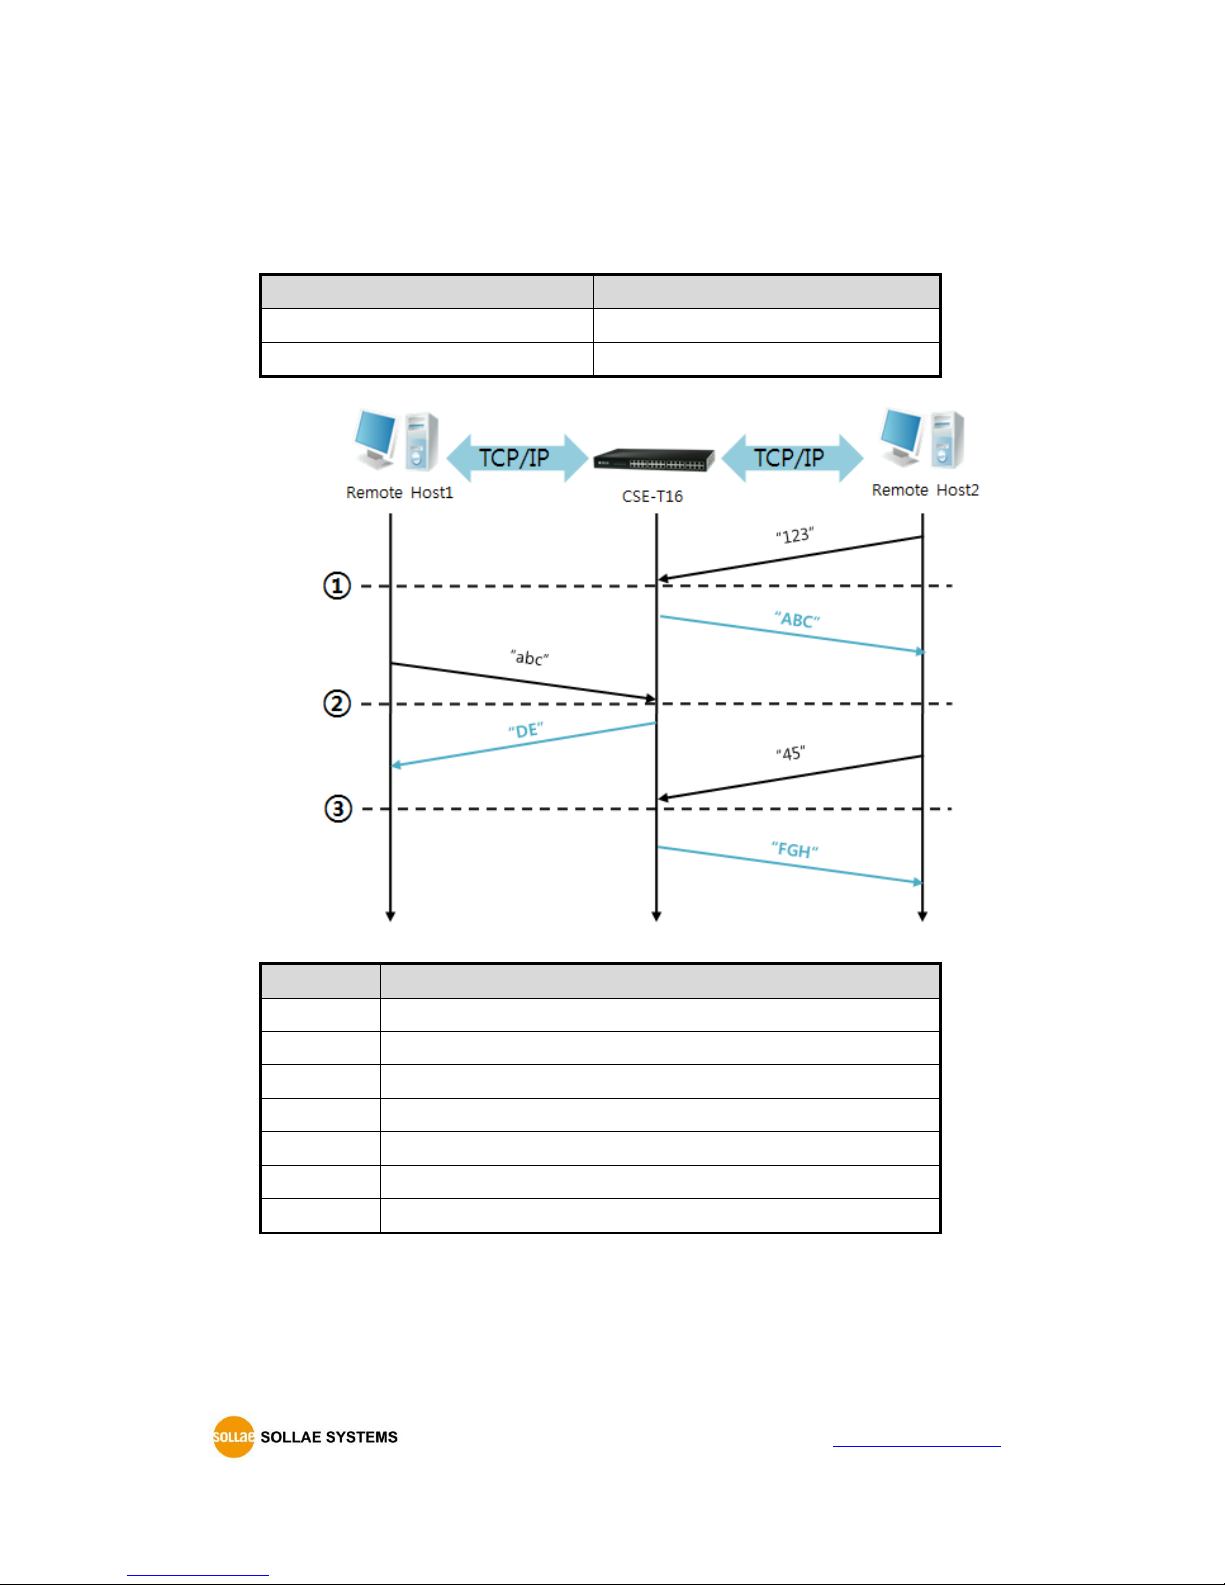
Dynamic Update of Peer host
This is a function that CSE-T16 automatically sets its peer host with information of the last
packet received from network. The source address of the packet is set to the peer host.
Parameters
Values
Peer Address
0 (None)
Peer Port
0
Table 4-10 setting for [dynamic update of peer host] function
Figure 4-6 time chart
Time
States
~
Sending any UDP data to the network is impossible.
①
UDP data arrives from Remote Host 2.
~
Send UDP data to Remote Host 2.
②
UDP data arrives from Remote Host 1.
~
Send UDP data to Remote Host 1.
③
UDP data arrives from Remote Host 2.
~
Send UDP data to Remote Host 2.
Table 4-11 states of each point
The data “ABC”, “DE” and “FGH” are ones that come from the serial port of CSE-T16 in
the above figure.
Page 34
CSE-T16 User Manual Ver. 1.2
- 33 -
http://www.ezTCP.com
5 System Management
5.1 Upgrading Firmware
5.1.1 Firmware
Firmware is a type of software for operation of CSE-T16. If it is needed to add function or fix
bugs, the firmware will be modified and released. We recommend that users keep using the latest
released firmware.
5.1.2 Process
Downloading the latest released firmware
Download the newest firmware file. We update our homepage when a new firmware is
released. You can find it on our website.
Run a TFTP client and ready to send the firmware file
Run a TFTP client program. ezManager is equipped with the client program.
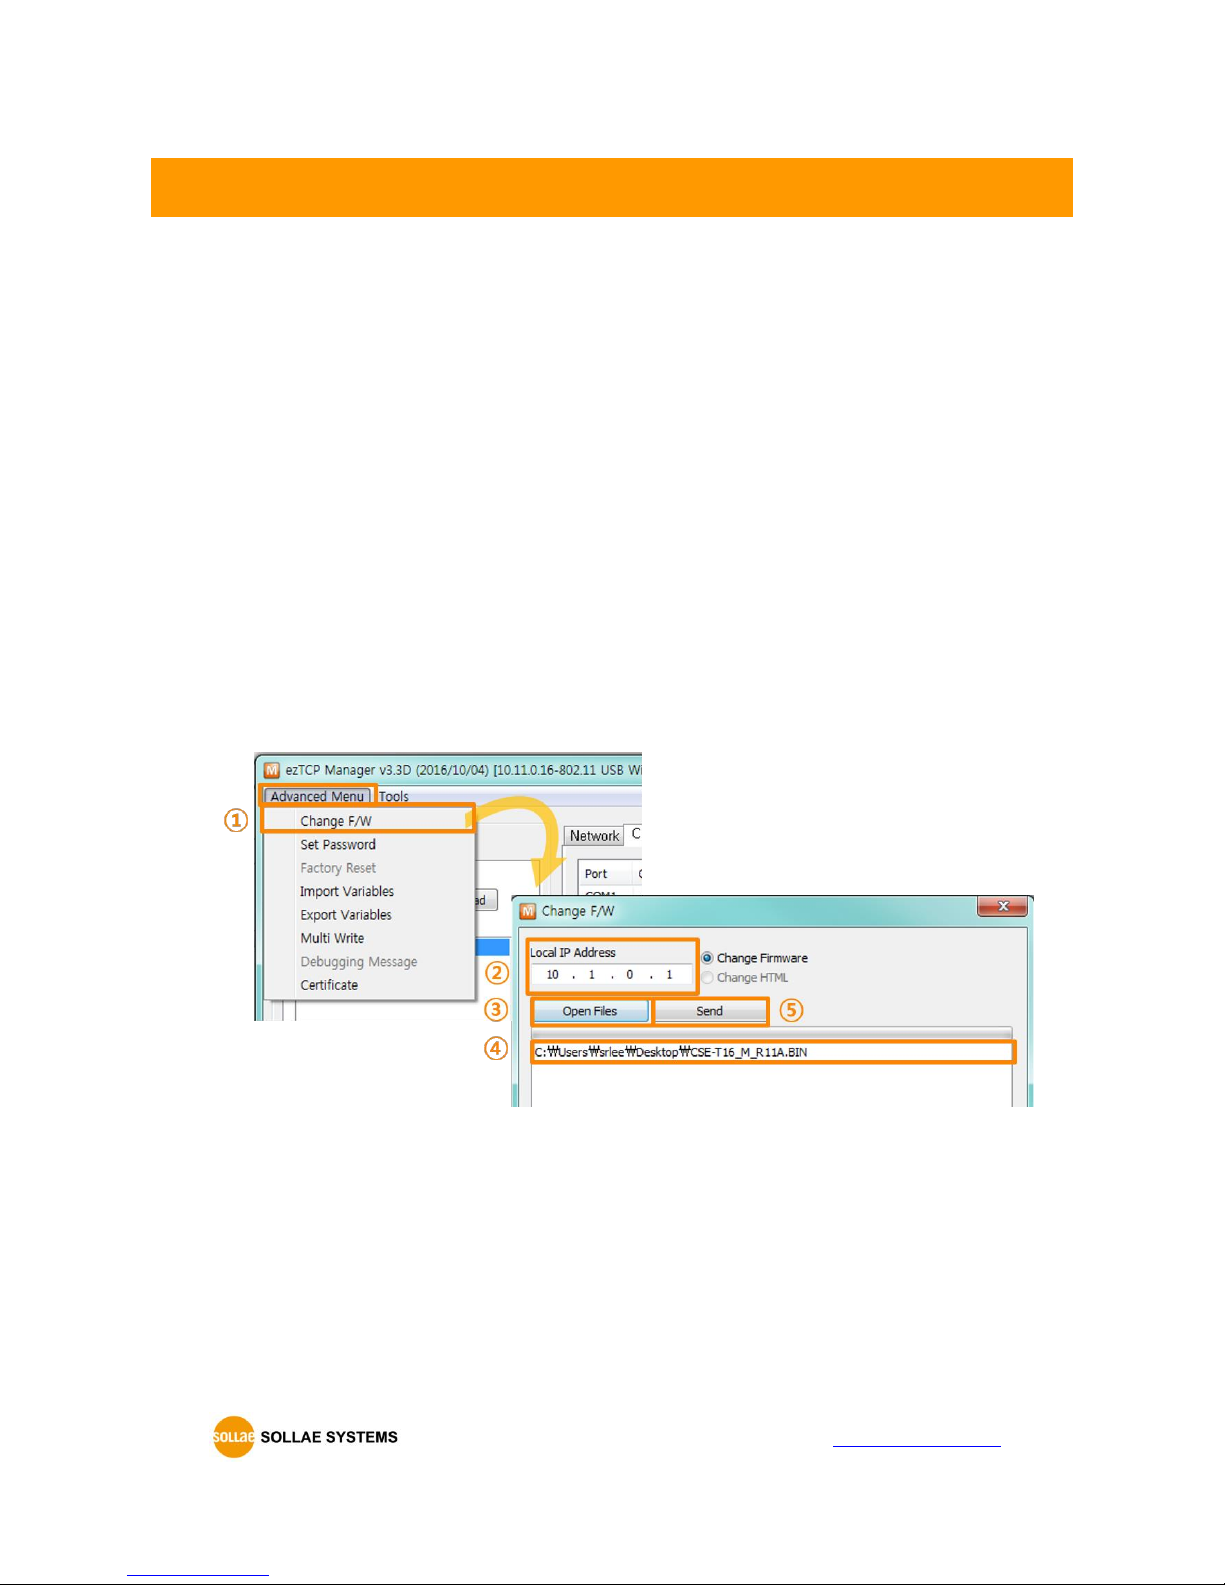
Figure 5-1 running TFTP client
① Click the [Change F/W] button to run TFTP client
② Input the IP address of CSE-T16 to the [Local IP Address] text box
③ Press the [Open Files] button and choose the firmware file
④ Check if the name and path of the firmware file are correct
⑤ Click the [Send] button
Page 35
CSE-T16 User Manual Ver. 1.2
- 34 -
http://www.ezTCP.com
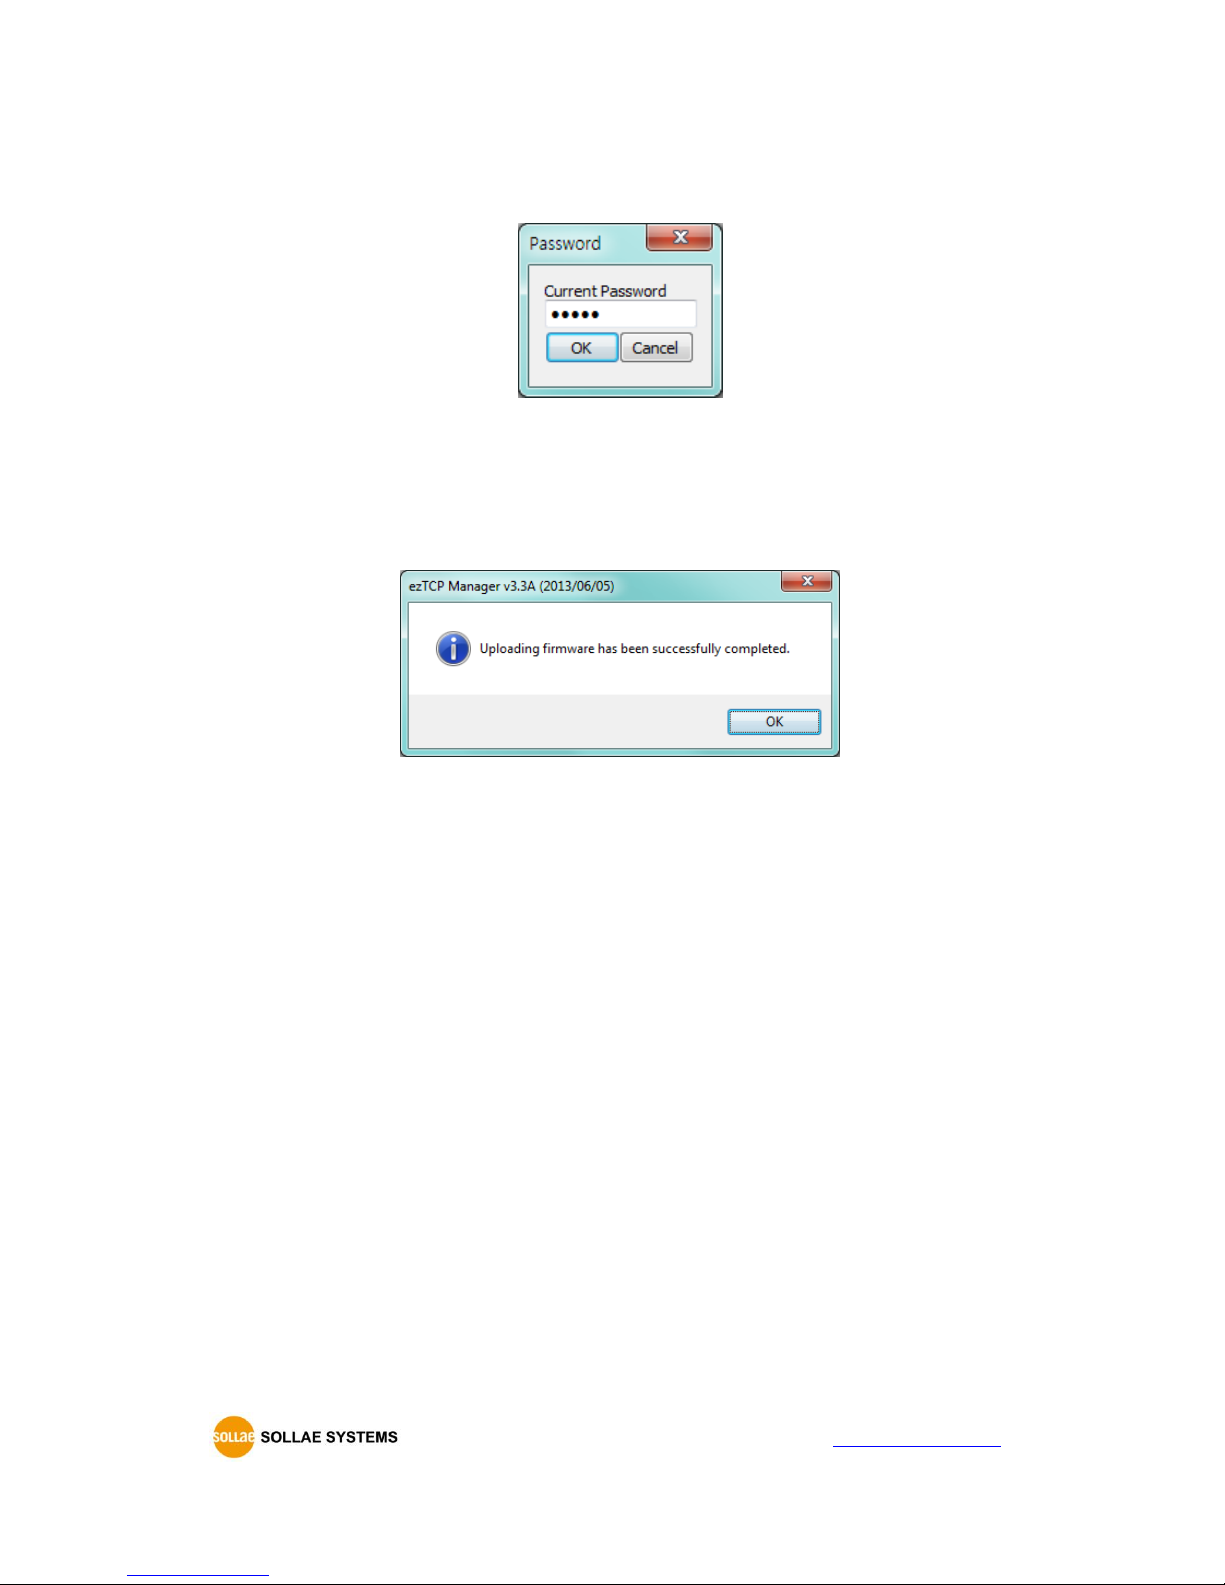
⑥ Input Password
Figure 5-2 password
Default password is “sollae”. (Firmwares on V1.1 and before versions is “admin”.)
⑦ Confirm the completed message
Figure 5-3 sending firmware file
Page 36
CSE-T16 User Manual Ver. 1.2
- 35 -
http://www.ezTCP.com
5.2 Status Monitoring through Shell command
5.2.1 How to connect
Telnet login
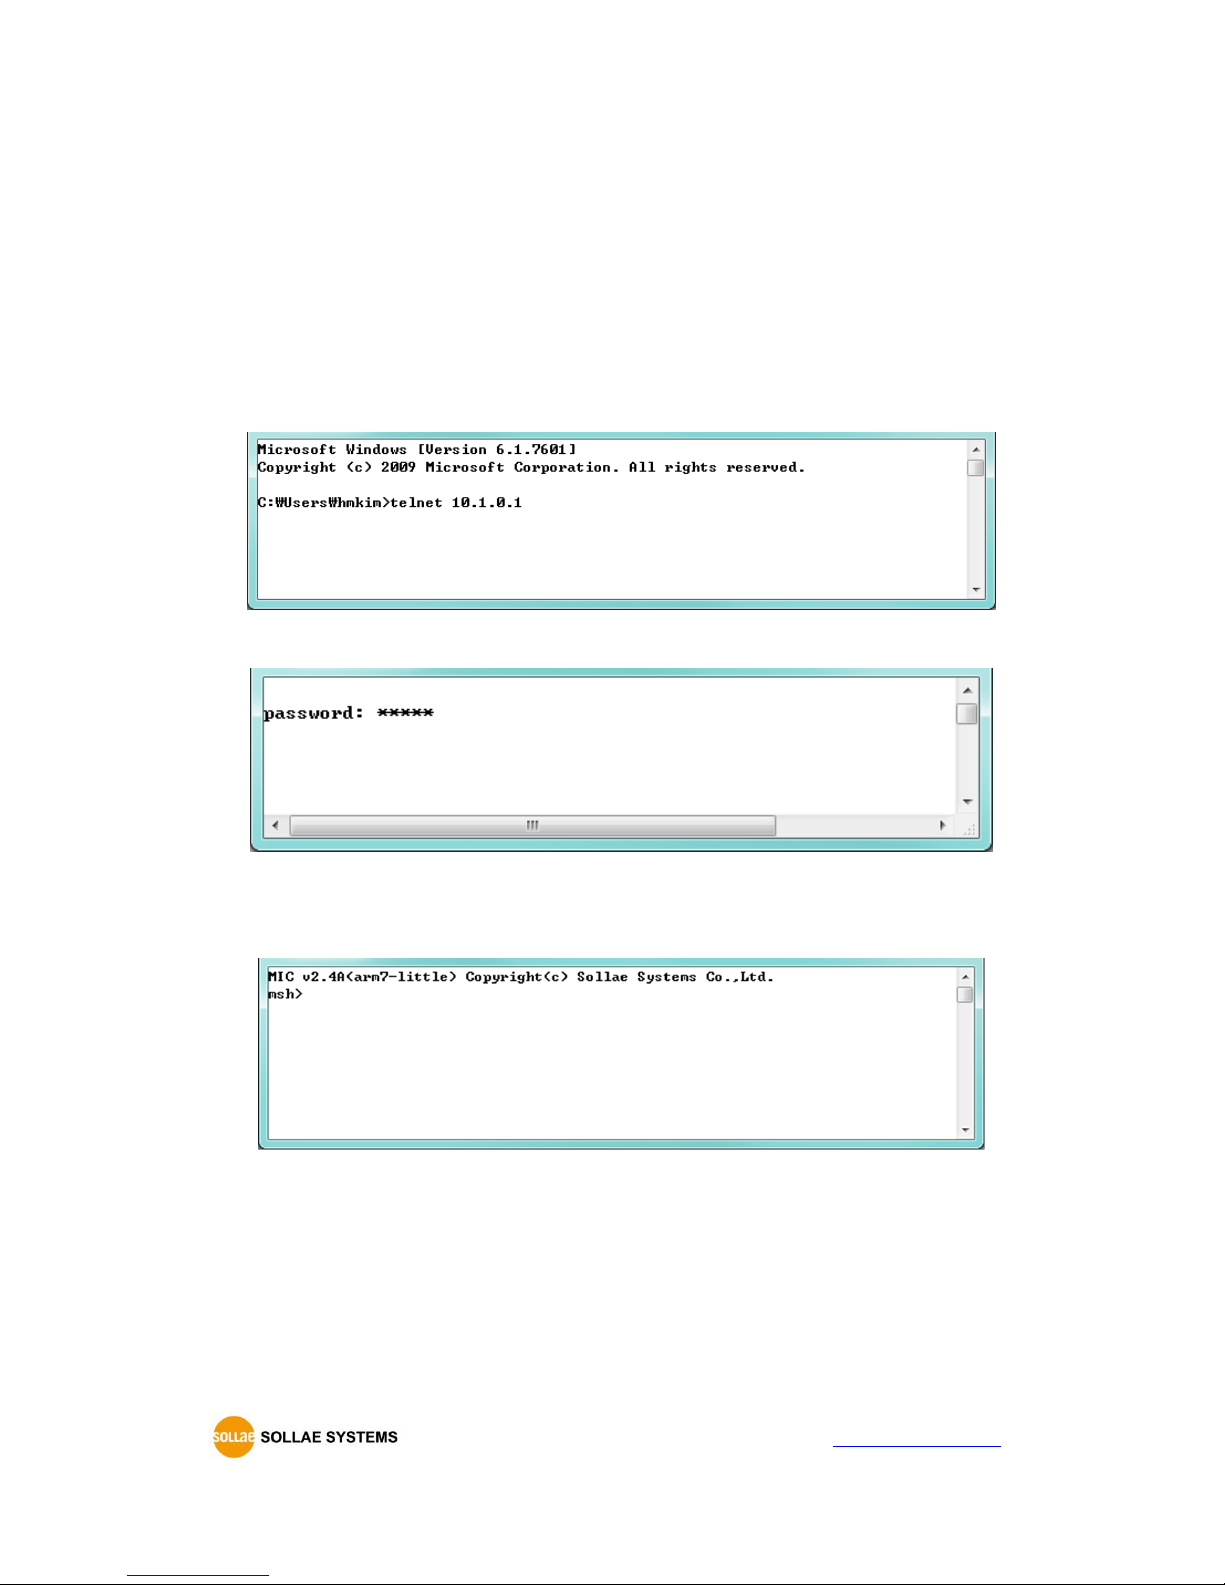
Once the [TELNET] option is activated, users can remotely log in to CSE-T16. If a password is set,
users should input the password.
After that, messages from CSE-T16 appear as shown in the figure below.
Figure 5-4 connect to CSE-T16
Figure 5-5 Input password
Default password is “sollae”
Figure 5-6 log in
Console port
If you connect the console port of CSE-T16 and PC's serial port, you can check the serial and
network status by a terminal program.
Page 37
CSE-T16 User Manual Ver. 1.2
- 36 -
http://www.ezTCP.com
SSH
When [SSH] option is activated on the ezManager, users can establish SSH secured
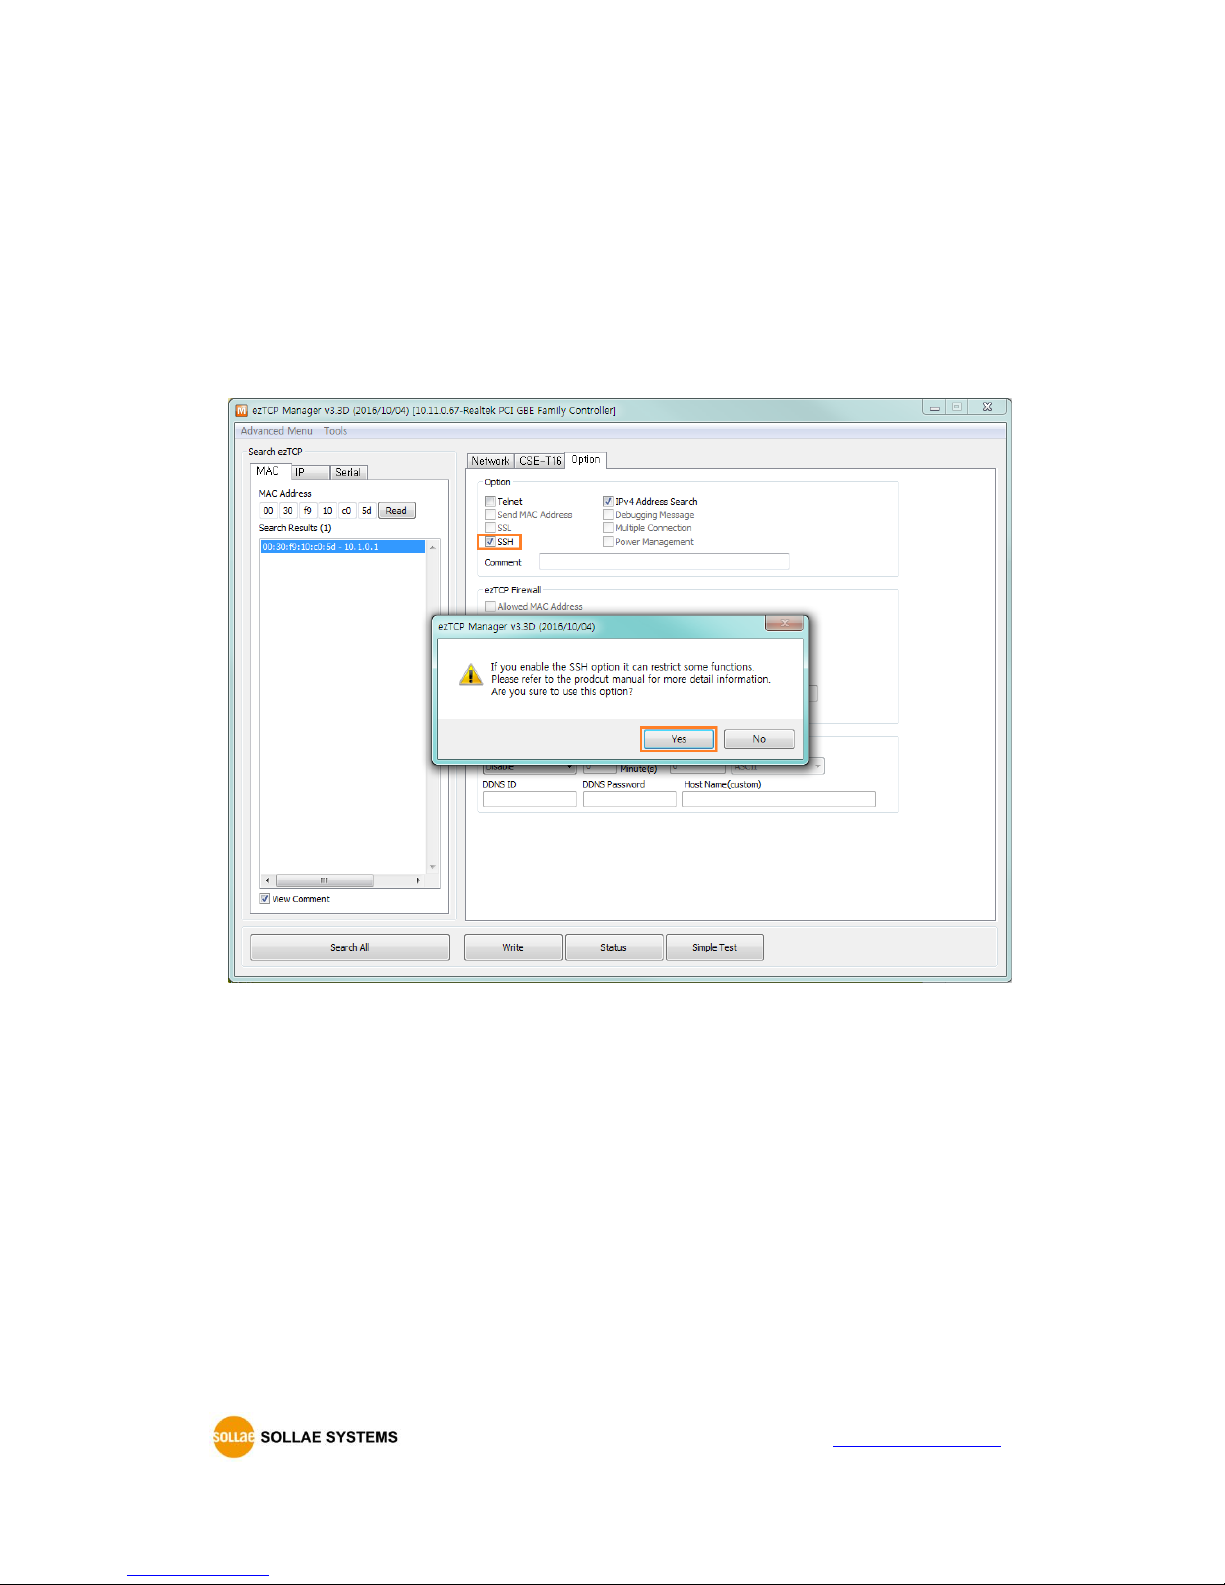
connection to check equipment's serial and its network status. Following steps are to
establish the SSH connection.
SSH function is available on firmware version of 1.1A or higher.
① Click the [SSH] check box on the ezManager.
Figure 5-7 Set [SSH] option
You can not use [Telnet] and [SSH] at the same time.
② Make a certification and write it using ezManager (Refer to the Figure6-2 ~ Figure6-5)
Certification for SSH is available on ezManager of v3.3D or higher.
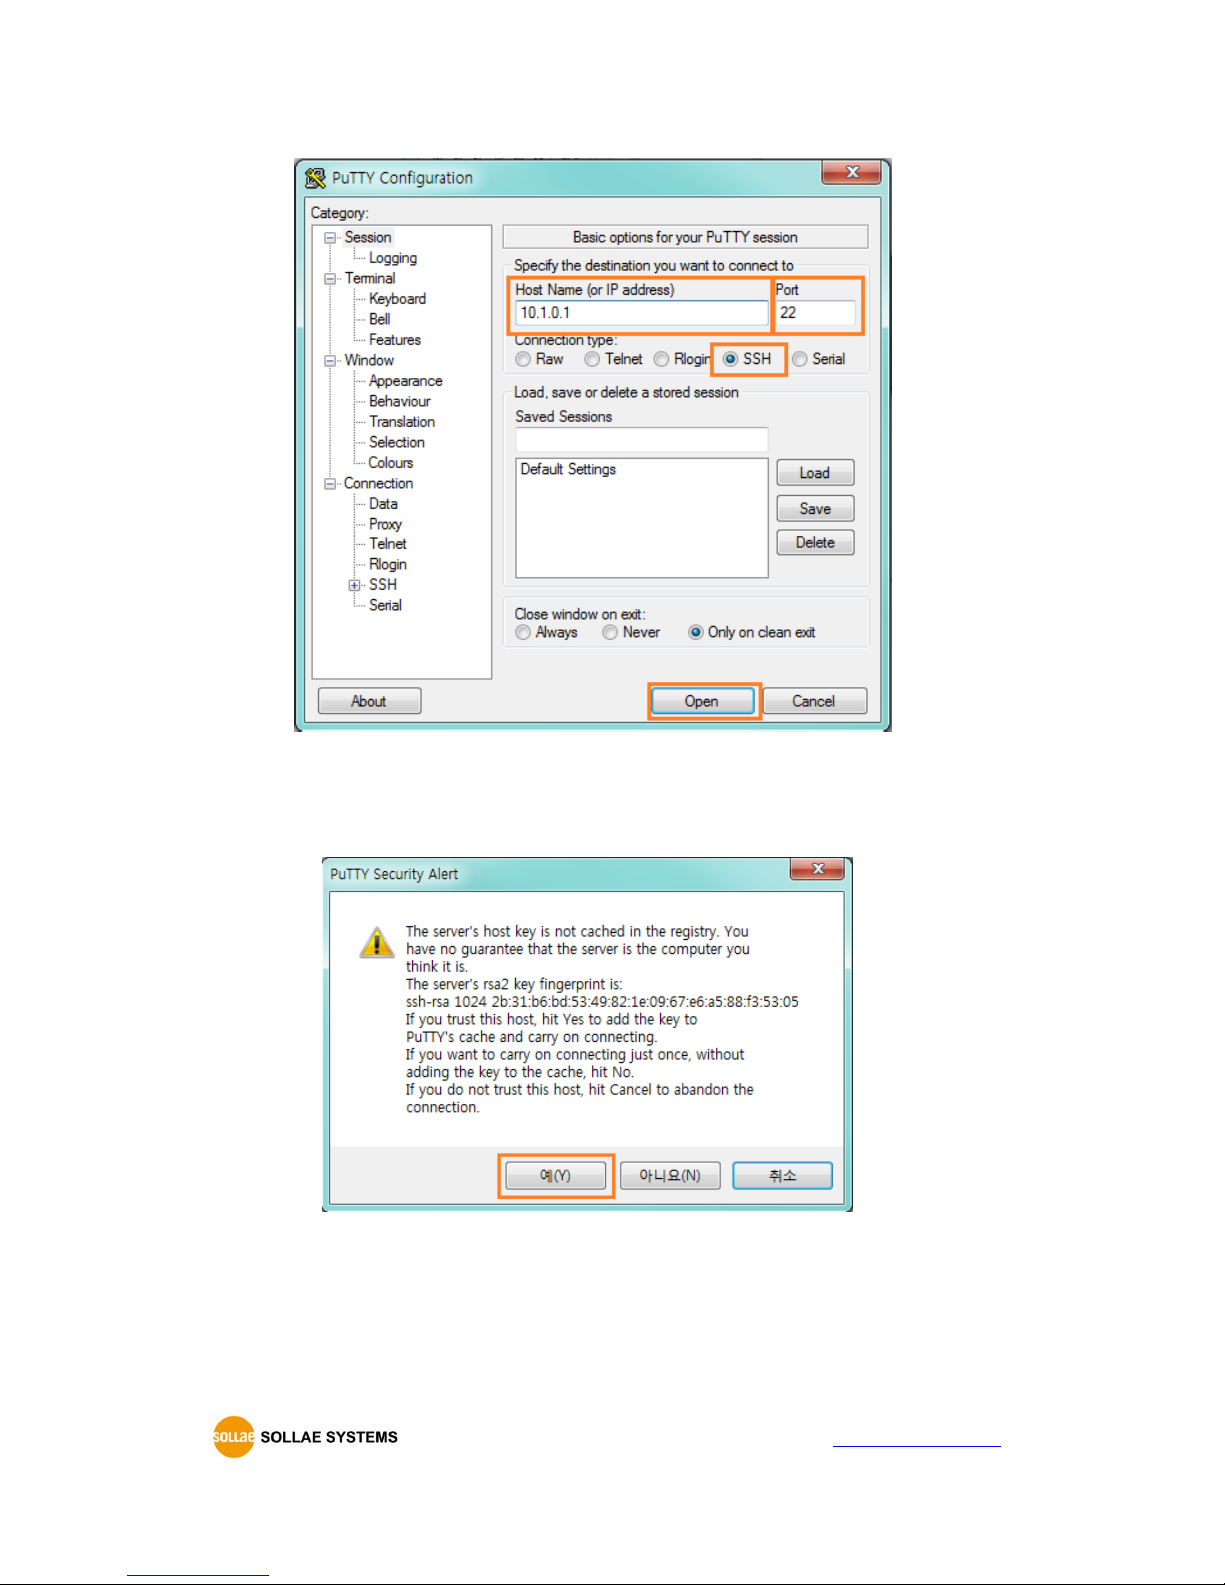
③ Run the client program [PuTTY] that supports SSH and connect to port 22 (SSH default
number). Try access and enter the ID and password. You will be able to connect as shown in
the Figure 5-11 below.
Page 38
CSE-T16 User Manual Ver. 1.2
- 37 -
http://www.ezTCP.com
Figure 5-8 PuTTY(SSH Client program)
When user connect to CSE-H16 which is enabled “SSH” feature, pop up window like the below
may appear.
Figure 5-9 Check KEY value of SSH Server
If the SSH server’s key is not cached in SSH client, the SSH client ask whether it save the server’s
key. After saving the server’s key once, the SSH client doesn’t ask this pop-up again. If user change
the key of CSE-T16, the SSH client will ask it again.
Page 39
CSE-T16 User Manual Ver. 1.2
- 38 -
http://www.ezTCP.com
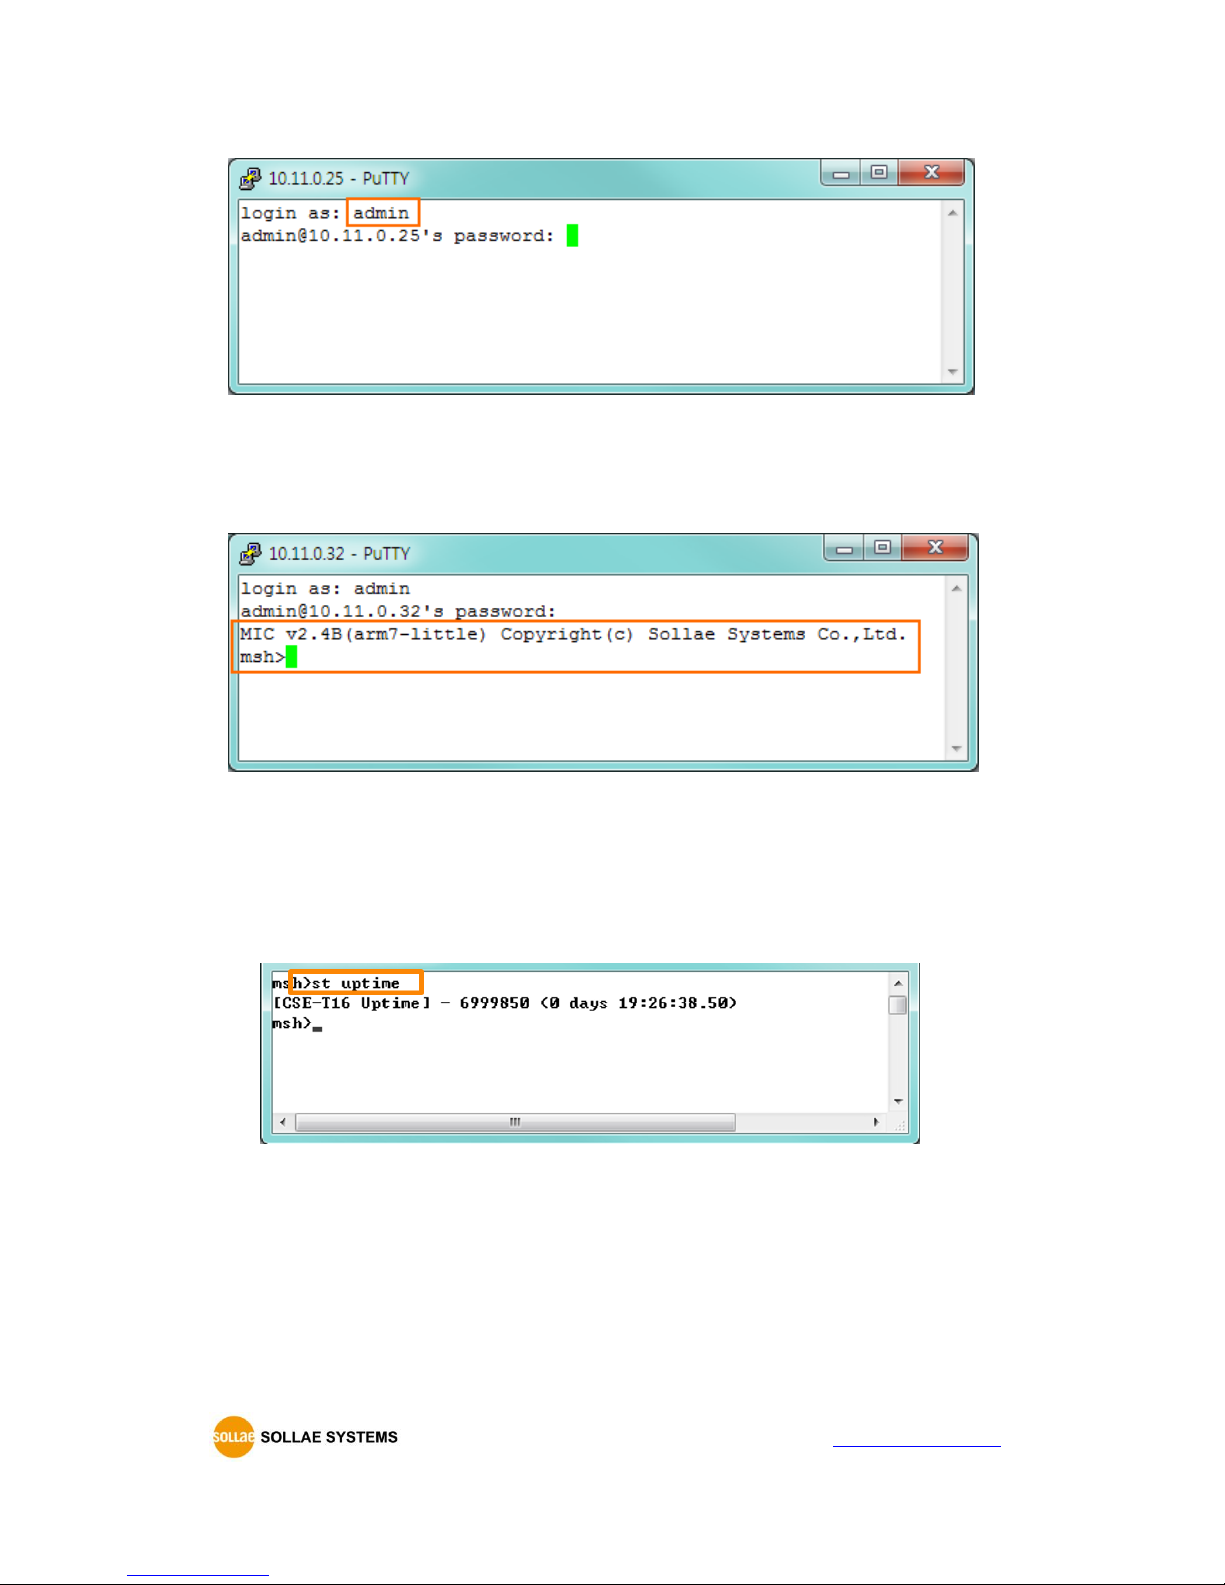
Figure 5-10 Enter ID/Password
The ID and Password for SSH is "admin" and "sollae "
Figure 5-11 Completed SSH connection
5.2.2 Shell command
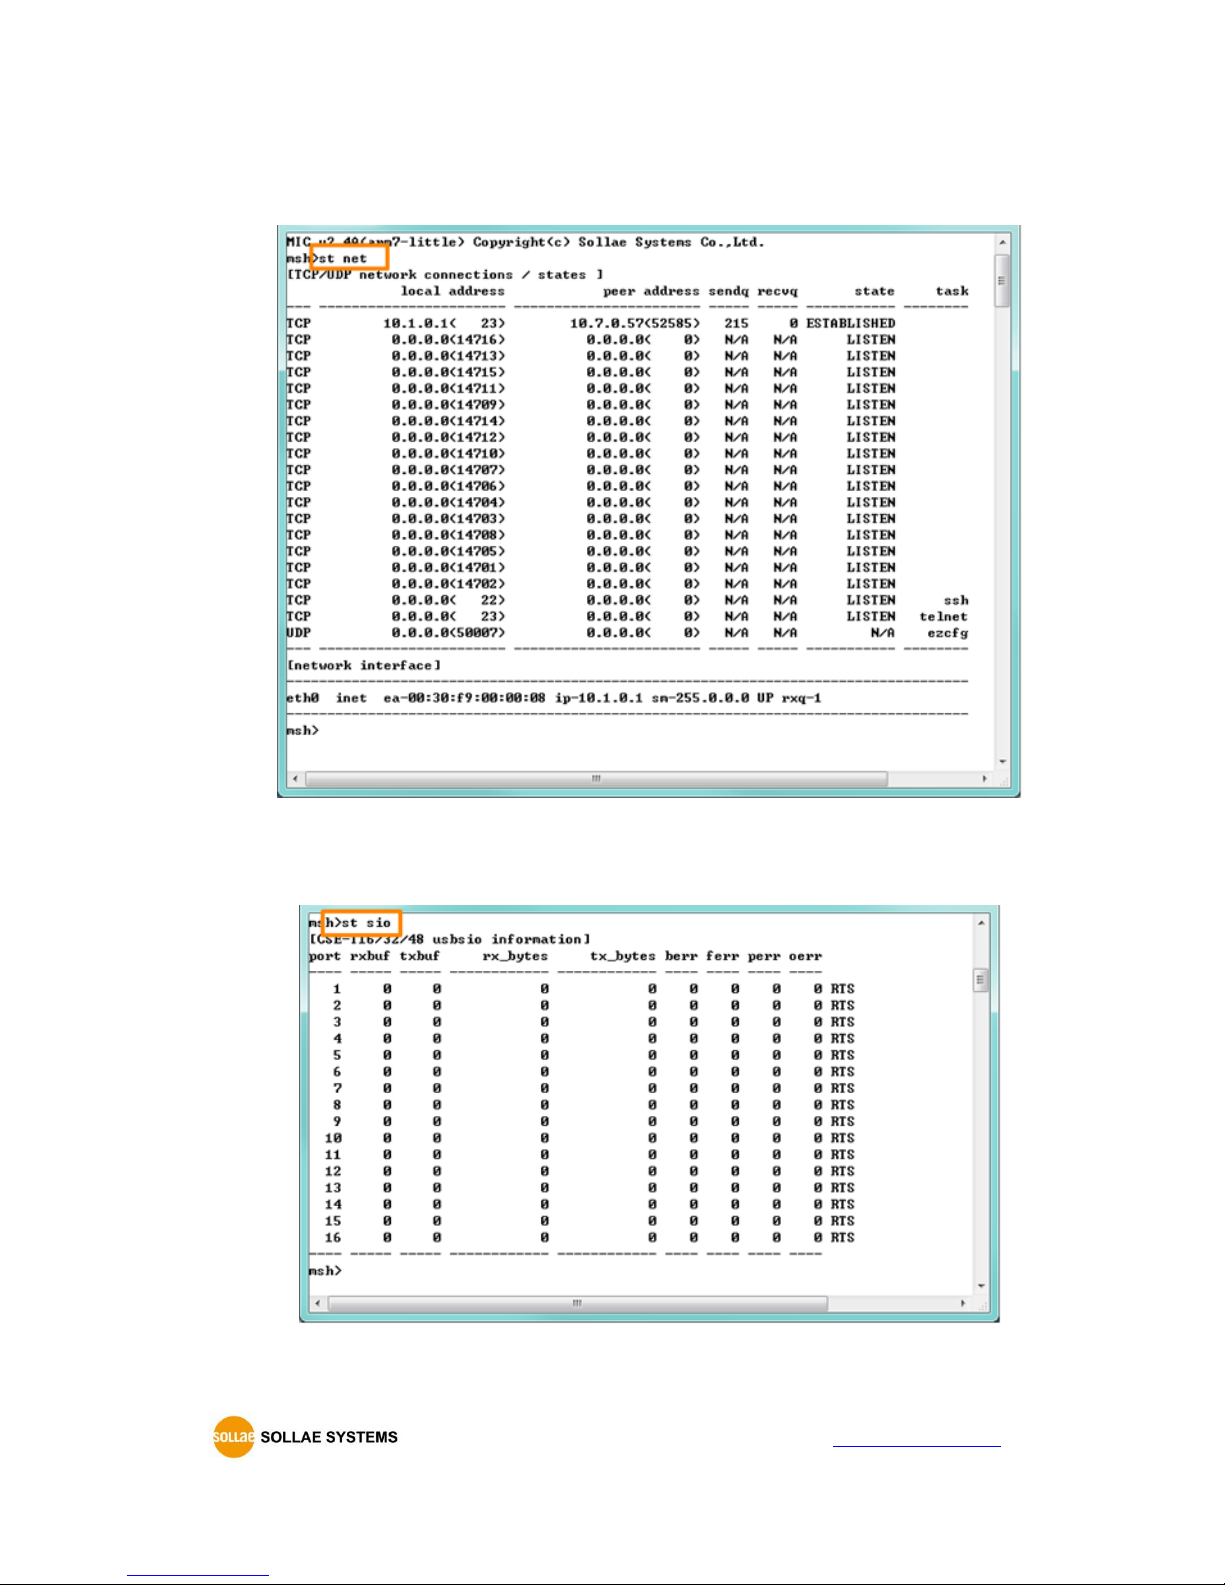
st uptime
Figure 5-12 “st uptime” command
Page 40
CSE-T16 User Manual Ver. 1.2
- 39 -
http://www.ezTCP.com
st net
This command is displays current Ipv4 network states of all sessions.
Figure 5-13 “st net” command
st sio
This command displays the number of bytes of the serial port. (rx_bytes, tx_bytes)
Figure 5-14 “st sio” command
Page 41
CSE-T16 User Manual Ver. 1.2
- 40 -
http://www.ezTCP.com
5.3 Status Window of ezManager
5.3.1 Status
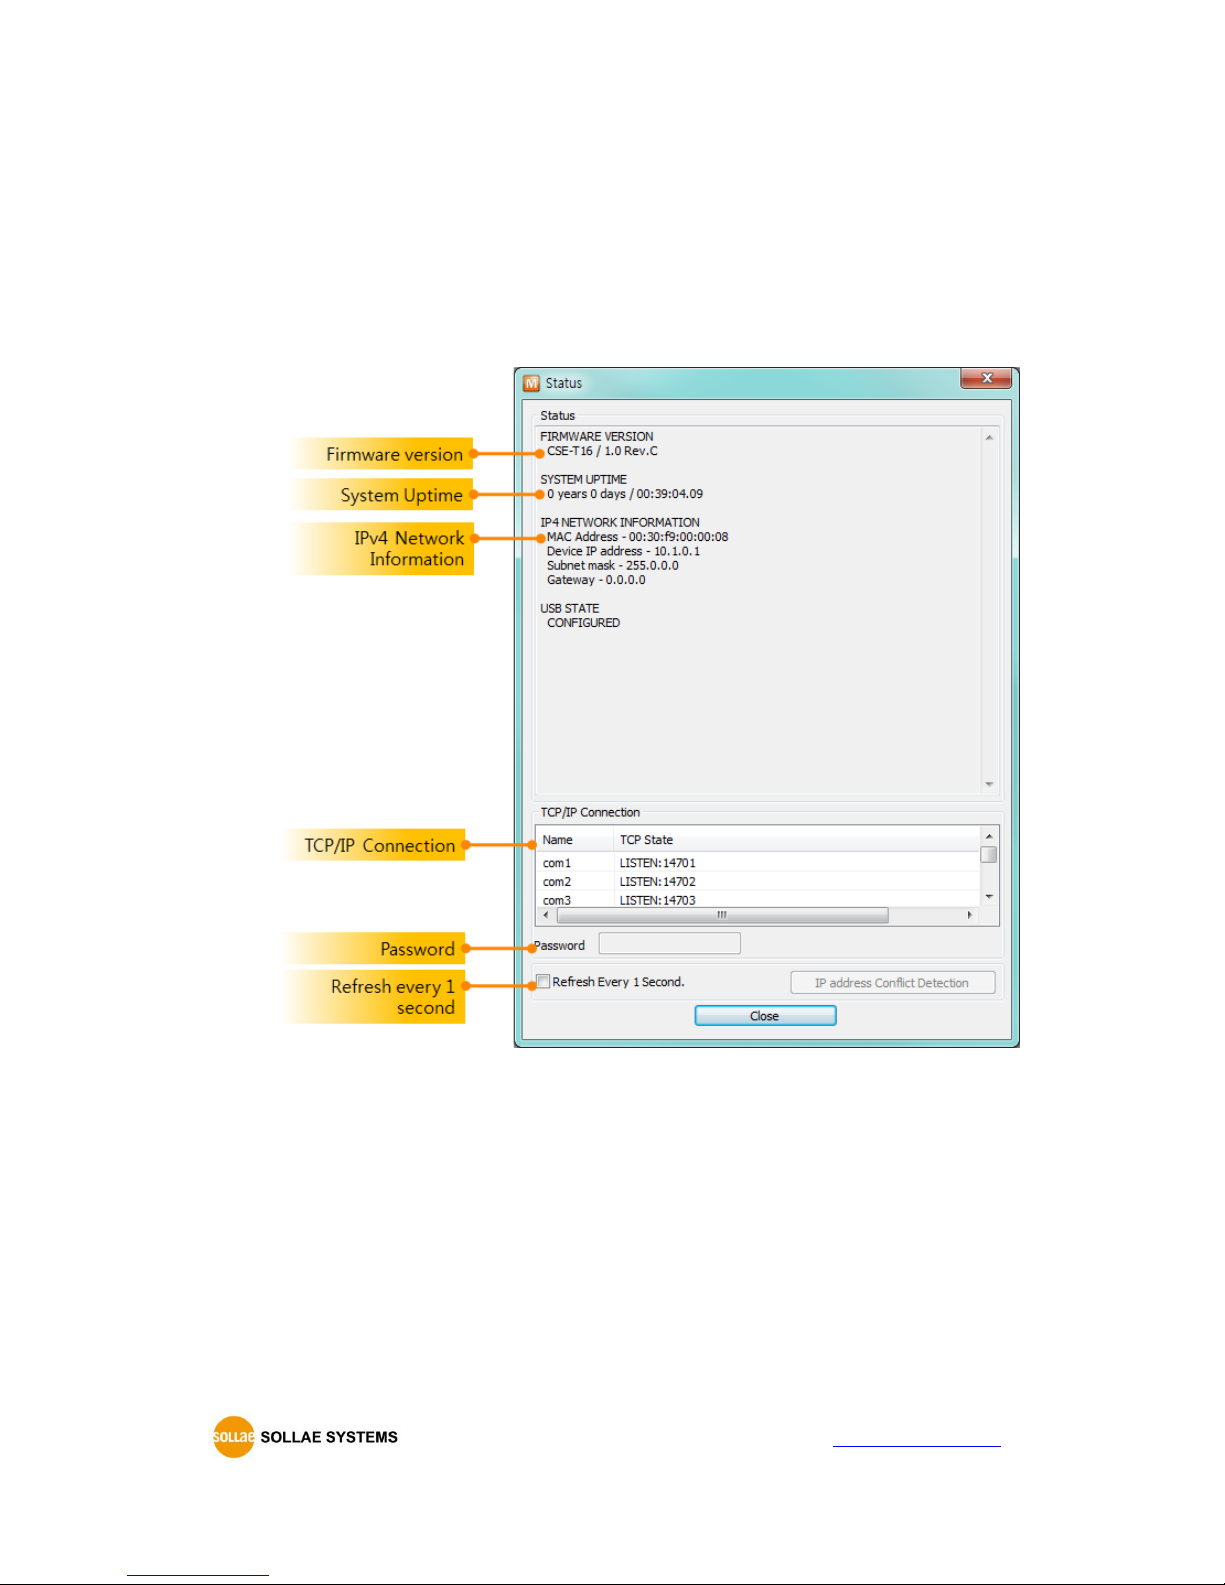
Status of CSE-T16 can be monitored by the [Status] button on ezManager. By using the [Refresh
Every 1 Second] option in the window, the status will be automatically updated in every second.
Figure 5-15 Status
FIRMWARE VERSION
The name of model and the version of firmware are displayed here.
SYSTEM UPTIME
Amount of operating time since CSE-T16 has booted up is displayed.
IP4 NETWORK INFORMATION
All information about related items with the Ipv4 Address is shown here.
TCP/IP Connection
The same information with [TCP STATE] is displayed with an IP address and port number. A
Page 42

CSE-T16 User Manual Ver. 1.2
- 41 -
http://www.ezTCP.com
difference from [TCP STATE] is whether you can terminate TCP connection or not. When right
click on a session, a small window will be popped up.
Password
This text box is activated when CSE-T16 has a password. If you want to close TCP connection
on [TCP/IP Connection] list, input the password first.
Refresh Every 1 Second.
If this option is checked, ezManager sends queries in every second.
Page 43
CSE-T16 User Manual Ver. 1.2
- 42 -
http://www.ezTCP.com
5.4 Factory Reset
It is a function physically initializes all the setting.
5.4.1 How to reset
Press FUNCTION button on the back of CSE-T16 for about 10 seconds to do a factory reset.
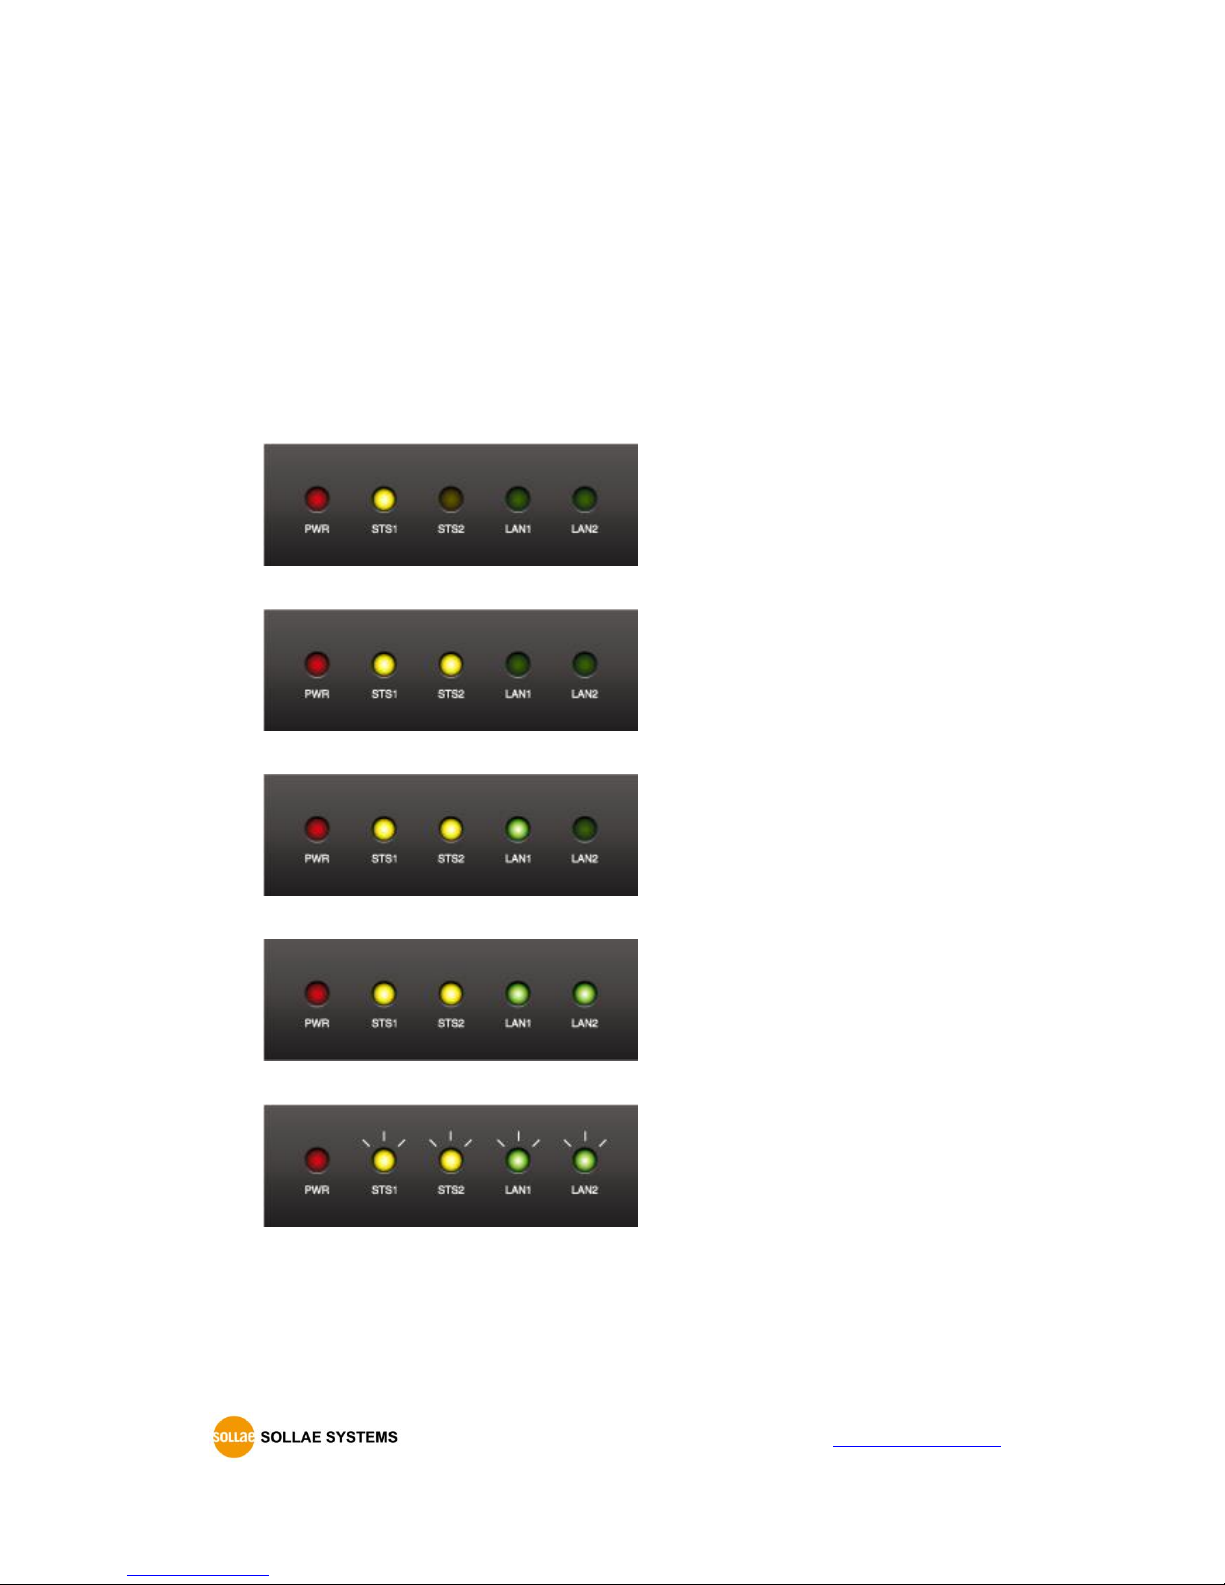
5.4.2 Sequence of LED operation
STS1 On
STS2 On
LAN1 On
LAN2 On
STS1, STS2, LAN1, LAN2 are blinking
Page 44
CSE-T16 User Manual Ver. 1.2
- 43 -
http://www.ezTCP.com
6 Security functions
6.1 SSL
6.1.1 SSL(Secure Socket Layer)
SSL is cryptographic protocol that provides secure communication on the Internet. SSL works
over TCP.
6.1.2 How to set SSL
To set SSL, you have to set the SSL-related parameters as the following steps.
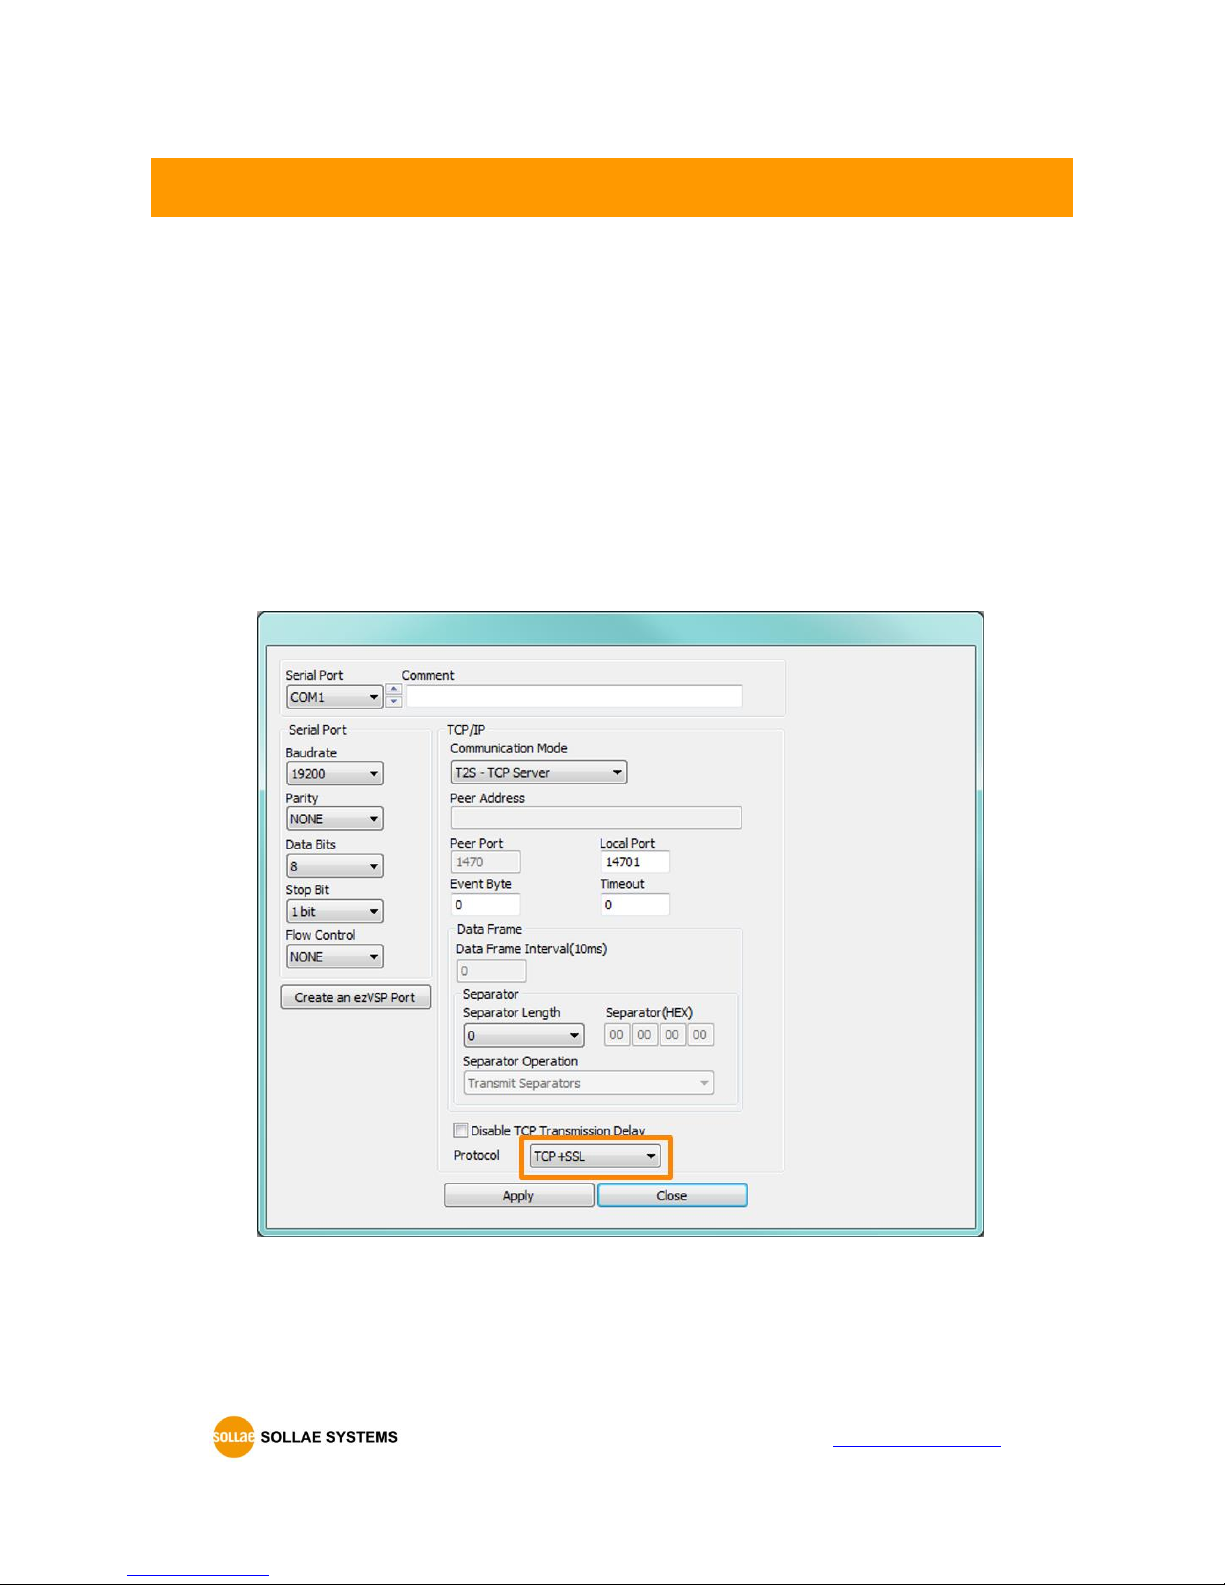
Select [TCP+SSL] of [Protocol] in [CSE-T16] tab of ezManager.
Figure 6-1 SSL setting
Page 45
CSE-T16 User Manual Ver. 1.2
- 44 -
http://www.ezTCP.com
In case of T2S-TCP server mode, user make a certification and write it at CSE-T16. Please
check the followings.
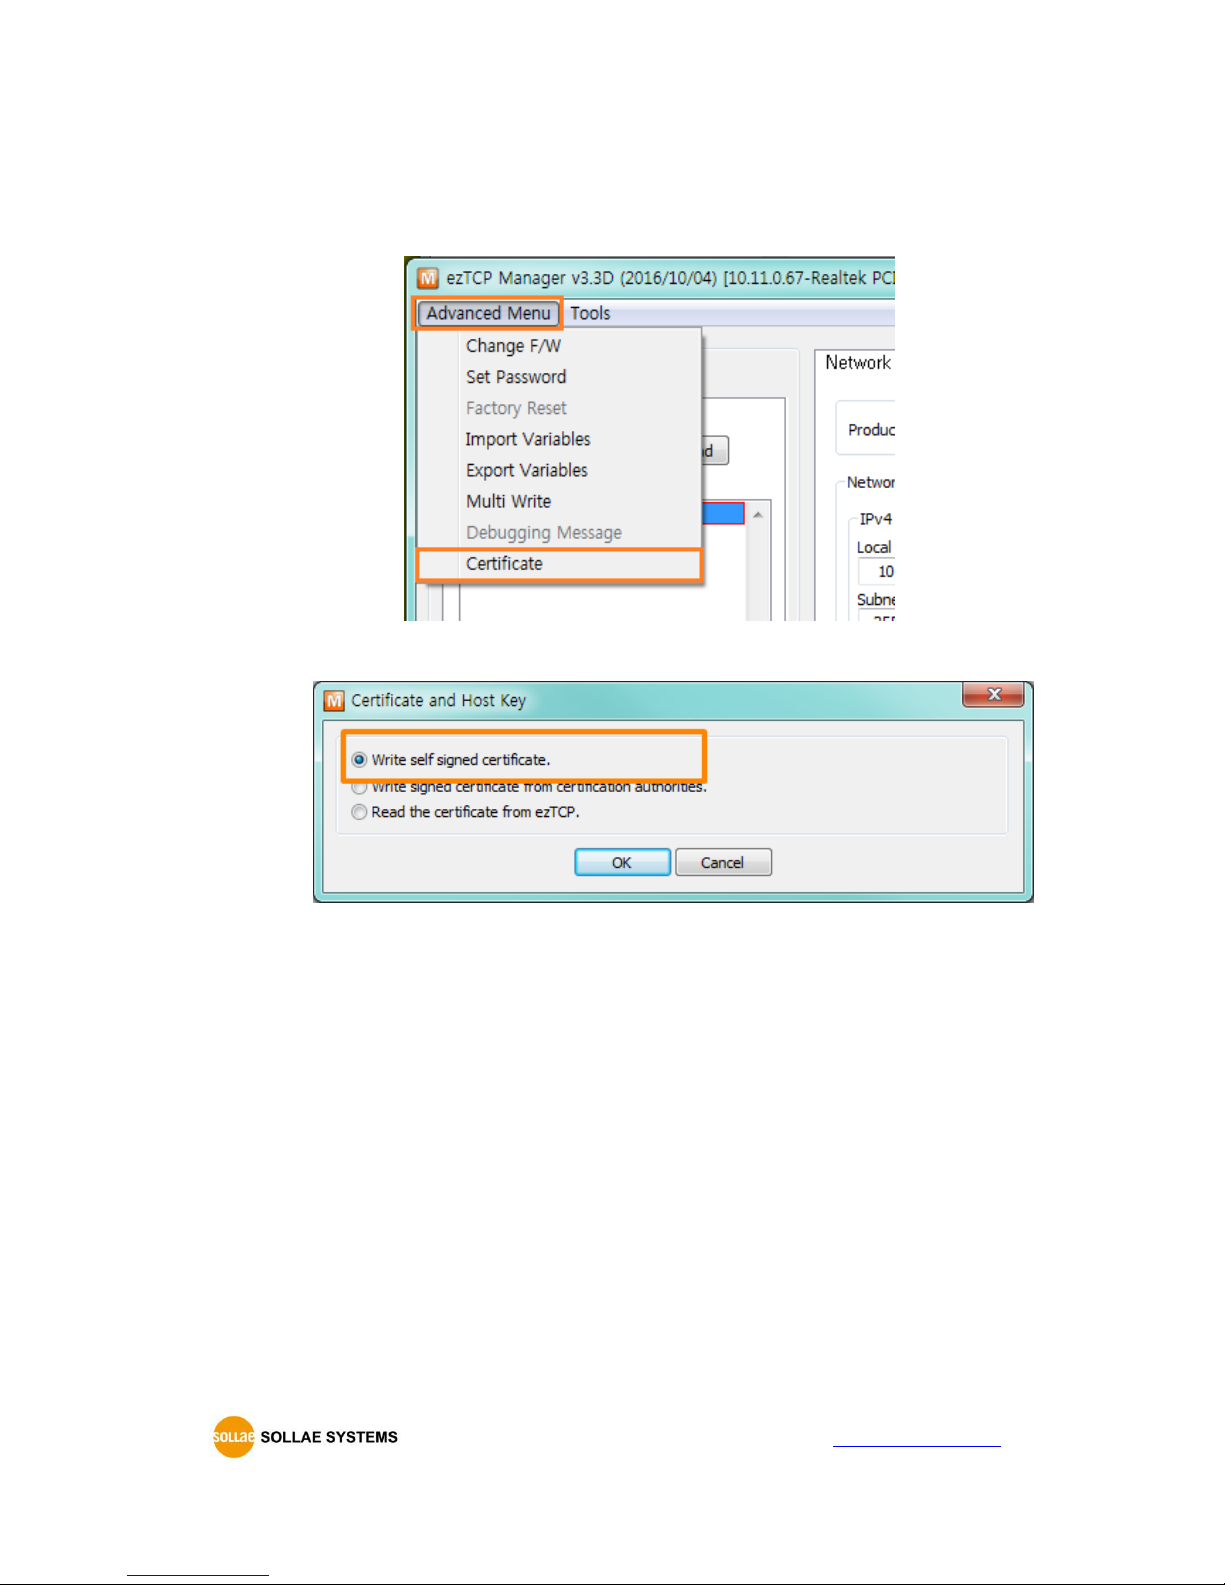
① Click the [Certificate] button in ezManager.
Figure 6-2 create the certification
② Choice the [Write self-signed certificate]
Figure 6-3 certificate and host key
Page 46
CSE-T16 User Manual Ver. 1.2
- 45 -
http://www.ezTCP.com
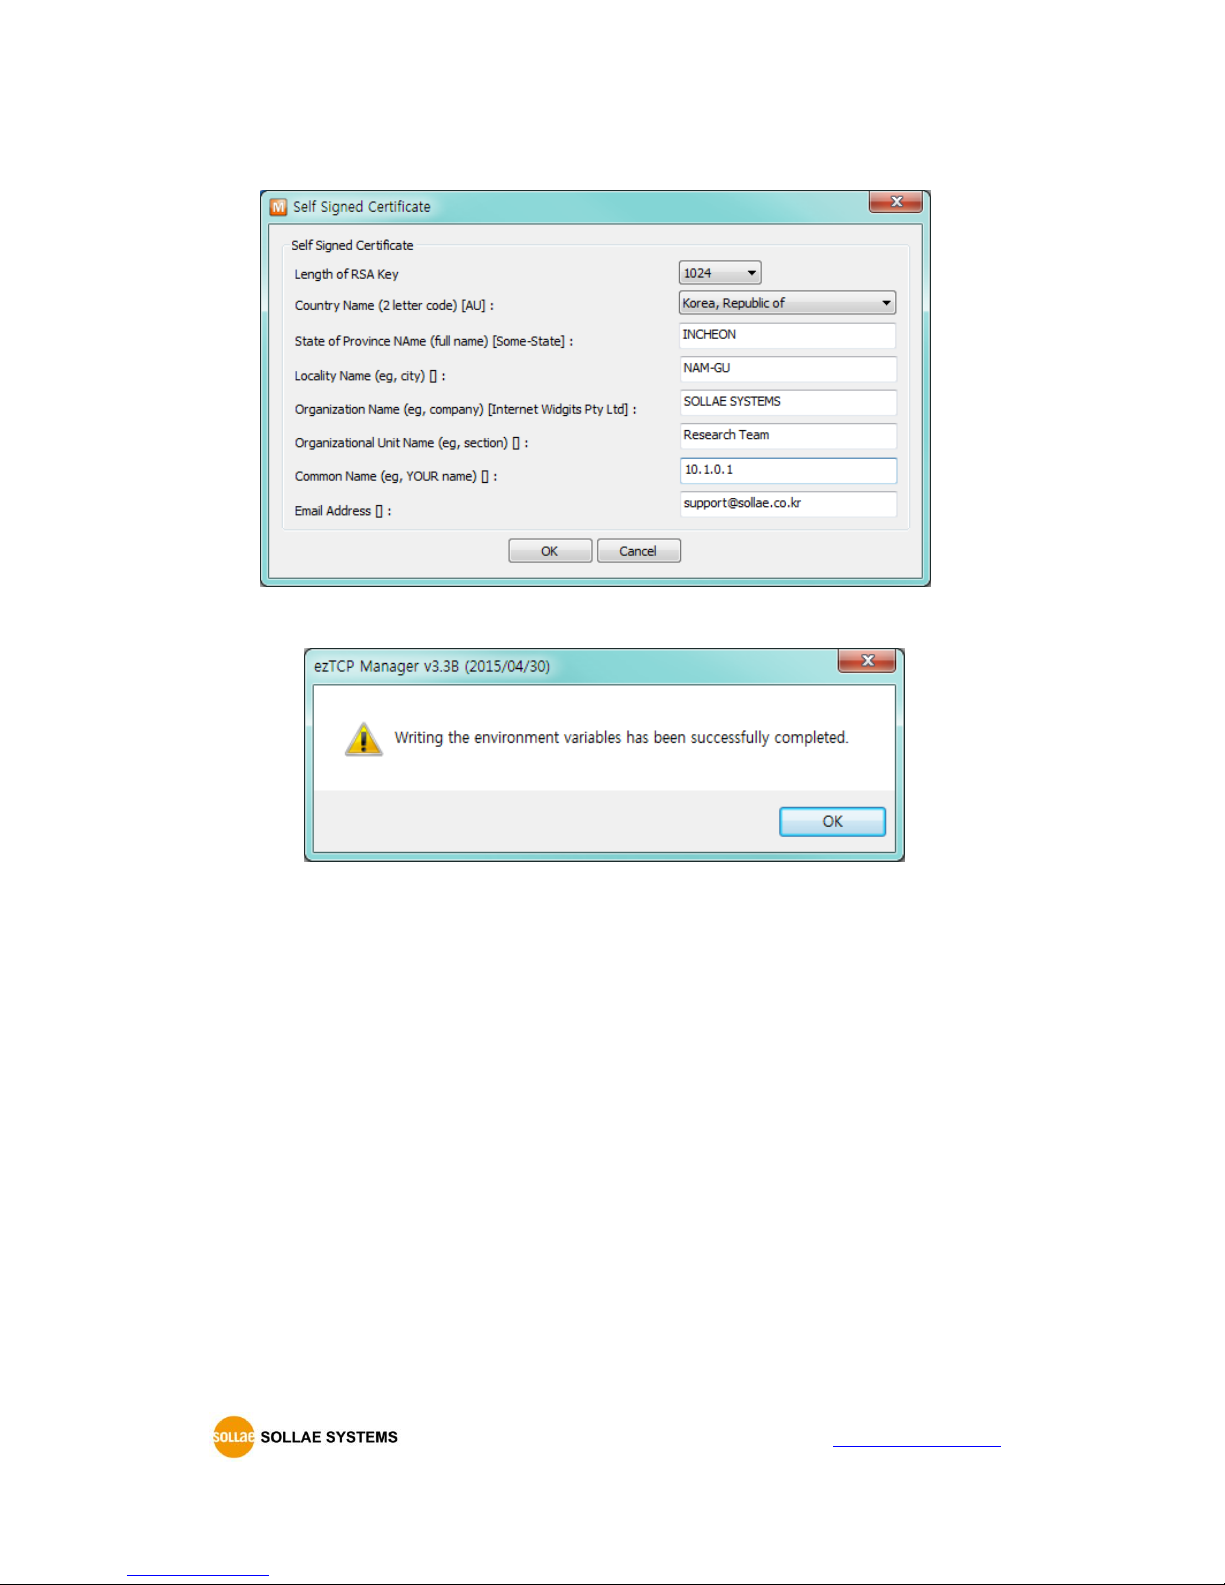
③ Input the key length and information in [Self signed certificate]
Figure 6-4 input the information
④ Check the successful message
Figure 6-5 check the successful message
Page 47
CSE-T16 User Manual Ver. 1.2
- 46 -
http://www.ezTCP.com
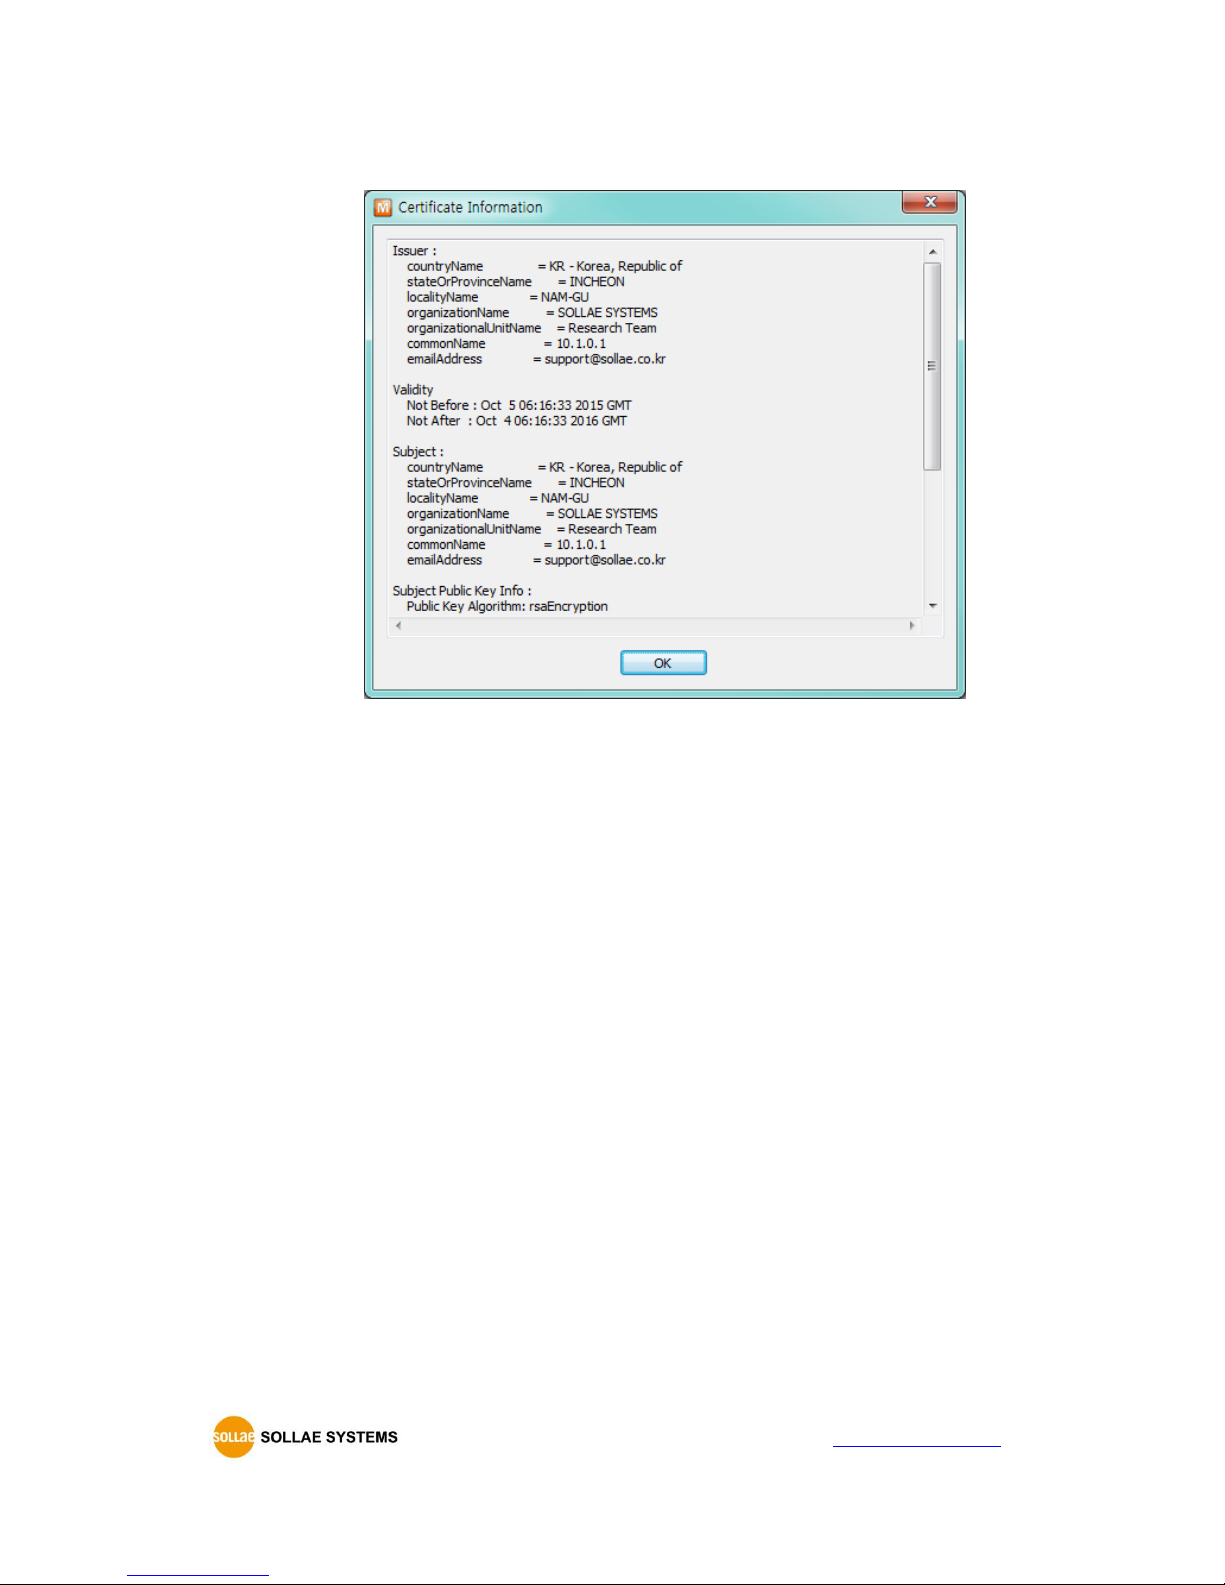
⑤ Check the certification
Figure 6-6 certification information
6.1.3 Restriction
You should generate a new certification when IP address changes. If user set SSL with CSE-T16,
the other device have to set the SSL.
6.2 Setting password
A password can be used for protecting CSE-T16 from TELNET login or changing environmental
parameters by unauthorized hosts. The maximum length is 8 bytes of Alphabet or number.
If user forgets the password, factory reset must be done, and then all the environmental
variables will be reset.
Page 48
CSE-T16 User Manual Ver. 1.2
- 47 -
http://www.ezTCP.com
7 Additional Functions
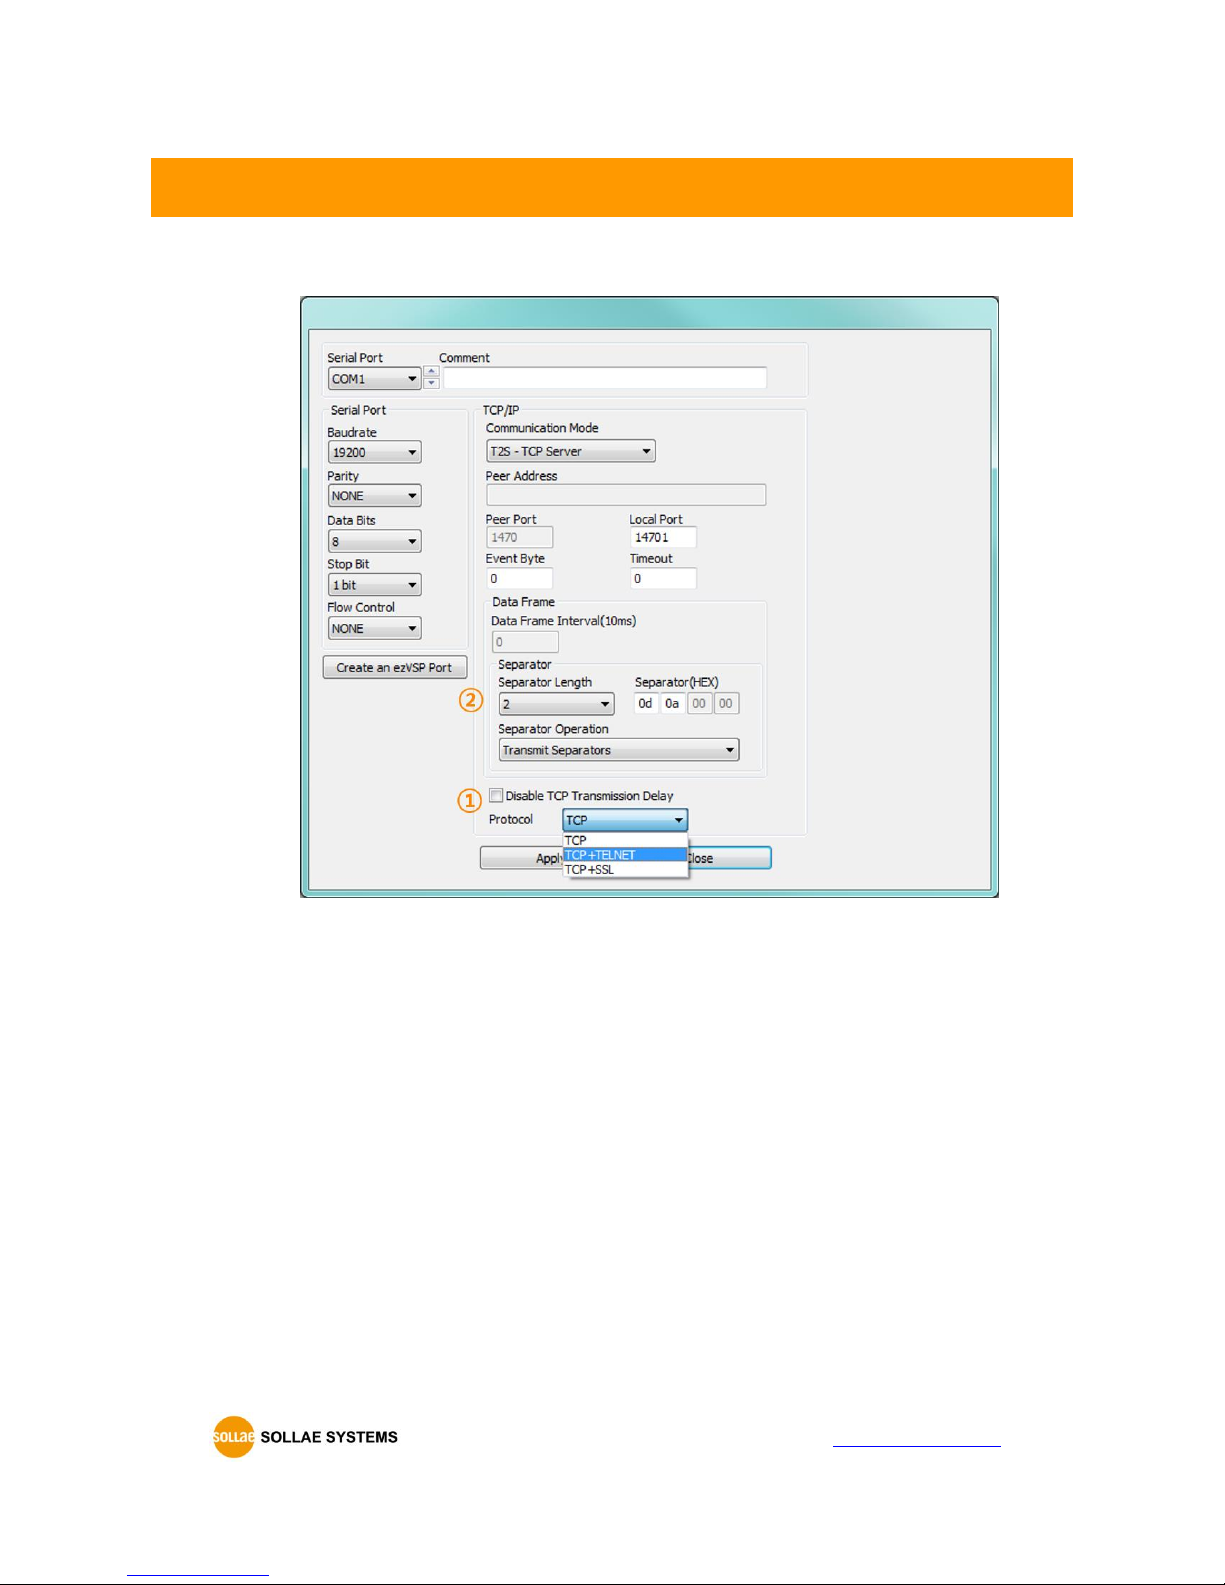
7.1 CSE-T16 Tab Functions
Figure 7-1 CSE-T16 tab
7.1.1 TCP+TENLET - ①
Using the TELNET option, user can use a universal telnet client program without developing a
TCP/IP communication program.
Page 49
CSE-T16 User Manual Ver. 1.2
- 48 -
http://www.ezTCP.com
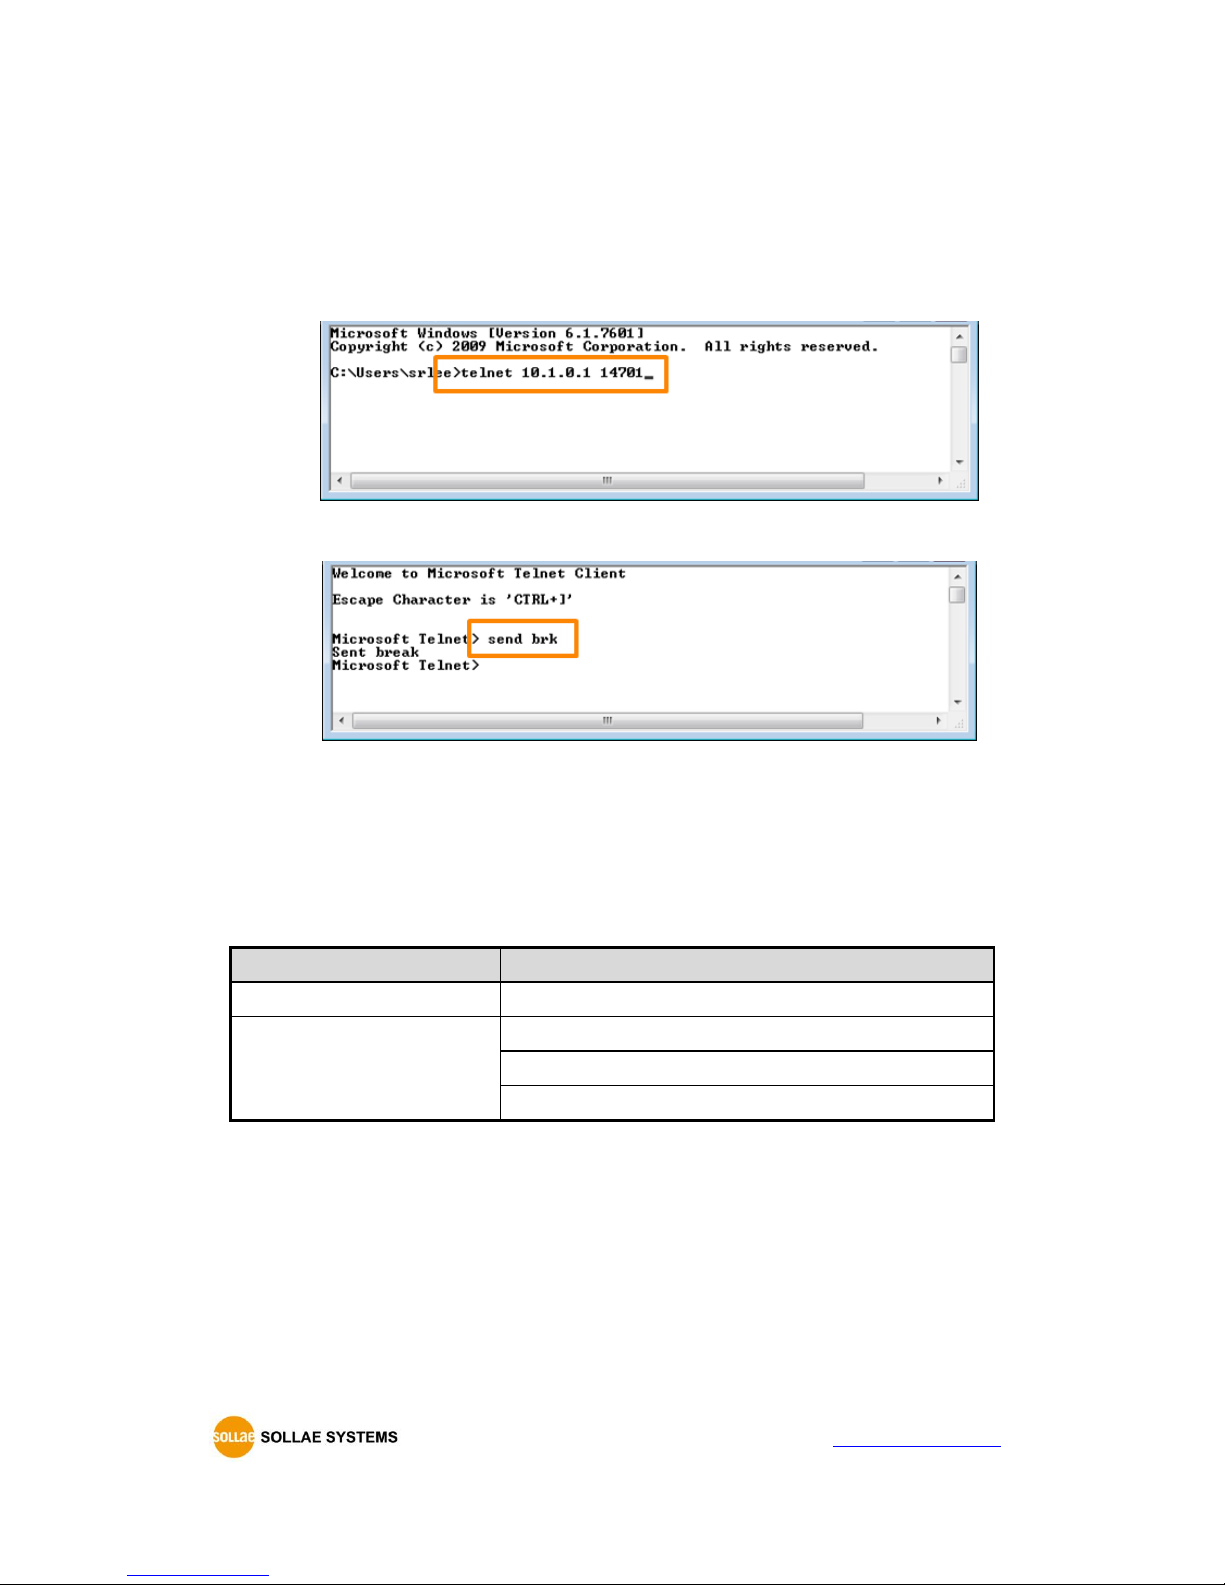
Sending serial break signal
You can send a break signal with a command “send brk” to serial port.
Type the command(“send brk”) using the escape shortcut keys (ctrl+]) after the TCP
connection via telnet client.
Figure 7-2 connecting telnet
Figure 7-3 sending break signal
7.1.2 Separator - ②
Using this function, you can control the length of network packets by specific characters.
When you enable this function, the maximum packet size is 1024 bytes.
Separator
options
Length
select the length between 0 ~ 4 bytes
Operation
Transmit Separators without additional bytes
Transmit Separators + 1 byte
Transmit Separators + 2 bytes
Table 7-1 separator
Page 50
CSE-T16 User Manual Ver. 1.2
- 49 -
http://www.ezTCP.com
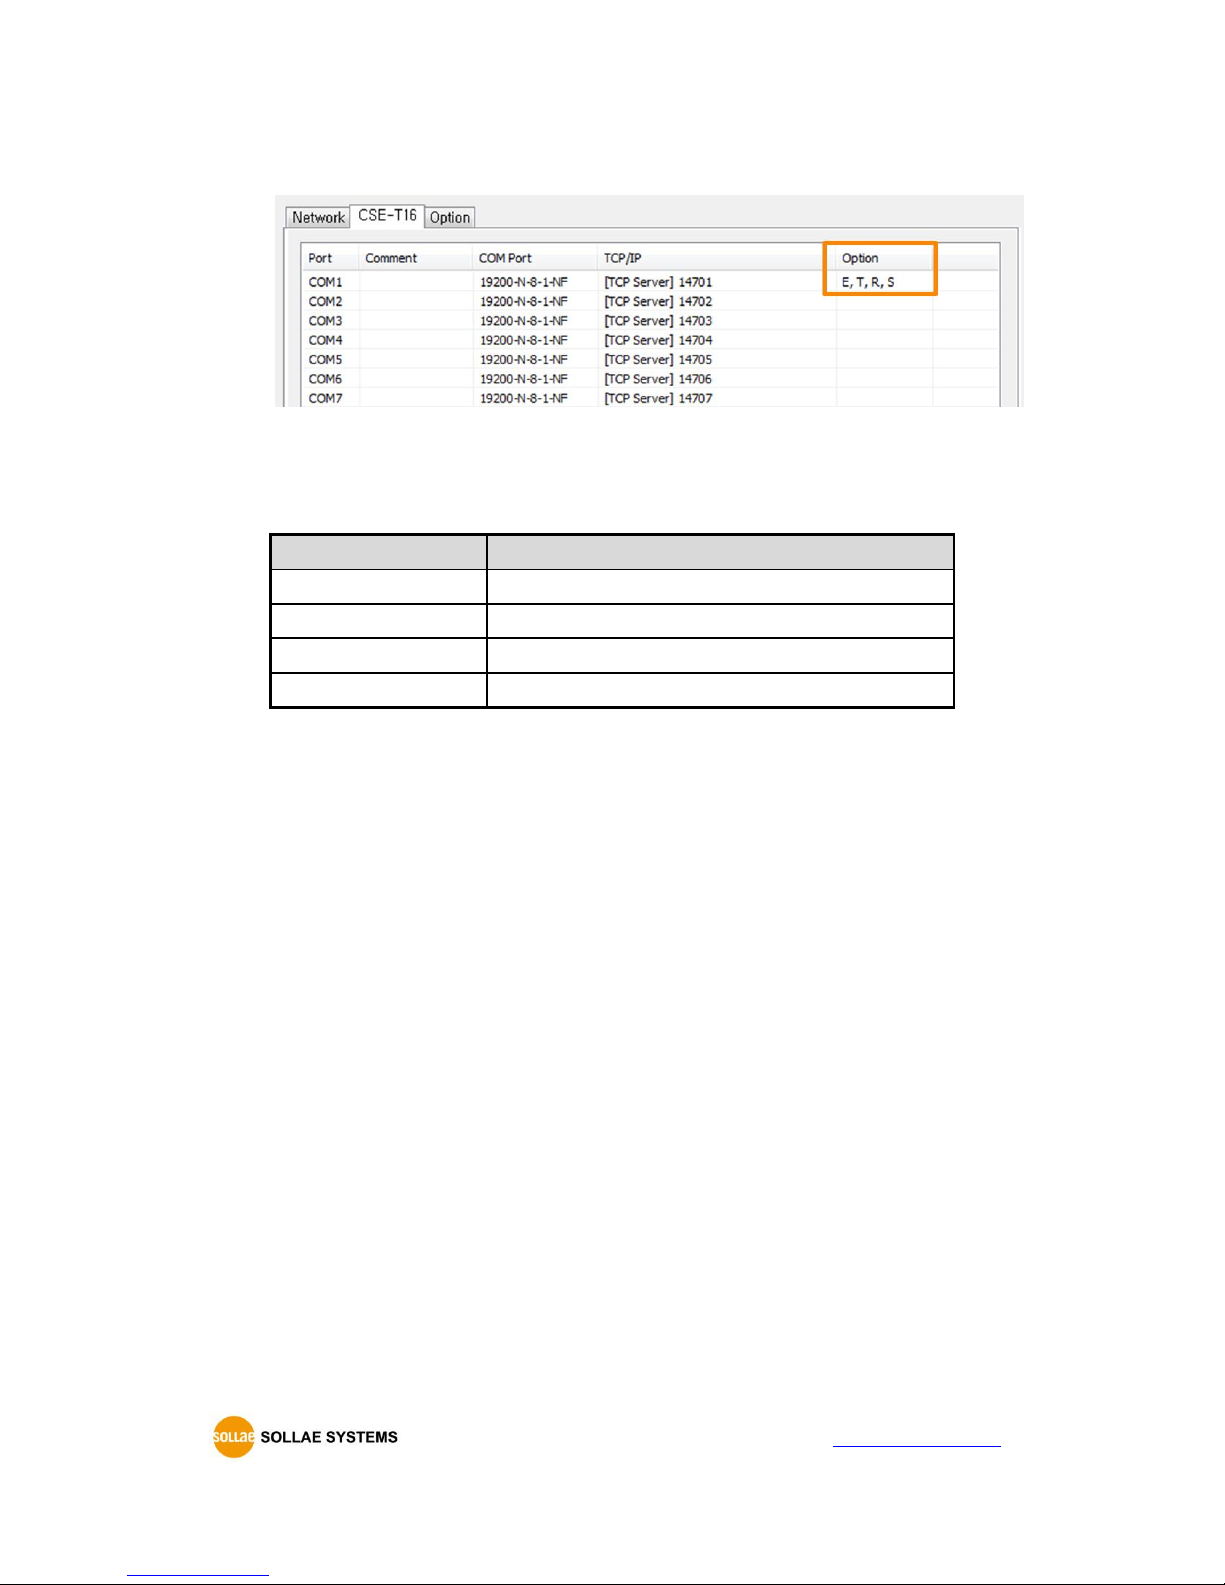
7.1.3 Checking an option
Figure 7-4 CSE-T16 ports option
You can check options of each port with alphabetical initials.
Initials
Option
E
Event Bytes
T
Time out
R
TCP + TELNET (RFC 2217)
S
Separator
Table 7-2 Initials for checking an option
Page 51
CSE-T16 User Manual Ver. 1.2
- 50 -
http://www.ezTCP.com
7.2 Option tab functions
7.2.1 Notify Ipv4 Change
CSE-T16 can be a TCP server even though it is assigned an IP address automatically. Using
[Notify IP Change] function, CSE-T16 sends its IP address with the host name to the designated
server.
Dynamic Domain Name Service (DDNS)
CSE-T16 supports DDNS service offered by DynDNS. Therefore, you have to make an account
and create host names on the website of DynDNS before you use.
All about service usage of an account could be changed according to the policy of
DynDNS.
DynDNS website: http://dyn.com/dns/
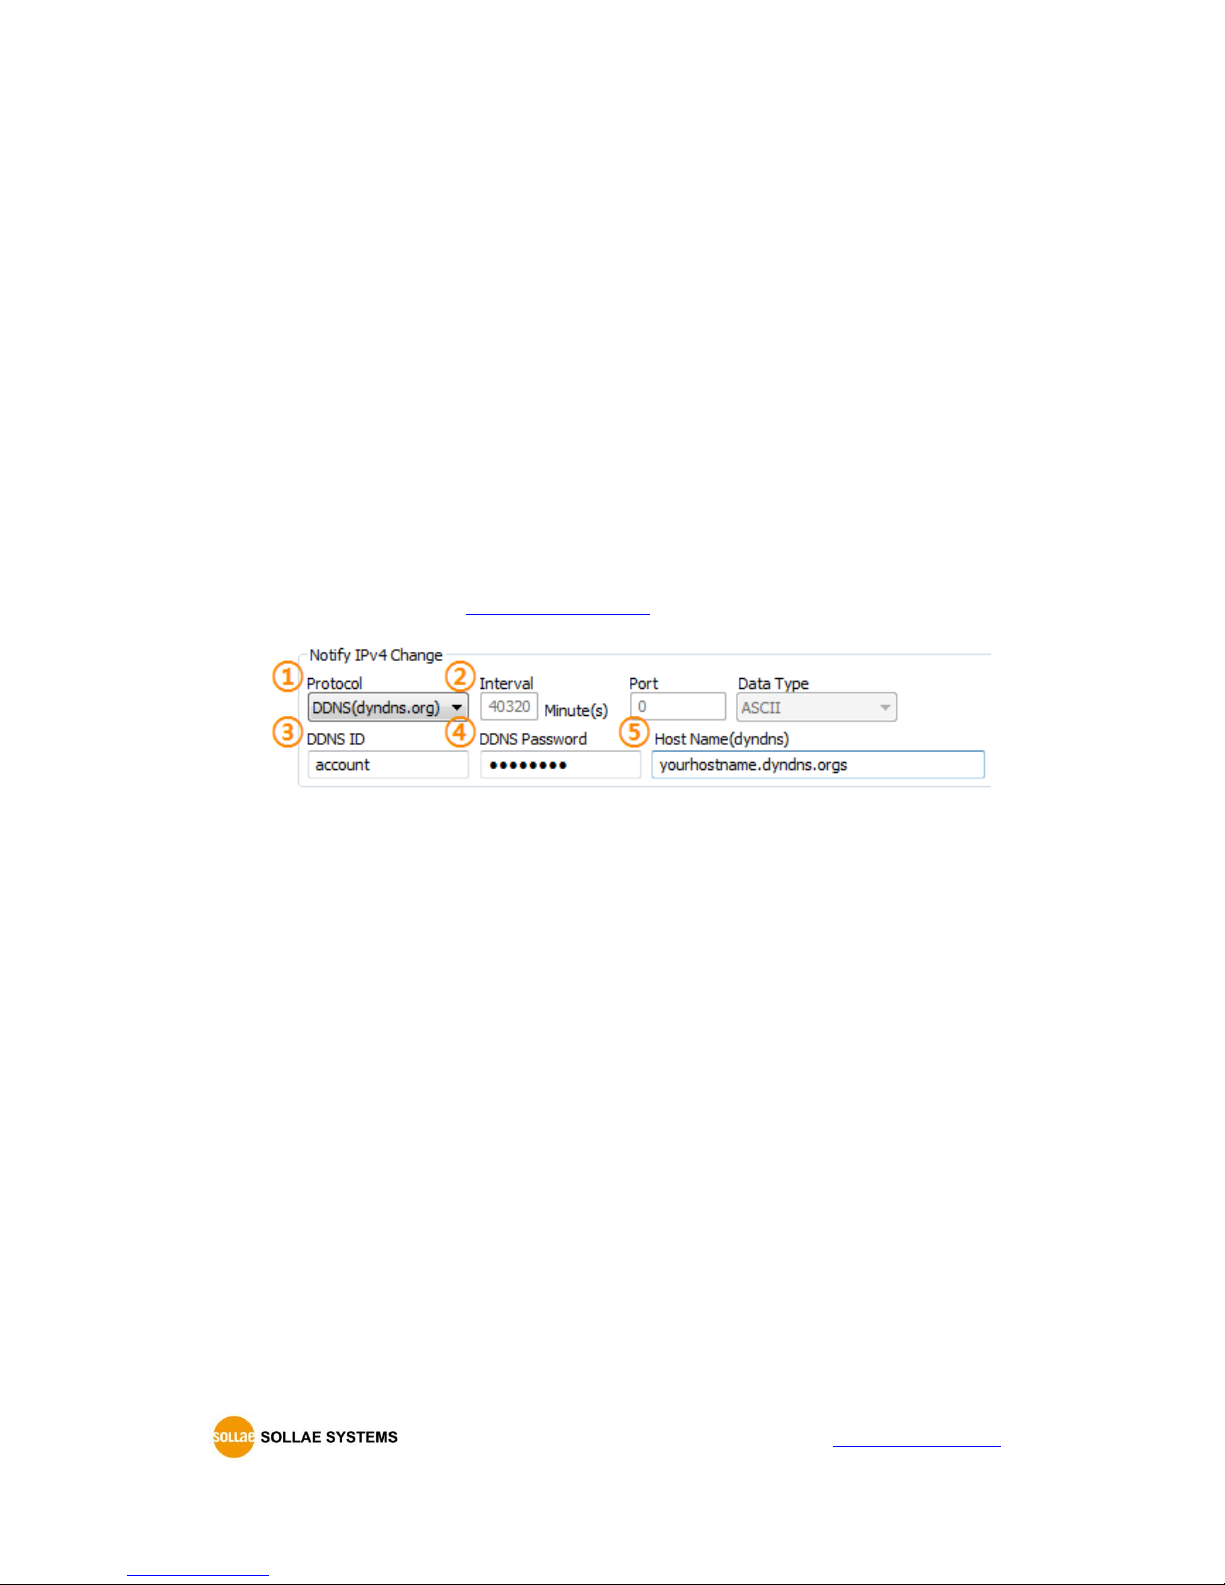
Figure 7-5 setting DDNS
① Select the [DDNS(dyndns.org)]
② 40,320 is a fixed value
③ Input the ID of DDNS account
④ Input the password of the account
⑤ Input a host name which you create on your account
Refer to the [IP Change Notification] document on our website for details.
Page 52

CSE-T16 User Manual Ver. 1.2
- 51 -
http://www.ezTCP.com
8 Related Materials
8.1 Documents
You can find each document on our web site or included DVD in your package.
Datasheet
IP change notification (DDNS)
Telnet COM Port Control Option
RS232 Flow Control
etc
8.2 Applications for a Smart Phone
TCP/IP Client(iOS)
TCP/IP Client(Android)
Page 53

CSE-T16 User Manual Ver. 1.2
- 52 -
http://www.ezTCP.com
9 Technical Support and Warranty
9.1 Technical Support
If you have any question regarding operation of the product, visit Customer Support FAQ corner
and the message board on Sollae Systems’ web site or send us an email at the following address:
E-mail: [email protected]
Website Address for Customer Support: http://www.eztcp.com/en/support/
9.2 Warranty
9.2.1 Refund
Upon the customer’s request to refund the product within two weeks after purchase, Sollae
Systems will refund the product.
9.2.2 Free Repair Services
For product failures occurring within 2 years after purchase, Sollae Systems provides free repair
services or exchange the product. However, if the product failure is due to user’s fault, repair
service fees will be charged or the product will be replaced at user’s expense.
9.2.3 Charged Repair Services
For product failures occurring after the warranty period (2 years) or resulting from user’s fault,
repair service fees will be charged and the product will be replaced at user’s expense.
Page 54

CSE-T16 User Manual Ver. 1.2
- 53 -
http://www.ezTCP.com
10 Precaution and Exemption from Liability
10.1 Precaution
Sollae Systems is not responsible for product failures occurring due to user ’s alternation of
the product.
Specifications of the product are subject to change without prior notice for performance
improvement.
Sollae Systems does not guarantee successful operation of the product if the product was
used under conditions deviating from the product specifications.
Reverse engineering of firmware and applications provided by Sollae Systems is prohibited.
Use of firmware and applications provided by Sollae Systems for purposes other than those
for which they were designed is prohibited.
Do not use the product in an extremely cold or hot place or in a place where vibration is
severe.
Do not use the product in an environment in which humidity is high or a lot of oil exists.
Do not use the product where there is caustic or combustible gas.
Sollae Systems does not guarantee normal operation of the product under the conditions a
lot of noise exists.
Do not use the product for a purpose that requires exceptional quality and reliability relating
to user’s injuries or accidents – aerospace, aviation, health care, nuclear power, transportation,
and safety purposes.
Sollae Systems is not responsible for any accident or damage occurring while using the
product.
Page 55

CSE-T16 User Manual Ver. 1.2
- 54 -
http://www.ezTCP.com
10.2 Exemption from Liability
10.2.1 English version
In no event shall Sollae Systems Co., Ltd. and its distributors be liable for any damages
whatsoever (including, without limitation, damages for loss of profit, operating cost for commercial
interruption, loss of information, or any other financial loss) from the use or inability to use the
CSE-T16 even if Sollae Systems Co., Ltd. or its distributors have been informed of such damages.
The CSE-T16 is not designed and not authorized for use in military applications, in nuclear
applications, in airport applications or for use in applications involving explosives, or in medical
applications, or for use in security alarm, or for use in a fire alarm, or in applications involving
elevators, or in embedded applications in vehicles such as but not limited to cars, planes, trucks,
boats, aircraft, helicopters, etc..
In the same way, the CSE-T16 is not designed, or intended, or authorized to test, develop, or be
built into applications where failure could create a dangerous situation that may result in financial
losses, damage to property, personal injury, or the death of people or animals. If you use the CSET16 voluntarily or involuntarily for such unauthorized applications, you agree to subtract Sollae
Systems Co., Ltd. and its distributors from all liability for any claim for compensation.
Sollae Systems Co., Ltd. and its distributors entire liability and your exclusive remedy shall be
Sollae Systems Co., Ltd. and its distributors option for the return of the price paid for, or repair, or
replacement of the CSE-T16.
Sollae Systems Co., Ltd. and its distributors disclaim all other warranties, either expressed or
implied, including, but not limited to, the implied warranties of merchantability and fitness for a
particular purpose, with respect to the CSE-T16 including accompanying written material, hardware
and firmware.
Page 56

CSE-T16 User Manual Ver. 1.2
- 55 -
http://www.ezTCP.com
10.2.2 French version
Documentation
La documentation du boîtier CSE-T16 est conçue avec la plus grande attention. Tous les efforts
ont été mis en œuvre pour éviter les anomalies. Toutefois, nous ne pouvons garantir que cette
documentation soit à 100% exempt de toute erreur. Les informations présentes dans cette
documentation sont données à titre indicatif. Les caractéristiques techniques peuvent changer à
tout moment sans aucun préavis dans le but d'améliorer la qualité et les possibilités des produits.
Copyright et appellations commerciales
Toutes les marques, les procédés, les références et les appellations commerciales des produits
cités dans la documentation appartiennent à leur propriétaire et Fabricant respectif.
Conditions d’utilisations et limite de responsabilité
En aucun cas Sollae Systems Co., Ltd. ou un de ses distributeurs ne pourra être tenu responsable
de dommages quels qu'ils soient (intégrant, mais sans limitation, les dommages pour perte de
bénéfice commercial, interruption d'exploitation commerciale, perte d’informations et de données à
caractère commercial ou de toute autre perte financière) provenant de l'utilisation ou de
l'incapacité à pouvoir utiliser le boîtier CSE-T16, même si Sollae Systems Co., Ltd. ou un de ses
distributeurs a été informé de la possibilité de tels dommages.
Le boîtier CSE-T16 est exclusivement prévu pour un usage en intérieur, dans un environnement
sec et non poussiéreux. Le boîtier CSE-T16 n’est pas prévu, ni autorisé pour être utilisé en extérieur,
ni de façon embarquée dans des engins mobiles de quelque nature que ce soit (voiture, camion,
train, avion, etc…), ni en milieu explosif, ni dans des enceintes nucléaires, ni dans des ascenseurs, ni
dans des aéroports, ni dans des enceintes hospitaliers, ni pour des applications à caractère médical,
ni dans des dispositifs de détection et d’alerte anti-intrusion, ni dans des dispositifs de détection et
d’alerte anti-incendie, ni dans des dispositifs d’alarme GTC, ni pour des applications militaires.
De même, le boîtier CSE-T16 n’est pas conçu, ni destiné, ni autorisé pour expérimenter,
développer ou être intégré au sein d’applications dans lesquelles une défaillance de celui-ci
pourrait créer une situation dangereuse pouvant entraîner des pertes financières, des dégâts
matériel, des blessures corporelles ou la mort de personnes ou d’animaux. Si vous utilisez le boîtier
CSE-T16 volontairement ou involontairement pour de telles applications non autorisées, vous vous
engagez à soustraire Sollae Systems Co., Ltd. et ses distributeurs de toute responsabilité et de toute
demande de dédommagement.
En cas de litige, l'entière responsabilité de Sollae Systems Co., Ltd. et de ses distributeurs vis-à-vis
Page 57

CSE-T16 User Manual Ver. 1.2
- 56 -
http://www.ezTCP.com
de votre recours durant la période de garantie se limitera exclusivement selon le choix de Sollae
Systems Co., Ltd. et de ses distributeurs au remboursement de votre produit ou de sa réparation ou
de son échange. Sollae Systems Co., Ltd. et ses distributeurs démentent toutes autres garanties,
exprimées ou implicites.
Tous les boîtiers CSE-T16 sont testés avant expédition. Toute utilisation en dehors des
spécifications et limites indiquées dans cette documentation ainsi que les court-circuit, les chocs,
les utilisations non autorisées, pourront affecter la fiabilité, créer des dysfonctionnements et/ou la
destruction du boîtier CSE-T16 sans que la responsabilité de Sollae Systems Co., Ltd. et de ses
distributeurs ne puissent être mise en cause, ni que le boîtier CSE-T16 puisse être échangé au titre
de la garantie.
Conditions d’utilisations et limite de responsabilité
En aucun cas Sollae Systems Co., Ltd. ou un de ses distributeurs ne pourra être tenu responsable
de dommages quels qu'ils soient (intégrant, mais sans limitation, les dommages pour perte de
bénéfice commercial, interruption d'exploitation commerciale, perte d’informations et de données à
caractère commercial ou de toute autre perte financière) provenant de l'utilisation ou de
l'incapacité à pouvoir utiliser le boîtier CSE-T16, même si Sollae Systems Co., Ltd. ou un de ses
distributeurs a été informé de la possibilité de tels dommages.
Page 58
CSE-T16 User Manual Ver. 1.2
- 57 -
http://www.ezTCP.com
11 Revision History
Date
Version
Description
Author
2015.10.12
1.0
○ Initial release
Amy Kim
2016.10.21
1.1
○ Add function of SSH
○ Add a description on 7.1.2. Separator
Sara Lee
2017.10.24
1.2
○ Add reference on 3.1.1
Sara Lee
 Loading...