

Page 1

comfort
Nur mit Verkaufsdatum und Unterschrift der Verkaufsfirma gültig.
Seulement valable avec signature et date de la vente.
Valid only if provided with date of sale and signature of seller.
Nur mit Verkaufsdatum und Unterschrift der Verkaufsfirma gültig.
Seulement valable avec signature et date de la vente.
Valid only if provided with date of sale and signature of seller.
For all repairs and warranty cases please send the appliance directly to:
En cas de réparation et de garantie veuillez envoyer l’appareil directement à:
Für alle Reparaturen oder Garantiefälle ist das Gerät direkt einzusenden an:
G UAR A N T E E C A R D
BO N D E G A R A N T I E
G A R A N TIESC H E I N
plus
line
Typ/Type/Tipo/Type 431
Bedienungsanleitung
Mode d’emploi
Istruzioni per l’uso
Instructions for use
SOLIS HELPLINE:
044 874 6 4 14
(Nur für Kundinnen und Kunden in der Schweiz)
(Uniquement pour clientes et clients en Suisse)
Dieser Artikel zeichnet sich durch Langlebigkeit und Zuverlässigkeit
aus. Sollte aber trotzdem einmal eine Funktionsstörung auftreten,
rufen Sie uns einfach an. Oftmals lässt sich nämlich eine Panne mit
dem richtigen Tipp oder Kniff unkompliziert und einfach wieder
beheben, ohne dass Sie das Gerät gleich zur Reparatur einschicken
müssen. Wir stehen Ihnen gerne mit Rat und Tat zur Seite.
Cet article se distingue par sa longévité et sa fiabilité. Si un
disfonctionnement devait tout de même survenir, appelez-nous
tout simplement. Il arrive souvent qu’une panne soit facile à
réparer sans difficulté grâce au bon conseil et à la bonne astuce,
sans que l’appareil ne doive être envoyé chez un réparateur.
Nous vous conseillons et vous aidons volontiers.
This item stands out due to its long-life cycle and reliability. Despite
this though, if a malfunction ever occurs, simply give us a call.
Often a breakdown can be easily and quickly remedied with the
right tip or technique without having to straight away send off
the device for repair. We will give you all the advice and practical
support you require.
(Only for customers in Switzerland)
240/ 120 Volt
Page 2

BETRIEBSANLEITUNG
Vielen Dank, dass Sie unser Produkt verwenden. Wir sind überzeugt, dass es Ihnen in Zukunft
viel Freude bereiten wird.
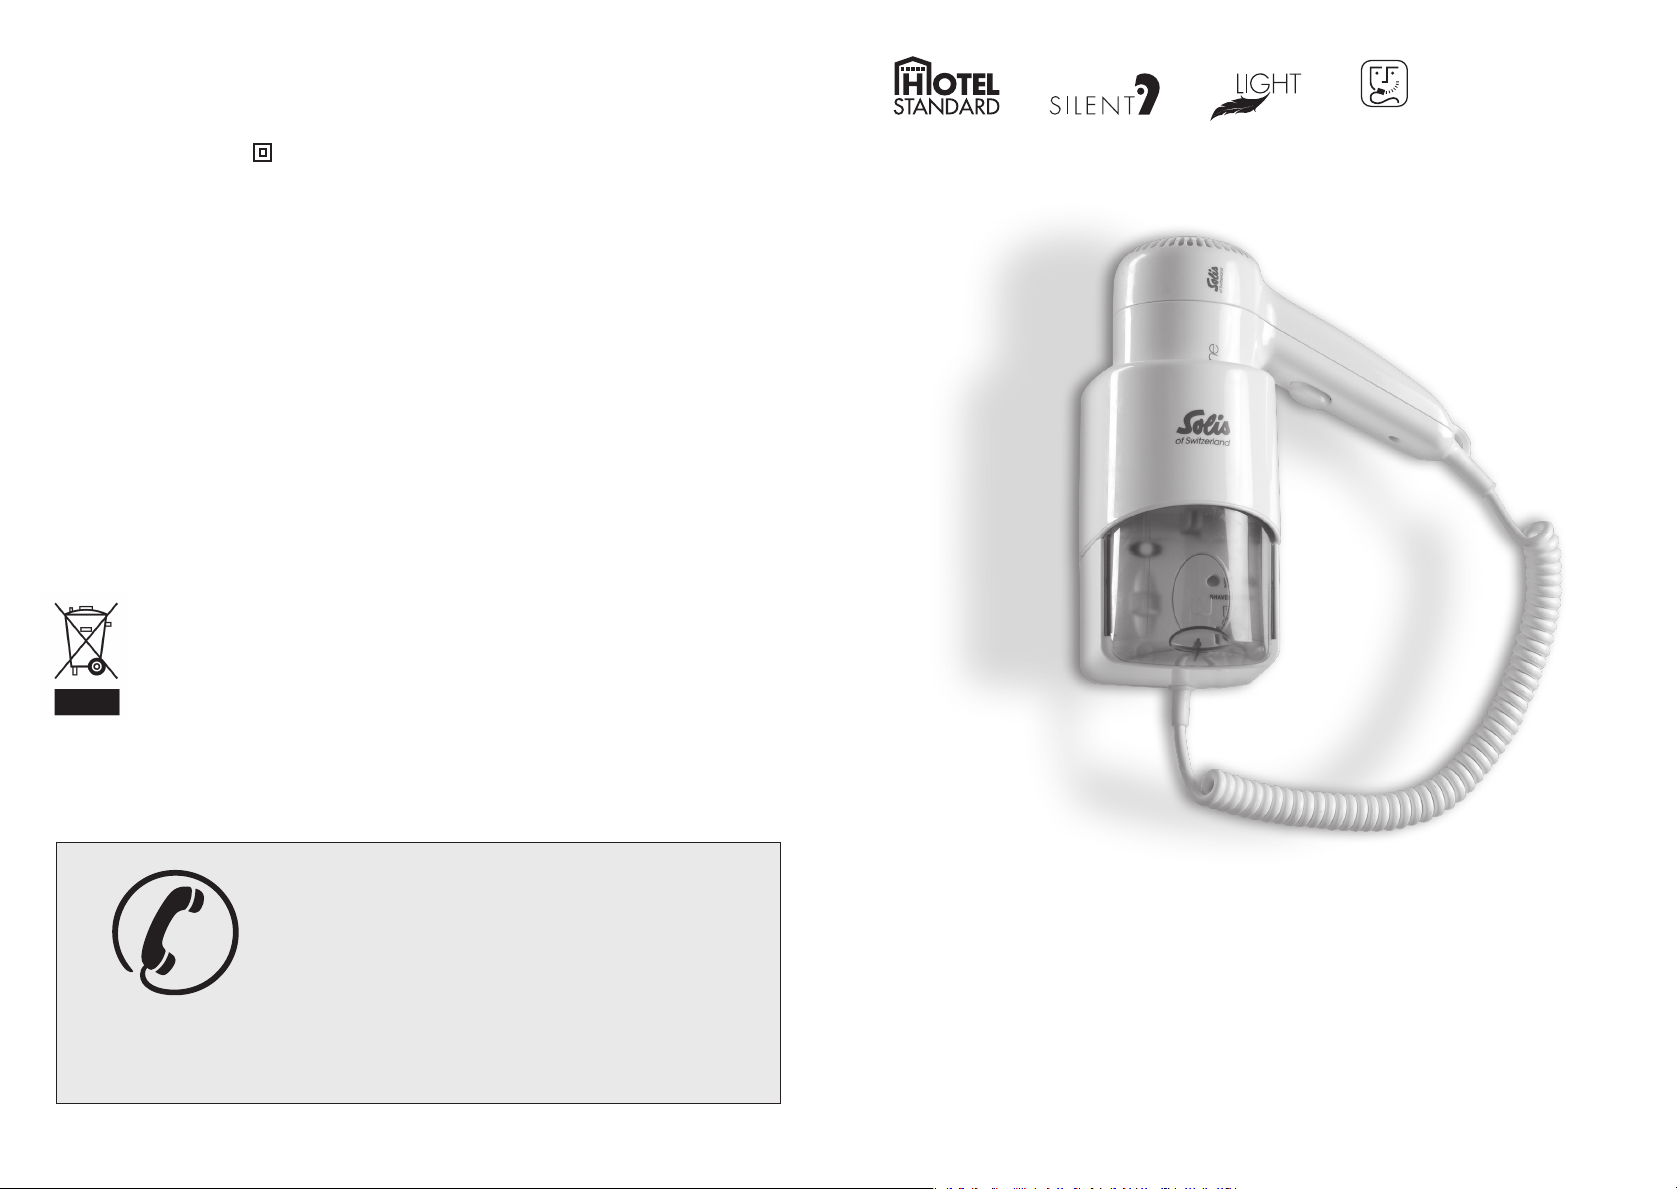
Dieser Wandföhn hat eine Haar- und Hauttrocknungsfunktion. In der Wandeinheit befinden sich zwei
Steckdosen für Elektrorasierer (120V/240V) und ein Netzschalter. Dank seinen technisch und ästhetisch
hochwertigen Eigenschaften ist er die ideale Wahl für die Verwendung in Hotellerie und Privathaushalt.
Merkmale
• Hauptschalter(SicherungdesGerätesbeiNichtbenutzung)
• ZweiHeizstufen
• EinfachesEin-undAusschaltendenFöhnsmittelsDrückenoderLoslassendesDruckschalters
• DieRasierersteckdosenstehennurunterSpannung,wenndieAbdeckunghochgeschobenwird
Bestandteile
Abb. 1
1. Haartrockner
2. Halter
3. Durchsichtige Abdeckung
4. Kontrolllampe
5. Hauptschalter
6. Mikroschalter
7. Abdeckplättchen
8. Rasierersteckdose
9. Druckschalter
10. Heizstufenschalter
1
2
10
9
8
3
4
5
6
7
Abb. 1
Montage
Die Montage darf nur von einem qualifizierten Fachmann durchgeführt werden.
1. Zwei Löcher, Durchmesser 6 mm im Abstand von 140 mm bohren (siehe Abb. 2). Dübel in die Löcher
stecken, den Aufhänger mittels Schraube im unteren Loch befestigen, anschliessend den Halter
einhängen und mit der Schraube über das obere Loch befestigen.
2. Frontabdeckung (3) lösen und entfernen (siehe Abb. 3).
3. Elektrischer Anschluss:
Mittels Netzleitung: Netzleitung in Lüsterklemme (1) befestigen und Netzleitung mittels Kabelbride
festklemmen (siehe Abb. 4).
Bei Unterputzanschluss: Basis an der vorbestimmten Stelle öffnen (2) und die Anschlussdrähte
(230/240V) an der Lüsterklemme (1) anschliessen (siehe Abb. 4).
4. Montage nochmals überprüfen und Rahmenelement sowie Frontabdeckung montieren.
5. Strom und Hauptschalter einschalten.
Abb. 2
1. Dübel
2. Schraube
3. Abdeckplättchen
4. Aufhänger
5. Schraube
Abb. 3
1. Durchsichtige Abdeckung
2. Rahmenelement
3. Frontabdeckung
4. Schraube 2
5. Abdeckplättchen
140 mm
1
2
3
4
5
Abb. 2
1
2
3
4
5
Abb. 3
Positionierung
Warnung: Montieren Sie das Gerät nicht über der Duschwanne oder in der Nähe von Armaturen.
Beachten Sie in diesem Zusammenhang bitte die nachfolgende Skizze.
min. 60 cm
min. 60 cm
Abb. 4
1. Klemme
2. Drahteingangsöffnung
3. Halteroberteil-Gruppe
1
2
3
Abb. 4
Anwendung
Strom einschalten, Föhn herausnehmen. Der Haartrockner funktioniert, solange der Druckschalter (9)
gedrückt bleibt. Heizstufenschalter (10) nach oben und unten bewegen, um die maximale bzw. minimale
Hitze einzustellen. Wird das Gerät über längere Zeit nicht verwendet, Hauptschalter ausschalten, um das
Gerät von der Stromzufuhr zu trennen.
ca. 130 cm
2 3
Anwendung Steckdosen
Durchsichtige Abdeckung hochschieben. Die Rasierersteckdosen stehen unter Spannung, wenn der
Hauptschalter eingeschaltet ist. Abdeckung hinunterziehen, um den Strom bei leerer Rasierersteckdose
auszuschalten.
Page 3

Spezifikationen
Stromspannung: 230/240V - 50 Hz.
Leistung: 1’200 W max.
Leistung Rasiersteckdose: 20 W
Berührungsschutz:
Hinweise
1. Das Gerät darf nur ausser Reichweite von badenden Personen montiert werden.
2. Nicht in der Nähe von Badewannen oder anderen Badebehältnissen verwenden.
3. Direkte Wasserbespritzung vermeiden.
4. Luftein- und/oder -auslassöffnung nicht abdecken.
5. Gerät bei Funktionsstörungen ausschalten und Kontakt mit unserer Firma oder mit einem
qualifizierten Eelektriker aufnehmen.
6. Dieses Gerät ist nicht geeignet für die Verwendung durch Personen (einschliesslich Kinder) mit eingeschränkten physischen, sensorischen oder mentalen Fähigkeiten oder mangelnder Erfahrung oder
Kenntnis, sofern sie nicht durch eine für ihre Sicherheit verantwortliche Person bei der Verwendung
des Gerätes überwacht werden oder in dessen Handhabung instruiert worden sind.
7. Kinder sind zu beaufsichtigen, damit sie nicht mit dem Gerät spielen.
Inhalt
1 Haartrockner-Set
1 Bedienungsanleitung
1 Aufhänger, zwei Schrauben und zwei Dübel
Entsorgung
EU 2002/96/EC
240/ 120 Volt
In Übereinstimmung mit der Richtlinie 2002/96/EC für die Entsorgung von Elektro- und
Elektronik-Altgeräten (EEAG) bringen Sie bitte Ihr Gerät am Ende der Lebensdauer zur
Entsorgung und zum Schutz der Umwelt zu einer Sammelstelle für Elektrogeräte.
SOLIS HELPLINE:
044 874 64 14
(Nur für Kundinnen und Kunden in der Schweiz)
Dieser Artikel zeichnet sich durch Langlebigkeit und Zuverlässigkeit aus. Sollte aber trotzdem
einmal eine Funktionsstörung auftreten, rufen Sie uns einfach an. Oftmals lässt sich nämlich
eine Panne mit dem richtigen Tipp oder Kniff unkompliziert und einfach wieder beheben,
ohne dass Sie das Gerät gleich zur Reparatur einschicken müssen. Wir stehen Ihnen gerne
mit Rat und Tat zur Seite.
4 5
SOLIS AG
Solis-Haus • CH-8152 Glattbrugg-Zürich • Schweiz
Telefon +41 44 874 64 54 • Telefax +41 44 874 64 99
info@solis.ch • www.solis.ch •www.solis.com
September 2009
Page 4

MANUEL D’UTILISATION
Nous vous remercions vivement d’être devenu un utilisateur de notre produit qui vous apportera confort et plaisir dans le futur.
Ce sèche-cheveux mural présente une fonction pour les cheveux et pour la peau. L’unité murale comprend deux prises permettant de brancher un rasoir électrique (120V/240V) et un interrupteur-réseau.
Grâce à ses caractéristiques de qualité au niveau technique ainsi qu’esthétique, il représente le choix idéal
pour une utilisation dans l’hôtellerie et les foyers des particuliers.
Caractéristiques
• Caractériséparuncommutateurgénéralpourpermettreàcetteunitéd’êtreàl’arrêtlorsqu’il
n’est pas utilisé
• Deuxpuissancesdechauffage
• Ilsuftdemettreenmarcheetd’arrêtercetteunitéenmaintenantouenrelâchantlebouton
de sécurité micro.
• Lesprisespourrasoirpeuventuniquementêtremisessous-tensionunefoislecacherelevévers
le haut.
Éléments
Montage
Le montage doit être réalisé uniquement par un spécialiste.
1. Percer 2 trous de 6 mm de diamètre à une distance de 140 mm (cf. figure 2). Insérer ensuite la cheville
dans les trous et fixer le cordon à l’aide de la vis dans le trou inférieur. Accrocher le support et le fixer
avec la vis sur le trou supérieur.
2. Desserrer et retirer le couvercle frontal (3) (cf. figure 3).
3. Branchement électrique:
À l’aide du câble secteur: fixer le câble secteur au domino de raccordement (1) et bloquer le câble
secteur à l’aide de la bride de câble (cf. figure 4).
Branchement encastré: ouvrir la base aux endroits prévus (2) et brancher les fils de raccordement
(230/240 V) au domino de raccordement (1) (cf. figure 4).
4. Contrôler à nouveau le montage et monter le panneau et le couvercle frontal.
5. Allumer les commutateurs d’énergie et principal.
Figure 2
1. Cheville
2. Vis
3. Couvercle
4. Cordon
5. Vis
140 mm
1
2
3
4
5
Fig. 2
Figure 1
1. Sèche-cheveux
2. Support
3. Cache transparent
4. Voyant de contrôle
5. Interrupteur principal
6. Microrupteur
7. Plaquettes de protection
8. Prise pour rasoir
9. Interrupteur à pression
10. Commutateur de chauffage
1
2
10
9
8
3
4
5
6
7
Fig. 1
Emplacement
Avertissement: Ne pas installer cette unité au-dessus de la cabine de douche ni à aucun endroit sous
une arrivée d’eau. Veuillez également observer les schémas indiqués ci-dessous.
min. 60 cm
min. 60 cm
ca. 130 cm
Figure 3
1. Cache transparent
2. Élément-cadre
3. Cache frontal
4. Vis 2
5. Plaquettes de protection
Figure 4
1. Borne
2. Ouverture pour l’entrée
du câble
3. Groupe- partie supérieure
du support
1
2
3
4
5
Fig. 3
1
2
3
Fig. 4
Mode d’emploi
Mettre le courant et prendre le corps du sèche-cheveux. Le sèche-cheveux fonctionne lorsque l’on
appuie sur le bouton de sécurité micro (9). Déplacer le bouton de réglage de la chaleur (10) vers le bas et
le haut pour un chauffage fort ou faible indiqué par Max et Min respectivement. Dans le cas où l’appareil
n’est pas utilisé pendant un certain temps, éteindre l’interrupteur principal, afin de couper l’appareil de
l’alimentation en électricité.
Utilisation des prises
Relever le cache transparent vers le haut. Les prises pour rasoir se trouvent sous tension lorsque
l’interrupteur principal est allumé. Lorsque la prise pour rasoir n’est pas utilisée, rabattre le cache pour
éteindre le courant.
6 7
Page 5
Spécifications
Tension: 230/240V - 50 Hz.
Puissance: 1’200 W max.
Puissance prise pour rasoir: 20 W
Protection contre les chocs:
Notes
1. Cette unité doit être installée à un endroit éloigné des personnes se baignant.
2. Ne pas utiliser cette unité à proximité d’une baignoire ou autre installation de bain.
3. Éviter de projeter directement de l’eau sur l’unité.
4. Ne pas couvrir l’arrivée et/ou la sortie d’air.
5. En cas de panne, veuillez arrêter l’appareil et prendre contact avec notre entreprise ou un électricien
qualifié pour l’entretien.
6. Cet appareil n’est pas destiné à être utilisé par des personnes (y compris les enfants) aux capacités
physiques, sensorielles ou mentales réduites ou qui manque d’expérience et de connaissances, à
moins d’être surveillé ou d’avoir reçu des instructions concernant l’utilisation de l’appareil par une
personne responsable de leur sécurité.
7. Les enfants doivent être surveillés pour s’assurer qu’ils ne jouent pas avec
Contenu
1 Kit sèche-cheveux
1 Manuel d’utilisateur
1 Cordon, deux vis et deux chevilles
Élimination
UE 2002/96/CE
240/ 120 Volt
En conformité avec la directive 2002/96/CE relative aux déchets d’équipements électriques et
électroniques (DEEE), veuillez apporter votre appareil à un point de collecte pour appareils électriques à
la fin de sa durée de vie afin d’assurer son élimination correcte et la protection de l’environnement.
SOLIS HELPLINE:
044 874 64 14
(Uniquement pour clientes et clients en Suisse)
Cet article se distingue par sa longévité et sa fiabilité. Si un disfonctionnement devait tout
de même survenir, appelez-nous tout simplement. Il arrive souvent qu’une panne soit facile à
réparer sans difficulté grâce au bon conseil et à la bonne astuce, sans que l’appareil ne doive
être envoyé chez un réparateur. Nous vous conseillons et vous aidons volontiers.
8 9
SOLIS AG
Solis-Haus • CH-8152 Glattbrugg-Zurich • Suisse
Téléphone +41 44 874 64 54 • Téléfax +41 44 874 64 99
info@solis.ch • www.solis.ch •www.solis.com
Septembre 2009
Page 6

MANUALE UTENTE
Grazie per aver scelto di utilizzare il nostro prodotto. Siamo certi che ne resterà molto
soddisfatto.
Questo asciugacapelli a parete può essere utilizzato per asciugare sia i capelli sia la pelle. L’unità a
parete è dotata di due prese per rasoio elettrico (120V/240V) e di un interruttore generale. Grazie alle
sue caratteristiche tecniche ed estetiche di qualità costituisce la scelta ideale per l’utilizzo nelle strutture
alberghiere e in ambiente domestico.
Caratteristiche
• Interruttoregenerale(protezionedell’apparecchioquandononèinuso)
• Duelivelliditemperatura
• Facilitàdiaccensioneespegnimentodell’asciugacapellimediantelapressioneoilrilasciodelcoman-
do a pulsante
• Lepreseperrasoioricevonotensionesoloquandolacoperturavienefatascorrereversol’alto
Componenti
Fig. 1
1. Asciugacapelli
2. Supporto
3. Copertura trasparente
4. Lampada-spia
5. Interruttore generale
6. Microinterruttore
7. Placchette di copertura
8. Presa per rasoio
9. Comando a pulsante
10. Interruttore di regolazione
della temperatura
Posizionamento
Attenzione: non installare la presente unità al di sopra del piatto doccia o in prossimità di accessori
idraulici. A tale proposito fare riferimento allo schizzo sotto.
1
2
10
9
8
3
4
5
6
7
fig. 1
Montaggio
Attenzione: il montaggio deve essere effettuato da un tecnico qualificato.
1. Praticare 2 fori del diametro di 6 mm ad una distanza di 140 mm l’uno dall’altro (vedi figura 2).
Inserire i tasselli nei fori e fissare il gancio sul foro più basso utilizzando la vite. Quindi appendere il
gancio e fissarlo con la vite al di sopra del foro superiore.
2. Allentare e rimuovere la protezione anteriore (3) (vedi figura 3).
3. Collegamento elettrico:
Con cavo di alimentazione: fissare il cavo di alimentazione nel morsetto da lampadario (1) e fissare il
cavo di alimentazione mediante la staffa per cavi (vedi figura 4).
Con attacco a incasso: aprire la base nel punto prestabilito (2) e collegare i fili di collegamento
(230/240V) al morsetto da lampadario (1) (vedi figura 4).
4. Verificare ancora una volta la correttezza delle operazioni di montaggio e montare l’elemento a
telaio e la protezione anteriore.
5. Inserire l’alimentazione e accendere l’interruttore generale.
1
Fig. 2
1. Tasselli
2. Vite
3. Placchette di copertura
4. Gancio
5. Vite
Fig. 3
1. Copertura trasparente
2. Elemento a telaio
3. Copertura anteriore
4. Vite 2
5. Placchette di copertura
Fig. 4
1. Morsetto
2. Apertura d’ingresso del filo
3. Complessivo parte
superiore supporto
140 mm
2
3
4
5
fig. 2
1
2
3
4
5
fig. 3
1
2
3
fig. 4
min. 60 cm
min. 60 cm
Modalità di utilizzo
Accendere l’alimentazione ed estrarre l’asciugacapelli. L’asciugacapelli resterà in funzione fino a quando
sarà mantenuto premuto il comando a pulsante (9). Spostare verso l’alto o verso il basso l’interruttore di
regolazione della temperatura (10) per regolare la temperatura al massimo o al minimo. Se l’apparecchio
non viene utilizzato per un periodo prolungato, disinserire l’interruttore generale per scollegare
l’apparecchio dall’entrata di corrente.
Uso delle prese
ca. 130 cm
10 11
Spingere verso l’alto la copertura trasparente. Le prese per il rasoio ricevono tensione solo quando viene
inserito l’interruttore generale. Tirare verso il basso la copertura per scollegare la corrente quando la
presa per il rasoio è vuota.
Page 7

Specifiche
Tensione di alimentazione: 230/240V - 50 Hz.
Potenza: 1’200 W max.
Potenza presa per rasoio: 20 W
Messa a terra:
Note
1. L’apparecchio deve essere montato fuori dalla portata di persone che fanno il bagno.
2. Non utilizzare l’apparecchio in prossimità di vasche da bagno o altri accessori da bagno contenenti acqua.
3. Evitare di esporre l’apparecchio a getti d’acqua diretti.
4. Non coprire l’apertura di entrata e/o di uscita dell’aria.
5. In caso di malfunzionamento, scollegare l’apparecchio dall’alimentazione e contattare la nostra
azienda o un elettricista qualificato.
6. Non far utilizzare il presente apparecchio a persone (compresi i bambini) con capacità fisiche,
sensoriali o mentali limitate, o sprovviste della necessaria esperienza o competenza, senza la
supervisione di una persona responsabile per la loro sicurezza durante l’utilizzo dell’apparecchio
o senza che le stesse siano state istruite sul suo funzionamento.
7. Sorvegliare i bambini per assicurarsi che non giochino con l’apparecchio.
Contenuto
1 set asciugacapelli
1 manuale utente
1 gancio, 2 viti e 2 tasselli
Smaltimento
UE 2002/96/CE
240/ 120 Volt
In conformità alla Direttiva 2002/96/CE sui rifiuti di apparecchiature elettriche ed elettroniche (RAEE), per
uno smaltimento rispettoso dell’ambiente al termine della vita del vostro apparecchio portatelo in
un centro per la raccolta di apparecchi elettrici.
SOLIS HELPLINE:
044 874 64 14
(Solo per i clienti in Svizzera)
Questo articolo si contraddistingue per la sua lunga durata ed affidabilità. Se ciononostante
dovessero presentarsi dei problemi di funzionamento, ci telefoni. Spesso, un guasto si risolve
senza complicazioni e in modo semplice con il consiglio o lo stratagemma giusti senza dovere
spedire subito l’apparecchio per ripararlo. Siamo a Sua disposizione per consigli ed aiuto.
12 13
SOLIS AG
Solis-Haus • CH-8152 Glattbrugg-Zurigo •Svizzera
Telefono +41 44 874 64 54 • Fax +41 44 874 64 99
info@solis.ch • www.solis.ch •www.solis.com
Settembre 2009
Page 8

INSTRUCTION MANUAL
Thank you very much for purchasing our product, which will bring convenience and pleasure
to you in the future.
This wall-mounted blow dryer can be used for drying hair or skin. There are two outlets for an electric
razor (120V/240V) and a master power switch contained in the wall unit. With its smart combination of
style and the latest technology, it is the ideal choice for hair drying at home or at a hotel.
Features
• Masterswitchallowingtheunittobecompletelyswitchedoffwhennotinuse
• Twoheatsettings
• Turntheunitonandoffwitheasebypushinginorreleasingthepowerswitch.
• Theelectricrazoroutletsshouldonlybeusedwhenthefrontpanelisclosed.
Components
Pic. 1
1. Hair dryer
2. Holder
3. Transparent front cover
4. Indication light
5. Main power switch
6. Micro switch
7. Cover plate
8. Electric razor outlet
9. Power button
10. Heat setting button
1
2
10
9
8
3
4
5
6
7
Pic. 1
Installation
The installation must be carried out by a qualified specialist.
1. Drill two holes 6 mm in diameter 140 mm apart (see picture 2). Insert rawlplugs into the holes and
fix the hanger to the bottom hole with a screw. Then hang the bracket up and secure with a screw
in the top hole.
2. Remove front cover (3) (see picture 3).
3. Electrical connection:
Connection to the mains: attach the mains connection to the connector strip (1) and clamp it down
with a wire clamp (see picture 4).
When flush-mounted: open up the base as intended (2) and connect power supply (230/240V) to
the connector strip (1) (see picture 4).
4. Check the installation diagram and make sure the panel and front cover are secure.
5. Turn on power and master switch.
Pic. 2
1. Rawlplug
2. Screw
3. Cover panel
4. Hanger
5. Screw
Pic. 3
1. Transparent front cover
2. Panel
3. Front panel
4. Screw 2
5. Cover plate
140 mm
1
2
3
4
5
Pic. 2
1
2
3
4
5
Pic. 3
Positioning diagram
Warning: do not install this unit above a shower basin or near any bathroom fittings. Check that your
installation matches the following diagram.
min. 60 cm
min. 60 cm
Pic. 4
1. Clamp
2. Wire entry opening
3. Holder top section
1
2
3
Pic. 4
How to use
Switch on the power and remove the dryer from the holder. The dryer will work when the power button
(9) is pushed in. Move heat setting button (10) up or down to alter the heat setting. If the unit is not
being used for a long period of time, switch off the master power switch to disconnect it from the mains.
ca. 130 cm
14 15
How to use the electric razor outlets
Lift up the transparent front cover. The electric razor outlets can only be used if the main power switch
is switched on. Pull down the panel in order to turn off the power if the outlet is not being used.
Page 9

Specification
Voltage: 230/240V - 50 Hz.
Power: 1’200 W max.
Electric razor outlet power: 20 W
Shock protection:
Notes
1. This unit must be installed away from anyone in direct contact with water.
2. Do not use this unit whilst near any bathroom fittings.
3. Avoid direct contact of this unit with water.
4. Do not obstruct the air inlet and/or outlet.
5. If there is a malfunction, please switch off the power and contact our company or a qualified electrician.
6. This appliance is not intended for use by persons (including children) with reduced physical, sensory
or mental capabilities or lack of experience and knowledge, unless they have been given supervision
or instruction concerning use of the appliance by a person responsible for their safety.
7. Children should be supervised to ensure that they do not play with the appliance.
Pack contents
1 Hair dryer set
1 Copy of the user manual
1 Bracket, two screws and two rawlplugs
Disposal
240/ 120 Volt
EU 2002/96/EC
In accordance with the directive 2002/96/EC on waste electrical and electronic equipment (WEEE),
please dispose your appliance at the end of its life cycle and take it to a collection point for electronic
devices for environmental protection.
SOLIS HELPLINE:
044 874 64 14
(Only for customers in Switzerland)
This item stands out due to its long-life cycle and reliability. Despite this though, if a malfunction
ever occurs, simply give us a call. Often a breakdown can be easily and quickly remedied
with the right tip or technique without having to straight away send off the device for repair.
We will give you all the advice and practical support you require.
16 17
SOLIS AG
Solis-House • CH-8152 Glattbrugg-Zurich • Switzerland
Phone +41 44 874 64 54 • Fax +41 44 874 64 99
info@solis.ch • www.solis.ch •www.solis.com
September 2009
Page 10

18
Mit Ihrem Kauf wählten Sie ein erstklassiges Produkt, und das Gerät wird Ihnen
sicher lange Zeit Freude bereiten. Der Apparat hat eine sorgfältige Schlusskon-
trolle bestanden. Wir leisten hiefür eine Garantie für die Gratis-Reparatur aller
Bestandteile, wenn die Defekte nachweisbar infolge Materialfehler entstanden
sind. Die Garantie beginnt mit dem durch die Verkaufsfirma eingetragenen Ver-
kaufsdatum. Der Apparat muss in ungeöffnetem Zustand mit Garantieschein
bei uns eingehen. Schäden, welche durch normale Abnützung, Verschmut-
zung, unsachgemässe Bedienung oder falschen Netzanschluss entstanden sind
sowie der Ersatz von zerbrochenen Teilen, fallen nicht unter Garantie und eine
Haftpflicht für Sach- oder Personenschaden wird wegbedungen.
Bei gewerblichem Gebrauch beträgt die Garantiezeit 12 Monate.
En achetant un appareil SOLIS vous avez acquis un produit de la plus haute
qualité qui vous rendra certainement de bons services pendant longtemps.
Avant de quitter l’usine, l’appareil a été contôlé soigneusement. Nous nous
engageons à effectuer sans frais toutes les réparations résultant d’un défaut
de fabrication ou de matériel. La garantie commence avec la date de vente
marquée par le revendeur. L’appareil est à nous retourner sans avoir été ouvert
et accompagné du bon de garantie. Ne sont pas couverts les dommages qui
résultent d’une usure normale, d’un entretien laissant à désirer ou d’un emploi
incorrect ou provenant d’un choc ou d’une chute. La garantie écarte tout
recours qui n’est pas spécifié ci-dessus et ne peut en aucun cas donner lieu à
des poursuites.
En cas d’usage industriel, la durée de garantie est de 12 mois.
Typ Nr.:
Type No:
Wir gewähren Ihnen für diesen SOLIS-Apparat
Nous vous accordons pour ce produit SOLIS
We grant you for this SOLIS appliance
2 JA H R E GARANTI E
2 ANS DE GARANTIE
2 YEARS GUARANTEE
nach unseren Lieferbedingungen
selon nos conditions de livraison
as per our delivery conditions
Mod. No:
By acquiring this unit you chose a first-class article. This item will surely provide
you lots of satisfaction for a long time. The apparatus has passed a very careful
final test. Our guarantee covers the free repair of any defective part which is
proven to be due to faulty material. The warranty commences as from the date
of delivery certified by the seller. The unit is to be returned to us without having
been opened, accompanied by this guarantee card. No indemnity is paid in
case of damage through normal wear, soiling, incorrect use, connection to the
wrong voltage supply or replacement of broken parts.We disclaim any responsi-
bility for damage caused to property or persons.
If the appliance is used commercially, the warranty period is 12 months.
Fabr./Serie-Nr.:
No de fabrication/série:
Manuf./serial No:
Verkauft am:
Livré le:
Sold on:
durch:
Magasin de vente:
By:
 Loading...