

Page 1
Water Level Temperature Meter Instructions
Model 201
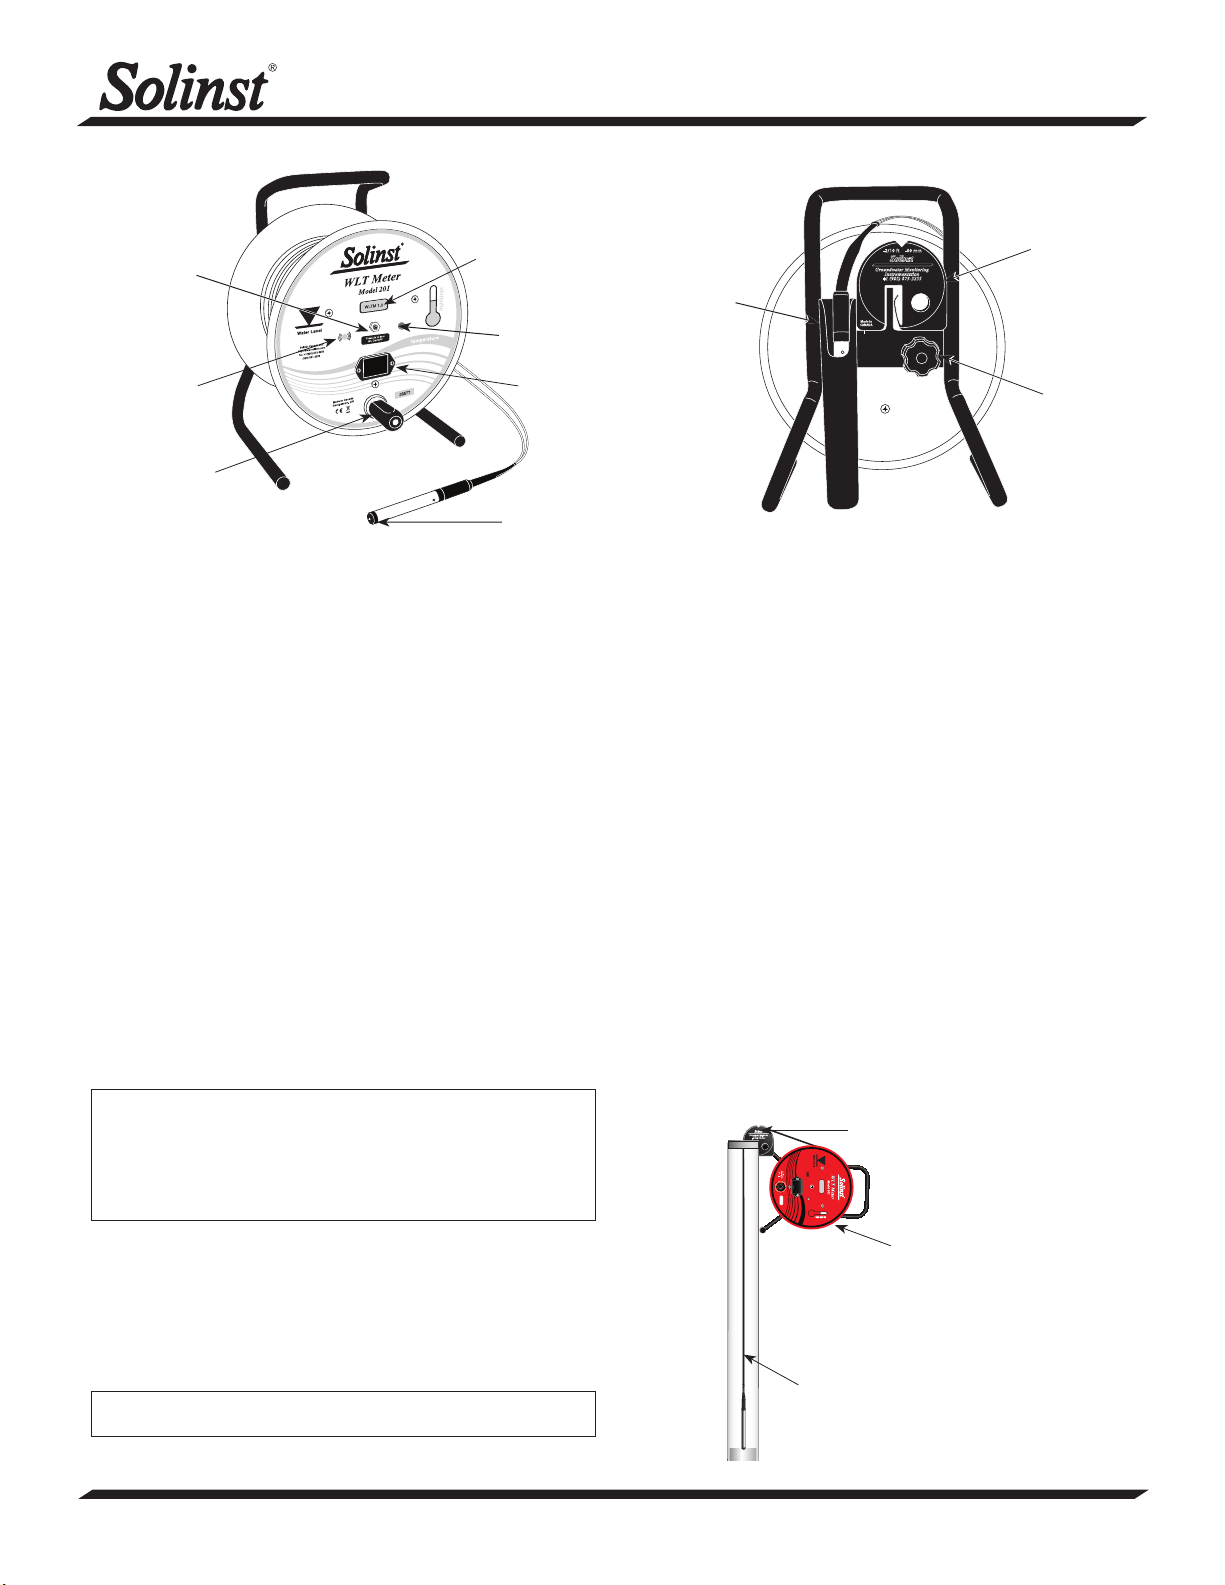
Button
Sonalert
(Buzzer)
Handle
LCD Display
Indicator
Light
Battery
Drawer
Zero Point
Front View Back View
Operating Principles
The Solinst Model 201 Water Level Temperature (WLT) Meter
measures water level and temperature. Temperature readings are
displayed on the LCD screen and water level is read from the tape as
with a conventional Water Level Meter. When the probe is immersed in
a conductive fluid, a circuit is completed and the water level is indicated
by a tone and light.
Equipment Check
Upon receipt of your Solinst Model 201 Water Level Temperature
Meter, and always before heading out to the field, the following checks
are recommended:
1. Press the button to turn the meter on. The display should briefly
show the firmware version of the meter (e.g. WLTM 1.0), then the
air temperature (e.g. 21.12 C). If the battery is low, a ‘LOW BATT’
warning appears and the 9 volt alkaline battery should be replaced.
If “No Comm” appears, check the probe connection (call Solinst if
message persists). If the display is blank, install a new 9V battery.
2. Ensure the probe tip is clean.
3. Submerse the probe in tap water. This completes the circuit and
activates the buzzer and light.
Taking Water Level & Temperature Measurements
Notes:
1. The zero measurement point of the Water Level Temperature Meter
is located near the tip of the probe.
2. If the display indicates ‘LOW BATT’ there is still some life left in the
battery, but it is recommended that you change the batteries as soon
as possible.
Tape Guide
Probe Holder
Brake
3. To turn the buzzer off while you are obtaining a temperature
profile, press the button 2 times quickly. “WL-off” will display
above the temperature reading on the LCD. To turn the buzzer
back on, press the button 2 times quickly.
4. To conserve battery power, the display has an auto off after
8 minutes of use. If the display is blank when you wish to take
a measurement, press the button to display temperature reading.
5. Repeat at each desired depth.
6. After each use clean the sensor pin with a soft cloth and rinse with
deionized water.
7. To turn the Water Level Temperature Meter off, press and hold the
button for about 2 seconds.
Tape Guide Instructions
1. Fit the Tape Guide over the top of the well, small end in.
2. Insert the leg of the Water Level Temperature Meter into the hole
on the Tape Guide and rest the Water Level Temperature Meter on
the side of the well casing (small reels only, see diagram).
3. Take all measurements at the ‘V’ notch on the Tape Guide, and
adjust readings according to the offset stamped on the Tape Guide
(i.e. subtract 6 cm or 2/10 ft).
4. When finished, store the Tape Guide by clipping it onto the support
bracket on the back of the Water Level Temperature Meter.
Tape Guide: prevents tape
Solinst Canada Ltd.
from scratching the top edge
Tel: +1(905) 873-2255
www.solinst.com
(800) 661-2023
of well casing
1. Turn the meter on and lower the probe into water. A tone and light
indicate that water has been reached and the depth can be read
off the tape and recorded. Lower and raise the probe slowly a few
times to verify the depth.
2. Once in water, the screen displays temperature of the water at the
zero point. Lower the probe to the desired depth. Record the depth
and the associated temperature reading when stabilized.
Note: Temperature readings are most accurate when the entire probe
is submersed.
(Page 1 of 2)
High Quality Groundwater and Surface Water Monitoring Instrumentation
Water Level
Temperature Meter:
anchored to the well casing with the
tape guide for stable operation. Small
reels only. Medium and large reels
should be placed on the ground.
High quality PVDF at tape:
hangs straight in the well for
accurate interface
measurements
Page 2
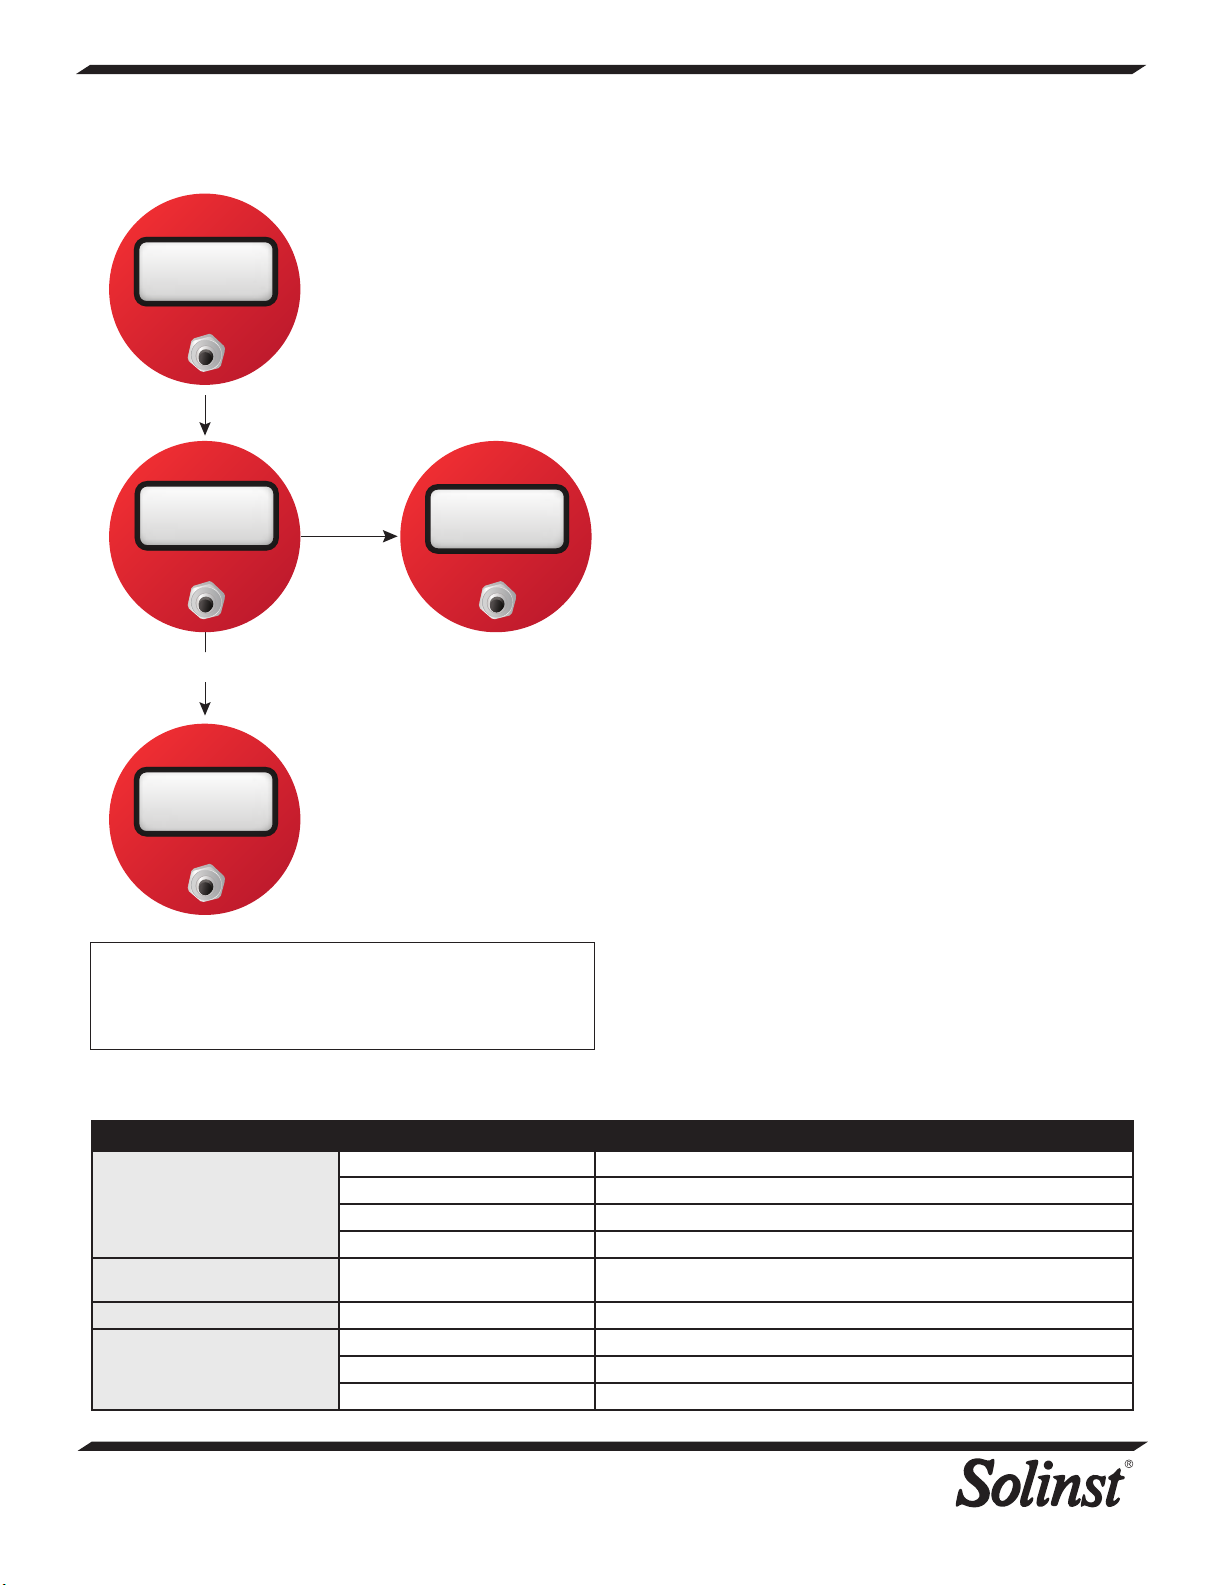
Display Menu
WLTM 1.0
23.53 C
Press & hold for off
WL - off
23.53 C
Press 2x to
turn buzzer
off/on
Routine Care
1. After the depth to water has been recorded, the tape should be
carefully rewound onto the reel, the probe wiped dry and placed into
the probe holder.
2. The probe, tape and reel can be wiped clean with phosphate free
(non-abrasive) detergent and warm water. Do not submerge the
reel.
3. Use of the Carrying Bag adds to the service life of the meter.
4. Use of the Tape Guide adds to the life of the tape.
Probe Care and Cleaning
1. The probe should be wiped clean after each use.
2. Clean probe and sensor with a cloth or paper towel.
3. To remove hard deposits, or stains on the probe and sensor pin,
use either pure white vinegar (acetic acid) or CLR diluted by 50%.
Try a 30 minute soak followed by gently rubbing with Q-tip, or soft
cloth.
4. Rinse thoroughly with de-ionized water.
5. After cleaning, place probe back in its holder.
Battery Replacement
• Battery type - alkaline, 9 volt.
1. The battery is housed in a convenient battery drawer located in the
faceplate of the Water Level Temperature Meter.
2. To replace the battery, simply press the drawer in, lift then pull.
3. The battery drawer should slide out of the faceplate enough to pull
it out.
4. Note the polarity (positive (+) terminal should be towards the small
notch in the end of the drawer) and place new battery in the drawer
and slide it back into the faceplate.
Replacement Parts
The following parts can be provided should they become lost or
damaged.
1. Probes
Notes:
1. To turn the WLT Meter buzzer off, press the button 2 times quickly.
2. To turn the WLT Meter off, press and hold the button for 2
seconds.
2. Tape with Tape Seal Plug
3. Tape Seal Plug on shorter lengths of tape (3 ft or 1 m) and splice
kit
4. Faceplate electronics
5. Reels, faceplate, etc.
Troubleshooting
SYMPTOM CAUSE REMEDY
No display, blank screen, or no
sound when probe in water.
Temperature readings are
inaccurate/bouncing.
Meter continuously sounds. Water in probe or probe is dirty. Remove and check probe for dirt and moisture.
“No Comm” always displayed. Probe disconnected or leaking, Ensure probe is properly connected to tape seal plug and that there are no leaks.
Dead battery. Replace 9V alkaline battery.
Wire disconnected on faceplate. Check all connections inside reel for loose/disconnected wires - solder or reconnect.
Broken wire in tape. Locate break in tape - splice and seal, or replace. (Contact Solinst)
Disconnected wire inside probe. Contact Solinst to obtain parts/repair instructions.
Probe is dirty. See cleaning instructions.
Broken wire in tape. Locate break in tape - splice and seal, or replace. (Contact Solinst)
Wire disconnected on faceplate. Check all connections inside reel for loose/disconnected wires - solder or reconnect.
Printed in Canada
October 31, 2017
(#113363)
(Page 2 of 2)
For further information contact: Solinst Canada Ltd.
Fax: +1 (905) 873-1992; (800) 516-9081 Tel: +1 (905) 873-2255; (800) 661-2023
35 Todd Road, Georgetown, Ontario Canada L7G 4R8
Web Site: www.solinst.com E-mail: [email protected]
 Loading...